Updated Overview of FPS for YouTube Videos for 2024

Overview of FPS for YouTube Videos
YouTube has become one of the to go to social media platforms for internet use because it provides entertainment for people who want to get entertained, learn or catch up with their favorite personalities. This platform has also given content creators a space to showcase their talents, educate the masses or simply have a good time when playing their games.
However, being a content creator on YouTube entails more than just posting a video weekly. You ought to ensure you get the frame rate in the video right. Failure to choose the correct frame rate will affect how your audience enjoys the video, increasing the chances that you lose subscribers.
Without further ado, let’s discuss the best fps for YouTube.
How Does FPS Affect Viewing YouTube Videos?
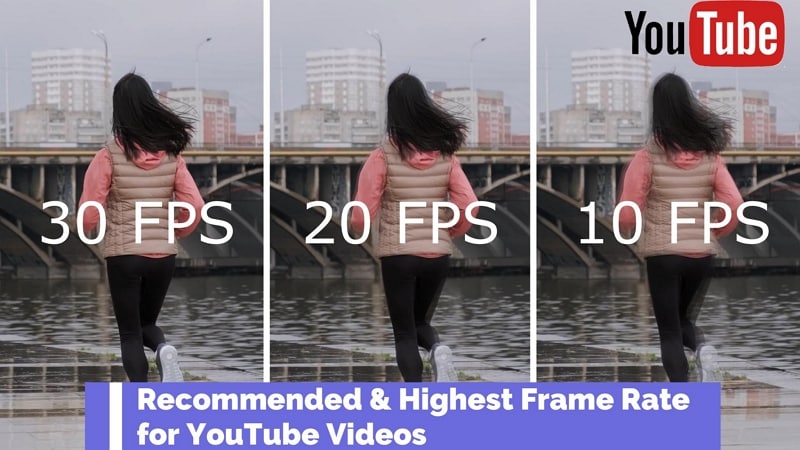
Before we dive into how FPS affects your viewing experience on YouTube and determine the best frame rate for YouTube, let’s define what it is. FPS is short for frames per second and is the number of still images appearing on display in one second. The more frames per second you have in your video, the clearer your video will become. The vice versa is also true.
To further simplify this definition, we will use the example of a flipbook. An animator usually draws an image on each page of the book. When they flip the pages in rapid succession, the images appear to be in motion. Suppose the animator used fewer pages to make their flipbook.
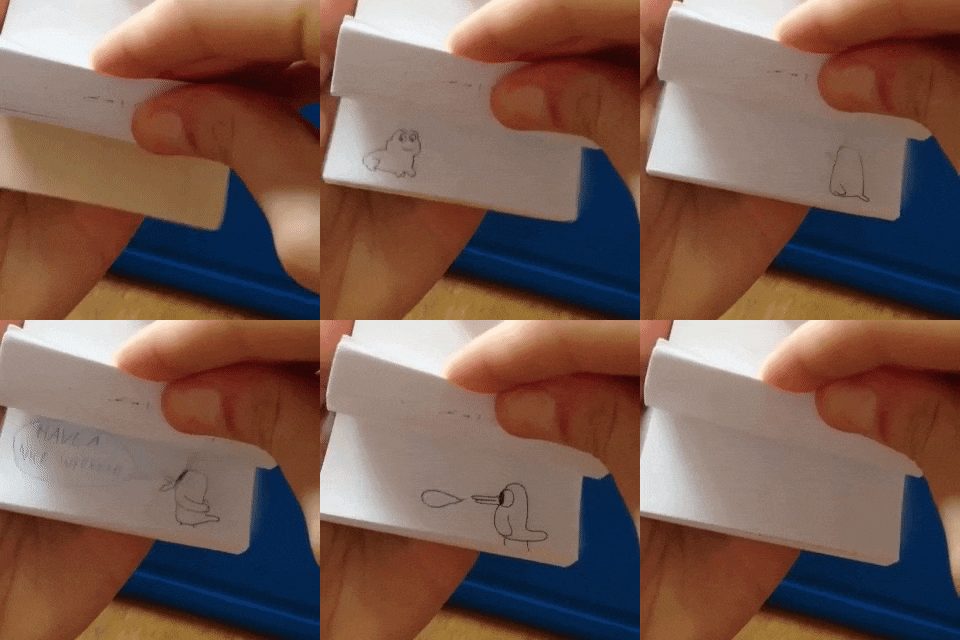
The animation would not be as smooth and crisp as if they had used more pages, each with a different still image contributing to the final motion.
The human brain can easily differentiate between 12 distinct images. However, when the photos exceed 18 and move rapidly, the brain is tricked into believing that the pictures are in motion. A frame rate lower than 24FPS will make your YouTube video look choppy and unnatural, as if it lags in real time.
Ideally, 24fps is the best fps for YouTube videos featuring mundane activities that we see in daily life. However, if you want to pack more information into your video and make the motion a bit smoother, then 30fps is the best video frame rate for YouTube.
Perhaps you post fast-paced content about gaming and other live-action videos. You are better off choosing 60FPS, which makes high-speed scenes look more fluid and helps you capture double the information.
What Is the Recommended & Highest Frame Rate for YouTube Videos?
Unfortunately, there is no correct answer when it comes to the best video frame rate for YouTube videos. The controversy still continues, and everyone seems to have their own opinion.
According to Thomas Edison , anything less than 46FPS for motion pictures will strain the eyes and give an unpleasant viewing experience. At the time, filmmakers and videographers were adamant about sticking to between 22-26PFS for their videos, provided the audio adaptability remained at 35mm.
Different frame rates are used for various displays, genres, and mediums. For instance, 1-16FPS was common in silent-era movies and stop-motion movies. However, this frame rate is neither universally accepted nor widespread in the world today.
An excellent example of a frame rate that produces larger-than-life videos with exceptional detail is 24fps. However, the NTSC confirms that it is, in fact, 23.97 frames per second when you consider issues to do with color and hue.
Another universally acceptable frame rate is 30fps, which is widespread in television. Videographers also use it to make slow-motion segments in sports videos or other fast-paced content. The sweet 60fps makes any motion look smooth as butter and significantly reduces any blur in your videos. This frame rate is also characterized by super fine details you can easily miss with 24 and 30fps. It is also the highest fps video on YouTube.
120fps is synonymous with grandeur, with its monumental footage suitable for slow-motion scenes. Lastly, anything above 120fps works great with ultra-slow-motion videos. Of course, we are talking 240fps, which is rare but not uncommon. However, you would need a high-speed capture camera, which we believe doesn’t come cheap.
To sum it all up, 24fps is the recommended frame rate for YouTube. You can go higher than the baseline and use 30fps or higher if you make videos with lots of motion, like gaming videos. Most of the time, a higher frame rate is a personal choice rather than a necessity. However, we understand you want to give your viewers a pleasant experience while watching your content.
What Is the Best Frame Rate for YouTube Videos?
If you want to record a video for your YouTube channel, you might wonder what is the best fps for YouTube videos. You are better off sticking between 24fps and 60fps. The platform has only recently added 8K support for videos, which is a plus for many content creators. Below is a list of frame rates for the most popular genres on YouTube.
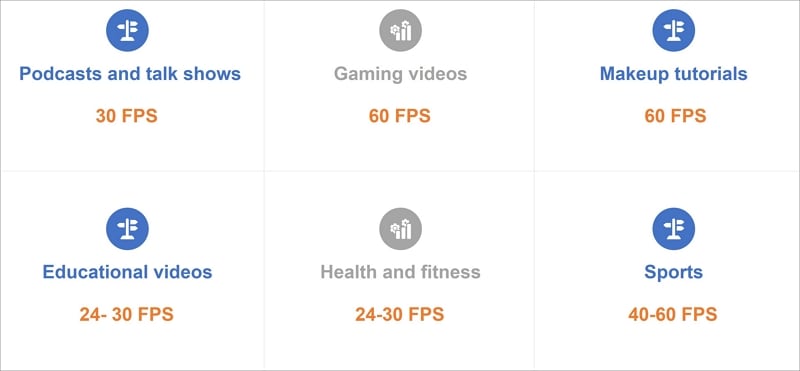
- Podcasts and talk shows - 30 FPS
- Gaming videos - 60 FPS
- Makeup tutorials - 60 FPS
- Educational videos - 24- 30 FPS
- Health and fitness - 24-30 FPS
- Sports - 40-60 FPS
Remember that the list above is not exhaustive and doesn’t cover all types of content on the platform. We can’t also guarantee that there is a “best” frame rate for your YouTube video. We suggest you heed our suggestion and practice to determine the best frame rate for YouTube videos.
We couldn’t fail to mention that your frame rate should match the content uploading and decoding. Since the interlaced content may experience performance issues on YouTube, it would help if you deinterlaced it.
How To Check FPS on YouTube Video?
Below is a simple guide on how to check fps on YouTube videos.
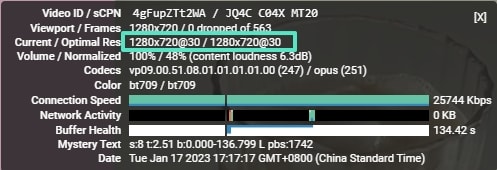
Step1 Open any video on YouTube and right-click on it. A pop-up window will appear. Select “Stats for nerds.”
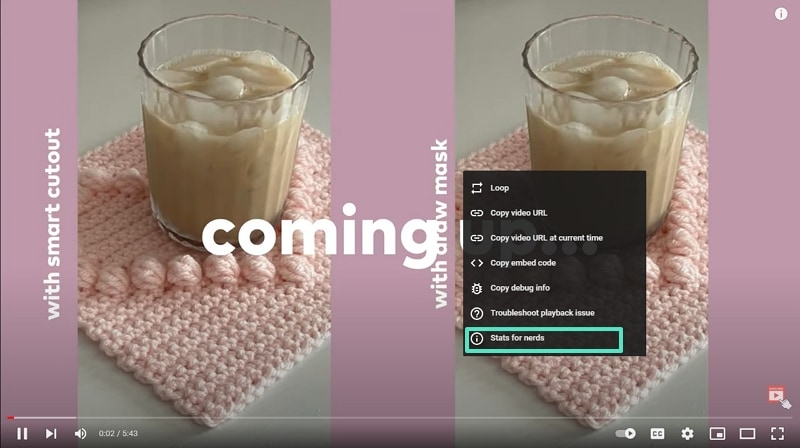
Step2 Narrow down on the “Current/Optimal Res” tab. The first set of figures before the forward slash represents the current resolution, while the figures after the forward slash represent the optimal resolution for the video. For instance, the figure in the picture below indicates that the resolution is 1280*720, and the frame rate is 30FPS. The figures repeat themselves, meaning that the video is at the optimal resolution.
How To Adjust FPS When Editing a YouTube Video?
An efficient video editing tool is all you need to adjust the frame rate for a video you want to upload to YouTube. Since there are so many options in the market, it is easy to get swept away by the prospects and wonder which one to choose.
Based on our research, Wondershare Filmora is one of the most efficient editing tools to change the FPS in your video and make it more enjoyable to watch.
Free Download For Win 7 or later(64-bit)
Free Download For macOS 10.14 or later
Wondershare Filmora is highly feature-rich, making it an editor’s dream. We guarantee you don’t need to be a pro to use this platform. The user-friendly interface is the ideal choice for even the most clueless novice.
However, a little knowledge goes a long way in ensuring you don’t get stuck using it. In addition, customer support is impeccable, meaning you will always find someone to help you whenever you encounter a problem using the platform.
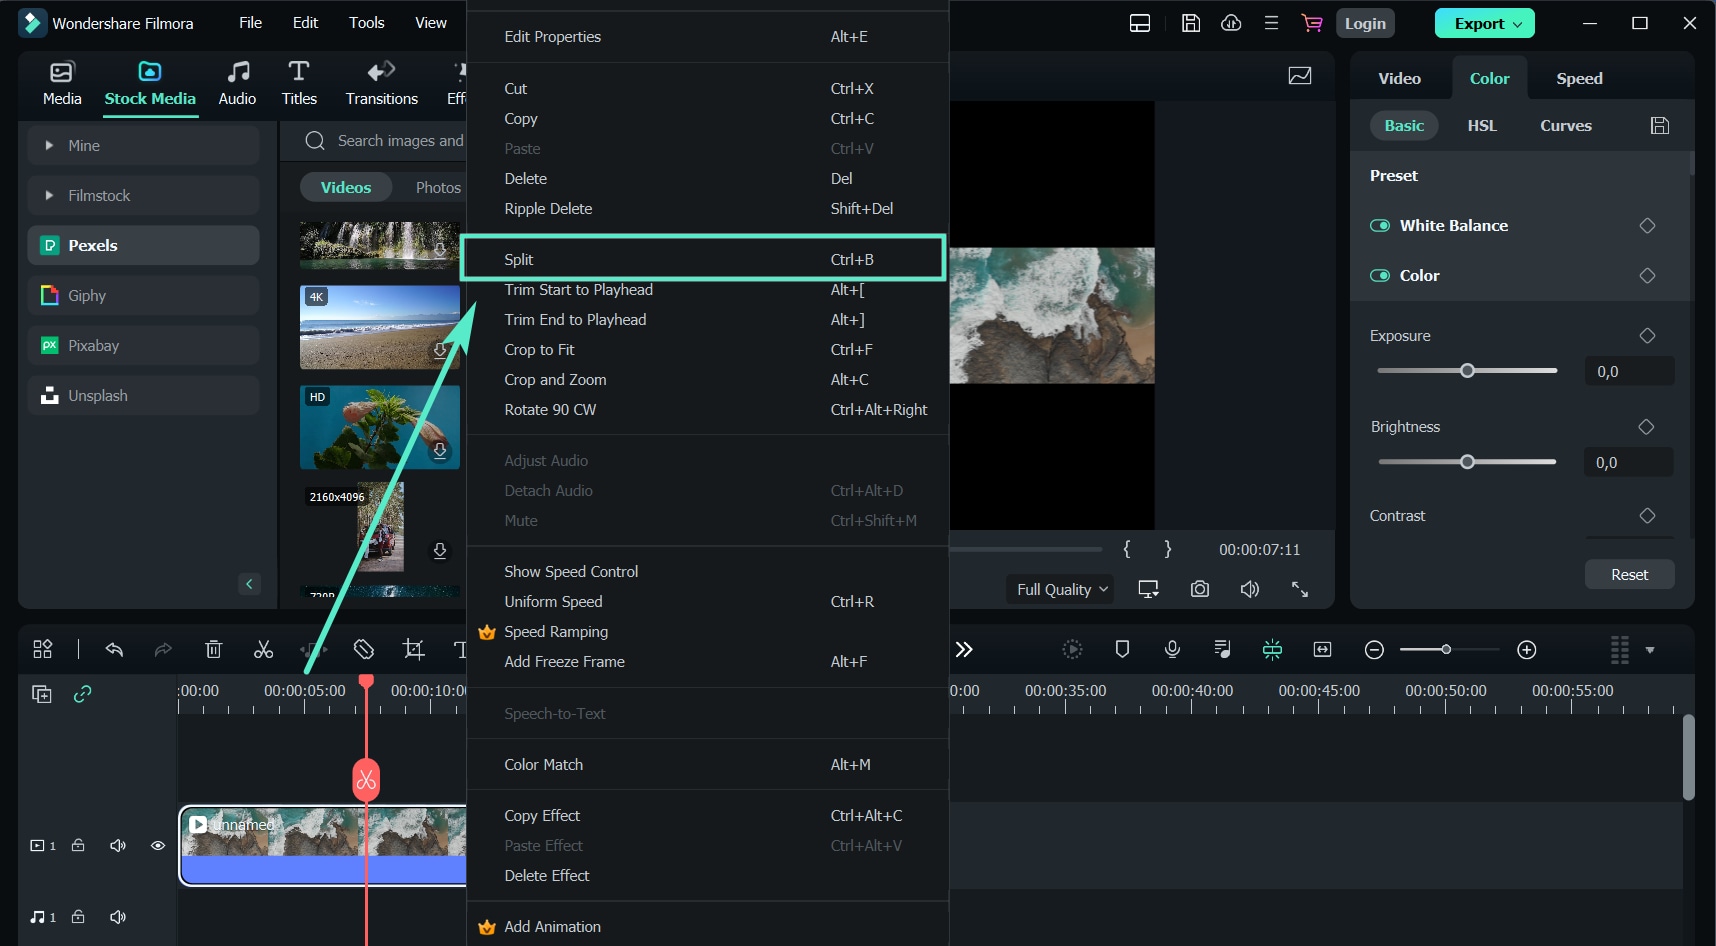
The split-screen icon allows you to play and edit different clips simultaneously without clicking out of the app or finishing one task before starting the next. You can also select the number of split screens you want, depending on the videos you want to edit in one go. The newer version, Filomra 12, has everything you need to edit your video and make anyone who watches it glued to the screen because of how crisp it is.
Below are some examples of key features you might find interesting.
- GIF support
- Audio equalizer
- 4K editing
- Advanced text editing
- Noise removal
- Scene detection
- Audio mixer
- Colour tuning
Here is a detailed guide on how to use Wondershare Filmora to adjust the frame rate for YouTube videos.
Step1 Launch the platform on your PC or laptop and click on the “File” tab at the top of the page. A drop-down menu will appear. Select “Project Settings.”

Step2 After a dialogue box appears, click “Frame Rate” and choose the best option.
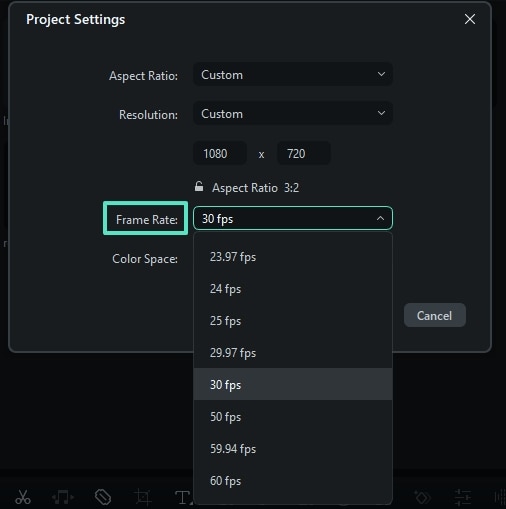
Step3 Continue customizing your video using the other editing tools in the platform, and click “Export” to save a copy to your device.
Conclusion
Making crisp, polished-looking YouTube videos takes a lot of time and dedication. Fortunately, you knew that by the time you decided to start creating content for the platform. With all the knowledge at your fingertips, you have no reason not to broaden your knowledge base and gather enough information to help you create the best videos.
There are plenty of video editing tools to get your video to the correct resolution, so your content is above par. If you don’t know how to use a specific app or platform, you must search for a tutorial and start practicing. You could also consult other creators in your niche and ask them how they make their videos look so good.
Free Download For macOS 10.14 or later
Wondershare Filmora is highly feature-rich, making it an editor’s dream. We guarantee you don’t need to be a pro to use this platform. The user-friendly interface is the ideal choice for even the most clueless novice.
However, a little knowledge goes a long way in ensuring you don’t get stuck using it. In addition, customer support is impeccable, meaning you will always find someone to help you whenever you encounter a problem using the platform.
The split-screen icon allows you to play and edit different clips simultaneously without clicking out of the app or finishing one task before starting the next. You can also select the number of split screens you want, depending on the videos you want to edit in one go. The newer version, Filomra 12, has everything you need to edit your video and make anyone who watches it glued to the screen because of how crisp it is.

Below are some examples of key features you might find interesting.
- GIF support
- Audio equalizer
- 4K editing
- Advanced text editing
- Noise removal
- Scene detection
- Audio mixer
- Colour tuning
Here is a detailed guide on how to use Wondershare Filmora to adjust the frame rate for YouTube videos.
Step1 Launch the platform on your PC or laptop and click on the “File” tab at the top of the page. A drop-down menu will appear. Select “Project Settings.”

Step2 After a dialogue box appears, click “Frame Rate” and choose the best option.

Step3 Continue customizing your video using the other editing tools in the platform, and click “Export” to save a copy to your device.
Conclusion
Making crisp, polished-looking YouTube videos takes a lot of time and dedication. Fortunately, you knew that by the time you decided to start creating content for the platform. With all the knowledge at your fingertips, you have no reason not to broaden your knowledge base and gather enough information to help you create the best videos.
There are plenty of video editing tools to get your video to the correct resolution, so your content is above par. If you don’t know how to use a specific app or platform, you must search for a tutorial and start practicing. You could also consult other creators in your niche and ask them how they make their videos look so good.
Special Animated Transition Tutorial【SUPER EASY】
Preparation
What you need to prepare:
- A computer (Windows or macOS)
- Your video materials.
- Filmora video editor
Step 1
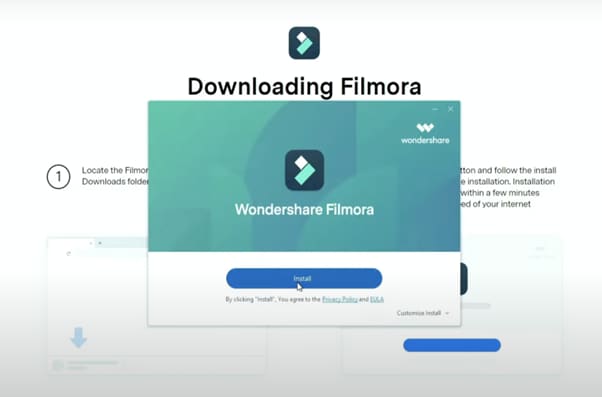
First off, download the Filmora video editor . After it downloads, click install and follow the provided steps.
Step 2
After installing, the editor will start automatically. When it does, click on the “New Project” button to finally open the editor.

Step 3
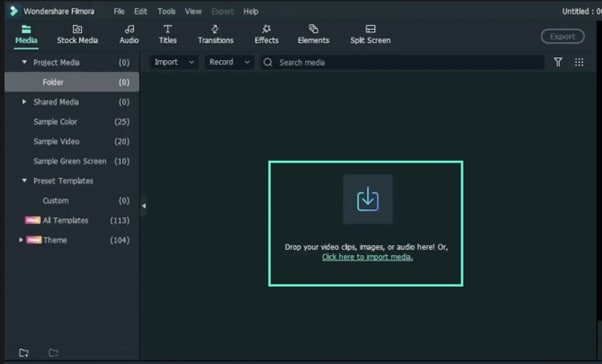
From the upper-left side of the screen, click the highlighted text to import media. This is where you insert your video files into the editor. Once the folder opens, select the videos you want to import and click “Open”.
Step 4
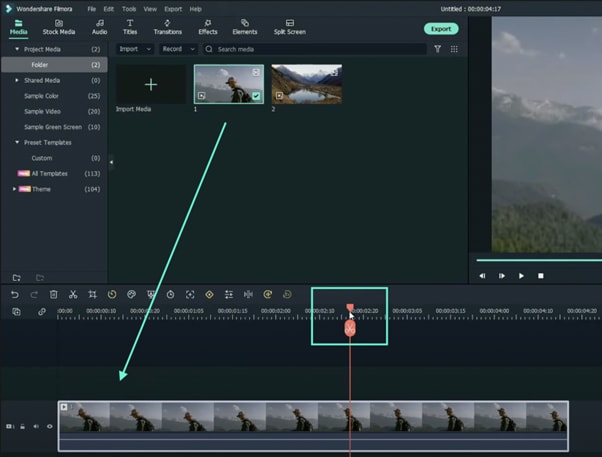
Drag your first clip to the timeline. Then, move the Playhead to where you want to start your transition.
Step 5
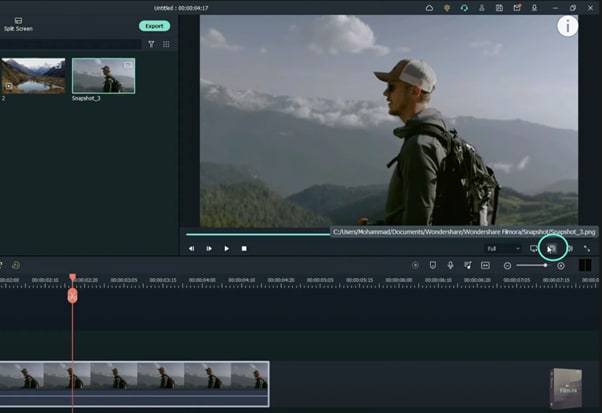
Take a snapshot of this frame.
Step 6
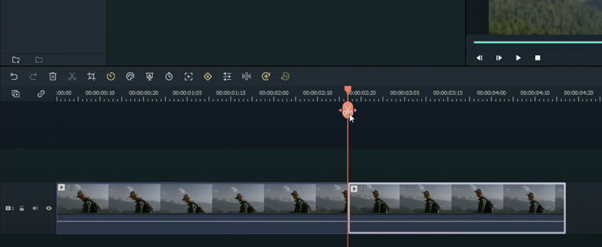
Split the footage and delete the part on the right side of the Playhead.
Step 7
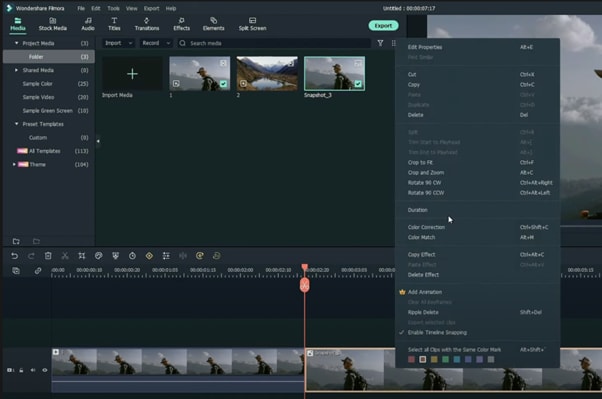
Without moving the Playhead, simply drag the snapshot you took earlier. Right-click on the snapshot in the timeline and click on “Duration”. Then, set the duration to 1 second. Finally, click “OK”.
Step 8
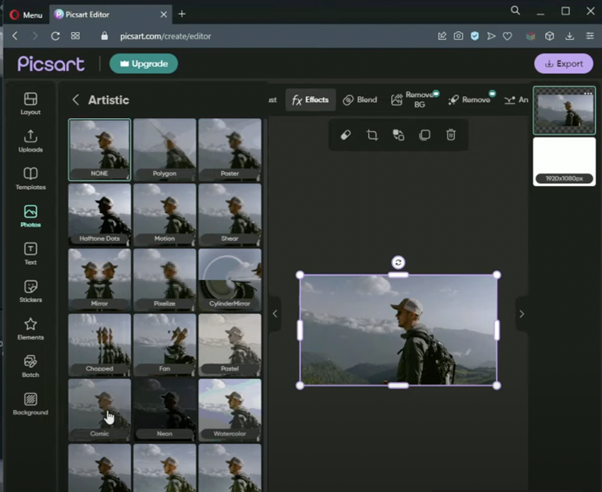
Open your browser and go to the Picsart photo effects editor . Upload the same snapshot we made in Filmora and apply the “Comic” preset on it. Then, download the photo and import it back into Filmora.
Step 9
Drag the snapshot with the Comic preset to the Timeline and set its duration to 1 second as well.
Step 10
Repeat the same process with the second clip. Take a snapshot, add the Comic effect, and import it back into Filmora. But this time, align the clips as follows: Add the snapshot with the comic preset first, then the snapshot without any effects, and then the video. It should look like this.

Step 11
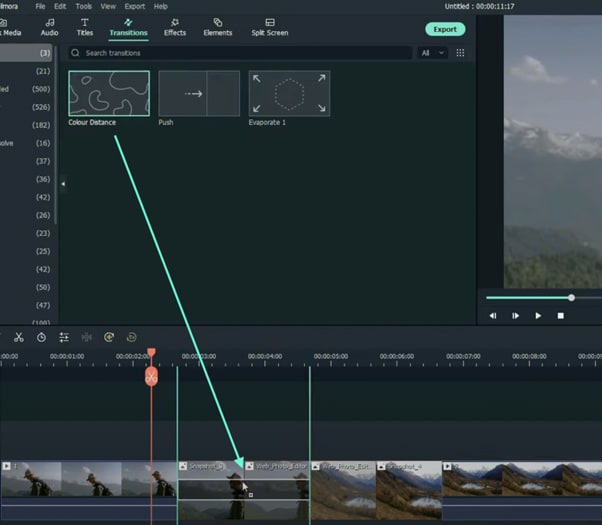
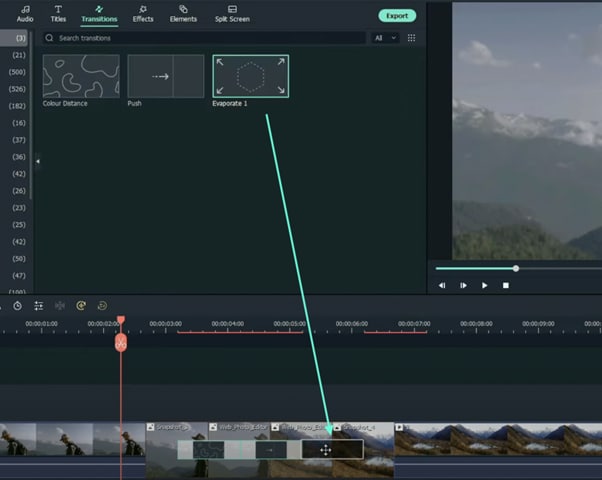
Go to the Transitions tab and drag the “Color Distance” transition between the first and second snapshot on your Timeline. Then, right-click on the transition box in the timeline and select “Edit Properties”. From there, change the duration of the transition to 1 second and click “OK”.
Step 12
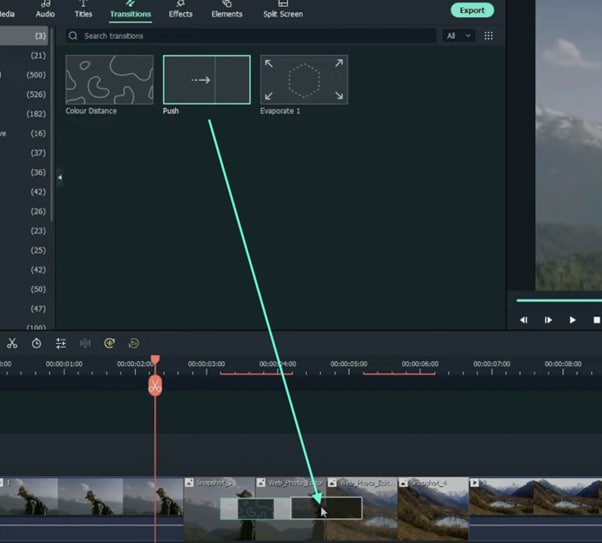
Drag the “Push” transition between the next two snapshots. Set its duration to 1 second as well by right clicking the transition and going to “Edit Properties”.
Step 13
Place the last transition between the last two snapshots in your timeline. This time, we’re going to use the “Evaporate” transition. Set its duration to 1 second as well.
Step 14
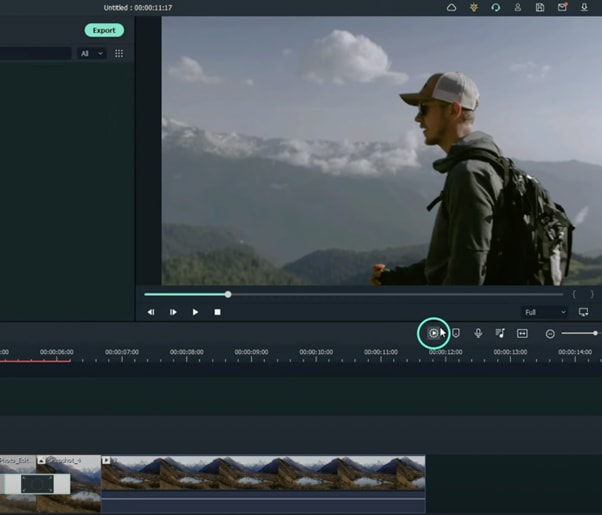
The final step is to render the video. Click this button and you will finally be done.
Summary
What you’ve learned:
- How to add any type of transition to video clips and images in Filmora
- How to take quick snapshots of any frame in Filmora
- A quick way to Render videos and watch the final preview
- Add custom effects to images
What you need to prepare:
- A computer (Windows or macOS)
- Your video materials.
- Filmora video editor
Step 1
First off, download the Filmora video editor . After it downloads, click install and follow the provided steps.

Step 2
After installing, the editor will start automatically. When it does, click on the “New Project” button to finally open the editor.

Step 3
From the upper-left side of the screen, click the highlighted text to import media. This is where you insert your video files into the editor. Once the folder opens, select the videos you want to import and click “Open”.

Step 4
Drag your first clip to the timeline. Then, move the Playhead to where you want to start your transition.

Step 5
Take a snapshot of this frame.

Step 6
Split the footage and delete the part on the right side of the Playhead.

Step 7
Without moving the Playhead, simply drag the snapshot you took earlier. Right-click on the snapshot in the timeline and click on “Duration”. Then, set the duration to 1 second. Finally, click “OK”.

Step 8
Open your browser and go to the Picsart photo effects editor . Upload the same snapshot we made in Filmora and apply the “Comic” preset on it. Then, download the photo and import it back into Filmora.

Step 9
Drag the snapshot with the Comic preset to the Timeline and set its duration to 1 second as well.
Step 10
Repeat the same process with the second clip. Take a snapshot, add the Comic effect, and import it back into Filmora. But this time, align the clips as follows: Add the snapshot with the comic preset first, then the snapshot without any effects, and then the video. It should look like this.

Step 11
Go to the Transitions tab and drag the “Color Distance” transition between the first and second snapshot on your Timeline. Then, right-click on the transition box in the timeline and select “Edit Properties”. From there, change the duration of the transition to 1 second and click “OK”.

Step 12
Drag the “Push” transition between the next two snapshots. Set its duration to 1 second as well by right clicking the transition and going to “Edit Properties”.

Step 13
Place the last transition between the last two snapshots in your timeline. This time, we’re going to use the “Evaporate” transition. Set its duration to 1 second as well.

Step 14
The final step is to render the video. Click this button and you will finally be done.

Summary
What you’ve learned:
- How to add any type of transition to video clips and images in Filmora
- How to take quick snapshots of any frame in Filmora
- A quick way to Render videos and watch the final preview
- Add custom effects to images
What you need to prepare:
- A computer (Windows or macOS)
- Your video materials.
- Filmora video editor
Step 1
First off, download the Filmora video editor . After it downloads, click install and follow the provided steps.

Step 2
After installing, the editor will start automatically. When it does, click on the “New Project” button to finally open the editor.

Step 3
From the upper-left side of the screen, click the highlighted text to import media. This is where you insert your video files into the editor. Once the folder opens, select the videos you want to import and click “Open”.

Step 4
Drag your first clip to the timeline. Then, move the Playhead to where you want to start your transition.

Step 5
Take a snapshot of this frame.

Step 6
Split the footage and delete the part on the right side of the Playhead.

Step 7
Without moving the Playhead, simply drag the snapshot you took earlier. Right-click on the snapshot in the timeline and click on “Duration”. Then, set the duration to 1 second. Finally, click “OK”.

Step 8
Open your browser and go to the Picsart photo effects editor . Upload the same snapshot we made in Filmora and apply the “Comic” preset on it. Then, download the photo and import it back into Filmora.

Step 9
Drag the snapshot with the Comic preset to the Timeline and set its duration to 1 second as well.
Step 10
Repeat the same process with the second clip. Take a snapshot, add the Comic effect, and import it back into Filmora. But this time, align the clips as follows: Add the snapshot with the comic preset first, then the snapshot without any effects, and then the video. It should look like this.

Step 11
Go to the Transitions tab and drag the “Color Distance” transition between the first and second snapshot on your Timeline. Then, right-click on the transition box in the timeline and select “Edit Properties”. From there, change the duration of the transition to 1 second and click “OK”.

Step 12
Drag the “Push” transition between the next two snapshots. Set its duration to 1 second as well by right clicking the transition and going to “Edit Properties”.

Step 13
Place the last transition between the last two snapshots in your timeline. This time, we’re going to use the “Evaporate” transition. Set its duration to 1 second as well.

Step 14
The final step is to render the video. Click this button and you will finally be done.

Summary
What you’ve learned:
- How to add any type of transition to video clips and images in Filmora
- How to take quick snapshots of any frame in Filmora
- A quick way to Render videos and watch the final preview
- Add custom effects to images
What you need to prepare:
- A computer (Windows or macOS)
- Your video materials.
- Filmora video editor
Step 1
First off, download the Filmora video editor . After it downloads, click install and follow the provided steps.

Step 2
After installing, the editor will start automatically. When it does, click on the “New Project” button to finally open the editor.

Step 3
From the upper-left side of the screen, click the highlighted text to import media. This is where you insert your video files into the editor. Once the folder opens, select the videos you want to import and click “Open”.

Step 4
Drag your first clip to the timeline. Then, move the Playhead to where you want to start your transition.

Step 5
Take a snapshot of this frame.

Step 6
Split the footage and delete the part on the right side of the Playhead.

Step 7
Without moving the Playhead, simply drag the snapshot you took earlier. Right-click on the snapshot in the timeline and click on “Duration”. Then, set the duration to 1 second. Finally, click “OK”.

Step 8
Open your browser and go to the Picsart photo effects editor . Upload the same snapshot we made in Filmora and apply the “Comic” preset on it. Then, download the photo and import it back into Filmora.

Step 9
Drag the snapshot with the Comic preset to the Timeline and set its duration to 1 second as well.
Step 10
Repeat the same process with the second clip. Take a snapshot, add the Comic effect, and import it back into Filmora. But this time, align the clips as follows: Add the snapshot with the comic preset first, then the snapshot without any effects, and then the video. It should look like this.

Step 11
Go to the Transitions tab and drag the “Color Distance” transition between the first and second snapshot on your Timeline. Then, right-click on the transition box in the timeline and select “Edit Properties”. From there, change the duration of the transition to 1 second and click “OK”.

Step 12
Drag the “Push” transition between the next two snapshots. Set its duration to 1 second as well by right clicking the transition and going to “Edit Properties”.

Step 13
Place the last transition between the last two snapshots in your timeline. This time, we’re going to use the “Evaporate” transition. Set its duration to 1 second as well.

Step 14
The final step is to render the video. Click this button and you will finally be done.

Summary
What you’ve learned:
- How to add any type of transition to video clips and images in Filmora
- How to take quick snapshots of any frame in Filmora
- A quick way to Render videos and watch the final preview
- Add custom effects to images
How to Export Video From iMovie
We live in a digital technology world where various applications do everything, and it has made our lives simpler and hassle-free to a certain extent. One of the path-breaking digital technologies is sharing your ideas and thoughts in a video format. You can now create your videos in any format and export them to your friends, colleagues, and family members. Moreover, you can also export your videos to any secondary device so that your hard drive does not get congested with heavy files.
So, if you want to know how to export iMovie, we will give you a step-by-step guideline to satisfy your requirements. One of the most significant aspects of iMovie is that you can edit your videos at your convenience. You can create professional videos, enhance your creativity, and showcase your talent to the world. You can add videos and photos and edit them according to your story.
Part 1. How to Export iMovie Video from iPhone?
Once you design the shape of your story, it is time you make the world know about your creativity. Since iMovie has loads of exciting tools and features, you can create videos with a professional touch. With the help of your iPhone, you can easily export iMovie videos in various ways. Following are the ways how to export iMovie:
1. Send video via email or text message
You can easily send video via email or text message from your iPhone. Following are the steps:
- Tap on the movie that you want to send.
- It would be best if you tap on the share option, which will redirect you to your email page.
- Complete the steps of the email by filling in the required details.
- Once your file is attached, tap on the send button.
2. Export video to another device
With the help of the iPhone, you can easily export iMovie videos to other devices. It saves the hard disk space of your iPhone and, simultaneously, gives you the advantage of restoring your videos if your video gets deleted from your iPhone. Following are the steps to export your iMovie videos from iPhone to other devices. One of the best options is to export your videos to other devices using the AirDrop option.
- Tap the video you want to export from the Project browser of your iPhone.
- Tap the share button after selecting the video that you want to export.
- Choose the resolution of the video that you want to share.
- Tap on the frame rate
- Turn on the HDR output for the particular video.
- Tap on Done
- Select the AirDrop option and tap on the device you want to transfer.
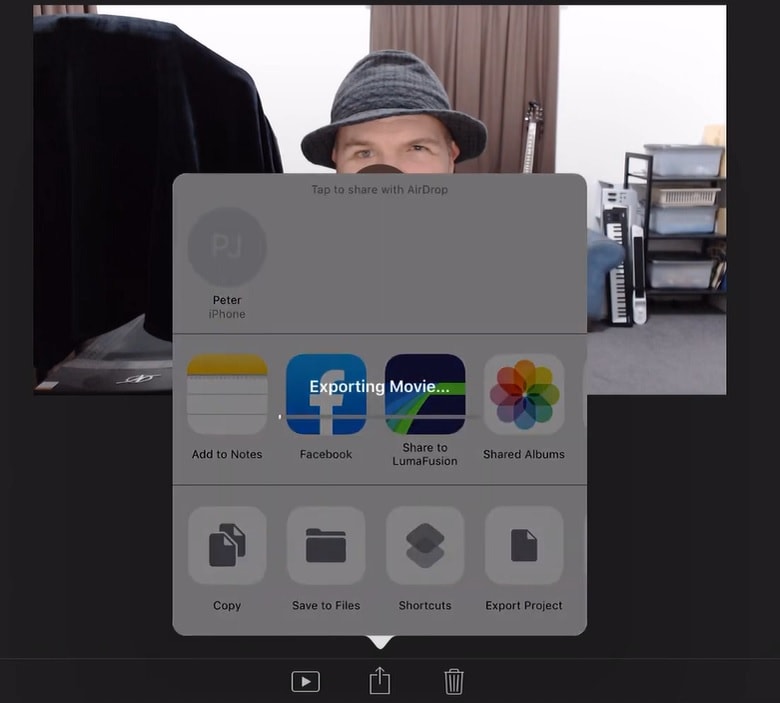
- You must ensure that the AirDrop option is turned on for both devices.
3. Export video to the web
Since iMovie is versatile video editing software, you can quickly transfer them anywhere, including any social networking site. It is an excellent way of showcasing your masterpiece to the world. However, if you plan to upload your video to any social networking site, you must ensure that you have an account with it. The following steps will help you export your iMovie videos to the web.
- Select any of your favorite social networking sites.
- Click on create and select Upload Video.
- Select the video that you want to upload.
- Click on Next to upload your iMovie video.
Part 2. How to Export iMovie Video from Mac?
1. Send video via email
Mac offers you the comfort to send your videos to your friends, colleagues, and loved ones via email. You can create professional videos and send them instantly. However, you must make sure that the videos do not have a high resolution, otherwise it will take some time to transfer the files.
Following are the steps for exporting the iMovie video via email.
- Download the Google Drive app to your iPhone
- Choose the video that you want to transfer to Google drive.
- Tap on the arrow following the name of the video.
- Slide the bar from offline to online
- Tap on the Export icon.
- Tap on Share
- You need to type the email address of the recipient you want to share your iMovie video.
- Tap on the Add option.
- The recipient will get your video instantly.
2. Add the movie to your Photos library
You can add your creative iMovie videos to the Photos library on your Mac, giving you the freedom to store your videos for later use. Following are the steps to add iMovie videos to your Photos library.
- From the Project Browser, select the iMovie video that you want to add to your Photos Library.
- Click on the ‘More’ option and choose the Share Project.
- Click on File.
- Choose a Resolution from the Resolution pop-up menu to define the size of your video. If you select a resolution video, the file size will be less and load onto your photos library fast. However, you need to choose a higher resolution video for excellent viewing.
- Choose a location to save your iMovie video.
- Drag the file that you want to transfer to the photos library.
3. Share video to web
iMovie allows you to share your videos on the web using any social networking platform. Following are the steps to share your videos on the web.
- Click on the iMovie video that you want to export.
- Click on the share button.
- Open your choice of any social networking site.
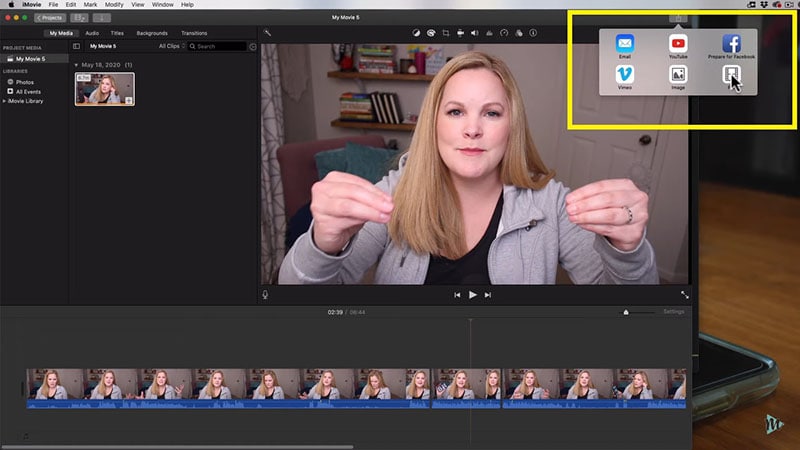
- Choose a location to save your file by clicking on ‘save’
- Upload the file that you want to share on the social networking site.
Part 3. iMovie Alternative to Edit Videos on Mac
If you find that iMovie export video is not your cup of tea, one of the best alternatives to edit your videos is to use Filmora . The advantage of using Filmora is that you can easily edit your videos. Moreover, you do not have to have previous experience in video editing as the application is easy to use. You can easily download Windows Filmora from the net and use it like a professional. It has some of the most exciting tools that will help you to make videos according to your convenience.
Free Download For Win 7 or later(64-bit)
Free Download For macOS 10.14 or later

With the help of Filmora, you can easily create and transfer your videos in any format. You can even edit any particular area of the videos and add subtitles and music to give it a professional look. One of the most exciting features of Filmora is that the application has one of the best special effects that will enhance the pro touch of your video. You can even make tutorials and other educational videos for your students. It is because you can add your audio and use it best for educational purposes. It is the best application for professionals as well as beginners.
Moreover, you can export the videos in any of the formats of your choice for better viewing, as it works on any given platform. Filmora is great at creating and editing Youtube videos, professional videos, and other videos on social networks. It is one of the best applications for editing your videos.
Conclusion
Apple’s iMovie is one of the most exciting video editing applications that will enhance your creativity. It offers a wide range of tools to create and edit videos according to your choice. Therefore, with the help of iMovie export, you can explore your creativity and showcase the world of your talent. Moreover, it allows you to export files in any video format so you can play them on any device.
Therefore, it is time to empower your imagination and give it a professional look with Apple’s iMovie application. Overall, iMovie is excellent software that is apt for any business or educational institution to enhance its growth. It is the best way to share your ideas and thoughts visually.
Free Download For Win 7 or later(64-bit)
Free Download For macOS 10.14 or later
Free Download For macOS 10.14 or later

With the help of Filmora, you can easily create and transfer your videos in any format. You can even edit any particular area of the videos and add subtitles and music to give it a professional look. One of the most exciting features of Filmora is that the application has one of the best special effects that will enhance the pro touch of your video. You can even make tutorials and other educational videos for your students. It is because you can add your audio and use it best for educational purposes. It is the best application for professionals as well as beginners.
Moreover, you can export the videos in any of the formats of your choice for better viewing, as it works on any given platform. Filmora is great at creating and editing Youtube videos, professional videos, and other videos on social networks. It is one of the best applications for editing your videos.
Conclusion
Apple’s iMovie is one of the most exciting video editing applications that will enhance your creativity. It offers a wide range of tools to create and edit videos according to your choice. Therefore, with the help of iMovie export, you can explore your creativity and showcase the world of your talent. Moreover, it allows you to export files in any video format so you can play them on any device.
Therefore, it is time to empower your imagination and give it a professional look with Apple’s iMovie application. Overall, iMovie is excellent software that is apt for any business or educational institution to enhance its growth. It is the best way to share your ideas and thoughts visually.
Free Download For Win 7 or later(64-bit)
Free Download For macOS 10.14 or later
11 Tools To Create Radial Blur Photo Mobile And Desktop
Radial blur is an effect you can use to create a sense of movement, emphasize parts of an image, add visual interest to a scene, or make a subject stand out. There are multiple apps and software programs available to achieve this effect.
But if you don’t know where to start, we’ll show you 11 ways to create radial blur images on your iPhone, Android device, Mac, or Windows PC. With these tools, you can quickly recreate your pictures to make them unique by adding visual interest.
How To Make A Radial Blur Effect On iPhone And Android?
Below we’ve provided a list of 5 apps that can help you make a radial blur photo effect on your iPhone or Android devices.
1. Design Blur: Radial Blur
Design Blur: Radial Blur is a free app available on the Play Store for Android devices that lets you add a sense of motion and depth to your picture by applying the radial effect with just a few taps.
Download:Android
Key features:
- Mainly devoted to creating radial blur and motion blur effects.
- Includes a camera to help you instantly take pictures and apply radial effects.
- Option to revert to your original picture if you don’t like the effects.
- Easier to remove the radial blur effect from parts of your image.
- Supports changing the intensity of the effect.
Pros
- Includes a redo and undo option
- Free to use
- User-friendly UI
- Applies the effect instantly
Cons
- Includes ads
2. DSLR Camera Blur Effects
With the DSLR Camera Blur Effects app, you can instantly apply a more natural-looking radial motion blur effect to your images to give them a more professional appearance. The app offers multiple image-blurring tools and adds a DSLR-like finish to your photos.
Download: Android
Key Features
- Import photos from your phone’s gallery or take a new one using the app’s camera option.
- Options to crop your image before uploading.
- Multiple types of blur effects to choose from, such as motion blur, gaussian blur, line blur, box blur, and pixel blur.
- Can change the focus from auto to circular, linear, freestyle, point focus, or point blur.
Pros
- Simple and fast to use
- Available for free
- Draws around the subject
- A quick social sharing option is available
Cons
- Shows multiple ads
- Adds a watermark to your final image
3. Image Radial Blur
The Image Radial Blur is another user-friendly app designed to create radial blur effects for Android users and has a range of blur strengths, types, and focus options, so you can create the exact look you want.
Download:Android
Key Features
- Two Focus Move options and two blur types to choose from.
- Adjusts the strength of the radial blur on your image.
- Instantly applies the radial blur effect.
Pros
- Free and easy to use
- Applies the effect with one tap
- Comes with a quick social sharing option
- Excellent UI
Cons
- Displays ads
4. Picsart
Picsart is a powerful photo editing app that lets you create beautiful images by removing backgrounds, adding text and radial blur or other effects, and even creating collages.

Key Features
- All-in-one photo and video editor.
- Supports creating slideshows, and collages, adding subtitles to your video, and more.
- Labeled as “Editor’s Choice” on Google Play Store.
- Blur parts of an image, its background, the subject’s face, or a complete photo.
Pros
- Available for free
- AI select auto-detect blur feature
- Perfect for quick and easy edits
- Gives a professional touch to images
Cons
- The app lags sometimes
5. Affinity Photo
Affinity Photo is an award-winning photo editor available for iPads offering desktop-grade basic and advanced editing tools, including the Radial Blur effect.

Download: iOS
Key Features
- Available for a one-time purchase of $2476.20.
- Creates the radial effect in concentric circle lines, giving your images a sense of rotation.
- Brings the focus point in your pictures to life.
Pros
- Creates unique motion blur effects
- Offers other editing options
- Desktop-grade editing
Cons
- No image organization feature is available
6 Ways To Radial Blur Your Images On Windows And Mac
Here are our top 5 recommended tools to radial blur your images on Windows and Mac:
1. Wondershare Filmora
Free Download For Win 7 or later(64-bit)
Free Download For macOS 10.14 or later
Price: Starts at $7.99 per month
Support System: Windows 11 and below & macOS 10.14 - macOS 12
Wondershare Filmora is an editing software recommended by many content creators and is available for Windows and macOS. The software comes with various features such as speed ramping, screen recording, a library of royalty-free music, radial blur, keyframing, numerous filters, effects, & preset templates, motion tracking, title editing, and more.
To create a radial blur effect on your photos using the Wondershare Filmora software, do the following steps:
Step1 Visit the Filmora website and download the file, depending on your system. Install the software and launch it. Click the “Create New Project” option and drag & drop your file.

Step2 Head to the “Effects” tab, choose the Tilt-shift Circle for the radial blur effect and drop it in the timeline.

Step3 Double-click the effect in the timeline and configure the size, X-axis, Y-axis, and intensity. That’s about it. You can now export your file by clicking the “Export” option.
2. Final Cut Pro
Price: $299.99/perpetual license
Support System: macOS 11.5.1 or later
Final Cut Pro is an editing software designed for Mac systems and has everything you need to create high-finished videos. This software program offers a wide range of features, including a timeline, proxy editing, Multicam editing, and support for 4K and HDR footage.
With Final Cut Pro, you can instantly apply the radial blur effect to your images and adjust it using various parameters in the Filters Inspector section, such as Center, Angle, Crop, and Mix.
3. Adobe Photoshop
Price: US$20.99/month
Support System: macOS and Windows
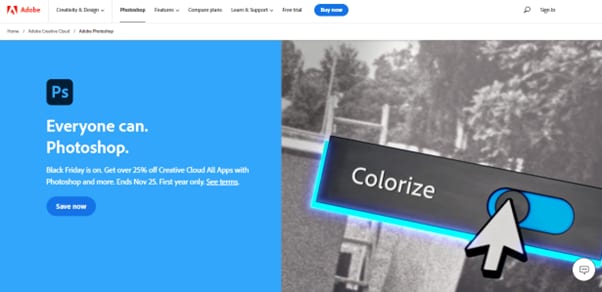
As one of the most popular and advanced photo editing software in the digital market, Adobe Photoshop is packed with high-end features and is used by many professionals as well as graphic designers to create stunning radial blur effects in their projects.
To add the radial blur effect on your images using Adobe Photoshop, start with converting your background image into a Smart Object and go to the “Filters” tab. Next, select “Blur” and click “Radial Blur.” Finally, you can set the parameter in the radial blur window to adjust the effect.
4. Paint.NET
Price: Free
Support System: Microsoft .NET 6, Windows XP, Vista, 7, & 8, and needs a 64-bit Windows processor

Paint.NET is an easy-to-use software developed on the .NET framework and is only compatible with Windows PCs. The software is free and has an innovative interface for novice users to create stunning image editing projects in no time.
Paint.NET also lets you quickly create the radial blur image effect using its blur effects. You can even configure the angle, center, and quality of the effect.
5. BCC FX Editor
Price: $175 per month
Support System: macOS Mojave 10.14
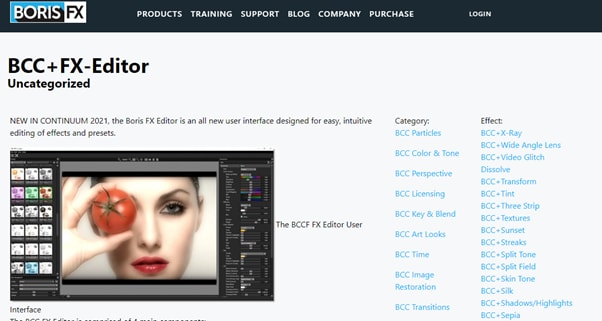
Yet another powerful software is the BCC FX Editor, designed with an intuitive interface where you can quickly apply the BCC+ Radial Blur effect around a specific point in your pictures.
The software also offers various parameters to help you adjust the effect on your image. These include GPU rendering, blur type, center, radial amount, rotation amount, falloff, smooth mode, edge mode, apply mode, and more.
6. VideoPad Video Editor
Price: Free, and the premium version starts at $23.16 quarterly
Support System: Windows 10, XP, Vista, 7, 8, and 8.1
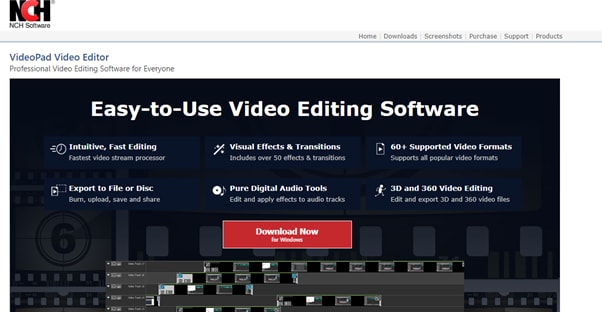
Designed for Windows systems, the VideoPad Editor is an intuitive and fast software program that can help you quickly add the radial blur effect to your file. Moreover, the software comes with numerous visual effects and transitions.
You can add custom logos, texts, & overlays and create & export your file in over 60 different video formats.
Last Words
In this article, we’ve provided a list of 5 iOS and Android apps and 6 Mac and Windows software for creating the radial blur image effect. From the above list, whichever tool you choose can help you create some stunning radial blur effects that will add depth and movement to your photos.
We’ve also provided step-by-step instructions on how you can use the Filmora 11 software to add impactful effects.
Hopefully, you’ve enjoyed reading this article and can now quickly add the radial blur effect to your images without any issues.
2. DSLR Camera Blur Effects
With the DSLR Camera Blur Effects app, you can instantly apply a more natural-looking radial motion blur effect to your images to give them a more professional appearance. The app offers multiple image-blurring tools and adds a DSLR-like finish to your photos.

Download: Android
Key Features
- Import photos from your phone’s gallery or take a new one using the app’s camera option.
- Options to crop your image before uploading.
- Multiple types of blur effects to choose from, such as motion blur, gaussian blur, line blur, box blur, and pixel blur.
- Can change the focus from auto to circular, linear, freestyle, point focus, or point blur.
Pros
- Simple and fast to use
- Available for free
- Draws around the subject
- A quick social sharing option is available
Cons
- Shows multiple ads
- Adds a watermark to your final image
3. Image Radial Blur
The Image Radial Blur is another user-friendly app designed to create radial blur effects for Android users and has a range of blur strengths, types, and focus options, so you can create the exact look you want.

Download:Android
Key Features
- Two Focus Move options and two blur types to choose from.
- Adjusts the strength of the radial blur on your image.
- Instantly applies the radial blur effect.
Pros
- Free and easy to use
- Applies the effect with one tap
- Comes with a quick social sharing option
- Excellent UI
Cons
- Displays ads
4. Picsart
Picsart is a powerful photo editing app that lets you create beautiful images by removing backgrounds, adding text and radial blur or other effects, and even creating collages.

Key Features
- All-in-one photo and video editor.
- Supports creating slideshows, and collages, adding subtitles to your video, and more.
- Labeled as “Editor’s Choice” on Google Play Store.
- Blur parts of an image, its background, the subject’s face, or a complete photo.
Pros
- Available for free
- AI select auto-detect blur feature
- Perfect for quick and easy edits
- Gives a professional touch to images
Cons
- The app lags sometimes
5. Affinity Photo
Affinity Photo is an award-winning photo editor available for iPads offering desktop-grade basic and advanced editing tools, including the Radial Blur effect.

Download: iOS
Key Features
- Available for a one-time purchase of $2476.20.
- Creates the radial effect in concentric circle lines, giving your images a sense of rotation.
- Brings the focus point in your pictures to life.
Pros
- Creates unique motion blur effects
- Offers other editing options
- Desktop-grade editing
Cons
- No image organization feature is available
6 Ways To Radial Blur Your Images On Windows And Mac
Here are our top 5 recommended tools to radial blur your images on Windows and Mac:
1. Wondershare Filmora
Free Download For Win 7 or later(64-bit)
Free Download For macOS 10.14 or later
Price: Starts at $7.99 per month
Support System: Windows 11 and below & macOS 10.14 - macOS 12
Wondershare Filmora is an editing software recommended by many content creators and is available for Windows and macOS. The software comes with various features such as speed ramping, screen recording, a library of royalty-free music, radial blur, keyframing, numerous filters, effects, & preset templates, motion tracking, title editing, and more.
To create a radial blur effect on your photos using the Wondershare Filmora software, do the following steps:
Step1 Visit the Filmora website and download the file, depending on your system. Install the software and launch it. Click the “Create New Project” option and drag & drop your file.

Step2 Head to the “Effects” tab, choose the Tilt-shift Circle for the radial blur effect and drop it in the timeline.

Step3 Double-click the effect in the timeline and configure the size, X-axis, Y-axis, and intensity. That’s about it. You can now export your file by clicking the “Export” option.
2. Final Cut Pro
Price: $299.99/perpetual license
Support System: macOS 11.5.1 or later

Final Cut Pro is an editing software designed for Mac systems and has everything you need to create high-finished videos. This software program offers a wide range of features, including a timeline, proxy editing, Multicam editing, and support for 4K and HDR footage.
With Final Cut Pro, you can instantly apply the radial blur effect to your images and adjust it using various parameters in the Filters Inspector section, such as Center, Angle, Crop, and Mix.
3. Adobe Photoshop
Price: US$20.99/month
Support System: macOS and Windows

As one of the most popular and advanced photo editing software in the digital market, Adobe Photoshop is packed with high-end features and is used by many professionals as well as graphic designers to create stunning radial blur effects in their projects.
To add the radial blur effect on your images using Adobe Photoshop, start with converting your background image into a Smart Object and go to the “Filters” tab. Next, select “Blur” and click “Radial Blur.” Finally, you can set the parameter in the radial blur window to adjust the effect.
4. Paint.NET
Price: Free
Support System: Microsoft .NET 6, Windows XP, Vista, 7, & 8, and needs a 64-bit Windows processor

Paint.NET is an easy-to-use software developed on the .NET framework and is only compatible with Windows PCs. The software is free and has an innovative interface for novice users to create stunning image editing projects in no time.
Paint.NET also lets you quickly create the radial blur image effect using its blur effects. You can even configure the angle, center, and quality of the effect.
5. BCC FX Editor
Price: $175 per month
Support System: macOS Mojave 10.14

Yet another powerful software is the BCC FX Editor, designed with an intuitive interface where you can quickly apply the BCC+ Radial Blur effect around a specific point in your pictures.
The software also offers various parameters to help you adjust the effect on your image. These include GPU rendering, blur type, center, radial amount, rotation amount, falloff, smooth mode, edge mode, apply mode, and more.
6. VideoPad Video Editor
Price: Free, and the premium version starts at $23.16 quarterly
Support System: Windows 10, XP, Vista, 7, 8, and 8.1

Designed for Windows systems, the VideoPad Editor is an intuitive and fast software program that can help you quickly add the radial blur effect to your file. Moreover, the software comes with numerous visual effects and transitions.
You can add custom logos, texts, & overlays and create & export your file in over 60 different video formats.
Last Words
In this article, we’ve provided a list of 5 iOS and Android apps and 6 Mac and Windows software for creating the radial blur image effect. From the above list, whichever tool you choose can help you create some stunning radial blur effects that will add depth and movement to your photos.
We’ve also provided step-by-step instructions on how you can use the Filmora 11 software to add impactful effects.
Hopefully, you’ve enjoyed reading this article and can now quickly add the radial blur effect to your images without any issues.
Also read:
- Updated Best Online YouTube Video Trimmer 2024
- Every Compositor Should Know The Trick of Color Match in After Effects for 2024
- Updated 2024 Approved How to Concatenate Videos Using FFmpeg
- New 2024 Approved How to Add Text to Video
- Updated 2024 Approved Speed Control Is Frequently Used in Video Editing. By Speed up or Slow Down the Video Speed, You Can Achieve Different Visual Results. This Article Will Show You How to Control the Speed of a Video
- New In 2024, Thousands Already Know What Ezgif Is and So Can You
- Updated HOW to Add Fade to Black on Premiere Pro for 2024
- Updated 2024 Approved Have You Recently Experienced Motion Blur in Games? Do You Wish to Learn More About It? This Article Provides an Overview and the Need for Motion Blur Gaming
- 2024 Approved What Is TS Format and How To Play TS Files?
- How to Use OBS Chroma Key With/Without Green Screen Easy Solutions
- New How to Add a Lower Third to Your Video
- New 2024 Approved 6 Top Online MP4 Croppers
- Are You Eager to Know How to Create an Adjustment Layer in Premiere Pro? This Article Will Highlight the Significance of Adding an Adjustment Layer in Premiere Pro
- Updated 2024 Approved Top 5 Apps To Add Song To Video
- Do You Wish to Create the Best Video Collages ? No Problem, because Wondershare Filmora Will Help You Make the Best Video Collages
- New Make Your Presentation More Attractive with Best Google Slideshows Templates. How to Make a Google Slideshow in Simple Step, In 2024 Do You Know How to Create Google Images Slideshow?
- New 2024 Approved 4 Methods to Merge MP4 and MP3
- Updated 2024 Approved How to Use LUTS to Color Grade on Your iPhone
- In 2024, Guide To Using Free Luts for OBS
- New 2024 Approved Experience Time Differently with The Top Slow-Motion Applications
- How To Synchronize Your Audio And Videos Properly, In 2024
- Updated In 2024, Separate Audio From Video in DaVinci Resolve Step by Step
- Updated In 2024, How to Blur a Still or Moving Part of Video
- Updated Looking for Ways to Enhance Overall Look for Your Contents Professionally? Then Coming up with These Cool PowerPoint Templates Can Help You a Lot for 2024
- New How to Use OBS Chroma Key With/Without Green Screen Easy Solutions
- How to Animate Your Designs With Canva GIF
- New 2024 Approved Fixing The Slow Playback Issues in DaVinci Resolve
- Modern Silence Detection Tools Are Changing the Face of Video Editing. Use Them to Improve the Quality of Your Video Clips. Learn How These Tools Let You Detect Silence with Pinpoint Accuracy
- Gif to Svg, Svg to Gif, Convert Gif to Svg, Animated Svg to Gif, Convert Svg to Gif, Svg to Gif Converter, Svg to Gif Animation, Svg Animation to Gif, Gif to Svg Converter
- New In 2024, Free Green Screen Mobile Frame Downloads
- Updated 12 Best Marketing Slideshow Templates
- Updated How to Rotate a Video in Windows 10
- Updated Have You Ever Wondered How Those PowerPoint, Looping Slideshows You See in Conferences and Reception Areas Display and Move to the Next Slide Automatically without Clicking a Mouse? You Dont Have to Be Amazed at This for 2024
- Learn How to Use 3D Camera Tracking in Adobe After Effects and Take Your Skills to the Next Level
- Updated 2024 Approved Why You Should Master Slideshows In Lightroom, Fresh Insight?
- Best 8 AR Apps for Android and iOS | Help You See the World of AR for 2024
- New Do You Know You Can Trim and Cut Your Video Into the Desired Portions Using a Reliable Video Splitter? Get an Easy Video Splitter Now to Simplify Your Work. Here Are 33 Carefully Chosen Apps to Help You in This
- New Want to Immediately Know Something About Discord GIF?
- 2024 Approved How to Denoise in Final Cut Pro – Reduce Video and Audio Noise
- Updated Top Applications That Can Help Apply The Best VHS Camera Effect
- Updated In 2024, How to Loop Videos on Android Phones
- New In 2024, Best Cinematic LUTs For Premiere Pro Recommendation
- Have You Ever Heard Hyperlapse and Tume Lapse Videos? Do You Know the Differences Between Them? This Article Will Introduce the Concepts, Features and Differnces of Them for 2024
- Are You in a Funny Chat with a Friend and Want to Send a GIF but Couldnt Find One? Here We Will Provide You with the Top Image for GIF Converters. So, Let Us See How to Turn Images Into GIFs Very Quickly for 2024
- New In 2024, 3 Best Effects to Appear on Camera
- How to Fix Life360 Shows Wrong Location On Samsung Galaxy S23 Tactical Edition? | Dr.fone
- In 2024, 4 Feasible Ways to Fake Location on Facebook For your Nokia 130 Music | Dr.fone
- 6 Ways to Change Spotify Location On Your Motorola Edge 40 Pro | Dr.fone
- In 2024, How to Get and Use Pokemon Go Promo Codes On Apple iPhone 13 Pro | Dr.fone
- How do I play MKV movies on Samsung Galaxy S21 FE 5G (2023)?
- In 2024, 2 Ways to Monitor Apple iPhone 8 Plus Activity | Dr.fone
- 5 Hassle-Free Solutions to Fake Location on Find My Friends Of OnePlus Nord N30 SE | Dr.fone
- Complete Tutorial to Use VPNa to Fake GPS Location On Oppo Reno 8T 5G | Dr.fone
- Prank Your Friends! Easy Ways to Fake and Share Google Maps Location On Sony Xperia 5 V | Dr.fone
- What Is a SIM Network Unlock PIN? Get Your Nokia 130 Music Phone Network-Ready
- In 2024, Full Guide to Fix iToolab AnyGO Not Working On Realme C55 | Dr.fone
- In 2024, 10 Fake GPS Location Apps on Android Of your Xiaomi Redmi K70 | Dr.fone
- 2024 Approved Best 10 Free AI Video Generators with Innovative/Advanced Algorithms
- Solved Warning Camera Failed on Vivo Y27s | Dr.fone
- How to Downgrade Apple iPhone 6s Plus without Losing Data? | Dr.fone
- Updated Learn How to Create Adobe 3D Animation
- Where Is the Best Place to Catch Dratini On Vivo T2x 5G | Dr.fone
- In 2024, How to Send and Fake Live Location on Facebook Messenger Of your Poco F5 5G | Dr.fone
- In 2024, How To Pause Life360 Location Sharing For Vivo Y78+ | Dr.fone
- In 2024, A Complete Guide To OEM Unlocking on Xiaomi Redmi 13C
- 4 Methods to Turn off Life 360 On Motorola Moto G84 5G without Anyone Knowing | Dr.fone
- Fake the Location to Get Around the MLB Blackouts on Honor Magic 5 Lite | Dr.fone
- In 2024, How To Remove the Two Factor Authentication From iPhone SE (2022)
- The 6 Best SIM Unlock Services That Actually Work On Your Samsung Galaxy S21 FE 5G (2023) Device
- In 2024, All You Need To Know About Mega Greninja For Oppo A2 | Dr.fone
- Sign Word Online for Free
- In 2024, How To Open Your Apple iPhone XR Without a Home Button | Dr.fone
- How To Change Your Apple ID on Apple iPhone 11 Pro With or Without Password | Dr.fone
- In 2024, Best Samsung Galaxy F15 5G Pattern Lock Removal Tools Remove Android Pattern Lock Without Losing Data
- New Best Hatsune Miku AI Voice Generators for All Times for 2024
- In 2024, How To Unlock A Found Apple iPhone 12?
- In 2024, How to Delete iCloud Account From Apple iPhone SE (2020) without Password?
- How To Change Your iPhone 11 Apple ID on MacBook
- 5 Best Route Generator Apps You Should Try On Itel P55 | Dr.fone
- How To Unlock Apple iPhone 14 Pro Max Without Swiping Up? 6 Ways | Dr.fone
- Fix Cant Take Screenshot Due to Security Policy on Tecno Spark 20C | Dr.fone
- 6 Proven Ways to Unlock Realme 10T 5G Phone When You Forget the Password
- How to Transfer Data from Oppo F25 Pro 5G to Samsung Phone | Dr.fone
- In 2024, All You Need To Know About Mega Greninja For Tecno Phantom V Fold | Dr.fone
- How to Stop Google Chrome from Tracking Your Location On Lava Blaze Pro 5G? | Dr.fone
- In 2024, Unlock Your Oppo Find X7s Potential The Top 20 Lock Screen Apps You Need to Try
- How to Fix Error 495 While Download/Updating Android Apps On Gionee F3 Pro | Dr.fone
- Fixes for Apps Keep Crashing on Honor 70 Lite 5G | Dr.fone
- Title: Updated Overview of FPS for YouTube Videos for 2024
- Author: Morgan
- Created at : 2024-06-15 18:56:15
- Updated at : 2024-06-16 18:56:15
- Link: https://ai-video-editing.techidaily.com/updated-overview-of-fps-for-youtube-videos-for-2024/
- License: This work is licensed under CC BY-NC-SA 4.0.


