
Updated REVIEW Whats Top 10 Software to Make AI Upscaling Video
REVIEW: What’s Top 10 Software to Make AI Upscaling Video
REVIEW: What’s Best 10 Software to Make AI Upscaling Video
An easy yet powerful editor
Numerous effects to choose from
Detailed tutorials provided by the official channel
AI Upscaling is often used to improve the video quality. Here are some of the methods to do AI video upscaling. Follow these methods to successfully enhance your video quality.
In this article
01 [What Is AI Upscaling? And Why AI Upscaling Is Significant?](#Part 1)
02 [How to Easily AI Upscale Video to 1080p or 4K?](#Part 2)
03 [Best 10 Software to Make AI Upscaling Video](#Part 3)
Part 1 What Is AI Upscaling? And Why AI Upscaling Is Significant?
The process of generating or creating additional pixels of an image or frame in a video is AI Upscaling. This has many good results on the final video output.
This is mainly done to raise the bit rate of the video and, therefore, slightly improve the visual quality of the video. This is also used to improve the picture quality of DVDs and other low-quality videos. It is done to support lower quality videos or pictures on higher resolution screens like TV. This kind of upscaling is mostly done in TVs automatically.
Part 2 How to Easily AI Upscale Video to 1080p or 4K?
The interesting part is that this upscaling is done by the higher resolution device itself. If you display a lower resolution video on a high-resolution TV, the TV will upscale the video quality of the lower resolution video. This process mainly happens by the displaying device itself. But you can try to upscale videos by yourself using this software, which will help you achieve the best results.
Part 3 Best 10 Software to Make AI Upscaling Video
There are numerous AI upscale video software on the internet. The software listed below is the best among the numerous software because of its extraordinary features and interface. The 10 best AI video upscaling software are:
01DVDFab Enlarger AI
DVDFab Enlarger AI is an AI upscale video software published by Fengtao Software Limited. You can upscale any video you want to 4k. There are a few highlights of this software, and they are:
● This software is available onWindows.
● The price of the software ranges from $44.99 to $139.99
● You can use this software to rip videos from both DVDs and Blu-ray.
● You can save the output from the software in MP4 or MKV form.
● This software allows you to boost your fps up to 60.
Pros
Upscale your video to 4K resolution.
Boost your video to 60 fps.
Appropriate for beginners.
Cons
Available only on Windows.
Very Expensive.
No slow-motion is available.

02Video2X
Video2X is popular ai video upscaling software that is developed by Open-source. It is quite popular among the professionals for various reasons like:
● Video2X is available exclusive to Windows.
● You can avail this software without paying any money.
● You can upscale old low-resolution videos.
● Upscale your videos to 4K.
● You can save the output from the software in MP4 or MKV form.
Pros
You can availthis software for free.
You can upscale GIFs.
You can decide your output format.
Cons
It is not beginner-friendly.
No slow-motion editing is available.
There is no fps boosting.

03Pixop
Pixop ai video upscaling online software is published or developed by Pixop ApS. The main features of this software are:
● It is available online.
● Available both for Windows and Mac.
● Allows to upscale videos up to 8K.
● Supports MP4, MXF, M2TS, and MOV formats of output.
● Allows custom fps boost in videos.
Pros
Available online for both Windows and Mac.
Allows video upscaling up to 8K.
Allows custom fps boost.
Cons
Expensive for longer videos.
Does not support slow-motion editing.
Only supports MP4, MXF, M2TS, and MOV formats of output.

04Topaz Video Enhance AI
Topaz Video Enhance AI is an ai upscaling video enhancing app developed by the Topaz labs. The built-in AI system in topaz ai upscale software has been experimented on numerous videos, and it has been successful each time to edit every pixel in every frame of the video. The main features of this software are:
● The software is available for both os that is Mac and Windows.
● You can use this software to edit your video into slow motion, two thousand percent.
● This software can enhance any video up to 8K resolution.
● You can save the output from the software in any form, like MP4, PNG, TIFF, JPG, or MOV.
● This software allows fps boosting up to 120.
Pros
You can have a free trial.
You can upscale any video up to 8K resolution.
You can edit the video into slow motion to 2000%.
Cons
The app is expensive.
A watermark remains on the videos edited through these apps.
This software is not beginner-friendly software.

05AVCLabs Video Enhancer AI
AVCLabs Video Enhancer AI is ai video upscaling software developed by Anvsoft Inc. The most interesting features of this software are:
● Available for Windows only.
● It can be accessed through payment of $39.95/Month.
● Enhance video quality up to 4K.
● ‘Multi-frame feature’ helps to edit every frame of the video minutely.
● Manual settings for upscaling video or converting to low-quality video up to 480p.
Pros
Excellent video enhancing quality.
Allows enhancing video up to 4K.
This software can remove noise, overlay, and blurriness from the videos.
Cons
Expensive
Available only on Windows
Only for professional or expert users.

06GDFLab
GDFLab is an AI video enhancer online software. You can edit both images and videos with this software. This app is used in many fields, and it has been successful in all those fields due to its outstanding features like:
● This ai video upscaling online software gives a full free trial for its users.
● It is available online.
● It can be used both in Windows and Mac.
● You can upscale your videos up to 4K.
● The price of the software depends on the size of the video or photo you are enhancing.
Pros
This software is available both in Windows and Mac.
You can upscale your videos up to 4K.
You can use this app to restore your images to 4x.
Cons
Interruption in editing for internet problems.
You cannot use this app until you register.
This software is too complex for beginners to handle.

07iSize
iSize is an ai upscaler video online enhancer published by iSize technologies. It is said that this app excels in its field. This may happen for its extraordinary features like:
● This software is available both for Mac and Windows.
● A must-use software for professionals.
● High-end video codec capacity.
● You can use this app to upscale videos and also images.
Pros
You can use this software to upscale both videos and photos.
The video conversion process is fast.
This software supports batch conversion of videos.
Cons
Hardware is not upgraded regularly.
Expensive to avail.
Not for beginners.
● You can upscale your videos up to 8K.

08Cupscale
Cupscale is another such ai upscaling video software. The main features of this software are:
● This software uses the very popular ESRGAN algorithm.
● This software is available both for PC and Mac.
● This software is available for free.
● This software can be used to upscale videos up to 8K.
● This software does not change the actual video format while editing the video.
Pros
Available for both Windows and Mac.
Available free.
Allows you to upscale videos up to 8K.
Cons
Supports only MP4, PNG, and JPG output formats.
Complex interface.
The AI used by this software is not stable.

09MiniTool Video Converter
MiniTool Video Converter is another AI-driven video upscaling software. This app can also be used to upscale videos. It has some exciting features which can make your editing experience outstanding. The features are:
● This software is available for free.
● It is available only for Windows.
● This software supports more than 1000 output formats.
● You can use this video to enhance videos as well as audio.
● You can record your computer screen without a watermark.
Pros
Available free.
Supports more than 1000 different output formats.
Allows to the record computer screen without watermark.
Cons
Available only on Windows.
To run this software, high-end PC specifications are required.
This software is not for beginner use.

10Tipard Video Converter Ultimate
Tipard Video Converter Ultimate has some mind-boggling features, making this software one of the bestai upscale video software**.** This software is an all-in-one solution for the editors. The main features of this app are:
● Available in both Windows and Mac.
● Supports almost all different video formats.
● Upscale videos from DVDs to UHD videos.
● You can upscale your videos up to 8K.
● This app allows you to edit or retouch your videos on the timeline.
Pros
Available both for Windows and Mac.
You can rip videos from DVDs.
Allows you to upscale your videos up to 8K resolution.
Cons
It has a time-consuming editing process.
Does not support any usual PC.
Not beginner-friendly software.

Tip:Comparison between different AI Video Upscaling software
| Software | Windows/Mac/Both | 8K/4K Upscaling | Expensive | Beginner Friendly |
|---|---|---|---|---|
| DVDFab Enlarger AI | Windows | 4k | Yes | Yes |
| Video2x | Windows | 4k | No | No |
| Pixop | Both | 8k | Yes | No |
| Topaz Video Enhance AI | Both | 8k | Yes | No |
| AVCLabs Video Enhancer AI | Both | 8k | Yes | No |
| Windows | Both | 4k | Yes | No |
| GDFLab | Both | 4k | No | No |
| iSize | Both | 8k | Yes | No |
| Cupscale | Both | 8k | No | No |
| MiniTool Video Converter | Windows | 8k | No | No |
| Tipard Video Converter | Both | 8k | No | No |
There is another video editing app, which is Wondershare Filmora Video Editor . It is not an AI-driven video upscaling app. You can use this app to upscale videos of any format and create outputs of any format. This app allows you to upscale videos to 4K. You can use this app also for other video editing purposes to add new meaning and engagement to your video.
For Win 7 or later (64-bit)
For macOS 10.12 or later
● Ending Thoughts →
● I hope by now you know different software to upscale your low-quality video.
● Though this is an automatic process, you can use any software mentioned above to make your work smooth and hustle-free.
● You can access most software from any device and get output in any format with high-quality editing. This software will help you achieve the best results in your editing experience.
AI Upscaling is often used to improve the video quality. Here are some of the methods to do AI video upscaling. Follow these methods to successfully enhance your video quality.
In this article
01 [What Is AI Upscaling? And Why AI Upscaling Is Significant?](#Part 1)
02 [How to Easily AI Upscale Video to 1080p or 4K?](#Part 2)
03 [Best 10 Software to Make AI Upscaling Video](#Part 3)
Part 1 What Is AI Upscaling? And Why AI Upscaling Is Significant?
The process of generating or creating additional pixels of an image or frame in a video is AI Upscaling. This has many good results on the final video output.
This is mainly done to raise the bit rate of the video and, therefore, slightly improve the visual quality of the video. This is also used to improve the picture quality of DVDs and other low-quality videos. It is done to support lower quality videos or pictures on higher resolution screens like TV. This kind of upscaling is mostly done in TVs automatically.
Part 2 How to Easily AI Upscale Video to 1080p or 4K?
The interesting part is that this upscaling is done by the higher resolution device itself. If you display a lower resolution video on a high-resolution TV, the TV will upscale the video quality of the lower resolution video. This process mainly happens by the displaying device itself. But you can try to upscale videos by yourself using this software, which will help you achieve the best results.
Part 3 Best 10 Software to Make AI Upscaling Video
There are numerous AI upscale video software on the internet. The software listed below is the best among the numerous software because of its extraordinary features and interface. The 10 best AI video upscaling software are:
01DVDFab Enlarger AI
DVDFab Enlarger AI is an AI upscale video software published by Fengtao Software Limited. You can upscale any video you want to 4k. There are a few highlights of this software, and they are:
● This software is available onWindows.
● The price of the software ranges from $44.99 to $139.99
● You can use this software to rip videos from both DVDs and Blu-ray.
● You can save the output from the software in MP4 or MKV form.
● This software allows you to boost your fps up to 60.
Pros
Upscale your video to 4K resolution.
Boost your video to 60 fps.
Appropriate for beginners.
Cons
Available only on Windows.
Very Expensive.
No slow-motion is available.
02Video2X
Video2X is popular ai video upscaling software that is developed by Open-source. It is quite popular among the professionals for various reasons like:
● Video2X is available exclusive to Windows.
● You can avail this software without paying any money.
● You can upscale old low-resolution videos.
● Upscale your videos to 4K.
● You can save the output from the software in MP4 or MKV form.
Pros
You can availthis software for free.
You can upscale GIFs.
You can decide your output format.
Cons
It is not beginner-friendly.
No slow-motion editing is available.
There is no fps boosting.
03Pixop
Pixop ai video upscaling online software is published or developed by Pixop ApS. The main features of this software are:
● It is available online.
● Available both for Windows and Mac.
● Allows to upscale videos up to 8K.
● Supports MP4, MXF, M2TS, and MOV formats of output.
● Allows custom fps boost in videos.
Pros
Available online for both Windows and Mac.
Allows video upscaling up to 8K.
Allows custom fps boost.
Cons
Expensive for longer videos.
Does not support slow-motion editing.
Only supports MP4, MXF, M2TS, and MOV formats of output.
04Topaz Video Enhance AI
Topaz Video Enhance AI is an ai upscaling video enhancing app developed by the Topaz labs. The built-in AI system in topaz ai upscale software has been experimented on numerous videos, and it has been successful each time to edit every pixel in every frame of the video. The main features of this software are:
● The software is available for both os that is Mac and Windows.
● You can use this software to edit your video into slow motion, two thousand percent.
● This software can enhance any video up to 8K resolution.
● You can save the output from the software in any form, like MP4, PNG, TIFF, JPG, or MOV.
● This software allows fps boosting up to 120.
Pros
You can have a free trial.
You can upscale any video up to 8K resolution.
You can edit the video into slow motion to 2000%.
Cons
The app is expensive.
A watermark remains on the videos edited through these apps.
This software is not beginner-friendly software.
05AVCLabs Video Enhancer AI
AVCLabs Video Enhancer AI is ai video upscaling software developed by Anvsoft Inc. The most interesting features of this software are:
● Available for Windows only.
● It can be accessed through payment of $39.95/Month.
● Enhance video quality up to 4K.
● ‘Multi-frame feature’ helps to edit every frame of the video minutely.
● Manual settings for upscaling video or converting to low-quality video up to 480p.
Pros
Excellent video enhancing quality.
Allows enhancing video up to 4K.
This software can remove noise, overlay, and blurriness from the videos.
Cons
Expensive
Available only on Windows
Only for professional or expert users.
06GDFLab
GDFLab is an AI video enhancer online software. You can edit both images and videos with this software. This app is used in many fields, and it has been successful in all those fields due to its outstanding features like:
● This ai video upscaling online software gives a full free trial for its users.
● It is available online.
● It can be used both in Windows and Mac.
● You can upscale your videos up to 4K.
● The price of the software depends on the size of the video or photo you are enhancing.
Pros
This software is available both in Windows and Mac.
You can upscale your videos up to 4K.
You can use this app to restore your images to 4x.
Cons
Interruption in editing for internet problems.
You cannot use this app until you register.
This software is too complex for beginners to handle.
07iSize
iSize is an ai upscaler video online enhancer published by iSize technologies. It is said that this app excels in its field. This may happen for its extraordinary features like:
● This software is available both for Mac and Windows.
● A must-use software for professionals.
● High-end video codec capacity.
● You can use this app to upscale videos and also images.
Pros
You can use this software to upscale both videos and photos.
The video conversion process is fast.
This software supports batch conversion of videos.
Cons
Hardware is not upgraded regularly.
Expensive to avail.
Not for beginners.
● You can upscale your videos up to 8K.
08Cupscale
Cupscale is another such ai upscaling video software. The main features of this software are:
● This software uses the very popular ESRGAN algorithm.
● This software is available both for PC and Mac.
● This software is available for free.
● This software can be used to upscale videos up to 8K.
● This software does not change the actual video format while editing the video.
Pros
Available for both Windows and Mac.
Available free.
Allows you to upscale videos up to 8K.
Cons
Supports only MP4, PNG, and JPG output formats.
Complex interface.
The AI used by this software is not stable.
09MiniTool Video Converter
MiniTool Video Converter is another AI-driven video upscaling software. This app can also be used to upscale videos. It has some exciting features which can make your editing experience outstanding. The features are:
● This software is available for free.
● It is available only for Windows.
● This software supports more than 1000 output formats.
● You can use this video to enhance videos as well as audio.
● You can record your computer screen without a watermark.
Pros
Available free.
Supports more than 1000 different output formats.
Allows to the record computer screen without watermark.
Cons
Available only on Windows.
To run this software, high-end PC specifications are required.
This software is not for beginner use.
10Tipard Video Converter Ultimate
Tipard Video Converter Ultimate has some mind-boggling features, making this software one of the bestai upscale video software**.** This software is an all-in-one solution for the editors. The main features of this app are:
● Available in both Windows and Mac.
● Supports almost all different video formats.
● Upscale videos from DVDs to UHD videos.
● You can upscale your videos up to 8K.
● This app allows you to edit or retouch your videos on the timeline.
Pros
Available both for Windows and Mac.
You can rip videos from DVDs.
Allows you to upscale your videos up to 8K resolution.
Cons
It has a time-consuming editing process.
Does not support any usual PC.
Not beginner-friendly software.
Tip:Comparison between different AI Video Upscaling software
| Software | Windows/Mac/Both | 8K/4K Upscaling | Expensive | Beginner Friendly |
|---|---|---|---|---|
| DVDFab Enlarger AI | Windows | 4k | Yes | Yes |
| Video2x | Windows | 4k | No | No |
| Pixop | Both | 8k | Yes | No |
| Topaz Video Enhance AI | Both | 8k | Yes | No |
| AVCLabs Video Enhancer AI | Both | 8k | Yes | No |
| Windows | Both | 4k | Yes | No |
| GDFLab | Both | 4k | No | No |
| iSize | Both | 8k | Yes | No |
| Cupscale | Both | 8k | No | No |
| MiniTool Video Converter | Windows | 8k | No | No |
| Tipard Video Converter | Both | 8k | No | No |
There is another video editing app, which is Wondershare Filmora Video Editor . It is not an AI-driven video upscaling app. You can use this app to upscale videos of any format and create outputs of any format. This app allows you to upscale videos to 4K. You can use this app also for other video editing purposes to add new meaning and engagement to your video.
For Win 7 or later (64-bit)
For macOS 10.12 or later
● Ending Thoughts →
● I hope by now you know different software to upscale your low-quality video.
● Though this is an automatic process, you can use any software mentioned above to make your work smooth and hustle-free.
● You can access most software from any device and get output in any format with high-quality editing. This software will help you achieve the best results in your editing experience.
How to Use Kahoot! On Zoom
In the educational game Kahoot! participants respond to multiple-choice questions based on trivia. Each participant uses their own controller to answer questions in the online game. There are several question kinds to pick from, allowing for complete customization of the test. Each player needs their own controller for Kahoot! The game questions will be shown in the Zoom/Google Meet window, but the answers must be entered using the controller. With the Kahoot!! app for Zoom, presenters may use play and friendly rivalry to increase participant engagement. Users may organize knowledge- and feedback-gathering pulse checks with staff members, encourage original thought with word clouds, and empower participants’ voices with surveys, open-ended questions, and other tools. Utilizing the brainstorm tool, organizations may crowdsource ideas and advance teamwork.
Engagement has emerged as a crucial component of successful learning, collaboration, and connection as the globe has increased the use of video communications in social and professional situations. Users may access, host, and play Kahoot!! games and educational information with other meeting participants using the Kahoot!! app for Zoom without ever leaving the Zoom Meeting or requiring a second device. Corporate executives may motivate their staff via speeches, meetings, and online activities. Meeting hosts will have immediate access to data and statistics from their Kahoot!! experience, allowing them to respond in real time to audience engagement with the material. Additionally, hosts may email the Kahoot!! games to all participants so they can practice and improve their scores, which will increase participant engagement and learning retention. Hosts can also distribute the Kahoot!! games as self-paced challenges with individuals who couldn’t attend in person.
Part 1: Key Features of Kahoot
What more is there to discuss, Kahoot!? Every pupil adores it. Many instructors and educators use it all around the world to make learning simple, enjoyable, and interesting. Everyone may use it since it is free and extremely simple to use. These are some of its attributes:
- Quizzes may be made in a matter of minutes.
- Develop games based on the abilities of the kids. Playing at home or in the Zoom is simple for them.
- Various templates are offered. You can choose one of them with confidence.
- Kahoot! has the ability to be organized into many folders according to topics or subjects.
- Additionally, multiple choice questions may be included by quiz makers.
- Teachers using Kahoot! may combine different questions into one format, such as quizzes, polls, riddles, and slides.
- Use Apple Schoolwork, Google Zooms, and Microsoft Teams to share student-centered tasks.
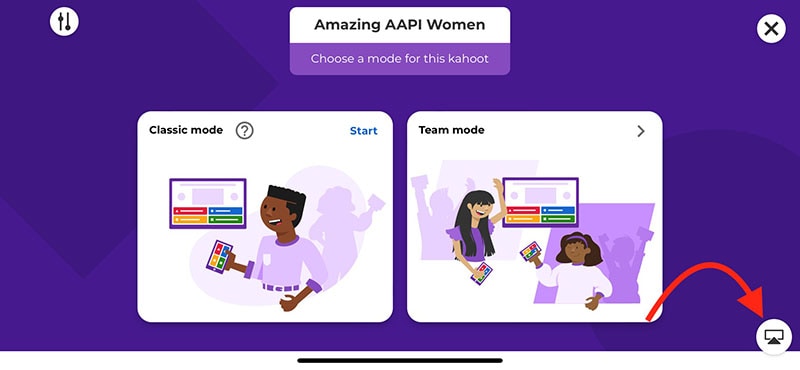
Part 2: How to Host a Kahoot! Session within a Zoom Meeting
With the Zoom app, Kahoot! may be viewed, hosted, and used. It’s amazing that Kahoot!!, one of the most well-known brands in quiz-based learning, still provides a free-to-use platform, making it very accessible to both instructors and students. It’s also a useful resource for a hybrid class that combines online and classroom instruction. Most devices will be able to use the cloud-based service using a web browser. This implies that students using computers, tablets, and cellphones in class or at home may access this. Participants in Zoom Meetings may play games and learn without having to leave the Zoom meeting or bring a second device.
Step1Sign up for Zoom ahead of time and get ready. On the other hand, launch the Kahoot! test in your web browser, then be ready to share your screen in Zoom.
Step2As the participants come, allow them in and check to see whether you and they can both hear each other. To access the Kahoot! quiz, make sure they have a device or another browser tab open.
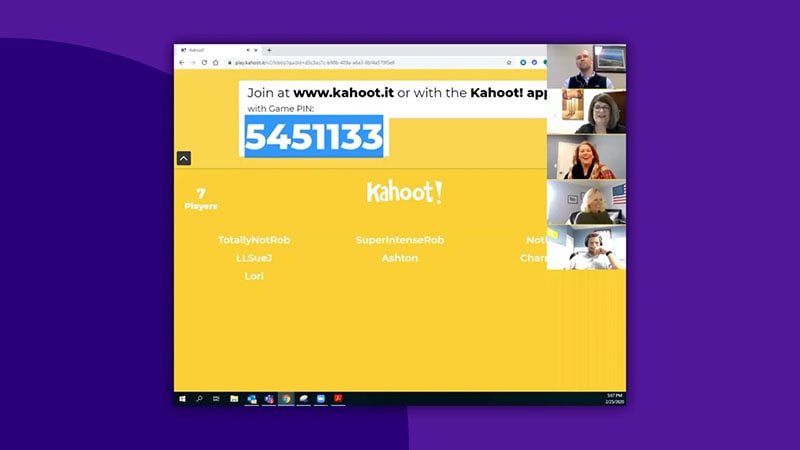
Step3Open the Kahoot! test and share it using Zoom’s “Share Screen” feature. While your screen is shared, continue to host the Kahoot! as normal. To view participants next to your shared screen, we advise selecting Side-by-Side Mode.
Part 3: How to Participate in Kahoot! Sessions within a Zoom Meeting
With more than 40 million ready-made games available on Kahoot!!, getting started is fast and simple. When time and resources are limited, hybrid or distant learning is ideal. After linking the Kahoot! to your Zoom account, you may utilize it. Use this app and start a meeting. Go to Apps on the toolbar and choose the program you wish to use. Select Who is Hosting to locate their host or to join a Kahoot! session being hosted by a friend or another player. Players may post a question to a shared screen on the Kahoot! platform. Kahoot!! just needs an account to be made in order to use it since it is free. Most devices may be used by students to access Kahoot!! from wherever there is an internet connection. This is how:
Step1Take the time to check that Zoom, Skype, Cisco Webex, or Google Hangout are operating and that your camera, microphone, and speaker are all operational.
Step2In the right-side panel, add the Kahoot!! app to your list of apps and click Join.
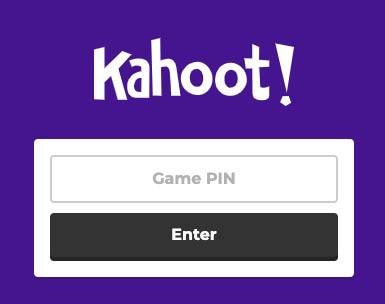
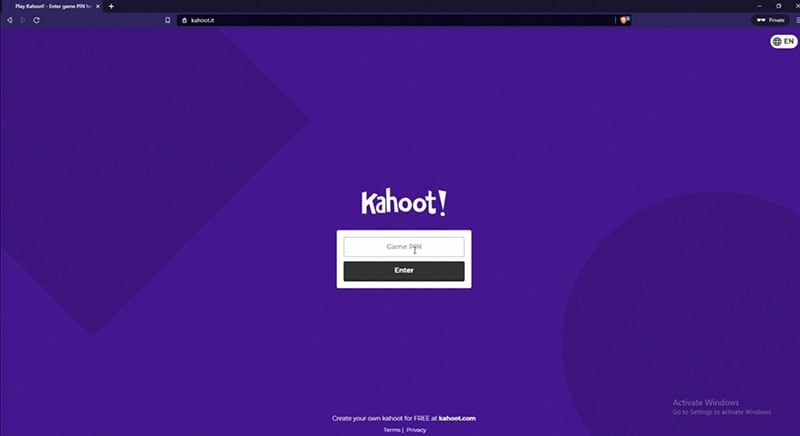
Step3The lobby will reveal your game PIN when you click the Play button, allowing the computer to show you a Kahoot! You may enter the game PIN and press Enter to join the Kahoot! session once the host shows their screen with you. To participate in a Kahoot! session, you don’t need a Kahoot! account.
Part 4: How to Record Zoom Meetings
Zoom is a conference tool that enables real-time, high-quality, low-latency communication. Filmora is an excellent video recorder for that reason, enabling users to capture on-screen activity such Zoom audio tracks and video conversations. Wondershare One of the most versatile and portable Zoom voice recorders is the Filmora. Even novices may easily utilize it due to its user-friendly UI. All you have to do is click the record button after choosing the proper audio source in the settings. The all-in-one video editing program Filmora allows you to record your screen with audio, a facecam, and a green screen effect. You can record the entire screen or just a portion of it, and you can perform a number of quick edits on your video using tools like trimming, cropping, changing the audio track’s volume, and so on.
How to Use Filmora to Record Zoom Lectures
Having said that, Filmora is a great Zoom recorder that can capture games, audio, and video conversations. This video recorder may be used to make video clip lessons in addition to recording movies, video games, and webcam footage. In addition to Zoom, it can also capture internet streaming audio. Here is information on how to record Zoom meetings using this software:
Step1Download and Install Filmora on your PC
To use this program for a number of tasks, including screen recording and recording editing, you must first download and install it on your computer. To achieve this, download the recording program by clicking the link below. Launch the program as soon as the download is finished to start the installation process, and then adhere to the on-screen directions to install and make this software available for usage.
Step2Choose the Record’s Ideal Position in the Zoom
Use it on your PC at this point. As soon as you start the program, a window interface with two choices for screen recording, editing already recorded videos, and generating videos will display. Choose the Recording option from the menu. When you click the record button, the program will direct you to the recording interface, where you can easily adjust the settings for your camera and audio. To add the microphone or Zoom sound in that particular field, use the necessary buttons as described below:
Step3Press the Record Button
It goes without saying that you must test your recording tools to ensure they are functional and capturing the highest quality audio. But once you’re ready, click the record button, which will allow you 3-5 seconds before starting to record the personalized screen of your PC as seen below:
Step4Export and Save Your Zoom Recording
You may now save the Zoom video for sharing on social media after making and modifying it. The following file types may be used to save the document: MP4, WMV, AVI, MOV, GIF, and MP3. The finest feature of Wondershare Filmora is the direct export and sharing of Zoom video recordings to YouTube; the only need is that you must be signed in to your YouTube account inside the application:
Because the MOV format is only available for online movies, you may also export your Zoom recordings to MP4 if you want to publish them to your YouTube channel. You are free to choose the format that best suits your needs. You may choose the encoder from a drop-down menu in the export options.
Conclusion
With the aid of several interesting tools and programs made accessible in this virtual environment, learning has now become enjoyable. Of them is Kahoot! In Zoom. It is an application that acts as a learning tool by providing fun games, tests, and a variety of other chances. In only a few minutes, quizzes may be made and distributed. Games and quizzes may be planned using this platform quite easily. The Kahoot! with Zoom will make it simpler than ever for corporate leaders to engage and encourage their team members with Kahoot!! engaging game-based learning experiences at a time when many organizations are staying virtual or planning for a hybrid model. Head towards recording Kahoot with Filmora to experience a smooth Kahoot! usage on Zoom. Plus, you can also share the gameplay afterwards.
In the educational game Kahoot! participants respond to multiple-choice questions based on trivia. Each participant uses their own controller to answer questions in the online game. There are several question kinds to pick from, allowing for complete customization of the test. Each player needs their own controller for Kahoot! The game questions will be shown in the Zoom/Google Meet window, but the answers must be entered using the controller. With the Kahoot!! app for Zoom, presenters may use play and friendly rivalry to increase participant engagement. Users may organize knowledge- and feedback-gathering pulse checks with staff members, encourage original thought with word clouds, and empower participants’ voices with surveys, open-ended questions, and other tools. Utilizing the brainstorm tool, organizations may crowdsource ideas and advance teamwork.
Engagement has emerged as a crucial component of successful learning, collaboration, and connection as the globe has increased the use of video communications in social and professional situations. Users may access, host, and play Kahoot!! games and educational information with other meeting participants using the Kahoot!! app for Zoom without ever leaving the Zoom Meeting or requiring a second device. Corporate executives may motivate their staff via speeches, meetings, and online activities. Meeting hosts will have immediate access to data and statistics from their Kahoot!! experience, allowing them to respond in real time to audience engagement with the material. Additionally, hosts may email the Kahoot!! games to all participants so they can practice and improve their scores, which will increase participant engagement and learning retention. Hosts can also distribute the Kahoot!! games as self-paced challenges with individuals who couldn’t attend in person.
Part 1: Key Features of Kahoot
What more is there to discuss, Kahoot!? Every pupil adores it. Many instructors and educators use it all around the world to make learning simple, enjoyable, and interesting. Everyone may use it since it is free and extremely simple to use. These are some of its attributes:
- Quizzes may be made in a matter of minutes.
- Develop games based on the abilities of the kids. Playing at home or in the Zoom is simple for them.
- Various templates are offered. You can choose one of them with confidence.
- Kahoot! has the ability to be organized into many folders according to topics or subjects.
- Additionally, multiple choice questions may be included by quiz makers.
- Teachers using Kahoot! may combine different questions into one format, such as quizzes, polls, riddles, and slides.
- Use Apple Schoolwork, Google Zooms, and Microsoft Teams to share student-centered tasks.
Part 2: How to Host a Kahoot! Session within a Zoom Meeting
With the Zoom app, Kahoot! may be viewed, hosted, and used. It’s amazing that Kahoot!!, one of the most well-known brands in quiz-based learning, still provides a free-to-use platform, making it very accessible to both instructors and students. It’s also a useful resource for a hybrid class that combines online and classroom instruction. Most devices will be able to use the cloud-based service using a web browser. This implies that students using computers, tablets, and cellphones in class or at home may access this. Participants in Zoom Meetings may play games and learn without having to leave the Zoom meeting or bring a second device.
Step1Sign up for Zoom ahead of time and get ready. On the other hand, launch the Kahoot! test in your web browser, then be ready to share your screen in Zoom.
Step2As the participants come, allow them in and check to see whether you and they can both hear each other. To access the Kahoot! quiz, make sure they have a device or another browser tab open.
Step3Open the Kahoot! test and share it using Zoom’s “Share Screen” feature. While your screen is shared, continue to host the Kahoot! as normal. To view participants next to your shared screen, we advise selecting Side-by-Side Mode.
Part 3: How to Participate in Kahoot! Sessions within a Zoom Meeting
With more than 40 million ready-made games available on Kahoot!!, getting started is fast and simple. When time and resources are limited, hybrid or distant learning is ideal. After linking the Kahoot! to your Zoom account, you may utilize it. Use this app and start a meeting. Go to Apps on the toolbar and choose the program you wish to use. Select Who is Hosting to locate their host or to join a Kahoot! session being hosted by a friend or another player. Players may post a question to a shared screen on the Kahoot! platform. Kahoot!! just needs an account to be made in order to use it since it is free. Most devices may be used by students to access Kahoot!! from wherever there is an internet connection. This is how:
Step1Take the time to check that Zoom, Skype, Cisco Webex, or Google Hangout are operating and that your camera, microphone, and speaker are all operational.
Step2In the right-side panel, add the Kahoot!! app to your list of apps and click Join.
Step3The lobby will reveal your game PIN when you click the Play button, allowing the computer to show you a Kahoot! You may enter the game PIN and press Enter to join the Kahoot! session once the host shows their screen with you. To participate in a Kahoot! session, you don’t need a Kahoot! account.
Part 4: How to Record Zoom Meetings
Zoom is a conference tool that enables real-time, high-quality, low-latency communication. Filmora is an excellent video recorder for that reason, enabling users to capture on-screen activity such Zoom audio tracks and video conversations. Wondershare One of the most versatile and portable Zoom voice recorders is the Filmora. Even novices may easily utilize it due to its user-friendly UI. All you have to do is click the record button after choosing the proper audio source in the settings. The all-in-one video editing program Filmora allows you to record your screen with audio, a facecam, and a green screen effect. You can record the entire screen or just a portion of it, and you can perform a number of quick edits on your video using tools like trimming, cropping, changing the audio track’s volume, and so on.
How to Use Filmora to Record Zoom Lectures
Having said that, Filmora is a great Zoom recorder that can capture games, audio, and video conversations. This video recorder may be used to make video clip lessons in addition to recording movies, video games, and webcam footage. In addition to Zoom, it can also capture internet streaming audio. Here is information on how to record Zoom meetings using this software:
Step1Download and Install Filmora on your PC
To use this program for a number of tasks, including screen recording and recording editing, you must first download and install it on your computer. To achieve this, download the recording program by clicking the link below. Launch the program as soon as the download is finished to start the installation process, and then adhere to the on-screen directions to install and make this software available for usage.
Step2Choose the Record’s Ideal Position in the Zoom
Use it on your PC at this point. As soon as you start the program, a window interface with two choices for screen recording, editing already recorded videos, and generating videos will display. Choose the Recording option from the menu. When you click the record button, the program will direct you to the recording interface, where you can easily adjust the settings for your camera and audio. To add the microphone or Zoom sound in that particular field, use the necessary buttons as described below:
Step3Press the Record Button
It goes without saying that you must test your recording tools to ensure they are functional and capturing the highest quality audio. But once you’re ready, click the record button, which will allow you 3-5 seconds before starting to record the personalized screen of your PC as seen below:
Step4Export and Save Your Zoom Recording
You may now save the Zoom video for sharing on social media after making and modifying it. The following file types may be used to save the document: MP4, WMV, AVI, MOV, GIF, and MP3. The finest feature of Wondershare Filmora is the direct export and sharing of Zoom video recordings to YouTube; the only need is that you must be signed in to your YouTube account inside the application:
Because the MOV format is only available for online movies, you may also export your Zoom recordings to MP4 if you want to publish them to your YouTube channel. You are free to choose the format that best suits your needs. You may choose the encoder from a drop-down menu in the export options.
Conclusion
With the aid of several interesting tools and programs made accessible in this virtual environment, learning has now become enjoyable. Of them is Kahoot! In Zoom. It is an application that acts as a learning tool by providing fun games, tests, and a variety of other chances. In only a few minutes, quizzes may be made and distributed. Games and quizzes may be planned using this platform quite easily. The Kahoot! with Zoom will make it simpler than ever for corporate leaders to engage and encourage their team members with Kahoot!! engaging game-based learning experiences at a time when many organizations are staying virtual or planning for a hybrid model. Head towards recording Kahoot with Filmora to experience a smooth Kahoot! usage on Zoom. Plus, you can also share the gameplay afterwards.
Are You Looking to Store Your Videos Securely and Efficiently? Look No Further than Our Top Pick for the Best Cloud Storage Service for Videos
Which video cloud storage service is the best for storing videos? Many options are available, so it can be hard to decide which is the best for you.
Some factors to consider when choosing a cloud storage service for videos include how easy it is to use, the number of storage options available, and the price.
Some popular best video cloud storage services for videos include Flicker, Wondershare Drive, and Adobe Creative Cloud. Each has its own advantages and disadvantages, so it’s essential to consider what you need before making a decision.
Ultimately, the best cloud storage service for videos is one that meets your specific needs. So don’t hesitate to try out different services to see which one is best for you.
Part 1: No.1 Flicker
Flickr is an online image hosting and video hosting service that has been around for a long time. However, SmugMug now owns it, and you can access photos and videos from Flickr without registering an account.
Flicker Free Storage Policy
Flickr is a great online video storage service, but it can be limiting if you want to store many pictures and videos. For example, a Flickr free account can only store 1000 photos and videos, which means it can only hold about 2-3 GB of data.
Flickr also has some limitations when it comes to file size. For example, photos are limited to 200 MB and videos are limited to 1 GB. However, you can get around these limitations by storing the maximum allowed file size (e.g., photo files are limited to 200 MB and video files are limited to 1 GB). Additionally, if you want to share photos and videos with others, you’ll need to upload video to the cloud or use the Flickr app on a device.
Overall, Flickr is a great online photo and video storage service, but it may not be the best option for you if you’re looking for a lot of space or want to share photos and videos with others.
Flicker Pro Storage Policy
Flicker Cloud Storage is a paid storage service that offers users unlimited storage space and a range of features to help them manage their photos and videos.
The paid policy of Flicker Cloud Storage allows users to store unlimited data for a monthly fee of $5.99. The storage space is available as a monthly subscription or can be purchased yearly.
The features available to users of Flicker Cloud Storage include the ability to search and view photos and videos and share photos and videos with friends and family.
Flicker Cloud Storage is an excellent option for users who want to store their photos and videos in a safe and secure environment. The paid policy of Flicker Cloud Storage allows users to store more data than other storage services, and the features available make it easy to access and share your photos and videos.
Why Flicker is the best choice for cloud storage
Flicker is the best place to share your work with the world. With Flicker, you can securely and privately share your photos with the world and make profits while you do it.
Flicker is a great way to communicate your work to the world. You can share your photos with your friends, family, and followers and let them know what you’re working on. Flicker is also a great place to make money. You can monetize your photos by selling them through Flicker or licensing them to other businesses.
There’s no reason not to start using Flicker. It’s free to sign up. So start sharing your work with Flicker today!
Part 2: No.2 Wondershare Drive

What is Wondershare Drive
Wondershare Drive is a comprehensive media management tool that helps you organize and manage your videos, music, photos, and documents. It has a wide range of features, such as automatic video and music recognition, easy file sharing, and powerful search capabilities.
Wondershare Drive also features a built-in media player that lets you play videos and music right from the app. With Wondershare Drive, you can easily keep your videos, music, and photos organized and accessible from any device.
Best for Filmora users
Are you looking for editing software that can handle photos and videos with ease? Then, Wondershare Filmora should be your go-to option. This software is known for its easy-to-use interface and its impressive editing capabilities. Whether you’re just starting or a seasoned user, Filmora has something for you. Here are just a few of its features:
Filmora has an easy-to-use interface that makes it easy for beginners to get started.
- It has a wide range of features that allow you to edit photos and videos easily.
- Its editing features are top-notch, and it can easily handle photos and videos.
- It has a wide range of filters that you can use to give your photos and videos a unique look.
- It has a built-in video editor that makes it easy to create videos that look great.
- It has a built-in music editor that makes adding music to your videos easy.
- It has a range of sharing options that make it easy to share your edited videos and photos with friends and family.
- It is free software; you can download it from Wondershare’s website.
If you’re looking for editing software that can easily handle photos and videos, Wondershare Filmora should definitely be your go-to option.
Part 3: No.3 Adobe Creative Cloud

What’s the free policy
Adobe Creative Cloud is a suite of applications that allow users to create and share creative content. In addition, the software offers a free policy, which allows users to use up to 2 GB of storage.
Reasons to choose Adobe Creative Cloud
Adobe Creative Cloud is a software suite that allows users to create and share creative content. It includes Adobe Photoshop, Adobe Illustrator, and Adobe InDesign, as well as a variety of other software tools. Creative Cloud allows users to access their content from any device and share it with others. It also offers a variety of features to help users create more powerful and professional content.
One of the most important features of Creative Cloud is its ability to sync your content between devices. This means that you can access your content anywhere and share it with others. In addition, you can also use Creative Cloud to share your content with collaborators. This way, you can work on the content together and share it with others.
Creative Cloud also offers a variety of features to help you create better content. These features include a variety of tools and resources to help you create better graphics and layouts. Additionally, Creative Cloud offers a variety of tools to help you edit your content. This includes tools to help you correct grammar and spelling mistakes as well as tools to help you add multimedia content.
Creative Cloud is a great way to improve your content skills and create more powerful and professional content. It offers a variety of features to help you create better content and share it with others.
Best Cloud Storage for Adobe Users
Creative Cloud is the best subscription service for you if you’re an Adobe user. Here’s why:
You get the latest versions of all Adobe Creative Suite applications, including Photoshop, Illustrator, InDesign, and Dreamweaver.
You can use all of your Creative Cloud applications on any device, including your computer, tablet, and phone.
- You can share files with other Creative Cloud users easily.
- You can access your Creative Cloud applications from any web browser.
- You can get help from Adobe experts if you need it.
- You can be confident that your data is safe and secure.
- You can manage your Creative Cloud subscriptions in one place.
If you’re not an Adobe user, Creative Cloud is still a great option. It includes all the features of the Adobe Creative Suite, plus many other great applications, such as Acrobat, After Effects, and Audition. You can find out more about Creative Cloud here.
Part 4: No.4 Vimeo

What’s the pricing policy of Vimeo for Video storage?
As a free user, you’re allowed to upload up to two videos per month. This limit is in place for the lifetime of the account and does not reset or renew. After you reach 25 videos, you will need to upgrade your account to upload or create more videos.
Vimeo has a paid video storage policy. Video storage on Vimeo is priced at $12/year for 60 videos, $35/year for 120 videos, or $55/year for 240 videos. That means you can share your videos with your friends and family without worrying about space constraints.
Choose Vimeo for Video storage
Vimeo is a great video storage service that can easily store your videos. The service offers a variety of features that make it a great choice for video storage. Vimeo also offers a great interface that makes it easy to manage your videos.
One of the great features of Vimeo is its ability to share videos with friends and family. You can easily share videos with friends and family by posting them to your Vimeo account or by sending them as an email attachment.
Another great feature of Vimeo is its ability to sync your videos with your devices. You can easily sync your videos with your devices by using the Vimeo app or by using the Vimeo website.
So if you want to create and share quality videos, Vimeo is the perfect platform. And the paid video storage policy means you can store plenty of videos without having to worry about space constraints.
FAQs
Why use cloud storage?
Cloud storage is accessible from anywhere in the world. First, this means that you can access your data even if you’re not at your computer. Second, cloud storage is affordable.
Is cloud storage safe?
Yes, cloud storage is generally safe, but you should take a few precautions to safeguard your data. First, make sure that you choose a reputable provider with robust security measures. Second, keep your files backed up regularly if something goes wrong with your cloud storage account. And finally, be aware that even if your data is stored in the Cloud, it may still be subject to legal discovery or seizure if needed in a criminal investigation.
Free Download For Win 7 or later(64-bit)
Free Download For macOS 10.14 or later
Free Download For macOS 10.14 or later
Final Cut Pro - How to Download and Install It?
We all know that video editing takes the video content to a whole another level. The video editing tools provide the users with an opportunity to modify their created videos. And one such pioneering application available for video editing in the market is the Final Cut Pro. It is an iOS-based application that facilitates dozens of editing tools for its users. Also, it comes with a free trial for all users. Visual contents are a key factor in providing information to the audience since they are more effective than text.
And with the introduction of applications like YouTube, Facebook, and other video streaming platforms, the necessity for quality video content has greatly increased. The video editing tools are perfect applications to make any video more attractive and cinematic. In this article, we are going to look into the process of editing videos with Final Cut Pro and the different benefits of using this application.
How to Download and Install Final Cut Pro?
Final Cut Pro is a very popular iOS application that has limitless possibilities in editing and creating videos. And one of the main reasons for its popularity is because its user interface allows even the new users to work with videos flawlessly. And if you have an apple device and you are looking for an application that can help you edit your video contents, then this application is just for you.

For final cut pro free download and installation, you will need to follow these steps:
- First, go to the apple store from your iOS device and search for Final Cut Pro in the search bar provided. This will open the application page where the Final Cut Pro icon will be shown.
- Now, you can click on the “Free Trial” option to download the 90-day free trial version, and then the download will start. Again, in this step, if you have already tried the free version and want to buy the premium version of Final Cut Pro by paying the required amount. To do that you can click on the “Buy” option and the download will start after you initiate the payment.
- Alternatively, you can download the Final Cut Pro application from your web browser too. To do that first open any web browser and search for Final Cut Pro in the search bar.
- The first result will be from the official apple website with the “Final Cut Pro” name on it. Click on that and you will be headed to the official apple website.
- Here you will see the same “Free Trial” or “Buy” option which you can choose as explained in the previous steps.
- After the file is downloaded to your device, click on the “Install” option and the installation will start. This process will take some time and after it’s completed, you will be able to use the Final Cut Pro without any issues.

Key Features of Final Cut Pro
The several key features of Final Cut Pro are:
- Importing and exporting high-quality HD videos are possible
- Multiple resolution and format support for any video
- Easy to use basic tools such as cropping, merging, filters, and many more.
- Dozens of editing tools such as transitions, texts, etc.
- An intuitive user interface to encourage users with its simple approach
- Modern metal engine support for faster delivery of videos
- Workflow extension support for an extension to other applications
- Advanced color grading tools to create stunning cinematic videos
How to Edit Videos with Final Cut Pro
Final Cut Pro is believed to be one of the most efficient applications in video editing. This is because of its simple yet efficient interface for designing and creating awesome cinematic videos. It has industry-standard color grading tools that work with AI power to enable its users to enhance their video creations. It also is available with voiceover and video overlay features. Now, these can help social media content creators easily develop their video content.
And after installing Final Cut Pro if you are overwhelmed by its tons of features, then here are the steps following which you will be able to use Final Cut Pro:
- First, open the application. Now, it will ask to allow for the permissions to use your files along with your camera and other audiovisual devices. After allowing that, you will be able to enter the user interface of Final Cut Pro.
- Here, you will have to click on the “New project” icon.
- It will then ask you to import any media files to the application. Select the video file that you want to edit and it will take some time to import the media file.
![]()
- Alternatively, you can also import any media file by pressing the “cmd+I” keys and selecting the video file. You should note that Final Cut Pro organizes all the contents and media files into different libraries, events as well as projects. This way if you are working on multiple projects, then it is easy to switch between them.
- Now, after importing, a thumbnail of your media file will be appearing at the bottom of the screen.
- You can now trim or crop your media files from the below timeline. And if you want to add new clips to your project, then you can do so by clicking the “+” icon available.
- In the timeline, you can also rearrange the timeline of your video clips.
- You can add texts and titles to your videos by clicking on the “Titles” options located in the toolbar. This toolbar is the same browser where you imported the media files in the previous steps. You can also add transitions to add subtle movements between hard-cut clips.

- The effect tools available in the toolbar allow you to use the built-in effects that can bring life to any video. And along with this, you can also use the colors tool to color grade your videos and make them more cinematic. There is also the option to add music and voiceover to your project if you need that.

- After you are done with your changes, click on the “share” option available on the screen and then click on “Share Master File” and you will be able to export the project successfully.
Final Cut Pro Alternative to Edit Videos
Content creators who have access to Apple devices can enjoy the features of Final Cut Pro without any difficulties. But for people with other operating systems, Final Cut Pro isn’t available. It is why they need alternatives for this application. And if you are looking for the best alternative to Final Cut Pro, then Filmora is the best choice for you. Here is how you can use Filmora to edit your contents:

For Win 7 or later (64-bit)
For macOS 10.12 or later
- First, install the Filmora application and then open it on your device.
- Then click on the “Import” option and then select the video files that you want to edit.
- Now if you have selected multiple video files, then you can rearrange, cut, split, and trim your videos in your preferred order.
- After you are done with that head to the toolbar where you will be able to add effects, music, transition, and texts to your clip.
- WonderShare Filmora also supports voiceover and video overlay that is perfect for content creators.
- After you have finished editing your videos, click on the “Export” option available on the toolbar and then save the video file to your device.
FAQs about Final Cut Pro
1. Is Final Cut Pro available for free?
Final Cut Pro is available with a free trial for all the users who are on iOS. But to unlock all the tools of Final Cut Pro you will need to purchase the application. It can be done by paying a premium amount of money to the company.
2. Is Final Cut Pro for mac only?
Yes, Final Cut Pro is only available for Mac and it isn’t supported in any other operating system. For users who have any other OS, they can try using Filmora. It is one of the best alternatives for Final Cut Pro on the market.
3. Is the Final Cut Pro good for editing?
Yes, Final Cut Pro is believed to be one of the finest video editing applications that even is used by popular content creators. This application has a variety of tools that can elevate the content of any video to a whole another level.
Final Cut Pro is one of the most trusted video editing applications. This is used by most content creators around the world and it is popular because of its versatile tools. This article discussed some of the key aspects of Final Cut Pro and how it can help creators and general users fulfill their needs for video editing. And for creators who are looking for any alternatives to final cut pro editing, we also discussed the use of Filmora thoroughly which can help them create stunning videos.
Key Features of Final Cut Pro
The several key features of Final Cut Pro are:
- Importing and exporting high-quality HD videos are possible
- Multiple resolution and format support for any video
- Easy to use basic tools such as cropping, merging, filters, and many more.
- Dozens of editing tools such as transitions, texts, etc.
- An intuitive user interface to encourage users with its simple approach
- Modern metal engine support for faster delivery of videos
- Workflow extension support for an extension to other applications
- Advanced color grading tools to create stunning cinematic videos
How to Edit Videos with Final Cut Pro
Final Cut Pro is believed to be one of the most efficient applications in video editing. This is because of its simple yet efficient interface for designing and creating awesome cinematic videos. It has industry-standard color grading tools that work with AI power to enable its users to enhance their video creations. It also is available with voiceover and video overlay features. Now, these can help social media content creators easily develop their video content.
And after installing Final Cut Pro if you are overwhelmed by its tons of features, then here are the steps following which you will be able to use Final Cut Pro:
- First, open the application. Now, it will ask to allow for the permissions to use your files along with your camera and other audiovisual devices. After allowing that, you will be able to enter the user interface of Final Cut Pro.
- Here, you will have to click on the “New project” icon.
- It will then ask you to import any media files to the application. Select the video file that you want to edit and it will take some time to import the media file.
![]()
- Alternatively, you can also import any media file by pressing the “cmd+I” keys and selecting the video file. You should note that Final Cut Pro organizes all the contents and media files into different libraries, events as well as projects. This way if you are working on multiple projects, then it is easy to switch between them.
- Now, after importing, a thumbnail of your media file will be appearing at the bottom of the screen.
- You can now trim or crop your media files from the below timeline. And if you want to add new clips to your project, then you can do so by clicking the “+” icon available.
- In the timeline, you can also rearrange the timeline of your video clips.
- You can add texts and titles to your videos by clicking on the “Titles” options located in the toolbar. This toolbar is the same browser where you imported the media files in the previous steps. You can also add transitions to add subtle movements between hard-cut clips.
- The effect tools available in the toolbar allow you to use the built-in effects that can bring life to any video. And along with this, you can also use the colors tool to color grade your videos and make them more cinematic. There is also the option to add music and voiceover to your project if you need that.
- After you are done with your changes, click on the “share” option available on the screen and then click on “Share Master File” and you will be able to export the project successfully.
Final Cut Pro Alternative to Edit Videos
Content creators who have access to Apple devices can enjoy the features of Final Cut Pro without any difficulties. But for people with other operating systems, Final Cut Pro isn’t available. It is why they need alternatives for this application. And if you are looking for the best alternative to Final Cut Pro, then Filmora is the best choice for you. Here is how you can use Filmora to edit your contents:
For Win 7 or later (64-bit)
For macOS 10.12 or later
- First, install the Filmora application and then open it on your device.
- Then click on the “Import” option and then select the video files that you want to edit.
- Now if you have selected multiple video files, then you can rearrange, cut, split, and trim your videos in your preferred order.
- After you are done with that head to the toolbar where you will be able to add effects, music, transition, and texts to your clip.
- WonderShare Filmora also supports voiceover and video overlay that is perfect for content creators.
- After you have finished editing your videos, click on the “Export” option available on the toolbar and then save the video file to your device.
FAQs about Final Cut Pro
1. Is Final Cut Pro available for free?
Final Cut Pro is available with a free trial for all the users who are on iOS. But to unlock all the tools of Final Cut Pro you will need to purchase the application. It can be done by paying a premium amount of money to the company.
2. Is Final Cut Pro for mac only?
Yes, Final Cut Pro is only available for Mac and it isn’t supported in any other operating system. For users who have any other OS, they can try using Filmora. It is one of the best alternatives for Final Cut Pro on the market.
3. Is the Final Cut Pro good for editing?
Yes, Final Cut Pro is believed to be one of the finest video editing applications that even is used by popular content creators. This application has a variety of tools that can elevate the content of any video to a whole another level.
Final Cut Pro is one of the most trusted video editing applications. This is used by most content creators around the world and it is popular because of its versatile tools. This article discussed some of the key aspects of Final Cut Pro and how it can help creators and general users fulfill their needs for video editing. And for creators who are looking for any alternatives to final cut pro editing, we also discussed the use of Filmora thoroughly which can help them create stunning videos.
Also read:
- With Many Available Video Editing Solutions in the Market Today, It Is a Bit Hard to Choose the Best Video Editing Software for Your Unique Needs for 2024
- How to Zoom Video in VLC Media Player for 2024
- New Best 10 Mind-Blowing Video Collage Maker for PC
- Updated 2024 Approved If You Are Looking for Reliable Solutions to Export Your Musical Slideshow Through a DVD Burning Process, Take a Breath, You Have Landed at the Right Place
- Updated Is Augmented Reality Conferencing the Future of Workplace Collaboration, In 2024
- Updated In 2024, Best Cinematic LUTs For Premiere Pro Recommendation
- In 2024, Find a Solution for Effortless Sky Replacement Photoshop in This Comprehensive Guide. Also, Use the Easiest Video Editing Tool to Make Your Media Stunning
- 10 Best Cartoon Video Makers (Online and Desktop Solution)
- New Guide Create The Perfect VHS Effect Look in Premiere Pro
- Do You Need to Create a Video for Your Business Online but Feel You Do Not Have the Skill and Time to Do That? Try Out These AI Video Generators that Will Work for You to Carry Out Tasks Effectively for 2024
- In 2024, Do You Want to Apply LUTs Using Open Broadcaster Software? You Can Download Free LUTs for OBS and Apply Them to Your Files. There Are Many LUTs Available
- New How to Become a Youtuber, In 2024
- In 2024, Do You Want to Know How to Convert YouTube SBV Subtitles to SRT Format? Here Is an Ultimate Guide About It
- 2024 Approved Slow Motion Video Editors To Look Out For
- How Did AI Video Games Act More Human Than Human, In 2024
- Updated In 2024, Whatre the Best Alternatives to Pexels?
- Updated 5 Best Video Denoisers for 2024
- New 2024 Approved Best 5 Tools to Help You Know More Freeze-Frame Video Editing Skills
- New This Article Will Show You How to Clone Yourslef in Videos with Filmora for 2024
- Updated In 2024, Want to Add Subtitles to Netflix Videos in Your Preferred Language? Read This Article to Learn Two Different Methods for Uploading Custom Subtitles to Netflix
- 2024 Approved Do You Know How AI Is Helping Video Editors and Enthusiasts? Many Video Editing Software Allows an Auto Reframe Option to Use that Can Help Manage Videos
- New How to Merge FLV Files Windows, Mac,Android, iPhone & Online
- Updated 2024 Approved Perfectly Use the Audio Mixer in Filmora
- Updated In 2024, How To Cut Videos For Instagram On Mac
- How To Export Video in Filmora
- 5 Ways to Make a Fake Facetime Call Video for 2024
- New Top 10 Sony LUT for Different Purposes for 2024
- New The Best Cinematic LUTs in The Market
- New Camtasia Vs. Final Cut Pro
- Updated Discover How to Create Professional Foggy Text Reflection Effects in the Filmora Video Editor
- 2024 Approved How to Apply Video Filters
- 2024 Approved You Have to Get It Right when It Comes to Cinematic Grading. We Highlight the Most Common Mistakes to Avoid While Focusing on Various Tips to Apply in the Process
- Best Applications That Can Help Apply The Best VHS Camera Effect for 2024
- New Are You Looking for Software to Convert Word to SRT Format? Here Is a Complete Guide About It for 2024
- New Have You Tried Using a Craig Bot on Discord to Record Audio? Do You Have an Idea of Using a Discord Craig Bot Is Safe? Get Answers to These Questions and More From This Article as You Continue Reading
- Updated 2024 Approved Ideas That Will Help You Out in Converting AVI to GIF
- 2024 Approved Why You Should Master Slideshows In Lightroom, Fresh Insight?
- New 2024 Approved Looking for a Free and Open Source Video Editor with Cross-Platform Support? Kdenlive Video Editor Is Great but Is It the Best? Find Out From Our Complete Kdenlive Review
- 10 Free Location Spoofers to Fake GPS Location on your Motorola Moto G24 | Dr.fone
- How to Quickly Fix Bluetooth Not Working on Samsung Galaxy M54 5G | Dr.fone
- Ultimate Guide to Free PPTP VPN For Beginners On Honor Play 7T | Dr.fone
- In 2024, Is GSM Flasher ADB Legit? Full Review To Bypass Your Infinix Hot 40FRP Lock
- App Wont Open on Your Realme C53? Here Are All Fixes | Dr.fone
- New What Is an AI Video Generator?
- In 2024, How to Come up With the Best Pokemon Team On Oppo Reno 8T 5G? | Dr.fone
- Top 10 AirPlay Apps in Honor X50i+ for Streaming | Dr.fone
- Process of Screen Sharing Vivo S18e to PC- Detailed Steps | Dr.fone
- In 2024, How To Track IMEI Number Of Nokia C22 Through Google Earth?
- How to Fix It Vivo X Flip Wont Turn On | Dr.fone
- How to Easily Hard reset my Nubia Z50S Pro | Dr.fone
- How to Change Location On Facebook Dating for your Vivo Y27 4G | Dr.fone
- 7 Fixes for Unfortunately, Phone Has Stopped on Lava Blaze 2 Pro | Dr.fone
- Is pgsharp legal when you are playing pokemon On Oppo Reno 11F 5G? | Dr.fone
- In 2024, The Updated Method to Bypass Oppo Reno 11 5G FRP
- How Do I Restore Excel 2000 File ? | Stellar
- In 2024, How to Change Location on TikTok to See More Content On your Poco X6 | Dr.fone
- In 2024, Top 10 Best Spy Watches For your Meizu 21 Pro | Dr.fone
- Reset pattern lock Tutorial for Vivo X Fold 2
- Top 12 Prominent Realme Narzo 60 Pro 5G Fingerprint Not Working Solutions
- 4 Methods to Turn off Life 360 On Samsung Galaxy A15 5G without Anyone Knowing | Dr.fone
- In 2024, Top 5 Tracking Apps to Track Realme GT 5 Pro without Them Knowing | Dr.fone
- In 2024, Tips and Tricks for Apple ID Locked Issue From iPhone 15 Pro
- How to Change Netflix Location to Get More Country Version On Infinix Note 30 5G | Dr.fone
- How to Fix Android App Not Installed Error on Honor 70 Lite 5G Quickly? | Dr.fone
- In 2024, How to Reset Gmail Password on Vivo Y100i Power 5G Devices
- How to Intercept Text Messages on OnePlus Ace 2 Pro | Dr.fone
- 8 Solutions to Solve YouTube App Crashing on Poco X5 Pro | Dr.fone
- In 2024, Fixing Foneazy MockGo Not Working On Xiaomi 14 Pro | Dr.fone
- In 2024, How Can You Transfer Files From Itel P55 To iPhone 15/14/13? | Dr.fone
- Does Life360 Notify When You Log Out On Vivo S18? | Dr.fone
- Unlock a disable iPhone 14 Plus without itunes or icloud
- Title: Updated REVIEW Whats Top 10 Software to Make AI Upscaling Video
- Author: Morgan
- Created at : 2024-05-19 05:12:22
- Updated at : 2024-05-20 05:12:22
- Link: https://ai-video-editing.techidaily.com/updated-review-whats-top-10-software-to-make-ai-upscaling-video/
- License: This work is licensed under CC BY-NC-SA 4.0.
