:max_bytes(150000):strip_icc():format(webp)/MorningShow-aed160f9cfd448cc8034b23bb3073314.jpg)
Updated Step by Step to Cut Videos in Adobe Premiere Pro

Step by Step to Cut Videos in Adobe Premiere Pro
Video editing is an essential skill in a world that has a growing focus on creative fields. And if you work with videos, knowing which clips to use and where to cut is essential in conveying your story and increasing its impact. So, if you are a beginner and want to familiarise yourself with steps and terms used in video editing, in this article, we will go through the steps you will need to cut your video file in Adobe Premiere Pro and Wondershare Filmora.
This guide uses Adobe Premiere Pro 2022 and Wondershare Filmora X.
How to cut video in Adobe Premiere Pro?
Once you have Adobe Premiere Pro open on your computer, follow the steps listed below.
Step 1: Create a new project in Premiere Pro.
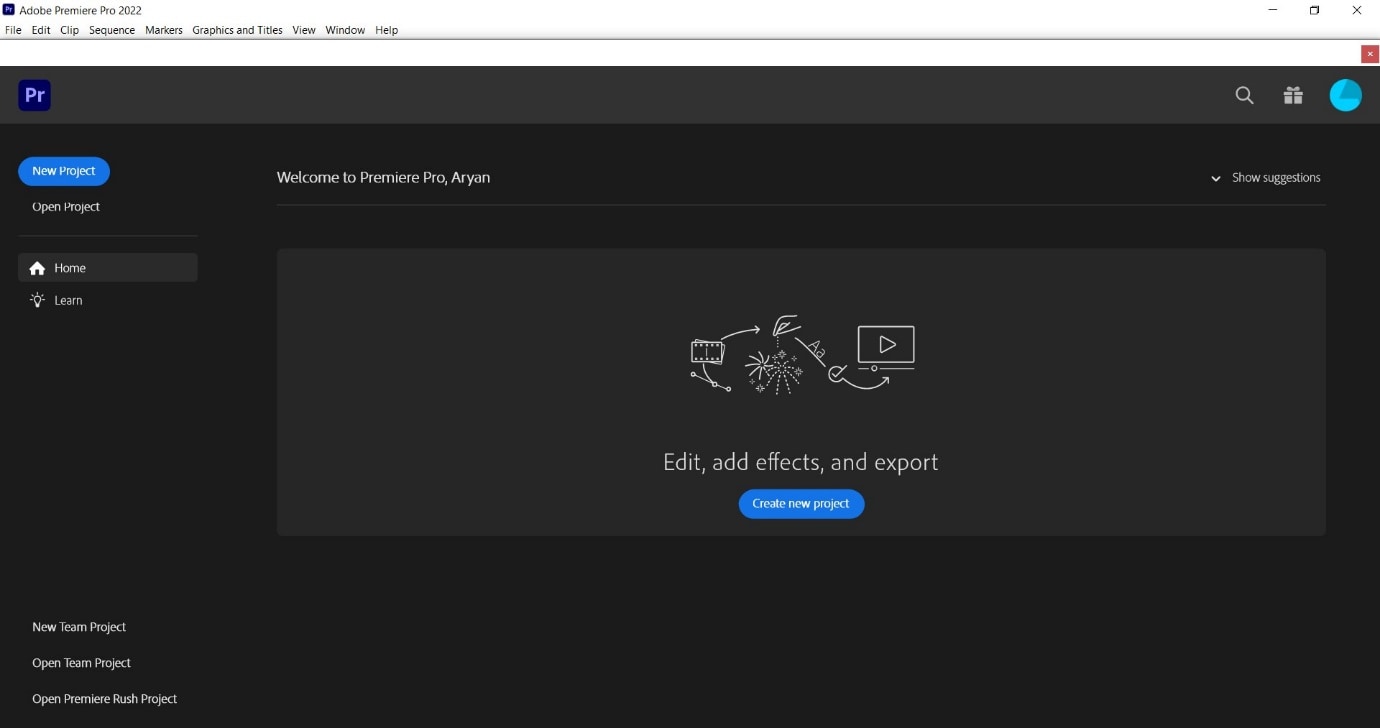
During project creation, we recommend keeping an eye on the file name set and the storage location; this can help reduce the time spent in locating the Premiere Project.
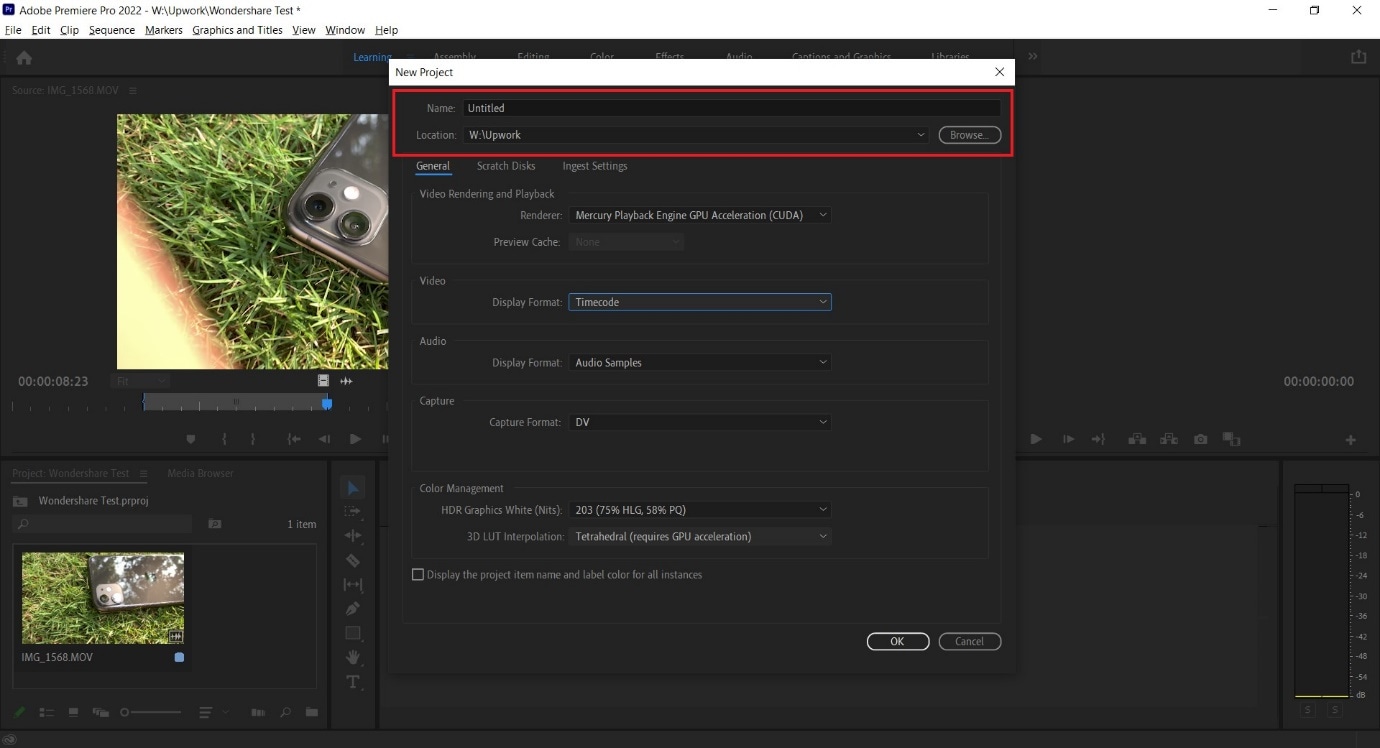
Step 2: Import a video file into Premiere Pro with a double click in the marked area and choose the file from its stored location.
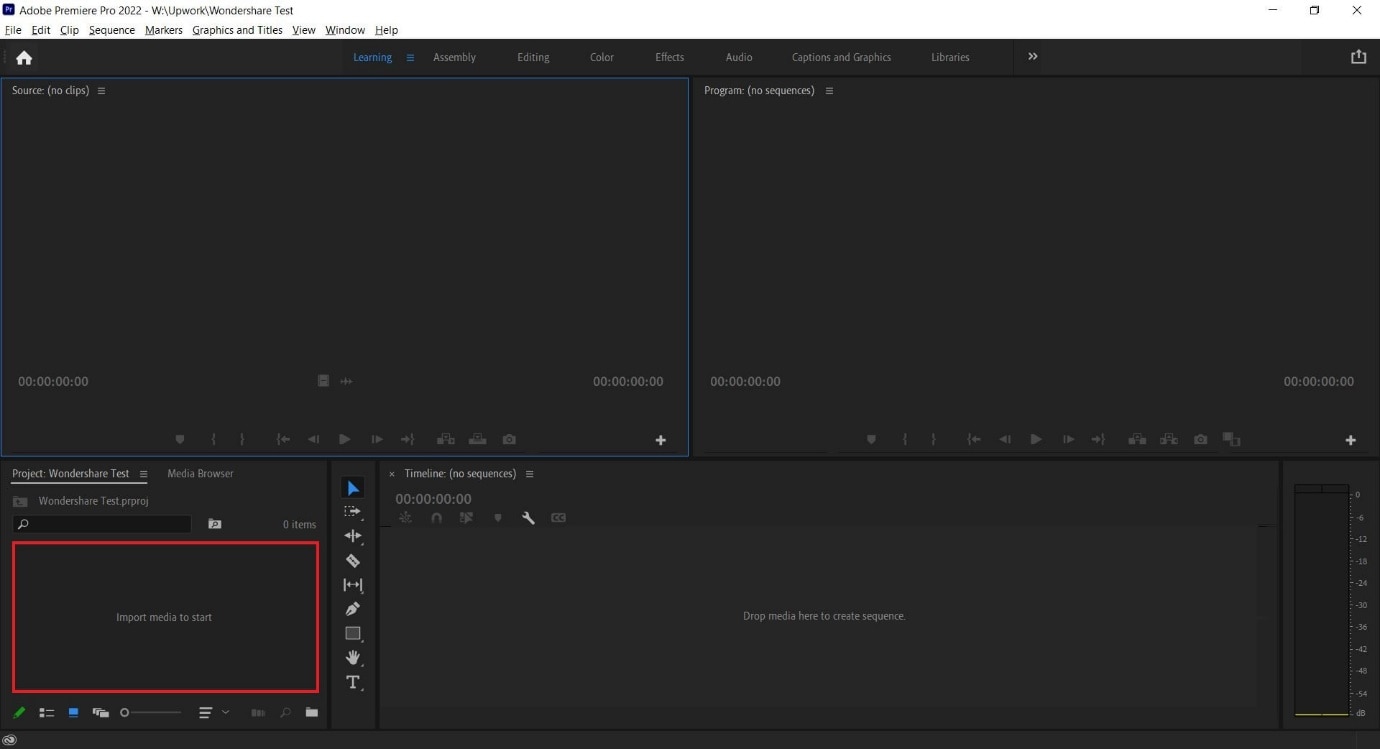
Step 3: Double click on any imported media to activate it and send it to the Source Window.
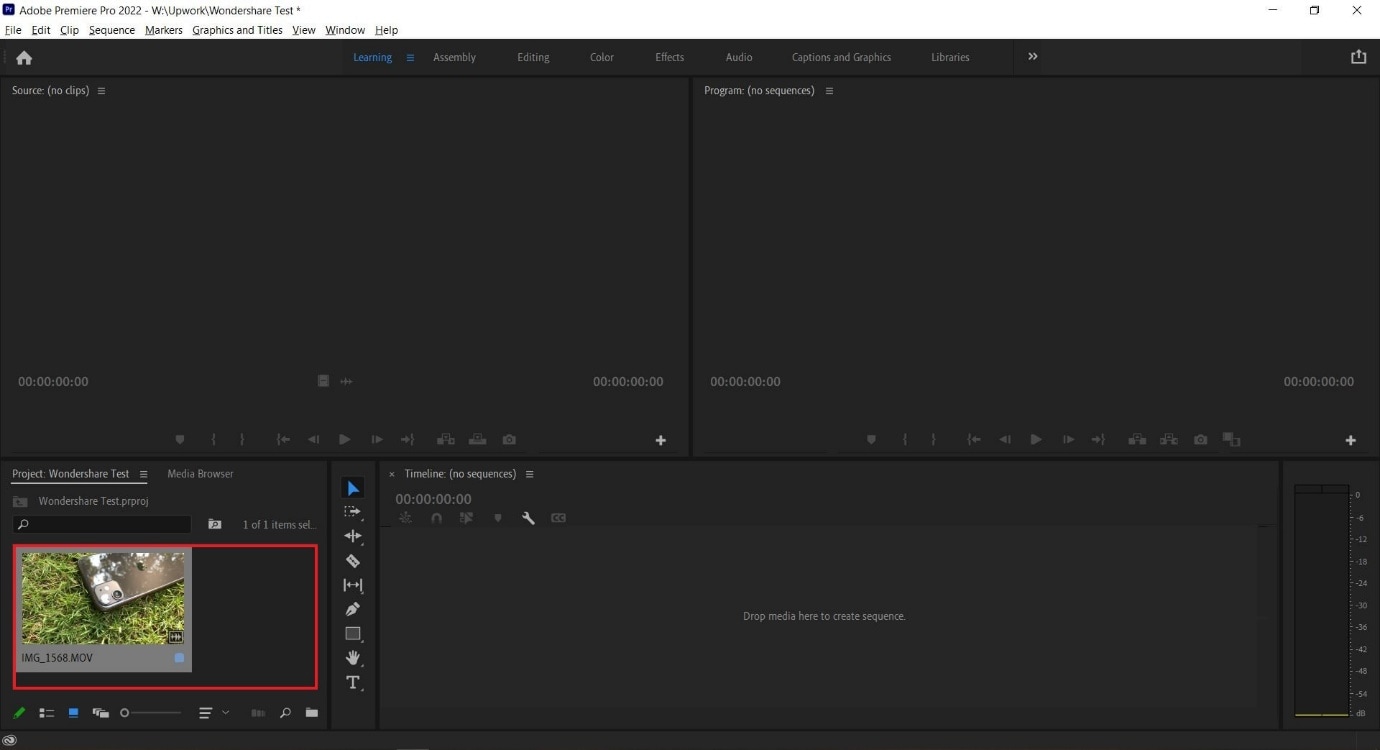
You can continue to import more media by double-clicking within the marked area. For better organization, users can also create Bins, which are folders within a Premiere Pro File that are often in use to sort out imported media.
Users can create Bins with a right-click in the red box marked area (refer to image above).
Step 4: Select either the whole clip or a part of it from the Source Window and drag it onto the Timeline.
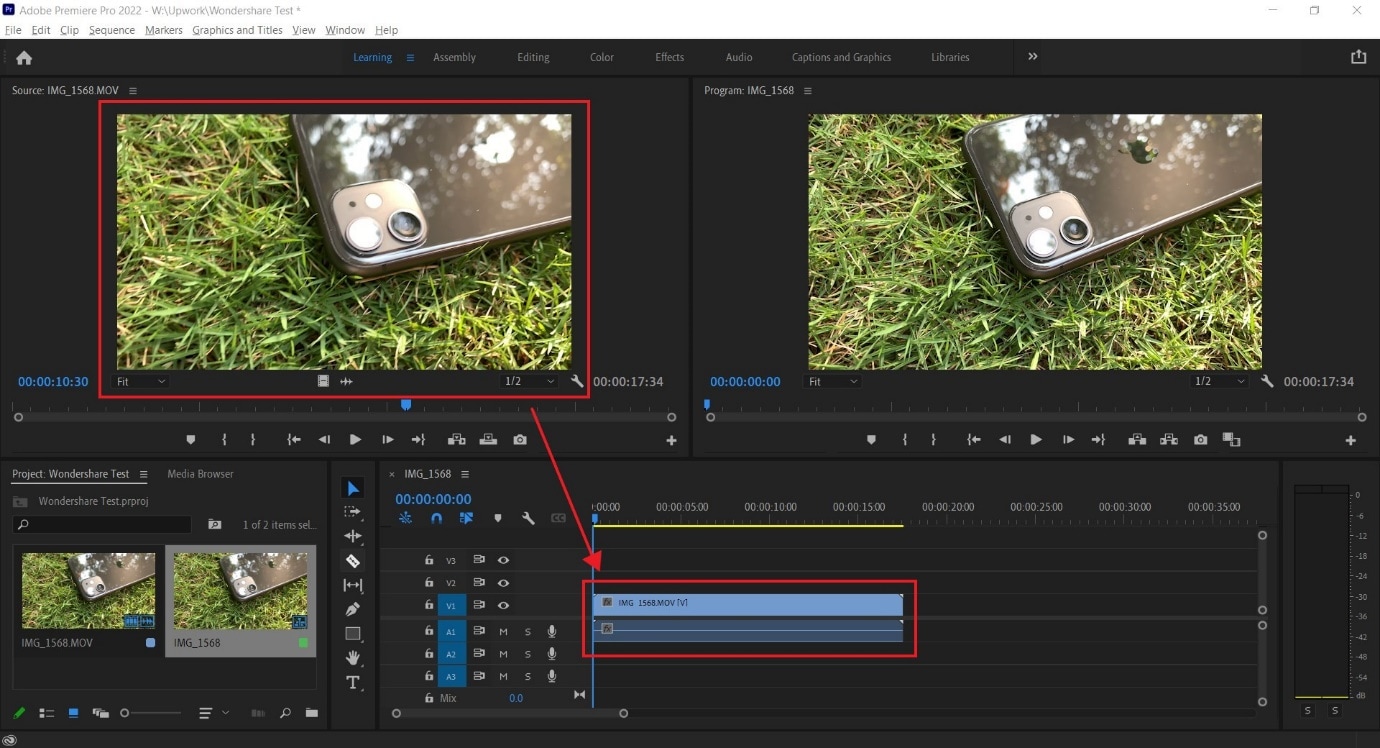
Step 5: Select the Razor Tool from the Tools Window. Now, pick the point where you want to introduce a cut and confirm with your left mouse button; this will split your video track into two parts.
Make a second cut where desired, following which you can move around the newly generated clip or delete it.
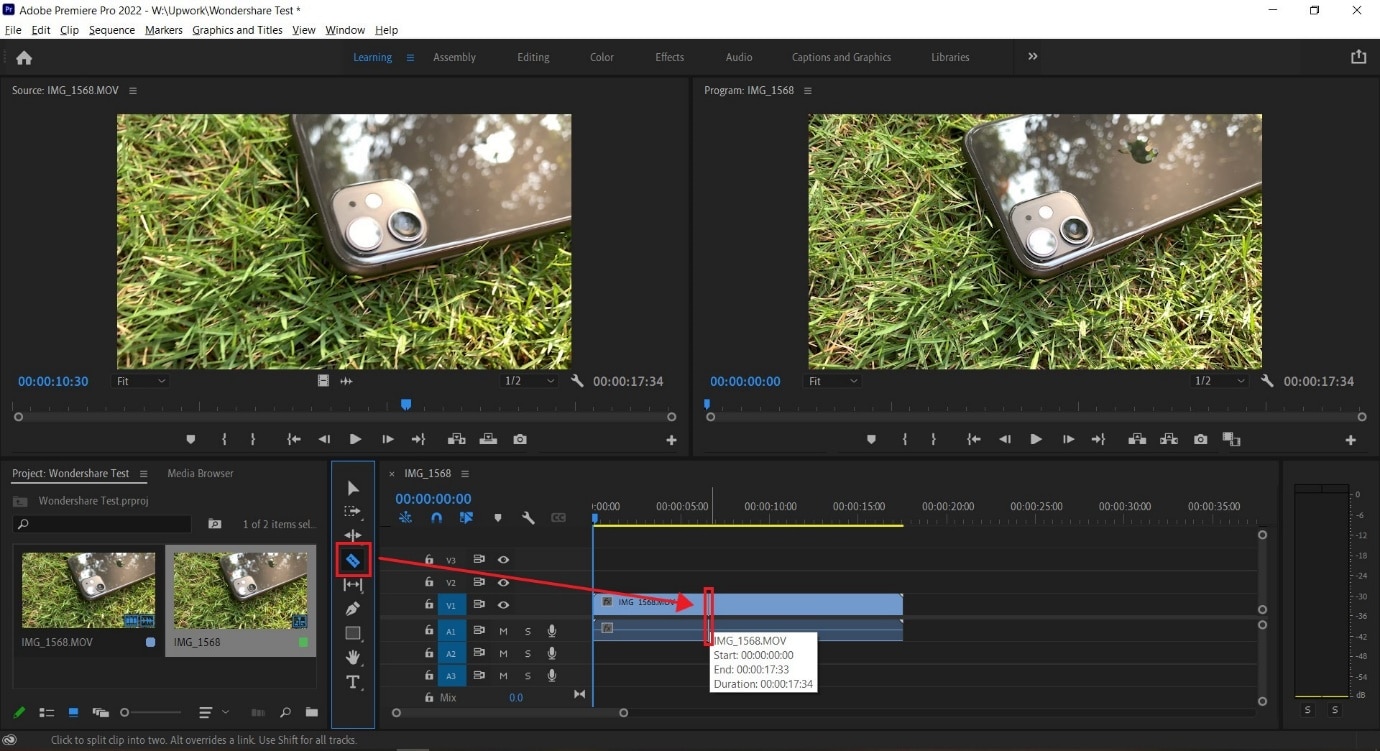
**Tip:**You can also select the Razor Tool by pressing C on the keyboard_._
We also recommend using the Snap in Timeline feature (activated with (S) on your keyboard or by choosing the magnet option), which will match your mouse pointer with the Playhead to ensure your cut will match the exact frame shown on your screen.
-—————————————————————————————————————————————-
Some more tips for Adobe Premiere Pro:
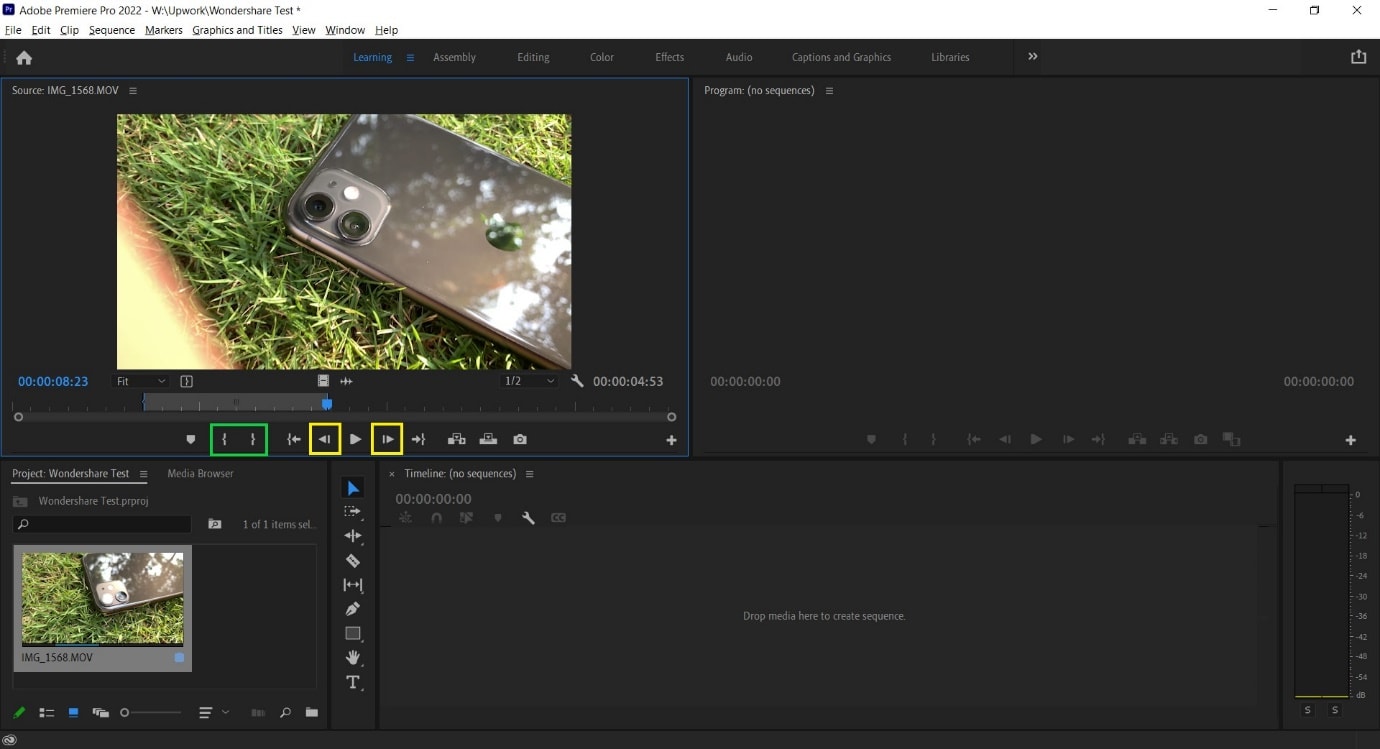
- Using the I and O keys on your keyboard while playing a video in the Source Window will allow you to set an In Pointand an Out Point. These markers will allow you to move a specific part of your video file into the Timeline, thus, reducing the amount of time spent making the right cut.
We have tagged the Mark In and Mark Out buttons with a Green Box in the image below.
- Clicking on the Step Frame Buttons [marked in Yellow] will also help increase the accuracy of your cut by allowing you to select the exact moment you desire.
- You can also mark a Point of Interest in your video file with the help of Markers in Premiere Pro. These afford you the ability to come back to the moment at a later time and see why it interested you in the first place, as editing sessions can often take hours at an end.
An alternative way to cut video with Wondershare Filmora
In Wondershare Filmora Video Editor , the steps to cut a video are simplified and don’t require as many steps as seen earlier. Opening the application throws you straight into a project, and following this, you can import a video file and begin editing. From the process you will learn below, it is easy to assume that Wondershare Filmora is more convenient for beginners and provides software features that match paid professional software.
For Win 7 or later (64-bit)
For macOS 10.14 or later
Note: If you don’t have Wondershare Filmora installed, you can get the video editor by visiting its official website . Once the setup program download completes, execute it and begin the installation process.
Once you have the editing software open, follow the steps listed below.
Step 1: Import a video file by clicking on the import window.
The default project setting for Filmora X is 1920x1080 at 25 frames per second. Users can change this to match their video file by going into Project Settings under the File tab or by accepting the automatic prompt that appears when dragging the video file onto the Timeline.

Note: If you have a PC with weak hardware, Wondershare Filmora gives you the option to create Video Proxies that will reduce the load on your computer by creating smaller clips that are lower in size, resulting in a smoother and faster experience. You can also do this in Premiere Pro, but Filmora does it for you automatically once given permission.
Step 2: Drag the video file onto the Timeline to begin previewing it in the Playback Window and commence editing operations.

Step 3: Locate where you want to cut in the video file and click on the orange scissors option to split the video file.
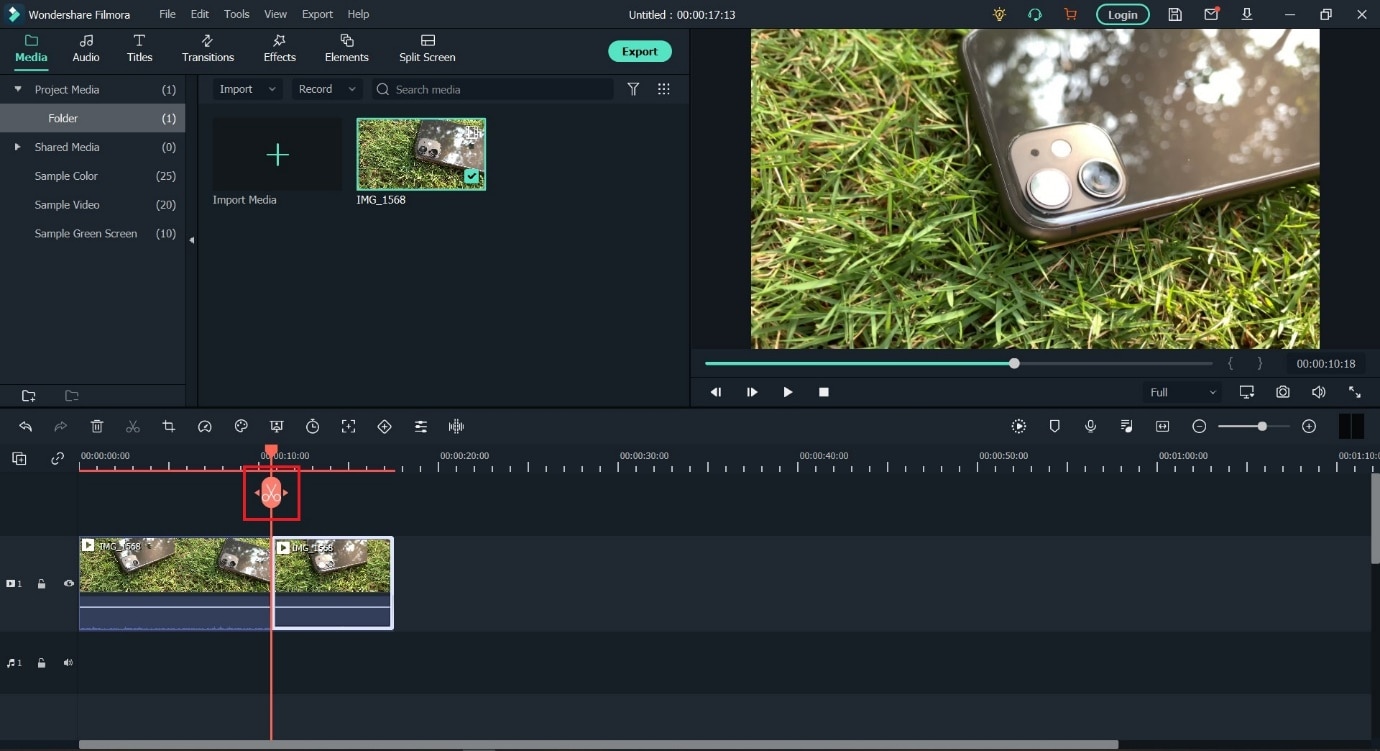
Tip: You can also use the keyboard shortcut (CTRL+B) to cut without using a mouse click, in case you make use of a trackpad while editing.
The Bottom Line
As said earlier, knowing where to cut is essential in improving the feel of your video, and we hope this guide showed you exactly how to perform the actions to create your best project. If you are a beginner, the simplistic approach of Wondershare Filmora will be more welcoming and easier to navigate. In addition, the software is also free to download, with added features that you can activate by paying a monthly, yearly, or one-time fee. Adobe Premiere Pro is an option worth considering if you plan on using third-party plugins and other applications from the Creative Cloud Suite.
During project creation, we recommend keeping an eye on the file name set and the storage location; this can help reduce the time spent in locating the Premiere Project.

Step 2: Import a video file into Premiere Pro with a double click in the marked area and choose the file from its stored location.

Step 3: Double click on any imported media to activate it and send it to the Source Window.

You can continue to import more media by double-clicking within the marked area. For better organization, users can also create Bins, which are folders within a Premiere Pro File that are often in use to sort out imported media.
Users can create Bins with a right-click in the red box marked area (refer to image above).
Step 4: Select either the whole clip or a part of it from the Source Window and drag it onto the Timeline.

Step 5: Select the Razor Tool from the Tools Window. Now, pick the point where you want to introduce a cut and confirm with your left mouse button; this will split your video track into two parts.
Make a second cut where desired, following which you can move around the newly generated clip or delete it.

**Tip:**You can also select the Razor Tool by pressing C on the keyboard_._
We also recommend using the Snap in Timeline feature (activated with (S) on your keyboard or by choosing the magnet option), which will match your mouse pointer with the Playhead to ensure your cut will match the exact frame shown on your screen.
-—————————————————————————————————————————————-
Some more tips for Adobe Premiere Pro:
- Using the I and O keys on your keyboard while playing a video in the Source Window will allow you to set an In Pointand an Out Point. These markers will allow you to move a specific part of your video file into the Timeline, thus, reducing the amount of time spent making the right cut.
We have tagged the Mark In and Mark Out buttons with a Green Box in the image below.
- Clicking on the Step Frame Buttons [marked in Yellow] will also help increase the accuracy of your cut by allowing you to select the exact moment you desire.
- You can also mark a Point of Interest in your video file with the help of Markers in Premiere Pro. These afford you the ability to come back to the moment at a later time and see why it interested you in the first place, as editing sessions can often take hours at an end.

An alternative way to cut video with Wondershare Filmora
In Wondershare Filmora Video Editor , the steps to cut a video are simplified and don’t require as many steps as seen earlier. Opening the application throws you straight into a project, and following this, you can import a video file and begin editing. From the process you will learn below, it is easy to assume that Wondershare Filmora is more convenient for beginners and provides software features that match paid professional software.
For Win 7 or later (64-bit)
For macOS 10.14 or later
Note: If you don’t have Wondershare Filmora installed, you can get the video editor by visiting its official website . Once the setup program download completes, execute it and begin the installation process.
Once you have the editing software open, follow the steps listed below.
Step 1: Import a video file by clicking on the import window.
The default project setting for Filmora X is 1920x1080 at 25 frames per second. Users can change this to match their video file by going into Project Settings under the File tab or by accepting the automatic prompt that appears when dragging the video file onto the Timeline.

Note: If you have a PC with weak hardware, Wondershare Filmora gives you the option to create Video Proxies that will reduce the load on your computer by creating smaller clips that are lower in size, resulting in a smoother and faster experience. You can also do this in Premiere Pro, but Filmora does it for you automatically once given permission.
Step 2: Drag the video file onto the Timeline to begin previewing it in the Playback Window and commence editing operations.

Step 3: Locate where you want to cut in the video file and click on the orange scissors option to split the video file.

Tip: You can also use the keyboard shortcut (CTRL+B) to cut without using a mouse click, in case you make use of a trackpad while editing.
The Bottom Line
As said earlier, knowing where to cut is essential in improving the feel of your video, and we hope this guide showed you exactly how to perform the actions to create your best project. If you are a beginner, the simplistic approach of Wondershare Filmora will be more welcoming and easier to navigate. In addition, the software is also free to download, with added features that you can activate by paying a monthly, yearly, or one-time fee. Adobe Premiere Pro is an option worth considering if you plan on using third-party plugins and other applications from the Creative Cloud Suite.
During project creation, we recommend keeping an eye on the file name set and the storage location; this can help reduce the time spent in locating the Premiere Project.

Step 2: Import a video file into Premiere Pro with a double click in the marked area and choose the file from its stored location.

Step 3: Double click on any imported media to activate it and send it to the Source Window.

You can continue to import more media by double-clicking within the marked area. For better organization, users can also create Bins, which are folders within a Premiere Pro File that are often in use to sort out imported media.
Users can create Bins with a right-click in the red box marked area (refer to image above).
Step 4: Select either the whole clip or a part of it from the Source Window and drag it onto the Timeline.

Step 5: Select the Razor Tool from the Tools Window. Now, pick the point where you want to introduce a cut and confirm with your left mouse button; this will split your video track into two parts.
Make a second cut where desired, following which you can move around the newly generated clip or delete it.

**Tip:**You can also select the Razor Tool by pressing C on the keyboard_._
We also recommend using the Snap in Timeline feature (activated with (S) on your keyboard or by choosing the magnet option), which will match your mouse pointer with the Playhead to ensure your cut will match the exact frame shown on your screen.
-—————————————————————————————————————————————-
Some more tips for Adobe Premiere Pro:
- Using the I and O keys on your keyboard while playing a video in the Source Window will allow you to set an In Pointand an Out Point. These markers will allow you to move a specific part of your video file into the Timeline, thus, reducing the amount of time spent making the right cut.
We have tagged the Mark In and Mark Out buttons with a Green Box in the image below.
- Clicking on the Step Frame Buttons [marked in Yellow] will also help increase the accuracy of your cut by allowing you to select the exact moment you desire.
- You can also mark a Point of Interest in your video file with the help of Markers in Premiere Pro. These afford you the ability to come back to the moment at a later time and see why it interested you in the first place, as editing sessions can often take hours at an end.

An alternative way to cut video with Wondershare Filmora
In Wondershare Filmora Video Editor , the steps to cut a video are simplified and don’t require as many steps as seen earlier. Opening the application throws you straight into a project, and following this, you can import a video file and begin editing. From the process you will learn below, it is easy to assume that Wondershare Filmora is more convenient for beginners and provides software features that match paid professional software.
For Win 7 or later (64-bit)
For macOS 10.14 or later
Note: If you don’t have Wondershare Filmora installed, you can get the video editor by visiting its official website . Once the setup program download completes, execute it and begin the installation process.
Once you have the editing software open, follow the steps listed below.
Step 1: Import a video file by clicking on the import window.
The default project setting for Filmora X is 1920x1080 at 25 frames per second. Users can change this to match their video file by going into Project Settings under the File tab or by accepting the automatic prompt that appears when dragging the video file onto the Timeline.

Note: If you have a PC with weak hardware, Wondershare Filmora gives you the option to create Video Proxies that will reduce the load on your computer by creating smaller clips that are lower in size, resulting in a smoother and faster experience. You can also do this in Premiere Pro, but Filmora does it for you automatically once given permission.
Step 2: Drag the video file onto the Timeline to begin previewing it in the Playback Window and commence editing operations.

Step 3: Locate where you want to cut in the video file and click on the orange scissors option to split the video file.

Tip: You can also use the keyboard shortcut (CTRL+B) to cut without using a mouse click, in case you make use of a trackpad while editing.
The Bottom Line
As said earlier, knowing where to cut is essential in improving the feel of your video, and we hope this guide showed you exactly how to perform the actions to create your best project. If you are a beginner, the simplistic approach of Wondershare Filmora will be more welcoming and easier to navigate. In addition, the software is also free to download, with added features that you can activate by paying a monthly, yearly, or one-time fee. Adobe Premiere Pro is an option worth considering if you plan on using third-party plugins and other applications from the Creative Cloud Suite.
During project creation, we recommend keeping an eye on the file name set and the storage location; this can help reduce the time spent in locating the Premiere Project.

Step 2: Import a video file into Premiere Pro with a double click in the marked area and choose the file from its stored location.

Step 3: Double click on any imported media to activate it and send it to the Source Window.

You can continue to import more media by double-clicking within the marked area. For better organization, users can also create Bins, which are folders within a Premiere Pro File that are often in use to sort out imported media.
Users can create Bins with a right-click in the red box marked area (refer to image above).
Step 4: Select either the whole clip or a part of it from the Source Window and drag it onto the Timeline.

Step 5: Select the Razor Tool from the Tools Window. Now, pick the point where you want to introduce a cut and confirm with your left mouse button; this will split your video track into two parts.
Make a second cut where desired, following which you can move around the newly generated clip or delete it.

**Tip:**You can also select the Razor Tool by pressing C on the keyboard_._
We also recommend using the Snap in Timeline feature (activated with (S) on your keyboard or by choosing the magnet option), which will match your mouse pointer with the Playhead to ensure your cut will match the exact frame shown on your screen.
-—————————————————————————————————————————————-
Some more tips for Adobe Premiere Pro:
- Using the I and O keys on your keyboard while playing a video in the Source Window will allow you to set an In Pointand an Out Point. These markers will allow you to move a specific part of your video file into the Timeline, thus, reducing the amount of time spent making the right cut.
We have tagged the Mark In and Mark Out buttons with a Green Box in the image below.
- Clicking on the Step Frame Buttons [marked in Yellow] will also help increase the accuracy of your cut by allowing you to select the exact moment you desire.
- You can also mark a Point of Interest in your video file with the help of Markers in Premiere Pro. These afford you the ability to come back to the moment at a later time and see why it interested you in the first place, as editing sessions can often take hours at an end.

An alternative way to cut video with Wondershare Filmora
In Wondershare Filmora Video Editor , the steps to cut a video are simplified and don’t require as many steps as seen earlier. Opening the application throws you straight into a project, and following this, you can import a video file and begin editing. From the process you will learn below, it is easy to assume that Wondershare Filmora is more convenient for beginners and provides software features that match paid professional software.
For Win 7 or later (64-bit)
For macOS 10.14 or later
Note: If you don’t have Wondershare Filmora installed, you can get the video editor by visiting its official website . Once the setup program download completes, execute it and begin the installation process.
Once you have the editing software open, follow the steps listed below.
Step 1: Import a video file by clicking on the import window.
The default project setting for Filmora X is 1920x1080 at 25 frames per second. Users can change this to match their video file by going into Project Settings under the File tab or by accepting the automatic prompt that appears when dragging the video file onto the Timeline.

Note: If you have a PC with weak hardware, Wondershare Filmora gives you the option to create Video Proxies that will reduce the load on your computer by creating smaller clips that are lower in size, resulting in a smoother and faster experience. You can also do this in Premiere Pro, but Filmora does it for you automatically once given permission.
Step 2: Drag the video file onto the Timeline to begin previewing it in the Playback Window and commence editing operations.

Step 3: Locate where you want to cut in the video file and click on the orange scissors option to split the video file.

Tip: You can also use the keyboard shortcut (CTRL+B) to cut without using a mouse click, in case you make use of a trackpad while editing.
The Bottom Line
As said earlier, knowing where to cut is essential in improving the feel of your video, and we hope this guide showed you exactly how to perform the actions to create your best project. If you are a beginner, the simplistic approach of Wondershare Filmora will be more welcoming and easier to navigate. In addition, the software is also free to download, with added features that you can activate by paying a monthly, yearly, or one-time fee. Adobe Premiere Pro is an option worth considering if you plan on using third-party plugins and other applications from the Creative Cloud Suite.
Make A Tattoo Disappear Like A Magic
Do you have any tattoos that you don’t like anymore? Have you ever wished you had the superpower to make unwanted tattoos vanish? Then, keep reading this article since this article will provide you with how to use masking and colour correction to make a tattoo disappear in Filmora .
Part 1: What You’ll Need to Getting ready
Step1 The first thing you need is a video clip of your arm. Next, place the camera on a tripod, and tilt down to show the table from the top.

Step2 After that, put the arm on the tableand keep it still while filming. Meanwhile, have another hand perform on the other side of the frame and pretend to use magic to remove the tattoo.

Step3 Next, you need a picture of a tattoo. Indeed, it would be better to have the tattoo in the same position on the arm so it can match the video clip we just filmed.

After preparing everything, you need to go to Filmora 11 and start editing. If you haven’t downloaded Filmora already, you can visit filmora.wondershare.com.
Part 2: Editing Tutorial
Step1 First, drag and drop the arm video clip onto the first video track and the tattoo picture on the second video track.
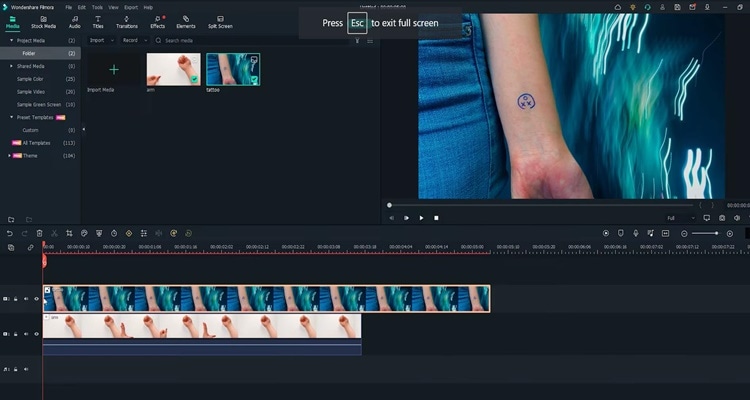
Step2 Add a mask around the tattoo part from the picture. You must hide the first video track to see the mask clearly.Then, double-click on the picture on the timeline and go to the setting window on the top left. Find the Mask Section and select the circle shape. Now you can see the mask is applied.
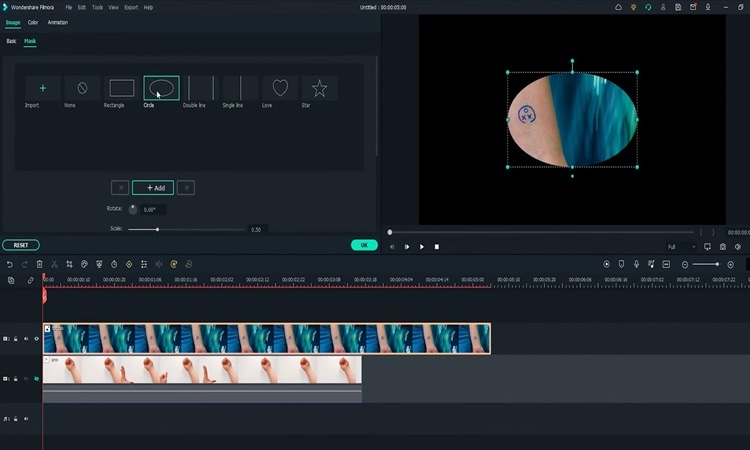
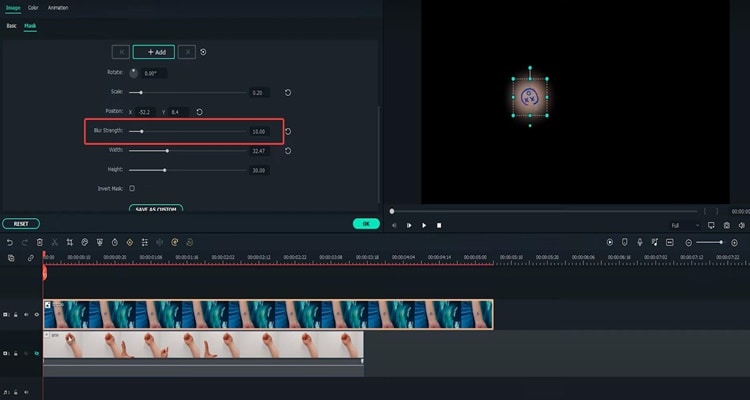
Step3 Adjust the position and size of the mask to reveal only the tattoo part. Then you must change the “Blur Strength” to add more blur to the edge of the mask.
Step4 With the mask finalized,unhide the first video track with the arm video clip. Next, adjust the position and size of the tattoo and make it fit the arm clip.
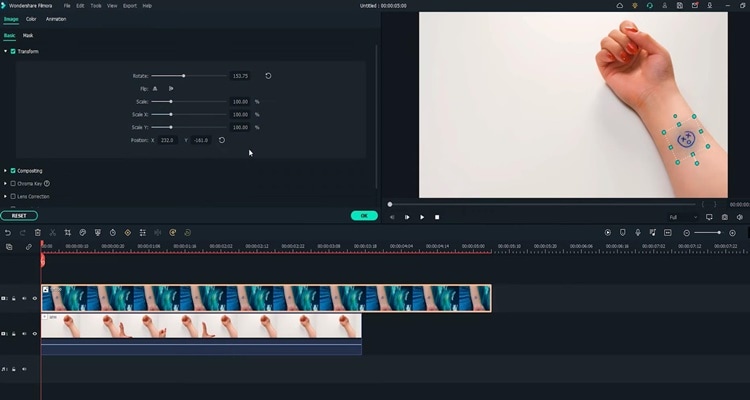
Step5 Go to do colour correction on the tattoo image so that it matches better with the arm skin. Double-click on the tattoo on the timeline and go to the setting window on the top left. Find the “Color” Section and open the “Tone” menu. First, you have to adjust the brightness first.
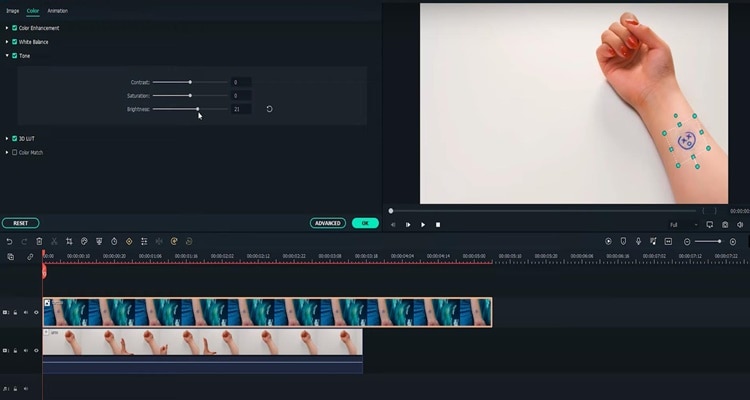
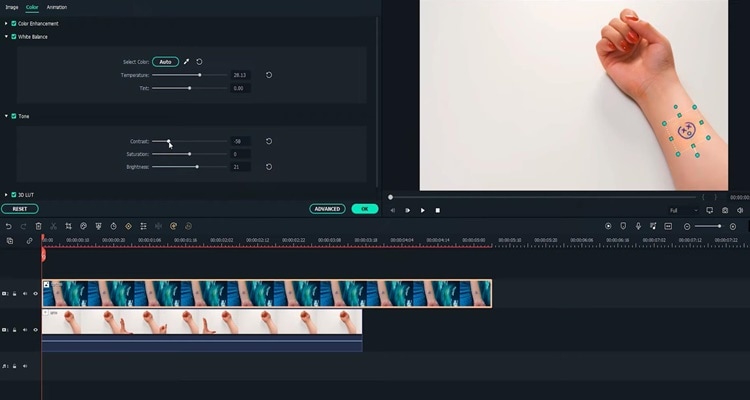
Step6 Afterwards, open the “White Balance”menu and adjust the temperature. Indeed, you can also adjust the contrast and saturation if needed. Once done, click “OK.” The tattoo should look like it blends into the arm video.
Part 3: Make the tattoo disappear
Step1 Move the play head to where you want the tattoo fades, and adjust the length of the tattoo picture there.
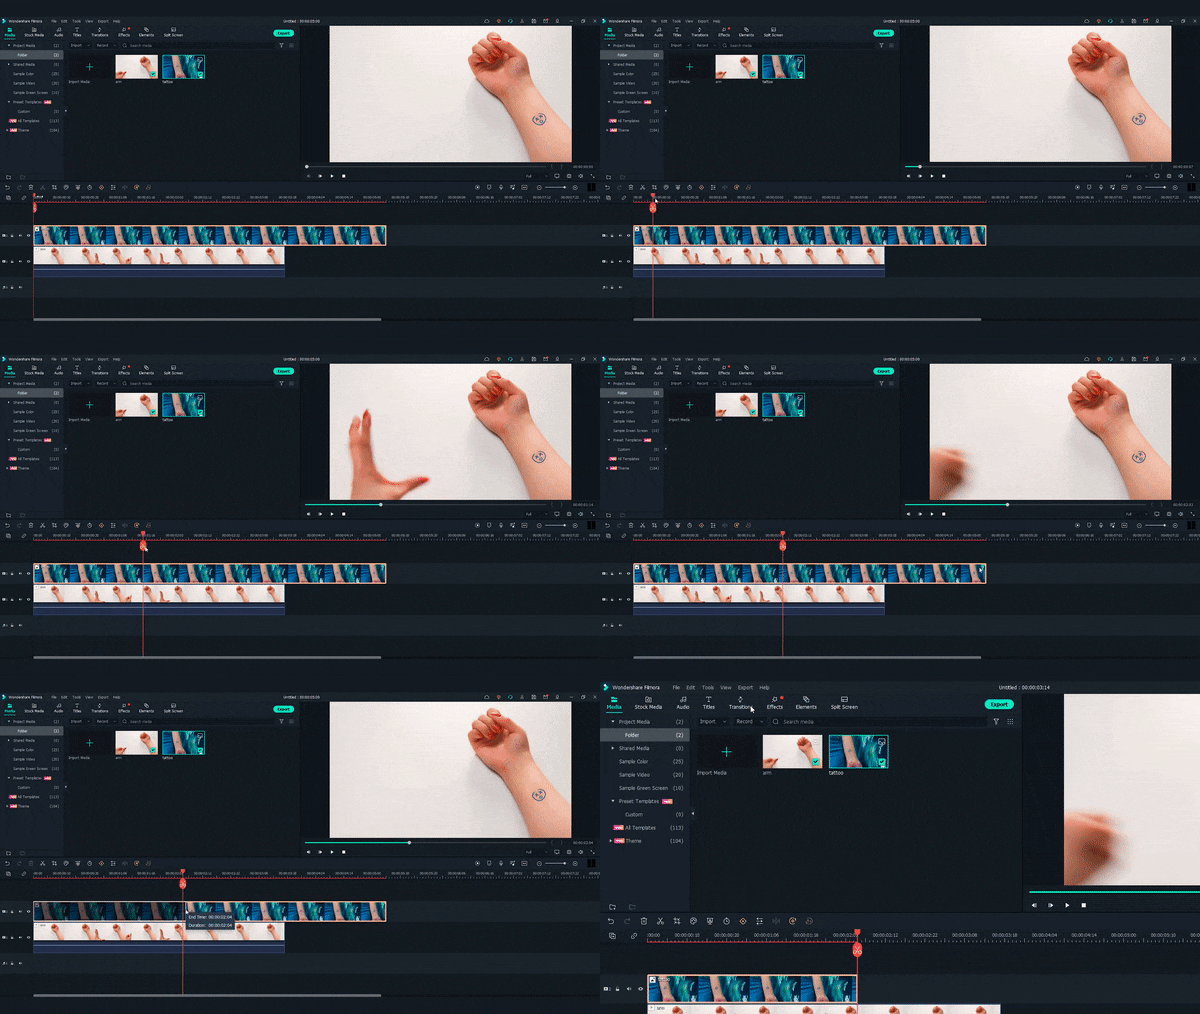
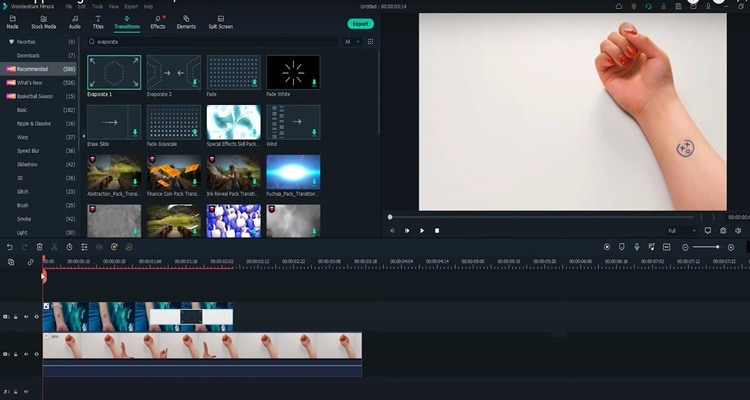
Step2 Next, find the “Evaporate 1” from the “Transitions” window. Drag and drop it to the end of the tattoo clip.
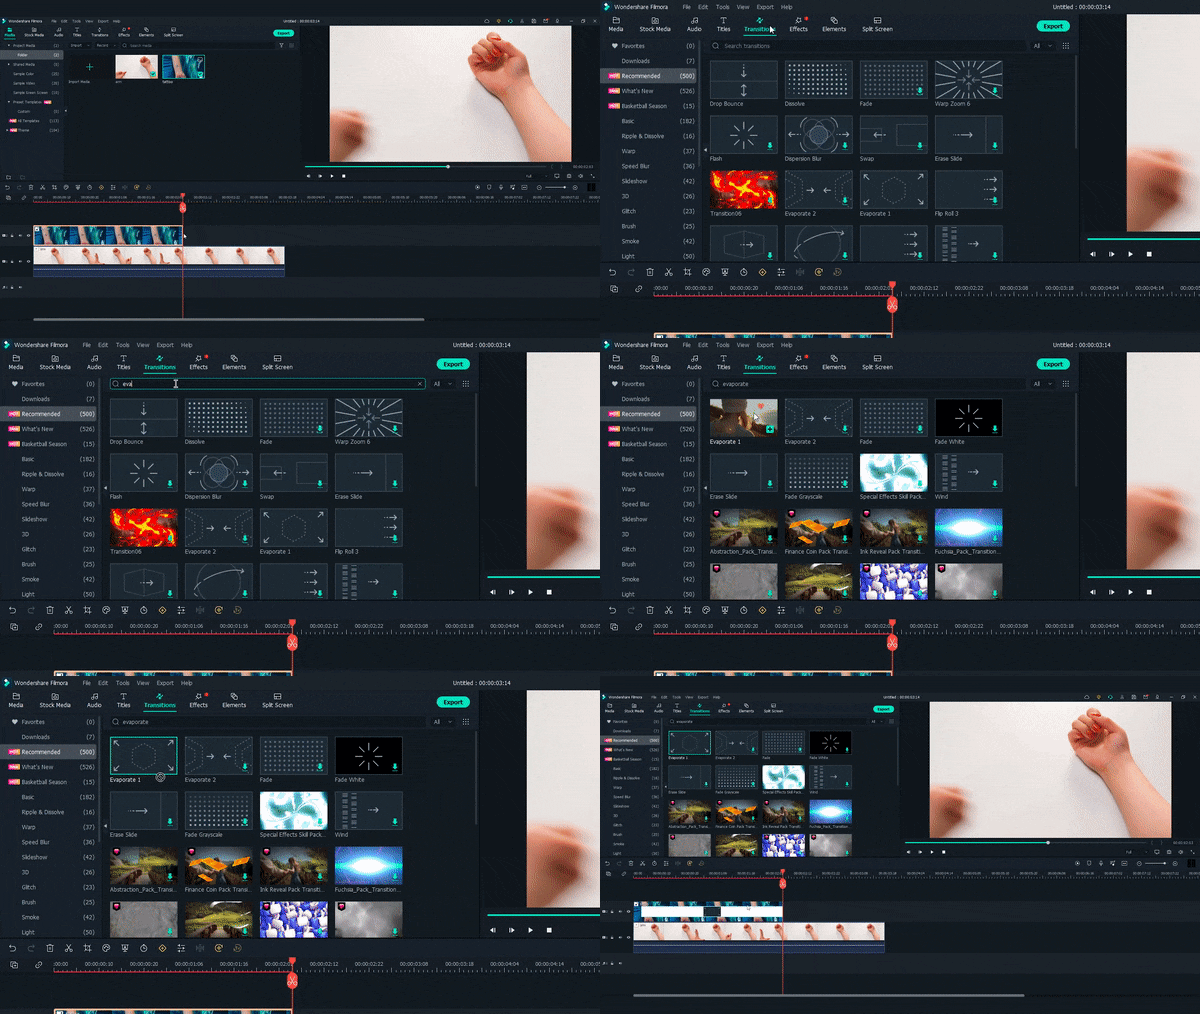
Step3 Adjust the length if needed. Finally, Let’s playback and see how it looks!
Summary
That’s how to make a tattoo disappear in Filmora 11. With Filmora 11, you can get as many new tattoos as possible. Indeed, you can follow all the steps above carefully to get the perfect result.
Free Download For Win 7 or later(64-bit)
Free Download For macOS 10.14 or later
Free Download For macOS 10.14 or later
What Slideshow Templates Teach You About Aesthetic
What Slideshow Templates Can Teach You About Aesthetic
An easy yet powerful editor
Numerous effects to choose from
Detailed tutorials provided by the official channel
The Slideshows are more capable of easily sums-up your trip or an event with some beautiful moments in an organised way to put things all-together.”Aesthetics” is not just about design style, instead it is a lifestyle and when you are making use of PowerPoint slideshow templates there should be some room for the trends, retro or a vintage style. By having aesthetically designed templates for the Google Slides & PowerPoint, you can have better opportunity to highlight the desired information in an attractive and beautiful manner.

Whether it is about representing your company or organization with beautiful contents or making a slideshow for your loved ones on their special occasion, aesthetic designed templates can overcome the complications in an organized and memorable manner.When it comes to enhancing productivity in a creative manner then coming up with the professional-looking presentations can help you to draw attention to your audience.
Part 1 Best Slideshow Video Templates
No matter what sort of topic you choose, a great looking and successful video presentation mainly depends on the key factors namely: PowerPoint’s designing tools, the attention to presentation process by the speaker or presenter, and devotion to the consistent styling.This is the reason it comes really important for you to get through with the process of making PowerPoint Slide Show right from the group but with addition of little bit of creativity. The templates can make your PowerPoint slideshow much more attractive.

Here is what you are going to get with the help of best possible slide show PowerPoint templates that you can use for business presentation or any other relevant event.
So, lets for go for it.
For Free
These 6 free slideshow templates can let you amaze each & everyone in your audience.
01Surprise Birthday Video Template
Make use of this template to amaze each & everyone in just a few clicks. The surprise birthdaySlideshow presentationtemplate can allow you to design as well as organize surprised, memorable parties with lots of fun.
02Rainbow Gradients Template
Comes with colourful backgrounds & some abstract gradients, it is perfect for making your presentation astounding in no time. In terms of giving you originality, this rainbow template is creative, artistic and much more smoothening to the eyes.
03Composition Book Template
Among the list of free slideshow templates, the composition book presentation template is capable of placing the contents in terms of ruled book pages. You can make use of this template to highlight educational importance, talk about education or write exercises for your students in a funny manner.

04Neutral Colours based Presentation Theme
Don’t want to be overcomplicated in terms of designing? Then it is the perfect template to consider for your presentation in order to stand out among the competition. Grilled with natural colours, strong images and clearer composition based slideshow designsthis will help you to convey better information in terms calm and composed manner to the desired audience.
05Vintage Moodboard Slides
All set to leave great impression on your audience with genuinely great presentation template with small details on every slide and to make it more unique you can customize it as per your needs.

06Birthday Card Presentation Template
The powerful and professionally oriented birthday designed template is fully handcrafted, for giving an organic feel. Just keep it simple by adapting any colour of your choice, layout with some customizable pages for the agendas, ideas and topics on your loved one’s birthday.
For Paid
With this collection of premium Google Slides and PowerPoint templates you can easily steal the show for both personal and commercial usages.
07Realistic Galaxy Consulting-Toolkit
Why limiting yourself to customers from planet Earth when you can be the best company in the entire Milky Way? But to aim that high, you’ll need the help

08Corporate Typography Plus
You will be amazed by how much typography one can do with this template. In terms of mixing as well as matching charts, text you can define stories on a pretty serious notes. It is a data drive template for the professionals.
09Aqua Marketing
The aqua marketing plan can clearly put some impact to your contents; you can trust this template for instantly appealing water-colour details in the best possible manner.
10Pastel Portfolio
If there is any creative portfolio which can open a lot of opportunities for your contents more than your imagination then, it is Pastel Portfolio template. You can easily showcase your skills and working style.

11Minimalist Korean Aesthetic Pitch Deck Presentation
This template is based on the minimalist style and usually comes with varieties of shades for the business presentations and clearly capable of making your audience focus on relatable contents.
12College Candy Aesthetics
The explosion of colours will welcome you, the moment you started using this template. It is a perfect blend of “aesthetics” style which is super cool & capable of shaking latest trends in the market for art. With subscription you can edit as well as add much more information apart from its free version.
Why not go for Filmora Wonderful from which you can make amazing slideshows with blend of custom audio and video?
Well Filmora is pretty awesome for Making your Presentation much more convenient and unique in all perspectives and comes with features like:-
● Entirely customizable slides
● Comes in different nodes & colors.
● Slides here are available in 16:9 as well as 4:3 format.
● You can easily change slide colours quickly.
● Get access to well-crafted templates with instant facility to download it.
● Some Pre-designed templates to help you in making it much more engaging and convenient as per the presentation.
● Best designed templatesto use in the market for special occasions
Part 2 5 Slideshow Websites to Help You Find Aesthetic Slideshow
The slideshow design for PowerPointis really time consuming &you need to create slides right from the scratch. If you are not into a mood of spending so much time in slideshow designs then with thousands of templates already present in the market you can save your time and efforts.

Here, the list of five slideshows, describe various number of slideshow templates designing resources to use so that you can download beautiful as well as professionally designed slideshow templates not just for the PowerPoint, but also for the Keynote &Google Slides.
01Power-User: Range Of Attractive Templates To Use In Offline Mode Directly
The Power-user is one of the most powerful add-onscrafted by the experts for PowerPoint and easily let you browse &insert varieties of attractive templates directly to your presentations.
With access to one million plus pictures, 250 editable maps and around 6,000 icons, charts, diagrams etc. you are getting a tool to save your time for the excel.
02Slide Model: Professionally Designed Templates &Themes
It’s aslideshow websitewith thirty thousand PowerPoint templates that are designed professionally to use for increasing the productivity and quality. You will get unlimited downloads for the 1st year with a subscription. When it comes to design a presentation with a minimal efforts, then simply download a preferred template from this website.
03Powered Template: Outstanding Powerpoint Templates
You will get access to a wide range of entirely royalty-free, attractively designed Google Slides and PowerPoint templates for the business making presentations or for the personal use. You can choose either a free plan or go with the subscription plan.
04Envato Elements: Professionally Implemented Templates By Designers
Right from the creative group of people or community, you will get access to wide range of visual elements on a monthly subscription with features of unlimited downloads& wide range of cataloguethat contains 300,000 plus stock photos & around 34,000 and more graphic assets. You can also download the whole presentation for the specified topics like investor pitch, sales presentation, Real-Estate project, etc. that can be used as a template for Slideshow PowerPoint.
05Aiippt.Com: Free Access To Powerpoint Templates, Diagrams And Designs
Thisslide show websitecan surely help for you to find a perfect match for the Aesthetic Slideshows. AIPPT is a great tool for providing value to your slide show at free of cost. Availability of delivering backgrounds, cover pages for the presentation in terms of real templates really makes it look beautiful. With some interesting elements you can adjust the template as per your needs.
Part 3 FAQ of Slideshow Templates
The ultimate goal of the PowerPoint templates is to deliver solutions to the customer’s queries with a straightforward approach. Slideshow templates are meant to give attractive features to the PowerPoint Presentation. One can easily comply with the updating as well as editing of the template following your taste. With some striking background themes & well-designed presentation templates, you can make your presentation looks even much more eye-catching to truly amaze the audience.
Here are a few FAQs about PowerPoint templates to help you in understanding Aesthetic slideshows:-
How to make an aesthetic slideshow?
You can make use of PowerPoint slideshow templates available in order to effortlessly apply attractive themes, subtle shades of highlighted pictures, and minimalistic text-based designs/fonts in your slides.
Which one is the best tool for creating an aesthetic slideshow?
If you want to have an all-rounder application for taking care of your designing needs with great tools and amazing features of its own then Filmora is the best you can have. With aesthetically pleasing templates, you can access almost 600 plus filters, innumerable templates, and effects with uncountable features in order to make your PowerPoint slides minimalistic & aesthetic.
How to use Filmora for aesthetic slideshow making?
With several varieties of Slideshow templates, Wondershare Filmora Video Editor reflects an idea of minimalistic design. You can make use of filters in order to provide a subtle pastel tone to the existing slides. Also, multiple motion control benefits & fonts available on the help can clearly make a huge difference in providing an aesthetically pleasing slideshow design.
For Win 7 or later (64-bit)
For macOS 10.12 or later
● Ending Thoughts →
● Creating a good looking PowerPoint presentation is a skill that professionals are using it to take the benefit. It is really easy for anyone to go wrong, but with custom designed templates you can have better choices to go fanatic.
●You can find varieties of attractive templates for your business and personal needs without any worries.
●It is easy to customize as well as edit the templates as per your convenient so that you can focus on your attractive ideas.
The Slideshows are more capable of easily sums-up your trip or an event with some beautiful moments in an organised way to put things all-together.”Aesthetics” is not just about design style, instead it is a lifestyle and when you are making use of PowerPoint slideshow templates there should be some room for the trends, retro or a vintage style. By having aesthetically designed templates for the Google Slides & PowerPoint, you can have better opportunity to highlight the desired information in an attractive and beautiful manner.

Whether it is about representing your company or organization with beautiful contents or making a slideshow for your loved ones on their special occasion, aesthetic designed templates can overcome the complications in an organized and memorable manner.When it comes to enhancing productivity in a creative manner then coming up with the professional-looking presentations can help you to draw attention to your audience.
Part 1 Best Slideshow Video Templates
No matter what sort of topic you choose, a great looking and successful video presentation mainly depends on the key factors namely: PowerPoint’s designing tools, the attention to presentation process by the speaker or presenter, and devotion to the consistent styling.This is the reason it comes really important for you to get through with the process of making PowerPoint Slide Show right from the group but with addition of little bit of creativity. The templates can make your PowerPoint slideshow much more attractive.

Here is what you are going to get with the help of best possible slide show PowerPoint templates that you can use for business presentation or any other relevant event.
So, lets for go for it.
For Free
These 6 free slideshow templates can let you amaze each & everyone in your audience.
01Surprise Birthday Video Template
Make use of this template to amaze each & everyone in just a few clicks. The surprise birthdaySlideshow presentationtemplate can allow you to design as well as organize surprised, memorable parties with lots of fun.
02Rainbow Gradients Template
Comes with colourful backgrounds & some abstract gradients, it is perfect for making your presentation astounding in no time. In terms of giving you originality, this rainbow template is creative, artistic and much more smoothening to the eyes.
03Composition Book Template
Among the list of free slideshow templates, the composition book presentation template is capable of placing the contents in terms of ruled book pages. You can make use of this template to highlight educational importance, talk about education or write exercises for your students in a funny manner.

04Neutral Colours based Presentation Theme
Don’t want to be overcomplicated in terms of designing? Then it is the perfect template to consider for your presentation in order to stand out among the competition. Grilled with natural colours, strong images and clearer composition based slideshow designsthis will help you to convey better information in terms calm and composed manner to the desired audience.
05Vintage Moodboard Slides
All set to leave great impression on your audience with genuinely great presentation template with small details on every slide and to make it more unique you can customize it as per your needs.

06Birthday Card Presentation Template
The powerful and professionally oriented birthday designed template is fully handcrafted, for giving an organic feel. Just keep it simple by adapting any colour of your choice, layout with some customizable pages for the agendas, ideas and topics on your loved one’s birthday.
For Paid
With this collection of premium Google Slides and PowerPoint templates you can easily steal the show for both personal and commercial usages.
07Realistic Galaxy Consulting-Toolkit
Why limiting yourself to customers from planet Earth when you can be the best company in the entire Milky Way? But to aim that high, you’ll need the help

08Corporate Typography Plus
You will be amazed by how much typography one can do with this template. In terms of mixing as well as matching charts, text you can define stories on a pretty serious notes. It is a data drive template for the professionals.
09Aqua Marketing
The aqua marketing plan can clearly put some impact to your contents; you can trust this template for instantly appealing water-colour details in the best possible manner.
10Pastel Portfolio
If there is any creative portfolio which can open a lot of opportunities for your contents more than your imagination then, it is Pastel Portfolio template. You can easily showcase your skills and working style.

11Minimalist Korean Aesthetic Pitch Deck Presentation
This template is based on the minimalist style and usually comes with varieties of shades for the business presentations and clearly capable of making your audience focus on relatable contents.
12College Candy Aesthetics
The explosion of colours will welcome you, the moment you started using this template. It is a perfect blend of “aesthetics” style which is super cool & capable of shaking latest trends in the market for art. With subscription you can edit as well as add much more information apart from its free version.
Why not go for Filmora Wonderful from which you can make amazing slideshows with blend of custom audio and video?
Well Filmora is pretty awesome for Making your Presentation much more convenient and unique in all perspectives and comes with features like:-
● Entirely customizable slides
● Comes in different nodes & colors.
● Slides here are available in 16:9 as well as 4:3 format.
● You can easily change slide colours quickly.
● Get access to well-crafted templates with instant facility to download it.
● Some Pre-designed templates to help you in making it much more engaging and convenient as per the presentation.
● Best designed templatesto use in the market for special occasions
Part 2 5 Slideshow Websites to Help You Find Aesthetic Slideshow
The slideshow design for PowerPointis really time consuming &you need to create slides right from the scratch. If you are not into a mood of spending so much time in slideshow designs then with thousands of templates already present in the market you can save your time and efforts.

Here, the list of five slideshows, describe various number of slideshow templates designing resources to use so that you can download beautiful as well as professionally designed slideshow templates not just for the PowerPoint, but also for the Keynote &Google Slides.
01Power-User: Range Of Attractive Templates To Use In Offline Mode Directly
The Power-user is one of the most powerful add-onscrafted by the experts for PowerPoint and easily let you browse &insert varieties of attractive templates directly to your presentations.
With access to one million plus pictures, 250 editable maps and around 6,000 icons, charts, diagrams etc. you are getting a tool to save your time for the excel.
02Slide Model: Professionally Designed Templates &Themes
It’s aslideshow websitewith thirty thousand PowerPoint templates that are designed professionally to use for increasing the productivity and quality. You will get unlimited downloads for the 1st year with a subscription. When it comes to design a presentation with a minimal efforts, then simply download a preferred template from this website.
03Powered Template: Outstanding Powerpoint Templates
You will get access to a wide range of entirely royalty-free, attractively designed Google Slides and PowerPoint templates for the business making presentations or for the personal use. You can choose either a free plan or go with the subscription plan.
04Envato Elements: Professionally Implemented Templates By Designers
Right from the creative group of people or community, you will get access to wide range of visual elements on a monthly subscription with features of unlimited downloads& wide range of cataloguethat contains 300,000 plus stock photos & around 34,000 and more graphic assets. You can also download the whole presentation for the specified topics like investor pitch, sales presentation, Real-Estate project, etc. that can be used as a template for Slideshow PowerPoint.
05Aiippt.Com: Free Access To Powerpoint Templates, Diagrams And Designs
Thisslide show websitecan surely help for you to find a perfect match for the Aesthetic Slideshows. AIPPT is a great tool for providing value to your slide show at free of cost. Availability of delivering backgrounds, cover pages for the presentation in terms of real templates really makes it look beautiful. With some interesting elements you can adjust the template as per your needs.
Part 3 FAQ of Slideshow Templates
The ultimate goal of the PowerPoint templates is to deliver solutions to the customer’s queries with a straightforward approach. Slideshow templates are meant to give attractive features to the PowerPoint Presentation. One can easily comply with the updating as well as editing of the template following your taste. With some striking background themes & well-designed presentation templates, you can make your presentation looks even much more eye-catching to truly amaze the audience.
Here are a few FAQs about PowerPoint templates to help you in understanding Aesthetic slideshows:-
How to make an aesthetic slideshow?
You can make use of PowerPoint slideshow templates available in order to effortlessly apply attractive themes, subtle shades of highlighted pictures, and minimalistic text-based designs/fonts in your slides.
Which one is the best tool for creating an aesthetic slideshow?
If you want to have an all-rounder application for taking care of your designing needs with great tools and amazing features of its own then Filmora is the best you can have. With aesthetically pleasing templates, you can access almost 600 plus filters, innumerable templates, and effects with uncountable features in order to make your PowerPoint slides minimalistic & aesthetic.
How to use Filmora for aesthetic slideshow making?
With several varieties of Slideshow templates, Wondershare Filmora Video Editor reflects an idea of minimalistic design. You can make use of filters in order to provide a subtle pastel tone to the existing slides. Also, multiple motion control benefits & fonts available on the help can clearly make a huge difference in providing an aesthetically pleasing slideshow design.
For Win 7 or later (64-bit)
For macOS 10.12 or later
● Ending Thoughts →
● Creating a good looking PowerPoint presentation is a skill that professionals are using it to take the benefit. It is really easy for anyone to go wrong, but with custom designed templates you can have better choices to go fanatic.
●You can find varieties of attractive templates for your business and personal needs without any worries.
●It is easy to customize as well as edit the templates as per your convenient so that you can focus on your attractive ideas.
The Slideshows are more capable of easily sums-up your trip or an event with some beautiful moments in an organised way to put things all-together.”Aesthetics” is not just about design style, instead it is a lifestyle and when you are making use of PowerPoint slideshow templates there should be some room for the trends, retro or a vintage style. By having aesthetically designed templates for the Google Slides & PowerPoint, you can have better opportunity to highlight the desired information in an attractive and beautiful manner.

Whether it is about representing your company or organization with beautiful contents or making a slideshow for your loved ones on their special occasion, aesthetic designed templates can overcome the complications in an organized and memorable manner.When it comes to enhancing productivity in a creative manner then coming up with the professional-looking presentations can help you to draw attention to your audience.
Part 1 Best Slideshow Video Templates
No matter what sort of topic you choose, a great looking and successful video presentation mainly depends on the key factors namely: PowerPoint’s designing tools, the attention to presentation process by the speaker or presenter, and devotion to the consistent styling.This is the reason it comes really important for you to get through with the process of making PowerPoint Slide Show right from the group but with addition of little bit of creativity. The templates can make your PowerPoint slideshow much more attractive.

Here is what you are going to get with the help of best possible slide show PowerPoint templates that you can use for business presentation or any other relevant event.
So, lets for go for it.
For Free
These 6 free slideshow templates can let you amaze each & everyone in your audience.
01Surprise Birthday Video Template
Make use of this template to amaze each & everyone in just a few clicks. The surprise birthdaySlideshow presentationtemplate can allow you to design as well as organize surprised, memorable parties with lots of fun.
02Rainbow Gradients Template
Comes with colourful backgrounds & some abstract gradients, it is perfect for making your presentation astounding in no time. In terms of giving you originality, this rainbow template is creative, artistic and much more smoothening to the eyes.
03Composition Book Template
Among the list of free slideshow templates, the composition book presentation template is capable of placing the contents in terms of ruled book pages. You can make use of this template to highlight educational importance, talk about education or write exercises for your students in a funny manner.

04Neutral Colours based Presentation Theme
Don’t want to be overcomplicated in terms of designing? Then it is the perfect template to consider for your presentation in order to stand out among the competition. Grilled with natural colours, strong images and clearer composition based slideshow designsthis will help you to convey better information in terms calm and composed manner to the desired audience.
05Vintage Moodboard Slides
All set to leave great impression on your audience with genuinely great presentation template with small details on every slide and to make it more unique you can customize it as per your needs.

06Birthday Card Presentation Template
The powerful and professionally oriented birthday designed template is fully handcrafted, for giving an organic feel. Just keep it simple by adapting any colour of your choice, layout with some customizable pages for the agendas, ideas and topics on your loved one’s birthday.
For Paid
With this collection of premium Google Slides and PowerPoint templates you can easily steal the show for both personal and commercial usages.
07Realistic Galaxy Consulting-Toolkit
Why limiting yourself to customers from planet Earth when you can be the best company in the entire Milky Way? But to aim that high, you’ll need the help

08Corporate Typography Plus
You will be amazed by how much typography one can do with this template. In terms of mixing as well as matching charts, text you can define stories on a pretty serious notes. It is a data drive template for the professionals.
09Aqua Marketing
The aqua marketing plan can clearly put some impact to your contents; you can trust this template for instantly appealing water-colour details in the best possible manner.
10Pastel Portfolio
If there is any creative portfolio which can open a lot of opportunities for your contents more than your imagination then, it is Pastel Portfolio template. You can easily showcase your skills and working style.

11Minimalist Korean Aesthetic Pitch Deck Presentation
This template is based on the minimalist style and usually comes with varieties of shades for the business presentations and clearly capable of making your audience focus on relatable contents.
12College Candy Aesthetics
The explosion of colours will welcome you, the moment you started using this template. It is a perfect blend of “aesthetics” style which is super cool & capable of shaking latest trends in the market for art. With subscription you can edit as well as add much more information apart from its free version.
Why not go for Filmora Wonderful from which you can make amazing slideshows with blend of custom audio and video?
Well Filmora is pretty awesome for Making your Presentation much more convenient and unique in all perspectives and comes with features like:-
● Entirely customizable slides
● Comes in different nodes & colors.
● Slides here are available in 16:9 as well as 4:3 format.
● You can easily change slide colours quickly.
● Get access to well-crafted templates with instant facility to download it.
● Some Pre-designed templates to help you in making it much more engaging and convenient as per the presentation.
● Best designed templatesto use in the market for special occasions
Part 2 5 Slideshow Websites to Help You Find Aesthetic Slideshow
The slideshow design for PowerPointis really time consuming &you need to create slides right from the scratch. If you are not into a mood of spending so much time in slideshow designs then with thousands of templates already present in the market you can save your time and efforts.

Here, the list of five slideshows, describe various number of slideshow templates designing resources to use so that you can download beautiful as well as professionally designed slideshow templates not just for the PowerPoint, but also for the Keynote &Google Slides.
01Power-User: Range Of Attractive Templates To Use In Offline Mode Directly
The Power-user is one of the most powerful add-onscrafted by the experts for PowerPoint and easily let you browse &insert varieties of attractive templates directly to your presentations.
With access to one million plus pictures, 250 editable maps and around 6,000 icons, charts, diagrams etc. you are getting a tool to save your time for the excel.
02Slide Model: Professionally Designed Templates &Themes
It’s aslideshow websitewith thirty thousand PowerPoint templates that are designed professionally to use for increasing the productivity and quality. You will get unlimited downloads for the 1st year with a subscription. When it comes to design a presentation with a minimal efforts, then simply download a preferred template from this website.
03Powered Template: Outstanding Powerpoint Templates
You will get access to a wide range of entirely royalty-free, attractively designed Google Slides and PowerPoint templates for the business making presentations or for the personal use. You can choose either a free plan or go with the subscription plan.
04Envato Elements: Professionally Implemented Templates By Designers
Right from the creative group of people or community, you will get access to wide range of visual elements on a monthly subscription with features of unlimited downloads& wide range of cataloguethat contains 300,000 plus stock photos & around 34,000 and more graphic assets. You can also download the whole presentation for the specified topics like investor pitch, sales presentation, Real-Estate project, etc. that can be used as a template for Slideshow PowerPoint.
05Aiippt.Com: Free Access To Powerpoint Templates, Diagrams And Designs
Thisslide show websitecan surely help for you to find a perfect match for the Aesthetic Slideshows. AIPPT is a great tool for providing value to your slide show at free of cost. Availability of delivering backgrounds, cover pages for the presentation in terms of real templates really makes it look beautiful. With some interesting elements you can adjust the template as per your needs.
Part 3 FAQ of Slideshow Templates
The ultimate goal of the PowerPoint templates is to deliver solutions to the customer’s queries with a straightforward approach. Slideshow templates are meant to give attractive features to the PowerPoint Presentation. One can easily comply with the updating as well as editing of the template following your taste. With some striking background themes & well-designed presentation templates, you can make your presentation looks even much more eye-catching to truly amaze the audience.
Here are a few FAQs about PowerPoint templates to help you in understanding Aesthetic slideshows:-
How to make an aesthetic slideshow?
You can make use of PowerPoint slideshow templates available in order to effortlessly apply attractive themes, subtle shades of highlighted pictures, and minimalistic text-based designs/fonts in your slides.
Which one is the best tool for creating an aesthetic slideshow?
If you want to have an all-rounder application for taking care of your designing needs with great tools and amazing features of its own then Filmora is the best you can have. With aesthetically pleasing templates, you can access almost 600 plus filters, innumerable templates, and effects with uncountable features in order to make your PowerPoint slides minimalistic & aesthetic.
How to use Filmora for aesthetic slideshow making?
With several varieties of Slideshow templates, Wondershare Filmora Video Editor reflects an idea of minimalistic design. You can make use of filters in order to provide a subtle pastel tone to the existing slides. Also, multiple motion control benefits & fonts available on the help can clearly make a huge difference in providing an aesthetically pleasing slideshow design.
For Win 7 or later (64-bit)
For macOS 10.12 or later
● Ending Thoughts →
● Creating a good looking PowerPoint presentation is a skill that professionals are using it to take the benefit. It is really easy for anyone to go wrong, but with custom designed templates you can have better choices to go fanatic.
●You can find varieties of attractive templates for your business and personal needs without any worries.
●It is easy to customize as well as edit the templates as per your convenient so that you can focus on your attractive ideas.
The Slideshows are more capable of easily sums-up your trip or an event with some beautiful moments in an organised way to put things all-together.”Aesthetics” is not just about design style, instead it is a lifestyle and when you are making use of PowerPoint slideshow templates there should be some room for the trends, retro or a vintage style. By having aesthetically designed templates for the Google Slides & PowerPoint, you can have better opportunity to highlight the desired information in an attractive and beautiful manner.

Whether it is about representing your company or organization with beautiful contents or making a slideshow for your loved ones on their special occasion, aesthetic designed templates can overcome the complications in an organized and memorable manner.When it comes to enhancing productivity in a creative manner then coming up with the professional-looking presentations can help you to draw attention to your audience.
Part 1 Best Slideshow Video Templates
No matter what sort of topic you choose, a great looking and successful video presentation mainly depends on the key factors namely: PowerPoint’s designing tools, the attention to presentation process by the speaker or presenter, and devotion to the consistent styling.This is the reason it comes really important for you to get through with the process of making PowerPoint Slide Show right from the group but with addition of little bit of creativity. The templates can make your PowerPoint slideshow much more attractive.

Here is what you are going to get with the help of best possible slide show PowerPoint templates that you can use for business presentation or any other relevant event.
So, lets for go for it.
For Free
These 6 free slideshow templates can let you amaze each & everyone in your audience.
01Surprise Birthday Video Template
Make use of this template to amaze each & everyone in just a few clicks. The surprise birthdaySlideshow presentationtemplate can allow you to design as well as organize surprised, memorable parties with lots of fun.
02Rainbow Gradients Template
Comes with colourful backgrounds & some abstract gradients, it is perfect for making your presentation astounding in no time. In terms of giving you originality, this rainbow template is creative, artistic and much more smoothening to the eyes.
03Composition Book Template
Among the list of free slideshow templates, the composition book presentation template is capable of placing the contents in terms of ruled book pages. You can make use of this template to highlight educational importance, talk about education or write exercises for your students in a funny manner.

04Neutral Colours based Presentation Theme
Don’t want to be overcomplicated in terms of designing? Then it is the perfect template to consider for your presentation in order to stand out among the competition. Grilled with natural colours, strong images and clearer composition based slideshow designsthis will help you to convey better information in terms calm and composed manner to the desired audience.
05Vintage Moodboard Slides
All set to leave great impression on your audience with genuinely great presentation template with small details on every slide and to make it more unique you can customize it as per your needs.

06Birthday Card Presentation Template
The powerful and professionally oriented birthday designed template is fully handcrafted, for giving an organic feel. Just keep it simple by adapting any colour of your choice, layout with some customizable pages for the agendas, ideas and topics on your loved one’s birthday.
For Paid
With this collection of premium Google Slides and PowerPoint templates you can easily steal the show for both personal and commercial usages.
07Realistic Galaxy Consulting-Toolkit
Why limiting yourself to customers from planet Earth when you can be the best company in the entire Milky Way? But to aim that high, you’ll need the help

08Corporate Typography Plus
You will be amazed by how much typography one can do with this template. In terms of mixing as well as matching charts, text you can define stories on a pretty serious notes. It is a data drive template for the professionals.
09Aqua Marketing
The aqua marketing plan can clearly put some impact to your contents; you can trust this template for instantly appealing water-colour details in the best possible manner.
10Pastel Portfolio
If there is any creative portfolio which can open a lot of opportunities for your contents more than your imagination then, it is Pastel Portfolio template. You can easily showcase your skills and working style.

11Minimalist Korean Aesthetic Pitch Deck Presentation
This template is based on the minimalist style and usually comes with varieties of shades for the business presentations and clearly capable of making your audience focus on relatable contents.
12College Candy Aesthetics
The explosion of colours will welcome you, the moment you started using this template. It is a perfect blend of “aesthetics” style which is super cool & capable of shaking latest trends in the market for art. With subscription you can edit as well as add much more information apart from its free version.
Why not go for Filmora Wonderful from which you can make amazing slideshows with blend of custom audio and video?
Well Filmora is pretty awesome for Making your Presentation much more convenient and unique in all perspectives and comes with features like:-
● Entirely customizable slides
● Comes in different nodes & colors.
● Slides here are available in 16:9 as well as 4:3 format.
● You can easily change slide colours quickly.
● Get access to well-crafted templates with instant facility to download it.
● Some Pre-designed templates to help you in making it much more engaging and convenient as per the presentation.
● Best designed templatesto use in the market for special occasions
Part 2 5 Slideshow Websites to Help You Find Aesthetic Slideshow
The slideshow design for PowerPointis really time consuming &you need to create slides right from the scratch. If you are not into a mood of spending so much time in slideshow designs then with thousands of templates already present in the market you can save your time and efforts.

Here, the list of five slideshows, describe various number of slideshow templates designing resources to use so that you can download beautiful as well as professionally designed slideshow templates not just for the PowerPoint, but also for the Keynote &Google Slides.
01Power-User: Range Of Attractive Templates To Use In Offline Mode Directly
The Power-user is one of the most powerful add-onscrafted by the experts for PowerPoint and easily let you browse &insert varieties of attractive templates directly to your presentations.
With access to one million plus pictures, 250 editable maps and around 6,000 icons, charts, diagrams etc. you are getting a tool to save your time for the excel.
02Slide Model: Professionally Designed Templates &Themes
It’s aslideshow websitewith thirty thousand PowerPoint templates that are designed professionally to use for increasing the productivity and quality. You will get unlimited downloads for the 1st year with a subscription. When it comes to design a presentation with a minimal efforts, then simply download a preferred template from this website.
03Powered Template: Outstanding Powerpoint Templates
You will get access to a wide range of entirely royalty-free, attractively designed Google Slides and PowerPoint templates for the business making presentations or for the personal use. You can choose either a free plan or go with the subscription plan.
04Envato Elements: Professionally Implemented Templates By Designers
Right from the creative group of people or community, you will get access to wide range of visual elements on a monthly subscription with features of unlimited downloads& wide range of cataloguethat contains 300,000 plus stock photos & around 34,000 and more graphic assets. You can also download the whole presentation for the specified topics like investor pitch, sales presentation, Real-Estate project, etc. that can be used as a template for Slideshow PowerPoint.
05Aiippt.Com: Free Access To Powerpoint Templates, Diagrams And Designs
Thisslide show websitecan surely help for you to find a perfect match for the Aesthetic Slideshows. AIPPT is a great tool for providing value to your slide show at free of cost. Availability of delivering backgrounds, cover pages for the presentation in terms of real templates really makes it look beautiful. With some interesting elements you can adjust the template as per your needs.
Part 3 FAQ of Slideshow Templates
The ultimate goal of the PowerPoint templates is to deliver solutions to the customer’s queries with a straightforward approach. Slideshow templates are meant to give attractive features to the PowerPoint Presentation. One can easily comply with the updating as well as editing of the template following your taste. With some striking background themes & well-designed presentation templates, you can make your presentation looks even much more eye-catching to truly amaze the audience.
Here are a few FAQs about PowerPoint templates to help you in understanding Aesthetic slideshows:-
How to make an aesthetic slideshow?
You can make use of PowerPoint slideshow templates available in order to effortlessly apply attractive themes, subtle shades of highlighted pictures, and minimalistic text-based designs/fonts in your slides.
Which one is the best tool for creating an aesthetic slideshow?
If you want to have an all-rounder application for taking care of your designing needs with great tools and amazing features of its own then Filmora is the best you can have. With aesthetically pleasing templates, you can access almost 600 plus filters, innumerable templates, and effects with uncountable features in order to make your PowerPoint slides minimalistic & aesthetic.
How to use Filmora for aesthetic slideshow making?
With several varieties of Slideshow templates, Wondershare Filmora Video Editor reflects an idea of minimalistic design. You can make use of filters in order to provide a subtle pastel tone to the existing slides. Also, multiple motion control benefits & fonts available on the help can clearly make a huge difference in providing an aesthetically pleasing slideshow design.
For Win 7 or later (64-bit)
For macOS 10.12 or later
● Ending Thoughts →
● Creating a good looking PowerPoint presentation is a skill that professionals are using it to take the benefit. It is really easy for anyone to go wrong, but with custom designed templates you can have better choices to go fanatic.
●You can find varieties of attractive templates for your business and personal needs without any worries.
●It is easy to customize as well as edit the templates as per your convenient so that you can focus on your attractive ideas.
| How to Change Quicktime Player Speed on Mac?
Powerful Video Editor - Wondershare Filmora
An easy and powerful editor
Numerous effects to choose from
Detailed tutorials are provided by the official channel
Quicktime Player is an Apple Inc. software that is compatible with all current versions of macOS X as well as Windows.
The user interface of the Quicktime media player is straightforward to navigate. The majority of video formats may be supported, as well. Like VLC, you can quickly speed up or slow down videos with Quicktime player using specific hotkeys or by manually altering the speed of the video.

A broad number of formats may be handled by QuickTime, including music, graphics, and panoramic photography. All of your music and video files will play without a hitch, and it is a fully complete media player.
Many customers buy a Mac computer and instantly install QuickTime, the default video player, under the notion that it is a basic video player with few additional functions. In fact, the QuickTime player has a slew of hidden functions that are pretty useful, but only a few people are aware of it. The option to increase the Quicktime player speed is one of these hidden features’ which is most popular and helpful. This is particularly true if you have to sit through a presentation or lecture.
How to Speed up Videos in Quicktime Player?
If you want to watch your movies on Quicktime player as quickly as possible, go with a long-term solution. The pace of the clip may be raised or lowered from the toolbar, and the settings of the application can be altered.
Thus, in easy words when you download a video to your Mac, you can control the speed at which it plays back on your computer using Quicktime player.

There are two ways to achieve this goal, one is manually through settings whereas the second way is using hotkeys. Let’s discuss both by understanding how to increase QuickTime player speed manually.
Manually Setting Up Quicktime player speed
- Open the Quicktime player installed on your computer.
- Embedding video within the interface is recommended.
- Go to the Toolbar and choose the Windows tab from the drop-down menu.
- To access the A/V controls, press the A/V Controls button. There will be a dialogue box that appears.
- Locate the Playback Speed option and adjust the speed of the movie by increasing or decreasing it.
- Close the box and go to watch the video in its entirety.
Speeding Up playback Speed Quicktime Using Hotkeys
- There isn’t a special hotkey for Quicktime that allows you to speed up or slow down the video. Using your mouse and keyboard, on the other hand, you may do the task in an instant.
- Open the video in the Quicktime Player on your computer by clicking on it.
- Play the video clip, and then hit the “OPTIONS” key on your keyboard to stop it.
- Press the Fast Forward button on the player and the left mouse button at the same time. It will speed up the pace at which the video is played back.
- The tap will cause a 1.1x choice to appear at the top of the screen.

Increasing the speed is accomplished by repeatedly clicking until the desired speed is achieved.
However, keep in mind that there has been a glitch that has existed for years that causes the audio to stop working after you reach 2x speed. To get around this problem, just accelerate to 1.9x and then stop.
If you come across anything you like and want to view it again, you may stop the video by pressing the space bar twice. However, pressing the spacebar will cause the playing speed to be reset.
How to Slow Down Videos in Quicktime Player?
When viewing a movie on your Mac, you may discover that you need to slow it down on a frequent basis. You may discover a range of slow down video editing tools that can help you slow down a video on the internet. Furthermore, various video players may be able to let you quickly slow down your movie. QuickTime Player is one of those programs that may be customized to your individual needs.
We sometimes overlook the enormous capacity inherent inside the dependable and dependable QuickTime Player. QuickTime contains a number of key capabilities meant to help you deal with your media files and play video and audio files.
Steps to follow to slow down Quicktime Player speed
Like speeding up the QuickTime playback speed, the users can simultaneously slow down the playback speed as well. It can be done manually and through the use of specific keys already present on the keyboard.
Manual Setup
In order to manually slowdown QuickTime video, follow the below-mentioned steps:
- Launch the Quicktime player application
- Click on “File” and choose the video which is already saved or downloaded on your MAC.
- Once the video is loaded in the Quicktime player, click on “View” on the toolbar on the top.
- As you click on “View”, a drop-down menu will appear. Locate the “Playback speed” option from the drop-down menu.

- When you click on “Playback speed”, another dialogue box will appear right next to the drop-down menu, which will have options regarding the playback speed.

- Click on “Half speed” and press the play button to watch the video with a slower playback rate.

Slowdown QuickTime speed using Hotkeys
- Open the video or the clip you want to watch.
- If Quicktime is your default player, the video loads in it.
- Otherwise, launch the QuickTime application
- By clicking on “Open”, choose your specific clip or video.
- Once the video is loaded, press the ““OPTIONS”” key next to cmd and simultaneously press the rewind button on the task bar of Quicktime. It starts to slow down the playback speed of the video.
What If Quicktime Player Speed up With No Sound?
No sound may be heard when the video is played back if it was encoded in a format that QuickTime cannot understand. Verifying your QuickTime installation is the most obvious way to find out whether it has decoded all of the video files. Let’s investigate the issue to its root.
Updating Your Quicktime to the Latest Version
The user must carefully study the QuickTime player. For some reason, your QuickTime behaviour is out of whack.
People often neglect to keep their QuickTime software up-to-date, which results in problems with video playback, such as no sound or stuttering, among many other things. To fix this issue, just download and install the most latest release of QuickTime player.
Examine the System and Driver
Faulty speakers, audio issues in the system, and update failures will ultimately cause media playback difficulties.
To find the root cause, you should first check internally to see whether your speakers are working correctly. Speaking straight to Siri and hearing her reaction is the fastest and most straightforward option.
Another reason you may be hearing no sound on QuickTime is because of a recent system update. Apple, as we all know, often releases new operating systems, and you must keep track of the most current versions of updates in order to keep your system running effectively.
You just need to ensure that your machine is running the most recent version. As a result, your system will resume regular functioning, and QuickTime will be immediately fixed and restored.
Inspect if the File is Corrupted or not
Checking the file to see whether it has been corrupted is a good idea regardless of whether QuickTime and your system are up and running. To make matters worse, the lack of sound in QuickTime will be the consequence of a corrupted video file.
Try opening the file in a different programme or player to see if the issue may be resolved. If this is the case, your source video file is either destroyed or corrupted. You may wish to consider regaining access to the file in this situation. The likelihood of your file being corrupted by malware or a virus is relatively high. Remember to be patient if this does happen to you.
It is necessary to use third-party repair programmes to successfully fix the file. Consequently, using third-party software to recover and restore the source file should be considered if you are in a situation where the source file is crucial and do not have a backup. As we’ll see, there are a number of options available, including Filmora.
How to Play Videos at 2X Speed with Sound in Quicktime?
Follow the below-mentioned steps to play video at 2x speed with sound in Quicktime:
- Launch QuickTime.
- Click on Edit, which is located on the toolbar on the top. A drop-down menu will appear.
- From the drop-down menu, click on QuickTime Preferences.
- Then select Audio from the dialogue box.
- Then moving forward, change the music synthesizer to Promethean Audio Device, Promethean USB Audio or USB Audio Device. These options might vary depending on the user’s specific hardware.
- Click on Apply and then OK.
Use Quick Time Features in Filmora
What is Wondershare Filmora?
For users to quickly and easily create high-quality films using a variety of sophisticated editing tools, Wondershare Filmora provides an extensive set of powerful tools for video editors. Wondershare Filmora’s user-friendly interface makes it easy for anybody to become an expert video editor on Mac .
In addition to the usual video effects, Wondershare Filmora provides filters, animated components, and other video effects. In order to alter a movie, you may use filters and overlays to add a variety of effects and graphic overlays. There are several options for titles, openers, and bottom thirds to pick from in Wondershare Filmora.

Using Wondershare Filmora’s drag and drop, users may include moving graphics into their movies. Additionally, users may quickly combine many videos and photographs and choose the good royalty-free music from a wide range of options, all in one spot.
Among the many functions offered by Wondershare Filmora include the ability to edit in 4K and GIF format, noise reduction and colour correction, and an advanced text editor and an audio mixer. A wide range of operating systems can run Wondershare Filmora.
Although there are many other video editors out there vying for attention, Wondershare has been one of the few that has managed to stay relevant in an increasingly competitive industry saturated with old and new video editors all competing for the same consumer base.
Unique and Distinct Features of Filmora
Software is not nearly as good if it does not have the appropriate set of functionalities, and most users will not bother to use it if it does not include these features. Listed here are the most eagerly anticipated features of Filmora’s latest version:
Motion Tracking
The Motion Tracking module enables you to identify an object or point inside a video and then have the computer track that object or point to generate a moving path.
It allows you to capture the motion of a moving object in the frame and add text, subtitles, effects, and other components to the frame that follow the moving object’s motion as it moves around the screen. After you’ve constructed that path, you may link any other item to it and have it follow the initial object.
Colour Matching Feature
This team has always considered that Filmora’s colour grading and correction tools were excellent, but their most recent addition to the ‘Color Matching’ program has garnered them even more praise.
Colour matching is crucial when trying to merge several video images obtained by two different cameras. In this semi-automated module, you may match video from multiple sources or footage acquired at different times of day with one another.
Keyframing Feature
Keyframing is an essential feature for users who wish to boost the appeal of their video by incorporating critical animation sequences throughout the film.
It enables you to create custom animations and have fine-grained control over the effects you apply to your projects via the use of keyframes.
Keyframing becomes critical when creating special effects, custom title cards at the beginning or middle of a film or conjuring precise paths for visuals or picture-in-picture movies to follow.
Audio Ducking
Audio ducking is a method used in video editing and production that allows the narrator’s voice to be heard consistently and clearly over other sounds on the recording that are happening at the same time, such as background music, without being dominated.
Transitions and Vast Amount of Effects
Over 300 special effects, objects, overlays, transitions, and music and audio effects are available whenever and wherever you need them. The bundle includes 25 sound effects and 26 royalty-free recordings, making it a complete package.
Then there are 176 transitions, each of which may be customized to liven up your project. You may also alter and manipulate visuals and text to make your project more aesthetically appealing.
Hardcore Video Editing
Moving on to the heart of this application, Filmora latest version’s video editing features are both excellent and user-friendly. [pagebreak] The editing options in Filmora are comprehensive, with the most noticeable being cutting, audio manipulation, transition creation, visual effects, and a plethora of additional features and functions.
The above editing functions are simple to carry out by selecting a specific section of the video on your timeline, double-clicking it, waiting for it to appear in the preview section, and then applying effects and transitions, adding audio, stabilizing and correcting the video using any of the editing options available to you.
Simplified Exporting Of Your Masterpiece
Exporting a finished project is as simple as any other activity in Filmora latest version. Indeed, the option to export your completed project is clearly presented on the main page and instantly visible to the human eye. After you’ve completed making changes, all you have to do is click the ‘Export’ button.
How to change video playback speed in Filmora
When using fast-motion/slow-motion effects on a video, the clips are sped up or slowed down in comparison to their original speed.
If you’re looking for a “close up in time,” the slow-motion effect may be the best choice, while the fast-forward effect may be used to produce dramatic or amusing videos.
Filmora is widely praised and utilized by professionals throughout the globe because of its user-friendly design and uncomplicated editing features. For this, it is often chosen over other editing programs.
Steps
Follow the below-mentioned steps to change video speed in Filmora:
- A wide range of video formats is supported by Wondershare Filmora, including MP4 and AVI, WMV and MOV, and FLV and M4V, etc. Enter the media library and click Import to import videos from your PC. The software will use the video files on your computer. Drag and drop is also an option for adding files to the User’s Album.

- Right-click on the video track on the Timeline and then drag movies from your User’s Album into it to access the Speed and Duration choices.

- A pop-up window will be shown. The rapidity or sluggishness of the motion effects is denoted by speed numbers. Then you may go at your own speed. Just click on the preview box to test out effects like sped-up or slowed-down videos. 0.5 speed is a good choice if you think it’s too much.

Video playback speed similarly affects the audio playback speed. Delete the video’s audio if you want to maintain the original playing speed of the video’s audio.
You must first double-click the audio clip in the audio editing window in order to adjust it. Adding and deleting fade in/out effects and reducing background noise are all options.
After you’ve finished adjusting the video speed, click Export. To save your movie in a standard format, just choose Format from the File menu.

It’s also possible to publish your videos to YouTube and Vimeo or create a DVD if you’d like.
Choose Device from the drop-down box and choose the proper symbol to view your new video output on your iPod, iPhone, or iPad.
Conclusion
While watching a movie, you may want the audio to be slower or faster, and you may want to adjust the atmosphere with the help of the music track, either when merely a soundtrack is being played or while a movie is being watched. This article, which includes images, explains in great detail how Mac users can achieve this using playback speed Quicktime. It also explains how to alter the speed at which a video play by in Filmora. Filmora has a variety of easy and advanced editing options, as well as video effects like slow motion and fast motion.
Quicktime Player is an Apple Inc. software that is compatible with all current versions of macOS X as well as Windows.
The user interface of the Quicktime media player is straightforward to navigate. The majority of video formats may be supported, as well. Like VLC, you can quickly speed up or slow down videos with Quicktime player using specific hotkeys or by manually altering the speed of the video.

A broad number of formats may be handled by QuickTime, including music, graphics, and panoramic photography. All of your music and video files will play without a hitch, and it is a fully complete media player.
Many customers buy a Mac computer and instantly install QuickTime, the default video player, under the notion that it is a basic video player with few additional functions. In fact, the QuickTime player has a slew of hidden functions that are pretty useful, but only a few people are aware of it. The option to increase the Quicktime player speed is one of these hidden features’ which is most popular and helpful. This is particularly true if you have to sit through a presentation or lecture.
How to Speed up Videos in Quicktime Player?
If you want to watch your movies on Quicktime player as quickly as possible, go with a long-term solution. The pace of the clip may be raised or lowered from the toolbar, and the settings of the application can be altered.
Thus, in easy words when you download a video to your Mac, you can control the speed at which it plays back on your computer using Quicktime player.

There are two ways to achieve this goal, one is manually through settings whereas the second way is using hotkeys. Let’s discuss both by understanding how to increase QuickTime player speed manually.
Manually Setting Up Quicktime player speed
- Open the Quicktime player installed on your computer.
- Embedding video within the interface is recommended.
- Go to the Toolbar and choose the Windows tab from the drop-down menu.
- To access the A/V controls, press the A/V Controls button. There will be a dialogue box that appears.
- Locate the Playback Speed option and adjust the speed of the movie by increasing or decreasing it.
- Close the box and go to watch the video in its entirety.
Speeding Up playback Speed Quicktime Using Hotkeys
- There isn’t a special hotkey for Quicktime that allows you to speed up or slow down the video. Using your mouse and keyboard, on the other hand, you may do the task in an instant.
- Open the video in the Quicktime Player on your computer by clicking on it.
- Play the video clip, and then hit the “OPTIONS” key on your keyboard to stop it.
- Press the Fast Forward button on the player and the left mouse button at the same time. It will speed up the pace at which the video is played back.
- The tap will cause a 1.1x choice to appear at the top of the screen.

Increasing the speed is accomplished by repeatedly clicking until the desired speed is achieved.
However, keep in mind that there has been a glitch that has existed for years that causes the audio to stop working after you reach 2x speed. To get around this problem, just accelerate to 1.9x and then stop.
If you come across anything you like and want to view it again, you may stop the video by pressing the space bar twice. However, pressing the spacebar will cause the playing speed to be reset.
How to Slow Down Videos in Quicktime Player?
When viewing a movie on your Mac, you may discover that you need to slow it down on a frequent basis. You may discover a range of slow down video editing tools that can help you slow down a video on the internet. Furthermore, various video players may be able to let you quickly slow down your movie. QuickTime Player is one of those programs that may be customized to your individual needs.
We sometimes overlook the enormous capacity inherent inside the dependable and dependable QuickTime Player. QuickTime contains a number of key capabilities meant to help you deal with your media files and play video and audio files.
Steps to follow to slow down Quicktime Player speed
Like speeding up the QuickTime playback speed, the users can simultaneously slow down the playback speed as well. It can be done manually and through the use of specific keys already present on the keyboard.
Manual Setup
In order to manually slowdown QuickTime video, follow the below-mentioned steps:
- Launch the Quicktime player application
- Click on “File” and choose the video which is already saved or downloaded on your MAC.
- Once the video is loaded in the Quicktime player, click on “View” on the toolbar on the top.
- As you click on “View”, a drop-down menu will appear. Locate the “Playback speed” option from the drop-down menu.

- When you click on “Playback speed”, another dialogue box will appear right next to the drop-down menu, which will have options regarding the playback speed.

- Click on “Half speed” and press the play button to watch the video with a slower playback rate.

Slowdown QuickTime speed using Hotkeys
- Open the video or the clip you want to watch.
- If Quicktime is your default player, the video loads in it.
- Otherwise, launch the QuickTime application
- By clicking on “Open”, choose your specific clip or video.
- Once the video is loaded, press the ““OPTIONS”” key next to cmd and simultaneously press the rewind button on the task bar of Quicktime. It starts to slow down the playback speed of the video.
What If Quicktime Player Speed up With No Sound?
No sound may be heard when the video is played back if it was encoded in a format that QuickTime cannot understand. Verifying your QuickTime installation is the most obvious way to find out whether it has decoded all of the video files. Let’s investigate the issue to its root.
Updating Your Quicktime to the Latest Version
The user must carefully study the QuickTime player. For some reason, your QuickTime behaviour is out of whack.
People often neglect to keep their QuickTime software up-to-date, which results in problems with video playback, such as no sound or stuttering, among many other things. To fix this issue, just download and install the most latest release of QuickTime player.
Examine the System and Driver
Faulty speakers, audio issues in the system, and update failures will ultimately cause media playback difficulties.
To find the root cause, you should first check internally to see whether your speakers are working correctly. Speaking straight to Siri and hearing her reaction is the fastest and most straightforward option.
Another reason you may be hearing no sound on QuickTime is because of a recent system update. Apple, as we all know, often releases new operating systems, and you must keep track of the most current versions of updates in order to keep your system running effectively.
You just need to ensure that your machine is running the most recent version. As a result, your system will resume regular functioning, and QuickTime will be immediately fixed and restored.
Inspect if the File is Corrupted or not
Checking the file to see whether it has been corrupted is a good idea regardless of whether QuickTime and your system are up and running. To make matters worse, the lack of sound in QuickTime will be the consequence of a corrupted video file.
Try opening the file in a different programme or player to see if the issue may be resolved. If this is the case, your source video file is either destroyed or corrupted. You may wish to consider regaining access to the file in this situation. The likelihood of your file being corrupted by malware or a virus is relatively high. Remember to be patient if this does happen to you.
It is necessary to use third-party repair programmes to successfully fix the file. Consequently, using third-party software to recover and restore the source file should be considered if you are in a situation where the source file is crucial and do not have a backup. As we’ll see, there are a number of options available, including Filmora.
How to Play Videos at 2X Speed with Sound in Quicktime?
Follow the below-mentioned steps to play video at 2x speed with sound in Quicktime:
- Launch QuickTime.
- Click on Edit, which is located on the toolbar on the top. A drop-down menu will appear.
- From the drop-down menu, click on QuickTime Preferences.
- Then select Audio from the dialogue box.
- Then moving forward, change the music synthesizer to Promethean Audio Device, Promethean USB Audio or USB Audio Device. These options might vary depending on the user’s specific hardware.
- Click on Apply and then OK.
Use Quick Time Features in Filmora
What is Wondershare Filmora?
For users to quickly and easily create high-quality films using a variety of sophisticated editing tools, Wondershare Filmora provides an extensive set of powerful tools for video editors. Wondershare Filmora’s user-friendly interface makes it easy for anybody to become an expert video editor on Mac .
In addition to the usual video effects, Wondershare Filmora provides filters, animated components, and other video effects. In order to alter a movie, you may use filters and overlays to add a variety of effects and graphic overlays. There are several options for titles, openers, and bottom thirds to pick from in Wondershare Filmora.

Using Wondershare Filmora’s drag and drop, users may include moving graphics into their movies. Additionally, users may quickly combine many videos and photographs and choose the good royalty-free music from a wide range of options, all in one spot.
Among the many functions offered by Wondershare Filmora include the ability to edit in 4K and GIF format, noise reduction and colour correction, and an advanced text editor and an audio mixer. A wide range of operating systems can run Wondershare Filmora.
Although there are many other video editors out there vying for attention, Wondershare has been one of the few that has managed to stay relevant in an increasingly competitive industry saturated with old and new video editors all competing for the same consumer base.
Unique and Distinct Features of Filmora
Software is not nearly as good if it does not have the appropriate set of functionalities, and most users will not bother to use it if it does not include these features. Listed here are the most eagerly anticipated features of Filmora’s latest version:
Motion Tracking
The Motion Tracking module enables you to identify an object or point inside a video and then have the computer track that object or point to generate a moving path.
It allows you to capture the motion of a moving object in the frame and add text, subtitles, effects, and other components to the frame that follow the moving object’s motion as it moves around the screen. After you’ve constructed that path, you may link any other item to it and have it follow the initial object.
Colour Matching Feature
This team has always considered that Filmora’s colour grading and correction tools were excellent, but their most recent addition to the ‘Color Matching’ program has garnered them even more praise.
Colour matching is crucial when trying to merge several video images obtained by two different cameras. In this semi-automated module, you may match video from multiple sources or footage acquired at different times of day with one another.
Keyframing Feature
Keyframing is an essential feature for users who wish to boost the appeal of their video by incorporating critical animation sequences throughout the film.
It enables you to create custom animations and have fine-grained control over the effects you apply to your projects via the use of keyframes.
Keyframing becomes critical when creating special effects, custom title cards at the beginning or middle of a film or conjuring precise paths for visuals or picture-in-picture movies to follow.
Audio Ducking
Audio ducking is a method used in video editing and production that allows the narrator’s voice to be heard consistently and clearly over other sounds on the recording that are happening at the same time, such as background music, without being dominated.
Transitions and Vast Amount of Effects
Over 300 special effects, objects, overlays, transitions, and music and audio effects are available whenever and wherever you need them. The bundle includes 25 sound effects and 26 royalty-free recordings, making it a complete package.
Then there are 176 transitions, each of which may be customized to liven up your project. You may also alter and manipulate visuals and text to make your project more aesthetically appealing.
Hardcore Video Editing
Moving on to the heart of this application, Filmora latest version’s video editing features are both excellent and user-friendly. [pagebreak] The editing options in Filmora are comprehensive, with the most noticeable being cutting, audio manipulation, transition creation, visual effects, and a plethora of additional features and functions.
The above editing functions are simple to carry out by selecting a specific section of the video on your timeline, double-clicking it, waiting for it to appear in the preview section, and then applying effects and transitions, adding audio, stabilizing and correcting the video using any of the editing options available to you.
Simplified Exporting Of Your Masterpiece
Exporting a finished project is as simple as any other activity in Filmora latest version. Indeed, the option to export your completed project is clearly presented on the main page and instantly visible to the human eye. After you’ve completed making changes, all you have to do is click the ‘Export’ button.
How to change video playback speed in Filmora
When using fast-motion/slow-motion effects on a video, the clips are sped up or slowed down in comparison to their original speed.
If you’re looking for a “close up in time,” the slow-motion effect may be the best choice, while the fast-forward effect may be used to produce dramatic or amusing videos.
Filmora is widely praised and utilized by professionals throughout the globe because of its user-friendly design and uncomplicated editing features. For this, it is often chosen over other editing programs.
Steps
Follow the below-mentioned steps to change video speed in Filmora:
- A wide range of video formats is supported by Wondershare Filmora, including MP4 and AVI, WMV and MOV, and FLV and M4V, etc. Enter the media library and click Import to import videos from your PC. The software will use the video files on your computer. Drag and drop is also an option for adding files to the User’s Album.

- Right-click on the video track on the Timeline and then drag movies from your User’s Album into it to access the Speed and Duration choices.

- A pop-up window will be shown. The rapidity or sluggishness of the motion effects is denoted by speed numbers. Then you may go at your own speed. Just click on the preview box to test out effects like sped-up or slowed-down videos. 0.5 speed is a good choice if you think it’s too much.

Video playback speed similarly affects the audio playback speed. Delete the video’s audio if you want to maintain the original playing speed of the video’s audio.
You must first double-click the audio clip in the audio editing window in order to adjust it. Adding and deleting fade in/out effects and reducing background noise are all options.
After you’ve finished adjusting the video speed, click Export. To save your movie in a standard format, just choose Format from the File menu.

It’s also possible to publish your videos to YouTube and Vimeo or create a DVD if you’d like.
Choose Device from the drop-down box and choose the proper symbol to view your new video output on your iPod, iPhone, or iPad.
Conclusion
While watching a movie, you may want the audio to be slower or faster, and you may want to adjust the atmosphere with the help of the music track, either when merely a soundtrack is being played or while a movie is being watched. This article, which includes images, explains in great detail how Mac users can achieve this using playback speed Quicktime. It also explains how to alter the speed at which a video play by in Filmora. Filmora has a variety of easy and advanced editing options, as well as video effects like slow motion and fast motion.
Quicktime Player is an Apple Inc. software that is compatible with all current versions of macOS X as well as Windows.
The user interface of the Quicktime media player is straightforward to navigate. The majority of video formats may be supported, as well. Like VLC, you can quickly speed up or slow down videos with Quicktime player using specific hotkeys or by manually altering the speed of the video.

A broad number of formats may be handled by QuickTime, including music, graphics, and panoramic photography. All of your music and video files will play without a hitch, and it is a fully complete media player.
Many customers buy a Mac computer and instantly install QuickTime, the default video player, under the notion that it is a basic video player with few additional functions. In fact, the QuickTime player has a slew of hidden functions that are pretty useful, but only a few people are aware of it. The option to increase the Quicktime player speed is one of these hidden features’ which is most popular and helpful. This is particularly true if you have to sit through a presentation or lecture.
How to Speed up Videos in Quicktime Player?
If you want to watch your movies on Quicktime player as quickly as possible, go with a long-term solution. The pace of the clip may be raised or lowered from the toolbar, and the settings of the application can be altered.
Thus, in easy words when you download a video to your Mac, you can control the speed at which it plays back on your computer using Quicktime player.

There are two ways to achieve this goal, one is manually through settings whereas the second way is using hotkeys. Let’s discuss both by understanding how to increase QuickTime player speed manually.
Manually Setting Up Quicktime player speed
- Open the Quicktime player installed on your computer.
- Embedding video within the interface is recommended.
- Go to the Toolbar and choose the Windows tab from the drop-down menu.
- To access the A/V controls, press the A/V Controls button. There will be a dialogue box that appears.
- Locate the Playback Speed option and adjust the speed of the movie by increasing or decreasing it.
- Close the box and go to watch the video in its entirety.
Speeding Up playback Speed Quicktime Using Hotkeys
- There isn’t a special hotkey for Quicktime that allows you to speed up or slow down the video. Using your mouse and keyboard, on the other hand, you may do the task in an instant.
- Open the video in the Quicktime Player on your computer by clicking on it.
- Play the video clip, and then hit the “OPTIONS” key on your keyboard to stop it.
- Press the Fast Forward button on the player and the left mouse button at the same time. It will speed up the pace at which the video is played back.
- The tap will cause a 1.1x choice to appear at the top of the screen.

Increasing the speed is accomplished by repeatedly clicking until the desired speed is achieved.
However, keep in mind that there has been a glitch that has existed for years that causes the audio to stop working after you reach 2x speed. To get around this problem, just accelerate to 1.9x and then stop.
If you come across anything you like and want to view it again, you may stop the video by pressing the space bar twice. However, pressing the spacebar will cause the playing speed to be reset.
How to Slow Down Videos in Quicktime Player?
When viewing a movie on your Mac, you may discover that you need to slow it down on a frequent basis. You may discover a range of slow down video editing tools that can help you slow down a video on the internet. Furthermore, various video players may be able to let you quickly slow down your movie. QuickTime Player is one of those programs that may be customized to your individual needs.
We sometimes overlook the enormous capacity inherent inside the dependable and dependable QuickTime Player. QuickTime contains a number of key capabilities meant to help you deal with your media files and play video and audio files.
Steps to follow to slow down Quicktime Player speed
Like speeding up the QuickTime playback speed, the users can simultaneously slow down the playback speed as well. It can be done manually and through the use of specific keys already present on the keyboard.
Manual Setup
In order to manually slowdown QuickTime video, follow the below-mentioned steps:
- Launch the Quicktime player application
- Click on “File” and choose the video which is already saved or downloaded on your MAC.
- Once the video is loaded in the Quicktime player, click on “View” on the toolbar on the top.
- As you click on “View”, a drop-down menu will appear. Locate the “Playback speed” option from the drop-down menu.

- When you click on “Playback speed”, another dialogue box will appear right next to the drop-down menu, which will have options regarding the playback speed.

- Click on “Half speed” and press the play button to watch the video with a slower playback rate.

Slowdown QuickTime speed using Hotkeys
- Open the video or the clip you want to watch.
- If Quicktime is your default player, the video loads in it.
- Otherwise, launch the QuickTime application
- By clicking on “Open”, choose your specific clip or video.
- Once the video is loaded, press the ““OPTIONS”” key next to cmd and simultaneously press the rewind button on the task bar of Quicktime. It starts to slow down the playback speed of the video.
What If Quicktime Player Speed up With No Sound?
No sound may be heard when the video is played back if it was encoded in a format that QuickTime cannot understand. Verifying your QuickTime installation is the most obvious way to find out whether it has decoded all of the video files. Let’s investigate the issue to its root.
Updating Your Quicktime to the Latest Version
The user must carefully study the QuickTime player. For some reason, your QuickTime behaviour is out of whack.
People often neglect to keep their QuickTime software up-to-date, which results in problems with video playback, such as no sound or stuttering, among many other things. To fix this issue, just download and install the most latest release of QuickTime player.
Examine the System and Driver
Faulty speakers, audio issues in the system, and update failures will ultimately cause media playback difficulties.
To find the root cause, you should first check internally to see whether your speakers are working correctly. Speaking straight to Siri and hearing her reaction is the fastest and most straightforward option.
Another reason you may be hearing no sound on QuickTime is because of a recent system update. Apple, as we all know, often releases new operating systems, and you must keep track of the most current versions of updates in order to keep your system running effectively.
You just need to ensure that your machine is running the most recent version. As a result, your system will resume regular functioning, and QuickTime will be immediately fixed and restored.
Inspect if the File is Corrupted or not
Checking the file to see whether it has been corrupted is a good idea regardless of whether QuickTime and your system are up and running. To make matters worse, the lack of sound in QuickTime will be the consequence of a corrupted video file.
Try opening the file in a different programme or player to see if the issue may be resolved. If this is the case, your source video file is either destroyed or corrupted. You may wish to consider regaining access to the file in this situation. The likelihood of your file being corrupted by malware or a virus is relatively high. Remember to be patient if this does happen to you.
It is necessary to use third-party repair programmes to successfully fix the file. Consequently, using third-party software to recover and restore the source file should be considered if you are in a situation where the source file is crucial and do not have a backup. As we’ll see, there are a number of options available, including Filmora.
How to Play Videos at 2X Speed with Sound in Quicktime?
Follow the below-mentioned steps to play video at 2x speed with sound in Quicktime:
- Launch QuickTime.
- Click on Edit, which is located on the toolbar on the top. A drop-down menu will appear.
- From the drop-down menu, click on QuickTime Preferences.
- Then select Audio from the dialogue box.
- Then moving forward, change the music synthesizer to Promethean Audio Device, Promethean USB Audio or USB Audio Device. These options might vary depending on the user’s specific hardware.
- Click on Apply and then OK.
Use Quick Time Features in Filmora
What is Wondershare Filmora?
For users to quickly and easily create high-quality films using a variety of sophisticated editing tools, Wondershare Filmora provides an extensive set of powerful tools for video editors. Wondershare Filmora’s user-friendly interface makes it easy for anybody to become an expert video editor on Mac .
In addition to the usual video effects, Wondershare Filmora provides filters, animated components, and other video effects. In order to alter a movie, you may use filters and overlays to add a variety of effects and graphic overlays. There are several options for titles, openers, and bottom thirds to pick from in Wondershare Filmora.

Using Wondershare Filmora’s drag and drop, users may include moving graphics into their movies. Additionally, users may quickly combine many videos and photographs and choose the good royalty-free music from a wide range of options, all in one spot.
Among the many functions offered by Wondershare Filmora include the ability to edit in 4K and GIF format, noise reduction and colour correction, and an advanced text editor and an audio mixer. A wide range of operating systems can run Wondershare Filmora.
Although there are many other video editors out there vying for attention, Wondershare has been one of the few that has managed to stay relevant in an increasingly competitive industry saturated with old and new video editors all competing for the same consumer base.
Unique and Distinct Features of Filmora
Software is not nearly as good if it does not have the appropriate set of functionalities, and most users will not bother to use it if it does not include these features. Listed here are the most eagerly anticipated features of Filmora’s latest version:
Motion Tracking
The Motion Tracking module enables you to identify an object or point inside a video and then have the computer track that object or point to generate a moving path.
It allows you to capture the motion of a moving object in the frame and add text, subtitles, effects, and other components to the frame that follow the moving object’s motion as it moves around the screen. After you’ve constructed that path, you may link any other item to it and have it follow the initial object.
Colour Matching Feature
This team has always considered that Filmora’s colour grading and correction tools were excellent, but their most recent addition to the ‘Color Matching’ program has garnered them even more praise.
Colour matching is crucial when trying to merge several video images obtained by two different cameras. In this semi-automated module, you may match video from multiple sources or footage acquired at different times of day with one another.
Keyframing Feature
Keyframing is an essential feature for users who wish to boost the appeal of their video by incorporating critical animation sequences throughout the film.
It enables you to create custom animations and have fine-grained control over the effects you apply to your projects via the use of keyframes.
Keyframing becomes critical when creating special effects, custom title cards at the beginning or middle of a film or conjuring precise paths for visuals or picture-in-picture movies to follow.
Audio Ducking
Audio ducking is a method used in video editing and production that allows the narrator’s voice to be heard consistently and clearly over other sounds on the recording that are happening at the same time, such as background music, without being dominated.
Transitions and Vast Amount of Effects
Over 300 special effects, objects, overlays, transitions, and music and audio effects are available whenever and wherever you need them. The bundle includes 25 sound effects and 26 royalty-free recordings, making it a complete package.
Then there are 176 transitions, each of which may be customized to liven up your project. You may also alter and manipulate visuals and text to make your project more aesthetically appealing.
Hardcore Video Editing
Moving on to the heart of this application, Filmora latest version’s video editing features are both excellent and user-friendly. [pagebreak] The editing options in Filmora are comprehensive, with the most noticeable being cutting, audio manipulation, transition creation, visual effects, and a plethora of additional features and functions.
The above editing functions are simple to carry out by selecting a specific section of the video on your timeline, double-clicking it, waiting for it to appear in the preview section, and then applying effects and transitions, adding audio, stabilizing and correcting the video using any of the editing options available to you.
Simplified Exporting Of Your Masterpiece
Exporting a finished project is as simple as any other activity in Filmora latest version. Indeed, the option to export your completed project is clearly presented on the main page and instantly visible to the human eye. After you’ve completed making changes, all you have to do is click the ‘Export’ button.
How to change video playback speed in Filmora
When using fast-motion/slow-motion effects on a video, the clips are sped up or slowed down in comparison to their original speed.
If you’re looking for a “close up in time,” the slow-motion effect may be the best choice, while the fast-forward effect may be used to produce dramatic or amusing videos.
Filmora is widely praised and utilized by professionals throughout the globe because of its user-friendly design and uncomplicated editing features. For this, it is often chosen over other editing programs.
Steps
Follow the below-mentioned steps to change video speed in Filmora:
- A wide range of video formats is supported by Wondershare Filmora, including MP4 and AVI, WMV and MOV, and FLV and M4V, etc. Enter the media library and click Import to import videos from your PC. The software will use the video files on your computer. Drag and drop is also an option for adding files to the User’s Album.

- Right-click on the video track on the Timeline and then drag movies from your User’s Album into it to access the Speed and Duration choices.

- A pop-up window will be shown. The rapidity or sluggishness of the motion effects is denoted by speed numbers. Then you may go at your own speed. Just click on the preview box to test out effects like sped-up or slowed-down videos. 0.5 speed is a good choice if you think it’s too much.

Video playback speed similarly affects the audio playback speed. Delete the video’s audio if you want to maintain the original playing speed of the video’s audio.
You must first double-click the audio clip in the audio editing window in order to adjust it. Adding and deleting fade in/out effects and reducing background noise are all options.
After you’ve finished adjusting the video speed, click Export. To save your movie in a standard format, just choose Format from the File menu.

It’s also possible to publish your videos to YouTube and Vimeo or create a DVD if you’d like.
Choose Device from the drop-down box and choose the proper symbol to view your new video output on your iPod, iPhone, or iPad.
Conclusion
While watching a movie, you may want the audio to be slower or faster, and you may want to adjust the atmosphere with the help of the music track, either when merely a soundtrack is being played or while a movie is being watched. This article, which includes images, explains in great detail how Mac users can achieve this using playback speed Quicktime. It also explains how to alter the speed at which a video play by in Filmora. Filmora has a variety of easy and advanced editing options, as well as video effects like slow motion and fast motion.
Quicktime Player is an Apple Inc. software that is compatible with all current versions of macOS X as well as Windows.
The user interface of the Quicktime media player is straightforward to navigate. The majority of video formats may be supported, as well. Like VLC, you can quickly speed up or slow down videos with Quicktime player using specific hotkeys or by manually altering the speed of the video.

A broad number of formats may be handled by QuickTime, including music, graphics, and panoramic photography. All of your music and video files will play without a hitch, and it is a fully complete media player.
Many customers buy a Mac computer and instantly install QuickTime, the default video player, under the notion that it is a basic video player with few additional functions. In fact, the QuickTime player has a slew of hidden functions that are pretty useful, but only a few people are aware of it. The option to increase the Quicktime player speed is one of these hidden features’ which is most popular and helpful. This is particularly true if you have to sit through a presentation or lecture.
How to Speed up Videos in Quicktime Player?
If you want to watch your movies on Quicktime player as quickly as possible, go with a long-term solution. The pace of the clip may be raised or lowered from the toolbar, and the settings of the application can be altered.
Thus, in easy words when you download a video to your Mac, you can control the speed at which it plays back on your computer using Quicktime player.

There are two ways to achieve this goal, one is manually through settings whereas the second way is using hotkeys. Let’s discuss both by understanding how to increase QuickTime player speed manually.
Manually Setting Up Quicktime player speed
- Open the Quicktime player installed on your computer.
- Embedding video within the interface is recommended.
- Go to the Toolbar and choose the Windows tab from the drop-down menu.
- To access the A/V controls, press the A/V Controls button. There will be a dialogue box that appears.
- Locate the Playback Speed option and adjust the speed of the movie by increasing or decreasing it.
- Close the box and go to watch the video in its entirety.
Speeding Up playback Speed Quicktime Using Hotkeys
- There isn’t a special hotkey for Quicktime that allows you to speed up or slow down the video. Using your mouse and keyboard, on the other hand, you may do the task in an instant.
- Open the video in the Quicktime Player on your computer by clicking on it.
- Play the video clip, and then hit the “OPTIONS” key on your keyboard to stop it.
- Press the Fast Forward button on the player and the left mouse button at the same time. It will speed up the pace at which the video is played back.
- The tap will cause a 1.1x choice to appear at the top of the screen.

Increasing the speed is accomplished by repeatedly clicking until the desired speed is achieved.
However, keep in mind that there has been a glitch that has existed for years that causes the audio to stop working after you reach 2x speed. To get around this problem, just accelerate to 1.9x and then stop.
If you come across anything you like and want to view it again, you may stop the video by pressing the space bar twice. However, pressing the spacebar will cause the playing speed to be reset.
How to Slow Down Videos in Quicktime Player?
When viewing a movie on your Mac, you may discover that you need to slow it down on a frequent basis. You may discover a range of slow down video editing tools that can help you slow down a video on the internet. Furthermore, various video players may be able to let you quickly slow down your movie. QuickTime Player is one of those programs that may be customized to your individual needs.
We sometimes overlook the enormous capacity inherent inside the dependable and dependable QuickTime Player. QuickTime contains a number of key capabilities meant to help you deal with your media files and play video and audio files.
Steps to follow to slow down Quicktime Player speed
Like speeding up the QuickTime playback speed, the users can simultaneously slow down the playback speed as well. It can be done manually and through the use of specific keys already present on the keyboard.
Manual Setup
In order to manually slowdown QuickTime video, follow the below-mentioned steps:
- Launch the Quicktime player application
- Click on “File” and choose the video which is already saved or downloaded on your MAC.
- Once the video is loaded in the Quicktime player, click on “View” on the toolbar on the top.
- As you click on “View”, a drop-down menu will appear. Locate the “Playback speed” option from the drop-down menu.

- When you click on “Playback speed”, another dialogue box will appear right next to the drop-down menu, which will have options regarding the playback speed.

- Click on “Half speed” and press the play button to watch the video with a slower playback rate.

Slowdown QuickTime speed using Hotkeys
- Open the video or the clip you want to watch.
- If Quicktime is your default player, the video loads in it.
- Otherwise, launch the QuickTime application
- By clicking on “Open”, choose your specific clip or video.
- Once the video is loaded, press the ““OPTIONS”” key next to cmd and simultaneously press the rewind button on the task bar of Quicktime. It starts to slow down the playback speed of the video.
What If Quicktime Player Speed up With No Sound?
No sound may be heard when the video is played back if it was encoded in a format that QuickTime cannot understand. Verifying your QuickTime installation is the most obvious way to find out whether it has decoded all of the video files. Let’s investigate the issue to its root.
Updating Your Quicktime to the Latest Version
The user must carefully study the QuickTime player. For some reason, your QuickTime behaviour is out of whack.
People often neglect to keep their QuickTime software up-to-date, which results in problems with video playback, such as no sound or stuttering, among many other things. To fix this issue, just download and install the most latest release of QuickTime player.
Examine the System and Driver
Faulty speakers, audio issues in the system, and update failures will ultimately cause media playback difficulties.
To find the root cause, you should first check internally to see whether your speakers are working correctly. Speaking straight to Siri and hearing her reaction is the fastest and most straightforward option.
Another reason you may be hearing no sound on QuickTime is because of a recent system update. Apple, as we all know, often releases new operating systems, and you must keep track of the most current versions of updates in order to keep your system running effectively.
You just need to ensure that your machine is running the most recent version. As a result, your system will resume regular functioning, and QuickTime will be immediately fixed and restored.
Inspect if the File is Corrupted or not
Checking the file to see whether it has been corrupted is a good idea regardless of whether QuickTime and your system are up and running. To make matters worse, the lack of sound in QuickTime will be the consequence of a corrupted video file.
Try opening the file in a different programme or player to see if the issue may be resolved. If this is the case, your source video file is either destroyed or corrupted. You may wish to consider regaining access to the file in this situation. The likelihood of your file being corrupted by malware or a virus is relatively high. Remember to be patient if this does happen to you.
It is necessary to use third-party repair programmes to successfully fix the file. Consequently, using third-party software to recover and restore the source file should be considered if you are in a situation where the source file is crucial and do not have a backup. As we’ll see, there are a number of options available, including Filmora.
How to Play Videos at 2X Speed with Sound in Quicktime?
Follow the below-mentioned steps to play video at 2x speed with sound in Quicktime:
- Launch QuickTime.
- Click on Edit, which is located on the toolbar on the top. A drop-down menu will appear.
- From the drop-down menu, click on QuickTime Preferences.
- Then select Audio from the dialogue box.
- Then moving forward, change the music synthesizer to Promethean Audio Device, Promethean USB Audio or USB Audio Device. These options might vary depending on the user’s specific hardware.
- Click on Apply and then OK.
Use Quick Time Features in Filmora
What is Wondershare Filmora?
For users to quickly and easily create high-quality films using a variety of sophisticated editing tools, Wondershare Filmora provides an extensive set of powerful tools for video editors. Wondershare Filmora’s user-friendly interface makes it easy for anybody to become an expert video editor on Mac .
In addition to the usual video effects, Wondershare Filmora provides filters, animated components, and other video effects. In order to alter a movie, you may use filters and overlays to add a variety of effects and graphic overlays. There are several options for titles, openers, and bottom thirds to pick from in Wondershare Filmora.

Using Wondershare Filmora’s drag and drop, users may include moving graphics into their movies. Additionally, users may quickly combine many videos and photographs and choose the good royalty-free music from a wide range of options, all in one spot.
Among the many functions offered by Wondershare Filmora include the ability to edit in 4K and GIF format, noise reduction and colour correction, and an advanced text editor and an audio mixer. A wide range of operating systems can run Wondershare Filmora.
Although there are many other video editors out there vying for attention, Wondershare has been one of the few that has managed to stay relevant in an increasingly competitive industry saturated with old and new video editors all competing for the same consumer base.
Unique and Distinct Features of Filmora
Software is not nearly as good if it does not have the appropriate set of functionalities, and most users will not bother to use it if it does not include these features. Listed here are the most eagerly anticipated features of Filmora’s latest version:
Motion Tracking
The Motion Tracking module enables you to identify an object or point inside a video and then have the computer track that object or point to generate a moving path.
It allows you to capture the motion of a moving object in the frame and add text, subtitles, effects, and other components to the frame that follow the moving object’s motion as it moves around the screen. After you’ve constructed that path, you may link any other item to it and have it follow the initial object.
Colour Matching Feature
This team has always considered that Filmora’s colour grading and correction tools were excellent, but their most recent addition to the ‘Color Matching’ program has garnered them even more praise.
Colour matching is crucial when trying to merge several video images obtained by two different cameras. In this semi-automated module, you may match video from multiple sources or footage acquired at different times of day with one another.
Keyframing Feature
Keyframing is an essential feature for users who wish to boost the appeal of their video by incorporating critical animation sequences throughout the film.
It enables you to create custom animations and have fine-grained control over the effects you apply to your projects via the use of keyframes.
Keyframing becomes critical when creating special effects, custom title cards at the beginning or middle of a film or conjuring precise paths for visuals or picture-in-picture movies to follow.
Audio Ducking
Audio ducking is a method used in video editing and production that allows the narrator’s voice to be heard consistently and clearly over other sounds on the recording that are happening at the same time, such as background music, without being dominated.
Transitions and Vast Amount of Effects
Over 300 special effects, objects, overlays, transitions, and music and audio effects are available whenever and wherever you need them. The bundle includes 25 sound effects and 26 royalty-free recordings, making it a complete package.
Then there are 176 transitions, each of which may be customized to liven up your project. You may also alter and manipulate visuals and text to make your project more aesthetically appealing.
Hardcore Video Editing
Moving on to the heart of this application, Filmora latest version’s video editing features are both excellent and user-friendly. [pagebreak] The editing options in Filmora are comprehensive, with the most noticeable being cutting, audio manipulation, transition creation, visual effects, and a plethora of additional features and functions.
The above editing functions are simple to carry out by selecting a specific section of the video on your timeline, double-clicking it, waiting for it to appear in the preview section, and then applying effects and transitions, adding audio, stabilizing and correcting the video using any of the editing options available to you.
Simplified Exporting Of Your Masterpiece
Exporting a finished project is as simple as any other activity in Filmora latest version. Indeed, the option to export your completed project is clearly presented on the main page and instantly visible to the human eye. After you’ve completed making changes, all you have to do is click the ‘Export’ button.
How to change video playback speed in Filmora
When using fast-motion/slow-motion effects on a video, the clips are sped up or slowed down in comparison to their original speed.
If you’re looking for a “close up in time,” the slow-motion effect may be the best choice, while the fast-forward effect may be used to produce dramatic or amusing videos.
Filmora is widely praised and utilized by professionals throughout the globe because of its user-friendly design and uncomplicated editing features. For this, it is often chosen over other editing programs.
Steps
Follow the below-mentioned steps to change video speed in Filmora:
- A wide range of video formats is supported by Wondershare Filmora, including MP4 and AVI, WMV and MOV, and FLV and M4V, etc. Enter the media library and click Import to import videos from your PC. The software will use the video files on your computer. Drag and drop is also an option for adding files to the User’s Album.

- Right-click on the video track on the Timeline and then drag movies from your User’s Album into it to access the Speed and Duration choices.

- A pop-up window will be shown. The rapidity or sluggishness of the motion effects is denoted by speed numbers. Then you may go at your own speed. Just click on the preview box to test out effects like sped-up or slowed-down videos. 0.5 speed is a good choice if you think it’s too much.

Video playback speed similarly affects the audio playback speed. Delete the video’s audio if you want to maintain the original playing speed of the video’s audio.
You must first double-click the audio clip in the audio editing window in order to adjust it. Adding and deleting fade in/out effects and reducing background noise are all options.
After you’ve finished adjusting the video speed, click Export. To save your movie in a standard format, just choose Format from the File menu.

It’s also possible to publish your videos to YouTube and Vimeo or create a DVD if you’d like.
Choose Device from the drop-down box and choose the proper symbol to view your new video output on your iPod, iPhone, or iPad.
Conclusion
While watching a movie, you may want the audio to be slower or faster, and you may want to adjust the atmosphere with the help of the music track, either when merely a soundtrack is being played or while a movie is being watched. This article, which includes images, explains in great detail how Mac users can achieve this using playback speed Quicktime. It also explains how to alter the speed at which a video play by in Filmora. Filmora has a variety of easy and advanced editing options, as well as video effects like slow motion and fast motion.
Also read:
- New A Roster of 8 Best Color Match Generators
- Updated Read on to Learn About Multi Object Tracking, Its Types, and Requirements. Youll Also Learn About the Different Approaches Toward Object Tracking for 2024
- New In 2024, Camtasia Video Editor Review
- Updated How to Choose A Nice GoPro for Vlogging, In 2024
- Updated Want to Make a Fun and Cinematic Video with an Introductory Text Title? Learn the Stages of Editing with Filmora for This Effect Here
- New In 2024, Best Slow Motion Camera Apps for Best Content Creation
- Updated 2024 Approved What Is First Impression Review Video
- 4 Solutions to Crop a Video on Android Easily
- How to Add Motion Blur in After Effects
- New In 2024, Want to Know the Simplest Way to Match the Colors of Your Photos in Photoshop? The Following Discussion Will Help Match Color in Photoshop, Almost Effortlessly
- New The Ultimate Guide to Using AR Emoji Stickers in Your Videos
- Updated How to Loop a Video with iMovie on Mac and iPhone for 2024
- Looking Forward to Making up Your Career in Video Editing? Land in Here to Learn About the Credibility of some Popular Video Editing Courses
- New How to Add Subtitles to MKV Videos on All Platforms for 2024
- Updated 2024 Approved Here You Can Lean About the Different Ways for GIMP Transparent Background PNG Format Files
- Step by Step to Cut Videos in Adobe Premiere Pro
- Updated Want to Speed up Your Video to Create Short-Duration Instagram Reels? Here Is How You Can Change the Speed of Pre-Recorded and Live Videos on Instagram Reels
- In 2024, Top 10 Secret Tips & Tricks to Use in Wondershare Filmora
- End Screen Makers
- Updated 2024 Approved Want to Create a Stunning Intro Video on Your Smartphone? Legend Intro Maker Is a Popular Choice. Learn the Steps to Design Intro Video Legend Intro Maker
- Updated 2024 Approved Are You a Vlogger Looking for Good Color Correction and Video Grading Presets? Here Youll Find Different Vlog LUTs that You Can Use for Your Videos
- The Premiere Pro Video Templates Help Make Original Content of Broadcast Quality. The Article Introduces 10 Free Premiere Pro Templates that Are Sure to Make Your Life Easy for 2024
- In 2024, Top iOS Solutions Finding Premium Slow Motion Apps For Video Creation
- New 2024 Approved Splice Video Editor Online - Get Your Videos Splice
- Updated 2024 Approved If You Want to Make an Intro Video, Then Adobe After Effects Will Be a Great Choice. This Article Will Show the Steps to Create an Intro Video with After Effects by Your Own
- Updated Top Tools To Create Blend Image Collage for 2024
- 2024 Approved You Can Make Attractive Videos by Adding Text Behind Objects. This Article Will Explain How to Use Wondershare Filmora to Create These Videos
- New In 2024, Using Adobe After Effects as a Pro-Level Editing Platforms Demands You to Add Expressions in After Effects. If Youre Looking for the Solutions on After Effects How to Add Expressions Then Weve Got You Covered. Learn More Here
- In 2024, Best MOV to GIF Converters
- New In 2024, Want to Add the Radial Blur Image Effect to Your Photos to Make Them Stand Out? Read on to Find the 11 Best Tools for Creating Stunning Image Editing Projects
- How To Slow Down GIF Building an Understanding
- 3 Effective Ways to Unlock iCloud Account Without Password On Apple iPhone 11
- In 2024, How To Unlock a Xiaomi Redmi 12 5G Easily?
- In 2024, How to Transfer Contacts from Honor X50i+ to Other Android Devices Devices? | Dr.fone
- Top-Notch Solutions for Disabled Apple ID On Apple iPhone XS Max Making It Possible
- In 2024, List of Pokémon Go Joysticks On Realme Note 50 | Dr.fone
- 10 Free Location Spoofers to Fake GPS Location on your Lava Blaze Curve 5G | Dr.fone
- In 2024, 9 Best Phone Monitoring Apps for Motorola Moto G14 | Dr.fone
- App Wont Open on Your Infinix Smart 8 HD? Here Are All Fixes | Dr.fone
- In 2024, 4 Feasible Ways to Fake Location on Facebook For your Tecno Pova 6 Pro 5G | Dr.fone
- In 2024, How does the stardust trade cost In pokemon go On Poco M6 5G? | Dr.fone
- Best 9 French Video Translators Online and Download Options for 2024
- In 2024, How to Remove and Reset Face ID on Apple iPhone 15 Plus | Dr.fone
- What Is a SIM Network Unlock PIN? Get Your Oppo F25 Pro 5G Phone Network-Ready
- In 2024, Full Guide on Mirroring Your Vivo Y200 to Your PC/Mac | Dr.fone
- Title: Updated Step by Step to Cut Videos in Adobe Premiere Pro
- Author: Morgan
- Created at : 2024-05-19 05:12:23
- Updated at : 2024-05-20 05:12:23
- Link: https://ai-video-editing.techidaily.com/updated-step-by-step-to-cut-videos-in-adobe-premiere-pro/
- License: This work is licensed under CC BY-NC-SA 4.0.

