:max_bytes(150000):strip_icc():format(webp)/AE-lock-572ece975f9b58c34c0a2492.jpg)
Updated Step by Step to Cut Videos in Adobe Premiere Pro for 2024

Step by Step to Cut Videos in Adobe Premiere Pro
Video editing is an essential skill in a world that has a growing focus on creative fields. And if you work with videos, knowing which clips to use and where to cut is essential in conveying your story and increasing its impact. So, if you are a beginner and want to familiarise yourself with steps and terms used in video editing, in this article, we will go through the steps you will need to cut your video file in Adobe Premiere Pro and Wondershare Filmora.
This guide uses Adobe Premiere Pro 2022 and Wondershare Filmora X.
How to cut video in Adobe Premiere Pro?
Once you have Adobe Premiere Pro open on your computer, follow the steps listed below.
Step 1: Create a new project in Premiere Pro.
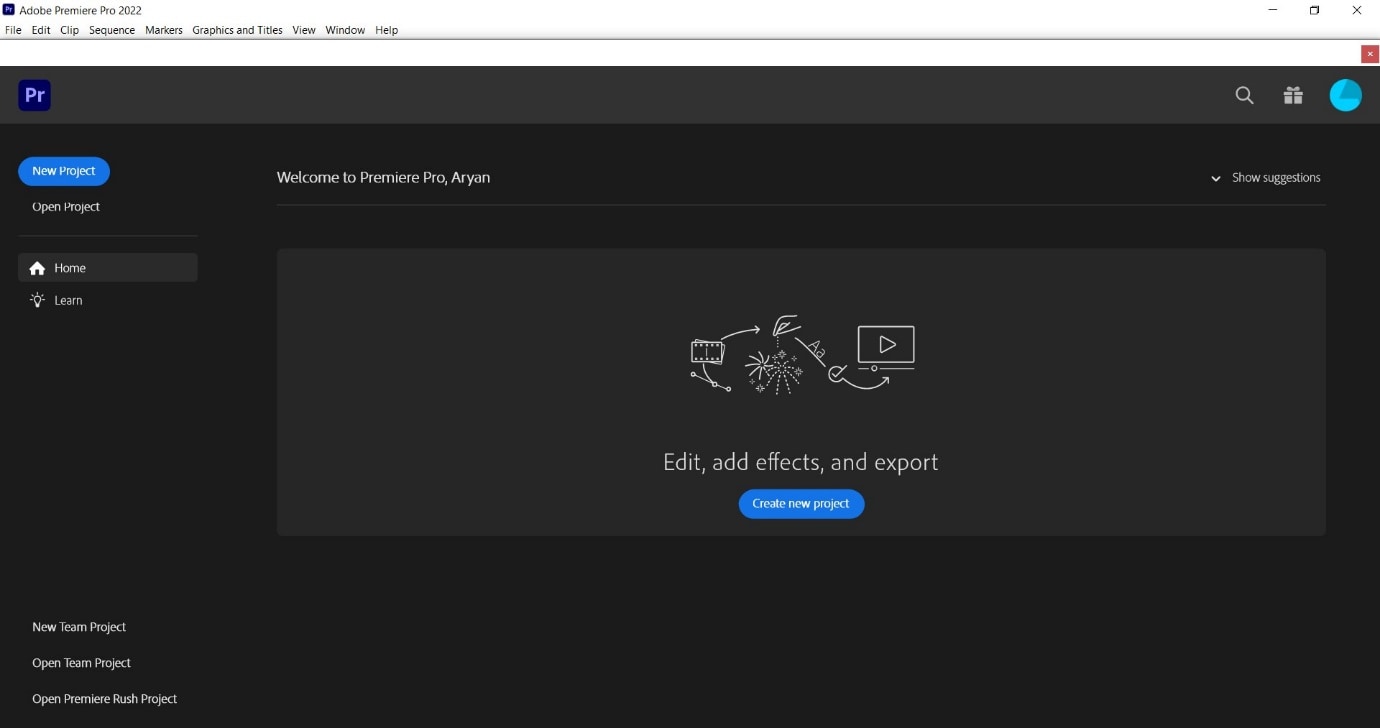
During project creation, we recommend keeping an eye on the file name set and the storage location; this can help reduce the time spent in locating the Premiere Project.
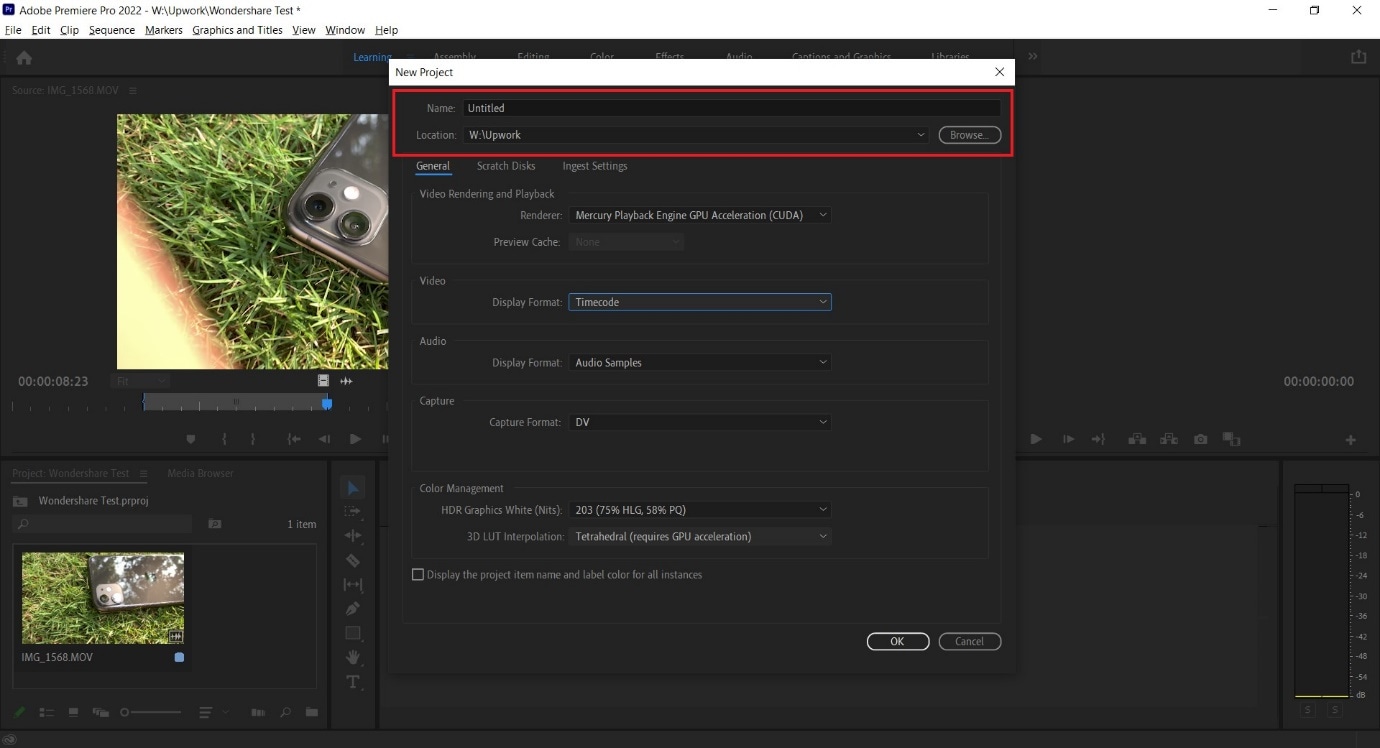
Step 2: Import a video file into Premiere Pro with a double click in the marked area and choose the file from its stored location.
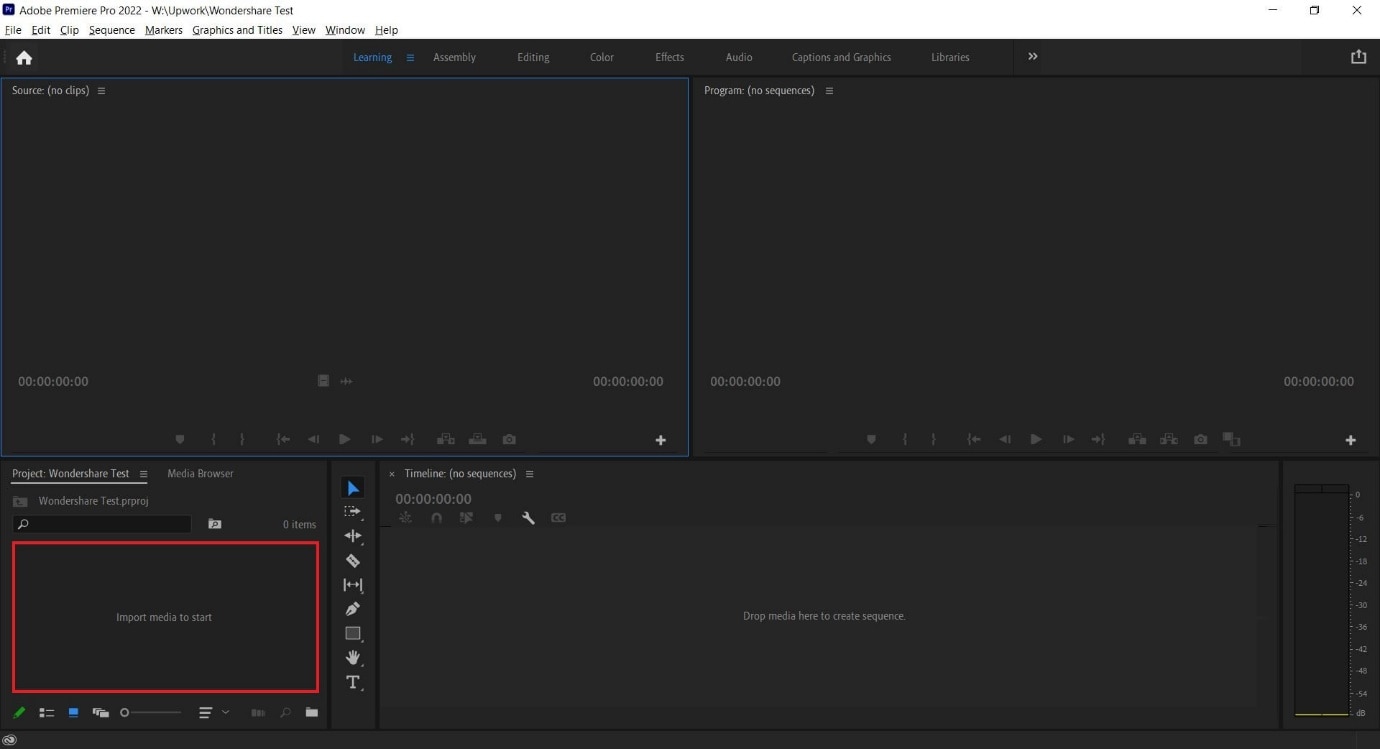
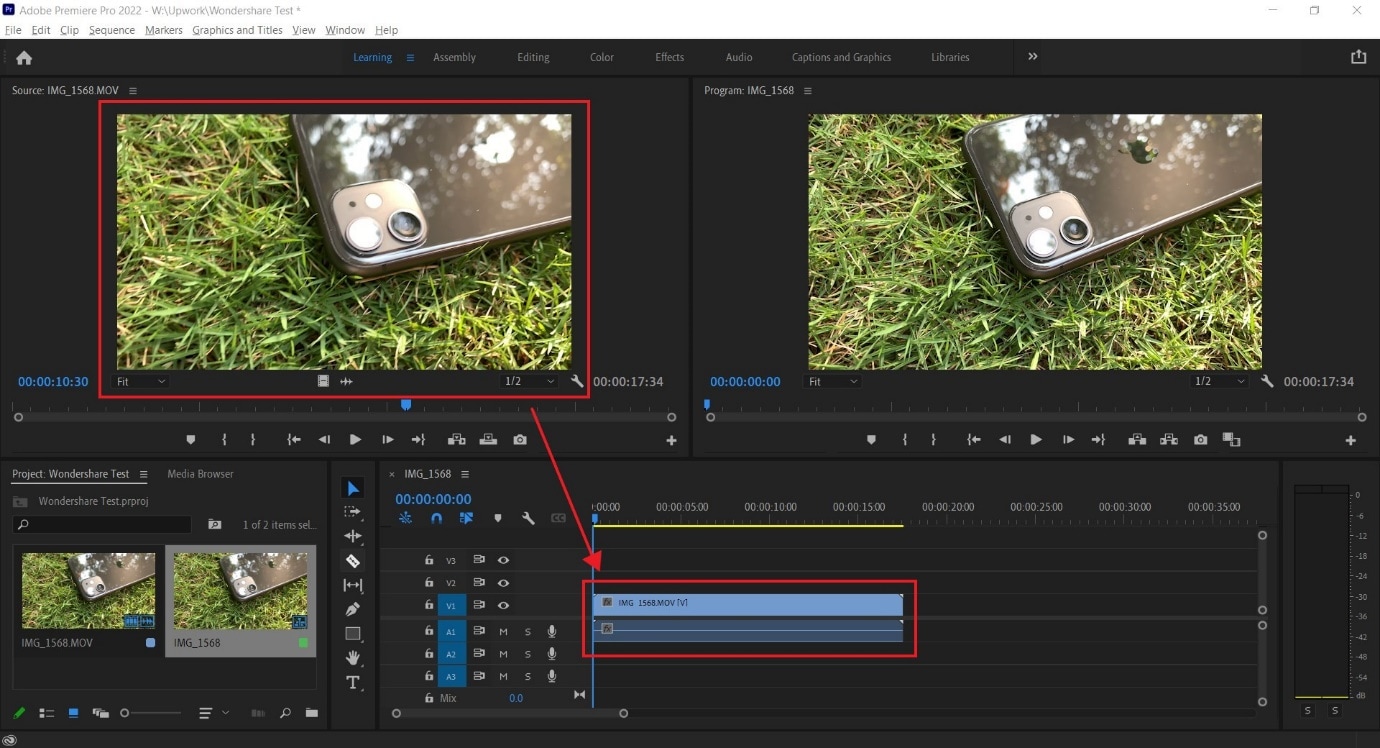
Step 3: Double click on any imported media to activate it and send it to the Source Window.
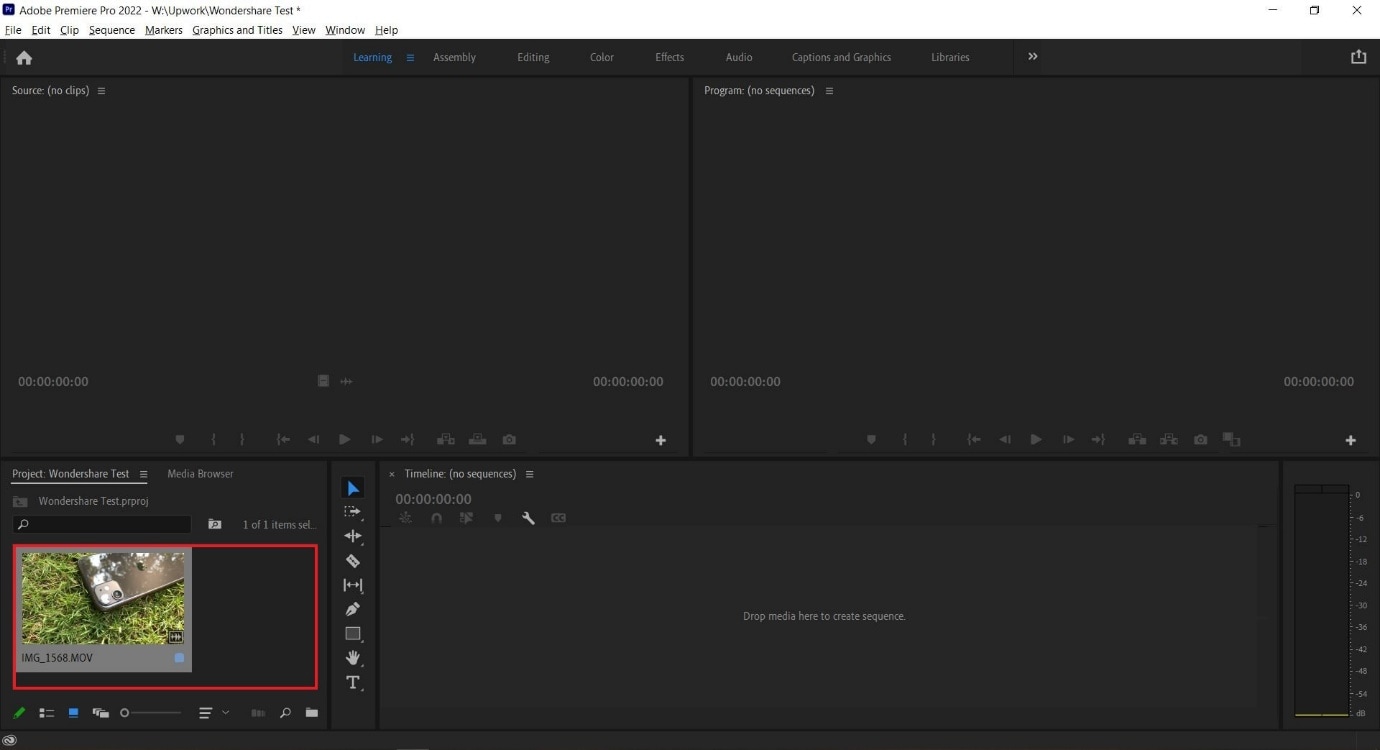
You can continue to import more media by double-clicking within the marked area. For better organization, users can also create Bins, which are folders within a Premiere Pro File that are often in use to sort out imported media.
Users can create Bins with a right-click in the red box marked area (refer to image above).
Step 4: Select either the whole clip or a part of it from the Source Window and drag it onto the Timeline.
Step 5: Select the Razor Tool from the Tools Window. Now, pick the point where you want to introduce a cut and confirm with your left mouse button; this will split your video track into two parts.
Make a second cut where desired, following which you can move around the newly generated clip or delete it.
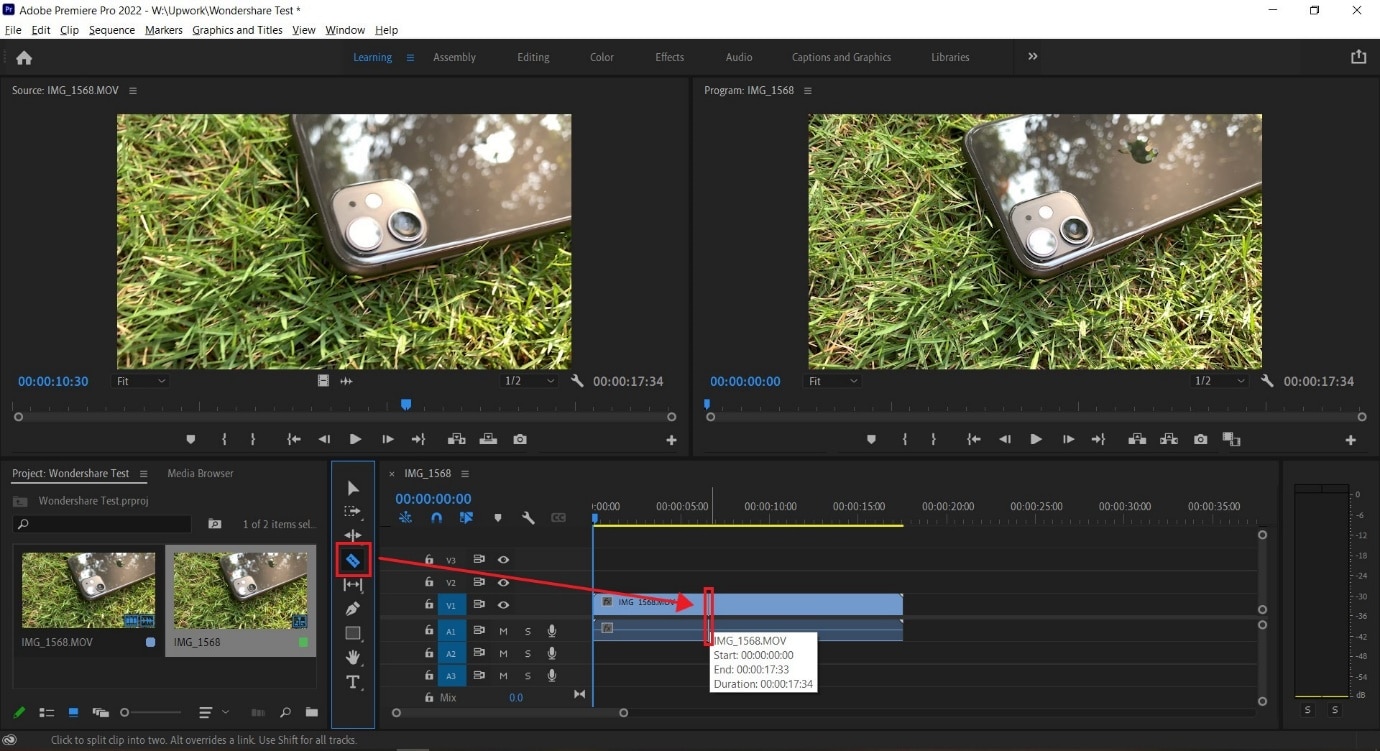
**Tip:**You can also select the Razor Tool by pressing C on the keyboard_._
We also recommend using the Snap in Timeline feature (activated with (S) on your keyboard or by choosing the magnet option), which will match your mouse pointer with the Playhead to ensure your cut will match the exact frame shown on your screen.
-—————————————————————————————————————————————-
Some more tips for Adobe Premiere Pro:
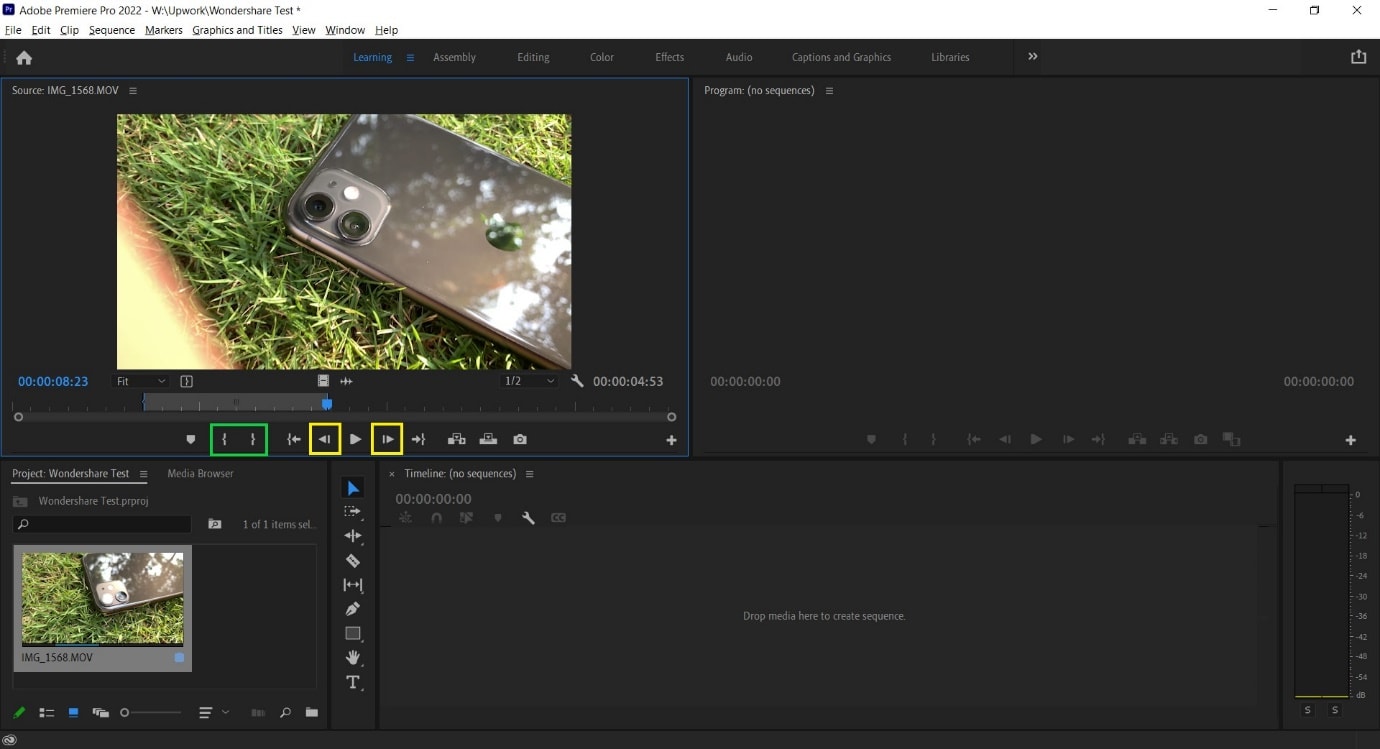
- Using the I and O keys on your keyboard while playing a video in the Source Window will allow you to set an In Pointand an Out Point. These markers will allow you to move a specific part of your video file into the Timeline, thus, reducing the amount of time spent making the right cut.
We have tagged the Mark In and Mark Out buttons with a Green Box in the image below.
- Clicking on the Step Frame Buttons [marked in Yellow] will also help increase the accuracy of your cut by allowing you to select the exact moment you desire.
- You can also mark a Point of Interest in your video file with the help of Markers in Premiere Pro. These afford you the ability to come back to the moment at a later time and see why it interested you in the first place, as editing sessions can often take hours at an end.
An alternative way to cut video with Wondershare Filmora
In Wondershare Filmora Video Editor , the steps to cut a video are simplified and don’t require as many steps as seen earlier. Opening the application throws you straight into a project, and following this, you can import a video file and begin editing. From the process you will learn below, it is easy to assume that Wondershare Filmora is more convenient for beginners and provides software features that match paid professional software.
For Win 7 or later (64-bit)
For macOS 10.14 or later
Note: If you don’t have Wondershare Filmora installed, you can get the video editor by visiting its official website . Once the setup program download completes, execute it and begin the installation process.
Once you have the editing software open, follow the steps listed below.
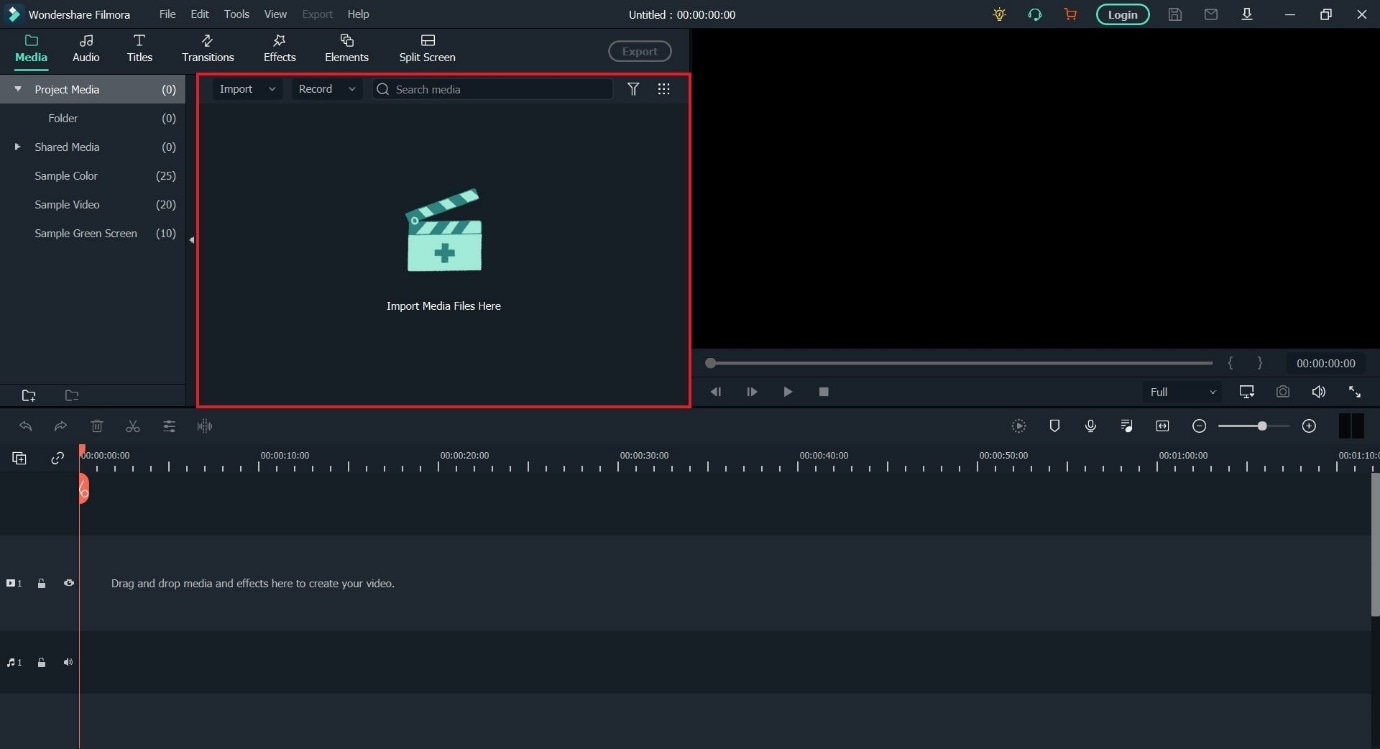
Step 1: Import a video file by clicking on the import window.
The default project setting for Filmora X is 1920x1080 at 25 frames per second. Users can change this to match their video file by going into Project Settings under the File tab or by accepting the automatic prompt that appears when dragging the video file onto the Timeline.
Note: If you have a PC with weak hardware, Wondershare Filmora gives you the option to create Video Proxies that will reduce the load on your computer by creating smaller clips that are lower in size, resulting in a smoother and faster experience. You can also do this in Premiere Pro, but Filmora does it for you automatically once given permission.
Step 2: Drag the video file onto the Timeline to begin previewing it in the Playback Window and commence editing operations.
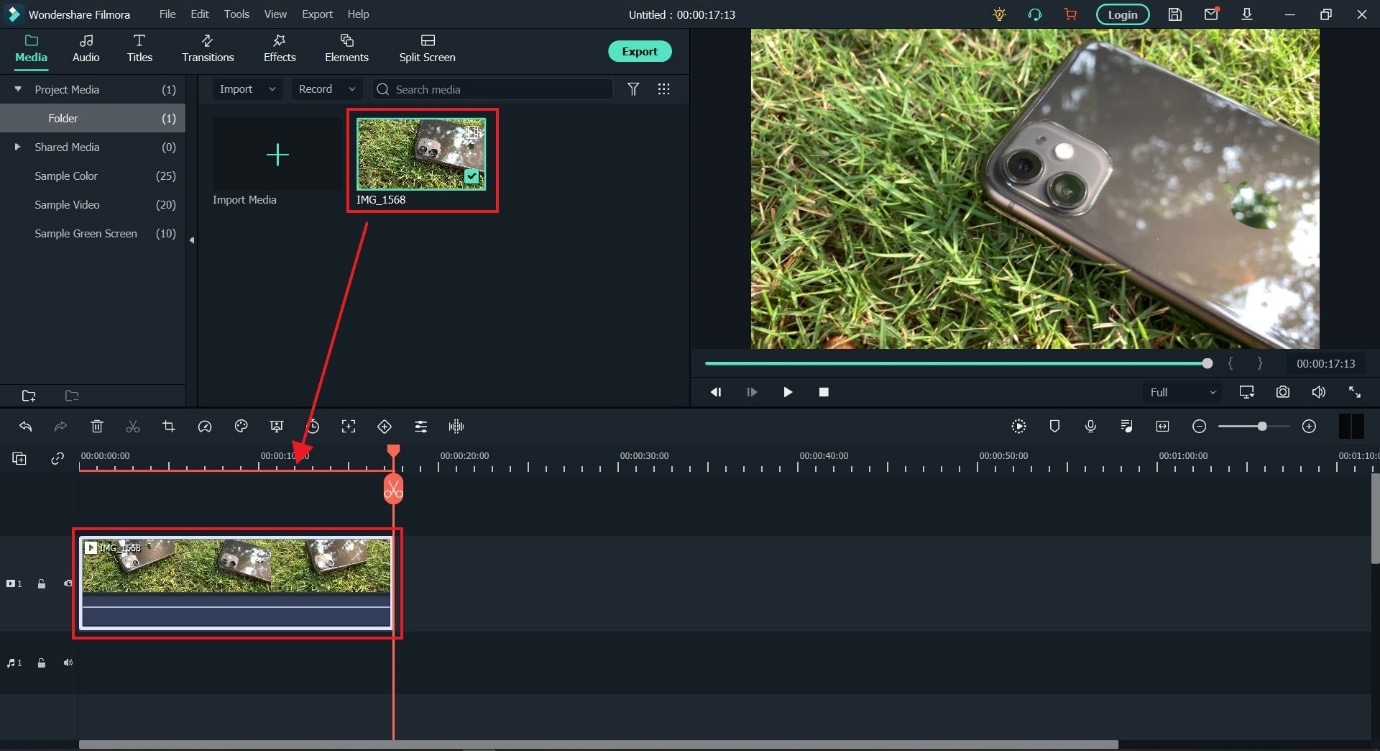
Step 3: Locate where you want to cut in the video file and click on the orange scissors option to split the video file.
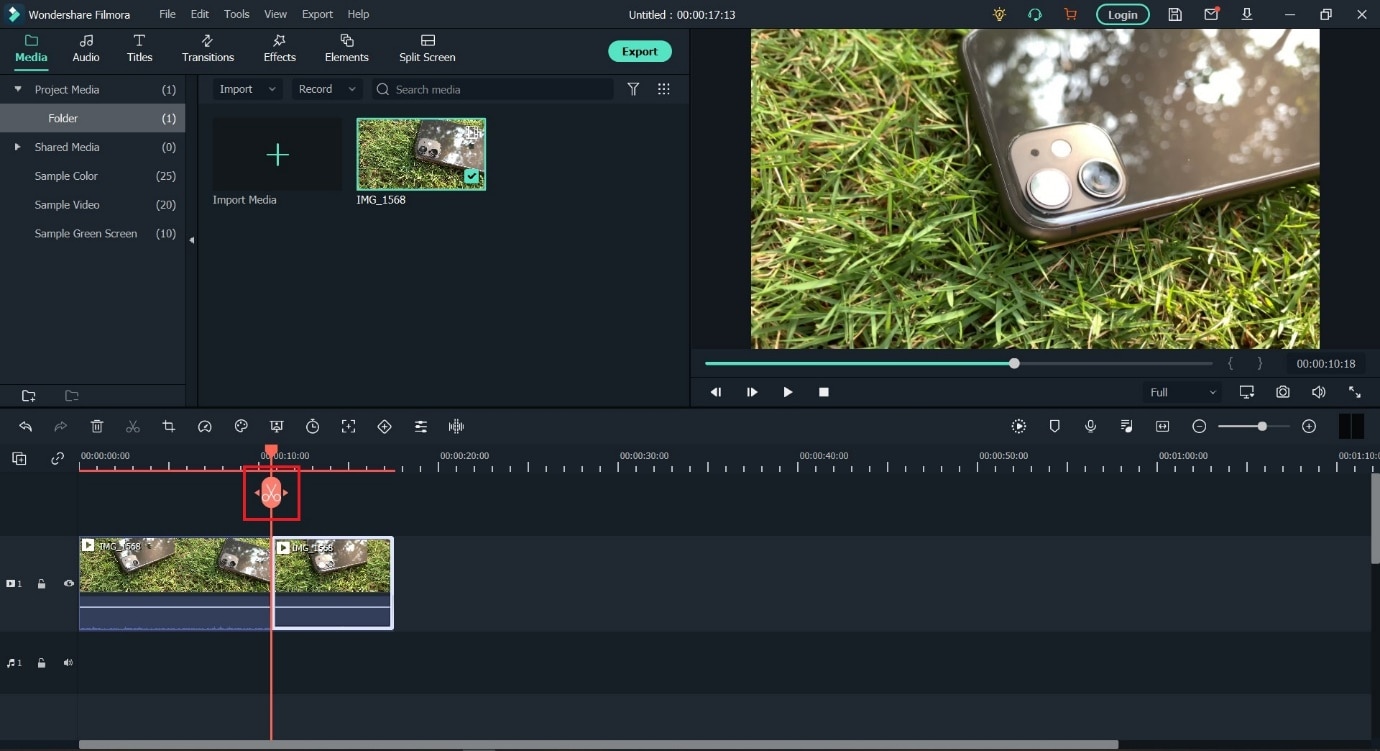
Tip: You can also use the keyboard shortcut (CTRL+B) to cut without using a mouse click, in case you make use of a trackpad while editing.
The Bottom Line
As said earlier, knowing where to cut is essential in improving the feel of your video, and we hope this guide showed you exactly how to perform the actions to create your best project. If you are a beginner, the simplistic approach of Wondershare Filmora will be more welcoming and easier to navigate. In addition, the software is also free to download, with added features that you can activate by paying a monthly, yearly, or one-time fee. Adobe Premiere Pro is an option worth considering if you plan on using third-party plugins and other applications from the Creative Cloud Suite.
During project creation, we recommend keeping an eye on the file name set and the storage location; this can help reduce the time spent in locating the Premiere Project.

Step 2: Import a video file into Premiere Pro with a double click in the marked area and choose the file from its stored location.

Step 3: Double click on any imported media to activate it and send it to the Source Window.

You can continue to import more media by double-clicking within the marked area. For better organization, users can also create Bins, which are folders within a Premiere Pro File that are often in use to sort out imported media.
Users can create Bins with a right-click in the red box marked area (refer to image above).
Step 4: Select either the whole clip or a part of it from the Source Window and drag it onto the Timeline.

Step 5: Select the Razor Tool from the Tools Window. Now, pick the point where you want to introduce a cut and confirm with your left mouse button; this will split your video track into two parts.
Make a second cut where desired, following which you can move around the newly generated clip or delete it.

**Tip:**You can also select the Razor Tool by pressing C on the keyboard_._
We also recommend using the Snap in Timeline feature (activated with (S) on your keyboard or by choosing the magnet option), which will match your mouse pointer with the Playhead to ensure your cut will match the exact frame shown on your screen.
-—————————————————————————————————————————————-
Some more tips for Adobe Premiere Pro:
- Using the I and O keys on your keyboard while playing a video in the Source Window will allow you to set an In Pointand an Out Point. These markers will allow you to move a specific part of your video file into the Timeline, thus, reducing the amount of time spent making the right cut.
We have tagged the Mark In and Mark Out buttons with a Green Box in the image below.
- Clicking on the Step Frame Buttons [marked in Yellow] will also help increase the accuracy of your cut by allowing you to select the exact moment you desire.
- You can also mark a Point of Interest in your video file with the help of Markers in Premiere Pro. These afford you the ability to come back to the moment at a later time and see why it interested you in the first place, as editing sessions can often take hours at an end.

An alternative way to cut video with Wondershare Filmora
In Wondershare Filmora Video Editor , the steps to cut a video are simplified and don’t require as many steps as seen earlier. Opening the application throws you straight into a project, and following this, you can import a video file and begin editing. From the process you will learn below, it is easy to assume that Wondershare Filmora is more convenient for beginners and provides software features that match paid professional software.
For Win 7 or later (64-bit)
For macOS 10.14 or later
Note: If you don’t have Wondershare Filmora installed, you can get the video editor by visiting its official website . Once the setup program download completes, execute it and begin the installation process.
Once you have the editing software open, follow the steps listed below.
Step 1: Import a video file by clicking on the import window.
The default project setting for Filmora X is 1920x1080 at 25 frames per second. Users can change this to match their video file by going into Project Settings under the File tab or by accepting the automatic prompt that appears when dragging the video file onto the Timeline.

Note: If you have a PC with weak hardware, Wondershare Filmora gives you the option to create Video Proxies that will reduce the load on your computer by creating smaller clips that are lower in size, resulting in a smoother and faster experience. You can also do this in Premiere Pro, but Filmora does it for you automatically once given permission.
Step 2: Drag the video file onto the Timeline to begin previewing it in the Playback Window and commence editing operations.

Step 3: Locate where you want to cut in the video file and click on the orange scissors option to split the video file.

Tip: You can also use the keyboard shortcut (CTRL+B) to cut without using a mouse click, in case you make use of a trackpad while editing.
The Bottom Line
As said earlier, knowing where to cut is essential in improving the feel of your video, and we hope this guide showed you exactly how to perform the actions to create your best project. If you are a beginner, the simplistic approach of Wondershare Filmora will be more welcoming and easier to navigate. In addition, the software is also free to download, with added features that you can activate by paying a monthly, yearly, or one-time fee. Adobe Premiere Pro is an option worth considering if you plan on using third-party plugins and other applications from the Creative Cloud Suite.
During project creation, we recommend keeping an eye on the file name set and the storage location; this can help reduce the time spent in locating the Premiere Project.

Step 2: Import a video file into Premiere Pro with a double click in the marked area and choose the file from its stored location.

Step 3: Double click on any imported media to activate it and send it to the Source Window.

You can continue to import more media by double-clicking within the marked area. For better organization, users can also create Bins, which are folders within a Premiere Pro File that are often in use to sort out imported media.
Users can create Bins with a right-click in the red box marked area (refer to image above).
Step 4: Select either the whole clip or a part of it from the Source Window and drag it onto the Timeline.

Step 5: Select the Razor Tool from the Tools Window. Now, pick the point where you want to introduce a cut and confirm with your left mouse button; this will split your video track into two parts.
Make a second cut where desired, following which you can move around the newly generated clip or delete it.

**Tip:**You can also select the Razor Tool by pressing C on the keyboard_._
We also recommend using the Snap in Timeline feature (activated with (S) on your keyboard or by choosing the magnet option), which will match your mouse pointer with the Playhead to ensure your cut will match the exact frame shown on your screen.
-—————————————————————————————————————————————-
Some more tips for Adobe Premiere Pro:
- Using the I and O keys on your keyboard while playing a video in the Source Window will allow you to set an In Pointand an Out Point. These markers will allow you to move a specific part of your video file into the Timeline, thus, reducing the amount of time spent making the right cut.
We have tagged the Mark In and Mark Out buttons with a Green Box in the image below.
- Clicking on the Step Frame Buttons [marked in Yellow] will also help increase the accuracy of your cut by allowing you to select the exact moment you desire.
- You can also mark a Point of Interest in your video file with the help of Markers in Premiere Pro. These afford you the ability to come back to the moment at a later time and see why it interested you in the first place, as editing sessions can often take hours at an end.

An alternative way to cut video with Wondershare Filmora
In Wondershare Filmora Video Editor , the steps to cut a video are simplified and don’t require as many steps as seen earlier. Opening the application throws you straight into a project, and following this, you can import a video file and begin editing. From the process you will learn below, it is easy to assume that Wondershare Filmora is more convenient for beginners and provides software features that match paid professional software.
For Win 7 or later (64-bit)
For macOS 10.14 or later
Note: If you don’t have Wondershare Filmora installed, you can get the video editor by visiting its official website . Once the setup program download completes, execute it and begin the installation process.
Once you have the editing software open, follow the steps listed below.
Step 1: Import a video file by clicking on the import window.
The default project setting for Filmora X is 1920x1080 at 25 frames per second. Users can change this to match their video file by going into Project Settings under the File tab or by accepting the automatic prompt that appears when dragging the video file onto the Timeline.

Note: If you have a PC with weak hardware, Wondershare Filmora gives you the option to create Video Proxies that will reduce the load on your computer by creating smaller clips that are lower in size, resulting in a smoother and faster experience. You can also do this in Premiere Pro, but Filmora does it for you automatically once given permission.
Step 2: Drag the video file onto the Timeline to begin previewing it in the Playback Window and commence editing operations.

Step 3: Locate where you want to cut in the video file and click on the orange scissors option to split the video file.

Tip: You can also use the keyboard shortcut (CTRL+B) to cut without using a mouse click, in case you make use of a trackpad while editing.
The Bottom Line
As said earlier, knowing where to cut is essential in improving the feel of your video, and we hope this guide showed you exactly how to perform the actions to create your best project. If you are a beginner, the simplistic approach of Wondershare Filmora will be more welcoming and easier to navigate. In addition, the software is also free to download, with added features that you can activate by paying a monthly, yearly, or one-time fee. Adobe Premiere Pro is an option worth considering if you plan on using third-party plugins and other applications from the Creative Cloud Suite.
During project creation, we recommend keeping an eye on the file name set and the storage location; this can help reduce the time spent in locating the Premiere Project.

Step 2: Import a video file into Premiere Pro with a double click in the marked area and choose the file from its stored location.

Step 3: Double click on any imported media to activate it and send it to the Source Window.

You can continue to import more media by double-clicking within the marked area. For better organization, users can also create Bins, which are folders within a Premiere Pro File that are often in use to sort out imported media.
Users can create Bins with a right-click in the red box marked area (refer to image above).
Step 4: Select either the whole clip or a part of it from the Source Window and drag it onto the Timeline.

Step 5: Select the Razor Tool from the Tools Window. Now, pick the point where you want to introduce a cut and confirm with your left mouse button; this will split your video track into two parts.
Make a second cut where desired, following which you can move around the newly generated clip or delete it.

**Tip:**You can also select the Razor Tool by pressing C on the keyboard_._
We also recommend using the Snap in Timeline feature (activated with (S) on your keyboard or by choosing the magnet option), which will match your mouse pointer with the Playhead to ensure your cut will match the exact frame shown on your screen.
-—————————————————————————————————————————————-
Some more tips for Adobe Premiere Pro:
- Using the I and O keys on your keyboard while playing a video in the Source Window will allow you to set an In Pointand an Out Point. These markers will allow you to move a specific part of your video file into the Timeline, thus, reducing the amount of time spent making the right cut.
We have tagged the Mark In and Mark Out buttons with a Green Box in the image below.
- Clicking on the Step Frame Buttons [marked in Yellow] will also help increase the accuracy of your cut by allowing you to select the exact moment you desire.
- You can also mark a Point of Interest in your video file with the help of Markers in Premiere Pro. These afford you the ability to come back to the moment at a later time and see why it interested you in the first place, as editing sessions can often take hours at an end.

An alternative way to cut video with Wondershare Filmora
In Wondershare Filmora Video Editor , the steps to cut a video are simplified and don’t require as many steps as seen earlier. Opening the application throws you straight into a project, and following this, you can import a video file and begin editing. From the process you will learn below, it is easy to assume that Wondershare Filmora is more convenient for beginners and provides software features that match paid professional software.
For Win 7 or later (64-bit)
For macOS 10.14 or later
Note: If you don’t have Wondershare Filmora installed, you can get the video editor by visiting its official website . Once the setup program download completes, execute it and begin the installation process.
Once you have the editing software open, follow the steps listed below.
Step 1: Import a video file by clicking on the import window.
The default project setting for Filmora X is 1920x1080 at 25 frames per second. Users can change this to match their video file by going into Project Settings under the File tab or by accepting the automatic prompt that appears when dragging the video file onto the Timeline.

Note: If you have a PC with weak hardware, Wondershare Filmora gives you the option to create Video Proxies that will reduce the load on your computer by creating smaller clips that are lower in size, resulting in a smoother and faster experience. You can also do this in Premiere Pro, but Filmora does it for you automatically once given permission.
Step 2: Drag the video file onto the Timeline to begin previewing it in the Playback Window and commence editing operations.

Step 3: Locate where you want to cut in the video file and click on the orange scissors option to split the video file.

Tip: You can also use the keyboard shortcut (CTRL+B) to cut without using a mouse click, in case you make use of a trackpad while editing.
The Bottom Line
As said earlier, knowing where to cut is essential in improving the feel of your video, and we hope this guide showed you exactly how to perform the actions to create your best project. If you are a beginner, the simplistic approach of Wondershare Filmora will be more welcoming and easier to navigate. In addition, the software is also free to download, with added features that you can activate by paying a monthly, yearly, or one-time fee. Adobe Premiere Pro is an option worth considering if you plan on using third-party plugins and other applications from the Creative Cloud Suite.
What Is the Best Voice Changer for WhatsApp? Discover the Seven (7) Best Voice Changers for WhatsApp Here in This Post
Ever thought of the best way to prank your friends via WhatsApp voice calls? WhatsApp voice changing app is what you need. Not any voice changer, but one that offers quality services to end-users. Many software programs claim to render such services. However, not all are the perfect fit since the majority are substandard.
Are you looking for an efficient WhatsApp voice changer with a comprehensive user interface that you can use on your Windows, Mac, or mobile devices? You are at the right spot. Our team has browsed the internet and handpicked the best 7 WhatsApp voice-changing apps available in the global market today. We will share them with you here.
Try AI Voice Changer For Win 7 or later(64-bit)
Try AI Voice Changer For macOS 10.14 or later
Part 1. 7 Best Voice Changers for WhatsApp
Here are the seven (7) most powerful software or apps that offer quality voice-changing services on WhatsApp:
1. Magic Call[iOS] [Free with Limited Features]
Magic Call [iOS] is one of the best voice-changing apps available on the internet. The app lets you switch your voice into a fun and lovely one with complete ease. It’s a simple app available for download to Android and iOS devices.
Users of this WhatsApp voice changer find it simple to operate because of the comprehensive user interface and rich features it holds. Magic Call [iOS] is a freemium app and highly secured. The app provides you with several voice-changing options that you can choose from to prank your callers. Some of them are male, female, and robotic sounds. Additionally, it supports sounds like clap, laughter, gasp, and several others.

How to Use Magic Call [iOS] with WhatsApp
Open Google PlayStore or App Store on your Android device, and search Magic Call. Click on the corresponding key to download and install the app on your device, then follow the procedure below to change your WhatsApp voice:
Step1 Launch Magic Call [iOS], and grant it access to the necessary features such as contact, audio recording, etc.
Step2 Next, choose a contact from the list appearing on your display screen to speak to
Step3 Tap on the contact’s name, and then click on the Female Voice filter from the options that pop up.
Step4 Apply the WhatsApp voice-changer to spice up your conversation with friends and relatives on your contact.
2. Voicemod
Here is another fun-oriented software that permits you to change your voice during WhatsApp calls easily and quickly. Voicemod is a highly efficient WhatsApp voice changer popular among gamers, content creators, and more.
The app is well-customized with epic sound effects that you can select from to pimp your voice during calls. You can choose to sound like a robot, woman, man, or demon. Voicemod integrates with apps like TikTok, Elgato Stream, Audacity, Discord, Skype, and many more.
Also, Voicemod comes with voice filters. The app allows you to switch between scary, loud, or funny voices. Additionally, you have the chance to customize your vice via the Voicelab feature tucked into it. It’s a simple tool compatible with Windows, Mac, and Chromebook.

How to Use Voicemod with WhatsApp
Step1 Open your desired web browser on your PC, and navigate to the official website for Voicemod. A page as below will appear on your screen:
Click on the corresponding button to download and install a suitable version. Wait until the download is complete, and follow the on-screen instructions to configure the app. Ensure you grant permission to the necessary devices such as Microphone, etc.
Step2 Next, confirm the Voice Changer toggle at the bottom of the Window page is activated. Once that’s set, scroll through the library of voice filters, and sound effects to select your desired prank voice.
Step3 Now connect the selected Microphone to WhatsApp, host a call, and start enjoying the lovely prank voices from Voicemod.
3. Call Voice Changer [iOS]
Call Voice Changer is a simple yet powerful voice-changing app built with countless sound effects that you can use to fool your contacts during calls. The app helps you spice up your conversation with friends and families. It lets you select between funny, creepy, and loud voices.
Also, Call Voice Changer supports sound effects like birthday songs, cartoon characters, and lots more. All end-users of this app find it simple to operate. The reason is because of the clean user interface. Call Voice Changer provides you with real-time voice-changing effects- this means you have the privilege to change your voice at any time during calls.

How to Use Call Voice Changer- IntCall
Step1 On your iOS device, open the App Store, and click on the Search tab at the extreme lower right corner of your screen. Enter Call Voice Changer in the empty field provided and tap on the Enter key on your keypad.
Step2 A new screen showing the Call Voice Changer app will pop up. Here is what the app looks like:
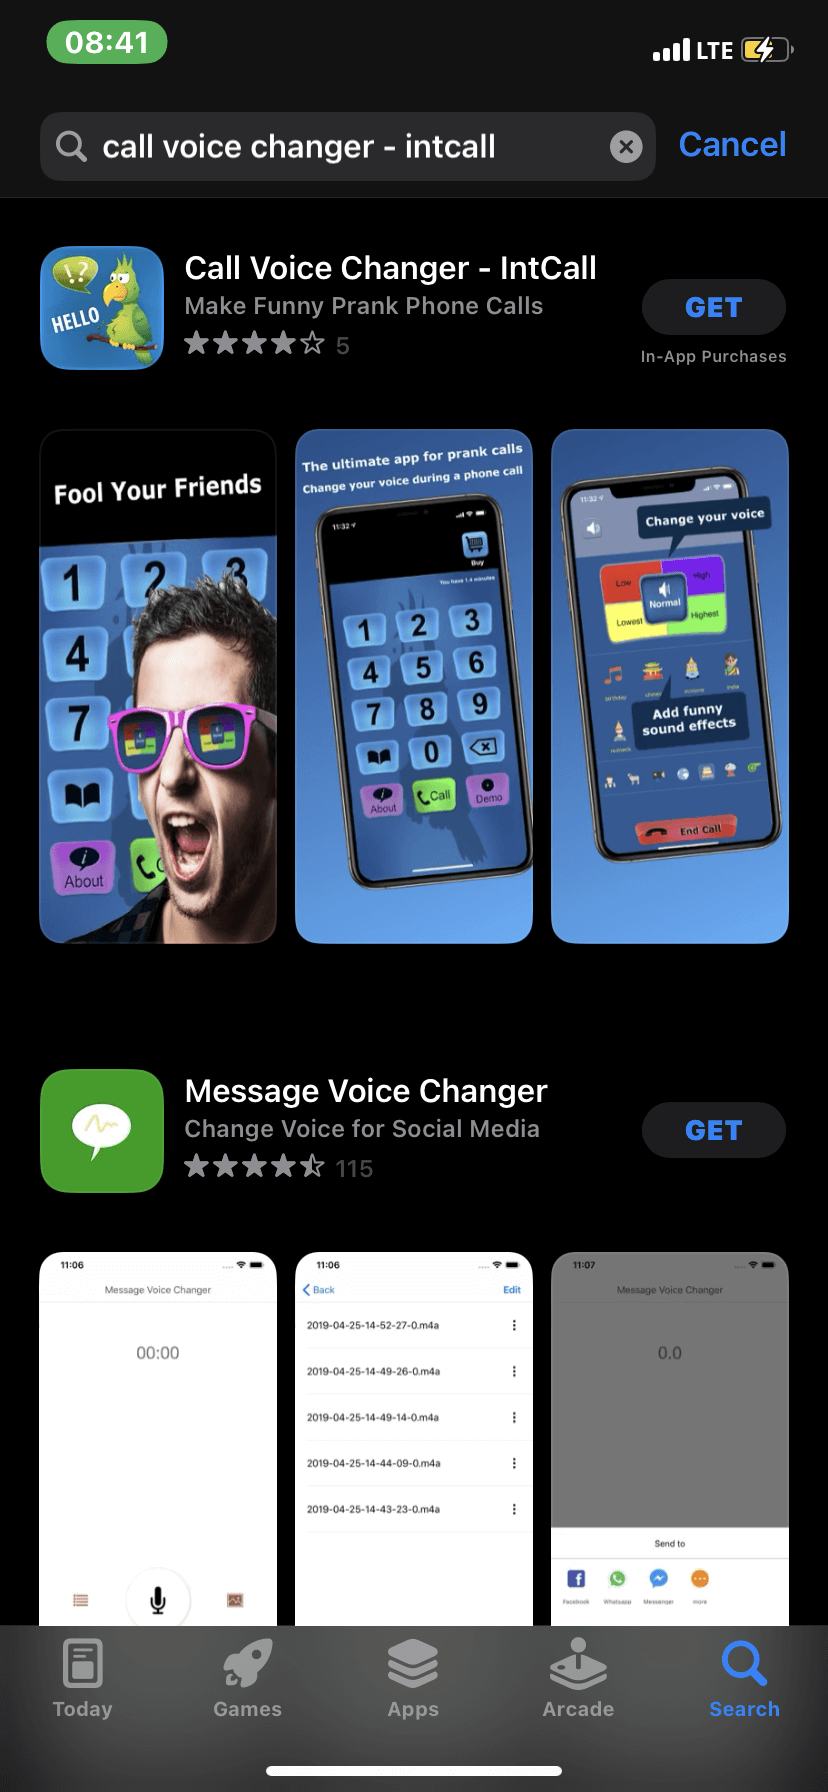
Click on the GET button next to the app name. Validate your action when required. Launch the app after the successful download, accept the necessary conditions, and grant access if prompted.
Step3 When Call Voice Changer opens, add your cellphone number, and grant access to Microphone.
Next, select your preferred voice pitch on the next interface that pops up.
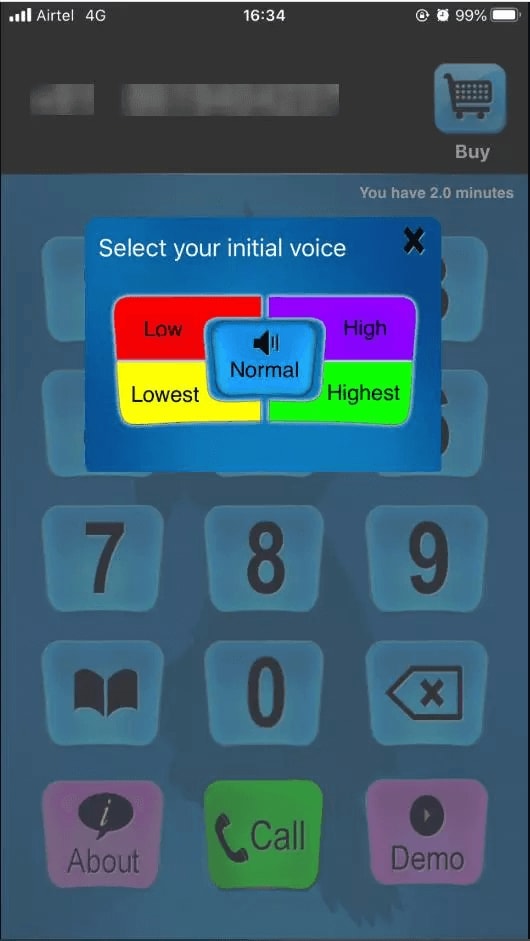
Step4 Choose your preferred sound effect from the available options, and make calls via WhatsApp.
4. Funcalls- Voice Changer & Call Recording
With over 100 voice effects, Funcalls is another wonderful WhatsApp voice-changer you can use to alter your voice during audio or video calls. The app makes it to our top list because of the quality features it holds. Funcalls is well-designed with a clean interface that lets you navigate around easily and quickly without involving a third party.
Besides voice changing, Funcalls lets you record your conversations during calls. This WhatsApp voice-changer works perfectly with mobile operating systems like Android and iOS devices. It’s a highly flexible app that permits you to change your voice using different pitches and speeds.
How to Use Funcalls- Voice Changer & Call Recorder
Step1 Depending on the mobile operating system you are using, launch the App Store, or Google PlayStore, click on the Search button and enter Funcalls in the appropriate field.
Tap on the appropriate button to install the app on your device.
Step2 Wait patiently for the installation to complete, and follow the on-screen prompts to set up the app with your Android or iOS device. Once the configuration is complete, click on the Dialer button at the bottom of the app screen. Enter a cellphone number by selecting the appropriate keys. Ensure you input the country code while dialing the number.
Step3 Now select your preferred voice effect from the options appearing on your screen.
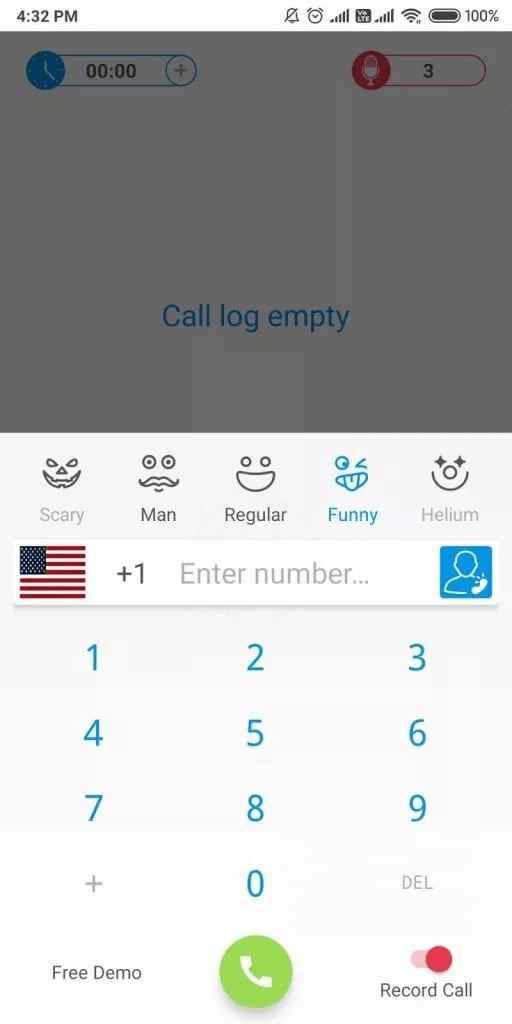
Host the call, and download the audio recording. After the call, share the recording with friends and families for fun.
5. Prank Dial
Designed for novices and experts in the tech space, Prank Dial is another voice changer that integrates with WhatsApp. This lightweight app lets you change your voice during calls to spice up conversations with families and friends.
It’s a fun app customized with several background sound effects. From funny sounds to annoying, celebrations, scams, money, politics, and lots more. Prank Dial WhatsApp voice-changer offers quality services in free and paid subscription packages. Like the Funcalls-Voice Changer & Call Recording, Prank Dial also supports call recording.

How to Use Prank Dial with WhatsApp
Step1 Click the appropriate button on your Android or iOS device to open Google PlayStore or App Store. Enter Prank Dial in the field given to search the WhatsApp voice-changer.
Tap the corresponding button to download and install the app on your device. After the installation is over, open the app for operation.
Step2 Next, kindly grant Prank Dial access to calls, contact, and local storage. Pick a sound effect to prank your friend, and head to connect with a friend via WhatsApp.
Step3 Once the step above is complete, settle down and prank your friends. Export and share audio recordings with people on your contact list for fun.
6. Voice Changer with Effects
Here is another good WhatsApp voice-changer with top-notch sound effects that you can select from to prank your contacts. It is a high utility voice-changing app well-known for delivering all it promises. End-users have the freedom to switch a boring phone call into an interesting one by selecting a background effect.
How to Use Voice Changer with Effects with WhatsApp
Step1 Download and install Voice Changer with Effects on your smartphone. Launch the app, and grant necessary permission as required.
Step2 Next, locate the Microphone icon, and click on it. Speak to the mic, and add your desired background voice effect.
Step3 Once the step above is complete, edit the recording, and hit the Share button to send it to your contact.
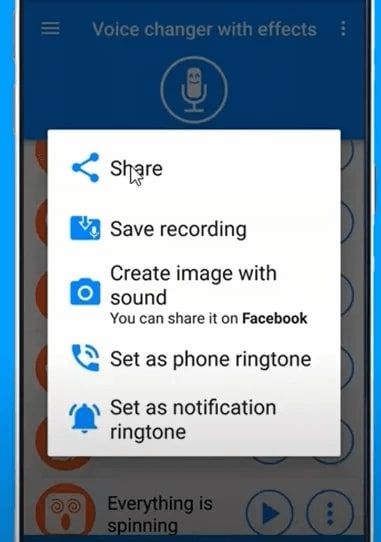
You can share it via WhatsApp. To do that, select the WhatsApp icon
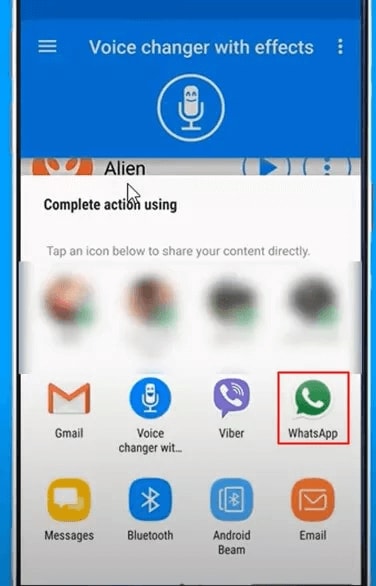
7. Narrator’s Voice
Lastly, Narrator’s voice is a top-rated WhatsApp voice-changing app designed with extraordinary background sound effects you can use to create a wonderful phone call experience. The app supports the text-to-speech feature. Thus, you can type, and Narrator’s Voice will convert into speech.
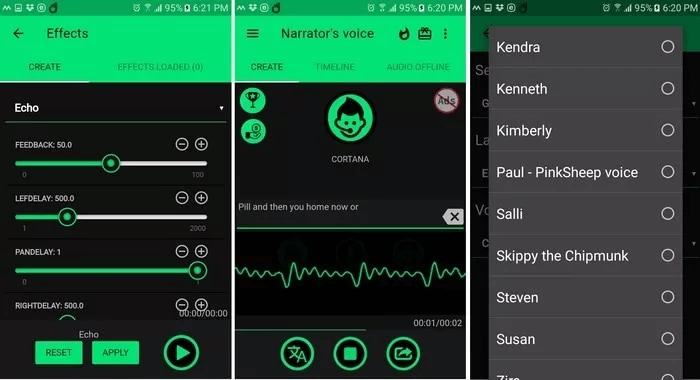
How to Use Narrator’s Voice with WhatsApp
Step1 Run Narrator’s Voice by clicking on the appropriate icon on your Android device.
Step2 Grant the app access to all the necessary apps and features, including the microphone. Speak to the microphone to proceed.
Step3 Edit your speech with sound effects, and click on Apply. When the editing is complete, click on Share to send to friends.
Part 2: FAQs
Q1. Can I change my voice during calls?
Yes, of course, you can!
However, you need a voice-changing app that supports real-time voice changing. You can select one from the list shared above. We mentioned seven (7) quality voice-changing apps that you can use to prank your contact during calls.
Q2. How to edit voice recordings before sharing them with friends?
Editing voice recording before sharing it with friends is straightforward if you have a voice editing tool like Wondershare Filmora. Wondershare Filmora is a world-leading video editing software with robust features that you need to edit your media files. It supports audio editing without distorting the file format.
Filmora allows you to detach audio from videos, delete, and adjust audio speeds with quality. Additionally, you can use the software to edit your videos, add transitions, effects, and more. This software works with popular computer systems like Windows and Mac. The software is simple to operate and offers quality results at a remarkably high speed. When compared with other video editing tools, Filmora stands out.
Conclusion
Now we’ve successfully explored the best 7 WhatsApp voice changers. Which do you wish to invest your funds in? While making a selection, we advise that you consider the subscription price, ease of use, and compatibility. If you want to edit your voice recordings before sharing them with friends and relatives, Filmora is the perfect tool to apply.
Free Download For Win 7 or later(64-bit)
Free Download For macOS 10.14 or later
Try AI Voice Changer For Win 7 or later(64-bit)
Try AI Voice Changer For macOS 10.14 or later
Part 1. 7 Best Voice Changers for WhatsApp
Here are the seven (7) most powerful software or apps that offer quality voice-changing services on WhatsApp:
1. Magic Call[iOS] [Free with Limited Features]
Magic Call [iOS] is one of the best voice-changing apps available on the internet. The app lets you switch your voice into a fun and lovely one with complete ease. It’s a simple app available for download to Android and iOS devices.
Users of this WhatsApp voice changer find it simple to operate because of the comprehensive user interface and rich features it holds. Magic Call [iOS] is a freemium app and highly secured. The app provides you with several voice-changing options that you can choose from to prank your callers. Some of them are male, female, and robotic sounds. Additionally, it supports sounds like clap, laughter, gasp, and several others.

How to Use Magic Call [iOS] with WhatsApp
Open Google PlayStore or App Store on your Android device, and search Magic Call. Click on the corresponding key to download and install the app on your device, then follow the procedure below to change your WhatsApp voice:
Step1 Launch Magic Call [iOS], and grant it access to the necessary features such as contact, audio recording, etc.
Step2 Next, choose a contact from the list appearing on your display screen to speak to
Step3 Tap on the contact’s name, and then click on the Female Voice filter from the options that pop up.
Step4 Apply the WhatsApp voice-changer to spice up your conversation with friends and relatives on your contact.
2. Voicemod
Here is another fun-oriented software that permits you to change your voice during WhatsApp calls easily and quickly. Voicemod is a highly efficient WhatsApp voice changer popular among gamers, content creators, and more.
The app is well-customized with epic sound effects that you can select from to pimp your voice during calls. You can choose to sound like a robot, woman, man, or demon. Voicemod integrates with apps like TikTok, Elgato Stream, Audacity, Discord, Skype, and many more.
Also, Voicemod comes with voice filters. The app allows you to switch between scary, loud, or funny voices. Additionally, you have the chance to customize your vice via the Voicelab feature tucked into it. It’s a simple tool compatible with Windows, Mac, and Chromebook.

How to Use Voicemod with WhatsApp
Step1 Open your desired web browser on your PC, and navigate to the official website for Voicemod. A page as below will appear on your screen:
Click on the corresponding button to download and install a suitable version. Wait until the download is complete, and follow the on-screen instructions to configure the app. Ensure you grant permission to the necessary devices such as Microphone, etc.
Step2 Next, confirm the Voice Changer toggle at the bottom of the Window page is activated. Once that’s set, scroll through the library of voice filters, and sound effects to select your desired prank voice.
Step3 Now connect the selected Microphone to WhatsApp, host a call, and start enjoying the lovely prank voices from Voicemod.
3. Call Voice Changer [iOS]
Call Voice Changer is a simple yet powerful voice-changing app built with countless sound effects that you can use to fool your contacts during calls. The app helps you spice up your conversation with friends and families. It lets you select between funny, creepy, and loud voices.
Also, Call Voice Changer supports sound effects like birthday songs, cartoon characters, and lots more. All end-users of this app find it simple to operate. The reason is because of the clean user interface. Call Voice Changer provides you with real-time voice-changing effects- this means you have the privilege to change your voice at any time during calls.

How to Use Call Voice Changer- IntCall
Step1 On your iOS device, open the App Store, and click on the Search tab at the extreme lower right corner of your screen. Enter Call Voice Changer in the empty field provided and tap on the Enter key on your keypad.
Step2 A new screen showing the Call Voice Changer app will pop up. Here is what the app looks like:

Click on the GET button next to the app name. Validate your action when required. Launch the app after the successful download, accept the necessary conditions, and grant access if prompted.
Step3 When Call Voice Changer opens, add your cellphone number, and grant access to Microphone.
Next, select your preferred voice pitch on the next interface that pops up.

Step4 Choose your preferred sound effect from the available options, and make calls via WhatsApp.
4. Funcalls- Voice Changer & Call Recording
With over 100 voice effects, Funcalls is another wonderful WhatsApp voice-changer you can use to alter your voice during audio or video calls. The app makes it to our top list because of the quality features it holds. Funcalls is well-designed with a clean interface that lets you navigate around easily and quickly without involving a third party.
Besides voice changing, Funcalls lets you record your conversations during calls. This WhatsApp voice-changer works perfectly with mobile operating systems like Android and iOS devices. It’s a highly flexible app that permits you to change your voice using different pitches and speeds.
How to Use Funcalls- Voice Changer & Call Recorder
Step1 Depending on the mobile operating system you are using, launch the App Store, or Google PlayStore, click on the Search button and enter Funcalls in the appropriate field.
Tap on the appropriate button to install the app on your device.
Step2 Wait patiently for the installation to complete, and follow the on-screen prompts to set up the app with your Android or iOS device. Once the configuration is complete, click on the Dialer button at the bottom of the app screen. Enter a cellphone number by selecting the appropriate keys. Ensure you input the country code while dialing the number.
Step3 Now select your preferred voice effect from the options appearing on your screen.

Host the call, and download the audio recording. After the call, share the recording with friends and families for fun.
5. Prank Dial
Designed for novices and experts in the tech space, Prank Dial is another voice changer that integrates with WhatsApp. This lightweight app lets you change your voice during calls to spice up conversations with families and friends.
It’s a fun app customized with several background sound effects. From funny sounds to annoying, celebrations, scams, money, politics, and lots more. Prank Dial WhatsApp voice-changer offers quality services in free and paid subscription packages. Like the Funcalls-Voice Changer & Call Recording, Prank Dial also supports call recording.

How to Use Prank Dial with WhatsApp
Step1 Click the appropriate button on your Android or iOS device to open Google PlayStore or App Store. Enter Prank Dial in the field given to search the WhatsApp voice-changer.
Tap the corresponding button to download and install the app on your device. After the installation is over, open the app for operation.
Step2 Next, kindly grant Prank Dial access to calls, contact, and local storage. Pick a sound effect to prank your friend, and head to connect with a friend via WhatsApp.
Step3 Once the step above is complete, settle down and prank your friends. Export and share audio recordings with people on your contact list for fun.
6. Voice Changer with Effects
Here is another good WhatsApp voice-changer with top-notch sound effects that you can select from to prank your contacts. It is a high utility voice-changing app well-known for delivering all it promises. End-users have the freedom to switch a boring phone call into an interesting one by selecting a background effect.
How to Use Voice Changer with Effects with WhatsApp
Step1 Download and install Voice Changer with Effects on your smartphone. Launch the app, and grant necessary permission as required.
Step2 Next, locate the Microphone icon, and click on it. Speak to the mic, and add your desired background voice effect.
Step3 Once the step above is complete, edit the recording, and hit the Share button to send it to your contact.

You can share it via WhatsApp. To do that, select the WhatsApp icon

7. Narrator’s Voice
Lastly, Narrator’s voice is a top-rated WhatsApp voice-changing app designed with extraordinary background sound effects you can use to create a wonderful phone call experience. The app supports the text-to-speech feature. Thus, you can type, and Narrator’s Voice will convert into speech.

How to Use Narrator’s Voice with WhatsApp
Step1 Run Narrator’s Voice by clicking on the appropriate icon on your Android device.
Step2 Grant the app access to all the necessary apps and features, including the microphone. Speak to the microphone to proceed.
Step3 Edit your speech with sound effects, and click on Apply. When the editing is complete, click on Share to send to friends.
Part 2: FAQs
Q1. Can I change my voice during calls?
Yes, of course, you can!
However, you need a voice-changing app that supports real-time voice changing. You can select one from the list shared above. We mentioned seven (7) quality voice-changing apps that you can use to prank your contact during calls.
Q2. How to edit voice recordings before sharing them with friends?
Editing voice recording before sharing it with friends is straightforward if you have a voice editing tool like Wondershare Filmora. Wondershare Filmora is a world-leading video editing software with robust features that you need to edit your media files. It supports audio editing without distorting the file format.
Filmora allows you to detach audio from videos, delete, and adjust audio speeds with quality. Additionally, you can use the software to edit your videos, add transitions, effects, and more. This software works with popular computer systems like Windows and Mac. The software is simple to operate and offers quality results at a remarkably high speed. When compared with other video editing tools, Filmora stands out.

Conclusion
Now we’ve successfully explored the best 7 WhatsApp voice changers. Which do you wish to invest your funds in? While making a selection, we advise that you consider the subscription price, ease of use, and compatibility. If you want to edit your voice recordings before sharing them with friends and relatives, Filmora is the perfect tool to apply.
Free Download For Win 7 or later(64-bit)
Free Download For macOS 10.14 or later
How to Create Cooking Video Intro and Outro for YouTube Channel?
With the number of YouTube content creators increasing every minute, the competition will be strong and unmatched. If you are a chef owning a YouTube cooking channel, this article might be your calling.
The revolutionary cooking video intros and promising outro for the channels are the need of the hour. It has become crucial to give your competitors a powerful match via robust content, incredible cooking background music, and a great end. The article covers creating a café meal intro and cooking channel YouTube end screen. So, time to begin? Shall we?
In this article
01 How to Create a Cafe Meal Intro?
02 How to Create a Cooking Channel YouTube End Screen?
03 3 Recommended Sites to Download Cooking Background Music
Part 1: How to Create a Cafe Meal Intro?
Are you a chef in a restaurant in Paris? Do you need to create a café meal intro that grabs the attention of all food fanatics worldwide? Worry no more, as this section has got you covered.
Wondershare Filmora is a one of its kind software to create an astonishing café meal intro in seconds. Let us initiate the step-by-step!
For Win 7 or later (64-bit)
For macOS 10.12 or later
Step 1: Double click on Wondershare Filmora to open the software. Head to the “Audio” tab and tap “Young and Bright.” The process will launch interesting music from there.

Step 2: Pick one and drag it to the timeline. Navigate to the “Media” tab to drag the cooking video to the first track. You can also import the video from your system.

Step 3: It is time to use the “Split Screen” to show more scenes in one video. Pick one and drag it to the timeline. It will create three vertical divisions on the preview window. Drop three different videos in each division and adjust the height using the Zoom settings.

Step 4: Import another cooking video and import it to the first track. Navigate to the “Elements” section and drag one of it as a background to the end of the first track. Look for another “café” related element to drag it to the end of the second track.

Step 5: Moving on, scroll to the “Titles” panel to pick a “restaurant” related idea and drag it to the timeline. The position of the title can be adjusted, and the name of the title can be altered by placing it in the preview window.

Step 6: Use the big titles for the beginning of the video and drag them to the second track. The title can be adjusted and renamed effortlessly. Pick another title for the middle of the video and perform the same procedure. The process is completed, and you can export the video.

Part 2: How to Create a Cooking Channel YouTube End Screen?
Are you an impeccable chef? Do you own a YouTube channel with limited subscribers?
The background music for cooking videos is essential to capture the attention of food addicts in the world. Your cooking channel’s stunning YouTube end screen is your perfect shot at improving subscribers’ range. The subsection shall reflect upon the procedure to effortlessly use Wondershare Filmora. So, let us have a look!
For Win 7 or later (64-bit)
For macOS 10.12 or later
Step 1: Open Wondershare Filmora from your computer and import the video that you need for the YouTube outro. Drag the video to the first track of your timeline. Head to the “Titles” tab and find the ideal title related to the restaurant idea. Now, drag it on to the second track.

Step 2: Now, it is time to use the “Transitions” tab to pick one and drag it to the end of the second track. First, import another video and drag it to the first track. After that, select the “Titles” and search YouTube pack lower-thirds. Hit one and drag it to the second track. Make required alterations related to the position, allocation, title name, size, and color.

Step 3: Navigate to the “Transitions” and click on one. Drag it and drop between the two clips. Screenshot the picture from the preview window and drag it from the “Media” tab to the first track. Pick the “YouTube end screen template” from titles and drag it to the second track.

Step 4: Modify your text from the “Advanced Settings.” Now, it is time to pick another media from your system to be used as a YouTube channel avatar. Place it on to the third track. It is time to adjust the photo on the end screen.

Step 5: To do so, go to the “Effects” and pick an image mask from it. Drag it to the photo avatar in the preview window. After that, double click on the track, and settings will appear. Select “Image Mask” options to adjust the size of the circle as needed.

Step 6: Adjust the position of the avatar on your preview window. Moving on, pick the keyframe to animate the position of the avatar. Change the rotation, escalation, and opacity as needed.

Step 7: It is time to add another image to the fourth track and perform the same procedure as the profile image. It will be displayed as the recent video on the end screen. Animate the imagery as done previously. You have created a creative end screen for your cooking YouTube channel.

Part 3: 3 Recommended Sites to Download Cooking Background Music
The background music for cooking videos is an important part of a cooking video intro and outro. Therefore, we can introduce three sites that offer great cooking background music free of copyright infringement issues. So, are you with us? Let us start!
Envato Elements
The first one of the lot is Envato Elements. There are different genres of music linked with cooking videos. The website filters can be tailored according to the theme of one’s cooking YouTube channel. Additionally, there are cooking moods music as well.

MobCup
MobCup has made it easy to browse the related cooking background music. The cooking music soup, monster hunt, cooking instrumental, and cooking effects are famous music options. The user can download them by hitting the “Download” button effortlessly.

SoundCloud
SoundCloud is another remarkable source for cooking videos to get hands-on background music. The royalty-free music for food, cooking music, and uplifting background music can be incorporated in the videos to give an essence of the cooking tutorials. The link can be copied, and the track can be downloaded in seconds.

Concluding Remarks
The marketing industry is getting more fame than the actual brand services due to multiple reasons. The animations and transitions are used to attract the attention of potential users and clients. If you own a restaurant with a YouTube cooking channel, the exciting cooking background music will work best for you.
The article discussed creating a café meal intro and cooking channel YouTube end screen through Filmora. The three recommended sites to download the music were also this write-up’s crux.
Wondershare Filmora
Get started easily with Filmora’s powerful performance, intuitive interface, and countless effects!
Try It Free Try It Free Try It Free Learn More >

02 How to Create a Cooking Channel YouTube End Screen?
03 3 Recommended Sites to Download Cooking Background Music
Part 1: How to Create a Cafe Meal Intro?
Are you a chef in a restaurant in Paris? Do you need to create a café meal intro that grabs the attention of all food fanatics worldwide? Worry no more, as this section has got you covered.
Wondershare Filmora is a one of its kind software to create an astonishing café meal intro in seconds. Let us initiate the step-by-step!
For Win 7 or later (64-bit)
For macOS 10.12 or later
Step 1: Double click on Wondershare Filmora to open the software. Head to the “Audio” tab and tap “Young and Bright.” The process will launch interesting music from there.

Step 2: Pick one and drag it to the timeline. Navigate to the “Media” tab to drag the cooking video to the first track. You can also import the video from your system.

Step 3: It is time to use the “Split Screen” to show more scenes in one video. Pick one and drag it to the timeline. It will create three vertical divisions on the preview window. Drop three different videos in each division and adjust the height using the Zoom settings.

Step 4: Import another cooking video and import it to the first track. Navigate to the “Elements” section and drag one of it as a background to the end of the first track. Look for another “café” related element to drag it to the end of the second track.

Step 5: Moving on, scroll to the “Titles” panel to pick a “restaurant” related idea and drag it to the timeline. The position of the title can be adjusted, and the name of the title can be altered by placing it in the preview window.

Step 6: Use the big titles for the beginning of the video and drag them to the second track. The title can be adjusted and renamed effortlessly. Pick another title for the middle of the video and perform the same procedure. The process is completed, and you can export the video.

Part 2: How to Create a Cooking Channel YouTube End Screen?
Are you an impeccable chef? Do you own a YouTube channel with limited subscribers?
The background music for cooking videos is essential to capture the attention of food addicts in the world. Your cooking channel’s stunning YouTube end screen is your perfect shot at improving subscribers’ range. The subsection shall reflect upon the procedure to effortlessly use Wondershare Filmora. So, let us have a look!
For Win 7 or later (64-bit)
For macOS 10.12 or later
Step 1: Open Wondershare Filmora from your computer and import the video that you need for the YouTube outro. Drag the video to the first track of your timeline. Head to the “Titles” tab and find the ideal title related to the restaurant idea. Now, drag it on to the second track.

Step 2: Now, it is time to use the “Transitions” tab to pick one and drag it to the end of the second track. First, import another video and drag it to the first track. After that, select the “Titles” and search YouTube pack lower-thirds. Hit one and drag it to the second track. Make required alterations related to the position, allocation, title name, size, and color.

Step 3: Navigate to the “Transitions” and click on one. Drag it and drop between the two clips. Screenshot the picture from the preview window and drag it from the “Media” tab to the first track. Pick the “YouTube end screen template” from titles and drag it to the second track.

Step 4: Modify your text from the “Advanced Settings.” Now, it is time to pick another media from your system to be used as a YouTube channel avatar. Place it on to the third track. It is time to adjust the photo on the end screen.

Step 5: To do so, go to the “Effects” and pick an image mask from it. Drag it to the photo avatar in the preview window. After that, double click on the track, and settings will appear. Select “Image Mask” options to adjust the size of the circle as needed.

Step 6: Adjust the position of the avatar on your preview window. Moving on, pick the keyframe to animate the position of the avatar. Change the rotation, escalation, and opacity as needed.

Step 7: It is time to add another image to the fourth track and perform the same procedure as the profile image. It will be displayed as the recent video on the end screen. Animate the imagery as done previously. You have created a creative end screen for your cooking YouTube channel.

Part 3: 3 Recommended Sites to Download Cooking Background Music
The background music for cooking videos is an important part of a cooking video intro and outro. Therefore, we can introduce three sites that offer great cooking background music free of copyright infringement issues. So, are you with us? Let us start!
Envato Elements
The first one of the lot is Envato Elements. There are different genres of music linked with cooking videos. The website filters can be tailored according to the theme of one’s cooking YouTube channel. Additionally, there are cooking moods music as well.

MobCup
MobCup has made it easy to browse the related cooking background music. The cooking music soup, monster hunt, cooking instrumental, and cooking effects are famous music options. The user can download them by hitting the “Download” button effortlessly.

SoundCloud
SoundCloud is another remarkable source for cooking videos to get hands-on background music. The royalty-free music for food, cooking music, and uplifting background music can be incorporated in the videos to give an essence of the cooking tutorials. The link can be copied, and the track can be downloaded in seconds.

Concluding Remarks
The marketing industry is getting more fame than the actual brand services due to multiple reasons. The animations and transitions are used to attract the attention of potential users and clients. If you own a restaurant with a YouTube cooking channel, the exciting cooking background music will work best for you.
The article discussed creating a café meal intro and cooking channel YouTube end screen through Filmora. The three recommended sites to download the music were also this write-up’s crux.
Wondershare Filmora
Get started easily with Filmora’s powerful performance, intuitive interface, and countless effects!
Try It Free Try It Free Try It Free Learn More >

02 How to Create a Cooking Channel YouTube End Screen?
03 3 Recommended Sites to Download Cooking Background Music
Part 1: How to Create a Cafe Meal Intro?
Are you a chef in a restaurant in Paris? Do you need to create a café meal intro that grabs the attention of all food fanatics worldwide? Worry no more, as this section has got you covered.
Wondershare Filmora is a one of its kind software to create an astonishing café meal intro in seconds. Let us initiate the step-by-step!
For Win 7 or later (64-bit)
For macOS 10.12 or later
Step 1: Double click on Wondershare Filmora to open the software. Head to the “Audio” tab and tap “Young and Bright.” The process will launch interesting music from there.

Step 2: Pick one and drag it to the timeline. Navigate to the “Media” tab to drag the cooking video to the first track. You can also import the video from your system.

Step 3: It is time to use the “Split Screen” to show more scenes in one video. Pick one and drag it to the timeline. It will create three vertical divisions on the preview window. Drop three different videos in each division and adjust the height using the Zoom settings.

Step 4: Import another cooking video and import it to the first track. Navigate to the “Elements” section and drag one of it as a background to the end of the first track. Look for another “café” related element to drag it to the end of the second track.

Step 5: Moving on, scroll to the “Titles” panel to pick a “restaurant” related idea and drag it to the timeline. The position of the title can be adjusted, and the name of the title can be altered by placing it in the preview window.

Step 6: Use the big titles for the beginning of the video and drag them to the second track. The title can be adjusted and renamed effortlessly. Pick another title for the middle of the video and perform the same procedure. The process is completed, and you can export the video.

Part 2: How to Create a Cooking Channel YouTube End Screen?
Are you an impeccable chef? Do you own a YouTube channel with limited subscribers?
The background music for cooking videos is essential to capture the attention of food addicts in the world. Your cooking channel’s stunning YouTube end screen is your perfect shot at improving subscribers’ range. The subsection shall reflect upon the procedure to effortlessly use Wondershare Filmora. So, let us have a look!
For Win 7 or later (64-bit)
For macOS 10.12 or later
Step 1: Open Wondershare Filmora from your computer and import the video that you need for the YouTube outro. Drag the video to the first track of your timeline. Head to the “Titles” tab and find the ideal title related to the restaurant idea. Now, drag it on to the second track.

Step 2: Now, it is time to use the “Transitions” tab to pick one and drag it to the end of the second track. First, import another video and drag it to the first track. After that, select the “Titles” and search YouTube pack lower-thirds. Hit one and drag it to the second track. Make required alterations related to the position, allocation, title name, size, and color.

Step 3: Navigate to the “Transitions” and click on one. Drag it and drop between the two clips. Screenshot the picture from the preview window and drag it from the “Media” tab to the first track. Pick the “YouTube end screen template” from titles and drag it to the second track.

Step 4: Modify your text from the “Advanced Settings.” Now, it is time to pick another media from your system to be used as a YouTube channel avatar. Place it on to the third track. It is time to adjust the photo on the end screen.

Step 5: To do so, go to the “Effects” and pick an image mask from it. Drag it to the photo avatar in the preview window. After that, double click on the track, and settings will appear. Select “Image Mask” options to adjust the size of the circle as needed.

Step 6: Adjust the position of the avatar on your preview window. Moving on, pick the keyframe to animate the position of the avatar. Change the rotation, escalation, and opacity as needed.

Step 7: It is time to add another image to the fourth track and perform the same procedure as the profile image. It will be displayed as the recent video on the end screen. Animate the imagery as done previously. You have created a creative end screen for your cooking YouTube channel.

Part 3: 3 Recommended Sites to Download Cooking Background Music
The background music for cooking videos is an important part of a cooking video intro and outro. Therefore, we can introduce three sites that offer great cooking background music free of copyright infringement issues. So, are you with us? Let us start!
Envato Elements
The first one of the lot is Envato Elements. There are different genres of music linked with cooking videos. The website filters can be tailored according to the theme of one’s cooking YouTube channel. Additionally, there are cooking moods music as well.

MobCup
MobCup has made it easy to browse the related cooking background music. The cooking music soup, monster hunt, cooking instrumental, and cooking effects are famous music options. The user can download them by hitting the “Download” button effortlessly.

SoundCloud
SoundCloud is another remarkable source for cooking videos to get hands-on background music. The royalty-free music for food, cooking music, and uplifting background music can be incorporated in the videos to give an essence of the cooking tutorials. The link can be copied, and the track can be downloaded in seconds.

Concluding Remarks
The marketing industry is getting more fame than the actual brand services due to multiple reasons. The animations and transitions are used to attract the attention of potential users and clients. If you own a restaurant with a YouTube cooking channel, the exciting cooking background music will work best for you.
The article discussed creating a café meal intro and cooking channel YouTube end screen through Filmora. The three recommended sites to download the music were also this write-up’s crux.
Wondershare Filmora
Get started easily with Filmora’s powerful performance, intuitive interface, and countless effects!
Try It Free Try It Free Try It Free Learn More >

02 How to Create a Cooking Channel YouTube End Screen?
03 3 Recommended Sites to Download Cooking Background Music
Part 1: How to Create a Cafe Meal Intro?
Are you a chef in a restaurant in Paris? Do you need to create a café meal intro that grabs the attention of all food fanatics worldwide? Worry no more, as this section has got you covered.
Wondershare Filmora is a one of its kind software to create an astonishing café meal intro in seconds. Let us initiate the step-by-step!
For Win 7 or later (64-bit)
For macOS 10.12 or later
Step 1: Double click on Wondershare Filmora to open the software. Head to the “Audio” tab and tap “Young and Bright.” The process will launch interesting music from there.

Step 2: Pick one and drag it to the timeline. Navigate to the “Media” tab to drag the cooking video to the first track. You can also import the video from your system.

Step 3: It is time to use the “Split Screen” to show more scenes in one video. Pick one and drag it to the timeline. It will create three vertical divisions on the preview window. Drop three different videos in each division and adjust the height using the Zoom settings.

Step 4: Import another cooking video and import it to the first track. Navigate to the “Elements” section and drag one of it as a background to the end of the first track. Look for another “café” related element to drag it to the end of the second track.

Step 5: Moving on, scroll to the “Titles” panel to pick a “restaurant” related idea and drag it to the timeline. The position of the title can be adjusted, and the name of the title can be altered by placing it in the preview window.

Step 6: Use the big titles for the beginning of the video and drag them to the second track. The title can be adjusted and renamed effortlessly. Pick another title for the middle of the video and perform the same procedure. The process is completed, and you can export the video.

Part 2: How to Create a Cooking Channel YouTube End Screen?
Are you an impeccable chef? Do you own a YouTube channel with limited subscribers?
The background music for cooking videos is essential to capture the attention of food addicts in the world. Your cooking channel’s stunning YouTube end screen is your perfect shot at improving subscribers’ range. The subsection shall reflect upon the procedure to effortlessly use Wondershare Filmora. So, let us have a look!
For Win 7 or later (64-bit)
For macOS 10.12 or later
Step 1: Open Wondershare Filmora from your computer and import the video that you need for the YouTube outro. Drag the video to the first track of your timeline. Head to the “Titles” tab and find the ideal title related to the restaurant idea. Now, drag it on to the second track.

Step 2: Now, it is time to use the “Transitions” tab to pick one and drag it to the end of the second track. First, import another video and drag it to the first track. After that, select the “Titles” and search YouTube pack lower-thirds. Hit one and drag it to the second track. Make required alterations related to the position, allocation, title name, size, and color.

Step 3: Navigate to the “Transitions” and click on one. Drag it and drop between the two clips. Screenshot the picture from the preview window and drag it from the “Media” tab to the first track. Pick the “YouTube end screen template” from titles and drag it to the second track.

Step 4: Modify your text from the “Advanced Settings.” Now, it is time to pick another media from your system to be used as a YouTube channel avatar. Place it on to the third track. It is time to adjust the photo on the end screen.

Step 5: To do so, go to the “Effects” and pick an image mask from it. Drag it to the photo avatar in the preview window. After that, double click on the track, and settings will appear. Select “Image Mask” options to adjust the size of the circle as needed.

Step 6: Adjust the position of the avatar on your preview window. Moving on, pick the keyframe to animate the position of the avatar. Change the rotation, escalation, and opacity as needed.

Step 7: It is time to add another image to the fourth track and perform the same procedure as the profile image. It will be displayed as the recent video on the end screen. Animate the imagery as done previously. You have created a creative end screen for your cooking YouTube channel.

Part 3: 3 Recommended Sites to Download Cooking Background Music
The background music for cooking videos is an important part of a cooking video intro and outro. Therefore, we can introduce three sites that offer great cooking background music free of copyright infringement issues. So, are you with us? Let us start!
Envato Elements
The first one of the lot is Envato Elements. There are different genres of music linked with cooking videos. The website filters can be tailored according to the theme of one’s cooking YouTube channel. Additionally, there are cooking moods music as well.

MobCup
MobCup has made it easy to browse the related cooking background music. The cooking music soup, monster hunt, cooking instrumental, and cooking effects are famous music options. The user can download them by hitting the “Download” button effortlessly.

SoundCloud
SoundCloud is another remarkable source for cooking videos to get hands-on background music. The royalty-free music for food, cooking music, and uplifting background music can be incorporated in the videos to give an essence of the cooking tutorials. The link can be copied, and the track can be downloaded in seconds.

Concluding Remarks
The marketing industry is getting more fame than the actual brand services due to multiple reasons. The animations and transitions are used to attract the attention of potential users and clients. If you own a restaurant with a YouTube cooking channel, the exciting cooking background music will work best for you.
The article discussed creating a café meal intro and cooking channel YouTube end screen through Filmora. The three recommended sites to download the music were also this write-up’s crux.
Wondershare Filmora
Get started easily with Filmora’s powerful performance, intuitive interface, and countless effects!
Try It Free Try It Free Try It Free Learn More >

How To Change Text In Premiere Pro
One of the most fundamental and significant tasks in the editing process is knowing how to change text in Premiere Pro. Any skill level may easily do this with the help of Premiere. Your workflow will be streamlined and accelerated by using a template to apply change text Premiere Pro, and it could even inspire you to use your imagination to create some effects of your own! Follow this guide for the details on how to change text in Adobe Premiere.
By using customization and animated motion, Premiere also does a wonderful job of enabling an editor to create dynamic text. The keyboard shortcut is the quickest method to create a text file as well as change text in Premiere Pro. Given that each approach has a unique set of applications, it is crucial to be familiar with them all. Learn step-by-step how to change text in Adobe Premiere in this tutorial.
Part 1. Types of Text to Add in PR
You may not be aware of all the many characteristics that a text file might have. The font’s style, size, and color are only the tip of the iceberg.
FX Reflection : Reflection FX settings for Premiere Pro give your text or logo a reflecting appearance. 5 different preset types that you may mix and match to obtain different reflections. Reflection FX is a great pack for making text that blends into an environment or has a 3D appearance. It allows you to give your text several sorts of reflected texture effects.
Digital Blocks Text : Digital Blocks Text Animator is a bundle of chic text animation presets is called Text Animator. This one-of-a-kind, geometric preset collection may be used for a wide range of effects, including glitching, lower thirds, dramatic titles, animations, and more. Use this tool to make cinematic, corporate, wedding, or glitch titles, animation typography, lower thirds, or movie titles.
Colored Glitch : Any technology-related movies often use colored glitch effects. This animation glitch preset collection is made up of geometric shapes and vivid colors. It’s really easy to use and produces dramatic, complicated effects. These effects may be easily produced in Premiere Pro with a little color tweak.
Impulse Text : It is really easy to do; all that is needed to create the desired appearance is to vary the size of the layers. This dynamic text transitions set is bold and styled for designers with a lot of guts. Impress viewers by having your titles exit the screen as quickly as dramatically as they came in.
3D Text : This 3D Text Animation set is perfect if you need some text that will stand out in a presentation or video. It doesn’t have a lot of crazy effects or color changes, but it makes your text move in 3D space and is guaranteed to catch your audience’s eye.
Wiggle Animation of Text : For vloggers looking for that hand-drawn impression while preserving a little bit of subtlety, Wiggle text is a good option. It’s a customizable wiggle text effect package with various presets and a beginner-friendly video guide.
Part 2. How to Change Text on Video with PR
The new technique of text creation is more user-friendly and has greater integration than previously. The older methods had their advantages, but the modern methods undoubtedly take things to the next level. The older methods handled text like it was independent, discrete video clips that could be put into your source monitor and then chopped into the timeline. Overall, this method of adding text to your movie is fast, easy, but rather restricted; for many videos, this may be sufficient.
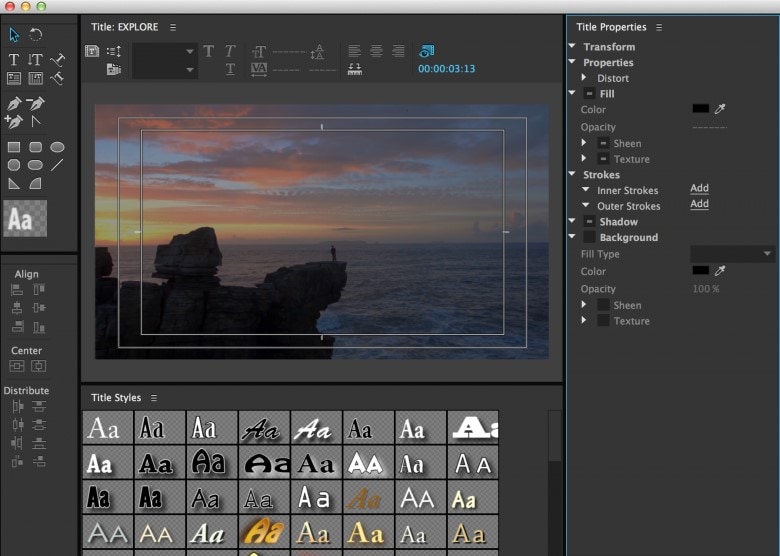
Step1Adding Text
Press the CTRL+T on Windows or if you’re on MacBook, then press CMD+T keyboard shortcut with your sequence chosen. Both on the sequence and in the Program window, a new text file will show up.
Step2Choosing the Type Tool
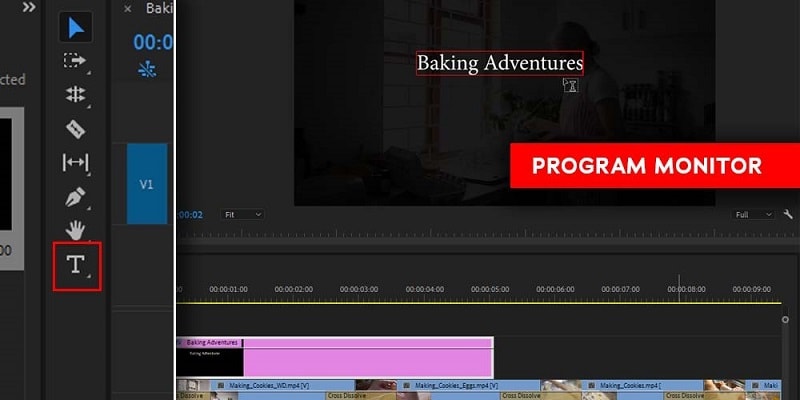
Drag a text box onto your movie using the Type Tool, then start typing. You may need to go to Windows > Tools and click and hold Type Tool if it isn’t already visible. Use the Type Tool by clicking on its icon in the Tool panel or by using the T key on your keyboard. A new text file should then emerge on the sequence and Program window once you click anywhere within the Program window.
Step3Edit Your Text
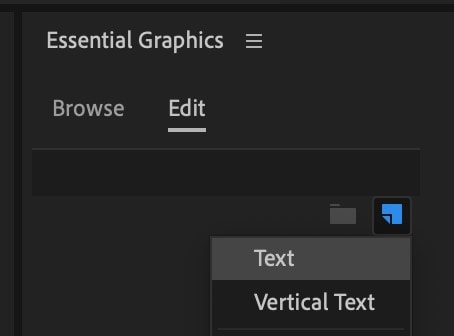
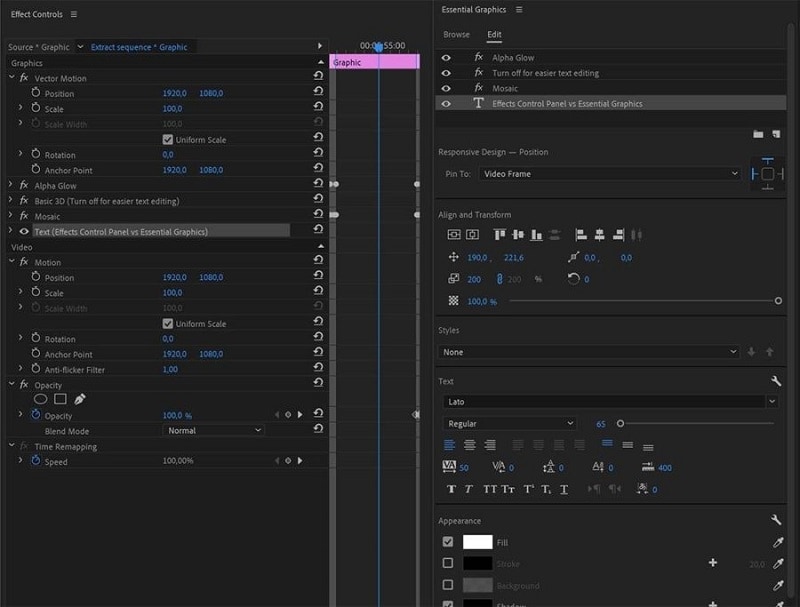
You may make simple text modifications, such as changing the font’s size, color, or style, by opening the Essential Graphics panel (Window > Essential Graphics). The right side of the screen will display the Essential Graphics panel. Select Text when you click the New Layer button as shown below. The sequence and program window should display a text file.
Step4Make your text animated
Use the Effect Controls panel, where you can add motion, to add some simple movement to your text. Keyframes may be used to make rolling credits or to give a title a rotating effect.
Part 3. Alternative way to edit text in video
A text effect may significantly increase the production value of any project, whether you are editing YouTube videos, a science fiction movie, or a commercial. You’ll be able to get inventive with frame duplication and quality tweaking to produce a variety of effects if you understand how to make a glitch effect from start. For this reason, we advise using Wondershare Filmora as a quick fix before using text effects in your projects.
If you don’t consider yourself an expert in motion graphics, have you ever had a wonderful idea for an animated title, wacky typography, or other entertaining text effects? Fortunately, applying text effects in Filmora is quite easy. Additionally, having a backup plan in mind enhances your effectiveness during a negotiation. Filmora is brimming with highlights, astounding motions, and titles to spice up your finished film and give it a polished look. Let’s look at using Filmora to alter text in your video.
Step1Open the Filmora Editor
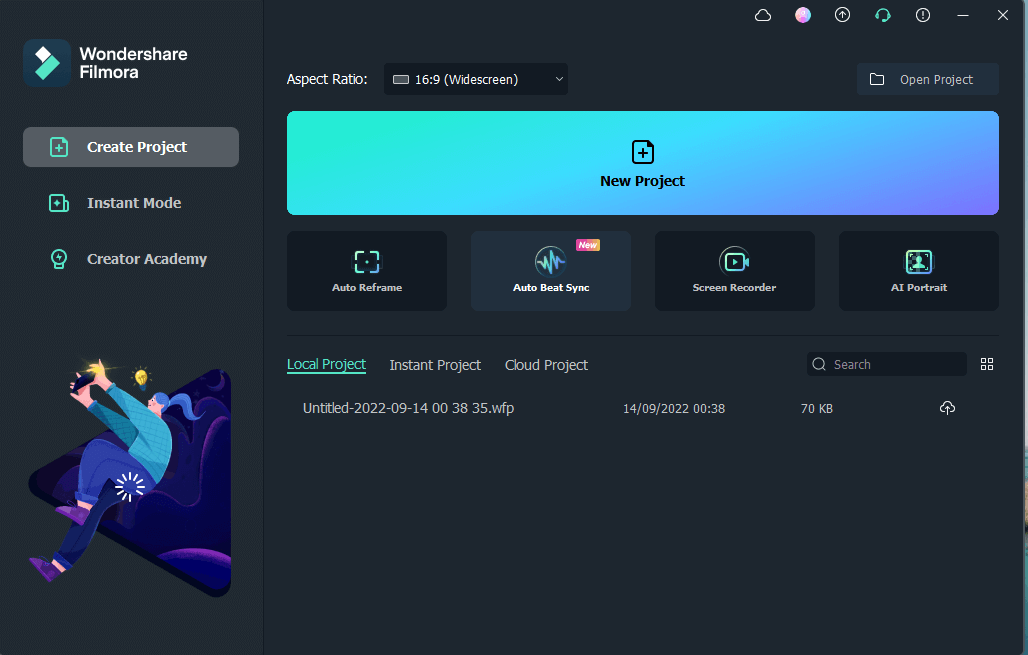
You must first launch the software application in order to go further without difficulty. To do so, choose the Video Editor button in the startup window. The following editor panel will then appear:

Step2Adding text to the timeline
Filmora quickly imports your files and then groups everything under the Import area. The imported files are easily visible, and you can start working with the text animation by adding the necessary ones to the timeline below from that area. Just drag the files to the timeline as seen below. Additionally, a variety of options are shown; you must choose the one where you want your text to appear.

Step3Animate the Text
Animate By assisting you with font, style, color, alignment, and everything else, Filmora helps you make your text animation using the controller window as shown below. The Advanced option, located in the editor tab, allows you to give your text motion.

Step4Export the File
You can also use the software’s Preview window to check the animation you’ve chosen and then add it to the timeline with a few easy drag-and-drop operations. You may now save the instructive video for sharing on social media after completing its creation and editing. You have the option of saving the file as an MP4, WMV, AVI, MOV, or even in GIF file.
Conclusion
Text and titles may be used to easily build simple animations in Premiere. In summary, learning how to change text on premiere pro is addressed in detail. The majority of the change text in Premiere Pro presets will be compatible to you now. Though there are loads of complications with different versions of PR, Filmora, on the other hand, gives you the option to add some excellent text effects to your films in a simplified manner. Refer to this toolkit as PR alternative to change text in Premiere Pro files effectively.
Free Download For Win 7 or later(64-bit)
Free Download For macOS 10.14 or later
Also read:
- In 2024, What Slideshow Templates Teach You About Aesthetic
- New In 2024, Learn How to Merge Audio and Video Like a Pro with This Step-by-Step Guide to Using FFmpeg. Create Seamless Videos and Improve Your Video Production Skills
- In 2024, YouTube Zoom to Fill Is a Great Feature for Viewing Things in Depth. This Article Answers All Questions About Fixing YouTube Zoom to Fill Not Working on Your Device
- In 2024, For Artists Who Are Making Videos for Show Their Knowledge or Projects, Add some Effects for the Video Can Always Provoke Interests and Attention. This Article Will Show You How to Do that Easily
- New Converting Files Is Easy with the Right Tools, and Likewise, GIF to JPG Conversion Is. Choose the Best Tool and Get the Expected Results Within the Blink of an Eye for 2024
- New In 2024, Minecraft Pixel Art Is a Trending Subject, and They Simply Consist of In-Game Pixel Artworks, Besides the Minecraft Houses, Farms, or Cities. Lets Explore the Fantastic World of Minecraft Pixel Art
- New How to Make a Gaming Montage - Guide & Tips for 2024
- Updated 2024 Approved 2 Easy Methods | How To Zoom In On TikTok Videos?
- Updated In 2024, DVD Slideshow Builder Review and Tutorial
- In 2024, How to Share YouTube Video on Zoom?
- Updated How to Create Intro with Renderforest for 2024
- Updated Want to Find some Creative, Entertaining Ways to Preserve Precious Memories& Pass Them On-To Upcoming Generations? Well, Surely You Can Do It for 2024
- New Do You Want to Make Your Video Look Like Its From the 90S? Then, Make Sure to Add Vintage Overlays and VHS Sound Effects to Give It the Old Feel for 2024
- Updated 2024 Approved Create Kinetice Typography Text Effect in Filmora
- 2024 Approved Top LUTs for Sony HLG
- Do You Need More Time to Explain a Particular Screen or Moment in Your Recording Using an Extended Freeze-Frame? Learn How to Use Camtasia Freeze-Frame to Extend Parts of a Video Effectively for 2024
- New How to Download and Use Vegas Pro for 2024
- New Top-Search The Best Game Screen Recording Tools for PC for 2024
- In 2024, 8 Best Video Editor with Useful Masking
- New In 2024, Wondering if You Can Make DIY Green Screen Video for Streaming? Learn the Easy Steps to Setup DIY Green Screen, Shoot the Video and Edit It Out to Add Green Screen Effects
- Solved Photos Disappeared from iPhone 11 Pro Max Suddenly | Stellar
- How To Get the Apple ID Verification Code From Apple iPhone 13 Pro Max in the Best Ways
- Edit and Send Fake Location on Telegram For your Samsung Galaxy M54 5G in 3 Ways | Dr.fone
- App Wont Open on Your Poco M6 Pro 5G? Here Are All Fixes | Dr.fone
- In 2024, Universal Unlock Pattern for Vivo V30 Pro
- In 2024, How to Change Netflix Location to Get More Country Version On Motorola Razr 40 | Dr.fone
- In 2024, How To Use Special Features - Virtual Location On Vivo Y100i Power 5G? | Dr.fone
- In 2024, How to Mirror Motorola Moto E13 to Mac? | Dr.fone
- In 2024, The Best iSpoofer Alternative to Try On Oppo A58 4G | Dr.fone
- Tecno Camon 20 Pro 5G Screen Unresponsive? Heres How to Fix It | Dr.fone
- In 2024, How To Remove Flashlight From iPhone X Lock Screen | Dr.fone
- In 2024, Bypass iCloud Activation Lock with IMEI Code From your Apple iPhone SE (2020)
- Updated In 2024, What Is an AI Presentation Maker? | Wondershare Virbo Glossary
- How to share/fake gps on Uber for Samsung Galaxy A24 | Dr.fone
- How to Intercept Text Messages on Motorola Razr 40 | Dr.fone
- How To Remove or Bypass Knox Enrollment Service On Nubia Red Magic 8S Pro+
- In 2024, Vivo V29 Pro ADB Format Tool for PC vs. Other Unlocking Tools Which One is the Best?
- How to Unlock SIM Card on Vivo Y78+ online without jailbreak
- Title: Updated Step by Step to Cut Videos in Adobe Premiere Pro for 2024
- Author: Morgan
- Created at : 2024-04-24 01:07:18
- Updated at : 2024-04-25 01:07:18
- Link: https://ai-video-editing.techidaily.com/updated-step-by-step-to-cut-videos-in-adobe-premiere-pro-for-2024/
- License: This work is licensed under CC BY-NC-SA 4.0.

