
Updated Text Animation Intro Tutorial in Filmora for 2024

Text Animation Intro Tutorial in Filmora
Preparation
What you need to prepare:
- A computer (Windows or macOS)
- Your video materials.
- Filmora video editor
Step 1
Download and Install the Filmora video editor . Then, click on New Project once the program starts.
Step 2
Go to Titles and drag the Default Title to the Timeline. Then, double-click on the Default Title clip to open its settings. Here, type in your text → change the text color to Black → click OK → take a snapshot.

Step 3
Double-click on the Default Title once more and simply change the text color to anything other than black this time. Then, click OK and take another snapshot. After this, delete the Default Title from the Timeline.
Step 4
Next, go to Sample Color and drag the White color to the Timeline. Increase the White Color clip’s duration to 10 seconds by dragging the tail of the clip to the right.

Step 5
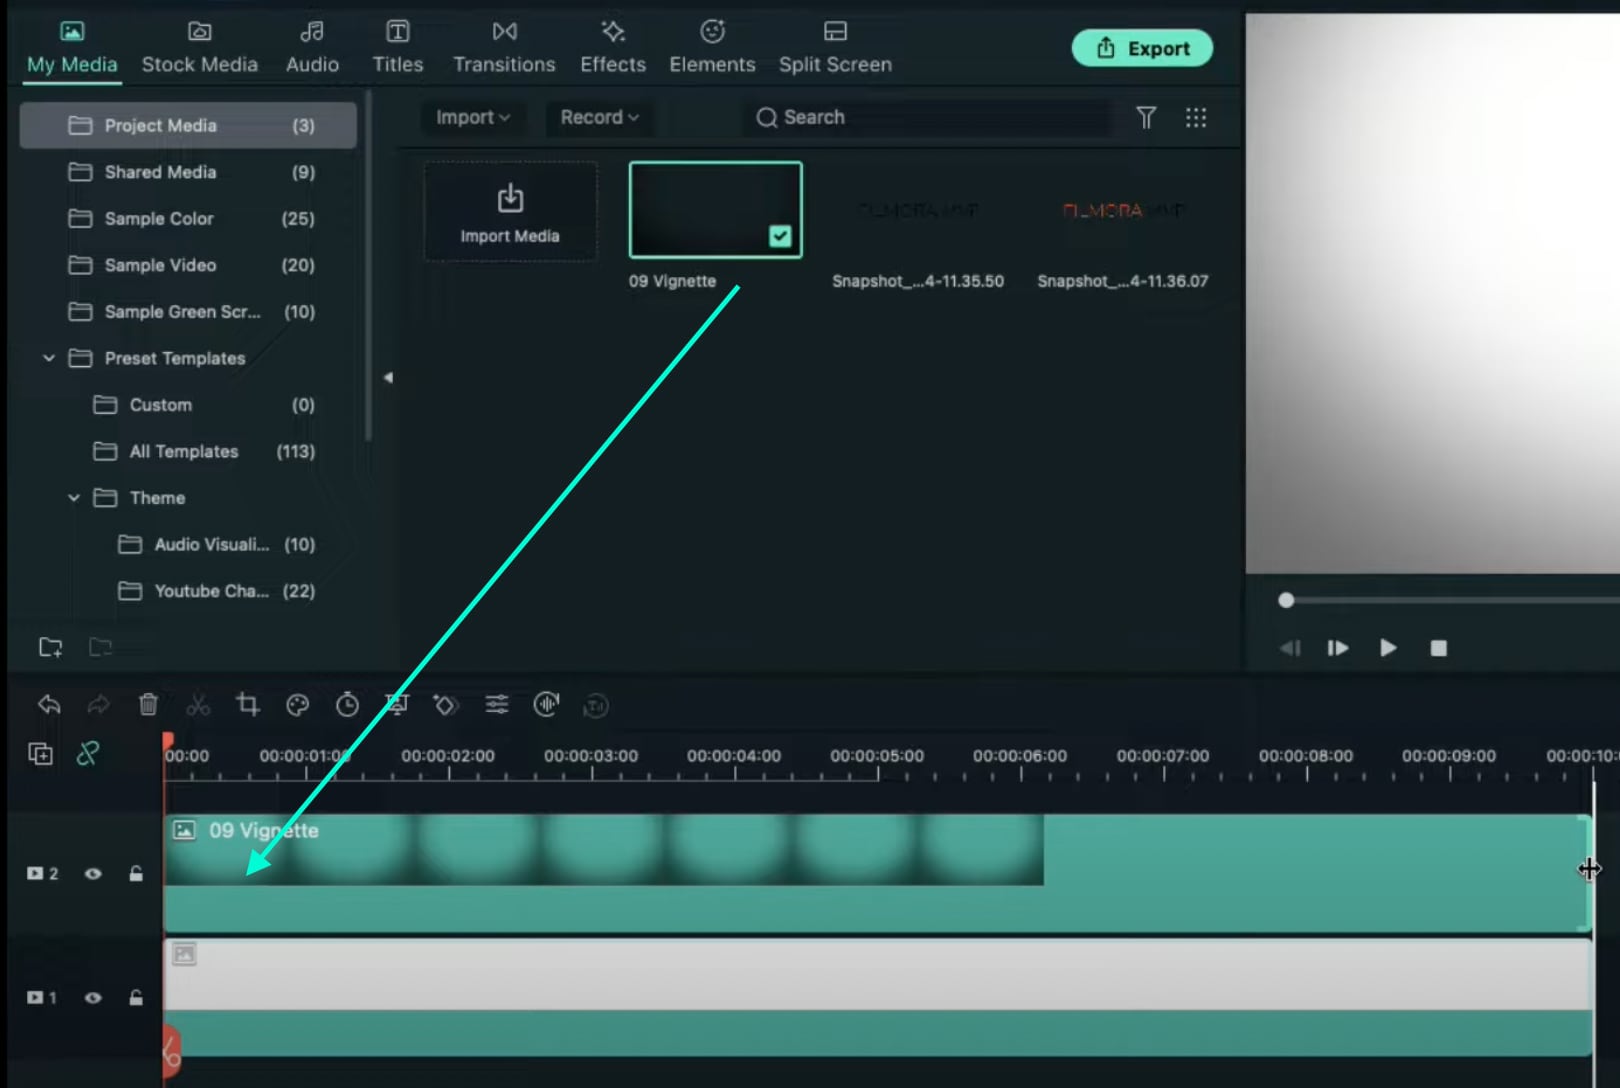
For the next step, you need to download a simple Vignette png image . Then, import the Vignette image into Filmora. Go to My Media and click on Import Media. Import it and drag the image to the Timeline. Then, move that clip to Track 3.
Step 6
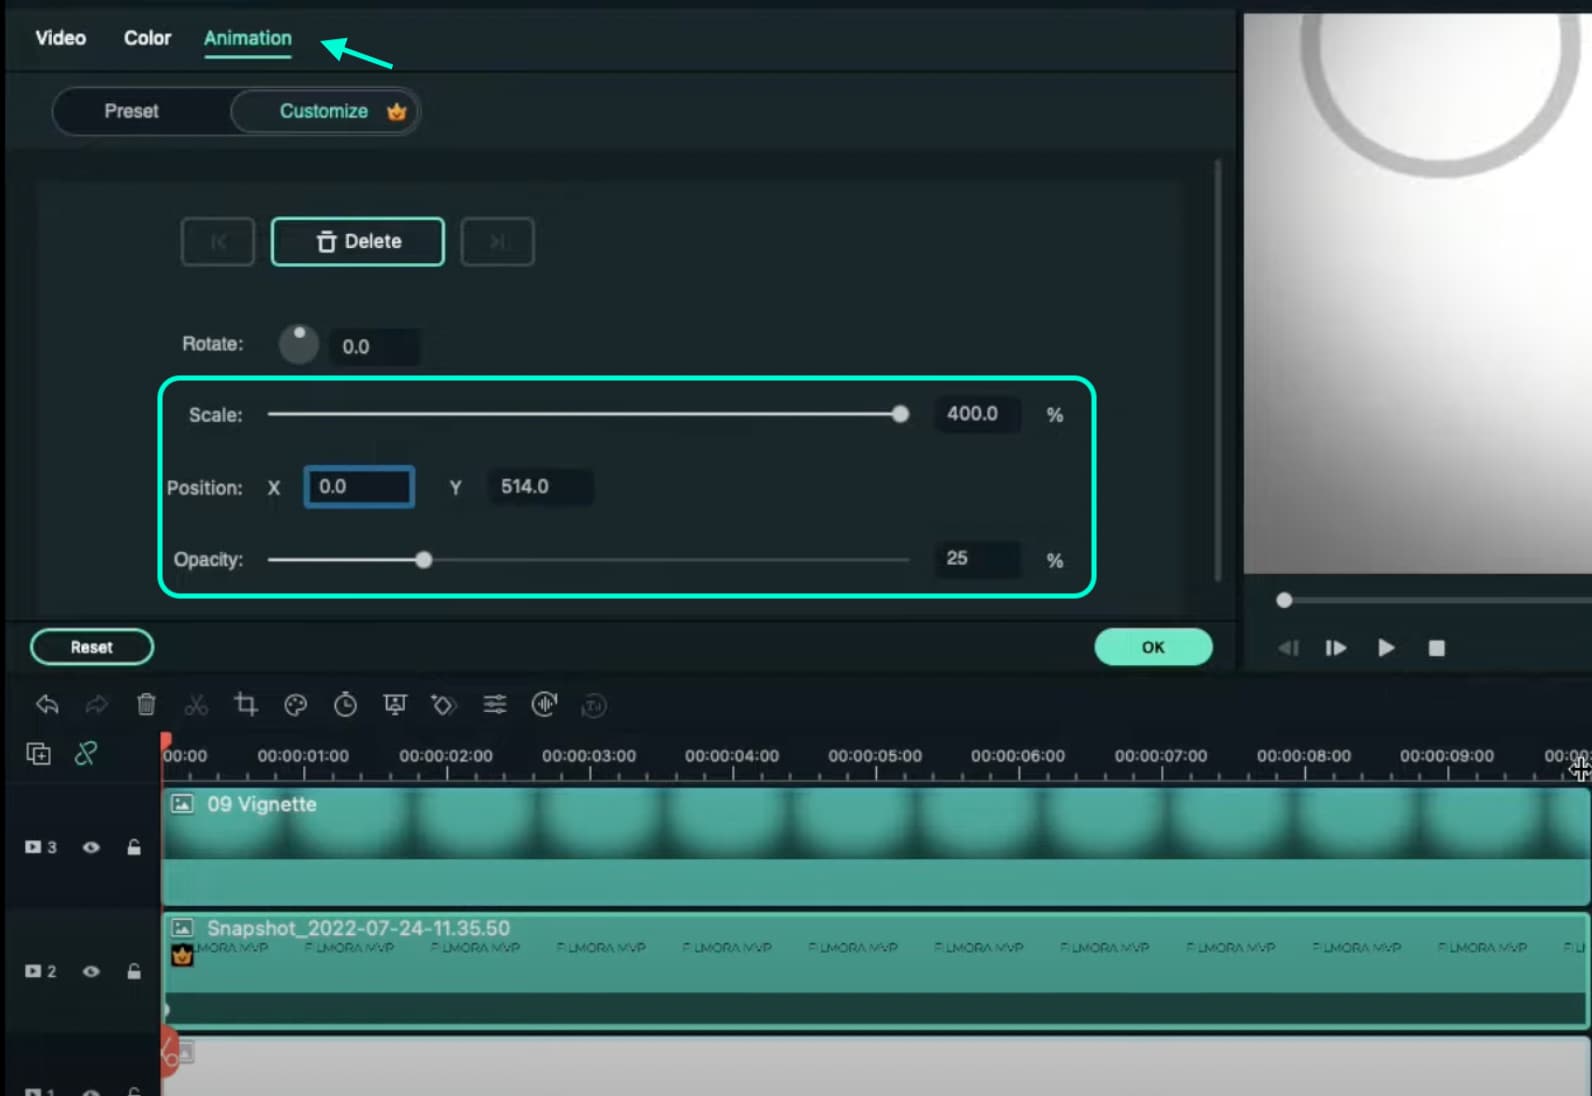
Drop the Black snapshot you took earlier to Track 2. Double-click on it, go to Animation, and apply these settings. After this, move the Playhead to the end of the clip and change the X-axis value to “-800”.
Step 7
Go to Effects and drag the Square Blur effect to Track 4 on the Timeline. Increase its duration to match the other clips. Then, click on the effect and change its Size bar value to 4. Click OK.

Step 8
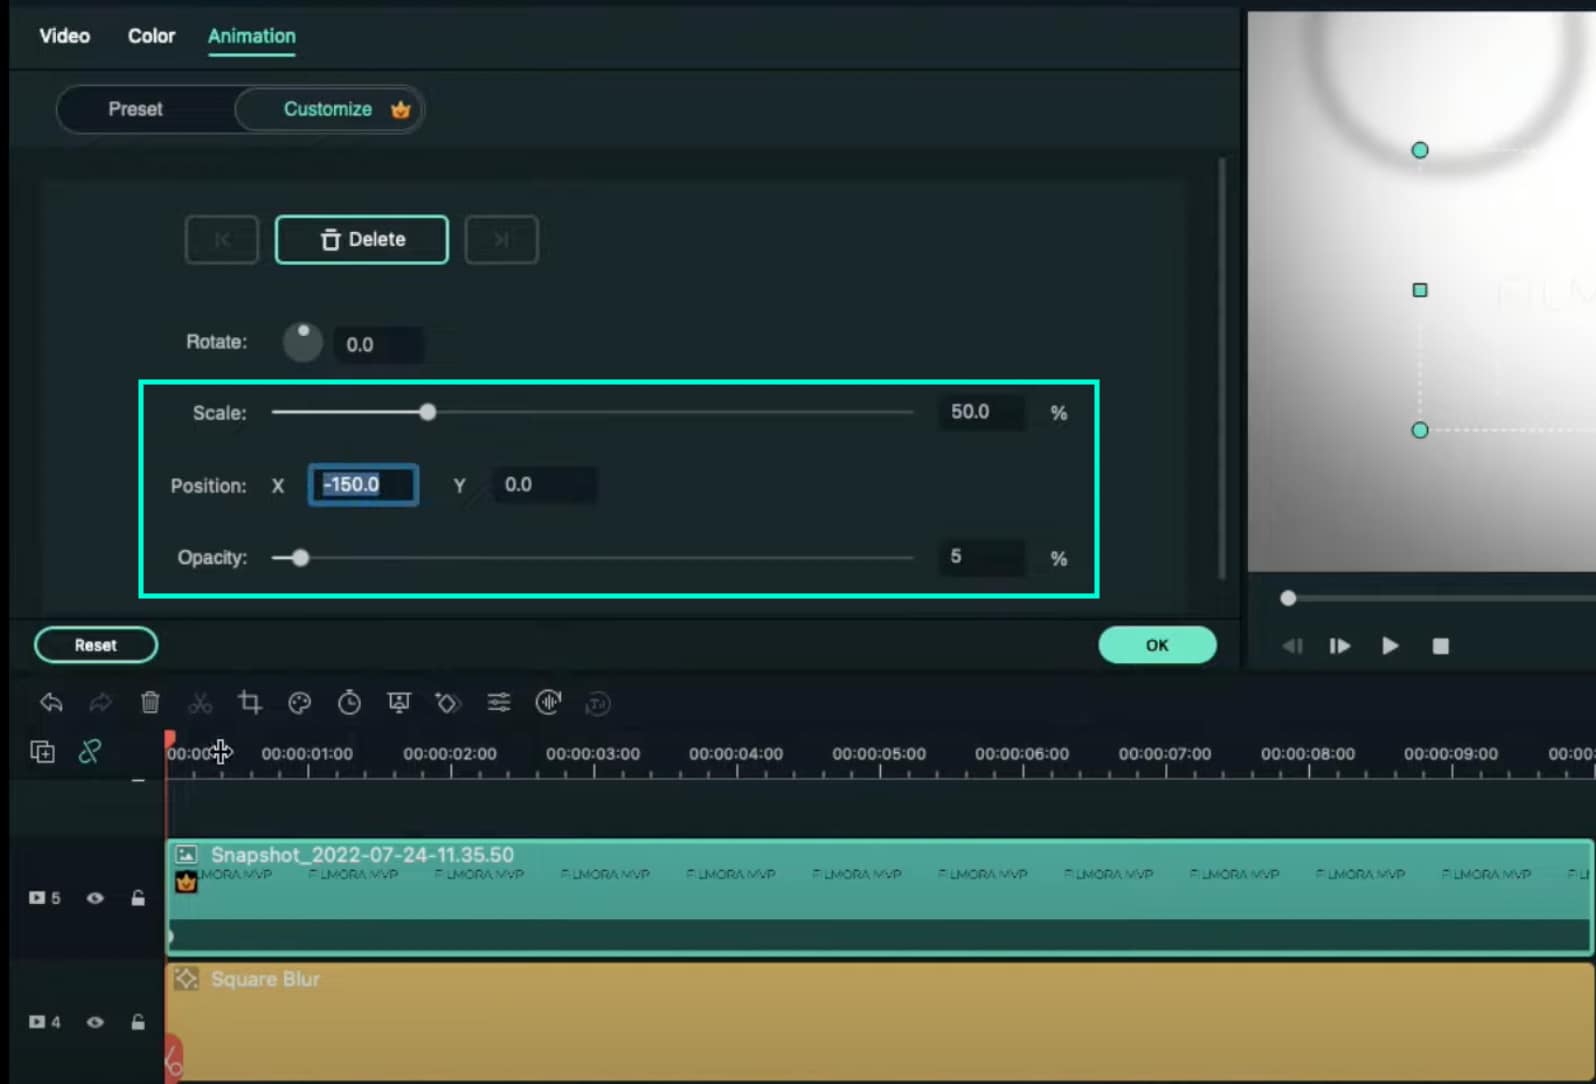
Place the Playhead at the beginning of the clip. Go to My Media and drag the Black snapshot to Track 5. Double-click on it → go to Animation and change the settings to look like this. Then, move the Playhead to 9 seconds. Here, change the X-axis to “150” and the Scale to 75%.
Step 9
Now, place the Playhead at the starting point and drag the colored snapshot in Track 6. Double-click on it and change the Scale to 50%. Then, move the Playhead to 9 seconds again and change the Scale to 75%. Click OK.
Step 10
Go to Sample Color and drag “Gradient 4” to Track 7 on the Timeline. Double-click on it → go to the Video tab → change the Blending Mode to Overlay → decrease the Opacity to 25%. Click OK.

Step 11
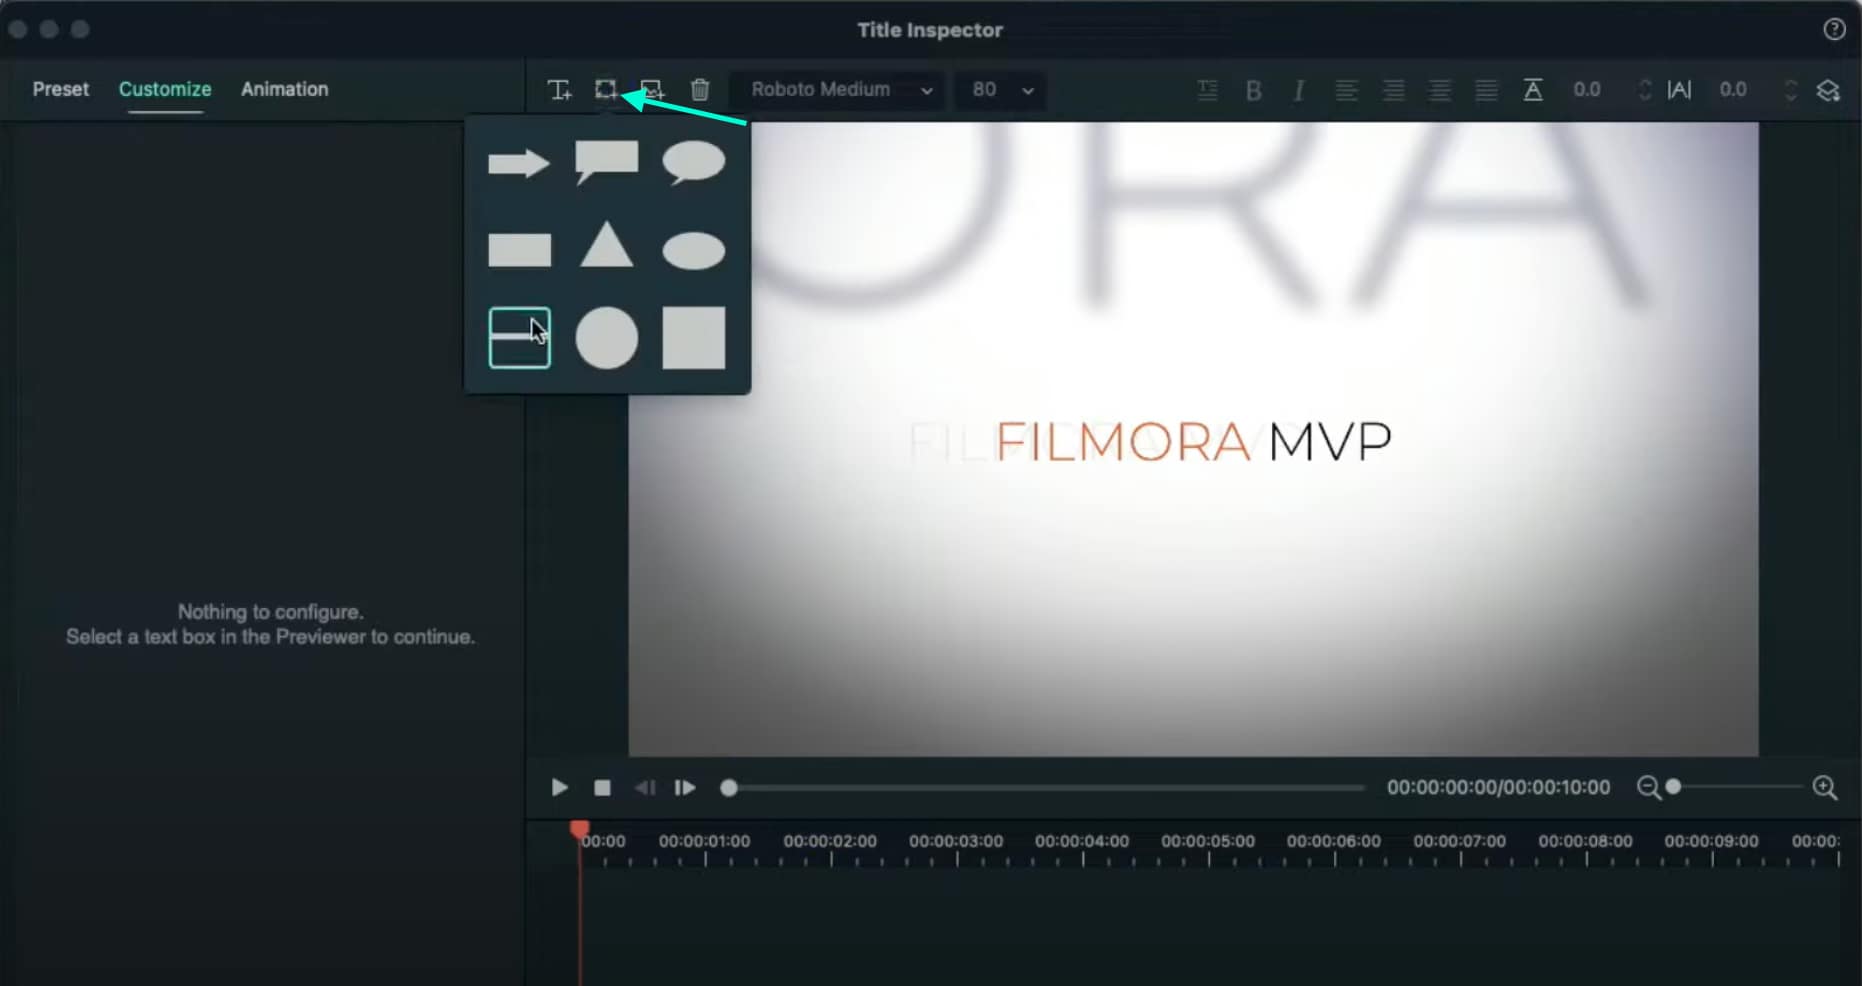
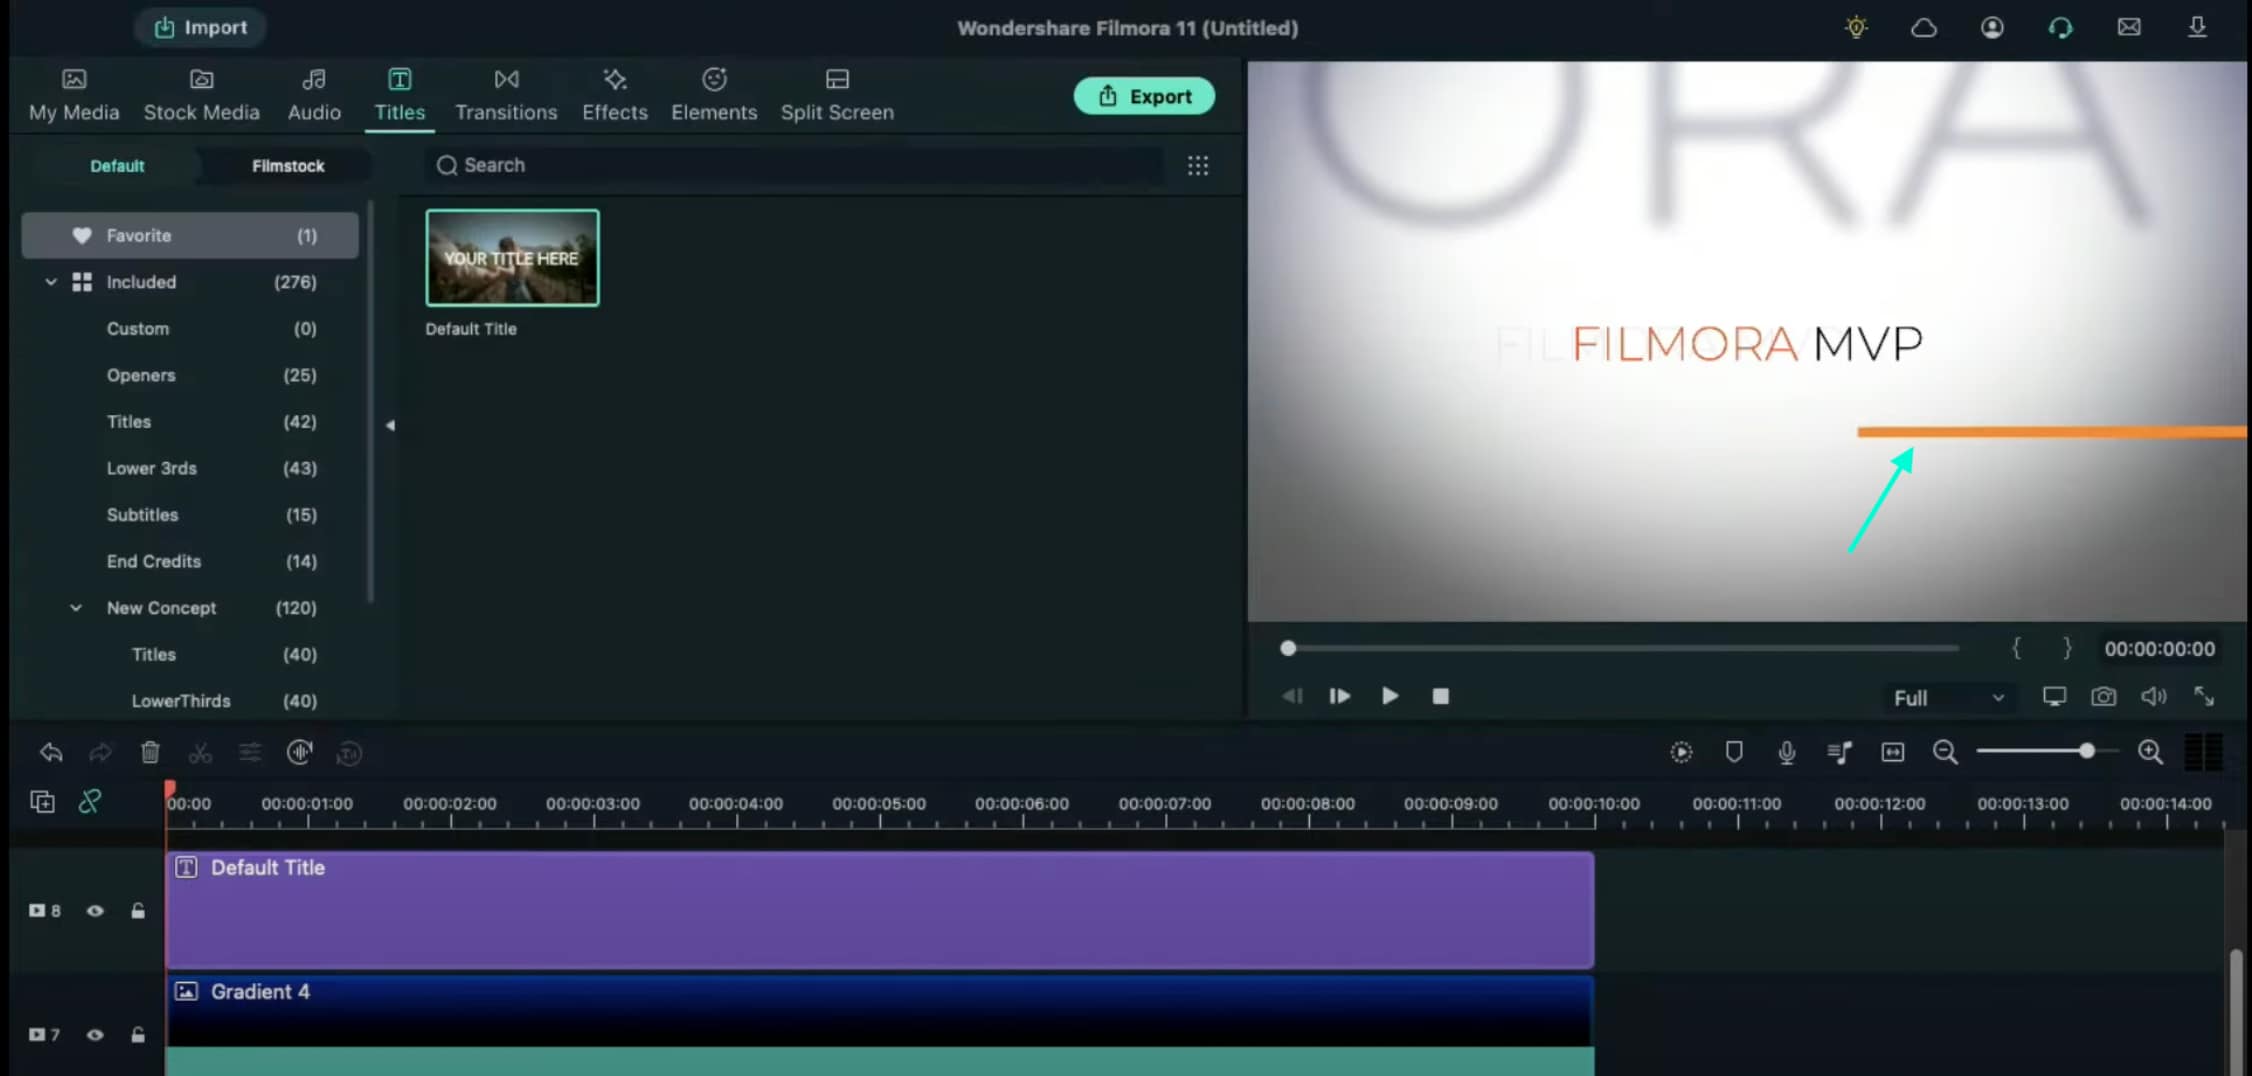
Drag a Default Title to Track 8 and double-click on it to open its Advanced settings. From here, delete the yellow text clip located under the video. Then, insert a Line shape.
Step 12
Increase the Line’s length to be almost as long as the screen. Then adjust its position until half of the Line is visible on the screen. Like this.
Step 13
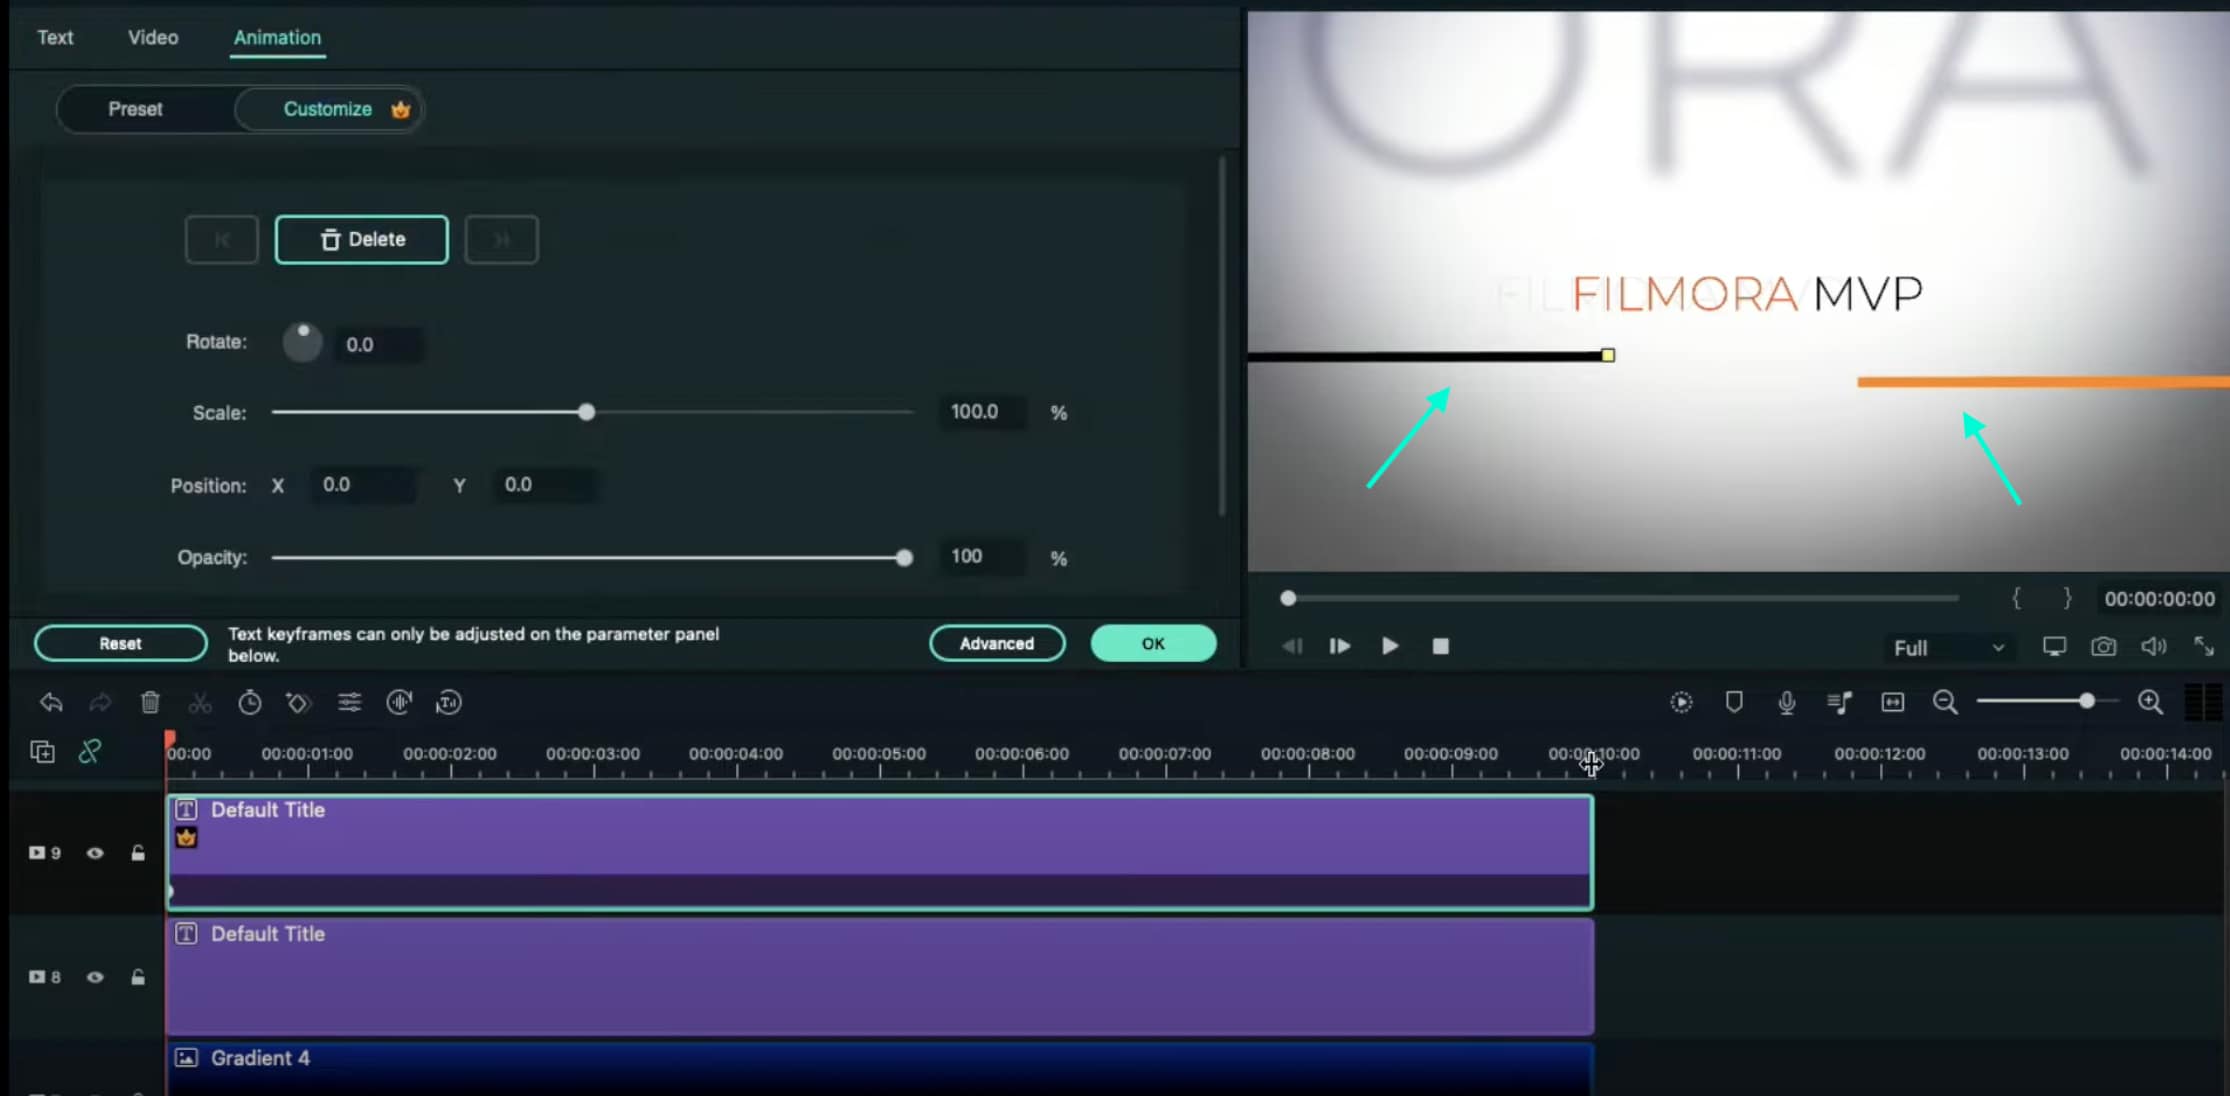
Copy this Default Title and paste it into Track 9. Open its Advanced settings and change the Line color to something different than the previous one. Then, move it to the other side of the screen, slightly above the previous line. Click OK.
Step 14
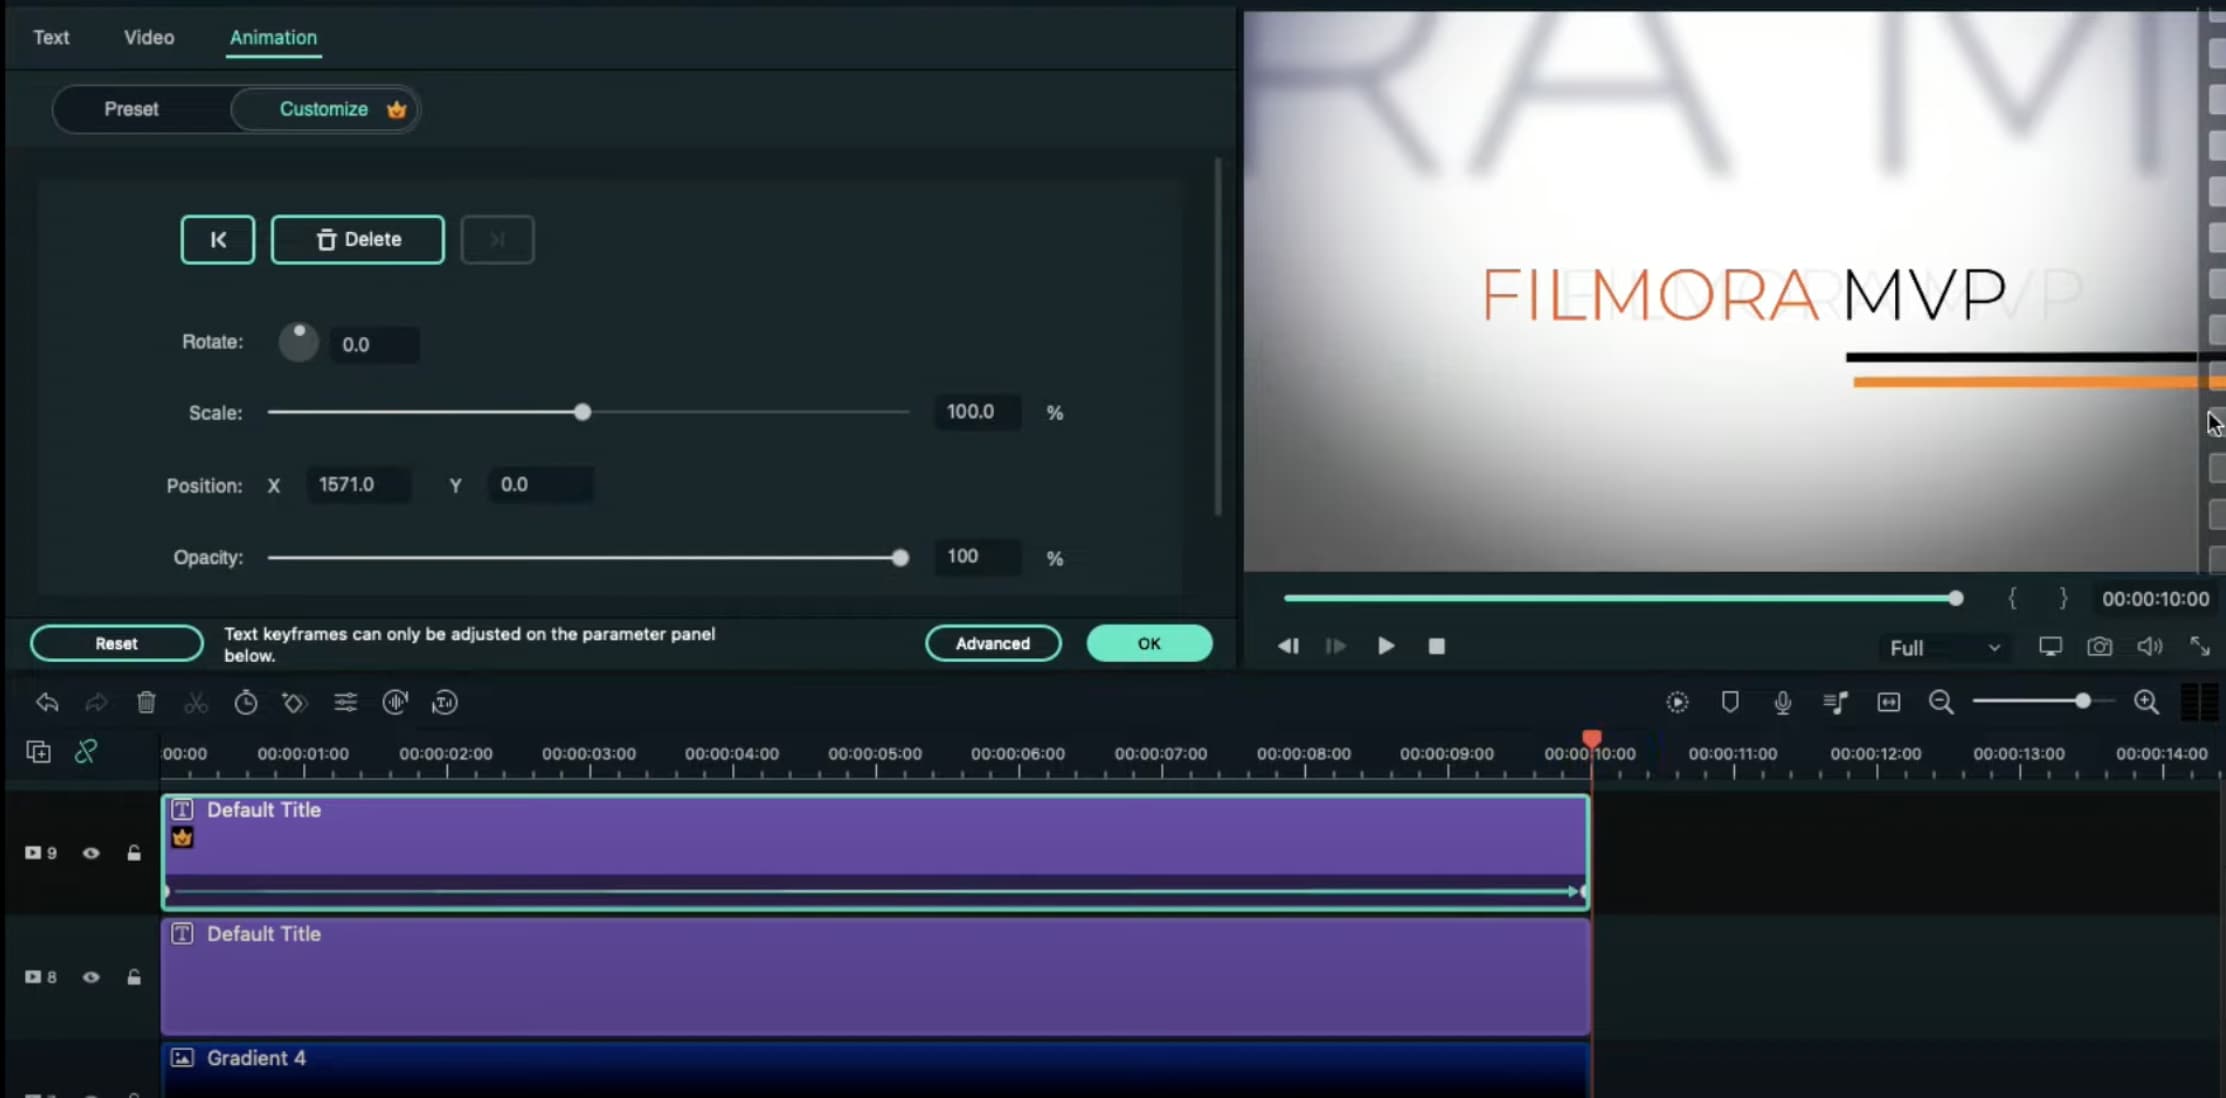
Now, select the Default Title on Track 9, double-click it, and go to the Animation tab. Move the Playhead at the starting point of the Timeline and add a keyframe. Then, move the Playhead to the end of the clip. Drag the X-axis position to the right until the Line shape moves all the way to the right side of the screen.
Do the same for the Default Title on Track 8. But this time, drag the X-axis position toward the other side. When you’re done, press OK.
Step 15
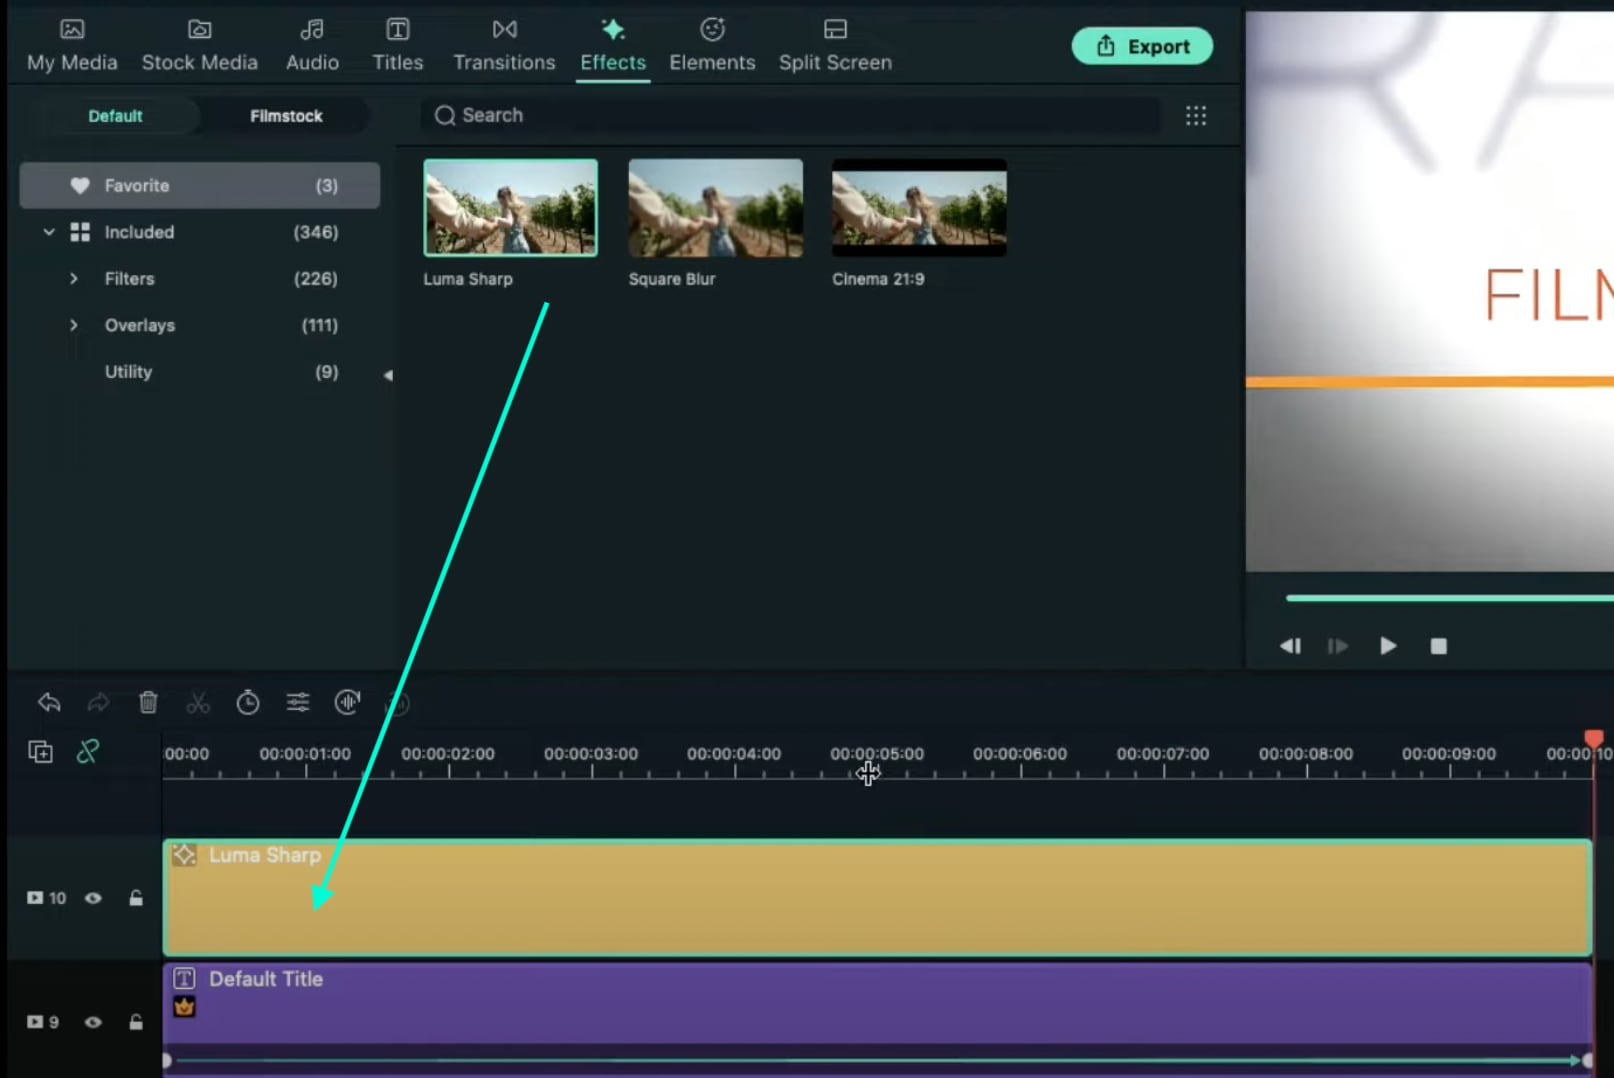
Go to the Effects tab → drag the Luma Sharp effect to Track 10. Click it and change its Intensity to 10.
Step 16
You’re all done. Click on the Render button to render all the clips and finally preview your creation. Congratulations on creating a text animation intro in Filmora.

Summary
What you’ve learned:
- Create a unique text animation intro in Filmora
- Animate text and titles
- How to add and animate different shapes in Filmora
- Edit the advanced settings of elements in the Filmora video editor
What you need to prepare:
- A computer (Windows or macOS)
- Your video materials.
- Filmora video editor
Step 1
Download and Install the Filmora video editor . Then, click on New Project once the program starts.
Step 2
Go to Titles and drag the Default Title to the Timeline. Then, double-click on the Default Title clip to open its settings. Here, type in your text → change the text color to Black → click OK → take a snapshot.

Step 3
Double-click on the Default Title once more and simply change the text color to anything other than black this time. Then, click OK and take another snapshot. After this, delete the Default Title from the Timeline.
Step 4
Next, go to Sample Color and drag the White color to the Timeline. Increase the White Color clip’s duration to 10 seconds by dragging the tail of the clip to the right.

Step 5
For the next step, you need to download a simple Vignette png image . Then, import the Vignette image into Filmora. Go to My Media and click on Import Media. Import it and drag the image to the Timeline. Then, move that clip to Track 3.

Step 6
Drop the Black snapshot you took earlier to Track 2. Double-click on it, go to Animation, and apply these settings. After this, move the Playhead to the end of the clip and change the X-axis value to “-800”.

Step 7
Go to Effects and drag the Square Blur effect to Track 4 on the Timeline. Increase its duration to match the other clips. Then, click on the effect and change its Size bar value to 4. Click OK.

Step 8
Place the Playhead at the beginning of the clip. Go to My Media and drag the Black snapshot to Track 5. Double-click on it → go to Animation and change the settings to look like this. Then, move the Playhead to 9 seconds. Here, change the X-axis to “150” and the Scale to 75%.

Step 9
Now, place the Playhead at the starting point and drag the colored snapshot in Track 6. Double-click on it and change the Scale to 50%. Then, move the Playhead to 9 seconds again and change the Scale to 75%. Click OK.
Step 10
Go to Sample Color and drag “Gradient 4” to Track 7 on the Timeline. Double-click on it → go to the Video tab → change the Blending Mode to Overlay → decrease the Opacity to 25%. Click OK.

Step 11
Drag a Default Title to Track 8 and double-click on it to open its Advanced settings. From here, delete the yellow text clip located under the video. Then, insert a Line shape.

Step 12
Increase the Line’s length to be almost as long as the screen. Then adjust its position until half of the Line is visible on the screen. Like this.

Step 13
Copy this Default Title and paste it into Track 9. Open its Advanced settings and change the Line color to something different than the previous one. Then, move it to the other side of the screen, slightly above the previous line. Click OK.

Step 14
Now, select the Default Title on Track 9, double-click it, and go to the Animation tab. Move the Playhead at the starting point of the Timeline and add a keyframe. Then, move the Playhead to the end of the clip. Drag the X-axis position to the right until the Line shape moves all the way to the right side of the screen.
Do the same for the Default Title on Track 8. But this time, drag the X-axis position toward the other side. When you’re done, press OK.

Step 15
Go to the Effects tab → drag the Luma Sharp effect to Track 10. Click it and change its Intensity to 10.

Step 16
You’re all done. Click on the Render button to render all the clips and finally preview your creation. Congratulations on creating a text animation intro in Filmora.

Summary
What you’ve learned:
- Create a unique text animation intro in Filmora
- Animate text and titles
- How to add and animate different shapes in Filmora
- Edit the advanced settings of elements in the Filmora video editor
What you need to prepare:
- A computer (Windows or macOS)
- Your video materials.
- Filmora video editor
Step 1
Download and Install the Filmora video editor . Then, click on New Project once the program starts.
Step 2
Go to Titles and drag the Default Title to the Timeline. Then, double-click on the Default Title clip to open its settings. Here, type in your text → change the text color to Black → click OK → take a snapshot.

Step 3
Double-click on the Default Title once more and simply change the text color to anything other than black this time. Then, click OK and take another snapshot. After this, delete the Default Title from the Timeline.
Step 4
Next, go to Sample Color and drag the White color to the Timeline. Increase the White Color clip’s duration to 10 seconds by dragging the tail of the clip to the right.

Step 5
For the next step, you need to download a simple Vignette png image . Then, import the Vignette image into Filmora. Go to My Media and click on Import Media. Import it and drag the image to the Timeline. Then, move that clip to Track 3.

Step 6
Drop the Black snapshot you took earlier to Track 2. Double-click on it, go to Animation, and apply these settings. After this, move the Playhead to the end of the clip and change the X-axis value to “-800”.

Step 7
Go to Effects and drag the Square Blur effect to Track 4 on the Timeline. Increase its duration to match the other clips. Then, click on the effect and change its Size bar value to 4. Click OK.

Step 8
Place the Playhead at the beginning of the clip. Go to My Media and drag the Black snapshot to Track 5. Double-click on it → go to Animation and change the settings to look like this. Then, move the Playhead to 9 seconds. Here, change the X-axis to “150” and the Scale to 75%.

Step 9
Now, place the Playhead at the starting point and drag the colored snapshot in Track 6. Double-click on it and change the Scale to 50%. Then, move the Playhead to 9 seconds again and change the Scale to 75%. Click OK.
Step 10
Go to Sample Color and drag “Gradient 4” to Track 7 on the Timeline. Double-click on it → go to the Video tab → change the Blending Mode to Overlay → decrease the Opacity to 25%. Click OK.

Step 11
Drag a Default Title to Track 8 and double-click on it to open its Advanced settings. From here, delete the yellow text clip located under the video. Then, insert a Line shape.

Step 12
Increase the Line’s length to be almost as long as the screen. Then adjust its position until half of the Line is visible on the screen. Like this.

Step 13
Copy this Default Title and paste it into Track 9. Open its Advanced settings and change the Line color to something different than the previous one. Then, move it to the other side of the screen, slightly above the previous line. Click OK.

Step 14
Now, select the Default Title on Track 9, double-click it, and go to the Animation tab. Move the Playhead at the starting point of the Timeline and add a keyframe. Then, move the Playhead to the end of the clip. Drag the X-axis position to the right until the Line shape moves all the way to the right side of the screen.
Do the same for the Default Title on Track 8. But this time, drag the X-axis position toward the other side. When you’re done, press OK.

Step 15
Go to the Effects tab → drag the Luma Sharp effect to Track 10. Click it and change its Intensity to 10.

Step 16
You’re all done. Click on the Render button to render all the clips and finally preview your creation. Congratulations on creating a text animation intro in Filmora.

Summary
What you’ve learned:
- Create a unique text animation intro in Filmora
- Animate text and titles
- How to add and animate different shapes in Filmora
- Edit the advanced settings of elements in the Filmora video editor
What you need to prepare:
- A computer (Windows or macOS)
- Your video materials.
- Filmora video editor
Step 1
Download and Install the Filmora video editor . Then, click on New Project once the program starts.
Step 2
Go to Titles and drag the Default Title to the Timeline. Then, double-click on the Default Title clip to open its settings. Here, type in your text → change the text color to Black → click OK → take a snapshot.

Step 3
Double-click on the Default Title once more and simply change the text color to anything other than black this time. Then, click OK and take another snapshot. After this, delete the Default Title from the Timeline.
Step 4
Next, go to Sample Color and drag the White color to the Timeline. Increase the White Color clip’s duration to 10 seconds by dragging the tail of the clip to the right.

Step 5
For the next step, you need to download a simple Vignette png image . Then, import the Vignette image into Filmora. Go to My Media and click on Import Media. Import it and drag the image to the Timeline. Then, move that clip to Track 3.

Step 6
Drop the Black snapshot you took earlier to Track 2. Double-click on it, go to Animation, and apply these settings. After this, move the Playhead to the end of the clip and change the X-axis value to “-800”.

Step 7
Go to Effects and drag the Square Blur effect to Track 4 on the Timeline. Increase its duration to match the other clips. Then, click on the effect and change its Size bar value to 4. Click OK.

Step 8
Place the Playhead at the beginning of the clip. Go to My Media and drag the Black snapshot to Track 5. Double-click on it → go to Animation and change the settings to look like this. Then, move the Playhead to 9 seconds. Here, change the X-axis to “150” and the Scale to 75%.

Step 9
Now, place the Playhead at the starting point and drag the colored snapshot in Track 6. Double-click on it and change the Scale to 50%. Then, move the Playhead to 9 seconds again and change the Scale to 75%. Click OK.
Step 10
Go to Sample Color and drag “Gradient 4” to Track 7 on the Timeline. Double-click on it → go to the Video tab → change the Blending Mode to Overlay → decrease the Opacity to 25%. Click OK.

Step 11
Drag a Default Title to Track 8 and double-click on it to open its Advanced settings. From here, delete the yellow text clip located under the video. Then, insert a Line shape.

Step 12
Increase the Line’s length to be almost as long as the screen. Then adjust its position until half of the Line is visible on the screen. Like this.

Step 13
Copy this Default Title and paste it into Track 9. Open its Advanced settings and change the Line color to something different than the previous one. Then, move it to the other side of the screen, slightly above the previous line. Click OK.

Step 14
Now, select the Default Title on Track 9, double-click it, and go to the Animation tab. Move the Playhead at the starting point of the Timeline and add a keyframe. Then, move the Playhead to the end of the clip. Drag the X-axis position to the right until the Line shape moves all the way to the right side of the screen.
Do the same for the Default Title on Track 8. But this time, drag the X-axis position toward the other side. When you’re done, press OK.

Step 15
Go to the Effects tab → drag the Luma Sharp effect to Track 10. Click it and change its Intensity to 10.

Step 16
You’re all done. Click on the Render button to render all the clips and finally preview your creation. Congratulations on creating a text animation intro in Filmora.

Summary
What you’ve learned:
- Create a unique text animation intro in Filmora
- Animate text and titles
- How to add and animate different shapes in Filmora
- Edit the advanced settings of elements in the Filmora video editor
Discover the Top 10 Video Editing Apps with Templates for Professional-Grade Results. Edit Like a Pro with These Tools
Are you tired of spending hours trying to perfect your video edits? It’s time to upgrade to a video editing app with built-in templates. Not only do these apps save time and effort, but they also allow you to create professional-grade videos with a consistent look and feel. This article will showcase the 10 best video editing apps with templates that will take your editing skills to the next level.
But before we dive into the list, let’s discuss the benefits of using a video editing app with templates. Not only do templates save time and effort, but they also ensure that your videos have a cohesive and polished look. So whether you’re a beginner or a seasoned pro, a video editing app with templates is a must-have for any video creator.

- Filmora for Mobile (Formerly Known as Filmora) - Best for Beginners & Vloggers
- Promeo Video Making App With Templates for Mobile
- LumaFusion Video Editing App With Templates for iPhone/iPad
- KineMaster Video Editor Program With Templates
- VivaVideo
Benefits of Using Video Makers With Templates
There are many benefits to using a video maker with built-in templates. Here are just a few:
- Save time: Templates allow you to quickly and easily create professional-grade videos without starting from scratch.
- Consistent look and feel: Templates ensure that all your videos have a cohesive and polished look.
- Easy to use: Most video makers with templates are user-friendly and easy to learn, even for beginners.
- Wide variety of options: Many video makers offer a wide range of templates to choose from, covering a variety of styles and themes.
Overall, using a video maker with templates is a great way to save time and effort while creating professional-grade videos with a consistent look and feel. Whether a beginner or a seasoned pro, a video maker with templates is valuable in your video creation toolkit.
5 Best Video Editing Apps With Templates for iOS/Android
Looking for the best video editing app with templates for your iOS or Android device? Look no further! These apps are user-friendly, feature-rich, and offer many templates. Whether a beginner or a seasoned pro, you’ll find an app on this list that suits your needs.
1. Filmora for Mobile (Formerly Known as Filmora) - Best for Beginners & Vloggers

Filmora for Mobile (formerly known as Filmora) is a powerful and user-friendly video editing app with many templates to choose from.
Editor’s Verdict: It’s perfect for beginners and vloggers who want to create professional-grade videos on the go.
Ratings in App Store: 4.7 out of 5
Ratings in Google Play Store: 4.7 out of 5
Operating Systems: Android and iOS
Pricing: Free and offers In-App Purchases
In the app, you’ll find a variety of templates for different occasions, including holidays, birthdays, and more. You can easily customize these templates to fit your specific needs or create your own from scratch. Filmora for Mobile also offers a range of video editing tools, including trimming, splitting, and merging, as well as adding text, music, and other media to your videos.
2. Promeo Video Making App With Templates for Mobile

Promeo is a video-making app with many templates to choose from. Whether you’re looking to create a promotional video, a tutorial, or something else, you’ll find a template in Promeo that fits your needs.
Editor’s Verdict: The app’s templates are easy to use and customize, allowing you to create professional-grade videos with a consistent look and feel.
Ratings in App Store: 4.8 out of 5
Ratings in Google Play Store: 4.5 out of 5
Operating Systems: Android and iOS
Pricing: Free and offers In-App Purchases
Promeo’s templates are a great asset for anyone seeking to create top-notch videos on their mobile device. In addition to the templates, the app also provides various video editing tools such as cutting, separating, and combining clips and the option to insert text, music, and other elements into the videos.
3. LumaFusion Video Editing App With Templates for iPhone/iPad
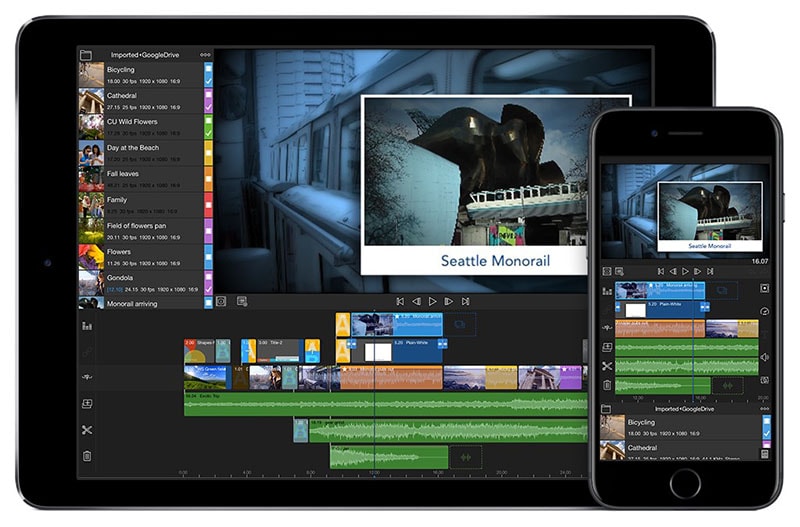
LumaFusion is a powerful and feature-rich video editing app with templates for iPhone and iPad. It’s a favorite among professional video editors and has features that make it easy to create high-quality videos on the go.
Editor’s Verdict: LumaFusion’s templates are a valuable resource for anyone seeking to create professional videos on their iOS device.
Ratings in App Store: 4.8 out of 5
Ratings in Google Play Store: 4.5 out of 5
Operating Systems: Android and iOS
Pricing: $29.99 and offers In-App Purchases
One standout feature is the app’s collection of templates, which allow users to produce professional-grade videos with a cohesive look and feel quickly and easily. In addition to a wide selection of templates, LumaFusion also provides video editing tools such as trimming, splitting and merging.
4. KineMaster Video Editor Program With Templates

KineMaster is a full-featured video editor program with many templates to choose from. Whether you’re looking to create a promotional video, a tutorial, or something else, you’ll find a template in KineMaster that fits your needs.
Editor’s Verdict: The app’s templates are easy to use and customize, allowing you to create professional-grade videos with a consistent look and feel.
Ratings in App Store: 4.7 out of 5
Ratings in Google Play Store: 4.1 out of 5
Operating Systems: Android and iOS
Pricing: Free and offers In-App Purchases
KineMaster’s templates are easy to use and customize, making them a valuable tool for anyone looking to create high-quality videos on their mobile device. KineMaster is a feature-rich video editor program with templates perfect for beginners and professionals.
5. VivaVideo

VivaVideo is a fantastic video editing app that makes it easy to create professional-grade videos on your mobile device.
Editor’s Verdict: Whether a beginner or a seasoned pro, you’ll find VivaVideo’s templates easy to use and customize to fit your specific needs.
Ratings in App Store: 4.8 out of 5
Ratings in Google Play Store: 4.6 out of 5
Operating Systems: Android and iOS
Pricing: Free and offers In-App Purchases
One of the app’s standout features is its wide range of templates, which allow you to create polished and cohesive videos with just a few taps. Give VivaVideo a try and see how its templates can elevate your video editing game!
2 Best Video Makers With Templates for Desktop
If you’re looking to create professional-grade videos on your desktop computer, a video maker with templates is a must-have tool. These video makers are feature-rich and offer a wide range of templates to choose from, making it easy to create high-quality videos on your desktop.
6. Wondershare Filmora for Windows/Mac
Free Download For Win 7 or later(64-bit)
Free Download For macOS 10.14 or later

Wondershare Filmora is a top-notch video editor suitable for both beginners and more advanced users. It has a wide range of features that make it a valuable tool for video editing.
Editor’s Verdict: While some users may initially find the interface confusing, it is easy to learn and navigate. With Filmora, you’ll be able to start editing videos in no time.
Ratings from G2: 4.4 out of 5
Operating Systems: Windows and Mac
Pricing:
● $49.99 Filmora Annual
● $79.99 Filmora Perpetual
● $59.99 Filmora Cross-Platform Plan
Filmora is a versatile video editor available for both Mac and Windows platforms. It offers a wide range of tools suitable for novice editors and advanced features for more experienced users. With Filmora, you’ll have everything you need to create professional-grade videos.
7. PowerDirector 365 Business
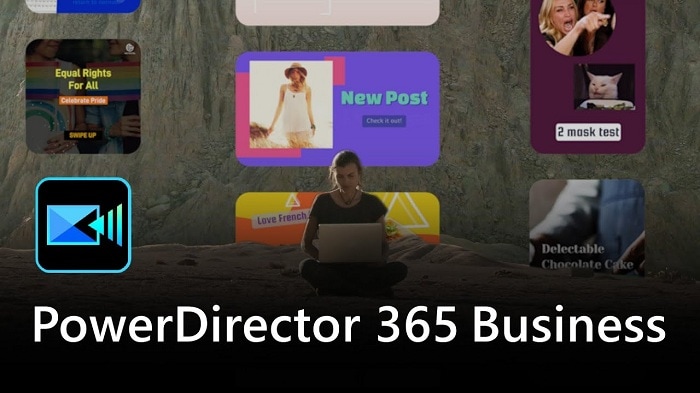
PowerDirector is an extremely feature-rich video maker perfect for those who plan on regularly editing videos.
Editor’s Verdict: Its subscription service, offered by CyberLink, is a great value for those who will be using the app’s many features regularly.
Ratings from G2: 4.4 out of 5
Operating Systems: Windows and Mac
Pricing:
● $12.50 monthly subscription
PowerDirector offers great value subscriptions with regular feature updates, making it a flexible and adaptable choice for video editing. The app also includes free premium effects and plugins, adding even more value to its subscriptions.
3 Best Video Creators With Templates Online
Are you looking to create professional-grade videos online without downloading any software? A video creator with templates is the perfect solution! These video creators make it easy to create high-quality videos from the comfort of your web browser.
8. Canva

Canva is a feature-rich video creator with templates perfect for beginners and professionals.
Editor’s Verdict: Canva is a user-friendly and feature-rich video creator with many templates.
Ratings from G2: 4.7 out of 5
Pricing:
● $0 - Free subscription
● $12.99/month - Pro subscription
● $14.99/month - Team subscription
Canva’s templates are easy to use and customize, making them a valuable tool for creating high-quality videos online.
9. Animoto

With Animoto, creating stunning, professional-grade videos on your computer and mobile device is simple. Give it a try and see how easy it is to create high-quality videos with Animoto.
Editor’s Verdict: Any video from the template collection can be selected and modified to fit the user’s needs.
Ratings from G2: 4.4 out of 5
Pricing:
● $0 - Personal
● $8.00 /month - Basic
● $15.00/month - Professional
● $39.00/month - Business
Animoto’s pre-made templates are designed to make video marketing a breeze! Customizable with your photos, videos, text, and branding, these templates follow best practices and can be easily updated to fit your needs.
10. InVideo
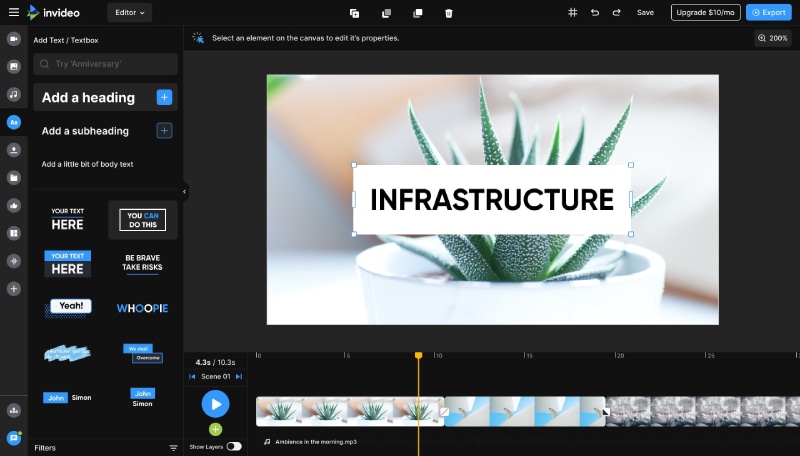
InVideo is a powerful online video creator that provides users with a large collection of assets, including high-quality images and footage from industry leaders such as Shutterstock and iStock.
Editor’s Verdict: With its extensive collection of assets and powerful editing tools, InVideo is a valuable resource for businesses and professionals looking to create high-quality videos.
Ratings from G2: 4.7 out of 5
Pricing:
● $0 - Free
● $16.0/month - Basic
● $29.00/month - Professional
● $79.00/month - Professional Plus
InVideo enables full customization of the videos, providing options such as the addition of emojis, filters, animated transitions, special effects, and animated objects to make the videos more visually engaging and interesting.
How To Make a Video With Templates
Creating a professional-grade video with templates has always been challenging, thanks to video editing software such as Filmora. Whether a beginner or a seasoned pro, you’ll find this step-by-step guide easy to follow and customize to fit your specific needs. So let’s get started and learn how to make a video with Filmora’s templates!
l How To Create Video With Templetes Using Filmora for Desktop
Step1 Launch Filmora, click Instant Mode, and select the template you want for your video.

Step2 Import all your media and click “Auto Create.”

Step3 Edit your video with the “Quick Edit“ features.
Step4 After you edit, you can export your video to your device.
l How To Create Video With Templetes Using Filmora for Mobile
Step1 Download and install Filmora for Mobile from the App Store or Google Play Store.
Step2 Tap on the “Template” button at the bottom.

Step3 Select a desired template and tap on its icon.

Step4 Tap on “Make Video” icon to download the template.

Step5 Import your own footage/photo into the template.

Step6 Export the final video.

Conclusion
Creating a professional-grade video has always been challenging, thanks to the wide range of video editing software and templates available. Filmora is a great choice for easy-to-use yet feature-rich video editing software. Its wide range of templates and powerful editing tools make it easy to create high-quality videos quickly and easily. Whether you’re a beginner or a seasoned pro, Filmora’s template are a valuable resource for anyone looking to create professional-grade videos.
- Wondershare Filmora for Windows/Mac
- PowerDirector 365 Business
- 3 Best Video Creators With Templates Online
Benefits of Using Video Makers With Templates
There are many benefits to using a video maker with built-in templates. Here are just a few:
- Save time: Templates allow you to quickly and easily create professional-grade videos without starting from scratch.
- Consistent look and feel: Templates ensure that all your videos have a cohesive and polished look.
- Easy to use: Most video makers with templates are user-friendly and easy to learn, even for beginners.
- Wide variety of options: Many video makers offer a wide range of templates to choose from, covering a variety of styles and themes.
Overall, using a video maker with templates is a great way to save time and effort while creating professional-grade videos with a consistent look and feel. Whether a beginner or a seasoned pro, a video maker with templates is valuable in your video creation toolkit.
5 Best Video Editing Apps With Templates for iOS/Android
Looking for the best video editing app with templates for your iOS or Android device? Look no further! These apps are user-friendly, feature-rich, and offer many templates. Whether a beginner or a seasoned pro, you’ll find an app on this list that suits your needs.
1. Filmora for Mobile (Formerly Known as Filmora) - Best for Beginners & Vloggers

Filmora for Mobile (formerly known as Filmora) is a powerful and user-friendly video editing app with many templates to choose from.
Editor’s Verdict: It’s perfect for beginners and vloggers who want to create professional-grade videos on the go.
Ratings in App Store: 4.7 out of 5
Ratings in Google Play Store: 4.7 out of 5
Operating Systems: Android and iOS
Pricing: Free and offers In-App Purchases
In the app, you’ll find a variety of templates for different occasions, including holidays, birthdays, and more. You can easily customize these templates to fit your specific needs or create your own from scratch. Filmora for Mobile also offers a range of video editing tools, including trimming, splitting, and merging, as well as adding text, music, and other media to your videos.
2. Promeo Video Making App With Templates for Mobile

Promeo is a video-making app with many templates to choose from. Whether you’re looking to create a promotional video, a tutorial, or something else, you’ll find a template in Promeo that fits your needs.
Editor’s Verdict: The app’s templates are easy to use and customize, allowing you to create professional-grade videos with a consistent look and feel.
Ratings in App Store: 4.8 out of 5
Ratings in Google Play Store: 4.5 out of 5
Operating Systems: Android and iOS
Pricing: Free and offers In-App Purchases
Promeo’s templates are a great asset for anyone seeking to create top-notch videos on their mobile device. In addition to the templates, the app also provides various video editing tools such as cutting, separating, and combining clips and the option to insert text, music, and other elements into the videos.
3. LumaFusion Video Editing App With Templates for iPhone/iPad

LumaFusion is a powerful and feature-rich video editing app with templates for iPhone and iPad. It’s a favorite among professional video editors and has features that make it easy to create high-quality videos on the go.
Editor’s Verdict: LumaFusion’s templates are a valuable resource for anyone seeking to create professional videos on their iOS device.
Ratings in App Store: 4.8 out of 5
Ratings in Google Play Store: 4.5 out of 5
Operating Systems: Android and iOS
Pricing: $29.99 and offers In-App Purchases
One standout feature is the app’s collection of templates, which allow users to produce professional-grade videos with a cohesive look and feel quickly and easily. In addition to a wide selection of templates, LumaFusion also provides video editing tools such as trimming, splitting and merging.
4. KineMaster Video Editor Program With Templates

KineMaster is a full-featured video editor program with many templates to choose from. Whether you’re looking to create a promotional video, a tutorial, or something else, you’ll find a template in KineMaster that fits your needs.
Editor’s Verdict: The app’s templates are easy to use and customize, allowing you to create professional-grade videos with a consistent look and feel.
Ratings in App Store: 4.7 out of 5
Ratings in Google Play Store: 4.1 out of 5
Operating Systems: Android and iOS
Pricing: Free and offers In-App Purchases
KineMaster’s templates are easy to use and customize, making them a valuable tool for anyone looking to create high-quality videos on their mobile device. KineMaster is a feature-rich video editor program with templates perfect for beginners and professionals.
5. VivaVideo

VivaVideo is a fantastic video editing app that makes it easy to create professional-grade videos on your mobile device.
Editor’s Verdict: Whether a beginner or a seasoned pro, you’ll find VivaVideo’s templates easy to use and customize to fit your specific needs.
Ratings in App Store: 4.8 out of 5
Ratings in Google Play Store: 4.6 out of 5
Operating Systems: Android and iOS
Pricing: Free and offers In-App Purchases
One of the app’s standout features is its wide range of templates, which allow you to create polished and cohesive videos with just a few taps. Give VivaVideo a try and see how its templates can elevate your video editing game!
2 Best Video Makers With Templates for Desktop
If you’re looking to create professional-grade videos on your desktop computer, a video maker with templates is a must-have tool. These video makers are feature-rich and offer a wide range of templates to choose from, making it easy to create high-quality videos on your desktop.
6. Wondershare Filmora for Windows/Mac
Free Download For Win 7 or later(64-bit)
Free Download For macOS 10.14 or later

Wondershare Filmora is a top-notch video editor suitable for both beginners and more advanced users. It has a wide range of features that make it a valuable tool for video editing.
Editor’s Verdict: While some users may initially find the interface confusing, it is easy to learn and navigate. With Filmora, you’ll be able to start editing videos in no time.
Ratings from G2: 4.4 out of 5
Operating Systems: Windows and Mac
Pricing:
● $49.99 Filmora Annual
● $79.99 Filmora Perpetual
● $59.99 Filmora Cross-Platform Plan
Filmora is a versatile video editor available for both Mac and Windows platforms. It offers a wide range of tools suitable for novice editors and advanced features for more experienced users. With Filmora, you’ll have everything you need to create professional-grade videos.
7. PowerDirector 365 Business

PowerDirector is an extremely feature-rich video maker perfect for those who plan on regularly editing videos.
Editor’s Verdict: Its subscription service, offered by CyberLink, is a great value for those who will be using the app’s many features regularly.
Ratings from G2: 4.4 out of 5
Operating Systems: Windows and Mac
Pricing:
● $12.50 monthly subscription
PowerDirector offers great value subscriptions with regular feature updates, making it a flexible and adaptable choice for video editing. The app also includes free premium effects and plugins, adding even more value to its subscriptions.
3 Best Video Creators With Templates Online
Are you looking to create professional-grade videos online without downloading any software? A video creator with templates is the perfect solution! These video creators make it easy to create high-quality videos from the comfort of your web browser.
8. Canva

Canva is a feature-rich video creator with templates perfect for beginners and professionals.
Editor’s Verdict: Canva is a user-friendly and feature-rich video creator with many templates.
Ratings from G2: 4.7 out of 5
Pricing:
● $0 - Free subscription
● $12.99/month - Pro subscription
● $14.99/month - Team subscription
Canva’s templates are easy to use and customize, making them a valuable tool for creating high-quality videos online.
9. Animoto

With Animoto, creating stunning, professional-grade videos on your computer and mobile device is simple. Give it a try and see how easy it is to create high-quality videos with Animoto.
Editor’s Verdict: Any video from the template collection can be selected and modified to fit the user’s needs.
Ratings from G2: 4.4 out of 5
Pricing:
● $0 - Personal
● $8.00 /month - Basic
● $15.00/month - Professional
● $39.00/month - Business
Animoto’s pre-made templates are designed to make video marketing a breeze! Customizable with your photos, videos, text, and branding, these templates follow best practices and can be easily updated to fit your needs.
10. InVideo

InVideo is a powerful online video creator that provides users with a large collection of assets, including high-quality images and footage from industry leaders such as Shutterstock and iStock.
Editor’s Verdict: With its extensive collection of assets and powerful editing tools, InVideo is a valuable resource for businesses and professionals looking to create high-quality videos.
Ratings from G2: 4.7 out of 5
Pricing:
● $0 - Free
● $16.0/month - Basic
● $29.00/month - Professional
● $79.00/month - Professional Plus
InVideo enables full customization of the videos, providing options such as the addition of emojis, filters, animated transitions, special effects, and animated objects to make the videos more visually engaging and interesting.
How To Make a Video With Templates
Creating a professional-grade video with templates has always been challenging, thanks to video editing software such as Filmora. Whether a beginner or a seasoned pro, you’ll find this step-by-step guide easy to follow and customize to fit your specific needs. So let’s get started and learn how to make a video with Filmora’s templates!
l How To Create Video With Templetes Using Filmora for Desktop
Step1 Launch Filmora, click Instant Mode, and select the template you want for your video.

Step2 Import all your media and click “Auto Create.”

Step3 Edit your video with the “Quick Edit“ features.
Step4 After you edit, you can export your video to your device.
l How To Create Video With Templetes Using Filmora for Mobile
Step1 Download and install Filmora for Mobile from the App Store or Google Play Store.
Step2 Tap on the “Template” button at the bottom.

Step3 Select a desired template and tap on its icon.

Step4 Tap on “Make Video” icon to download the template.

Step5 Import your own footage/photo into the template.

Step6 Export the final video.

Conclusion
Creating a professional-grade video has always been challenging, thanks to the wide range of video editing software and templates available. Filmora is a great choice for easy-to-use yet feature-rich video editing software. Its wide range of templates and powerful editing tools make it easy to create high-quality videos quickly and easily. Whether you’re a beginner or a seasoned pro, Filmora’s template are a valuable resource for anyone looking to create professional-grade videos.
Master Premiere Pro: Custom Sequence Presets
You’ve probably heard of Adobe Premiere Pro – it’s a top-tier video editing software that’s widely recognized in the market. But have you delved into the nitty-gritty of sequence presets? A custom sequence preset is your best friend for maintaining consistency across projects.
It allows users to save specific settings for sequence attributes like frame rate, resolution, and audio settings. Instead of reconfiguring these settings for each new project, a custom sequence preset lets you jump right into editing. Now, how do you create one? Keep reading!
Part 1: How to Create a Custom Sequence in Premiere Pro
Creating a custom sequence is like tailoring a shirt to fit you perfectly. Here’s a step-by-step guide to help you do just that:
Step 1: Displays the New Sequence Window
Begin by launching Adobe Premiere Pro. Once opened, navigate to the top menu and select File > New > Sequence. This will open up the New Sequence window, where all the magic happens!
Step 2: Change the Editing Mode to Custom in the Settings Panel
You’ll see several tabs in the New Sequence window, but we will focus on the “Settings” tab for our purposes. Click on it.
Here, you’ll find the ‘Editing Mode’ dropdown menu. By default, it’s set to a specific format like ‘DSLR’ or ‘AVCHD.’ Change this to ‘Custom.’ This will unlock a plethora of options for you to play with.
Deep Dive into Settings:
- Frame Size: Define your video’s width and height. Remember, 1920x1080 is Full HD, and 3840x2160 is 4K. Choose based on your project needs.
- Frame Rate: 24fps is the cinematic standard, but if you’re creating content for TV or web, 30fps or 60fps might be more suitable.
- Pixel Aspect Ratio: Stick with ‘Square Pixels’ unless you have a specific reason to do otherwise.
- Fields: Choose ‘No Fields’ for progressive footage. If you’re unsure, this is a safe bet.
- Audio Settings: Here, you can configure the sample rate, among other things. 48000Hz is standard for video.
Step 3: Give the New Preset a Name and Save It
Once you’ve customized the settings to your satisfaction, it’s time to save this configuration for future use. At the bottom of the New Sequence window, you’ll see a ‘Save Preset’ button. Click on it.
A pop-up window will show up, requesting you to provide a name for your new preset. Choose something descriptive so you can easily recognize it later. Once named, click ‘OK’.
Your custom sequence preset is now saved and will appear under the ‘Custom’ folder in the ‘Sequence Presets’ tab.
Part 2: Why Custom Sequence Presets are Essential for Efficient Editing
As you delve deeper into video editing, you’ll begin to appreciate the little things that shave off minutes from your workflow, allowing you to dedicate more time to the creative process. This is precisely where the utility of custom sequence presets in Premiere Pro comes into play. But why are these presets so crucial?
- Consistency Across Projects: If you’re managing multiple projects or a series of videos, having a standard format ensures that all your content has a uniform look and feel. Consistency is a hallmark of professional-grade content. It’s not just about the visuals – maintaining a uniform audio quality and format is equally significant. With a preset, you no longer need to remember the minutiae of each setting, ensuring consistency effortlessly.
- Speed Up Your Workflow: Every minute you spend adjusting the sequence settings is a minute less you have for cutting, color correcting, audio mixing, or adding those special effects that make your videos pop. Over time, those minutes can add up to hours. By using a custom sequence preset, you can jump straight into the creative part of editing without the preliminary setup.
- Avoid Common Mistakes: Have you ever rendered an entire project only to find that the frame rate was off or the audio was set to the wrong sample rate? These kinds of errors can occur when setting up a new sequence from scratch each time. By relying on a preset, you mitigate the risks of such oversights.
- Personalized Templates for Different Platforms: Different platforms may have varying preferred settings. For instance, the ideal video format for YouTube might differ from that of Instagram or TikTok. Instead of Googling these settings each time, you can have a custom sequence preset ready for each platform, ensuring your content is optimized wherever it’s destined.
- Ease of Collaboration: If you’re working as part of a team, having standard sequence presets ensures everyone is on the same page. This is particularly handy when multiple editors are working on different segments of the same project. With custom presets, you’re not just aligning sequences but also visions.
Incorporating this practice into your editing routine might initially seem trivial, but its benefits compound with time.
Part 3: Summary
Creating a custom sequence preset in Adobe Premiere Pro isn’t just about streamlining your workflow – it’s about ensuring consistency across your projects.
By saving your most-used settings, you’re creating a base template that can be pulled up any time, granting you more time for the creative process.
Adobe Premiere Pro’s interface is designed to make tasks like these intuitive, so even if you’re a beginner, with a bit of practice, you’ll be creating custom sequence presets like a pro.
A Complete Guideline About QuickTime Player
While designing the iOS and macOS for its dedicated devices, Apple created multiple supporting software that competes for the best in the market. An example is the QuickTime Player, a state-of-the-art, built-in video player available across Mac. This article shall introduce a detailed analysis and overview of QuickTime Player along with major QuickTime formats and features.
Come along as we explore more about QuickTime Player! You surely will get to know much about the tool before using it.
In this article
01 Key Features of QuickTime Player
02 List of QuickTime File Format
03 How to Play Videos with QuickTime
04 How to Do Screen Recording with QuickTime?
05 How to Convert Video File to MOV Format in QuickTime?
06 Top Recommended Video Editor in 2022 – Filmora Video Editor
Part 1: Key Features of QuickTime Player
Multiple highlighting features can be discovered across QuickTime Player. While a basic built-in video player, the tool outshines other video players for the following features, making it a special choice for users working across Mac. Let us look into these features to know more about QuickTime.
Record Across the Player
QuickTime Player offers users a variety of options in recording across the tool. With the basic screen recording where the user potentially sets up the area for recording and other settings, users can also record audio and movies across QuickTime. Doesn’t it sound awesome?
Editing with QuickTime
This video player is much more than a simple video player. Users can effectively use this tool for editing their videos in numerous ways. From trimming video or audio to splitting videos across the player, there are multiple options available that can be accessed easily. The user can also merge and rotate their clips according to their convenience. Sounds convenient, doesn’t it?
Change Resolution of Video
Want to change the resolution of a video? QuickTime Player allows you to potentially change the resolution of the video according to your requirement. If you have a 4K video of huge size, QuickTime Player can easily change its resolution to 1080p, 720p, or 480p, as per the requirement of the user.
Sharing Videos Directly
One of the most impressive options available across QuickTime Player is to share the video directly across different platforms. Users can share their video through Mail, Messages, AirDrop, Vimeo, Facebook, Flickr, YouTube, and several other options supported by QuickTime. Get it shared anywhere!
Part 2: List of QuickTime File Format
QuickTime offers a tangible list of file formats that can be operated across the video player. The following list shows all the QuickTime file format that can run across it:
Video File Formats
- QuickTime Movie (.mov)
- MPEG-4 (.mp4, .m4v)
- MPEG-1
- 3GPP
- 3GPP2
- AVI
- DV
Audio File Formats
- iTunes Audio (.m4a, .m4b, .m4p)
- MP3
- Core Audio (.caf)
- AIFF
- AU
- SD2
- WAV
- SND
- AMR
Part 3: How to Play Videos with QuickTime
Once you know how QuickTime Player makes it easy for Mac users to play their video, it is time to understand the steps associated with the procedure. Two basic techniques can be implemented to play videos with QuickTime. The first method to play videos with QuickTime are featured as follows:
Step 1: You need to open QuickTime Player across your Mac. For that, proceed across Launchpad to access the application.

Step 2: Once the player is launched, you can simply select any video across the window that opens up. Once selected, tap “Open” to play it across QuickTime.

Sounds easy, right? However, if you have multiple videos to open or have other video players installed in your Mac, you should consider following this second approach. If QuickTime Player is not your default video player, it is important to follow the steps below for opening any video across QuickTime.
Step 1: Open Finder on your device and proceed to locate the video that you wish to open across QuickTime. On finding the video, click on the video while holding the “Control” button on the keyboard. This opens a drop-down menu.

Step 2: In the “Open With” section across the menu, you will find the option of QuickTime Player. Tap on the option to open the video across QuickTime.

Part 4: How to Do Screen Recording with QuickTime?
Several functions can be performed across QuickTime. While the QuickTime video format allows you to play different videos across the platform, it also helps users record screens of their choice. To understand the step-by-step procedure, you need to follow the steps displayed below. Come along and learn more about it.
Step 1: Open QuickTime Player on your device and tap on the “File” tab on the top of the screen. Select the option of “New Screen Recording” from the available options to initiate screen recording.

Step 2: The next window opens up, which involves managing the screen recording settings. You need to set up the screen area recorded in the process initially.

Step 3: After setting the screen area, tap on “Options” to specify the microphone settings, the location where the recording will be saved, the timer, and other significant options that are important for screen recording. Click on the “Record” button to start.

Step 4: Once you have recorded the appropriate screen, click on the “Stop” sign appearing on the top of the window to conclude recording and save it across the decided location.

Part 5: How to Convert Video File to MOV Format in QuickTime?
QuickTime Player is not quite extensive when it comes to converting video files. Although there are several QuickTime format files that you may come across and play across the platform, it only converts any video file into MOV format, which is the dedicated file format potentially designed by Apple. To understand the method to convert any QuickTime video format to MOV format, follow the steps shown below:
Step 1: You need to open the appropriate video across QuickTime to convert it accordingly. Once opened, tap on the “File” tab, and select “Export as” across the available options.

Step 2: You need to select an appropriate resolution from the available options according to the video quality that you want the video to be saved in on the preceding menu. QuickTime player will show low-quality resolutions for the high-quality video but not vice versa.

Step 3: A new window opens that requires you to set up the name and location for the video. Add the file extension “.mov” at the end of the name of the video to convert it into MOV format.

Extra Tips: Top Recommended Video Editor in 2022 – Filmora Video Editor
Video players are important for running videos across your devices. However, the significance of a video editor is as primary as a video player in the market. When selecting the best video editor for making changes in your video before posting and viewing it across devices, there are multiple factors that a user looks into.
Wondershare Filmora offers unique and extensive features to its users at a price that is unmatched by the other players in the market. When it comes to basic video editing, the platform features the simplest set of tools that helps users enhance their video to perfection. Along with that, Filmora even allows you to add in music, effects, and transitions as desired. Isn’t it the dream?

For Win 7 or later (64-bit)
For macOS 10.12 or later
With such tools available, Filmora is recognized for its ability to make editing simple for users. There is no need for the user to be a professional in editing for making changes across Filmora. Any individual who is new to video editing can efficiently use the platform for their needs. Along with that, Filmora even allows users to make changes across the audios, both within the videos and separately. It surely is perfect!
Closing Words
Got to know much about QuickTime Player? This effective video player is the best available in the market for Mac users. While supporting different QuickTime file format, users can make significant changes across their videos with the tool. QuickTime allows them to make edits, convert, and record screens easily. This is what makes it a special choice in the market.
02 List of QuickTime File Format
03 How to Play Videos with QuickTime
04 How to Do Screen Recording with QuickTime?
05 How to Convert Video File to MOV Format in QuickTime?
06 Top Recommended Video Editor in 2022 – Filmora Video Editor
Part 1: Key Features of QuickTime Player
Multiple highlighting features can be discovered across QuickTime Player. While a basic built-in video player, the tool outshines other video players for the following features, making it a special choice for users working across Mac. Let us look into these features to know more about QuickTime.
Record Across the Player
QuickTime Player offers users a variety of options in recording across the tool. With the basic screen recording where the user potentially sets up the area for recording and other settings, users can also record audio and movies across QuickTime. Doesn’t it sound awesome?
Editing with QuickTime
This video player is much more than a simple video player. Users can effectively use this tool for editing their videos in numerous ways. From trimming video or audio to splitting videos across the player, there are multiple options available that can be accessed easily. The user can also merge and rotate their clips according to their convenience. Sounds convenient, doesn’t it?
Change Resolution of Video
Want to change the resolution of a video? QuickTime Player allows you to potentially change the resolution of the video according to your requirement. If you have a 4K video of huge size, QuickTime Player can easily change its resolution to 1080p, 720p, or 480p, as per the requirement of the user.
Sharing Videos Directly
One of the most impressive options available across QuickTime Player is to share the video directly across different platforms. Users can share their video through Mail, Messages, AirDrop, Vimeo, Facebook, Flickr, YouTube, and several other options supported by QuickTime. Get it shared anywhere!
Part 2: List of QuickTime File Format
QuickTime offers a tangible list of file formats that can be operated across the video player. The following list shows all the QuickTime file format that can run across it:
Video File Formats
- QuickTime Movie (.mov)
- MPEG-4 (.mp4, .m4v)
- MPEG-1
- 3GPP
- 3GPP2
- AVI
- DV
Audio File Formats
- iTunes Audio (.m4a, .m4b, .m4p)
- MP3
- Core Audio (.caf)
- AIFF
- AU
- SD2
- WAV
- SND
- AMR
Part 3: How to Play Videos with QuickTime
Once you know how QuickTime Player makes it easy for Mac users to play their video, it is time to understand the steps associated with the procedure. Two basic techniques can be implemented to play videos with QuickTime. The first method to play videos with QuickTime are featured as follows:
Step 1: You need to open QuickTime Player across your Mac. For that, proceed across Launchpad to access the application.

Step 2: Once the player is launched, you can simply select any video across the window that opens up. Once selected, tap “Open” to play it across QuickTime.

Sounds easy, right? However, if you have multiple videos to open or have other video players installed in your Mac, you should consider following this second approach. If QuickTime Player is not your default video player, it is important to follow the steps below for opening any video across QuickTime.
Step 1: Open Finder on your device and proceed to locate the video that you wish to open across QuickTime. On finding the video, click on the video while holding the “Control” button on the keyboard. This opens a drop-down menu.

Step 2: In the “Open With” section across the menu, you will find the option of QuickTime Player. Tap on the option to open the video across QuickTime.

Part 4: How to Do Screen Recording with QuickTime?
Several functions can be performed across QuickTime. While the QuickTime video format allows you to play different videos across the platform, it also helps users record screens of their choice. To understand the step-by-step procedure, you need to follow the steps displayed below. Come along and learn more about it.
Step 1: Open QuickTime Player on your device and tap on the “File” tab on the top of the screen. Select the option of “New Screen Recording” from the available options to initiate screen recording.

Step 2: The next window opens up, which involves managing the screen recording settings. You need to set up the screen area recorded in the process initially.

Step 3: After setting the screen area, tap on “Options” to specify the microphone settings, the location where the recording will be saved, the timer, and other significant options that are important for screen recording. Click on the “Record” button to start.

Step 4: Once you have recorded the appropriate screen, click on the “Stop” sign appearing on the top of the window to conclude recording and save it across the decided location.

Part 5: How to Convert Video File to MOV Format in QuickTime?
QuickTime Player is not quite extensive when it comes to converting video files. Although there are several QuickTime format files that you may come across and play across the platform, it only converts any video file into MOV format, which is the dedicated file format potentially designed by Apple. To understand the method to convert any QuickTime video format to MOV format, follow the steps shown below:
Step 1: You need to open the appropriate video across QuickTime to convert it accordingly. Once opened, tap on the “File” tab, and select “Export as” across the available options.

Step 2: You need to select an appropriate resolution from the available options according to the video quality that you want the video to be saved in on the preceding menu. QuickTime player will show low-quality resolutions for the high-quality video but not vice versa.

Step 3: A new window opens that requires you to set up the name and location for the video. Add the file extension “.mov” at the end of the name of the video to convert it into MOV format.

Extra Tips: Top Recommended Video Editor in 2022 – Filmora Video Editor
Video players are important for running videos across your devices. However, the significance of a video editor is as primary as a video player in the market. When selecting the best video editor for making changes in your video before posting and viewing it across devices, there are multiple factors that a user looks into.
Wondershare Filmora offers unique and extensive features to its users at a price that is unmatched by the other players in the market. When it comes to basic video editing, the platform features the simplest set of tools that helps users enhance their video to perfection. Along with that, Filmora even allows you to add in music, effects, and transitions as desired. Isn’t it the dream?

For Win 7 or later (64-bit)
For macOS 10.12 or later
With such tools available, Filmora is recognized for its ability to make editing simple for users. There is no need for the user to be a professional in editing for making changes across Filmora. Any individual who is new to video editing can efficiently use the platform for their needs. Along with that, Filmora even allows users to make changes across the audios, both within the videos and separately. It surely is perfect!
Closing Words
Got to know much about QuickTime Player? This effective video player is the best available in the market for Mac users. While supporting different QuickTime file format, users can make significant changes across their videos with the tool. QuickTime allows them to make edits, convert, and record screens easily. This is what makes it a special choice in the market.
02 List of QuickTime File Format
03 How to Play Videos with QuickTime
04 How to Do Screen Recording with QuickTime?
05 How to Convert Video File to MOV Format in QuickTime?
06 Top Recommended Video Editor in 2022 – Filmora Video Editor
Part 1: Key Features of QuickTime Player
Multiple highlighting features can be discovered across QuickTime Player. While a basic built-in video player, the tool outshines other video players for the following features, making it a special choice for users working across Mac. Let us look into these features to know more about QuickTime.
Record Across the Player
QuickTime Player offers users a variety of options in recording across the tool. With the basic screen recording where the user potentially sets up the area for recording and other settings, users can also record audio and movies across QuickTime. Doesn’t it sound awesome?
Editing with QuickTime
This video player is much more than a simple video player. Users can effectively use this tool for editing their videos in numerous ways. From trimming video or audio to splitting videos across the player, there are multiple options available that can be accessed easily. The user can also merge and rotate their clips according to their convenience. Sounds convenient, doesn’t it?
Change Resolution of Video
Want to change the resolution of a video? QuickTime Player allows you to potentially change the resolution of the video according to your requirement. If you have a 4K video of huge size, QuickTime Player can easily change its resolution to 1080p, 720p, or 480p, as per the requirement of the user.
Sharing Videos Directly
One of the most impressive options available across QuickTime Player is to share the video directly across different platforms. Users can share their video through Mail, Messages, AirDrop, Vimeo, Facebook, Flickr, YouTube, and several other options supported by QuickTime. Get it shared anywhere!
Part 2: List of QuickTime File Format
QuickTime offers a tangible list of file formats that can be operated across the video player. The following list shows all the QuickTime file format that can run across it:
Video File Formats
- QuickTime Movie (.mov)
- MPEG-4 (.mp4, .m4v)
- MPEG-1
- 3GPP
- 3GPP2
- AVI
- DV
Audio File Formats
- iTunes Audio (.m4a, .m4b, .m4p)
- MP3
- Core Audio (.caf)
- AIFF
- AU
- SD2
- WAV
- SND
- AMR
Part 3: How to Play Videos with QuickTime
Once you know how QuickTime Player makes it easy for Mac users to play their video, it is time to understand the steps associated with the procedure. Two basic techniques can be implemented to play videos with QuickTime. The first method to play videos with QuickTime are featured as follows:
Step 1: You need to open QuickTime Player across your Mac. For that, proceed across Launchpad to access the application.

Step 2: Once the player is launched, you can simply select any video across the window that opens up. Once selected, tap “Open” to play it across QuickTime.

Sounds easy, right? However, if you have multiple videos to open or have other video players installed in your Mac, you should consider following this second approach. If QuickTime Player is not your default video player, it is important to follow the steps below for opening any video across QuickTime.
Step 1: Open Finder on your device and proceed to locate the video that you wish to open across QuickTime. On finding the video, click on the video while holding the “Control” button on the keyboard. This opens a drop-down menu.

Step 2: In the “Open With” section across the menu, you will find the option of QuickTime Player. Tap on the option to open the video across QuickTime.

Part 4: How to Do Screen Recording with QuickTime?
Several functions can be performed across QuickTime. While the QuickTime video format allows you to play different videos across the platform, it also helps users record screens of their choice. To understand the step-by-step procedure, you need to follow the steps displayed below. Come along and learn more about it.
Step 1: Open QuickTime Player on your device and tap on the “File” tab on the top of the screen. Select the option of “New Screen Recording” from the available options to initiate screen recording.

Step 2: The next window opens up, which involves managing the screen recording settings. You need to set up the screen area recorded in the process initially.

Step 3: After setting the screen area, tap on “Options” to specify the microphone settings, the location where the recording will be saved, the timer, and other significant options that are important for screen recording. Click on the “Record” button to start.

Step 4: Once you have recorded the appropriate screen, click on the “Stop” sign appearing on the top of the window to conclude recording and save it across the decided location.

Part 5: How to Convert Video File to MOV Format in QuickTime?
QuickTime Player is not quite extensive when it comes to converting video files. Although there are several QuickTime format files that you may come across and play across the platform, it only converts any video file into MOV format, which is the dedicated file format potentially designed by Apple. To understand the method to convert any QuickTime video format to MOV format, follow the steps shown below:
Step 1: You need to open the appropriate video across QuickTime to convert it accordingly. Once opened, tap on the “File” tab, and select “Export as” across the available options.

Step 2: You need to select an appropriate resolution from the available options according to the video quality that you want the video to be saved in on the preceding menu. QuickTime player will show low-quality resolutions for the high-quality video but not vice versa.

Step 3: A new window opens that requires you to set up the name and location for the video. Add the file extension “.mov” at the end of the name of the video to convert it into MOV format.

Extra Tips: Top Recommended Video Editor in 2022 – Filmora Video Editor
Video players are important for running videos across your devices. However, the significance of a video editor is as primary as a video player in the market. When selecting the best video editor for making changes in your video before posting and viewing it across devices, there are multiple factors that a user looks into.
Wondershare Filmora offers unique and extensive features to its users at a price that is unmatched by the other players in the market. When it comes to basic video editing, the platform features the simplest set of tools that helps users enhance their video to perfection. Along with that, Filmora even allows you to add in music, effects, and transitions as desired. Isn’t it the dream?

For Win 7 or later (64-bit)
For macOS 10.12 or later
With such tools available, Filmora is recognized for its ability to make editing simple for users. There is no need for the user to be a professional in editing for making changes across Filmora. Any individual who is new to video editing can efficiently use the platform for their needs. Along with that, Filmora even allows users to make changes across the audios, both within the videos and separately. It surely is perfect!
Closing Words
Got to know much about QuickTime Player? This effective video player is the best available in the market for Mac users. While supporting different QuickTime file format, users can make significant changes across their videos with the tool. QuickTime allows them to make edits, convert, and record screens easily. This is what makes it a special choice in the market.
02 List of QuickTime File Format
03 How to Play Videos with QuickTime
04 How to Do Screen Recording with QuickTime?
05 How to Convert Video File to MOV Format in QuickTime?
06 Top Recommended Video Editor in 2022 – Filmora Video Editor
Part 1: Key Features of QuickTime Player
Multiple highlighting features can be discovered across QuickTime Player. While a basic built-in video player, the tool outshines other video players for the following features, making it a special choice for users working across Mac. Let us look into these features to know more about QuickTime.
Record Across the Player
QuickTime Player offers users a variety of options in recording across the tool. With the basic screen recording where the user potentially sets up the area for recording and other settings, users can also record audio and movies across QuickTime. Doesn’t it sound awesome?
Editing with QuickTime
This video player is much more than a simple video player. Users can effectively use this tool for editing their videos in numerous ways. From trimming video or audio to splitting videos across the player, there are multiple options available that can be accessed easily. The user can also merge and rotate their clips according to their convenience. Sounds convenient, doesn’t it?
Change Resolution of Video
Want to change the resolution of a video? QuickTime Player allows you to potentially change the resolution of the video according to your requirement. If you have a 4K video of huge size, QuickTime Player can easily change its resolution to 1080p, 720p, or 480p, as per the requirement of the user.
Sharing Videos Directly
One of the most impressive options available across QuickTime Player is to share the video directly across different platforms. Users can share their video through Mail, Messages, AirDrop, Vimeo, Facebook, Flickr, YouTube, and several other options supported by QuickTime. Get it shared anywhere!
Part 2: List of QuickTime File Format
QuickTime offers a tangible list of file formats that can be operated across the video player. The following list shows all the QuickTime file format that can run across it:
Video File Formats
- QuickTime Movie (.mov)
- MPEG-4 (.mp4, .m4v)
- MPEG-1
- 3GPP
- 3GPP2
- AVI
- DV
Audio File Formats
- iTunes Audio (.m4a, .m4b, .m4p)
- MP3
- Core Audio (.caf)
- AIFF
- AU
- SD2
- WAV
- SND
- AMR
Part 3: How to Play Videos with QuickTime
Once you know how QuickTime Player makes it easy for Mac users to play their video, it is time to understand the steps associated with the procedure. Two basic techniques can be implemented to play videos with QuickTime. The first method to play videos with QuickTime are featured as follows:
Step 1: You need to open QuickTime Player across your Mac. For that, proceed across Launchpad to access the application.

Step 2: Once the player is launched, you can simply select any video across the window that opens up. Once selected, tap “Open” to play it across QuickTime.

Sounds easy, right? However, if you have multiple videos to open or have other video players installed in your Mac, you should consider following this second approach. If QuickTime Player is not your default video player, it is important to follow the steps below for opening any video across QuickTime.
Step 1: Open Finder on your device and proceed to locate the video that you wish to open across QuickTime. On finding the video, click on the video while holding the “Control” button on the keyboard. This opens a drop-down menu.

Step 2: In the “Open With” section across the menu, you will find the option of QuickTime Player. Tap on the option to open the video across QuickTime.

Part 4: How to Do Screen Recording with QuickTime?
Several functions can be performed across QuickTime. While the QuickTime video format allows you to play different videos across the platform, it also helps users record screens of their choice. To understand the step-by-step procedure, you need to follow the steps displayed below. Come along and learn more about it.
Step 1: Open QuickTime Player on your device and tap on the “File” tab on the top of the screen. Select the option of “New Screen Recording” from the available options to initiate screen recording.

Step 2: The next window opens up, which involves managing the screen recording settings. You need to set up the screen area recorded in the process initially.

Step 3: After setting the screen area, tap on “Options” to specify the microphone settings, the location where the recording will be saved, the timer, and other significant options that are important for screen recording. Click on the “Record” button to start.

Step 4: Once you have recorded the appropriate screen, click on the “Stop” sign appearing on the top of the window to conclude recording and save it across the decided location.

Part 5: How to Convert Video File to MOV Format in QuickTime?
QuickTime Player is not quite extensive when it comes to converting video files. Although there are several QuickTime format files that you may come across and play across the platform, it only converts any video file into MOV format, which is the dedicated file format potentially designed by Apple. To understand the method to convert any QuickTime video format to MOV format, follow the steps shown below:
Step 1: You need to open the appropriate video across QuickTime to convert it accordingly. Once opened, tap on the “File” tab, and select “Export as” across the available options.

Step 2: You need to select an appropriate resolution from the available options according to the video quality that you want the video to be saved in on the preceding menu. QuickTime player will show low-quality resolutions for the high-quality video but not vice versa.

Step 3: A new window opens that requires you to set up the name and location for the video. Add the file extension “.mov” at the end of the name of the video to convert it into MOV format.

Extra Tips: Top Recommended Video Editor in 2022 – Filmora Video Editor
Video players are important for running videos across your devices. However, the significance of a video editor is as primary as a video player in the market. When selecting the best video editor for making changes in your video before posting and viewing it across devices, there are multiple factors that a user looks into.
Wondershare Filmora offers unique and extensive features to its users at a price that is unmatched by the other players in the market. When it comes to basic video editing, the platform features the simplest set of tools that helps users enhance their video to perfection. Along with that, Filmora even allows you to add in music, effects, and transitions as desired. Isn’t it the dream?

For Win 7 or later (64-bit)
For macOS 10.12 or later
With such tools available, Filmora is recognized for its ability to make editing simple for users. There is no need for the user to be a professional in editing for making changes across Filmora. Any individual who is new to video editing can efficiently use the platform for their needs. Along with that, Filmora even allows users to make changes across the audios, both within the videos and separately. It surely is perfect!
Closing Words
Got to know much about QuickTime Player? This effective video player is the best available in the market for Mac users. While supporting different QuickTime file format, users can make significant changes across their videos with the tool. QuickTime allows them to make edits, convert, and record screens easily. This is what makes it a special choice in the market.
Also read:
- Updated And when It Comes to Voice Changers for Discord, None Is as Easy to Operate as the Voicemod. Here Is a Detailed Guide About How to Use Voicemod on Discord on Mobile and Desktop Devices for 2024
- 2024 Approved 20 Best LUTs for Music Videos
- New How To Change Sky Background With Adobe Photoshop Best Ways for 2024
- Updated Beginners Guide to Green Screen Keying for 2024
- Updated 2024 Approved Cropping a Video in Davinci Resolve Step by Step
- Updated How to Add Freeze Frame to Your Video From Any Device, In 2024
- New Things About Transparent PNG Remove and Convert for 2024
- 2024 Approved Discover the Top 5 Free Online Video Filter Editors to Transform Your Videos with Captivating Color Grading and Correction Presets. Elevate Your Digital Storytelling Effortlessly
- Updated Everything That You Need to Know About Video Montages- Ideas, Techniqu
- Updated 2024 Approved Top 10 TEXT TO SPEECH VIDEO MAKERS
- Updated How to Clone Yourself in Videos with Filmora for 2024
- New Full Guide to Funcall Voice Changer and Its Alternatives for 2024
- Mastering Video Speed Control Slow Down, Speed Up, and Edit with Ease for 2024
- New 10 Best Innovative AR Video Effects to Check Out
- New How to Add Zoom Blur Effect In Photoshop for 2024
- New In 2024, Using The AI Auto Reframe Feature | Wondershare Filmora Tutorial
- 2024 Approved Finding The Finest Way to Add Subtitles to Videos | Filmora
- Updated In 2024, Motion Blur Photo With GIMP Step-By-Step Guide
- How to Split a Clip in After Effects for 2024
- New Are You a Teacher? Are You Looking for Educational Background Music? This Article Has Everything You Will Need to Know for Creating Outstanding Educational Teaching Videos
- Updated 2024 Approved How to Make Discord GIF Avatar in Depth Guide
- New In 2024, Learn Everything About Leeming LUT Pro
- New In 2024, Best 8 Srt File Creators
- In 2024, Create Photoshop GIFs with Zero Hustle
- Updated The Quick and Simple Way to Mirror Video in Premiere Pro
- Confused About Deciding the Next Destination for Your Trip? This Article Features some of the Best Vloggers You Can Find for Gaining Inspiration for Traveling
- 2024 Approved All You Need to Know About Transparent Logos and How You Can Make Them. Top Transparent Logos You Can Take Inspiration From
- Updated In 2024, Vintage Film Effect 1990S - How to Make
- New 2024 Approved Best 8 Free Video Editing Software Reddit
- New How to Use Adjustment Layer in Final Cut Pro
- New The Best 10 GIF to JPGPNG Converters
- Updated Transforming a Slow-Motion Video to Normal Mastering the Skill for 2024
- New Top 6 MP4 Mergers to Join Videos Easily
- How to Convert Images Into Video - Kapwing Tutorial
- In 2024, Best Love Video Maker with Music
- Updated In 2024, Add Zoom Blur Effect In Photoshop Step by Step
- Updated Storyboards Are Amazing Way if You Want to Present Your Story in a Visual Way, Like Explaining Any Process or Giving Any Information. It Is a Graphic Layout to Tell You a Story
- New In 2024, Can You Enhance Your Drone Footage with Cinematic Drone LUTs? This Article Discusses Top Drone LUTs Recommendations to Simplify Video Editing
- Updated 2024 Approved Create Eye-Catching Slow-Motion Videos to Set Your Own Trend. For This Purpose, Read This Article to Find and Learn to Use CapCuts New Slow-Motion Templates
- Looking Into The Top Free Slow Motion Apps (Android & iOS)
- In 2024, How Does the YouTube AI Algorithm Work
- In 2024, Step by Step to Rotate Videos in Windows Media Player
- New 2024 Approved Read This Article to Learn How to Convert Your Slow-Motion Videos Into Normal-Speed Videos in a Few Simple Steps and Methods. So, Stick to the End
- In 2024, How to Add Adjustment Layer in Premiere Pro
- 2024 Approved Benefits of Live Streaming on YouTube
- Updated The Background in Your Footage Might Be Bland or Unpleasant. This Article Will Discuss Video Background Templates You Can Use to Spice Things up and Make Your Videos Go Viral for 2024
- Step by Step to Rotate Video in Google Photos for 2024
- In This Article We Will Be Covering the Most Important Topics You Have to Remember when Becoming a Successful YouTube-Star
- In 2024, Slow Down the GIF to Emphasize Details Better. To Do so, Read This Guide and Learn to Use the Best Platforms for Slow-Motion GIFs
- Full Guide to Hard Reset Your Lava Blaze 2 Pro | Dr.fone
- A How-To Guide on Bypassing iPhone SE (2022) iCloud Activation Lock
- 4 Ways to Transfer Music from Vivo X90S to iPhone | Dr.fone
- Why does the pokemon go battle league not available On Oppo A1x 5G | Dr.fone
- Updated What Is AI Voice Over, In 2024
- How to Transfer Videos from OnePlus Nord N30 5G to iPad | Dr.fone
- Ways to stop parent tracking your Motorola Moto G 5G (2023) | Dr.fone
- In 2024, How to Change your Samsung Galaxy Z Flip 5 Location on Twitter | Dr.fone
- Android Safe Mode - How to Turn off Safe Mode on Lava Yuva 3 Pro? | Dr.fone
- How Do You Unlock your Apple iPhone 11 Pro Max? Learn All 4 Methods | Dr.fone
- Title: Updated Text Animation Intro Tutorial in Filmora for 2024
- Author: Morgan
- Created at : 2024-06-15 18:56:24
- Updated at : 2024-06-16 18:56:24
- Link: https://ai-video-editing.techidaily.com/updated-text-animation-intro-tutorial-in-filmora-for-2024/
- License: This work is licensed under CC BY-NC-SA 4.0.

