
:max_bytes(150000):strip_icc():format(webp)/jens-kreuter-85328-c5ada5fb87224444a49aaa4ad1e16897.jpg)
Updated The Quick and Simple Way to Mirror Video in Premiere Pro
The Quick and Simple Way to Mirror Video in Premiere Pro
Video editing is a crucial part of filmmaking, and it can make or break the outcome of a project. Adobe Premiere Pro is a widely used video editing software that provides a vast range of tools for professional video editing. One of the features that Premiere Pro offers is the ability to mirror video clips, which can add an interesting visual element to your footage.
In this article, we will look at how to mirror a video clip in Premiere Pro in a few simple steps. Whether you’re a seasoned video editor or just starting, this guide will help you achieve the desired effect in your videos. From basic mirroring to advanced techniques, we will cover everything you need to know to create a symmetrical and visually appealing look in your projects.

What Is To “Mirror” a Video?
Mirroring a video in Adobe Premiere Pro refers to reflecting the footage along either the horizontal or vertical axis. This results in the composition being flipped and reversed, creating a reflection-like effect. Flipping a video is distinct from rotating it, as the orientation of the elements is changed, but their position remains the same.
Flipping can serve both creative and practical purposes. On the one hand, it can add a unique and visually interesting element to a project, creating a form of self-reflection or self-analysis. On the other hand, flipping can also be used to correct videos accidentally captured upside down. For example, flipping a video recorded with a selfie camera along the horizontal axis will correctly display the right side up.
It is important to note the distinction between flipping and rotating a video. A flipped video will look like a mirror image, whereas a video rotated 180 degrees will not. By understanding the differences between these techniques, you can effectively use mirroring to achieve the desired result in your projects.
How To Mirror a Video in Adobe Premiere Pro
Mirroring a video in Adobe Premiere Pro is a quick and simple process that can add a unique and visually appealing touch to your projects. Whether you want to create a symmetrical look or experiment with a new visual style, this guide will mirror a video clip in Premiere Pro. From basic to advanced techniques, you’ll be able to create stunning and reflective videos in no time. So, let’s get started!
Step1 Choose the “Effects“ option from the menu.

Step2 Look for the “Transform“ tab.

Step3 Pick the “Horizontal Flip“ or “Vertical Flip“ from the drop-down list.

Step4 Drag the desired flip onto the selected clip, which will immediately reverse the image displayed on the Program Monitor.

How To Create Mirror Video Effect in Premiere Pro
Creating a mirror video effect in Adobe Premiere Pro opens up a world of artistic possibilities for your projects. With the right techniques, you can create visually appealing and symmetrical videos that stand out from the crowd. This guide will show you how to master the art of mirror video effects in Premiere Pro, from the basics to more advanced techniques. Get ready to explore the creative side of video editing and elevate your projects to the next level.
Step1 Access the “Effects“ menu and select “Video Effects.”

Step2 Pick “Distort“, then the “Mirror“.

Step3 Apply the Mirror effect to your clip.

Step4 Adjust “Reflection Center“ for side-by-side effect or “Reflection Angle“ for up-and-down effect in the Effect Controls panel.

[Bonus] Wondershare Filmora – A Great Alternative to Premiere Pro Mirror Tool
Wondershare Filmora is a great alternative to Adobe Premiere Pro for video editing. Not only does it offer an intuitive interface for both beginners and professionals, but it also offers a range of video editing tools and features. One of those features is its ability to easily mirror a video. With Filmora, you can flip your videos vertically or horizontally with just a few clicks.
Free Download For Win 7 or later(64-bit)
Free Download For macOS 10.14 or later

Filmora also offers a variety of creative video effects and templates, making it easy to add a unique touch to your projects. In addition, its built-in audio editing tools allow you to create professional-sounding soundtracks for your videos. Filmora’s easy-to-use keyframe animation feature gives you precise control over the animation of your elements, allowing you to add movement and bring your videos to life.
Furthermore, Filmora’s advanced color correction tools help you achieve the perfect color balance in your videos. Whether you’re a beginner or a professional, Wondershare Filmora is a great option for anyone looking for a powerful and easy-to-use video editor.
How To Mirror a Video Clip With Wondershare Filmora
Mirroring a video clip is a simple process with Wondershare Filmora. This video editing software provides an intuitive and user-friendly interface, making it easy to achieve the desired result.
To mirror your video in Filmora, you can follow a few straightforward steps. Whether you want to flip your video horizontally or vertically, Filmora’s mirroring tool will help you achieve the perfect reflection with just a few clicks. So, if you’re looking for an alternative to Adobe Premiere Pro, Wondershare Filmora is a great option to consider for your video editing needs.
Step1 Within the “Flip“ section, there are four options available. To flip the clip from left to right, select the “Flip Horizontal“ icon, or if you want to turn the clip upside down, choose the “Flip “ option.

Step2 You can rotate the clip by clicking either the “Clockwise“ or “Counterclockwise“ icons under the Rotate section.

Step3 If you want to specify the rotation angle, you can either enter a value in the box under the Rotate tab or manipulate the dot in the circle to achieve the desired angle.

How To Create Mirror Video Effect in Wondershare Filmora
Wondershare Filmora is an excellent video editing software that offers a simple solution for creating a mirror video effect. Its intuitive interface and powerful features make it possible for amateur and professional video editors to achieve stunning results. Filmora provides users with an array of tools to create a mirror effect on their video clip effortlessly.
Whether you want to create a reversed image, flip the orientation vertically, or rotate the clip in a specific direction, Filmora has got you covered. Let’s see how to create a mirror video effect with Wondershare Filmora.
Step1 Add the video clip to a video track on the timeline

Step2 Click the “Filters“ icon and choose the “Distortion“ category

Step3 Locate the “Mirror“ effect, drag and drop it to the filter track, and adjust its duration to match the video clip

Step4 Preview the results in the Preview Window before exporting the video from Filmora.

Conclusion
Mirroring a video can add an interesting and unique visual effect to your videos. Adobe Premiere Pro and Wondershare Filmora provide easy-to-use tools to achieve this effect. While Premiere Pro offers more advanced features and customization options, Filmora provides a simpler and more user-friendly interface for those who want to achieve the same results without the hassle. Whichever option you choose, you can create stunning mirror videos in no time.
Free Download For macOS 10.14 or later
Filmora also offers a variety of creative video effects and templates, making it easy to add a unique touch to your projects. In addition, its built-in audio editing tools allow you to create professional-sounding soundtracks for your videos. Filmora’s easy-to-use keyframe animation feature gives you precise control over the animation of your elements, allowing you to add movement and bring your videos to life.
Furthermore, Filmora’s advanced color correction tools help you achieve the perfect color balance in your videos. Whether you’re a beginner or a professional, Wondershare Filmora is a great option for anyone looking for a powerful and easy-to-use video editor.
How To Mirror a Video Clip With Wondershare Filmora
Mirroring a video clip is a simple process with Wondershare Filmora. This video editing software provides an intuitive and user-friendly interface, making it easy to achieve the desired result.
To mirror your video in Filmora, you can follow a few straightforward steps. Whether you want to flip your video horizontally or vertically, Filmora’s mirroring tool will help you achieve the perfect reflection with just a few clicks. So, if you’re looking for an alternative to Adobe Premiere Pro, Wondershare Filmora is a great option to consider for your video editing needs.
Step1 Within the “Flip“ section, there are four options available. To flip the clip from left to right, select the “Flip Horizontal“ icon, or if you want to turn the clip upside down, choose the “Flip “ option.
Step2 You can rotate the clip by clicking either the “Clockwise“ or “Counterclockwise“ icons under the Rotate section.
Step3 If you want to specify the rotation angle, you can either enter a value in the box under the Rotate tab or manipulate the dot in the circle to achieve the desired angle.
How To Create Mirror Video Effect in Wondershare Filmora
Wondershare Filmora is an excellent video editing software that offers a simple solution for creating a mirror video effect. Its intuitive interface and powerful features make it possible for amateur and professional video editors to achieve stunning results. Filmora provides users with an array of tools to create a mirror effect on their video clip effortlessly.
Whether you want to create a reversed image, flip the orientation vertically, or rotate the clip in a specific direction, Filmora has got you covered. Let’s see how to create a mirror video effect with Wondershare Filmora.
Step1 Add the video clip to a video track on the timeline
Step2 Click the “Filters“ icon and choose the “Distortion“ category
Step3 Locate the “Mirror“ effect, drag and drop it to the filter track, and adjust its duration to match the video clip
Step4 Preview the results in the Preview Window before exporting the video from Filmora.
Conclusion
Mirroring a video can add an interesting and unique visual effect to your videos. Adobe Premiere Pro and Wondershare Filmora provide easy-to-use tools to achieve this effect. While Premiere Pro offers more advanced features and customization options, Filmora provides a simpler and more user-friendly interface for those who want to achieve the same results without the hassle. Whichever option you choose, you can create stunning mirror videos in no time.
How to Uue Adobe Lightroom Color Grading
The main focus of color grading is changing the colors and tones in your photographs. Recent updates to Lightroom and Photoshop’s color grading functionality have improved its use and increased its capabilities. Color grading is ideal for giving your photograph a bit extra interest and improving the lighting.
All forms of photography benefit from and depend on color grading. The color grading tools in Lightroom and Photoshop will be especially appreciated by landscape and portrait photographers. If you’re wondering what happened to split toning, it was replaced by the Color Grading module, which is why split toning is now referred to as color grading.
1. Getting to Color Grading
Select the photo you want to modify and go to the develop module in Lightroom to access the Color Grading tool. Then, move your cursor down to the Color Grading menu on the right side of the screen. To see three separate color wheels, choose this.
The same choices are available in Photoshop’s Camera Raw Filter. Simply scroll down on the right side of the screen once you’ve opened a photo in the Camera Raw Filter until you see Color Grading. The process of color grading is identical in Photoshop and Lightroom. I’ll be using Lightroom to demonstrate the example photographs for the purposes of this blog article.
2. How to Use Color Grading
The first thing you’ll notice is that there are actually three identical color wheels. Each color wheel, though, has a distinct purpose. Midtones are controlled by the top wheel, shadows, and highlights by the left and right wheels, respectively.
Before moving on to the color grading stage, it’s crucial to notice that you should balance the temperature and tint of your image. Instead of balancing the colors to create the image, color grading is a technique for enhancing the colors in the image.
Avoid using the midtones color wheel when using the Color Grading tool for the first time. First, try modifying only the highlights and shadows wheel. Warm hues in the highlights and cold colors in the shadows appear great in the majority of photographs. However, when using these sliders to create some truly incredible photos, you may let your creativity run wild!
I’ve added some yellow (warmth) to the highlights and some blue (coolness) to the shadows in this particular example. As a result, the sunlight in my image appears to be very warm and inviting, and the shadows take on a colder, bluer appearance.
The color wheels are actually fairly easy to use. To select a color, merely click and drag it anywhere on the color wheel. The color will become stronger the further you are from the circle’s center. Each circle has a hidden slider bar underneath it. This modifies the related color wheel’s brightness value. In other words, you can brighten or darken the highlights by adjusting the bar underneath the highlights color wheel. The ability to quickly change the brightness levels in the highlights, shadows, or midtones is a convenient feature.
Blending and balancing are the other two parameters that you can modify. You can alter how well the color in the highlights, midtones, or shadows blend with one another with the blending slider. The colors will blend in more naturally by moving the blending slider higher.
The amount of the image that is judged to be in the highlights, shadows, or midtones can be changed with the balance slider. For instance, if I move the balance slider to the right, less of the highlights will show the adjustment. Only the highlights with the highest brightness will be affected by the change.
3. HSL/Color Panel
Move to the HSL/Color Panel, which stands for Hue, Saturation, and Luminance, after your image is ready to use. It is located under Tone Curve in the Develop Panel. This adjustment panel, in contrast to the ones stated before, will let you change different colors in your image independently of one another. Hue, Saturation, and Luminance are the three modifications that each color will receive.
4. Hue
Hue is measured in terms of the color wheel’s degrees. It’s possible to change the color’s real shade in this panel. For instance, you can modify the turquoise or blue to a more greenish tone if your scenario is a beach (as in our example photo). It’s advisable to begin making adjustments to your panel’s Hue before moving on to the others.
5. Saturation
The strength of the hue is known as saturation. (Remember that this HSL panel modification only affects the saturation of individual colors, not the saturation of the entire image.) In order to achieve a more subdued, muted appearance for this example, I reduced the Saturation on the aqua, blue, and green hues. To increase the intensity of your shot, you can do the exact reverse. Find the tweaks that suit your photo and the appearance you want to achieve best.
6. Luminance
Each color’s luminance measures how brightly it reflects light. Use this tool to brighten or darken specific areas of your image (it works especially well to provide contrast to black and white images). To make the water and sky behind the model darker in this example photograph, I decreased the Luminance setting on the aqua panel.
7. Adjustment Brush
Further isolate a section of your image using the Adjustment Brush so that you can change the Hue and any other parameters you like. Your Adjustment Brush is the final brush icon on the top of your editing panel. Adjust your Hue and begin painting on your image where you wish to change the color to begin color grading.(At the bottom of the Adjustment Brush Panel, you can adjust the brush’s size or feathering.)
This is perfect if you only want to edit one part of your shot. You can keep using the adjustments after you’ve painted your image to witness more changes as they happen in real time.
Here are a few tips to set you on the correct course because color grading might take some time and practice to master. Shooting in RAW will give you the most dynamic control over your colors, so be sure to do this. Try your best to start with a good photograph and to alter your default settings so that the canvas is even. Use color psychology to visually transmit the mood or feeling you wish to portray through color grading.
Utilize each panel to practice and experiment. There is no right or wrong method to color grade; it all depends on how you want your photographs to look stylistically. Press the Reset button in the right -hand corner of your panel to return to your original image.
Free Download For Win 7 or later(64-bit)
Free Download For macOS 10.14 or later
Free Download For macOS 10.14 or later
How to Remove Audio From Video on Mac? Free and Official Solutions
Videography is getting into a trend nowadays. Everyone is recording videos for different reasons. However, when shooting outside, background sounds and noise reduce video quality.
You can remove audio from your video on Mac devices using different software. For instance, you can go for iMovie to remove sound from video on Mac. Filmora also allows you to remove audio from video on Mac.
Method 1: Use online and free solutions to mute audio in videos
1. Canva
Canva is a free design platform for anyone. It has both web and app versions. A very user-friendly graphic design tool that is easy to use, even for those with no design experience.
Canva offers a wide selection of templates and over 1 million templates. A library of over 2 million stock photos and illustrations for free. It also has a paid option at an affordable price.
An Ultimate Guide to How to remove audio from video in Canva?
To remove audio from your video in Canva, you can do so by following these simple steps:
Step1 Open the video in Canva.

Step2 Click on the “Audio” tab in the toolbar and remove the audio.

Step3 Save the video in desired option.
2. Clideo
Clideo is a cloud-based video editing tool that offers a simple yet powerful way to edit videos. With Cleo, you can trim, crop, merge, and audio or text to their videos.
Its user-friendly interface makes it easy to edit videos. Clideo offers a variety of effects and transitions that let you create videos that look unique. It supports a wide range of video formats, making it easy to export your videos.
An Ultimate Guide to How to remove audio from video in Clideo?
This online video editor offers a straightforward way to remove audio from any video file.
Here’s how you can do it:
Step1 Go to clideo.com and upload the video from which you want to remove the audio. You can either drag and drop the file into the designated area or click the “Choose file” button.

Step2 Once the video is uploaded, select the “Mute” option from the toolbar above the video player.

Step3 Click on “Export” to save the video without audio.

3. Ezgif
Ezgif.com is a great online resource for creating and editing GIF images. This online software has a user-friendly interface.
You can upload images or video files from your computer or a URL, and Ezgif will create a GIF for you. It lets you edit your GIFs before you download them. You can crop, resize, rotate, and reverse your GIFs and add text, filters, audio, and other effects.
How to remove audio from video in Ezgif?
To remove audio from a video using Ezgif, follow the steps below;
Step1 Upload the video to the website.

Step2 Once the video is uploaded, select the “Audio” tab and click on the “Remove audio” button.

Step3 It will remove the audio from the video, and you can download the new video file.
Method2: Use Apple official tools to remove audio from videos
1.QuickTime
QuickTime is a video editor that comes installed on all Mac computers. It is easy to use yet packed with features that allow you to create, edit, and share your work.
QuickTime includes a basic set of video editing features perfect for simple tasks like trimming a clip or adding a title. You can export your video in various formats or upload it directly to YouTube.
An Ultimate Guide to How to remove audio from video in QuickTime?
You can remove and mute the audio from video in Quicktime as follows:
Step1 Open the video with “QuickTime Player,” from which you want to remove the audio.

Step2 Select “Edit” from the taskbar and click “Remove Audio.”

Step3 Now select ‘File” and then click “Save.” It will save the muted video.

2. iMovie:
iMovie is a video editing software application by Apple Inc. It was released in 1999 as a Mac OS. iMovie is a cross-platform application with the Mac OS X operating system and iOS.
It is easy to use and free. You can use iMovie to make movies from your photos and video clips. You can add titles, transitions, filters, text, background music, audio, color correction, animations, and video effects.
How to remove audio from video in iMovie?
There are a few different ways that you can remove audio from video in iMovie.
Step1 Click on the “Movie” button. Select the video whose audio is to be removed.

Step2 Now press and hold the timeline. Some options will appear. Click on the “Volume” button.

Step3 Mute the audio.

Step4 Now release the timeline and click the “arrow “button.

Step5 Save the muted file on your Mac by clicking “Save.”

Step6 Muted videos will get exported to your library.

3. Final Cut Pro
Final Cut Pro is a powerful video editor that allows users to create professional-quality videos. With its intuitive design and wide range of features, Final Cut Pro is the perfect tool for anyone looking to create videos for personal or professional use.
Final Cut Pro is a professional-grade video editing software for some of the biggest Hollywood movies. It’s also become a favorite among YouTubers and filmmakers.
How to remove audio from video in Final Cut Pro?
You can remove audio from your video in either of two ways.
Step1 Open the video from which the audio is to be removed.

Step2 Now select the timeline.

Step3 Double-click on the timeline. It will detach the audio from the video.
Now press the “Delete key” on the keyboard. The audio will get removed.

Method 3: Use Filmora to remove audio from the video
Filmora
If you’re looking for easy-to-use video editing software, Filmora is a great option. It’s simple to use yet still offers a wide range of features. Plus, it’s affordable and supports both Windows and Mac computers.
Free Download For Win 7 or later(64-bit)
Free Download For macOS 10.14 or later
An Ultimate Guide to How to remove audio from video in Filmora?
One way is to mute the audio track. To do this, follow the given steps.
Step1 Open a new project in Filmora.

Step2 Click on the audio track in the timeline.

Step3 Now, click the mute button.

Another way to remove the audio from a video is to delete the audio track. To do this:
Step1 Click on the audio track in the timeline
Step2 Press the delete key on your keyboard.

Step3 Click on the export button.

Special Features:
#Silent Detection
With silence detection, you can quickly and easily find the silent moments in your footage. It is great for finding those perfect moments of silence that can impact your film much.
#Audio Ducking
Audio Ducking is a feature in Filmora that automatically lowers the volume of an audio track when another audio track is getting played. It can help ensure that dialog is always audible, even when other sounds are playing in the background.
#TTS and STT
TTS and STT are two features in Filmora that you can use to create subtitles for your video.
TTS stands for text-to-speech, meaning you can create subtitles by typing in the text you want to speak in the video.
STT stands for speech-to-text, meaning you can create subtitles by recording your voice and having Filmora transcribe the text.
Conclusion
Here you go, the best solutions to remove audio from video on Mac. You may choose anyone as per your need.
However, Wondershare Filmora is recommended due to its cross-platform nature and unlimited features.
Free Download For macOS 10.14 or later
An Ultimate Guide to How to remove audio from video in Filmora?
One way is to mute the audio track. To do this, follow the given steps.
Step1 Open a new project in Filmora.
Step2 Click on the audio track in the timeline.
Step3 Now, click the mute button.
Another way to remove the audio from a video is to delete the audio track. To do this:
Step1 Click on the audio track in the timeline
Step2 Press the delete key on your keyboard.
Step3 Click on the export button.
Special Features:
#Silent Detection
With silence detection, you can quickly and easily find the silent moments in your footage. It is great for finding those perfect moments of silence that can impact your film much.
#Audio Ducking
Audio Ducking is a feature in Filmora that automatically lowers the volume of an audio track when another audio track is getting played. It can help ensure that dialog is always audible, even when other sounds are playing in the background.
#TTS and STT
TTS and STT are two features in Filmora that you can use to create subtitles for your video.
TTS stands for text-to-speech, meaning you can create subtitles by typing in the text you want to speak in the video.
STT stands for speech-to-text, meaning you can create subtitles by recording your voice and having Filmora transcribe the text.
Conclusion
Here you go, the best solutions to remove audio from video on Mac. You may choose anyone as per your need.
However, Wondershare Filmora is recommended due to its cross-platform nature and unlimited features.
The Only Guide You’ll Ever Need to Learn GIF Design
The Only Guide You’ll Ever Need to Learn GIF Design That Get Shared Like Crazy
An easy yet powerful editor
Numerous effects to choose from
Detailed tutorials provided by the official channel
The Only Guide You’ll Ever Need to Learn GIF Design That Get Shared Like Crazy
In this article
01 [8 Principles for Great GIF Design](#Part 1)
02 [6 Amazing Examples of Animated Gifs in Web Design](#Part 2)
03 [Learn How to Create and Add Gifs to Interactive Layouts in Filmora](#Part 3)
Part 1 Principles for Great GIF Design
Creating GIFs for infotainment or casual information sharing is the current talk of the trend. You might have visibly landed across a heap of tantalizing GIFs in blogs, social media posts, product promotion websites and almost every other domain you can possibly think of. Using GIFs for any type of content promotion is bound to captivate the target audience in impressive multiplicities. Ever wondered what’s the cue behind the mass appeal that GIFs create? Well, an obvious answer is the stunning GIF design.
When going for GIF creation and selection, design plays the key role in creating considerable buzz about the information being transmitted. To add impact to your creation, you need to pay considerable attention to its design implications, thus ensuring that the right things get presented in the right way. Outlined below are some amazing principles you can use to enhance your GIF design to the next level:
01Ensure Accuracy and Preciseness
The primary concern you need to be attentive about while designing a GIF is its preciseness. Ensure ban exactness of information and confine your creation to the theme and requirement of your creation, like, the message you want to deliver or the impact you want to create through the GIF. Balance your creativity within specific content parameters and avoid getting carried away or overdoing on the beautifying aspect.
As an example, it is visibly not appealing to add a wholesome mix of 15 shades and 20 different elements in a nature-based GIF. You will end up getting too harsh on the viewers’ eyes, confusing them with a hoard of speeding elements and banging colors. You can instead stick to 2 or 3 frames with an intelligent mix of 2 complementary shades.
02Maintain Visual Identity
An important aspect to keep in mind while attempting to design GIF is, it should visually relate to the underlying content. For instance, if you are intending a brand promotion through your GIF, lay stress on adding elements like, brand definition, product specifications, know-how of your work patterns, etc. ensure that your content flows naturally and has exactness.
Other alternatives are, using your product logo as the GIF background, character representation of your brand or using some explicit product oriented themes. While, you are free to pick anything that suits your preferences and needs, just make sure that using it in your GIF adds value to your brand instead of giving an out of the box feel.
Image Name: The-only-guide-you’ll-ever-need-to-learn-gif-design-that-get-shared-like-crazy-1

03Cut Down on Unnecessary Frames
Have you ever encountered a halt in the natural loop of your GIF out of nowhere? While pondering over the underlying cause, it is a common assumption to take this as an animation fallacy, but that’s evidently not the case. The actual culprits behind this glitch are those extra frames that contribute towards nothing but adding weight to an already heavy file.
To set this straight, you should switch to removing any extra frames, while saving a particular one which you may stretch to a desired duration according to the break point of your contents in the GIF. However, take caution to maintain the visual quality of your GIF while you remove those extra frames.
04Make Your GIF Accessible
You should always adhere to the concern of accessibility while creating a GIF. The reason being, your content is visibly going to get mass attention across the web and you cannot filter out visitors, make sure your GIF is easily accessible to all kind of users, particularly those with vision limitations, like, epileptic patients or the ones using screen readers.
Focus on describing your GIF content with alt text and using a limited blinking and flashing rate. In case your GIF content is primarily text based, take care to limit the effective color and image movement and adjust the frames rates to avoid constant and quick movement of image frames when adding many clips on a single page.
Pay additional heed to the auto play feature of your GIFs. It can be visibly annoying to be welcomed on a site homepage with GIFs enjoying an auto play session of their own. You can alternatively, incorporate a ‘Click to Play’ option or grant your site visitors the liberty to decide on what is to be played when.

05Use Storyboards
When aiming to create visibly appealing GIFs, you need to lay considerable stress on choosing an apt background story. Don’t get misled by the wrong assumption of using any random background, owing to the short play duration of GIFs. An impressive solution to this concern is taking the help of a storyboard to keep track of your GIF’s content flow.
Using a storyboard is quite effective means of being in line with the direction of content movement, rescuing you from the hustle of going off the track. This comes explicitly handy when you are working with a team of creators. The storyboard is there to keep everything at the exact place, thus improving member communications and boosting up the design process.

06Focus on Creating Loops
Consider creating an animated motion loop for your GIF allowing a repeated and comprehensive view of your content. Looping projects a deeper observation of the clip and its contents in a seamless transition. However, creating an infinite motion loop in GIFs is quite tricky, as you need to pay utmost concern to ensure a smooth content flow and chances of even the slightest errors are not entertained.
Any loopholes in placement of your GIF elements will get noticed within a blink and lead to an unsatisfactory user experience. Hence, you need to check each of your content frames separately to eliminate chances of possible errors. If you are a beginner, try working with geometrical animations to get the initial pickup. This will be advantageous in deciding the exact element positions at the start and end of the GIF.
07Make Use of Motion Blur
Using the concept of motion blur is pivotal in providing a natural flow and feel to your GIF, which, in an otherwise case would ordinarily appear as a mere collection of static images clubbed together. This would give a wobbling feel with unsteady frame movements to your viewers. The motion blur effect potentially ensures a smooth content flow, and your GIF looks like a short video captured from a camera.
08Stick to a Reduced File Size
Creating GIF of within a standard size range is quite difficult, owing to the fact that these are shared across a variety of media platforms, each having a different file size constraint. It is, however, recommended to stick to a file size as low as possible to escape the notch of modifying the same, ener5y time you need to work with the GIF on a different platform.
Listed below are a few ways to limit your GIF to a lower file size:
● Restrict your GIF to a frame count under 150, exceeding which, it will get difficult to export the GIF to most of the commonly visited social media and content sharing platforms.
● When your GIF is ready to export, adjust its lossy parameter between 5 and 10 to boost the file compression rate. Look for a setting that decreases the effective file size without compromising with the overall GIF design.
● Restrict to a minimum possible color usage. This will not only intensify the GIF design, but also contribute in maintaining a decreased file size. You can instead, focus on playing with animations or adjusting your image frames to longer play durations.
● Don’t experiment with multiple background gradients in your GIF. You can select from either a completely opaque, or a totally transparent background. Adding unnecessary gradients will end up giving your GIF a hazy look, along with a visibly large file that will be difficult to export non any platform.
Part 2 Amazing Examples of Animated Gifs in Web Design
GIFs are an effective means of adding appeal to brand promotions and achieving improved market buildup by delivering just the right content in the most captivating and interesting ways. You can use them as creative web design tools to add spark to your product sites, which can potentially boost the market value and reach of your product by multiplying the number of visitors to your site.
Discussed below are some stunning examples of using animated GIFs to enhance commercial web design, which you can use to create a significant buzz about your product among a target audience:
01Marie Weber
This is a shoe designer company in France, famous for its classy, handmade shoes. On visiting the company’s site, you are welcomed by a simple and subtle, animated product logo on each page. This animated logo is a masterpiece in itself, telling you the about the lavishness of the associated product.
On navigating further, you will find animated elements, like; shoe images and collection names, which appear on the screen before a zoom out. There are underlined links that pop up to animate beneath the name, indicating the link you are going to visit.

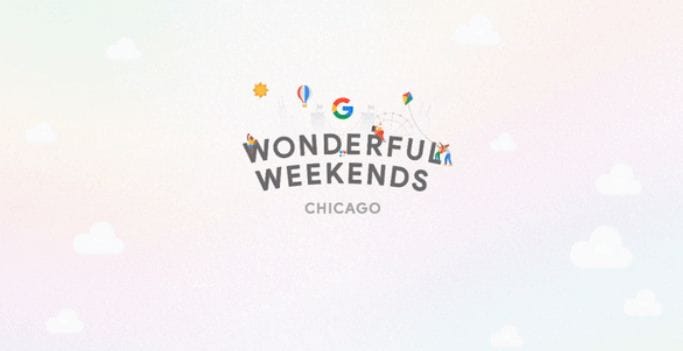
02Wonderful Weekends Festival
This is an absolute animation delight, where the welcome page of the site greets you with vibrant pieces in motion, and a pop up box informs you of the festival’s arrival time and asks you to select one from the options of ‘Play Now’ or ‘Show Me the Festival’.
As you click to make a choice, the Google brand shines with associated colors. As you continue to browse through the site, pages open up with brand color animations, along with colored active links flashing on the pages.
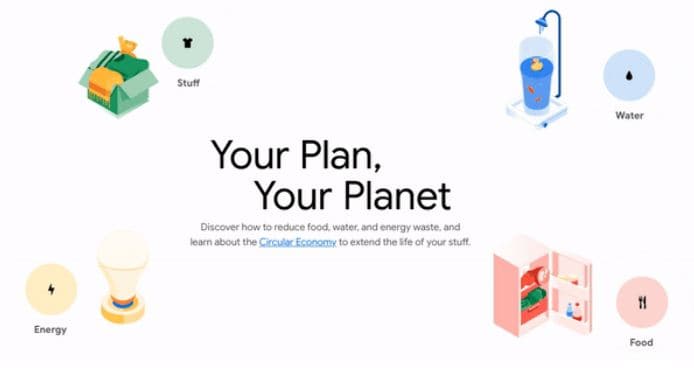
03Google
This is a brand name that needs no introduction. Google has launched its ‘Your Plan, Your Planet’ site to infuse awareness about environment conservation and eco friendly lifestyles, guiding visitors on ways and means of introducing related changes. The site greets you with a simple layout, with a short text moving in and getting still. Click on ‘Let’s Get Started’ and you will see 4 amazingly animated icons that open up to more vibrant animations.
Tap any one of the swinging refrigerator door, the illuminated light bulb, the running faucet or the teddy bear waving at you, to land on a schema that informs you about effective means of improving on conservation in within your selected section. This is a perfect example of using animations as a marketing strategy to captivate people’s attention on a subject that evidently turns them off.
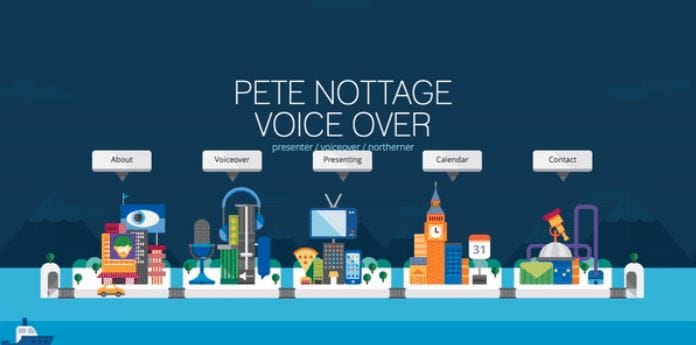
04Pete Nottage
Designed explicitly as a hiring site for voice presenter Pete Nottage, this website tells you everything about the actor and the credibility of hiring him. The site lands among the best examples of web animation usage. The welcome page of the site greets you with the brand logo. Tap on the red swipe and you will get to know that the brand infuses vibrancy to something that’s originally dull.
Next, you will find a plethora of dynamic and elegant animations in a plying plane, cityscape, flowing sea and sailing boats, moving cars and excusive motion graphics on each building. Visiting the animated site links provides you an insight of the actor’s personality. In the ‘About’ section, you can find a headshot animation, that disappears on clicking, and is followed by a more dynamic motion snippet.
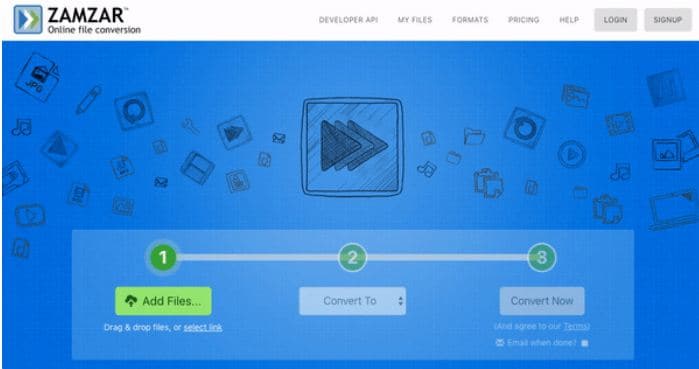
05Zamzar
This one is an online file conversion site and lives up to its tagline ‘File Conversion Made Easy’ through a concrete animation on the welcome page. The file conversion on this site is quick, 3-step process, with a blinking animation indicating the current conversion stage.
For instance, when you are at the first step of selecting a file to convert, the animation shoes a blinking glow on number 1. This continues for the rest of the steps, till your file is finally converted into the desired file format.
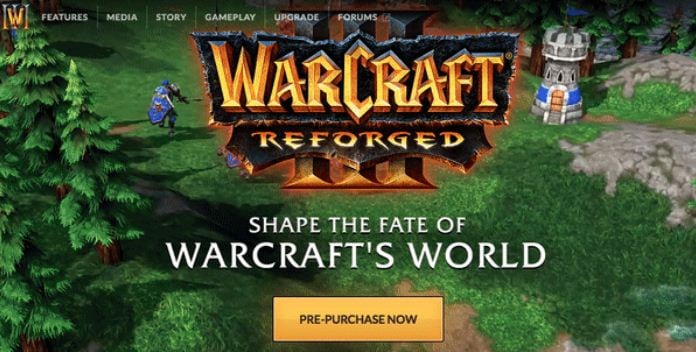
06Blizzard: Warcraft III Reforged
Warcraft was one complete heaven of adventure and thrill for console gamers. While the enticing cutscenes with stunning motion graphics were an absolute favorite, the game had a plenty of other exciting elements.
The relaunched game (Warcraft III Reforged) website has a mix of gaming adventures and cutscenes running in the site’s background with the game title and pitch appearing as an overlaid animation. On navigating through the site, you will find classy animated elements that take you on a nostalgic trip of the original game.
Part 3 Learn How to Create and Add Gifs to Interactive Layouts in Filmora
Now that you are quite familiar with the utility of GIFs in almost every market field, and have seen stunning examples of GIF design and usage for an impressive brand promotion, let’s take a dive into creating and using these motion clips to make interactive graphic layouts for websites, social media blogs and posts, and a variety of other applications that require some brilliant imagery for market promotion.
When looking for the perfect GIF designer software, Wondershare Filmora Video Editor is the most affordable pick. This is a free and an enhanced GIF design tool, packed with world class and premium quality features that are most suitable for giving the much appreciated professional touch to your graphic artwork. Here’s how you can work with Filmora to make alluring graphic layouts:
Step 1: Launch Filmora
The software is readily compatible to your Windows and MacOS devices and you don’t even require a signup to use the application. Just download and install the software in your preferred device and launch the same to reach the software’s welcome interface.
Filmora Free Download Link:
Step 2: Upload Media Files
Select and import the desired media files from your device to upload them to the Filmora timeline. You can either pick a video or choose a series of static images.
Step 3: Add to Timeline
Once imported, you need to add the selected files to the software’s editor timeline. You can use the ‘Drag and Drop’ method to get this done.

Wondershare Filmora - Best Video Editor for Mac/Windows
5,481,435 people have downloaded it.
Build unique custom animations without breaking a sweat.
Focus on creating epic stories and leave the details to Filmora’s auto features.
Start a creative adventure with drag & drop effects and endless possibilities.
Filmora simplifies advanced features to save you time and effort.
Filmora cuts out repetition so you can move on to your next creative breakthrough.
Step 4: Explore Your Editing Skills
As already stated, the Filmora effects library is an extensive inventory of stunning features to compliment your artwork with matchless class. You are free to choose from tons of image and video editing effects and filters suited to your GIF content to create excellent pieces of graphic art.
When starting to customize your GIF in Filmora, you can begin with cropping and trimming your images or video to the perfect part, or even cut and split them to ward off unwanted portions, or rotate and flip the images to set them in the perfect orientation.
You can further add elements like, graphic transitions, overlays, animations and texts, and etc., to customize your artwork to your heart’s content. The software’s audio-visual library facilitates you with around 300 audio-visual effects and music choices to supplement your creation with a conducive sound feel. You can also make adjustments in frame speed and play durations to get the best most snippet ever!
You are granted the liberty to choose almost any common file format to create and customize GIFs in Filmora. A more convincing feature is, the software does not leave a watermark on your artwork and you can easily share your creation across media platforms.

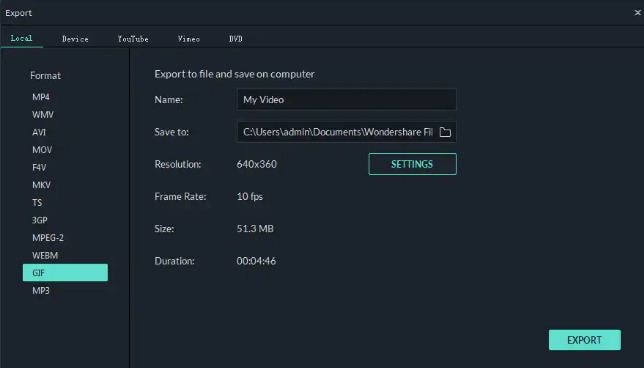
Step 5: Save and Export
Once your creation satisfies you, save it to your device with a .gif extension, from where it can be exported to various media sharing platforms with ease.
● Key Takeaways from This Episode →
● When planning a perfect and appealing product marketing strategy, you can consider using GIFs to enhance the feel. Complement your product site with suitable GIF design and graphic transitions can prove pivotal to target and hold your related audience.
● Looking for the best GIF creator and customization software, you can rely on Filmora to create and customize professional quality GIFs with utmost convenience.
The Only Guide You’ll Ever Need to Learn GIF Design That Get Shared Like Crazy
In this article
01 [8 Principles for Great GIF Design](#Part 1)
02 [6 Amazing Examples of Animated Gifs in Web Design](#Part 2)
03 [Learn How to Create and Add Gifs to Interactive Layouts in Filmora](#Part 3)
Part 1 Principles for Great GIF Design
Creating GIFs for infotainment or casual information sharing is the current talk of the trend. You might have visibly landed across a heap of tantalizing GIFs in blogs, social media posts, product promotion websites and almost every other domain you can possibly think of. Using GIFs for any type of content promotion is bound to captivate the target audience in impressive multiplicities. Ever wondered what’s the cue behind the mass appeal that GIFs create? Well, an obvious answer is the stunning GIF design.
When going for GIF creation and selection, design plays the key role in creating considerable buzz about the information being transmitted. To add impact to your creation, you need to pay considerable attention to its design implications, thus ensuring that the right things get presented in the right way. Outlined below are some amazing principles you can use to enhance your GIF design to the next level:
01Ensure Accuracy and Preciseness
The primary concern you need to be attentive about while designing a GIF is its preciseness. Ensure ban exactness of information and confine your creation to the theme and requirement of your creation, like, the message you want to deliver or the impact you want to create through the GIF. Balance your creativity within specific content parameters and avoid getting carried away or overdoing on the beautifying aspect.
As an example, it is visibly not appealing to add a wholesome mix of 15 shades and 20 different elements in a nature-based GIF. You will end up getting too harsh on the viewers’ eyes, confusing them with a hoard of speeding elements and banging colors. You can instead stick to 2 or 3 frames with an intelligent mix of 2 complementary shades.
02Maintain Visual Identity
An important aspect to keep in mind while attempting to design GIF is, it should visually relate to the underlying content. For instance, if you are intending a brand promotion through your GIF, lay stress on adding elements like, brand definition, product specifications, know-how of your work patterns, etc. ensure that your content flows naturally and has exactness.
Other alternatives are, using your product logo as the GIF background, character representation of your brand or using some explicit product oriented themes. While, you are free to pick anything that suits your preferences and needs, just make sure that using it in your GIF adds value to your brand instead of giving an out of the box feel.
Image Name: The-only-guide-you’ll-ever-need-to-learn-gif-design-that-get-shared-like-crazy-1
03Cut Down on Unnecessary Frames
Have you ever encountered a halt in the natural loop of your GIF out of nowhere? While pondering over the underlying cause, it is a common assumption to take this as an animation fallacy, but that’s evidently not the case. The actual culprits behind this glitch are those extra frames that contribute towards nothing but adding weight to an already heavy file.
To set this straight, you should switch to removing any extra frames, while saving a particular one which you may stretch to a desired duration according to the break point of your contents in the GIF. However, take caution to maintain the visual quality of your GIF while you remove those extra frames.
04Make Your GIF Accessible
You should always adhere to the concern of accessibility while creating a GIF. The reason being, your content is visibly going to get mass attention across the web and you cannot filter out visitors, make sure your GIF is easily accessible to all kind of users, particularly those with vision limitations, like, epileptic patients or the ones using screen readers.
Focus on describing your GIF content with alt text and using a limited blinking and flashing rate. In case your GIF content is primarily text based, take care to limit the effective color and image movement and adjust the frames rates to avoid constant and quick movement of image frames when adding many clips on a single page.
Pay additional heed to the auto play feature of your GIFs. It can be visibly annoying to be welcomed on a site homepage with GIFs enjoying an auto play session of their own. You can alternatively, incorporate a ‘Click to Play’ option or grant your site visitors the liberty to decide on what is to be played when.
05Use Storyboards
When aiming to create visibly appealing GIFs, you need to lay considerable stress on choosing an apt background story. Don’t get misled by the wrong assumption of using any random background, owing to the short play duration of GIFs. An impressive solution to this concern is taking the help of a storyboard to keep track of your GIF’s content flow.
Using a storyboard is quite effective means of being in line with the direction of content movement, rescuing you from the hustle of going off the track. This comes explicitly handy when you are working with a team of creators. The storyboard is there to keep everything at the exact place, thus improving member communications and boosting up the design process.
06Focus on Creating Loops
Consider creating an animated motion loop for your GIF allowing a repeated and comprehensive view of your content. Looping projects a deeper observation of the clip and its contents in a seamless transition. However, creating an infinite motion loop in GIFs is quite tricky, as you need to pay utmost concern to ensure a smooth content flow and chances of even the slightest errors are not entertained.
Any loopholes in placement of your GIF elements will get noticed within a blink and lead to an unsatisfactory user experience. Hence, you need to check each of your content frames separately to eliminate chances of possible errors. If you are a beginner, try working with geometrical animations to get the initial pickup. This will be advantageous in deciding the exact element positions at the start and end of the GIF.
07Make Use of Motion Blur
Using the concept of motion blur is pivotal in providing a natural flow and feel to your GIF, which, in an otherwise case would ordinarily appear as a mere collection of static images clubbed together. This would give a wobbling feel with unsteady frame movements to your viewers. The motion blur effect potentially ensures a smooth content flow, and your GIF looks like a short video captured from a camera.
08Stick to a Reduced File Size
Creating GIF of within a standard size range is quite difficult, owing to the fact that these are shared across a variety of media platforms, each having a different file size constraint. It is, however, recommended to stick to a file size as low as possible to escape the notch of modifying the same, ener5y time you need to work with the GIF on a different platform.
Listed below are a few ways to limit your GIF to a lower file size:
● Restrict your GIF to a frame count under 150, exceeding which, it will get difficult to export the GIF to most of the commonly visited social media and content sharing platforms.
● When your GIF is ready to export, adjust its lossy parameter between 5 and 10 to boost the file compression rate. Look for a setting that decreases the effective file size without compromising with the overall GIF design.
● Restrict to a minimum possible color usage. This will not only intensify the GIF design, but also contribute in maintaining a decreased file size. You can instead, focus on playing with animations or adjusting your image frames to longer play durations.
● Don’t experiment with multiple background gradients in your GIF. You can select from either a completely opaque, or a totally transparent background. Adding unnecessary gradients will end up giving your GIF a hazy look, along with a visibly large file that will be difficult to export non any platform.
Part 2 Amazing Examples of Animated Gifs in Web Design
GIFs are an effective means of adding appeal to brand promotions and achieving improved market buildup by delivering just the right content in the most captivating and interesting ways. You can use them as creative web design tools to add spark to your product sites, which can potentially boost the market value and reach of your product by multiplying the number of visitors to your site.
Discussed below are some stunning examples of using animated GIFs to enhance commercial web design, which you can use to create a significant buzz about your product among a target audience:
01Marie Weber
This is a shoe designer company in France, famous for its classy, handmade shoes. On visiting the company’s site, you are welcomed by a simple and subtle, animated product logo on each page. This animated logo is a masterpiece in itself, telling you the about the lavishness of the associated product.
On navigating further, you will find animated elements, like; shoe images and collection names, which appear on the screen before a zoom out. There are underlined links that pop up to animate beneath the name, indicating the link you are going to visit.
02Wonderful Weekends Festival
This is an absolute animation delight, where the welcome page of the site greets you with vibrant pieces in motion, and a pop up box informs you of the festival’s arrival time and asks you to select one from the options of ‘Play Now’ or ‘Show Me the Festival’.
As you click to make a choice, the Google brand shines with associated colors. As you continue to browse through the site, pages open up with brand color animations, along with colored active links flashing on the pages.
03Google
This is a brand name that needs no introduction. Google has launched its ‘Your Plan, Your Planet’ site to infuse awareness about environment conservation and eco friendly lifestyles, guiding visitors on ways and means of introducing related changes. The site greets you with a simple layout, with a short text moving in and getting still. Click on ‘Let’s Get Started’ and you will see 4 amazingly animated icons that open up to more vibrant animations.
Tap any one of the swinging refrigerator door, the illuminated light bulb, the running faucet or the teddy bear waving at you, to land on a schema that informs you about effective means of improving on conservation in within your selected section. This is a perfect example of using animations as a marketing strategy to captivate people’s attention on a subject that evidently turns them off.
04Pete Nottage
Designed explicitly as a hiring site for voice presenter Pete Nottage, this website tells you everything about the actor and the credibility of hiring him. The site lands among the best examples of web animation usage. The welcome page of the site greets you with the brand logo. Tap on the red swipe and you will get to know that the brand infuses vibrancy to something that’s originally dull.
Next, you will find a plethora of dynamic and elegant animations in a plying plane, cityscape, flowing sea and sailing boats, moving cars and excusive motion graphics on each building. Visiting the animated site links provides you an insight of the actor’s personality. In the ‘About’ section, you can find a headshot animation, that disappears on clicking, and is followed by a more dynamic motion snippet.
05Zamzar
This one is an online file conversion site and lives up to its tagline ‘File Conversion Made Easy’ through a concrete animation on the welcome page. The file conversion on this site is quick, 3-step process, with a blinking animation indicating the current conversion stage.
For instance, when you are at the first step of selecting a file to convert, the animation shoes a blinking glow on number 1. This continues for the rest of the steps, till your file is finally converted into the desired file format.
06Blizzard: Warcraft III Reforged
Warcraft was one complete heaven of adventure and thrill for console gamers. While the enticing cutscenes with stunning motion graphics were an absolute favorite, the game had a plenty of other exciting elements.
The relaunched game (Warcraft III Reforged) website has a mix of gaming adventures and cutscenes running in the site’s background with the game title and pitch appearing as an overlaid animation. On navigating through the site, you will find classy animated elements that take you on a nostalgic trip of the original game.
Part 3 Learn How to Create and Add Gifs to Interactive Layouts in Filmora
Now that you are quite familiar with the utility of GIFs in almost every market field, and have seen stunning examples of GIF design and usage for an impressive brand promotion, let’s take a dive into creating and using these motion clips to make interactive graphic layouts for websites, social media blogs and posts, and a variety of other applications that require some brilliant imagery for market promotion.
When looking for the perfect GIF designer software, Wondershare Filmora Video Editor is the most affordable pick. This is a free and an enhanced GIF design tool, packed with world class and premium quality features that are most suitable for giving the much appreciated professional touch to your graphic artwork. Here’s how you can work with Filmora to make alluring graphic layouts:
Step 1: Launch Filmora
The software is readily compatible to your Windows and MacOS devices and you don’t even require a signup to use the application. Just download and install the software in your preferred device and launch the same to reach the software’s welcome interface.
Filmora Free Download Link:
Step 2: Upload Media Files
Select and import the desired media files from your device to upload them to the Filmora timeline. You can either pick a video or choose a series of static images.
Step 3: Add to Timeline
Once imported, you need to add the selected files to the software’s editor timeline. You can use the ‘Drag and Drop’ method to get this done.
Wondershare Filmora - Best Video Editor for Mac/Windows
5,481,435 people have downloaded it.
Build unique custom animations without breaking a sweat.
Focus on creating epic stories and leave the details to Filmora’s auto features.
Start a creative adventure with drag & drop effects and endless possibilities.
Filmora simplifies advanced features to save you time and effort.
Filmora cuts out repetition so you can move on to your next creative breakthrough.
Step 4: Explore Your Editing Skills
As already stated, the Filmora effects library is an extensive inventory of stunning features to compliment your artwork with matchless class. You are free to choose from tons of image and video editing effects and filters suited to your GIF content to create excellent pieces of graphic art.
When starting to customize your GIF in Filmora, you can begin with cropping and trimming your images or video to the perfect part, or even cut and split them to ward off unwanted portions, or rotate and flip the images to set them in the perfect orientation.
You can further add elements like, graphic transitions, overlays, animations and texts, and etc., to customize your artwork to your heart’s content. The software’s audio-visual library facilitates you with around 300 audio-visual effects and music choices to supplement your creation with a conducive sound feel. You can also make adjustments in frame speed and play durations to get the best most snippet ever!
You are granted the liberty to choose almost any common file format to create and customize GIFs in Filmora. A more convincing feature is, the software does not leave a watermark on your artwork and you can easily share your creation across media platforms.
Step 5: Save and Export
Once your creation satisfies you, save it to your device with a .gif extension, from where it can be exported to various media sharing platforms with ease.
● Key Takeaways from This Episode →
● When planning a perfect and appealing product marketing strategy, you can consider using GIFs to enhance the feel. Complement your product site with suitable GIF design and graphic transitions can prove pivotal to target and hold your related audience.
● Looking for the best GIF creator and customization software, you can rely on Filmora to create and customize professional quality GIFs with utmost convenience.
Also read:
- Best 12 AI Video Generators to Pick for 2024
- 2024 Approved Recommended Video Background Changers
- New How to Create a Vacation Slideshow in 5 Minutes
- Updated 2024 Approved The Actual Discussion Is Regarding the Splitting of the Video by Using the VSDC. Also, Recommendation of Using Wondershare Filmora as the Better Substitute in Place of VSDC
- Updated Have You Ever Used the Path Blur Effect in Your Photos? This Article Will Address How to Use Path Blur in Photoshop to Generate Appealing Results Accurately
- Updated What Is the Best MP4 Cutter for YouTuber on Mac?
- Updated 2024 Approved Would You Like to Know How to Change the Ratio of the Video or Which Is the Correct Aspect Ratio for Uploading to the Online Platform? Then, Go Through the Article to Get Complete Details About the Video Aspect Ratio
- New In 2024, How to Make a Video with My Phone
- New 2024 Approved How to Change Aspect Ratio in iMovie
- New All Things About Adding Effects In Kinemaster
- New In 2024, The Most Complete Guide to Make Fortnite Montage
- Updated 2024 Approved When the Talk Is About an Effective Slideshow Design, People Also Ask of Creating a Quick Windows 10 Slideshow. Keep Reading to Know About the Quickest Ways of Setting the Issue Straight
- Updated How to Create Emoji on Mac That Take Less Than 10 Mins for 2024
- New If You Are a Marketer Who Want to Create Facebook Ads to Boost Your Business, You Are Coming to the Right Place. Well Share You some Useful Tips to Start Your First FB Ads Campaign
- New In 2024, Want to Know the Simplest Way to Match the Colors of Your Photos in Photoshop? The Following Discussion Will Help Match Color in Photoshop, Almost Effortlessly
- New How to Create LUTs with LUTs Generator
- Updated 2024 Approved Time Lapse Video Is Very Interesting and Creative, Which Usually Attracts More Attention. This Article Will Show You How to Make a Time Lapse Video with Adobe After Effects
- Top 7 Best GoPro Video Editors for Mac for 2024
- New Do You Want Your Videos to Look Like Danny Gevirtz? You Can Use some Inspired Presets. There Are Different Danny Gevirtz LUTs that You Can Download and Use
- 2024 Approved 2 Methods to Crop Video in VLC
- Updated This Article Presents the Guide to Using Magic Effects for Creating Competent Films with Step-by-Step Instructions and Filmoras Grow and Win Program Contest
- Doable Ways to Make Transparent Background in Procreate
- Updated Step by Step to Crop a Video Using Lightworks
- Updated In 2024, When It Comes to Video Editing, There Are Countless Software Options Available on the Market. However, Not All of Them Come with Useful Masking Tools. In This Article, We Will Be Discussing the Top 8 Video Editor with Useful Masking Tools
- New Are You Excited to Find Out the Top-Class VHS Video Effects Maker? Put Your Worries at Rest because This Article Will Provide the Best VHS Effect Makers
- New Tips for Choosing Location & Scheduling Music Video for 2024
- Updated Spooky Halloween Best 15+ Halloween Countdown Video Clips for 2024
- New In 2024, Find a Solution for Effortless Sky Replacement Photoshop in This Comprehensive Guide. Also, Use the Easiest Video Editing Tool to Make Your Media Stunning
- Updated 2024 Approved To Know How to Add Effects in Premiere Pro, You Need to Follow This Guide as It Has All You Need to Know to Add Effects in Premiere Pro. Learn More Here
- 10 Creative AR Teaching Examples to Tell You What Is AR in Teaching for 2024
- In 2024, How to Create The Best Video Collages ?
- New In 2024, Finding The Best Filmic Pro LUTs For Video Editing
- New The Best 10 GIF to JPGPNG Converters
- Updated Do You Want to Use a Professional Tool to Add Subtitles? Read This Article to Discover the Best Reliable Tool to Create Subtitles in Your Desired Manner for 2024
- New 2024 Approved Top 10 Free WhatsApp Video Converter 2023
- New In 2024, 12 Best Picks of Video Enhancer Software
- Updated In 2024, 7 Best MP4 Editors on Mac Edit MP4 in Mac
- New CapCut Lenta Template How It Benefits Slow Motion Video
- 2024 Approved In This Guidepost, Youll Learn What an HDRI Photo Is and How to Use the Best Free HDRI Program to Edit Photos. Youll Also Know the Difference Between HDR and HDRI
- New In 2024, 4 Ways for Rotating Your GoPro Videos Professionally
- Updated Back up and Organize Your Files to Protect Any Misfortune Befalling Them. The Article Will Guide You on How to Back up and Manage Your Footage for 2024
- How to Add Adjustment Layer in Premiere Pro
- Create a Kickass COD Warzone Thumbnail for Free
- Updated How to Add Echo Effect to Video
- Clearly, the Efectum App Download without a Watermark Option Is on Android Phones. Thus, Read This Review on the Efectum App and Find Replacements for Good for 2024
- 2024 Approved Detailed Tutorial to Resize Your Video in VLC
- New 2024 Approved The Craziest 10 AI Editors Youve Seen
- Updated In 2024, Easy Guide to Use a Stabilization Tool in Filmora
- Updated Learn How to Add Dynamic Shake Effects to Your Videos Using Alight Motion. Our Step-by-Step Guide Makes It Easy to Create Cinematic Footage
- Updated In 2024, Have You Been Looking for Online YouTube Video Trimmer? You Will Be Introduced to Different Ways to Trim YouTube Videos as Introduced by YouTube Itself and some Online and Desktop Software to Help You Learn Video Trimming in This Article
- In 2024, Detailed guide of ispoofer for pogo installation On Oppo Reno 8T | Dr.fone
- 3 Ways for Android Pokemon Go Spoofing On Xiaomi Redmi Note 12 5G | Dr.fone
- In 2024, Why does the pokemon go battle league not available On Poco C55 | Dr.fone
- What is Fake GPS Location Pro and Is It Good On Vivo Y78 5G? | Dr.fone
- In 2024, Planning to Use a Pokemon Go Joystick on Realme C67 4G? | Dr.fone
- How to restore wiped music on Red Magic 9 Pro
- Vivo S17e Screen Unresponsive? Heres How to Fix It | Dr.fone
- Catch or Beat Sleeping Snorlax on Pokemon Go For Vivo Y200e 5G | Dr.fone
- Android Unlock Code Sim Unlock Your Tecno Pova 6 Pro 5G Phone and Remove Locked Screen
- In 2024, How To Stream Anything From OnePlus Open to Apple TV | Dr.fone
- Title: Updated The Quick and Simple Way to Mirror Video in Premiere Pro
- Author: Morgan
- Created at : 2024-05-19 05:12:24
- Updated at : 2024-05-20 05:12:24
- Link: https://ai-video-editing.techidaily.com/updated-the-quick-and-simple-way-to-mirror-video-in-premiere-pro/
- License: This work is licensed under CC BY-NC-SA 4.0.
