
:max_bytes(150000):strip_icc():format(webp)/GettyImages-1139232374-700d343900854115ad26acf3f1dd80b3.jpg)
Updated Top 7 Easy Ways to Convert a Video to a GIF Online
Top 7 Easy Ways to Convert a Video to a GIF Online
Looking for the best video to gif online conversion tools? No worries, as we have done all the research work and have shortlisted the best tools that can assist you with the task. GIF is short and cute animated files that help in interestingly conveying a message. These short-animated visuals help in reaching and creating an impact on the target audience. So, if you have some videos, GIF animations can be created from them using a good converter tool which can be an online program or system software.
Online programs are preferred by the users owing to their simple and hassle-free use, support for basic features, and cost-saving options. So, here in this topic, we will discuss the top and easy ways to convert video to GIF online.

Part 1: Top 7 Easy Ways to Convert a Video to a GIF Online
Several online tools can be used for converting a video file into GIF, but all do not stand up to the tall claims it makes. So, if you are in search of an easy yet effective tool, shortlisted below are the top 7 tools for video into GIF online conversion.
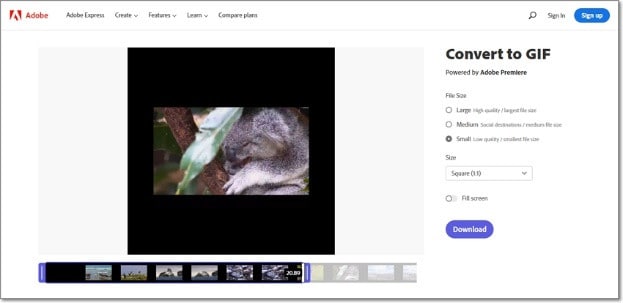
1. Adobe Express
Powered by Adobe Premiere, this is an excellent online tool that allows converting videos in all key formats in GIF format. The free version allows adding videos for up to 1 hour and the processed files can be downloaded to the local system.
Key features
- Video files in all key formats can be converted to GIF.
- Allows selecting the aspect ratio and the file size of the target file.
- This video to GIF converter online tool support drag and drop feature.
- Allows trimming the video so that the file portion can be selected.
Pros:
- Simple and clean interface.
- Quick file processing.
- Allows selecting aspect ratio and file size.
Cons:
- Only one file at a time can be processed.
- Only desktop files can be added.
- To download the file, you need to free sign-up.
User Review:
A good online multi-platform service that works with interesting features. -TechRadar
This is one of the best programs that comes packed with wide range of features that can assist you in getting the target customized files.
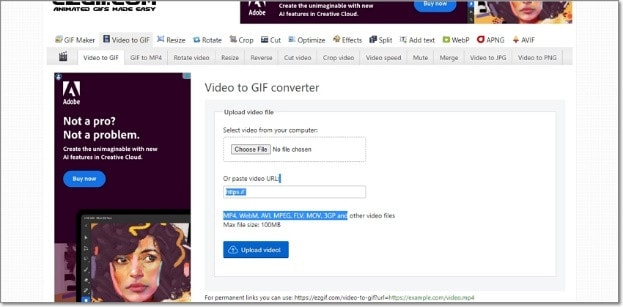
2. Ezgif
Using this browser-based tool, local as well as online videos in key formats can be converted to GIFs. The interface is simple where you just need to add the file and the conversion will be done automatically.
Key features
- GIF can be created from the local and online video files in all key formats.
- Choose the video part for creating the GIF file else by default, the first 5 seconds of the video are used.
Pros:
- All popular video formats like MP4, MPEG, FLV, MOV, and others are supported for conversion to GIF.
- Local, as well as file links in case of online files, can be added.
- Allows selecting the video part for which the GIF has to be created.
- Allows choosing the frame rate, and the size of the video.
This online GIF converter has an option to set static background.
Cons:
- File size limitation of 100 MB.
- Internet dependency.
User Review
“A website with many important and good tools that facilitates making your task easier. You get all features in one place. -Sasa011, Mywot.
This simple online tool is a pocket friendly option for converting your videos into GIF with added option for editing them. Supporting all key formats, the program supports additional tools as well.
3. Img2Go
Your videos on the system, cloud storage, as well as using URLs can be added to this online tool for conversion to GIF format. The look and the quality of GIFs can be adjusted by making changes in the file parameters.

Key features
- Convert all key video files like MP4, MOV, MPEG, and others to GIF.
- Customize the GIF look by editing the file size and applying the color filter.
- This online video to GIF converter allows to choose to enhance, sharpen, equalize, and edit files in other ways.
- Files to be converted can be added from the desktop, Google Drive, Dropbox, as well as URL.
- Processed files can be saved to the cloud storage in addition to the local system.
Pros:
- Multiple sources to add the video file.
- Customize the file parameters and enhance its look.
- Converted file is downloaded automatically to the local system.
Cons:
- Free version allows converting only 3 files at a time.
- Dependency on internet connectivity.
User review:
“This is the best online converter app I have discovered. It is really easy and fast to use. I absolutely recommend it and it really works.”-Maria Ancil, ChromeStats
When you need to convert only a few files at a time in a hassle-free manner consider this simple online tool. After the conversion is done, you would not have any hassles of file downloading as it is automatically saved to the system.
4. CloudConvert
Convert your videos in MP4, FLV, WebM, and other key formats to GIF using this browser-based tool that is simple and free to use. Multiple file parameters can be changed using the tool to get the desired file.

Key Features:
- Allows converting all key video formats.
- Files to be converted can be added from the desktop, URL, Dropbox, Google Drive, and OneDrive.
- Allows adjusting the fit, codec, resolution, aspect ratio, and fps.
- Option to trim the file and also add a watermark.
Pros:
- Files to be converted can be added from multiple sources.
- All key video formats supported.
- Option to control the video size, quality, and aspect ratio.
Cons:
- Free version allows only 25 conversions per day.
- Converted files need to be downloaded.
User Review
“Instant way of converting small-sized files online in many different formats.”
-Sushil, SoftwareAdvice
When conversion of cloud-based files is needed, this works a good online tool that also allows you to edit and change the key file parameters.
5. io
This is a free browser-based tool that allows creating of animated GIF files from videos. There are several video editing options also supported by the tool like split, cut, adding text, and more. You can even add a YouTube video or its link to create a GIF.

Key features:
- Free online tool for creating a GIF file.
- Support all key video formats like MP4, MOV, FLV, and others.
- Local, YouTube as well as videos from Dropbox can be added.
- Option to record the video and create its GIF.
- ‘Allows choosing the size, duration, background color, and several other file parameters.
Pros:
- Videos from multiple sources can be added.
- YouTube videos can also be converted to GIFs.
- Option to record the video and create its GIF.
- Support multiple video editing options.
Cons:
- Slow processing speed.
- Files processed through the free version have a watermark.
- Free version allows processing files under 10 minutes and of 250Mb in size.
User Review:
“It is just a perfect tool and easy to use. It supports a wide variety of media files.” - Koi, Trustpilot.
Option to convert the YouTube videos as well as the recorded videos make this tool different from the others. All popular file formats are supported and you can even customize and change the file parameters as per your requirements.
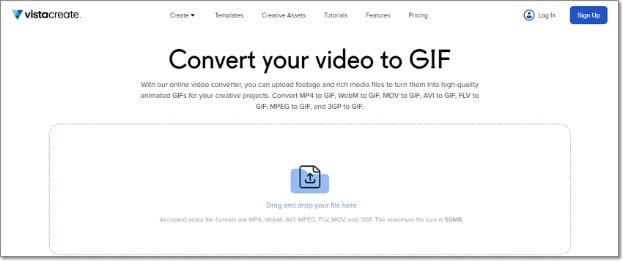
6. VistaCreate
This is another simple-to-use tool that allows converting all key video formats to a GIF file. The program allows setting various parameters as needed.
Key Features
- Convert MP4, WebM, AVI, MPEG, FLV, MOV, and 3GP to GIF.
- Support Drag and Drop feature.
- Videos up to 50MB can be processed.
- Allows choosing the video start and the end time for which GIF is to be created. If no time is selected, the first 5 seconds of the video are used.
Pros:
- Simple user interface.
- Allows selecting the video part for which GIF is to be created.
- Choose the frame rate and the speed.
Cons:
- Limited format support.
- Free version has a limitation of 50Mb file size.
- Processing speed is slow.
User Review:
“It is a simple and fast online tool that works. The program allows creating eye-catchy visuals and is free to use.”-Kshitij T, G2. Com
Simple to use, this online tool is apt when you need selected parts of the video for creating a GIF. Though it is compatible with a few selected formats, the process of conversion is simple.
7. XConvert
This online tool support conversion of wide range of file types and formats including videos to GIF. The supported video formats are MP4, WebM, MOV, and MKV. The tool also allows changing the target file parameters.

Key Features
- Free to use online tool with a simple interface.
- Allows converting MO4, MOV, WebM, and MKV videos to GIF.
- Frame Rate and resolution of the target GIF file can be selected.
- Allows adding local as well as files saved to the cloud storage.
Pros:
- Add videos from the desktop, Google Drive, and Dropbox.
- Choose the desired frame rate and resolution.
- Option to save the processed file to the system or Dropbox. Option to get the converted file download link.
Cons:
- Limited file support.
- Converted files need to be downloaded.
- Internet dependency.
User Review:
Portable, nice UI, cross-platform tool and has a lot of actions and run fast. -Roflpancake, Alternativeto
When simple conversion with basic file editing is needed, consider this online tool for your task. In addition to the local system, you can even save the files to your cloud storage.
Part 2: Comparison Table of the Best Video to GIF Converters
The table below compares the above 7 listed tools based on the formats supports, speed of file processing, and the watermark on the processed files.
| Features/Tool | Supported Format | Free Version with watermark or not | Speed of conversion |
|---|---|---|---|
| Adobe Express | All key video formats | No watermark | 2 (Fast) |
| Ezgif | All key formats including MP4, MPEG, FLV, MOV, and others. | No watermark. | 4 (Slow) |
| Img2Go | MP4, FLV, MOV, and all key video formats. | No Watermark | 2 (Fast) |
| CloudConvert | All popular video formats including MP4, MOV, FLV, MPEG, and more. | No Watermark | 2(Fast) |
| Veed.io | All key formats | Yes, free version has a watermark. | 5 (very Slow) |
| VistaCreate | MP4, WebM, AVI, MPEG, FLV, MOV, and 3GP. | No watermark | 5 (Very Slow) |
| XConvert | MP4, WebM, MOV, MKV. | No watermark | 3 (Average) |
Part 3: Best Solution to Convert Video to GIF on Windows/Mac
To convert videos to GIF on your Windows and Mac without worrying about any limitations or internet dependency, desktop software works as the best option. If you too have been looking for one such desktop program, we recommend Filmora Video Editor as the best choice. Though the software is used majorly for advanced video editing options, it is capable of performing a variety of other tasks as well including video to GIF conversion. The software allows file conversion through its export feature.
For Win 7 or later (64-bit)
For macOS 10.14 or later
Key Features
- Almost all video formats like MOV, MP4, MKV, FLV, and others can be converted to GIF.
- High-quality conversion at a fast speed.
- Support batch processing so that multiple files can be processed at a time.
- Allows editing and customizing videos using the built-in features of the software like effects, subtitles, crop, cut, and more.
Pros:
- The interface is simple which makes the software suitable even for beginners.
- Almost all popular video formats are supported.
- High-quality conversion in a hassle-free manner.
- Windows and Mac support.
Cons:
- Being a desktop software, it needs download and installation.
- Need to purchase the software subscription.
Steps to convert videos to GIF using Wondershare Filmora
Step 1. Launch the installed software on your system and the main interface select Create Project > New Project.

Step 2. Click on Import Media Files Here option under the Media tab to browse and add the local video file. Multiple files for batch processing can be added here.

Step 3. After the files are added, now it’s time to move them to the time and for this, you can simply drag and drop them to the bottom. Now at the timeline, using the built-in editing features, customization can be done as required.

Step 4. Finally, tap on the Export button and then choose GIF as the desired target format and also the location to save the converted files.

Conclusion
If one of the above-listed online tools serves your videos for GIF conversion purposes, it’s great. If not, you can use the Wondershare Filmora software. Once downloaded, the software can be used for several editing and other video-related tasks.
For macOS 10.14 or later
Key Features
- Almost all video formats like MOV, MP4, MKV, FLV, and others can be converted to GIF.
- High-quality conversion at a fast speed.
- Support batch processing so that multiple files can be processed at a time.
- Allows editing and customizing videos using the built-in features of the software like effects, subtitles, crop, cut, and more.
Pros:
- The interface is simple which makes the software suitable even for beginners.
- Almost all popular video formats are supported.
- High-quality conversion in a hassle-free manner.
- Windows and Mac support.
Cons:
- Being a desktop software, it needs download and installation.
- Need to purchase the software subscription.
Steps to convert videos to GIF using Wondershare Filmora
Step 1. Launch the installed software on your system and the main interface select Create Project > New Project.
Step 2. Click on Import Media Files Here option under the Media tab to browse and add the local video file. Multiple files for batch processing can be added here.
Step 3. After the files are added, now it’s time to move them to the time and for this, you can simply drag and drop them to the bottom. Now at the timeline, using the built-in editing features, customization can be done as required.
Step 4. Finally, tap on the Export button and then choose GIF as the desired target format and also the location to save the converted files.
Conclusion
If one of the above-listed online tools serves your videos for GIF conversion purposes, it’s great. If not, you can use the Wondershare Filmora software. Once downloaded, the software can be used for several editing and other video-related tasks.
How to Create Realistic Fire Effects
Do you know that many cinema films and big-budget companies use visual effects to create realistic fires? It saves them from potential danger in production and helps them manage the time required to create a project. In this article, you will get pro tips and easy ways to add Fire effects by Wondershare Filmora.
![]()
Note: let’s not count Michael Bay and Christopher Nolan productions because their movies have a higher budget, and creating fake fire is easy.
Part 1. What do you need to create fire effects?
Using simple tools such as Filmora and visual effects, you can create a realistic fire effect with an easy setup. For filming the effect, we will need
- A good camera
- A light source
- Video editing software - Wondershare Filmora
- Basic editing skills
However, the light source is key to the fire effects. It will be beneficial if you have a warmer color light or a light that can change its temperature. You can use tungsten light bulbs or small circular LEDs that are pretty famous with Vloggers and tick-tock users.
Part 2. How to make a realistic effect fire?
After getting prepared, it’s time to do the real things. Follow the steps below to create a realistic fire effect like a pro.
Step1 Record your footage
While recording the video, you can slightly shake your light source, which will give it the flickering effect of the flame. Here, you can do this in two ways.
Shaking the light manually
Just make sure when you are shaking the light, it is not shaken aggressively, or it will lose its realism to a real fire.

Shaking the light using a dimmer
You can also use some skills to create the flickering effect of the fire without literally shaking the LED light. Dimmers come to help. A dimmer is a device that enables you to change the temperature of the LED light. If you have a dimmer, your work will be more accessible.
A regulator on the dimmer will help you switch between low and high tones. It will flicker the light on the object like a flame and make it look like it was placed in front of a real fire.

Step2 Record the object
Our next step will be to record the object on which the effect is taking place. Ensure the camera is placed under a good light source so that the picture is not dim and the object is exposed. Make sure the camera is placed at the level of the eye so that it will help you record your video clearly and accurately.
Also, keep in mind to zoom out the camera lens, which will fix the frame of the video so that the object or the person is entirely on the screen. Another tip for creating a realistic fire effect would be the person acting as the object. The more natural the acting is, the more realistic would be the fire effect.
Step3 Edit the footage
We are being safe and saving time by not using actual fire. The goal of creating a fake fire would be the effect and reaction of the object or the actor.
1. Download a professional video editing software - Wondershare Filmora
Visit Wondershare Filmora official site if you haven’t already downloaded it.
![]()
Note: download the latest version of filmora. It will give you a pro version and help you to create more realistic fire effects.
2. Create a new project and import the recorded clips
Before adding the fire effects to your video, you must ensure that you are familiar with the editing software. Your first step would be to add your clips to the timeline. Drag the footage from the library and enter it into the timeline.

3. create the fire effect more realistic by adding smoke
The next step would be to add smoke to the fire. As it is only fair that the fire makes the smoke so. Adding the smoke will create the fire effect more realistic. Follow the below steps to get your cinematic video!
#Step1 Search for smoke effects
To add the smoke effect, click on the element’s icon on the bar above and search for smokescreen 2.
#Step2 Add a smoke effect
Once you have searched and found the smoke screen 2 effects, then import that effect onto your timeline so that you can begin editing.

Once you’ve added the fire effect, you will notice the change on the screen in the top right corner.
#Step3 Add duration
The next step would be to set the duration of the smokescreen effect so that it matches the length of the video. To do so,
- Click on the edge of the smoke screen effect.
- Drag it to the right if the effect appears smaller than the video clip.
- And drag it to the left if it is larger than the video clip.
- As soon as it matches the length of the video, leave the drag, and it will fit right into place.
#Step4 Make some changes to the smoke effect
Once you have matched the duration of the smoke screen effect to the video clip, our next step would be to make some changes. These changes will make the smokescreen appear more pleasing—double-click on the smokescreen effect, which will open the transform menu.
We would first focus on the transform panel. Here you would have many options, but our focus would be on rotation, scale, and position.
![]()
Note: make sure to rotate the smoke screen effect by simply sliding the slider or dragging the slider right or left to your desire.
- You would have created an angle of the smokescreen to make it more natural.
- Now, we would have to adjust the scale of the smokescreen effect.
- Drag the slider to the right to expand the smoke to spread on the screen. It will help the smoke screen do appear more natural.
- You can adjust how much the smoke screen is visible on the screen by decreasing the opacity.
Adjust the slider to the left so it blends in with the flickering of the light we created. Now playback the video from the big screen to get an idea of the effect you added. And here are our parameters for reference.

Cool, isn’t it? Now we have added smoke to our timeline. Combined with the flickering light effect, we are closer to our goal.
Step4 Add flames or sparks
To mimic a real fire, we also have one more element that is missing, And that will be the sparks and the flames. And if you want to bring the fire effect of your video to the pro level, we would have to use the film stock effects. Flames and sparks are also available in the Wondershare Filmora.
#Step1 Search for Fire Tab

- To do so, click on the bar above the element’s icon.
- Once you have opened the elements tab, look to your left window, where further options are available.
- From these options, click on the fire tab.
- A new window will pop up in the library panel.
#Step2 Add the flame to the timeline
Click on a large scale 14 and drag it into your timeline above the smoke effect and the clip. Doing so would have created two extra layers after the video tab.

#Step3 Adjust the flame effect
Now, we have to do steps similar to the ones above the first job. But first, you have to click on the edges of the effect. Then, match it to the length of your video.
Now, remember if the length of the effect is more than that of the video clip. You can adjust it by clicking on the edge and dragging it to the left. And if it appears to be smaller than the video clip, drag the edge to the right to match the length.
#Step4 Blend the video
When you look at the effect as you play the video from the start, you will notice that the effect is a little more intense than we want. To change it to your desires, you can follow the following steps.
- First of all, double-click and open the transform
- Experiment with the rotation and the scale and position; make your choice.
- Then move on to the compositing panel and focus on the blending mode.
- Here, you will notice a drop-down panel and select the screen option from all the other options.
- Doing so would help you blend the spark effect video much better.
If you focus on the spark effect that appears on the screen, you will notice that it seems to be much more intense than we require. If you want to blend it further, you can use the opacity adjuster and decrease the transparency. Then, adjust the slider till you feel it to be just right.
And the following are ideal parameters of our adjustment just for you to refer to.

Final results
Now can easily create a realistic-looking fire effect by Wondershare Filmora.

Best editing views
See how easy it was to create a fire effect without using real fire. A fire effect you can use:
- To make your car catch on fire.
- You are screaming at the top of your lungs in a yard where your garden is on fire.
- Act like your husband forgot to watch the stove on with the dish in the kitchen.
You can create all these scenarios by using camera tricks and lighting effects. And a few skills in video editing, easily! How cool is that?
If you are a beginner or a frequent user of Wondershare Filmora, following the steps explained above will help you quickly get the hang of how to add fire effects to your videos.
Also, if you have a YouTube channel or a content creator, adding these effects will add unique creativity to your videos and ultimately boost your approach.
Free Download For Win 7 or later(64-bit)
Free Download For macOS 10.14 or later
Part 1. What do you need to create fire effects?
Using simple tools such as Filmora and visual effects, you can create a realistic fire effect with an easy setup. For filming the effect, we will need
- A good camera
- A light source
- Video editing software - Wondershare Filmora
- Basic editing skills
However, the light source is key to the fire effects. It will be beneficial if you have a warmer color light or a light that can change its temperature. You can use tungsten light bulbs or small circular LEDs that are pretty famous with Vloggers and tick-tock users.
Part 2. How to make a realistic effect fire?
After getting prepared, it’s time to do the real things. Follow the steps below to create a realistic fire effect like a pro.
Step1 Record your footage
While recording the video, you can slightly shake your light source, which will give it the flickering effect of the flame. Here, you can do this in two ways.
Shaking the light manually
Just make sure when you are shaking the light, it is not shaken aggressively, or it will lose its realism to a real fire.
Shaking the light using a dimmer
You can also use some skills to create the flickering effect of the fire without literally shaking the LED light. Dimmers come to help. A dimmer is a device that enables you to change the temperature of the LED light. If you have a dimmer, your work will be more accessible.
A regulator on the dimmer will help you switch between low and high tones. It will flicker the light on the object like a flame and make it look like it was placed in front of a real fire.
Step2 Record the object
Our next step will be to record the object on which the effect is taking place. Ensure the camera is placed under a good light source so that the picture is not dim and the object is exposed. Make sure the camera is placed at the level of the eye so that it will help you record your video clearly and accurately.
Also, keep in mind to zoom out the camera lens, which will fix the frame of the video so that the object or the person is entirely on the screen. Another tip for creating a realistic fire effect would be the person acting as the object. The more natural the acting is, the more realistic would be the fire effect.
Step3 Edit the footage
We are being safe and saving time by not using actual fire. The goal of creating a fake fire would be the effect and reaction of the object or the actor.
1. Download a professional video editing software - Wondershare Filmora
Visit Wondershare Filmora official site if you haven’t already downloaded it.
![]()
Note: download the latest version of filmora. It will give you a pro version and help you to create more realistic fire effects.
2. Create a new project and import the recorded clips
Before adding the fire effects to your video, you must ensure that you are familiar with the editing software. Your first step would be to add your clips to the timeline. Drag the footage from the library and enter it into the timeline.
3. create the fire effect more realistic by adding smoke
The next step would be to add smoke to the fire. As it is only fair that the fire makes the smoke so. Adding the smoke will create the fire effect more realistic. Follow the below steps to get your cinematic video!
#Step1 Search for smoke effects
To add the smoke effect, click on the element’s icon on the bar above and search for smokescreen 2.
#Step2 Add a smoke effect
Once you have searched and found the smoke screen 2 effects, then import that effect onto your timeline so that you can begin editing.
Once you’ve added the fire effect, you will notice the change on the screen in the top right corner.
#Step3 Add duration
The next step would be to set the duration of the smokescreen effect so that it matches the length of the video. To do so,
- Click on the edge of the smoke screen effect.
- Drag it to the right if the effect appears smaller than the video clip.
- And drag it to the left if it is larger than the video clip.
- As soon as it matches the length of the video, leave the drag, and it will fit right into place.
#Step4 Make some changes to the smoke effect
Once you have matched the duration of the smoke screen effect to the video clip, our next step would be to make some changes. These changes will make the smokescreen appear more pleasing—double-click on the smokescreen effect, which will open the transform menu.
We would first focus on the transform panel. Here you would have many options, but our focus would be on rotation, scale, and position.
![]()
Note: make sure to rotate the smoke screen effect by simply sliding the slider or dragging the slider right or left to your desire.
- You would have created an angle of the smokescreen to make it more natural.
- Now, we would have to adjust the scale of the smokescreen effect.
- Drag the slider to the right to expand the smoke to spread on the screen. It will help the smoke screen do appear more natural.
- You can adjust how much the smoke screen is visible on the screen by decreasing the opacity.
Adjust the slider to the left so it blends in with the flickering of the light we created. Now playback the video from the big screen to get an idea of the effect you added. And here are our parameters for reference.
Cool, isn’t it? Now we have added smoke to our timeline. Combined with the flickering light effect, we are closer to our goal.
Step4 Add flames or sparks
To mimic a real fire, we also have one more element that is missing, And that will be the sparks and the flames. And if you want to bring the fire effect of your video to the pro level, we would have to use the film stock effects. Flames and sparks are also available in the Wondershare Filmora.
#Step1 Search for Fire Tab
- To do so, click on the bar above the element’s icon.
- Once you have opened the elements tab, look to your left window, where further options are available.
- From these options, click on the fire tab.
- A new window will pop up in the library panel.
#Step2 Add the flame to the timeline
Click on a large scale 14 and drag it into your timeline above the smoke effect and the clip. Doing so would have created two extra layers after the video tab.
#Step3 Adjust the flame effect
Now, we have to do steps similar to the ones above the first job. But first, you have to click on the edges of the effect. Then, match it to the length of your video.
Now, remember if the length of the effect is more than that of the video clip. You can adjust it by clicking on the edge and dragging it to the left. And if it appears to be smaller than the video clip, drag the edge to the right to match the length.
#Step4 Blend the video
When you look at the effect as you play the video from the start, you will notice that the effect is a little more intense than we want. To change it to your desires, you can follow the following steps.
- First of all, double-click and open the transform
- Experiment with the rotation and the scale and position; make your choice.
- Then move on to the compositing panel and focus on the blending mode.
- Here, you will notice a drop-down panel and select the screen option from all the other options.
- Doing so would help you blend the spark effect video much better.
If you focus on the spark effect that appears on the screen, you will notice that it seems to be much more intense than we require. If you want to blend it further, you can use the opacity adjuster and decrease the transparency. Then, adjust the slider till you feel it to be just right.
And the following are ideal parameters of our adjustment just for you to refer to.
Final results
Now can easily create a realistic-looking fire effect by Wondershare Filmora.
Best editing views
See how easy it was to create a fire effect without using real fire. A fire effect you can use:
- To make your car catch on fire.
- You are screaming at the top of your lungs in a yard where your garden is on fire.
- Act like your husband forgot to watch the stove on with the dish in the kitchen.
You can create all these scenarios by using camera tricks and lighting effects. And a few skills in video editing, easily! How cool is that?
If you are a beginner or a frequent user of Wondershare Filmora, following the steps explained above will help you quickly get the hang of how to add fire effects to your videos.
Also, if you have a YouTube channel or a content creator, adding these effects will add unique creativity to your videos and ultimately boost your approach.
Free Download For Win 7 or later(64-bit)
Free Download For macOS 10.14 or later
Detailed Steps to Rotate Videos in Davinci Resolve
The first video editing machine in 1924 (Moviola) left an indelible print on the minds of the media industry. It was a maiden attempt to make edits while simultaneously viewing the film. Over time, editing videos followed the trajectory of various transitions letting the imagination run wild. According to a survey, the video editing software market will grow to 932.7 million U.S. dollars by 2025.
As video editing has become a pillar stone in post-production work, you might need to upgrade your knowledge about it. In this article, you will learn how to rotate the video.
Whether your video has an issue in the aspect ratio or you want the desired output in the mirror or flipped version, you need not panic. By exploring different options of Davinci Resolve and Filmora, you can easily change the orientation of your video.
You’ll see a complete picture guide of the above-mentioned softwares.
Changing the orientation of video by Davinci Resolve
Davinci Resolve is a comprehensive video editing software. It performs functions from colour grading to auto-enhancement for the post-production work. Though, professionals usually use this and pitch it as comparatively complex. But even novices need not worry. It comes with features that can change the entire output of the video. One of such functions is the rotation of the videos. You can give a professional and top-notch touch to your post-production work by changing the orientation of the videos. That will bring a new dimension to your project. The flipped version of videos can make the output more prompt and subtle as they stitch different videos scenes together.
Here is the step by step guide for rotating the video
Step 1: Entering the Edit Mode
Set DaVinci Resolve to Edit mode and in the upper-right corner of your workspace, select the Inspector tab.

The drop-down menu with different options will appear. Search for the Transform section. There you have to select the **Rotation Angle.**You can also enter the value of rotation.After entering the value, you will notice that your vidoe is rotated.

Tip: By pressing Ctrl + R, you can rotate the video 90 degrees clockwise.
Editing a portrait video in DaVinci Resolve
The Transform Panel has the XY Zoom fields. You can use this to scale your video to fit the vertical frame by increasing the size to ~1.750.
Voilà, you now have a vertical video you can edit and export.
Horizontal and Vertical Flip in DaVinci Resolve
You want to create a mirror effect for your video. Flipp it. You would love the results.
You can edit it by going to the same Inspector drop-down menu.

Select the kind of flip you want at the bottom of the Transform section. It can be horizontal or vertical.

How to change the direction of animation in the DaVinci Resolve?
Keyframes are an essential part of video animations. Davinci Resolve facilitates you to play a little with its keyframes parameters.
The keyframe system is not that complex.
All you need to do is select a region on your Timeline. Choose the parameters that need animation by clicking the small diamond. You can see the small diamond next to each parameter’s value.
Apart from Davinci Resolve, there is also an alternate software which has this versatility.You can also use Filmora Wonder for rotation of your vidoes
Changing the direction of video using Filmora Wondershare
If you have mistakenly taken a video at the wrong angle and don’t want to lose it. Filmora Video Editor is there to keep you out of trouble. It comes with the option of changing the orientation of your videos in your desired way. You can even zoom in or crop the unwanted parts in the videos. Adding more to it, it offers you preset ratios (16:9, 9:16; 4:5, 1:1) to find the perfect aspect ratio for YuoTube, Instagram, etc.
For Win 7 or later (64-bit)
For macOS 10.14 or later
Here is the step-by-step guide to rotating the direction of the video by using it.
Step 1: Drag and Drop
It starts with importing the desired file you wish to edit. Afterwards, you have to drag-drop it to the timeline.

Step 2: Enter the video-editing Panel
To start editing, you need to double-click on the video clip in the timeline. You’ll see various tabs above the timeline header from transformation to auto-enhance.

Step 3: Explore your options
Click on the Transform menu. It will display various options from rotation to scaling. You’ll find the “Rotate” option.

Either you can drag the slider or enter the specific value to adjust to the desired rotation.
For example, if you want to rotate this clip 170 degrees, enter the value in the box.

Moreover, you can adjust the scale. You have to drag the Scale slider to have a full-screen image. You can also edit the shape, size and position in the Viewer Panel.

Step 4:Ready to Export
Now, you have achieved the desired rotation for your video. You can export it and select the option that you want.

You can flip the direction of your video in a jiff by following these simple steps.
Conclusion
Stitching different scenes by video rotation has brought video editing to a new dimension altogether. Creating transitions in the videos has become easy more than ever. By adding effects in video editing, you can achieve your editing goals. Hence, you can have that “wow part of editing” without breaking a sweat. When the scenes with different directions are combined, they help in creating the subtle mood prompts for creating the desired flow. You can even adjust the angle of your video if you captured it at the wrong angle.
There are a variety of softwares in the digital world for this purpose. Davinci Resolve and Filmora Wondershare come with dynamic options for your post-production work. Owing to their versatility, these also have the feature of rotating your videos. Their user-friendly interface has made the entire experience of post-production work enjoyable.
The drop-down menu with different options will appear. Search for the Transform section. There you have to select the **Rotation Angle.**You can also enter the value of rotation.After entering the value, you will notice that your vidoe is rotated.
Tip: By pressing Ctrl + R, you can rotate the video 90 degrees clockwise.
Editing a portrait video in DaVinci Resolve
The Transform Panel has the XY Zoom fields. You can use this to scale your video to fit the vertical frame by increasing the size to ~1.750.
Voilà, you now have a vertical video you can edit and export.
Horizontal and Vertical Flip in DaVinci Resolve
You want to create a mirror effect for your video. Flipp it. You would love the results.
You can edit it by going to the same Inspector drop-down menu.
Select the kind of flip you want at the bottom of the Transform section. It can be horizontal or vertical.
How to change the direction of animation in the DaVinci Resolve?
Keyframes are an essential part of video animations. Davinci Resolve facilitates you to play a little with its keyframes parameters.
The keyframe system is not that complex.
All you need to do is select a region on your Timeline. Choose the parameters that need animation by clicking the small diamond. You can see the small diamond next to each parameter’s value.
Apart from Davinci Resolve, there is also an alternate software which has this versatility.You can also use Filmora Wonder for rotation of your vidoes
Changing the direction of video using Filmora Wondershare
If you have mistakenly taken a video at the wrong angle and don’t want to lose it. Filmora Video Editor is there to keep you out of trouble. It comes with the option of changing the orientation of your videos in your desired way. You can even zoom in or crop the unwanted parts in the videos. Adding more to it, it offers you preset ratios (16:9, 9:16; 4:5, 1:1) to find the perfect aspect ratio for YuoTube, Instagram, etc.
For Win 7 or later (64-bit)
For macOS 10.14 or later
Here is the step-by-step guide to rotating the direction of the video by using it.
Step 1: Drag and Drop
It starts with importing the desired file you wish to edit. Afterwards, you have to drag-drop it to the timeline.
Step 2: Enter the video-editing Panel
To start editing, you need to double-click on the video clip in the timeline. You’ll see various tabs above the timeline header from transformation to auto-enhance.
Step 3: Explore your options
Click on the Transform menu. It will display various options from rotation to scaling. You’ll find the “Rotate” option.
Either you can drag the slider or enter the specific value to adjust to the desired rotation.
For example, if you want to rotate this clip 170 degrees, enter the value in the box.
Moreover, you can adjust the scale. You have to drag the Scale slider to have a full-screen image. You can also edit the shape, size and position in the Viewer Panel.
Step 4:Ready to Export
Now, you have achieved the desired rotation for your video. You can export it and select the option that you want.
You can flip the direction of your video in a jiff by following these simple steps.
Conclusion
Stitching different scenes by video rotation has brought video editing to a new dimension altogether. Creating transitions in the videos has become easy more than ever. By adding effects in video editing, you can achieve your editing goals. Hence, you can have that “wow part of editing” without breaking a sweat. When the scenes with different directions are combined, they help in creating the subtle mood prompts for creating the desired flow. You can even adjust the angle of your video if you captured it at the wrong angle.
There are a variety of softwares in the digital world for this purpose. Davinci Resolve and Filmora Wondershare come with dynamic options for your post-production work. Owing to their versatility, these also have the feature of rotating your videos. Their user-friendly interface has made the entire experience of post-production work enjoyable.
This Article Will Show You How to Make a Tattoo Disappear on Your Body Magically
Do you have any tattoos that you don’t like anymore? Have you ever wished you had the superpower to make unwanted tattoos vanish? Then, keep reading this article since this article will provide you with how to use masking and colour correction to make a tattoo disappear in Filmora .
Part 1: What You’ll Need to Getting ready
Step1 The first thing you need is a video clip of your arm. Next, place the camera on a tripod, and tilt down to show the table from the top.

Step2 After that, put the arm on the tableand keep it still while filming. Meanwhile, have another hand perform on the other side of the frame and pretend to use magic to remove the tattoo.

Step3 Next, you need a picture of a tattoo. Indeed, it would be better to have the tattoo in the same position on the arm so it can match the video clip we just filmed.

After preparing everything, you need to go to Filmora 11 and start editing. If you haven’t downloaded Filmora already, you can visit filmora.wondershare.com.

Part 2: Editing Tutorial
Step1 First, drag and drop the arm video clip onto the first video track and the tattoo picture on the second video track.

Step2 Add a mask around the tattoo part from the picture. You must hide the first video track to see the mask clearly.Then, double-click on the picture on the timeline and go to the setting window on the top left. Find the Mask Section and select the circle shape. Now you can see the mask is applied.

Step3 Adjust the position and size of the mask to reveal only the tattoo part. Then you must change the “Blur Strength” to add more blur to the edge of the mask.

Step4 With the mask finalized,unhide the first video track with the arm video clip. Next, adjust the position and size of the tattoo and make it fit the arm clip.

Step5 Go to do colour correction on the tattoo image so that it matches better with the arm skin. Double-click on the tattoo on the timeline and go to the setting window on the top left. Find the “Color” Section and open the “Tone” menu. First, you have to adjust the brightness first.

Step6 Afterwards, open the “White Balance”menu and adjust the temperature. Indeed, you can also adjust the contrast and saturation if needed. Once done, click “OK.” The tattoo should look like it blends into the arm video.

Part 3: Make the tattoo disappear
Step1 Move the play head to where you want the tattoo fades, and adjust the length of the tattoo picture there.

Step2 Next, find the “Evaporate 1” from the “Transitions” window. Drag and drop it to the end of the tattoo clip.

Step3 Adjust the length if needed. Finally, Let’s playback and see how it looks!

Summary
That’s how to make a tattoo disappear in Filmora 11. With Filmora 11, you can get as many new tattoos as possible. Indeed, you can follow all the steps above carefully to get the perfect result.
Free Download For Win 7 or later(64-bit)
Free Download For macOS 10.14 or later
Free Download For macOS 10.14 or later
Also read:
- In 2024, Are You Looking for the Best Premiere Pro Slideshow Template Online for Free? If Yes, You Can Find a Few Exciting Slideshow Templates Here. They Are Worth Using
- 2024 Approved How to Create Educational Teaching Videos in An Outstanding Way?
- In 2024, Step by Step to Rotate Videos Using Kdenlive
- Updated In 2024, Creative Ways to Add Green Screen Effects In Photoshop
- New How to Add Text to Video
- Updated Easy Steps to Make Glitch Effect with Filmora for 2024
- Updated 2024 Approved Do You Want to Make Your Video Look Like Its From the 90S? Then, Make Sure to Add Vintage Overlays and VHS Sound Effects to Give It the Old Feel
- Updated 2024 Approved Have You Ever Used Premiere Pro to Create Slow-Motion Effects? This Article Will Provide a Guide on Producing Slow-Motion Effects by Using Adobe Premiere Pro
- New How to Perfect Quick and Efficient Video Editing | Keyboard Shortcuts in Filmora for 2024
- Updated 2024 Approved The Best Peter McKinnon LUTs for Perfect Video Editing
- New Follow the Trend of Making Slow-Motion Videos with a Camera Lenta CapCut Template. Learn Everything About CapCut and Find Its Alternatives in This Article
- Updated Premiere Pro Best Slow Motion Effects To Use for 2024
- Updated In 2024, How to Export iMovie?
- Want to Sync Separate Audio with Video? Check Out This Guide to Do It in the Simplest Way Using the Video Editor - Wondershare Filmora
- Looking for a Free and Open Source Video Editor with Cross-Platform Support? Kdenlive Video Editor Is Great but Is It the Best? Find Out From Our Complete Kdenlive Review
- How to Change Quicktime Player Speed on Mac, In 2024
- Updated The Most Complete Guide to Make Fortnite Montage for 2024
- Have You Recently Experienced Motion Blur in Games? Do You Wish to Learn More About It? This Article Provides an Overview and the Need for Motion Blur Gaming for 2024
- Updated How to Create a Slideshow GIF for 2024
- Updated LumaFusion – What Is It and the Best Alternative to Use
- 4 Solutions to Crop a Video on Android Easily
- New Are You Looking for the Best Video Marketing Agency to Help Your Business Grow Exponentially with Engaging Video Content? Here Is How to Find a High-Quality Video Marketing Company that Takes Your Videos to the Next Level
- Updated 2024 Approved A Roster of 8 Top Color Match Generators
- In 2024, How To Stream Anything From Vivo V29 to Apple TV | Dr.fone
- How to retrieve erased messages from Asus ROG Phone 8 Pro
- In 2024, Best Nubia Z50 Ultra Pattern Lock Removal Tools Remove Android Pattern Lock Without Losing Data
- What To Do When Samsung Galaxy M54 5G Has Black Screen of Death? | Dr.fone
- How to use iSpoofer on Vivo V30? | Dr.fone
- In 2024, 3 Ways for Android Pokemon Go Spoofing On Samsung Galaxy S24+ | Dr.fone
- Easy Guide to OnePlus Ace 2 FRP Bypass With Best Methods
- In 2024, How to Mirror Your Vivo V29 Pro Screen to PC with Chromecast | Dr.fone
- Identify missing hardware drivers with Windows Device Manager in Windows 11 & 10 & 7
- In 2024, 2 Ways to Transfer Text Messages from OnePlus Nord N30 5G to iPhone 15/14/13/12/11/X/8/ | Dr.fone
- In 2024, How to Unlock iPhone 13 mini Without Passcode?
- 5 Hassle-Free Solutions to Fake Location on Find My Friends Of Nokia G310 | Dr.fone
- In 2024, Easy Guide How To Bypass Vivo Y77t FRP Android 10/11/12/13
- Title: Updated Top 7 Easy Ways to Convert a Video to a GIF Online
- Author: Morgan
- Created at : 2024-05-19 05:12:26
- Updated at : 2024-05-20 05:12:26
- Link: https://ai-video-editing.techidaily.com/updated-top-7-easy-ways-to-convert-a-video-to-a-gif-online/
- License: This work is licensed under CC BY-NC-SA 4.0.
