
:max_bytes(150000):strip_icc():format(webp)/reddit-app-for-andoird-652f6fcd646245e9807afbac25a072ee.jpg)
Updated Top LUTs for Sony HLG
Top LUTs for Sony HLG
Social media platforms have undoubtedly become a dominant force in our lives. Similarly, color grading our photos and videos are also in high demand due to social media. Furthermore, HLG is a popular high-dynamic range (HDR) standard with significant traction. Many social media platforms like Instagram and YouTube increasingly support HDR content.
Additionally, to achieve consistent and desirable results in color grading, you can use LUTs. Various LUTs are available, each offering distinct color tones and schemes. Similarly, for HLG color grading, Sony HLG LUTs have become widely popular. These LUTs are designed to optimize the color reproduction and dynamic range of Sony cameras shooting in HLG mode.
Part 1: How Are LUTs Used in Cinematography?
In cinematography, LUTs are essential to adjust the color and tone of digital images after filming. They help cinematographers and editors to achieve specific looks and maintain consistency. Here’s how LUTs are typically used in cinematography:
- Correcting Colors: LUTs fix any color imbalances in any video or photo. Moreover, it ensures that the colors look accurate and natural.
- Creating a Style: Cinematographers use LUTs to establish a particular mood and feel for a film. Furthermore, LUTs can completely change your content’s overall color and tone in a unique style.
- Matching Different Cameras: When using multiple cameras, each camera may capture colors differently. However, LUTs can be applied for consistent color grading throughout your video.
- Adjusting Lighting Conditions: LUTs are helpful when shooting scenes under different lighting conditions. In addition, they maintain consistent color and contrast throughout your project.
- Recreating Film Looks: LUTs can imitate the color characteristics of specific film stocks. It helps the filmmakers to achieve a desired look similar to classic films. It is especially useful when shooting digitally but aiming for a film-like appearance.
- Previewing the Final Look: You can see the real-time view of your color grading using LUTs. It helps you make important creative decisions and to maintain visual consistency throughout.
Empower your videos with a new mood using different LUTs. Filmora now offers 800+ top-quality 3D LUTs cover a broad range of scenarios. Transform your videos with Filmora’s powerful 3D LUTs.
Apply LUT on Videos Apply LUT on Videos Learn More


Part 2: 5 Top LUTs Available for Sony HLG to Download
If you feel like searching for good LUTs for your Sony camera’s footage, don’t worry. Here is a list of some of the best Song HLG LUTs, each with a unique tone and feel. You can choose any LUT that matches your style and preference.
1. Cinematic HLG2 LUTs
It is a pack of cinematic-style Sony HLG2 LUTs. This pack is for those seeking a dramatic and moody style. It adds a film noir-inspired touch to your videos. Moreover, this pack offers 5 cinematic LUTs, each with unique color grading. Additionally, it creates a professional look with high contrast and desaturated colors. Furthermore, one of its LUT gives a bluish tone to create a Winter ambiance.

2. HLG Cinematic LUT Pack
The HLG Cinematic LUT Pack is a collection of 19 unique cinematic Look-Up Tables. Each LUT in the pack offers a different color scheme, tone, and style. Additionally, it provides multiple options to give your media the perfect cinematic feel. You can choose from different options and select the LUT which matches your style and mood.

3. HLG3 & HLG2 creative correction LUT
This LUT pack is all about bold and vibrant colors that grab attention. It is one of the best Sony HLG3 to Rec709 LUT packs available. It enhances the saturation and contrast of your videos and images. Furthermore, this pack makes colors appear vivid and eye-catching. Additionally, it adds a punch to your digital media content with more vibrant and bright colors.

4. HLG Normalized LUT Pack
The HLG Normalized LUT Pack offers a refreshing and calming color scheme. It gives your videos cool-toned hues, giving a serene and calm feel. This pack has 80 different styles of LUTs, each with a unique color composition. Furthermore, this pack is ideal for capturing scenic landscapes, beach views, or other relaxing scenes. It gives your visuals a cool and crisp look by highlighting the shades of blue and green.

5. HLG LUT Pack
This pack for Sony HLG offers a dreamy and soft color scheme. It softens the colors and adds a subtle pastel touch to your footage. Moreover, it creates a dreamier and fantasy-like color scheme. This LUT has over 10 different LUTs that you can use for your videos and images. With this LUT pack, you can add a touch of magic to give your videos a soft and dream-like feel.

Part 3: Wondershare Filmora: A Great Option for Applying LUTs
Wondershare Filmora is a versatile tool that offers impressive color grading capabilities. This tool allows you to enhance your content by improving its color composition. With Filmora, you have the ability to import and apply LUTs to your videos. Moreover, this tool goes a step further by offering a vast library of over 800+ LUTs that you can use. These LUTs offer a wide range of color grading options for you.
Add LUTs on Video For Win 7 or later(64-bit)
Add LUTs on Video For macOS 10.14 or later
Additionally, it allows you to customize the strength of your applied LUTs. That being said, you can even import your Sony HLG to Rec709 LUTs. Filmora isn’t just limited to color grading; it is a complete video editing software. You can add captivating texts, filters, effects, transitions, and more to your content. Last but not least, you can even access over 10 billion free media assets for your edits.

Key Features:
- You can make your audio as much professional as your videos. With its AI Denoiser, your audio will be distortion free. It will remove all the background noises and distortion from your audio.
- Moreover, if you want to change the background of your video without a green screen, you can. It has an AI Cutout tool, which selects your subject to change its background.
- Furthermore, make engaging short reels with Filmora. Don’t frustrate your audience with long and boring videos. Trim your videos, remove pauses and silent moments with Silence Detection, and make good reels.
Conclusion
In conclusion, color grading has become increasingly significant in social media. It can capture attention, convey emotions, and enhance the look of our content. Furthermore, HLG, with its HDR capabilities, offers a more immersive viewing experience. LUTs, including the popular Sony HLG LUTs, also provide a practical and efficient way to color grade your media files.
You can also try Filmora video editor to apply luts on videos.
Add LUTs on Video For Win 7 or later(64-bit)
Add LUTs on Video For macOS 10.14 or later
Apply LUT on Videos Apply LUT on Videos Learn More
Part 2: 5 Top LUTs Available for Sony HLG to Download
If you feel like searching for good LUTs for your Sony camera’s footage, don’t worry. Here is a list of some of the best Song HLG LUTs, each with a unique tone and feel. You can choose any LUT that matches your style and preference.
1. Cinematic HLG2 LUTs
It is a pack of cinematic-style Sony HLG2 LUTs. This pack is for those seeking a dramatic and moody style. It adds a film noir-inspired touch to your videos. Moreover, this pack offers 5 cinematic LUTs, each with unique color grading. Additionally, it creates a professional look with high contrast and desaturated colors. Furthermore, one of its LUT gives a bluish tone to create a Winter ambiance.
2. HLG Cinematic LUT Pack
The HLG Cinematic LUT Pack is a collection of 19 unique cinematic Look-Up Tables. Each LUT in the pack offers a different color scheme, tone, and style. Additionally, it provides multiple options to give your media the perfect cinematic feel. You can choose from different options and select the LUT which matches your style and mood.
3. HLG3 & HLG2 creative correction LUT
This LUT pack is all about bold and vibrant colors that grab attention. It is one of the best Sony HLG3 to Rec709 LUT packs available. It enhances the saturation and contrast of your videos and images. Furthermore, this pack makes colors appear vivid and eye-catching. Additionally, it adds a punch to your digital media content with more vibrant and bright colors.
4. HLG Normalized LUT Pack
The HLG Normalized LUT Pack offers a refreshing and calming color scheme. It gives your videos cool-toned hues, giving a serene and calm feel. This pack has 80 different styles of LUTs, each with a unique color composition. Furthermore, this pack is ideal for capturing scenic landscapes, beach views, or other relaxing scenes. It gives your visuals a cool and crisp look by highlighting the shades of blue and green.
5. HLG LUT Pack
This pack for Sony HLG offers a dreamy and soft color scheme. It softens the colors and adds a subtle pastel touch to your footage. Moreover, it creates a dreamier and fantasy-like color scheme. This LUT has over 10 different LUTs that you can use for your videos and images. With this LUT pack, you can add a touch of magic to give your videos a soft and dream-like feel.
Part 3: Wondershare Filmora: A Great Option for Applying LUTs
Wondershare Filmora is a versatile tool that offers impressive color grading capabilities. This tool allows you to enhance your content by improving its color composition. With Filmora, you have the ability to import and apply LUTs to your videos. Moreover, this tool goes a step further by offering a vast library of over 800+ LUTs that you can use. These LUTs offer a wide range of color grading options for you.
Add LUTs on Video For Win 7 or later(64-bit)
Add LUTs on Video For macOS 10.14 or later
Additionally, it allows you to customize the strength of your applied LUTs. That being said, you can even import your Sony HLG to Rec709 LUTs. Filmora isn’t just limited to color grading; it is a complete video editing software. You can add captivating texts, filters, effects, transitions, and more to your content. Last but not least, you can even access over 10 billion free media assets for your edits.
Key Features:
- You can make your audio as much professional as your videos. With its AI Denoiser, your audio will be distortion free. It will remove all the background noises and distortion from your audio.
- Moreover, if you want to change the background of your video without a green screen, you can. It has an AI Cutout tool, which selects your subject to change its background.
- Furthermore, make engaging short reels with Filmora. Don’t frustrate your audience with long and boring videos. Trim your videos, remove pauses and silent moments with Silence Detection, and make good reels.
Conclusion
In conclusion, color grading has become increasingly significant in social media. It can capture attention, convey emotions, and enhance the look of our content. Furthermore, HLG, with its HDR capabilities, offers a more immersive viewing experience. LUTs, including the popular Sony HLG LUTs, also provide a practical and efficient way to color grade your media files.
You can also try Filmora video editor to apply luts on videos.
Add LUTs on Video For Win 7 or later(64-bit)
Add LUTs on Video For macOS 10.14 or later
Change Background Color in After Effects
Adobe After Effects is a powerful video editor. After Effects is particularly popular for its special effects that you can add to your videos and blow the mind of your audience. In any video, the background plays a major role in enhancing the overall frame and scene. If you are planning to change background color After Effects or add special effects, you must shoot your video with a solid color background.
During the post-production phase, you can change the background uniformly to any color scheme or special effect as per the requirement of the scene. Since the learning curve for After Effects is slightly steeper, you should know the exact steps to change After Effects background color. We will explain the process in simple steps and provide you with an alternative way to change background color.
Part 1. How to change video BG color in After Effects?
After Effects is widely used for professionals to add animations and special effects to videos during video editing phase. Starting from editing social media videos and YouTube videos to short films and even movies, After Effects finds its application in every field of video editing. Changing background color in After Effects is super simple even though other video editing techniques could be slightly complex for beginners. Here are the steps on how to change background color in After Effects.
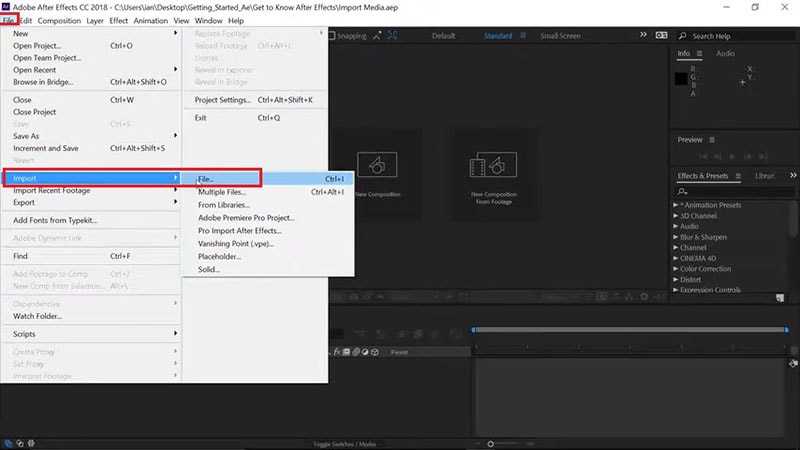
Step1 Open After Effects on your computer. Go to File> Import> File. Select the video file from your hard drive and it will appear under Project tab.
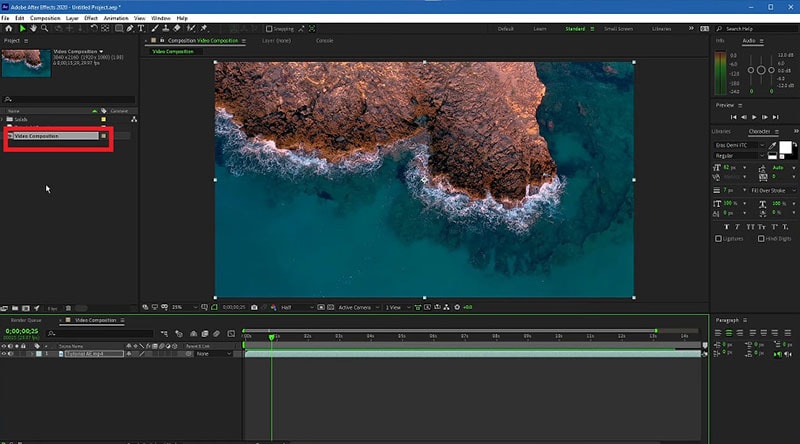
Step2 Drag and drop your video into Timeline. Select the video clip and right-click on Video Composition option located below Project tab.
Step3 From the menu, click on Composition Settings option. You can also use Ctrl + K(Windows) or Command + K(Mac) key combination to open Composition Settings directly.

Step4 On Composition Settings window, go to Background Color and set the color as per your preference. You can also use a color picker as well to select any color from the video directly.
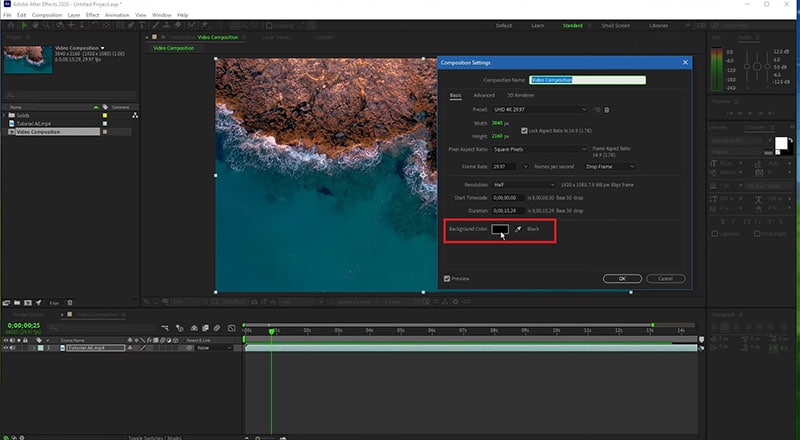
Step5 Click on Ok to set the new background color. Depending on the transparency of your video scene or the transition effect such as fade in and out, the background color will be more prominent.
Part 2. Alternative way to change background color
The best alternative to After Effects is Wondershare Filmora as Filmora has a wide range of special effects and animations. Filmora is a professional video editor where you can perform all basic as well as advanced video editing work. Most importantly, Filmora comes with an intuitive user interface so that even amateurs can use it easily.
There are several ways you can change background color in your video. For example, you can remove background color even when you do not have a solid color. If your video has a solid color, you can change background color to any color or graphical element using Chroma key. Here are the steps to change background color in Filmora .
Free Download For Win 7 or later(64-bit)
Free Download For macOS 10.14 or later
Step1 Download and install Filmora and it is available for Windows and Mac. Launch Filmora and click on New Project.

Step2 Import your video under Project Media folder and drag and drop into Timeline.
Step3 Double-click on the video clip and go to Video tab and turn on Chroma Key option. Select the solid color present in the background of the video and click on Ok button.
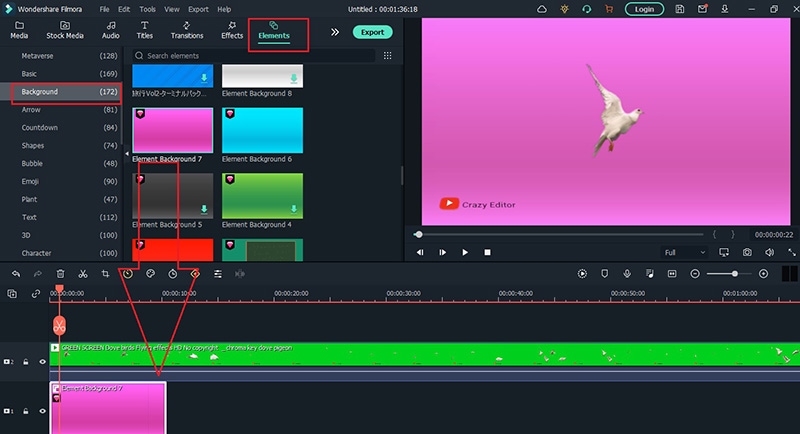
Step4 You will see the background color of the video disappear. Go to Elements> Background and drag and drop any background into Timeline. Make sure it is placed below the video clip and extend the duration of the background color as per your requirements.
Step5 Finally, play the video and click on Export button to save the video.
Part 3. FAQs about Video Background Colors
1. How do I remove background color in After Effects?
Import your video clip with a solid background color and place it on Timeline. Go to Effect menu> Keying> Keylight option. In Effects window and under Keylight, you will see Screen Colour option. Click on the eyedropper icon and select the background color you want to remove.
2. How do I change a solid background in After Effects?
The steps for After Effects how to change background color solid involve removing the background color and adding a layer of solid color to replace the transparency of the video. Go to Layer> New> Solid. Under Solid Settings window, go to Color and select the desired color from Color option and click on OK button. The new color will get reflected in the background of the video.
3. How do you add a white background in After Effects?
Go to Layer> New> Solid and add a white color solid first. However, this white color layer will not be visible unless you turn the background of your video transparent. Go to Effects & Presets and search for Luma Key and drop Luma Key on your video. Set Key type as Brighter and the threshold of the Lema key as per suitability on your video to see the white background appear.
Free Download For macOS 10.14 or later
Step1 Download and install Filmora and it is available for Windows and Mac. Launch Filmora and click on New Project.
Step2 Import your video under Project Media folder and drag and drop into Timeline.
Step3 Double-click on the video clip and go to Video tab and turn on Chroma Key option. Select the solid color present in the background of the video and click on Ok button.
Step4 You will see the background color of the video disappear. Go to Elements> Background and drag and drop any background into Timeline. Make sure it is placed below the video clip and extend the duration of the background color as per your requirements.
Step5 Finally, play the video and click on Export button to save the video.
Part 3. FAQs about Video Background Colors
1. How do I remove background color in After Effects?
Import your video clip with a solid background color and place it on Timeline. Go to Effect menu> Keying> Keylight option. In Effects window and under Keylight, you will see Screen Colour option. Click on the eyedropper icon and select the background color you want to remove.
2. How do I change a solid background in After Effects?
The steps for After Effects how to change background color solid involve removing the background color and adding a layer of solid color to replace the transparency of the video. Go to Layer> New> Solid. Under Solid Settings window, go to Color and select the desired color from Color option and click on OK button. The new color will get reflected in the background of the video.
3. How do you add a white background in After Effects?
Go to Layer> New> Solid and add a white color solid first. However, this white color layer will not be visible unless you turn the background of your video transparent. Go to Effects & Presets and search for Luma Key and drop Luma Key on your video. Set Key type as Brighter and the threshold of the Lema key as per suitability on your video to see the white background appear.
Let Us Talk About the Famous Photoshop and Most Commonly Used Glitch Effect. The Article Understudy Will Discuss in Detail About Photo Glitch Effect
Many of us are fascinated by glitch art. The aesthetic effect it adds to your content is unmatched. You can add color and class to your pictures with glitch picture effects. Someone who isn’t aware of the glitch effect is inspired by any technical mishap or digital error. The damage that the malfunctioning of a system causes is used as an art and an effect to beautify things.
You can add the glitch image effect to your photos easily. There are multiple cool templates available on the internet that could be used. You can also make your own stunning yet customized glitch effect Photoshop. If this has impressed you, then stay here because we will talk a lot about glitch photo editors.
In this article
01 Part 1. How Do You Do Photo Glitch Effect in Photoshop?
02 Part 2. 5 Awesome Glitch Effect Photoshop Actions.
Part 1. How Do You Do Photo Glitch Effect in Photoshop?
The jagged lines, the colorful pixels, frozen visuals, and also the distorted colors, everything perfectly blends to make a glitch effect. Usually, this is how all the glitch templates are, but if you get an opportunity to customize your image glitch effect and make your special effect, what will you do?
The best option to adopt in any such circumstances is Photoshop. With Photoshop, you can create a stunning and mind-blowing Photoshop VHS effect. If you want to learn about its steps, then continue reading.
Step 1: The process starts by importing the image to Photoshop on which you plan to add the photo glitch effect. Then you should always convert the image from colorful to black and white. This could be done quickly by going into the ‘Image’ menu from the menu bar. Next, go for the ‘Adjustments’ option and select ‘Desaturate.’

Step 2: Now duplicate the image by dragging it onto the New Layer icon in the Layers Panel. Then double click on the duplicated image. This will open a ‘Layer Style’ settings menu. Here, click on the icon for ‘R Channel’ and deselect it.

Step 3: Now, it’s time to add the first glitch element. For that, hold the ‘Shift’ key and move the image by using the left/right cursor keys on the keyboard. This will offset the image layer from the original.

Step 4: You can now select the ‘Mark’ tool from the left side. Make a rectangle anywhere on the image with the Mark tool and then switch back to the ‘Move’ tool. Then again, nudge the rectangular portion left or right to offset it. You can repeat this process multiple times on different areas of the image.

Step 5: At this point, make a New Layer and fill it with White. Now right-click on this white layer and select the option of ‘Convert to Smart Object.’

Step 6: Move to the menu bar at the top and go to the ‘Filter’ section. From there, select the option of ‘Filter Gallery.’ A new window will show up. Head to the ‘Sketch’ category, and there change the ‘Pattern Type’ to ‘Line.’ You can also play with the ‘Contrast’ and the ‘Size’ of the lines.

Step 7: Now, in the ‘Layers Panel,’ select the option of ‘Overlay’ from the dropdown menu so that the different layers can show through. You can adjust the visibility of the lines by adjusting the number on the scale.

Step 8: After setting everything for the glitch effect in your image, you can now add colors using the ‘Gradient Map.’ Or you can also import some graphic textures to Photoshop and add them to the image. Don’t forget to change the ‘Binding Mode’ to ‘Overlay.’ You can then play with the color and graphic settings.

Step 9: Once all the color adjustments have satisfied you, it’s time to add some text to your glitch image. For that, head to the ‘Text’ tool from the left menu and type in your text. Edit it as you did to your image so that you can make a cool glitch text effect Photoshop and with this, you are all done with making the most stunning glitch effect Photoshop.

Part 2. 5 Awesome Glitch Effect Photoshop Actions
With Photoshop, you can create your photo glitch effect as you prefer instead of using the available standard templates. What if you don’t have enough time to create the effect? Are you going to use the basic and standard templates?
If you are looking for some jaw-dropping glitch picture effects rather than using the basic effects, then this section of the article is perfect for you. We are going to talk about 5 fantastic glitch effects Photoshop action.
1. Distorted Glitch Photoshop Action
The first effect we will discuss is Distorted Glitch Photoshop Action. The effect is very easy to use. You can set it with just one click action. The effect allows you to do adjustment settings with very easy steps to edit it.
The effect has all the dark, distorted, and disturbance-related elements that make it an amazing effect to add glitch effect to image.

2. Geometric Glitch Photoshop Action
If glitch effect with lines is too mainstream for you, then this next effect will surely impress you. This effect is the Geometric Glitch Photoshop Action. You can edit this effect. All its colors, layers, and even elements are fully editable.
You can create a modern yet professional glitch image with this stunning effect. The effect lets you add shapes, abstract styles, and also glitch lines to make cool images.

3. Animated Glitch Photoshop Action
If you are looking for a glitch effect to add to animated content, then nothing is better than Animated Glitch Photoshop Action. The effect template is fully editable with 12 distinct color options. The animated effect has a very organized structure of layers, color coding, etc.
By using this effect, you can add a great vibe to your image. The template greatly shows the distortion, digital error, etc. You can play around with RGB to make it look crazy brilliant.

4. Futuristic Photoshop Action
The next effect in line to be discussed is Futuristic Photoshop Action. This effect has all the bright and neon colors. The effect could be added easily to your images regardless of the type of your content. Graphic designers and photographers use the Futuristic Effect to create stunning and professional glitch images.

5. Glitch Art Photoshop Action
The last effect template that we are going to shed light on is Glitch Art Photoshop Action. The effect is fully editable with 10 different abstract elements. The template has absolutely professional results. The effect delivers complete glitchy vibes.
The distortion, the abstract elements, the digital error, and everything else in effect represents all the glitchy vibes.

Final Words
This article is everything one person needs if they want to learn about glitch effect Photoshop. We have talked about creating a jaw-dropping glitch effect in Photoshop. The steps to create a stunning glitch effect have been mentioned above.
We then shared 5 incredible glitch effects that could be used in case you don’t want to create your own effect.
02 Part 2. 5 Awesome Glitch Effect Photoshop Actions.
Part 1. How Do You Do Photo Glitch Effect in Photoshop?
The jagged lines, the colorful pixels, frozen visuals, and also the distorted colors, everything perfectly blends to make a glitch effect. Usually, this is how all the glitch templates are, but if you get an opportunity to customize your image glitch effect and make your special effect, what will you do?
The best option to adopt in any such circumstances is Photoshop. With Photoshop, you can create a stunning and mind-blowing Photoshop VHS effect. If you want to learn about its steps, then continue reading.
Step 1: The process starts by importing the image to Photoshop on which you plan to add the photo glitch effect. Then you should always convert the image from colorful to black and white. This could be done quickly by going into the ‘Image’ menu from the menu bar. Next, go for the ‘Adjustments’ option and select ‘Desaturate.’
Step 2: Now duplicate the image by dragging it onto the New Layer icon in the Layers Panel. Then double click on the duplicated image. This will open a ‘Layer Style’ settings menu. Here, click on the icon for ‘R Channel’ and deselect it.
Step 3: Now, it’s time to add the first glitch element. For that, hold the ‘Shift’ key and move the image by using the left/right cursor keys on the keyboard. This will offset the image layer from the original.
Step 4: You can now select the ‘Mark’ tool from the left side. Make a rectangle anywhere on the image with the Mark tool and then switch back to the ‘Move’ tool. Then again, nudge the rectangular portion left or right to offset it. You can repeat this process multiple times on different areas of the image.
Step 5: At this point, make a New Layer and fill it with White. Now right-click on this white layer and select the option of ‘Convert to Smart Object.’
Step 6: Move to the menu bar at the top and go to the ‘Filter’ section. From there, select the option of ‘Filter Gallery.’ A new window will show up. Head to the ‘Sketch’ category, and there change the ‘Pattern Type’ to ‘Line.’ You can also play with the ‘Contrast’ and the ‘Size’ of the lines.
Step 7: Now, in the ‘Layers Panel,’ select the option of ‘Overlay’ from the dropdown menu so that the different layers can show through. You can adjust the visibility of the lines by adjusting the number on the scale.
Step 8: After setting everything for the glitch effect in your image, you can now add colors using the ‘Gradient Map.’ Or you can also import some graphic textures to Photoshop and add them to the image. Don’t forget to change the ‘Binding Mode’ to ‘Overlay.’ You can then play with the color and graphic settings.
Step 9: Once all the color adjustments have satisfied you, it’s time to add some text to your glitch image. For that, head to the ‘Text’ tool from the left menu and type in your text. Edit it as you did to your image so that you can make a cool glitch text effect Photoshop and with this, you are all done with making the most stunning glitch effect Photoshop.
Part 2. 5 Awesome Glitch Effect Photoshop Actions
With Photoshop, you can create your photo glitch effect as you prefer instead of using the available standard templates. What if you don’t have enough time to create the effect? Are you going to use the basic and standard templates?
If you are looking for some jaw-dropping glitch picture effects rather than using the basic effects, then this section of the article is perfect for you. We are going to talk about 5 fantastic glitch effects Photoshop action.
1. Distorted Glitch Photoshop Action
The first effect we will discuss is Distorted Glitch Photoshop Action. The effect is very easy to use. You can set it with just one click action. The effect allows you to do adjustment settings with very easy steps to edit it.
The effect has all the dark, distorted, and disturbance-related elements that make it an amazing effect to add glitch effect to image.
2. Geometric Glitch Photoshop Action
If glitch effect with lines is too mainstream for you, then this next effect will surely impress you. This effect is the Geometric Glitch Photoshop Action. You can edit this effect. All its colors, layers, and even elements are fully editable.
You can create a modern yet professional glitch image with this stunning effect. The effect lets you add shapes, abstract styles, and also glitch lines to make cool images.
3. Animated Glitch Photoshop Action
If you are looking for a glitch effect to add to animated content, then nothing is better than Animated Glitch Photoshop Action. The effect template is fully editable with 12 distinct color options. The animated effect has a very organized structure of layers, color coding, etc.
By using this effect, you can add a great vibe to your image. The template greatly shows the distortion, digital error, etc. You can play around with RGB to make it look crazy brilliant.
4. Futuristic Photoshop Action
The next effect in line to be discussed is Futuristic Photoshop Action. This effect has all the bright and neon colors. The effect could be added easily to your images regardless of the type of your content. Graphic designers and photographers use the Futuristic Effect to create stunning and professional glitch images.
5. Glitch Art Photoshop Action
The last effect template that we are going to shed light on is Glitch Art Photoshop Action. The effect is fully editable with 10 different abstract elements. The template has absolutely professional results. The effect delivers complete glitchy vibes.
The distortion, the abstract elements, the digital error, and everything else in effect represents all the glitchy vibes.
Final Words
This article is everything one person needs if they want to learn about glitch effect Photoshop. We have talked about creating a jaw-dropping glitch effect in Photoshop. The steps to create a stunning glitch effect have been mentioned above.
We then shared 5 incredible glitch effects that could be used in case you don’t want to create your own effect.
Blender Tips - How to Make Blender Render Transparent Background
Blender Tips - How to Make Blender Render Transparent Background
An easy yet powerful editor
Numerous effects to choose from
Detailed tutorials provided by the official channel
Want to explore open source 2D/3D content creation through Blender? Stay here to embark your graphic creations with over the top dimensional detailing!
In this article
01 [What’s Blender and What’s Its Advantages?](#Part 1)
02 [How to Make a Material Transparent in Blender](#Part 2)
03 [How to Make a Background Transparent in Blender](#Part 3)
Part 1 What’s Blender and What’s Its Advantages?
When landing into the world of 3D graphic design, the Blender software suite is a one stop access to everything you would possibly think of exploring with. Right from modeling, animation, rendering and compositing to rigging, motion tracking and simulation; the software is a complete video editor and game developer kit.
Some high rated professional applications of the software include, API based Python and allied tool scripting to customize different applications, most of which are a part of the suite’s later releases. The software further supports a common graphic pipeline; compatible to studio based professional as well as individual usage and undergoes continuous upgrade to ascertain maximum graphic productivity.
Talking of the software’s platform compatibility, you are free to use Blender on any of your Windows, Mac and Linux supported devices with utmost ease. The suite works on the OpenGL platform for the most responsive user experience and quick output response.
You can further, conveniently regard the software as your personal 3D graphic designer, owing to the fact that the software’s General Public License grants the liberty of minor and major code alterations to its users, which often results in making the suite additively responsive, with the inclusion of improved features, receptive bug fixes and interactive usage.
Potential Advantages
Choosing the Blender 3D design suite for dimensional and motion graphic editing, you are entitled to benefit from the following advantages:
01A Free Graphic Suite
Almost every software user has the obvious habit of prioritizing financial equity before all other program credibility. However, you should be relieved to realize that the Blender 3D Suite is available to you without a price tag. Loyal users of the software claim the product to outshine its priced counterparts in terms of features and responsive flexibility.
If you are at the shore of graphic design and 3D modeling, there’s absolutely no better software to jump with, in the creation pool. Talking of the concerns of long term free usage and hidden feature blocking pay walls, there’s no cause to worry.
The software earns most of it financial credits through sales merchandise, donations and Cloud Service, which is a reasonably priced and optional graphic design assistant and application resource.
02Open Source Software
Essentially programmed and developed by an expert and skilled core team, the software is liberal enough to entertain open source modifications. Public users of the suite are permitted to make functionality alterations with Python coding. This flexibility of the Blender software is the underlying reason to a community driven increment to the existing top class suite functionalities.
While the public user creativity is responsible for adding a heap of free and paid software functionalities, the suite offers a sale of the specific feature scripts at marketplaces like, Blendermarket.com as a developer support initiative to promote the creation of highly productive graphic tools.
03Extensive Pipeline Support
As already stated, the software supports a plethora of creative utilities ranging from still and motion image graphics, movie developments, dimensional modeling, gaming, studio VFX and lots more. What’s best is, you are entitled to all this without having to spend a single penny from your pocket.
While most creators take up Blender graphic designing as a full time earning source, the bottom line is, if you are wondering, whether or not Blender supports a particular design task, most of the times it possibly can!
04Rendering Flexibility
You can work with two rendering options, viz., Eevee and Cycles within Blender. Using the Eevee render option, users can render their design models in physical, real time outputs in a quick time span. T5her biggest advantage of this rendering engine happens to be its working speed. While it does not require you wait for tedious rendering durations, you can additionally escape individual frame renders.
The Cycles is a physical, path tracing render engine, using light rays to interpret design looks. Compatible to GPU and CPU rendering, this one is a bit slow, but delivers a much precise image than Eevee.
Part 2 How to Make a Material Transparent in Blender
Blender is a top class graphic modulation tool; you can use to play with your editing creativity to your heart’s content, catering to a variety of design requirements, while adhering to a distinguished professional outlook. If you are pondering over the perfect task choice to start your editing journey with Blender, you can begin with making a material transparent in the software.
When beginning to create transparent artworks in Blender, you need to be familiar with the Transparent BSDF node. Here’s a quick explanation:
Transparent BSDF Node
When working with Blender, you get to access a variety of graphic nodes that cater to specific design purposes. Likewise, the transparent BSDF, as the name suggests, is an exclusive transparency creation graphic node that is essential to make materials transparent in Blender. Talking of the specific node function, it is there to facilitate the control of different transparency modes, in cohesion with specific user requirements.
Browse through the following section for a guided tutorial to make a material transparent using Blender:
Step 1:
Prepare a suitable BSDF material by selecting any image from your device and applying it to the object in the Blender’s viewport.
Step 2:
To start working with the Transparent BSDF node, you first need to insert the same into the node tree amongst the Principle BSDF and the Mix Shader nodes. To do this, you need to select ‘Add’ or press ‘Ctrl + A’, followed by locating the same in the ‘Shader’ submenu. Do not forget to add the ‘Mix Shader’ node, which is again, present in the ‘Shader’ submenu, to the node tree.
Step 3:
Plug in the Transparent BSDF output into the top Shader input of the Mix Shader, while dragging the latter into the connecting link between the Material Output and Principle BSDF nodes. This enables the Mix Shader node to pass through the two output generating nodes. The resultant ‘Transparency Effect’ can be seen on the viewpoint object within a few seconds.
Step 4:
Make an additional connection of two fresh nodes into the node tree as follows:
● Transparent BSDF output to the Mix Shader input
● Principal BSDF output to the Mix Shader input
● Mix Shader output to the Surface input
This will finally fetch a transparent material output for the selected image object.

Part 3 How to Make a Background Transparent in Blender
Having experimented with object material transparency in Blender, you can try hands at taking your creativity to the next level by creating Blender render transparent backgrounds in the software. Here’s what you need to do to take up the creation process:

Step 1:
Begin with choosing a suitable image to create a transparent background in either of the Eevee or Cycles render engines, followed by navigating to the ‘Render Properties’ tab in the software’s main interface. Click on the same to get a related drop down menu for activating selected image effects.

Step 2:
From the dropdown that appears, reach to the ‘Film’ option and click on the ‘Transparency’ checkbox to activate it.

You will now observe the image background in the Blender object viewport to disappear.

Step 3:
Press F12 to receive the render output. You can now save the transparent background image in your device. Take note use a transparency compatible image format, preferably PNG.
Blender is undoubtedly a viable graphic editing software to create transparent background images, but if you are in search of a different editor alternative, the Filmora Image Creator and Editor software to take up the aforesaid task with utmost ease.

Wondershare Filmora Video Editor
Essentially a Wondershare software utility, Filmora is conveniently regarded as one among the finest and top curated image editor software. Adhering to the particular interest of transparent background creation, Filmora’s exclusive ‘Green Screen’ attribute is a viable solution to create masterpieces of professional quality, transparent background images. The huge effects library of the software is there to infuse the additional tint of class to your creative excellence.
Making Transparent Background Images in Filmora
Follow the stepwise guided tutorial given below to create images with excellent quality transparent background in Filmora:
Step 1: Software Download and Installation
Log in to your favorite web browser in a Mac or Windows device to download Filmora from its official site and proceed with the software installation process.
For Win 7 or later (64-bit)
For macOS 10.12 or later
Step 2: Import Image File
When you are done with the installation, launch the software and navigate to the ’Import’ tab in its welcome interface. Click and tap ‘Import Media File’ from the dropdown that appears to import the desired image to Filmora’s media library.

Step 3: Drag to Timeline
The next step is to drag your image selection from the software’s media library to its editor timeline. Either right click the image and select ‘Insert’ option from the submenu that appears, or use the conventional ‘Drag and Drop’ method to accomplish this task.

Step 4: Transparency Adjustments
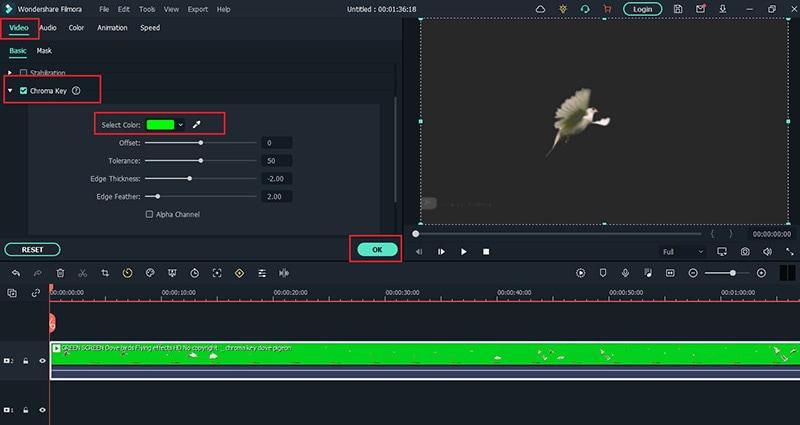
Once the image reaches the timeline, tap the same to see the ‘Settings’ tab get opened. Navigate through the tab options until you find ‘Chroma Key Settings’. Enable the ‘Chroma Key’ with a right side toggle to see your selected image get transparent with a ‘Green’ color in the background.
An alternative to the above method is to hit the ‘Color Picker’ option to the right of the ‘Select Color’ tab and navigate to a desired section of the image to make it transparent with a single click.

If you observe partial transparency in the resultant image background, consider making additional adjustments in ’Chroma Key’ setting parameters like, offset, edge thickness, tolerance, edge feather, etc., to ensure that the image background is totally transparent. When the final artwork makes you happy, tap ‘OK’.

**Step 4: Time to Export!**Your creation is now all set for a media export to your favorite social media handles. Just click on the ‘Export’ tab in the top right of the software timeline and that’s it!

● Ending Thoughts →
● Exploring your creative abilities with different graphic design tools and editing variations is an absolute fun. Among the various design alternatives, playing with dimensional graphic creativity is a remarkable craft that can be mastered with convenient market based software like Blender.
● However, if you are keen on trying other alternatives, you can prefer the Filmora Image Editor software for top class, professional quality image and video creation.
Want to explore open source 2D/3D content creation through Blender? Stay here to embark your graphic creations with over the top dimensional detailing!
In this article
01 [What’s Blender and What’s Its Advantages?](#Part 1)
02 [How to Make a Material Transparent in Blender](#Part 2)
03 [How to Make a Background Transparent in Blender](#Part 3)
Part 1 What’s Blender and What’s Its Advantages?
When landing into the world of 3D graphic design, the Blender software suite is a one stop access to everything you would possibly think of exploring with. Right from modeling, animation, rendering and compositing to rigging, motion tracking and simulation; the software is a complete video editor and game developer kit.
Some high rated professional applications of the software include, API based Python and allied tool scripting to customize different applications, most of which are a part of the suite’s later releases. The software further supports a common graphic pipeline; compatible to studio based professional as well as individual usage and undergoes continuous upgrade to ascertain maximum graphic productivity.
Talking of the software’s platform compatibility, you are free to use Blender on any of your Windows, Mac and Linux supported devices with utmost ease. The suite works on the OpenGL platform for the most responsive user experience and quick output response.
You can further, conveniently regard the software as your personal 3D graphic designer, owing to the fact that the software’s General Public License grants the liberty of minor and major code alterations to its users, which often results in making the suite additively responsive, with the inclusion of improved features, receptive bug fixes and interactive usage.
Potential Advantages
Choosing the Blender 3D design suite for dimensional and motion graphic editing, you are entitled to benefit from the following advantages:
01A Free Graphic Suite
Almost every software user has the obvious habit of prioritizing financial equity before all other program credibility. However, you should be relieved to realize that the Blender 3D Suite is available to you without a price tag. Loyal users of the software claim the product to outshine its priced counterparts in terms of features and responsive flexibility.
If you are at the shore of graphic design and 3D modeling, there’s absolutely no better software to jump with, in the creation pool. Talking of the concerns of long term free usage and hidden feature blocking pay walls, there’s no cause to worry.
The software earns most of it financial credits through sales merchandise, donations and Cloud Service, which is a reasonably priced and optional graphic design assistant and application resource.
02Open Source Software
Essentially programmed and developed by an expert and skilled core team, the software is liberal enough to entertain open source modifications. Public users of the suite are permitted to make functionality alterations with Python coding. This flexibility of the Blender software is the underlying reason to a community driven increment to the existing top class suite functionalities.
While the public user creativity is responsible for adding a heap of free and paid software functionalities, the suite offers a sale of the specific feature scripts at marketplaces like, Blendermarket.com as a developer support initiative to promote the creation of highly productive graphic tools.
03Extensive Pipeline Support
As already stated, the software supports a plethora of creative utilities ranging from still and motion image graphics, movie developments, dimensional modeling, gaming, studio VFX and lots more. What’s best is, you are entitled to all this without having to spend a single penny from your pocket.
While most creators take up Blender graphic designing as a full time earning source, the bottom line is, if you are wondering, whether or not Blender supports a particular design task, most of the times it possibly can!
04Rendering Flexibility
You can work with two rendering options, viz., Eevee and Cycles within Blender. Using the Eevee render option, users can render their design models in physical, real time outputs in a quick time span. T5her biggest advantage of this rendering engine happens to be its working speed. While it does not require you wait for tedious rendering durations, you can additionally escape individual frame renders.
The Cycles is a physical, path tracing render engine, using light rays to interpret design looks. Compatible to GPU and CPU rendering, this one is a bit slow, but delivers a much precise image than Eevee.
Part 2 How to Make a Material Transparent in Blender
Blender is a top class graphic modulation tool; you can use to play with your editing creativity to your heart’s content, catering to a variety of design requirements, while adhering to a distinguished professional outlook. If you are pondering over the perfect task choice to start your editing journey with Blender, you can begin with making a material transparent in the software.
When beginning to create transparent artworks in Blender, you need to be familiar with the Transparent BSDF node. Here’s a quick explanation:
Transparent BSDF Node
When working with Blender, you get to access a variety of graphic nodes that cater to specific design purposes. Likewise, the transparent BSDF, as the name suggests, is an exclusive transparency creation graphic node that is essential to make materials transparent in Blender. Talking of the specific node function, it is there to facilitate the control of different transparency modes, in cohesion with specific user requirements.
Browse through the following section for a guided tutorial to make a material transparent using Blender:
Step 1:
Prepare a suitable BSDF material by selecting any image from your device and applying it to the object in the Blender’s viewport.
Step 2:
To start working with the Transparent BSDF node, you first need to insert the same into the node tree amongst the Principle BSDF and the Mix Shader nodes. To do this, you need to select ‘Add’ or press ‘Ctrl + A’, followed by locating the same in the ‘Shader’ submenu. Do not forget to add the ‘Mix Shader’ node, which is again, present in the ‘Shader’ submenu, to the node tree.
Step 3:
Plug in the Transparent BSDF output into the top Shader input of the Mix Shader, while dragging the latter into the connecting link between the Material Output and Principle BSDF nodes. This enables the Mix Shader node to pass through the two output generating nodes. The resultant ‘Transparency Effect’ can be seen on the viewpoint object within a few seconds.
Step 4:
Make an additional connection of two fresh nodes into the node tree as follows:
● Transparent BSDF output to the Mix Shader input
● Principal BSDF output to the Mix Shader input
● Mix Shader output to the Surface input
This will finally fetch a transparent material output for the selected image object.
Part 3 How to Make a Background Transparent in Blender
Having experimented with object material transparency in Blender, you can try hands at taking your creativity to the next level by creating Blender render transparent backgrounds in the software. Here’s what you need to do to take up the creation process:
Step 1:
Begin with choosing a suitable image to create a transparent background in either of the Eevee or Cycles render engines, followed by navigating to the ‘Render Properties’ tab in the software’s main interface. Click on the same to get a related drop down menu for activating selected image effects.
Step 2:
From the dropdown that appears, reach to the ‘Film’ option and click on the ‘Transparency’ checkbox to activate it.
You will now observe the image background in the Blender object viewport to disappear.
Step 3:
Press F12 to receive the render output. You can now save the transparent background image in your device. Take note use a transparency compatible image format, preferably PNG.
Blender is undoubtedly a viable graphic editing software to create transparent background images, but if you are in search of a different editor alternative, the Filmora Image Creator and Editor software to take up the aforesaid task with utmost ease.
Wondershare Filmora Video Editor
Essentially a Wondershare software utility, Filmora is conveniently regarded as one among the finest and top curated image editor software. Adhering to the particular interest of transparent background creation, Filmora’s exclusive ‘Green Screen’ attribute is a viable solution to create masterpieces of professional quality, transparent background images. The huge effects library of the software is there to infuse the additional tint of class to your creative excellence.
Making Transparent Background Images in Filmora
Follow the stepwise guided tutorial given below to create images with excellent quality transparent background in Filmora:
Step 1: Software Download and Installation
Log in to your favorite web browser in a Mac or Windows device to download Filmora from its official site and proceed with the software installation process.
For Win 7 or later (64-bit)
For macOS 10.12 or later
Step 2: Import Image File
When you are done with the installation, launch the software and navigate to the ’Import’ tab in its welcome interface. Click and tap ‘Import Media File’ from the dropdown that appears to import the desired image to Filmora’s media library.
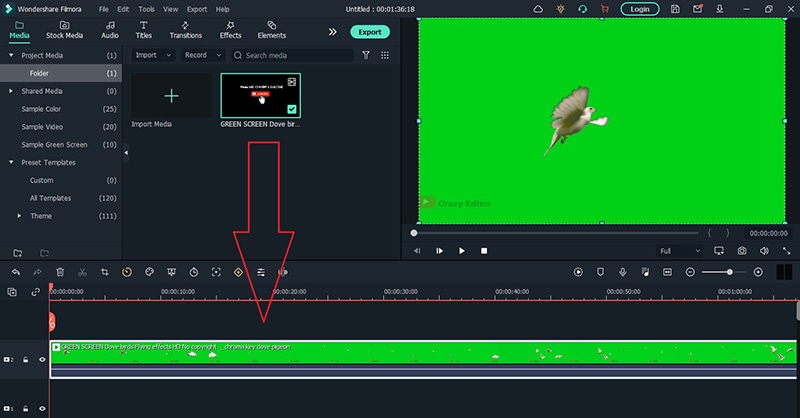
Step 3: Drag to Timeline
The next step is to drag your image selection from the software’s media library to its editor timeline. Either right click the image and select ‘Insert’ option from the submenu that appears, or use the conventional ‘Drag and Drop’ method to accomplish this task.
Step 4: Transparency Adjustments
Once the image reaches the timeline, tap the same to see the ‘Settings’ tab get opened. Navigate through the tab options until you find ‘Chroma Key Settings’. Enable the ‘Chroma Key’ with a right side toggle to see your selected image get transparent with a ‘Green’ color in the background.
An alternative to the above method is to hit the ‘Color Picker’ option to the right of the ‘Select Color’ tab and navigate to a desired section of the image to make it transparent with a single click.
If you observe partial transparency in the resultant image background, consider making additional adjustments in ’Chroma Key’ setting parameters like, offset, edge thickness, tolerance, edge feather, etc., to ensure that the image background is totally transparent. When the final artwork makes you happy, tap ‘OK’.
**Step 4: Time to Export!**Your creation is now all set for a media export to your favorite social media handles. Just click on the ‘Export’ tab in the top right of the software timeline and that’s it!
● Ending Thoughts →
● Exploring your creative abilities with different graphic design tools and editing variations is an absolute fun. Among the various design alternatives, playing with dimensional graphic creativity is a remarkable craft that can be mastered with convenient market based software like Blender.
● However, if you are keen on trying other alternatives, you can prefer the Filmora Image Editor software for top class, professional quality image and video creation.
Want to explore open source 2D/3D content creation through Blender? Stay here to embark your graphic creations with over the top dimensional detailing!
In this article
01 [What’s Blender and What’s Its Advantages?](#Part 1)
02 [How to Make a Material Transparent in Blender](#Part 2)
03 [How to Make a Background Transparent in Blender](#Part 3)
Part 1 What’s Blender and What’s Its Advantages?
When landing into the world of 3D graphic design, the Blender software suite is a one stop access to everything you would possibly think of exploring with. Right from modeling, animation, rendering and compositing to rigging, motion tracking and simulation; the software is a complete video editor and game developer kit.
Some high rated professional applications of the software include, API based Python and allied tool scripting to customize different applications, most of which are a part of the suite’s later releases. The software further supports a common graphic pipeline; compatible to studio based professional as well as individual usage and undergoes continuous upgrade to ascertain maximum graphic productivity.
Talking of the software’s platform compatibility, you are free to use Blender on any of your Windows, Mac and Linux supported devices with utmost ease. The suite works on the OpenGL platform for the most responsive user experience and quick output response.
You can further, conveniently regard the software as your personal 3D graphic designer, owing to the fact that the software’s General Public License grants the liberty of minor and major code alterations to its users, which often results in making the suite additively responsive, with the inclusion of improved features, receptive bug fixes and interactive usage.
Potential Advantages
Choosing the Blender 3D design suite for dimensional and motion graphic editing, you are entitled to benefit from the following advantages:
01A Free Graphic Suite
Almost every software user has the obvious habit of prioritizing financial equity before all other program credibility. However, you should be relieved to realize that the Blender 3D Suite is available to you without a price tag. Loyal users of the software claim the product to outshine its priced counterparts in terms of features and responsive flexibility.
If you are at the shore of graphic design and 3D modeling, there’s absolutely no better software to jump with, in the creation pool. Talking of the concerns of long term free usage and hidden feature blocking pay walls, there’s no cause to worry.
The software earns most of it financial credits through sales merchandise, donations and Cloud Service, which is a reasonably priced and optional graphic design assistant and application resource.
02Open Source Software
Essentially programmed and developed by an expert and skilled core team, the software is liberal enough to entertain open source modifications. Public users of the suite are permitted to make functionality alterations with Python coding. This flexibility of the Blender software is the underlying reason to a community driven increment to the existing top class suite functionalities.
While the public user creativity is responsible for adding a heap of free and paid software functionalities, the suite offers a sale of the specific feature scripts at marketplaces like, Blendermarket.com as a developer support initiative to promote the creation of highly productive graphic tools.
03Extensive Pipeline Support
As already stated, the software supports a plethora of creative utilities ranging from still and motion image graphics, movie developments, dimensional modeling, gaming, studio VFX and lots more. What’s best is, you are entitled to all this without having to spend a single penny from your pocket.
While most creators take up Blender graphic designing as a full time earning source, the bottom line is, if you are wondering, whether or not Blender supports a particular design task, most of the times it possibly can!
04Rendering Flexibility
You can work with two rendering options, viz., Eevee and Cycles within Blender. Using the Eevee render option, users can render their design models in physical, real time outputs in a quick time span. T5her biggest advantage of this rendering engine happens to be its working speed. While it does not require you wait for tedious rendering durations, you can additionally escape individual frame renders.
The Cycles is a physical, path tracing render engine, using light rays to interpret design looks. Compatible to GPU and CPU rendering, this one is a bit slow, but delivers a much precise image than Eevee.
Part 2 How to Make a Material Transparent in Blender
Blender is a top class graphic modulation tool; you can use to play with your editing creativity to your heart’s content, catering to a variety of design requirements, while adhering to a distinguished professional outlook. If you are pondering over the perfect task choice to start your editing journey with Blender, you can begin with making a material transparent in the software.
When beginning to create transparent artworks in Blender, you need to be familiar with the Transparent BSDF node. Here’s a quick explanation:
Transparent BSDF Node
When working with Blender, you get to access a variety of graphic nodes that cater to specific design purposes. Likewise, the transparent BSDF, as the name suggests, is an exclusive transparency creation graphic node that is essential to make materials transparent in Blender. Talking of the specific node function, it is there to facilitate the control of different transparency modes, in cohesion with specific user requirements.
Browse through the following section for a guided tutorial to make a material transparent using Blender:
Step 1:
Prepare a suitable BSDF material by selecting any image from your device and applying it to the object in the Blender’s viewport.
Step 2:
To start working with the Transparent BSDF node, you first need to insert the same into the node tree amongst the Principle BSDF and the Mix Shader nodes. To do this, you need to select ‘Add’ or press ‘Ctrl + A’, followed by locating the same in the ‘Shader’ submenu. Do not forget to add the ‘Mix Shader’ node, which is again, present in the ‘Shader’ submenu, to the node tree.
Step 3:
Plug in the Transparent BSDF output into the top Shader input of the Mix Shader, while dragging the latter into the connecting link between the Material Output and Principle BSDF nodes. This enables the Mix Shader node to pass through the two output generating nodes. The resultant ‘Transparency Effect’ can be seen on the viewpoint object within a few seconds.
Step 4:
Make an additional connection of two fresh nodes into the node tree as follows:
● Transparent BSDF output to the Mix Shader input
● Principal BSDF output to the Mix Shader input
● Mix Shader output to the Surface input
This will finally fetch a transparent material output for the selected image object.
Part 3 How to Make a Background Transparent in Blender
Having experimented with object material transparency in Blender, you can try hands at taking your creativity to the next level by creating Blender render transparent backgrounds in the software. Here’s what you need to do to take up the creation process:
Step 1:
Begin with choosing a suitable image to create a transparent background in either of the Eevee or Cycles render engines, followed by navigating to the ‘Render Properties’ tab in the software’s main interface. Click on the same to get a related drop down menu for activating selected image effects.
Step 2:
From the dropdown that appears, reach to the ‘Film’ option and click on the ‘Transparency’ checkbox to activate it.
You will now observe the image background in the Blender object viewport to disappear.
Step 3:
Press F12 to receive the render output. You can now save the transparent background image in your device. Take note use a transparency compatible image format, preferably PNG.
Blender is undoubtedly a viable graphic editing software to create transparent background images, but if you are in search of a different editor alternative, the Filmora Image Creator and Editor software to take up the aforesaid task with utmost ease.
Wondershare Filmora Video Editor
Essentially a Wondershare software utility, Filmora is conveniently regarded as one among the finest and top curated image editor software. Adhering to the particular interest of transparent background creation, Filmora’s exclusive ‘Green Screen’ attribute is a viable solution to create masterpieces of professional quality, transparent background images. The huge effects library of the software is there to infuse the additional tint of class to your creative excellence.
Making Transparent Background Images in Filmora
Follow the stepwise guided tutorial given below to create images with excellent quality transparent background in Filmora:
Step 1: Software Download and Installation
Log in to your favorite web browser in a Mac or Windows device to download Filmora from its official site and proceed with the software installation process.
For Win 7 or later (64-bit)
For macOS 10.12 or later
Step 2: Import Image File
When you are done with the installation, launch the software and navigate to the ’Import’ tab in its welcome interface. Click and tap ‘Import Media File’ from the dropdown that appears to import the desired image to Filmora’s media library.
Step 3: Drag to Timeline
The next step is to drag your image selection from the software’s media library to its editor timeline. Either right click the image and select ‘Insert’ option from the submenu that appears, or use the conventional ‘Drag and Drop’ method to accomplish this task.
Step 4: Transparency Adjustments
Once the image reaches the timeline, tap the same to see the ‘Settings’ tab get opened. Navigate through the tab options until you find ‘Chroma Key Settings’. Enable the ‘Chroma Key’ with a right side toggle to see your selected image get transparent with a ‘Green’ color in the background.
An alternative to the above method is to hit the ‘Color Picker’ option to the right of the ‘Select Color’ tab and navigate to a desired section of the image to make it transparent with a single click.
If you observe partial transparency in the resultant image background, consider making additional adjustments in ’Chroma Key’ setting parameters like, offset, edge thickness, tolerance, edge feather, etc., to ensure that the image background is totally transparent. When the final artwork makes you happy, tap ‘OK’.
**Step 4: Time to Export!**Your creation is now all set for a media export to your favorite social media handles. Just click on the ‘Export’ tab in the top right of the software timeline and that’s it!
● Ending Thoughts →
● Exploring your creative abilities with different graphic design tools and editing variations is an absolute fun. Among the various design alternatives, playing with dimensional graphic creativity is a remarkable craft that can be mastered with convenient market based software like Blender.
● However, if you are keen on trying other alternatives, you can prefer the Filmora Image Editor software for top class, professional quality image and video creation.
Also read:
- New 2024 Approved How to Slow-Mo YouTube Videos
- In 2024, Want to Convert MP4 Video To 60 FPS GIF? Read This
- New The Ultimate Guide to Using AR Emoji Stickers in Your Videos
- Updated You Can Match Paint Colors From Pictures for Your Wall, as Well as for Your Videos. And to Know How to Do Both, We Have Laid Down the Following Discussion for 2024
- Updated Best Dark Moody LUTs During Editing
- New How to Create a Smooth Cut Transition Effect for 2024
- New Are You Looking to Store Your Videos Securely and Efficiently? Look No Further than Our Top Pick for the Best Cloud Storage Service for Videos for 2024
- Updated In 2024, How to Denoise in After Effects – Audio & Video Noise Removal
- Updated 2024 Approved How To Synchronize Your Audio And Videos Properly?
- Take Your Video Editing to the Next Level with Video Scopes
- New 2024 Approved How to Get Motion Blur in Valorant?
- New This Article Provides Helpful Tips for Creating Better Film Footage in Public Places. Learn How to Choose the Right Angle and Re-Record the Audio with Filmora
- In 2024, How to Brighten a Video in Windows 10 | Step-By-Step Guide
- New 2024 Approved 10 Top Free GIF Background Remover for PC and Online
- In 2024, If You Want to Prompt Your eCommerce Business in Facebook, Then Using Facebook Video Ads Is One of the Effective Methods. This Post Will Show You How to Edit Videos for Facebook Advertisement
- Updated In 2024, What Is MOV Format and How To Edit MOV Video Creatively?
- New Powerpoint Supported Video Format and Advanced User Tips for 2024
- Updated Want to Make Your Canva Slideshow More Attractive? Follow the Given Discussion to Know Everything About Making the Best Slideshows with Canva for 2024
- New 2024 Approved 20 Best Text To Speech Software Windows, Mac, Android, iPhone & O
- New In 2024, Convert Video Voice to Text Online for Free Fast and Easy Ways
- How to Restore Previous Version of Excel File? | Stellar
- In 2024, 6 Proven Ways to Unlock Xiaomi Civi 3 Disney 100th Anniversary Edition Phone When You Forget the Password
- How to Transfer Data from Oppo A58 4G to Any iOS Devices | Dr.fone
- How to Track Apple iPhone 6s by Phone Number | Dr.fone
- How Can ZTE Nubia Flip 5GMirror Share to PC? | Dr.fone
- In 2024, How does the stardust trade cost In pokemon go On OnePlus Nord N30 5G? | Dr.fone
- What are Location Permissions Life360 On Samsung Galaxy XCover 7? | Dr.fone
- In 2024, Easy Tutorial for Activating iCloud from Apple iPhone 7 Safe and Legal
- How to retrieve erased call logs from Samsung Galaxy M14 5G?
- Hassle-Free Ways to Remove FRP Lock on Samsung Galaxy M14 5G Phones with/without a PC
- In 2024, How to use iSpoofer on Vivo V30 Lite 5G? | Dr.fone
- Dose Life360 Notify Me When Someone Checks My Location On Samsung Galaxy S24+? | Dr.fone
- Title: Updated Top LUTs for Sony HLG
- Author: Morgan
- Created at : 2024-05-19 05:12:26
- Updated at : 2024-05-20 05:12:26
- Link: https://ai-video-editing.techidaily.com/updated-top-luts-for-sony-hlg/
- License: This work is licensed under CC BY-NC-SA 4.0.
