
Using One of the Best Converter Tools to Turn GIFs Into PNG or JPG. Here, Learn About the Ten Best Ones for Different Operating Systems, with Details on Features, Prices, and More

Using One of the Best Converter Tools to Turn GIFs Into PNG or JPG. Here, Learn About the Ten Best Ones for Different Operating Systems, with Details on Features, Prices, and More
A GIF to JPG converter software is responsible for altering files in the animated GIF format to static JPG or PNG image format. Since GIFs are not compatible with some sites, platforms, or documentation types, this is a safer alternative.
JPG, PNG, and even APNG formats are easier to download, work on most device/OS types, and are simpler to print. They have a lesser size as well.
If you are looking for a stable converter, we present the top tools for that here, no matter what kind of devices you use! Read to know which ones you can use based on their features, usability, and support.
10 Best Tools to convert GIF into JPG/PNG/APNG
The following are the best converters for turning GIF into JPG, APNG, or PNG formats.
1. OnlineConvert
One of the simplest GIF to JPG converter types is OnlineConvert. It has diverse customization settings. For example, you can choose the image size and quality or use AI-powered optimization support.

How to download: iOS , Android , Online tool , Chrome extension , Firefox extension
Rating: 3.7 stars out of 5 (Google Play Store)
Compatible OS: web-based, iOS, Android
Price: Free
Main Features:
- Advanced features like Equalize, Stabilize, etc.
- Decide the black/white threshold limits.
- Activate AI enable for optimized conversion.
- Set cropping limits.
Pros
- Decide the image quality.
- Choose image width/height.
- Add an example file.
Cons
- The maximum size of the file is 100 MB.
- It cannot convert encrypted files.
2. Ezgif
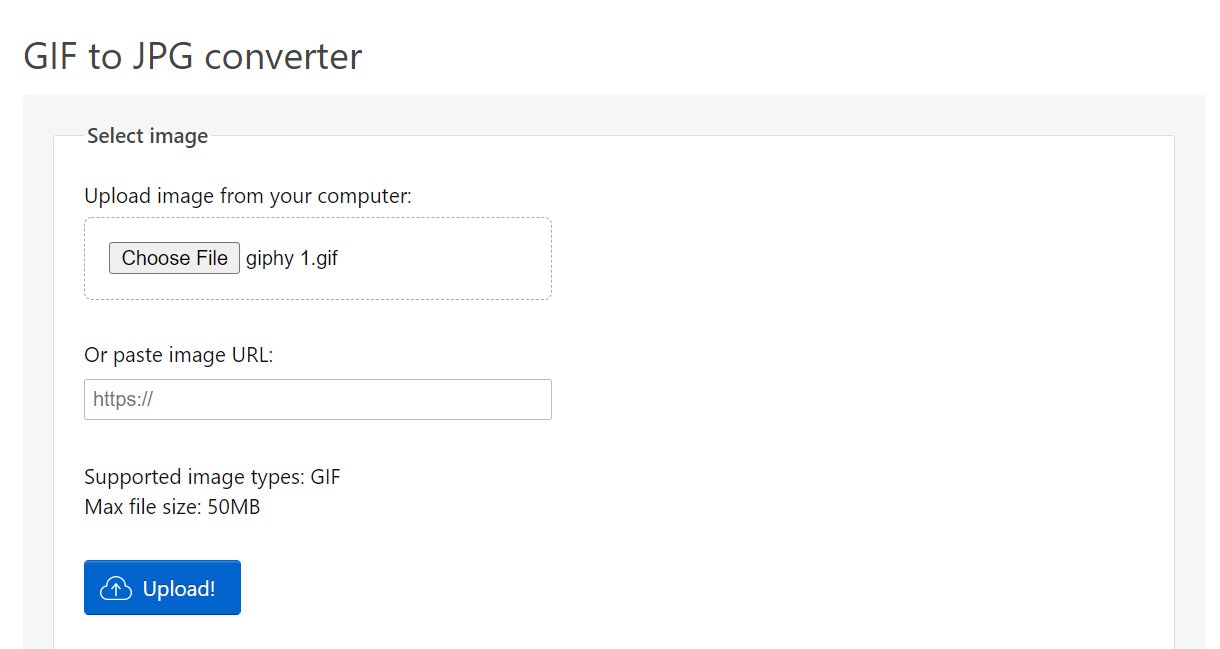
Ezgif is another simple-to-use online tool with substantial image conversion benefits. You can add your GIF files from the Cloud account or computer and directly get JPG files. PNG does not have a direct conversion here, though.
How to download: Online tool
Rating: 100 out of 100 (Scam Detector)
Compatible OS: web-based browsers
Price: Free
Main Features:
- Support a maximum of 50 MB file size for images.
- Direct converter to JPG.
- Set background color to white.
- Add URL link of online GIF files.
Pros
- Instant conversion.
- No changes to original file quality.
- Add from the device.
Cons
- Upload and convert files one by one.
- No cloud support.
3. CloudConvert
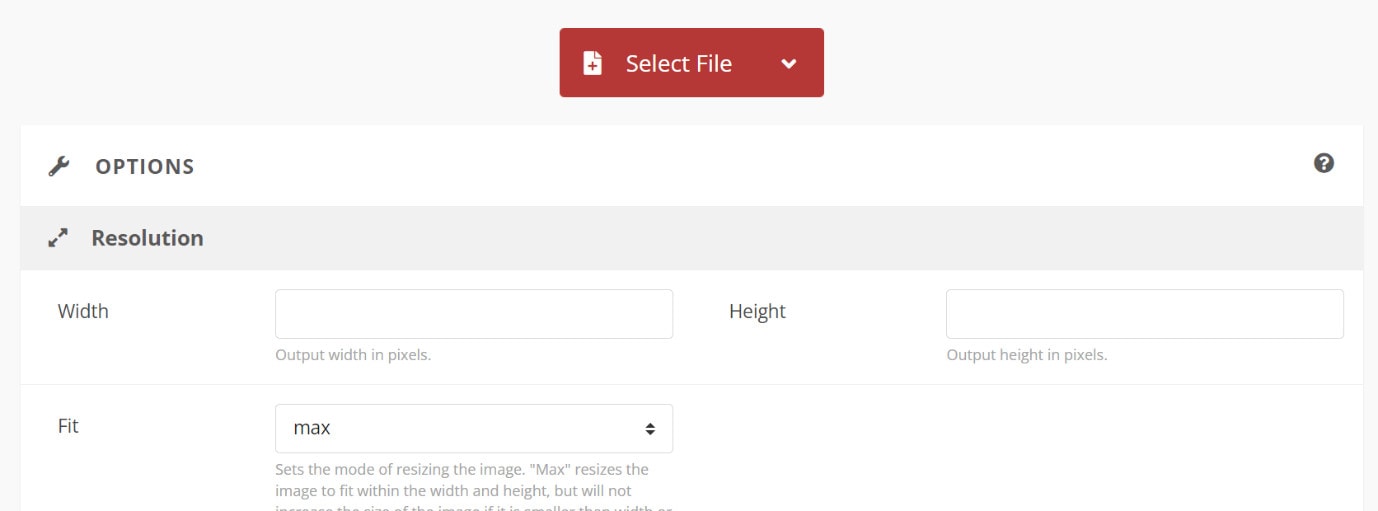
CloudConvert is a high-quality online GIF to PNG converter that people can use to convert high-quality image files with no quality loss. First, choose your files, go for settings, and then the converting will be finished in minutes.
How to download: Online tool
Rating: 4.5 stars of 5 (Capterra)
Compatible OS: web-based
Price: Packages/Subscriptions- Costs start at USD 8 per conversion minute.
Main Features:
- Select a file from various formats, like URL, Device, or cloud accounts.
- Set crop/scape adjustments.
- Note image width and height.
- Select to strip or vice versa.
Pros
- Customize output file type.
- Support watermark security feature. It protects your images and graphic files from being stolen, used, or altered without the owner’s permission.
- High-quality image resolution is available.
Cons
- Slightly complex for beginners to understand or use initially.
- Bigger files take a longer time to load.
4. Convertio
Convertio is another top-grade GIF to JPGF converter which people can utilize to prepare high-definition image files from animated pictures. You can make multiple conversions and get high-priority customer support.

How to download: Online tool
Rating: 4.9 stars of 5 (Capterra)
Compatible OS: web-based
Price: Light- USD 9.99/month, Basic- USD 14.99/month, Unlimited- USD 25.99/month
Main Features:
- Get at least 25 concurrent conversion benefits with paid plans.
- Adfree pages.
- Unlimited conversions are only supported by the highest-paid plan.
- Unlimited allowed conversion minutes for users daily.
Pros
- The drag and drop function is smooth to use.
- Add files with at least 100 MB file size.
- Multiple formats are supported.
Cons
- Signup is necessary for a higher file size allowance.
- More limited service for free.
5. Soda PDF
This GIF to PNG converter is top-notch and used for changing big and small-sized GIF files into static PNG or JPG formats. However, no issues with image quality would be noticeable. You can use it for multiple conversions.

How to download: Online tool
Rating: 3.4 stars of 5 (Capterra)
Compatible OS: Online, Mac, Windows, Linux
Price: Standard- USD 6.73/month, Pro- USD 8.23/month, Business- USD 16.63/month
Main Features:
- Add GIF files from the computer, Dropbox, or Google Drive.
- Files are stored for a full day.
- Direct download button available.
- Redo conversion in case of issues.
Pros
- A desktop version with offline usage is available.
- The drag and drop function makes the converting process more convenient.
- Quick file saving.
Cons
- Cannot access old converted files from servers.
- Ads are available.
6. FreeConvert.com
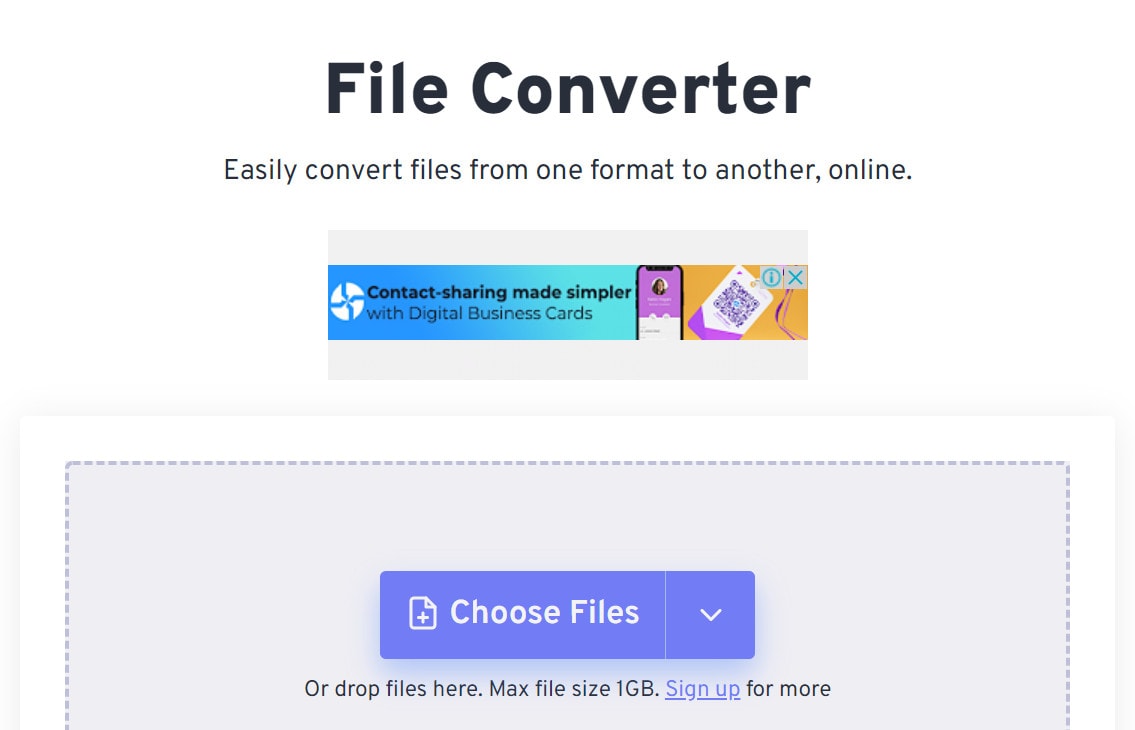
FreeConvert is operable for multiple types of file conversions. In addition, you can store your files in the cloud and handle various tasks simultaneously, depending on your plan.
How to download: Online tool , Chrome extension
Rating: 58.40 out of 100 (Scam Detector)
Compatible OS: Windows, Mac, Linux
Price: 24-hour Pass- USD 12.99, Pro- USD 25.99/month, Basic- USD 9.99/month, Standard- USD 14.99/month.
Main Features:
- Max 1GB of size allows for free conversion.
- Auto-orientation setting available.
- Choose to compress the file or not.
- Insert from device or cloud.
Pros
- You can add files from the computer, Dropbox, Google Drive, or URL.
- It enables you to strip attached metadata.
- Adjust image size freely.
Cons
- Limited customizations.
- No free plan.
7. Zamzar
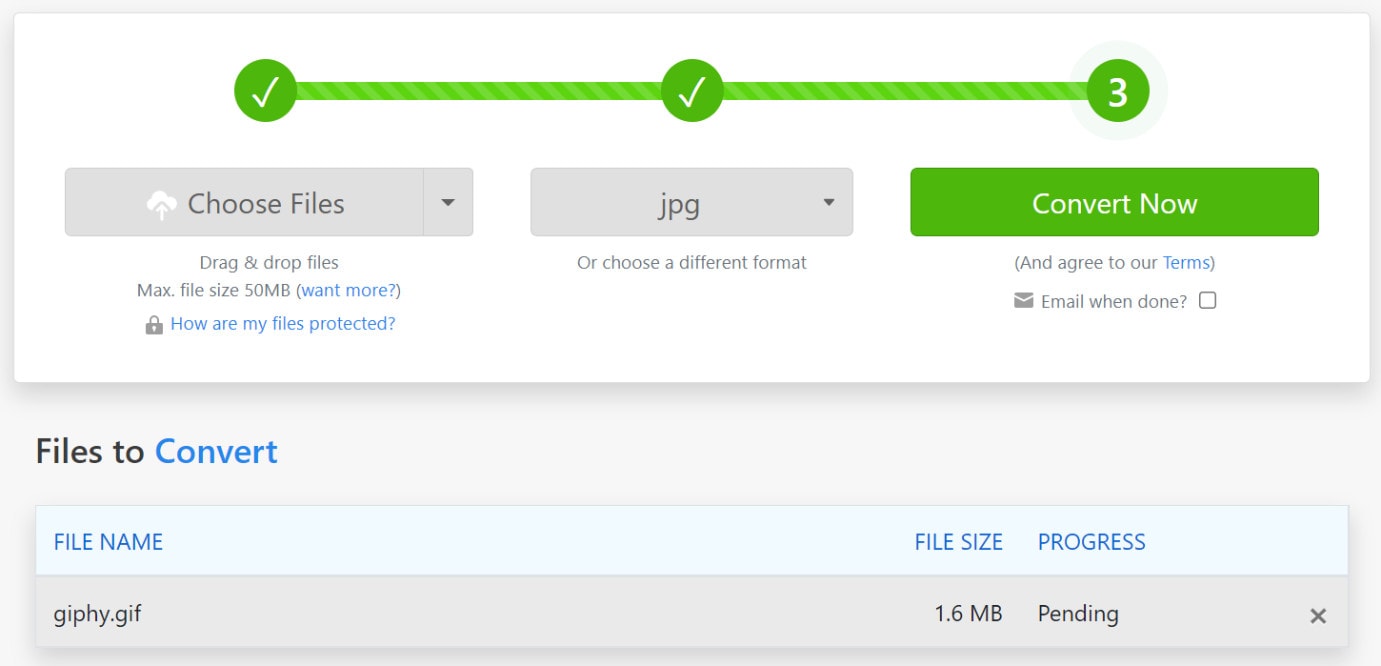
You can efficiently utilize this online tool to convert different file formats into another, like GIF into PNG. You can access the files you created for at least 24 hours after the conversion. For more time, upgrade your account.
How to download: Online tool
Rating: 4.5 stars out of 5 (Capterra)
Compatible OS: web-based
Price: Basic- USD 8.60/month, Pro- USD 15.18/month, Business- USD 24.04/month
Main Features:
- It supports multiple file formats for converting.
- Add a file from the device or cloud.
- Insert online URL of files.
- 50 MB is the maximum file size.
Pros
- All saved files for free users can be saved for 24 hours.
- Paid users can decide to remove files from storage.
- Email notification for downloading is possible.
Cons
- Convert/save only two files per day for free.
- You need to register an account when using.
8. Browserling
Browserling is one of the most accessible and high-quality conversion tools for turning GIFs into PNG, JPG, or any other format. The settings are simple to understand and use, and one can convert multiple files.

How to download: Online tool
Rating: 4 stars out of 5 (G2)
Compatible OS: web-based, Windows/Android devices.
Price: Free, Developer- USD 19/month, Team- USD 29+/month
Main Features:
- Insert from the device.
- You can add GIFs of any size.
- Drag and drop functionality is available.
- Automatically saves to the device.
Pros
- Quick conversion.
- Zero complex steps.
- Easy to use for all users at different stages.
Cons
- No batch processing is allowed.
- The free version is only web-based and not compatible with most OS/devices/browsers.
9. iLoveIMG
Another top-notch online GIF to PNG converter is iLoveIMG, with which you can add and alter multiple GIF files simultaneously. Then, after the conversion, share to social media accounts from Facebook or others easily.
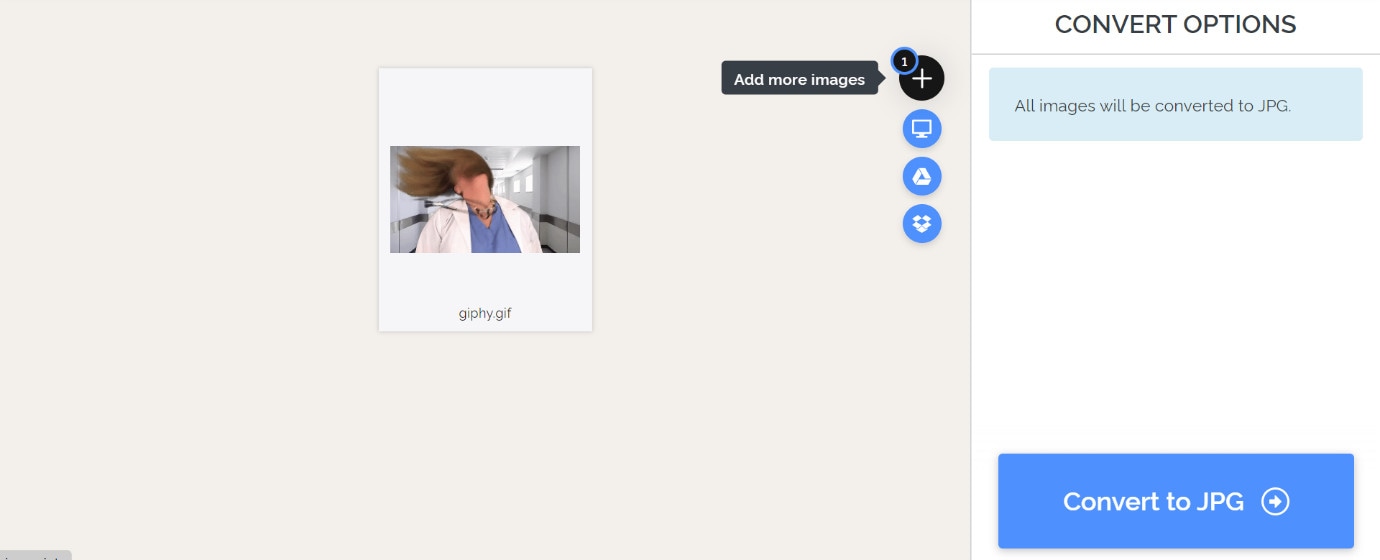
How to download: Online tool
Rating: 3.6 stars out of 5 (TrustPilot)
Compatible OS: web-based
Price: Free, Business- custom price, Premium- USD 3.79
Main Features:
- Insert from a folder, Dropbox, or Google Drive.
- Add multiple images.
- Rotate the files.
- Share to social media.
Pros
- Add from the device.
- Cloud support is available.
- Align files alphabetically.
Cons
- Does not work offline.
- Limited batch process for free users.
10. Convertfiles
This online tool can easily include and change GIFs into PNG files. The conversions occur quickly, and you can add your email account to get quick alerts for the completion of the process.

How to download: Online tool
Rating: 4.6 stars out of 5 (mywot.com)
Compatible OS: web-based
Price: Free
Main Features:
- Add specific input format.
- Include the preferred output format.
- Insert email for notifications.
- Support files to be added from the device library.
Pros
- Quicker process of conversion.
- A variety of file formats are compatible.
- Categorized list of formats like documents, images, videos, etc.
Cons
- Can include third-party unauthorized sites that transfer users to other pages.
- No video formats for output.
Pro Tips: How to Convert GIF to Video for Free?
Besides utilizing suitable tools to convert GIFs into PNG or other image files, you can also use the best GIF to video converters. For example, with Wondershare Filmora , you can easily convert GIFs or other image files into video files. In addition, some editing options, like GIFs, allow users to create videos after merging image files.
Free Download For Win 7 or later(64-bit)
Free Download For macOS 10.14 or later
Step1Launch the Filmora software.
Step2Press the “New Project” section and then access “Click to import media files.”

Add the image files, like GIFs, into the editor.
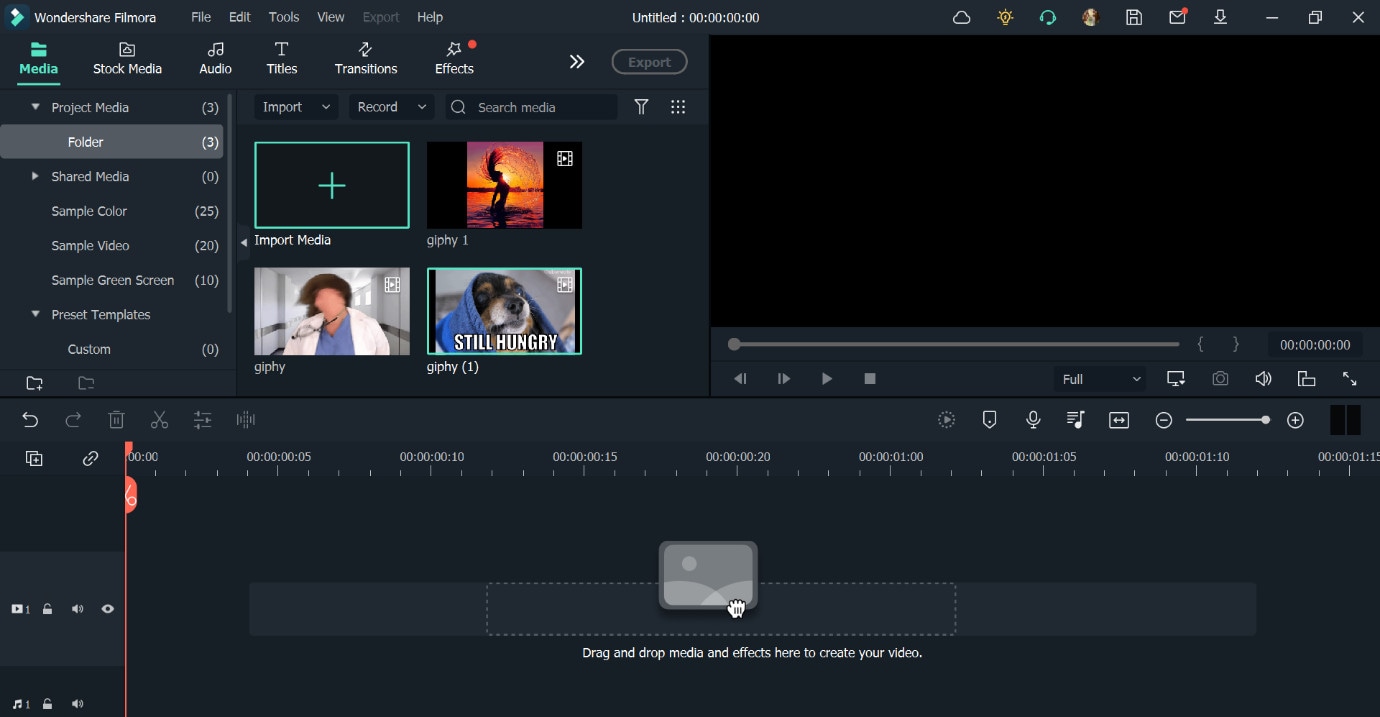
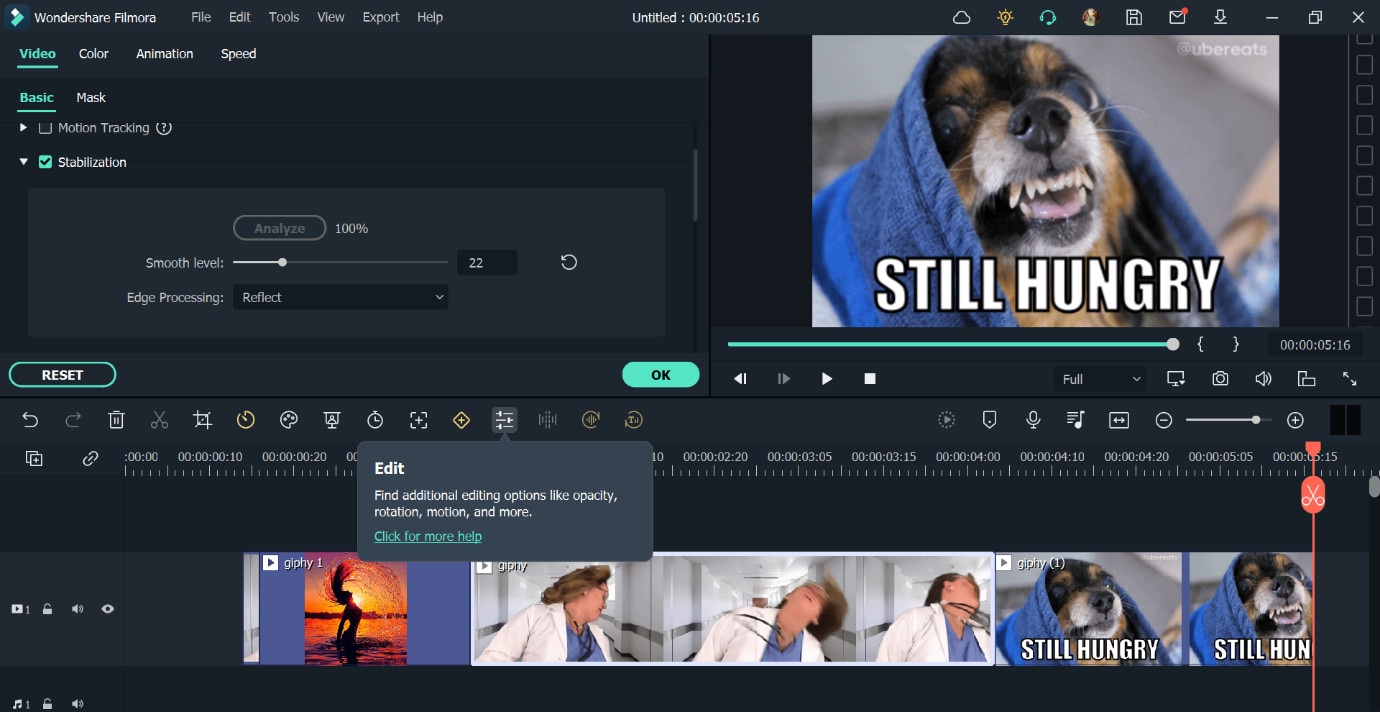
Step3Drag the files to the editing timeline. Use customization settings like Speed, Animation, Audio, Effects, etc., to edit the file.
Step4Click on Export > Local > Mp4. You can choose other video formats too.
Step5Add file information like saving location, name, and formatting specification.
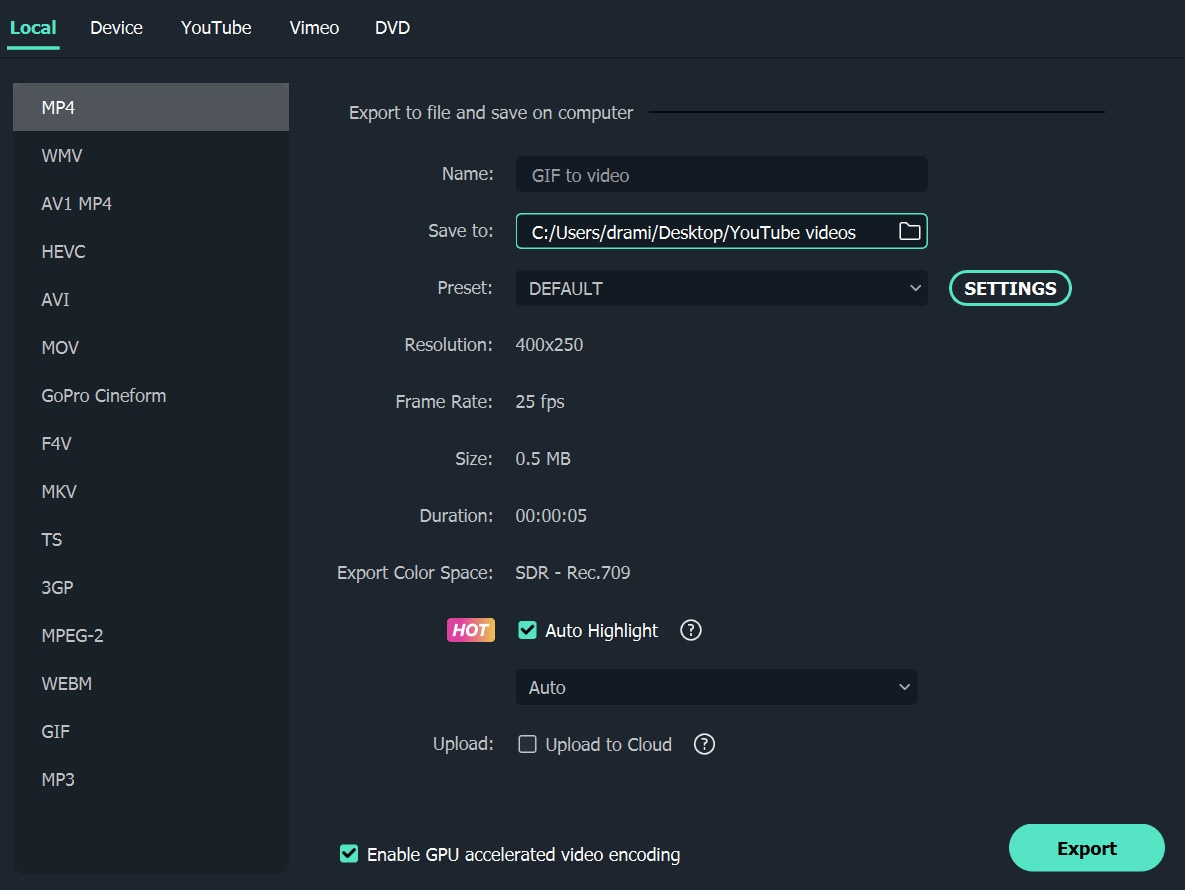
Step6Click on the Export button.
Final Words
You can easily use one of the given tools to convert GIF files into varying image file types. There are fully online options like CloudConvert, and certain choices with a software version, like Online Convert. Try each at least once for the best results to know which fits your needs perfectly.
2. Ezgif
Ezgif is another simple-to-use online tool with substantial image conversion benefits. You can add your GIF files from the Cloud account or computer and directly get JPG files. PNG does not have a direct conversion here, though.

How to download: Online tool
Rating: 100 out of 100 (Scam Detector)
Compatible OS: web-based browsers
Price: Free
Main Features:
- Support a maximum of 50 MB file size for images.
- Direct converter to JPG.
- Set background color to white.
- Add URL link of online GIF files.
Pros
- Instant conversion.
- No changes to original file quality.
- Add from the device.
Cons
- Upload and convert files one by one.
- No cloud support.
3. CloudConvert
CloudConvert is a high-quality online GIF to PNG converter that people can use to convert high-quality image files with no quality loss. First, choose your files, go for settings, and then the converting will be finished in minutes.

How to download: Online tool
Rating: 4.5 stars of 5 (Capterra)
Compatible OS: web-based
Price: Packages/Subscriptions- Costs start at USD 8 per conversion minute.
Main Features:
- Select a file from various formats, like URL, Device, or cloud accounts.
- Set crop/scape adjustments.
- Note image width and height.
- Select to strip or vice versa.
Pros
- Customize output file type.
- Support watermark security feature. It protects your images and graphic files from being stolen, used, or altered without the owner’s permission.
- High-quality image resolution is available.
Cons
- Slightly complex for beginners to understand or use initially.
- Bigger files take a longer time to load.
4. Convertio
Convertio is another top-grade GIF to JPGF converter which people can utilize to prepare high-definition image files from animated pictures. You can make multiple conversions and get high-priority customer support.

How to download: Online tool
Rating: 4.9 stars of 5 (Capterra)
Compatible OS: web-based
Price: Light- USD 9.99/month, Basic- USD 14.99/month, Unlimited- USD 25.99/month
Main Features:
- Get at least 25 concurrent conversion benefits with paid plans.
- Adfree pages.
- Unlimited conversions are only supported by the highest-paid plan.
- Unlimited allowed conversion minutes for users daily.
Pros
- The drag and drop function is smooth to use.
- Add files with at least 100 MB file size.
- Multiple formats are supported.
Cons
- Signup is necessary for a higher file size allowance.
- More limited service for free.
5. Soda PDF
This GIF to PNG converter is top-notch and used for changing big and small-sized GIF files into static PNG or JPG formats. However, no issues with image quality would be noticeable. You can use it for multiple conversions.

How to download: Online tool
Rating: 3.4 stars of 5 (Capterra)
Compatible OS: Online, Mac, Windows, Linux
Price: Standard- USD 6.73/month, Pro- USD 8.23/month, Business- USD 16.63/month
Main Features:
- Add GIF files from the computer, Dropbox, or Google Drive.
- Files are stored for a full day.
- Direct download button available.
- Redo conversion in case of issues.
Pros
- A desktop version with offline usage is available.
- The drag and drop function makes the converting process more convenient.
- Quick file saving.
Cons
- Cannot access old converted files from servers.
- Ads are available.
6. FreeConvert.com
FreeConvert is operable for multiple types of file conversions. In addition, you can store your files in the cloud and handle various tasks simultaneously, depending on your plan.

How to download: Online tool , Chrome extension
Rating: 58.40 out of 100 (Scam Detector)
Compatible OS: Windows, Mac, Linux
Price: 24-hour Pass- USD 12.99, Pro- USD 25.99/month, Basic- USD 9.99/month, Standard- USD 14.99/month.
Main Features:
- Max 1GB of size allows for free conversion.
- Auto-orientation setting available.
- Choose to compress the file or not.
- Insert from device or cloud.
Pros
- You can add files from the computer, Dropbox, Google Drive, or URL.
- It enables you to strip attached metadata.
- Adjust image size freely.
Cons
- Limited customizations.
- No free plan.
7. Zamzar
You can efficiently utilize this online tool to convert different file formats into another, like GIF into PNG. You can access the files you created for at least 24 hours after the conversion. For more time, upgrade your account.

How to download: Online tool
Rating: 4.5 stars out of 5 (Capterra)
Compatible OS: web-based
Price: Basic- USD 8.60/month, Pro- USD 15.18/month, Business- USD 24.04/month
Main Features:
- It supports multiple file formats for converting.
- Add a file from the device or cloud.
- Insert online URL of files.
- 50 MB is the maximum file size.
Pros
- All saved files for free users can be saved for 24 hours.
- Paid users can decide to remove files from storage.
- Email notification for downloading is possible.
Cons
- Convert/save only two files per day for free.
- You need to register an account when using.
8. Browserling
Browserling is one of the most accessible and high-quality conversion tools for turning GIFs into PNG, JPG, or any other format. The settings are simple to understand and use, and one can convert multiple files.

How to download: Online tool
Rating: 4 stars out of 5 (G2)
Compatible OS: web-based, Windows/Android devices.
Price: Free, Developer- USD 19/month, Team- USD 29+/month
Main Features:
- Insert from the device.
- You can add GIFs of any size.
- Drag and drop functionality is available.
- Automatically saves to the device.
Pros
- Quick conversion.
- Zero complex steps.
- Easy to use for all users at different stages.
Cons
- No batch processing is allowed.
- The free version is only web-based and not compatible with most OS/devices/browsers.
9. iLoveIMG
Another top-notch online GIF to PNG converter is iLoveIMG, with which you can add and alter multiple GIF files simultaneously. Then, after the conversion, share to social media accounts from Facebook or others easily.

How to download: Online tool
Rating: 3.6 stars out of 5 (TrustPilot)
Compatible OS: web-based
Price: Free, Business- custom price, Premium- USD 3.79
Main Features:
- Insert from a folder, Dropbox, or Google Drive.
- Add multiple images.
- Rotate the files.
- Share to social media.
Pros
- Add from the device.
- Cloud support is available.
- Align files alphabetically.
Cons
- Does not work offline.
- Limited batch process for free users.
10. Convertfiles
This online tool can easily include and change GIFs into PNG files. The conversions occur quickly, and you can add your email account to get quick alerts for the completion of the process.

How to download: Online tool
Rating: 4.6 stars out of 5 (mywot.com)
Compatible OS: web-based
Price: Free
Main Features:
- Add specific input format.
- Include the preferred output format.
- Insert email for notifications.
- Support files to be added from the device library.
Pros
- Quicker process of conversion.
- A variety of file formats are compatible.
- Categorized list of formats like documents, images, videos, etc.
Cons
- Can include third-party unauthorized sites that transfer users to other pages.
- No video formats for output.
Pro Tips: How to Convert GIF to Video for Free?
Besides utilizing suitable tools to convert GIFs into PNG or other image files, you can also use the best GIF to video converters. For example, with Wondershare Filmora , you can easily convert GIFs or other image files into video files. In addition, some editing options, like GIFs, allow users to create videos after merging image files.
Free Download For Win 7 or later(64-bit)
Free Download For macOS 10.14 or later
Step1Launch the Filmora software.
Step2Press the “New Project” section and then access “Click to import media files.”

Add the image files, like GIFs, into the editor.

Step3Drag the files to the editing timeline. Use customization settings like Speed, Animation, Audio, Effects, etc., to edit the file.

Step4Click on Export > Local > Mp4. You can choose other video formats too.
Step5Add file information like saving location, name, and formatting specification.

Step6Click on the Export button.
Final Words
You can easily use one of the given tools to convert GIF files into varying image file types. There are fully online options like CloudConvert, and certain choices with a software version, like Online Convert. Try each at least once for the best results to know which fits your needs perfectly.
YouTube Algorithm Hacks 2024
Every day, more than 1 billion hours of YouTube videos are seen by users worldwide, including cat videos and videos for cats. The YouTube algorithm determines the videos YouTube recommends to its more than 2 billion human users (and untold numbers of feline users).

The subject of how to encourage YouTube’s algorithm to promote your videos and give you more likes is crucial for marketers, influencers, and creators alike.
We’ll discuss what the algorithm is (and isn’t), the most recent updates for 2022, and how experts use
YouTube’s search and discovery tools to push their videos in front of viewers in this blog post.
Let’s start!
Part 1. YouTube’s algorithm’s history
The YouTube algorithm: What is it? Let’s take a quick look at how YouTube’s algorithm has evolved through time and how it functions now in order to respond to your question.
2005 to 2011: Click-and-view optimization
In order to crowdsource footage of Janet Jackson and Justin Timberlake’s infamous Superbowl performance, according to YouTube founder Jawed Karim (a.k.a. the star of Me at the Zoo), YouTube was established in 2005. Therefore, it should not be surprising that YouTube’s algorithm for many years displayed suggested videos that had the most views or clicks. Unfortunately, this resulted in an increase in deceptive titles and thumbnails, or clickbait. User experience suffered as a result of videos that made viewers feel duped, dissatisfied, or just plain irritated.
2012: Watch time optimization
YouTube made changes to its recommendation engine in 2012 to account for the amount of time spent watching each video as well as the total amount of time spent on the site. According to theory, when people find videos important and engaging, they watch them for a longer period of time, possibly all the way through. Due to this, some creators tried to make their movies shorter to enhance the likelihood that viewers would watch them through, while others made their videos longer to boost overall viewing time. YouTube maintained the official line—create content your audience wants to watch, and the algorithm will reward you—while refusing to support either of these strategies. However, as anyone who has used the internet for any length of time can attest, not all time spent online is created equal. YouTube has adopted a new strategy.
2015–2016: maximizing fulfillment
In addition to emphasizing direct reaction metrics like Shares, Likes, and Dislikes (and, of course, the extremely cruel “not interested” button), YouTube started monitoring viewer happiness directly using user surveys in 2005. YouTube published a whitepaper titled Deep Neural Networks for YouTube Recommendations in 2016 that detailed some of the inner workings of its AI.
2016-present: demonetization, and brand safety
The size and popularity of YouTube have led to an increase in content moderation difficulties over time, and what the algorithm suggests is now a major topic for news outlets and the government in addition to creators and advertisers.
YouTube has stated that it takes seriously its obligation to promote a variety of viewpoints while limiting the spread of damaging false material. For instance, algorithm modifications implemented in the beginning of 2019 have reduced consumption of questionable content by 70%. (According to YouTube, borderline content is that which is harmful or misleading but doesn’t quite go against community standards. On the other hand, offensive material is taken down right away.)
Creators are impacted by this problem because they worry about unintentionally breaking the constantly evolving community rules and getting punished with strikes, demonetization, or worse. (In fact, enhancing openness for community norms for artists is one of YouTube’s priorities for 2021, according to CEO Susan Wojcicki.) Brands and advertisers are also impacted since they don’t want their name and logo to be associated with white nationalists.
Politicians in America are growing more concerned about the societal impact of social media algorithms like YouTube’s. Democrats introduced the “Protecting Americans from Dangerous Algorithms Act” in early 2021, and YouTube (and other platforms) have been called to testify before Senate committees about their algorithms. Let’s now discuss what is known about this hazardous beast’s mechanism.
Part 2. How will YouTube’s algorithm function in 2022?
The YouTube algorithm chooses videos for users with the intention of finding the most relevant content for them and keeping them interested. When we refer to “the algorithm,” we mean one of three selection or discovery techniques that are related but slightly different: three different algorithms: one that chooses videos for YouTube’s main page, one that ranks the results of any given search, and one that chooses what videos users should watch next are used.
According to YouTube, in 2022 the majority of channels’ top traffic sources would often be their homepage and suggested videos. With the exception of explainer or instructional films, which frequently receive the most traffic via search (e.g., “how to tune up a bicycle”)
Part 3. How is the algorithm set up on YouTube?
What ranking factors does YouTube consider when deciding which videos to display to users? Every traffic source varies a little. But in the end, a combination of factors including customization (the history and preferences of the viewer) performance (the success of the video) external variables (the overall audience or market)
Part 4. How YouTube determines its homepage algorithm
The YouTube algorithm presents a wide selection of videos that it thinks a user might like to view every time they open the YouTube app or type in youtube.com. Because the computer hasn’t yet determined what the viewer wants—acoustic versions of popular songs, for example—this selection is frequently broad. talks that are motivating against procrastination? to watch their preferred possum vlogger? Two categories of ranking signals are used to determine which videos appear on the homepage:
Performance:
YouTube gauges performance using indicators including the click-through rate, typical viewing time, typical percentage of views, likes, and disapproval ratings from viewers. After you upload a video, the algorithm initially displays it to a small number of users on their homepage. If it appeals to, engages, and satisfies those viewers (i.e., they click on it, watch it through, like it, share it, etc.), then it is then presented to an increasing number of users on their homepages.
Personalization:
However, the trending tab does not include YouTube. According to their past activity, also known as their watch history, or personalization, YouTube suggests videos to users based on what it believes are relevant to their interests. More of the same will be presented to a user if they frequently watch a particular channel or show they have an interest in. This element is also responsive to behavioral alterations throughout time as a person’s affinities and interests change.
Conclusion
It’s a fallacy that the algorithm would penalize you for publishing too regularly or insufficiently frequently, even if YouTube undoubtedly promotes the idea of uploading constantly in order to develop and maintain a relationship with your audience. The growth of the audience is unrelated to the interval between uploads. The zeitgeist can change quickly, but by keeping an eye on Google Trends and giving yourself opportunity to explore, you won’t fall behind.
Free Download For Win 7 or later(64-bit)
Free Download For macOS 10.14 or later
Free Download For macOS 10.14 or later
How to Upload Videos to Twitch? Here’s a Guide for Beginner
Recently, Twitch announced that its users can now upload video to Twitch, and there is no need to broadcast or live stream on Twitch anymore. Uploading videos to Twitch can be an excellent way to share your videos with your audience.

Besides this, you don’t need to upload videos on other video-sharing sites. But if you are using this platform for the first time, then you must be wondering how to upload video to Twitch. Don’t worry, as we have got your back. Keep reading to explore the process, and it is quite easy.
Part 1: How to Upload Videos to Twitch?
- First of all, you need to open Twitch in any browser. Just type twitch.tv in the browser’s address bar and click on Enter. Then you need to log into your account.
- Once done, you can see your account with your profile picture in the screen’s top-right corner. You can find it next to the Get Bits option. Click on it to access the drop-down menu.
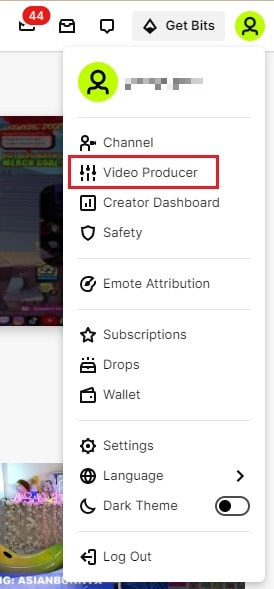
- Then you need to choose the Video Producer option available in the drop-down menu. A new page will open, and you can see the Creator Dashboard from where you can begin uploading your video or hosting a channel on twitch. If this option is unavailable, then you can’t upload your videos.
- Now, you need to click on the upload option. If you have not uploaded any video, you will find this area blank. You can just drag and drop your desired video to upload video to twitch.

- Choose the video that you want to upload and click on the Open option.
- Now, the upload process will begin. Wait for a few seconds to finish the process. Once done, click on the video, and the details window will come up.
- Here you need to edit your video’s metadata information. You can set a title, the category and a description for your video. Besides you can also edit the language and thumbnail here.
- After that, you can click on the Save Changes option that you can find in the upper right corner.
- Now you need to click on the Publish button to post your video on your channel. You can follow the process while hosting a channel on twitch to upload the videos.
Part 2: Why can’t you upload videos to twitch?
Well, it may be noted that not all Twitch users can upload video to twitch. For now, this feature is only available for Twitch partners and affiliates. So, first, you need to become an affiliate or partner, and then you can easily upload your videos. Besides, you should also keep the video upload guidelines in mind to avoid any issues.
- You can only upload video formats like 1080P videos, videos with up to 190mbps bit rate. The platform supports FLV, MOV, AVI and MP4 file formats.
- Besides, using one account, you can upload only 5 videos simultaneously. And within 24 hours, you can do a maximum of 100 uploads.
Now you know that only Twitch partners or affiliates can upload video to twitch, it is crucial for you to know how to become a Twitch affiliate or partner. Have a look at the below-given section for your answer.
Part 3: How to be a twitch affiliate or partner?
In general, streamers on Twitch can’t earn money from their content, and they can only make money from donations. However, if you have more followers, consistent viewers and hosting a channel on twitch regularly, then you can try to become a Twitch affiliate or partner. Some benefits that you can enjoy with this are:
- You will be able to sell your games
- You can get subscriptions.
- You will enjoy chargeback protection.
- It will be easier for you to get Twitch Bits.
- You can now earn revenue through advertisements.
To become an affiliate on Twitch, first of all, you need to monetize your content, i.e., stream. Now, let’s have a look at some requirements to become an affiliate.
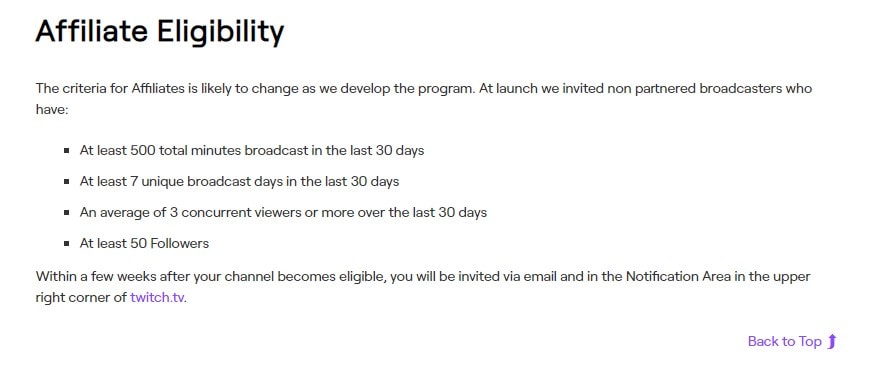
- You must have at least 50 followers.
- Make sure you have completed a minimum of 500 total minutes broadcast within one month or in the last 30 days.
- In the last 30 days, you should have at least seven unique broadcast days.
- At least 3 viewers per stream in the last 30 days.
Steps to Become an Affiliate
- Visit the Twitch website and log into your account.
- Find the Notifications icon and click on it.
- There you can see the Get Started option. Click on it.
- Sign the affiliate agreement and then give your tax information.
- Then choose your payment location to complete the procedure.
Requirements For Becoming a Partner
Once you receive your affiliate status, you can become a partner. But there are some requirements that you need to keep in your mind.
- You must have 75 average unique viewers per day in the last 30 days.
- Have streamed or hosting a channel on twitch for 12 days in the last 30 days.
- You need to stream for 25 hours in 30 days.
Steps to Follow
- Visit Twitch and log into your account.
- Now click on your Profile icon and then click on the Creator Dashboard option.
- Click on the arrow mark located near Insights and then click on Achievements.
- Click on the Apply option located under the Patch to Partner tab.
Once applied, Twitch will reply to your application within 7 business days. Well, if you face rejection, then you need to build a stronger audience and apply for it again later.
What Do You Mean Stay Active?
Chat is an important part of Twitch, and it lets you interact with your fellow members of the community as well as streamers. By keeping your chat active, you can let others know that you are ready to interact with them. This, in turn, can help you to increase your followers.
Part 4: What’s The Alternative to Twitch for Creators?
1. YouTube Gaming
Well, even though YouTube Gaming lacks in-game overlays, it offers other features. The platform offers live gaming broadcasts, channels, chat rooms and more. Here the viewers don’t need to subscribe to watch the content.
2. Smashcast
If you are a gaming fan, you must have heard about Hitbox and Azubu. They came together to form Smashcast. This provides the users with perfect JavaScript and HTML integration. If you are a gaming partner, esports team, viewer, organizer or streamer, then this platform will be an excellent option for you. Compared to Twitch, Smashcast offers better quality esports streams.
3. Facebook Gaming

Facebook also has introduced its own gaming and streaming platform. Facebook Gaming comes with an easy-to-navigate interface. It has a chat room and also allows you to watch videos from different social media platforms, like Twitter, Instagram, and YouTube. Besides, it offers some amazing features, such as different monetization options, interactive live-streaming, simple streaming setup, stream analytics and more.
4. DLive
While YouTube and Twitch have some high bars for monetization, they don’t offer sufficient profit to the creators. DLive is here to solve that issue. This platform rewards content creators as well as viewers. It charges a flat fee and takes around 20 percent of total revenue. On the other hand, viewers also get rewards for their engagement.
5. Ustream
This platform offers more than just gaming video streams, such as sports news, live streams, talk shows, podcasts and more. Some reviews say Ustream provides users with a better and faster streaming service. Besides, it is available for different platforms, such as PS4, Mac, Windows, iOS, and Android.
6. Vimeo

Vimeo has all the features, such as a live chat system and other features that a streaming platform must have. You can easily access its analytic dashboard to know your audience in a better way. It also has many integrations such as Figma, Meta, WordPress, Shopify and more. So, uploading videos directly from your website to Vimeo will not be a challenging task.
FAQs
How Long Do My Videos Stay on Twitch?
The answer is that it depends. If you are a Twitch Prime user, Turbo user or a Twitch partner, then once you upload video to twitch, it will stay for 60 days. For regular broadcasters, their videos will remain active for 14 days. Just follow the above-mentioned steps to successfully upload your videos.
Can I Upload Videos to Twitch?
You can upload your video to twitch if you become a Twitch affiliate or Partner. Regular streamers don’t have this feature for now. Just meet the criteria required for this and apply for an affiliate. This can be a great way to promote your brand as you can leverage this amazing form of influenced marketing.
Free Download For Win 7 or later(64-bit)
Free Download For macOS 10.14 or later
Free Download For macOS 10.14 or later
Want to Add a Motion Blur Effect to Your Photos? This Step-by-Step Tutorial Will Show You How to Use GIMP Software to Get the Effect You Want
GIMP is a cross-platform image editing software that you can use to edit photos and create graphics. The software is available for Linux, Windows, and macOS and can add a motion blur effect (A sense of movement in the photo), making your pictures look more realistic and professional.
So to help you tone your skills, we’ve written a comprehensive guide on how to apply the GIMP motion blur effect to your photos!
Part I. What Is GIMP?
GIMP software, a GNU Image Manipulation Program, is an open-source raster graphics editor used for image editing and retouching, converting between different image formats, free-form drawing, and more.
GIMP is frequently used as a Photoshop alternative. The software boasts a wide range of features, including support for layers, masks, color management, and third-party plugins.
Key Features
Here are some key features of the GIMP software:
- Quickly hide panels and menus to let you switch to a full-screen mode to preview pictures
- Fixes distorted images
- Available for Windows, Linux, Mac OS, and other operating systems
- Automatic image enhancement tool
- Lets you remove all the panels and tools from the workflow except the one you are working with.
- Released under a license called GNU General Public License v3 and later, which makes it free to use and distribute
- Add overlays and crop or resize an image
- Wide range of file formats that it can read and write, making it a versatile tool for working with images
Part II. How To Add The Motion Blur Effect To Your Photos in GIMP?
Below we’ve provided the step-by-step tutorial to add a motion blur effect to your photos in GIMP:
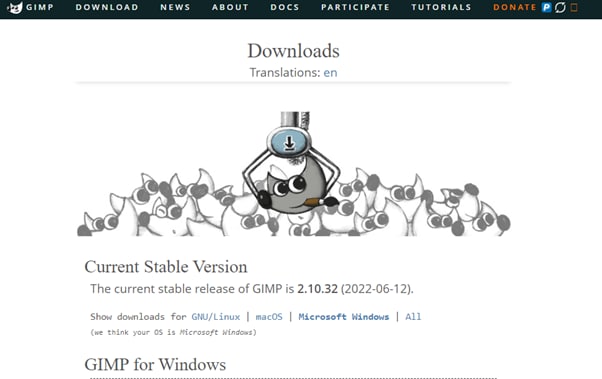
Step1 In the first step, launch a browser on your device, head to the GIMP website , and download the installation file according to your operating system. Now, click the downloaded installer, install the software on your system and launch it.
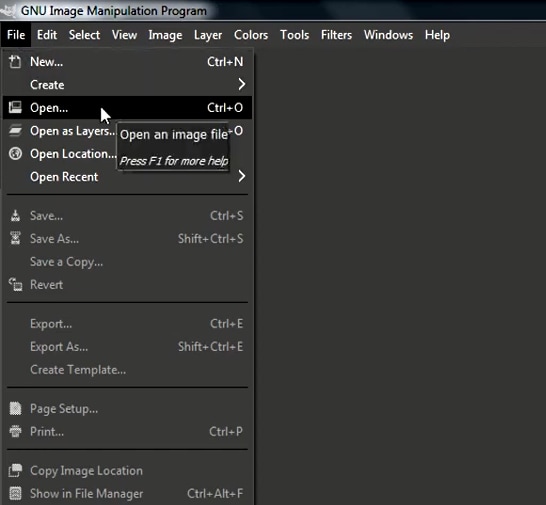
Step2 In the next step, click “File” on the GIMP dashboard, and select “Open” to access the Open Image window. Select your image file from your system and click “Open” to import the file.
Step3 Next, click the “Filters” option from the top toolbar, select “Blur,” and choose “Motion Blur” from the drop-down menu. A dialogue box will now open where you can preview the effect and adjust the settings, including Blur Type, Blur Center, and Blur Parameters.
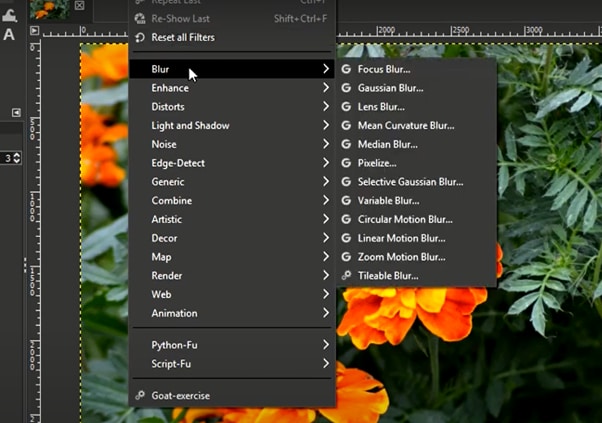
Step4 Once you are satisfied with your changes, click “OK” to apply the effect to the image, and make some other edits if needed. Finally, click “File” from the top toolbar, choose “Export As,” click “File Type” to select the format, and select the “Export” option to save your file.
Bonus Tips – The Alternative To GIMP To Create Motion Blur Effect
GIMP is a popular image editor that you can use to create motion blur effects. However, some users find it difficult to use the software for this purpose.
To simplify the process, we recommend using Wondershare Filmora an all-in-one editing software that offers multiple advanced features to help you quickly enhance your project.
Free Download For Win 7 or later(64-bit)
Free Download For macOS 10.14 or later
Here’s why Filmora is the best alternative to GIMP for creating motion blur effects:
- A user-friendly interface where you can quickly create the motion blur effect without spending hours learning the process
- Advanced video editing tools, such as keyframing, speed ramping, green screen, title editing, motion tracking, screen recorder, and preset templates
- Royalty-free music library where you can access millions of music and soundtracks
- Adds the motion blur effect to your videos as well as images
- Comes with multiple parameters to adjust the effect on your clip or image
To add the radial blur effect to images using Filmora, here are the quick and easy-to-follow steps:
Step1 Download the Filmora software on your PC, launch it, and click “Create New Project” on the main panel. Use the “Click Here to Import your Media File” option to import your photo and drag and drop it into the timeline.

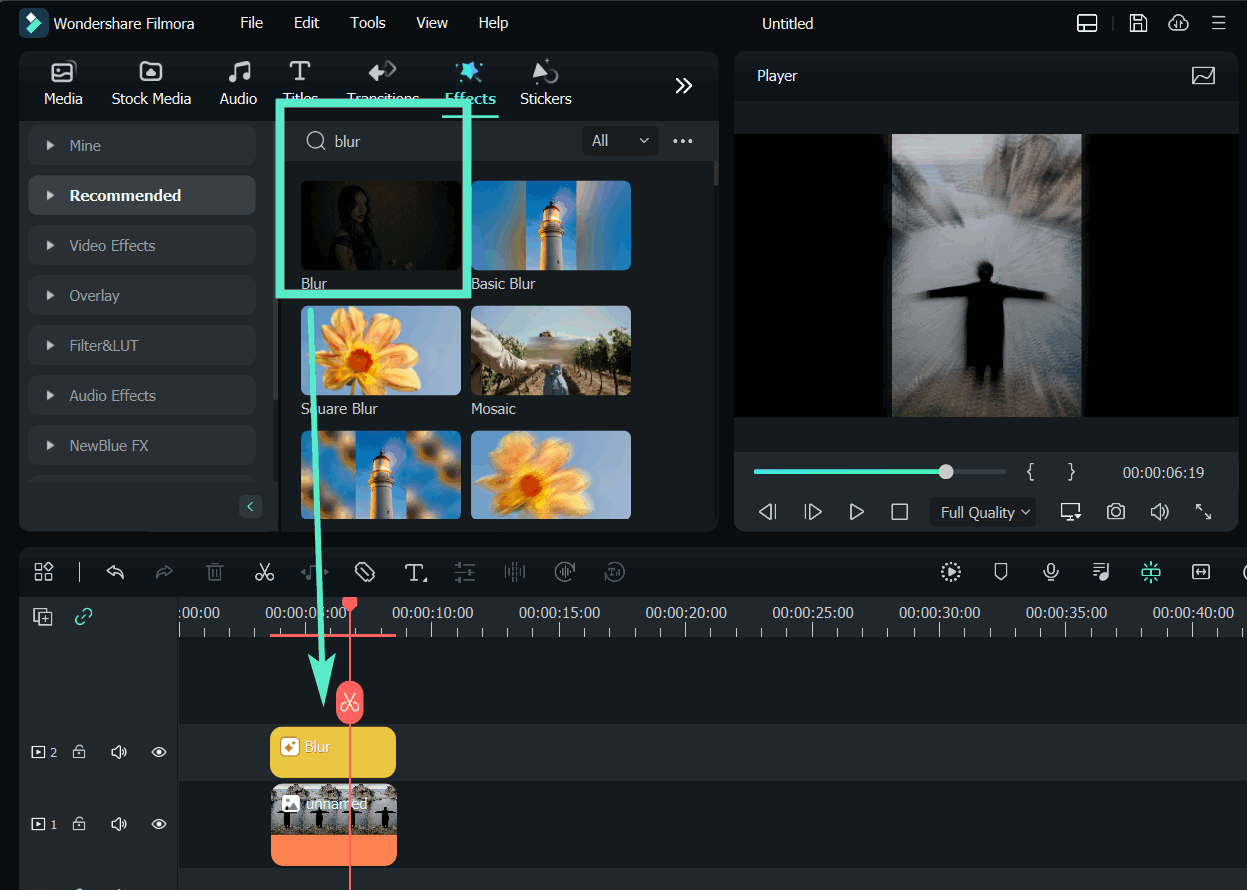
Step2 Now, head to the “Effects” tab from the taskbar. Use the search option to find the Blur effect. Afterward, drag & drop it in the timeline and adjust it on your selected clip.
Step3 Please note that motion blur is now a dynamic effect on the image. That means you can add multiple photos and make them into a slideshow with a blur effect transition. Or, press the “Play” icon to preview your photo and pause the clip where you think motion blur works best.
Step4 Click the effect in the timeline to open its settings. Now, play your clip to preview and adjust the parameters as you want to smooth down the motion effect.
Step5 Once satisfied with the outcome, click the “Export” option, go to the “Local” tab, select a file format to save the images, and click “Export” again to save your project.
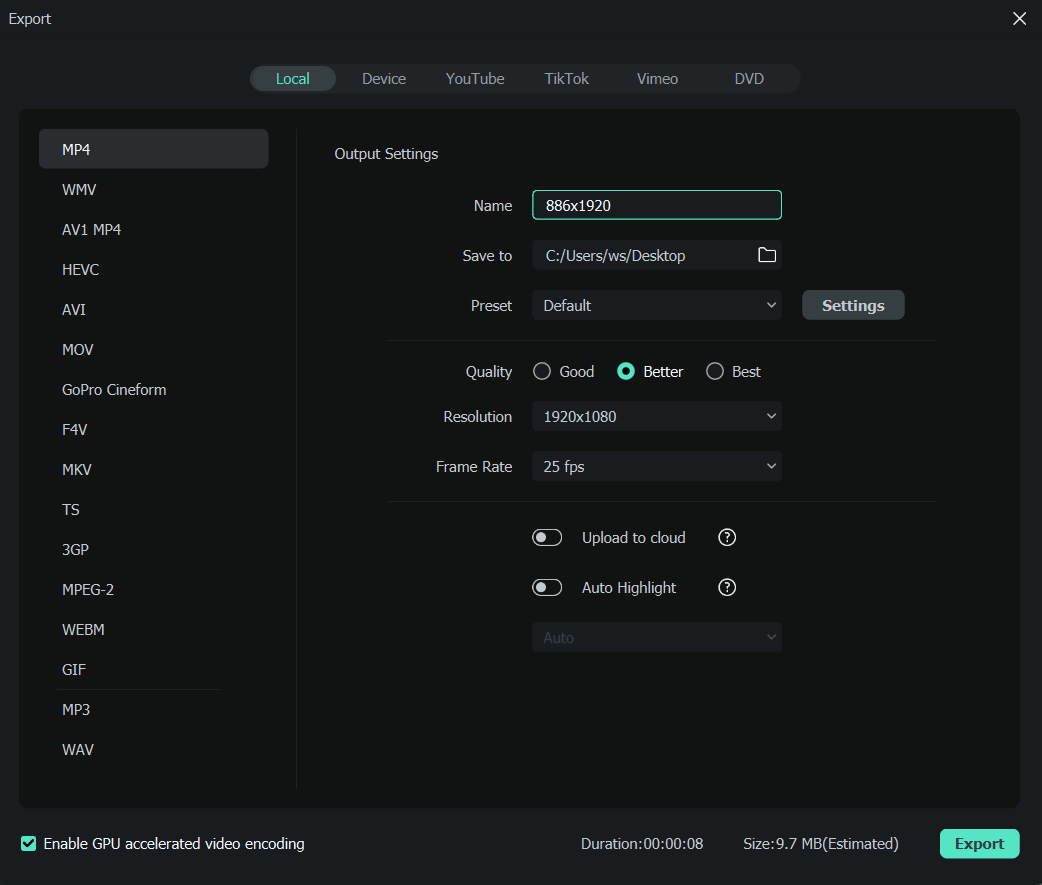
Filmora offers many export options, such as your device, YouTube, Vimeo, and DVD, with just a few clicks.
Last Words
In this detailed tutorial, we’ve discussed what GIMP is and its key features. We’ve provided a step-by-step guide to walk you through the process of creating the motion blur effect using the GIMP software.
In addition, we’ve provided a bonus tip to recommend Filmora as the best alternative to GIMP for creating the motion blur effect.
Hopefully, you found this article helpful in resolving your queries, and you can now add a smooth motion blur effect to your images.
Free Download For macOS 10.14 or later
Here’s why Filmora is the best alternative to GIMP for creating motion blur effects:
- A user-friendly interface where you can quickly create the motion blur effect without spending hours learning the process
- Advanced video editing tools, such as keyframing, speed ramping, green screen, title editing, motion tracking, screen recorder, and preset templates
- Royalty-free music library where you can access millions of music and soundtracks
- Adds the motion blur effect to your videos as well as images
- Comes with multiple parameters to adjust the effect on your clip or image
To add the radial blur effect to images using Filmora, here are the quick and easy-to-follow steps:
Step1 Download the Filmora software on your PC, launch it, and click “Create New Project” on the main panel. Use the “Click Here to Import your Media File” option to import your photo and drag and drop it into the timeline.

Step2 Now, head to the “Effects” tab from the taskbar. Use the search option to find the Blur effect. Afterward, drag & drop it in the timeline and adjust it on your selected clip.

Step3 Please note that motion blur is now a dynamic effect on the image. That means you can add multiple photos and make them into a slideshow with a blur effect transition. Or, press the “Play” icon to preview your photo and pause the clip where you think motion blur works best.
Step4 Click the effect in the timeline to open its settings. Now, play your clip to preview and adjust the parameters as you want to smooth down the motion effect.
Step5 Once satisfied with the outcome, click the “Export” option, go to the “Local” tab, select a file format to save the images, and click “Export” again to save your project.

Filmora offers many export options, such as your device, YouTube, Vimeo, and DVD, with just a few clicks.
Last Words
In this detailed tutorial, we’ve discussed what GIMP is and its key features. We’ve provided a step-by-step guide to walk you through the process of creating the motion blur effect using the GIMP software.
In addition, we’ve provided a bonus tip to recommend Filmora as the best alternative to GIMP for creating the motion blur effect.
Hopefully, you found this article helpful in resolving your queries, and you can now add a smooth motion blur effect to your images.
Also read:
- [New] 2024 Approved Optimizing ScreenCapture Techniques for Maximum Results
- [New] Mastering Online Image Cropping Techniques for 2024
- [New] Stepwise Process of Animated Image Crafting (GIF) for 2024
- [Updated] 2024 Approved Guide to Reinventing Facebook Video Coverages Step-by-Step
- 10 Best Sites to Download Free Slideshow Templates for 2024
- 2024 Approved Becoming a Master of Instagram Auditory Aesthetics
- 2024 Approved How to Create One Click Video Reverse Effect in Filmora
- New 2024 Approved How to Comment on YouTube Live Chat
- New How To Create Quiz Videos Detailed Guide for 2024
- New In 2024, Add Selective Color Effect to Your Videos Using Filmora
- Perfecting Your Video with Story Remix & Windows Photos
- The Elder Scrolls V: Unveiling Skyrim for Nintendo Switch – A Must-Play Adventure!
- Top Techniques for Applying Emojis and Graphics in Videos
- Ultimate Fix for Continuous Minecraft Game Crashes: A 6-Step Solution
- Updated 2024 Approved Competitive Guide To Use Slow Motion in After Effects
- Updated 2024 Approved Do You Want to Use a Professional Tool to Add Subtitles? Read This Article to Discover the Best Reliable Tool to Create Subtitles in Your Desired Manner
- Updated 2024 Approved How to Make Falling Text Effect in Filmora?
- Updated In 2024, What Are The Stages Of Film Production
- Updated Master Premiere Pro Custom Sequence Presets for 2024
- Title: Using One of the Best Converter Tools to Turn GIFs Into PNG or JPG. Here, Learn About the Ten Best Ones for Different Operating Systems, with Details on Features, Prices, and More
- Author: Morgan
- Created at : 2024-10-01 01:17:34
- Updated at : 2024-10-05 23:07:59
- Link: https://ai-video-editing.techidaily.com/using-one-of-the-best-converter-tools-to-turn-gifs-into-png-or-jpg-here-learn-about-the-ten-best-ones-for-different-operating-systems-with-details-on-featur/
- License: This work is licensed under CC BY-NC-SA 4.0.