:max_bytes(150000):strip_icc():format(webp)/GettyImages-1065028028-8e770c58918e4cf8b0852e81cff60ed6.jpg)
Vlogs and Travel Content Are Incomplete without a Fast-Motion Effect. Learn Step-by-Step How to Make Fast Motion Video on an iPhone in This Article

Vlogs and Travel Content Are Incomplete without a Fast-Motion Effect. Learn Step-by-Step How to Make Fast Motion Video on an iPhone in This Article
Fast motion has always been a time saver since it covers the unnecessary details in seconds. Acquiring this skill is important if you are a content creator or videographer. You might already be aware of how to make fast-motion videos on iPhone.
However, if this is unheard of or you are new to video editing, we’ve got you covered. This article covers the ins and outs of how to make a video fast-motion iPhone. In addition, users can gain insights into some applications and their guides. Moreover, we’ll discuss an AI alternative to those applications.
Slow Motion Video Maker Slow your video’s speed with better control of your keyframes to create unique cinematic effects!
Make A Slow Motion Video Make A Slow Motion Video More Features

Part 1: What are the Different Use Cases of Fast-Motion Videos?
The fast motion effect covers multiple creative ways of speed increase that you can incorporate. All these ways apply to different genres of videos. This section diverts your focus on different use cases of fast-motion videos. Here is how to make video fast motion on iPhone for different purposes:
1. Construction and Development Videos
Fast-motion videos help in video creation where development is happening. Such videos show the before and after results of an area, location, or building. The construction or manufacturing process is shown in fast motion in engineering videos. It also helps in showing the transformation of a non-populated or undeveloped city.
2. Nature Photography or Documentaries
Natural phenomenon like the blooming of a flower usually occurs at a slower rate. Capturing them takes a long time, but the audience may not like such a long duration. Hence, editors can increase the speed of such videos to speed up the phenomenon. In addition, if you watch wildlife or nature documentaries, they also use this effect.
3. Aesthetic Expression
Fast-paced videos bring a sense of creativity to your videos as they are an artistic expression of time. To indicate the passing of time in movies or to show a scene at a railway station or airport. It also indicates that the filmmakers and editors have put in an effort.
Part 2: Different Tools to Help You Make Fast Motion Video on iPhone
Fast-motion tools are important in video editing since they offer a chance at creativity. They have a wide range of applications in the filmmaking and media industry. Do you know how to make a video fast-motion iPhone using a third-party application? If not, here is a detailed guide on some of them:
1. iMovie
If you are looking for an accessible application with an easy-to-use interface, this is for you. The process of speed manipulation consists of a slider for control. After editing, you can integrate multiple soundtracks from 130 pre-assembled tracks. The application is compatible with iPhone X and newer versions.
Steps to Create a Fast Motion Video Using iMovie
Do you want to learn how to make fast-motion videos on your iPhone with this application? Given Below is your perfect guide to crafting a fast-paced video:
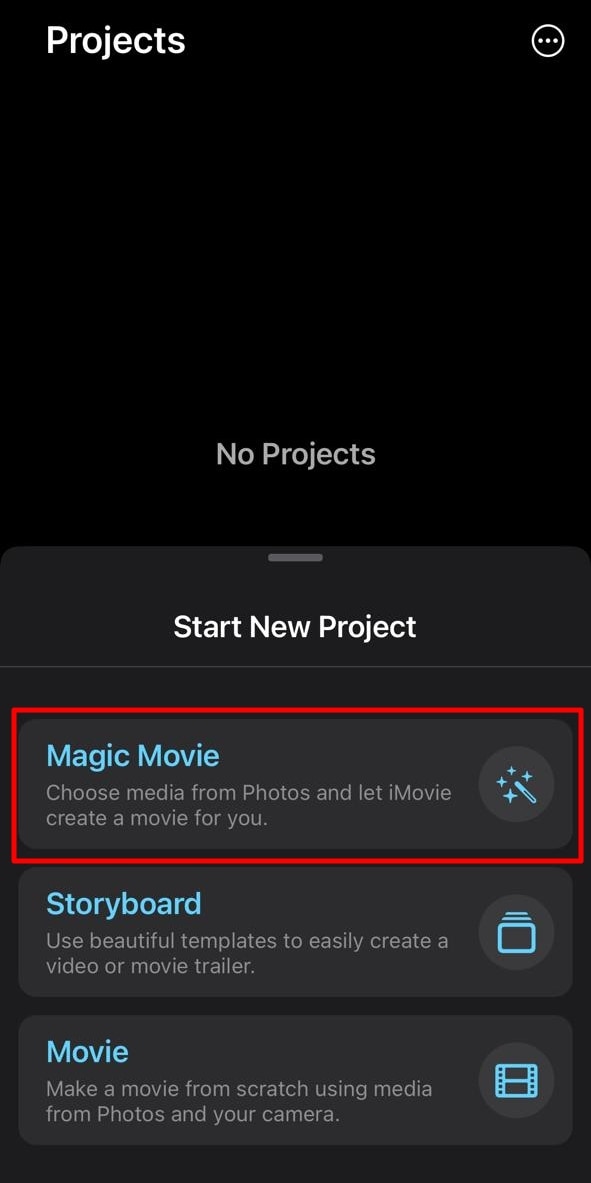
Step 1: After downloading the application on your iPhone, access it and “Start New Project.” Then, select a video from your media library to edit.
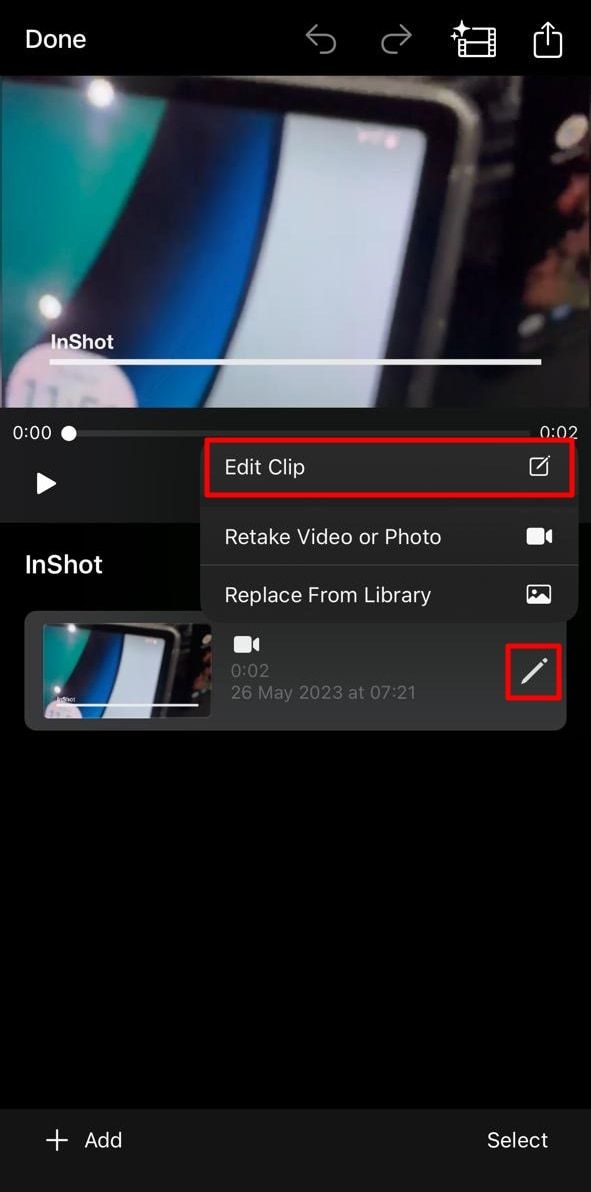
Step 2: After importing the video, click the “Pen” icon to access editing options. Then, click the “Edit Clip” option to do so.
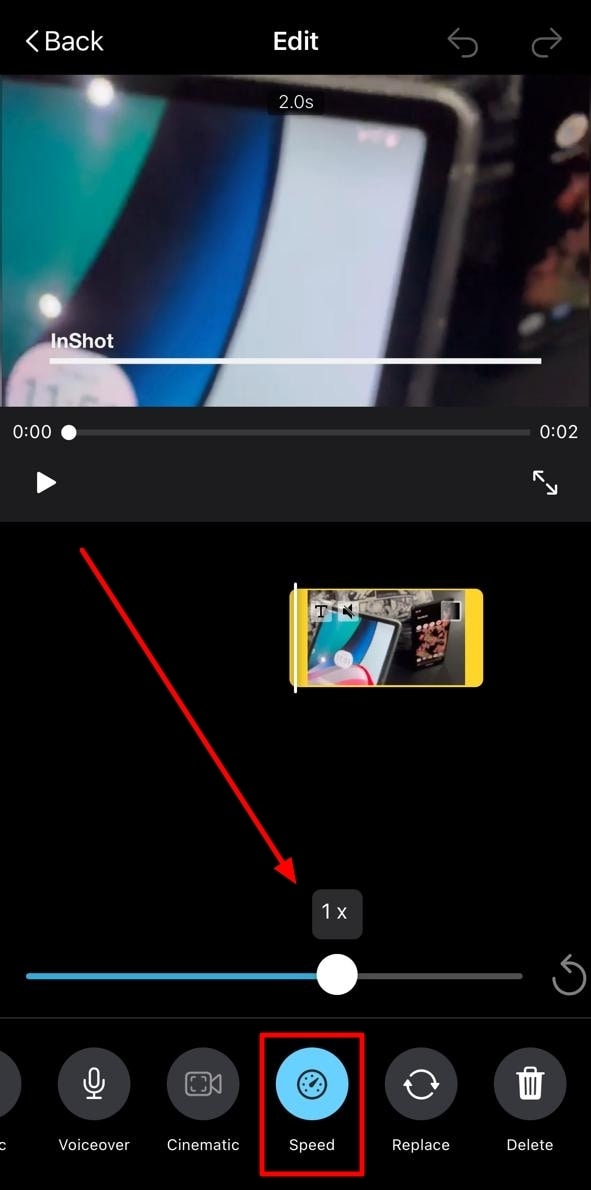
Step 3: Move to the bottom of the screen and slide the given option to access “Speed.” Click it and drag the speed slider towards the right side to increase the speed of the video.
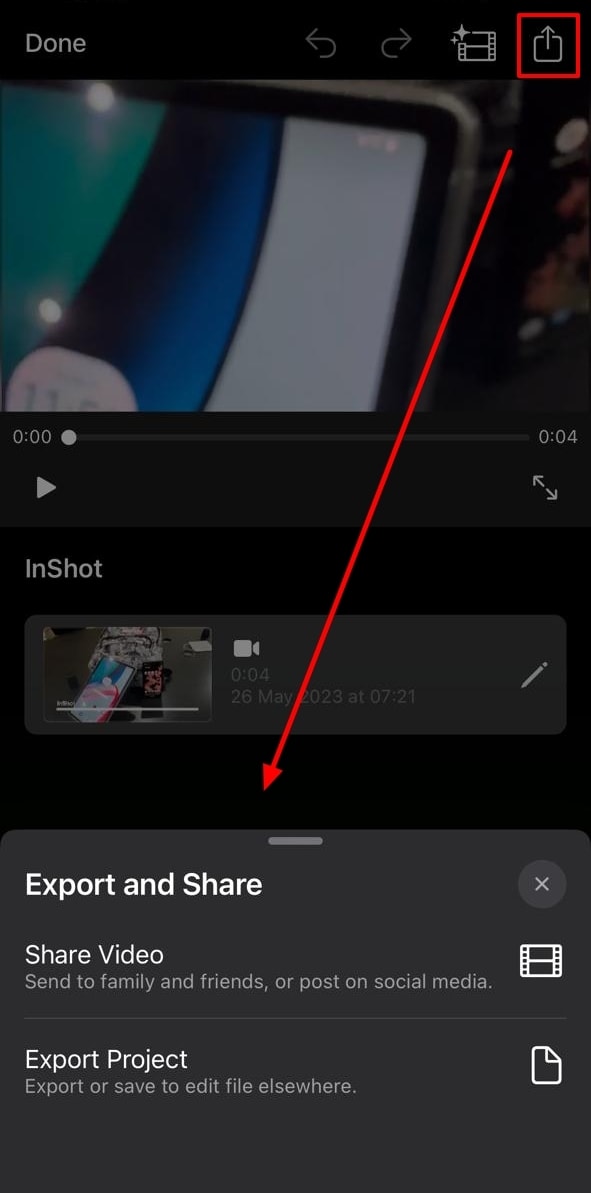
Step 4: Hit the “Play” button to see the speed of the video and re-adjust if required. Go to the top right corner of the screen, locate the “Export” icon, and click it.
2. Video Speed Changer – Editor
Want to learn how to make video fast motion on iPhone without additional technicalities? This application ensures a comprehensive narrative just for speed change. Users can formulate 3 fast motion effects with it at specific frames. For pre-recorded or new videos, it offers Time Wrap, Time Lapse, and Hyper-lapse. The application has been found to support iOS 12.3 and later versions.
Steps to Create a Fast Motion Video Using Video Speed Changer
Multiple applications provide similar services, but none can compare to its UI. Here is how to make a video fast motion iPhone using this
Step 1: Access this application from the App Store and launch it after installation. Click on the “Select Video” button and import a clip.

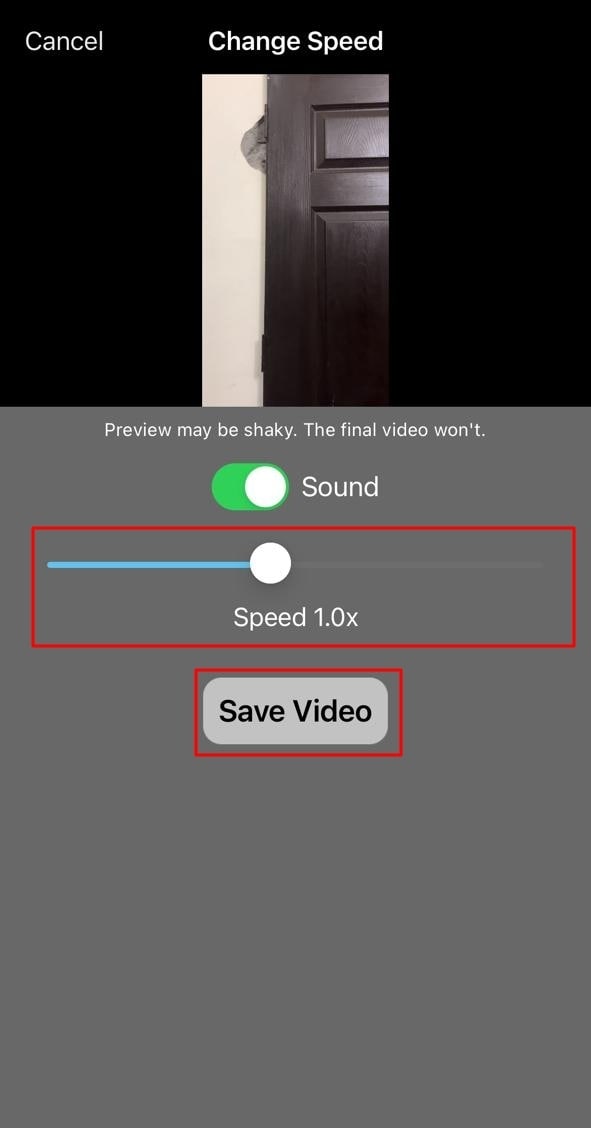
Step 2: Once you have selected a video, it will take you straight to the speed change option. Change the position of the given slider. Finally, preview the video and click the “Save Video” button to save it on your device.
3. Slow Motion Video FX Edit
Although the name indicates otherwise, this video editor is capable of high-speed change. It comes with an intuitive user interface and is easy for anyone to employ. In addition to speed alteration, you can insert 40 different filters into your video. You can also commence its freeze frame action to add an extra layer of creativity. The tool is compatible with iOS 13.0 and higher versions.
Steps to Create Fast Motion Using Slow Motion Video FX
This is another editor to gain insights on how to make fast-motion videos on an iPhone. We have given the verified step-by-step guide to using this app:
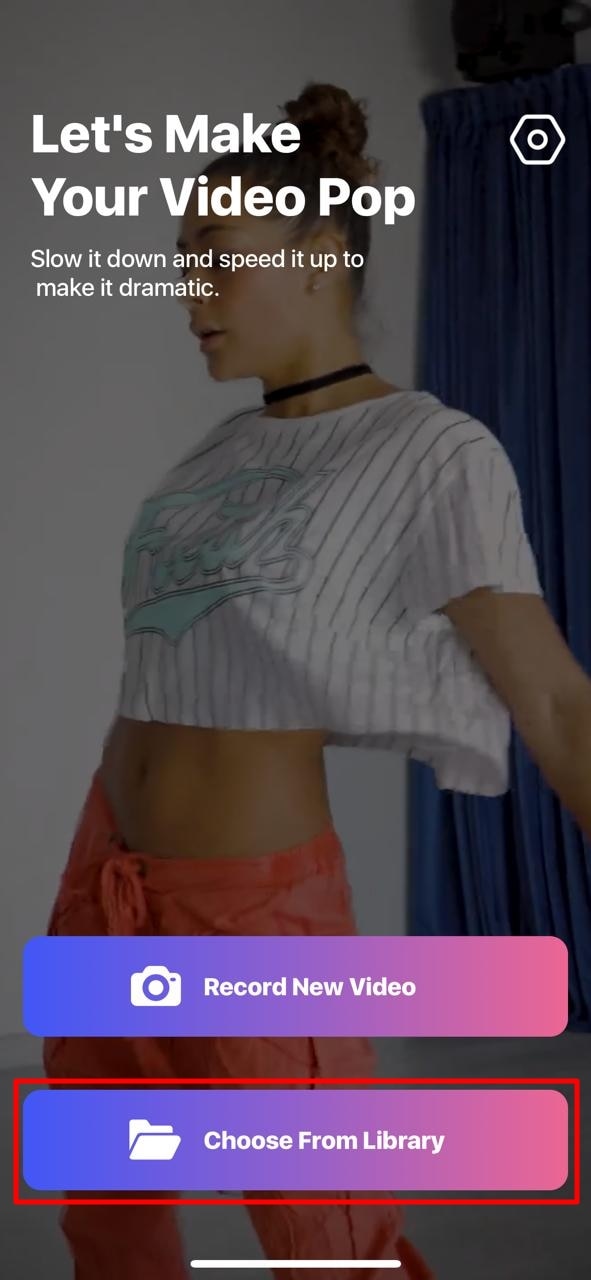
Step 1: After launching this application, click the “Choose From Library” option. Then, select a clip from your device’s gallery.
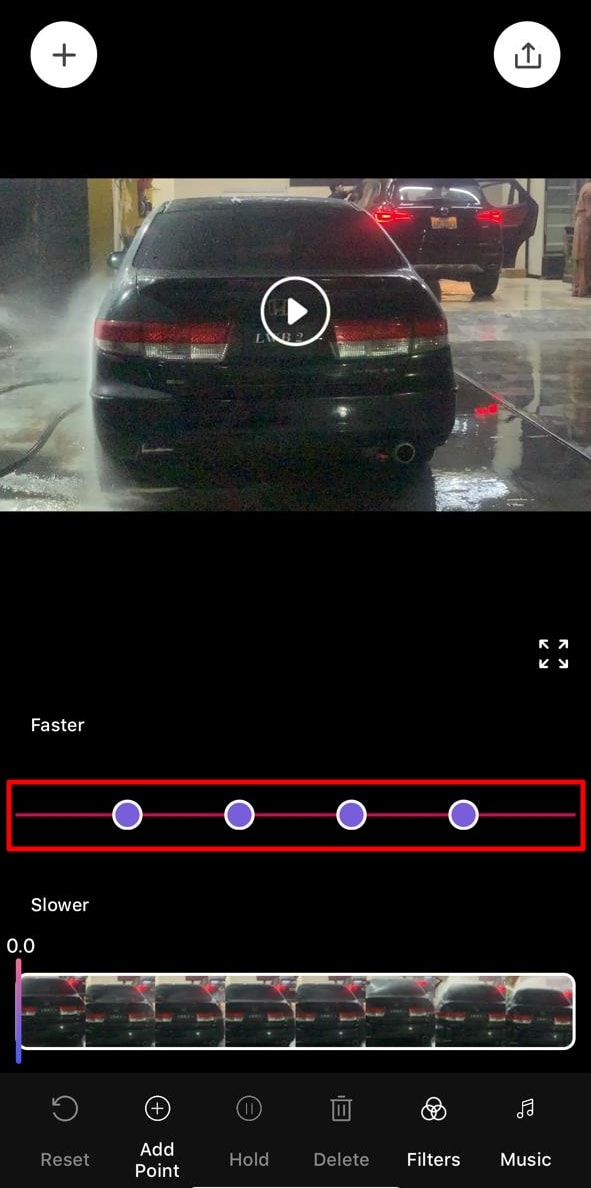
Step 2: Once the video is compressed, you’ll be taken to the speed change screen. From there, you can alter the speed of different clip sections. Move the slider of the relevant section upward to increase the speed.
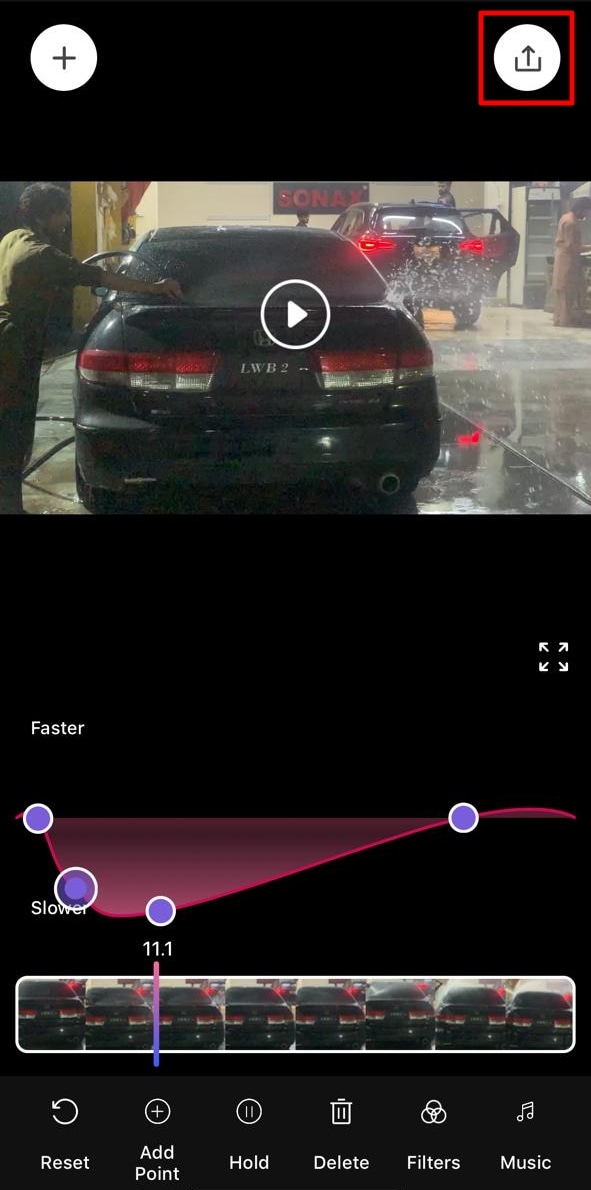
Step 3: Once you have altered the speed, navigate towards the top right corner and click the “Export” icon.
Part 3: Desktop Solution: Remedy for Those Who Want to Speed Up Video on Their Computer
If you have gone through the above applications, you know the fast-motion effect. Do you want to know how to make a video fast motion on an iPhone using a computer? Wondershare Filmora is the best alternative to the above applications for creating this effect. The software is compatible with all the macOS and iOS devices and allows seamless editing.
With this editor, you get multiple options to create a fast-motion video. In this article, we will use the Uniform Speed feature. The operating process is very accessible and designed to assist both professionals and beginners. You can also apply the AI Frame Interpolation option to apply “Frame Bending.”
Free Download For Win 7 or later(64-bit)
Free Download For macOS 10.14 or later
Step-by-Step Guide to Speed Up Video with Filmora
After reading the article till now, you have gained knowledge of Filmora’s speeding options. How to make fast motion video on iPhone now seems like an easy option. Even though the process is easy, we want you to stay ahead. Hence, here is a step-by-step procedure for creating fast motion in Filmora:
Step 1Create a New Project and Import Media
First, connect your iOS device to your Wondershare Filmora device. After that, launch Filmora to access the main menu. From there, click on the “New Project” tab fashioned in the center. Expand the “Import” option in the Project Media section and select the suitable option. In this case, choose the “Import from Phone or Camera” option.

Step 2Access the Uniform Speed Section
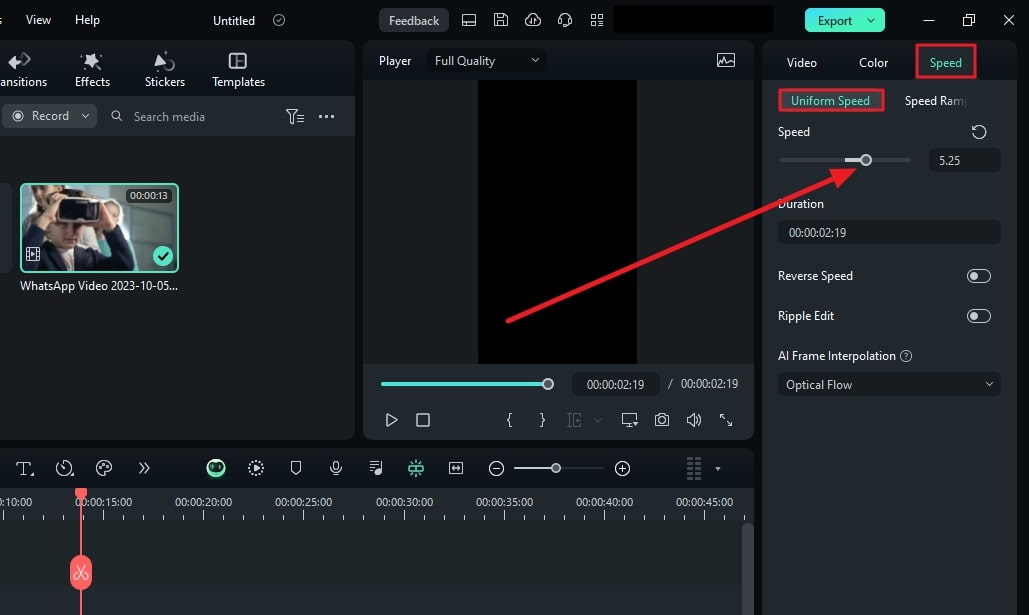
After bringing the imported media to the timeline, select it to access the settings panel. Select the “Speed > Uniform Speed” tab from the appeared panel. Then, drag the Speed slider on the right side to increase speed. Afterward, click the “Play” button on the preview screen to see the results.
Step 3Apply Frame Bending and Export
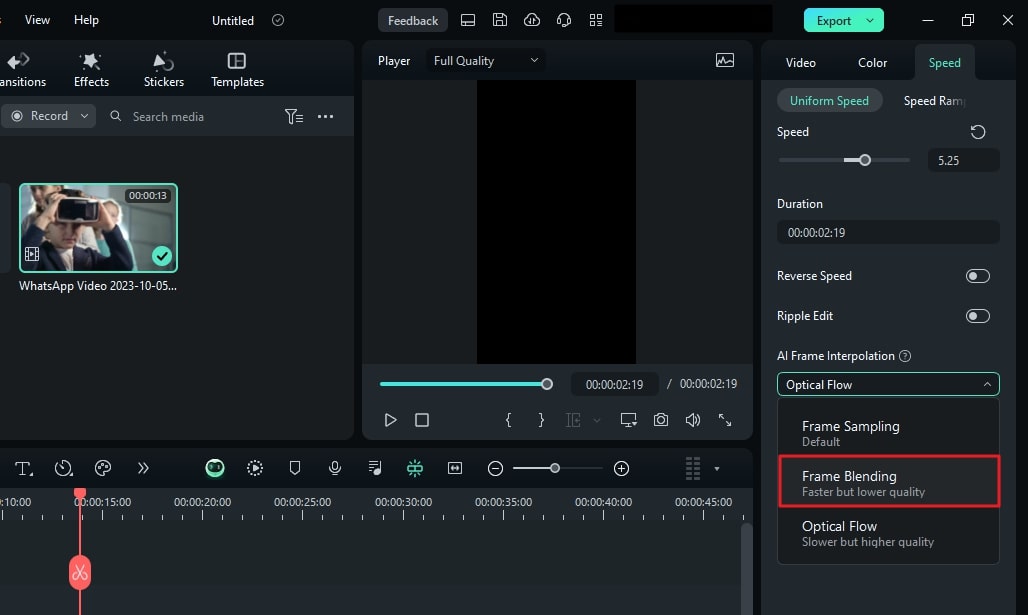
This part is optional, but if you find an irregularity or roughness to the video, apply this. Go to the “AI Frame Interpolation” section at the bottom and expand the options. From the dropdown menu, select the “Frame Bending” option and do the rendering from the timeline. After everything is set, select the “Export” button at the top right corner.
Trending Video Editing Features of Wondershare Filmora
Filmora is a versatile tool that is not confined to speed manipulation or fast motion only. This editor offers audio, text, AI editing options, and video. Here are some prominent key features of Wondershare Filmora to help you in editing:
1. Speed Ramping
The other option for speed modification mentioned previously is speed ramping. This option comes with 6 editable speed change presets for automated editing. However, you can also employ the custom preset to create your own way. Moreover, it allows the audio pitch option to enable automated maintenance of audio.
2. AI Smart Cutout
There is more than one way of removing and replacing a background in Filmora. Smart Cutout offers an AI-integrated masking option to cut out the selected parts. You can also set preferences for Edge Thickness or Edge Feather for accuracy. Afterward, you can introduce three background options: color, grid, or more.
3. AI Text-to-Video
Bring your imagination to visuals with this amazing generative AI video creator. It creates videos from text and covers the voice and graphical elements. Users can customize the AI voice and ratio before generating a video. The prompt section offers up to 1000 characters for adding a script or giving directions.
4. AI Smart Masking
Are there any effects or filters you want to introduce to only a specific part of the video? Use Filmora’s AI mask for automated masking of an object or background. The mask brush selects the relevant area on its own. Besides AI masks, there is a manual masking option or mask shapes to apply. You can also customize the Brush size according to the video.
Conclusion
The article highlighted the importance of increasing video speed in many industries. In addition, we discussed some tools that make fast motion with ease. We also provided step-by-step guides on how to make fast motion video on iPhone. Wondershare Filmora stands amongst all those applications to create fast motion. We recommend this software due to its multiple functionalities and detailed editing abilities.
Make A Slow Motion Video Make A Slow Motion Video More Features

Part 1: What are the Different Use Cases of Fast-Motion Videos?
The fast motion effect covers multiple creative ways of speed increase that you can incorporate. All these ways apply to different genres of videos. This section diverts your focus on different use cases of fast-motion videos. Here is how to make video fast motion on iPhone for different purposes:
1. Construction and Development Videos
Fast-motion videos help in video creation where development is happening. Such videos show the before and after results of an area, location, or building. The construction or manufacturing process is shown in fast motion in engineering videos. It also helps in showing the transformation of a non-populated or undeveloped city.
2. Nature Photography or Documentaries
Natural phenomenon like the blooming of a flower usually occurs at a slower rate. Capturing them takes a long time, but the audience may not like such a long duration. Hence, editors can increase the speed of such videos to speed up the phenomenon. In addition, if you watch wildlife or nature documentaries, they also use this effect.
3. Aesthetic Expression
Fast-paced videos bring a sense of creativity to your videos as they are an artistic expression of time. To indicate the passing of time in movies or to show a scene at a railway station or airport. It also indicates that the filmmakers and editors have put in an effort.
Part 2: Different Tools to Help You Make Fast Motion Video on iPhone
Fast-motion tools are important in video editing since they offer a chance at creativity. They have a wide range of applications in the filmmaking and media industry. Do you know how to make a video fast-motion iPhone using a third-party application? If not, here is a detailed guide on some of them:
1. iMovie
If you are looking for an accessible application with an easy-to-use interface, this is for you. The process of speed manipulation consists of a slider for control. After editing, you can integrate multiple soundtracks from 130 pre-assembled tracks. The application is compatible with iPhone X and newer versions.
Steps to Create a Fast Motion Video Using iMovie
Do you want to learn how to make fast-motion videos on your iPhone with this application? Given Below is your perfect guide to crafting a fast-paced video:
Step 1: After downloading the application on your iPhone, access it and “Start New Project.” Then, select a video from your media library to edit.

Step 2: After importing the video, click the “Pen” icon to access editing options. Then, click the “Edit Clip” option to do so.

Step 3: Move to the bottom of the screen and slide the given option to access “Speed.” Click it and drag the speed slider towards the right side to increase the speed of the video.

Step 4: Hit the “Play” button to see the speed of the video and re-adjust if required. Go to the top right corner of the screen, locate the “Export” icon, and click it.

2. Video Speed Changer – Editor
Want to learn how to make video fast motion on iPhone without additional technicalities? This application ensures a comprehensive narrative just for speed change. Users can formulate 3 fast motion effects with it at specific frames. For pre-recorded or new videos, it offers Time Wrap, Time Lapse, and Hyper-lapse. The application has been found to support iOS 12.3 and later versions.
Steps to Create a Fast Motion Video Using Video Speed Changer
Multiple applications provide similar services, but none can compare to its UI. Here is how to make a video fast motion iPhone using this
Step 1: Access this application from the App Store and launch it after installation. Click on the “Select Video” button and import a clip.

Step 2: Once you have selected a video, it will take you straight to the speed change option. Change the position of the given slider. Finally, preview the video and click the “Save Video” button to save it on your device.

3. Slow Motion Video FX Edit
Although the name indicates otherwise, this video editor is capable of high-speed change. It comes with an intuitive user interface and is easy for anyone to employ. In addition to speed alteration, you can insert 40 different filters into your video. You can also commence its freeze frame action to add an extra layer of creativity. The tool is compatible with iOS 13.0 and higher versions.
Steps to Create Fast Motion Using Slow Motion Video FX
This is another editor to gain insights on how to make fast-motion videos on an iPhone. We have given the verified step-by-step guide to using this app:
Step 1: After launching this application, click the “Choose From Library” option. Then, select a clip from your device’s gallery.

Step 2: Once the video is compressed, you’ll be taken to the speed change screen. From there, you can alter the speed of different clip sections. Move the slider of the relevant section upward to increase the speed.

Step 3: Once you have altered the speed, navigate towards the top right corner and click the “Export” icon.

Part 3: Desktop Solution: Remedy for Those Who Want to Speed Up Video on Their Computer
If you have gone through the above applications, you know the fast-motion effect. Do you want to know how to make a video fast motion on an iPhone using a computer? Wondershare Filmora is the best alternative to the above applications for creating this effect. The software is compatible with all the macOS and iOS devices and allows seamless editing.
With this editor, you get multiple options to create a fast-motion video. In this article, we will use the Uniform Speed feature. The operating process is very accessible and designed to assist both professionals and beginners. You can also apply the AI Frame Interpolation option to apply “Frame Bending.”
Free Download For Win 7 or later(64-bit)
Free Download For macOS 10.14 or later
Step-by-Step Guide to Speed Up Video with Filmora
After reading the article till now, you have gained knowledge of Filmora’s speeding options. How to make fast motion video on iPhone now seems like an easy option. Even though the process is easy, we want you to stay ahead. Hence, here is a step-by-step procedure for creating fast motion in Filmora:
Step 1Create a New Project and Import Media
First, connect your iOS device to your Wondershare Filmora device. After that, launch Filmora to access the main menu. From there, click on the “New Project” tab fashioned in the center. Expand the “Import” option in the Project Media section and select the suitable option. In this case, choose the “Import from Phone or Camera” option.

Step 2Access the Uniform Speed Section
After bringing the imported media to the timeline, select it to access the settings panel. Select the “Speed > Uniform Speed” tab from the appeared panel. Then, drag the Speed slider on the right side to increase speed. Afterward, click the “Play” button on the preview screen to see the results.

Step 3Apply Frame Bending and Export
This part is optional, but if you find an irregularity or roughness to the video, apply this. Go to the “AI Frame Interpolation” section at the bottom and expand the options. From the dropdown menu, select the “Frame Bending” option and do the rendering from the timeline. After everything is set, select the “Export” button at the top right corner.

Trending Video Editing Features of Wondershare Filmora
Filmora is a versatile tool that is not confined to speed manipulation or fast motion only. This editor offers audio, text, AI editing options, and video. Here are some prominent key features of Wondershare Filmora to help you in editing:
1. Speed Ramping
The other option for speed modification mentioned previously is speed ramping. This option comes with 6 editable speed change presets for automated editing. However, you can also employ the custom preset to create your own way. Moreover, it allows the audio pitch option to enable automated maintenance of audio.
2. AI Smart Cutout
There is more than one way of removing and replacing a background in Filmora. Smart Cutout offers an AI-integrated masking option to cut out the selected parts. You can also set preferences for Edge Thickness or Edge Feather for accuracy. Afterward, you can introduce three background options: color, grid, or more.
3. AI Text-to-Video
Bring your imagination to visuals with this amazing generative AI video creator. It creates videos from text and covers the voice and graphical elements. Users can customize the AI voice and ratio before generating a video. The prompt section offers up to 1000 characters for adding a script or giving directions.
4. AI Smart Masking
Are there any effects or filters you want to introduce to only a specific part of the video? Use Filmora’s AI mask for automated masking of an object or background. The mask brush selects the relevant area on its own. Besides AI masks, there is a manual masking option or mask shapes to apply. You can also customize the Brush size according to the video.
Conclusion
The article highlighted the importance of increasing video speed in many industries. In addition, we discussed some tools that make fast motion with ease. We also provided step-by-step guides on how to make fast motion video on iPhone. Wondershare Filmora stands amongst all those applications to create fast motion. We recommend this software due to its multiple functionalities and detailed editing abilities.
Best CapCut Templates for Slow Motion Video Trend
In this digital realm, CapCut is a video editor, turning into another social media app. It was launched in 2020 but gained massive success by the end of 2022 with the introduction of templates. It’s an automated tool which is a sister app to TikTok. When a TikTok trend goes viral, people move to CapCut to copy that as it is. From social media influencers to users, everyone is using this video editor for good.
Recently, the CapCut template’s new trend of slow motion has been in trend. If you intend to post a video on the CapCut new trend in slow motion, this guide is for you. Without any wait, read this article to learn everything about CapCut’s new slow-motion template. Before delving into detail, you should analyze how these templates have eased our video creation.
Slow Motion Video Maker Slow your video’s speed with better control of your keyframes to create unique cinematic effects!
Make A Slow Motion Video Make A Slow Motion Video More Features

Part 1. CapCut Video Editor: How Is It Making Slow Motion Video Making Easy?
As a social media user, you must be aware of CapCut ; if not, keep reading. CapCut is a video editing platform with advanced options to help you capture key moments. With unique features , your content can go viral on TikTok, Facebook, and Instagram. After making videos, users can directly post on their social media, especially on TikTok.
This software is available to use online or download on Windows, macOS, and smartphones. Delve into its key features besides the CapCut slow motion template with neon effect:
- CapCut can trim, merge, and delete clips like every other video editor.
- You can add transitions between clips from different categories.
- From advanced features, you can add keyframe animations in video.
- Offer millions of music from the music library or extract from existing video clips.
- With its intelligent features, users can remove backgrounds and add auto-captions.
- Allows smooth editing of slow-motion and fast-speed videos with speed ramping.
Part 2. Listing Out Some Unique Templates Available on CapCut for Slow Motion Video
CapCut has a vast library of templates, as discussed earlier. They contain well-designed video layouts, transitions, effects, and texts to inspire others. For slow-motion templates, it offers extensive options that you can choose based on your preferences. If you haven’t found anything attractive, look into these CapCut new slow-motion templates.
- Camera Lenta: It’s a trending slow-motion video template on the internet. As shown, it is used by more than 23k people and requires just one clip to process. This footage shows a blurry start, which gradually turns into a clear shot with music beats.

- Slow Motion: This template is popular with over 87k usages. It requires a single clip to make a video in a 9:16 aspect ratio. In this clip, a woman lip-syncs a song that reveals properly after a blurry transition into slow motion.

- CapCut Slow Motion: With more than 546k utilizations, this template is commonly available everywhere. You need 2 clips to use this, and an 11-second video will be generated. The massive use of this template might be due to its music, effects, and transitions.

- Slow Motion Transisi: Social media influencers prefer this template to show their dance moves. It requires 4 clips to make an attractive slow-motion video. At the start of the clip, you can see a countdown timer and a music beat with dance steps.

- Slow Motion Alih: If you want to reveal your mountain travel video, this template is perfect. This 11-second template is used by over 87k people. It starts with a musical voice and progresses at normal speed. Gradually, it slows down and shifts speed abruptly with the rhythm of the music.

- Slow Motion Izacklstyle: It’s another famous template that is perfect for your travel clips. This CapCut new trend 2022 template slow motion has more than 100k uses. It asks for 4 footage to show the natural beauty of nature, mountains, waterfalls, and you.

- Slow Motion JP: With 1.3 million uses, this template is widely recognized on social media. Actually, the kid smiling in this slow-motion video makes it popular. It is an 8-second clip where the boy is standing chin-down. Suddenly, the music’s rhythm and effect change when he looks upward.

Part 3. How to Create a Simple Slow-Motion Video from a Template in CapCut?
Making a CapCut template new trend in slow motion is not very difficult. For this purpose, you have to pick one template and select the media. After choosing a template from the above section, follow the given steps for better results. Regardless of the mobile device you are using, this step-by-step guide will prove beneficial for each.
Step 1
Launch CapCut on your smartphone and sign in to your account. Access the home screen of CapCut and look for the “Template” option from the bottom. Tap on it and find the vast video template library of this platform.

Step 2
Go to the search and prompt with “Slow Motion Video” to browse results. Pick one video template of your choice and get a preview. From its preview, hit the “Use Template” button and go directly to import media. Select the video you wish and touch the “Preview” button.

Step 3
After previewing results, go to the top right side and tap the “Export” button. You will get an extended “Export Setting” menu at the bottom. It’s up to you whether to choose “Save to Device” or Save and Share to TikTok.”

Part 4. Desktop Solution: How to Make Better Slow-Motion Videos with Wondershare Filmora?
Using CapCut’s new slow-motion templates makes videos easy but restricts certain tasks. If you want to enjoy more flexibility in creating slow-motion videos, use Wondershare Filmora . It’s a video editing platform with innovative features to uplift creativity with personalization. This all-in-all platform offers AI-integrated features to generate unique content effortlessly.
Filmora can assist you in editing tasks by providing AI Copilot Editing . Besides, it can generate engaging scripts with prompts that align with your goals. Moreover, you can get copyright-free music and images to achieve appealing virtual content. Filmora can bring limitless creativity and uniqueness to your media, so move to explore it.
Free Download For Win 7 or later(64-bit)
Free Download For macOS 10.14 or later
How to Create Personalized Slow-Motion Video with Filmora
Filmora offers Speed Ramping features to slow down video as you want. It also ensures smooth playback of slow-mo videos by providing an optical flow option. Let’s move to the real process with the given steps without further delay.
Step 1: Download Filmora and Import the Video to Slow Down
If you haven’t downloaded Filmora, visit its official site and get the latest version. Launch it on your device and access its main screen. Choose “New Project” and enter its editing screen. Press “Ctrl + I” to import your video into Filmora quickly. Drag and drop your imported media to the timeline section for further processing.

Step 2: Access Speed Ramping to Customize Video Speed
Locate your cursor on the video and right-click on it to choose “Speed Ramping” from the list. This way, you will get an editing panel on the right side. You have the flexibility to select a predesigned template for speed ramping. Otherwise, hit the “Customize” button and find the graph below. Use the graph and locate the dots upward and downward to get the desired slow-motion video.

Step 3: Apply Optical Flow and Export within Personalized Settings
Later, go downward to the “AI interpolation” and extend its menu. From the menu, select “Optical Flow” for a smooth playback speed. If you are satisfied with the result, look for the “Export” button at the top right. Get the “Export” screen and adjust the parameter to save the video in your assigned settings.

Conclusion
To conclude, social media influencers set trends using CapCut in real-time. They are getting the audience’s attention through the CapCut template’s new trend of slow motion. This article has also shed light on CapCut, its slow-motion templates, and how to use it. After reading, you must realize that using Wondershare Filmora is a far better option.
Make A Slow Motion Video Make A Slow Motion Video More Features

Part 1. CapCut Video Editor: How Is It Making Slow Motion Video Making Easy?
As a social media user, you must be aware of CapCut ; if not, keep reading. CapCut is a video editing platform with advanced options to help you capture key moments. With unique features , your content can go viral on TikTok, Facebook, and Instagram. After making videos, users can directly post on their social media, especially on TikTok.
This software is available to use online or download on Windows, macOS, and smartphones. Delve into its key features besides the CapCut slow motion template with neon effect:
- CapCut can trim, merge, and delete clips like every other video editor.
- You can add transitions between clips from different categories.
- From advanced features, you can add keyframe animations in video.
- Offer millions of music from the music library or extract from existing video clips.
- With its intelligent features, users can remove backgrounds and add auto-captions.
- Allows smooth editing of slow-motion and fast-speed videos with speed ramping.
Part 2. Listing Out Some Unique Templates Available on CapCut for Slow Motion Video
CapCut has a vast library of templates, as discussed earlier. They contain well-designed video layouts, transitions, effects, and texts to inspire others. For slow-motion templates, it offers extensive options that you can choose based on your preferences. If you haven’t found anything attractive, look into these CapCut new slow-motion templates.
- Camera Lenta: It’s a trending slow-motion video template on the internet. As shown, it is used by more than 23k people and requires just one clip to process. This footage shows a blurry start, which gradually turns into a clear shot with music beats.

- Slow Motion: This template is popular with over 87k usages. It requires a single clip to make a video in a 9:16 aspect ratio. In this clip, a woman lip-syncs a song that reveals properly after a blurry transition into slow motion.

- CapCut Slow Motion: With more than 546k utilizations, this template is commonly available everywhere. You need 2 clips to use this, and an 11-second video will be generated. The massive use of this template might be due to its music, effects, and transitions.

- Slow Motion Transisi: Social media influencers prefer this template to show their dance moves. It requires 4 clips to make an attractive slow-motion video. At the start of the clip, you can see a countdown timer and a music beat with dance steps.

- Slow Motion Alih: If you want to reveal your mountain travel video, this template is perfect. This 11-second template is used by over 87k people. It starts with a musical voice and progresses at normal speed. Gradually, it slows down and shifts speed abruptly with the rhythm of the music.

- Slow Motion Izacklstyle: It’s another famous template that is perfect for your travel clips. This CapCut new trend 2022 template slow motion has more than 100k uses. It asks for 4 footage to show the natural beauty of nature, mountains, waterfalls, and you.

- Slow Motion JP: With 1.3 million uses, this template is widely recognized on social media. Actually, the kid smiling in this slow-motion video makes it popular. It is an 8-second clip where the boy is standing chin-down. Suddenly, the music’s rhythm and effect change when he looks upward.

Part 3. How to Create a Simple Slow-Motion Video from a Template in CapCut?
Making a CapCut template new trend in slow motion is not very difficult. For this purpose, you have to pick one template and select the media. After choosing a template from the above section, follow the given steps for better results. Regardless of the mobile device you are using, this step-by-step guide will prove beneficial for each.
Step 1
Launch CapCut on your smartphone and sign in to your account. Access the home screen of CapCut and look for the “Template” option from the bottom. Tap on it and find the vast video template library of this platform.

Step 2
Go to the search and prompt with “Slow Motion Video” to browse results. Pick one video template of your choice and get a preview. From its preview, hit the “Use Template” button and go directly to import media. Select the video you wish and touch the “Preview” button.

Step 3
After previewing results, go to the top right side and tap the “Export” button. You will get an extended “Export Setting” menu at the bottom. It’s up to you whether to choose “Save to Device” or Save and Share to TikTok.”

Part 4. Desktop Solution: How to Make Better Slow-Motion Videos with Wondershare Filmora?
Using CapCut’s new slow-motion templates makes videos easy but restricts certain tasks. If you want to enjoy more flexibility in creating slow-motion videos, use Wondershare Filmora . It’s a video editing platform with innovative features to uplift creativity with personalization. This all-in-all platform offers AI-integrated features to generate unique content effortlessly.
Filmora can assist you in editing tasks by providing AI Copilot Editing . Besides, it can generate engaging scripts with prompts that align with your goals. Moreover, you can get copyright-free music and images to achieve appealing virtual content. Filmora can bring limitless creativity and uniqueness to your media, so move to explore it.
Free Download For Win 7 or later(64-bit)
Free Download For macOS 10.14 or later
How to Create Personalized Slow-Motion Video with Filmora
Filmora offers Speed Ramping features to slow down video as you want. It also ensures smooth playback of slow-mo videos by providing an optical flow option. Let’s move to the real process with the given steps without further delay.
Step 1: Download Filmora and Import the Video to Slow Down
If you haven’t downloaded Filmora, visit its official site and get the latest version. Launch it on your device and access its main screen. Choose “New Project” and enter its editing screen. Press “Ctrl + I” to import your video into Filmora quickly. Drag and drop your imported media to the timeline section for further processing.

Step 2: Access Speed Ramping to Customize Video Speed
Locate your cursor on the video and right-click on it to choose “Speed Ramping” from the list. This way, you will get an editing panel on the right side. You have the flexibility to select a predesigned template for speed ramping. Otherwise, hit the “Customize” button and find the graph below. Use the graph and locate the dots upward and downward to get the desired slow-motion video.

Step 3: Apply Optical Flow and Export within Personalized Settings
Later, go downward to the “AI interpolation” and extend its menu. From the menu, select “Optical Flow” for a smooth playback speed. If you are satisfied with the result, look for the “Export” button at the top right. Get the “Export” screen and adjust the parameter to save the video in your assigned settings.

Conclusion
To conclude, social media influencers set trends using CapCut in real-time. They are getting the audience’s attention through the CapCut template’s new trend of slow motion. This article has also shed light on CapCut, its slow-motion templates, and how to use it. After reading, you must realize that using Wondershare Filmora is a far better option.
3GP Video Format: What Is 3GP Format And How To Open It?
Everyone uses the internet nowadays as it is a necessary part of our lives. We exchange multimedia files and texts messages on various apps. The files that we share on the internet have a specific extension for the files. It is essential to know about the different available and widely used formats so that you can use and access the file easily.
The article below will focus on and share great details about the 3GP file format. The multimedia format is popularly used for its great benefits, such as audio and video transfer. Do you want to know more about the 3GP format? Let’s get started!
In this article
02 Advantages and Disadvantages About Video Format?
03 How Can You Open and Play 3GP Video Format?
04 How Edit 3GP Video More Creatively?
Part 1. What Is 3GP Video Format?
The multimedia files that we share on the internet have the extension as ‘.3GP’. It is an audio and video container made under the proprietorship of the 3rd Generation Partnership Project. The 3GP format stores and transmits the data that is shared between 3G-enabled devices. All 3G devices, along with some 2G and 4G devices, support 3GP file format video recording and playback.
3GP format needs less broadband demand which makes the phone run fluently. Along with taking less space as compared to other formats, it saves multimedia content efficiently. 3GP file format was designed to match the high speed of data transition between 3G networks.
Part 2. Advantages and Disadvantages About Video Format?
The 3GP format was designed to work at a high level on 3G devices. The above section of this article sheds light on what the 3GP file format is. Now that you have adequate knowledge of the format, let’s proceed and talk about the pros and cons of the file format.
Advantages of 3GP Format
- The biggest plus point of using the 3GP format is its size. The format is small in size but can store disk space. The small size of the format uses tiny amounts of data.
- The format is great because it creates an environment for business connections and improves communication. You can share text messages, videos, and multimedia files with your team members.
- 3GP file format is widely used because it has low bandwidth and also it has decreased mobile storage requirements.
- 3GP files are transferred and shared very efficiently. Hence, sharing video files has become a lot easier with this format.
- 3GP files are fast for both streaming and downloading, even if you have a weak or problematic internet connection.
Disadvantages of 3GP Format
- The quality of the audio file is damaged while compressing the file to reduce its size, as compared to the original file.
- Not every program supports 3GP file format; hence users face compatibility issues.
- Compared to the original video, the 3GP video files, after compressing, lose their quality, and the resolution is also compromised.
Part 3. How Can You Open and Play 3GP Video Format?
Do you know there are various file formats and different platforms support different formats? If we specifically talk about the 3GP format, it is supported by VLC Media Player, QuickTime Player, and 5KPlayer. Let’s discuss them:
VLC Media Player
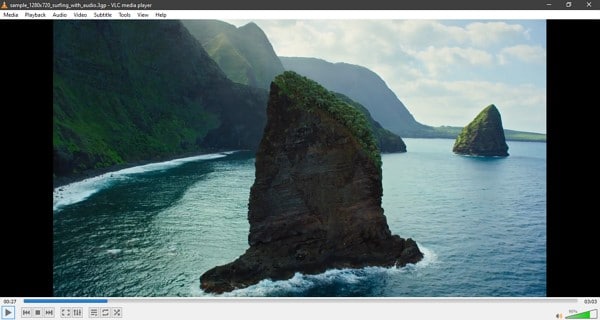
VLC Media Player is a free open-source platform that can play 3GP file format. It is developed by the VideoLAN project. VLC Media Player is a cross-platform media player software and media streamer available for Windows, Mac, Linux, and Unix.
Mobile users can use it irrespective of the device type; Android, iPhone, iPad, and iPod users can use it. VLC can be used to play 3GP format along with any format that you may encounter.
QuickTime Player
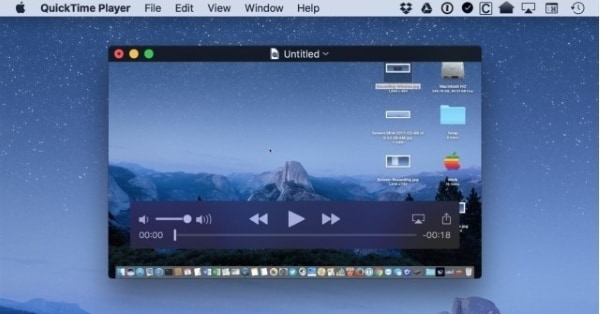
QuickTime Player was made under Apple Inc. proprietorship. It is an extendible multimedia framework and can only be used on macOS devices because the Windows-supported version was ceased after 2016. It can handle picture and digital video formats, including a 3GP file format. Although, the MOV file extension represents the QuickTime Player. QuickTime Player is pre-installed on all Mac devices.
5KPlayer
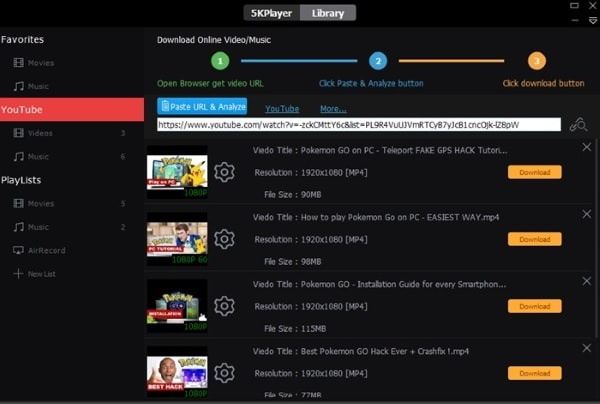
5KPlayer is developed under the proprietorship of DearMob. It is a music and video player. 5KPlayer has built-in support for AirPlay. You can stream audio and video via AirPlay without any loss in the quality of the media file. It supports different formats for multimedia, including a 3GP file format. 5KPlayer provides you the facility to download videos from 300+ sites, including YouTube, Vimeo, and Dailymotion.
3.1. Steps to Open and Play 3GP Format on VLC Media Player
Now that you know about the different platforms that support the 3GP format let us share the steps on how you can open and play 3GP video files on VLC Media Player.
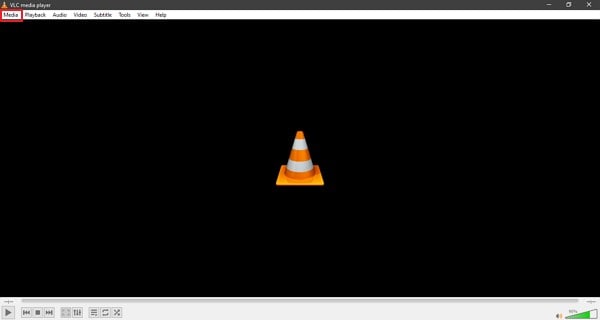
Step 1: After you have installed VLC Media Player on your device, launch it. Head to the ‘Media’ tab from the main screen by accessing the top menu. Or else, simply open VLC Media Player to drag and drop the media file there.
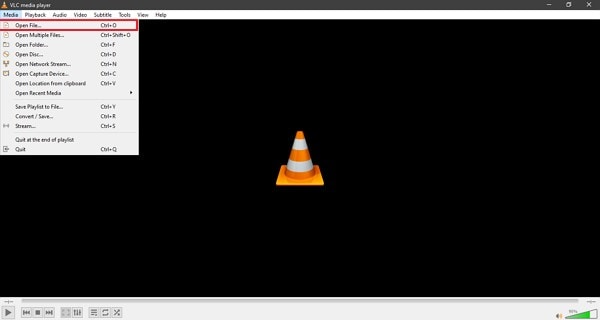
Step 2: Select the ‘Open File’ option from the Media section and locate the 3GP video file on your device. Add the file to VLC and enjoy watching it.
Part 4. How Edit 3GP Video More Creatively?
What else could be better for editing your videos than Wondershare Filmora ? Whenever you want a good video editor, you will find Filmora on top of the list. The video editor comes with an extensive range of features that you cannot even count. Moreover, it offers endless editing capabilities.
For editing unique and stunning 3GP format videos, try Filmora. It comes with both Basic and also Advanced editing features. Do you want to know more about it? Let us tell you. Filmora offers basic and standard editing tools like cut, trim, split, and join.
If we look at the advanced features, they include Green Screen, Scene Detection, Power Tool, Video Snapshot, and whatnot. Moreover, you also get various AI editing features like Auto Highlight, Auto Reframe, Auto Normalization, and much more than this.
What else does Filmora provide to its users? Let’s share a step-by-step guideline about how to edit 3GP file format videos on Filmora along with its other features.
Step 1: Import 3GP Video File
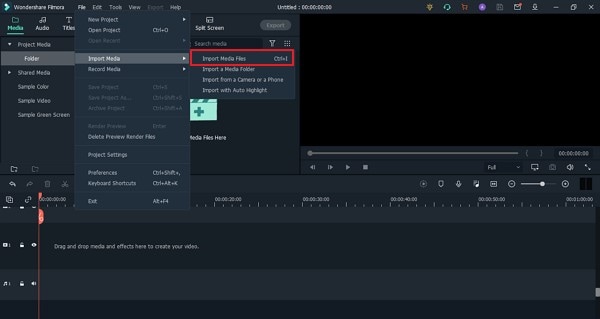
Start by launching Filmora Video Editor on your device and head to the ‘File’ tab from the top menu bar. There, hover on the ‘Import Media’ option; this will open a sub-menu with an option of ‘Import Media Files’; click on it.
For Win 7 or later (64-bit)
For macOS 10.12 or later
Step 2: Drag to Timeline
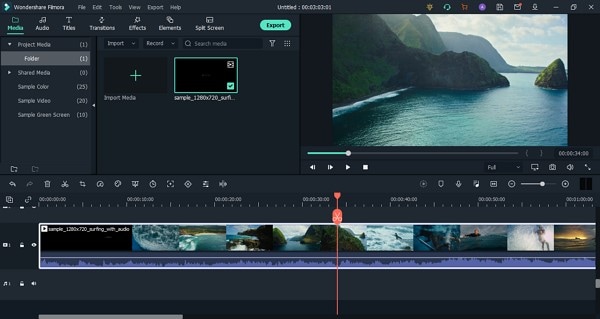
You can locate the video file from the device and import it to the software. After a successful import, the media file will appear on the screen, drag and drop it to the ‘Timeline’ to start the editing.
Step 3: Add Audio Effects
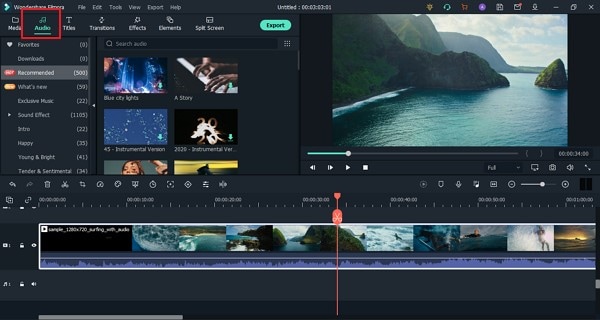
Start by adding audio effects to your video and making it more captivating. For this, head to the ‘Audio’ tab and select the most suitable sound from the provided options like Travel Vlog, Folk, Young & Bright, etc.
Step 4: Use Interesting Elements
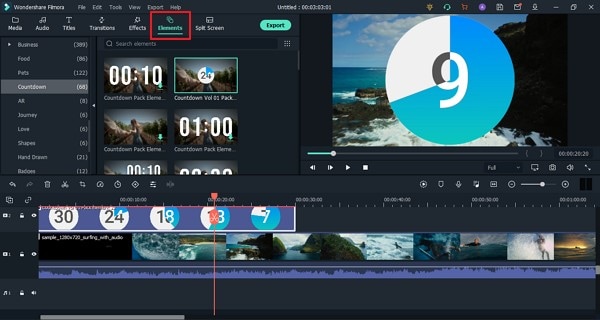
What kind of elements do you like? With Filmora, you get Countdown, Laser Eye, Subscription, Share, and a lot other cooler options are available under the ‘Elements’ section.
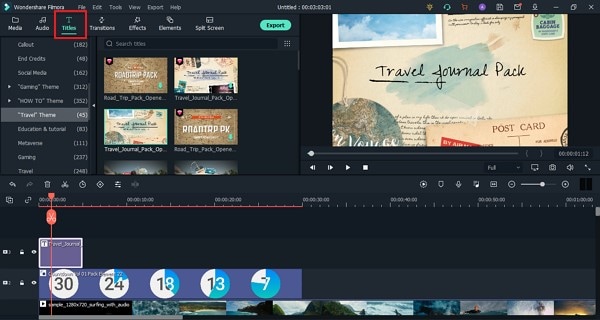
Step 5: Add Attractive Titles
Are you looking for title templates? Have you looked at the ‘Titles’ section in Filmora? You will get beautiful templates according to the latest trends and occasions.
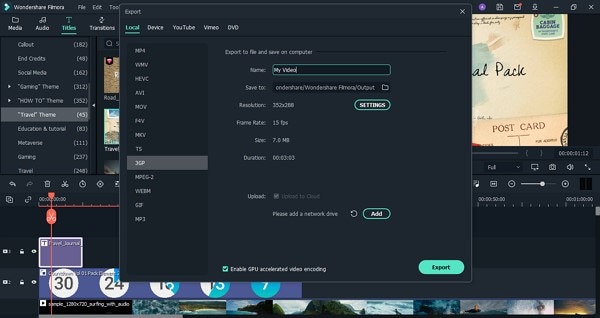
Step 6: Export 3GP File
Once you are done, export the 3GP format file. For this, click on the ‘Export’ button, select the output file format and proceed to save the file.
Bottom Line
We hope that the above article has shared sufficient information with you regarding the 3GP file format. We discussed its pros and cons, ways to open it, and also edit it. As we are concluding, let’s talk a little more about Wondershare Filmora. The video editor is an excellent choice for editing and creating mind-blowing videos.
You get various Basic and also Advanced features that can enhance your video. With Filmora, you can efficiently work with features like Silence Detection, Keyframing, Advanced Color Tuning, and much more. If you wish to create fantastic videos, use Wondershare Filmora.
For Win 7 or later (64-bit)
For macOS 10.12 or later
02 Advantages and Disadvantages About Video Format?
03 How Can You Open and Play 3GP Video Format?
04 How Edit 3GP Video More Creatively?
Part 1. What Is 3GP Video Format?
The multimedia files that we share on the internet have the extension as ‘.3GP’. It is an audio and video container made under the proprietorship of the 3rd Generation Partnership Project. The 3GP format stores and transmits the data that is shared between 3G-enabled devices. All 3G devices, along with some 2G and 4G devices, support 3GP file format video recording and playback.

3GP format needs less broadband demand which makes the phone run fluently. Along with taking less space as compared to other formats, it saves multimedia content efficiently. 3GP file format was designed to match the high speed of data transition between 3G networks.
Part 2. Advantages and Disadvantages About Video Format?
The 3GP format was designed to work at a high level on 3G devices. The above section of this article sheds light on what the 3GP file format is. Now that you have adequate knowledge of the format, let’s proceed and talk about the pros and cons of the file format.
Advantages of 3GP Format
- The biggest plus point of using the 3GP format is its size. The format is small in size but can store disk space. The small size of the format uses tiny amounts of data.
- The format is great because it creates an environment for business connections and improves communication. You can share text messages, videos, and multimedia files with your team members.
- 3GP file format is widely used because it has low bandwidth and also it has decreased mobile storage requirements.
- 3GP files are transferred and shared very efficiently. Hence, sharing video files has become a lot easier with this format.
- 3GP files are fast for both streaming and downloading, even if you have a weak or problematic internet connection.
Disadvantages of 3GP Format
- The quality of the audio file is damaged while compressing the file to reduce its size, as compared to the original file.
- Not every program supports 3GP file format; hence users face compatibility issues.
- Compared to the original video, the 3GP video files, after compressing, lose their quality, and the resolution is also compromised.
Part 3. How Can You Open and Play 3GP Video Format?
Do you know there are various file formats and different platforms support different formats? If we specifically talk about the 3GP format, it is supported by VLC Media Player, QuickTime Player, and 5KPlayer. Let’s discuss them:
VLC Media Player
VLC Media Player is a free open-source platform that can play 3GP file format. It is developed by the VideoLAN project. VLC Media Player is a cross-platform media player software and media streamer available for Windows, Mac, Linux, and Unix.
Mobile users can use it irrespective of the device type; Android, iPhone, iPad, and iPod users can use it. VLC can be used to play 3GP format along with any format that you may encounter.

QuickTime Player
QuickTime Player was made under Apple Inc. proprietorship. It is an extendible multimedia framework and can only be used on macOS devices because the Windows-supported version was ceased after 2016. It can handle picture and digital video formats, including a 3GP file format. Although, the MOV file extension represents the QuickTime Player. QuickTime Player is pre-installed on all Mac devices.

5KPlayer
5KPlayer is developed under the proprietorship of DearMob. It is a music and video player. 5KPlayer has built-in support for AirPlay. You can stream audio and video via AirPlay without any loss in the quality of the media file. It supports different formats for multimedia, including a 3GP file format. 5KPlayer provides you the facility to download videos from 300+ sites, including YouTube, Vimeo, and Dailymotion.

3.1. Steps to Open and Play 3GP Format on VLC Media Player
Now that you know about the different platforms that support the 3GP format let us share the steps on how you can open and play 3GP video files on VLC Media Player.
Step 1: After you have installed VLC Media Player on your device, launch it. Head to the ‘Media’ tab from the main screen by accessing the top menu. Or else, simply open VLC Media Player to drag and drop the media file there.

Step 2: Select the ‘Open File’ option from the Media section and locate the 3GP video file on your device. Add the file to VLC and enjoy watching it.

Part 4. How Edit 3GP Video More Creatively?
What else could be better for editing your videos than Wondershare Filmora ? Whenever you want a good video editor, you will find Filmora on top of the list. The video editor comes with an extensive range of features that you cannot even count. Moreover, it offers endless editing capabilities.
For editing unique and stunning 3GP format videos, try Filmora. It comes with both Basic and also Advanced editing features. Do you want to know more about it? Let us tell you. Filmora offers basic and standard editing tools like cut, trim, split, and join.
If we look at the advanced features, they include Green Screen, Scene Detection, Power Tool, Video Snapshot, and whatnot. Moreover, you also get various AI editing features like Auto Highlight, Auto Reframe, Auto Normalization, and much more than this.
What else does Filmora provide to its users? Let’s share a step-by-step guideline about how to edit 3GP file format videos on Filmora along with its other features.
Step 1: Import 3GP Video File
Start by launching Filmora Video Editor on your device and head to the ‘File’ tab from the top menu bar. There, hover on the ‘Import Media’ option; this will open a sub-menu with an option of ‘Import Media Files’; click on it.

For Win 7 or later (64-bit)
For macOS 10.12 or later
Step 2: Drag to Timeline
You can locate the video file from the device and import it to the software. After a successful import, the media file will appear on the screen, drag and drop it to the ‘Timeline’ to start the editing.

Step 3: Add Audio Effects
Start by adding audio effects to your video and making it more captivating. For this, head to the ‘Audio’ tab and select the most suitable sound from the provided options like Travel Vlog, Folk, Young & Bright, etc.

Step 4: Use Interesting Elements
What kind of elements do you like? With Filmora, you get Countdown, Laser Eye, Subscription, Share, and a lot other cooler options are available under the ‘Elements’ section.

Step 5: Add Attractive Titles
Are you looking for title templates? Have you looked at the ‘Titles’ section in Filmora? You will get beautiful templates according to the latest trends and occasions.

Step 6: Export 3GP File
Once you are done, export the 3GP format file. For this, click on the ‘Export’ button, select the output file format and proceed to save the file.

Bottom Line
We hope that the above article has shared sufficient information with you regarding the 3GP file format. We discussed its pros and cons, ways to open it, and also edit it. As we are concluding, let’s talk a little more about Wondershare Filmora. The video editor is an excellent choice for editing and creating mind-blowing videos.
You get various Basic and also Advanced features that can enhance your video. With Filmora, you can efficiently work with features like Silence Detection, Keyframing, Advanced Color Tuning, and much more. If you wish to create fantastic videos, use Wondershare Filmora.
For Win 7 or later (64-bit)
For macOS 10.12 or later
02 Advantages and Disadvantages About Video Format?
03 How Can You Open and Play 3GP Video Format?
04 How Edit 3GP Video More Creatively?
Part 1. What Is 3GP Video Format?
The multimedia files that we share on the internet have the extension as ‘.3GP’. It is an audio and video container made under the proprietorship of the 3rd Generation Partnership Project. The 3GP format stores and transmits the data that is shared between 3G-enabled devices. All 3G devices, along with some 2G and 4G devices, support 3GP file format video recording and playback.

3GP format needs less broadband demand which makes the phone run fluently. Along with taking less space as compared to other formats, it saves multimedia content efficiently. 3GP file format was designed to match the high speed of data transition between 3G networks.
Part 2. Advantages and Disadvantages About Video Format?
The 3GP format was designed to work at a high level on 3G devices. The above section of this article sheds light on what the 3GP file format is. Now that you have adequate knowledge of the format, let’s proceed and talk about the pros and cons of the file format.
Advantages of 3GP Format
- The biggest plus point of using the 3GP format is its size. The format is small in size but can store disk space. The small size of the format uses tiny amounts of data.
- The format is great because it creates an environment for business connections and improves communication. You can share text messages, videos, and multimedia files with your team members.
- 3GP file format is widely used because it has low bandwidth and also it has decreased mobile storage requirements.
- 3GP files are transferred and shared very efficiently. Hence, sharing video files has become a lot easier with this format.
- 3GP files are fast for both streaming and downloading, even if you have a weak or problematic internet connection.
Disadvantages of 3GP Format
- The quality of the audio file is damaged while compressing the file to reduce its size, as compared to the original file.
- Not every program supports 3GP file format; hence users face compatibility issues.
- Compared to the original video, the 3GP video files, after compressing, lose their quality, and the resolution is also compromised.
Part 3. How Can You Open and Play 3GP Video Format?
Do you know there are various file formats and different platforms support different formats? If we specifically talk about the 3GP format, it is supported by VLC Media Player, QuickTime Player, and 5KPlayer. Let’s discuss them:
VLC Media Player
VLC Media Player is a free open-source platform that can play 3GP file format. It is developed by the VideoLAN project. VLC Media Player is a cross-platform media player software and media streamer available for Windows, Mac, Linux, and Unix.
Mobile users can use it irrespective of the device type; Android, iPhone, iPad, and iPod users can use it. VLC can be used to play 3GP format along with any format that you may encounter.

QuickTime Player
QuickTime Player was made under Apple Inc. proprietorship. It is an extendible multimedia framework and can only be used on macOS devices because the Windows-supported version was ceased after 2016. It can handle picture and digital video formats, including a 3GP file format. Although, the MOV file extension represents the QuickTime Player. QuickTime Player is pre-installed on all Mac devices.

5KPlayer
5KPlayer is developed under the proprietorship of DearMob. It is a music and video player. 5KPlayer has built-in support for AirPlay. You can stream audio and video via AirPlay without any loss in the quality of the media file. It supports different formats for multimedia, including a 3GP file format. 5KPlayer provides you the facility to download videos from 300+ sites, including YouTube, Vimeo, and Dailymotion.

3.1. Steps to Open and Play 3GP Format on VLC Media Player
Now that you know about the different platforms that support the 3GP format let us share the steps on how you can open and play 3GP video files on VLC Media Player.
Step 1: After you have installed VLC Media Player on your device, launch it. Head to the ‘Media’ tab from the main screen by accessing the top menu. Or else, simply open VLC Media Player to drag and drop the media file there.

Step 2: Select the ‘Open File’ option from the Media section and locate the 3GP video file on your device. Add the file to VLC and enjoy watching it.

Part 4. How Edit 3GP Video More Creatively?
What else could be better for editing your videos than Wondershare Filmora ? Whenever you want a good video editor, you will find Filmora on top of the list. The video editor comes with an extensive range of features that you cannot even count. Moreover, it offers endless editing capabilities.
For editing unique and stunning 3GP format videos, try Filmora. It comes with both Basic and also Advanced editing features. Do you want to know more about it? Let us tell you. Filmora offers basic and standard editing tools like cut, trim, split, and join.
If we look at the advanced features, they include Green Screen, Scene Detection, Power Tool, Video Snapshot, and whatnot. Moreover, you also get various AI editing features like Auto Highlight, Auto Reframe, Auto Normalization, and much more than this.
What else does Filmora provide to its users? Let’s share a step-by-step guideline about how to edit 3GP file format videos on Filmora along with its other features.
Step 1: Import 3GP Video File
Start by launching Filmora Video Editor on your device and head to the ‘File’ tab from the top menu bar. There, hover on the ‘Import Media’ option; this will open a sub-menu with an option of ‘Import Media Files’; click on it.

For Win 7 or later (64-bit)
For macOS 10.12 or later
Step 2: Drag to Timeline
You can locate the video file from the device and import it to the software. After a successful import, the media file will appear on the screen, drag and drop it to the ‘Timeline’ to start the editing.

Step 3: Add Audio Effects
Start by adding audio effects to your video and making it more captivating. For this, head to the ‘Audio’ tab and select the most suitable sound from the provided options like Travel Vlog, Folk, Young & Bright, etc.

Step 4: Use Interesting Elements
What kind of elements do you like? With Filmora, you get Countdown, Laser Eye, Subscription, Share, and a lot other cooler options are available under the ‘Elements’ section.

Step 5: Add Attractive Titles
Are you looking for title templates? Have you looked at the ‘Titles’ section in Filmora? You will get beautiful templates according to the latest trends and occasions.

Step 6: Export 3GP File
Once you are done, export the 3GP format file. For this, click on the ‘Export’ button, select the output file format and proceed to save the file.

Bottom Line
We hope that the above article has shared sufficient information with you regarding the 3GP file format. We discussed its pros and cons, ways to open it, and also edit it. As we are concluding, let’s talk a little more about Wondershare Filmora. The video editor is an excellent choice for editing and creating mind-blowing videos.
You get various Basic and also Advanced features that can enhance your video. With Filmora, you can efficiently work with features like Silence Detection, Keyframing, Advanced Color Tuning, and much more. If you wish to create fantastic videos, use Wondershare Filmora.
For Win 7 or later (64-bit)
For macOS 10.12 or later
02 Advantages and Disadvantages About Video Format?
03 How Can You Open and Play 3GP Video Format?
04 How Edit 3GP Video More Creatively?
Part 1. What Is 3GP Video Format?
The multimedia files that we share on the internet have the extension as ‘.3GP’. It is an audio and video container made under the proprietorship of the 3rd Generation Partnership Project. The 3GP format stores and transmits the data that is shared between 3G-enabled devices. All 3G devices, along with some 2G and 4G devices, support 3GP file format video recording and playback.

3GP format needs less broadband demand which makes the phone run fluently. Along with taking less space as compared to other formats, it saves multimedia content efficiently. 3GP file format was designed to match the high speed of data transition between 3G networks.
Part 2. Advantages and Disadvantages About Video Format?
The 3GP format was designed to work at a high level on 3G devices. The above section of this article sheds light on what the 3GP file format is. Now that you have adequate knowledge of the format, let’s proceed and talk about the pros and cons of the file format.
Advantages of 3GP Format
- The biggest plus point of using the 3GP format is its size. The format is small in size but can store disk space. The small size of the format uses tiny amounts of data.
- The format is great because it creates an environment for business connections and improves communication. You can share text messages, videos, and multimedia files with your team members.
- 3GP file format is widely used because it has low bandwidth and also it has decreased mobile storage requirements.
- 3GP files are transferred and shared very efficiently. Hence, sharing video files has become a lot easier with this format.
- 3GP files are fast for both streaming and downloading, even if you have a weak or problematic internet connection.
Disadvantages of 3GP Format
- The quality of the audio file is damaged while compressing the file to reduce its size, as compared to the original file.
- Not every program supports 3GP file format; hence users face compatibility issues.
- Compared to the original video, the 3GP video files, after compressing, lose their quality, and the resolution is also compromised.
Part 3. How Can You Open and Play 3GP Video Format?
Do you know there are various file formats and different platforms support different formats? If we specifically talk about the 3GP format, it is supported by VLC Media Player, QuickTime Player, and 5KPlayer. Let’s discuss them:
VLC Media Player
VLC Media Player is a free open-source platform that can play 3GP file format. It is developed by the VideoLAN project. VLC Media Player is a cross-platform media player software and media streamer available for Windows, Mac, Linux, and Unix.
Mobile users can use it irrespective of the device type; Android, iPhone, iPad, and iPod users can use it. VLC can be used to play 3GP format along with any format that you may encounter.

QuickTime Player
QuickTime Player was made under Apple Inc. proprietorship. It is an extendible multimedia framework and can only be used on macOS devices because the Windows-supported version was ceased after 2016. It can handle picture and digital video formats, including a 3GP file format. Although, the MOV file extension represents the QuickTime Player. QuickTime Player is pre-installed on all Mac devices.

5KPlayer
5KPlayer is developed under the proprietorship of DearMob. It is a music and video player. 5KPlayer has built-in support for AirPlay. You can stream audio and video via AirPlay without any loss in the quality of the media file. It supports different formats for multimedia, including a 3GP file format. 5KPlayer provides you the facility to download videos from 300+ sites, including YouTube, Vimeo, and Dailymotion.

3.1. Steps to Open and Play 3GP Format on VLC Media Player
Now that you know about the different platforms that support the 3GP format let us share the steps on how you can open and play 3GP video files on VLC Media Player.
Step 1: After you have installed VLC Media Player on your device, launch it. Head to the ‘Media’ tab from the main screen by accessing the top menu. Or else, simply open VLC Media Player to drag and drop the media file there.

Step 2: Select the ‘Open File’ option from the Media section and locate the 3GP video file on your device. Add the file to VLC and enjoy watching it.

Part 4. How Edit 3GP Video More Creatively?
What else could be better for editing your videos than Wondershare Filmora ? Whenever you want a good video editor, you will find Filmora on top of the list. The video editor comes with an extensive range of features that you cannot even count. Moreover, it offers endless editing capabilities.
For editing unique and stunning 3GP format videos, try Filmora. It comes with both Basic and also Advanced editing features. Do you want to know more about it? Let us tell you. Filmora offers basic and standard editing tools like cut, trim, split, and join.
If we look at the advanced features, they include Green Screen, Scene Detection, Power Tool, Video Snapshot, and whatnot. Moreover, you also get various AI editing features like Auto Highlight, Auto Reframe, Auto Normalization, and much more than this.
What else does Filmora provide to its users? Let’s share a step-by-step guideline about how to edit 3GP file format videos on Filmora along with its other features.
Step 1: Import 3GP Video File
Start by launching Filmora Video Editor on your device and head to the ‘File’ tab from the top menu bar. There, hover on the ‘Import Media’ option; this will open a sub-menu with an option of ‘Import Media Files’; click on it.

For Win 7 or later (64-bit)
For macOS 10.12 or later
Step 2: Drag to Timeline
You can locate the video file from the device and import it to the software. After a successful import, the media file will appear on the screen, drag and drop it to the ‘Timeline’ to start the editing.

Step 3: Add Audio Effects
Start by adding audio effects to your video and making it more captivating. For this, head to the ‘Audio’ tab and select the most suitable sound from the provided options like Travel Vlog, Folk, Young & Bright, etc.

Step 4: Use Interesting Elements
What kind of elements do you like? With Filmora, you get Countdown, Laser Eye, Subscription, Share, and a lot other cooler options are available under the ‘Elements’ section.

Step 5: Add Attractive Titles
Are you looking for title templates? Have you looked at the ‘Titles’ section in Filmora? You will get beautiful templates according to the latest trends and occasions.

Step 6: Export 3GP File
Once you are done, export the 3GP format file. For this, click on the ‘Export’ button, select the output file format and proceed to save the file.

Bottom Line
We hope that the above article has shared sufficient information with you regarding the 3GP file format. We discussed its pros and cons, ways to open it, and also edit it. As we are concluding, let’s talk a little more about Wondershare Filmora. The video editor is an excellent choice for editing and creating mind-blowing videos.
You get various Basic and also Advanced features that can enhance your video. With Filmora, you can efficiently work with features like Silence Detection, Keyframing, Advanced Color Tuning, and much more. If you wish to create fantastic videos, use Wondershare Filmora.
For Win 7 or later (64-bit)
For macOS 10.12 or later
What Are The Stages Of Film Production - 2023
Film production is a very time-consuming and demanding procedure where attention and effort is necessary. While looking at the end result, the movie, or a short film, you may underestimate what the filmmakers have to go through while preparing, shooting and editing the movie to its final product.
Without further ado, let’s get started!

What Are The Stages Of Film Production
1. Pre-Production
The pre-production phase comes early in the process, it usually comes after the development and before the production itself. This stage includes finalizing the scripts, bringing together the actors and crew, browse for locations, deciding which equipment is needed, and deciding on the budget. Pre-production is a planning stage of the movie, where you confirm all the details of the project before starting on production.

Pre-production
2. Production
Now the fun part begins. It is time to get the movie on camera. All the producers and directors finished making the plans from the use of all the production assets that are needed to make the movie. Once the cast and locations are set, the actual filming process can begin and this can take from days, weeks, to months depending on how many locations are used, how much scenes are being filmed and if there are any problems that occur that delays the filming process.

Production
3. Post-Production

Post-Production
After the filming process, any re-taking, and other filming phases the entire crew has to go through, it is time for post-production. This stage is when the audio and visual materials are combined together to create the movie. An editor, or multiple editors are using the following procedures to create the film:
A. Cutting and Trimming Shots
Tips
▷ What’s a Cut
In the film and video industry, a cut is described by when one clip ends and another one starts. For example, say you have a wide shot clip of a car driving as well as clip of a man’s eyes watching.
▷ When Would the Cut Happen
The cut would happen when the first shot has ended and is followed by the second shot. Repeating that will have an impact on how the viewer sees the movie and follows the story.
B. Adding Music and Sound Effect
Tips
▷ Sound Effects
Depending on what kind of movie it is, sound effects can make a huge difference in the viewing experience. No matter if it’s an explosion, an extra wind sound, a door crackle, or laughing people in the background.
▷ Deliver the Emotion
Many sound effects are placed into the film to deliver the emotion and get the viewer onto the edge of their seat as it amplifies the moment.
C. Adding Visual Effects
Tips
▷ The Benefit of Post-production
When there are visual effects showing in the movie, these are not made physically on set. The benefit of post-production is that there are unlimited choices of adding visual effects to strengthen a moment and the impact on the viewer.
▷ Visual Effects
A lot of results are accomplished by visual effects because they would be impossible to re-create on set.
4. Distribution
Distribution is the final stage of production, which happens after the film has been edited, and is ready for release. Many film makers and production companies will advertise the movie’s trailer on social media and the general internet to target the audience that loves the type of movie that has been made. They will either see it on social media or on television to drive people to theaters to watch the movie and get them into the story. A lot of movies have follow-ups when it’s been received really well creating a storyline.

Distribution

What Are The Stages Of Film Production
1. Pre-Production
The pre-production phase comes early in the process, it usually comes after the development and before the production itself. This stage includes finalizing the scripts, bringing together the actors and crew, browse for locations, deciding which equipment is needed, and deciding on the budget. Pre-production is a planning stage of the movie, where you confirm all the details of the project before starting on production.

Pre-production
2. Production
Now the fun part begins. It is time to get the movie on camera. All the producers and directors finished making the plans from the use of all the production assets that are needed to make the movie. Once the cast and locations are set, the actual filming process can begin and this can take from days, weeks, to months depending on how many locations are used, how much scenes are being filmed and if there are any problems that occur that delays the filming process.

Production
3. Post-Production

Post-Production
After the filming process, any re-taking, and other filming phases the entire crew has to go through, it is time for post-production. This stage is when the audio and visual materials are combined together to create the movie. An editor, or multiple editors are using the following procedures to create the film:
A. Cutting and Trimming Shots
Tips
▷ What’s a Cut
In the film and video industry, a cut is described by when one clip ends and another one starts. For example, say you have a wide shot clip of a car driving as well as clip of a man’s eyes watching.
▷ When Would the Cut Happen
The cut would happen when the first shot has ended and is followed by the second shot. Repeating that will have an impact on how the viewer sees the movie and follows the story.
B. Adding Music and Sound Effect
Tips
▷ Sound Effects
Depending on what kind of movie it is, sound effects can make a huge difference in the viewing experience. No matter if it’s an explosion, an extra wind sound, a door crackle, or laughing people in the background.
▷ Deliver the Emotion
Many sound effects are placed into the film to deliver the emotion and get the viewer onto the edge of their seat as it amplifies the moment.
C. Adding Visual Effects
Tips
▷ The Benefit of Post-production
When there are visual effects showing in the movie, these are not made physically on set. The benefit of post-production is that there are unlimited choices of adding visual effects to strengthen a moment and the impact on the viewer.
▷ Visual Effects
A lot of results are accomplished by visual effects because they would be impossible to re-create on set.
4. Distribution
Distribution is the final stage of production, which happens after the film has been edited, and is ready for release. Many film makers and production companies will advertise the movie’s trailer on social media and the general internet to target the audience that loves the type of movie that has been made. They will either see it on social media or on television to drive people to theaters to watch the movie and get them into the story. A lot of movies have follow-ups when it’s been received really well creating a storyline.

Distribution
Also read:
- New In 2024, How to Create a Clideo Slideshow Simply
- How To Quickly Create A Screen Print Effect In Photoshop Detailed Gui
- New 2024 Approved How to Edit Text in Premiere Pro
- New Looking for the Best Way to Create Stunning Video Animations? Here, We Look at some of the Best Animated Video Maker Solutions to Use for 2024
- How to Make Custom Lower Thirds with Filmora for 2024
- New Are You Curious About Finding a Good iPhone Slow-Motion App? Discover the Top-Rated Applications in the Market that Will Help You Create the Perfect Video for 2024
- Updated 2024 Approved Top 5 Solutions on How to Add Emojis to iPhone
- 2024 Approved How to Make Discord Emoji GIF
- New Looking for a Full Guide on Removing the Background From PNG Images? Do You Want to Transform JPG to PNG Transparent? If so, Take some Time to Read This Article for 2024
- New 2024 Approved Top 10 TEXT TO SPEECH VIDEO MAKERS
- Updated How to Do Censor Effects with Filmora for 2024
- Learn How to Feather Shapes in After Effects and Add a Professional Touch to Your Designs. This Comprehensive Guide Covers Everything From the Basics to Advanced Techniques. Perfect for Beginners and Experts Alike for 2024
- In 2024, How to Calculate & Change Video Aspect Ratio Online
- New In 2024, Are You Looking for Software to Convert Word to SRT Format? Here Is a Complete Guide About It
- New How To Fade Audio With Movavi Editor for 2024
- Updated Best Method to Split the Video Into Parts Online
- Updated 2024 Approved Unraveling How the Slow Motion Guys Have Revolutionized The Slow Motion Game
- New Whether Youre a Professional Animator or a Beginner Into This. If You Want to Use the OBS Studio Chroma Key, Weve Presented some Efficient Ways to Proceed. Learn More Here for 2024
- New Hyperlapse VS Timelapse Videos for 2024
- Life360 Circle Everything You Need to Know On Xiaomi Redmi Note 13 Pro 5G | Dr.fone
- In 2024, 4 Ways to Transfer Music from Honor Play 7T to iPhone | Dr.fone
- How to Fake Snapchat Location on Vivo V27 Pro | Dr.fone
- How to Downgrade iPhone 14 Pro Max to an Older Version? | Dr.fone
- In 2024, How to Change Google Play Location On Asus ROG Phone 7 Ultimate | Dr.fone
- How to Unlock iCloud Activation Lock and iCloud Account On iPhone 11 Pro Max?
- Everything You Need to Know About Becoming a Motion Graphic Designer for 2024
- In 2024, How to Unlock Samsung Galaxy A14 4G PIN Code/Pattern Lock/Password
- How to Get and Use Pokemon Go Promo Codes On Tecno Camon 20 Pro 5G | Dr.fone
- Tecno Pova 6 Pro 5G ADB Format Tool for PC vs. Other Unlocking Tools Which One is the Best?
- In 2024, How to Fake Snapchat Location on Realme C53 | Dr.fone
- In 2024, How to Transfer Data After Switching From Xiaomi Redmi 13C to Latest Samsung | Dr.fone
- Title: Vlogs and Travel Content Are Incomplete without a Fast-Motion Effect. Learn Step-by-Step How to Make Fast Motion Video on an iPhone in This Article
- Author: Morgan
- Created at : 2024-05-19 05:11:43
- Updated at : 2024-05-20 05:11:43
- Link: https://ai-video-editing.techidaily.com/vlogs-and-travel-content-are-incomplete-without-a-fast-motion-effect-learn-step-by-step-how-to-make-fast-motion-video-on-an-iphone-in-this-article/
- License: This work is licensed under CC BY-NC-SA 4.0.

