Want to Speed up or Slow Down a Video to Make It Look Different? Here Are the Simple Steps to Change Video Speed in Lightworks Video Editor

Want to Speed up or Slow Down a Video to Make It Look Different? Here Are the Simple Steps to Change Video Speed in Lightworks Video Editor
You must have watched videos where certain parts have different speeds. Have you ever wondered why video creators change the speed of the video? The slow-motion video has some eye-pleasing effects. But the video creator’s intention could be to draw attention to the detail. Similarly, they speed up the video to go through boring parts faster than usual.
Apart from that, the speeding up of a video clip may make it look funny. Sometimes, speeding up a video is necessary to limit its duration. You will need a feature-rich video editor to speed up your video. Lightworks is a powerful video editor that can speed up or slow down your video. We will illustrate how to change video speed in Lightworks.
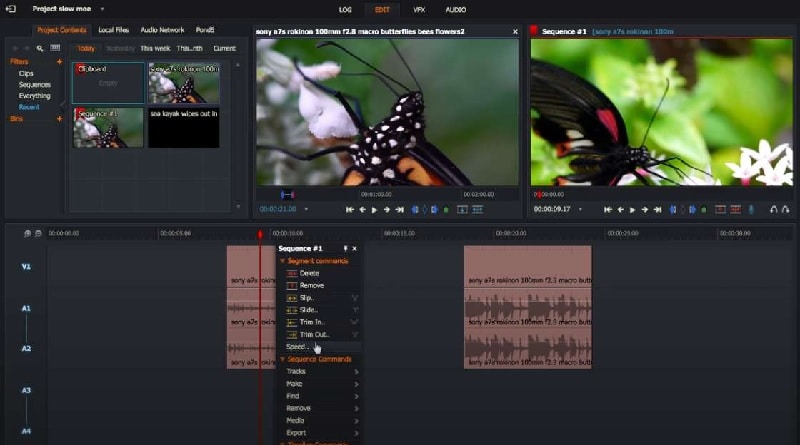
Part I. How to Speed Up Video in Lightworks
If you are making short-duration videos, you may need to speed up your video. You will come across many shorts and reels where sped-up videos look so funny. You can also speed up certain parts in your video where detail to attention is not required. Here are the steps for Lightworks to speed up a video.
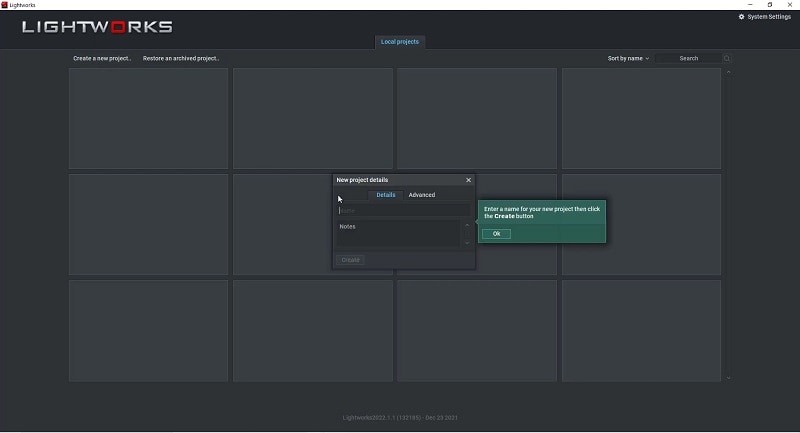
Step1 Launch Lightworks and click the New A New Project option. Enter a name for your video project and click Create button.
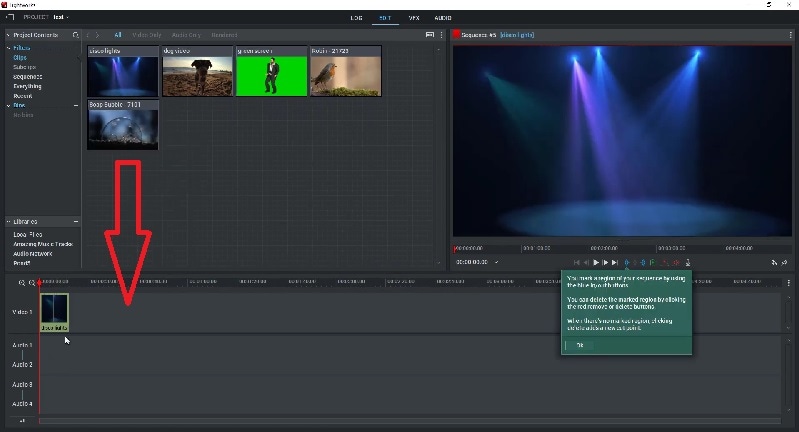
Step2 Drag and drop your video clip to the video editor under the Edit tab. Drag and drop the video clip from the Edit tab to the timeline.
Step3 Right-click the video clip on the timeline. Click the Speed option from the menu.
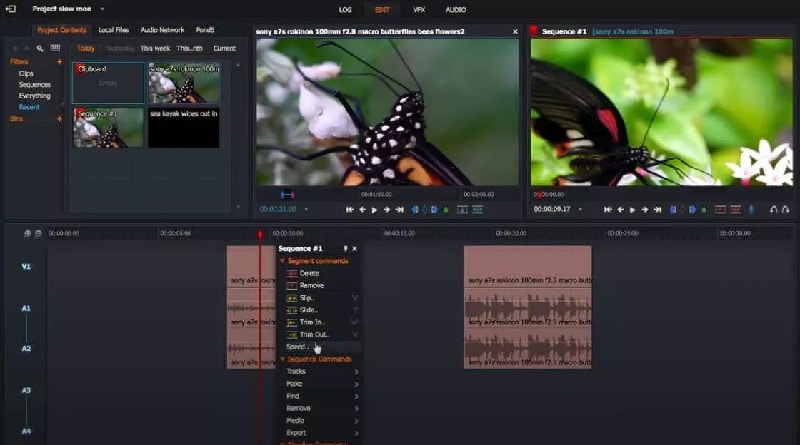
Step4 You can select from any preset. To speed up, you need to select options above 100%. Click the Do It button to save the changes you have made.
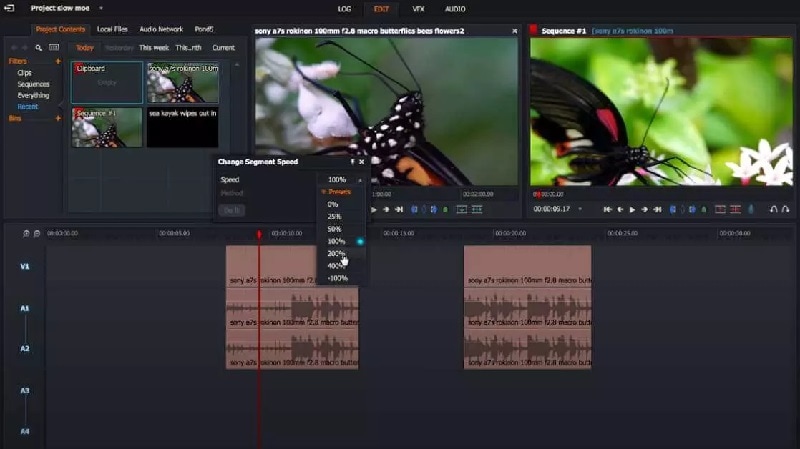
Part II. How to Slow Down Video in Lightworks
More often than not, you will want to slow down your video speed. This is because slow-motion video is in trend. You may want to slow down your video so that the viewers pay attention to the detail. Besides, slowing down certain motions looks extremely eye-catching. Here are the steps to slow down video in Lightworks.
Step1 If you have dragged and dropped your video clip onto the timeline, right-click on the video clip.
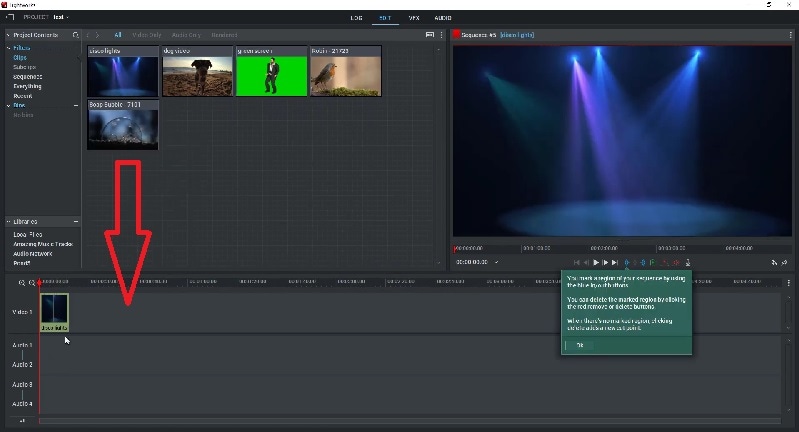
Step2 Select the Speed option from the menu. You need to select a speed preset, but it has to be below 100% so that your video slows down.
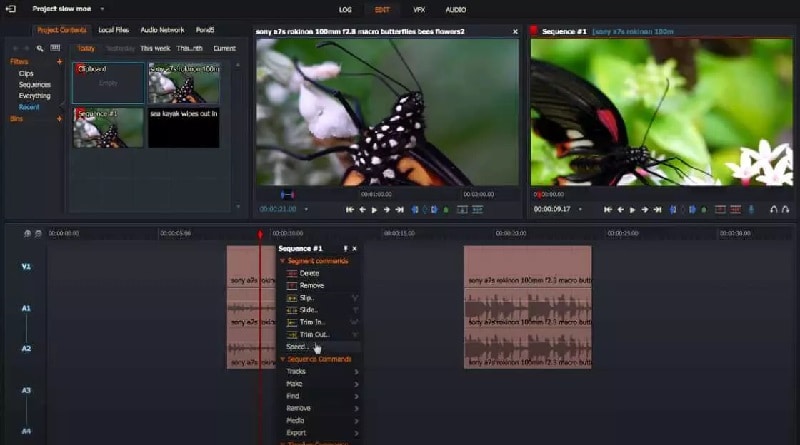
Step3 Finally, click the Do It button and play the video to check out the outcome.
Part III. Bonus Tips for Changing Video Speed in Lightworks
Now that you know how to speed up video Lightworks, here are some important tips to pay attention to. These tips will help you edit your video better, especially when you are tweaking the speed factor.
Lightworks speed up part of a video - If you want to speed up only a certain part of your video, you need to split the video. All you need to do is reposition the playhead and click the “C” icon to split the video. Thereafter, you can select any split portion of the video and follow the steps to change the speed.
Audio Video Syncing - You can alter the speed of the video as well as the audio on Lightworks. When you are performing speed-up video in Lightworks, you should ideally change the speed of the audio. This will make the video and the audio stay in sync so that it does not sound awkward.
Work with Frame Rate - If you know beforehand that you will change the speed of a certain scene, you should set the frame rate accordingly. If you want to slow down a video, you should shoot it at a higher frame rate. Similarly, if you want to speed up your video, you should shoot it at a lower frame rate. This is because, after the change of speed in Lightworks, the frame rate will be usual rather than abnormal. The video will be soothing to the eyes of the viewers.
Part IV. Is There an Easier Way to Change Video Speed?
There is no doubt that most users find Lightworks difficult to operate. This is because the user interface is not tailor-made for beginners. It is more for advanced video creators who have experience in video editing. If you are looking for an easier way to change video speed, we recommend Wondershare Filmora.
Filmora is a professional video editor like Lightworks. However, Filmora has wider popularity because of its intuitive user interface. Anyone can use the video editor without prior experience, and they can easily locate the required options. In fact, Filmora has a better collection of stock media files, video effects, and graphical elements. You can also save the edited video file in different file formats as per your requirements.
As a matter of fact, Filmora offers more options than Lightworks on how to speed up the video. You can choose from presets, customize speed uniformly as well as vary the speed through the video through curvy graphs. We will illustrate all the different ways to change the speed of your video on Wondershare Filmora .
Methods to Change Video Speed in Filmora in Simple Steps
We have already stated that there are different ways to change video speed in Filmora. Now, we will illustrate the steps for every method. You can choose any of them to change the speed of the video as per your requirements.
You can watch the video to understand these methods in detail.
Method 1. Change The Speed of Video From Presets
We have stated how to speed up a video in Lightworks from presets. The same method is available on Filmora as well. You can choose from the different preset speed options. This is the easiest way to speed up or slow down your video. In comparison to Lightworks, Filmora has more preset options. Here are the steps to speed up video by choosing a preset in Filmora.
Free Download For Win 7 or later(64-bit)
Free Download For macOS 10.14 or later
Step1 Install Filmora on your computer. It is available for Windows and macOS. Launch Filmora and select Create New Project option.

Step2 You need to import the desired video file in Filmora. Go to File> Import Media and select the Import Media Files option. You can browse your computer to select the video file whose speed you want to change. The chosen video file will be included in the Project Media folder. You can even drag and drop the target video file from your computer to the Project Media folder.

Step3 Drop the video file onto the timeline. Click on the video clip on the timeline to select it. Click on the Speed icon located at the top of the timeline.

Step4 Go to Fast or Slow and select a speed preset as per your requirements. If you are satisfied with the video, click on the Export button.

Method 2. Customize The Change of Speed in Wondershare Filmora
You may want to set a speed that is not available on the preset list. Filmora has come up with the Uniform Speed option to let you customize the speed of the video as per your requirements. You can choose from 0.01X to 100X speed, and the chosen speed will be applied to the video uniformly. Here are the steps to follow.
Step1 Drag and drop the video file from the Project Media folder onto the timeline. Click on the Speed icon located at the top of the timeline.
Step2 From the menu, select the Uniform Speed option. You will see the Uniform Speed tab above the timeline.

Step3 You need to move the speed slider to set the desired speed for your video. You can play the video to see how the video speed changes.

Step4 If satisfied with the result, click on the Ok button. Thereafter, you can export the video file in any file format.
Method 3. Use Speed Ramping to Customize Your Video
Speed ramping is a unique way to change video speed. It is useful for advanced video editors that want to vary the speed differently for different sections of the video. You can set the graph with nodes as per your requirements. According to the graph you have designed, your video speed will vary. Here is how to use speed ramping to change the speed of your video.
Step1 Drag and drop the video file onto the timeline and click the Speed icon.
Step2 Click Speed Ramping option from the menu. You will see Speed Ramping tab above the timeline.

Step3 You can choose any preset available. If you want to customize the graph, select the Customize option and edit the nodes.
Step4 Play the video as you make the changes. Click the Ok button if the output is as per your expectation. Finally, click the Export button to save the video file.
Conclusion
We have illustrated how to speed up a video in Lightworks. However, you can only choose from the fixed presets available in Lightworks. If you want to customize the speed of your video, Wondershare Filmora is a better alternative to Lightworks. Several methods are available to change your video’s speed in Filmora. Therefore, you can get the desired video output in simpler steps.
Method 1. Change The Speed of Video From Presets
We have stated how to speed up a video in Lightworks from presets. The same method is available on Filmora as well. You can choose from the different preset speed options. This is the easiest way to speed up or slow down your video. In comparison to Lightworks, Filmora has more preset options. Here are the steps to speed up video by choosing a preset in Filmora.
Free Download For Win 7 or later(64-bit)
Free Download For macOS 10.14 or later
Step1 Install Filmora on your computer. It is available for Windows and macOS. Launch Filmora and select Create New Project option.

Step2 You need to import the desired video file in Filmora. Go to File> Import Media and select the Import Media Files option. You can browse your computer to select the video file whose speed you want to change. The chosen video file will be included in the Project Media folder. You can even drag and drop the target video file from your computer to the Project Media folder.

Step3 Drop the video file onto the timeline. Click on the video clip on the timeline to select it. Click on the Speed icon located at the top of the timeline.

Step4 Go to Fast or Slow and select a speed preset as per your requirements. If you are satisfied with the video, click on the Export button.

Method 2. Customize The Change of Speed in Wondershare Filmora
You may want to set a speed that is not available on the preset list. Filmora has come up with the Uniform Speed option to let you customize the speed of the video as per your requirements. You can choose from 0.01X to 100X speed, and the chosen speed will be applied to the video uniformly. Here are the steps to follow.
Step1 Drag and drop the video file from the Project Media folder onto the timeline. Click on the Speed icon located at the top of the timeline.
Step2 From the menu, select the Uniform Speed option. You will see the Uniform Speed tab above the timeline.

Step3 You need to move the speed slider to set the desired speed for your video. You can play the video to see how the video speed changes.

Step4 If satisfied with the result, click on the Ok button. Thereafter, you can export the video file in any file format.
Method 3. Use Speed Ramping to Customize Your Video
Speed ramping is a unique way to change video speed. It is useful for advanced video editors that want to vary the speed differently for different sections of the video. You can set the graph with nodes as per your requirements. According to the graph you have designed, your video speed will vary. Here is how to use speed ramping to change the speed of your video.
Step1 Drag and drop the video file onto the timeline and click the Speed icon.
Step2 Click Speed Ramping option from the menu. You will see Speed Ramping tab above the timeline.

Step3 You can choose any preset available. If you want to customize the graph, select the Customize option and edit the nodes.
Step4 Play the video as you make the changes. Click the Ok button if the output is as per your expectation. Finally, click the Export button to save the video file.
Conclusion
We have illustrated how to speed up a video in Lightworks. However, you can only choose from the fixed presets available in Lightworks. If you want to customize the speed of your video, Wondershare Filmora is a better alternative to Lightworks. Several methods are available to change your video’s speed in Filmora. Therefore, you can get the desired video output in simpler steps.
This Article Discusses the Splitting of the Video Clips in DaVinci Resolve Explicitly. There Is Also a Brief Description of Its Best Alternative, Wondershare Filmora. This Is Also Practically Relevant and Reasonable as Well
The DaVinci resolve is an amazing video editing software that attracts professionals and beginners to work on it. You can also fulfil your wish to edit or split the video clips in it without facing any difficulty.
But, some of them are looking for guidance to work on DaVinci resolve correctly. This article discusses the splitting of the video clips in DaVinci Resolve explicitly. There is also a brief description of its best alternative, Wondershare Filmora. This is also practically relevant and reasonable as well.
How you can split the video clips in DaVinci resolve
DaVinci resolve is a comprehensive program that allows you to deliver different solutions. It can be related to editing the videos, correcting the colours, and producing the videos and audio. Just follow the simple steps below for splitting the videos in the DaVinci resolve:
Part 1 - Splitting of one clip:
Step 1: After installing the DaVinci resolve, launch it in your system.
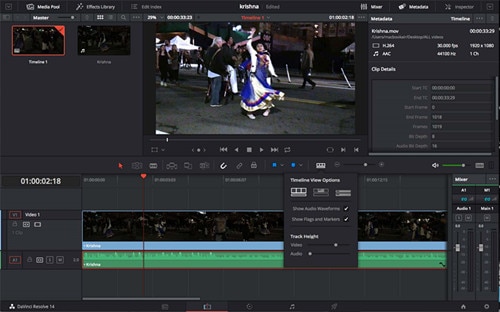
Step 2: Import and place the media file on the timeline from the library. This is the clip you want to split. Select the blade tool from where you want to split the clip. Use the timeline from the menu and go to Split Clip. Shortcut keys are also available that are Ctrl+\ or Cmd+\ or Cmd+B. Now the split clip is easily visible to you. You can use this clip wherever you want to use it.
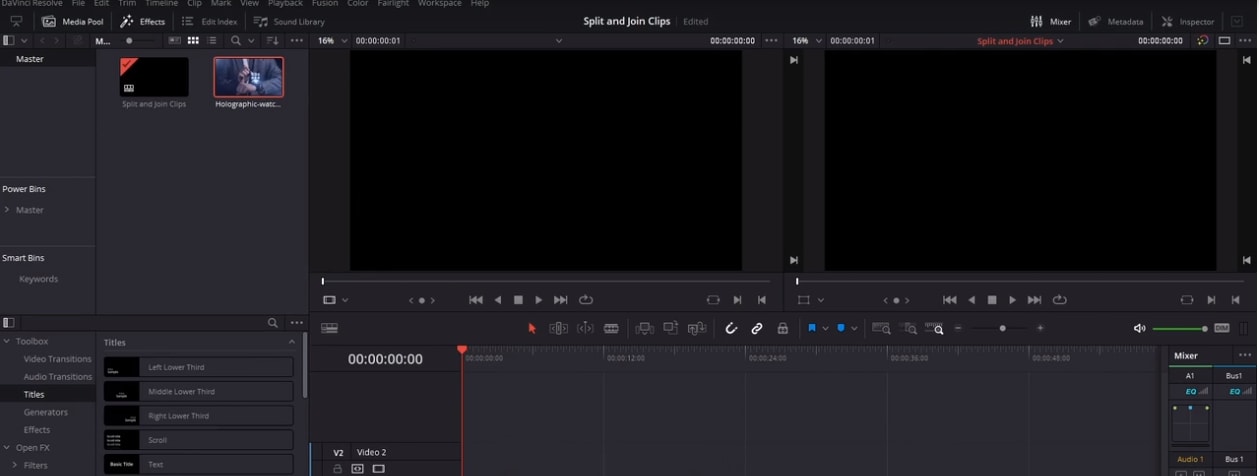
Part 2- Splitting of more than one clip on various tracks:
You can also split the number of video and audio clips at the exact timings in DaVinci resolve.
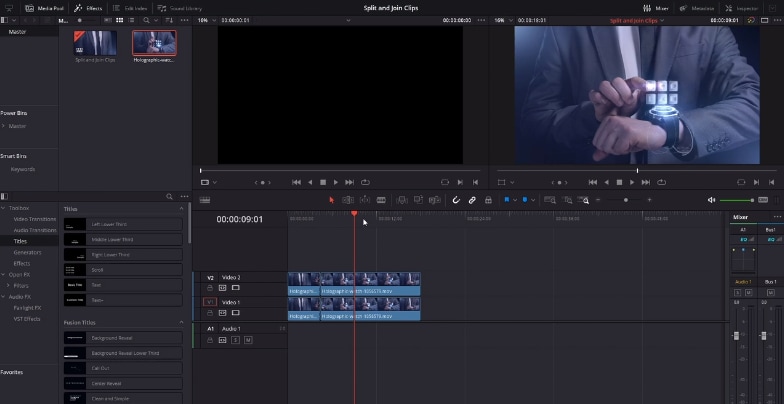
Step 1: When there are piles of clips one after the other, the selection of both of the clips is essential, which have to be split. Keep moving the playhead to the exact area where there is a requirement for the changes.
Step 2: Just keep pressing Command or Control + \ keys, or click on timeline> Split Clip. The selected clips of audio and video get split together now. No more slitting of the clips individually. This option is more appropriate for you when creating and managing different parts of massive projects.
An easier way to split the video clips
Without any doubt, DaVinci resolve is an advanced level software for video editing at the professional level. Moreover, the pricing of DaVinci resolve is $299, and it shows that it is quite expensive for many people. Due to this, you need an economical solution that is Filmora Video Editor .
Most graphic designers and video editors recommend Wondershare Fimora because it is lighter for the systems. All the tools are simplified in using like trimming or splitting the clips. You can convert split video clips into other formats in Wondershare Filmora. Add and apply all the special effects on your videos and export them wherever you want.
For Win 7 or later (64-bit)
For macOS 10.14 or later
Features:
- Splitting or trimming of the video clips
- Removing the noise
- Addition of the transition effects
- Availability of controls for the audio, sound and video
- Separating the audio from the video
Part 1 - Splitting the clips in Wondershare Filmora
If you want to split the clips or trim some parts of the videos, Wondershare Filmora is the right choice. Below are detailed steps for trimming the videos quickly and easily.
Step :1
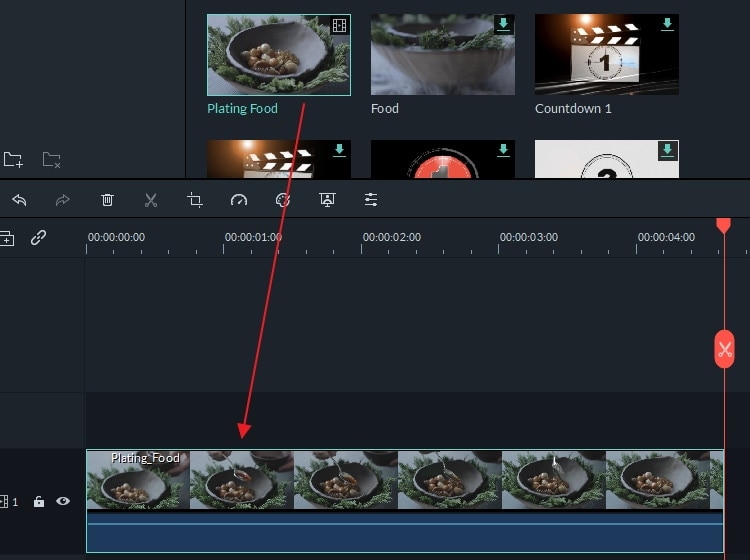
Drag or drop the files from Media Library or Click on “Import” after selecting the video clips to make the clip visible on the timeline. No need to worry regarding the formats as Wondershare Filmora is highly supportive towards it/
Step:2
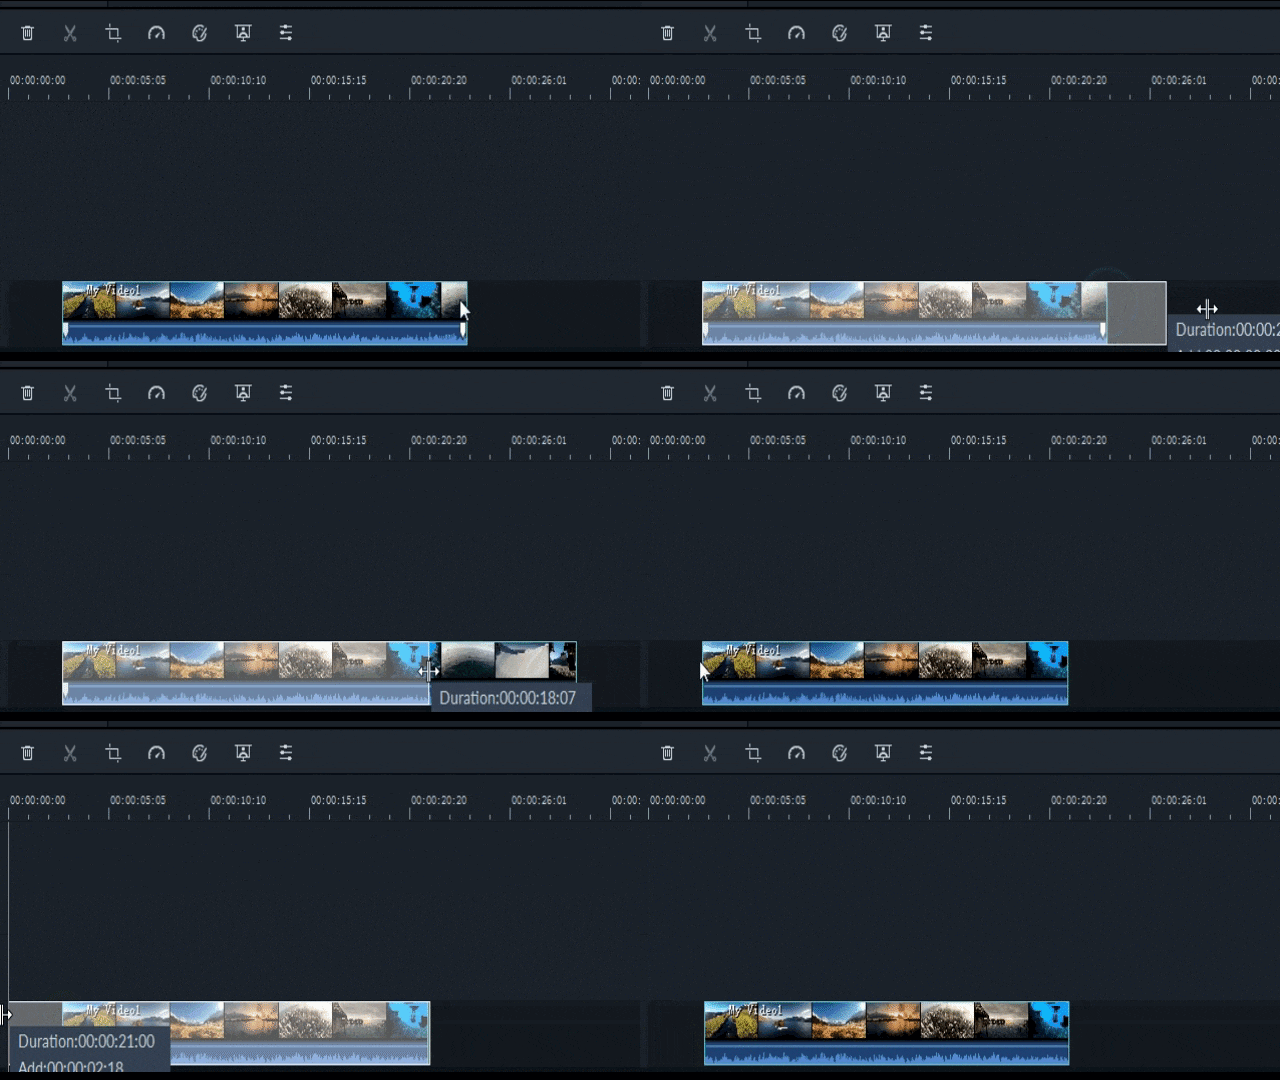
Keep hanging the mouse on the corner of the video until and unless the trimming icon appears. So, you can drag ahead or in a backward direction at the endpoints of the video you want to trim.
Step: 3
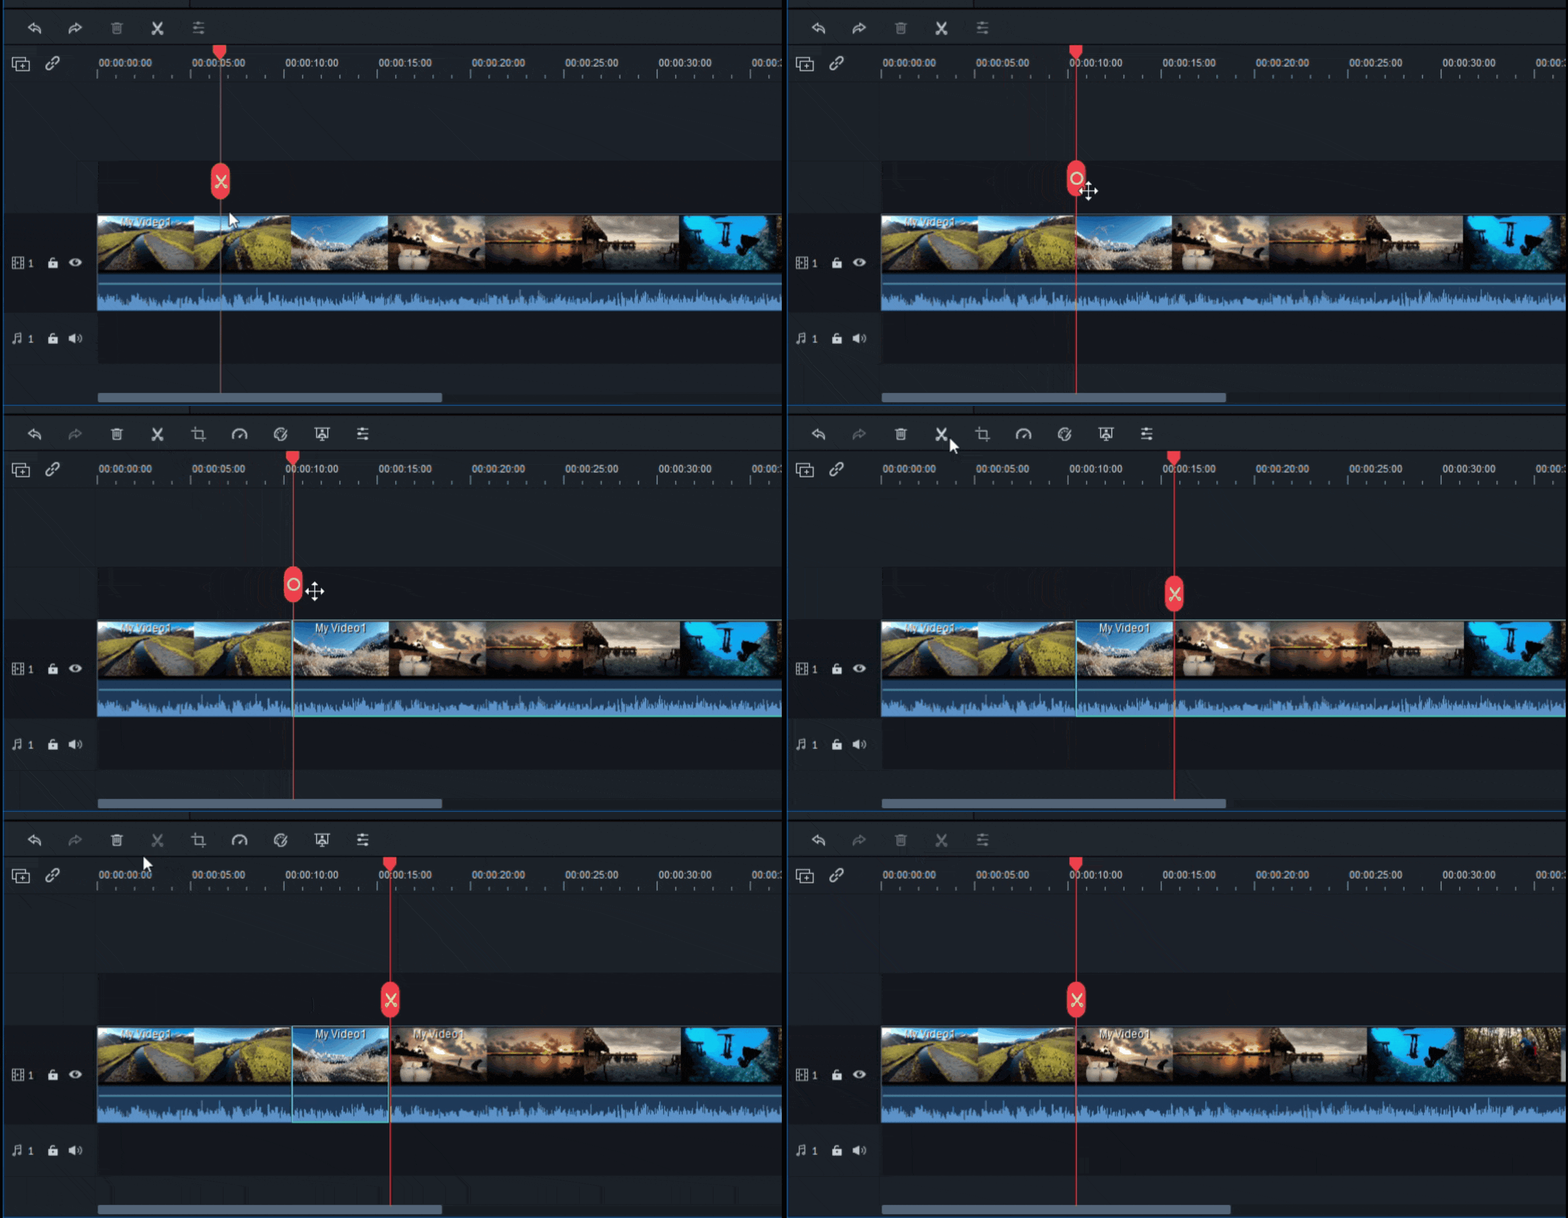
You don’t want the video parts in the centre of the video clips. First, split the video and delete it. For splitting the video, click on the icon of the scissor.
Step: 4
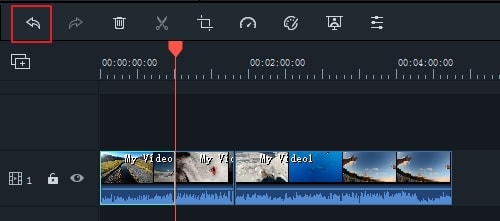
For deleting the part of the undesired part of the video, click on the dustbin icon. If there is any deletion by mistake, there is no need to worry about it. Click on the undo icon to make the video appear on the timeline again.
Part 2 - Splitting and trimming the clips in Wondershare Filmora:
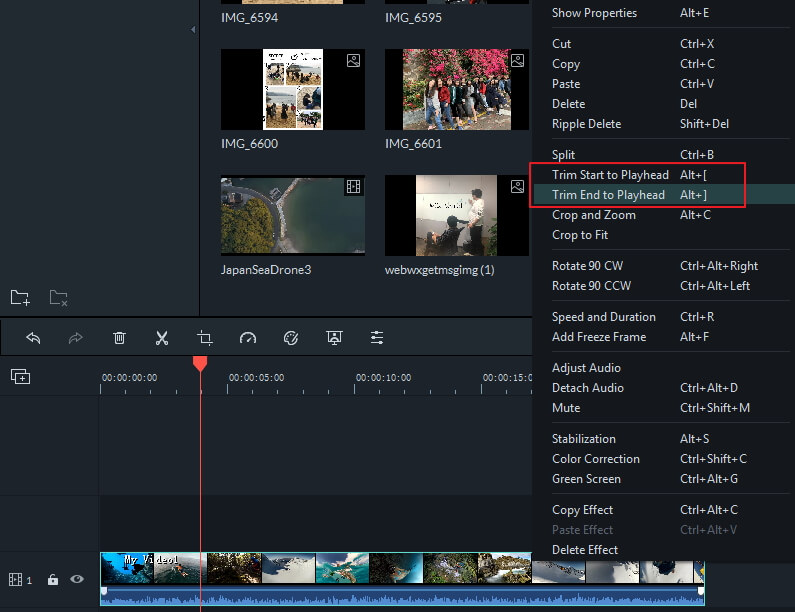
Apart from the above steps for trimming and splitting the videos in Wondershare Filmora, the position of the video has to be in the place head of the frame that you are willing to trim. Right-click on the clip and select the option of “Trim Start to Playhead or Trim End to Playhead “ for deleting the content of the video ahead or back of it.
In the latest version of the Wondershare Filmora, you can even trim the video without adding it to the timeline. A similar video can easily split multiple times and load only the required one. Go through the following steps to split the clips in a faster way:
- You can easily preview the video first from the library of your media files.
- Select the clip which you want to split or trim by selecting from the beginning till the end
- After dragging, you can view the trim section
- Keep repeating the steps mentioned above for splitting the videos

Although various editing software is available, Wondershare Filmora has to be on the top. It is the best choice to bring your imagination into reality, whether it is transitioning, applying the effects or importing/exporting the videos. All the options are suitable in front and visible on your timeline. Wondershare Filmora supports different operating systems as well. Even no proper training is required, so start using Wondershare Filmora today to get your editing done.
Step 2: Import and place the media file on the timeline from the library. This is the clip you want to split. Select the blade tool from where you want to split the clip. Use the timeline from the menu and go to Split Clip. Shortcut keys are also available that are Ctrl+\ or Cmd+\ or Cmd+B. Now the split clip is easily visible to you. You can use this clip wherever you want to use it.

Part 2- Splitting of more than one clip on various tracks:
You can also split the number of video and audio clips at the exact timings in DaVinci resolve.
Step 1: When there are piles of clips one after the other, the selection of both of the clips is essential, which have to be split. Keep moving the playhead to the exact area where there is a requirement for the changes.
Step 2: Just keep pressing Command or Control + \ keys, or click on timeline> Split Clip. The selected clips of audio and video get split together now. No more slitting of the clips individually. This option is more appropriate for you when creating and managing different parts of massive projects.

An easier way to split the video clips
Without any doubt, DaVinci resolve is an advanced level software for video editing at the professional level. Moreover, the pricing of DaVinci resolve is $299, and it shows that it is quite expensive for many people. Due to this, you need an economical solution that is Filmora Video Editor .
Most graphic designers and video editors recommend Wondershare Fimora because it is lighter for the systems. All the tools are simplified in using like trimming or splitting the clips. You can convert split video clips into other formats in Wondershare Filmora. Add and apply all the special effects on your videos and export them wherever you want.
For Win 7 or later (64-bit)
For macOS 10.14 or later
Features:
- Splitting or trimming of the video clips
- Removing the noise
- Addition of the transition effects
- Availability of controls for the audio, sound and video
- Separating the audio from the video
Part 1 - Splitting the clips in Wondershare Filmora
If you want to split the clips or trim some parts of the videos, Wondershare Filmora is the right choice. Below are detailed steps for trimming the videos quickly and easily.
Step :1
Drag or drop the files from Media Library or Click on “Import” after selecting the video clips to make the clip visible on the timeline. No need to worry regarding the formats as Wondershare Filmora is highly supportive towards it/

Step:2
Keep hanging the mouse on the corner of the video until and unless the trimming icon appears. So, you can drag ahead or in a backward direction at the endpoints of the video you want to trim.

Step: 3
You don’t want the video parts in the centre of the video clips. First, split the video and delete it. For splitting the video, click on the icon of the scissor.

Step: 4
For deleting the part of the undesired part of the video, click on the dustbin icon. If there is any deletion by mistake, there is no need to worry about it. Click on the undo icon to make the video appear on the timeline again.

Part 2 - Splitting and trimming the clips in Wondershare Filmora:
Apart from the above steps for trimming and splitting the videos in Wondershare Filmora, the position of the video has to be in the place head of the frame that you are willing to trim. Right-click on the clip and select the option of “Trim Start to Playhead or Trim End to Playhead “ for deleting the content of the video ahead or back of it.

In the latest version of the Wondershare Filmora, you can even trim the video without adding it to the timeline. A similar video can easily split multiple times and load only the required one. Go through the following steps to split the clips in a faster way:
- You can easily preview the video first from the library of your media files.
- Select the clip which you want to split or trim by selecting from the beginning till the end
- After dragging, you can view the trim section
- Keep repeating the steps mentioned above for splitting the videos

Although various editing software is available, Wondershare Filmora has to be on the top. It is the best choice to bring your imagination into reality, whether it is transitioning, applying the effects or importing/exporting the videos. All the options are suitable in front and visible on your timeline. Wondershare Filmora supports different operating systems as well. Even no proper training is required, so start using Wondershare Filmora today to get your editing done.
Step 2: Import and place the media file on the timeline from the library. This is the clip you want to split. Select the blade tool from where you want to split the clip. Use the timeline from the menu and go to Split Clip. Shortcut keys are also available that are Ctrl+\ or Cmd+\ or Cmd+B. Now the split clip is easily visible to you. You can use this clip wherever you want to use it.

Part 2- Splitting of more than one clip on various tracks:
You can also split the number of video and audio clips at the exact timings in DaVinci resolve.
Step 1: When there are piles of clips one after the other, the selection of both of the clips is essential, which have to be split. Keep moving the playhead to the exact area where there is a requirement for the changes.
Step 2: Just keep pressing Command or Control + \ keys, or click on timeline> Split Clip. The selected clips of audio and video get split together now. No more slitting of the clips individually. This option is more appropriate for you when creating and managing different parts of massive projects.

An easier way to split the video clips
Without any doubt, DaVinci resolve is an advanced level software for video editing at the professional level. Moreover, the pricing of DaVinci resolve is $299, and it shows that it is quite expensive for many people. Due to this, you need an economical solution that is Filmora Video Editor .
Most graphic designers and video editors recommend Wondershare Fimora because it is lighter for the systems. All the tools are simplified in using like trimming or splitting the clips. You can convert split video clips into other formats in Wondershare Filmora. Add and apply all the special effects on your videos and export them wherever you want.
For Win 7 or later (64-bit)
For macOS 10.14 or later
Features:
- Splitting or trimming of the video clips
- Removing the noise
- Addition of the transition effects
- Availability of controls for the audio, sound and video
- Separating the audio from the video
Part 1 - Splitting the clips in Wondershare Filmora
If you want to split the clips or trim some parts of the videos, Wondershare Filmora is the right choice. Below are detailed steps for trimming the videos quickly and easily.
Step :1
Drag or drop the files from Media Library or Click on “Import” after selecting the video clips to make the clip visible on the timeline. No need to worry regarding the formats as Wondershare Filmora is highly supportive towards it/

Step:2
Keep hanging the mouse on the corner of the video until and unless the trimming icon appears. So, you can drag ahead or in a backward direction at the endpoints of the video you want to trim.

Step: 3
You don’t want the video parts in the centre of the video clips. First, split the video and delete it. For splitting the video, click on the icon of the scissor.

Step: 4
For deleting the part of the undesired part of the video, click on the dustbin icon. If there is any deletion by mistake, there is no need to worry about it. Click on the undo icon to make the video appear on the timeline again.

Part 2 - Splitting and trimming the clips in Wondershare Filmora:
Apart from the above steps for trimming and splitting the videos in Wondershare Filmora, the position of the video has to be in the place head of the frame that you are willing to trim. Right-click on the clip and select the option of “Trim Start to Playhead or Trim End to Playhead “ for deleting the content of the video ahead or back of it.

In the latest version of the Wondershare Filmora, you can even trim the video without adding it to the timeline. A similar video can easily split multiple times and load only the required one. Go through the following steps to split the clips in a faster way:
- You can easily preview the video first from the library of your media files.
- Select the clip which you want to split or trim by selecting from the beginning till the end
- After dragging, you can view the trim section
- Keep repeating the steps mentioned above for splitting the videos

Although various editing software is available, Wondershare Filmora has to be on the top. It is the best choice to bring your imagination into reality, whether it is transitioning, applying the effects or importing/exporting the videos. All the options are suitable in front and visible on your timeline. Wondershare Filmora supports different operating systems as well. Even no proper training is required, so start using Wondershare Filmora today to get your editing done.
Step 2: Import and place the media file on the timeline from the library. This is the clip you want to split. Select the blade tool from where you want to split the clip. Use the timeline from the menu and go to Split Clip. Shortcut keys are also available that are Ctrl+\ or Cmd+\ or Cmd+B. Now the split clip is easily visible to you. You can use this clip wherever you want to use it.

Part 2- Splitting of more than one clip on various tracks:
You can also split the number of video and audio clips at the exact timings in DaVinci resolve.
Step 1: When there are piles of clips one after the other, the selection of both of the clips is essential, which have to be split. Keep moving the playhead to the exact area where there is a requirement for the changes.
Step 2: Just keep pressing Command or Control + \ keys, or click on timeline> Split Clip. The selected clips of audio and video get split together now. No more slitting of the clips individually. This option is more appropriate for you when creating and managing different parts of massive projects.

An easier way to split the video clips
Without any doubt, DaVinci resolve is an advanced level software for video editing at the professional level. Moreover, the pricing of DaVinci resolve is $299, and it shows that it is quite expensive for many people. Due to this, you need an economical solution that is Filmora Video Editor .
Most graphic designers and video editors recommend Wondershare Fimora because it is lighter for the systems. All the tools are simplified in using like trimming or splitting the clips. You can convert split video clips into other formats in Wondershare Filmora. Add and apply all the special effects on your videos and export them wherever you want.
For Win 7 or later (64-bit)
For macOS 10.14 or later
Features:
- Splitting or trimming of the video clips
- Removing the noise
- Addition of the transition effects
- Availability of controls for the audio, sound and video
- Separating the audio from the video
Part 1 - Splitting the clips in Wondershare Filmora
If you want to split the clips or trim some parts of the videos, Wondershare Filmora is the right choice. Below are detailed steps for trimming the videos quickly and easily.
Step :1
Drag or drop the files from Media Library or Click on “Import” after selecting the video clips to make the clip visible on the timeline. No need to worry regarding the formats as Wondershare Filmora is highly supportive towards it/

Step:2
Keep hanging the mouse on the corner of the video until and unless the trimming icon appears. So, you can drag ahead or in a backward direction at the endpoints of the video you want to trim.

Step: 3
You don’t want the video parts in the centre of the video clips. First, split the video and delete it. For splitting the video, click on the icon of the scissor.

Step: 4
For deleting the part of the undesired part of the video, click on the dustbin icon. If there is any deletion by mistake, there is no need to worry about it. Click on the undo icon to make the video appear on the timeline again.

Part 2 - Splitting and trimming the clips in Wondershare Filmora:
Apart from the above steps for trimming and splitting the videos in Wondershare Filmora, the position of the video has to be in the place head of the frame that you are willing to trim. Right-click on the clip and select the option of “Trim Start to Playhead or Trim End to Playhead “ for deleting the content of the video ahead or back of it.

In the latest version of the Wondershare Filmora, you can even trim the video without adding it to the timeline. A similar video can easily split multiple times and load only the required one. Go through the following steps to split the clips in a faster way:
- You can easily preview the video first from the library of your media files.
- Select the clip which you want to split or trim by selecting from the beginning till the end
- After dragging, you can view the trim section
- Keep repeating the steps mentioned above for splitting the videos

Although various editing software is available, Wondershare Filmora has to be on the top. It is the best choice to bring your imagination into reality, whether it is transitioning, applying the effects or importing/exporting the videos. All the options are suitable in front and visible on your timeline. Wondershare Filmora supports different operating systems as well. Even no proper training is required, so start using Wondershare Filmora today to get your editing done.
Splice Video Editor Online - Get Your Videos Splice
Create High-Quality Video - Wondershare Filmora
An easy and powerful YouTube video editor
Numerous video and audio effects to choose from
Detailed tutorials are provided by the official channel
We are in the digital era, and any online activity gives us a high exposure level. Making digital content and posting it online is not enough. You have to be creative and adopt an advanced mode of communication. The best place to begin is with online platforms. This is because most people find it easy to source information online instead of any other place.
The availability of video editors makes it possible to splice videos online and post them instantly, reaching thousands of viewers through social media platforms in a short time.
Recent research has shown that online videos are more effective and can help brands connect with their audience compared to other data types like images, audio, GIFs, and text, among others. Check out how to merge videos online and the advantages of going online on your video editing journey.
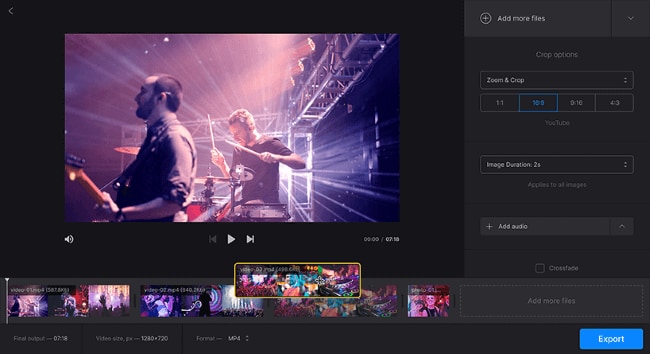
In this article
01 The Meaning of Splice Video
02 Top 6 Online Video Splice Editors
The Meaning of Splice Video
To splice a video means combining two or more video clips to form one. You can use the available editing apps to merge several videos. You need to select each video to splice and put them together in the timeline. Several apps enable you to edit your footage by trimming, cropping, adding music, and transitions, among other adjustments.
Reasons to splice video
You could be wondering why it is necessary to splice your videos. Well, people love to be creative, and working on several videos may not bring out the creativity they need. Here are some reasons that come in handy as far as splicing video is concerned.
- It isn’t easy to share many videos at once. Splicing your videos is a quick way to get your videos to move as one piece and express your message as direct as possible.
- You can also splice videos for easy management. Remember, you can edit it as one, making you finish the editing process quickly and easily.
- Merged videos make it easy to share on other platforms. It would be very hectic to promote several videos separately on media sites.
- Another reason for splicing videos is to compress them. It will take up less space compared to dealing with several videos at once.
- Spliced video is organized, indicating the starting point and endpoint of the video.
The Benefits of Online Video Editing
Since its backbone reason is to share videos online, several pros come with it. The Splice video editor online enables anyone to create engaging videos without software installation. Let’s peruse the advantages of using online video editing compared to the conventional options.
• Automatic updates
Updates are important for the normal operation of an application. It may be hectic to keep remembering when you should update your drivers on your device. However, online apps need no manual configuration as they do this automatically. You’ll always get the latest version anytime you log in. Besides, new templates and features are instantly available to you after every update.
• Easy collaboration
This comes when several people work on a project. It could be difficult to share files manually, given the rise of computer crashes and data loss. Online mechanisms come to the rescue as all files are kept in the cloud. This lets anyone working on the project access it on any device, anywhere, thereby minimizing the risks of data loss. Furthermore, multiple collaborators can log in to the same project to input their views and other additions. Anyone can upload the file from their end and make the necessary adjustments.
• Convenient
You don’t require any tools while manage Splice video editor online. You can easily make edits from anywhere as long as you have an internet connection. It also promotes easy accessibility of your files from any device. More so, making edits and polishing your video is accomplished faster than ever.
• Time-saving
You’ll get improved productivity when you work online on your video. You won’t waste time running up and down the stairs to install your app or get updates. All you need are a few clicks of a button to make quick moves as far as video editing is concerned. Instead, you can easily polish and post your clip while you figure out what works best for your audience at each step.
• Multi-OS compatible
An online video editor runs in a web browser and, therefore, can run on several operating systems. It doesn’t matter which device you use to compose your video. You can easily share it and be accessible on other platforms by several people. Likewise, the speed will not be affected no matter which operating system you use.
Top 6 Online Video Splice Editors
Now that we have seen what online video editing is best at, we need to explore the suitable Splice video editor online that will quickly bring out the creativity in you and elevate your editing ability to the next level.
1) MiniTool MovieMaker
The app comes free with no ads and is watermark-free as well. It is rich in features that help you to maneuver as you edit your video to perfection. The MiniTool lets you create continuous videos based on your vision. It also encompasses video templates that make it easy to settle on a theme.
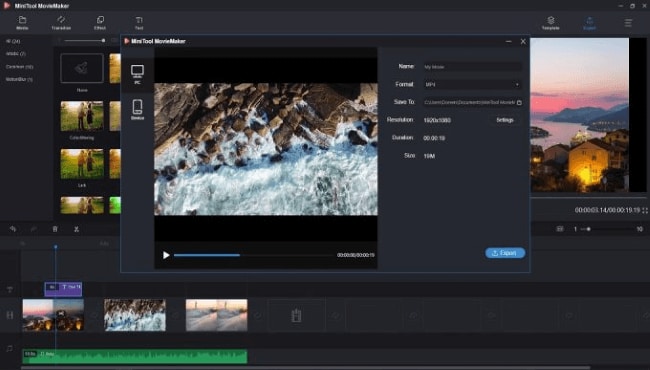
Pros
Customize videos with video transitions and animated text.
This app contains no advertisements.
It leaves no watermark on the finished video.
It has an intuitive and clean interface that enables easy editing of videos.
The app is highly compatible with popular video and audio formats.
Cons
It lacks some advanced features, like a green screen and motion speed control.
2) Filmora Video Editor
Filmora is another powerful tool with splice video templates. It has an intuitive interface that enables any level of user to easily edit videos. You can add filters and other video effects to create an engaging video. Also, make use of advanced features like keyframe animation, color matching, split screen, etc.
For Win 7 or later (64-bit)
For macOS 10.12 or later
Pros
It comes with advanced features to help you create compelling videos.
You can add music and other sound effects directly.
An intuitive interface that suits beginners.
Produce high-density videos.
Cons
It doesn’t support newer formats like HEIC photos..
3) Clipchamp
This online splice video editor offers you two modes of video creation online. You can either use the video templates or the blank project option. For templates, get customized ones right from the app’s gallery. However, you may also opt to start your video creation from scratch and make progress toward completion.
Pros
This app offers you two modes for video creation.
Preview your video clips before posting them.
Easily organize your music tracks in the timeline.
Splice your videos without quality loss.
Use styled text templates with animations.
Cons
It has no keyframe features for animation creation.
4) Kapwing
This is a video converter and splice video editor that freely edits your videos to any file format. You can use the screen-by-screen editing option for advanced editing ability. You can also bring on more creativity by using multiple scenes. Furthermore, you can’t run out of editing tools, which include rotating, splitting, and trimming, among others. Also, spice up your project by adding some background music and customizing text to the desired font and color.
Pros
It includes free music from the internet.
It comes with a large library of photos, stickers, etc.
It’s easy to use and allows editing of videos without signing in.
Cons
It lacks advanced features like speech ramping.
5) Video Editor by EaseUS
This is another reliable splice editor that comes with quality editing features. You can splice, merge, trim, and rotate your video, among other functionalities. Furthermore, the advanced features allow you to easily apply transitions and elements.
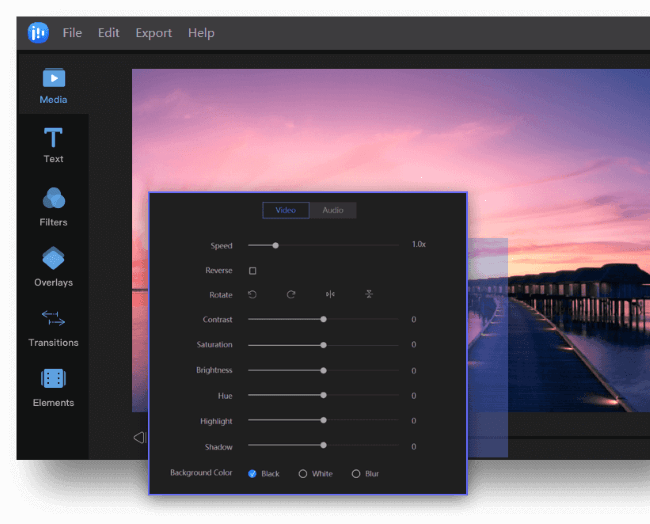
Pros
Splice your videos instantly using your mouse.
Easily detach the audio from the spliced video.
It supports various video formats.
Cons
It has limited templates.
6) WeVideo
This online editor lets you splice your videos anywhere. It supports several formats, and you can finally export your video in any format. Besides, it allows you access to free stock media like music tracks, videos, and images, among others.
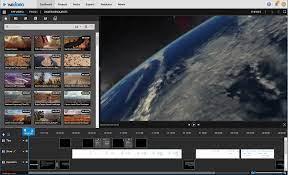
Pros
WeVideo is free to use. However, you can upgrade to the premium version for advanced features.
Directly export videos to YouTube, Instagram, etc.
Cons
The free version leaves a watermark on your videos.
Conclusion
● Are you looking forward to promoting your brand online? Then splice the video online at the best resolution for your editing purposes. You’ll quickly edit your videos and reach your target audience with just a few clicks of a button. Likewise, it is effective to monitor your viewers’ reactions through various comments and feedback. This article has brought you several editing apps for online use. You can easily pinpoint what works best for you concerning their features.
We are in the digital era, and any online activity gives us a high exposure level. Making digital content and posting it online is not enough. You have to be creative and adopt an advanced mode of communication. The best place to begin is with online platforms. This is because most people find it easy to source information online instead of any other place.
The availability of video editors makes it possible to splice videos online and post them instantly, reaching thousands of viewers through social media platforms in a short time.
Recent research has shown that online videos are more effective and can help brands connect with their audience compared to other data types like images, audio, GIFs, and text, among others. Check out how to merge videos online and the advantages of going online on your video editing journey.

In this article
01 The Meaning of Splice Video
02 Top 6 Online Video Splice Editors
The Meaning of Splice Video
To splice a video means combining two or more video clips to form one. You can use the available editing apps to merge several videos. You need to select each video to splice and put them together in the timeline. Several apps enable you to edit your footage by trimming, cropping, adding music, and transitions, among other adjustments.
Reasons to splice video
You could be wondering why it is necessary to splice your videos. Well, people love to be creative, and working on several videos may not bring out the creativity they need. Here are some reasons that come in handy as far as splicing video is concerned.
- It isn’t easy to share many videos at once. Splicing your videos is a quick way to get your videos to move as one piece and express your message as direct as possible.
- You can also splice videos for easy management. Remember, you can edit it as one, making you finish the editing process quickly and easily.
- Merged videos make it easy to share on other platforms. It would be very hectic to promote several videos separately on media sites.
- Another reason for splicing videos is to compress them. It will take up less space compared to dealing with several videos at once.
- Spliced video is organized, indicating the starting point and endpoint of the video.
The Benefits of Online Video Editing
Since its backbone reason is to share videos online, several pros come with it. The Splice video editor online enables anyone to create engaging videos without software installation. Let’s peruse the advantages of using online video editing compared to the conventional options.
• Automatic updates
Updates are important for the normal operation of an application. It may be hectic to keep remembering when you should update your drivers on your device. However, online apps need no manual configuration as they do this automatically. You’ll always get the latest version anytime you log in. Besides, new templates and features are instantly available to you after every update.
• Easy collaboration
This comes when several people work on a project. It could be difficult to share files manually, given the rise of computer crashes and data loss. Online mechanisms come to the rescue as all files are kept in the cloud. This lets anyone working on the project access it on any device, anywhere, thereby minimizing the risks of data loss. Furthermore, multiple collaborators can log in to the same project to input their views and other additions. Anyone can upload the file from their end and make the necessary adjustments.
• Convenient
You don’t require any tools while manage Splice video editor online. You can easily make edits from anywhere as long as you have an internet connection. It also promotes easy accessibility of your files from any device. More so, making edits and polishing your video is accomplished faster than ever.
• Time-saving
You’ll get improved productivity when you work online on your video. You won’t waste time running up and down the stairs to install your app or get updates. All you need are a few clicks of a button to make quick moves as far as video editing is concerned. Instead, you can easily polish and post your clip while you figure out what works best for your audience at each step.
• Multi-OS compatible
An online video editor runs in a web browser and, therefore, can run on several operating systems. It doesn’t matter which device you use to compose your video. You can easily share it and be accessible on other platforms by several people. Likewise, the speed will not be affected no matter which operating system you use.
Top 6 Online Video Splice Editors
Now that we have seen what online video editing is best at, we need to explore the suitable Splice video editor online that will quickly bring out the creativity in you and elevate your editing ability to the next level.
1) MiniTool MovieMaker
The app comes free with no ads and is watermark-free as well. It is rich in features that help you to maneuver as you edit your video to perfection. The MiniTool lets you create continuous videos based on your vision. It also encompasses video templates that make it easy to settle on a theme.

Pros
Customize videos with video transitions and animated text.
This app contains no advertisements.
It leaves no watermark on the finished video.
It has an intuitive and clean interface that enables easy editing of videos.
The app is highly compatible with popular video and audio formats.
Cons
It lacks some advanced features, like a green screen and motion speed control.
2) Filmora Video Editor
Filmora is another powerful tool with splice video templates. It has an intuitive interface that enables any level of user to easily edit videos. You can add filters and other video effects to create an engaging video. Also, make use of advanced features like keyframe animation, color matching, split screen, etc.
For Win 7 or later (64-bit)
For macOS 10.12 or later
Pros
It comes with advanced features to help you create compelling videos.
You can add music and other sound effects directly.
An intuitive interface that suits beginners.
Produce high-density videos.
Cons
It doesn’t support newer formats like HEIC photos..
3) Clipchamp
This online splice video editor offers you two modes of video creation online. You can either use the video templates or the blank project option. For templates, get customized ones right from the app’s gallery. However, you may also opt to start your video creation from scratch and make progress toward completion.

Pros
This app offers you two modes for video creation.
Preview your video clips before posting them.
Easily organize your music tracks in the timeline.
Splice your videos without quality loss.
Use styled text templates with animations.
Cons
It has no keyframe features for animation creation.
4) Kapwing
This is a video converter and splice video editor that freely edits your videos to any file format. You can use the screen-by-screen editing option for advanced editing ability. You can also bring on more creativity by using multiple scenes. Furthermore, you can’t run out of editing tools, which include rotating, splitting, and trimming, among others. Also, spice up your project by adding some background music and customizing text to the desired font and color.

Pros
It includes free music from the internet.
It comes with a large library of photos, stickers, etc.
It’s easy to use and allows editing of videos without signing in.
Cons
It lacks advanced features like speech ramping.
5) Video Editor by EaseUS
This is another reliable splice editor that comes with quality editing features. You can splice, merge, trim, and rotate your video, among other functionalities. Furthermore, the advanced features allow you to easily apply transitions and elements.

Pros
Splice your videos instantly using your mouse.
Easily detach the audio from the spliced video.
It supports various video formats.
Cons
It has limited templates.
6) WeVideo
This online editor lets you splice your videos anywhere. It supports several formats, and you can finally export your video in any format. Besides, it allows you access to free stock media like music tracks, videos, and images, among others.

Pros
WeVideo is free to use. However, you can upgrade to the premium version for advanced features.
Directly export videos to YouTube, Instagram, etc.
Cons
The free version leaves a watermark on your videos.
Conclusion
● Are you looking forward to promoting your brand online? Then splice the video online at the best resolution for your editing purposes. You’ll quickly edit your videos and reach your target audience with just a few clicks of a button. Likewise, it is effective to monitor your viewers’ reactions through various comments and feedback. This article has brought you several editing apps for online use. You can easily pinpoint what works best for you concerning their features.
We are in the digital era, and any online activity gives us a high exposure level. Making digital content and posting it online is not enough. You have to be creative and adopt an advanced mode of communication. The best place to begin is with online platforms. This is because most people find it easy to source information online instead of any other place.
The availability of video editors makes it possible to splice videos online and post them instantly, reaching thousands of viewers through social media platforms in a short time.
Recent research has shown that online videos are more effective and can help brands connect with their audience compared to other data types like images, audio, GIFs, and text, among others. Check out how to merge videos online and the advantages of going online on your video editing journey.

In this article
01 The Meaning of Splice Video
02 Top 6 Online Video Splice Editors
The Meaning of Splice Video
To splice a video means combining two or more video clips to form one. You can use the available editing apps to merge several videos. You need to select each video to splice and put them together in the timeline. Several apps enable you to edit your footage by trimming, cropping, adding music, and transitions, among other adjustments.
Reasons to splice video
You could be wondering why it is necessary to splice your videos. Well, people love to be creative, and working on several videos may not bring out the creativity they need. Here are some reasons that come in handy as far as splicing video is concerned.
- It isn’t easy to share many videos at once. Splicing your videos is a quick way to get your videos to move as one piece and express your message as direct as possible.
- You can also splice videos for easy management. Remember, you can edit it as one, making you finish the editing process quickly and easily.
- Merged videos make it easy to share on other platforms. It would be very hectic to promote several videos separately on media sites.
- Another reason for splicing videos is to compress them. It will take up less space compared to dealing with several videos at once.
- Spliced video is organized, indicating the starting point and endpoint of the video.
The Benefits of Online Video Editing
Since its backbone reason is to share videos online, several pros come with it. The Splice video editor online enables anyone to create engaging videos without software installation. Let’s peruse the advantages of using online video editing compared to the conventional options.
• Automatic updates
Updates are important for the normal operation of an application. It may be hectic to keep remembering when you should update your drivers on your device. However, online apps need no manual configuration as they do this automatically. You’ll always get the latest version anytime you log in. Besides, new templates and features are instantly available to you after every update.
• Easy collaboration
This comes when several people work on a project. It could be difficult to share files manually, given the rise of computer crashes and data loss. Online mechanisms come to the rescue as all files are kept in the cloud. This lets anyone working on the project access it on any device, anywhere, thereby minimizing the risks of data loss. Furthermore, multiple collaborators can log in to the same project to input their views and other additions. Anyone can upload the file from their end and make the necessary adjustments.
• Convenient
You don’t require any tools while manage Splice video editor online. You can easily make edits from anywhere as long as you have an internet connection. It also promotes easy accessibility of your files from any device. More so, making edits and polishing your video is accomplished faster than ever.
• Time-saving
You’ll get improved productivity when you work online on your video. You won’t waste time running up and down the stairs to install your app or get updates. All you need are a few clicks of a button to make quick moves as far as video editing is concerned. Instead, you can easily polish and post your clip while you figure out what works best for your audience at each step.
• Multi-OS compatible
An online video editor runs in a web browser and, therefore, can run on several operating systems. It doesn’t matter which device you use to compose your video. You can easily share it and be accessible on other platforms by several people. Likewise, the speed will not be affected no matter which operating system you use.
Top 6 Online Video Splice Editors
Now that we have seen what online video editing is best at, we need to explore the suitable Splice video editor online that will quickly bring out the creativity in you and elevate your editing ability to the next level.
1) MiniTool MovieMaker
The app comes free with no ads and is watermark-free as well. It is rich in features that help you to maneuver as you edit your video to perfection. The MiniTool lets you create continuous videos based on your vision. It also encompasses video templates that make it easy to settle on a theme.

Pros
Customize videos with video transitions and animated text.
This app contains no advertisements.
It leaves no watermark on the finished video.
It has an intuitive and clean interface that enables easy editing of videos.
The app is highly compatible with popular video and audio formats.
Cons
It lacks some advanced features, like a green screen and motion speed control.
2) Filmora Video Editor
Filmora is another powerful tool with splice video templates. It has an intuitive interface that enables any level of user to easily edit videos. You can add filters and other video effects to create an engaging video. Also, make use of advanced features like keyframe animation, color matching, split screen, etc.
For Win 7 or later (64-bit)
For macOS 10.12 or later
Pros
It comes with advanced features to help you create compelling videos.
You can add music and other sound effects directly.
An intuitive interface that suits beginners.
Produce high-density videos.
Cons
It doesn’t support newer formats like HEIC photos..
3) Clipchamp
This online splice video editor offers you two modes of video creation online. You can either use the video templates or the blank project option. For templates, get customized ones right from the app’s gallery. However, you may also opt to start your video creation from scratch and make progress toward completion.

Pros
This app offers you two modes for video creation.
Preview your video clips before posting them.
Easily organize your music tracks in the timeline.
Splice your videos without quality loss.
Use styled text templates with animations.
Cons
It has no keyframe features for animation creation.
4) Kapwing
This is a video converter and splice video editor that freely edits your videos to any file format. You can use the screen-by-screen editing option for advanced editing ability. You can also bring on more creativity by using multiple scenes. Furthermore, you can’t run out of editing tools, which include rotating, splitting, and trimming, among others. Also, spice up your project by adding some background music and customizing text to the desired font and color.

Pros
It includes free music from the internet.
It comes with a large library of photos, stickers, etc.
It’s easy to use and allows editing of videos without signing in.
Cons
It lacks advanced features like speech ramping.
5) Video Editor by EaseUS
This is another reliable splice editor that comes with quality editing features. You can splice, merge, trim, and rotate your video, among other functionalities. Furthermore, the advanced features allow you to easily apply transitions and elements.

Pros
Splice your videos instantly using your mouse.
Easily detach the audio from the spliced video.
It supports various video formats.
Cons
It has limited templates.
6) WeVideo
This online editor lets you splice your videos anywhere. It supports several formats, and you can finally export your video in any format. Besides, it allows you access to free stock media like music tracks, videos, and images, among others.

Pros
WeVideo is free to use. However, you can upgrade to the premium version for advanced features.
Directly export videos to YouTube, Instagram, etc.
Cons
The free version leaves a watermark on your videos.
Conclusion
● Are you looking forward to promoting your brand online? Then splice the video online at the best resolution for your editing purposes. You’ll quickly edit your videos and reach your target audience with just a few clicks of a button. Likewise, it is effective to monitor your viewers’ reactions through various comments and feedback. This article has brought you several editing apps for online use. You can easily pinpoint what works best for you concerning their features.
We are in the digital era, and any online activity gives us a high exposure level. Making digital content and posting it online is not enough. You have to be creative and adopt an advanced mode of communication. The best place to begin is with online platforms. This is because most people find it easy to source information online instead of any other place.
The availability of video editors makes it possible to splice videos online and post them instantly, reaching thousands of viewers through social media platforms in a short time.
Recent research has shown that online videos are more effective and can help brands connect with their audience compared to other data types like images, audio, GIFs, and text, among others. Check out how to merge videos online and the advantages of going online on your video editing journey.

In this article
01 The Meaning of Splice Video
02 Top 6 Online Video Splice Editors
The Meaning of Splice Video
To splice a video means combining two or more video clips to form one. You can use the available editing apps to merge several videos. You need to select each video to splice and put them together in the timeline. Several apps enable you to edit your footage by trimming, cropping, adding music, and transitions, among other adjustments.
Reasons to splice video
You could be wondering why it is necessary to splice your videos. Well, people love to be creative, and working on several videos may not bring out the creativity they need. Here are some reasons that come in handy as far as splicing video is concerned.
- It isn’t easy to share many videos at once. Splicing your videos is a quick way to get your videos to move as one piece and express your message as direct as possible.
- You can also splice videos for easy management. Remember, you can edit it as one, making you finish the editing process quickly and easily.
- Merged videos make it easy to share on other platforms. It would be very hectic to promote several videos separately on media sites.
- Another reason for splicing videos is to compress them. It will take up less space compared to dealing with several videos at once.
- Spliced video is organized, indicating the starting point and endpoint of the video.
The Benefits of Online Video Editing
Since its backbone reason is to share videos online, several pros come with it. The Splice video editor online enables anyone to create engaging videos without software installation. Let’s peruse the advantages of using online video editing compared to the conventional options.
• Automatic updates
Updates are important for the normal operation of an application. It may be hectic to keep remembering when you should update your drivers on your device. However, online apps need no manual configuration as they do this automatically. You’ll always get the latest version anytime you log in. Besides, new templates and features are instantly available to you after every update.
• Easy collaboration
This comes when several people work on a project. It could be difficult to share files manually, given the rise of computer crashes and data loss. Online mechanisms come to the rescue as all files are kept in the cloud. This lets anyone working on the project access it on any device, anywhere, thereby minimizing the risks of data loss. Furthermore, multiple collaborators can log in to the same project to input their views and other additions. Anyone can upload the file from their end and make the necessary adjustments.
• Convenient
You don’t require any tools while manage Splice video editor online. You can easily make edits from anywhere as long as you have an internet connection. It also promotes easy accessibility of your files from any device. More so, making edits and polishing your video is accomplished faster than ever.
• Time-saving
You’ll get improved productivity when you work online on your video. You won’t waste time running up and down the stairs to install your app or get updates. All you need are a few clicks of a button to make quick moves as far as video editing is concerned. Instead, you can easily polish and post your clip while you figure out what works best for your audience at each step.
• Multi-OS compatible
An online video editor runs in a web browser and, therefore, can run on several operating systems. It doesn’t matter which device you use to compose your video. You can easily share it and be accessible on other platforms by several people. Likewise, the speed will not be affected no matter which operating system you use.
Top 6 Online Video Splice Editors
Now that we have seen what online video editing is best at, we need to explore the suitable Splice video editor online that will quickly bring out the creativity in you and elevate your editing ability to the next level.
1) MiniTool MovieMaker
The app comes free with no ads and is watermark-free as well. It is rich in features that help you to maneuver as you edit your video to perfection. The MiniTool lets you create continuous videos based on your vision. It also encompasses video templates that make it easy to settle on a theme.

Pros
Customize videos with video transitions and animated text.
This app contains no advertisements.
It leaves no watermark on the finished video.
It has an intuitive and clean interface that enables easy editing of videos.
The app is highly compatible with popular video and audio formats.
Cons
It lacks some advanced features, like a green screen and motion speed control.
2) Filmora Video Editor
Filmora is another powerful tool with splice video templates. It has an intuitive interface that enables any level of user to easily edit videos. You can add filters and other video effects to create an engaging video. Also, make use of advanced features like keyframe animation, color matching, split screen, etc.
For Win 7 or later (64-bit)
For macOS 10.12 or later
Pros
It comes with advanced features to help you create compelling videos.
You can add music and other sound effects directly.
An intuitive interface that suits beginners.
Produce high-density videos.
Cons
It doesn’t support newer formats like HEIC photos..
3) Clipchamp
This online splice video editor offers you two modes of video creation online. You can either use the video templates or the blank project option. For templates, get customized ones right from the app’s gallery. However, you may also opt to start your video creation from scratch and make progress toward completion.

Pros
This app offers you two modes for video creation.
Preview your video clips before posting them.
Easily organize your music tracks in the timeline.
Splice your videos without quality loss.
Use styled text templates with animations.
Cons
It has no keyframe features for animation creation.
4) Kapwing
This is a video converter and splice video editor that freely edits your videos to any file format. You can use the screen-by-screen editing option for advanced editing ability. You can also bring on more creativity by using multiple scenes. Furthermore, you can’t run out of editing tools, which include rotating, splitting, and trimming, among others. Also, spice up your project by adding some background music and customizing text to the desired font and color.

Pros
It includes free music from the internet.
It comes with a large library of photos, stickers, etc.
It’s easy to use and allows editing of videos without signing in.
Cons
It lacks advanced features like speech ramping.
5) Video Editor by EaseUS
This is another reliable splice editor that comes with quality editing features. You can splice, merge, trim, and rotate your video, among other functionalities. Furthermore, the advanced features allow you to easily apply transitions and elements.

Pros
Splice your videos instantly using your mouse.
Easily detach the audio from the spliced video.
It supports various video formats.
Cons
It has limited templates.
6) WeVideo
This online editor lets you splice your videos anywhere. It supports several formats, and you can finally export your video in any format. Besides, it allows you access to free stock media like music tracks, videos, and images, among others.

Pros
WeVideo is free to use. However, you can upgrade to the premium version for advanced features.
Directly export videos to YouTube, Instagram, etc.
Cons
The free version leaves a watermark on your videos.
Conclusion
● Are you looking forward to promoting your brand online? Then splice the video online at the best resolution for your editing purposes. You’ll quickly edit your videos and reach your target audience with just a few clicks of a button. Likewise, it is effective to monitor your viewers’ reactions through various comments and feedback. This article has brought you several editing apps for online use. You can easily pinpoint what works best for you concerning their features.
Can You Make an Fcpx Slideshow? Undoubtedly Yes, with the Unlimited Best Fcpx Slideshow Templates Available. To Know How to, Follow the Discussion Below
10+ Best Unlimited FCPX Slideshow Templates
An easy yet powerful editor
Numerous effects to choose from
Detailed tutorials provided by the official channel
The Final Cut Pro is one of the best and the most well-known tools or software for editing and making slideshows and videos. And making slideshows with fcpx leads to the production of the finest and the most creative slideshow videos!
The best part about using fcpx is that one can use the best of the best fcpx slideshow template for free. The software includes a large variety of templates which makes your slideshows look unique, and you will find templates that will suit every necessary purpose for the slideshow.
In this article
01 [10+ Best Final Cut Pro Slideshow Templates in 2022](#Part 1)
02 [How to Create a Slideshow in Final Cut Pro?](#Part 2)
03 [FAQ of FCPX Slideshow Templates](#Part 3)
Part 1 Best Final Cut Pro Slideshow Templates in 2022
Let us begin our discussion with the best Final Cut Pro slideshow templates in 2022. We will put forth the names of the templates and a short description of them so that you know what they are best suitable for.
So, here are the best Final Cut Pro slideshow templates for 2022.
01Colorful Liquid Slideshow
The Colorful Liquid Slideshow is the template best suited for any slideshow video for promotional purposes on social media. It has a very attractive design and components that quickly draws attention. And it is needed for any promotional videos on social media platforms.
The template is all about vibrant colours and beautiful transitions, making it ideal for fashion and lifestyle videos.

02Freestyle Slideshow
If you want to play with different transitional effects on your slideshow, the Freestyle Slideshow template of FCPX is best suited for your purpose. It has many transition effects that make your slideshow look highly engaging and jaw-dropping.
It is compatible with Apple Motion also and is best for making casual and fun slideshow videos.

03Smooth Colourful Slideshow
To present a modern touch to your slideshow, the Smooth Colourful Slideshow template of FCPX is the best option. It has the integration of vibrant colours, with a sophisticated modern touch to the use and design of the template. This template works the best to draw the necessary attention for any branding purposes.

04Beautiful Slideshow
As its name suggests, the Beautiful Slideshow template emits a sense and aura of soothing and pleasantness through its design. It is best suitable for any travelling slideshow videos, as it has an old-school film theme. It has a vintage vibe, and the best feature is that it is available for free. It consists of 10 placeholders for texts and media.

05Fast Dynamic Slideshow
The Fast Dynamic Slideshow consists of all the quick transitional effects. So, if you want to make a slideshow video that would have some action, this template will be best suitable for the purpose. The template and its transitions are sure to catch the audience’s attention, and the clean and quick transitions make this template one of the best on the list.
06Colorful Slideshow
The Colourful Slideshow template of FCPX is a template that is simple yet elegant. The design has a modern theme to it. So, if you want to create a simple but modern and elegant styled slideshow, this template can help you the best. You can readily make edits in the template, and it includes sufficient place for media and text holder.

07Urban Fashion Promo
As its name suggests, the Urban Fashion Promo slideshow template of FCPX is best suited for making slideshows for stylish themes with an urban touch to it. It is ideal for making any fashion slideshow videos. The template is customizable with different slide layout styles and customizable colours. The template is compatible with Apple Motion which makes it possible for you to customize it on Apple Motion.

08Multi-Screen Slideshow
The inspiration behind this fantastic Multi-Screen Template design of FCPX is the popular ongoing trend. The template has 32 media placeholders and as many as 26 text placeholders. Additionally, one can readily customize and edit the template to make it more attractive and eye-catching. It is best suitable for making any action-oriented slideshow and the ones that require grasping the audience’s attention.

09Dynamic Slideshow Opener
If you want to make trendy slideshow videos and involve the game of colours, the Dynamic Slideshow Opener template is best suitable for it. The creative effects of the template are added with an urban style which can create unique slideshows. It is ideal for videos on social media platforms.

10AI Technology Slideshow
When you are to make a slideshow for any exhibitions, presentations or any other professional purpose, the AI Technology Slideshow is the best option. The the template has a design related to tech backgrounds, so it is also ideal for any slideshows involving the showcasing of technological components or topics.

11Typography Slides
The Typography Slides of FCPX are best for making slideshow videos for professional purposes and business projects. It consists of various layouts that are ideal for showcasing various products, services, brands and the like. The resolution compatible with this template is 4K, and one can use this template on Apple Motion.

12Portfolio Video Slideshow Template
The Portfolio Video Slideshow Template of FCPX is best suited for making the best portfolio videos. It has all the elements that can significantly help you create your portfolio. The template is available in 4K resolution and allows you to integrate different slides together to create the best slideshow.
Part 2 How to Create a Slideshow in Final Cut Pro?
Now, we will discuss the different steps that will help you make a slideshow in Final Cut Pro. The steps are easy to follow. So, the following are the steps for creating an fcpx slideshow.
Step 1: Create a new project in the Final Cut Pro. For that, select “File” and then select “New Project”.
Step 2: The next step is about importing the photos you want to include in your slideshow. for this, use the option “Import” in “File” and import all the images you want for your slideshow.
Step 3: Create the timeline for your slideshow. Drag the images into the order you prefer, and it will make the photos appear in the sequence you want in your slideshow.
Step 4: Add the different transitions, effects, filters and the other elements of editing the slideshow. You can also integrate the various templates that are available at fcpx.
Step 5: It is the last step, which requires you to export the slideshow you just made. For that, go to “File”, sleet “Export”, choose “QuickTime Movie” and the quality you would prefer.
Part 3 FAQ of FCPX Slideshow Templates
Let us now look into some common questions related to FCPX slideshow templates. Some of the common questions about the fcpx slideshow template is as follows.
01Can I create a slideshow using Final Cut Pro?
Yes, one can effortlessly create the best and the most inimitable slideshows with Final Cut Pro. There are only five steps involved, and all the steps are easy to follow, as we have mentioned earlier.
02Are there templates like fcpx available at Filmora?
Filmora has a large variety of equally excellent templates, like fcpx’s. One can create the best and the most incredible slideshows in Wondershare Filmora Video Editor with its endless array of templates.
03What can we understand by fcpx templates?
The fcpx slideshow templates help you integrate different transitions, effects, texts, and other editing components and make your slideshow appear more engaging and extraordinary.
04**Can I make slideshows in Wondershare Filmora Video Editor
Yes, one can make the most fantastic slideshow videos at Filmora with its incomparable professional yet simple-to-use features with which it is wholly loaded.
For Win 7 or later (64-bit)
For macOS 10.12 or later
Now, let us discuss the best tool with which you can make excellent slideshow videos and edit them. The tool we are talking about is Filmora. And it has the best features for video editing and making slideshow videos, and it is suitable for beginners and also professionals.
The features and elements for editing are simple to use but are the most advanced and proficient ones. The templates at Filmora are innumerable and are equally incredible, and you will find templates that will perfectly fit every purpose. You can readily avail yourself of the free version of Filmora and try out the free trial version of the paid version of the tool, which offers you the most excellent tools for editing.
● Ending Thoughts →
● We have covered the topics in our discussion that are given below.
● The best Final Cut Pro slideshow templates of 2022 and their description.
● The steps with which you can create a sideshow in the Final Cut Pro software.
● We have discussed the solutions to the common questions relating to the FCPX slideshow templates, and we introduced Filmora, the best tool for creating and editing incredible slideshow videos.
The Final Cut Pro is one of the best and the most well-known tools or software for editing and making slideshows and videos. And making slideshows with fcpx leads to the production of the finest and the most creative slideshow videos!
The best part about using fcpx is that one can use the best of the best fcpx slideshow template for free. The software includes a large variety of templates which makes your slideshows look unique, and you will find templates that will suit every necessary purpose for the slideshow.
In this article
01 [10+ Best Final Cut Pro Slideshow Templates in 2022](#Part 1)
02 [How to Create a Slideshow in Final Cut Pro?](#Part 2)
03 [FAQ of FCPX Slideshow Templates](#Part 3)
Part 1 Best Final Cut Pro Slideshow Templates in 2022
Let us begin our discussion with the best Final Cut Pro slideshow templates in 2022. We will put forth the names of the templates and a short description of them so that you know what they are best suitable for.
So, here are the best Final Cut Pro slideshow templates for 2022.
01Colorful Liquid Slideshow
The Colorful Liquid Slideshow is the template best suited for any slideshow video for promotional purposes on social media. It has a very attractive design and components that quickly draws attention. And it is needed for any promotional videos on social media platforms.
The template is all about vibrant colours and beautiful transitions, making it ideal for fashion and lifestyle videos.

02Freestyle Slideshow
If you want to play with different transitional effects on your slideshow, the Freestyle Slideshow template of FCPX is best suited for your purpose. It has many transition effects that make your slideshow look highly engaging and jaw-dropping.
It is compatible with Apple Motion also and is best for making casual and fun slideshow videos.

03Smooth Colourful Slideshow
To present a modern touch to your slideshow, the Smooth Colourful Slideshow template of FCPX is the best option. It has the integration of vibrant colours, with a sophisticated modern touch to the use and design of the template. This template works the best to draw the necessary attention for any branding purposes.

04Beautiful Slideshow
As its name suggests, the Beautiful Slideshow template emits a sense and aura of soothing and pleasantness through its design. It is best suitable for any travelling slideshow videos, as it has an old-school film theme. It has a vintage vibe, and the best feature is that it is available for free. It consists of 10 placeholders for texts and media.

05Fast Dynamic Slideshow
The Fast Dynamic Slideshow consists of all the quick transitional effects. So, if you want to make a slideshow video that would have some action, this template will be best suitable for the purpose. The template and its transitions are sure to catch the audience’s attention, and the clean and quick transitions make this template one of the best on the list.
06Colorful Slideshow
The Colourful Slideshow template of FCPX is a template that is simple yet elegant. The design has a modern theme to it. So, if you want to create a simple but modern and elegant styled slideshow, this template can help you the best. You can readily make edits in the template, and it includes sufficient place for media and text holder.

07Urban Fashion Promo
As its name suggests, the Urban Fashion Promo slideshow template of FCPX is best suited for making slideshows for stylish themes with an urban touch to it. It is ideal for making any fashion slideshow videos. The template is customizable with different slide layout styles and customizable colours. The template is compatible with Apple Motion which makes it possible for you to customize it on Apple Motion.

08Multi-Screen Slideshow
The inspiration behind this fantastic Multi-Screen Template design of FCPX is the popular ongoing trend. The template has 32 media placeholders and as many as 26 text placeholders. Additionally, one can readily customize and edit the template to make it more attractive and eye-catching. It is best suitable for making any action-oriented slideshow and the ones that require grasping the audience’s attention.

09Dynamic Slideshow Opener
If you want to make trendy slideshow videos and involve the game of colours, the Dynamic Slideshow Opener template is best suitable for it. The creative effects of the template are added with an urban style which can create unique slideshows. It is ideal for videos on social media platforms.

10AI Technology Slideshow
When you are to make a slideshow for any exhibitions, presentations or any other professional purpose, the AI Technology Slideshow is the best option. The the template has a design related to tech backgrounds, so it is also ideal for any slideshows involving the showcasing of technological components or topics.

11Typography Slides
The Typography Slides of FCPX are best for making slideshow videos for professional purposes and business projects. It consists of various layouts that are ideal for showcasing various products, services, brands and the like. The resolution compatible with this template is 4K, and one can use this template on Apple Motion.

12Portfolio Video Slideshow Template
The Portfolio Video Slideshow Template of FCPX is best suited for making the best portfolio videos. It has all the elements that can significantly help you create your portfolio. The template is available in 4K resolution and allows you to integrate different slides together to create the best slideshow.
Part 2 How to Create a Slideshow in Final Cut Pro?
Now, we will discuss the different steps that will help you make a slideshow in Final Cut Pro. The steps are easy to follow. So, the following are the steps for creating an fcpx slideshow.
Step 1: Create a new project in the Final Cut Pro. For that, select “File” and then select “New Project”.
Step 2: The next step is about importing the photos you want to include in your slideshow. for this, use the option “Import” in “File” and import all the images you want for your slideshow.
Step 3: Create the timeline for your slideshow. Drag the images into the order you prefer, and it will make the photos appear in the sequence you want in your slideshow.
Step 4: Add the different transitions, effects, filters and the other elements of editing the slideshow. You can also integrate the various templates that are available at fcpx.
Step 5: It is the last step, which requires you to export the slideshow you just made. For that, go to “File”, sleet “Export”, choose “QuickTime Movie” and the quality you would prefer.
Part 3 FAQ of FCPX Slideshow Templates
Let us now look into some common questions related to FCPX slideshow templates. Some of the common questions about the fcpx slideshow template is as follows.
01Can I create a slideshow using Final Cut Pro?
Yes, one can effortlessly create the best and the most inimitable slideshows with Final Cut Pro. There are only five steps involved, and all the steps are easy to follow, as we have mentioned earlier.
02Are there templates like fcpx available at Filmora?
Filmora has a large variety of equally excellent templates, like fcpx’s. One can create the best and the most incredible slideshows in Wondershare Filmora Video Editor with its endless array of templates.
03What can we understand by fcpx templates?
The fcpx slideshow templates help you integrate different transitions, effects, texts, and other editing components and make your slideshow appear more engaging and extraordinary.
04**Can I make slideshows in Wondershare Filmora Video Editor
Yes, one can make the most fantastic slideshow videos at Filmora with its incomparable professional yet simple-to-use features with which it is wholly loaded.
For Win 7 or later (64-bit)
For macOS 10.12 or later
Now, let us discuss the best tool with which you can make excellent slideshow videos and edit them. The tool we are talking about is Filmora. And it has the best features for video editing and making slideshow videos, and it is suitable for beginners and also professionals.
The features and elements for editing are simple to use but are the most advanced and proficient ones. The templates at Filmora are innumerable and are equally incredible, and you will find templates that will perfectly fit every purpose. You can readily avail yourself of the free version of Filmora and try out the free trial version of the paid version of the tool, which offers you the most excellent tools for editing.
● Ending Thoughts →
● We have covered the topics in our discussion that are given below.
● The best Final Cut Pro slideshow templates of 2022 and their description.
● The steps with which you can create a sideshow in the Final Cut Pro software.
● We have discussed the solutions to the common questions relating to the FCPX slideshow templates, and we introduced Filmora, the best tool for creating and editing incredible slideshow videos.
The Final Cut Pro is one of the best and the most well-known tools or software for editing and making slideshows and videos. And making slideshows with fcpx leads to the production of the finest and the most creative slideshow videos!
The best part about using fcpx is that one can use the best of the best fcpx slideshow template for free. The software includes a large variety of templates which makes your slideshows look unique, and you will find templates that will suit every necessary purpose for the slideshow.
In this article
01 [10+ Best Final Cut Pro Slideshow Templates in 2022](#Part 1)
02 [How to Create a Slideshow in Final Cut Pro?](#Part 2)
03 [FAQ of FCPX Slideshow Templates](#Part 3)
Part 1 Best Final Cut Pro Slideshow Templates in 2022
Let us begin our discussion with the best Final Cut Pro slideshow templates in 2022. We will put forth the names of the templates and a short description of them so that you know what they are best suitable for.
So, here are the best Final Cut Pro slideshow templates for 2022.
01Colorful Liquid Slideshow
The Colorful Liquid Slideshow is the template best suited for any slideshow video for promotional purposes on social media. It has a very attractive design and components that quickly draws attention. And it is needed for any promotional videos on social media platforms.
The template is all about vibrant colours and beautiful transitions, making it ideal for fashion and lifestyle videos.

02Freestyle Slideshow
If you want to play with different transitional effects on your slideshow, the Freestyle Slideshow template of FCPX is best suited for your purpose. It has many transition effects that make your slideshow look highly engaging and jaw-dropping.
It is compatible with Apple Motion also and is best for making casual and fun slideshow videos.

03Smooth Colourful Slideshow
To present a modern touch to your slideshow, the Smooth Colourful Slideshow template of FCPX is the best option. It has the integration of vibrant colours, with a sophisticated modern touch to the use and design of the template. This template works the best to draw the necessary attention for any branding purposes.

04Beautiful Slideshow
As its name suggests, the Beautiful Slideshow template emits a sense and aura of soothing and pleasantness through its design. It is best suitable for any travelling slideshow videos, as it has an old-school film theme. It has a vintage vibe, and the best feature is that it is available for free. It consists of 10 placeholders for texts and media.

05Fast Dynamic Slideshow
The Fast Dynamic Slideshow consists of all the quick transitional effects. So, if you want to make a slideshow video that would have some action, this template will be best suitable for the purpose. The template and its transitions are sure to catch the audience’s attention, and the clean and quick transitions make this template one of the best on the list.
06Colorful Slideshow
The Colourful Slideshow template of FCPX is a template that is simple yet elegant. The design has a modern theme to it. So, if you want to create a simple but modern and elegant styled slideshow, this template can help you the best. You can readily make edits in the template, and it includes sufficient place for media and text holder.

07Urban Fashion Promo
As its name suggests, the Urban Fashion Promo slideshow template of FCPX is best suited for making slideshows for stylish themes with an urban touch to it. It is ideal for making any fashion slideshow videos. The template is customizable with different slide layout styles and customizable colours. The template is compatible with Apple Motion which makes it possible for you to customize it on Apple Motion.

08Multi-Screen Slideshow
The inspiration behind this fantastic Multi-Screen Template design of FCPX is the popular ongoing trend. The template has 32 media placeholders and as many as 26 text placeholders. Additionally, one can readily customize and edit the template to make it more attractive and eye-catching. It is best suitable for making any action-oriented slideshow and the ones that require grasping the audience’s attention.

09Dynamic Slideshow Opener
If you want to make trendy slideshow videos and involve the game of colours, the Dynamic Slideshow Opener template is best suitable for it. The creative effects of the template are added with an urban style which can create unique slideshows. It is ideal for videos on social media platforms.

10AI Technology Slideshow
When you are to make a slideshow for any exhibitions, presentations or any other professional purpose, the AI Technology Slideshow is the best option. The the template has a design related to tech backgrounds, so it is also ideal for any slideshows involving the showcasing of technological components or topics.

11Typography Slides
The Typography Slides of FCPX are best for making slideshow videos for professional purposes and business projects. It consists of various layouts that are ideal for showcasing various products, services, brands and the like. The resolution compatible with this template is 4K, and one can use this template on Apple Motion.

12Portfolio Video Slideshow Template
The Portfolio Video Slideshow Template of FCPX is best suited for making the best portfolio videos. It has all the elements that can significantly help you create your portfolio. The template is available in 4K resolution and allows you to integrate different slides together to create the best slideshow.
Part 2 How to Create a Slideshow in Final Cut Pro?
Now, we will discuss the different steps that will help you make a slideshow in Final Cut Pro. The steps are easy to follow. So, the following are the steps for creating an fcpx slideshow.
Step 1: Create a new project in the Final Cut Pro. For that, select “File” and then select “New Project”.
Step 2: The next step is about importing the photos you want to include in your slideshow. for this, use the option “Import” in “File” and import all the images you want for your slideshow.
Step 3: Create the timeline for your slideshow. Drag the images into the order you prefer, and it will make the photos appear in the sequence you want in your slideshow.
Step 4: Add the different transitions, effects, filters and the other elements of editing the slideshow. You can also integrate the various templates that are available at fcpx.
Step 5: It is the last step, which requires you to export the slideshow you just made. For that, go to “File”, sleet “Export”, choose “QuickTime Movie” and the quality you would prefer.
Part 3 FAQ of FCPX Slideshow Templates
Let us now look into some common questions related to FCPX slideshow templates. Some of the common questions about the fcpx slideshow template is as follows.
01Can I create a slideshow using Final Cut Pro?
Yes, one can effortlessly create the best and the most inimitable slideshows with Final Cut Pro. There are only five steps involved, and all the steps are easy to follow, as we have mentioned earlier.
02Are there templates like fcpx available at Filmora?
Filmora has a large variety of equally excellent templates, like fcpx’s. One can create the best and the most incredible slideshows in Wondershare Filmora Video Editor with its endless array of templates.
03What can we understand by fcpx templates?
The fcpx slideshow templates help you integrate different transitions, effects, texts, and other editing components and make your slideshow appear more engaging and extraordinary.
04**Can I make slideshows in Wondershare Filmora Video Editor
Yes, one can make the most fantastic slideshow videos at Filmora with its incomparable professional yet simple-to-use features with which it is wholly loaded.
For Win 7 or later (64-bit)
For macOS 10.12 or later
Now, let us discuss the best tool with which you can make excellent slideshow videos and edit them. The tool we are talking about is Filmora. And it has the best features for video editing and making slideshow videos, and it is suitable for beginners and also professionals.
The features and elements for editing are simple to use but are the most advanced and proficient ones. The templates at Filmora are innumerable and are equally incredible, and you will find templates that will perfectly fit every purpose. You can readily avail yourself of the free version of Filmora and try out the free trial version of the paid version of the tool, which offers you the most excellent tools for editing.
● Ending Thoughts →
● We have covered the topics in our discussion that are given below.
● The best Final Cut Pro slideshow templates of 2022 and their description.
● The steps with which you can create a sideshow in the Final Cut Pro software.
● We have discussed the solutions to the common questions relating to the FCPX slideshow templates, and we introduced Filmora, the best tool for creating and editing incredible slideshow videos.
The Final Cut Pro is one of the best and the most well-known tools or software for editing and making slideshows and videos. And making slideshows with fcpx leads to the production of the finest and the most creative slideshow videos!
The best part about using fcpx is that one can use the best of the best fcpx slideshow template for free. The software includes a large variety of templates which makes your slideshows look unique, and you will find templates that will suit every necessary purpose for the slideshow.
In this article
01 [10+ Best Final Cut Pro Slideshow Templates in 2022](#Part 1)
02 [How to Create a Slideshow in Final Cut Pro?](#Part 2)
03 [FAQ of FCPX Slideshow Templates](#Part 3)
Part 1 Best Final Cut Pro Slideshow Templates in 2022
Let us begin our discussion with the best Final Cut Pro slideshow templates in 2022. We will put forth the names of the templates and a short description of them so that you know what they are best suitable for.
So, here are the best Final Cut Pro slideshow templates for 2022.
01Colorful Liquid Slideshow
The Colorful Liquid Slideshow is the template best suited for any slideshow video for promotional purposes on social media. It has a very attractive design and components that quickly draws attention. And it is needed for any promotional videos on social media platforms.
The template is all about vibrant colours and beautiful transitions, making it ideal for fashion and lifestyle videos.

02Freestyle Slideshow
If you want to play with different transitional effects on your slideshow, the Freestyle Slideshow template of FCPX is best suited for your purpose. It has many transition effects that make your slideshow look highly engaging and jaw-dropping.
It is compatible with Apple Motion also and is best for making casual and fun slideshow videos.

03Smooth Colourful Slideshow
To present a modern touch to your slideshow, the Smooth Colourful Slideshow template of FCPX is the best option. It has the integration of vibrant colours, with a sophisticated modern touch to the use and design of the template. This template works the best to draw the necessary attention for any branding purposes.

04Beautiful Slideshow
As its name suggests, the Beautiful Slideshow template emits a sense and aura of soothing and pleasantness through its design. It is best suitable for any travelling slideshow videos, as it has an old-school film theme. It has a vintage vibe, and the best feature is that it is available for free. It consists of 10 placeholders for texts and media.

05Fast Dynamic Slideshow
The Fast Dynamic Slideshow consists of all the quick transitional effects. So, if you want to make a slideshow video that would have some action, this template will be best suitable for the purpose. The template and its transitions are sure to catch the audience’s attention, and the clean and quick transitions make this template one of the best on the list.
06Colorful Slideshow
The Colourful Slideshow template of FCPX is a template that is simple yet elegant. The design has a modern theme to it. So, if you want to create a simple but modern and elegant styled slideshow, this template can help you the best. You can readily make edits in the template, and it includes sufficient place for media and text holder.

07Urban Fashion Promo
As its name suggests, the Urban Fashion Promo slideshow template of FCPX is best suited for making slideshows for stylish themes with an urban touch to it. It is ideal for making any fashion slideshow videos. The template is customizable with different slide layout styles and customizable colours. The template is compatible with Apple Motion which makes it possible for you to customize it on Apple Motion.

08Multi-Screen Slideshow
The inspiration behind this fantastic Multi-Screen Template design of FCPX is the popular ongoing trend. The template has 32 media placeholders and as many as 26 text placeholders. Additionally, one can readily customize and edit the template to make it more attractive and eye-catching. It is best suitable for making any action-oriented slideshow and the ones that require grasping the audience’s attention.

09Dynamic Slideshow Opener
If you want to make trendy slideshow videos and involve the game of colours, the Dynamic Slideshow Opener template is best suitable for it. The creative effects of the template are added with an urban style which can create unique slideshows. It is ideal for videos on social media platforms.

10AI Technology Slideshow
When you are to make a slideshow for any exhibitions, presentations or any other professional purpose, the AI Technology Slideshow is the best option. The the template has a design related to tech backgrounds, so it is also ideal for any slideshows involving the showcasing of technological components or topics.

11Typography Slides
The Typography Slides of FCPX are best for making slideshow videos for professional purposes and business projects. It consists of various layouts that are ideal for showcasing various products, services, brands and the like. The resolution compatible with this template is 4K, and one can use this template on Apple Motion.

12Portfolio Video Slideshow Template
The Portfolio Video Slideshow Template of FCPX is best suited for making the best portfolio videos. It has all the elements that can significantly help you create your portfolio. The template is available in 4K resolution and allows you to integrate different slides together to create the best slideshow.
Part 2 How to Create a Slideshow in Final Cut Pro?
Now, we will discuss the different steps that will help you make a slideshow in Final Cut Pro. The steps are easy to follow. So, the following are the steps for creating an fcpx slideshow.
Step 1: Create a new project in the Final Cut Pro. For that, select “File” and then select “New Project”.
Step 2: The next step is about importing the photos you want to include in your slideshow. for this, use the option “Import” in “File” and import all the images you want for your slideshow.
Step 3: Create the timeline for your slideshow. Drag the images into the order you prefer, and it will make the photos appear in the sequence you want in your slideshow.
Step 4: Add the different transitions, effects, filters and the other elements of editing the slideshow. You can also integrate the various templates that are available at fcpx.
Step 5: It is the last step, which requires you to export the slideshow you just made. For that, go to “File”, sleet “Export”, choose “QuickTime Movie” and the quality you would prefer.
Part 3 FAQ of FCPX Slideshow Templates
Let us now look into some common questions related to FCPX slideshow templates. Some of the common questions about the fcpx slideshow template is as follows.
01Can I create a slideshow using Final Cut Pro?
Yes, one can effortlessly create the best and the most inimitable slideshows with Final Cut Pro. There are only five steps involved, and all the steps are easy to follow, as we have mentioned earlier.
02Are there templates like fcpx available at Filmora?
Filmora has a large variety of equally excellent templates, like fcpx’s. One can create the best and the most incredible slideshows in Wondershare Filmora Video Editor with its endless array of templates.
03What can we understand by fcpx templates?
The fcpx slideshow templates help you integrate different transitions, effects, texts, and other editing components and make your slideshow appear more engaging and extraordinary.
04**Can I make slideshows in Wondershare Filmora Video Editor
Yes, one can make the most fantastic slideshow videos at Filmora with its incomparable professional yet simple-to-use features with which it is wholly loaded.
For Win 7 or later (64-bit)
For macOS 10.12 or later
Now, let us discuss the best tool with which you can make excellent slideshow videos and edit them. The tool we are talking about is Filmora. And it has the best features for video editing and making slideshow videos, and it is suitable for beginners and also professionals.
The features and elements for editing are simple to use but are the most advanced and proficient ones. The templates at Filmora are innumerable and are equally incredible, and you will find templates that will perfectly fit every purpose. You can readily avail yourself of the free version of Filmora and try out the free trial version of the paid version of the tool, which offers you the most excellent tools for editing.
● Ending Thoughts →
● We have covered the topics in our discussion that are given below.
● The best Final Cut Pro slideshow templates of 2022 and their description.
● The steps with which you can create a sideshow in the Final Cut Pro software.
● We have discussed the solutions to the common questions relating to the FCPX slideshow templates, and we introduced Filmora, the best tool for creating and editing incredible slideshow videos.
Also read:
- New In This Article, Youll Find Four Solutions for Rotating Your Go-Pro Videos. The Following Tools Will Be Used for This Purpose
- New How To Change Sky Background With Adobe Photoshop Best Ways
- New 10 Catchy Pixel Art Wallpapers and How to Custom Your Own for 2024
- Updated 2024 Approved Best 5 Apps To Add Song To Video
- Updated 2024 Approved Learn How to Effectively Use Masking in After Effects with This Comprehensive Guide. Includes Step-by-Step Instructions and an Alternative Masking Technique
- In 2024, Unraveling How the Slow Motion Guys Have Revolutionized The Slow Motion Game
- 2024 Approved How to Use Adjustment Layer in Photoshop?
- New 2024 Approved How to Create and Use Adjustment Layers in After Effects
- Event Videography Is Popular in Weddings, Graduation, Family Reunion and Other Great Moments. Here Im Going to Share some of the Tips to Make a Better Event Videography for 2024
- Updated 2024 Approved 11 Apps To Speed Up A Video On iPhone
- New OBS Green Screen Guide for 2024
- Updated 2024 Approved Steps to Create One Click Video Reverse Effect in Filmora
- In 2024, General Knowledge About MP4 Format and Best MP4 Video Editor
- New Top List The Best Slow Motion Video Editors Available
- New In 2024, Having Issues Trying to View SRT Files when You Add Subtitle Files for VLC? Learn the Right Ways to Do so and the Best Alternative Solution
- Three Solutions to Hard Reset Samsung Galaxy A15 4G? | Dr.fone
- Fixes for Apps Keep Crashing on Motorola Moto G04 | Dr.fone
- How to Unlock Apple iPhone 6 Plus without Passcode or Face ID
- Full Guide to Catch 100 IV Pokémon Using a Map On OnePlus Ace 3 | Dr.fone
- In 2024, Planning to Use a Pokemon Go Joystick on Motorola Edge 40 Neo? | Dr.fone
- In 2024, 5 Ways to Track Motorola Defy 2 without App | Dr.fone
- In 2024, How to Transfer Contacts from Nubia Red Magic 8S Pro to Other Android Devices Using Bluetooth? | Dr.fone
- 8 Quick Fixes Unfortunately, Snapchat has Stopped on Realme GT Neo 5 | Dr.fone
- Easy steps to recover deleted pictures from 11 5G.
- How To Transfer WhatsApp From iPhone 12 Pro to other iPhone devices? | Dr.fone
- How to Lock Apps on Vivo Y100 to Protect Your Individual Information
- New In 2024, Create AI Avatar Video with AI Script
- In 2024, Turning Off Two Factor Authentication From Apple iPhone 14 Plus? 5 Tips You Must Know
- In 2024, The Ultimate Guide to Bypassing iCloud Activation Lock from Apple iPhone XS Max
- 4 Ways to Transfer Music from Apple iPhone 11 to iPod touch | Dr.fone
- Title: Want to Speed up or Slow Down a Video to Make It Look Different? Here Are the Simple Steps to Change Video Speed in Lightworks Video Editor
- Author: Morgan
- Created at : 2024-07-01 13:02:22
- Updated at : 2024-07-02 13:02:22
- Link: https://ai-video-editing.techidaily.com/want-to-speed-up-or-slow-down-a-video-to-make-it-look-different-here-are-the-simple-steps-to-change-video-speed-in-lightworks-video-editor/
- License: This work is licensed under CC BY-NC-SA 4.0.

