:max_bytes(150000):strip_icc():format(webp)/GettyImages-1342255561-483b636ee00f40a1b3d91d1969b1aaf6.jpg)
Want to Sync Separate Audio with Video? Check Out This Guide to Do It in the Simplest Way Using the Video Editor - Wondershare Filmora

Want to Sync Separate Audio with Video? Check Out This Guide to Do It in the Simplest Way Using the Video Editor - Wondershare Filmora
Syncing audio with video is an integral part of video editing for any video creator. But believe me; it’s not such a difficult task if you know what to do. The point is IF YOU KNOW WHAT TO DO.
That’s why in this brief guide, we’ll show you the simplest way to sync audio with video using a fantastic video editor easily. But wait a minute, some of you might be confused about why we even need to sync separate audio & video when a single camera can record both. So let’s first answer this simple question.
Part 1: Why Do We Need to Sync Separate Audio & Video?
Creating great video needs extraordinary video graphics, content, and top-notch audio. And you can’t expect a single camera to achieve all these goals. That’s why all professional video creators use a specialized camera for recording with a separate audio recording device.
You might think it’s an exaggeration, but this small change can have massive effects on the quality of your video. Especially the background noise removal effect of separate external microphones.

But the downside of using this method is that after the recording is complete, you must sync these audio and video files. And if you don’t do it right, all the effort goes to the drain within a split second. Well, nobody wants to watch a video with an audio lag. Isn’t it?
Correctly synching an audio file with a video is easier than you think. You just need to prepare beforehand and use a suitable video editing tool. So considering these factors, let’s first see what preparations we need. After that, we’ll recommend a top-class video editing tool to achieve this goal in detailed steps. Why are we still waiting? Let’s begin our journey.
Part 2: Preparation for Syncing Audio With Video During Recording
You must make some preparations to sync an audio file with a video properly. It’s to have a sound spike to match the footage properly with the separate audio file. And it might look disturbing, but even a simple Clap might do the job.
And if you want a professional way, just imagine the clapper board. You must have seen it in the film industry. This clapper board is used not only to mark the shot but also to create a sound spike when it claps. We use this audio spike as a reference to sync the audio files with the video.

Every time you cut your shot, remember to clap on camera again the next time you roll. It’s best to clap before you say “Action” or speak so that it’s easy to find and sync when editing. But if you forget, you can also clap at the end of the shot before you cut. That is called a Tail Slate!!!
After you’ve recorded your video like this, the next step is pretty simple. The video editor we recommend is no other than the world’s leading tool in the market, Wondershare Filmora. Let’s move forward and see how to sync audio with video using Filmora .
Part 3: How To Sync Audio With Video Using Filmora
Before we dive into the step-by-step guide, here’s a brief overview of Filmora.
Wondershare Filmora
Filmora is one of the most used video editors that can help all video creators to deliver the best they can. This incredible software from Wondershare contains multiple features that can polish any video.
Free Download For Win 7 or later(64-bit)
Free Download For macOS 10.14 or later
Moreover, the vast arsenal of video effects, images, short clips, AI avatars, and many other things are also available. You just have to pick out the one you like and add it to your video with just a single click.
On top of that, you can also adjust the audio files like audio ducking, silent detection, audio mixing, and synching audio with the video files.
As far as the audio synching is concerned, you can do it either manually or with auto synchronization. And we will explain both of these processes in a stepwise manner to give you complete mastery over your audio synching. Let’s start with the manual process first.
Steps To Manually Sync Audio With Video Using Filmora
Step1Download & install
If you haven’t downloaded the latest version of Filmora yet, click the button below to download it without any cost. And after the download is completed, you can install it on your device right away.
Free Download For Win 7 or later(64-bit)
Free Download For macOS 10.14 or later
Step2Import your files
The next step is to import all the files. Launch the Filmora and click on the “New Project” button from the opening interface.

When a new project is created, you’ll see an “Import Media” section on it. Click on this section to browse your audio and video files from the computer. Or you can also drag and drop these files here to import them.

Step3Prepare your files
Now, it’s time to prepare our files for synchronization. First, drag the video file down to the timeline from the “Import Media” section. After that, drag the audio file in the same way below the video on the panel.
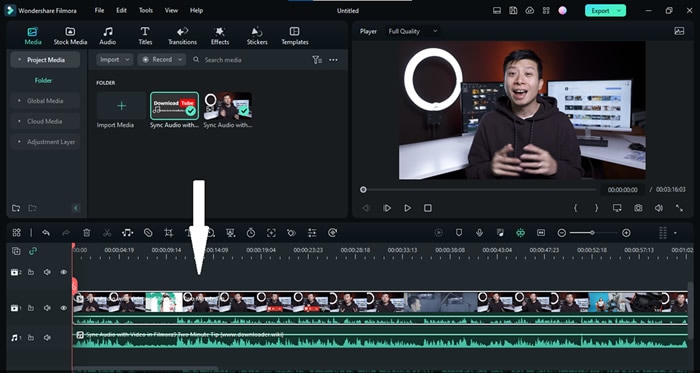
Step4Sync the audio & video files using the audio spike
Now that the video and audio files are on the timeline, you’ll have to find the moment you clap your hands. Look at the waveform from the in-camera audio and the independent audio track. At the moment you clap, we’ll see a spike.
Bonus Tip: If you can’t find the audio spike, zoom the panel to make it easier.
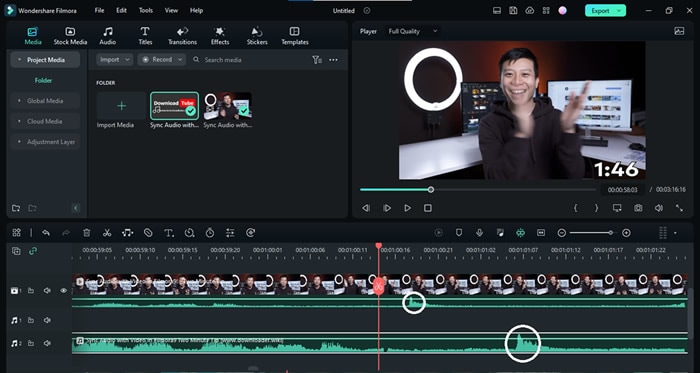
Now take the independent audio clip and align it so that both the spikes match.
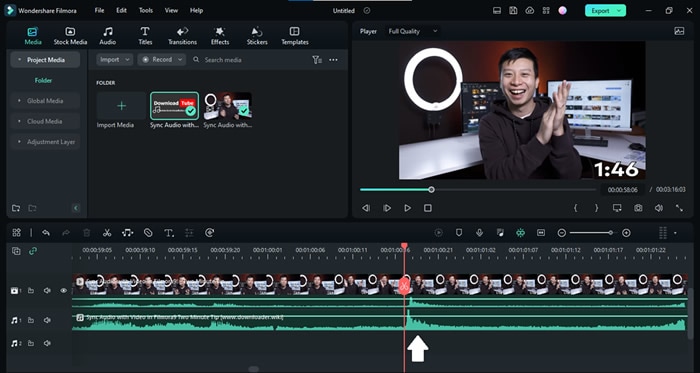
That’s it! We just need to remove the in-camera audio now. Let’s see how to do it now.
Step5Remove the audio from the video footage
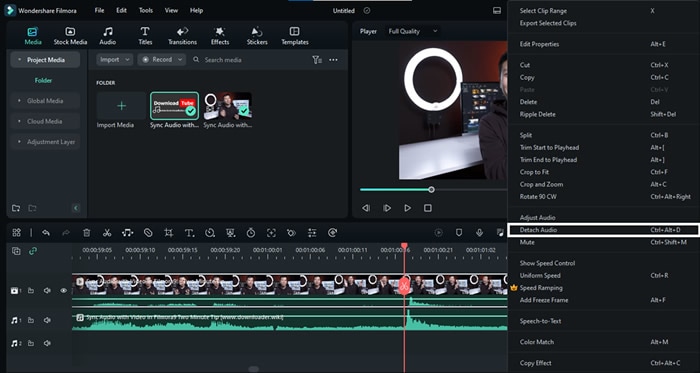
To detach the audio in the video footage, right-click on this file and select the “Detach Audio” option. Or you can also use the “Ctrl+Alt+D” as the hotkey.
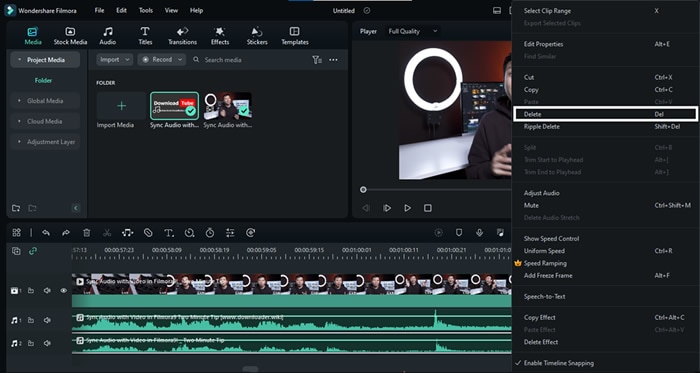
Once the audio file has been separated, you can move forward and delete it. To delete this audio, right-click on it and select “Delete.”
Step6Enjoy your video with the new audio track
So here we go. Our video file has been synced with the high-quality audio file. You can now hit the Export button to get this edited file. But wait a minute. Didn’t we say we’ll show you a method to automatically sync audio with video? Let’s start this method now.
Steps To Automatically Sync Audio With Video Using Filmora
Did you find the above method troubling? Well, be assured because Wondershare Filmora can also automatically sync your audio file with video in a single click. Here are the steps to achieve this feat.
Free Download For Win 7 or later(64-bit)
Free Download For macOS 10.14 or later
Step1Prepare your files
This method’s starting process is the same as the previous one. You’ll need to download the Filmora and prepare your file on the timeline by importing them on a New Project.
Step2Select both audio & video files
Once you’ve got everything ready, select both your audio and files from the timeline.
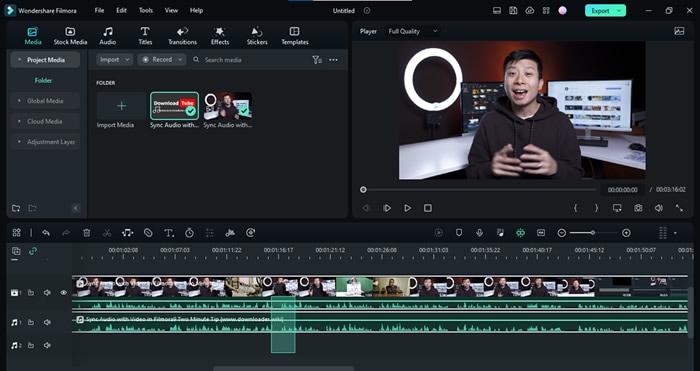
Step3Click on the auto synchronization icon
When you select these files, you’ll see that the “Auto Synchronization” icon has appeared on the toolbar below the Import Media section. Click on this icon and wait for the magic.
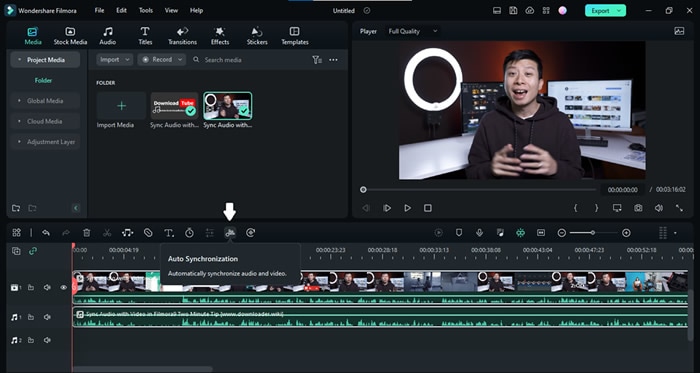
Remember that you need a Premium ID of Wondershare Filmora to use the Auto Synchronization option.
Step4Wait until the syncing is completed
Filmora will start synchronizing your files, and you’ll see the “Synchronization in process” prompt on the screen. Wait until the process is completed.
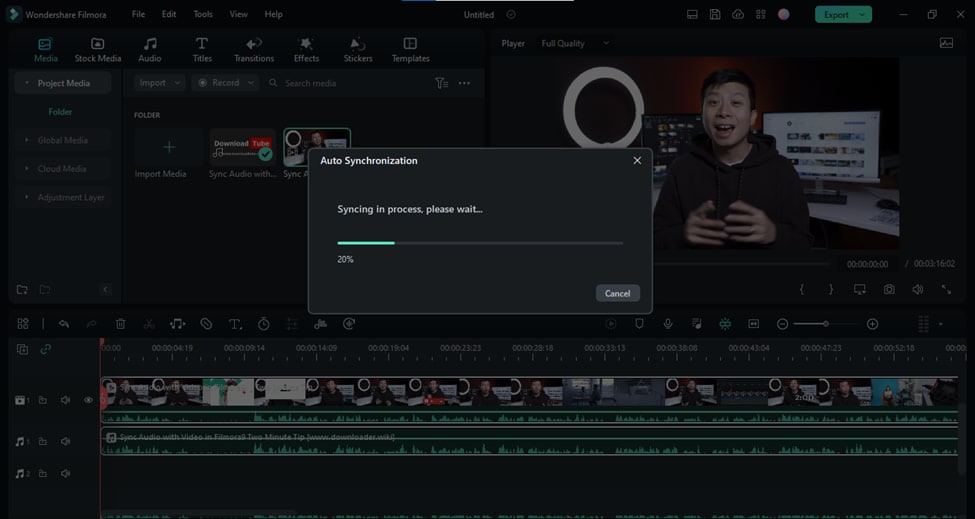
Step5Finish your editing
You can finish your editing when the separate audio file perfectly aligns with the video file. Delete the audio from the in-camera video file and hit the “Export” button.
Congratulations! We have successfully synced separate audio and video files. Now let’s take a look at some hot FAQs before we end our guide.
Part 4: FAQs About Synching Audio With Video
Is auto synchronization better than manual syncing?
Well, auto synchronization is no doubt easier than manual syncing. But that doesn’t mean you don’t need the manual process anymore. Many situations may arise where you may be left with no choice but to use the manual syncing of separate audio and video files. So make sure to properly learn both these methods, and each one of them will definitely come in handy someday.
How can we sync audio & video for free?
Syncing audio and video files for free is not a difficult task. Download the Filmora right now, and after installation, you can freely sync any Audio file with its corresponding video file by using the manual method described above.
Conclusion
For any video creator, knowing how to sync audio with video is a must. That’s because most creators record audio and video separately for higher quality.
This brief guide has covered all the details about how to sync audio and video files using an outstanding video editor, Wondershare Filmora . We hope it comes in handy.
Free Download For Win 7 or later(64-bit)
Free Download For macOS 10.14 or later
Free Download For macOS 10.14 or later
Moreover, the vast arsenal of video effects, images, short clips, AI avatars, and many other things are also available. You just have to pick out the one you like and add it to your video with just a single click.
On top of that, you can also adjust the audio files like audio ducking, silent detection, audio mixing, and synching audio with the video files.

As far as the audio synching is concerned, you can do it either manually or with auto synchronization. And we will explain both of these processes in a stepwise manner to give you complete mastery over your audio synching. Let’s start with the manual process first.
Steps To Manually Sync Audio With Video Using Filmora
Step1Download & install
If you haven’t downloaded the latest version of Filmora yet, click the button below to download it without any cost. And after the download is completed, you can install it on your device right away.
Free Download For Win 7 or later(64-bit)
Free Download For macOS 10.14 or later
Step2Import your files
The next step is to import all the files. Launch the Filmora and click on the “New Project” button from the opening interface.

When a new project is created, you’ll see an “Import Media” section on it. Click on this section to browse your audio and video files from the computer. Or you can also drag and drop these files here to import them.

Step3Prepare your files
Now, it’s time to prepare our files for synchronization. First, drag the video file down to the timeline from the “Import Media” section. After that, drag the audio file in the same way below the video on the panel.

Step4Sync the audio & video files using the audio spike
Now that the video and audio files are on the timeline, you’ll have to find the moment you clap your hands. Look at the waveform from the in-camera audio and the independent audio track. At the moment you clap, we’ll see a spike.
Bonus Tip: If you can’t find the audio spike, zoom the panel to make it easier.

Now take the independent audio clip and align it so that both the spikes match.

That’s it! We just need to remove the in-camera audio now. Let’s see how to do it now.
Step5Remove the audio from the video footage
To detach the audio in the video footage, right-click on this file and select the “Detach Audio” option. Or you can also use the “Ctrl+Alt+D” as the hotkey.

Once the audio file has been separated, you can move forward and delete it. To delete this audio, right-click on it and select “Delete.”

Step6Enjoy your video with the new audio track
So here we go. Our video file has been synced with the high-quality audio file. You can now hit the Export button to get this edited file. But wait a minute. Didn’t we say we’ll show you a method to automatically sync audio with video? Let’s start this method now.
Steps To Automatically Sync Audio With Video Using Filmora
Did you find the above method troubling? Well, be assured because Wondershare Filmora can also automatically sync your audio file with video in a single click. Here are the steps to achieve this feat.
Free Download For Win 7 or later(64-bit)
Free Download For macOS 10.14 or later
Step1Prepare your files
This method’s starting process is the same as the previous one. You’ll need to download the Filmora and prepare your file on the timeline by importing them on a New Project.
Step2Select both audio & video files
Once you’ve got everything ready, select both your audio and files from the timeline.

Step3Click on the auto synchronization icon
When you select these files, you’ll see that the “Auto Synchronization” icon has appeared on the toolbar below the Import Media section. Click on this icon and wait for the magic.

Remember that you need a Premium ID of Wondershare Filmora to use the Auto Synchronization option.
Step4Wait until the syncing is completed
Filmora will start synchronizing your files, and you’ll see the “Synchronization in process” prompt on the screen. Wait until the process is completed.

Step5Finish your editing
You can finish your editing when the separate audio file perfectly aligns with the video file. Delete the audio from the in-camera video file and hit the “Export” button.
Congratulations! We have successfully synced separate audio and video files. Now let’s take a look at some hot FAQs before we end our guide.
Part 4: FAQs About Synching Audio With Video
Is auto synchronization better than manual syncing?
Well, auto synchronization is no doubt easier than manual syncing. But that doesn’t mean you don’t need the manual process anymore. Many situations may arise where you may be left with no choice but to use the manual syncing of separate audio and video files. So make sure to properly learn both these methods, and each one of them will definitely come in handy someday.
How can we sync audio & video for free?
Syncing audio and video files for free is not a difficult task. Download the Filmora right now, and after installation, you can freely sync any Audio file with its corresponding video file by using the manual method described above.
Conclusion
For any video creator, knowing how to sync audio with video is a must. That’s because most creators record audio and video separately for higher quality.
This brief guide has covered all the details about how to sync audio and video files using an outstanding video editor, Wondershare Filmora . We hope it comes in handy.
Free Download For Win 7 or later(64-bit)
Free Download For macOS 10.14 or later
For Converting GIF to MOV Format, You Don’t Need to Search From A-Z. Here Is an Amazing Guide, that Gives You Complete Details About Both Offline and Online Gif-to-MOV Converters. Catch Them Below and Experience a Pro Editing Time
Powerful Video Editor - Wondershare Filmora
Provide abundant video effects - A creative video editor
Powerful color correction and grading
Detailed tutorials provided by the official channel
Nowadays, we tend to see more GIFs in email. Many businesses incorporate video in email to promote their products, but why use a video when you can convert GIFs to MOV?
Everyone needs to convert one file type to another sometimes and it can become a bit of a hassle. A lot of conversion apps and websites aren’t free, so you might want to find out if there’s an online or offline app that can help you to do it. This article will look at some of the top options that are worth looking at.
Best 5 GIF to MOV Converter Software
Love GIFs, but worried about support on email clients? It’s time to convert your animated GIFs to MOVs, eliminating the need for MP4 conversion. Here are some of the top GIF-to-MOV converters to get you started.
1. Wondershare Filmora

You may have heard of Filmora by Wondershare , a powerful but easy-to-use video editing suite that provides animation, video effects, and editing capabilities to users. But did you know you can convert GIFs to MOV files with it?
Wondershare Filmora lets you convert animated GIF files to video files in a breeze. So if you want to turn your unforgettable GIF images into remarkable home movies or promo videos, this free GIF to MOV converter will be your best choice!
It works well in real-time and you can also create short videos with it. For a very long time, this video editor has gained popularity among millions of people.
Pros
Available for all devices
Professional to run offline
Best offline video editing tool
Supports screen recording
User-friendly interface
Cons
Free version has watermarks
A bit more expensive than others
Not sophisticated with 4k video editing
2. Adobe Premiere Pro
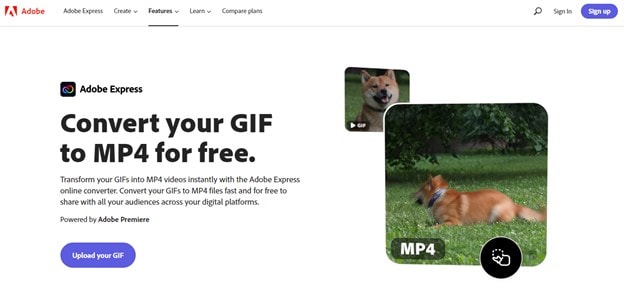
Adobe Premiere Pro is the top-of-the-line video editing software. It is one of the most powerful and professional applications, and it is more than able to handle even the most serious projects.
If you are a professional video editor and have all Adobe products, then you’ll find this conversion process straightforward. However, if you are an amateur and don’t have any prior experience with editing software – then converting GIF to MOV can be quite challenging.
Still, for many people, it is simply too expensive, which is why choosing a less expensive option may be appropriate. Fortunately, there are other similar programs that are excellent choices in terms of quality versus price.
Pros
Support a plethora of file formats
Very professional video editing
Runs effectively on Windows OS, macOS
Integrated VR Support
Cons
Not an easy application for non-tech users
Free for only 30 day
3. Movavi Video Editor Plus
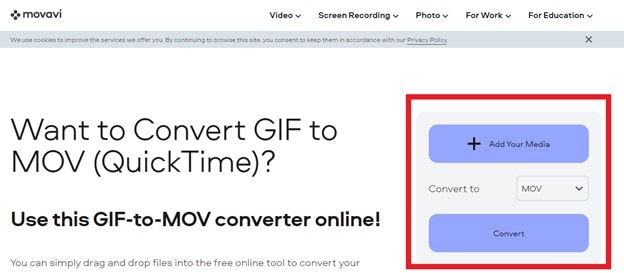
Movavi Video Editor Plus is one of the most favorite GIF to MOV offline and online converters because it offers all the options and tools you need to make videos. It comes with a lot of useful features, including 20+ filters, 15+ transition effects, 40+ video and audio effects, 60+ built-in templates, and 34 color schemes.
You simply upload our gif file, select the format of your choice, e.g. MOV, and run the process. This tool provides immediate results and an easy-to-use interface.
It’s a great option for users who want to create quality videos from animated GIFs but don’t want to pay a lot for the software.
Pros
Chroma keying
Sharp movie-creation app
Highly adaptive
Easy functions
Cons
No advance trimming options available for editing
Doesn’t support editing on Apple Silicon M1
4. VLC
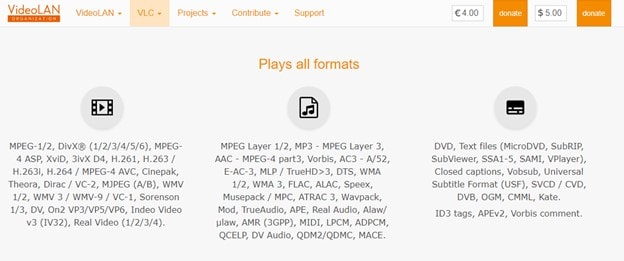
VLC has been a popular video converter for many years because it can also be used as a multimedia player, and this is why we are going to introduce you to this software. If you are looking for a free, complete, and safe converter to convert your files easily, this is the best option for you.
VLC (Videolan Media Player) is a program with a large number of use cases. It can be used to play your music and videos, but it’s also an audio and video converter as well. This Multiplatform program is available for Windows, Mac, Linux, Android, and iOS systems.
The interface is very intuitive and easy to learn. We don’t need to mention that it is constantly being updated with new features from the development team.
Pros
Simple interface
Can be installed quickly
Free to use
Best solution to play all video formats
Cons
No updated features
5. Cyberlink PowerDirector

The CyberLink PowerDirector is a complete video editing suite used for creating outstanding videos from scratch. It comes with a number of advanced editing tools and offers simple three editing modes to users that help them create compelling videos at faster speeds.
With it, you can easily create photo slideshows and turn your visual memories into video masterpieces like a pro. It has advanced video editing tools and trendy transitions and effects. Also, the tool is a good converter of all formats that you can use as better content for multiple tasks.
Pros
Support over 100 stellar audio and video editing features
Supports end-to-end 3D and 4k animations
Fast in action and functions
Friendly layout
Support amazing effects, filters, themes, and transitions
Cons
Ads creating distraction
Expensive tool
Online GIF to MOV Converter
Why go to the offline gif to MOV converter page? Online converters are far easier to use as they don’t require you to install any software. For instance, you can convert gif files to MOV files just by logging onto different websites. All that is required is a few simple clicks and you are ready for your next step.
1. CloudConvert

If you ever need to convert a gif file to MOV or one of the other formats supported by CloudConvert , you’re in luck. CloudConvert is an online platform through which you can quickly and easily convert gifs to MOV or any other format. With it, you’ll enjoy fast conversions with lossless compression and a batch conversion feature to ensure performance-friendly uploads. Best of all, the service is free for personal use, has no hidden fees, and requires no downloads or plugins.
Pros
Free to use
Interactive layout
Smooth experience
Provides extra customization of file
Cloud-based technology
Cons
Large volume files can be troubling for tool
Work pace depends on internet speed
2. EZGIF.COM
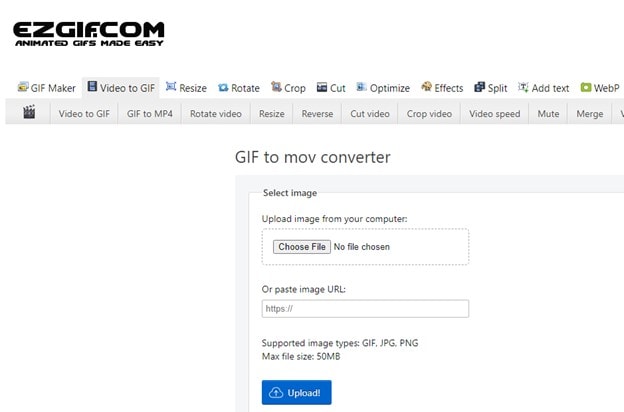
Ezgif.com is an interesting website. It helps GIF fans around the world to convert their favorite gif image to MOV or MP4. It offers a fast, efficient, and high-quality conversion service. Their commitment to customer satisfaction is genuinely remarkable and the attention they give new clients is excellent. Would recommend them highly!
Apart from converting files, Ezgif.com is an awesome animated GIF maker. It converts, resizes, edits, and creates GIF animations, and works on virtually any device or browser. Nowadays, more and more people are switching to chat applications that support animated graphics, over old email systems so it’s useful for both personal and professional use.
Pros
Absolutely safe website
Upload file from cloud, computer, or URL
Quick functionality
No need for paid subscription
Cons
The design seems outdated
No feature of file customization
3. Convertio
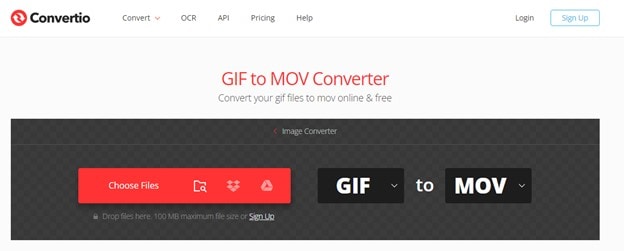
Whether you need to convert a GIF to an AVI, MP4, or MOV, Convertio is one of the most comprehensive online programs which can do this for you.
It is an online conversion tool that lets you choose from and convert MOV, AVI, WMV, FLV, MPEG-1, MPEG-2, ASF, QT, and DivX formats. It boasts a ton of supported formats with really fast conversion (up to 3 files per minute) that can be done by drag & dropping.
Its simple interface shows two blocks from which you can select which file will be converted to which format. Choosing files, selecting format, and converting them is all that this process is about. So here we conclude that Convertio is so far the best and easy-to-use interface for all online conversions of documents.
Pros
No guide is required for starting conversion
Fast conversion tool
Satisfied performance
Highly interactive
Affordable to experience premium features
Cons
Free trial is limited
100 MB per file is daily limit under freemium use
How to Convert GIF to MOV Using Wondershare Filmora?
Step 1: Download and install
To get started, download the software for free and install it on your computer.

Step 2: Make a new project
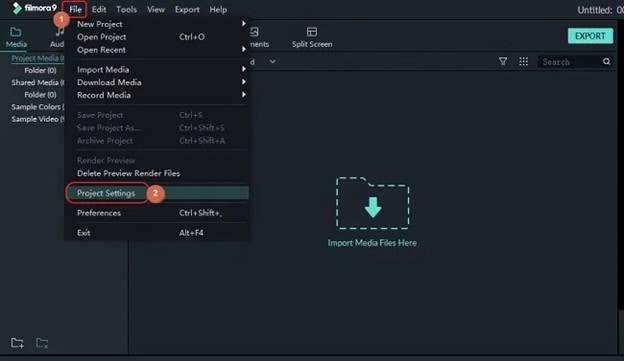
Click on the filmora icon to open the software interface and create a new project. On the top menu, go to File and choose “Project Settings”.

Step 3: Download GIF
Download the GIF to convert and save it to your document folder or desktop.
Step 4: Import GIF
Click on the timeline to import your GIF. Now click the highlighted “EXPORT” at the top.
Step 5: Save MOV format
On the options given, select MOV as your output video file format and tap Find Target to save your video file.
Conclusion
The two main types of GIF to MOV Converters are online ones and offline apps. The most popular offline converter is Wondershare Filmora, as it’s been around longer than most. On the other hand, the best online video editor and file converter is Convertio. It supports a wide range of input and output formats, but there are many other free converters that convert from GIF to MOV, so you might like to check them out before deciding which one to use.
Nowadays, we tend to see more GIFs in email. Many businesses incorporate video in email to promote their products, but why use a video when you can convert GIFs to MOV?
Everyone needs to convert one file type to another sometimes and it can become a bit of a hassle. A lot of conversion apps and websites aren’t free, so you might want to find out if there’s an online or offline app that can help you to do it. This article will look at some of the top options that are worth looking at.
Best 5 GIF to MOV Converter Software
Love GIFs, but worried about support on email clients? It’s time to convert your animated GIFs to MOVs, eliminating the need for MP4 conversion. Here are some of the top GIF-to-MOV converters to get you started.
1. Wondershare Filmora

You may have heard of Filmora by Wondershare , a powerful but easy-to-use video editing suite that provides animation, video effects, and editing capabilities to users. But did you know you can convert GIFs to MOV files with it?
Wondershare Filmora lets you convert animated GIF files to video files in a breeze. So if you want to turn your unforgettable GIF images into remarkable home movies or promo videos, this free GIF to MOV converter will be your best choice!
It works well in real-time and you can also create short videos with it. For a very long time, this video editor has gained popularity among millions of people.
Pros
Available for all devices
Professional to run offline
Best offline video editing tool
Supports screen recording
User-friendly interface
Cons
Free version has watermarks
A bit more expensive than others
Not sophisticated with 4k video editing
2. Adobe Premiere Pro

Adobe Premiere Pro is the top-of-the-line video editing software. It is one of the most powerful and professional applications, and it is more than able to handle even the most serious projects.
If you are a professional video editor and have all Adobe products, then you’ll find this conversion process straightforward. However, if you are an amateur and don’t have any prior experience with editing software – then converting GIF to MOV can be quite challenging.
Still, for many people, it is simply too expensive, which is why choosing a less expensive option may be appropriate. Fortunately, there are other similar programs that are excellent choices in terms of quality versus price.
Pros
Support a plethora of file formats
Very professional video editing
Runs effectively on Windows OS, macOS
Integrated VR Support
Cons
Not an easy application for non-tech users
Free for only 30 day
3. Movavi Video Editor Plus

Movavi Video Editor Plus is one of the most favorite GIF to MOV offline and online converters because it offers all the options and tools you need to make videos. It comes with a lot of useful features, including 20+ filters, 15+ transition effects, 40+ video and audio effects, 60+ built-in templates, and 34 color schemes.
You simply upload our gif file, select the format of your choice, e.g. MOV, and run the process. This tool provides immediate results and an easy-to-use interface.
It’s a great option for users who want to create quality videos from animated GIFs but don’t want to pay a lot for the software.
Pros
Chroma keying
Sharp movie-creation app
Highly adaptive
Easy functions
Cons
No advance trimming options available for editing
Doesn’t support editing on Apple Silicon M1
4. VLC

VLC has been a popular video converter for many years because it can also be used as a multimedia player, and this is why we are going to introduce you to this software. If you are looking for a free, complete, and safe converter to convert your files easily, this is the best option for you.
VLC (Videolan Media Player) is a program with a large number of use cases. It can be used to play your music and videos, but it’s also an audio and video converter as well. This Multiplatform program is available for Windows, Mac, Linux, Android, and iOS systems.
The interface is very intuitive and easy to learn. We don’t need to mention that it is constantly being updated with new features from the development team.
Pros
Simple interface
Can be installed quickly
Free to use
Best solution to play all video formats
Cons
No updated features
5. Cyberlink PowerDirector

The CyberLink PowerDirector is a complete video editing suite used for creating outstanding videos from scratch. It comes with a number of advanced editing tools and offers simple three editing modes to users that help them create compelling videos at faster speeds.
With it, you can easily create photo slideshows and turn your visual memories into video masterpieces like a pro. It has advanced video editing tools and trendy transitions and effects. Also, the tool is a good converter of all formats that you can use as better content for multiple tasks.
Pros
Support over 100 stellar audio and video editing features
Supports end-to-end 3D and 4k animations
Fast in action and functions
Friendly layout
Support amazing effects, filters, themes, and transitions
Cons
Ads creating distraction
Expensive tool
Online GIF to MOV Converter
Why go to the offline gif to MOV converter page? Online converters are far easier to use as they don’t require you to install any software. For instance, you can convert gif files to MOV files just by logging onto different websites. All that is required is a few simple clicks and you are ready for your next step.
1. CloudConvert

If you ever need to convert a gif file to MOV or one of the other formats supported by CloudConvert , you’re in luck. CloudConvert is an online platform through which you can quickly and easily convert gifs to MOV or any other format. With it, you’ll enjoy fast conversions with lossless compression and a batch conversion feature to ensure performance-friendly uploads. Best of all, the service is free for personal use, has no hidden fees, and requires no downloads or plugins.
Pros
Free to use
Interactive layout
Smooth experience
Provides extra customization of file
Cloud-based technology
Cons
Large volume files can be troubling for tool
Work pace depends on internet speed
2. EZGIF.COM

Ezgif.com is an interesting website. It helps GIF fans around the world to convert their favorite gif image to MOV or MP4. It offers a fast, efficient, and high-quality conversion service. Their commitment to customer satisfaction is genuinely remarkable and the attention they give new clients is excellent. Would recommend them highly!
Apart from converting files, Ezgif.com is an awesome animated GIF maker. It converts, resizes, edits, and creates GIF animations, and works on virtually any device or browser. Nowadays, more and more people are switching to chat applications that support animated graphics, over old email systems so it’s useful for both personal and professional use.
Pros
Absolutely safe website
Upload file from cloud, computer, or URL
Quick functionality
No need for paid subscription
Cons
The design seems outdated
No feature of file customization
3. Convertio

Whether you need to convert a GIF to an AVI, MP4, or MOV, Convertio is one of the most comprehensive online programs which can do this for you.
It is an online conversion tool that lets you choose from and convert MOV, AVI, WMV, FLV, MPEG-1, MPEG-2, ASF, QT, and DivX formats. It boasts a ton of supported formats with really fast conversion (up to 3 files per minute) that can be done by drag & dropping.
Its simple interface shows two blocks from which you can select which file will be converted to which format. Choosing files, selecting format, and converting them is all that this process is about. So here we conclude that Convertio is so far the best and easy-to-use interface for all online conversions of documents.
Pros
No guide is required for starting conversion
Fast conversion tool
Satisfied performance
Highly interactive
Affordable to experience premium features
Cons
Free trial is limited
100 MB per file is daily limit under freemium use
How to Convert GIF to MOV Using Wondershare Filmora?
Step 1: Download and install
To get started, download the software for free and install it on your computer.

Step 2: Make a new project
Click on the filmora icon to open the software interface and create a new project. On the top menu, go to File and choose “Project Settings”.

Step 3: Download GIF
Download the GIF to convert and save it to your document folder or desktop.
Step 4: Import GIF
Click on the timeline to import your GIF. Now click the highlighted “EXPORT” at the top.

Step 5: Save MOV format
On the options given, select MOV as your output video file format and tap Find Target to save your video file.
Conclusion
The two main types of GIF to MOV Converters are online ones and offline apps. The most popular offline converter is Wondershare Filmora, as it’s been around longer than most. On the other hand, the best online video editor and file converter is Convertio. It supports a wide range of input and output formats, but there are many other free converters that convert from GIF to MOV, so you might like to check them out before deciding which one to use.
Nowadays, we tend to see more GIFs in email. Many businesses incorporate video in email to promote their products, but why use a video when you can convert GIFs to MOV?
Everyone needs to convert one file type to another sometimes and it can become a bit of a hassle. A lot of conversion apps and websites aren’t free, so you might want to find out if there’s an online or offline app that can help you to do it. This article will look at some of the top options that are worth looking at.
Best 5 GIF to MOV Converter Software
Love GIFs, but worried about support on email clients? It’s time to convert your animated GIFs to MOVs, eliminating the need for MP4 conversion. Here are some of the top GIF-to-MOV converters to get you started.
1. Wondershare Filmora

You may have heard of Filmora by Wondershare , a powerful but easy-to-use video editing suite that provides animation, video effects, and editing capabilities to users. But did you know you can convert GIFs to MOV files with it?
Wondershare Filmora lets you convert animated GIF files to video files in a breeze. So if you want to turn your unforgettable GIF images into remarkable home movies or promo videos, this free GIF to MOV converter will be your best choice!
It works well in real-time and you can also create short videos with it. For a very long time, this video editor has gained popularity among millions of people.
Pros
Available for all devices
Professional to run offline
Best offline video editing tool
Supports screen recording
User-friendly interface
Cons
Free version has watermarks
A bit more expensive than others
Not sophisticated with 4k video editing
2. Adobe Premiere Pro

Adobe Premiere Pro is the top-of-the-line video editing software. It is one of the most powerful and professional applications, and it is more than able to handle even the most serious projects.
If you are a professional video editor and have all Adobe products, then you’ll find this conversion process straightforward. However, if you are an amateur and don’t have any prior experience with editing software – then converting GIF to MOV can be quite challenging.
Still, for many people, it is simply too expensive, which is why choosing a less expensive option may be appropriate. Fortunately, there are other similar programs that are excellent choices in terms of quality versus price.
Pros
Support a plethora of file formats
Very professional video editing
Runs effectively on Windows OS, macOS
Integrated VR Support
Cons
Not an easy application for non-tech users
Free for only 30 day
3. Movavi Video Editor Plus

Movavi Video Editor Plus is one of the most favorite GIF to MOV offline and online converters because it offers all the options and tools you need to make videos. It comes with a lot of useful features, including 20+ filters, 15+ transition effects, 40+ video and audio effects, 60+ built-in templates, and 34 color schemes.
You simply upload our gif file, select the format of your choice, e.g. MOV, and run the process. This tool provides immediate results and an easy-to-use interface.
It’s a great option for users who want to create quality videos from animated GIFs but don’t want to pay a lot for the software.
Pros
Chroma keying
Sharp movie-creation app
Highly adaptive
Easy functions
Cons
No advance trimming options available for editing
Doesn’t support editing on Apple Silicon M1
4. VLC

VLC has been a popular video converter for many years because it can also be used as a multimedia player, and this is why we are going to introduce you to this software. If you are looking for a free, complete, and safe converter to convert your files easily, this is the best option for you.
VLC (Videolan Media Player) is a program with a large number of use cases. It can be used to play your music and videos, but it’s also an audio and video converter as well. This Multiplatform program is available for Windows, Mac, Linux, Android, and iOS systems.
The interface is very intuitive and easy to learn. We don’t need to mention that it is constantly being updated with new features from the development team.
Pros
Simple interface
Can be installed quickly
Free to use
Best solution to play all video formats
Cons
No updated features
5. Cyberlink PowerDirector

The CyberLink PowerDirector is a complete video editing suite used for creating outstanding videos from scratch. It comes with a number of advanced editing tools and offers simple three editing modes to users that help them create compelling videos at faster speeds.
With it, you can easily create photo slideshows and turn your visual memories into video masterpieces like a pro. It has advanced video editing tools and trendy transitions and effects. Also, the tool is a good converter of all formats that you can use as better content for multiple tasks.
Pros
Support over 100 stellar audio and video editing features
Supports end-to-end 3D and 4k animations
Fast in action and functions
Friendly layout
Support amazing effects, filters, themes, and transitions
Cons
Ads creating distraction
Expensive tool
Online GIF to MOV Converter
Why go to the offline gif to MOV converter page? Online converters are far easier to use as they don’t require you to install any software. For instance, you can convert gif files to MOV files just by logging onto different websites. All that is required is a few simple clicks and you are ready for your next step.
1. CloudConvert

If you ever need to convert a gif file to MOV or one of the other formats supported by CloudConvert , you’re in luck. CloudConvert is an online platform through which you can quickly and easily convert gifs to MOV or any other format. With it, you’ll enjoy fast conversions with lossless compression and a batch conversion feature to ensure performance-friendly uploads. Best of all, the service is free for personal use, has no hidden fees, and requires no downloads or plugins.
Pros
Free to use
Interactive layout
Smooth experience
Provides extra customization of file
Cloud-based technology
Cons
Large volume files can be troubling for tool
Work pace depends on internet speed
2. EZGIF.COM

Ezgif.com is an interesting website. It helps GIF fans around the world to convert their favorite gif image to MOV or MP4. It offers a fast, efficient, and high-quality conversion service. Their commitment to customer satisfaction is genuinely remarkable and the attention they give new clients is excellent. Would recommend them highly!
Apart from converting files, Ezgif.com is an awesome animated GIF maker. It converts, resizes, edits, and creates GIF animations, and works on virtually any device or browser. Nowadays, more and more people are switching to chat applications that support animated graphics, over old email systems so it’s useful for both personal and professional use.
Pros
Absolutely safe website
Upload file from cloud, computer, or URL
Quick functionality
No need for paid subscription
Cons
The design seems outdated
No feature of file customization
3. Convertio

Whether you need to convert a GIF to an AVI, MP4, or MOV, Convertio is one of the most comprehensive online programs which can do this for you.
It is an online conversion tool that lets you choose from and convert MOV, AVI, WMV, FLV, MPEG-1, MPEG-2, ASF, QT, and DivX formats. It boasts a ton of supported formats with really fast conversion (up to 3 files per minute) that can be done by drag & dropping.
Its simple interface shows two blocks from which you can select which file will be converted to which format. Choosing files, selecting format, and converting them is all that this process is about. So here we conclude that Convertio is so far the best and easy-to-use interface for all online conversions of documents.
Pros
No guide is required for starting conversion
Fast conversion tool
Satisfied performance
Highly interactive
Affordable to experience premium features
Cons
Free trial is limited
100 MB per file is daily limit under freemium use
How to Convert GIF to MOV Using Wondershare Filmora?
Step 1: Download and install
To get started, download the software for free and install it on your computer.

Step 2: Make a new project
Click on the filmora icon to open the software interface and create a new project. On the top menu, go to File and choose “Project Settings”.

Step 3: Download GIF
Download the GIF to convert and save it to your document folder or desktop.
Step 4: Import GIF
Click on the timeline to import your GIF. Now click the highlighted “EXPORT” at the top.

Step 5: Save MOV format
On the options given, select MOV as your output video file format and tap Find Target to save your video file.
Conclusion
The two main types of GIF to MOV Converters are online ones and offline apps. The most popular offline converter is Wondershare Filmora, as it’s been around longer than most. On the other hand, the best online video editor and file converter is Convertio. It supports a wide range of input and output formats, but there are many other free converters that convert from GIF to MOV, so you might like to check them out before deciding which one to use.
Nowadays, we tend to see more GIFs in email. Many businesses incorporate video in email to promote their products, but why use a video when you can convert GIFs to MOV?
Everyone needs to convert one file type to another sometimes and it can become a bit of a hassle. A lot of conversion apps and websites aren’t free, so you might want to find out if there’s an online or offline app that can help you to do it. This article will look at some of the top options that are worth looking at.
Best 5 GIF to MOV Converter Software
Love GIFs, but worried about support on email clients? It’s time to convert your animated GIFs to MOVs, eliminating the need for MP4 conversion. Here are some of the top GIF-to-MOV converters to get you started.
1. Wondershare Filmora

You may have heard of Filmora by Wondershare , a powerful but easy-to-use video editing suite that provides animation, video effects, and editing capabilities to users. But did you know you can convert GIFs to MOV files with it?
Wondershare Filmora lets you convert animated GIF files to video files in a breeze. So if you want to turn your unforgettable GIF images into remarkable home movies or promo videos, this free GIF to MOV converter will be your best choice!
It works well in real-time and you can also create short videos with it. For a very long time, this video editor has gained popularity among millions of people.
Pros
Available for all devices
Professional to run offline
Best offline video editing tool
Supports screen recording
User-friendly interface
Cons
Free version has watermarks
A bit more expensive than others
Not sophisticated with 4k video editing
2. Adobe Premiere Pro

Adobe Premiere Pro is the top-of-the-line video editing software. It is one of the most powerful and professional applications, and it is more than able to handle even the most serious projects.
If you are a professional video editor and have all Adobe products, then you’ll find this conversion process straightforward. However, if you are an amateur and don’t have any prior experience with editing software – then converting GIF to MOV can be quite challenging.
Still, for many people, it is simply too expensive, which is why choosing a less expensive option may be appropriate. Fortunately, there are other similar programs that are excellent choices in terms of quality versus price.
Pros
Support a plethora of file formats
Very professional video editing
Runs effectively on Windows OS, macOS
Integrated VR Support
Cons
Not an easy application for non-tech users
Free for only 30 day
3. Movavi Video Editor Plus

Movavi Video Editor Plus is one of the most favorite GIF to MOV offline and online converters because it offers all the options and tools you need to make videos. It comes with a lot of useful features, including 20+ filters, 15+ transition effects, 40+ video and audio effects, 60+ built-in templates, and 34 color schemes.
You simply upload our gif file, select the format of your choice, e.g. MOV, and run the process. This tool provides immediate results and an easy-to-use interface.
It’s a great option for users who want to create quality videos from animated GIFs but don’t want to pay a lot for the software.
Pros
Chroma keying
Sharp movie-creation app
Highly adaptive
Easy functions
Cons
No advance trimming options available for editing
Doesn’t support editing on Apple Silicon M1
4. VLC

VLC has been a popular video converter for many years because it can also be used as a multimedia player, and this is why we are going to introduce you to this software. If you are looking for a free, complete, and safe converter to convert your files easily, this is the best option for you.
VLC (Videolan Media Player) is a program with a large number of use cases. It can be used to play your music and videos, but it’s also an audio and video converter as well. This Multiplatform program is available for Windows, Mac, Linux, Android, and iOS systems.
The interface is very intuitive and easy to learn. We don’t need to mention that it is constantly being updated with new features from the development team.
Pros
Simple interface
Can be installed quickly
Free to use
Best solution to play all video formats
Cons
No updated features
5. Cyberlink PowerDirector

The CyberLink PowerDirector is a complete video editing suite used for creating outstanding videos from scratch. It comes with a number of advanced editing tools and offers simple three editing modes to users that help them create compelling videos at faster speeds.
With it, you can easily create photo slideshows and turn your visual memories into video masterpieces like a pro. It has advanced video editing tools and trendy transitions and effects. Also, the tool is a good converter of all formats that you can use as better content for multiple tasks.
Pros
Support over 100 stellar audio and video editing features
Supports end-to-end 3D and 4k animations
Fast in action and functions
Friendly layout
Support amazing effects, filters, themes, and transitions
Cons
Ads creating distraction
Expensive tool
Online GIF to MOV Converter
Why go to the offline gif to MOV converter page? Online converters are far easier to use as they don’t require you to install any software. For instance, you can convert gif files to MOV files just by logging onto different websites. All that is required is a few simple clicks and you are ready for your next step.
1. CloudConvert

If you ever need to convert a gif file to MOV or one of the other formats supported by CloudConvert , you’re in luck. CloudConvert is an online platform through which you can quickly and easily convert gifs to MOV or any other format. With it, you’ll enjoy fast conversions with lossless compression and a batch conversion feature to ensure performance-friendly uploads. Best of all, the service is free for personal use, has no hidden fees, and requires no downloads or plugins.
Pros
Free to use
Interactive layout
Smooth experience
Provides extra customization of file
Cloud-based technology
Cons
Large volume files can be troubling for tool
Work pace depends on internet speed
2. EZGIF.COM

Ezgif.com is an interesting website. It helps GIF fans around the world to convert their favorite gif image to MOV or MP4. It offers a fast, efficient, and high-quality conversion service. Their commitment to customer satisfaction is genuinely remarkable and the attention they give new clients is excellent. Would recommend them highly!
Apart from converting files, Ezgif.com is an awesome animated GIF maker. It converts, resizes, edits, and creates GIF animations, and works on virtually any device or browser. Nowadays, more and more people are switching to chat applications that support animated graphics, over old email systems so it’s useful for both personal and professional use.
Pros
Absolutely safe website
Upload file from cloud, computer, or URL
Quick functionality
No need for paid subscription
Cons
The design seems outdated
No feature of file customization
3. Convertio

Whether you need to convert a GIF to an AVI, MP4, or MOV, Convertio is one of the most comprehensive online programs which can do this for you.
It is an online conversion tool that lets you choose from and convert MOV, AVI, WMV, FLV, MPEG-1, MPEG-2, ASF, QT, and DivX formats. It boasts a ton of supported formats with really fast conversion (up to 3 files per minute) that can be done by drag & dropping.
Its simple interface shows two blocks from which you can select which file will be converted to which format. Choosing files, selecting format, and converting them is all that this process is about. So here we conclude that Convertio is so far the best and easy-to-use interface for all online conversions of documents.
Pros
No guide is required for starting conversion
Fast conversion tool
Satisfied performance
Highly interactive
Affordable to experience premium features
Cons
Free trial is limited
100 MB per file is daily limit under freemium use
How to Convert GIF to MOV Using Wondershare Filmora?
Step 1: Download and install
To get started, download the software for free and install it on your computer.

Step 2: Make a new project
Click on the filmora icon to open the software interface and create a new project. On the top menu, go to File and choose “Project Settings”.

Step 3: Download GIF
Download the GIF to convert and save it to your document folder or desktop.
Step 4: Import GIF
Click on the timeline to import your GIF. Now click the highlighted “EXPORT” at the top.

Step 5: Save MOV format
On the options given, select MOV as your output video file format and tap Find Target to save your video file.
Conclusion
The two main types of GIF to MOV Converters are online ones and offline apps. The most popular offline converter is Wondershare Filmora, as it’s been around longer than most. On the other hand, the best online video editor and file converter is Convertio. It supports a wide range of input and output formats, but there are many other free converters that convert from GIF to MOV, so you might like to check them out before deciding which one to use.
How To Change Speed of Video in Final Cut Pro?
When there are certain boring but necessary parts in your video, you need to speed them up. Similarly, you may need to reduce the duration of the entire video. Speeding up the video is your only option when you do not want to cut any part. You must have also observed that certain videos look funny when you speed them up. To speed up videos, you will need a video editor that does not degrade the video quality.
Final Cut Pro is a popular choice to speed up video without distorting the pitch. Many think that the video quality can degrade when they change the speed of the video clip. This concern can be taken care of when you alter the video speed with Final Cut Pro. Instead of changing the speed of the entire video, you can change the speed of specific parts. We will illustrate how to speed up the video using Final Cut Pro and suggest a better choice than FCP.
Part I. Speed Up Video using Final Cut Pro
Final Cut Pro by Apple is one of Mac users’ most popular video editors. Many video creators purchase MacBooks for editing their videos in Final Cut Pro. The video editor is suitable for beginners as well as professionals. FCP, as a video editor, is super fast in rendering and processing video while exporting. Here are the steps for the Final Cut Pro speed-up clip.
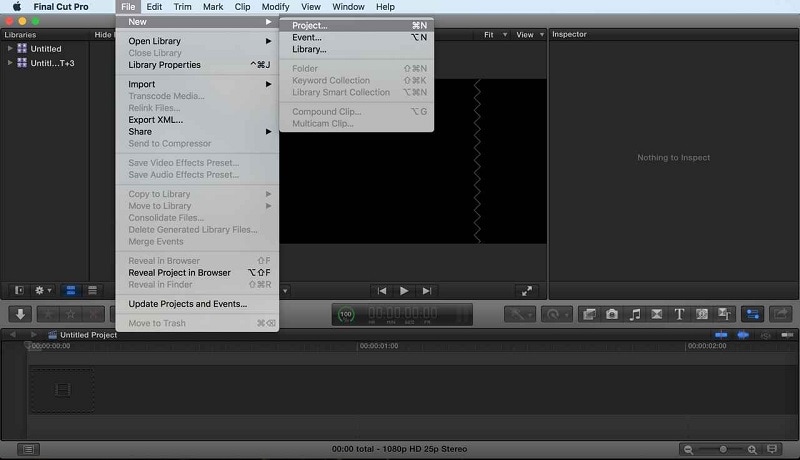
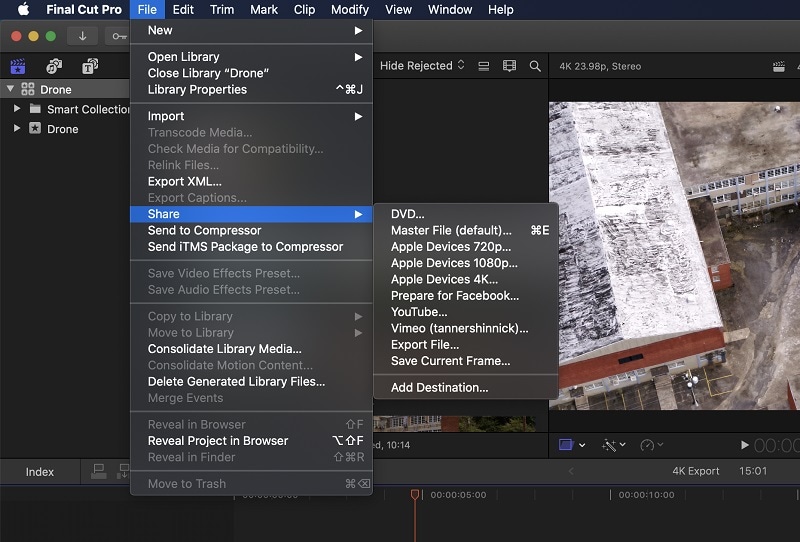
Step1 Open FCP. Navigate to File>New> and tap Project to start a new project.
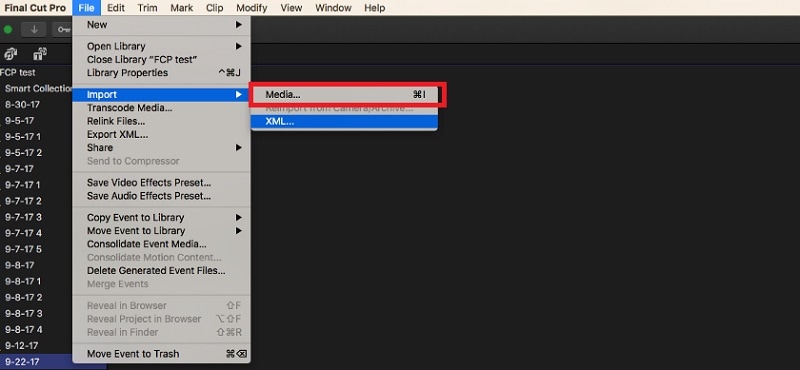
Step2 Go to File>Import> Media and fetch your video clip. After that, drag/drop the video clip into the timeline.
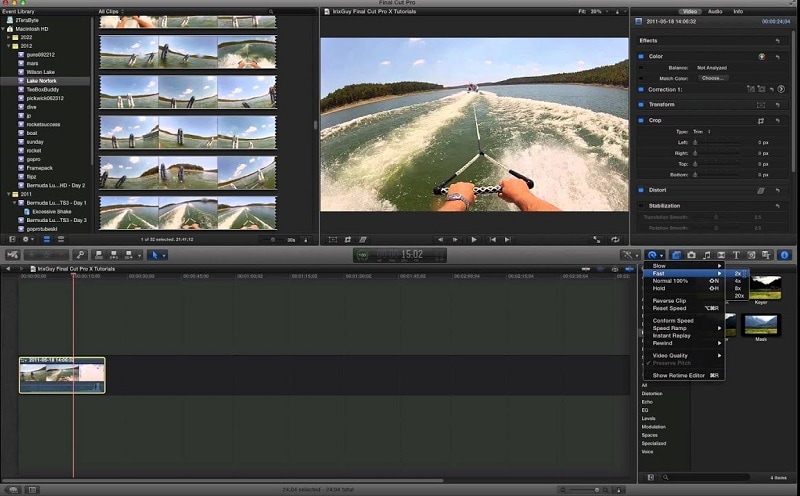
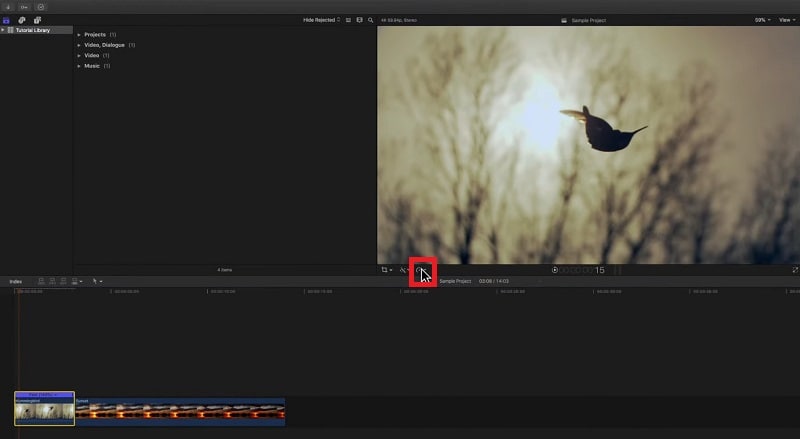
Step3 Choose the video clip from the timeline. Click on the Speedometer(Retime) icon at the top of the timeline.
Step4 Tap the Speedometer icon, to get the drop-drop menu. For the Final Cut Pro speed-up video, go to Fast and select the speed. You get to choose from 2X to 20X.
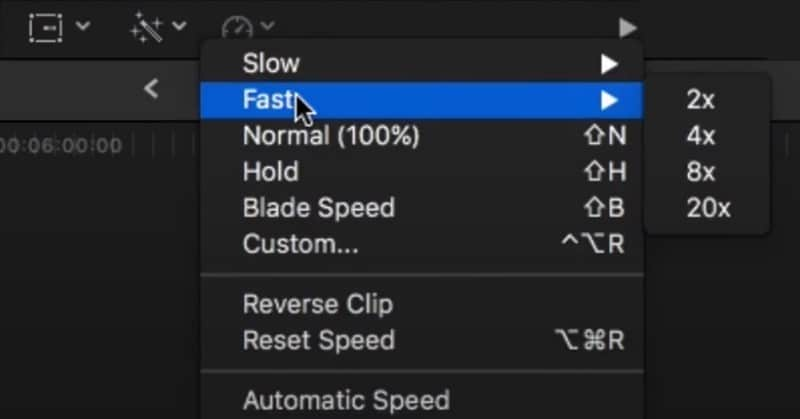
If you want to customize the speed-up rate, you can click on the Custom option. Enter any desired percentage speed.
Step5 Now, play the video.
Part II. Tips for Speeding Up Video in Final Cut Pro
You have to keep a few points in mind when you speed up videos in Final Cut Pro. This ensures that the video does not get distorted while speeding up a section. Here are some tips to follow to speed up the video in FCP.
Adjust The Pitch of Sped-Up Clips -
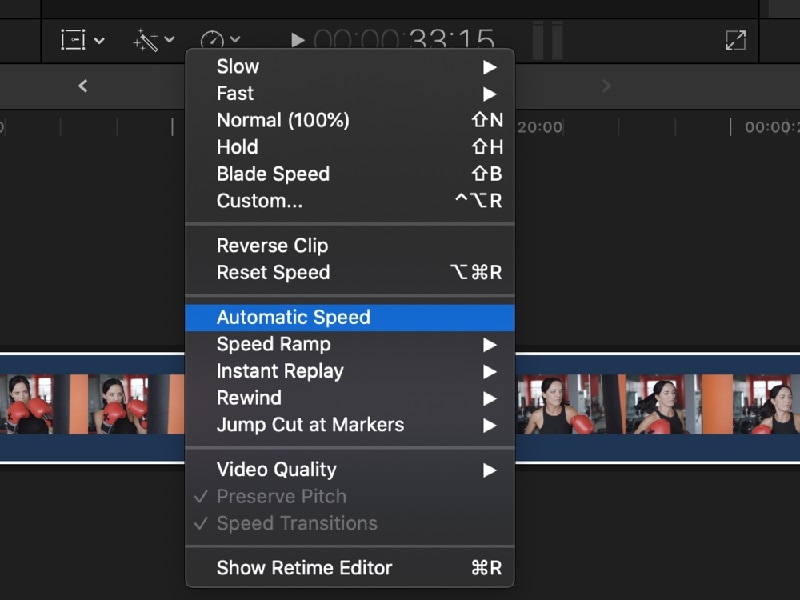
By default, Final Cut Pro preserves the pitch of the audio even when you change the speed of the video. However, you may want to change the pitch per the video’s speed. This is because you might want to make the audio sound funny. You need to turn off the Preserve Pitch option from Retime menu. Once you do that, the pitch of the sped-up clip adjusts itself as per the change in speed.
Speeding Up Video by Adjusting Frame Rate -
You can shoot at a low frame rate for the scene you want to speed up. The frame rate should be lower than the overall video project’s frame rate.
You can add the scene to your video project on the timeline. Then you need to choose Automatic Speed from Retime menu. This will increase the frame rate from the scene to the video project frame rate. Once the frame rate increases, the video will speed up automatically.
Smoothen Out the Sped-Up Video -
Sometimes, the overall video may look old when you speed up a particular portion. That is why there are two options available on Final Cut Pro. The first option is frame blending which is more suitable for the slow-motion clip.
The second option is the optical flow that smoothens out the sped-up clip. It adds in-between frames by analyzing the directional movement of pixels. You can find the option from Video Quality present in the Retime menu.
Part III. The Right Final Cut Pro Alternative for Changing Speed - Filmora
Final Cut Pro has a steep learning curve. Unless you have some experience in video editing, you will find the user interface slightly complicated. Besides, Final Cut Pro is only available for Mac users since it is an Apple product.
Many people look for a Final Cut Pro alternative to change the speed of the video. Wondershare Filmora is the best choice over Final Cut Pro to change the speed of video Final Cut Pro.
Wondershare Filmora is a professional video editor that is available for Windows and Mac users. The video editor is suitable for beginners as well as experienced video creators. The popularity of Filmora is due to its super intuitive user interface. You get almost all the features of FCP in Filmora.
In comparison, there are more video effects, elements, and stock media files available to enhance your videos. You get the latest effects from time to time so that you can have the trending elements in the video, you can also save the edited video in different video file formats as per your requirements, and even record video through a webcam and capture the screen using Filmora.
Several AI effects, stickers, and elements are available to enhance your videos. Most users find it easier to edit videos on Filmora over Final Cut Pro.
Free Download For Win 7 or later(64-bit)
Free Download For macOS 10.14 or later
How to Change Video Speed in Filmora?
Changing video speed in Filmora is super easy. You can speed up your video as per your requirements in a number of ways. That is why Filmora happens to be a better option than Final Cut Pro. We will illustrate all the different methods to change video speed in Filmora.
You can watch this video to understand how to change video speed in Filmora.
Method 1. The Simplest Way - Click “2x-100x” Speed Options
Just like Final Cut Pro, you can choose from preset speed options to change video speed. This is undoubtedly the easiest way to change video speed instantly. While Final Cut Pro offers 2X to 20X speed options, Filmora has 2X to 100X speed presets. Here are the steps to speed up video by choosing a preset speed option.
Step1 Download, install and simply Launch Filmora. Tap Create New Project option.

Step2 Go to File> Import Media> Import Media Files and choose the video file. The selected video will be imported into the Project Media folder. Alternatively, you can also use the drag/drop function.

Step3 Drag and drop the video file onto the timeline. Select the video clip from the timeline and click on the Speed (timer icon) option at the top of the timeline. If you want to speed up a portion of the video, you need to split the video clip.

Step4 From the menu, go to Fast and select any speed option as per your requirements. Thereafter, play the video to see the changes.

Step5 Press Export to save the video file in your desired file format.
Method 2. Use Uniform Speed to Change Speed
If you want to customize the video speed uniformly, there is a dedicated option called Uniform Speed in Filmora. This means you do not want to choose from the preset speed options. You may want to set the speed of the video to 3X, but it is not available in the preset options.
That is where Uniform Speed comes in handy, and you can set any speed from 0.01X to 100X. Here are the steps to follow.
Step1 Once you have dropped the video file onto the timeline, click on the Speed(timer) icon.
Step2 Click on the Uniform Speed option. This will open the Uniform Speed tab above the timeline.

Step3 Adjust the speed slider to set the desired speed as per your requirements. The duration will change as per the speed you set, and you can set the duration below the speed slider. Just like Final Cut Pro, you can turn on Ripple and Audio Pitch as per your preference.

Step4 Once you are satisfied with the speed, click on the Ok button. Thereafter, tap Export to save the edited video file.
Method 3. Use Speed Ramping to Change Speed
There is a unique way to change your video speed called speed ramping. You can speed up some parts and slow down the other parts, like crests and troughs in a graph.
The speed ramping feature comes with several graphical presets. You can choose from the presets and customize the speed as per your requirements. Check the steps to use speed ramping to change your video speed.
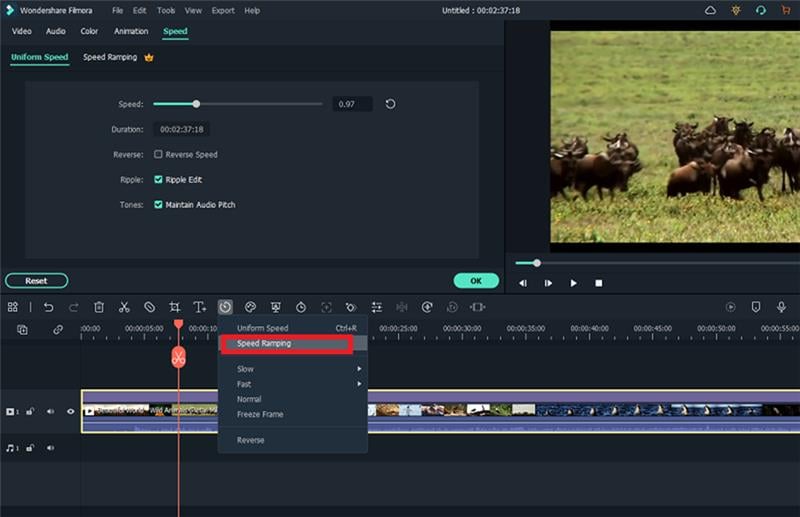
Step1 Drag and drop the video file onto the timeline. Click on the Speed(timer) icon at the top of the timeline.
Step2 Click on Speed Ramping option. This will open Speed Ramping above the timeline.

Step3 Select from the available preset as per your requirements. Otherwise, you can select Customize option and edit the nodes as needed.
Step4 Once satisfied with the result, click on the Ok button. Finally, tap Export
Conclusion
There are some videos where you may have to speed up certain parts. In detail, we have illustrated how to speed up the video in Final Cut Pro. However, if you do not have Final Cut Pro or are unsatisfied with FCP, Wondershare Filmora is a great choice. Most importantly, the steps for all the different methods are very simple for everyone to follow.
Free Download For macOS 10.14 or later
How to Change Video Speed in Filmora?
Changing video speed in Filmora is super easy. You can speed up your video as per your requirements in a number of ways. That is why Filmora happens to be a better option than Final Cut Pro. We will illustrate all the different methods to change video speed in Filmora.
You can watch this video to understand how to change video speed in Filmora.
Method 1. The Simplest Way - Click “2x-100x” Speed Options
Just like Final Cut Pro, you can choose from preset speed options to change video speed. This is undoubtedly the easiest way to change video speed instantly. While Final Cut Pro offers 2X to 20X speed options, Filmora has 2X to 100X speed presets. Here are the steps to speed up video by choosing a preset speed option.
Step1 Download, install and simply Launch Filmora. Tap Create New Project option.

Step2 Go to File> Import Media> Import Media Files and choose the video file. The selected video will be imported into the Project Media folder. Alternatively, you can also use the drag/drop function.

Step3 Drag and drop the video file onto the timeline. Select the video clip from the timeline and click on the Speed (timer icon) option at the top of the timeline. If you want to speed up a portion of the video, you need to split the video clip.

Step4 From the menu, go to Fast and select any speed option as per your requirements. Thereafter, play the video to see the changes.

Step5 Press Export to save the video file in your desired file format.
Method 2. Use Uniform Speed to Change Speed
If you want to customize the video speed uniformly, there is a dedicated option called Uniform Speed in Filmora. This means you do not want to choose from the preset speed options. You may want to set the speed of the video to 3X, but it is not available in the preset options.
That is where Uniform Speed comes in handy, and you can set any speed from 0.01X to 100X. Here are the steps to follow.
Step1 Once you have dropped the video file onto the timeline, click on the Speed(timer) icon.
Step2 Click on the Uniform Speed option. This will open the Uniform Speed tab above the timeline.

Step3 Adjust the speed slider to set the desired speed as per your requirements. The duration will change as per the speed you set, and you can set the duration below the speed slider. Just like Final Cut Pro, you can turn on Ripple and Audio Pitch as per your preference.

Step4 Once you are satisfied with the speed, click on the Ok button. Thereafter, tap Export to save the edited video file.
Method 3. Use Speed Ramping to Change Speed
There is a unique way to change your video speed called speed ramping. You can speed up some parts and slow down the other parts, like crests and troughs in a graph.
The speed ramping feature comes with several graphical presets. You can choose from the presets and customize the speed as per your requirements. Check the steps to use speed ramping to change your video speed.
Step1 Drag and drop the video file onto the timeline. Click on the Speed(timer) icon at the top of the timeline.
Step2 Click on Speed Ramping option. This will open Speed Ramping above the timeline.

Step3 Select from the available preset as per your requirements. Otherwise, you can select Customize option and edit the nodes as needed.

Step4 Once satisfied with the result, click on the Ok button. Finally, tap Export
Conclusion
There are some videos where you may have to speed up certain parts. In detail, we have illustrated how to speed up the video in Final Cut Pro. However, if you do not have Final Cut Pro or are unsatisfied with FCP, Wondershare Filmora is a great choice. Most importantly, the steps for all the different methods are very simple for everyone to follow.
Top Tips on How to Design Travel Slideshow
Best Tips on How to Design Travel Slideshow
An easy yet powerful editor
Numerous effects to choose from
Detailed tutorials provided by the official channel
A single travel trip besides numerous memories also has innumerable pictures and videos. Sharing all of these pictures and videos with your friends, and dear ones are tedious and not a practical thing to do. Here comes your creativity, where you can make an impressive slideshow using some of the most interesting images and videos from your clips. Creating a digital slideshow will not only help you to share your files online with your loved ones but will also work as a keepsake where you relive the moments later.

So now when decided to create a slideshow, the next question is how, tips, tools, templates, and software can be used. The article below will cover all these aspects that will help you in designing and creating a wonderful travel slideshow.
In this article
01 [Tips and steps for creating a travel slideshow](#Part 1)
02 [Importance of using a travel slideshow template](#Part 2)
03 [Best tool for creating a travel slideshow- Wondershare Filmora](#Part 3)
Part 1 Tips and steps for creating a travel slideshow
Want to hear the words- cool and wow when you play your slideshow in front of your dear ones. The below-listed tips will help you create an engaging and engrossing slideshow.

01Identify the audience
Before creating a slideshow, you first need to ascertain who is your target audience. The slideshow can be created for your friends, family, relatives, or YouTube or social media platform viewers. Depending on the target audience, the content and other slideshow elements will vary.
02Choose a travel story
Next, you need to decide upon the story of your travel slideshow. Depending on the story, you can pick up the content to be included. The story can be based on the places you visited, food, local shopping, and others. Also draft a story that has an introduction, a middle part, and an end.
03Sort the pictures and videos
Next comes the trickiest part of selecting the pictures and videos to be added to the slideshow. For any trip, there are hundreds of images but you cannot add them all to your slideshow. So, depending on the target audience and your travel story, pick up the most appropriate ones. Pick up the number of images and videos so that the total slideshow length is around 5-7 minutes.
04Edit images and add effects
Next comes the editing part. Check out the images that need editing like cropping, color correction, and others. Also, you can add some effects to make your slideshow interesting. To edit the files and add effects, there are several editing online and desktop-based tools available. You can choose the ones that meet your requirements.
05Add transitions
Next, choose the transitions you want to add between the images and the videos. There are slideshow-making tools where you can check out different types of transition effects and use them.
06Add Music
Music will set the right tone and mood for your slideshow. You can either download the relevant song from any online site or a music library or can also combine multiple audio clips to be added to the slideshow.
Part 2 Importance of using a travel slideshow template
For some, slideshow creation can be a simple task of adding a few images and videos but for the ones who need to create something interesting, several elements go into the making of a slideshow. Moreover, when it comes to travel, the task becomes even trickier with so many things to include and grab the attention of the viewers.
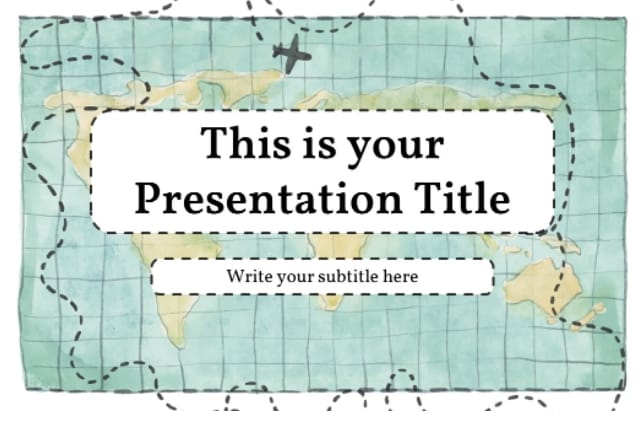
So, if you are not experienced or a pro at making a slideshow but want to create something impressive, templates come to a great rescue. The templates are like ready-to-use designs where you simply need to add the required elements that in turn will create a travel slideshow.
Using a template for creating a travel slideshow served several benefits as enlisted below.
● Save time in drafting a design.
● Save efforts.
● Helps in creating a professional-looking impressive slideshow.
● Multiple elements can be added.
● Helps in creating a slideshow with some story.
There are several online sites and tools available from where you can select and pick a travel slideshow template of your choice.
Part 3 Best tool for creating a travel slideshow- Wondershare Filmora
For creating your travel slideshow in an interesting manner and that too in a hassle-free manner, Wondershare Filmora Video Editor is excellent. Though it is a professional video editing tool with advanced features, it supports multiple additional tasks as well including slideshow making. Using the software, your slideshow having pictures, videos, and music files can be created in no time.
For Win 7 or later (64-bit)
For macOS 10.12 or later
You can even edit the files for further customization using the built-in functions. Add transitions, filters, effects, and other elements for creating a slideshow of your choice. An array of templates in different categories will further help you to quickly create a presentation based on your theme. There is also a stock collection of videos, images, and other files that can be used for your slideshow.
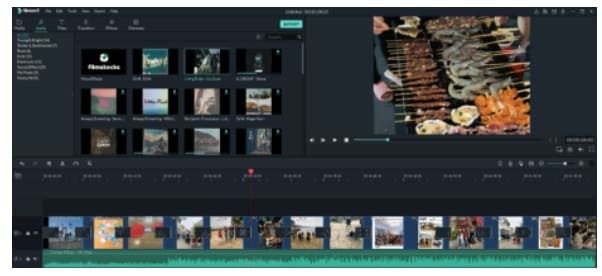
Steps to create a travel slideshow using Wondershare Filmora
Step 1. From the official software page, download and install the program, and at the main interface choose the New Project option.
Step 2. Next, the videos and images that need to be included in the slideshow have to be imported and added to the Media Library of the software. Next, drag and move these files to the timeline. The sequence can be changed as desired.
Note: Before moving the files to the timeline, you can edit and customize them by using the built-in features of the software like rotate, crop, and zoom.
Step 3. An array of transitions is available in the software from which you can choose the ones that fit into your theme. Some of the popular ones are cross-merge, sweep clockwise, cross split, and others.
Step 4. Also add filters, overlays, effects, and other elements to your slideshow.
Step 5. Next comes the music, add the local music file or use the one from the inbuilt audio library. The Voice-over recording option is also available in the software.
Step 6. Finally, export and save the slideshow. You can save it to your local system, or DVD, or can even share it directly to YouTube or Vimeo.
● Ending Thoughts →
● For creating an interesting travel slideshow consider all the important elements like the story, theme, pictures, music, and others.
● Templates help to a great extent for creating a slideshow in a simple quick-manner.
● Wondershare Filmora is an excellent tool for finding a template as well as creating a travel slideshow.
A single travel trip besides numerous memories also has innumerable pictures and videos. Sharing all of these pictures and videos with your friends, and dear ones are tedious and not a practical thing to do. Here comes your creativity, where you can make an impressive slideshow using some of the most interesting images and videos from your clips. Creating a digital slideshow will not only help you to share your files online with your loved ones but will also work as a keepsake where you relive the moments later.

So now when decided to create a slideshow, the next question is how, tips, tools, templates, and software can be used. The article below will cover all these aspects that will help you in designing and creating a wonderful travel slideshow.
In this article
01 [Tips and steps for creating a travel slideshow](#Part 1)
02 [Importance of using a travel slideshow template](#Part 2)
03 [Best tool for creating a travel slideshow- Wondershare Filmora](#Part 3)
Part 1 Tips and steps for creating a travel slideshow
Want to hear the words- cool and wow when you play your slideshow in front of your dear ones. The below-listed tips will help you create an engaging and engrossing slideshow.

01Identify the audience
Before creating a slideshow, you first need to ascertain who is your target audience. The slideshow can be created for your friends, family, relatives, or YouTube or social media platform viewers. Depending on the target audience, the content and other slideshow elements will vary.
02Choose a travel story
Next, you need to decide upon the story of your travel slideshow. Depending on the story, you can pick up the content to be included. The story can be based on the places you visited, food, local shopping, and others. Also draft a story that has an introduction, a middle part, and an end.
03Sort the pictures and videos
Next comes the trickiest part of selecting the pictures and videos to be added to the slideshow. For any trip, there are hundreds of images but you cannot add them all to your slideshow. So, depending on the target audience and your travel story, pick up the most appropriate ones. Pick up the number of images and videos so that the total slideshow length is around 5-7 minutes.
04Edit images and add effects
Next comes the editing part. Check out the images that need editing like cropping, color correction, and others. Also, you can add some effects to make your slideshow interesting. To edit the files and add effects, there are several editing online and desktop-based tools available. You can choose the ones that meet your requirements.
05Add transitions
Next, choose the transitions you want to add between the images and the videos. There are slideshow-making tools where you can check out different types of transition effects and use them.
06Add Music
Music will set the right tone and mood for your slideshow. You can either download the relevant song from any online site or a music library or can also combine multiple audio clips to be added to the slideshow.
Part 2 Importance of using a travel slideshow template
For some, slideshow creation can be a simple task of adding a few images and videos but for the ones who need to create something interesting, several elements go into the making of a slideshow. Moreover, when it comes to travel, the task becomes even trickier with so many things to include and grab the attention of the viewers.
So, if you are not experienced or a pro at making a slideshow but want to create something impressive, templates come to a great rescue. The templates are like ready-to-use designs where you simply need to add the required elements that in turn will create a travel slideshow.
Using a template for creating a travel slideshow served several benefits as enlisted below.
● Save time in drafting a design.
● Save efforts.
● Helps in creating a professional-looking impressive slideshow.
● Multiple elements can be added.
● Helps in creating a slideshow with some story.
There are several online sites and tools available from where you can select and pick a travel slideshow template of your choice.

Part 3 Best tool for creating a travel slideshow- Wondershare Filmora
For creating your travel slideshow in an interesting manner and that too in a hassle-free manner, Wondershare Filmora Video Editor is excellent. Though it is a professional video editing tool with advanced features, it supports multiple additional tasks as well including slideshow making. Using the software, your slideshow having pictures, videos, and music files can be created in no time.
For Win 7 or later (64-bit)
For macOS 10.12 or later
You can even edit the files for further customization using the built-in functions. Add transitions, filters, effects, and other elements for creating a slideshow of your choice. An array of templates in different categories will further help you to quickly create a presentation based on your theme. There is also a stock collection of videos, images, and other files that can be used for your slideshow.

Steps to create a travel slideshow using Wondershare Filmora
Step 1. From the official software page, download and install the program, and at the main interface choose the New Project option.
Step 2. Next, the videos and images that need to be included in the slideshow have to be imported and added to the Media Library of the software. Next, drag and move these files to the timeline. The sequence can be changed as desired.
Note: Before moving the files to the timeline, you can edit and customize them by using the built-in features of the software like rotate, crop, and zoom.
Step 3. An array of transitions is available in the software from which you can choose the ones that fit into your theme. Some of the popular ones are cross-merge, sweep clockwise, cross split, and others.
Step 4. Also add filters, overlays, effects, and other elements to your slideshow.
Step 5. Next comes the music, add the local music file or use the one from the inbuilt audio library. The Voice-over recording option is also available in the software.
Step 6. Finally, export and save the slideshow. You can save it to your local system, or DVD, or can even share it directly to YouTube or Vimeo.
● Ending Thoughts →
● For creating an interesting travel slideshow consider all the important elements like the story, theme, pictures, music, and others.
● Templates help to a great extent for creating a slideshow in a simple quick-manner.
● Wondershare Filmora is an excellent tool for finding a template as well as creating a travel slideshow.
A single travel trip besides numerous memories also has innumerable pictures and videos. Sharing all of these pictures and videos with your friends, and dear ones are tedious and not a practical thing to do. Here comes your creativity, where you can make an impressive slideshow using some of the most interesting images and videos from your clips. Creating a digital slideshow will not only help you to share your files online with your loved ones but will also work as a keepsake where you relive the moments later.

So now when decided to create a slideshow, the next question is how, tips, tools, templates, and software can be used. The article below will cover all these aspects that will help you in designing and creating a wonderful travel slideshow.
In this article
01 [Tips and steps for creating a travel slideshow](#Part 1)
02 [Importance of using a travel slideshow template](#Part 2)
03 [Best tool for creating a travel slideshow- Wondershare Filmora](#Part 3)
Part 1 Tips and steps for creating a travel slideshow
Want to hear the words- cool and wow when you play your slideshow in front of your dear ones. The below-listed tips will help you create an engaging and engrossing slideshow.

01Identify the audience
Before creating a slideshow, you first need to ascertain who is your target audience. The slideshow can be created for your friends, family, relatives, or YouTube or social media platform viewers. Depending on the target audience, the content and other slideshow elements will vary.
02Choose a travel story
Next, you need to decide upon the story of your travel slideshow. Depending on the story, you can pick up the content to be included. The story can be based on the places you visited, food, local shopping, and others. Also draft a story that has an introduction, a middle part, and an end.
03Sort the pictures and videos
Next comes the trickiest part of selecting the pictures and videos to be added to the slideshow. For any trip, there are hundreds of images but you cannot add them all to your slideshow. So, depending on the target audience and your travel story, pick up the most appropriate ones. Pick up the number of images and videos so that the total slideshow length is around 5-7 minutes.
04Edit images and add effects
Next comes the editing part. Check out the images that need editing like cropping, color correction, and others. Also, you can add some effects to make your slideshow interesting. To edit the files and add effects, there are several editing online and desktop-based tools available. You can choose the ones that meet your requirements.
05Add transitions
Next, choose the transitions you want to add between the images and the videos. There are slideshow-making tools where you can check out different types of transition effects and use them.
06Add Music
Music will set the right tone and mood for your slideshow. You can either download the relevant song from any online site or a music library or can also combine multiple audio clips to be added to the slideshow.
Part 2 Importance of using a travel slideshow template
For some, slideshow creation can be a simple task of adding a few images and videos but for the ones who need to create something interesting, several elements go into the making of a slideshow. Moreover, when it comes to travel, the task becomes even trickier with so many things to include and grab the attention of the viewers.
So, if you are not experienced or a pro at making a slideshow but want to create something impressive, templates come to a great rescue. The templates are like ready-to-use designs where you simply need to add the required elements that in turn will create a travel slideshow.
Using a template for creating a travel slideshow served several benefits as enlisted below.
● Save time in drafting a design.
● Save efforts.
● Helps in creating a professional-looking impressive slideshow.
● Multiple elements can be added.
● Helps in creating a slideshow with some story.
There are several online sites and tools available from where you can select and pick a travel slideshow template of your choice.

Part 3 Best tool for creating a travel slideshow- Wondershare Filmora
For creating your travel slideshow in an interesting manner and that too in a hassle-free manner, Wondershare Filmora Video Editor is excellent. Though it is a professional video editing tool with advanced features, it supports multiple additional tasks as well including slideshow making. Using the software, your slideshow having pictures, videos, and music files can be created in no time.
For Win 7 or later (64-bit)
For macOS 10.12 or later
You can even edit the files for further customization using the built-in functions. Add transitions, filters, effects, and other elements for creating a slideshow of your choice. An array of templates in different categories will further help you to quickly create a presentation based on your theme. There is also a stock collection of videos, images, and other files that can be used for your slideshow.

Steps to create a travel slideshow using Wondershare Filmora
Step 1. From the official software page, download and install the program, and at the main interface choose the New Project option.
Step 2. Next, the videos and images that need to be included in the slideshow have to be imported and added to the Media Library of the software. Next, drag and move these files to the timeline. The sequence can be changed as desired.
Note: Before moving the files to the timeline, you can edit and customize them by using the built-in features of the software like rotate, crop, and zoom.
Step 3. An array of transitions is available in the software from which you can choose the ones that fit into your theme. Some of the popular ones are cross-merge, sweep clockwise, cross split, and others.
Step 4. Also add filters, overlays, effects, and other elements to your slideshow.
Step 5. Next comes the music, add the local music file or use the one from the inbuilt audio library. The Voice-over recording option is also available in the software.
Step 6. Finally, export and save the slideshow. You can save it to your local system, or DVD, or can even share it directly to YouTube or Vimeo.
● Ending Thoughts →
● For creating an interesting travel slideshow consider all the important elements like the story, theme, pictures, music, and others.
● Templates help to a great extent for creating a slideshow in a simple quick-manner.
● Wondershare Filmora is an excellent tool for finding a template as well as creating a travel slideshow.
A single travel trip besides numerous memories also has innumerable pictures and videos. Sharing all of these pictures and videos with your friends, and dear ones are tedious and not a practical thing to do. Here comes your creativity, where you can make an impressive slideshow using some of the most interesting images and videos from your clips. Creating a digital slideshow will not only help you to share your files online with your loved ones but will also work as a keepsake where you relive the moments later.

So now when decided to create a slideshow, the next question is how, tips, tools, templates, and software can be used. The article below will cover all these aspects that will help you in designing and creating a wonderful travel slideshow.
In this article
01 [Tips and steps for creating a travel slideshow](#Part 1)
02 [Importance of using a travel slideshow template](#Part 2)
03 [Best tool for creating a travel slideshow- Wondershare Filmora](#Part 3)
Part 1 Tips and steps for creating a travel slideshow
Want to hear the words- cool and wow when you play your slideshow in front of your dear ones. The below-listed tips will help you create an engaging and engrossing slideshow.

01Identify the audience
Before creating a slideshow, you first need to ascertain who is your target audience. The slideshow can be created for your friends, family, relatives, or YouTube or social media platform viewers. Depending on the target audience, the content and other slideshow elements will vary.
02Choose a travel story
Next, you need to decide upon the story of your travel slideshow. Depending on the story, you can pick up the content to be included. The story can be based on the places you visited, food, local shopping, and others. Also draft a story that has an introduction, a middle part, and an end.
03Sort the pictures and videos
Next comes the trickiest part of selecting the pictures and videos to be added to the slideshow. For any trip, there are hundreds of images but you cannot add them all to your slideshow. So, depending on the target audience and your travel story, pick up the most appropriate ones. Pick up the number of images and videos so that the total slideshow length is around 5-7 minutes.
04Edit images and add effects
Next comes the editing part. Check out the images that need editing like cropping, color correction, and others. Also, you can add some effects to make your slideshow interesting. To edit the files and add effects, there are several editing online and desktop-based tools available. You can choose the ones that meet your requirements.
05Add transitions
Next, choose the transitions you want to add between the images and the videos. There are slideshow-making tools where you can check out different types of transition effects and use them.
06Add Music
Music will set the right tone and mood for your slideshow. You can either download the relevant song from any online site or a music library or can also combine multiple audio clips to be added to the slideshow.
Part 2 Importance of using a travel slideshow template
For some, slideshow creation can be a simple task of adding a few images and videos but for the ones who need to create something interesting, several elements go into the making of a slideshow. Moreover, when it comes to travel, the task becomes even trickier with so many things to include and grab the attention of the viewers.
So, if you are not experienced or a pro at making a slideshow but want to create something impressive, templates come to a great rescue. The templates are like ready-to-use designs where you simply need to add the required elements that in turn will create a travel slideshow.
Using a template for creating a travel slideshow served several benefits as enlisted below.
● Save time in drafting a design.
● Save efforts.
● Helps in creating a professional-looking impressive slideshow.
● Multiple elements can be added.
● Helps in creating a slideshow with some story.
There are several online sites and tools available from where you can select and pick a travel slideshow template of your choice.

Part 3 Best tool for creating a travel slideshow- Wondershare Filmora
For creating your travel slideshow in an interesting manner and that too in a hassle-free manner, Wondershare Filmora Video Editor is excellent. Though it is a professional video editing tool with advanced features, it supports multiple additional tasks as well including slideshow making. Using the software, your slideshow having pictures, videos, and music files can be created in no time.
For Win 7 or later (64-bit)
For macOS 10.12 or later
You can even edit the files for further customization using the built-in functions. Add transitions, filters, effects, and other elements for creating a slideshow of your choice. An array of templates in different categories will further help you to quickly create a presentation based on your theme. There is also a stock collection of videos, images, and other files that can be used for your slideshow.

Steps to create a travel slideshow using Wondershare Filmora
Step 1. From the official software page, download and install the program, and at the main interface choose the New Project option.
Step 2. Next, the videos and images that need to be included in the slideshow have to be imported and added to the Media Library of the software. Next, drag and move these files to the timeline. The sequence can be changed as desired.
Note: Before moving the files to the timeline, you can edit and customize them by using the built-in features of the software like rotate, crop, and zoom.
Step 3. An array of transitions is available in the software from which you can choose the ones that fit into your theme. Some of the popular ones are cross-merge, sweep clockwise, cross split, and others.
Step 4. Also add filters, overlays, effects, and other elements to your slideshow.
Step 5. Next comes the music, add the local music file or use the one from the inbuilt audio library. The Voice-over recording option is also available in the software.
Step 6. Finally, export and save the slideshow. You can save it to your local system, or DVD, or can even share it directly to YouTube or Vimeo.
● Ending Thoughts →
● For creating an interesting travel slideshow consider all the important elements like the story, theme, pictures, music, and others.
● Templates help to a great extent for creating a slideshow in a simple quick-manner.
● Wondershare Filmora is an excellent tool for finding a template as well as creating a travel slideshow.
Also read:
- New Can You Enhance Your Drone Footage with Cinematic Drone LUTs? This Article Discusses Top Drone LUTs Recommendations to Simplify Video Editing
- How to Make a TikTok Loop Video for 2024
- New In 2024, Top 6 Drones for Videography
- New 2024 Approved The Ultimate Wedding Videography Checklist
- Do You Want to Know Where You Can Find Online Video Editing Courses? In This Article, We Have Provided 15 Options for Your Various Demand. We Also Recommend a Great Video Editor to Help You Start Your Video Editing Journey with Ease for 2024
- New How to Easily Add VHS Green Screen to Your Video
- New What Is MKV Format and How To Play MKV Video, In 2024
- Updated In 2024, Are You Looking for the Best Premiere Pro Slideshow Template Online for Free? If Yes, You Can Find a Few Exciting Slideshow Templates Here. They Are Worth Using
- In 2024, Efficient Ways to Manage Your Timeline
- Quick Answer What Is a GIF File?
- New In 2024, Learning The Details Of How To Replace Sky in Lightroom
- New Finding the Best Voice Changers for WhatsApp Free and Paid
- New Learn More About the Video Editing Interface of Wondershare Filmora
- | Top GIF to MP4 Converters for 2024
- New In 2024, Little Tricks to Create Canva Slideshow No One Is Telling You
- Updated 2024 Approved Color Matching Is the Trickiest Part of Graphic Designing. Learn in Detail About Using Canva Color Match Ideally While Working on Your Pins, Social Media Posts, and Other Designs
- 2024 Approved How to Zoom in Discord
- Updated In 2024, Want to Make a Slide Show Video? Heres How
- New In 2024, How to Make After Effects Gifs
- In This Article Ill Share to You some of the Skin Care Vlog Ideas for You to Start Doing a Skin Care Review on Your YouTube Channel. But Before that Ill Share with You How Important Is Skin Care, In 2024
- In 2024, Color Matching Is the Trickiest Part of Graphic Designing. Learn in Detail About Using Canva Color Match Ideally While Working on Your Pins, Social Media Posts, and Other Designs
- Easy Way to Add Transitions to Videos for 2024
- Updated Splitting Video Into Frames with the FFmpeg Step by Step
- New TOP 10 Types of Video Framing From Novice to Master
- New How to Speed Up Pictures on TikTok Slideshow for 2024
- Updated Practical Way to Resize Video in Handbrake
- Updated In 2024, Online Video Makers
- Updated Detailed Tutorial to Crop Videos Using Openshot?
- In 2024, 12 Top Marketing Slideshow Templates
- In 2024, Do You Intend to Include Motion Blur on Your Video Using Video Star? This Article Explains How to Use Motion Blur on Video Star with Exquisite Control
- New In 2024, Easy Guide to Zoom Video in VLC
- Updated In 2024, How to Download and Use Vegas Pro
- New Learn to Splice Videos Together on iPhone
- Updated Learn How to Blur a Still or Moving Part of Video for 2024
- AR Is a Trend These Days. Here, You Can Browse the List of Top 10 Picks for AR Video Editing Apps for 2024
- New The Benefits Of Using Video For Social Media Marketing
- In 2024, Learn How to Effectively Use Masking in After Effects with This Comprehensive Guide. Includes Step-by-Step Instructions and an Alternative Masking Technique
- New In 2024, Do You Want to Know How to Edit a Time Lapse Video on iPhone, Interesting Ideas, and some Tips and Pointers for Shooting a Professional Time Lapse Video? Find Out Everything in This Guide
- Updated How to Create a Glitch Text Effect, In 2024
- New How to Do Masking in After Effects Alternative Provided for 2024
- 2024 Approved Do You Want a LUT that You Can Use for Your High-Definition Content? You Can Use Rec 709 LUT Premiere Pro for Your HD Digital Media to Give the Perfect Result
- Updated Best GIF to AVI Converters for 2024
- 5 Tried-And-True Ways to GIF Making
- The Best 10 AI Video Analytics Companies at a Glance
- Updated Best 5 GIF to Video Converters You Cant-Miss for 2024
- New The Craziest 10 AI Editors Youve Seen for 2024
- Updated 2024 Approved Camera Shake Effects in Videos Helps to Showcase Aesthetics and Vibes. Do You Wish to Add a Camera Shake in Videos? Consider Using the Video Editor Discussed Here for This
- New In 2024, LumaFusion – What Is It and the Best Alternative to Use
- 2024 Approved What You Should Know About Speech-to-Text Technology
- Updated How to Download and Use Windows Movie Maker 10 for 2024
- Oppo Find X6 Pro ADB Format Tool for PC vs. Other Unlocking Tools Which One is the Best?
- 8 Solutions to Solve YouTube App Crashing on Realme Narzo 60 Pro 5G | Dr.fone
- In 2024, Two Ways to Track My Boyfriends Samsung Galaxy M54 5G without Him Knowing | Dr.fone
- In 2024, How to Remove Apple iPhone 6s SIM Lock?
- How to Access Your iPhone 7 When You Forget the Passcode? | Dr.fone
- Why does the pokemon go battle league not available On Tecno Camon 20 Premier 5G | Dr.fone
- In 2024, Overview of the Best OnePlus 12 Screen Mirroring App | Dr.fone
- How to Fix Pokemon Go Route Not Working On Vivo Y78+ (T1) Edition? | Dr.fone
- Ultimate guide to get the meltan box pokemon go For Realme 11 Pro+ | Dr.fone
- Reasons why Pokémon GPS does not Work On Realme 12 5G? | Dr.fone
- In 2024, How to Transfer Contacts from Samsung Galaxy A15 5G to Other Android Devices Devices? | Dr.fone
- How to Bypass Google FRP Lock from Xiaomi Civi 3 Devices
- The Most Useful Tips for Pokemon Go Ultra League On Apple iPhone 15 Plus | Dr.fone
- Device unlock Infinix Hot 40 Pro
- In 2024, What Legendaries Are In Pokemon Platinum On Meizu 21 Pro? | Dr.fone
- In 2024, How To Fix Apple ID Verification Code Not Working On iPhone 11
- CatchEmAll Celebrate National Pokémon Day with Virtual Location On Samsung Galaxy XCover 7 | Dr.fone
- In 2024, Latest Guide How To Bypass Samsung Galaxy M14 5G FRP Without Computer
- Updated Top 11 Deepfake Voice Apps and Software You Need to Know About
- In 2024, How to Get and Use Pokemon Go Promo Codes On Oppo Find X6 | Dr.fone
- In 2024, Does Poco X6 Have Find My Friends? | Dr.fone
- In 2024, How to Fix Pokemon Go Route Not Working On Samsung Galaxy A15 5G? | Dr.fone
- Title: Want to Sync Separate Audio with Video? Check Out This Guide to Do It in the Simplest Way Using the Video Editor - Wondershare Filmora
- Author: Morgan
- Created at : 2024-05-19 05:11:43
- Updated at : 2024-05-20 05:11:43
- Link: https://ai-video-editing.techidaily.com/want-to-sync-separate-audio-with-video-check-out-this-guide-to-do-it-in-the-simplest-way-using-the-video-editor-wondershare-filmora/
- License: This work is licensed under CC BY-NC-SA 4.0.

