:max_bytes(150000):strip_icc():format(webp)/windows11contextmenu-f4d6ebb14db4444d851b4338aa553e21.png)
WebM to GIF Converters (Online and Offline Solutions) for 2024

WebM to GIF Converters (Online and Offline Solutions)
Powerful Video Editor - Wondershare Filmora
Provide abundant video effects - A creative video editor
Powerful color correction and grading
Detailed tutorials provided by the official channel
Video content has become an essential element on almost every platform. With its growing rise to fame, multiple video file formats are now available, including MP4, WebM, and GIF files. The WebM video format is helpful in web-based scenarios due to its high quality and smaller file size support.
Most browsers with HTML5 support the WebM format. In contrast, GIF formats offer a much smaller file size and increased compatibility with all web browsers. If you want to convert your WebM to a GIF file, you can use the various format converter tools available. Here, discover some of the best WebM to GIF converter tools to help you with the task.
In this article
Part 1: Best 3 WebM to GIF Converter Software
Part 2: Top 3 WebM to GIF Converters
Part 3: How to Convert WebM to GIF Using CloudConvert?
Part 1: Best 3 WebM to GIF Converter Software
We have some info for you if you are looking for software that can help convert WebM to GIF files. Here are our top picks for programs that you can easily use as WebM to GIF converters:
1. Wondershare Filmora
| Compatibility | Pricing |
|---|---|
| Windows/Mac | $28.98/Monthly $68.98/Annual $98.98/Perpetual |
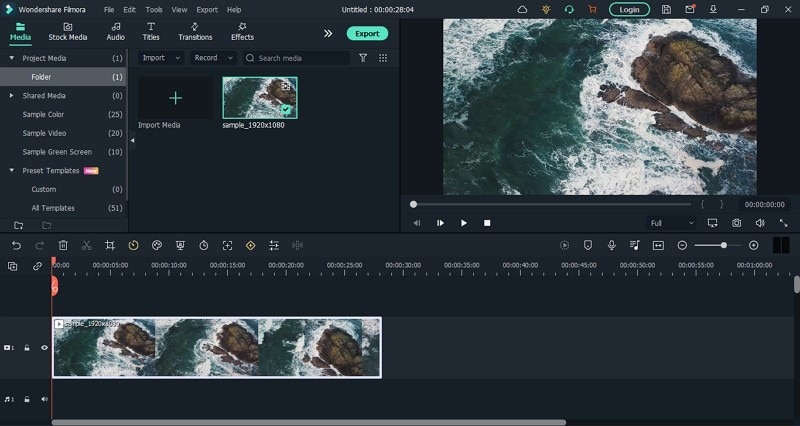
Wondershare Filmora is one of the most prestigious video editing software that can also act as a WebM to GIF converter tool. Filmora offers its users various visual effects, stock footage, intuitive templates, and more to enhance their video content. Users can create robust and lively videos suited to their skill level using Filmora.
Filmora can turn all your video storytelling dreams into reality with its creative assets and easy-to-use features. After editing a WebM video on Filmora, you can export it to your local system’s library into several file formats, including GIF. Thus, you can convert WebM to GIF files efficiently and instantly using Filmora.
Pros
Filmora offers built-in templates and creative assets for an easy start.
You can add smooth transitions and effects to your video using Filmora’s keyframing.
Filmora offers powerful motion tracking tools for better quality realistic visuals.
Filmora’s Auto Reframe option lets you resize your videos easily and automatically.
Cons
The free version of Filmora retains a watermark on the video.
2. Adobe Premium Pro
| Compatibility | Pricing |
|---|---|
| Windows/Mac | $20.99/Monthly |
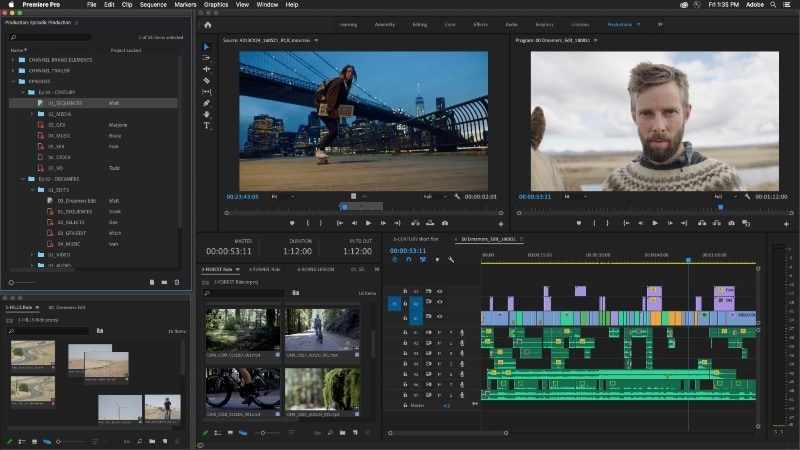
Adobe Premium Pro is a professional-level video editor and filmmaking software. Premium Pro can help you with everything from creating marketing content to cinematic masterpieces. You can shape your stories with Adobe’s one-of-a-kind tools. Premium Pro contains everything you might need to make your content shine, from audio tools to professional templates.
If you want to convert WebM to GIF, Premium Pro can help you. Using Adobe’s powerful features, you can import your WebM file to the program’s interface and customize its various aspects. Once you have finished the conversion, you can export your video file into a format of your choice, i.e., the GIF file format.
Pros
Premium Pro now offers up to 100GB of cloud storage with Adobe’s Creative Cloud.
You can edit up to five projects at a time, accompanied by live sharing.
Premium Pro allows powerful and accurate auto color adjustments on your projects.
You can send your camera’s feed directly to Premium Pro for live processing.
Cons
The software requires technical skills and is not well-suited for beginners.
3. Movavi Video Editor Plus
| Compatibility | Pricing |
|---|---|
| Windows/Mac | $49.95/Year $69.95/Lifetime |
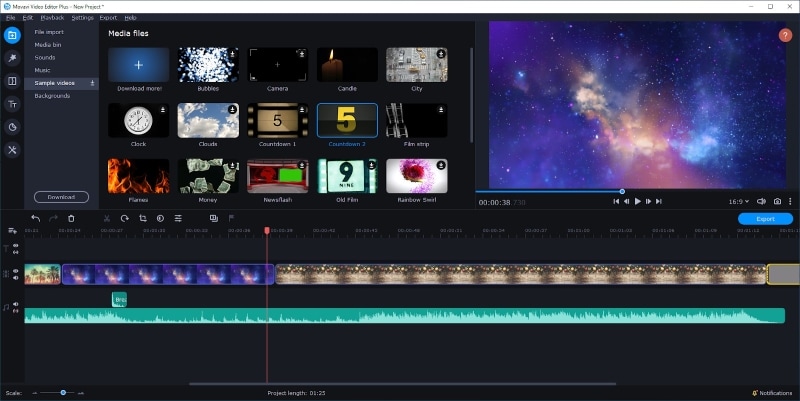
Movavi is a great video editing software that can help harness your creative abilities and inspirations into meaningful content. Movavi can also act as a WebM to GIF converter tool for both Mac and Windows computers. With its unique special effects, animations, and templates, you can bring all your intuitive ideas to life.
Movavi offers fast processing and high-quality results. The program supports multiple formats that can be converted into one another, such as WebM to GIF and vice versa. Once you import your WebM file into Movavi’s interface, you can customize every aspect of the video to enhance your vision and export it to a GIF format with just a few clicks.
Pros
You can record your desktop screens and add them to your video using Movavi.
It offers various advanced editing options such as Chroma key and motion tracking.
Using its Stabilization feature, you can fix motion distortion and shakes in your video.
Movavi lets you adjust the audio and normalize the audio volume using its Equalizer tool.
Cons
Movavi offers limited control over some effects, such as title additions.
Part 2: Top 3 WebM to GIF Converters
If you are looking for web-based tools dedicated to video file format conversions, we have a lot in store for you. Below, you can find the top 3 WebM to GIF online converter tools to make your task easier.
1. CloudConvert
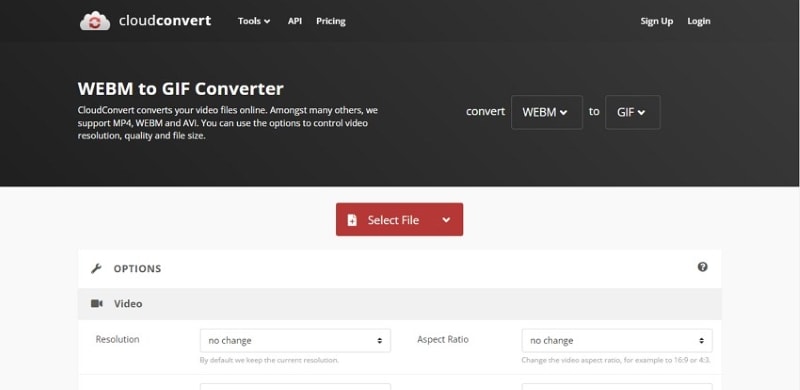
CloudConvert is a notable file converter tool that offers services across the web. The tool features an easy-to-use and interactive user interface. CloudConvert provides extensive support to help convert your WebM files into GIF images in a few simple clicks. You can use it to transform your WebM to GIF without losing the quality of the product.
Pros
CloudConvert offers up to 25 free conversions per day, with premium quality results.
It supports more than 200 file formats for images, videos, audio, etc.
CloudConvert offers enhanced security for your file without the risk of viruses, redirects, popups, etc.
Before conversion, you can change your file’s various aspects, including the resolution and frame rate.
Cons
CloudConvert does not offer support for batch conversion.
2. Convertio
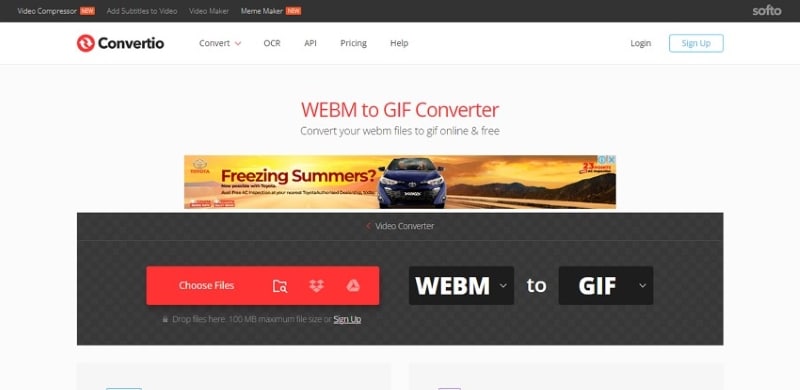
An incredible web-based tool that can help you convert WebM to GIF files is Convertio. This tool offers high-quality conversion from a wide range of supported formats. Compatible with all modern browsers and OS, Convertio features a simple interface that ensures a smooth and trouble-free conversion process.
Pros
Convertio offers major Cloud Storage services integration, including Google Drive and Dropbox.
The tool offers batch processing support so you can convert multiple files at the same time.
It is highly versatile and offers conversions for multiple file types.
Convertio also offers a video compression feature.
Cons
You can only upload maximum file size of 100MBs on Convertio.
3. EZGIF.com
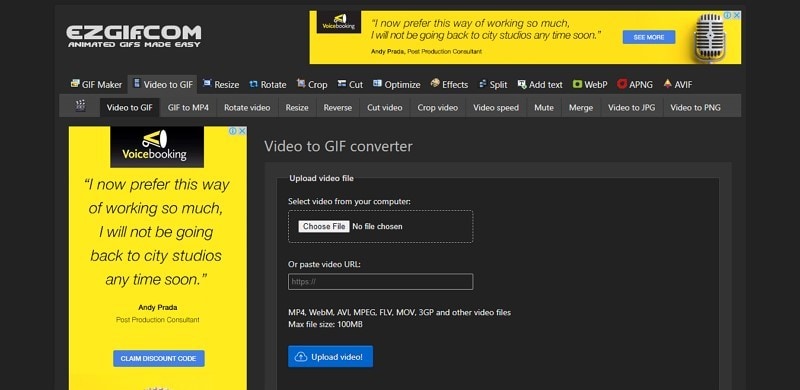
Another notable online tool that you can use as a WebM to GIF converter is EZGIF.com. It is an intuitive website dedicated to GIF file format. You can access this free web-based service to convert a file into GIF format or edit your created GIFs in virtually every way possible. The conversion process is also quick and straightforward on EZGIF.com.
Pros
You can easily adjust your output file’s size and dimensions on EZGIF.
The tool offers easy markers and pauses options to help you accurately select the start and end positions for your GIF.
You can crop, rotate, or trim your video prior to conversion.
EZGIF can also help you create GIFs from images.
Cons
The website currently does not offer integration with Cloud Storage services.
Part 3: How to Convert WebM to GIF Using CloudConvert?
CloudConvert is a remarkable WebM to GIF converter tool that offers web-based services across multiple platforms. If you want to convert your WebM video file to a GIF format, here is how you can do that using CloudConvert:
Step 1: Upload Video
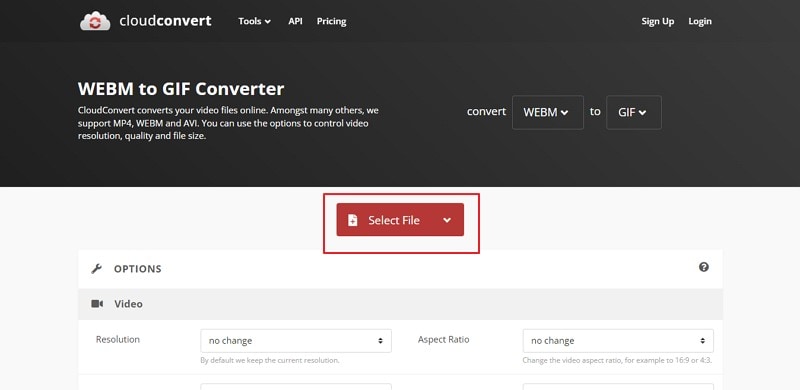
After opening the website on your device, click on the “Select File” button on the program’s interface. You can choose to upload your file from the local computer, by a URL, or through a cloud storage service.
Step 2: Specify Options
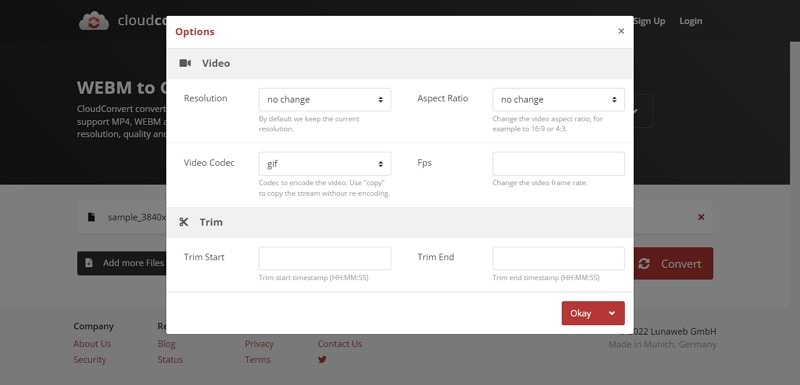
You can now select the specifications of your video, such as choosing the resolution, aspect ratio, and frame rate. CloudConvert also allows you to trim your video during the conversion process.
Step 3: Convert to GIF and Save
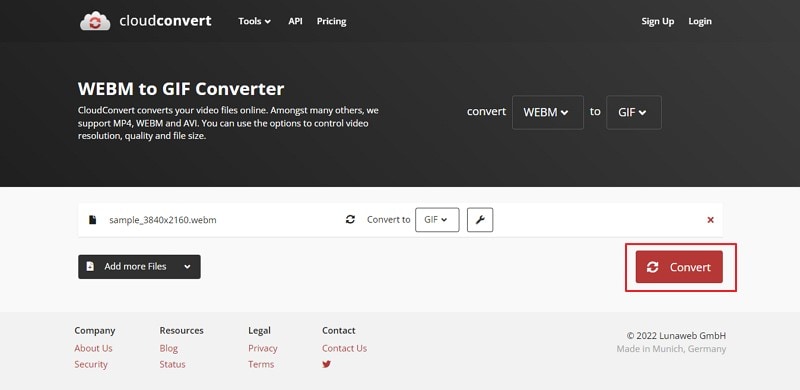
Once you have specified your video details, hit the “Convert option.” When CloudConvert has converted your video format from WebM to GIF, click “Download” to save your file.
Conclusion
The choice of a suitable file format depends greatly on the final use of your video. Your video file type can influence the quality and the file size of your content. Format converters are handy tools if your file is incompatible with your chosen platform.
If you want to convert WebM to GIF files, you can do so effectively with the converter software and websites mentioned above. If you’re going to refine your video with post-processing further, you can try the wonderful features offered by Wondershare Filmora. The software comes loaded with remarkable tools to help your video content stand apart.
Video content has become an essential element on almost every platform. With its growing rise to fame, multiple video file formats are now available, including MP4, WebM, and GIF files. The WebM video format is helpful in web-based scenarios due to its high quality and smaller file size support.
Most browsers with HTML5 support the WebM format. In contrast, GIF formats offer a much smaller file size and increased compatibility with all web browsers. If you want to convert your WebM to a GIF file, you can use the various format converter tools available. Here, discover some of the best WebM to GIF converter tools to help you with the task.
In this article
Part 1: Best 3 WebM to GIF Converter Software
Part 2: Top 3 WebM to GIF Converters
Part 3: How to Convert WebM to GIF Using CloudConvert?
Part 1: Best 3 WebM to GIF Converter Software
We have some info for you if you are looking for software that can help convert WebM to GIF files. Here are our top picks for programs that you can easily use as WebM to GIF converters:
1. Wondershare Filmora
| Compatibility | Pricing |
|---|---|
| Windows/Mac | $28.98/Monthly $68.98/Annual $98.98/Perpetual |
Wondershare Filmora is one of the most prestigious video editing software that can also act as a WebM to GIF converter tool. Filmora offers its users various visual effects, stock footage, intuitive templates, and more to enhance their video content. Users can create robust and lively videos suited to their skill level using Filmora.
Filmora can turn all your video storytelling dreams into reality with its creative assets and easy-to-use features. After editing a WebM video on Filmora, you can export it to your local system’s library into several file formats, including GIF. Thus, you can convert WebM to GIF files efficiently and instantly using Filmora.

Pros
Filmora offers built-in templates and creative assets for an easy start.
You can add smooth transitions and effects to your video using Filmora’s keyframing.
Filmora offers powerful motion tracking tools for better quality realistic visuals.
Filmora’s Auto Reframe option lets you resize your videos easily and automatically.
Cons
The free version of Filmora retains a watermark on the video.
2. Adobe Premium Pro
| Compatibility | Pricing |
|---|---|
| Windows/Mac | $20.99/Monthly |
Adobe Premium Pro is a professional-level video editor and filmmaking software. Premium Pro can help you with everything from creating marketing content to cinematic masterpieces. You can shape your stories with Adobe’s one-of-a-kind tools. Premium Pro contains everything you might need to make your content shine, from audio tools to professional templates.
If you want to convert WebM to GIF, Premium Pro can help you. Using Adobe’s powerful features, you can import your WebM file to the program’s interface and customize its various aspects. Once you have finished the conversion, you can export your video file into a format of your choice, i.e., the GIF file format.

Pros
Premium Pro now offers up to 100GB of cloud storage with Adobe’s Creative Cloud.
You can edit up to five projects at a time, accompanied by live sharing.
Premium Pro allows powerful and accurate auto color adjustments on your projects.
You can send your camera’s feed directly to Premium Pro for live processing.
Cons
The software requires technical skills and is not well-suited for beginners.
3. Movavi Video Editor Plus
| Compatibility | Pricing |
|---|---|
| Windows/Mac | $49.95/Year $69.95/Lifetime |
Movavi is a great video editing software that can help harness your creative abilities and inspirations into meaningful content. Movavi can also act as a WebM to GIF converter tool for both Mac and Windows computers. With its unique special effects, animations, and templates, you can bring all your intuitive ideas to life.
Movavi offers fast processing and high-quality results. The program supports multiple formats that can be converted into one another, such as WebM to GIF and vice versa. Once you import your WebM file into Movavi’s interface, you can customize every aspect of the video to enhance your vision and export it to a GIF format with just a few clicks.

Pros
You can record your desktop screens and add them to your video using Movavi.
It offers various advanced editing options such as Chroma key and motion tracking.
Using its Stabilization feature, you can fix motion distortion and shakes in your video.
Movavi lets you adjust the audio and normalize the audio volume using its Equalizer tool.
Cons
Movavi offers limited control over some effects, such as title additions.
Part 2: Top 3 WebM to GIF Converters
If you are looking for web-based tools dedicated to video file format conversions, we have a lot in store for you. Below, you can find the top 3 WebM to GIF online converter tools to make your task easier.
1. CloudConvert
CloudConvert is a notable file converter tool that offers services across the web. The tool features an easy-to-use and interactive user interface. CloudConvert provides extensive support to help convert your WebM files into GIF images in a few simple clicks. You can use it to transform your WebM to GIF without losing the quality of the product.

Pros
CloudConvert offers up to 25 free conversions per day, with premium quality results.
It supports more than 200 file formats for images, videos, audio, etc.
CloudConvert offers enhanced security for your file without the risk of viruses, redirects, popups, etc.
Before conversion, you can change your file’s various aspects, including the resolution and frame rate.
Cons
CloudConvert does not offer support for batch conversion.
2. Convertio
An incredible web-based tool that can help you convert WebM to GIF files is Convertio. This tool offers high-quality conversion from a wide range of supported formats. Compatible with all modern browsers and OS, Convertio features a simple interface that ensures a smooth and trouble-free conversion process.

Pros
Convertio offers major Cloud Storage services integration, including Google Drive and Dropbox.
The tool offers batch processing support so you can convert multiple files at the same time.
It is highly versatile and offers conversions for multiple file types.
Convertio also offers a video compression feature.
Cons
You can only upload maximum file size of 100MBs on Convertio.
3. EZGIF.com
Another notable online tool that you can use as a WebM to GIF converter is EZGIF.com. It is an intuitive website dedicated to GIF file format. You can access this free web-based service to convert a file into GIF format or edit your created GIFs in virtually every way possible. The conversion process is also quick and straightforward on EZGIF.com.

Pros
You can easily adjust your output file’s size and dimensions on EZGIF.
The tool offers easy markers and pauses options to help you accurately select the start and end positions for your GIF.
You can crop, rotate, or trim your video prior to conversion.
EZGIF can also help you create GIFs from images.
Cons
The website currently does not offer integration with Cloud Storage services.
Part 3: How to Convert WebM to GIF Using CloudConvert?
CloudConvert is a remarkable WebM to GIF converter tool that offers web-based services across multiple platforms. If you want to convert your WebM video file to a GIF format, here is how you can do that using CloudConvert:
Step 1: Upload Video
After opening the website on your device, click on the “Select File” button on the program’s interface. You can choose to upload your file from the local computer, by a URL, or through a cloud storage service.

Step 2: Specify Options
You can now select the specifications of your video, such as choosing the resolution, aspect ratio, and frame rate. CloudConvert also allows you to trim your video during the conversion process.

Step 3: Convert to GIF and Save
Once you have specified your video details, hit the “Convert option.” When CloudConvert has converted your video format from WebM to GIF, click “Download” to save your file.

Conclusion
The choice of a suitable file format depends greatly on the final use of your video. Your video file type can influence the quality and the file size of your content. Format converters are handy tools if your file is incompatible with your chosen platform.
If you want to convert WebM to GIF files, you can do so effectively with the converter software and websites mentioned above. If you’re going to refine your video with post-processing further, you can try the wonderful features offered by Wondershare Filmora. The software comes loaded with remarkable tools to help your video content stand apart.
Video content has become an essential element on almost every platform. With its growing rise to fame, multiple video file formats are now available, including MP4, WebM, and GIF files. The WebM video format is helpful in web-based scenarios due to its high quality and smaller file size support.
Most browsers with HTML5 support the WebM format. In contrast, GIF formats offer a much smaller file size and increased compatibility with all web browsers. If you want to convert your WebM to a GIF file, you can use the various format converter tools available. Here, discover some of the best WebM to GIF converter tools to help you with the task.
In this article
Part 1: Best 3 WebM to GIF Converter Software
Part 2: Top 3 WebM to GIF Converters
Part 3: How to Convert WebM to GIF Using CloudConvert?
Part 1: Best 3 WebM to GIF Converter Software
We have some info for you if you are looking for software that can help convert WebM to GIF files. Here are our top picks for programs that you can easily use as WebM to GIF converters:
1. Wondershare Filmora
| Compatibility | Pricing |
|---|---|
| Windows/Mac | $28.98/Monthly $68.98/Annual $98.98/Perpetual |
Wondershare Filmora is one of the most prestigious video editing software that can also act as a WebM to GIF converter tool. Filmora offers its users various visual effects, stock footage, intuitive templates, and more to enhance their video content. Users can create robust and lively videos suited to their skill level using Filmora.
Filmora can turn all your video storytelling dreams into reality with its creative assets and easy-to-use features. After editing a WebM video on Filmora, you can export it to your local system’s library into several file formats, including GIF. Thus, you can convert WebM to GIF files efficiently and instantly using Filmora.

Pros
Filmora offers built-in templates and creative assets for an easy start.
You can add smooth transitions and effects to your video using Filmora’s keyframing.
Filmora offers powerful motion tracking tools for better quality realistic visuals.
Filmora’s Auto Reframe option lets you resize your videos easily and automatically.
Cons
The free version of Filmora retains a watermark on the video.
2. Adobe Premium Pro
| Compatibility | Pricing |
|---|---|
| Windows/Mac | $20.99/Monthly |
Adobe Premium Pro is a professional-level video editor and filmmaking software. Premium Pro can help you with everything from creating marketing content to cinematic masterpieces. You can shape your stories with Adobe’s one-of-a-kind tools. Premium Pro contains everything you might need to make your content shine, from audio tools to professional templates.
If you want to convert WebM to GIF, Premium Pro can help you. Using Adobe’s powerful features, you can import your WebM file to the program’s interface and customize its various aspects. Once you have finished the conversion, you can export your video file into a format of your choice, i.e., the GIF file format.

Pros
Premium Pro now offers up to 100GB of cloud storage with Adobe’s Creative Cloud.
You can edit up to five projects at a time, accompanied by live sharing.
Premium Pro allows powerful and accurate auto color adjustments on your projects.
You can send your camera’s feed directly to Premium Pro for live processing.
Cons
The software requires technical skills and is not well-suited for beginners.
3. Movavi Video Editor Plus
| Compatibility | Pricing |
|---|---|
| Windows/Mac | $49.95/Year $69.95/Lifetime |
Movavi is a great video editing software that can help harness your creative abilities and inspirations into meaningful content. Movavi can also act as a WebM to GIF converter tool for both Mac and Windows computers. With its unique special effects, animations, and templates, you can bring all your intuitive ideas to life.
Movavi offers fast processing and high-quality results. The program supports multiple formats that can be converted into one another, such as WebM to GIF and vice versa. Once you import your WebM file into Movavi’s interface, you can customize every aspect of the video to enhance your vision and export it to a GIF format with just a few clicks.

Pros
You can record your desktop screens and add them to your video using Movavi.
It offers various advanced editing options such as Chroma key and motion tracking.
Using its Stabilization feature, you can fix motion distortion and shakes in your video.
Movavi lets you adjust the audio and normalize the audio volume using its Equalizer tool.
Cons
Movavi offers limited control over some effects, such as title additions.
Part 2: Top 3 WebM to GIF Converters
If you are looking for web-based tools dedicated to video file format conversions, we have a lot in store for you. Below, you can find the top 3 WebM to GIF online converter tools to make your task easier.
1. CloudConvert
CloudConvert is a notable file converter tool that offers services across the web. The tool features an easy-to-use and interactive user interface. CloudConvert provides extensive support to help convert your WebM files into GIF images in a few simple clicks. You can use it to transform your WebM to GIF without losing the quality of the product.

Pros
CloudConvert offers up to 25 free conversions per day, with premium quality results.
It supports more than 200 file formats for images, videos, audio, etc.
CloudConvert offers enhanced security for your file without the risk of viruses, redirects, popups, etc.
Before conversion, you can change your file’s various aspects, including the resolution and frame rate.
Cons
CloudConvert does not offer support for batch conversion.
2. Convertio
An incredible web-based tool that can help you convert WebM to GIF files is Convertio. This tool offers high-quality conversion from a wide range of supported formats. Compatible with all modern browsers and OS, Convertio features a simple interface that ensures a smooth and trouble-free conversion process.

Pros
Convertio offers major Cloud Storage services integration, including Google Drive and Dropbox.
The tool offers batch processing support so you can convert multiple files at the same time.
It is highly versatile and offers conversions for multiple file types.
Convertio also offers a video compression feature.
Cons
You can only upload maximum file size of 100MBs on Convertio.
3. EZGIF.com
Another notable online tool that you can use as a WebM to GIF converter is EZGIF.com. It is an intuitive website dedicated to GIF file format. You can access this free web-based service to convert a file into GIF format or edit your created GIFs in virtually every way possible. The conversion process is also quick and straightforward on EZGIF.com.

Pros
You can easily adjust your output file’s size and dimensions on EZGIF.
The tool offers easy markers and pauses options to help you accurately select the start and end positions for your GIF.
You can crop, rotate, or trim your video prior to conversion.
EZGIF can also help you create GIFs from images.
Cons
The website currently does not offer integration with Cloud Storage services.
Part 3: How to Convert WebM to GIF Using CloudConvert?
CloudConvert is a remarkable WebM to GIF converter tool that offers web-based services across multiple platforms. If you want to convert your WebM video file to a GIF format, here is how you can do that using CloudConvert:
Step 1: Upload Video
After opening the website on your device, click on the “Select File” button on the program’s interface. You can choose to upload your file from the local computer, by a URL, or through a cloud storage service.

Step 2: Specify Options
You can now select the specifications of your video, such as choosing the resolution, aspect ratio, and frame rate. CloudConvert also allows you to trim your video during the conversion process.

Step 3: Convert to GIF and Save
Once you have specified your video details, hit the “Convert option.” When CloudConvert has converted your video format from WebM to GIF, click “Download” to save your file.

Conclusion
The choice of a suitable file format depends greatly on the final use of your video. Your video file type can influence the quality and the file size of your content. Format converters are handy tools if your file is incompatible with your chosen platform.
If you want to convert WebM to GIF files, you can do so effectively with the converter software and websites mentioned above. If you’re going to refine your video with post-processing further, you can try the wonderful features offered by Wondershare Filmora. The software comes loaded with remarkable tools to help your video content stand apart.
Video content has become an essential element on almost every platform. With its growing rise to fame, multiple video file formats are now available, including MP4, WebM, and GIF files. The WebM video format is helpful in web-based scenarios due to its high quality and smaller file size support.
Most browsers with HTML5 support the WebM format. In contrast, GIF formats offer a much smaller file size and increased compatibility with all web browsers. If you want to convert your WebM to a GIF file, you can use the various format converter tools available. Here, discover some of the best WebM to GIF converter tools to help you with the task.
In this article
Part 1: Best 3 WebM to GIF Converter Software
Part 2: Top 3 WebM to GIF Converters
Part 3: How to Convert WebM to GIF Using CloudConvert?
Part 1: Best 3 WebM to GIF Converter Software
We have some info for you if you are looking for software that can help convert WebM to GIF files. Here are our top picks for programs that you can easily use as WebM to GIF converters:
1. Wondershare Filmora
| Compatibility | Pricing |
|---|---|
| Windows/Mac | $28.98/Monthly $68.98/Annual $98.98/Perpetual |
Wondershare Filmora is one of the most prestigious video editing software that can also act as a WebM to GIF converter tool. Filmora offers its users various visual effects, stock footage, intuitive templates, and more to enhance their video content. Users can create robust and lively videos suited to their skill level using Filmora.
Filmora can turn all your video storytelling dreams into reality with its creative assets and easy-to-use features. After editing a WebM video on Filmora, you can export it to your local system’s library into several file formats, including GIF. Thus, you can convert WebM to GIF files efficiently and instantly using Filmora.

Pros
Filmora offers built-in templates and creative assets for an easy start.
You can add smooth transitions and effects to your video using Filmora’s keyframing.
Filmora offers powerful motion tracking tools for better quality realistic visuals.
Filmora’s Auto Reframe option lets you resize your videos easily and automatically.
Cons
The free version of Filmora retains a watermark on the video.
2. Adobe Premium Pro
| Compatibility | Pricing |
|---|---|
| Windows/Mac | $20.99/Monthly |
Adobe Premium Pro is a professional-level video editor and filmmaking software. Premium Pro can help you with everything from creating marketing content to cinematic masterpieces. You can shape your stories with Adobe’s one-of-a-kind tools. Premium Pro contains everything you might need to make your content shine, from audio tools to professional templates.
If you want to convert WebM to GIF, Premium Pro can help you. Using Adobe’s powerful features, you can import your WebM file to the program’s interface and customize its various aspects. Once you have finished the conversion, you can export your video file into a format of your choice, i.e., the GIF file format.

Pros
Premium Pro now offers up to 100GB of cloud storage with Adobe’s Creative Cloud.
You can edit up to five projects at a time, accompanied by live sharing.
Premium Pro allows powerful and accurate auto color adjustments on your projects.
You can send your camera’s feed directly to Premium Pro for live processing.
Cons
The software requires technical skills and is not well-suited for beginners.
3. Movavi Video Editor Plus
| Compatibility | Pricing |
|---|---|
| Windows/Mac | $49.95/Year $69.95/Lifetime |
Movavi is a great video editing software that can help harness your creative abilities and inspirations into meaningful content. Movavi can also act as a WebM to GIF converter tool for both Mac and Windows computers. With its unique special effects, animations, and templates, you can bring all your intuitive ideas to life.
Movavi offers fast processing and high-quality results. The program supports multiple formats that can be converted into one another, such as WebM to GIF and vice versa. Once you import your WebM file into Movavi’s interface, you can customize every aspect of the video to enhance your vision and export it to a GIF format with just a few clicks.

Pros
You can record your desktop screens and add them to your video using Movavi.
It offers various advanced editing options such as Chroma key and motion tracking.
Using its Stabilization feature, you can fix motion distortion and shakes in your video.
Movavi lets you adjust the audio and normalize the audio volume using its Equalizer tool.
Cons
Movavi offers limited control over some effects, such as title additions.
Part 2: Top 3 WebM to GIF Converters
If you are looking for web-based tools dedicated to video file format conversions, we have a lot in store for you. Below, you can find the top 3 WebM to GIF online converter tools to make your task easier.
1. CloudConvert
CloudConvert is a notable file converter tool that offers services across the web. The tool features an easy-to-use and interactive user interface. CloudConvert provides extensive support to help convert your WebM files into GIF images in a few simple clicks. You can use it to transform your WebM to GIF without losing the quality of the product.

Pros
CloudConvert offers up to 25 free conversions per day, with premium quality results.
It supports more than 200 file formats for images, videos, audio, etc.
CloudConvert offers enhanced security for your file without the risk of viruses, redirects, popups, etc.
Before conversion, you can change your file’s various aspects, including the resolution and frame rate.
Cons
CloudConvert does not offer support for batch conversion.
2. Convertio
An incredible web-based tool that can help you convert WebM to GIF files is Convertio. This tool offers high-quality conversion from a wide range of supported formats. Compatible with all modern browsers and OS, Convertio features a simple interface that ensures a smooth and trouble-free conversion process.

Pros
Convertio offers major Cloud Storage services integration, including Google Drive and Dropbox.
The tool offers batch processing support so you can convert multiple files at the same time.
It is highly versatile and offers conversions for multiple file types.
Convertio also offers a video compression feature.
Cons
You can only upload maximum file size of 100MBs on Convertio.
3. EZGIF.com
Another notable online tool that you can use as a WebM to GIF converter is EZGIF.com. It is an intuitive website dedicated to GIF file format. You can access this free web-based service to convert a file into GIF format or edit your created GIFs in virtually every way possible. The conversion process is also quick and straightforward on EZGIF.com.

Pros
You can easily adjust your output file’s size and dimensions on EZGIF.
The tool offers easy markers and pauses options to help you accurately select the start and end positions for your GIF.
You can crop, rotate, or trim your video prior to conversion.
EZGIF can also help you create GIFs from images.
Cons
The website currently does not offer integration with Cloud Storage services.
Part 3: How to Convert WebM to GIF Using CloudConvert?
CloudConvert is a remarkable WebM to GIF converter tool that offers web-based services across multiple platforms. If you want to convert your WebM video file to a GIF format, here is how you can do that using CloudConvert:
Step 1: Upload Video
After opening the website on your device, click on the “Select File” button on the program’s interface. You can choose to upload your file from the local computer, by a URL, or through a cloud storage service.

Step 2: Specify Options
You can now select the specifications of your video, such as choosing the resolution, aspect ratio, and frame rate. CloudConvert also allows you to trim your video during the conversion process.

Step 3: Convert to GIF and Save
Once you have specified your video details, hit the “Convert option.” When CloudConvert has converted your video format from WebM to GIF, click “Download” to save your file.

Conclusion
The choice of a suitable file format depends greatly on the final use of your video. Your video file type can influence the quality and the file size of your content. Format converters are handy tools if your file is incompatible with your chosen platform.
If you want to convert WebM to GIF files, you can do so effectively with the converter software and websites mentioned above. If you’re going to refine your video with post-processing further, you can try the wonderful features offered by Wondershare Filmora. The software comes loaded with remarkable tools to help your video content stand apart.
How to Create Photoshop GIF The Easy Way
How to Create Photoshop GIF The 100% Easy Way
An easy yet powerful editor
Numerous effects to choose from
Detailed tutorials provided by the official channel
Having trouble creating Photoshop GIFs? Stay tuned to set everything straight.
In this article
01 [Easy Ways to Create an Animated GIF in Photoshop](#Part 1)
02 [6 Ways To Make An Animated GIF Without Photoshop](#Part 2)
Part 1 Easy Ways to Create an Animated GIF in Photoshop
Animated GIFs are a naturally captivating means of information exchange and entertainment. When the talk is about creating these, you can visibly see a flood of creation tools and software solutions. However, standing out in the crowd, are those catchy Photoshop snippets that certainly have the potential to leave you jaw dropped.
A Photoshop GIF is bound to capture attention, owing to its high quality imaging and top rated professional editing outlook. If you possess the editing flare, do try creating one for an amazing editing experience.
Creating Animated Photoshop GIFs: Easiest Solutions
Let’s take a look into some easy and interesting ways of creating a GIF in Photoshop, to leave you with handy solutions, just in case you feel motivated to take up the creation idea.
Before you begin, make sure to install and launch a suitable version the Photoshop application in your device and keep a set of selected images at hand that you will require for GIF creation.
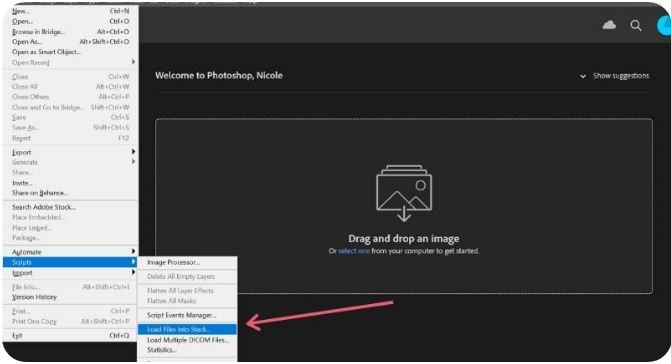
● Step 1: Load Image Files
Photoshop requires you to load your selected files into its creation stack. There is no limit on the image count, but make sure you choose images in a natural series so that the GIF doesn’t give an out of the box feel.
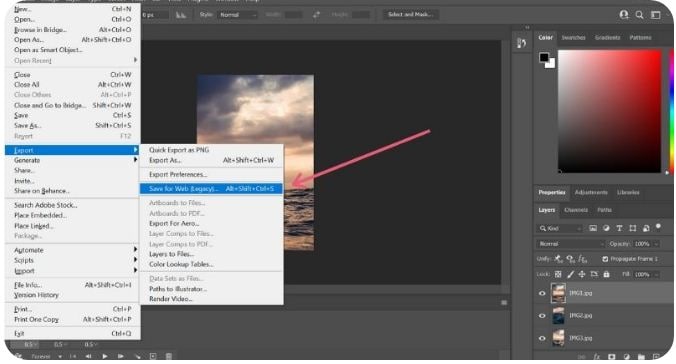
Reach the ‘File’ tab at the top and load your image files into the Photoshop stack using the following path:
File -> Scripts -> Load Files into Stack
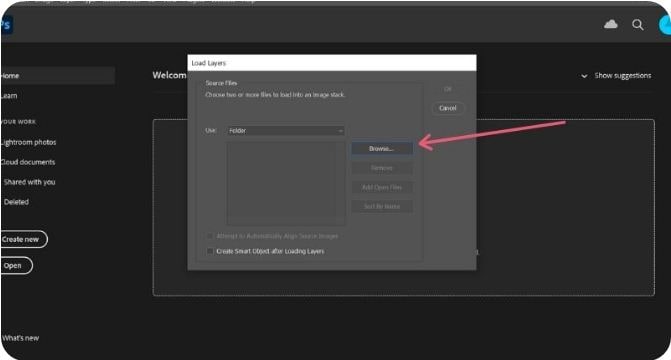
● Step 2: Image Selection
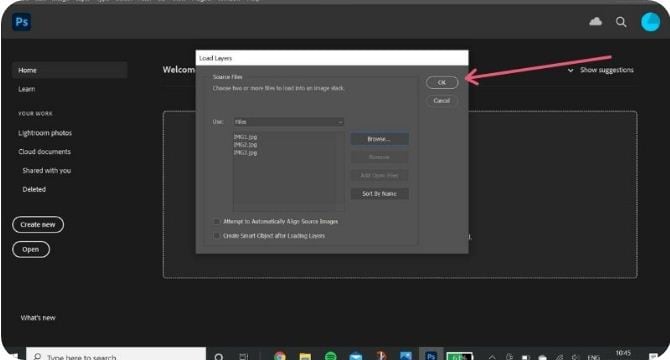
In the next pop-up window, click ‘Browse’ and choose the image file you wish to load into the Photoshop stack. In case the selected images seem tom lack proper alignment, click on the ‘Attempt to Automatically Align Source Images’ checkbox to set this straight and make your GIF frame stable.
Click on ‘OK’ when you are happy with your selections.
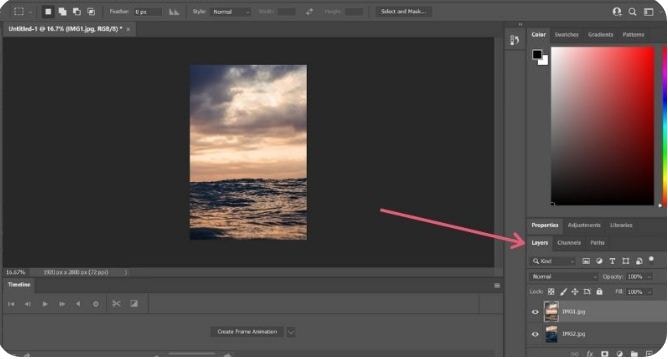
At this instant, Photoshop starts creating layers for the uploaded images, which you can see in the ‘Layers’ panel at the bottom-right. You are allowed to rearrange the image layers by selecting and dragging them or click on layer names to rename them.
If you notice distortion in Photoshop’s automatic alignment of your images, just crop the images frames to sort this out. Here’s how you can get this done:
● Tap the ‘Crop’ symbol.
● Adjust the crop frame to select the desired portion.
● Click on ‘Enter’ to confirm the action.
If you didn’t permit auto alignment previously, no worries, you can move ahead.
● Step 3: Make a Timeline Setup
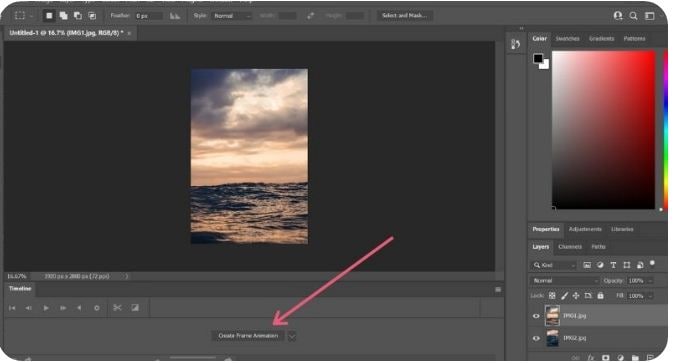
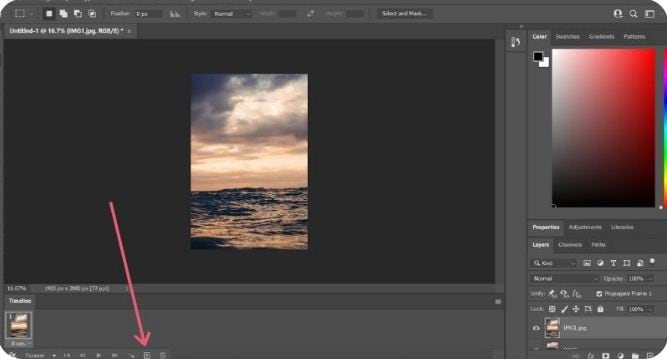
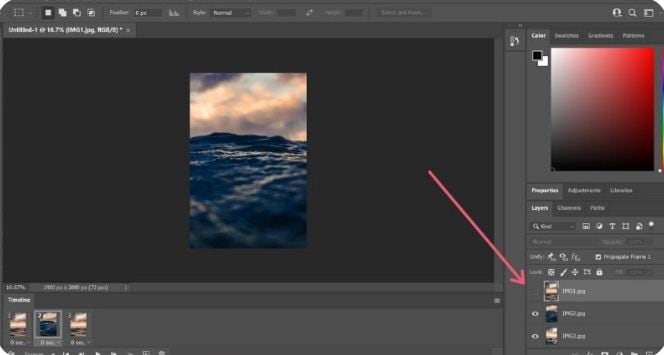
Navigate to the ‘Window’ tab in the top menu and click the ’Timeline’ checkbox. You will see the ‘Timeline Window’ pop up below the Photoshop workspace, where you need to select the ‘Create Frame Animation’ tab. This will cause the options for frame animation to pop-up.
Select you topmost image layer, followed by clicking on the ‘Duplicate’ icon to generate a copy of the image frame.
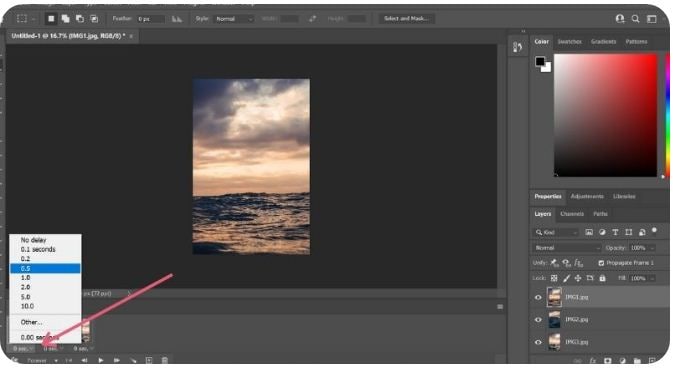
● Step 4: Decide Time Frames
Select your topmost image frame to see a play duration of ‘0 sec’ below its thumbnail. Click to open the drop-down menu beside it and choose suitable time duration for the frame to run. Allot time durations to all successive frames in a similar manner.
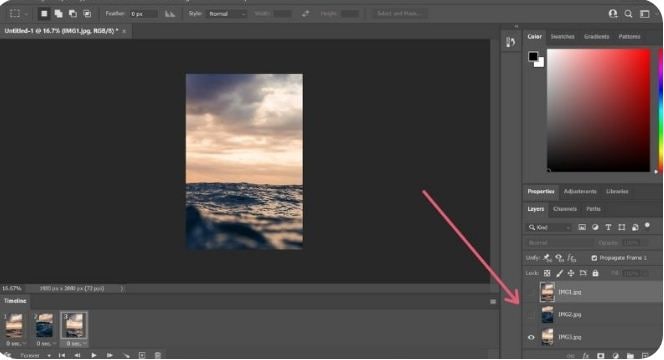
● Step 5: Conceal Top Layers
You will see am combination of the first and second image layers in the image thumbnail. To set this right, navigate to ‘Layers’ to hide the top layer.
Continue to hide previous layers in successive frames so that each layer appears in its respective frame at the end of the process.
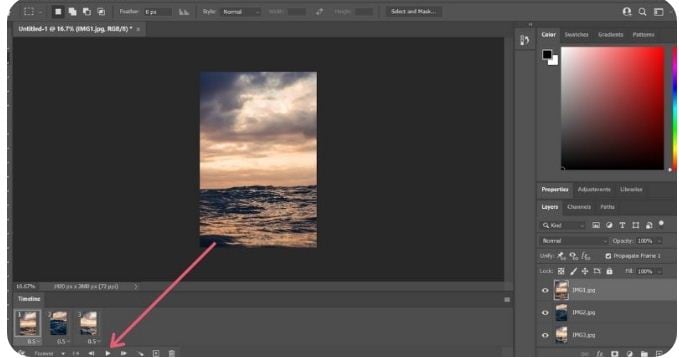
● Step 6: Preview Your Creation
Tap the ‘Play’ button to see your GIF preview. Ensure a smooth run with correct appearance order of images and precise frame durations.
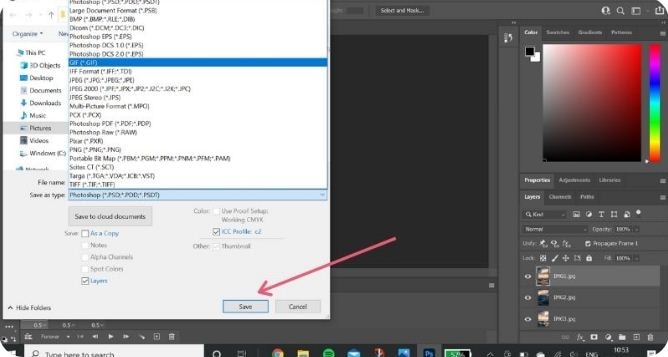
● Step 7: Time to Share.
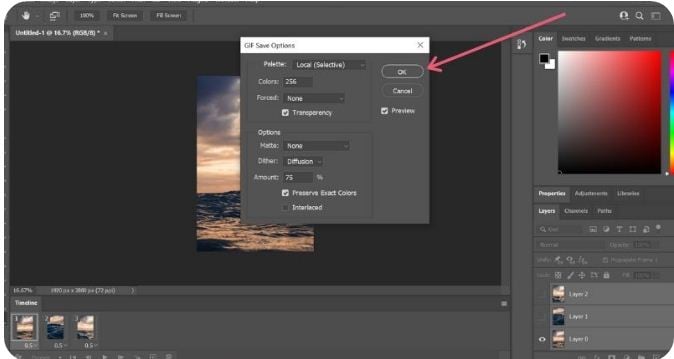
When you are satisfied, navigate to the ‘File’ tab and select ‘Save As’. From the menu that drops down, choose the GIF file format and click on ‘Save’.
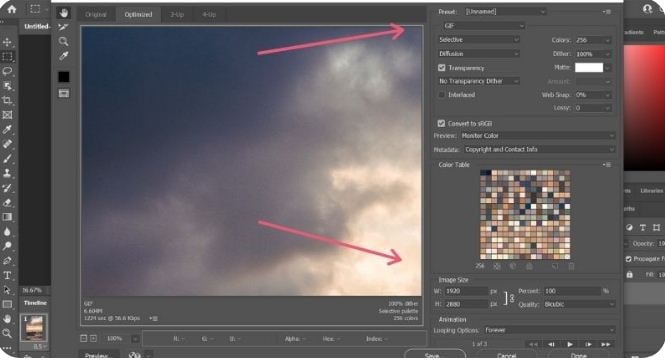
In the ’GIF Save Options’ that follows, adjust file settings suited to your preference and tap ‘OK’.
As an alternative you can take the following path to open the ‘GIF Preview Window’:
File -> Export -> Save for Web
In the top-right comer, choose the GIF file format from the drop-down menu. There is also an option to resize your image at the bottom-right. It is advisable to keep the image size within 500 pixels for a convenient export across various media sharing platforms. When you finish, click on ‘Save’. Your creation is now ready for a media export.
Part 2 6 Ways to Make an Animated GIF Without Photoshop
The idea to create GIF in Photoshop is fun and exciting, no doubt on that, but you may often want to switch to a different platform. No issues with that, the web is there to sort out everything for you. All you need to do is open your favorite browser to land across a heap of welcoming solutions to create GIFs without Photoshop. Let’s have a look through the best ones:
01**Wondershare Filmora Video Editor **
Filmora by Wondershare is probably the best GIF maker tool you can rely on. This is packed with a diverse inventory of exciting design features that are ready to provide a creative boost to your editing skills. Loaded with a ton of classic audio visual effects, this software is certainly comprises of everything you need to create static and animated GIFs like a pro.

Wondershare Filmora - Best Video Editor for Mac/Windows
5,481,435 people have downloaded it.
Build unique custom animations without breaking a sweat.
Focus on creating epic stories and leave the details to Filmora’s auto features.
Start a creative adventure with drag & drop effects and endless possibilities.
Filmora simplifies advanced features to save you time and effort.
Filmora cuts out repetition so you can move on to your next creative breakthrough.
Key Features
● This is free software with possibly the most convenient interface.
● You get the freedom to play with hundreds of audio-visual effects to your heart’s content.
● You can create GIFs with static images and videos that are simply awesome to say the least.
● You need not worry about specific file formats. The software is compatible with almost all commonly known ones.
● Filmora allows you to expand and explore your editing talent to the fullest. You can play with tools like, cut, trim or combine image frames and make color and speed adjustments to get the perfect results for your artwork.
02Photoscape
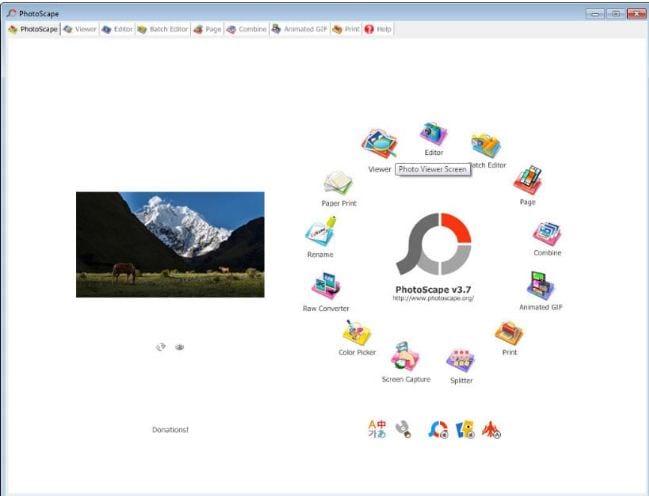
This is another GIF maker tool you can choose to create catchy and interesting GIFs. Photoscape is a simple graphic editor that makes GIF creation exciting and fun. Available to you for free, this software allows you to design and edit animated GIFs with a series of image enhancements, like, resizing, color selection, image prints, etc. Photoscape is compatible with your Windows, Linux and Mac supported devices and has a clean interface. However, the program may sometimes take up a slow run.
Key Features
● You can improvise you GIF with image editing tools, like, color and size adjustments, clip arts, effects, overlays, etc.
● It has a unique ‘Photo Batch’ tool that you can use to process and rename multiple images simultaneously.
● Photoscape allows you to create interesting collages by merging a series of images into a single one.
● You can create captivating animated GIFs with multiple still images.
● The software is loaded with a bunch of utilities like, photo splitter, page merger, color picker, image viewer and others to give that perfect professional outlook to your creations.
03Gifted Motion
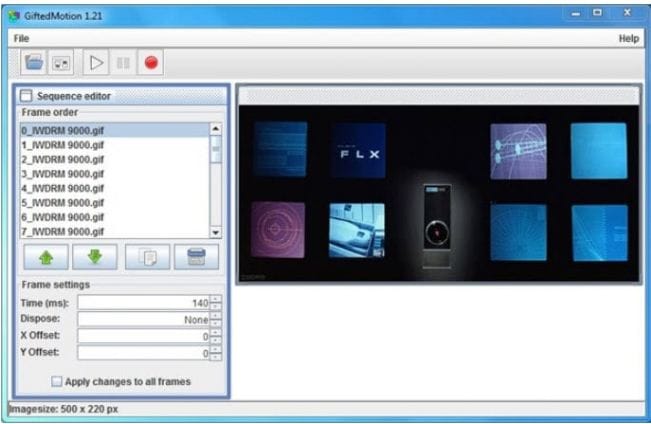
This is also among the commonly preferred GIF creator software. The best this about the tool is that it is platform independent and compatible with almost any Operating System. Another choice appeal of the software is its direct workability that is, you don’t require any program installations to create GIFs using this tool.
Key Features
● This is a simple graphic editor that runs on JAVA and is quite convenient to use.
● You can use this software to edit and create GIFs with images saved locally in your device.
● File formats supported by the software include PNG, JPEG, BMP and GIF.
● You don’t need to worry about licensing costs or in-app purchases; this tool is absolutely free to use.
● Loading big image files on this software may however, cost you some extra time.
01SSuite GIF Animator
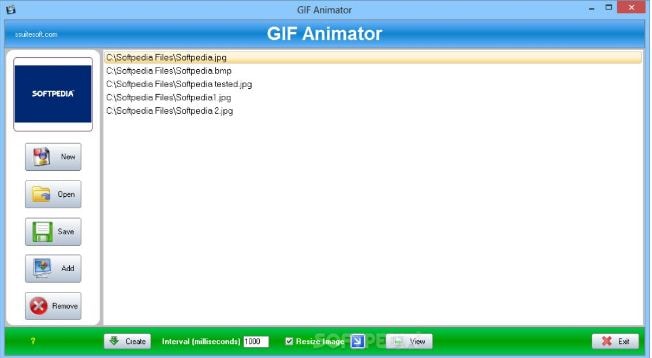
This one is Windows compatible software that works well with both, 32 and 64-bit Operating System configurations. It lies among those ’Green Software Programs’ that cut down on your net energy cost. Apart from high quality animated GIFs, y6ou can also create movies and slides shows with this software.
Key Features
● This is a free of cost, clean and user-friendly graphic editor software.
● You don’t require Windows registration to use this software
● You can conveniently save the software into any USB or memory device; it is easily portable.
● It facilitates a speedy GIF creation and editing.
● You can explore a variety of editing features and add separate time frames to each image using this software.
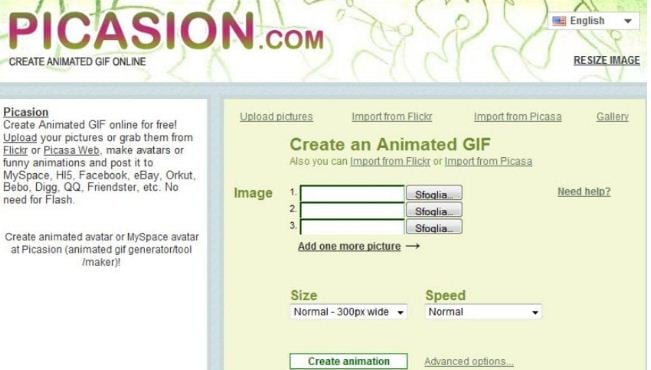
● Picasion
This is a free, online GIF maker tool that gives you the liberty to import images and videos from different app galleries, like, Picasa, Flickr and others to create and edit motion GIFs. The tool, though having a simple interface and feature packed, is quite ad-stricken, but you can skip that by sticking to the right webpage.
Key Features
● The tool crosses language borders and is available to you in English, Spanish, Portuguese and Russian.
● You can make size adjustments to the GIF images, or add a completely new avatar of your own.
● The tool offers you a variety of editing effects and filters to enhance and improvise your created GIFs.
● You need not limit yourself to specific file formats with this tool; all common ones are conveniently supported.
● It is a quick and clean tool that rescues you from the glitch of a messy interface.
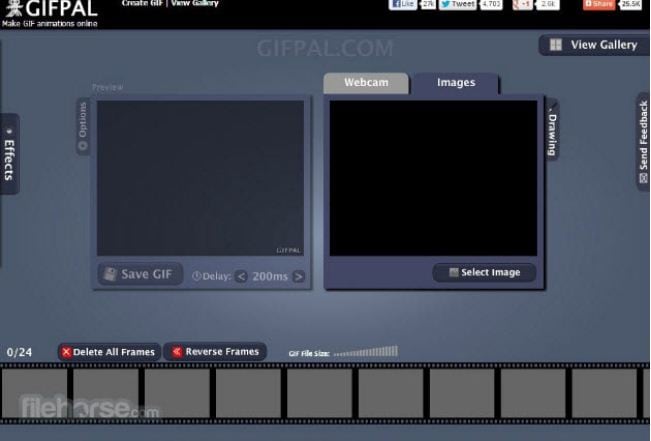
05GifPal
This one is also a free, online GIF creator with amazing editing features and tools. It comes with a diverse library of 20 frames and 30 effects to choose from, for creating normal and animated GIFs. It further has a variety of drawing and text editing tools you can use to add messages to your GIFs to make more impactful.
Key Features
● The tool is packed with a vast set of quality image editing tools that can create attractive motion and animated GIFs.
● The tool allows you to adjust and change the speed of image frames to give a natural flow to your GIF.
● An exclusive feature of the tool is that it allows you to edit frames in its timeline.
● Your creations with the tools are deprived of any default watermarks. You can either add one of your choice, or even create GIFs without a watermark.
● The tool site is free of unwanted and irrelevant ads.
● Key Takeaways from This Episode →
● Making a GIF in Photoshop is a great idea to design animation snippets, both for fun and a target purpose. Using the Photoshop GIF maker ensures quality and class in complete professional styles.
● However, if you are keen on browsing through other GIF creator alternatives, you can safely pick the Filmora GIF Maher software for creating excellent, next level animated GIFs.
Having trouble creating Photoshop GIFs? Stay tuned to set everything straight.
In this article
01 [Easy Ways to Create an Animated GIF in Photoshop](#Part 1)
02 [6 Ways To Make An Animated GIF Without Photoshop](#Part 2)
Part 1 Easy Ways to Create an Animated GIF in Photoshop
Animated GIFs are a naturally captivating means of information exchange and entertainment. When the talk is about creating these, you can visibly see a flood of creation tools and software solutions. However, standing out in the crowd, are those catchy Photoshop snippets that certainly have the potential to leave you jaw dropped.
A Photoshop GIF is bound to capture attention, owing to its high quality imaging and top rated professional editing outlook. If you possess the editing flare, do try creating one for an amazing editing experience.
Creating Animated Photoshop GIFs: Easiest Solutions
Let’s take a look into some easy and interesting ways of creating a GIF in Photoshop, to leave you with handy solutions, just in case you feel motivated to take up the creation idea.
Before you begin, make sure to install and launch a suitable version the Photoshop application in your device and keep a set of selected images at hand that you will require for GIF creation.
● Step 1: Load Image Files
Photoshop requires you to load your selected files into its creation stack. There is no limit on the image count, but make sure you choose images in a natural series so that the GIF doesn’t give an out of the box feel.
Reach the ‘File’ tab at the top and load your image files into the Photoshop stack using the following path:
File -> Scripts -> Load Files into Stack
● Step 2: Image Selection
In the next pop-up window, click ‘Browse’ and choose the image file you wish to load into the Photoshop stack. In case the selected images seem tom lack proper alignment, click on the ‘Attempt to Automatically Align Source Images’ checkbox to set this straight and make your GIF frame stable.
Click on ‘OK’ when you are happy with your selections.
At this instant, Photoshop starts creating layers for the uploaded images, which you can see in the ‘Layers’ panel at the bottom-right. You are allowed to rearrange the image layers by selecting and dragging them or click on layer names to rename them.
If you notice distortion in Photoshop’s automatic alignment of your images, just crop the images frames to sort this out. Here’s how you can get this done:
● Tap the ‘Crop’ symbol.
● Adjust the crop frame to select the desired portion.
● Click on ‘Enter’ to confirm the action.
If you didn’t permit auto alignment previously, no worries, you can move ahead.
● Step 3: Make a Timeline Setup
Navigate to the ‘Window’ tab in the top menu and click the ’Timeline’ checkbox. You will see the ‘Timeline Window’ pop up below the Photoshop workspace, where you need to select the ‘Create Frame Animation’ tab. This will cause the options for frame animation to pop-up.
Select you topmost image layer, followed by clicking on the ‘Duplicate’ icon to generate a copy of the image frame.
● Step 4: Decide Time Frames
Select your topmost image frame to see a play duration of ‘0 sec’ below its thumbnail. Click to open the drop-down menu beside it and choose suitable time duration for the frame to run. Allot time durations to all successive frames in a similar manner.
● Step 5: Conceal Top Layers
You will see am combination of the first and second image layers in the image thumbnail. To set this right, navigate to ‘Layers’ to hide the top layer.
Continue to hide previous layers in successive frames so that each layer appears in its respective frame at the end of the process.
● Step 6: Preview Your Creation
Tap the ‘Play’ button to see your GIF preview. Ensure a smooth run with correct appearance order of images and precise frame durations.
● Step 7: Time to Share.
When you are satisfied, navigate to the ‘File’ tab and select ‘Save As’. From the menu that drops down, choose the GIF file format and click on ‘Save’.
In the ’GIF Save Options’ that follows, adjust file settings suited to your preference and tap ‘OK’.
As an alternative you can take the following path to open the ‘GIF Preview Window’:
File -> Export -> Save for Web
In the top-right comer, choose the GIF file format from the drop-down menu. There is also an option to resize your image at the bottom-right. It is advisable to keep the image size within 500 pixels for a convenient export across various media sharing platforms. When you finish, click on ‘Save’. Your creation is now ready for a media export.
Part 2 6 Ways to Make an Animated GIF Without Photoshop
The idea to create GIF in Photoshop is fun and exciting, no doubt on that, but you may often want to switch to a different platform. No issues with that, the web is there to sort out everything for you. All you need to do is open your favorite browser to land across a heap of welcoming solutions to create GIFs without Photoshop. Let’s have a look through the best ones:
01**Wondershare Filmora Video Editor **
Filmora by Wondershare is probably the best GIF maker tool you can rely on. This is packed with a diverse inventory of exciting design features that are ready to provide a creative boost to your editing skills. Loaded with a ton of classic audio visual effects, this software is certainly comprises of everything you need to create static and animated GIFs like a pro.

Wondershare Filmora - Best Video Editor for Mac/Windows
5,481,435 people have downloaded it.
Build unique custom animations without breaking a sweat.
Focus on creating epic stories and leave the details to Filmora’s auto features.
Start a creative adventure with drag & drop effects and endless possibilities.
Filmora simplifies advanced features to save you time and effort.
Filmora cuts out repetition so you can move on to your next creative breakthrough.
Key Features
● This is free software with possibly the most convenient interface.
● You get the freedom to play with hundreds of audio-visual effects to your heart’s content.
● You can create GIFs with static images and videos that are simply awesome to say the least.
● You need not worry about specific file formats. The software is compatible with almost all commonly known ones.
● Filmora allows you to expand and explore your editing talent to the fullest. You can play with tools like, cut, trim or combine image frames and make color and speed adjustments to get the perfect results for your artwork.
02Photoscape
This is another GIF maker tool you can choose to create catchy and interesting GIFs. Photoscape is a simple graphic editor that makes GIF creation exciting and fun. Available to you for free, this software allows you to design and edit animated GIFs with a series of image enhancements, like, resizing, color selection, image prints, etc. Photoscape is compatible with your Windows, Linux and Mac supported devices and has a clean interface. However, the program may sometimes take up a slow run.
Key Features
● You can improvise you GIF with image editing tools, like, color and size adjustments, clip arts, effects, overlays, etc.
● It has a unique ‘Photo Batch’ tool that you can use to process and rename multiple images simultaneously.
● Photoscape allows you to create interesting collages by merging a series of images into a single one.
● You can create captivating animated GIFs with multiple still images.
● The software is loaded with a bunch of utilities like, photo splitter, page merger, color picker, image viewer and others to give that perfect professional outlook to your creations.
03Gifted Motion
This is also among the commonly preferred GIF creator software. The best this about the tool is that it is platform independent and compatible with almost any Operating System. Another choice appeal of the software is its direct workability that is, you don’t require any program installations to create GIFs using this tool.
Key Features
● This is a simple graphic editor that runs on JAVA and is quite convenient to use.
● You can use this software to edit and create GIFs with images saved locally in your device.
● File formats supported by the software include PNG, JPEG, BMP and GIF.
● You don’t need to worry about licensing costs or in-app purchases; this tool is absolutely free to use.
● Loading big image files on this software may however, cost you some extra time.
01SSuite GIF Animator
This one is Windows compatible software that works well with both, 32 and 64-bit Operating System configurations. It lies among those ’Green Software Programs’ that cut down on your net energy cost. Apart from high quality animated GIFs, y6ou can also create movies and slides shows with this software.
Key Features
● This is a free of cost, clean and user-friendly graphic editor software.
● You don’t require Windows registration to use this software
● You can conveniently save the software into any USB or memory device; it is easily portable.
● It facilitates a speedy GIF creation and editing.
● You can explore a variety of editing features and add separate time frames to each image using this software.
● Picasion
This is a free, online GIF maker tool that gives you the liberty to import images and videos from different app galleries, like, Picasa, Flickr and others to create and edit motion GIFs. The tool, though having a simple interface and feature packed, is quite ad-stricken, but you can skip that by sticking to the right webpage.
Key Features
● The tool crosses language borders and is available to you in English, Spanish, Portuguese and Russian.
● You can make size adjustments to the GIF images, or add a completely new avatar of your own.
● The tool offers you a variety of editing effects and filters to enhance and improvise your created GIFs.
● You need not limit yourself to specific file formats with this tool; all common ones are conveniently supported.
● It is a quick and clean tool that rescues you from the glitch of a messy interface.
05GifPal
This one is also a free, online GIF creator with amazing editing features and tools. It comes with a diverse library of 20 frames and 30 effects to choose from, for creating normal and animated GIFs. It further has a variety of drawing and text editing tools you can use to add messages to your GIFs to make more impactful.
Key Features
● The tool is packed with a vast set of quality image editing tools that can create attractive motion and animated GIFs.
● The tool allows you to adjust and change the speed of image frames to give a natural flow to your GIF.
● An exclusive feature of the tool is that it allows you to edit frames in its timeline.
● Your creations with the tools are deprived of any default watermarks. You can either add one of your choice, or even create GIFs without a watermark.
● The tool site is free of unwanted and irrelevant ads.
● Key Takeaways from This Episode →
● Making a GIF in Photoshop is a great idea to design animation snippets, both for fun and a target purpose. Using the Photoshop GIF maker ensures quality and class in complete professional styles.
● However, if you are keen on browsing through other GIF creator alternatives, you can safely pick the Filmora GIF Maher software for creating excellent, next level animated GIFs.
Having trouble creating Photoshop GIFs? Stay tuned to set everything straight.
In this article
01 [Easy Ways to Create an Animated GIF in Photoshop](#Part 1)
02 [6 Ways To Make An Animated GIF Without Photoshop](#Part 2)
Part 1 Easy Ways to Create an Animated GIF in Photoshop
Animated GIFs are a naturally captivating means of information exchange and entertainment. When the talk is about creating these, you can visibly see a flood of creation tools and software solutions. However, standing out in the crowd, are those catchy Photoshop snippets that certainly have the potential to leave you jaw dropped.
A Photoshop GIF is bound to capture attention, owing to its high quality imaging and top rated professional editing outlook. If you possess the editing flare, do try creating one for an amazing editing experience.
Creating Animated Photoshop GIFs: Easiest Solutions
Let’s take a look into some easy and interesting ways of creating a GIF in Photoshop, to leave you with handy solutions, just in case you feel motivated to take up the creation idea.
Before you begin, make sure to install and launch a suitable version the Photoshop application in your device and keep a set of selected images at hand that you will require for GIF creation.
● Step 1: Load Image Files
Photoshop requires you to load your selected files into its creation stack. There is no limit on the image count, but make sure you choose images in a natural series so that the GIF doesn’t give an out of the box feel.
Reach the ‘File’ tab at the top and load your image files into the Photoshop stack using the following path:
File -> Scripts -> Load Files into Stack
● Step 2: Image Selection
In the next pop-up window, click ‘Browse’ and choose the image file you wish to load into the Photoshop stack. In case the selected images seem tom lack proper alignment, click on the ‘Attempt to Automatically Align Source Images’ checkbox to set this straight and make your GIF frame stable.
Click on ‘OK’ when you are happy with your selections.
At this instant, Photoshop starts creating layers for the uploaded images, which you can see in the ‘Layers’ panel at the bottom-right. You are allowed to rearrange the image layers by selecting and dragging them or click on layer names to rename them.
If you notice distortion in Photoshop’s automatic alignment of your images, just crop the images frames to sort this out. Here’s how you can get this done:
● Tap the ‘Crop’ symbol.
● Adjust the crop frame to select the desired portion.
● Click on ‘Enter’ to confirm the action.
If you didn’t permit auto alignment previously, no worries, you can move ahead.
● Step 3: Make a Timeline Setup
Navigate to the ‘Window’ tab in the top menu and click the ’Timeline’ checkbox. You will see the ‘Timeline Window’ pop up below the Photoshop workspace, where you need to select the ‘Create Frame Animation’ tab. This will cause the options for frame animation to pop-up.
Select you topmost image layer, followed by clicking on the ‘Duplicate’ icon to generate a copy of the image frame.
● Step 4: Decide Time Frames
Select your topmost image frame to see a play duration of ‘0 sec’ below its thumbnail. Click to open the drop-down menu beside it and choose suitable time duration for the frame to run. Allot time durations to all successive frames in a similar manner.
● Step 5: Conceal Top Layers
You will see am combination of the first and second image layers in the image thumbnail. To set this right, navigate to ‘Layers’ to hide the top layer.
Continue to hide previous layers in successive frames so that each layer appears in its respective frame at the end of the process.
● Step 6: Preview Your Creation
Tap the ‘Play’ button to see your GIF preview. Ensure a smooth run with correct appearance order of images and precise frame durations.
● Step 7: Time to Share.
When you are satisfied, navigate to the ‘File’ tab and select ‘Save As’. From the menu that drops down, choose the GIF file format and click on ‘Save’.
In the ’GIF Save Options’ that follows, adjust file settings suited to your preference and tap ‘OK’.
As an alternative you can take the following path to open the ‘GIF Preview Window’:
File -> Export -> Save for Web
In the top-right comer, choose the GIF file format from the drop-down menu. There is also an option to resize your image at the bottom-right. It is advisable to keep the image size within 500 pixels for a convenient export across various media sharing platforms. When you finish, click on ‘Save’. Your creation is now ready for a media export.
Part 2 6 Ways to Make an Animated GIF Without Photoshop
The idea to create GIF in Photoshop is fun and exciting, no doubt on that, but you may often want to switch to a different platform. No issues with that, the web is there to sort out everything for you. All you need to do is open your favorite browser to land across a heap of welcoming solutions to create GIFs without Photoshop. Let’s have a look through the best ones:
01**Wondershare Filmora Video Editor **
Filmora by Wondershare is probably the best GIF maker tool you can rely on. This is packed with a diverse inventory of exciting design features that are ready to provide a creative boost to your editing skills. Loaded with a ton of classic audio visual effects, this software is certainly comprises of everything you need to create static and animated GIFs like a pro.

Wondershare Filmora - Best Video Editor for Mac/Windows
5,481,435 people have downloaded it.
Build unique custom animations without breaking a sweat.
Focus on creating epic stories and leave the details to Filmora’s auto features.
Start a creative adventure with drag & drop effects and endless possibilities.
Filmora simplifies advanced features to save you time and effort.
Filmora cuts out repetition so you can move on to your next creative breakthrough.
Key Features
● This is free software with possibly the most convenient interface.
● You get the freedom to play with hundreds of audio-visual effects to your heart’s content.
● You can create GIFs with static images and videos that are simply awesome to say the least.
● You need not worry about specific file formats. The software is compatible with almost all commonly known ones.
● Filmora allows you to expand and explore your editing talent to the fullest. You can play with tools like, cut, trim or combine image frames and make color and speed adjustments to get the perfect results for your artwork.
02Photoscape
This is another GIF maker tool you can choose to create catchy and interesting GIFs. Photoscape is a simple graphic editor that makes GIF creation exciting and fun. Available to you for free, this software allows you to design and edit animated GIFs with a series of image enhancements, like, resizing, color selection, image prints, etc. Photoscape is compatible with your Windows, Linux and Mac supported devices and has a clean interface. However, the program may sometimes take up a slow run.
Key Features
● You can improvise you GIF with image editing tools, like, color and size adjustments, clip arts, effects, overlays, etc.
● It has a unique ‘Photo Batch’ tool that you can use to process and rename multiple images simultaneously.
● Photoscape allows you to create interesting collages by merging a series of images into a single one.
● You can create captivating animated GIFs with multiple still images.
● The software is loaded with a bunch of utilities like, photo splitter, page merger, color picker, image viewer and others to give that perfect professional outlook to your creations.
03Gifted Motion
This is also among the commonly preferred GIF creator software. The best this about the tool is that it is platform independent and compatible with almost any Operating System. Another choice appeal of the software is its direct workability that is, you don’t require any program installations to create GIFs using this tool.
Key Features
● This is a simple graphic editor that runs on JAVA and is quite convenient to use.
● You can use this software to edit and create GIFs with images saved locally in your device.
● File formats supported by the software include PNG, JPEG, BMP and GIF.
● You don’t need to worry about licensing costs or in-app purchases; this tool is absolutely free to use.
● Loading big image files on this software may however, cost you some extra time.
01SSuite GIF Animator
This one is Windows compatible software that works well with both, 32 and 64-bit Operating System configurations. It lies among those ’Green Software Programs’ that cut down on your net energy cost. Apart from high quality animated GIFs, y6ou can also create movies and slides shows with this software.
Key Features
● This is a free of cost, clean and user-friendly graphic editor software.
● You don’t require Windows registration to use this software
● You can conveniently save the software into any USB or memory device; it is easily portable.
● It facilitates a speedy GIF creation and editing.
● You can explore a variety of editing features and add separate time frames to each image using this software.
● Picasion
This is a free, online GIF maker tool that gives you the liberty to import images and videos from different app galleries, like, Picasa, Flickr and others to create and edit motion GIFs. The tool, though having a simple interface and feature packed, is quite ad-stricken, but you can skip that by sticking to the right webpage.
Key Features
● The tool crosses language borders and is available to you in English, Spanish, Portuguese and Russian.
● You can make size adjustments to the GIF images, or add a completely new avatar of your own.
● The tool offers you a variety of editing effects and filters to enhance and improvise your created GIFs.
● You need not limit yourself to specific file formats with this tool; all common ones are conveniently supported.
● It is a quick and clean tool that rescues you from the glitch of a messy interface.
05GifPal
This one is also a free, online GIF creator with amazing editing features and tools. It comes with a diverse library of 20 frames and 30 effects to choose from, for creating normal and animated GIFs. It further has a variety of drawing and text editing tools you can use to add messages to your GIFs to make more impactful.
Key Features
● The tool is packed with a vast set of quality image editing tools that can create attractive motion and animated GIFs.
● The tool allows you to adjust and change the speed of image frames to give a natural flow to your GIF.
● An exclusive feature of the tool is that it allows you to edit frames in its timeline.
● Your creations with the tools are deprived of any default watermarks. You can either add one of your choice, or even create GIFs without a watermark.
● The tool site is free of unwanted and irrelevant ads.
● Key Takeaways from This Episode →
● Making a GIF in Photoshop is a great idea to design animation snippets, both for fun and a target purpose. Using the Photoshop GIF maker ensures quality and class in complete professional styles.
● However, if you are keen on browsing through other GIF creator alternatives, you can safely pick the Filmora GIF Maher software for creating excellent, next level animated GIFs.
Having trouble creating Photoshop GIFs? Stay tuned to set everything straight.
In this article
01 [Easy Ways to Create an Animated GIF in Photoshop](#Part 1)
02 [6 Ways To Make An Animated GIF Without Photoshop](#Part 2)
Part 1 Easy Ways to Create an Animated GIF in Photoshop
Animated GIFs are a naturally captivating means of information exchange and entertainment. When the talk is about creating these, you can visibly see a flood of creation tools and software solutions. However, standing out in the crowd, are those catchy Photoshop snippets that certainly have the potential to leave you jaw dropped.
A Photoshop GIF is bound to capture attention, owing to its high quality imaging and top rated professional editing outlook. If you possess the editing flare, do try creating one for an amazing editing experience.
Creating Animated Photoshop GIFs: Easiest Solutions
Let’s take a look into some easy and interesting ways of creating a GIF in Photoshop, to leave you with handy solutions, just in case you feel motivated to take up the creation idea.
Before you begin, make sure to install and launch a suitable version the Photoshop application in your device and keep a set of selected images at hand that you will require for GIF creation.
● Step 1: Load Image Files
Photoshop requires you to load your selected files into its creation stack. There is no limit on the image count, but make sure you choose images in a natural series so that the GIF doesn’t give an out of the box feel.
Reach the ‘File’ tab at the top and load your image files into the Photoshop stack using the following path:
File -> Scripts -> Load Files into Stack
● Step 2: Image Selection
In the next pop-up window, click ‘Browse’ and choose the image file you wish to load into the Photoshop stack. In case the selected images seem tom lack proper alignment, click on the ‘Attempt to Automatically Align Source Images’ checkbox to set this straight and make your GIF frame stable.
Click on ‘OK’ when you are happy with your selections.
At this instant, Photoshop starts creating layers for the uploaded images, which you can see in the ‘Layers’ panel at the bottom-right. You are allowed to rearrange the image layers by selecting and dragging them or click on layer names to rename them.
If you notice distortion in Photoshop’s automatic alignment of your images, just crop the images frames to sort this out. Here’s how you can get this done:
● Tap the ‘Crop’ symbol.
● Adjust the crop frame to select the desired portion.
● Click on ‘Enter’ to confirm the action.
If you didn’t permit auto alignment previously, no worries, you can move ahead.
● Step 3: Make a Timeline Setup
Navigate to the ‘Window’ tab in the top menu and click the ’Timeline’ checkbox. You will see the ‘Timeline Window’ pop up below the Photoshop workspace, where you need to select the ‘Create Frame Animation’ tab. This will cause the options for frame animation to pop-up.
Select you topmost image layer, followed by clicking on the ‘Duplicate’ icon to generate a copy of the image frame.
● Step 4: Decide Time Frames
Select your topmost image frame to see a play duration of ‘0 sec’ below its thumbnail. Click to open the drop-down menu beside it and choose suitable time duration for the frame to run. Allot time durations to all successive frames in a similar manner.
● Step 5: Conceal Top Layers
You will see am combination of the first and second image layers in the image thumbnail. To set this right, navigate to ‘Layers’ to hide the top layer.
Continue to hide previous layers in successive frames so that each layer appears in its respective frame at the end of the process.
● Step 6: Preview Your Creation
Tap the ‘Play’ button to see your GIF preview. Ensure a smooth run with correct appearance order of images and precise frame durations.
● Step 7: Time to Share.
When you are satisfied, navigate to the ‘File’ tab and select ‘Save As’. From the menu that drops down, choose the GIF file format and click on ‘Save’.
In the ’GIF Save Options’ that follows, adjust file settings suited to your preference and tap ‘OK’.
As an alternative you can take the following path to open the ‘GIF Preview Window’:
File -> Export -> Save for Web
In the top-right comer, choose the GIF file format from the drop-down menu. There is also an option to resize your image at the bottom-right. It is advisable to keep the image size within 500 pixels for a convenient export across various media sharing platforms. When you finish, click on ‘Save’. Your creation is now ready for a media export.
Part 2 6 Ways to Make an Animated GIF Without Photoshop
The idea to create GIF in Photoshop is fun and exciting, no doubt on that, but you may often want to switch to a different platform. No issues with that, the web is there to sort out everything for you. All you need to do is open your favorite browser to land across a heap of welcoming solutions to create GIFs without Photoshop. Let’s have a look through the best ones:
01**Wondershare Filmora Video Editor **
Filmora by Wondershare is probably the best GIF maker tool you can rely on. This is packed with a diverse inventory of exciting design features that are ready to provide a creative boost to your editing skills. Loaded with a ton of classic audio visual effects, this software is certainly comprises of everything you need to create static and animated GIFs like a pro.

Wondershare Filmora - Best Video Editor for Mac/Windows
5,481,435 people have downloaded it.
Build unique custom animations without breaking a sweat.
Focus on creating epic stories and leave the details to Filmora’s auto features.
Start a creative adventure with drag & drop effects and endless possibilities.
Filmora simplifies advanced features to save you time and effort.
Filmora cuts out repetition so you can move on to your next creative breakthrough.
Key Features
● This is free software with possibly the most convenient interface.
● You get the freedom to play with hundreds of audio-visual effects to your heart’s content.
● You can create GIFs with static images and videos that are simply awesome to say the least.
● You need not worry about specific file formats. The software is compatible with almost all commonly known ones.
● Filmora allows you to expand and explore your editing talent to the fullest. You can play with tools like, cut, trim or combine image frames and make color and speed adjustments to get the perfect results for your artwork.
02Photoscape
This is another GIF maker tool you can choose to create catchy and interesting GIFs. Photoscape is a simple graphic editor that makes GIF creation exciting and fun. Available to you for free, this software allows you to design and edit animated GIFs with a series of image enhancements, like, resizing, color selection, image prints, etc. Photoscape is compatible with your Windows, Linux and Mac supported devices and has a clean interface. However, the program may sometimes take up a slow run.
Key Features
● You can improvise you GIF with image editing tools, like, color and size adjustments, clip arts, effects, overlays, etc.
● It has a unique ‘Photo Batch’ tool that you can use to process and rename multiple images simultaneously.
● Photoscape allows you to create interesting collages by merging a series of images into a single one.
● You can create captivating animated GIFs with multiple still images.
● The software is loaded with a bunch of utilities like, photo splitter, page merger, color picker, image viewer and others to give that perfect professional outlook to your creations.
03Gifted Motion
This is also among the commonly preferred GIF creator software. The best this about the tool is that it is platform independent and compatible with almost any Operating System. Another choice appeal of the software is its direct workability that is, you don’t require any program installations to create GIFs using this tool.
Key Features
● This is a simple graphic editor that runs on JAVA and is quite convenient to use.
● You can use this software to edit and create GIFs with images saved locally in your device.
● File formats supported by the software include PNG, JPEG, BMP and GIF.
● You don’t need to worry about licensing costs or in-app purchases; this tool is absolutely free to use.
● Loading big image files on this software may however, cost you some extra time.
01SSuite GIF Animator
This one is Windows compatible software that works well with both, 32 and 64-bit Operating System configurations. It lies among those ’Green Software Programs’ that cut down on your net energy cost. Apart from high quality animated GIFs, y6ou can also create movies and slides shows with this software.
Key Features
● This is a free of cost, clean and user-friendly graphic editor software.
● You don’t require Windows registration to use this software
● You can conveniently save the software into any USB or memory device; it is easily portable.
● It facilitates a speedy GIF creation and editing.
● You can explore a variety of editing features and add separate time frames to each image using this software.
● Picasion
This is a free, online GIF maker tool that gives you the liberty to import images and videos from different app galleries, like, Picasa, Flickr and others to create and edit motion GIFs. The tool, though having a simple interface and feature packed, is quite ad-stricken, but you can skip that by sticking to the right webpage.
Key Features
● The tool crosses language borders and is available to you in English, Spanish, Portuguese and Russian.
● You can make size adjustments to the GIF images, or add a completely new avatar of your own.
● The tool offers you a variety of editing effects and filters to enhance and improvise your created GIFs.
● You need not limit yourself to specific file formats with this tool; all common ones are conveniently supported.
● It is a quick and clean tool that rescues you from the glitch of a messy interface.
05GifPal
This one is also a free, online GIF creator with amazing editing features and tools. It comes with a diverse library of 20 frames and 30 effects to choose from, for creating normal and animated GIFs. It further has a variety of drawing and text editing tools you can use to add messages to your GIFs to make more impactful.
Key Features
● The tool is packed with a vast set of quality image editing tools that can create attractive motion and animated GIFs.
● The tool allows you to adjust and change the speed of image frames to give a natural flow to your GIF.
● An exclusive feature of the tool is that it allows you to edit frames in its timeline.
● Your creations with the tools are deprived of any default watermarks. You can either add one of your choice, or even create GIFs without a watermark.
● The tool site is free of unwanted and irrelevant ads.
● Key Takeaways from This Episode →
● Making a GIF in Photoshop is a great idea to design animation snippets, both for fun and a target purpose. Using the Photoshop GIF maker ensures quality and class in complete professional styles.
● However, if you are keen on browsing through other GIF creator alternatives, you can safely pick the Filmora GIF Maher software for creating excellent, next level animated GIFs.
[Updated 2024] Top Free Vintage LUTs to Use
Whether it is an image or video footage, LUTs can change the look and feel of your content. You can add a new color scheme, change the contrast, or create a new digital media look. Although there are many LUTs options, vintage LUTs are some of the most popular ones. These LUTs can add a nostalgic and warm feeling to your content and are perfect for creating a vintage or retro look.
Vintage LUTs are a great way to add a classic feel to your photos or videos, and they work especially well for old-school-themed projects. Using free vintage LUTs, you can easily add a vintage look to your content without spending too much time editing.
- Part 2: Best Free Vintage LUTs That Can Be Found in The Market
- Part 3: The Best Video Editor to Integrate LUTs - Wondershare Filmora
Part 1: What Are the Diverse Use Cases of LUTs?
LUTs are an array of numbers that helps you to change colors from one color space to another. You can use LUTs for color grading, color correction, or to change the color tone. The section below will highlight where you can use these LUTs.
- Color Grading: LUTs can be used for color grading to adjust the colors of an image to create a specific look or mood. Additionally, you can tweak an entire image’s colors or target specific colors or tones using LUTs.
- Color Correction: Another way is you can use LUTs to color-correct any image or video. It is the process of adjusting the colors of an image to make it look more natural. This technique is often used to correct color temperature, adjust contrast, and fix color imbalances.
- Film Emulation: It can emulate the look of different film stocks, such as Kodak or Fuji. This technique is commonly used in filmmaking to achieve a specific aesthetic or match older films’ looks.
- Special Effects: LUTs can create a wide range of special effects. For instance, a LUT can create the look of a night vision camera or infrared vision. This technique is often used in action movies and video games to create a more 3D experience.
- Still Photography: Furthermore, LUTs can also be used in still photography to adjust the color and tone of an image. It applies a color film that looks like a filter or an effect making the content look more creative.
- 3D Rendering: LUTs are used in 3D rendering to convert colors from one color space to another. Moreover, it can adjust the color and tone of rendered images. This technique can help in animated movies, video games, and visual effects for film and TV.
Free Download For Win 7 or later(64-bit)
Free Download For macOS 10.14 or later
Part 2: Best Free Vintage LUTs That Can Be Found in The Market
We know that LUTs change the perspective and mood of your story. There are many different LUTs to download, but vintage LUTs add more depth to your content. You can choose from different vintage look LUT packs, but here are some of the best.
1. Vintage Looks
Vintage Looks is a LUT pack that offers 10 vintage-style LUTs that can be used to give your media files a classic, old-school look. These LUTs highlight tropical colors, such as shades of blue and yellow. These shades create an old and vintage atmosphere for your photos and videos. You can apply one of the LUTs to your footage and watch your media files transform.

2.Vintage LUTs
Vintage LUTs is a pack of LUTs that can transform your media into a different vintage look. Your results look like they are taken from old Kodak or Fuji films. Moreover, use its monochromatic or B&W LUTs to give your media files the old vintage feel. You can set a different tone by applying these LUTs to your videos and photos for a retro look.

3.50 Vintage Wedding LUTs Pack
The 50 Vintage Wedding LUTs Pack is a collection of 50 high-quality LUTs. These LUTs can add a beautiful vintage-style effect to your photos and videos. Additionally, these LUTs are designed to bring your media a warm, sepia-like tone. It creates a tone giving it a classic, timeless look that is perfect for weddings. Moreover, you can create old-fashioned-themed photos and videos using these LUTs.

4. Vintage Color Grading Video Editing LUTs
It is a pack of 20 LUTs to color-grade your digital media in a vintage feel. Vintage Color Grading Video Editing LUTs overexpose your video to fade its colors. Furthermore, it highlights orange and tan shades to warm your digital files. It will create an overexposed, rich contrast, old classic Hollywood movie feel. It has different styled vintage LUTs that you apply to your videos.

5. Vintage Film LUTs
Another amazing LUT pack that creates an old retro feel to your content is Vintage Film LUTs. Achieve a cinematic style with a vintage feel with multiple vintage presets. These LUTs are designed to replicate the look of the Black Magic Pocket Cinema Camera. Similarly, you can add a classic and timeless look to your photos and videos with this vintage pack.

Empower your videos with a new mood using different LUTs. Filmora now offers 800+ top-quality 3D LUTs cover a broad range of scenarios. Transform your videos with Filmora’s powerful 3D LUTs.
Apply LUT on Videos Apply LUT on Videos Learn More

6. 50 Vintage Cinematic Lightroom Presets and LUTs
50 Vintage Cinematic Lightroom Presets and LUTs is a pack designed to give your digital media an old look. This pack contains 50 different LUTs, each with a different vintage look. It overexposes your footage and increases the contrast to achieve a retro feel. Furthermore, these LUTs add a brown shade to your media, enhancing its vintage feel.

7. Retro Film LUTs
Retro Film LUTs is a vintage LUTs pack that will give your photos and videos an old, rusty look. These LUTs highlight colors like orange and brown to create nostalgia. Furthermore, these LUTs add film grains to your media to create a better vintage look. This pack is perfect for content creators and enthusiasts who want to create something different.

8. Vibrance Colors
Yet another great vintage-style pack for your images and video footage is Vibrance Colors. It focuses on enhancing colors to give an old-school feel. This LUT adds vibrance to your photos and videos to bring the natural feel out of your content. Additionally, increasing vibrance in your content adds the late 80s and early 90s touch to your digital media files.

9. Free LUTs Retro Color
Another vintage LUT free pack is Free LUTs Retro Color. This vintage retro LUT adds warmth and nostalgia to your media. These LUTs modify your footage by fading colors and increasing the muddiness to create a classic retro look. Moreover, you can create a music video, short film, or personal video by adding depth and character to your work.

10. Green Harmony
Last but not least, Green Harmony is a free vintage LUT. This LUT adds a greenish tint to your digital files, giving your content an old sci-fi movie feel. By applying this LUT, your content will resemble The Matrix movie’s iconic color grading. Using this LUT pack, you can take your footage back to the days of old-school sci-fi movies.

Part 3: The Best Video Editor to Integrate LUTs - Wondershare Filmora
Wondershare Filmora is a great video editor that allows you to integrate LUTs into your projects. It offers over 800+ LUTs for download, which can be used for your videos. With its extensive library, choose from cinematic to vintage LUTs that fit your style. You can choose from cinematic or vintage LUTs free download and more to give your content the desired feel.
Add Vintage LUTs on Video For Win 7 or later(64-bit)
Add Vintage LUTs on Video For macOS 10.14 or later
Additionally, you can adjust the intensity of your LUTs with the latest update. The new update gives you more control over color grading and correction. In addition, Filmora comes equipped with a color wheel that enables you to adjust the color scheme of your video content. This helps you create and edit your digital content professionally using this software.

Conclusion
In conclusion, Look-Up Tables are an essential component in video editing. It enables creators to achieve the desired look and feel for their footage. Vintage LUTs, in particular, can add a unique perspective to your story by adding emotions and moods. However, Wondershare Filmora can help to integrate your favorite free vintage LUTs into your content.
Part 1: What Are the Diverse Use Cases of LUTs?
LUTs are an array of numbers that helps you to change colors from one color space to another. You can use LUTs for color grading, color correction, or to change the color tone. The section below will highlight where you can use these LUTs.
- Color Grading: LUTs can be used for color grading to adjust the colors of an image to create a specific look or mood. Additionally, you can tweak an entire image’s colors or target specific colors or tones using LUTs.
- Color Correction: Another way is you can use LUTs to color-correct any image or video. It is the process of adjusting the colors of an image to make it look more natural. This technique is often used to correct color temperature, adjust contrast, and fix color imbalances.
- Film Emulation: It can emulate the look of different film stocks, such as Kodak or Fuji. This technique is commonly used in filmmaking to achieve a specific aesthetic or match older films’ looks.
- Special Effects: LUTs can create a wide range of special effects. For instance, a LUT can create the look of a night vision camera or infrared vision. This technique is often used in action movies and video games to create a more 3D experience.
- Still Photography: Furthermore, LUTs can also be used in still photography to adjust the color and tone of an image. It applies a color film that looks like a filter or an effect making the content look more creative.
- 3D Rendering: LUTs are used in 3D rendering to convert colors from one color space to another. Moreover, it can adjust the color and tone of rendered images. This technique can help in animated movies, video games, and visual effects for film and TV.
Free Download For Win 7 or later(64-bit)
Free Download For macOS 10.14 or later
Part 2: Best Free Vintage LUTs That Can Be Found in The Market
We know that LUTs change the perspective and mood of your story. There are many different LUTs to download, but vintage LUTs add more depth to your content. You can choose from different vintage look LUT packs, but here are some of the best.
1. Vintage Looks
Vintage Looks is a LUT pack that offers 10 vintage-style LUTs that can be used to give your media files a classic, old-school look. These LUTs highlight tropical colors, such as shades of blue and yellow. These shades create an old and vintage atmosphere for your photos and videos. You can apply one of the LUTs to your footage and watch your media files transform.

2.Vintage LUTs
Vintage LUTs is a pack of LUTs that can transform your media into a different vintage look. Your results look like they are taken from old Kodak or Fuji films. Moreover, use its monochromatic or B&W LUTs to give your media files the old vintage feel. You can set a different tone by applying these LUTs to your videos and photos for a retro look.

3.50 Vintage Wedding LUTs Pack
The 50 Vintage Wedding LUTs Pack is a collection of 50 high-quality LUTs. These LUTs can add a beautiful vintage-style effect to your photos and videos. Additionally, these LUTs are designed to bring your media a warm, sepia-like tone. It creates a tone giving it a classic, timeless look that is perfect for weddings. Moreover, you can create old-fashioned-themed photos and videos using these LUTs.

4. Vintage Color Grading Video Editing LUTs
It is a pack of 20 LUTs to color-grade your digital media in a vintage feel. Vintage Color Grading Video Editing LUTs overexpose your video to fade its colors. Furthermore, it highlights orange and tan shades to warm your digital files. It will create an overexposed, rich contrast, old classic Hollywood movie feel. It has different styled vintage LUTs that you apply to your videos.

5. Vintage Film LUTs
Another amazing LUT pack that creates an old retro feel to your content is Vintage Film LUTs. Achieve a cinematic style with a vintage feel with multiple vintage presets. These LUTs are designed to replicate the look of the Black Magic Pocket Cinema Camera. Similarly, you can add a classic and timeless look to your photos and videos with this vintage pack.

Empower your videos with a new mood using different LUTs. Filmora now offers 800+ top-quality 3D LUTs cover a broad range of scenarios. Transform your videos with Filmora’s powerful 3D LUTs.
Apply LUT on Videos Apply LUT on Videos Learn More

6. 50 Vintage Cinematic Lightroom Presets and LUTs
50 Vintage Cinematic Lightroom Presets and LUTs is a pack designed to give your digital media an old look. This pack contains 50 different LUTs, each with a different vintage look. It overexposes your footage and increases the contrast to achieve a retro feel. Furthermore, these LUTs add a brown shade to your media, enhancing its vintage feel.

7. Retro Film LUTs
Retro Film LUTs is a vintage LUTs pack that will give your photos and videos an old, rusty look. These LUTs highlight colors like orange and brown to create nostalgia. Furthermore, these LUTs add film grains to your media to create a better vintage look. This pack is perfect for content creators and enthusiasts who want to create something different.

8. Vibrance Colors
Yet another great vintage-style pack for your images and video footage is Vibrance Colors. It focuses on enhancing colors to give an old-school feel. This LUT adds vibrance to your photos and videos to bring the natural feel out of your content. Additionally, increasing vibrance in your content adds the late 80s and early 90s touch to your digital media files.

9. Free LUTs Retro Color
Another vintage LUT free pack is Free LUTs Retro Color. This vintage retro LUT adds warmth and nostalgia to your media. These LUTs modify your footage by fading colors and increasing the muddiness to create a classic retro look. Moreover, you can create a music video, short film, or personal video by adding depth and character to your work.

10. Green Harmony
Last but not least, Green Harmony is a free vintage LUT. This LUT adds a greenish tint to your digital files, giving your content an old sci-fi movie feel. By applying this LUT, your content will resemble The Matrix movie’s iconic color grading. Using this LUT pack, you can take your footage back to the days of old-school sci-fi movies.

Part 3: The Best Video Editor to Integrate LUTs - Wondershare Filmora
Wondershare Filmora is a great video editor that allows you to integrate LUTs into your projects. It offers over 800+ LUTs for download, which can be used for your videos. With its extensive library, choose from cinematic to vintage LUTs that fit your style. You can choose from cinematic or vintage LUTs free download and more to give your content the desired feel.
Add Vintage LUTs on Video For Win 7 or later(64-bit)
Add Vintage LUTs on Video For macOS 10.14 or later
Additionally, you can adjust the intensity of your LUTs with the latest update. The new update gives you more control over color grading and correction. In addition, Filmora comes equipped with a color wheel that enables you to adjust the color scheme of your video content. This helps you create and edit your digital content professionally using this software.

Conclusion
In conclusion, Look-Up Tables are an essential component in video editing. It enables creators to achieve the desired look and feel for their footage. Vintage LUTs, in particular, can add a unique perspective to your story by adding emotions and moods. However, Wondershare Filmora can help to integrate your favorite free vintage LUTs into your content.
Easily Combine Videos and Audios with 5 Simple Online Tools
When it comes to creating multimedia content, merging videos and audio can be a tricky task. But with the right tools, it can be a breeze. In this article, we will share the top 5 online tools for merging videos and audio quickly and easily.
These tools will streamline your editing process and help you create seamless multimedia content that will captivate your audience. Whether you are a professional video editor or just someone looking to create a personal video, these tools will come in handy. These tools have something for everyone, from basic editing features to advanced ones. So, let’s dive in and look at the best tools to merge videos and audio online.
- Merge Audio and Video Online Using Media.io for FREE
- Merge Audio and Video Online Without Watermark in 123APPS
- Mix Audio With Video Online in Clideo
- Veed.io Video Audio Merger Online
- Combine Video and Audio Online With FlexClip
- Join Video and Audio Online or Offline? Which To Choose?
- [Bonus] Merge Audio and Video Offline With Wondershare Filmora
5 Tools To Merge Video and Audio Online
There are a plethora of online tools available for merging videos and audio. However, not all tools are created equal. We have rounded up the top 5 online tools that are user-friendly, reliable, and efficient.
These tools will make it easy to merge your videos and audio and offer a range of features to help you create professional-looking multimedia content. Whether you are a beginner or an experienced video editor, these tools will help you finish the job in no time. So, without further ado, let’s look at the top 5 online tools for merging videos and audio online.
1. Merge Audio and Video Online Using Media.io for FREE

Ratings from G2: 4.5 out of 5
Pricing:
- Free - $0
- Basic - $3.95 / monthly
- Pro - $6.66 / annually
Sound is crucial in videos as it can enhance engagement, replace poor narration, and promote music videos. Use Media.io Online Video Editor to add music to videos for free easily. It’s a user-friendly program with multitrack timeline editing for all formats, allowing for adjustments such as trimming, splitting, fade effects, texts, elements, and picture overlays. Importantly, it doesn’t leave watermarks on your videos.
Pros
- Fast compression speeds
- No file limits
- No watermarks
- Smart output settings
Cons
- Lacks some advanced functionality
Here’s how to merge audio and video using Media.io:
Step1 Begin by opening Media.io Online Video Editor and uploading your video and audio files.

Step2 Improve the background audio by editing it with options such as trimming, splitting, copying, and deleting.
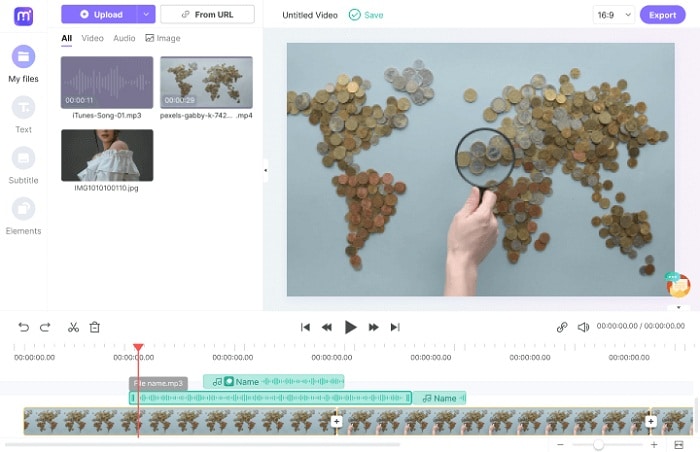
Step3 Adjust the aspect ratio, export the video, name the file, choose the resolution quality, then it’s finished.

You can learn more details about how to add audio to a video and how to edit videos using Media.io with the video below:
2. Merge Audio and Video Online Without Watermark in 123APPS

Ratings from G2: No rating yet
Pricing:
- Free
Add music to videos and easily edit using this powerful video editing platform. Publish videos with background audio of your choice, free and high-quality, without the need for downloads, software, or browser extensions. User-friendly interface, no learning curve, and works on any device, including Mac, PC, and mobile. The platform supports various file formats, including MP4, MOV, AVI, and WMV for video and MP3, WAV, and OGG for audio.
Pros
- Free and easy to use
- Multiple functions provided
Cons
- Lacks some advanced functionality
- Too basic for video cutting
Here’s how to merge audio and video using 123APPS:
Step1 Go to 123APPS and select “Video Tools“ > “Add Audio to Video.”
Step2 Upload the video and audio
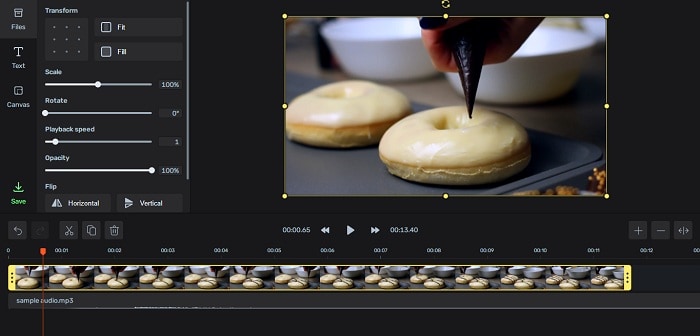
Step3 Use the “Sound“ option to crop and adjust the audio volume
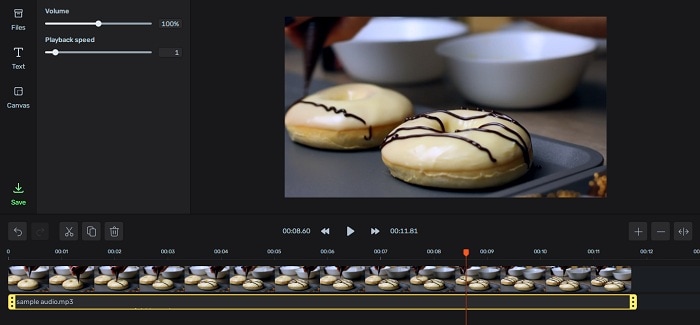
Step4 Select the output video format and download the final video with audio included.
3. Mix Audio With Video Online in Clideo
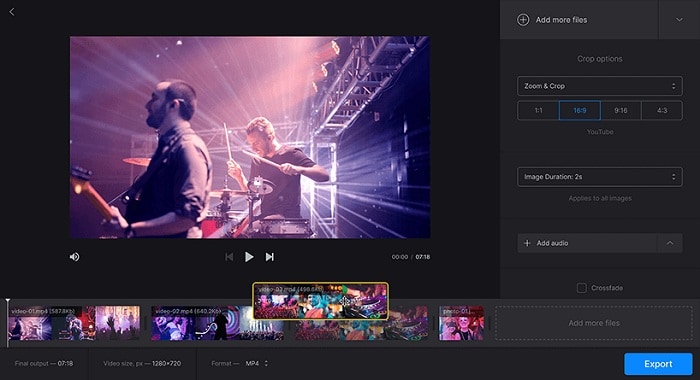
Ratings from G2: 4.8 out of 5
Pricing:
- Free - $0 with a watermark
- Monthly - $9.00
Clideo is a free, easy-to-use, browser-based video merging tool by Softo. It supports almost all video formats and allows you to add borders, choose aspect ratio templates or crop the video, apply transition effects, and add music. You can import multiple videos and arrange them in your desired order with drag and drop.
Pros
- Free to use with unlimited videos
- Easy to use
- Supports multiple video formats
Cons
- Lack of themes and design elements
Here’s how to merge audio and video using Clideo:
Step1 Go to Clideo’s page to add music to videos.
Step2 Drag and drop a video from your computer to access the editor.
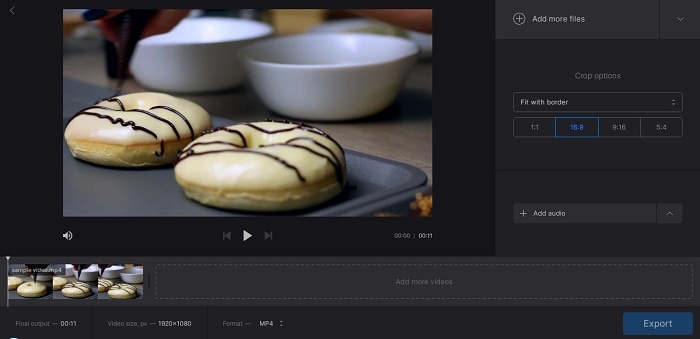
Step3 Add the audio file and sync it with the video.
Step4 Select “Export“ and wait for it to finish, then download the final video.

4. Veed.io Video Audio Merger Online

Ratings from G2: 4.2 out of 5
Pricing:
- Free - $0
- Monthly - $12.00
VEED is a versatile video editor that makes it simple to merge, join, and combine various media files online. Whether using a Windows, Mac, or mobile device, you can easily cut, trim, and arrange multiple video clips into one file on a user-friendly timeline. You can also add audio, image files, and subtitles with a single click.
Compatible with all browsers and versions, VEED supports all file formats and allows you to upload multiple file types, arrange your video tracks, and export as one file. With VEED, you can easily create a seamless Instagram Story or YouTube Ad and even resize your clips in one click.
Pros
- Attractive and well-organized layout
- Compatible with all devices, including smartphones
- Simple and easy to begin using
Cons
- Cannot specify precise starting and ending times for video cuts
- The free version includes watermarks on output videos
- Limited to videos shorter than 10 minutes and 250 MB in size
Here’s how to merge audio and video using VEED:
Step1 Go to VEED’s website and upload your video files and audio.
Step2 Use the cutter/splitter tool to trim any file ends as needed.
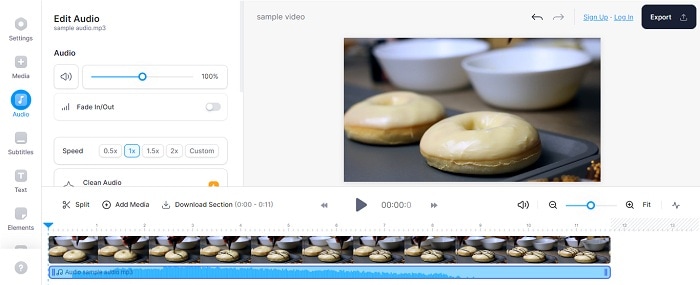
Step3 Click the “Export“ button to merge the files into a single video. Download the newly created merged video file.

5. Combine Video and Audio Online With FlexClip

Ratings from G2: 4.0 out of 5
Pricing:
- Free - $0
- Basic - $9.99 per month
- Plus - $19.99 per month
- Business - $29.99 per month
FlexClip’s online audio and video merger is a simple solution for combining audio and video files. The process is as easy as uploading your video and audio files and then syncing them by adjusting the slider. The entire process takes just a few minutes, and there is no loss in video or audio quality, nor will a watermark be added to the output.
Once you have successfully merged your audio and video, you can easily share the video to YouTube or download it to your computer with just one click. It’s an efficient and effective way to merge audio and video.
Pros
- The stock library is royalty-free and allows for the monetization of projects without copyright restrictions
- The user interface is simple and easy to navigate
- The pricing is reasonable compared to other professional video editors
Cons
- The features are more basic compared to other professional video editors
- The video converter has limited output format options
Here’s how to merge audio and video using FlexClip:
Step1 Open the FlexClip website and drag and drop your video clip into the Media section. Add it to the timeline.
Step2 Upload your audio file from your computer to the Media section.

Step3 Adjust the audio and video on the timeline by dragging the slider.

Step4 Finish editing or select a resolution to download the merged video.
Join Video and Audio Online or Offline? Which To Choose?
Merging audio and video can be done either online or offline. Each method has its advantages and disadvantages.
Online video and audio merging join audio and video files using an online tool. The main advantage of this method is that it is easily accessible and requires no software installation. Many online tools are also free to use and offer various editing options. Additionally, online tools are often compatible with many file formats, making working with different audio and video files easy.
On the other hand, offline video and audio merging requires video editing software installed on a computer. The main advantage of this method is that it offers more advanced editing options and greater control over the final output. Offline tools also typically offer a wider range of output options and higher-quality output. However, offline tools can be more expensive and require a certain level of technical expertise to use effectively.
[Bonus] Merge Audio and Video Offline With Wondershare Filmora
Free Download For Win 7 or later(64-bit)
Free Download For macOS 10.14 or later
Merging audio and video offline with Filmora is a great option for those who want more advanced editing capabilities and are okay with downloading software to their computer. This powerful video editing software allows you to easily merge, trim, and edit multiple video and audio files, while also providing a wide range of creative tools, including effects, filters, and animations. With Filmora, you can create professional-quality videos with minimal effort.
Filmora is a powerful video editing software that allows users to merge audio and video offline easily. The software boasts a user-friendly interface that makes it easy for users to navigate and access the various features, including adding audio to video and syncing them together.
With Filmora, users can import audio and video files and use the software’s timeline to arrange and sync them. It also provides a wide range of options for editing, such as trimming, cutting, and adjusting the volume of audio tracks. Filmora also offers a variety of export options, including a choice of resolutions and file formats, making it a great choice for those looking to merge audio and video offline.
Here’s how to merge audio and video using Filmora:
Step1 Drag and drop or use the “Import Media“ button to add audio and video files to Filmora.

Step2 Arrange the media files on the timeline and sync the video with the audio.

Step3 Right-click the video, select “Detach Audio,“ delete the original audio, and replace it with new audio.

Step4 Choose a format and click “Export“ to save the final video.

Conclusion
There are many ways to merge audio and video, whether online or offline. Each method has its own set of advantages and disadvantages. It ultimately depends on your needs and preferences. Filmora is a great offline option for those looking for a professional video editor with a user-friendly interface, while online options offer a quick and easy solution for basic editing needs.
5 Tools To Merge Video and Audio Online
There are a plethora of online tools available for merging videos and audio. However, not all tools are created equal. We have rounded up the top 5 online tools that are user-friendly, reliable, and efficient.
These tools will make it easy to merge your videos and audio and offer a range of features to help you create professional-looking multimedia content. Whether you are a beginner or an experienced video editor, these tools will help you finish the job in no time. So, without further ado, let’s look at the top 5 online tools for merging videos and audio online.
1. Merge Audio and Video Online Using Media.io for FREE

Ratings from G2: 4.5 out of 5
Pricing:
- Free - $0
- Basic - $3.95 / monthly
- Pro - $6.66 / annually
Sound is crucial in videos as it can enhance engagement, replace poor narration, and promote music videos. Use Media.io Online Video Editor to add music to videos for free easily. It’s a user-friendly program with multitrack timeline editing for all formats, allowing for adjustments such as trimming, splitting, fade effects, texts, elements, and picture overlays. Importantly, it doesn’t leave watermarks on your videos.
Pros
- Fast compression speeds
- No file limits
- No watermarks
- Smart output settings
Cons
- Lacks some advanced functionality
Here’s how to merge audio and video using Media.io:
Step1 Begin by opening Media.io Online Video Editor and uploading your video and audio files.

Step2 Improve the background audio by editing it with options such as trimming, splitting, copying, and deleting.

Step3 Adjust the aspect ratio, export the video, name the file, choose the resolution quality, then it’s finished.

You can learn more details about how to add audio to a video and how to edit videos using Media.io with the video below:
2. Merge Audio and Video Online Without Watermark in 123APPS

Ratings from G2: No rating yet
Pricing:
- Free
Add music to videos and easily edit using this powerful video editing platform. Publish videos with background audio of your choice, free and high-quality, without the need for downloads, software, or browser extensions. User-friendly interface, no learning curve, and works on any device, including Mac, PC, and mobile. The platform supports various file formats, including MP4, MOV, AVI, and WMV for video and MP3, WAV, and OGG for audio.
Pros
- Free and easy to use
- Multiple functions provided
Cons
- Lacks some advanced functionality
- Too basic for video cutting
Here’s how to merge audio and video using 123APPS:
Step1 Go to 123APPS and select “Video Tools“ > “Add Audio to Video.”
Step2 Upload the video and audio

Step3 Use the “Sound“ option to crop and adjust the audio volume

Step4 Select the output video format and download the final video with audio included.

3. Mix Audio With Video Online in Clideo

Ratings from G2: 4.8 out of 5
Pricing:
- Free - $0 with a watermark
- Monthly - $9.00
Clideo is a free, easy-to-use, browser-based video merging tool by Softo. It supports almost all video formats and allows you to add borders, choose aspect ratio templates or crop the video, apply transition effects, and add music. You can import multiple videos and arrange them in your desired order with drag and drop.
Pros
- Free to use with unlimited videos
- Easy to use
- Supports multiple video formats
Cons
- Lack of themes and design elements
Here’s how to merge audio and video using Clideo:
Step1 Go to Clideo’s page to add music to videos.
Step2 Drag and drop a video from your computer to access the editor.

Step3 Add the audio file and sync it with the video.
Step4 Select “Export“ and wait for it to finish, then download the final video.

4. Veed.io Video Audio Merger Online

Ratings from G2: 4.2 out of 5
Pricing:
- Free - $0
- Monthly - $12.00
VEED is a versatile video editor that makes it simple to merge, join, and combine various media files online. Whether using a Windows, Mac, or mobile device, you can easily cut, trim, and arrange multiple video clips into one file on a user-friendly timeline. You can also add audio, image files, and subtitles with a single click.
Compatible with all browsers and versions, VEED supports all file formats and allows you to upload multiple file types, arrange your video tracks, and export as one file. With VEED, you can easily create a seamless Instagram Story or YouTube Ad and even resize your clips in one click.
Pros
- Attractive and well-organized layout
- Compatible with all devices, including smartphones
- Simple and easy to begin using
Cons
- Cannot specify precise starting and ending times for video cuts
- The free version includes watermarks on output videos
- Limited to videos shorter than 10 minutes and 250 MB in size
Here’s how to merge audio and video using VEED:
Step1 Go to VEED’s website and upload your video files and audio.
Step2 Use the cutter/splitter tool to trim any file ends as needed.

Step3 Click the “Export“ button to merge the files into a single video. Download the newly created merged video file.

5. Combine Video and Audio Online With FlexClip

Ratings from G2: 4.0 out of 5
Pricing:
- Free - $0
- Basic - $9.99 per month
- Plus - $19.99 per month
- Business - $29.99 per month
FlexClip’s online audio and video merger is a simple solution for combining audio and video files. The process is as easy as uploading your video and audio files and then syncing them by adjusting the slider. The entire process takes just a few minutes, and there is no loss in video or audio quality, nor will a watermark be added to the output.
Once you have successfully merged your audio and video, you can easily share the video to YouTube or download it to your computer with just one click. It’s an efficient and effective way to merge audio and video.
Pros
- The stock library is royalty-free and allows for the monetization of projects without copyright restrictions
- The user interface is simple and easy to navigate
- The pricing is reasonable compared to other professional video editors
Cons
- The features are more basic compared to other professional video editors
- The video converter has limited output format options
Here’s how to merge audio and video using FlexClip:
Step1 Open the FlexClip website and drag and drop your video clip into the Media section. Add it to the timeline.
Step2 Upload your audio file from your computer to the Media section.

Step3 Adjust the audio and video on the timeline by dragging the slider.

Step4 Finish editing or select a resolution to download the merged video.
Join Video and Audio Online or Offline? Which To Choose?
Merging audio and video can be done either online or offline. Each method has its advantages and disadvantages.
Online video and audio merging join audio and video files using an online tool. The main advantage of this method is that it is easily accessible and requires no software installation. Many online tools are also free to use and offer various editing options. Additionally, online tools are often compatible with many file formats, making working with different audio and video files easy.
On the other hand, offline video and audio merging requires video editing software installed on a computer. The main advantage of this method is that it offers more advanced editing options and greater control over the final output. Offline tools also typically offer a wider range of output options and higher-quality output. However, offline tools can be more expensive and require a certain level of technical expertise to use effectively.
[Bonus] Merge Audio and Video Offline With Wondershare Filmora
Free Download For Win 7 or later(64-bit)
Free Download For macOS 10.14 or later
Merging audio and video offline with Filmora is a great option for those who want more advanced editing capabilities and are okay with downloading software to their computer. This powerful video editing software allows you to easily merge, trim, and edit multiple video and audio files, while also providing a wide range of creative tools, including effects, filters, and animations. With Filmora, you can create professional-quality videos with minimal effort.
Filmora is a powerful video editing software that allows users to merge audio and video offline easily. The software boasts a user-friendly interface that makes it easy for users to navigate and access the various features, including adding audio to video and syncing them together.
With Filmora, users can import audio and video files and use the software’s timeline to arrange and sync them. It also provides a wide range of options for editing, such as trimming, cutting, and adjusting the volume of audio tracks. Filmora also offers a variety of export options, including a choice of resolutions and file formats, making it a great choice for those looking to merge audio and video offline.
Here’s how to merge audio and video using Filmora:
Step1 Drag and drop or use the “Import Media“ button to add audio and video files to Filmora.

Step2 Arrange the media files on the timeline and sync the video with the audio.

Step3 Right-click the video, select “Detach Audio,“ delete the original audio, and replace it with new audio.

Step4 Choose a format and click “Export“ to save the final video.

Conclusion
There are many ways to merge audio and video, whether online or offline. Each method has its own set of advantages and disadvantages. It ultimately depends on your needs and preferences. Filmora is a great offline option for those looking for a professional video editor with a user-friendly interface, while online options offer a quick and easy solution for basic editing needs.
Also read:
- New 15 Best LUTS to Buy for 2024
- Updated 8 Best Video Editor with Useful Masking for 2024
- Updated How to Customize Your Loading Text Effect?
- Updated In 2024, 12 Top Marketing Slideshow Templates
- Updated How to Do Censor Effects with Filmora for 2024
- Top 10 Video Editing Online Makers Is Worth Your Attention for 2024
- Updated | How to Change Quicktime Player Speed on Mac?
- Updated 6 Free Tools To Radial Blur Photos Online for 2024
- In 2024, Unlock the Power of Shotcut The Ultimate Guide to Rotating Videos
- New Top 10 Video Editing Online Makers Is Worth Your Attention
- New Does the Customary Speed of Your TikTok Slideshow Appear to Be Slow Enough of Late? If Yes, Drop Your Worries Here with the Know-How of Increasing the TikTok Slideshow Speed for 2024
- In 2024, 6 Best Methods to Make a Video Longer
- Creative Ways to Add Green Screen Effects In Photoshop for 2024
- New In 2024, This Article Talks in Detail About How to Edit Videos with Windows Movie Maker 10, How to Download or Install It, and so On. It Further Involves the Use of an Alternative to This Tool. Check Out Now
- Updated In 2024, Splitting a Video in VSDC Step by Step
- Want to Make a Single Video From Different Clips? Follow These Ways to Learn About How to Merge Clips in DaVinci Resolve
- New Creating a Slideshow Is Necessity of the Modern Time. Whether You Plan a Business Meeting or You Are Going to Do some Family Event with Slideshow Presentation, a Good Slideshow Maker Will Help You in This Direction for 2024
- Updated How to Make Blender Render Transparent Background
- Updated In 2024, Learn How to Create a Unique Repeated Text Animation in the Filmora Video Editor. Follow the Simple Step-by-Step Instructions
- New How to Brighten Video in Premiere Pro
- Updated How to Put Emoji on Mac That Take Less Than 10 Mins for 2024
- 2024 Approved YouTube Being One of the Most Used Video Platforms Uses Artificial Intelligence to Recommend Videos. Click Here to Know About YouTube AI in Detail
- New Top Animated Title Makers for 2024
- Updated In 2024, Read on to Learn About OpenCV Object Tracking, What It Is, and How to Implement It in Python, and OpenCV
- Updated 2024 Approved IMovie Review – Is It The Best Video Editor for Mac Users
- Updated Want to Sync Separate Audio with Video? Check Out This Guide to Do It in the Simplest Way Using the Video Editor - Wondershare Filmora
- Have the Desire to Create a Stylish Glitch Effect to a Text on Your Video? Use Filmora for the Editing, Following the Given Steps Explained in Detail
- New Do You Know that You Can Apply Different LUTs and Create Your Own? There Are Many LUT Online and Offline Generators that You Can Use to Create Your LUT
- Updated In 2024, 15 Free Cinematic LUTs for Your Film
- New Do You Need to Create a Video for Your Business Online but Feel You Do Not Have the Skill and Time to Do That? Try Out These AI Video Generators that Will Work for You to Carry Out Tasks Effectively
- Updated Whats The Best Laptops For Video Editing for 2024
- Updated 2024 Approved Complete Guide to Make a Super Easy Rotating Video Effect
- New How to Select and Use The Best BRAW LUTs
- Updated A Full Guide to Funcall Voice Changer and Its Alternatives for 2024
- How To Upgrade or Downgrade Apple iPhone 14 Pro Max Without iTunes? | Dr.fone
- How to Factory Reset OnePlus Ace 2 Pro in 5 Easy Ways | Dr.fone
- In 2024, Easy Ways to Manage Your Honor Play 40C Location Settings | Dr.fone
- In 2024, Why Your WhatsApp Location is Not Updating and How to Fix On Motorola Moto E13 | Dr.fone
- Hassle-Free Ways to Remove FRP Lock on Samsung Galaxy M34 Phones with/without a PC
- Easy steps to recover deleted videos from Vivo X Flip
- How to Track Apple iPhone SE Location without Installing Software? | Dr.fone
- How to rescue lost call logs from Motorola Edge 40 Neo
- In 2024, How to Unlock Vivo Y36 Phone without Google Account?
- Ultimate Guide on Xiaomi Civi 3 Disney 100th Anniversary Edition FRP Bypass
- Title: WebM to GIF Converters (Online and Offline Solutions) for 2024
- Author: Morgan
- Created at : 2024-05-19 05:12:27
- Updated at : 2024-05-20 05:12:27
- Link: https://ai-video-editing.techidaily.com/webm-to-gif-converters-online-and-offline-solutions-for-2024/
- License: This work is licensed under CC BY-NC-SA 4.0.


