
:max_bytes(150000):strip_icc():format(webp)/iPad-Mini-Splash-ef002ffe8db643d2a2b4de772ff46790.jpg)
How to Share YouTube Video on Zoom?
How to Share YouTube Video on Zoom?
Abundant Video Effects - Wondershare Filmora
Provide abundant video effects - A creative video editor
Powerful color correction and grading
Detailed tutorials are provided by the official channel
While the internet has made all of our lives significantly easier, there are still things that can prove difficult for people who are not very tech-savvy. Not everything on the web comes with a built-in tutorial, but luckily, you can find guides across the internet.
YouTube is a free online video streaming platform that is ranked as the world’s second most viewed website, just after Google. Zoom Cloud Meetings is software designed to help users set up video and audio calls for various purposes. Are you looking to combine the two platforms?
Keep reading to learn how to share a YouTube video on Zoom easily, along with a detailed step-by-step guide with a near-to-zero learning curve.
In this article
Part 1: Potential Reasons to Share YouTube Videos in Zoom
Part 2: How to Share YouTube Videos in Zoom
Part 1: Potential Reasons to Share YouTube Videos in Zoom
Everyone’s favorite app, YouTube, provides a lot of useful services for its users. The online streaming platform contains millions of videos on almost every topic from around the world, ranging from educational content to recipes and music videos.
The Zoom streaming service has also gained tremendous popularity in recent years, particularly owing to the raging pandemic that swept the world off its feet. It is quite a convenient software program that lets you organize online meetings with up to a hundred members or more in the premium version.
Certain moments may arise when you want to share a YouTube video on Zoom. Luckily, the Zoom platform offers various methods by which users can do that easily. But why would you want to share a video from YouTube on Zoom in the first place? Let’s shine some light on that.
Let’s assume you are taking an online class via Zoom. You find a YouTube video that you believe can help explain the topic to your students. During the lecture on Zoom, just like viewing a video on a projector or a screen, you can share your chosen YouTube video with the rest of the class easily.
Now let’s say you are organizing a business meeting via Zoom. You have a YouTube video showing a compilation of different forms of marketing strategies that you wish to share with your team. With just a few simple clicks, you can easily share the YouTube video with everyone present in the meeting.
You and your friends are having a group video chat on Zoom. While laughing at something your friend said, you suddenly remember seeing a reaction video meme on YouTube that would exactly fit the situation. You quickly search it up and share it with your friends, who then applaud you for your choice.
These are just some of the scenarios where you might have to share YouTube videos on Zoom. A whole set of different reasons may arise, which can cause you to share a YouTube video with your Zoom attendees. If such an instance arises, you need to learn how to do that quickly and efficiently.
Part 2: How to Share YouTube Videos in Zoom
While each of us might have different reasons for sharing YouTube videos on Zoom, the process to do so is identical on all versions of the Zoom application. Looking for a guide on how to share YouTube videos on Zoom easily?
Below, you can find two different methods using which you can seamlessly share a YouTube video of your choice on Zoom. The methods are accompanied by a step-by-step guide and relevant images, so you don’t get lost along the way.
Method 1: Sharing Video through Screen Share
The easiest and most effective method to share a YouTube video on Zoom is using Zoom’s screen sharing option. It is designed in such a way that users can share whatever is being shown on their screens with their audiences, such as PowerPoint presentations, documents, YouTube videos, and more.
The following steps indicate how you can share your video via the screen share option in the Zoom app:
Step 1: Open Your YouTube Video
To begin with, launch the browser on your computer and go to YouTube’s website. You can now search for the video you want to share with your Zoom attendees. If you have your video saved, simply access your playlists to open the video. Click on the video and ensure that the volume is turned up, but don’t hit Play yet.

Step 2: Share Screen on Zoom
Back in your Zoom meeting’s main screen, check the bottom line for options. A green “Share Screens” option will be available in the middle. When you click on it, Zoom will open a window showing all the tabs open on your device. Click the screen with the YouTube video and check the little box next to “Share Sound” at the bottom left corner of the window. Now hit “Share.”

Step 3: Play Video
You can now go back to your browser window, open your video in the full-screen mode, and hit the “Play” button to share the YouTube video with everyone. You can press the “Stop Share” button to stop sharing your screen in the meeting.

Method 2: Using Links to Share YouTube Video
If you don’t want to play the YouTube video live in the meeting, you can still share its link so people can access it privately. Zoom offers a chat box that can help you do that. Follow the steps given below to learn how to share a YouTube video’s link on Zoom meetings.
Step 1: Copy Video Link
Open YouTube on your device and navigate to the video you wish to share in Zoom. Tap the “Share” button below the video’s title and hit “Copy” to save the link on your clipboard.

Step 2: Open Chat Box
Now go to your Zoom meeting’s interface and click on the “Chat” button at the bottom. If you are using the phone app, you might have to tap the “More” option at the bottom and find “Chat” from there.
Step 3: Share Video Link on Zoom
Now simply paste the copied video link into the chat box and hit “Enter” to share it with everyone in the meeting.

Conclusion
The wonders of technology never cease to amaze. Some of the world’s top websites and software programs offer integration and support for one another. YouTube and Zoom are the prime examples of such apps which you can use collectively, leaving behind any potential hassle.
You can now share YouTube videos on Zoom without any trouble by following the simple guide mentioned above. There are multiple options to share a YouTube video via Zoom, which include screen sharing and external links. Once done, you can show the shared video to all the participants present in a Zoom meeting.
While the internet has made all of our lives significantly easier, there are still things that can prove difficult for people who are not very tech-savvy. Not everything on the web comes with a built-in tutorial, but luckily, you can find guides across the internet.
YouTube is a free online video streaming platform that is ranked as the world’s second most viewed website, just after Google. Zoom Cloud Meetings is software designed to help users set up video and audio calls for various purposes. Are you looking to combine the two platforms?
Keep reading to learn how to share a YouTube video on Zoom easily, along with a detailed step-by-step guide with a near-to-zero learning curve.
In this article
Part 1: Potential Reasons to Share YouTube Videos in Zoom
Part 2: How to Share YouTube Videos in Zoom
Part 1: Potential Reasons to Share YouTube Videos in Zoom
Everyone’s favorite app, YouTube, provides a lot of useful services for its users. The online streaming platform contains millions of videos on almost every topic from around the world, ranging from educational content to recipes and music videos.
The Zoom streaming service has also gained tremendous popularity in recent years, particularly owing to the raging pandemic that swept the world off its feet. It is quite a convenient software program that lets you organize online meetings with up to a hundred members or more in the premium version.
Certain moments may arise when you want to share a YouTube video on Zoom. Luckily, the Zoom platform offers various methods by which users can do that easily. But why would you want to share a video from YouTube on Zoom in the first place? Let’s shine some light on that.
Let’s assume you are taking an online class via Zoom. You find a YouTube video that you believe can help explain the topic to your students. During the lecture on Zoom, just like viewing a video on a projector or a screen, you can share your chosen YouTube video with the rest of the class easily.
Now let’s say you are organizing a business meeting via Zoom. You have a YouTube video showing a compilation of different forms of marketing strategies that you wish to share with your team. With just a few simple clicks, you can easily share the YouTube video with everyone present in the meeting.
You and your friends are having a group video chat on Zoom. While laughing at something your friend said, you suddenly remember seeing a reaction video meme on YouTube that would exactly fit the situation. You quickly search it up and share it with your friends, who then applaud you for your choice.
These are just some of the scenarios where you might have to share YouTube videos on Zoom. A whole set of different reasons may arise, which can cause you to share a YouTube video with your Zoom attendees. If such an instance arises, you need to learn how to do that quickly and efficiently.
Part 2: How to Share YouTube Videos in Zoom
While each of us might have different reasons for sharing YouTube videos on Zoom, the process to do so is identical on all versions of the Zoom application. Looking for a guide on how to share YouTube videos on Zoom easily?
Below, you can find two different methods using which you can seamlessly share a YouTube video of your choice on Zoom. The methods are accompanied by a step-by-step guide and relevant images, so you don’t get lost along the way.
Method 1: Sharing Video through Screen Share
The easiest and most effective method to share a YouTube video on Zoom is using Zoom’s screen sharing option. It is designed in such a way that users can share whatever is being shown on their screens with their audiences, such as PowerPoint presentations, documents, YouTube videos, and more.
The following steps indicate how you can share your video via the screen share option in the Zoom app:
Step 1: Open Your YouTube Video
To begin with, launch the browser on your computer and go to YouTube’s website. You can now search for the video you want to share with your Zoom attendees. If you have your video saved, simply access your playlists to open the video. Click on the video and ensure that the volume is turned up, but don’t hit Play yet.
Step 2: Share Screen on Zoom
Back in your Zoom meeting’s main screen, check the bottom line for options. A green “Share Screens” option will be available in the middle. When you click on it, Zoom will open a window showing all the tabs open on your device. Click the screen with the YouTube video and check the little box next to “Share Sound” at the bottom left corner of the window. Now hit “Share.”
Step 3: Play Video
You can now go back to your browser window, open your video in the full-screen mode, and hit the “Play” button to share the YouTube video with everyone. You can press the “Stop Share” button to stop sharing your screen in the meeting.
Method 2: Using Links to Share YouTube Video
If you don’t want to play the YouTube video live in the meeting, you can still share its link so people can access it privately. Zoom offers a chat box that can help you do that. Follow the steps given below to learn how to share a YouTube video’s link on Zoom meetings.
Step 1: Copy Video Link
Open YouTube on your device and navigate to the video you wish to share in Zoom. Tap the “Share” button below the video’s title and hit “Copy” to save the link on your clipboard.
Step 2: Open Chat Box
Now go to your Zoom meeting’s interface and click on the “Chat” button at the bottom. If you are using the phone app, you might have to tap the “More” option at the bottom and find “Chat” from there.
Step 3: Share Video Link on Zoom
Now simply paste the copied video link into the chat box and hit “Enter” to share it with everyone in the meeting.
Conclusion
The wonders of technology never cease to amaze. Some of the world’s top websites and software programs offer integration and support for one another. YouTube and Zoom are the prime examples of such apps which you can use collectively, leaving behind any potential hassle.
You can now share YouTube videos on Zoom without any trouble by following the simple guide mentioned above. There are multiple options to share a YouTube video via Zoom, which include screen sharing and external links. Once done, you can show the shared video to all the participants present in a Zoom meeting.
8 Tips to Apply Cinematic Color Grading to Your Videos
Create High-Quality Video - Wondershare Filmora
An easy and powerful YouTube video editor
Numerous video and audio effects to choose from
Detailed tutorials are provided by the official channel
After a successful video shoot, video editing tends to wrap up the video production process. However, a video cannot be enlivened by using simple video editing tools, i.e., cut, crop, and trim, but rather tools such as cinematic color grading. Usually, directors want their video to evoke their intended ambiance and appear more realistic – This can only be achieved through cinematic color grading.
Color grading is the alteration and enhancement of color in a video, motion picture, or still image. Color grading is an essential tool for videographers since it enables them to enhance the mood or tone. Stick to this article and learn about the eight tips to apply cinematic color grading to your video.
In this article
02 8 Tips to Apply Cinematic Color Grading to Your Video
Don’t Make These Mistakes
Even though to err is human, there are some mistakes that colorists and video editors need to avoid at all costs. It is not only because they will make them look amateurish but also undermines the message and impact of the video.
Some people assume color grading is as simple as adding filters to their Instagram photos which they are absolutely wrong. Color grading is a long and frustrating process, and it only requires “persons with a thick skin.”
Some mistakes are not only committed by amateurs alone but also professional colorists who are in a rush to complete their projects on due time. Usually, these mistakes degrade the quality output. Some of the mistakes that one needs not make include:
1. Using a Poorly Calibrated Monitor
Almost every videographer and colorist’s goal is to design footages that distinctively display their primary colors and decipher the intended message. And this can only be achieved using a properly calibrated monitor.
Before working on a project, you ought to crosscheck your monitor calibration. Most people assume that the calibration is accurate since they possess a new, out-of-the-box monitor. It is utterly wrong since retailer shops usually adjust the monitor settings to overblown saturation and contrast to attract customers.
Furthermore, if you opt to edit your videos without adjusting your monitor calibration, you will have a poor footage.
2. Poor Prepping of the Video Footage
One major mistake that videographers often make is not prepping their video correctly. A poorly prepped footage is one that has a bad color space conversion. Usually, the outcome result of poorly prepped footage is an imbalanced image.
Prepping footage is not as easy as an apple pie. Besides, most videographers tend to follow a shortcut by starting messing with the gains and individual nodes, forgetting that a shortcut is often a wrong cut.
The best way of prepping a video is to start by making separate nodes and labeling them differently.
3. Imbalancing the Shadow
Have you ever seen video footage with partially opaque shadows? And when you look keenly, you see tinted greens and reds. Usually, this is a result of an imbalanced shadow.
This mistake is not only carried out by beginner videographers but also professionals who are always in a hurry to complete a project. When you look at your scope, you see the shadows are lifted or down in other scenarios – This is also a result of shadow imbalance.
4. Overusing LUTs
A mistake that beginner editors often make is overusing LUTs. Footages with overly used LUTs often appear to be dull. A thing that videographers need to observe when using LUTs is consistency.
When using LUTs, you need to ensure that your project has similar saturation, colors, and contrast throughout your video project. Moreover, it would be best to choose your LUTs based on the film color palette and your story.
5. Having Limited break
Having enough break enables one’s eyes to recalibrate. As a colorist, your eyes are often considered the main asset. Sitting for long periods in your workstation and staring for long hours at your monitor may cause one to add more saturation and contrast, thus making the video dull. Therefore the best remedy is to take a break from your monitor.
Besides, coming from a break enables one to have another different perspective about the color grading of the project.
8 Tips to Apply Cinematic Color Grading to Your Video
When it comes to creating cinematic looks in video footage, the camera type is usually non-essential. What matters is that you capture quality videos with the right angles then leave the rest to color grading.
For a video clip to look more cinematic, a couple of elements are put together. Here, we will look at those elements and create stunning videos.
1. Use Lumetri Color to adjust brightness, contrast, and saturation
The Lumeri color is an essential color grading functionality in most premiere software, including Wondershare Filmora, Adobe After Effects, and Davinci Resolve 17. With this functionality tool, you can carry out a wide range of customizable settings such as hue, saturation, contrasts, brightness, and tone.
The lumetri panel contains a histogram, vectorscope, parade scope, and waveform monitor. In your lumetri panel, you can measure the brightness and tonal values using a histogram, the light intensity with a waveform monitor, saturation and hue using vectorscope, and color channel using parade scope.
Adjusting the brightness, contrast, hue, saturation, and tone to moderate levels will give your video clip that cinematic look.

2. Use Cosmo functionality to adjust skin tones
Due to the light effect, shots taken during the day will have inconsistent color matches, especially skin tone. In the post-production process, one needs to make uniformity in skin tone and the clip. To rectify this, you need to involve a professional color grading functionality, Cosmo.
With cosmo, you can adjust the skin color, squeeze the skin, and soften the skin. Generally, Cosmo makes people in video clips look their best.

3. Use Highlights and Shadows adjustment
A clip will look more cinematic when the shadows and highlights are brought out as separate entities. The shadows become more vivid when adjusted to either teal, purple or blue. You can go a mile and adjust the highlights to become crystal clear by making the footage become yellow, red, or orange.
When carrying out color grading, you need to know the various video demands, such as the horror clips demand more of the dark shadow.

4. Use Vectorscope to get the accurate adjustment
Naked eyes cannot effectively see all the errors in a video project, which is the essence of having a vectorscope. A vectorscope provides all the quantitative information about a video image – This lessens work for video editors.
Vectorscope provides extensive details, such as how intense a given color is – This will help you make necessary adjustments to your footage.

5. Use the black and white functionality to change the opacity
Even though you can change your footage to black and white using the hue and saturation functionality, the black and white tool gives you more control.
This functionality feature can make your footage blend with the soft light part. Besides, it is best to first lower the contrast of your image or video to black and white to be able to highlight the unclear parts.

6. Use levels to unveil the whites, blacks, and mids of an image
Levels is a functionality feature that displays the blacks, whites, and mids of footage. With this functionality, you can make the highlight parts lighter and the shadows appear darker, which is essential in making cinematic videos.
In the levels histogram, the left slider defines the darkest part, the right defines the brightest part, and the top defines distributions.
In software such as Adobe After Effects, you can set this functionality to automatic or customize it based on your preference.

7. Use Vibrance to control other levels of saturation
The saturation of video footage or a clip can be regulated using vibrance functionality. With vibrance, you can alter the saturation levels of your clip while simultaneously minimizing clippings for the colors to approach complete saturation.
When you want to use this functionality in After Effects, you drag and drop it right on top of your footage – The exact part you want to apply it.

8. Use a Vignette to fade edges
To increase the point of focus, you need to fade your edges. In color grading, you can only fade your edges with a vignette.
This functionality allows you to center images or certain video parts and make the edges unclear. Your emphasis will be more on the central region.

Bottom line
● Color grading is not a piece of cake. Besides, you should not use it as an excuse for making simple mistakes such as the ones highlighted above. You need to pay close attention when color grading your films, and you will have your video project mapping out its intended meaning.
● Moreover, you need not be a pro to carry out cinematic color grading. You need to follow the above eight tips altogether to apply color grading to your video. You will create stunning video files that leave your viewers’ eyes gorged out.
After a successful video shoot, video editing tends to wrap up the video production process. However, a video cannot be enlivened by using simple video editing tools, i.e., cut, crop, and trim, but rather tools such as cinematic color grading. Usually, directors want their video to evoke their intended ambiance and appear more realistic – This can only be achieved through cinematic color grading.
Color grading is the alteration and enhancement of color in a video, motion picture, or still image. Color grading is an essential tool for videographers since it enables them to enhance the mood or tone. Stick to this article and learn about the eight tips to apply cinematic color grading to your video.
In this article
02 8 Tips to Apply Cinematic Color Grading to Your Video
Don’t Make These Mistakes
Even though to err is human, there are some mistakes that colorists and video editors need to avoid at all costs. It is not only because they will make them look amateurish but also undermines the message and impact of the video.
Some people assume color grading is as simple as adding filters to their Instagram photos which they are absolutely wrong. Color grading is a long and frustrating process, and it only requires “persons with a thick skin.”
Some mistakes are not only committed by amateurs alone but also professional colorists who are in a rush to complete their projects on due time. Usually, these mistakes degrade the quality output. Some of the mistakes that one needs not make include:
1. Using a Poorly Calibrated Monitor
Almost every videographer and colorist’s goal is to design footages that distinctively display their primary colors and decipher the intended message. And this can only be achieved using a properly calibrated monitor.
Before working on a project, you ought to crosscheck your monitor calibration. Most people assume that the calibration is accurate since they possess a new, out-of-the-box monitor. It is utterly wrong since retailer shops usually adjust the monitor settings to overblown saturation and contrast to attract customers.
Furthermore, if you opt to edit your videos without adjusting your monitor calibration, you will have a poor footage.
2. Poor Prepping of the Video Footage
One major mistake that videographers often make is not prepping their video correctly. A poorly prepped footage is one that has a bad color space conversion. Usually, the outcome result of poorly prepped footage is an imbalanced image.
Prepping footage is not as easy as an apple pie. Besides, most videographers tend to follow a shortcut by starting messing with the gains and individual nodes, forgetting that a shortcut is often a wrong cut.
The best way of prepping a video is to start by making separate nodes and labeling them differently.
3. Imbalancing the Shadow
Have you ever seen video footage with partially opaque shadows? And when you look keenly, you see tinted greens and reds. Usually, this is a result of an imbalanced shadow.
This mistake is not only carried out by beginner videographers but also professionals who are always in a hurry to complete a project. When you look at your scope, you see the shadows are lifted or down in other scenarios – This is also a result of shadow imbalance.
4. Overusing LUTs
A mistake that beginner editors often make is overusing LUTs. Footages with overly used LUTs often appear to be dull. A thing that videographers need to observe when using LUTs is consistency.
When using LUTs, you need to ensure that your project has similar saturation, colors, and contrast throughout your video project. Moreover, it would be best to choose your LUTs based on the film color palette and your story.
5. Having Limited break
Having enough break enables one’s eyes to recalibrate. As a colorist, your eyes are often considered the main asset. Sitting for long periods in your workstation and staring for long hours at your monitor may cause one to add more saturation and contrast, thus making the video dull. Therefore the best remedy is to take a break from your monitor.
Besides, coming from a break enables one to have another different perspective about the color grading of the project.
8 Tips to Apply Cinematic Color Grading to Your Video
When it comes to creating cinematic looks in video footage, the camera type is usually non-essential. What matters is that you capture quality videos with the right angles then leave the rest to color grading.
For a video clip to look more cinematic, a couple of elements are put together. Here, we will look at those elements and create stunning videos.
1. Use Lumetri Color to adjust brightness, contrast, and saturation
The Lumeri color is an essential color grading functionality in most premiere software, including Wondershare Filmora, Adobe After Effects, and Davinci Resolve 17. With this functionality tool, you can carry out a wide range of customizable settings such as hue, saturation, contrasts, brightness, and tone.
The lumetri panel contains a histogram, vectorscope, parade scope, and waveform monitor. In your lumetri panel, you can measure the brightness and tonal values using a histogram, the light intensity with a waveform monitor, saturation and hue using vectorscope, and color channel using parade scope.
Adjusting the brightness, contrast, hue, saturation, and tone to moderate levels will give your video clip that cinematic look.
2. Use Cosmo functionality to adjust skin tones
Due to the light effect, shots taken during the day will have inconsistent color matches, especially skin tone. In the post-production process, one needs to make uniformity in skin tone and the clip. To rectify this, you need to involve a professional color grading functionality, Cosmo.
With cosmo, you can adjust the skin color, squeeze the skin, and soften the skin. Generally, Cosmo makes people in video clips look their best.
3. Use Highlights and Shadows adjustment
A clip will look more cinematic when the shadows and highlights are brought out as separate entities. The shadows become more vivid when adjusted to either teal, purple or blue. You can go a mile and adjust the highlights to become crystal clear by making the footage become yellow, red, or orange.
When carrying out color grading, you need to know the various video demands, such as the horror clips demand more of the dark shadow.
4. Use Vectorscope to get the accurate adjustment
Naked eyes cannot effectively see all the errors in a video project, which is the essence of having a vectorscope. A vectorscope provides all the quantitative information about a video image – This lessens work for video editors.
Vectorscope provides extensive details, such as how intense a given color is – This will help you make necessary adjustments to your footage.
5. Use the black and white functionality to change the opacity
Even though you can change your footage to black and white using the hue and saturation functionality, the black and white tool gives you more control.
This functionality feature can make your footage blend with the soft light part. Besides, it is best to first lower the contrast of your image or video to black and white to be able to highlight the unclear parts.
6. Use levels to unveil the whites, blacks, and mids of an image
Levels is a functionality feature that displays the blacks, whites, and mids of footage. With this functionality, you can make the highlight parts lighter and the shadows appear darker, which is essential in making cinematic videos.
In the levels histogram, the left slider defines the darkest part, the right defines the brightest part, and the top defines distributions.
In software such as Adobe After Effects, you can set this functionality to automatic or customize it based on your preference.
7. Use Vibrance to control other levels of saturation
The saturation of video footage or a clip can be regulated using vibrance functionality. With vibrance, you can alter the saturation levels of your clip while simultaneously minimizing clippings for the colors to approach complete saturation.
When you want to use this functionality in After Effects, you drag and drop it right on top of your footage – The exact part you want to apply it.
8. Use a Vignette to fade edges
To increase the point of focus, you need to fade your edges. In color grading, you can only fade your edges with a vignette.
This functionality allows you to center images or certain video parts and make the edges unclear. Your emphasis will be more on the central region.
Bottom line
● Color grading is not a piece of cake. Besides, you should not use it as an excuse for making simple mistakes such as the ones highlighted above. You need to pay close attention when color grading your films, and you will have your video project mapping out its intended meaning.
● Moreover, you need not be a pro to carry out cinematic color grading. You need to follow the above eight tips altogether to apply color grading to your video. You will create stunning video files that leave your viewers’ eyes gorged out.
Sync Audio With Video With Filmora
Syncing audio with video is an integral part of video editing for any video creator. But believe me; it’s not such a difficult task if you know what to do. The point is IF YOU KNOW WHAT TO DO.
That’s why in this brief guide, we’ll show you the simplest way to sync audio with video using a fantastic video editor easily. But wait a minute, some of you might be confused about why we even need to sync separate audio & video when a single camera can record both. So let’s first answer this simple question.
Part 1: Why Do We Need to Sync Separate Audio & Video?
Creating great video needs extraordinary video graphics, content, and top-notch audio. And you can’t expect a single camera to achieve all these goals. That’s why all professional video creators use a specialized camera for recording with a separate audio recording device.
You might think it’s an exaggeration, but this small change can have massive effects on the quality of your video. Especially the background noise removal effect of separate external microphones.

But the downside of using this method is that after the recording is complete, you must sync these audio and video files. And if you don’t do it right, all the effort goes to the drain within a split second. Well, nobody wants to watch a video with an audio lag. Isn’t it?
Correctly synching an audio file with a video is easier than you think. You just need to prepare beforehand and use a suitable video editing tool. So considering these factors, let’s first see what preparations we need. After that, we’ll recommend a top-class video editing tool to achieve this goal in detailed steps. Why are we still waiting? Let’s begin our journey.
Part 2: Preparation for Syncing Audio With Video During Recording
You must make some preparations to sync an audio file with a video properly. It’s to have a sound spike to match the footage properly with the separate audio file. And it might look disturbing, but even a simple Clap might do the job.
And if you want a professional way, just imagine the clapper board. You must have seen it in the film industry. This clapper board is used not only to mark the shot but also to create a sound spike when it claps. We use this audio spike as a reference to sync the audio files with the video.

Every time you cut your shot, remember to clap on camera again the next time you roll. It’s best to clap before you say “Action” or speak so that it’s easy to find and sync when editing. But if you forget, you can also clap at the end of the shot before you cut. That is called a Tail Slate!!!
After you’ve recorded your video like this, the next step is pretty simple. The video editor we recommend is no other than the world’s leading tool in the market, Wondershare Filmora. Let’s move forward and see how to sync audio with video using Filmora .
Part 3: How To Sync Audio With Video Using Filmora
Before we dive into the step-by-step guide, here’s a brief overview of Filmora.
Wondershare Filmora
Filmora is one of the most used video editors that can help all video creators to deliver the best they can. This incredible software from Wondershare contains multiple features that can polish any video.
Free Download For Win 7 or later(64-bit)
Free Download For macOS 10.14 or later
Moreover, the vast arsenal of video effects, images, short clips, AI avatars, and many other things are also available. You just have to pick out the one you like and add it to your video with just a single click.
On top of that, you can also adjust the audio files like audio ducking, silent detection, audio mixing, and synching audio with the video files.

As far as the audio synching is concerned, you can do it either manually or with auto synchronization. And we will explain both of these processes in a stepwise manner to give you complete mastery over your audio synching. Let’s start with the manual process first.
Steps To Manually Sync Audio With Video Using Filmora
Step1Download & install
If you haven’t downloaded the latest version of Filmora yet, click the button below to download it without any cost. And after the download is completed, you can install it on your device right away.
Free Download For Win 7 or later(64-bit)
Free Download For macOS 10.14 or later
Step2Import your files
The next step is to import all the files. Launch the Filmora and click on the “New Project” button from the opening interface.

When a new project is created, you’ll see an “Import Media” section on it. Click on this section to browse your audio and video files from the computer. Or you can also drag and drop these files here to import them.

Step3Prepare your files
Now, it’s time to prepare our files for synchronization. First, drag the video file down to the timeline from the “Import Media” section. After that, drag the audio file in the same way below the video on the panel.

Step4Sync the audio & video files using the audio spike
Now that the video and audio files are on the timeline, you’ll have to find the moment you clap your hands. Look at the waveform from the in-camera audio and the independent audio track. At the moment you clap, we’ll see a spike.
Bonus Tip: If you can’t find the audio spike, zoom the panel to make it easier.

Now take the independent audio clip and align it so that both the spikes match.

That’s it! We just need to remove the in-camera audio now. Let’s see how to do it now.
Step5Remove the audio from the video footage
To detach the audio in the video footage, right-click on this file and select the “Detach Audio” option. Or you can also use the “Ctrl+Alt+D” as the hotkey.

Once the audio file has been separated, you can move forward and delete it. To delete this audio, right-click on it and select “Delete.”

Step6Enjoy your video with the new audio track
So here we go. Our video file has been synced with the high-quality audio file. You can now hit the Export button to get this edited file. But wait a minute. Didn’t we say we’ll show you a method to automatically sync audio with video? Let’s start this method now.
Steps To Automatically Sync Audio With Video Using Filmora
Did you find the above method troubling? Well, be assured because Wondershare Filmora can also automatically sync your audio file with video in a single click. Here are the steps to achieve this feat.
Free Download For Win 7 or later(64-bit)
Free Download For macOS 10.14 or later
Step1Prepare your files
This method’s starting process is the same as the previous one. You’ll need to download the Filmora and prepare your file on the timeline by importing them on a New Project.
Step2Select both audio & video files
Once you’ve got everything ready, select both your audio and files from the timeline.

Step3Click on the auto synchronization icon
When you select these files, you’ll see that the “Auto Synchronization” icon has appeared on the toolbar below the Import Media section. Click on this icon and wait for the magic.

Remember that you need a Premium ID of Wondershare Filmora to use the Auto Synchronization option.
Step4Wait until the syncing is completed
Filmora will start synchronizing your files, and you’ll see the “Synchronization in process” prompt on the screen. Wait until the process is completed.

Step5Finish your editing
You can finish your editing when the separate audio file perfectly aligns with the video file. Delete the audio from the in-camera video file and hit the “Export” button.
Congratulations! We have successfully synced separate audio and video files. Now let’s take a look at some hot FAQs before we end our guide.
Part 4: FAQs About Synching Audio With Video
Is auto synchronization better than manual syncing?
Well, auto synchronization is no doubt easier than manual syncing. But that doesn’t mean you don’t need the manual process anymore. Many situations may arise where you may be left with no choice but to use the manual syncing of separate audio and video files. So make sure to properly learn both these methods, and each one of them will definitely come in handy someday.
How can we sync audio & video for free?
Syncing audio and video files for free is not a difficult task. Download the Filmora right now, and after installation, you can freely sync any Audio file with its corresponding video file by using the manual method described above.
Conclusion
For any video creator, knowing how to sync audio with video is a must. That’s because most creators record audio and video separately for higher quality.
This brief guide has covered all the details about how to sync audio and video files using an outstanding video editor, Wondershare Filmora . We hope it comes in handy.
Free Download For Win 7 or later(64-bit)
Free Download For macOS 10.14 or later
Free Download For macOS 10.14 or later
Moreover, the vast arsenal of video effects, images, short clips, AI avatars, and many other things are also available. You just have to pick out the one you like and add it to your video with just a single click.
On top of that, you can also adjust the audio files like audio ducking, silent detection, audio mixing, and synching audio with the video files.
As far as the audio synching is concerned, you can do it either manually or with auto synchronization. And we will explain both of these processes in a stepwise manner to give you complete mastery over your audio synching. Let’s start with the manual process first.
Steps To Manually Sync Audio With Video Using Filmora
Step1Download & install
If you haven’t downloaded the latest version of Filmora yet, click the button below to download it without any cost. And after the download is completed, you can install it on your device right away.
Free Download For Win 7 or later(64-bit)
Free Download For macOS 10.14 or later
Step2Import your files
The next step is to import all the files. Launch the Filmora and click on the “New Project” button from the opening interface.
When a new project is created, you’ll see an “Import Media” section on it. Click on this section to browse your audio and video files from the computer. Or you can also drag and drop these files here to import them.
Step3Prepare your files
Now, it’s time to prepare our files for synchronization. First, drag the video file down to the timeline from the “Import Media” section. After that, drag the audio file in the same way below the video on the panel.
Step4Sync the audio & video files using the audio spike
Now that the video and audio files are on the timeline, you’ll have to find the moment you clap your hands. Look at the waveform from the in-camera audio and the independent audio track. At the moment you clap, we’ll see a spike.
Bonus Tip: If you can’t find the audio spike, zoom the panel to make it easier.
Now take the independent audio clip and align it so that both the spikes match.
That’s it! We just need to remove the in-camera audio now. Let’s see how to do it now.
Step5Remove the audio from the video footage
To detach the audio in the video footage, right-click on this file and select the “Detach Audio” option. Or you can also use the “Ctrl+Alt+D” as the hotkey.
Once the audio file has been separated, you can move forward and delete it. To delete this audio, right-click on it and select “Delete.”
Step6Enjoy your video with the new audio track
So here we go. Our video file has been synced with the high-quality audio file. You can now hit the Export button to get this edited file. But wait a minute. Didn’t we say we’ll show you a method to automatically sync audio with video? Let’s start this method now.
Steps To Automatically Sync Audio With Video Using Filmora
Did you find the above method troubling? Well, be assured because Wondershare Filmora can also automatically sync your audio file with video in a single click. Here are the steps to achieve this feat.
Free Download For Win 7 or later(64-bit)
Free Download For macOS 10.14 or later
Step1Prepare your files
This method’s starting process is the same as the previous one. You’ll need to download the Filmora and prepare your file on the timeline by importing them on a New Project.
Step2Select both audio & video files
Once you’ve got everything ready, select both your audio and files from the timeline.
Step3Click on the auto synchronization icon
When you select these files, you’ll see that the “Auto Synchronization” icon has appeared on the toolbar below the Import Media section. Click on this icon and wait for the magic.
Remember that you need a Premium ID of Wondershare Filmora to use the Auto Synchronization option.
Step4Wait until the syncing is completed
Filmora will start synchronizing your files, and you’ll see the “Synchronization in process” prompt on the screen. Wait until the process is completed.
Step5Finish your editing
You can finish your editing when the separate audio file perfectly aligns with the video file. Delete the audio from the in-camera video file and hit the “Export” button.
Congratulations! We have successfully synced separate audio and video files. Now let’s take a look at some hot FAQs before we end our guide.
Part 4: FAQs About Synching Audio With Video
Is auto synchronization better than manual syncing?
Well, auto synchronization is no doubt easier than manual syncing. But that doesn’t mean you don’t need the manual process anymore. Many situations may arise where you may be left with no choice but to use the manual syncing of separate audio and video files. So make sure to properly learn both these methods, and each one of them will definitely come in handy someday.
How can we sync audio & video for free?
Syncing audio and video files for free is not a difficult task. Download the Filmora right now, and after installation, you can freely sync any Audio file with its corresponding video file by using the manual method described above.
Conclusion
For any video creator, knowing how to sync audio with video is a must. That’s because most creators record audio and video separately for higher quality.
This brief guide has covered all the details about how to sync audio and video files using an outstanding video editor, Wondershare Filmora . We hope it comes in handy.
Free Download For Win 7 or later(64-bit)
Free Download For macOS 10.14 or later
Add Green Screen Video on TikTok
TikTok is the most popular platform for making short videos. You can create creative short videos and upload to TikTok so that they can entertain your followers and make your videos go viral. To add variety to your video content, the use of green screen in short videos is a great idea. You can replace the green screen with any background in your TikTok video. You need to know how to add green screen video on TikTok.
Adding green screen on TikTok videos has become a trend now as there are several green screen TikTok videos that have gone viral. In fact, creative green screen videos are extremely popular on social media platforms. Instead of replacing the green screen in your video with a single photo, you can replace it with multiple pictures on TikTok. We will illustrate how to add multiple pictures on TikTok green screen.
Part 1. How to Add Green Screen on TikTok?
To add green screen on TikTok video, you need to have a background of uniform color. It does not necessarily have to be a green screen. For example, if you are shooting a video of your legs and the floor tiles have uniform color, you can use green screen on TikTok to replace the tiles with any picture. Instead of using one picture on TikTok short video, you can use multiple pictures in the background to create stunning TikTok videos. Here are the steps on how to add multiple pictures to TikTok green screen.
Step1 Open TikTok app on your phone. Tap on Plus icon located at the bottom of the app screen to make a new video.
Step2 Choose the duration of the video as per your preference. Thereafter, tap on Effects option located at the bottom-left corner to see the different effects available on TikTok.
![]()
Step3 Go to Trending tab and you will see Green Screen and Green Screen Video icons. If you want your video to have green screen photo, tap on Green Screen icon. If you want your video to have green screen video, tap on Green Screen Video icon.
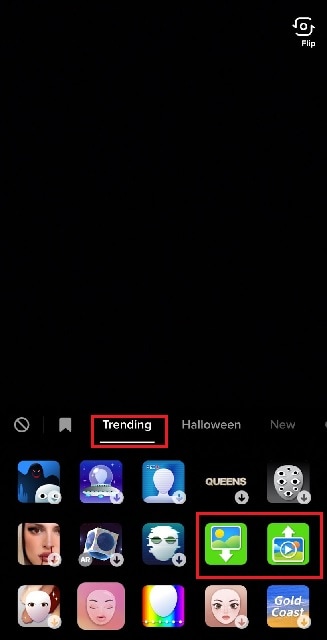
Step4 You will get a generic background and you can choose any preset background or select photo or video from your phone gallery by tapping on Plus icon. Once you are done, tap on Record button.
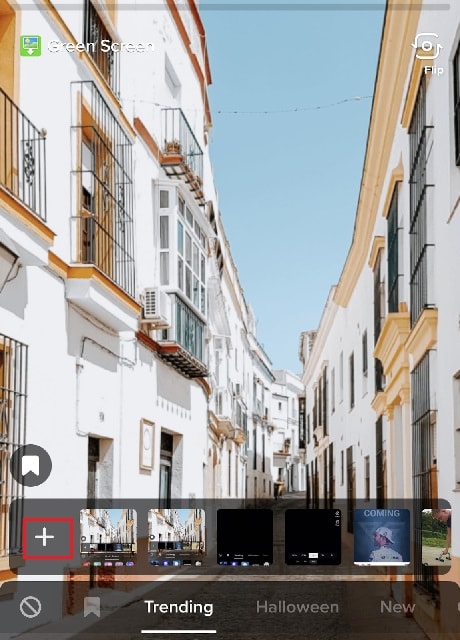
Step5 In order to use multiple pictures, you should stop recording in between and change your green screen image to anything you desire. Then tap on Record button again. TikTok will string your clips and it would appear that you have been changing multiple pictures of your background for your video.
If you want to experiment with green scree effects, you can scroll down after tapping on Green Screen icon under Effects. You will see different types of green screen videos possible on TikTok to choose from.
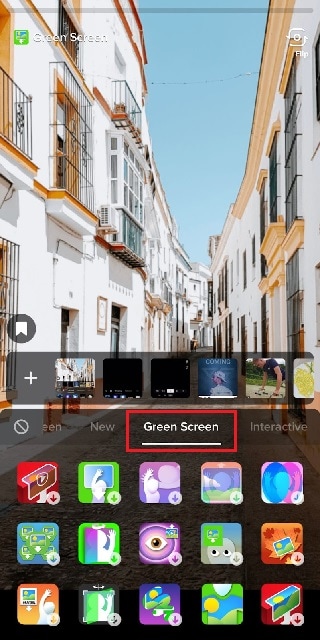
Part 2. Creative Ideas to Make TikTok Green Screen Video
Now that you know how to add a video on TikTok green screen, you have to make the most out of it. If you are wondering how you can use green screen in your TikTok videos, here are some creative ideas for you.
Walking Out Videos – You can use green screen effect to show that you are walking out of plane, walking vertically on the wall like inception, walking on the roof of a building. In fact, you can show that you are walking out of popular monuments and palaces and trick your viewers into thinking that you were actually there.
Photoshoot Location – Create a TikTok video showing your favorite locations across the world where you dream of doing photoshoot. You can pose differently and place the location in your background through green screen effect.
How-To Video – If your TikTok channel is about tutorial and learning videos, you can explain things better by putting screenshots and multiple relevant pictures in the background so that viewers can get a pictorial representation of what you are speaking to them.
Mystery Story – You can a create short video describing unknowing facts and mysteries around certain places in the world. You can put photos or video clips of those mysterious places in your background to keep your viewers hooked and related to your narration.
Rate Them Video – You can use green screen effect to showcase your old Instagram photos or videos and rate them. This is an extremely popular trend in TikTok where people show their old photos, display work from the past, and rate them today.
Reveal Your Creation – Share your secrets or interesting stories behind some of the photos or videos you took in the past. You can talk about how creatively you took certain photos and put those photos in the background while discussing them.
Part 3. How to Make Green Screen Video on Computer?
If you have a computer and a webcam, you can record a green screen video on your computer. You can place the green screen in the background perfectly and place the webcam so that the background stays within the green screen. You will need a video recorder and a video editor to make green screen video as well as replace the green screen with any photo or video. We recommend Wondershare Filmora where you can record as well as edit green screen video.
Filmora is a professional video editor where you can record your computer screen as well as your webcam video with green screen background in Picture-in-Picture mode. After recording the video, you can replace the green screen with any video clip or photo instantly in a few steps. You can also fine-tune green screen effect for perfection. Therefore, you can save the video in any resolution and file format as per your preference.

Free Download For Win 7 or later(64-bit)
Free Download For macOS 10.14 or later
Conclusion
Adding green screen effect on TikTok videos can make your videos stand out. We have illustrated how to add multiple green screen videos on TikTok and your videos will have a better chance of getting viral. Keep the green screen ideas in mind while making TikTok green screen videos. If you want to make and edit green screen videos on computer, Wondershare Filmora is the best application available for Windows and Mac users.
Also read:
- In 2024, Whether Youre a Professional Animator or a Beginner Into This. If You Want to Use the OBS Studio Chroma Key, Weve Presented some Efficient Ways to Proceed. Learn More Here
- Thousands Already Know What Ezgif Is and So Can You
- 2024 Approved Filmora Is a Great Video Editor that Many Users Are Making Intro Video with It. This Article Will Guide You How to Create an Intro Video with Filmora
- New Do You Want to Print Designs Onto Your Garments or Other Fashion Accessories? Find Out How to Create a Screen Print Effect in Photoshop to Give Your Text or Graphics a Vintage or Retro Look
- 2024 Approved Perfect Moody LUTs for VN Editor An Overview
- Ideas That Will Help You Out in Converting AVI to GIF
- How to Make First Impression Review Video
- New How to Add VHS Green Screen to Your Video
- 2024 Approved Wondershare Filmora Tutorial | Using The AI Auto Reframe Feature
- Best Ways to Add Photos to Tik Tok Video
- New In 2024, Fast Method to Match Color in Photoshop
- Updated In This Article We Will Be Covering the Most Important Topics You Have to Remember when Becoming a Successful YouTube-Star for 2024
- Updated 2024 Approved Best 6 Online MP4 Croppers
- Updated A Complete Guide to the Best Brand Story Videos
- Updated 2024 Approved Convert Time-Lapse to Normal Video
- In 2024, How to Enable and Use OBS Zoom Camera
- 2024 Approved Looking For the Best VHS Video Effect Makers? Get To Know the Top List
- 2024 Approved Want to Skip the Typing Hustle with a Convenient and Instant Conversion of Your Words Into Text? Stay Here to Learn About some Irresistible Software Solutions to Address the Concern
- 2024 Approved All You Need to Know About Transparent Logos and How You Can Make Them. Top Transparent Logos You Can Take Inspiration From
- New In 2024, Focusing On The Best Ways To Convert Slow-Motion Video to Normal
- Wondering How to Add Custom Transitions in OBS Studio? Here Are the Steps to Add Stinger Transitions to OBS. Get a Better OBS Alternative to Add Transitions for 2024
- Are You Finding It Challenging to Convert GIFs Into JPG or PNG Images? Do Not Worry! The Best Free Online Tool and Software to Change Your GIF Into PNG or JPG Images Are Below for 2024
- New 2024 Approved How to Create One Click Video Reverse Effect in Filmora
- Updated Things You Need to Know About Transparent PNG Remove and Convert for 2024
- New How To Fade Audio With Movavi Editor for 2024
- New How to Use Filmora Slideshow Maker for Making Slideshow for 2024 What Is Slideshow Filmora? Know the Steps to Make Filmora Slideshow. What Are Steps to Make Filmora Slideshow Template?
- Updated How to Add Effects on TikTok for 2024
- 2024 Approved How to Edit Recorded Video
- How to Change Aspect Ratio in iMovie for 2024
- This Article Will Show You How to Clone Yourslef in Videos with Filmora for 2024
- In 2024, Top 8 Augmented Reality Video Games
- Updated 2024 Approved How to Make a GIF With Transparent Background?
- List of Supported Whatsapp Video Format You May Want to Know for 2024
- Oppo Find X6 Stuck on Screen – Finding Solutions For Stuck on Boot | Dr.fone
- Top 4 SIM Location Trackers To Easily Find Your Lost Realme 12 5G Device
- In 2024, How To Unlock The Apple iPhone XS SIM Lock 4 Easy Methods
- Calls on Gionee F3 Pro Go Straight to Voicemail? 12 Fixes | Dr.fone
- In 2024, How to Transfer Data After Switching From OnePlus 11R to Latest Samsung | Dr.fone
- In 2024, Fixing Foneazy MockGo Not Working On Oppo Reno 11F 5G | Dr.fone
- Pokemon Go No GPS Signal? Heres Every Possible Solution On Honor 90 GT | Dr.fone
- Updated 2024 Approved Formula to Animate Photos From 10 Animate Pictures App
- In 2024, How to Unlock Vivo S17t Phone without Google Account?
- 6 Proven Ways to Unlock Poco M6 5G Phone When You Forget the Password
- 8 Ultimate Fixes for Google Play Your Tecno Camon 30 Pro 5G Isnt Compatible | Dr.fone
- How to Recover Apple iPhone 11 Pro Data From iOS iTunes? | Dr.fone
- In 2024, How and Where to Find a Shiny Stone Pokémon For Honor 90 Lite? | Dr.fone
- Fixes for Apps Keep Crashing on Realme 12 Pro 5G | Dr.fone
- In 2024, How To Track IMEI Number Of Samsung Galaxy A54 5G Through Google Earth?
- How To Unlock SIM Cards Of Samsung Galaxy S24+ Without PUK Codes
- Here are Some Pro Tips for Pokemon Go PvP Battles On Apple iPhone 15 Pro | Dr.fone
- 4 Ways to Transfer Music from Samsung Galaxy XCover 7 to iPhone | Dr.fone
- 5 Quick Methods to Bypass Honor Magic 6 FRP
- AddROM Bypass An Android Tool to Unlock FRP Lock Screen For your Oppo A59 5G
- How To Unlock SIM Cards Of Vivo Y28 5G Without PUK Codes
- How to Check Distance and Radius on Google Maps For your OnePlus Open | Dr.fone
- In 2024, 5 Solutions For Poco F5 Pro 5G Unlock Without Password
- Title: How to Share YouTube Video on Zoom?
- Author: Morgan
- Created at : 2024-04-24 01:12:32
- Updated at : 2024-04-25 01:12:32
- Link: https://ai-video-editing.techidaily.com/1713939563024-how-to-share-youtube-video-on-zoom/
- License: This work is licensed under CC BY-NC-SA 4.0.
