
:max_bytes(150000):strip_icc():format(webp)/best-instagram-captions-4171697-ae21b04e6866470c80a50c9bef1cc26e.png)
Updated Here, You Will Learn How to Add a Realistic Fire Effect Using Wondershare Filmora. That Will Help to Boost Your Channel and Decorate Your YouTube Channel with Creative and Unique Effects for 2024
Here, You Will Learn How to Add a Realistic Fire Effect Using Wondershare Filmora. That Will Help to Boost Your Channel and Decorate Your YouTube Channel with Creative and Unique Effects
Do you know that many cinema films and big-budget companies use visual effects to create realistic fires? It saves them from potential danger in production and helps them manage the time required to create a project. In this article, you will get pro tips and easy ways to add Fire effects by Wondershare Filmora.
![]()
Note: let’s not count Michael Bay and Christopher Nolan productions because their movies have a higher budget, and creating fake fire is easy.
Part 1. What do you need to create fire effects?
Using simple tools such as Filmora and visual effects, you can create a realistic fire effect with an easy setup. For filming the effect, we will need
- A good camera
- A light source
- Video editing software - Wondershare Filmora
- Basic editing skills
However, the light source is key to the fire effects. It will be beneficial if you have a warmer color light or a light that can change its temperature. You can use tungsten light bulbs or small circular LEDs that are pretty famous with Vloggers and tick-tock users.
Part 2. How to make a realistic effect fire?
After getting prepared, it’s time to do the real things. Follow the steps below to create a realistic fire effect like a pro.
Step1 Record your footage
While recording the video, you can slightly shake your light source, which will give it the flickering effect of the flame. Here, you can do this in two ways.
Shaking the light manually
Just make sure when you are shaking the light, it is not shaken aggressively, or it will lose its realism to a real fire.

Shaking the light using a dimmer
You can also use some skills to create the flickering effect of the fire without literally shaking the LED light. Dimmers come to help. A dimmer is a device that enables you to change the temperature of the LED light. If you have a dimmer, your work will be more accessible.
A regulator on the dimmer will help you switch between low and high tones. It will flicker the light on the object like a flame and make it look like it was placed in front of a real fire.

Step2 Record the object
Our next step will be to record the object on which the effect is taking place. Ensure the camera is placed under a good light source so that the picture is not dim and the object is exposed. Make sure the camera is placed at the level of the eye so that it will help you record your video clearly and accurately.
Also, keep in mind to zoom out the camera lens, which will fix the frame of the video so that the object or the person is entirely on the screen. Another tip for creating a realistic fire effect would be the person acting as the object. The more natural the acting is, the more realistic would be the fire effect.
Step3 Edit the footage
We are being safe and saving time by not using actual fire. The goal of creating a fake fire would be the effect and reaction of the object or the actor.
1. Download a professional video editing software - Wondershare Filmora
Visit Wondershare Filmora official site if you haven’t already downloaded it.
![]()
Note: download the latest version of filmora. It will give you a pro version and help you to create more realistic fire effects.
2. Create a new project and import the recorded clips
Before adding the fire effects to your video, you must ensure that you are familiar with the editing software. Your first step would be to add your clips to the timeline. Drag the footage from the library and enter it into the timeline.

3. create the fire effect more realistic by adding smoke
The next step would be to add smoke to the fire. As it is only fair that the fire makes the smoke so. Adding the smoke will create the fire effect more realistic. Follow the below steps to get your cinematic video!
#Step1 Search for smoke effects
To add the smoke effect, click on the element’s icon on the bar above and search for smokescreen 2.
#Step2 Add a smoke effect
Once you have searched and found the smoke screen 2 effects, then import that effect onto your timeline so that you can begin editing.

Once you’ve added the fire effect, you will notice the change on the screen in the top right corner.
#Step3 Add duration
The next step would be to set the duration of the smokescreen effect so that it matches the length of the video. To do so,
- Click on the edge of the smoke screen effect.
- Drag it to the right if the effect appears smaller than the video clip.
- And drag it to the left if it is larger than the video clip.
- As soon as it matches the length of the video, leave the drag, and it will fit right into place.
#Step4 Make some changes to the smoke effect
Once you have matched the duration of the smoke screen effect to the video clip, our next step would be to make some changes. These changes will make the smokescreen appear more pleasing—double-click on the smokescreen effect, which will open the transform menu.
We would first focus on the transform panel. Here you would have many options, but our focus would be on rotation, scale, and position.
![]()
Note: make sure to rotate the smoke screen effect by simply sliding the slider or dragging the slider right or left to your desire.
- You would have created an angle of the smokescreen to make it more natural.
- Now, we would have to adjust the scale of the smokescreen effect.
- Drag the slider to the right to expand the smoke to spread on the screen. It will help the smoke screen do appear more natural.
- You can adjust how much the smoke screen is visible on the screen by decreasing the opacity.
Adjust the slider to the left so it blends in with the flickering of the light we created. Now playback the video from the big screen to get an idea of the effect you added. And here are our parameters for reference.

Cool, isn’t it? Now we have added smoke to our timeline. Combined with the flickering light effect, we are closer to our goal.
Step4 Add flames or sparks
To mimic a real fire, we also have one more element that is missing, And that will be the sparks and the flames. And if you want to bring the fire effect of your video to the pro level, we would have to use the film stock effects. Flames and sparks are also available in the Wondershare Filmora.
#Step1 Search for Fire Tab

- To do so, click on the bar above the element’s icon.
- Once you have opened the elements tab, look to your left window, where further options are available.
- From these options, click on the fire tab.
- A new window will pop up in the library panel.
#Step2 Add the flame to the timeline
Click on a large scale 14 and drag it into your timeline above the smoke effect and the clip. Doing so would have created two extra layers after the video tab.

#Step3 Adjust the flame effect
Now, we have to do steps similar to the ones above the first job. But first, you have to click on the edges of the effect. Then, match it to the length of your video.
Now, remember if the length of the effect is more than that of the video clip. You can adjust it by clicking on the edge and dragging it to the left. And if it appears to be smaller than the video clip, drag the edge to the right to match the length.
#Step4 Blend the video
When you look at the effect as you play the video from the start, you will notice that the effect is a little more intense than we want. To change it to your desires, you can follow the following steps.
- First of all, double-click and open the transform
- Experiment with the rotation and the scale and position; make your choice.
- Then move on to the compositing panel and focus on the blending mode.
- Here, you will notice a drop-down panel and select the screen option from all the other options.
- Doing so would help you blend the spark effect video much better.
If you focus on the spark effect that appears on the screen, you will notice that it seems to be much more intense than we require. If you want to blend it further, you can use the opacity adjuster and decrease the transparency. Then, adjust the slider till you feel it to be just right.
And the following are ideal parameters of our adjustment just for you to refer to.

Final results
Now can easily create a realistic-looking fire effect by Wondershare Filmora.

Best editing views
See how easy it was to create a fire effect without using real fire. A fire effect you can use:
- To make your car catch on fire.
- You are screaming at the top of your lungs in a yard where your garden is on fire.
- Act like your husband forgot to watch the stove on with the dish in the kitchen.
You can create all these scenarios by using camera tricks and lighting effects. And a few skills in video editing, easily! How cool is that?
If you are a beginner or a frequent user of Wondershare Filmora, following the steps explained above will help you quickly get the hang of how to add fire effects to your videos.
Also, if you have a YouTube channel or a content creator, adding these effects will add unique creativity to your videos and ultimately boost your approach.
Free Download For Win 7 or later(64-bit)
Free Download For macOS 10.14 or later
Part 1. What do you need to create fire effects?
Using simple tools such as Filmora and visual effects, you can create a realistic fire effect with an easy setup. For filming the effect, we will need
- A good camera
- A light source
- Video editing software - Wondershare Filmora
- Basic editing skills
However, the light source is key to the fire effects. It will be beneficial if you have a warmer color light or a light that can change its temperature. You can use tungsten light bulbs or small circular LEDs that are pretty famous with Vloggers and tick-tock users.
Part 2. How to make a realistic effect fire?
After getting prepared, it’s time to do the real things. Follow the steps below to create a realistic fire effect like a pro.
Step1 Record your footage
While recording the video, you can slightly shake your light source, which will give it the flickering effect of the flame. Here, you can do this in two ways.
Shaking the light manually
Just make sure when you are shaking the light, it is not shaken aggressively, or it will lose its realism to a real fire.
Shaking the light using a dimmer
You can also use some skills to create the flickering effect of the fire without literally shaking the LED light. Dimmers come to help. A dimmer is a device that enables you to change the temperature of the LED light. If you have a dimmer, your work will be more accessible.
A regulator on the dimmer will help you switch between low and high tones. It will flicker the light on the object like a flame and make it look like it was placed in front of a real fire.
Step2 Record the object
Our next step will be to record the object on which the effect is taking place. Ensure the camera is placed under a good light source so that the picture is not dim and the object is exposed. Make sure the camera is placed at the level of the eye so that it will help you record your video clearly and accurately.
Also, keep in mind to zoom out the camera lens, which will fix the frame of the video so that the object or the person is entirely on the screen. Another tip for creating a realistic fire effect would be the person acting as the object. The more natural the acting is, the more realistic would be the fire effect.
Step3 Edit the footage
We are being safe and saving time by not using actual fire. The goal of creating a fake fire would be the effect and reaction of the object or the actor.
1. Download a professional video editing software - Wondershare Filmora
Visit Wondershare Filmora official site if you haven’t already downloaded it.
![]()
Note: download the latest version of filmora. It will give you a pro version and help you to create more realistic fire effects.
2. Create a new project and import the recorded clips
Before adding the fire effects to your video, you must ensure that you are familiar with the editing software. Your first step would be to add your clips to the timeline. Drag the footage from the library and enter it into the timeline.
3. create the fire effect more realistic by adding smoke
The next step would be to add smoke to the fire. As it is only fair that the fire makes the smoke so. Adding the smoke will create the fire effect more realistic. Follow the below steps to get your cinematic video!
#Step1 Search for smoke effects
To add the smoke effect, click on the element’s icon on the bar above and search for smokescreen 2.
#Step2 Add a smoke effect
Once you have searched and found the smoke screen 2 effects, then import that effect onto your timeline so that you can begin editing.
Once you’ve added the fire effect, you will notice the change on the screen in the top right corner.
#Step3 Add duration
The next step would be to set the duration of the smokescreen effect so that it matches the length of the video. To do so,
- Click on the edge of the smoke screen effect.
- Drag it to the right if the effect appears smaller than the video clip.
- And drag it to the left if it is larger than the video clip.
- As soon as it matches the length of the video, leave the drag, and it will fit right into place.
#Step4 Make some changes to the smoke effect
Once you have matched the duration of the smoke screen effect to the video clip, our next step would be to make some changes. These changes will make the smokescreen appear more pleasing—double-click on the smokescreen effect, which will open the transform menu.
We would first focus on the transform panel. Here you would have many options, but our focus would be on rotation, scale, and position.
![]()
Note: make sure to rotate the smoke screen effect by simply sliding the slider or dragging the slider right or left to your desire.
- You would have created an angle of the smokescreen to make it more natural.
- Now, we would have to adjust the scale of the smokescreen effect.
- Drag the slider to the right to expand the smoke to spread on the screen. It will help the smoke screen do appear more natural.
- You can adjust how much the smoke screen is visible on the screen by decreasing the opacity.
Adjust the slider to the left so it blends in with the flickering of the light we created. Now playback the video from the big screen to get an idea of the effect you added. And here are our parameters for reference.
Cool, isn’t it? Now we have added smoke to our timeline. Combined with the flickering light effect, we are closer to our goal.
Step4 Add flames or sparks
To mimic a real fire, we also have one more element that is missing, And that will be the sparks and the flames. And if you want to bring the fire effect of your video to the pro level, we would have to use the film stock effects. Flames and sparks are also available in the Wondershare Filmora.
#Step1 Search for Fire Tab
- To do so, click on the bar above the element’s icon.
- Once you have opened the elements tab, look to your left window, where further options are available.
- From these options, click on the fire tab.
- A new window will pop up in the library panel.
#Step2 Add the flame to the timeline
Click on a large scale 14 and drag it into your timeline above the smoke effect and the clip. Doing so would have created two extra layers after the video tab.
#Step3 Adjust the flame effect
Now, we have to do steps similar to the ones above the first job. But first, you have to click on the edges of the effect. Then, match it to the length of your video.
Now, remember if the length of the effect is more than that of the video clip. You can adjust it by clicking on the edge and dragging it to the left. And if it appears to be smaller than the video clip, drag the edge to the right to match the length.
#Step4 Blend the video
When you look at the effect as you play the video from the start, you will notice that the effect is a little more intense than we want. To change it to your desires, you can follow the following steps.
- First of all, double-click and open the transform
- Experiment with the rotation and the scale and position; make your choice.
- Then move on to the compositing panel and focus on the blending mode.
- Here, you will notice a drop-down panel and select the screen option from all the other options.
- Doing so would help you blend the spark effect video much better.
If you focus on the spark effect that appears on the screen, you will notice that it seems to be much more intense than we require. If you want to blend it further, you can use the opacity adjuster and decrease the transparency. Then, adjust the slider till you feel it to be just right.
And the following are ideal parameters of our adjustment just for you to refer to.
Final results
Now can easily create a realistic-looking fire effect by Wondershare Filmora.
Best editing views
See how easy it was to create a fire effect without using real fire. A fire effect you can use:
- To make your car catch on fire.
- You are screaming at the top of your lungs in a yard where your garden is on fire.
- Act like your husband forgot to watch the stove on with the dish in the kitchen.
You can create all these scenarios by using camera tricks and lighting effects. And a few skills in video editing, easily! How cool is that?
If you are a beginner or a frequent user of Wondershare Filmora, following the steps explained above will help you quickly get the hang of how to add fire effects to your videos.
Also, if you have a YouTube channel or a content creator, adding these effects will add unique creativity to your videos and ultimately boost your approach.
Free Download For Win 7 or later(64-bit)
Free Download For macOS 10.14 or later
Add Green Screen Video on TikTok
TikTok is the most popular platform for making short videos. You can create creative short videos and upload to TikTok so that they can entertain your followers and make your videos go viral. To add variety to your video content, the use of green screen in short videos is a great idea. You can replace the green screen with any background in your TikTok video. You need to know how to add green screen video on TikTok.
Adding green screen on TikTok videos has become a trend now as there are several green screen TikTok videos that have gone viral. In fact, creative green screen videos are extremely popular on social media platforms. Instead of replacing the green screen in your video with a single photo, you can replace it with multiple pictures on TikTok. We will illustrate how to add multiple pictures on TikTok green screen.
Part 1. How to Add Green Screen on TikTok?
To add green screen on TikTok video, you need to have a background of uniform color. It does not necessarily have to be a green screen. For example, if you are shooting a video of your legs and the floor tiles have uniform color, you can use green screen on TikTok to replace the tiles with any picture. Instead of using one picture on TikTok short video, you can use multiple pictures in the background to create stunning TikTok videos. Here are the steps on how to add multiple pictures to TikTok green screen.
Step1 Open TikTok app on your phone. Tap on Plus icon located at the bottom of the app screen to make a new video.
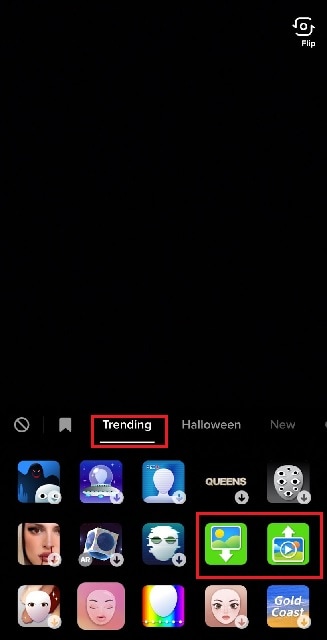
Step2 Choose the duration of the video as per your preference. Thereafter, tap on Effects option located at the bottom-left corner to see the different effects available on TikTok.
![]()
Step3 Go to Trending tab and you will see Green Screen and Green Screen Video icons. If you want your video to have green screen photo, tap on Green Screen icon. If you want your video to have green screen video, tap on Green Screen Video icon.
Step4 You will get a generic background and you can choose any preset background or select photo or video from your phone gallery by tapping on Plus icon. Once you are done, tap on Record button.
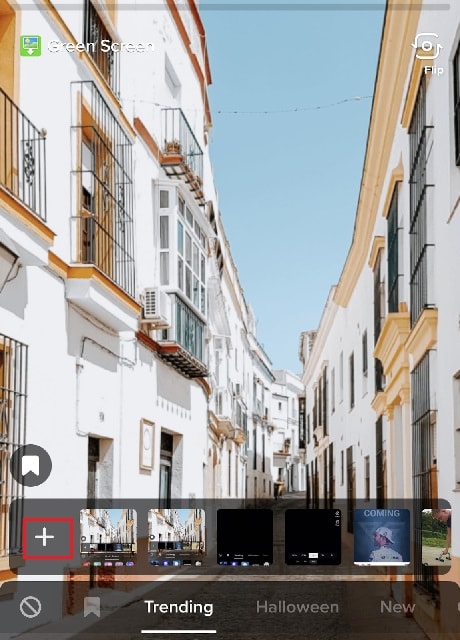
Step5 In order to use multiple pictures, you should stop recording in between and change your green screen image to anything you desire. Then tap on Record button again. TikTok will string your clips and it would appear that you have been changing multiple pictures of your background for your video.
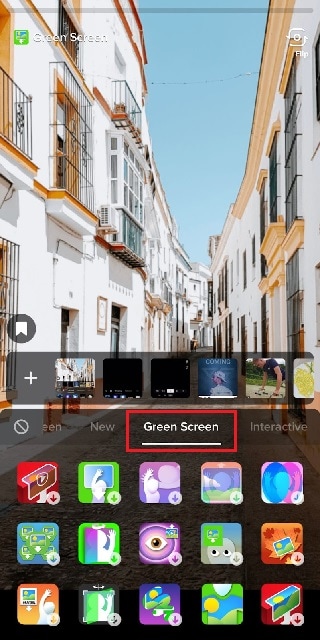
If you want to experiment with green scree effects, you can scroll down after tapping on Green Screen icon under Effects. You will see different types of green screen videos possible on TikTok to choose from.
Part 2. Creative Ideas to Make TikTok Green Screen Video
Now that you know how to add a video on TikTok green screen, you have to make the most out of it. If you are wondering how you can use green screen in your TikTok videos, here are some creative ideas for you.
Walking Out Videos – You can use green screen effect to show that you are walking out of plane, walking vertically on the wall like inception, walking on the roof of a building. In fact, you can show that you are walking out of popular monuments and palaces and trick your viewers into thinking that you were actually there.
Photoshoot Location – Create a TikTok video showing your favorite locations across the world where you dream of doing photoshoot. You can pose differently and place the location in your background through green screen effect.
How-To Video – If your TikTok channel is about tutorial and learning videos, you can explain things better by putting screenshots and multiple relevant pictures in the background so that viewers can get a pictorial representation of what you are speaking to them.
Mystery Story – You can a create short video describing unknowing facts and mysteries around certain places in the world. You can put photos or video clips of those mysterious places in your background to keep your viewers hooked and related to your narration.
Rate Them Video – You can use green screen effect to showcase your old Instagram photos or videos and rate them. This is an extremely popular trend in TikTok where people show their old photos, display work from the past, and rate them today.
Reveal Your Creation – Share your secrets or interesting stories behind some of the photos or videos you took in the past. You can talk about how creatively you took certain photos and put those photos in the background while discussing them.
Part 3. How to Make Green Screen Video on Computer?
If you have a computer and a webcam, you can record a green screen video on your computer. You can place the green screen in the background perfectly and place the webcam so that the background stays within the green screen. You will need a video recorder and a video editor to make green screen video as well as replace the green screen with any photo or video. We recommend Wondershare Filmora where you can record as well as edit green screen video.
Filmora is a professional video editor where you can record your computer screen as well as your webcam video with green screen background in Picture-in-Picture mode. After recording the video, you can replace the green screen with any video clip or photo instantly in a few steps. You can also fine-tune green screen effect for perfection. Therefore, you can save the video in any resolution and file format as per your preference.

Free Download For Win 7 or later(64-bit)
Free Download For macOS 10.14 or later
Conclusion
Adding green screen effect on TikTok videos can make your videos stand out. We have illustrated how to add multiple green screen videos on TikTok and your videos will have a better chance of getting viral. Keep the green screen ideas in mind while making TikTok green screen videos. If you want to make and edit green screen videos on computer, Wondershare Filmora is the best application available for Windows and Mac users.
6 Best MP4 Mergers to Join Videos Easily
Not all software allows you to combine videos in the MP4 format. And even if they do, the quality you get is not satisfying. The reason is pretty basic – overrated and underrated video merging software. Some tools are complicated, while others are extremely user-friendly with the interface and options.
So, after spending several days on the research, finally, here are the 6 best mp4 mergers along with their tutorials to help you understand the process and complexity of each software and pick the best one in terms of simplicity and user-friendliness.
In this article
04 Media Cope
Part 1: Free Video Joiner (For Windows Users Only)
Free Video Joiner is a free tool to use for Windows users. You can join multiple videos to turn into a big video file. The software allows you to convert WMV, MPG, MPEG, AVI, and MOV files into MP4, MOV, WMV, and AVI. You can also “Save As” videos in VCD and DVD, iPhone, iPod, Zune, or PSP video formats.
The company claims “no quality loss” when the complete video is out. However, you have to be very picky when selecting the first video in your list to merge with others because the Free Video Joiner keeps the same width and height of the merged file as of the first video.
So, for instance, if you have 10 videos in the list to merge in the MP4 format, the first video has 1280 x 720 dimensions while the rest are 1920 x 1080. Then, the final merged video will be available to you in the same width and height as the first video (1280 x 720).
Merging Videos in Free Video Joiner
Step1: Download Free Video Joiner
Open your browser and go to the Free Video Joiner website. Then, click the “Download” button on the page to save the setup on your computer.

Step 2: Install and Run Free Video Joiner
Now, double-click on the Free Video Joiner set up to install it in your system. It will hardly take a few seconds for the entire software to get into your system’s hard drive.
Once the software is installed, open the software, and you will see the interface like this.

Step 3: Add Files
Click on the “Add Files” button.

And select the clips you want to merge in MP4.

To change the order of the videos, you can use the “Move Up” or “Move Down” button.

Step 4: Select Output Folder
Choose your output directory to save the merged file by clicking on the “Select” button.

Then, click on the “Video” tab to choose the format of your joined video. Also, take your time to choose the “Presets” from the drop-down menu below the video tab.
As you can see, MP4 is selected in the screenshot below.

Step 5: Staring Merging in MP4
Now, click on the “Join Now” button.

You will see that the “Overall Progress” bar will begin to increase.

Once the bar is 100%, click on the “Open Folder” button to directly visit the folder where you will find the merged video. Or click the “Finish” button if you wish to start another project.

Part 2: Freemake Video Converter (For Windows Users Only)
Freemake Video Converter is reliable software to convert videos without registration. The program is free to download with more than 180 million users worldwide. And not just the MP4, but you can convert videos in all the popular formats and use the program to copy and burn DVDs.
Apart from the video conversion feature, you can use Freemake to merge your MP4 videos from your Windows operating system. However, the software is unavailable for MAC users, and it is one of the major drawbacks of this video merger.
Merging Videos in Freemake Video Converter
Step 1: Download Freemake Video Converter
First, go to the Freemake Video Converter website and click on the “Free Download” button.

Then, install the software on your computer and open it. The software appears to be simple like this.

Step 2: Add Videos
Click on the “Video” tab from the top menu to select videos you want to merge.

As you can see below, two videos are uploaded on the software.

Step 3: Rearrange Video Order
If you wish to rearrange the videos, you can do it by simply dragging the video up or down with the help of your mouse.

For example, the “Photo Slideshow” video, which was previously on the top, is now placed beneath the “Intro” video.

That means the merged video will begin from the “Intro” video, and then the “Photo Slideshow” will continue right after the first clip ends. All be done without any break or pause.
Step 4: Join Videos
After rearranging the videos, use your mouse to select clips by clicking once on each video. All selected videos will be highlighted in the “light blue” color.

Then, take the mouse cursor on the top-right side of the software and turn on the “Join Files” button by clicking on it.

You will see that a merged video will be added to the software.
For instance, you can see that a new file has been added to the interface, showing the number of merged files in the red circle.

The above screenshot represents a single merged video that includes two files.
Step 5: Choose Your Output Video Format
Look at the bottom of the software to see different video formats, and click on “MP4.”

Click on the “Preset” menu to choose the format and size of the output video. Then, select the output folder.

Step 6: Save Your Video
Lastly, click on the “Convert” button to allow the software to merge the video in MP4 format and save it on your computer.

Part 3: Boilsoft Video Joiner (For Windows and MAC Users)
Boilsoft Video Joiner is a video merger tool to join MP4, WMA, WMV, ASF, 3GP, RMVB/RM, MPG, MPEG, AVI, VOB, FLV, and MKV clips into one complete single video. You can download the free trial version or buy the full software for your MAC and Windows operating systems.
Boilsoft Video Joiner also offers Encode mode and Direct Stream mode, allowing you to merge clips efficiently into different formats at great speed.
Merging Videos in Boilsoft Video Joiner
Step 1: Download and Install Boilsoft Video Joiner
Visit the Boilsoft Video Joiner website from your computer browser and click on the “Download” tab.

If you want to install the software on Windows OS, then click on the “Windows” tab and then click on the “Download” button next to the “Boilsoft Video Joiner” software.

Contrarily, you can download the program for MAC operating system by clicking on the “Mac” tab and clicking the “Download” button.

Now, run the installer to install the software on your computer and open it.

Note: The screenshots are from the previous version of Boilsoft Video Joiner. However, this tutorial’s steps to merge MP4 videos are workable on the latest version.
Step 2: Add Videos in Boilsoft Video Joiner
Click on the “Add File” icon on the top menu to add the clips you want to join together.

Here you can see that two files have been uploaded. Plus, with the small green “arrow” buttons, you can rearrange the order of the clips.

Step 3: Merge Videos
Find the “Merge” option on the top menu, and click it.

Then, choose the “Direct Stream” mode or “Encode Mode” from the merge mode options, and click on the “OK” button.

Note: It is suggested to choose the “Direct Stream” mode if you want files to be converted in the MP4 format.
Step 4: Save Joined Video
After clicking the “OK” button, choose the folder to save the merged video on your computer. And click the “Save” button.

A green progress bar will start until you see the “Finished” message above the bar, confirming that the video has been merged. So, click the “Open Folder” button to see the joined video in MP4 format.

Part 4: Media Cope (For Windows Users Only)
Media Cope is free software with multiple features, including audio and video joiner. The software is available for Windows users only but does not support the latest Windows versions. So, if you are running XP, Vista, Windows 7, or Windows 8, you can easily install the software on your computer.
Although the software doesn’t support MAC, you can still join and save the videos on your iPhone. Nevertheless, the developers assure that the software supports all major formats, such as MP4, MOV, 3GP, AC3, AMR, WAV, MKV, FLV, DIVX, AVI, and many more.
Merging Videos in Media Cope
Step 1: Download and Install Media Cope
Downloading Media Cope is no big deal. All you need to do is go to the official Media Cope’s website and click on the “Download” tab on the top menu.

Once you are taken to another page, click on the “Download” button to save the setup on your computer.

Double click the “MediaCopeSetup.exe” file to install the software. It will only take a few minutes to install the complete program on your PC.
So, after installing Media Cope, open the program, and you will see a blank screen with several options on the top and bottom of the interface.

Step 2: Add Files
Click on the “Audio/Video Joiner” tab to select your video clips.

Select your clips and click on the “Add” button to transfer files on the software.

As you can see, two video files are added to the platform.

Step 3: Choose Output Format
If you look down in the software, you will find the “Output Format” options. So, choose your format (MP4 recommended) and select the video quality from the drop-down menu.

Step 4: Merge Videos and Save
Now, click on the “Join” button, choose your output folder, and give time to complete the process.

After the process ends, enjoy your merged video in the output folder.
Part 5: MP4Joiner by MP4Tools (For Windows, MAC, and Linux Users)
MP4Joiner is a free software to join MP4 format videos into one single video that comes with an MP4Splitter. This software duo is called MP4Tools. So don’t get confused by the name when downloading the program on your PC.
A good thing about MP4Joiner is that it is developed for multiple platforms, such as Windows, MAC, and Linux. But unfortunately, it only supports “win32,” “Mac 10.10 and Catalina,” and “BZ2” file extension.
Merging Videos in MP4Joiner
Step 1: Download MP4Joiner
The first step requires downloading MP4Joiner on your computer according to your operating system. To do that, go to the MP4Joiner’s site. And click on any one of the following “.exe” files to download the setup.

Then, install the program in your Windows, MAC, or Linux, and run it. The interface is extremely simple, with no confusing options.

Step 2: Add Files in MP4Joiner
Next, click on the “Add Video” tab with a green “+” sign.

Doing so will help you choose videos you want to join together. So, select the videos and click on the “Open” button, as shown in the screenshot below.

Step 3: Start Joining Videos
Once all your selected videos are imported on the interface, click on the “Join” tab.

Then, choose the folder where you want the merged video to be saved, and click the “Save” button.

A new window will appear, showing a green progress bar.

Wait until you see the “Successful” note on the top of the progress bar, and then click on the “Close” button.

Go to your output folder to watch the joined video in the MP4 format.
Part 6: Filmora by Wondershare (For Windows and MAC Users - Recommended)
Filmora Video Editor is one of the famous video editing software by Wondershare. It is like a gateway to creativity for beginner and experienced editors. The software offers a wide range of tools and presets, which makes video editing quick and easy.
This video editing tool is for both MAC and Windows users. You can use the software by choosing a suitable pricing plan or downloading the free version if the watermark is not an issue.
Gladly, Filmora can help you merge your videos without destroying a pixel in any format of your choice, including MP4. Also, the process is pretty simple, time-saving, and fun. Furthermore, you can also include flavors to your video merger by adding several transitions and effects to your videos.
For Win 7 or later (64-bit)
For macOS 10.14 or later
Merging Videos in MP4Joiner
Step 1: Download Filmora by Wondershare
Enter Filmora’s website in your browser to visit the homepage and click on the blue “Free Download” button.

After downloading the setup, install the software on your device. The process will only take a few minutes. Then, open Filmora, and you will see a modern-designed interface with all the tools and presets right in front of your eyes.

Step 2: Import Videos You Want to Merge
Use your mouse to click the blue “+” icon in the center of the software to import videos from your computer.

Then, drag-and-drop the videos to your timeline. But make sure that you place both clips on the same timeline. As you can see below, there are two clips. The first clip is named “Travel 05,” while the second video is called “Travel 06.”

Step 3: Fill the Gap to Merge
When you will drag-and-drop videos on the timeline, the chances are that there will be a gap or a blank space between the two clips, like this.

If this blank space is left untreated, the merged video will include this empty black space, as you can see on the preview screen.

Therefore, use your right mouse click to hold the second video and drag it to the wall of the first video without leaving any gap in between both clips.

Great! You have already merged the videos. Now, let’s move on to the final step.
Step 4: Export the Joined Video and Save in MP4
Click on the “Export” option on the left of the preview screen to see the settings window.

Under the “Local” tab, select “MP4” and feel free to perform other changes, such as choosing an output folder, renaming the merged video, picking the resolution, and more. Once you are satisfied with the settings, click on the “Export” button (on the right bottom of the screen) to save the video on your computer.

And it’s done!
Bottom Line
Among the 6 best MP4 mergers, Filmora seems to be winning. It’s not just a video editor with plenty of tools, but you can also join two or more videos in MP4 format without sacrificing the video quality.
On the other hand, video merges like Free Video Joiner, Freemake, Media Cope, Boilsoft Video Joiner, and MP4 Joiner have limited options. Plus, they are time-consuming, and some of them even disturb the video and audio quality when clips are merged through them.
FAQs
Q1. What is the best video merger for MP4?
There are many excellent video mergers to combine MP4 videos. Most users recommend Filmora because it works flawlessly on MAC and Windows operating systems. Besides, it’s a user-friendly software that even non-professional people can use to join MP4 videos.
Q2. What is the fastest video merger for MP4 clips?
Filmora by Wondershare is one of the fastest video mergers. You can merge videos by working on the timeline, which ultimately saves your time. And you can export merged videos in MP4 or any other format without many struggles. The second and third options are Media Cope and Boilsoft Video Joiner. Although they are a bit old-fashioned, you will still find them more accessible and fast than other MP4 mergers.
Q3. How do I merge MP4 videos without losing quality?
Merging MP4 videos without losing the quality depends on your software to combine videos. Filmora never disappoints its users when it comes to quality. As a matter of fact, you can choose your own resolution from the export settings menu when saving the merged MP4 video in your Windows or MAC computer.
04 Media Cope
Part 1: Free Video Joiner (For Windows Users Only)
Free Video Joiner is a free tool to use for Windows users. You can join multiple videos to turn into a big video file. The software allows you to convert WMV, MPG, MPEG, AVI, and MOV files into MP4, MOV, WMV, and AVI. You can also “Save As” videos in VCD and DVD, iPhone, iPod, Zune, or PSP video formats.
The company claims “no quality loss” when the complete video is out. However, you have to be very picky when selecting the first video in your list to merge with others because the Free Video Joiner keeps the same width and height of the merged file as of the first video.
So, for instance, if you have 10 videos in the list to merge in the MP4 format, the first video has 1280 x 720 dimensions while the rest are 1920 x 1080. Then, the final merged video will be available to you in the same width and height as the first video (1280 x 720).
Merging Videos in Free Video Joiner
Step1: Download Free Video Joiner
Open your browser and go to the Free Video Joiner website. Then, click the “Download” button on the page to save the setup on your computer.
Step 2: Install and Run Free Video Joiner
Now, double-click on the Free Video Joiner set up to install it in your system. It will hardly take a few seconds for the entire software to get into your system’s hard drive.
Once the software is installed, open the software, and you will see the interface like this.
Step 3: Add Files
Click on the “Add Files” button.
And select the clips you want to merge in MP4.
To change the order of the videos, you can use the “Move Up” or “Move Down” button.
Step 4: Select Output Folder
Choose your output directory to save the merged file by clicking on the “Select” button.
Then, click on the “Video” tab to choose the format of your joined video. Also, take your time to choose the “Presets” from the drop-down menu below the video tab.
As you can see, MP4 is selected in the screenshot below.
Step 5: Staring Merging in MP4
Now, click on the “Join Now” button.
You will see that the “Overall Progress” bar will begin to increase.
Once the bar is 100%, click on the “Open Folder” button to directly visit the folder where you will find the merged video. Or click the “Finish” button if you wish to start another project.
Part 2: Freemake Video Converter (For Windows Users Only)
Freemake Video Converter is reliable software to convert videos without registration. The program is free to download with more than 180 million users worldwide. And not just the MP4, but you can convert videos in all the popular formats and use the program to copy and burn DVDs.
Apart from the video conversion feature, you can use Freemake to merge your MP4 videos from your Windows operating system. However, the software is unavailable for MAC users, and it is one of the major drawbacks of this video merger.
Merging Videos in Freemake Video Converter
Step 1: Download Freemake Video Converter
First, go to the Freemake Video Converter website and click on the “Free Download” button.
Then, install the software on your computer and open it. The software appears to be simple like this.
Step 2: Add Videos
Click on the “Video” tab from the top menu to select videos you want to merge.
As you can see below, two videos are uploaded on the software.
Step 3: Rearrange Video Order
If you wish to rearrange the videos, you can do it by simply dragging the video up or down with the help of your mouse.
For example, the “Photo Slideshow” video, which was previously on the top, is now placed beneath the “Intro” video.
That means the merged video will begin from the “Intro” video, and then the “Photo Slideshow” will continue right after the first clip ends. All be done without any break or pause.
Step 4: Join Videos
After rearranging the videos, use your mouse to select clips by clicking once on each video. All selected videos will be highlighted in the “light blue” color.
Then, take the mouse cursor on the top-right side of the software and turn on the “Join Files” button by clicking on it.
You will see that a merged video will be added to the software.
For instance, you can see that a new file has been added to the interface, showing the number of merged files in the red circle.
The above screenshot represents a single merged video that includes two files.
Step 5: Choose Your Output Video Format
Look at the bottom of the software to see different video formats, and click on “MP4.”
Click on the “Preset” menu to choose the format and size of the output video. Then, select the output folder.
Step 6: Save Your Video
Lastly, click on the “Convert” button to allow the software to merge the video in MP4 format and save it on your computer.
Part 3: Boilsoft Video Joiner (For Windows and MAC Users)
Boilsoft Video Joiner is a video merger tool to join MP4, WMA, WMV, ASF, 3GP, RMVB/RM, MPG, MPEG, AVI, VOB, FLV, and MKV clips into one complete single video. You can download the free trial version or buy the full software for your MAC and Windows operating systems.
Boilsoft Video Joiner also offers Encode mode and Direct Stream mode, allowing you to merge clips efficiently into different formats at great speed.
Merging Videos in Boilsoft Video Joiner
Step 1: Download and Install Boilsoft Video Joiner
Visit the Boilsoft Video Joiner website from your computer browser and click on the “Download” tab.
If you want to install the software on Windows OS, then click on the “Windows” tab and then click on the “Download” button next to the “Boilsoft Video Joiner” software.
Contrarily, you can download the program for MAC operating system by clicking on the “Mac” tab and clicking the “Download” button.
Now, run the installer to install the software on your computer and open it.
Note: The screenshots are from the previous version of Boilsoft Video Joiner. However, this tutorial’s steps to merge MP4 videos are workable on the latest version.
Step 2: Add Videos in Boilsoft Video Joiner
Click on the “Add File” icon on the top menu to add the clips you want to join together.
Here you can see that two files have been uploaded. Plus, with the small green “arrow” buttons, you can rearrange the order of the clips.
Step 3: Merge Videos
Find the “Merge” option on the top menu, and click it.
Then, choose the “Direct Stream” mode or “Encode Mode” from the merge mode options, and click on the “OK” button.
Note: It is suggested to choose the “Direct Stream” mode if you want files to be converted in the MP4 format.
Step 4: Save Joined Video
After clicking the “OK” button, choose the folder to save the merged video on your computer. And click the “Save” button.
A green progress bar will start until you see the “Finished” message above the bar, confirming that the video has been merged. So, click the “Open Folder” button to see the joined video in MP4 format.
Part 4: Media Cope (For Windows Users Only)
Media Cope is free software with multiple features, including audio and video joiner. The software is available for Windows users only but does not support the latest Windows versions. So, if you are running XP, Vista, Windows 7, or Windows 8, you can easily install the software on your computer.
Although the software doesn’t support MAC, you can still join and save the videos on your iPhone. Nevertheless, the developers assure that the software supports all major formats, such as MP4, MOV, 3GP, AC3, AMR, WAV, MKV, FLV, DIVX, AVI, and many more.
Merging Videos in Media Cope
Step 1: Download and Install Media Cope
Downloading Media Cope is no big deal. All you need to do is go to the official Media Cope’s website and click on the “Download” tab on the top menu.
Once you are taken to another page, click on the “Download” button to save the setup on your computer.
Double click the “MediaCopeSetup.exe” file to install the software. It will only take a few minutes to install the complete program on your PC.
So, after installing Media Cope, open the program, and you will see a blank screen with several options on the top and bottom of the interface.
Step 2: Add Files
Click on the “Audio/Video Joiner” tab to select your video clips.
Select your clips and click on the “Add” button to transfer files on the software.
As you can see, two video files are added to the platform.
Step 3: Choose Output Format
If you look down in the software, you will find the “Output Format” options. So, choose your format (MP4 recommended) and select the video quality from the drop-down menu.
Step 4: Merge Videos and Save
Now, click on the “Join” button, choose your output folder, and give time to complete the process.
After the process ends, enjoy your merged video in the output folder.
Part 5: MP4Joiner by MP4Tools (For Windows, MAC, and Linux Users)
MP4Joiner is a free software to join MP4 format videos into one single video that comes with an MP4Splitter. This software duo is called MP4Tools. So don’t get confused by the name when downloading the program on your PC.
A good thing about MP4Joiner is that it is developed for multiple platforms, such as Windows, MAC, and Linux. But unfortunately, it only supports “win32,” “Mac 10.10 and Catalina,” and “BZ2” file extension.
Merging Videos in MP4Joiner
Step 1: Download MP4Joiner
The first step requires downloading MP4Joiner on your computer according to your operating system. To do that, go to the MP4Joiner’s site. And click on any one of the following “.exe” files to download the setup.
Then, install the program in your Windows, MAC, or Linux, and run it. The interface is extremely simple, with no confusing options.
Step 2: Add Files in MP4Joiner
Next, click on the “Add Video” tab with a green “+” sign.
Doing so will help you choose videos you want to join together. So, select the videos and click on the “Open” button, as shown in the screenshot below.
Step 3: Start Joining Videos
Once all your selected videos are imported on the interface, click on the “Join” tab.
Then, choose the folder where you want the merged video to be saved, and click the “Save” button.
A new window will appear, showing a green progress bar.
Wait until you see the “Successful” note on the top of the progress bar, and then click on the “Close” button.
Go to your output folder to watch the joined video in the MP4 format.
Part 6: Filmora by Wondershare (For Windows and MAC Users - Recommended)
Filmora Video Editor is one of the famous video editing software by Wondershare. It is like a gateway to creativity for beginner and experienced editors. The software offers a wide range of tools and presets, which makes video editing quick and easy.
This video editing tool is for both MAC and Windows users. You can use the software by choosing a suitable pricing plan or downloading the free version if the watermark is not an issue.
Gladly, Filmora can help you merge your videos without destroying a pixel in any format of your choice, including MP4. Also, the process is pretty simple, time-saving, and fun. Furthermore, you can also include flavors to your video merger by adding several transitions and effects to your videos.
For Win 7 or later (64-bit)
For macOS 10.14 or later
Merging Videos in MP4Joiner
Step 1: Download Filmora by Wondershare
Enter Filmora’s website in your browser to visit the homepage and click on the blue “Free Download” button.
After downloading the setup, install the software on your device. The process will only take a few minutes. Then, open Filmora, and you will see a modern-designed interface with all the tools and presets right in front of your eyes.
Step 2: Import Videos You Want to Merge
Use your mouse to click the blue “+” icon in the center of the software to import videos from your computer.
Then, drag-and-drop the videos to your timeline. But make sure that you place both clips on the same timeline. As you can see below, there are two clips. The first clip is named “Travel 05,” while the second video is called “Travel 06.”
Step 3: Fill the Gap to Merge
When you will drag-and-drop videos on the timeline, the chances are that there will be a gap or a blank space between the two clips, like this.
If this blank space is left untreated, the merged video will include this empty black space, as you can see on the preview screen.
Therefore, use your right mouse click to hold the second video and drag it to the wall of the first video without leaving any gap in between both clips.
Great! You have already merged the videos. Now, let’s move on to the final step.
Step 4: Export the Joined Video and Save in MP4
Click on the “Export” option on the left of the preview screen to see the settings window.
Under the “Local” tab, select “MP4” and feel free to perform other changes, such as choosing an output folder, renaming the merged video, picking the resolution, and more. Once you are satisfied with the settings, click on the “Export” button (on the right bottom of the screen) to save the video on your computer.
And it’s done!
Bottom Line
Among the 6 best MP4 mergers, Filmora seems to be winning. It’s not just a video editor with plenty of tools, but you can also join two or more videos in MP4 format without sacrificing the video quality.
On the other hand, video merges like Free Video Joiner, Freemake, Media Cope, Boilsoft Video Joiner, and MP4 Joiner have limited options. Plus, they are time-consuming, and some of them even disturb the video and audio quality when clips are merged through them.
FAQs
Q1. What is the best video merger for MP4?
There are many excellent video mergers to combine MP4 videos. Most users recommend Filmora because it works flawlessly on MAC and Windows operating systems. Besides, it’s a user-friendly software that even non-professional people can use to join MP4 videos.
Q2. What is the fastest video merger for MP4 clips?
Filmora by Wondershare is one of the fastest video mergers. You can merge videos by working on the timeline, which ultimately saves your time. And you can export merged videos in MP4 or any other format without many struggles. The second and third options are Media Cope and Boilsoft Video Joiner. Although they are a bit old-fashioned, you will still find them more accessible and fast than other MP4 mergers.
Q3. How do I merge MP4 videos without losing quality?
Merging MP4 videos without losing the quality depends on your software to combine videos. Filmora never disappoints its users when it comes to quality. As a matter of fact, you can choose your own resolution from the export settings menu when saving the merged MP4 video in your Windows or MAC computer.
How to Add VHS Green Screen to Your Video
Create High-Quality Video - Wondershare Filmora
An easy and powerful YouTube video editor
Numerous video and audio effects to choose from
Detailed tutorials provided by the official channel
When making a video, it is always fun to add an effect. You can do this for either atmospheric or aesthetic reasons. VHS green screen effects are among the world’s most popular effects people use today.
We’ll give you the low-down on VHS Green Screen, including how it became popular and where to get these effects for free. Keep reading to learn more.
In this article
01 What Is VHS?
02 How Did VHS Green Screen Become Popular?
03 Free VHS Green Screen Effect Resource to Download
04 How to Edit VHS Green Screen with Filmora
What Is VHS?
Since its introduction in 1976, VHS has been the most frequently used video cassette recording technology. The VHS format is a consumer-level analog video cassette recording standard for videotaping. The acronym VHS referred to Vertical Helical Scan and was eventually modified as the popularity of this technology increased.
Produced by a Japan Victor Company, the technology uses a magnetic tape measuring half an inch. By the 1950s, magnetic tape video recording had become a vital part of the television industry. The technology is exclusively utilized in professional settings like TV studios and medical imaging (fluoroscopy).
As consumer access to videotape increased in the 1970s, a new economy centered on home video emerged, drastically altering the economics of the film and television industries. By 1980, VHS had captured 70% of the market and had established itself as the industry standard for entertainment and instruction.
The original standard has a picture quality equivalent to that of analog television. High-definition television content could be recorded and re-created using digital VHS (D-VHS). Progressively, a new format was launched dubbed S-VHS (Super VHS), which featured improved video quality from 240 to 400 lines; however, people did not use it extensively.
VHS tape, compared to its competition at the time, Betamax tapes had longer tape lifespans. VHS tapes were preferred because they recorded three times as long as Betamax tapes because of their higher storage capacity.
The last VHS recorder manufacturer, Funai Electric of Japan, discontinued manufacturing in 2016 after the introduction of DVDs into the market.
How Did VHS Green Screen Become Popular?
The green screen effect allows you to superimpose subjects onto different virtual background video clips. Essentially, you take a video that’s going to be your background, then overlay another video on top of this background. Using green screen properly will make your video stands out from the crowd. Let’s look at some that made increased the popularity of the VHS green screen:
- Clarity and Interactivity
VHS green screen allows for better understanding and comprehension, especially when explaining complex concepts and processes.
VHS green screen allows users to interact with virtual elements. Essentially, it enhances customer engagement while improving communication between you and the audience.
- Creativity and Versatility
Differentiation is key to the world of business. Therefore, adding VHS green screen to your content allows it to be unique and customized to your business. The best part is: Your imagination is the only limit.
The green screen also helps people avoid building and breaking down sets, allowing them to complete several shoots in a single session, which provides greater efficiency for their business.
- Save Time
With VHS green screen, you can shoot your video anywhere and anytime. That means it helps you remove the extended production time while providing you with one location and infinite possibilities. For this reason, it’s ideal for those who want to get the job done swiftly without hindering the quality.
- Budget and Logistical Solution
It eliminates expenses in the production line, like location, travel, and operational costs. In turn, you’ll free up more budget that you can spend on other things that your business needs.
Additionally, it allows you to control your environment. Shooting a video depends on the weather; however, shooting a video on VHS green screen disregards weather. It also provides an effective solution to problems in different areas, including travel, lighting, sound, and location.
Branding
VHS green screen popularity has grown over the years because it allows you to superimpose your logo onto the background. This makes your videos look professional and clean and provides you with a chance to advertise your business or brand your service or product with your company identity.
Free VHS Green Screen Effect Resource to Download
If you are looking for free VHS green screen effects to make your videos stand out, here are some resources that you might want to consider.
1. ANFX
ANFX is a stock video, after-effects projects, and motion graphics download hub. You can download a range of VHS green screen effects. All items that you will find on this website are licensed under a Creative Commons (CC) Attribution 4.0 International License. That means you can use the effects for any legal purpose, but you have to give them credit.

2. Videezy
As one of the world’s largest video communities, Videezy offers free high-quality footage designed to make filmmaking easy and affordable. You can also download a range of free VHS green screen effects in 4k. The site has more than 4,000 free green screen videos.

3. Gfycat
VHS green screens for animated gifs is a thing, and Gfycat is a good resource for making animated gifs. It is free to use the green screen gifs on this platform. This user-generated short video hosting company is one of the first web services that offered video encoding of GIFs.

4. Videvo
Videvo offers VHS green-screen effects, music, motion graphics, and sound effects. The site has a variety of effects available in resolutions from 720p-4k. While you’ll need to pay for some premium clips, there are loads of free resources. The site is particularly helpful for those who want green-screen effects that allow them to present content as though it is on a phone, computer, or tablet.

5. Pixabay
This user-submitted content site offers free content for commercial use. You can make attributions or choose not to. The effects on this site are of high quality. All contents are released to users under Creative Commons CC0, making them safe to use without giving credit to the artist or asking for permission. What’s more? You can even use the effects for commercial purposes.

6. YouTube
YouTube is home to millions of users looking for parts to build their videos. You will need to learn how to download YouTube videos to take advantage of these resources. There are tons of YouTube channels devoted to providing users with free VHS green screen effects. Some of the notable channels include BestGreenScreen, HD Green Screen, Free Green HD, and Green Screen Animation.

How to Edit VHS Green Screen with Filmora
Filmora is a relatively new program that has taken the world by storm. This professional video editor is a lifeline for all videographers and creators who work with videos to increase their proficiency and create professional-grade videos without breaking the bank. To learn how to Use VHS green screen in Filmora, follow the steps below.
Step 1\
Import the video with the VHS green screen and the background video into the media library.

Step 2\
Drag the video with the green screen and the background video that you want to replace the green screen with into the timeline and add it to one of the tracks. The video with the green screen should come second in the timeline.

Step 3\
Right-click the green screen on the timeline and select the Green Screen option.

Step 4\
Select a color from the green screen menu.

Various settings under this menu allow you to customize how your video is affected by VHS Green Screen. Experiments with different settings may allow you to make good videos even better or give your videos a whole new feel.
The Tolerance slider adjusts how much of the green screen will be allowed in your subject.
Edge Thickness allows you to adjust the amount of the edge thickness you’ll bring into the shot.
Use the Edge Feather slider to soften the edges of your subject.
Touch your mouse’s right button and move your cursor to select the video you want to insert into the timeline or “Add Video to Timeline” if you are using a project that does not accept videos as sources.
Open Project Settings > Video Editor tab > VHS Green Screen and select Source Video from the drop-down menu to change the video from whatever it is currently set as.
You can also add VHS Green Screen to a Sub-track by pressing Ctrl + Alt combination.
After selecting your video and adding it to the timeline, you will see the Video Properties window.
You can edit the Source Video under Source Video Settings in the Video Properties menu or use the keyframes window to change its settings via a timeline.
You can also watch the below video to get a better underestanding about how to use Green Screen in Filmora.
For Win 7 or later (64-bit)
For macOS 10.12 or later
Conclusion
● VHS video effects have become popular over the years because of the many benefits they offer. They allow you to save time, make unique content, be creative, and more. You can use Filmora’s green screen feature to make your videos stand out.
When making a video, it is always fun to add an effect. You can do this for either atmospheric or aesthetic reasons. VHS green screen effects are among the world’s most popular effects people use today.
We’ll give you the low-down on VHS Green Screen, including how it became popular and where to get these effects for free. Keep reading to learn more.
In this article
01 What Is VHS?
02 How Did VHS Green Screen Become Popular?
03 Free VHS Green Screen Effect Resource to Download
04 How to Edit VHS Green Screen with Filmora
What Is VHS?
Since its introduction in 1976, VHS has been the most frequently used video cassette recording technology. The VHS format is a consumer-level analog video cassette recording standard for videotaping. The acronym VHS referred to Vertical Helical Scan and was eventually modified as the popularity of this technology increased.
Produced by a Japan Victor Company, the technology uses a magnetic tape measuring half an inch. By the 1950s, magnetic tape video recording had become a vital part of the television industry. The technology is exclusively utilized in professional settings like TV studios and medical imaging (fluoroscopy).
As consumer access to videotape increased in the 1970s, a new economy centered on home video emerged, drastically altering the economics of the film and television industries. By 1980, VHS had captured 70% of the market and had established itself as the industry standard for entertainment and instruction.
The original standard has a picture quality equivalent to that of analog television. High-definition television content could be recorded and re-created using digital VHS (D-VHS). Progressively, a new format was launched dubbed S-VHS (Super VHS), which featured improved video quality from 240 to 400 lines; however, people did not use it extensively.
VHS tape, compared to its competition at the time, Betamax tapes had longer tape lifespans. VHS tapes were preferred because they recorded three times as long as Betamax tapes because of their higher storage capacity.
The last VHS recorder manufacturer, Funai Electric of Japan, discontinued manufacturing in 2016 after the introduction of DVDs into the market.
How Did VHS Green Screen Become Popular?
The green screen effect allows you to superimpose subjects onto different virtual background video clips. Essentially, you take a video that’s going to be your background, then overlay another video on top of this background. Using green screen properly will make your video stands out from the crowd. Let’s look at some that made increased the popularity of the VHS green screen:
- Clarity and Interactivity
VHS green screen allows for better understanding and comprehension, especially when explaining complex concepts and processes.
VHS green screen allows users to interact with virtual elements. Essentially, it enhances customer engagement while improving communication between you and the audience.
- Creativity and Versatility
Differentiation is key to the world of business. Therefore, adding VHS green screen to your content allows it to be unique and customized to your business. The best part is: Your imagination is the only limit.
The green screen also helps people avoid building and breaking down sets, allowing them to complete several shoots in a single session, which provides greater efficiency for their business.
- Save Time
With VHS green screen, you can shoot your video anywhere and anytime. That means it helps you remove the extended production time while providing you with one location and infinite possibilities. For this reason, it’s ideal for those who want to get the job done swiftly without hindering the quality.
- Budget and Logistical Solution
It eliminates expenses in the production line, like location, travel, and operational costs. In turn, you’ll free up more budget that you can spend on other things that your business needs.
Additionally, it allows you to control your environment. Shooting a video depends on the weather; however, shooting a video on VHS green screen disregards weather. It also provides an effective solution to problems in different areas, including travel, lighting, sound, and location.
Branding
VHS green screen popularity has grown over the years because it allows you to superimpose your logo onto the background. This makes your videos look professional and clean and provides you with a chance to advertise your business or brand your service or product with your company identity.
Free VHS Green Screen Effect Resource to Download
If you are looking for free VHS green screen effects to make your videos stand out, here are some resources that you might want to consider.
1. ANFX
ANFX is a stock video, after-effects projects, and motion graphics download hub. You can download a range of VHS green screen effects. All items that you will find on this website are licensed under a Creative Commons (CC) Attribution 4.0 International License. That means you can use the effects for any legal purpose, but you have to give them credit.
2. Videezy
As one of the world’s largest video communities, Videezy offers free high-quality footage designed to make filmmaking easy and affordable. You can also download a range of free VHS green screen effects in 4k. The site has more than 4,000 free green screen videos.
3. Gfycat
VHS green screens for animated gifs is a thing, and Gfycat is a good resource for making animated gifs. It is free to use the green screen gifs on this platform. This user-generated short video hosting company is one of the first web services that offered video encoding of GIFs.
4. Videvo
Videvo offers VHS green-screen effects, music, motion graphics, and sound effects. The site has a variety of effects available in resolutions from 720p-4k. While you’ll need to pay for some premium clips, there are loads of free resources. The site is particularly helpful for those who want green-screen effects that allow them to present content as though it is on a phone, computer, or tablet.
5. Pixabay
This user-submitted content site offers free content for commercial use. You can make attributions or choose not to. The effects on this site are of high quality. All contents are released to users under Creative Commons CC0, making them safe to use without giving credit to the artist or asking for permission. What’s more? You can even use the effects for commercial purposes.
6. YouTube
YouTube is home to millions of users looking for parts to build their videos. You will need to learn how to download YouTube videos to take advantage of these resources. There are tons of YouTube channels devoted to providing users with free VHS green screen effects. Some of the notable channels include BestGreenScreen, HD Green Screen, Free Green HD, and Green Screen Animation.
How to Edit VHS Green Screen with Filmora
Filmora is a relatively new program that has taken the world by storm. This professional video editor is a lifeline for all videographers and creators who work with videos to increase their proficiency and create professional-grade videos without breaking the bank. To learn how to Use VHS green screen in Filmora, follow the steps below.
Step 1\
Import the video with the VHS green screen and the background video into the media library.
Step 2\
Drag the video with the green screen and the background video that you want to replace the green screen with into the timeline and add it to one of the tracks. The video with the green screen should come second in the timeline.
Step 3\
Right-click the green screen on the timeline and select the Green Screen option.
Step 4\
Select a color from the green screen menu.
Various settings under this menu allow you to customize how your video is affected by VHS Green Screen. Experiments with different settings may allow you to make good videos even better or give your videos a whole new feel.
The Tolerance slider adjusts how much of the green screen will be allowed in your subject.
Edge Thickness allows you to adjust the amount of the edge thickness you’ll bring into the shot.
Use the Edge Feather slider to soften the edges of your subject.
Touch your mouse’s right button and move your cursor to select the video you want to insert into the timeline or “Add Video to Timeline” if you are using a project that does not accept videos as sources.
Open Project Settings > Video Editor tab > VHS Green Screen and select Source Video from the drop-down menu to change the video from whatever it is currently set as.
You can also add VHS Green Screen to a Sub-track by pressing Ctrl + Alt combination.
After selecting your video and adding it to the timeline, you will see the Video Properties window.
You can edit the Source Video under Source Video Settings in the Video Properties menu or use the keyframes window to change its settings via a timeline.
You can also watch the below video to get a better underestanding about how to use Green Screen in Filmora.
For Win 7 or later (64-bit)
For macOS 10.12 or later
Conclusion
● VHS video effects have become popular over the years because of the many benefits they offer. They allow you to save time, make unique content, be creative, and more. You can use Filmora’s green screen feature to make your videos stand out.
Also read:
- New This Article Talks in Detail About How to Download Windows Movie Maker 2012 Version, the Key Features, How to Use It, Etc. It Further Discusses an Alternative Way to Create Videos on Windows PC. Check Out
- In 2024, How to Uue Adobe Lightroom Color Grading
- New How to Download and Use Vegas Pro for 2024
- Tips to Make Cinematic Color Grading
- Updated How Long Does It Take To Edit Videos for 2024
- Top 16 Motion Blur Apps for Videos & Photos
- Updated 2024 Approved There Are 10 Slideshow Makers Coming with Beautiful Music for Creating a Stunning Slideshow
- In 2024, Are You Tired of Long Video Edits? Do You Speed up the Video in Canva without a Hassle? Well, Stick with Us as We Guide You Through the Process Step by Step
- New In 2024, List of Supported iPhone Video Formats and Best iPhone Video Editor
- New Learn How to Use Face Tracking in After Effects to Quickly Mask Out Faces, Animate Objects on Faces, and More for 2024
- Updated 2024 Approved Find Out The Best Dark Moody LUTs During Editing
- New How Much Wedding Videographer Cost
- In 2024, What Is the Best FPS for YouTube Videos?
- Updated In 2024, How to Stabilize Videos for Free with Google Photos App
- In 2024, Learn the Step-by-Step Process of Slowing Down Time-Lapse Videos on Your iPhone
- Updated In 2024, What Is MOV Format and How To Edit MOV Video Creatively?
- Updated 10 Catchy Pixel Art Wallpapers and How to Custom Your Own for 2024
- Updated Make Time-Lapse Video on MacBook Complete Guide
- Are You Looking for Funny Discord Emojis to Massively Improve Your Discord Experience? Using some Fun Bots for Discord Is an Excellent Way of Doing That! Thus, We Compiled a List of 10 Fun Discord Bots You Need
- Do You Want to Use a Video Editor for Your iOS Device? This Article Introduces LumaFusion, a Perfect Multi-Track Video Editor Designed to Cater to Your Needs
- New This Article Talks in Detail About Why People Look for a Free Title Maker, and 8 Options that Will Benefit Their Work. It Includes Tools Like SEMrush Title Generator, Hubspot Title Generator, and More. Check Out
- New In 2024, Step by Step to Split Clips in VLC
- In 2024, Advancements in Game Recording Software A Comprehensive Overview
- In 2024, On the Tiktok App, You Can Make a Photo Video Slideshow. You Can Make Photo Video Slideshow with Music, Animated Tiktok Templates, and Can Also Add Text to Slideshow Video
- In 2024, Easily Cut Large Videos Faster on Mac 7 Solutions Included
- 2024 Approved All You Need to Know About Transparent Logos and How You Can Make Them. Top Transparent Logos You Can Take Inspiration From
- New Do You Know that You Can Apply Different LUTs and Create Your Own? There Are Many LUT Online and Offline Generators that You Can Use to Create Your LUT for 2024
- New 2024 Approved Sometimes It May Happen to You that You Are Watching a Video that Has Very Low Graphics or, in Other Words, Low Visual Quality. You Might Wish to Change, Instead Improve the Video Quality. Here, AI Upscaling Video Comes to Use
- New In 2024, Every Compositor Should Know The Trick of Color Match in After Effects
- How Do You Get Sun Stone Evolutions in Pokémon For Vivo S17t? | Dr.fone
- How to Mirror Vivo Y200e 5G to Mac? | Dr.fone
- Solved Warning Camera Failed on Motorola Edge 2023 | Dr.fone
- Sim Unlock Motorola Moto E13 Phones without Code 2 Ways to Remove Android Sim Lock
- In 2024, How to Turn Off Google Location to Stop Tracking You on Lava Yuva 2 Pro | Dr.fone
- How to sign a PDF v1.3 document with digital signature service
- In 2024, Easy Ways to Manage Your Vivo Y56 5G Location Settings | Dr.fone
- Can You Unlock Apple iPhone XS After Forgetting the Passcode?
- In 2024, The 6 Best SIM Unlock Services That Actually Work On Your Motorola Edge 40 Pro Device
- What Is a SIM Network Unlock PIN? Get Your Motorola Phone Network-Ready
- In 2024, 3 Easy Ways to Factory Reset a Locked Apple iPhone 6s Plus Without iTunes | Dr.fone
- What Does Enter PUK Code Mean And Why Did The Sim Get PUK Blocked On Vivo Y100i Power 5G Device
- How to Get and Use Pokemon Go Promo Codes On Samsung Galaxy Z Fold 5 | Dr.fone
- Complete Guide on Unlocking iPhone 11 Pro Max with a Broken Screen?
- 5 Best Route Generator Apps You Should Try On ZTE Nubia Flip 5G | Dr.fone
- 3 Things You Must Know about Fake Snapchat Location On Infinix Note 30 VIP Racing Edition | Dr.fone
- In 2024, How to Change/Add Location Filters on Snapchat For your Samsung Galaxy A25 5G | Dr.fone
- Recover lost data from OnePlus
- New 2024 Approved How to Make a Memorable Honeymoon Video
- Spotify Keeps Crashing A Complete List of Fixes You Can Use on Itel P40+ | Dr.fone
- Oppo F25 Pro 5G Not Receiving Texts? 10 Hassle-Free Solutions Here | Dr.fone
- In 2024, Rootjunky APK To Bypass Google FRP Lock For Realme C67 5G
- How To Get Out of DFU Mode on Apple iPhone 11? | Dr.fone
- Title: Updated Here, You Will Learn How to Add a Realistic Fire Effect Using Wondershare Filmora. That Will Help to Boost Your Channel and Decorate Your YouTube Channel with Creative and Unique Effects for 2024
- Author: Morgan
- Created at : 2024-04-24 01:09:59
- Updated at : 2024-04-25 01:09:59
- Link: https://ai-video-editing.techidaily.com/1713963430799-updated-here-you-will-learn-how-to-add-a-realistic-fire-effect-using-wondershare-filmora-that-will-help-to-boost-your-channel-and-decorate-your-youtube-chan/
- License: This work is licensed under CC BY-NC-SA 4.0.
