

2024 Approved Create Glitch Text Effect
Create Glitch Text Effect
Glitch text effect is a trending video effect whereby the texts get distorted for a few seconds. The effect is comparable to the glitch you face when your screen starts to malfunction, and the screen appears to be wavy and disoriented. A glitch text effect is better than a regular animated text effect as it helps to get the attention of the viewers immediately and get the message across clearly.
The glitch effect can be applied to the entire video as well as the text as per your preference. There are several video editors available where the glitch text effect comes pre-loaded. All you need to do is to apply it to the text and get it done in a few steps. We will illustrate how to add glitch text effect Premiere Pro. But we recommend Filmora for the best glitter text effect that you can add to your video instantly.
Part 1. Create Glitch Text in Video with Filmora
We have already stated that Wondershare Filmora is the best video editor for the best glitch text effect download and apply to your video in simple steps. Filmora is a premium video editor that is widely used by amateur and professional video editors. You can get all glitch text effect After Effects and add them to your video conveniently in comparison to After Effects.
As a matter of fact, there are literally unlimited video and text effects available, and you can find different types of glitch text effects to apply to your titles and texts. Filmora is available for both Windows and mac users. Here are the steps to create glitch text in video with Filmora.
Free Download For Win 7 or later(64-bit)
Free Download For macOS 10.14 or later
Step1 Download and install Filmora on your computer. Go to File> New Project from the menu bar to start video editing project.

Step2 Go to File> Import Media > Import Media Files to import the video clips where you want to add glitch text effect. Drop the clip into the Timeline to get started.

Step3 Go to Titles tab located at the top. From the left panel, click on Titles option. Search “glitch” in the search field and you will see all the glitch text effects that you can apply to the text in your video.
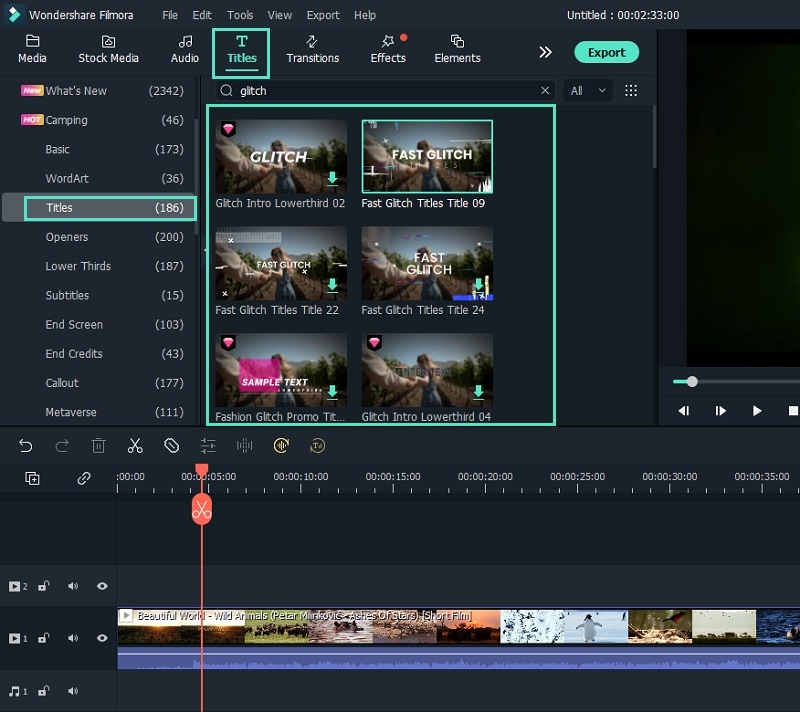
Step4 Select any glitch text effect and drop it into the Timeline above the video clip exactly where you want the text and the effect to appear.
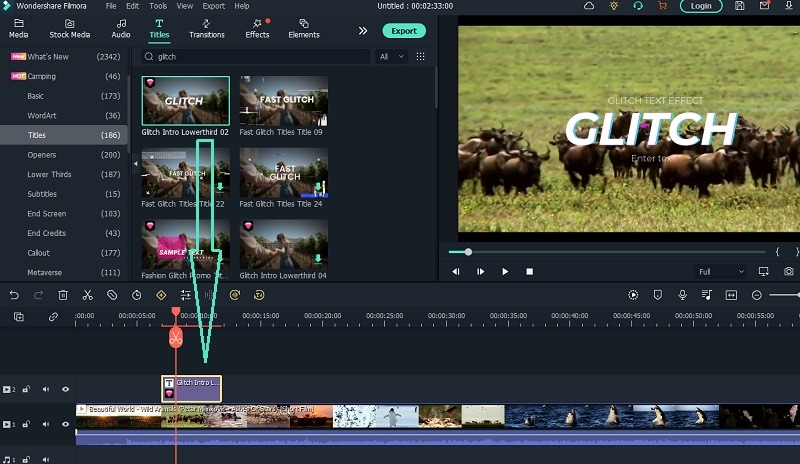
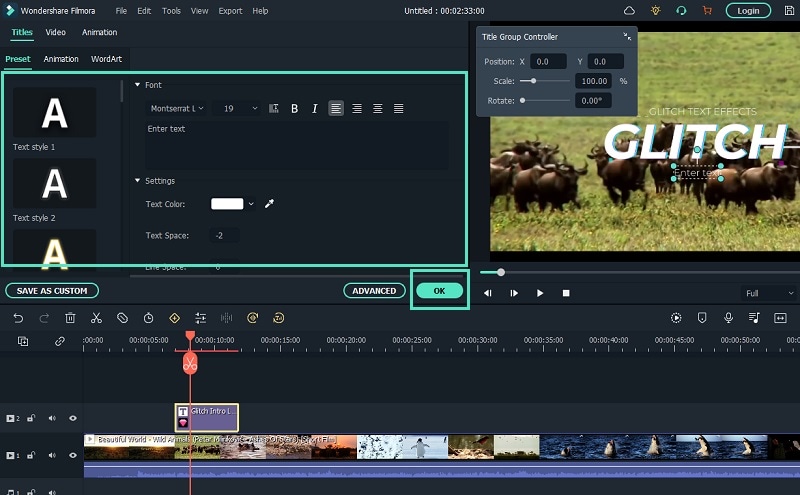
Step5 Double-click on the glitch text effect located on Timeline and edit the text, style, and other parameters as per your preference. Click on Ok and play the video to see your edited video with the glitch text effect.
Part 2. How to Make Glitch Text Effect with Premiere Pro
Adobe Premiere Pro is another renowned video editor where you can add glitch text effect to your video. Premiere Pro is strictly for professional video editors as the user interface is not as intuitive as Filmora . The learning curve is steep, and therefore, you need to go through the steps to add glitch text effect Premiere Pro. There are several glitch text effect presets available that you can apply to any text on your video to make them engaging. Here are the steps to make glitch text effect with Premiere Pro.
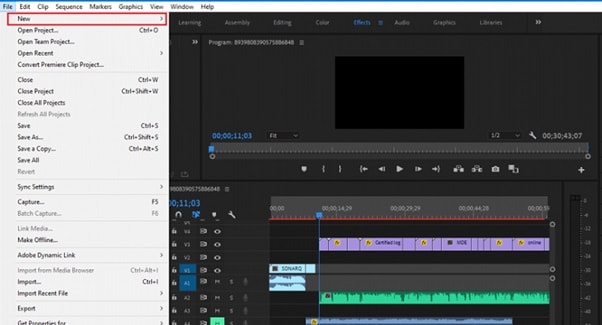
Step1 Launch Adobe Premiere Pro and go to New> Project to get started. Import your video and drop it into Timeline.
Step2 Use the Type tool to write any text on your video to add glitch text effect. You should have a text layer on Timeline.
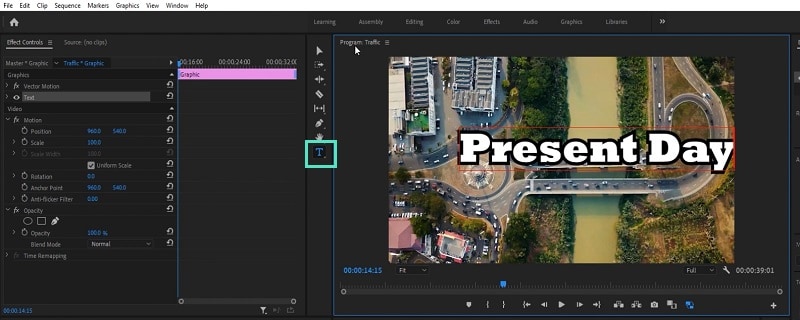
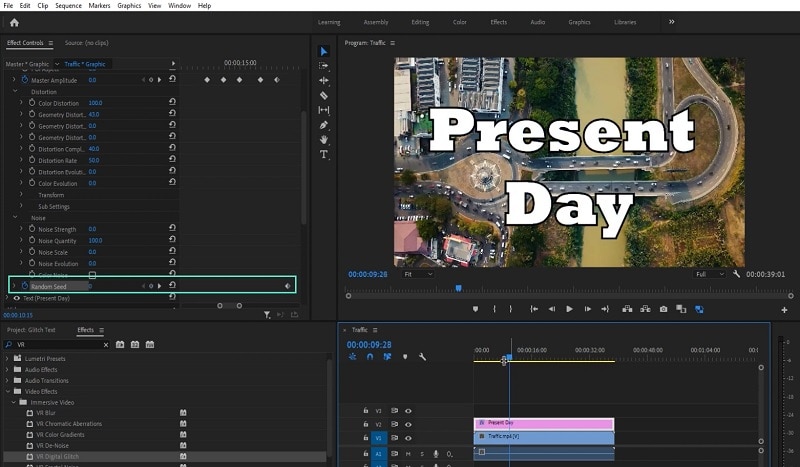
Step3 Go to Effects> Immersive Video> VR Digital Glitch option. Drag and drop the effect to text layer.
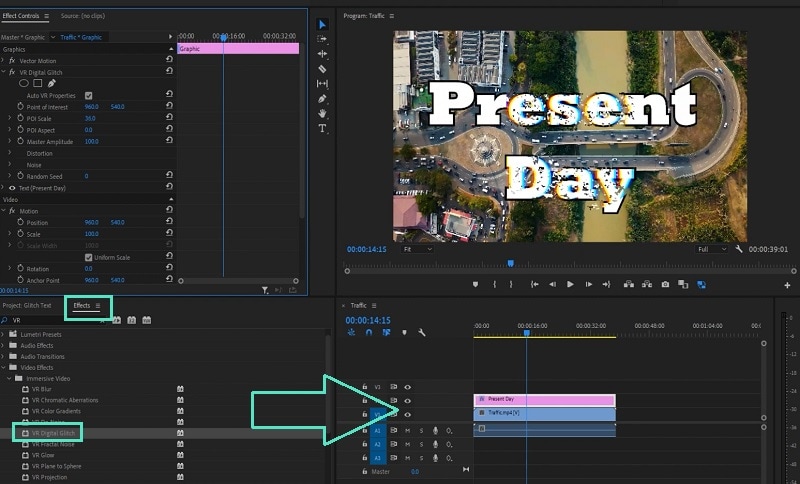
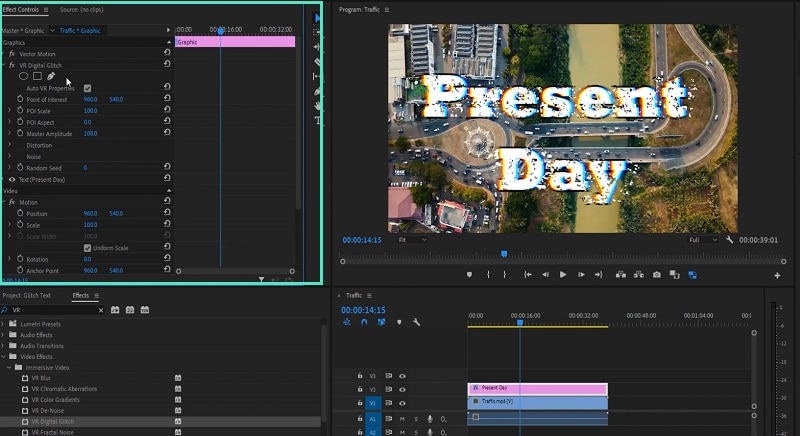
Step4 Under Effect Controls tab, you will find all the different parameters that you can adjust to get the glitch text effect perfectly.
Step5 Turn on Master Amplitude and add multiple keyframes as different points in the Timeline and change the distortion value to make the effect prominent.
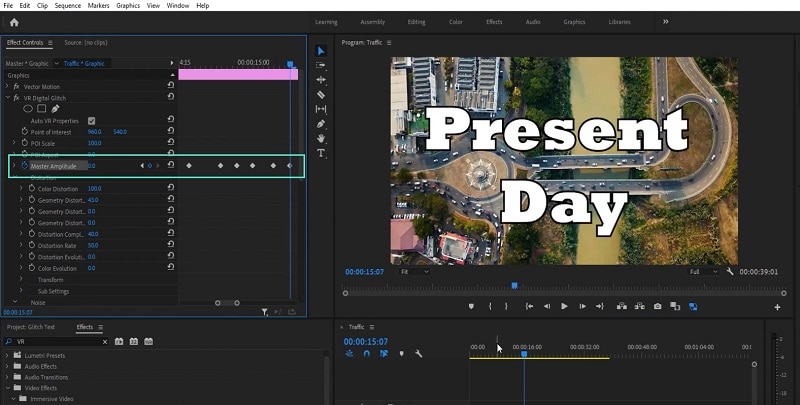
Step6 Go to the first keyframe and turn on Random Seed effect. Go to the last keyframe and turn on Random Seed effect and change the value to 75. Play the video to check the entire video with glitch text effect.
Part 3. Use VSDC Video Editor to Create Glitch Text
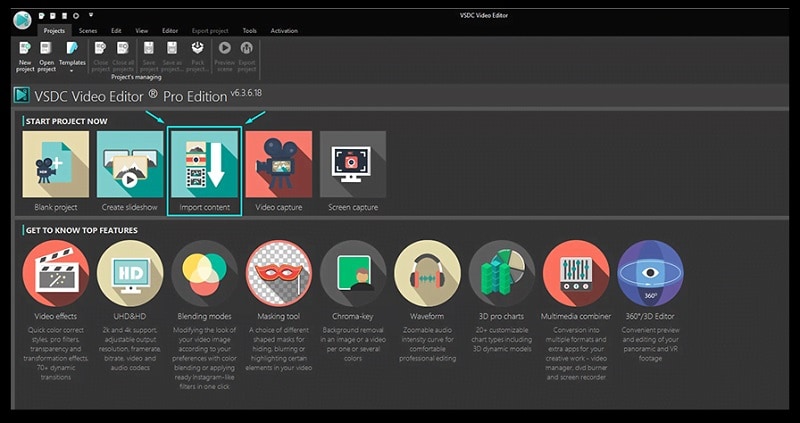
If you do not have any premium video editor on your computer and you do not want to purchase any premium video editor, you can still get glitter text effect free. You need to download and install VSDC free video editor on your computer. But the steps to create glitch text on VSDC video editor are slightly complicated as the user interface is not as intuitive as Filmora . Here are the steps to add free glitch text effect on your video.
Step1 Download and install VSDC video editor. Launch the editor and click on New Project to get started. Import your video to your project where you want to add glitch text effect.
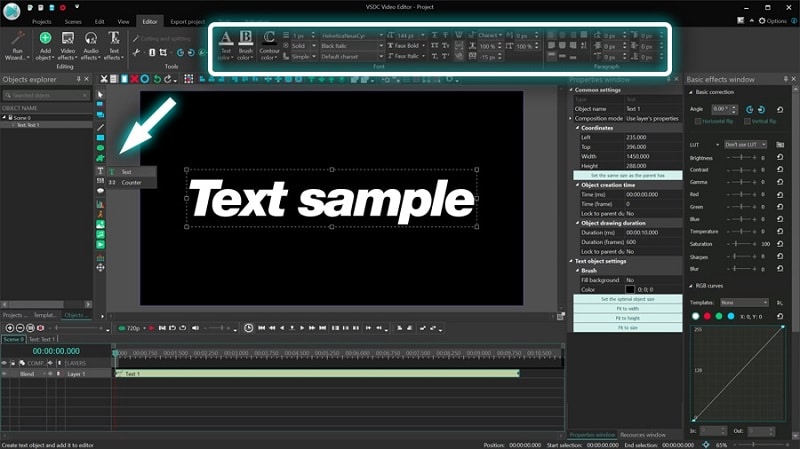
Step2 Use Type tool to write a text on the video. You can press Shift+T shortcut as well. After typing the text, adjust the text style as per your preference.
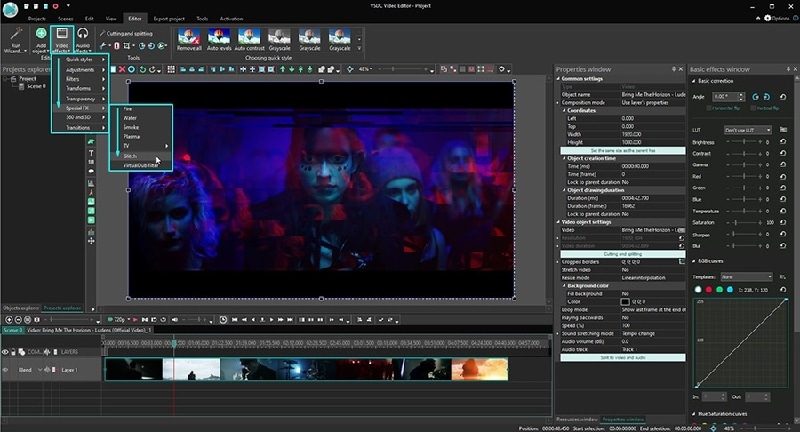
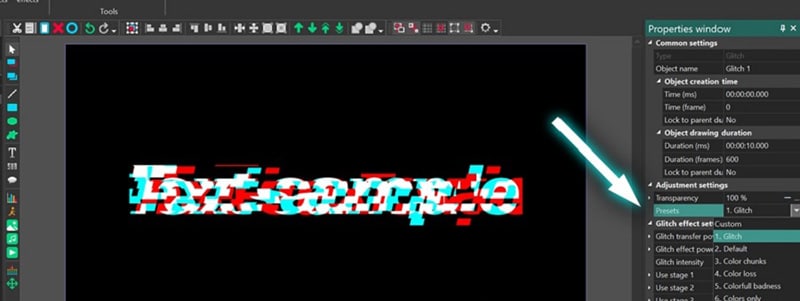
Step3 Double-click on the text layer on Timeline and go to Video Effects> Special FX and click on Glitch option.
Step4 A window will appear where you can set the starting point, duration, and different parameters. Click on Ok button.
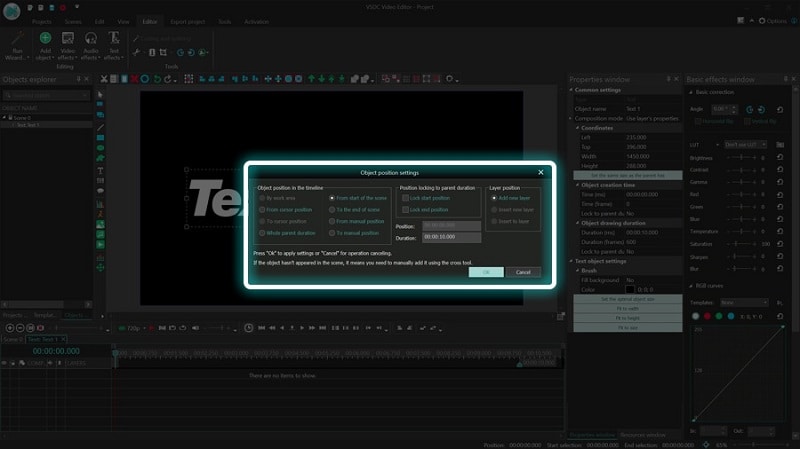
Step5 Go to Properties Windows and click on Presets to select different types of glitch text effects. You can also adjust the intensity of the text effects and other parameters as you feel.
Part 4. Related FAQs about Glitch Text
1. How do you animate glitch text?
If you want to animate glitch text for free, VSDC video editor is ideal as you can customize the effect on any text in simple steps. If you want to use a premium video editor, we recommend Filmora as there are various glitch text effects available to apply to any text on your video instantly.
2. How do you glitch text on video?
First, you have to import your video in your video editor. Type the desired text and set the style. Thereafter, go to glitch text effect presets available on the video editor and apply it to the text instantly. You can customize the glitch text effect as per your preference to make the animation more prominent.
3. How do you glitch text on Android?
You should first install Glitch Video Effect: Glitch FX app from Play Store. Edit your video on the app to add any text, and thereafter, add glitch text effect instantly. In fact, the glitch text effect is available in almost all popular video editor apps on Android due to the effect being trendy and viral.
Free Download For macOS 10.14 or later
Step1 Download and install Filmora on your computer. Go to File> New Project from the menu bar to start video editing project.
Step2 Go to File> Import Media > Import Media Files to import the video clips where you want to add glitch text effect. Drop the clip into the Timeline to get started.
Step3 Go to Titles tab located at the top. From the left panel, click on Titles option. Search “glitch” in the search field and you will see all the glitch text effects that you can apply to the text in your video.
Step4 Select any glitch text effect and drop it into the Timeline above the video clip exactly where you want the text and the effect to appear.
Step5 Double-click on the glitch text effect located on Timeline and edit the text, style, and other parameters as per your preference. Click on Ok and play the video to see your edited video with the glitch text effect.
Part 2. How to Make Glitch Text Effect with Premiere Pro
Adobe Premiere Pro is another renowned video editor where you can add glitch text effect to your video. Premiere Pro is strictly for professional video editors as the user interface is not as intuitive as Filmora . The learning curve is steep, and therefore, you need to go through the steps to add glitch text effect Premiere Pro. There are several glitch text effect presets available that you can apply to any text on your video to make them engaging. Here are the steps to make glitch text effect with Premiere Pro.
Step1 Launch Adobe Premiere Pro and go to New> Project to get started. Import your video and drop it into Timeline.
Step2 Use the Type tool to write any text on your video to add glitch text effect. You should have a text layer on Timeline.
Step3 Go to Effects> Immersive Video> VR Digital Glitch option. Drag and drop the effect to text layer.
Step4 Under Effect Controls tab, you will find all the different parameters that you can adjust to get the glitch text effect perfectly.
Step5 Turn on Master Amplitude and add multiple keyframes as different points in the Timeline and change the distortion value to make the effect prominent.
Step6 Go to the first keyframe and turn on Random Seed effect. Go to the last keyframe and turn on Random Seed effect and change the value to 75. Play the video to check the entire video with glitch text effect.
Part 3. Use VSDC Video Editor to Create Glitch Text
If you do not have any premium video editor on your computer and you do not want to purchase any premium video editor, you can still get glitter text effect free. You need to download and install VSDC free video editor on your computer. But the steps to create glitch text on VSDC video editor are slightly complicated as the user interface is not as intuitive as Filmora . Here are the steps to add free glitch text effect on your video.
Step1 Download and install VSDC video editor. Launch the editor and click on New Project to get started. Import your video to your project where you want to add glitch text effect.
Step2 Use Type tool to write a text on the video. You can press Shift+T shortcut as well. After typing the text, adjust the text style as per your preference.
Step3 Double-click on the text layer on Timeline and go to Video Effects> Special FX and click on Glitch option.
Step4 A window will appear where you can set the starting point, duration, and different parameters. Click on Ok button.
Step5 Go to Properties Windows and click on Presets to select different types of glitch text effects. You can also adjust the intensity of the text effects and other parameters as you feel.
Part 4. Related FAQs about Glitch Text
1. How do you animate glitch text?
If you want to animate glitch text for free, VSDC video editor is ideal as you can customize the effect on any text in simple steps. If you want to use a premium video editor, we recommend Filmora as there are various glitch text effects available to apply to any text on your video instantly.
2. How do you glitch text on video?
First, you have to import your video in your video editor. Type the desired text and set the style. Thereafter, go to glitch text effect presets available on the video editor and apply it to the text instantly. You can customize the glitch text effect as per your preference to make the animation more prominent.
3. How do you glitch text on Android?
You should first install Glitch Video Effect: Glitch FX app from Play Store. Edit your video on the app to add any text, and thereafter, add glitch text effect instantly. In fact, the glitch text effect is available in almost all popular video editor apps on Android due to the effect being trendy and viral.
How to Add Effects on TikTok
In TikTok, users may develop and produce visually appealing videos to share with their viewers. The program enables users to apply effects to TikTok videos in order to facilitate this kind of production. TikTok offers a lot of features, making it simple to become lost inside the application. The utilization of TikTok’s built-in effects is one of the elements that contributes to their films’ engaging nature. To know how to add effects to TikTok videos, you must thus follow the instructions provided in the article below.
To know how to add effect to TikTok is a daunting task if you don’t know the steps. However, it’s time to get familiar with the most prevalent and coolest effects of the app if you want to build a sizable following on this platform and produce films that go viral. With this guide you can add effects to your video to make it more visually appealing; this is one of the best possibilities. These effects might include slow motion, stickers, or even special effects like visual effects.
Part 1. Using TikTok In-App Effects
If you use Tik Tok often, you undoubtedly already know that this app has several effects available as well. These consist of stickers, time effects, video coverings, and filter effects. As soon as you record or submit a video clip, these effects are readily triggered. Simply locate the “Effects” option to begin adding them to your movie. However, using text or caption effects is not possible in this manner. However, it is a useful method for improving your Tik Tok video before sharing it.
Steps to Add Effects to TikTok Using Built-in Effects:
Step1 Open the app after installation and add a video by touching the “+” button to start a new recording or by tapping the “Upload” button to upload media files from your picture library.

Step2 On the right side of the screen, tap “Filters.” You may now apply effects when a video file is available by touching the “Effects” button in the bottom left corner of the app.

Step3 Choose the filter you want to use. To search, use the scroll, or choose a category to focus the sort of filter you want to apply.
Step4 Click on “Effects.” Once again, scroll to search or choose an effect category to browse. Tap “Save” to save the changes you’ve made. Tap “Next” and then “Post” to continue.

Part 2. Adding Effects Before Recording
Many people are hesitant to record a TikTok video with more than one filter effect applied. You’ve probably seen that a lot of well-known makers create videos that combine many different effects. Actually, the procedure is rather easy. You may apply as many filters as you’d like on the TikTok app while recording time stamps one at a time only! It is not feasible or the option is not presently accessible on the app if you wish to apply many effects at once.
Steps to Add Effects to TikTok Videos Before Recording:
Step1 Open the TikTok app and click the Create button in the lower-middle of the screen.

Step2 On the right side of the screen, tap Filters. The screen’s bottom will reveal a pop-up menu for filters.

Step3 To see the choices, swipe. By tapping the tabs, you may quickly navigate to that particular set of filters. Alternatively, you may just swipe and browse through each choice. Select a filter by tapping it. To lessen or intensify the filter effect, move the slider to the left or right.

Step4 If you like the result, press the screen to start recording your video normally. Tap the Stop symbol at the very left to remove the filter.

Part 3. Adding Effects After Recording
Forgot to use a filter effect before to beginning your recording? Not to worry! On the Preview page, you may also apply a filter to your clips. By selecting Visual under Effects after recording or uploading your TikTok video, you may also add some lovely dynamic filter effects. You may achieve that by saving the films to your camera roll after applying each effect individually to the same clip. then launch the app’s video recorder, add the previously recorded video, and choose a new filter to apply to the video clip.
Steps to Add Effects to TikTok After Recording:
Step1 The first step is to launch the program on your phone and touch the “+” icon. Simply choose a filter effect for your movie by going right to the Filters section here.
![]()
Step2 The filters button, which is indicated by three circles, must be tapped in the second stage. You may choose the TikTok effect you wish to use once all of the effects are shown on the screen.

Step3 You have access to a wide variety of effects once you enter the effects gallery. Select the effect that best suits your video and that you prefer. After making your decision, leave the effects gallery and upload the recording.
Step4 Click the review button to examine your video with the effect applied before publishing it. This will lead you to a preview screen. Before you actually publish it, you may also add music and other components.

Part 4. Add Filter on Video in TikTok
You may apply the filters after you film the movie, just as you do with the effects. You just need to visit visual. There is no way to identify the filter that your favorite TikToker used on his video on TikTok. Don’t worry, they often include the effect they employ in the hashtag or description, so you are still welcome to utilize it. To hunt for filter effects on TikTok, you might request a search function.
Steps to Add Filter on Videos in TikTok:
Step1 Click the “+” symbol in the bottom menu’s center after launching the TikTok app on your phone. Press the “+” button to start your camera before applying a specific filter.

Step2 The “effects” symbol, which looks like a winking emoji, should be tapped. You will have access to a wide variety of TikTok filters once inside. On your screen, click the Filters symbol in the top right corner.

Step3 The options screen opens when you press the effect filter button. Your effect will appear in your video once you just hit the red button. When you are presented with all of these filters, choose the one that best fits your video and give it a try.

Step4 You may apply the filter to your video after you have officially made your decision. After doing this, leave the filter gallery and begin recording your video. Now that all of these procedures have been completed, you are able to capture your video with the effect on it.

The Bottom Line
Filters on TikTok work similarly to filters on other social media applications. However, there is no option or function in the TikTok app that allows you to look for a filter effect under the Filters or Effects tab. However, since most TikTok users constantly upload videos with any filter and strive to put the filter’s name and hashtags on the films, you may search for some videos with the identical filter. Your films will get flair and individuality thanks to this simple technique, which also gives certain filters a chance to catch on as trends.
Free Download For Win 7 or later(64-bit)
Free Download For macOS 10.14 or later
Free Download For macOS 10.14 or later
Want to Convert MP4 Video To 60 FPS GIF? Read This
GIFs have become a popular way to share short and engaging videos online. They are widely used on social media platforms and messaging apps, making it easy to share moments, reactions, and emotions with friends and family. But not all GIFs are created equal. Some GIFs can look choppy and low-quality, detracting from the viewing experience.
To improve the quality of your GIFs, you can convert your MP4 videos to 60 FPS (frames per second). This will give your GIFs a smooth, fluid motion that looks professional and visually appealing. In this article, we’ll go over the steps you need to follow to convert your MP4 videos to 60 FPS GIFs and create high-quality GIFs that are perfect for sharing online.

Why Convert MP4 to 60-FPS GIF?
GIFs are a great way to share short, eye-catching videos online, but not all are made the same. GIFs with low frame rates tend to look choppy, and the motion could be smoother, making the video look unprofessional and detracting from the overall viewing experience. On the other hand, GIFs with higher frame rates look smoother, and the motion is more fluid, making the video more visually appealing.
Converting your MP4 videos to GIFs has several benefits:
- Smoother Motion: By converting MP4s to GIFs, you increase the frame rate of your GIFs, giving them a smoother and more fluid motion.
- Increased Detail: Higher frame rates allow for more detail and clarity in fast-moving scenes, making the video more engaging and easier to watch.
- Reduced Ghosting: A higher frame rate reduces the “ghosting” effect in low-frame rate GIFs, making the video clearer and reducing distractions.
- High-Quality Videos: Converting MP4s to GIFs eliminates the ghosting effect and creates high-quality GIFs that are perfect for sharing online.
- Increased Engagement: High-quality GIFs will engage and entertain your audience, making them more likely to share and interact with your content.
Converting MP4s to GIFs is a great way to improve the overall quality of your GIFs and create visually appealing videos that are perfect for sharing online. Whether you’re sharing a reaction, a moment, or an emotion, a high-quality GIF will engage and entertain your audience.
Can I Get a 60 FPS GIF?
While it’s true that many people search for 60 FPS GIFs, it’s important to understand that there is no such thing as a true 60 FPS GIF.

GIFs are an image format designed to display simple animations. GIF files store delay time between frames which is defined as multiples of 1/100th of a second. Value 1 would give you 100 FPS; value 2 would already have half of 100 FPS, that is, 50 FPS; value 3 would give you 33.3 FPS GIF, etc. So there are 20 FPS GIFs, 33.3 FPS GIFs, 50 FPS GIFs, and 100 FPS GIFs.
In addition, many websites or programs (including Google Chrome) ignore value 1 (100 FPS GIFs) and default to a much slower animation speed when viewing GIF files. Therefore, 100 FPS GIFs are technically possible but are rarely used. Value 2 (50 FPS) is the most you can get.
If you want to create high-quality animations, consider using MP4s or alternative image formats better suited for high frame rates and detailed animations.
That being said, some websites may have a “60 FPS GIFs” category, but it’s important to understand that most of the content in these categories is not 60 FPS. Instead, it’s likely to be either an MP4 video or a GIF with a lower frame rate, like 50 FPS, labeled as “60 FPS” for marketing purposes.
Is There Any 60 FPS GIF Maker?
Unfortunately, there is no such thing as a 60 FPS GIF maker. As mentioned before, there is no 60 FPS GIF, so it is impossible to create a 60 FPS GIF using traditional methods. However, many excellent video-to-GIF converters in the market allow you to set the GIF frame rate.
These video-to-GIF converters allow you to convert MP4 videos to GIFs with a higher frame rate, which can give your GIFs a smoother and more fluid motion. While these GIFs may not be 60 FPS, they can still provide a significant quality improvement compared to traditional GIFs.
How To Convert Video to GIF and Set Its FPS on Desktop
Converting videos to GIFs is a simple process that can be done using various tools, including desktop software such as Wondershare Filmora . Filmora is a powerful and user-friendly video editor that makes it easy to convert videos to GIFs and set their frame rate.
Free Download For Win 7 or later(64-bit)
Free Download For macOS 10.14 or later

Not only does it allow you to easily convert your videos to GIFs, but it also allows you to customize the frame rate and other settings to get the perfect results. With its user-friendly interface and powerful features, Filmora makes it simple for anyone to create high-quality GIFs that are perfect for sharing on social media or other platforms.
Here’s how to convert MP4 to GIF using Filmora:
Step1 Open the Filmora software and create a new project

Step2 Import your video to the timeline

Step3 Export the video

Step4 In the export window, select “GIF“ and set the frame rate of the GIF.

How To Convert MP4 to GIF Online for Free
Converting MP4 videos to GIFs online is a quick and convenient way to create animations without needing specialized software. One of the best online tools for this purpose is Media.io . Its simple and user-friendly interface, Media.io, makes it easy to convert MP4 videos to GIFs in just a few clicks.
With Media.io, you can customize the frame rate, duration, and other settings to get the perfect results. Whether you’re looking to create simple animations or more complex and detailed videos, Media.io has everything you need to get started.
Best of all, Media.io is free to use, making it an excellent choice for anyone who wants to convert MP4 and other videos to GIFs without spending a dime. So if you’re looking for a fast, convenient, and reliable way to convert your videos to GIFs, look no further than Media.io.
Follow these steps to convert MP4 to GIF online using Media.io:
Step1 Upload a video from your computer or drag and drop it onto the page.

Step2 Customize the output size, frame rate, and length, and add text before creating your GIF.

Step3 Download the resulting GIF file or save it for later.

People Also Ask
Here are some of the most frequently asked questions about converting MP4 to GIF and other related topics:
Q1. Can a GIF be 30 FPS?
It is impossible to get an exact 30 FPS GIF. Frame rate refers to the number of images (frames) displayed per second in a video or animation. That frame rate is stored as an integer (n) that defines n/100ths of a second. So you can specify a frame of 1/100 second (100 FPS), 2/100 second (50 FPS), 3/100 second (33.33 FPS), 4/100 second (25 FPS), etc. but not something like 3.3333…/100 second (30 FPS).
Q2. How Do I Get the FPS of a GIF?
To determine the speed or frame rate of a GIF, you can use online tools that show the delay time between its frames in milliseconds. The frame rate of a GIF is calculated by counting how many delays fit in 1 second of animation. The delay time determines the playback speed and can be adjusted to increase or decrease the frame rate. These tools also allow you to preview the speed changes and compare the input and output GIFs.
Q3. What FPS Should a GIF Be?
GIF files store delay time between frames in whole hundredths of a second. They typically run between 10 and 100 frames per second (FPS). The common frame rate for a GIF is 10 FPS, 20 FPS, 12.5 FPS, 25 FPS, and 50 FPS. With online tools, it’s possible to determine and change the speed of a GIF.
Q4. What Is the Max FPS for a GIF?
The maximum fps for a GIF is 100 FPS, but browsers or consumer screens do not support it. The browser-engine image decoders will automatically reduce the framerate to 10 fps, playing it ten times slower. If a GIF appears slow, the browser has reset the speed to 10 fps. Some software and devices may support higher frame rates.
Conclusion
GIF is a popular format for short animations and videos. The frame rate of a GIF determines its playback speed, which is usually set at 10, 20, 12.5, 25, and 50 per second. However, the highest possible frame rate that can be represented in the GIF format is 100 FPS, but most browsers and consumer screens cannot display it accurately.
There are various tools available, both online and desktop-based, that can convert videos to GIFs and adjust their frame rate as desired. With these tools, you can create high-quality, personalized GIFs that fit your specific needs and preferences.
Free Download For macOS 10.14 or later
Not only does it allow you to easily convert your videos to GIFs, but it also allows you to customize the frame rate and other settings to get the perfect results. With its user-friendly interface and powerful features, Filmora makes it simple for anyone to create high-quality GIFs that are perfect for sharing on social media or other platforms.
Here’s how to convert MP4 to GIF using Filmora:
Step1 Open the Filmora software and create a new project
Step2 Import your video to the timeline
Step3 Export the video
Step4 In the export window, select “GIF“ and set the frame rate of the GIF.
How To Convert MP4 to GIF Online for Free
Converting MP4 videos to GIFs online is a quick and convenient way to create animations without needing specialized software. One of the best online tools for this purpose is Media.io . Its simple and user-friendly interface, Media.io, makes it easy to convert MP4 videos to GIFs in just a few clicks.
With Media.io, you can customize the frame rate, duration, and other settings to get the perfect results. Whether you’re looking to create simple animations or more complex and detailed videos, Media.io has everything you need to get started.
Best of all, Media.io is free to use, making it an excellent choice for anyone who wants to convert MP4 and other videos to GIFs without spending a dime. So if you’re looking for a fast, convenient, and reliable way to convert your videos to GIFs, look no further than Media.io.
Follow these steps to convert MP4 to GIF online using Media.io:
Step1 Upload a video from your computer or drag and drop it onto the page.
Step2 Customize the output size, frame rate, and length, and add text before creating your GIF.
Step3 Download the resulting GIF file or save it for later.
People Also Ask
Here are some of the most frequently asked questions about converting MP4 to GIF and other related topics:
Q1. Can a GIF be 30 FPS?
It is impossible to get an exact 30 FPS GIF. Frame rate refers to the number of images (frames) displayed per second in a video or animation. That frame rate is stored as an integer (n) that defines n/100ths of a second. So you can specify a frame of 1/100 second (100 FPS), 2/100 second (50 FPS), 3/100 second (33.33 FPS), 4/100 second (25 FPS), etc. but not something like 3.3333…/100 second (30 FPS).
Q2. How Do I Get the FPS of a GIF?
To determine the speed or frame rate of a GIF, you can use online tools that show the delay time between its frames in milliseconds. The frame rate of a GIF is calculated by counting how many delays fit in 1 second of animation. The delay time determines the playback speed and can be adjusted to increase or decrease the frame rate. These tools also allow you to preview the speed changes and compare the input and output GIFs.
Q3. What FPS Should a GIF Be?
GIF files store delay time between frames in whole hundredths of a second. They typically run between 10 and 100 frames per second (FPS). The common frame rate for a GIF is 10 FPS, 20 FPS, 12.5 FPS, 25 FPS, and 50 FPS. With online tools, it’s possible to determine and change the speed of a GIF.
Q4. What Is the Max FPS for a GIF?
The maximum fps for a GIF is 100 FPS, but browsers or consumer screens do not support it. The browser-engine image decoders will automatically reduce the framerate to 10 fps, playing it ten times slower. If a GIF appears slow, the browser has reset the speed to 10 fps. Some software and devices may support higher frame rates.
Conclusion
GIF is a popular format for short animations and videos. The frame rate of a GIF determines its playback speed, which is usually set at 10, 20, 12.5, 25, and 50 per second. However, the highest possible frame rate that can be represented in the GIF format is 100 FPS, but most browsers and consumer screens cannot display it accurately.
There are various tools available, both online and desktop-based, that can convert videos to GIFs and adjust their frame rate as desired. With these tools, you can create high-quality, personalized GIFs that fit your specific needs and preferences.
11 Apps To Speed Up A Video On iPhone
As a content creator or a video editor, you may deal with many different aspects of editing. It may go from basic editing to VFX and so on. Speed ramping is also an important feature of editing. Creators who make cinematics or B-rolls often may have used this feature.
Changing the speed of the whole video doesn’t look good in most situations therefore speed ramping feature was created. Speed Ramping means gradually changing the speed of a clip over time. It isn’t a complex thing but doing it correctly in the right amount at the right time can change the feel of the whole video. It catches the attention of viewers through different scenes of a clip.
So, here we have mentioned some iPhone video editing softwares that can at least do basic speed changes. but most of them can also do advanced speed ramping. These are as follows:
Filmora Go:
It is available on IOS and Android both.
Want to do speed ramping? use Filmora Go. But are you a content creator and want to do more than just video editing? I would still recommend “Filmora Go”. Because it is such a versatile and easy-to-use software made by Wondershare. Like its PC software, it is also packed with many cool features such as chroma key, mask, keyframing, blending, e.t.c. It also supports multiple layers. It has built-in effects, transitions, and presets to speed up the editing process.
It is a paid video editor but you can try it for free, free trial includes most of the features but it leaves a watermark on export.
~Features:
- Has speed curves for smooth speed ramping.
- Supports multiple images and video layers.
- Have many presets and filters for fast pace editing.
- Have cool features like chroma key, masking, keyframing, e.t.c.
- Supports “Pixabay’s” stock library.
~Cons:
- Its UI doesn’t support editing in landscape orientation.
- It doesn’t support 4k video resolution.


~Steps:
Import: Open Filmora Go, Click “New project” to start a new project, or Choose the previous one from the “Draft” portion. Select videos or images to import to your timeline. Hold and drag the clip to change its arrangement.
Edit: You can add text, effects, stickers, layers, e.t.c. by clicking their icon, present on the bar at the bottom.
Click and Drag a clip from the corner to trim it.
Click the “PiP” icon to add image or video layers, you also can add multiple layers.
Select a clip to edit it. Different editing tools appear on the bottom bar. Here you can change its opacity, its speed, or add animations.
Click the diamond icon above the timeline to add keyframes. Zoom, move, or rotate the clip to add keyframes with the passage of time.
Speed Ramping: To Change the speed of a clip, select it then click the “Speed” icon on the bottom bar of the screen. Move the slider to change the speed of the whole clip. To do speed ramping, click the “curves” option to choose a preset or create your own. Click a preset to apply it, and click again to open its edit menu. drag the beats up and down to change speed or add or delete a beat if you want.
Effects: Click the “Effects” icon to open the effects menu. Select an effect to apply to your clip.
Click the white box between two clips to add transitions.
Export: Click the “Export” button to export your file. Select your desired resolution and frame rate to export your clip.


Some Free Video speeding Softwares for iPhone:
If you are short on budget or don’t want to spend much on video editing softwares then you can try these free softwares. They are free that doesn’t mean that they are useless, they are quite good for beginners or moderate users although some of them are designed for professionals also. If you don’t believe me, go and try it yourself. Apart from just changing the speed, they are good in other editing aspects also.
Adobe Premiere Rush:
It is available on IOS and Android both.
If you are looking for free but good speed ramping software then why go anywhere also when you have an amazing video editor made by a well-known software company “Adobe”. Like premiere pro, they have designed a compact version for phones named “Premiere Rush”.
It is a free video editor that has all the tools needed for video editing, from video effects to color grading and audio editing. Its UI is a bit similar to PC video editors. It is a free video editor with no watermarks. Although it takes some time to understand it. But once mastered, you can do editing quickly.
~Features:
- It is a free video editor with no watermark.
- It supports up to 4K resolution at 60fps.
- You can extract audio and can do voiceover directly from the software.
- It has hundreds of filters, overlays, and title designs.
- It has basic color grading tools.
- It also has a motion tracking feature. (in Paid version)
- It supports multiple audio, video, and text layers.


~Cons:
- It only runs on high-end devices. (It is not supported in most mid-range phones)
- Not suitable for beginners. Its UI is quite hard to understand.
- Doesn’t have common features like the chroma key, masking, e.t.c.


~Price:
Its Premium version is available for 9.99/month. It includes some premium features. Or you can purchase the “All Apps Bundle” at $54.99/month for the annual plan.
~Steps:
Import: Open “Adobe Premiere Rush”, Click the “+” sign at the bottom to create a new project. in the media location, select the clips, then click the blue “create” button to start editing.
Click the blue “+” button at the bottom-left corner to add clips, audio, or graphics.
Hold and drag the clips upward to add them as a layer.
Edit: Scroll over a clip to select it. Clicking again shows a pop-up above the selected clip. Here you get 4 options: split, duplicate, separate audio, and delete.
A number of edit options appear on the bottom line of the screen:
Graphics: Click the “Graphics” button to add animated titles, transition graphics, and overlays as a layer. Select to customize its design.
Effects: Click the “Effects” button to add transitions or motion effect. Select a clip to apply transition at both ends. or select a corner of the clip to apply on it only. And change the duration of transition if you want.
Color: Here you can color grade your clips, Apply a preset or color grade manually by using sliders. You can also create your presets.
Transform: Here you can resize, rotate, crop, or change the position of the clip.
Audio: Here you can edit the audio, select a clip to edit its audio.
Speed Ramping: Click the “Speed” button to edit its speed. Select the range option to speed ramp a specific part of the clip. Select the ramp option to create a smooth speed curve. Or Set the clip duration to change its speed accordingly.
Export: To Export your clip, click the “Export” icon on top of the screen. Click “Quality Settings” to adjust export settings then click “Export” to save your file.
CapCut:
It is available on IOS and Android both.
If you are looking for a free but good speed ramping software to help you create slo-mo videos easily anywhere, anytime you want, then “CapCut” can be the right choice for you. It is a free mobile video editing software with many interesting features like keyframing, chroma-key, masking e.t.c. It also supports video and image layers. It has one of the best speed ramping features among other mobile video editors. It provides curves to smoothly speed ramp your clips. It can edit landscape, portrait, and even square video formats. It has many amazing effects and filters, it also has some stock clips.


~Features:
- It is completely free and has no watermarks.
- It supports up to 4K video resolution.
- Has curves for speed ramping.
- Has keyframes for animation.
- It has hundreds of effects, overlays, and titles.


~Cons:
- Its UI doesn’t support editing in landscape orientation.
- Lacks some common editing tools.
~Steps:
Import: Open Capcut, then click “New Project” to start a new project. Select files then click “Add” to import them. Click the white box with the “+” sign to add more clips. Hold and drag to rearrange the clips.
Click the “Add overlay” button to add photos or videos as layers.
Edit: On the bottom of the screen, you can find a bunch of tools for editing. From here you can add overlays, effects, filters, titles e.t.c to the timeline.
Select a clip to open the edit menu situated at the bottom of the screen. Here you can do the following tasks:
Split the clip; Change its speed, remove background, edit audio, do color correction, apply filters, stabilize the clip, e.t.c.
We have more edit features for the layers only which include: Spice (Blending), Animation, Masking, Chroma key, freeze frame, change opacity e.t.c.
Click the “Keyframe” icon (Diamond shaped) below the playback screen to apply keyframes to the layer. Pinch and zoom or rotate to transform the clip. Use the “Graphs” button in the edit menu to customize the keyframe animation.
Speed Ramping: To Change the speed of a clip, select it then click the “Speed” icon on the bottom bar of the screen. Move the slider to change the speed of the whole clip. To do speed ramping, click the “curves” option to choose a preset or create your own. Click a preset to apply it, and click again to open its edit menu. drag the beats up and down to change speed or add or delete a beat if you want.
Effects: Click the “+” sign between the two clips to add a transition between them, and drag the slider to change its duration.
Select the effects, filters, or titles icon to add them as a layer.
Export: Click the “Export” button on the top-right side of the screen to export your clip. Or click the button, left to the “Export” button to change its resolution and frame rate.
iMovie:
It is available on IOS and Mac.
If you are an Apple fan and own everything Apple then what’s better than getting your hands on a video editor designed by Apple. It is simple and easy to use. It has all the basic editing tools to enhance your video like crop, trim, transitions, effects, e.t.c. It also has a speed ramping feature which let you change the speed at different points of a clip. It’s AI mode “Magic Movie” lets you select clips and a style and software will make the final product for you.
Its “Storyboards” mode is a creative way of learning production and post-production skills. It lets you choose a theme from many famous Genres available, then it will guide you through the production process like capturing footage, arranging your shots, and creating cinematic titles to enhance your story.


~Features:
- It is free and easy to use.
- Let you do speed ramping by changing the speed of different parts of the clip .
- Supports Raw files.
- It’s AI mode creates videos for you on its own.
- The “Storyboarding” feature helps you through the production process.


~Cons:
- It only works on IOS and Mac.
- Not suitable for professional projects.
~Steps:
Import: Open “iMovie” then click “Start New Project” and select one of the 3 following modes to start editing:
- Magic Movie: Select the clips for editing, then click “Create Magic Movie” to let iMovie create a movie for you, which you can customize according to your liking.
- Storyboard: Click “Storyboard” then select Template and a genre or a style then click “Create” to start the project. iMovie will guide you and let you add the clip or title according to the pattern.
- Movie: In “Movie” mode, select the clips from the media browser then click “Create Movie” to start editing.
Edit: Select a clip to edit it. A bunch of tools will appear at the bottom of the screen.
Click the “scissors” icon to split, duplicate, delete the clip, or to detach the audio.
Click the “volume” icon to change the volume of the clip.
Click the “Title” icon to add a title design. Click the text (on the playback window) to edit it.
Click the “Filters” icon to apply it to the selected clip and move the slider to change its intensity.
Speed Ramping: Click the “Speed” icon to change its speed. Move the yellow slider to change the speed of the whole clip. Or click the “Add” button to add partitions (in yellow color) to the selected clip. Select a partition to change its speed only. And click the “Freeze” button to add a freeze-frame.
Effects: Select the black box between two clips to add a transition. Select a transition to apply it and change its time duration if you want.
Export: Click the “Done” button on the top-left corner of the screen to save the clip, then click the “Export” icon on the bottom of the screen to save your file.
Some Paid Video speeding Softwares for iPhone:
If you do most of your video editing from your phone and want to invest some money in it then you should check the softwares mentioned below. They are quite affordable and are worthy of investment. As they are packed with many cool features. But if you aren’t sure which software to use then don’t worry as most of these softwares have a free version to try on but they have some limited features and they provide a watermark on export. But it is a great option to get your hands on new software and once you are comfortable with it, you can purchase its premium version.
Kinemaster:
It is available on IOS and Android both.
If you want to do more than just trimming and cropping to your videos then you should try Kinemaster. For editors, who want to do some advanced-level video editing on their phone, then you must have Kinemaster on your phone. It is a paid software, which is packed with many useful features. It has many video and audio effects. It also has an amazing audio editor. It also has many title designs and basic color correction tools. It has hundreds of effects and transitions + more can be downloaded from its asset store. Its UI is suitable for beginners and content creators both. It is a paid software, but all its features are completely free to use, but the free version leaves a watermark on export.

~Features:
- It supports up to 4K resolution at 60fps. (depending on mobile configuration)
- Have amazing features like chroma key, keyframing, blend e.t.c
- Has built-in audio and video recorder.
- Supports multiple texts and video layers with different resolutions depending on the capability of the mobile phone.
- Has UI like a PC video editor and supports landscape orientation for editing.
- Have an asset store with 100s of free effects, transitions, and stock material.


~Cons:
- Can’t export 4K videos on most devices.
- Can’t apply keyframes and chroma key to the main video. (can be done on layers only)
~Price:
Its Premium version is available for $4.9/month or $39.9/year. It also includes all the premium assets.

~Steps:
Import: Open Kinemaster, then click “New Project” to start a new project. Select the desired aspect ratio then click “Create” to start editing. Or click the “import” button on top to import an existing file to continue editing.
Media Browser will be opened. Select the clips to add them to the timeline. Click the “X” button on the top-right corner to close the media browser.
Edit: Drag the clip from the corner to trim it. Select a clip to open its editing menu. Here you can change its speed, add filters, do color correction, edit its audio, e.t.c.
On the right side, you will see a bunch of icons. Click the “Layer” button to add a media file, text, or effect as a layer. Click the “Audio” button to add an audio file. Or click the “Rec” button to do a voice-over.
Click the “+” symbol between two clips to add a transition between them, then adjust its time duration if you want.
Speed Ramping: Select the “Speed” option to change its speed. Here you can only do linear speed change. To create a speed ramp effect, split the clip into different parts and then change their speed according to your liking. Apply a crossfade transition of about 0.1 sec to smooth the jump cut between clips.
Effects: Select a clip then click “Clip Graphics” to apply the effect to your clip. Your clip will be highlighted with a yellow box, adjust it to set the time duration of the effect.
Click the “Shop” icon to visit the Asset store. Here you can find many cool Effects, clip graphics, transitions, and sound effects. Download them to use in your project.
Click the Layer clip to edit it. Here you can do chroma key, keyframing, or apply animation.
Export: Click the “Export” icon on the top-right corner of the app to open the export screen. Select the desired resolution and frame rate then click “Save as video” to export it.
Power Director:
It is available on IOS and Android both.
It is a paid but quite advanced video editor available for androids and IOS both. Like its PC version mobile version is also packed with many great features. It is compact and easy to use. It supports multiple video and audio layers. Have many cool filters and transitions. Can also do basic color corrections. To complete post-production work it also has audio editing tools and effects. It also has hundreds of title designs. Its UI is easy to use and supports both portrait and landscape orientation for editing. Most of its features can be used for free with a watermark on export. To remove the watermark you need to purchase the premium version.


~Features:
- It supports up to 4K resolution at 60fps. (compatible on most devices)
- Supports both Portrait and Landscape orientation for editing.
- Supports Key framing and video stabilization also.
- Supports multiple audio and video layers.
- Can edit videos in different aspect ratios.
- Have a vast stock library.


~Cons:
- Can’t export 4K videos on many devices.
- Can apply keyframing and chroma key to layers only.
- Software lags sometimes.
~Price:
Its Premium version is available for $4.9/month or $29.9/year.
~Steps:
Import: Open “Power Director”. Click “New Project” then select Aspect Ratio to start editing. Select clips from the media library Then click the “blue tick” button to add them to the timeline. Click the “+” icon to import more clips. From the bottom bar (in portrait mode), Select the video, image, audio, or effect icon to add them as a layer. In Landscape Mode bar it is situated on the left side of the screen.
Edit: Select and drag the clip from the corner to trim it. Select a clip to open edit tools. From here you can do audio editing, color correction, cropping, stabilization, and speed change.
Here you get more features to edit a layer or an overlay such as chroma key, masking, transform keyframe, e.t.c. To do keyframing, select a layer, then click the “diamond” icon located on the right side above the timeline to add keyframes then rotate, zoom or change the position of the clip with time to add more keyframes. You can also do keyframing for other features like adjustment, mask, blend, and opacity.
Speed Ramping: To Change speed, select a clip or a layer click the “speed” button then move the slider to change its speed. To do speed ramping split the clip into small parts and change their speed respectively. Click the “ease-in” and “ease-out” buttons to smooth the jump between the clips.
Effects: Click the grey box between the clips to add a transition and move the slider to change its duration if you want.
Select a clip, then choose a filter or an effect to apply to the selected clip.
Export: To Export the finished product, click the “export” icon on the top-right side of the screen then click “Produce and Share” to select the video resolution or click the “Settings” icon to change the storage path and frame rate. Then click “Produce”.
LumaFusion:
It is available on IOS and Mac (with an m1 processor).
As a content creator, have you ever wished for creating your own cinematic masterpiece, but the thing holding you back is that you don’t have a powerful workstation or expensive software then don’t worry. You can do professional-level editing on your iPhone with the software named “LumaFusion. It is one of the most powerful and advanced video editors available for your iPhone or iPad.
It is a multi-track video editor with many useful features like the Chroma key, keyframing, color grading, and color LUTs. Have powerful color grading tools and an audio editor. It also has a lock and load stabilizer. You have to purchase the software before using it. It doesn’t have any free version to try.

Credits: Pic by Luma touch website.
~Features:
- It supports up to 4K video resolution at a max of 240 fps.
- Can also edit and export 360 videos.
- Have powerful color correction tools. You can also import your own color LUTs.
- Supports Keyframing on almost all the editing tools within the software.
- You can add some third-party audio plugins.
- Supports up to 6 audio and video layers.
- Have “Storyblock” stock library. (Many of its contents are free to use)
- Supports external monitor for display.

Credits: Pic by Luma touch website.
~Cons:
- Not available for Android devices.
- Being an advanced software, it doesn’t have masking and speed ramping features.
- Doesn’t have a free version to try on.
~Price:
It is available for purchase at $29.99.
~Steps:
Import: Click the “+” button on the bottom of the screen to start a new project. A small tab will appear, change the settings if you want, then click the “+” button on the top-right side of the tab to start your project.
Click the “flower icon” on the top-right side of the screen to open the source menu (Its icon changes depending on the present tab), Click “Photos” to open folders and files. Click and drag files to add them to the timeline. Click and drag the clips on the top of the primary clip to add them as a layer.
Edit: Click and drag the clips from the corner to trim them. On the bar at the bottom of the screen, you will find basic tools. Click the clip, to open editing tools on the same bar.
Click the “+” icon on the bottom bar or select “Titles” on the source menu to open the Titles menu. Drag and drop the titles to use them. Double-click the text to open the edit menu.
Double-click the clip to open the edit menu. Here you can transform the clip, change its speed, Stabilize your clips, do color grading, add an effect and perform audio editing.
Speed Ramping: In the edit mode, click the “speed and reverse” button and move the slider back or forth to change the speed of the whole video. To do speed ramping, split the video into parts and apply different speeds to create a speed ramp effect. This method is not perfect but it gets the job done.
Effects: Select the “Transitions” icon on the source menu to open the transition menu. Drag and drop a transition on a clip to use it.
Double click a clip to open the edit menu. Then in the “Color & Effects” tab select any effects and apply them to your clip.
To do keyframing, on the edit menu, click the “circle” icon on the bottom-right side below the display to start keyframing. then change the settings with time to add further keyframes.
Export: To Export your file, click the “Export” icon on the bottom-right corner of the screen to open the export menu then click the “movie” icon to select the file destination. Select the desired export settings then click the “Export” icon on the top of the menu to export your finished product.
Which One Should I Choose Free or Paid iPhone Video speeding Softwares?
It usually depends on your needs. If you just want a speed editor to make slow-mo or timelapse videos for your social media then you should go for free video editors, as they are easy to use and provide better speed ramping features than some paid video editors mentioned here.
But as a content creator if you want more features alongside speed ramping then you should go for paid softwares mentioned above. As mobile video editors are quite affordable and some of them have features like that of some PC softwares.
FAQs about Speed ramping feature and softwares:
- Q) What is Speed Ramping and where it is used?
Speed Ramping is different from just changing the speed of the whole clip. It means changing the speed of the video gradually, so the clip doesn’t feel jumpy.
It is done to give viewers a smooth experience between different parts of the clip. like the fast-forward clip is used to show the passage of time. and the slow-mo is used to emphasize something or produce tension, while a mix of both is used in ads and action scenes, e.t.c.
- Q) How to do Speed Ramping?
Speed Ramping methods vary from software to software. Either you can do it by adding keyframes and changing speed with time or you can add or adjust curves for speed change. If your software doesn’t support the speed ramping feature, you can split a clip into parts and apply speed change to them differently. For some of the best iPhone softwares, we have mentioned the speed ramping steps above.
- Q) What FPS is best for Slo-mo videos?
Shooting at 60 Fps is ideal as it gives a smooth and crisp video and you can make slow motion easily if required, you can slow it down up to 40% of its speed while maintaining the quality. It is supported in almost most devices nowadays. And if you want to create super slo-mo for your cinematics or product video then 120 or 240 fps is preferable. But higher fps often have disadvantages as it is harder to apply visual effects or masks. So choose the frame rate according to your requirements.
- Q) Does changing the speed of video affect its audio?
Yes, changing the speed of video affects the audio, It affects its pitch (tempo). Increasing its speed increases the pitch of the audio making it sound shrill while decreasing the speed of the video or making slow-mo decreases the pitch making it sound deep.
Although, some softwares provide the feature to maintain the pitch while changing the speed of the clip.
~Cons:
- Its UI doesn’t support editing in landscape orientation.
- It doesn’t support 4k video resolution.
~Steps:
Import: Open Filmora Go, Click “New project” to start a new project, or Choose the previous one from the “Draft” portion. Select videos or images to import to your timeline. Hold and drag the clip to change its arrangement.
Edit: You can add text, effects, stickers, layers, e.t.c. by clicking their icon, present on the bar at the bottom.
Click and Drag a clip from the corner to trim it.
Click the “PiP” icon to add image or video layers, you also can add multiple layers.
Select a clip to edit it. Different editing tools appear on the bottom bar. Here you can change its opacity, its speed, or add animations.
Click the diamond icon above the timeline to add keyframes. Zoom, move, or rotate the clip to add keyframes with the passage of time.
Speed Ramping: To Change the speed of a clip, select it then click the “Speed” icon on the bottom bar of the screen. Move the slider to change the speed of the whole clip. To do speed ramping, click the “curves” option to choose a preset or create your own. Click a preset to apply it, and click again to open its edit menu. drag the beats up and down to change speed or add or delete a beat if you want.
Effects: Click the “Effects” icon to open the effects menu. Select an effect to apply to your clip.
Click the white box between two clips to add transitions.
Export: Click the “Export” button to export your file. Select your desired resolution and frame rate to export your clip.
Some Free Video speeding Softwares for iPhone:
If you are short on budget or don’t want to spend much on video editing softwares then you can try these free softwares. They are free that doesn’t mean that they are useless, they are quite good for beginners or moderate users although some of them are designed for professionals also. If you don’t believe me, go and try it yourself. Apart from just changing the speed, they are good in other editing aspects also.
Adobe Premiere Rush:
It is available on IOS and Android both.
If you are looking for free but good speed ramping software then why go anywhere also when you have an amazing video editor made by a well-known software company “Adobe”. Like premiere pro, they have designed a compact version for phones named “Premiere Rush”.
It is a free video editor that has all the tools needed for video editing, from video effects to color grading and audio editing. Its UI is a bit similar to PC video editors. It is a free video editor with no watermarks. Although it takes some time to understand it. But once mastered, you can do editing quickly.
~Features:
- It is a free video editor with no watermark.
- It supports up to 4K resolution at 60fps.
- You can extract audio and can do voiceover directly from the software.
- It has hundreds of filters, overlays, and title designs.
- It has basic color grading tools.
- It also has a motion tracking feature. (in Paid version)
- It supports multiple audio, video, and text layers.
~Cons:
- It only runs on high-end devices. (It is not supported in most mid-range phones)
- Not suitable for beginners. Its UI is quite hard to understand.
- Doesn’t have common features like the chroma key, masking, e.t.c.
~Price:
Its Premium version is available for 9.99/month. It includes some premium features. Or you can purchase the “All Apps Bundle” at $54.99/month for the annual plan.
~Steps:
Import: Open “Adobe Premiere Rush”, Click the “+” sign at the bottom to create a new project. in the media location, select the clips, then click the blue “create” button to start editing.
Click the blue “+” button at the bottom-left corner to add clips, audio, or graphics.
Hold and drag the clips upward to add them as a layer.
Edit: Scroll over a clip to select it. Clicking again shows a pop-up above the selected clip. Here you get 4 options: split, duplicate, separate audio, and delete.
A number of edit options appear on the bottom line of the screen:
Graphics: Click the “Graphics” button to add animated titles, transition graphics, and overlays as a layer. Select to customize its design.
Effects: Click the “Effects” button to add transitions or motion effect. Select a clip to apply transition at both ends. or select a corner of the clip to apply on it only. And change the duration of transition if you want.
Color: Here you can color grade your clips, Apply a preset or color grade manually by using sliders. You can also create your presets.
Transform: Here you can resize, rotate, crop, or change the position of the clip.
Audio: Here you can edit the audio, select a clip to edit its audio.
Speed Ramping: Click the “Speed” button to edit its speed. Select the range option to speed ramp a specific part of the clip. Select the ramp option to create a smooth speed curve. Or Set the clip duration to change its speed accordingly.
Export: To Export your clip, click the “Export” icon on top of the screen. Click “Quality Settings” to adjust export settings then click “Export” to save your file.
CapCut:
It is available on IOS and Android both.
If you are looking for a free but good speed ramping software to help you create slo-mo videos easily anywhere, anytime you want, then “CapCut” can be the right choice for you. It is a free mobile video editing software with many interesting features like keyframing, chroma-key, masking e.t.c. It also supports video and image layers. It has one of the best speed ramping features among other mobile video editors. It provides curves to smoothly speed ramp your clips. It can edit landscape, portrait, and even square video formats. It has many amazing effects and filters, it also has some stock clips.
~Features:
- It is completely free and has no watermarks.
- It supports up to 4K video resolution.
- Has curves for speed ramping.
- Has keyframes for animation.
- It has hundreds of effects, overlays, and titles.
~Cons:
- Its UI doesn’t support editing in landscape orientation.
- Lacks some common editing tools.
~Steps:
Import: Open Capcut, then click “New Project” to start a new project. Select files then click “Add” to import them. Click the white box with the “+” sign to add more clips. Hold and drag to rearrange the clips.
Click the “Add overlay” button to add photos or videos as layers.
Edit: On the bottom of the screen, you can find a bunch of tools for editing. From here you can add overlays, effects, filters, titles e.t.c to the timeline.
Select a clip to open the edit menu situated at the bottom of the screen. Here you can do the following tasks:
Split the clip; Change its speed, remove background, edit audio, do color correction, apply filters, stabilize the clip, e.t.c.
We have more edit features for the layers only which include: Spice (Blending), Animation, Masking, Chroma key, freeze frame, change opacity e.t.c.
Click the “Keyframe” icon (Diamond shaped) below the playback screen to apply keyframes to the layer. Pinch and zoom or rotate to transform the clip. Use the “Graphs” button in the edit menu to customize the keyframe animation.
Speed Ramping: To Change the speed of a clip, select it then click the “Speed” icon on the bottom bar of the screen. Move the slider to change the speed of the whole clip. To do speed ramping, click the “curves” option to choose a preset or create your own. Click a preset to apply it, and click again to open its edit menu. drag the beats up and down to change speed or add or delete a beat if you want.
Effects: Click the “+” sign between the two clips to add a transition between them, and drag the slider to change its duration.
Select the effects, filters, or titles icon to add them as a layer.
Export: Click the “Export” button on the top-right side of the screen to export your clip. Or click the button, left to the “Export” button to change its resolution and frame rate.
iMovie:
It is available on IOS and Mac.
If you are an Apple fan and own everything Apple then what’s better than getting your hands on a video editor designed by Apple. It is simple and easy to use. It has all the basic editing tools to enhance your video like crop, trim, transitions, effects, e.t.c. It also has a speed ramping feature which let you change the speed at different points of a clip. It’s AI mode “Magic Movie” lets you select clips and a style and software will make the final product for you.
Its “Storyboards” mode is a creative way of learning production and post-production skills. It lets you choose a theme from many famous Genres available, then it will guide you through the production process like capturing footage, arranging your shots, and creating cinematic titles to enhance your story.
~Features:
- It is free and easy to use.
- Let you do speed ramping by changing the speed of different parts of the clip .
- Supports Raw files.
- It’s AI mode creates videos for you on its own.
- The “Storyboarding” feature helps you through the production process.
~Cons:
- It only works on IOS and Mac.
- Not suitable for professional projects.
~Steps:
Import: Open “iMovie” then click “Start New Project” and select one of the 3 following modes to start editing:
- Magic Movie: Select the clips for editing, then click “Create Magic Movie” to let iMovie create a movie for you, which you can customize according to your liking.
- Storyboard: Click “Storyboard” then select Template and a genre or a style then click “Create” to start the project. iMovie will guide you and let you add the clip or title according to the pattern.
- Movie: In “Movie” mode, select the clips from the media browser then click “Create Movie” to start editing.
Edit: Select a clip to edit it. A bunch of tools will appear at the bottom of the screen.
Click the “scissors” icon to split, duplicate, delete the clip, or to detach the audio.
Click the “volume” icon to change the volume of the clip.
Click the “Title” icon to add a title design. Click the text (on the playback window) to edit it.
Click the “Filters” icon to apply it to the selected clip and move the slider to change its intensity.
Speed Ramping: Click the “Speed” icon to change its speed. Move the yellow slider to change the speed of the whole clip. Or click the “Add” button to add partitions (in yellow color) to the selected clip. Select a partition to change its speed only. And click the “Freeze” button to add a freeze-frame.
Effects: Select the black box between two clips to add a transition. Select a transition to apply it and change its time duration if you want.
Export: Click the “Done” button on the top-left corner of the screen to save the clip, then click the “Export” icon on the bottom of the screen to save your file.
Some Paid Video speeding Softwares for iPhone:
If you do most of your video editing from your phone and want to invest some money in it then you should check the softwares mentioned below. They are quite affordable and are worthy of investment. As they are packed with many cool features. But if you aren’t sure which software to use then don’t worry as most of these softwares have a free version to try on but they have some limited features and they provide a watermark on export. But it is a great option to get your hands on new software and once you are comfortable with it, you can purchase its premium version.
Kinemaster:
It is available on IOS and Android both.
If you want to do more than just trimming and cropping to your videos then you should try Kinemaster. For editors, who want to do some advanced-level video editing on their phone, then you must have Kinemaster on your phone. It is a paid software, which is packed with many useful features. It has many video and audio effects. It also has an amazing audio editor. It also has many title designs and basic color correction tools. It has hundreds of effects and transitions + more can be downloaded from its asset store. Its UI is suitable for beginners and content creators both. It is a paid software, but all its features are completely free to use, but the free version leaves a watermark on export.
~Features:
- It supports up to 4K resolution at 60fps. (depending on mobile configuration)
- Have amazing features like chroma key, keyframing, blend e.t.c
- Has built-in audio and video recorder.
- Supports multiple texts and video layers with different resolutions depending on the capability of the mobile phone.
- Has UI like a PC video editor and supports landscape orientation for editing.
- Have an asset store with 100s of free effects, transitions, and stock material.
~Cons:
- Can’t export 4K videos on most devices.
- Can’t apply keyframes and chroma key to the main video. (can be done on layers only)
~Price:
Its Premium version is available for $4.9/month or $39.9/year. It also includes all the premium assets.
~Steps:
Import: Open Kinemaster, then click “New Project” to start a new project. Select the desired aspect ratio then click “Create” to start editing. Or click the “import” button on top to import an existing file to continue editing.
Media Browser will be opened. Select the clips to add them to the timeline. Click the “X” button on the top-right corner to close the media browser.
Edit: Drag the clip from the corner to trim it. Select a clip to open its editing menu. Here you can change its speed, add filters, do color correction, edit its audio, e.t.c.
On the right side, you will see a bunch of icons. Click the “Layer” button to add a media file, text, or effect as a layer. Click the “Audio” button to add an audio file. Or click the “Rec” button to do a voice-over.
Click the “+” symbol between two clips to add a transition between them, then adjust its time duration if you want.
Speed Ramping: Select the “Speed” option to change its speed. Here you can only do linear speed change. To create a speed ramp effect, split the clip into different parts and then change their speed according to your liking. Apply a crossfade transition of about 0.1 sec to smooth the jump cut between clips.
Effects: Select a clip then click “Clip Graphics” to apply the effect to your clip. Your clip will be highlighted with a yellow box, adjust it to set the time duration of the effect.
Click the “Shop” icon to visit the Asset store. Here you can find many cool Effects, clip graphics, transitions, and sound effects. Download them to use in your project.
Click the Layer clip to edit it. Here you can do chroma key, keyframing, or apply animation.
Export: Click the “Export” icon on the top-right corner of the app to open the export screen. Select the desired resolution and frame rate then click “Save as video” to export it.
Power Director:
It is available on IOS and Android both.
It is a paid but quite advanced video editor available for androids and IOS both. Like its PC version mobile version is also packed with many great features. It is compact and easy to use. It supports multiple video and audio layers. Have many cool filters and transitions. Can also do basic color corrections. To complete post-production work it also has audio editing tools and effects. It also has hundreds of title designs. Its UI is easy to use and supports both portrait and landscape orientation for editing. Most of its features can be used for free with a watermark on export. To remove the watermark you need to purchase the premium version.
~Features:
- It supports up to 4K resolution at 60fps. (compatible on most devices)
- Supports both Portrait and Landscape orientation for editing.
- Supports Key framing and video stabilization also.
- Supports multiple audio and video layers.
- Can edit videos in different aspect ratios.
- Have a vast stock library.
~Cons:
- Can’t export 4K videos on many devices.
- Can apply keyframing and chroma key to layers only.
- Software lags sometimes.
~Price:
Its Premium version is available for $4.9/month or $29.9/year.
~Steps:
Import: Open “Power Director”. Click “New Project” then select Aspect Ratio to start editing. Select clips from the media library Then click the “blue tick” button to add them to the timeline. Click the “+” icon to import more clips. From the bottom bar (in portrait mode), Select the video, image, audio, or effect icon to add them as a layer. In Landscape Mode bar it is situated on the left side of the screen.
Edit: Select and drag the clip from the corner to trim it. Select a clip to open edit tools. From here you can do audio editing, color correction, cropping, stabilization, and speed change.
Here you get more features to edit a layer or an overlay such as chroma key, masking, transform keyframe, e.t.c. To do keyframing, select a layer, then click the “diamond” icon located on the right side above the timeline to add keyframes then rotate, zoom or change the position of the clip with time to add more keyframes. You can also do keyframing for other features like adjustment, mask, blend, and opacity.
Speed Ramping: To Change speed, select a clip or a layer click the “speed” button then move the slider to change its speed. To do speed ramping split the clip into small parts and change their speed respectively. Click the “ease-in” and “ease-out” buttons to smooth the jump between the clips.
Effects: Click the grey box between the clips to add a transition and move the slider to change its duration if you want.
Select a clip, then choose a filter or an effect to apply to the selected clip.
Export: To Export the finished product, click the “export” icon on the top-right side of the screen then click “Produce and Share” to select the video resolution or click the “Settings” icon to change the storage path and frame rate. Then click “Produce”.
LumaFusion:
It is available on IOS and Mac (with an m1 processor).
As a content creator, have you ever wished for creating your own cinematic masterpiece, but the thing holding you back is that you don’t have a powerful workstation or expensive software then don’t worry. You can do professional-level editing on your iPhone with the software named “LumaFusion. It is one of the most powerful and advanced video editors available for your iPhone or iPad.
It is a multi-track video editor with many useful features like the Chroma key, keyframing, color grading, and color LUTs. Have powerful color grading tools and an audio editor. It also has a lock and load stabilizer. You have to purchase the software before using it. It doesn’t have any free version to try.
Credits: Pic by Luma touch website.
~Features:
- It supports up to 4K video resolution at a max of 240 fps.
- Can also edit and export 360 videos.
- Have powerful color correction tools. You can also import your own color LUTs.
- Supports Keyframing on almost all the editing tools within the software.
- You can add some third-party audio plugins.
- Supports up to 6 audio and video layers.
- Have “Storyblock” stock library. (Many of its contents are free to use)
- Supports external monitor for display.
Credits: Pic by Luma touch website.
~Cons:
- Not available for Android devices.
- Being an advanced software, it doesn’t have masking and speed ramping features.
- Doesn’t have a free version to try on.
~Price:
It is available for purchase at $29.99.
~Steps:
Import: Click the “+” button on the bottom of the screen to start a new project. A small tab will appear, change the settings if you want, then click the “+” button on the top-right side of the tab to start your project.
Click the “flower icon” on the top-right side of the screen to open the source menu (Its icon changes depending on the present tab), Click “Photos” to open folders and files. Click and drag files to add them to the timeline. Click and drag the clips on the top of the primary clip to add them as a layer.
Edit: Click and drag the clips from the corner to trim them. On the bar at the bottom of the screen, you will find basic tools. Click the clip, to open editing tools on the same bar.
Click the “+” icon on the bottom bar or select “Titles” on the source menu to open the Titles menu. Drag and drop the titles to use them. Double-click the text to open the edit menu.
Double-click the clip to open the edit menu. Here you can transform the clip, change its speed, Stabilize your clips, do color grading, add an effect and perform audio editing.
Speed Ramping: In the edit mode, click the “speed and reverse” button and move the slider back or forth to change the speed of the whole video. To do speed ramping, split the video into parts and apply different speeds to create a speed ramp effect. This method is not perfect but it gets the job done.
Effects: Select the “Transitions” icon on the source menu to open the transition menu. Drag and drop a transition on a clip to use it.
Double click a clip to open the edit menu. Then in the “Color & Effects” tab select any effects and apply them to your clip.
To do keyframing, on the edit menu, click the “circle” icon on the bottom-right side below the display to start keyframing. then change the settings with time to add further keyframes.
Export: To Export your file, click the “Export” icon on the bottom-right corner of the screen to open the export menu then click the “movie” icon to select the file destination. Select the desired export settings then click the “Export” icon on the top of the menu to export your finished product.
Which One Should I Choose Free or Paid iPhone Video speeding Softwares?
It usually depends on your needs. If you just want a speed editor to make slow-mo or timelapse videos for your social media then you should go for free video editors, as they are easy to use and provide better speed ramping features than some paid video editors mentioned here.
But as a content creator if you want more features alongside speed ramping then you should go for paid softwares mentioned above. As mobile video editors are quite affordable and some of them have features like that of some PC softwares.
FAQs about Speed ramping feature and softwares:
- Q) What is Speed Ramping and where it is used?
Speed Ramping is different from just changing the speed of the whole clip. It means changing the speed of the video gradually, so the clip doesn’t feel jumpy.
It is done to give viewers a smooth experience between different parts of the clip. like the fast-forward clip is used to show the passage of time. and the slow-mo is used to emphasize something or produce tension, while a mix of both is used in ads and action scenes, e.t.c.
- Q) How to do Speed Ramping?
Speed Ramping methods vary from software to software. Either you can do it by adding keyframes and changing speed with time or you can add or adjust curves for speed change. If your software doesn’t support the speed ramping feature, you can split a clip into parts and apply speed change to them differently. For some of the best iPhone softwares, we have mentioned the speed ramping steps above.
- Q) What FPS is best for Slo-mo videos?
Shooting at 60 Fps is ideal as it gives a smooth and crisp video and you can make slow motion easily if required, you can slow it down up to 40% of its speed while maintaining the quality. It is supported in almost most devices nowadays. And if you want to create super slo-mo for your cinematics or product video then 120 or 240 fps is preferable. But higher fps often have disadvantages as it is harder to apply visual effects or masks. So choose the frame rate according to your requirements.
- Q) Does changing the speed of video affect its audio?
Yes, changing the speed of video affects the audio, It affects its pitch (tempo). Increasing its speed increases the pitch of the audio making it sound shrill while decreasing the speed of the video or making slow-mo decreases the pitch making it sound deep.
Although, some softwares provide the feature to maintain the pitch while changing the speed of the clip.
Also read:
- New 20 Must-Have Graduation Songs for Slideshow for 2024
- Updated Do You Know You Can Use Mobile Apps to Apply Camera Effects to Your Videos? Many Smartphone Applications Allow You to Apply Camcorder Effects for 2024
- Updated Finding the Best GIF Websites Was Never Easier
- How to Put a Filter on a Video in iMovie for 2024
- 2024 Approved This Article Talks in Detail About Why People Look for a Free Title Maker, and 8 Options that Will Benefit Their Work. It Includes Tools Like SEMrush Title Generator, Hubspot Title Generator, and More. Check Out
- Best Free Video Editing Software to Boost Your Content Creation for 2024
- Updated If You Want to Keep Your Memories in Form of Video or Slideshow Then Keynote Is Great App for You. It Has Amazing and Powerful Tools Which Give Your Slideshow a Great and Beautiful Look
- In 2024, How to Apply Gaussian Blur Effect to Videos In Premiere Pro?
- New In 2024, How to Create Video in Text Intro?
- New In 2024, How to Change the Speed of Video in DaVinci Resolve?
- Updated Detailed Steps to Cut a Video in QuickTime for 2024
- Updated In 2024, Vintage Film Effect 1980S - How to Create
- Updated Have You Ever Heard Bokeh Effects for Videos? Do You Know that You Can Make Your Own Bokeh Video Easily with some Software. This Article Will Introduce You How to Make a Bokeh Effect Video with Steps
- New 2024 Approved How to Zoom Webcam on PC
- Updated How to Use LUTS to Color Grade on Your iPhone
- Updated 2024 Approved How to Do Perfect Match Paint 100 the Simple Way
- New In 2024, How To Track and Blur Faces in Premiere Pro
- 2024 Approved Voice Changer for Discord | Use Voicemod on Discord
- Best 10 Tools To Make Quiz Videos for 2024
- New 2024 Approved Step-by-Step Guide to Storyboard
- 2024 Approved A Vlog Has Many Elements to Answer. While Setting up Ideas for It, There Are Several Things Into Which You Should Look. This Article Presents a Picture of How a Vlog Video Is Made Perfectly
- Updated 2024 Approved You Can Learn How to Color Grade Your Picture in Lightroom Effectively. By Understanding the Process of Color Grading in Lightroom, You Can Create Unique Works, and Improve Your Abilities
- New 2024 Approved Step by Step to Rotate Videos Using Kdenlive
- 2024 Approved 8 Best Video Editor with Useful Masking
- New Kdenlive Video Editor Review
- In 2024, How to Convert Time-Lapse to Normal Video
- In 2024, What Is the Best FPS for YouTube Videos?
- New 100+ Best TikTok Captions Enhance Your Content for 2024
- New In 2024, How to Make Cool COD Warzone Thumbnail
- New Tactics To Make Keynote Slideshow
- Free LUTs for OBS How to Use Them, In 2024
- 10 Best Video Editing Apps With Templates for 2024
- In 2024, Best Dark Moody LUTs During Editing
- 2024 Approved Are You Searching the Internet for Top Wedding LUTs Premiere Pro? This Article Provides Suggestions on the Best LUT Color Presets
- New How To Quick Guide for Creating Google Slideshows
- 2024 Approved The Most Efficient Ways to Manage Your Timeline
- Updated Splice Video Editor Online - Get Your Videos Splice Easily for 2024
- 2024 Approved How to Turn Text Into a Podcast
- New Best Tips for Camtasia Freeze-Frame for 2024
- New 2024 Approved Why Your Transparent GIF Is Hard to Remove and How to Do With It
- New | Zoom In and Zoom Out on YouTube for 2024
- Updated How to Comment on YouTube Live Chat for 2024
- Updated Heres All About GIF Keyboard Youll Ever Want to Know for 2024
- Updated 5 Tools to Create a Time-Lapse Video Online for 2024
- Updated 2024 Approved How to Turn On/Off Motion Blur in Dying Light 2?
- In 2024, Explore a Variety of Inexpensive Camera Models Suitable for Making Slow-Motion Footage without Compromising Quality
- 5 Solutions For Vivo Y200 Unlock Without Password
- Android Screen Stuck General Nokia G42 5G Partly Screen Unresponsive | Dr.fone
- In 2024, Top 9 Apple iPhone XR Monitoring Apps for Parental Controls | Dr.fone
- In 2024, The Complete Guide to Samsung Galaxy S23 Tactical Edition FRP Bypass Everything You Need to Know
- In 2024, How to Reset Apple ID and Apple Password On iPhone 13 mini
- How To Restore Missing Messages Files from 12 5G
- 11 Proven Solutions to Fix Google Play Store Not Working Issue on Tecno Pop 7 Pro | Dr.fone
- How to sign .wbk file electronically
- 3 Ways for Android Pokemon Go Spoofing On OnePlus Ace 2V | Dr.fone
- How To Fix Unresponsive Touch Screen on Vivo Y36 | Dr.fone
- Latest way to get Shiny Meltan Box in Pokémon Go Mystery Box On Honor X50 GT | Dr.fone
- How to Exit Android Factory Mode On Realme Note 50? | Dr.fone
- How Do You Remove Restricted Mode on Apple iPhone 14 Plus | Dr.fone
- How to Fix iPhone 11 Pro Passcode not Working? | Dr.fone
- Troubleshooting Guide How to Fix an Unresponsive Huawei P60 Screen | Dr.fone
- Realme 11 5G Camera Not Working Unexpected Error? Fix It Now | Dr.fone
- Top 4 SIM Location Trackers To Easily Find Your Lost Nokia C22 Device
- Can I recover permanently deleted photos from Xiaomi Redmi Note 13 Pro+ 5G
- In 2024, Catch or Beat Sleeping Snorlax on Pokemon Go For Tecno Camon 30 Pro 5G | Dr.fone
- In 2024, Hassle-Free Ways to Remove FRP Lock on Oppo Reno 9A Phones with/without a PC
- Ways to stop parent tracking your OnePlus Nord CE 3 5G | Dr.fone
- Life360 Learn How Everything Works On Lava Blaze 2 5G | Dr.fone
- In 2024, Lock Your Vivo T2 5G Phone in Style The Top 5 Gesture Lock Screen Apps
- 4 Ways to Transfer Music from Xiaomi Redmi 12 5G to iPhone | Dr.fone
- How to retrieve erased call logs from Honor Magic Vs 2?
- In 2024, 4 Ways to Unlock Apple iPhone XS Max to Use USB Accessories Without Passcode
- How to Change Netflix Location to Get More Country Version On Apple iPhone 15 Pro | Dr.fone
- Updated Best 5 AI Voice Generators Online (Supports All Browsers)
- In 2024, How to Spy on Text Messages from Computer & Motorola Moto G73 5G | Dr.fone
- How to Share Location in Messenger On Vivo Y200e 5G? | Dr.fone
- Best Ways to Bypass iCloud Activation Lock from Apple iPhone 15 Pro/iPad/iPod
- Apple ID Locked for Security Reasons From Apple iPhone 15 Pro? Find the Best Solution Here
- Title: 2024 Approved Create Glitch Text Effect
- Author: Morgan
- Created at : 2024-06-24 01:30:11
- Updated at : 2024-06-25 01:30:11
- Link: https://ai-video-editing.techidaily.com/2024-approved-create-glitch-text-effect/
- License: This work is licensed under CC BY-NC-SA 4.0.
