:max_bytes(150000):strip_icc():format(webp)/GettyImages-1369568023-c596ac8d6b5a4f3682bda2fa0feb12bd.jpg)
A Complete Guideline To Better Use QuickTime Player

A Complete Guideline To Better Use QuickTime Player
While designing the iOS and macOS for its dedicated devices, Apple created multiple supporting software that competes for the best in the market. An example is the QuickTime Player, a state-of-the-art, built-in video player available across Mac. This article shall introduce a detailed analysis and overview of QuickTime Player along with major QuickTime formats and features.
Come along as we explore more about QuickTime Player! You surely will get to know much about the tool before using it.
In this article
01 Key Features of QuickTime Player
02 List of QuickTime File Format
03 How to Play Videos with QuickTime
04 How to Do Screen Recording with QuickTime?
05 How to Convert Video File to MOV Format in QuickTime?
06 Top Recommended Video Editor in 2022 – Filmora Video Editor
Part 1: Key Features of QuickTime Player
Multiple highlighting features can be discovered across QuickTime Player. While a basic built-in video player, the tool outshines other video players for the following features, making it a special choice for users working across Mac. Let us look into these features to know more about QuickTime.
Record Across the Player
QuickTime Player offers users a variety of options in recording across the tool. With the basic screen recording where the user potentially sets up the area for recording and other settings, users can also record audio and movies across QuickTime. Doesn’t it sound awesome?
Editing with QuickTime
This video player is much more than a simple video player. Users can effectively use this tool for editing their videos in numerous ways. From trimming video or audio to splitting videos across the player, there are multiple options available that can be accessed easily. The user can also merge and rotate their clips according to their convenience. Sounds convenient, doesn’t it?
Change Resolution of Video
Want to change the resolution of a video? QuickTime Player allows you to potentially change the resolution of the video according to your requirement. If you have a 4K video of huge size, QuickTime Player can easily change its resolution to 1080p, 720p, or 480p, as per the requirement of the user.
Sharing Videos Directly
One of the most impressive options available across QuickTime Player is to share the video directly across different platforms. Users can share their video through Mail, Messages, AirDrop, Vimeo, Facebook, Flickr, YouTube, and several other options supported by QuickTime. Get it shared anywhere!
Part 2: List of QuickTime File Format
QuickTime offers a tangible list of file formats that can be operated across the video player. The following list shows all the QuickTime file format that can run across it:
Video File Formats
- QuickTime Movie (.mov)
- MPEG-4 (.mp4, .m4v)
- MPEG-1
- 3GPP
- 3GPP2
- AVI
- DV
Audio File Formats
- iTunes Audio (.m4a, .m4b, .m4p)
- MP3
- Core Audio (.caf)
- AIFF
- AU
- SD2
- WAV
- SND
- AMR
Part 3: How to Play Videos with QuickTime
Once you know how QuickTime Player makes it easy for Mac users to play their video, it is time to understand the steps associated with the procedure. Two basic techniques can be implemented to play videos with QuickTime. The first method to play videos with QuickTime are featured as follows:
Step 1: You need to open QuickTime Player across your Mac. For that, proceed across Launchpad to access the application.

Step 2: Once the player is launched, you can simply select any video across the window that opens up. Once selected, tap “Open” to play it across QuickTime.

Sounds easy, right? However, if you have multiple videos to open or have other video players installed in your Mac, you should consider following this second approach. If QuickTime Player is not your default video player, it is important to follow the steps below for opening any video across QuickTime.
Step 1: Open Finder on your device and proceed to locate the video that you wish to open across QuickTime. On finding the video, click on the video while holding the “Control” button on the keyboard. This opens a drop-down menu.

Step 2: In the “Open With” section across the menu, you will find the option of QuickTime Player. Tap on the option to open the video across QuickTime.

Part 4: How to Do Screen Recording with QuickTime?
Several functions can be performed across QuickTime. While the QuickTime video format allows you to play different videos across the platform, it also helps users record screens of their choice. To understand the step-by-step procedure, you need to follow the steps displayed below. Come along and learn more about it.
Step 1: Open QuickTime Player on your device and tap on the “File” tab on the top of the screen. Select the option of “New Screen Recording” from the available options to initiate screen recording.

Step 2: The next window opens up, which involves managing the screen recording settings. You need to set up the screen area recorded in the process initially.

Step 3: After setting the screen area, tap on “Options” to specify the microphone settings, the location where the recording will be saved, the timer, and other significant options that are important for screen recording. Click on the “Record” button to start.

Step 4: Once you have recorded the appropriate screen, click on the “Stop” sign appearing on the top of the window to conclude recording and save it across the decided location.

Part 5: How to Convert Video File to MOV Format in QuickTime?
QuickTime Player is not quite extensive when it comes to converting video files. Although there are several QuickTime format files that you may come across and play across the platform, it only converts any video file into MOV format, which is the dedicated file format potentially designed by Apple. To understand the method to convert any QuickTime video format to MOV format, follow the steps shown below:
Step 1: You need to open the appropriate video across QuickTime to convert it accordingly. Once opened, tap on the “File” tab, and select “Export as” across the available options.

Step 2: You need to select an appropriate resolution from the available options according to the video quality that you want the video to be saved in on the preceding menu. QuickTime player will show low-quality resolutions for the high-quality video but not vice versa.

Step 3: A new window opens that requires you to set up the name and location for the video. Add the file extension “.mov” at the end of the name of the video to convert it into MOV format.

Extra Tips: Top Recommended Video Editor in 2022 – Filmora Video Editor
Video players are important for running videos across your devices. However, the significance of a video editor is as primary as a video player in the market. When selecting the best video editor for making changes in your video before posting and viewing it across devices, there are multiple factors that a user looks into.
Wondershare Filmora offers unique and extensive features to its users at a price that is unmatched by the other players in the market. When it comes to basic video editing, the platform features the simplest set of tools that helps users enhance their video to perfection. Along with that, Filmora even allows you to add in music, effects, and transitions as desired. Isn’t it the dream?

For Win 7 or later (64-bit)
For macOS 10.12 or later
With such tools available, Filmora is recognized for its ability to make editing simple for users. There is no need for the user to be a professional in editing for making changes across Filmora. Any individual who is new to video editing can efficiently use the platform for their needs. Along with that, Filmora even allows users to make changes across the audios, both within the videos and separately. It surely is perfect!
Closing Words
Got to know much about QuickTime Player? This effective video player is the best available in the market for Mac users. While supporting different QuickTime file format, users can make significant changes across their videos with the tool. QuickTime allows them to make edits, convert, and record screens easily. This is what makes it a special choice in the market.
02 List of QuickTime File Format
03 How to Play Videos with QuickTime
04 How to Do Screen Recording with QuickTime?
05 How to Convert Video File to MOV Format in QuickTime?
06 Top Recommended Video Editor in 2022 – Filmora Video Editor
Part 1: Key Features of QuickTime Player
Multiple highlighting features can be discovered across QuickTime Player. While a basic built-in video player, the tool outshines other video players for the following features, making it a special choice for users working across Mac. Let us look into these features to know more about QuickTime.
Record Across the Player
QuickTime Player offers users a variety of options in recording across the tool. With the basic screen recording where the user potentially sets up the area for recording and other settings, users can also record audio and movies across QuickTime. Doesn’t it sound awesome?
Editing with QuickTime
This video player is much more than a simple video player. Users can effectively use this tool for editing their videos in numerous ways. From trimming video or audio to splitting videos across the player, there are multiple options available that can be accessed easily. The user can also merge and rotate their clips according to their convenience. Sounds convenient, doesn’t it?
Change Resolution of Video
Want to change the resolution of a video? QuickTime Player allows you to potentially change the resolution of the video according to your requirement. If you have a 4K video of huge size, QuickTime Player can easily change its resolution to 1080p, 720p, or 480p, as per the requirement of the user.
Sharing Videos Directly
One of the most impressive options available across QuickTime Player is to share the video directly across different platforms. Users can share their video through Mail, Messages, AirDrop, Vimeo, Facebook, Flickr, YouTube, and several other options supported by QuickTime. Get it shared anywhere!
Part 2: List of QuickTime File Format
QuickTime offers a tangible list of file formats that can be operated across the video player. The following list shows all the QuickTime file format that can run across it:
Video File Formats
- QuickTime Movie (.mov)
- MPEG-4 (.mp4, .m4v)
- MPEG-1
- 3GPP
- 3GPP2
- AVI
- DV
Audio File Formats
- iTunes Audio (.m4a, .m4b, .m4p)
- MP3
- Core Audio (.caf)
- AIFF
- AU
- SD2
- WAV
- SND
- AMR
Part 3: How to Play Videos with QuickTime
Once you know how QuickTime Player makes it easy for Mac users to play their video, it is time to understand the steps associated with the procedure. Two basic techniques can be implemented to play videos with QuickTime. The first method to play videos with QuickTime are featured as follows:
Step 1: You need to open QuickTime Player across your Mac. For that, proceed across Launchpad to access the application.

Step 2: Once the player is launched, you can simply select any video across the window that opens up. Once selected, tap “Open” to play it across QuickTime.

Sounds easy, right? However, if you have multiple videos to open or have other video players installed in your Mac, you should consider following this second approach. If QuickTime Player is not your default video player, it is important to follow the steps below for opening any video across QuickTime.
Step 1: Open Finder on your device and proceed to locate the video that you wish to open across QuickTime. On finding the video, click on the video while holding the “Control” button on the keyboard. This opens a drop-down menu.

Step 2: In the “Open With” section across the menu, you will find the option of QuickTime Player. Tap on the option to open the video across QuickTime.

Part 4: How to Do Screen Recording with QuickTime?
Several functions can be performed across QuickTime. While the QuickTime video format allows you to play different videos across the platform, it also helps users record screens of their choice. To understand the step-by-step procedure, you need to follow the steps displayed below. Come along and learn more about it.
Step 1: Open QuickTime Player on your device and tap on the “File” tab on the top of the screen. Select the option of “New Screen Recording” from the available options to initiate screen recording.

Step 2: The next window opens up, which involves managing the screen recording settings. You need to set up the screen area recorded in the process initially.

Step 3: After setting the screen area, tap on “Options” to specify the microphone settings, the location where the recording will be saved, the timer, and other significant options that are important for screen recording. Click on the “Record” button to start.

Step 4: Once you have recorded the appropriate screen, click on the “Stop” sign appearing on the top of the window to conclude recording and save it across the decided location.

Part 5: How to Convert Video File to MOV Format in QuickTime?
QuickTime Player is not quite extensive when it comes to converting video files. Although there are several QuickTime format files that you may come across and play across the platform, it only converts any video file into MOV format, which is the dedicated file format potentially designed by Apple. To understand the method to convert any QuickTime video format to MOV format, follow the steps shown below:
Step 1: You need to open the appropriate video across QuickTime to convert it accordingly. Once opened, tap on the “File” tab, and select “Export as” across the available options.

Step 2: You need to select an appropriate resolution from the available options according to the video quality that you want the video to be saved in on the preceding menu. QuickTime player will show low-quality resolutions for the high-quality video but not vice versa.

Step 3: A new window opens that requires you to set up the name and location for the video. Add the file extension “.mov” at the end of the name of the video to convert it into MOV format.

Extra Tips: Top Recommended Video Editor in 2022 – Filmora Video Editor
Video players are important for running videos across your devices. However, the significance of a video editor is as primary as a video player in the market. When selecting the best video editor for making changes in your video before posting and viewing it across devices, there are multiple factors that a user looks into.
Wondershare Filmora offers unique and extensive features to its users at a price that is unmatched by the other players in the market. When it comes to basic video editing, the platform features the simplest set of tools that helps users enhance their video to perfection. Along with that, Filmora even allows you to add in music, effects, and transitions as desired. Isn’t it the dream?

For Win 7 or later (64-bit)
For macOS 10.12 or later
With such tools available, Filmora is recognized for its ability to make editing simple for users. There is no need for the user to be a professional in editing for making changes across Filmora. Any individual who is new to video editing can efficiently use the platform for their needs. Along with that, Filmora even allows users to make changes across the audios, both within the videos and separately. It surely is perfect!
Closing Words
Got to know much about QuickTime Player? This effective video player is the best available in the market for Mac users. While supporting different QuickTime file format, users can make significant changes across their videos with the tool. QuickTime allows them to make edits, convert, and record screens easily. This is what makes it a special choice in the market.
02 List of QuickTime File Format
03 How to Play Videos with QuickTime
04 How to Do Screen Recording with QuickTime?
05 How to Convert Video File to MOV Format in QuickTime?
06 Top Recommended Video Editor in 2022 – Filmora Video Editor
Part 1: Key Features of QuickTime Player
Multiple highlighting features can be discovered across QuickTime Player. While a basic built-in video player, the tool outshines other video players for the following features, making it a special choice for users working across Mac. Let us look into these features to know more about QuickTime.
Record Across the Player
QuickTime Player offers users a variety of options in recording across the tool. With the basic screen recording where the user potentially sets up the area for recording and other settings, users can also record audio and movies across QuickTime. Doesn’t it sound awesome?
Editing with QuickTime
This video player is much more than a simple video player. Users can effectively use this tool for editing their videos in numerous ways. From trimming video or audio to splitting videos across the player, there are multiple options available that can be accessed easily. The user can also merge and rotate their clips according to their convenience. Sounds convenient, doesn’t it?
Change Resolution of Video
Want to change the resolution of a video? QuickTime Player allows you to potentially change the resolution of the video according to your requirement. If you have a 4K video of huge size, QuickTime Player can easily change its resolution to 1080p, 720p, or 480p, as per the requirement of the user.
Sharing Videos Directly
One of the most impressive options available across QuickTime Player is to share the video directly across different platforms. Users can share their video through Mail, Messages, AirDrop, Vimeo, Facebook, Flickr, YouTube, and several other options supported by QuickTime. Get it shared anywhere!
Part 2: List of QuickTime File Format
QuickTime offers a tangible list of file formats that can be operated across the video player. The following list shows all the QuickTime file format that can run across it:
Video File Formats
- QuickTime Movie (.mov)
- MPEG-4 (.mp4, .m4v)
- MPEG-1
- 3GPP
- 3GPP2
- AVI
- DV
Audio File Formats
- iTunes Audio (.m4a, .m4b, .m4p)
- MP3
- Core Audio (.caf)
- AIFF
- AU
- SD2
- WAV
- SND
- AMR
Part 3: How to Play Videos with QuickTime
Once you know how QuickTime Player makes it easy for Mac users to play their video, it is time to understand the steps associated with the procedure. Two basic techniques can be implemented to play videos with QuickTime. The first method to play videos with QuickTime are featured as follows:
Step 1: You need to open QuickTime Player across your Mac. For that, proceed across Launchpad to access the application.

Step 2: Once the player is launched, you can simply select any video across the window that opens up. Once selected, tap “Open” to play it across QuickTime.

Sounds easy, right? However, if you have multiple videos to open or have other video players installed in your Mac, you should consider following this second approach. If QuickTime Player is not your default video player, it is important to follow the steps below for opening any video across QuickTime.
Step 1: Open Finder on your device and proceed to locate the video that you wish to open across QuickTime. On finding the video, click on the video while holding the “Control” button on the keyboard. This opens a drop-down menu.

Step 2: In the “Open With” section across the menu, you will find the option of QuickTime Player. Tap on the option to open the video across QuickTime.

Part 4: How to Do Screen Recording with QuickTime?
Several functions can be performed across QuickTime. While the QuickTime video format allows you to play different videos across the platform, it also helps users record screens of their choice. To understand the step-by-step procedure, you need to follow the steps displayed below. Come along and learn more about it.
Step 1: Open QuickTime Player on your device and tap on the “File” tab on the top of the screen. Select the option of “New Screen Recording” from the available options to initiate screen recording.

Step 2: The next window opens up, which involves managing the screen recording settings. You need to set up the screen area recorded in the process initially.

Step 3: After setting the screen area, tap on “Options” to specify the microphone settings, the location where the recording will be saved, the timer, and other significant options that are important for screen recording. Click on the “Record” button to start.

Step 4: Once you have recorded the appropriate screen, click on the “Stop” sign appearing on the top of the window to conclude recording and save it across the decided location.

Part 5: How to Convert Video File to MOV Format in QuickTime?
QuickTime Player is not quite extensive when it comes to converting video files. Although there are several QuickTime format files that you may come across and play across the platform, it only converts any video file into MOV format, which is the dedicated file format potentially designed by Apple. To understand the method to convert any QuickTime video format to MOV format, follow the steps shown below:
Step 1: You need to open the appropriate video across QuickTime to convert it accordingly. Once opened, tap on the “File” tab, and select “Export as” across the available options.

Step 2: You need to select an appropriate resolution from the available options according to the video quality that you want the video to be saved in on the preceding menu. QuickTime player will show low-quality resolutions for the high-quality video but not vice versa.

Step 3: A new window opens that requires you to set up the name and location for the video. Add the file extension “.mov” at the end of the name of the video to convert it into MOV format.

Extra Tips: Top Recommended Video Editor in 2022 – Filmora Video Editor
Video players are important for running videos across your devices. However, the significance of a video editor is as primary as a video player in the market. When selecting the best video editor for making changes in your video before posting and viewing it across devices, there are multiple factors that a user looks into.
Wondershare Filmora offers unique and extensive features to its users at a price that is unmatched by the other players in the market. When it comes to basic video editing, the platform features the simplest set of tools that helps users enhance their video to perfection. Along with that, Filmora even allows you to add in music, effects, and transitions as desired. Isn’t it the dream?

For Win 7 or later (64-bit)
For macOS 10.12 or later
With such tools available, Filmora is recognized for its ability to make editing simple for users. There is no need for the user to be a professional in editing for making changes across Filmora. Any individual who is new to video editing can efficiently use the platform for their needs. Along with that, Filmora even allows users to make changes across the audios, both within the videos and separately. It surely is perfect!
Closing Words
Got to know much about QuickTime Player? This effective video player is the best available in the market for Mac users. While supporting different QuickTime file format, users can make significant changes across their videos with the tool. QuickTime allows them to make edits, convert, and record screens easily. This is what makes it a special choice in the market.
02 List of QuickTime File Format
03 How to Play Videos with QuickTime
04 How to Do Screen Recording with QuickTime?
05 How to Convert Video File to MOV Format in QuickTime?
06 Top Recommended Video Editor in 2022 – Filmora Video Editor
Part 1: Key Features of QuickTime Player
Multiple highlighting features can be discovered across QuickTime Player. While a basic built-in video player, the tool outshines other video players for the following features, making it a special choice for users working across Mac. Let us look into these features to know more about QuickTime.
Record Across the Player
QuickTime Player offers users a variety of options in recording across the tool. With the basic screen recording where the user potentially sets up the area for recording and other settings, users can also record audio and movies across QuickTime. Doesn’t it sound awesome?
Editing with QuickTime
This video player is much more than a simple video player. Users can effectively use this tool for editing their videos in numerous ways. From trimming video or audio to splitting videos across the player, there are multiple options available that can be accessed easily. The user can also merge and rotate their clips according to their convenience. Sounds convenient, doesn’t it?
Change Resolution of Video
Want to change the resolution of a video? QuickTime Player allows you to potentially change the resolution of the video according to your requirement. If you have a 4K video of huge size, QuickTime Player can easily change its resolution to 1080p, 720p, or 480p, as per the requirement of the user.
Sharing Videos Directly
One of the most impressive options available across QuickTime Player is to share the video directly across different platforms. Users can share their video through Mail, Messages, AirDrop, Vimeo, Facebook, Flickr, YouTube, and several other options supported by QuickTime. Get it shared anywhere!
Part 2: List of QuickTime File Format
QuickTime offers a tangible list of file formats that can be operated across the video player. The following list shows all the QuickTime file format that can run across it:
Video File Formats
- QuickTime Movie (.mov)
- MPEG-4 (.mp4, .m4v)
- MPEG-1
- 3GPP
- 3GPP2
- AVI
- DV
Audio File Formats
- iTunes Audio (.m4a, .m4b, .m4p)
- MP3
- Core Audio (.caf)
- AIFF
- AU
- SD2
- WAV
- SND
- AMR
Part 3: How to Play Videos with QuickTime
Once you know how QuickTime Player makes it easy for Mac users to play their video, it is time to understand the steps associated with the procedure. Two basic techniques can be implemented to play videos with QuickTime. The first method to play videos with QuickTime are featured as follows:
Step 1: You need to open QuickTime Player across your Mac. For that, proceed across Launchpad to access the application.

Step 2: Once the player is launched, you can simply select any video across the window that opens up. Once selected, tap “Open” to play it across QuickTime.

Sounds easy, right? However, if you have multiple videos to open or have other video players installed in your Mac, you should consider following this second approach. If QuickTime Player is not your default video player, it is important to follow the steps below for opening any video across QuickTime.
Step 1: Open Finder on your device and proceed to locate the video that you wish to open across QuickTime. On finding the video, click on the video while holding the “Control” button on the keyboard. This opens a drop-down menu.

Step 2: In the “Open With” section across the menu, you will find the option of QuickTime Player. Tap on the option to open the video across QuickTime.

Part 4: How to Do Screen Recording with QuickTime?
Several functions can be performed across QuickTime. While the QuickTime video format allows you to play different videos across the platform, it also helps users record screens of their choice. To understand the step-by-step procedure, you need to follow the steps displayed below. Come along and learn more about it.
Step 1: Open QuickTime Player on your device and tap on the “File” tab on the top of the screen. Select the option of “New Screen Recording” from the available options to initiate screen recording.

Step 2: The next window opens up, which involves managing the screen recording settings. You need to set up the screen area recorded in the process initially.

Step 3: After setting the screen area, tap on “Options” to specify the microphone settings, the location where the recording will be saved, the timer, and other significant options that are important for screen recording. Click on the “Record” button to start.

Step 4: Once you have recorded the appropriate screen, click on the “Stop” sign appearing on the top of the window to conclude recording and save it across the decided location.

Part 5: How to Convert Video File to MOV Format in QuickTime?
QuickTime Player is not quite extensive when it comes to converting video files. Although there are several QuickTime format files that you may come across and play across the platform, it only converts any video file into MOV format, which is the dedicated file format potentially designed by Apple. To understand the method to convert any QuickTime video format to MOV format, follow the steps shown below:
Step 1: You need to open the appropriate video across QuickTime to convert it accordingly. Once opened, tap on the “File” tab, and select “Export as” across the available options.

Step 2: You need to select an appropriate resolution from the available options according to the video quality that you want the video to be saved in on the preceding menu. QuickTime player will show low-quality resolutions for the high-quality video but not vice versa.

Step 3: A new window opens that requires you to set up the name and location for the video. Add the file extension “.mov” at the end of the name of the video to convert it into MOV format.

Extra Tips: Top Recommended Video Editor in 2022 – Filmora Video Editor
Video players are important for running videos across your devices. However, the significance of a video editor is as primary as a video player in the market. When selecting the best video editor for making changes in your video before posting and viewing it across devices, there are multiple factors that a user looks into.
Wondershare Filmora offers unique and extensive features to its users at a price that is unmatched by the other players in the market. When it comes to basic video editing, the platform features the simplest set of tools that helps users enhance their video to perfection. Along with that, Filmora even allows you to add in music, effects, and transitions as desired. Isn’t it the dream?

For Win 7 or later (64-bit)
For macOS 10.12 or later
With such tools available, Filmora is recognized for its ability to make editing simple for users. There is no need for the user to be a professional in editing for making changes across Filmora. Any individual who is new to video editing can efficiently use the platform for their needs. Along with that, Filmora even allows users to make changes across the audios, both within the videos and separately. It surely is perfect!
Closing Words
Got to know much about QuickTime Player? This effective video player is the best available in the market for Mac users. While supporting different QuickTime file format, users can make significant changes across their videos with the tool. QuickTime allows them to make edits, convert, and record screens easily. This is what makes it a special choice in the market.
Simple Tricks Make 3D GIF Production of Inspiration Pop Up
Simple Tricks Make 3d GIF Production of Inspiration Pop up Constantly
An easy yet powerful editor
Numerous effects to choose from
Detailed tutorials provided by the official channel
Making and sharing animated GIFs that practically pop out on your friend’s screen can be just the magic one needs to start their day.
3D animated GIFs are growing in popularity and surprisingly, because of a simple trick that even you can try out.
What separates 3D text GIFs or 3D animation GIFs from your regular GIFs is that they are bit more difficult but far more fun to make.
3D GIFs are where it feels like the picture is coming out of your screen. Of course, this is just a visual illusion which can be recreated over any video GIF that meets specific parameters.
In this article
01 [8 Examples of Inspiration for Fun 3D Gifs?](#Part 1)
02 [Top 5 Ways to Make 3D GIF](#Part 2)
03 [How to Make 3D Gifs in Videos More Textured](#Part 3)
Part 1 Examples of Inspiration for Fun 3D Gifs?
Remember that simple trick we mentioned earlier? This approach lets you create convincing 3D GIFs in an easy but deceptive way.
The actual magic behind this trick is the use of white lines that act as reference points separating 3 panels in the image.
Now, any animated elements of the GIF image will seem like they are popping out beyond the pre-set white lines and towards the viewer.
These white lines are used as referencing lines on the screen allowing our brains to bewilder at a passive 3D GIFs coming at us from the screen.
You can recreate this same affect with a few popular GIF makers.
Just to give you a taste of what it looks like, we have enlisted few trending pop culture 3D GIFs that are trending;
● We have all heard of Earth’s Mightiest Heroes, and Cap’ throwing his shield is certainly a fan favourite 3D GIF.

● Heard of Skull Island? Then you better call Skull Pest Control.

● Who wouldn’t love puppies? Well, here’s two.


● When you’re tangled up in things you don’t understand.

● You definitely don’t want to see this squirrel in your backyard.

● Make sure to get a good shot of caffeine when commuting through Elm Street.

● Ray Advertising is getting more innovative each year.

Part 2 Top 5 Ways to Make 3D GIF
The most instantaneous thing you can do to start making GIFs in your own free time is by using a GIF maker online. Online platforms like GIPHY and Imgflip (three more mentioned below) uses pre uploaded image and video content to create GIFs with the help of filters, texts, emoji’s and background effects.
You can simply create creative GIFs and share them directly to your social media pages. Of course if you are running your own business, you can choose to hire your own GIF animator for more personal banners and adverts.
On the other hand, if you are just sparking your creativity using a GIF creator to start out making simple animation GIFs. You can also use a GIF generator to create your GIFs from existing videos.
Now buckle up your imagination and let’s get GIFing.
01Wave.Video

This GIF creator earns its place among the best with sheer convenience. It is by far the easiest GIF maker to use on this list. You can get used to its editing interface in a shorter span of time and make amazing 3D GIFs using versatile features that are bound to impress your friends. Sharing your GIF is quite effortless with Wave.Video. You can take on small portions of your video and make a GIF out of it. It offers an amazing library of stock footage which you can use for a lot of other things too like creating intros for your videos.
02Make a GIF

If you have an image or a URL of a video and you wish to make an animated GIF out of it then Make a GIF is the GIF creator you need. Using this online free tool you can make GIFs out of any Facebook image or video URL. The Make a GIF interface also facilitates using your device’s webcam to click pictures and short clips for our GIFs and add them to the interface using drag and drop facility. You can select from pre uploaded stock samples from over a dozen different categories.
03Imgflip

When you not only need a GIF creator but an Editor as well, go for Imgflip. You can adjust and make changes in your GIF while creating it. It has tools designed into its interface that enables you to adjust the quality of the pictures you upload, their height and width as well. In terms of editing video GIFs you can tweak with the animation time and make adjustments in terms of placement of images using some of Imgflips amazing free tools.
04GIFMaker.me

Yet another animated GIF generator which simplifies your path to unlocking your GIF creativity skills a lot faster using images and videos. GIFMaker.me is compatible with all operating systems namely Windows, Mac and Linux. Although its arsenal of tools is quite basic and lets you only size/resize and reverse your GIFs. GIF maker has a very basic interface but can fulfil a fair average of your GIF creation needs.
05GIPHY

We kept the best for last and even if you type in making GIFs on Google, you might come across this search name quite often as pretty much lot of people are using it. Spark off your GIF creating drive with GIPHY which is an all-rounder in this arena. GIPHY has several awesome features that let you create GIFs by uploading images, videos and even URLs from YouTube or Vimeo or GIPHY itself. Its interface is simple and hassle free to use and lets you add filters, text, stickers and drawings to your GIFs.
Part 3 How to Make 3D Gifs in Videos More Textured
You can use GIF makers to create loops in videos you upload but the trick to making your 3D GIF stand out is about to be explained in the following.
● Step 1: Choosing an Image.
The first step in creating a 3D image is to carefully sort out which moment in your video you wish to convert into 3D. Pick an images or video clips that already have an element that pops out in a forward moving motion.
● Step 2: It should have a smart composition.
Becoming a creator means you need to know more about composition. This can be applicable to anything from making virtual designs to creating GIFs. 3D GIFs requires you to use a special Tumblr ‘frame’ that adds two breaks to the image which creates three horizontal panels. In exceptional cases, you could also use three break points and divide the image into four panels.
● Step 3: Become a content creator.
It’s okay to feel a bit off beat when trying out new skills but the prospects are rewarding. Try taking your own video footage, edit in Photoshop or any similar editing software. You can also opt for instant GIF creator apps that directly converts the footage or image you clicked into a GIF.
● Step 4: Making the split.
The next step would be splitting the image or frame into three panels as guideline for the 3D effects. In Photoshop you can import a GIF and choose ‘View’ from the navigation menu and then click on ‘New Guide’ from the drop down menu. Set the guide to 33% at first and 66% in the second.
● Step 5: Placingthe magical white lines over the guides.
From the shape menu on the sidebar, select the rectangle tool. Right click on this tool to get the shapes menu. Set ‘Fill Colour’ to white and set the weight to five pixels. Click and drag the lines over the guides.
● Step 6: For the final touch.
Merge these line layers and add a layer mask. The objective here is to only mask the panel where the main 3D element of the image which will be moving beyond the guides. How it is done is that you make copies of the frames where the animation goes beyond the guidelines and mask the layers where the element is over the visible layer.
● Step 7: Enjoy your GIF.
Once you are done masking every frame that you have copied. Replay your GIF to see if everything is in order.
Bonus Tip: Use Wondershare Filmora Video Editor to easily edit your videos using amazing tools, filters and affects. You can then make cool 3D GIFs from the videos you make.

Wondershare Filmora - Best Video Editor for Mac/Windows
5,481,435 people have downloaded it.
Build unique custom animations without breaking a sweat.
Focus on creating epic stories and leave the details to Filmora’s auto features.
Start a creative adventure with drag & drop effects and endless possibilities.
Filmora simplifies advanced features to save you time and effort.
Filmora cuts out repetition so you can move on to your next creative breakthrough.
● Key Takeaways from This Episode →
● Animated GIFs are interesting and fun to share with friends. They also make for effective advertising banners and conceptual promotions. So there are lot of applications for learning this skillset and is certainly is fun none the less.
● The easiest way to creating GIFs quick and easy would be by using a GIF creator. There are several amazing GIF creators online with fantastic features you can leverage to make amazing 3D GIFs.
● The basic trick which you should remember is using horizontal guidelines and an element which is moving towards the viewer. Keeping this in mind you can recreate amazing videos in fun GIF moments.
Making and sharing animated GIFs that practically pop out on your friend’s screen can be just the magic one needs to start their day.
3D animated GIFs are growing in popularity and surprisingly, because of a simple trick that even you can try out.
What separates 3D text GIFs or 3D animation GIFs from your regular GIFs is that they are bit more difficult but far more fun to make.
3D GIFs are where it feels like the picture is coming out of your screen. Of course, this is just a visual illusion which can be recreated over any video GIF that meets specific parameters.
In this article
01 [8 Examples of Inspiration for Fun 3D Gifs?](#Part 1)
02 [Top 5 Ways to Make 3D GIF](#Part 2)
03 [How to Make 3D Gifs in Videos More Textured](#Part 3)
Part 1 Examples of Inspiration for Fun 3D Gifs?
Remember that simple trick we mentioned earlier? This approach lets you create convincing 3D GIFs in an easy but deceptive way.
The actual magic behind this trick is the use of white lines that act as reference points separating 3 panels in the image.
Now, any animated elements of the GIF image will seem like they are popping out beyond the pre-set white lines and towards the viewer.
These white lines are used as referencing lines on the screen allowing our brains to bewilder at a passive 3D GIFs coming at us from the screen.
You can recreate this same affect with a few popular GIF makers.
Just to give you a taste of what it looks like, we have enlisted few trending pop culture 3D GIFs that are trending;
● We have all heard of Earth’s Mightiest Heroes, and Cap’ throwing his shield is certainly a fan favourite 3D GIF.

● Heard of Skull Island? Then you better call Skull Pest Control.

● Who wouldn’t love puppies? Well, here’s two.


● When you’re tangled up in things you don’t understand.

● You definitely don’t want to see this squirrel in your backyard.

● Make sure to get a good shot of caffeine when commuting through Elm Street.

● Ray Advertising is getting more innovative each year.

Part 2 Top 5 Ways to Make 3D GIF
The most instantaneous thing you can do to start making GIFs in your own free time is by using a GIF maker online. Online platforms like GIPHY and Imgflip (three more mentioned below) uses pre uploaded image and video content to create GIFs with the help of filters, texts, emoji’s and background effects.
You can simply create creative GIFs and share them directly to your social media pages. Of course if you are running your own business, you can choose to hire your own GIF animator for more personal banners and adverts.
On the other hand, if you are just sparking your creativity using a GIF creator to start out making simple animation GIFs. You can also use a GIF generator to create your GIFs from existing videos.
Now buckle up your imagination and let’s get GIFing.
01Wave.Video

This GIF creator earns its place among the best with sheer convenience. It is by far the easiest GIF maker to use on this list. You can get used to its editing interface in a shorter span of time and make amazing 3D GIFs using versatile features that are bound to impress your friends. Sharing your GIF is quite effortless with Wave.Video. You can take on small portions of your video and make a GIF out of it. It offers an amazing library of stock footage which you can use for a lot of other things too like creating intros for your videos.
02Make a GIF

If you have an image or a URL of a video and you wish to make an animated GIF out of it then Make a GIF is the GIF creator you need. Using this online free tool you can make GIFs out of any Facebook image or video URL. The Make a GIF interface also facilitates using your device’s webcam to click pictures and short clips for our GIFs and add them to the interface using drag and drop facility. You can select from pre uploaded stock samples from over a dozen different categories.
03Imgflip

When you not only need a GIF creator but an Editor as well, go for Imgflip. You can adjust and make changes in your GIF while creating it. It has tools designed into its interface that enables you to adjust the quality of the pictures you upload, their height and width as well. In terms of editing video GIFs you can tweak with the animation time and make adjustments in terms of placement of images using some of Imgflips amazing free tools.
04GIFMaker.me

Yet another animated GIF generator which simplifies your path to unlocking your GIF creativity skills a lot faster using images and videos. GIFMaker.me is compatible with all operating systems namely Windows, Mac and Linux. Although its arsenal of tools is quite basic and lets you only size/resize and reverse your GIFs. GIF maker has a very basic interface but can fulfil a fair average of your GIF creation needs.
05GIPHY

We kept the best for last and even if you type in making GIFs on Google, you might come across this search name quite often as pretty much lot of people are using it. Spark off your GIF creating drive with GIPHY which is an all-rounder in this arena. GIPHY has several awesome features that let you create GIFs by uploading images, videos and even URLs from YouTube or Vimeo or GIPHY itself. Its interface is simple and hassle free to use and lets you add filters, text, stickers and drawings to your GIFs.
Part 3 How to Make 3D Gifs in Videos More Textured
You can use GIF makers to create loops in videos you upload but the trick to making your 3D GIF stand out is about to be explained in the following.
● Step 1: Choosing an Image.
The first step in creating a 3D image is to carefully sort out which moment in your video you wish to convert into 3D. Pick an images or video clips that already have an element that pops out in a forward moving motion.
● Step 2: It should have a smart composition.
Becoming a creator means you need to know more about composition. This can be applicable to anything from making virtual designs to creating GIFs. 3D GIFs requires you to use a special Tumblr ‘frame’ that adds two breaks to the image which creates three horizontal panels. In exceptional cases, you could also use three break points and divide the image into four panels.
● Step 3: Become a content creator.
It’s okay to feel a bit off beat when trying out new skills but the prospects are rewarding. Try taking your own video footage, edit in Photoshop or any similar editing software. You can also opt for instant GIF creator apps that directly converts the footage or image you clicked into a GIF.
● Step 4: Making the split.
The next step would be splitting the image or frame into three panels as guideline for the 3D effects. In Photoshop you can import a GIF and choose ‘View’ from the navigation menu and then click on ‘New Guide’ from the drop down menu. Set the guide to 33% at first and 66% in the second.
● Step 5: Placingthe magical white lines over the guides.
From the shape menu on the sidebar, select the rectangle tool. Right click on this tool to get the shapes menu. Set ‘Fill Colour’ to white and set the weight to five pixels. Click and drag the lines over the guides.
● Step 6: For the final touch.
Merge these line layers and add a layer mask. The objective here is to only mask the panel where the main 3D element of the image which will be moving beyond the guides. How it is done is that you make copies of the frames where the animation goes beyond the guidelines and mask the layers where the element is over the visible layer.
● Step 7: Enjoy your GIF.
Once you are done masking every frame that you have copied. Replay your GIF to see if everything is in order.
Bonus Tip: Use Wondershare Filmora Video Editor to easily edit your videos using amazing tools, filters and affects. You can then make cool 3D GIFs from the videos you make.

Wondershare Filmora - Best Video Editor for Mac/Windows
5,481,435 people have downloaded it.
Build unique custom animations without breaking a sweat.
Focus on creating epic stories and leave the details to Filmora’s auto features.
Start a creative adventure with drag & drop effects and endless possibilities.
Filmora simplifies advanced features to save you time and effort.
Filmora cuts out repetition so you can move on to your next creative breakthrough.
● Key Takeaways from This Episode →
● Animated GIFs are interesting and fun to share with friends. They also make for effective advertising banners and conceptual promotions. So there are lot of applications for learning this skillset and is certainly is fun none the less.
● The easiest way to creating GIFs quick and easy would be by using a GIF creator. There are several amazing GIF creators online with fantastic features you can leverage to make amazing 3D GIFs.
● The basic trick which you should remember is using horizontal guidelines and an element which is moving towards the viewer. Keeping this in mind you can recreate amazing videos in fun GIF moments.
Making and sharing animated GIFs that practically pop out on your friend’s screen can be just the magic one needs to start their day.
3D animated GIFs are growing in popularity and surprisingly, because of a simple trick that even you can try out.
What separates 3D text GIFs or 3D animation GIFs from your regular GIFs is that they are bit more difficult but far more fun to make.
3D GIFs are where it feels like the picture is coming out of your screen. Of course, this is just a visual illusion which can be recreated over any video GIF that meets specific parameters.
In this article
01 [8 Examples of Inspiration for Fun 3D Gifs?](#Part 1)
02 [Top 5 Ways to Make 3D GIF](#Part 2)
03 [How to Make 3D Gifs in Videos More Textured](#Part 3)
Part 1 Examples of Inspiration for Fun 3D Gifs?
Remember that simple trick we mentioned earlier? This approach lets you create convincing 3D GIFs in an easy but deceptive way.
The actual magic behind this trick is the use of white lines that act as reference points separating 3 panels in the image.
Now, any animated elements of the GIF image will seem like they are popping out beyond the pre-set white lines and towards the viewer.
These white lines are used as referencing lines on the screen allowing our brains to bewilder at a passive 3D GIFs coming at us from the screen.
You can recreate this same affect with a few popular GIF makers.
Just to give you a taste of what it looks like, we have enlisted few trending pop culture 3D GIFs that are trending;
● We have all heard of Earth’s Mightiest Heroes, and Cap’ throwing his shield is certainly a fan favourite 3D GIF.

● Heard of Skull Island? Then you better call Skull Pest Control.

● Who wouldn’t love puppies? Well, here’s two.


● When you’re tangled up in things you don’t understand.

● You definitely don’t want to see this squirrel in your backyard.

● Make sure to get a good shot of caffeine when commuting through Elm Street.

● Ray Advertising is getting more innovative each year.

Part 2 Top 5 Ways to Make 3D GIF
The most instantaneous thing you can do to start making GIFs in your own free time is by using a GIF maker online. Online platforms like GIPHY and Imgflip (three more mentioned below) uses pre uploaded image and video content to create GIFs with the help of filters, texts, emoji’s and background effects.
You can simply create creative GIFs and share them directly to your social media pages. Of course if you are running your own business, you can choose to hire your own GIF animator for more personal banners and adverts.
On the other hand, if you are just sparking your creativity using a GIF creator to start out making simple animation GIFs. You can also use a GIF generator to create your GIFs from existing videos.
Now buckle up your imagination and let’s get GIFing.
01Wave.Video

This GIF creator earns its place among the best with sheer convenience. It is by far the easiest GIF maker to use on this list. You can get used to its editing interface in a shorter span of time and make amazing 3D GIFs using versatile features that are bound to impress your friends. Sharing your GIF is quite effortless with Wave.Video. You can take on small portions of your video and make a GIF out of it. It offers an amazing library of stock footage which you can use for a lot of other things too like creating intros for your videos.
02Make a GIF

If you have an image or a URL of a video and you wish to make an animated GIF out of it then Make a GIF is the GIF creator you need. Using this online free tool you can make GIFs out of any Facebook image or video URL. The Make a GIF interface also facilitates using your device’s webcam to click pictures and short clips for our GIFs and add them to the interface using drag and drop facility. You can select from pre uploaded stock samples from over a dozen different categories.
03Imgflip

When you not only need a GIF creator but an Editor as well, go for Imgflip. You can adjust and make changes in your GIF while creating it. It has tools designed into its interface that enables you to adjust the quality of the pictures you upload, their height and width as well. In terms of editing video GIFs you can tweak with the animation time and make adjustments in terms of placement of images using some of Imgflips amazing free tools.
04GIFMaker.me

Yet another animated GIF generator which simplifies your path to unlocking your GIF creativity skills a lot faster using images and videos. GIFMaker.me is compatible with all operating systems namely Windows, Mac and Linux. Although its arsenal of tools is quite basic and lets you only size/resize and reverse your GIFs. GIF maker has a very basic interface but can fulfil a fair average of your GIF creation needs.
05GIPHY

We kept the best for last and even if you type in making GIFs on Google, you might come across this search name quite often as pretty much lot of people are using it. Spark off your GIF creating drive with GIPHY which is an all-rounder in this arena. GIPHY has several awesome features that let you create GIFs by uploading images, videos and even URLs from YouTube or Vimeo or GIPHY itself. Its interface is simple and hassle free to use and lets you add filters, text, stickers and drawings to your GIFs.
Part 3 How to Make 3D Gifs in Videos More Textured
You can use GIF makers to create loops in videos you upload but the trick to making your 3D GIF stand out is about to be explained in the following.
● Step 1: Choosing an Image.
The first step in creating a 3D image is to carefully sort out which moment in your video you wish to convert into 3D. Pick an images or video clips that already have an element that pops out in a forward moving motion.
● Step 2: It should have a smart composition.
Becoming a creator means you need to know more about composition. This can be applicable to anything from making virtual designs to creating GIFs. 3D GIFs requires you to use a special Tumblr ‘frame’ that adds two breaks to the image which creates three horizontal panels. In exceptional cases, you could also use three break points and divide the image into four panels.
● Step 3: Become a content creator.
It’s okay to feel a bit off beat when trying out new skills but the prospects are rewarding. Try taking your own video footage, edit in Photoshop or any similar editing software. You can also opt for instant GIF creator apps that directly converts the footage or image you clicked into a GIF.
● Step 4: Making the split.
The next step would be splitting the image or frame into three panels as guideline for the 3D effects. In Photoshop you can import a GIF and choose ‘View’ from the navigation menu and then click on ‘New Guide’ from the drop down menu. Set the guide to 33% at first and 66% in the second.
● Step 5: Placingthe magical white lines over the guides.
From the shape menu on the sidebar, select the rectangle tool. Right click on this tool to get the shapes menu. Set ‘Fill Colour’ to white and set the weight to five pixels. Click and drag the lines over the guides.
● Step 6: For the final touch.
Merge these line layers and add a layer mask. The objective here is to only mask the panel where the main 3D element of the image which will be moving beyond the guides. How it is done is that you make copies of the frames where the animation goes beyond the guidelines and mask the layers where the element is over the visible layer.
● Step 7: Enjoy your GIF.
Once you are done masking every frame that you have copied. Replay your GIF to see if everything is in order.
Bonus Tip: Use Wondershare Filmora Video Editor to easily edit your videos using amazing tools, filters and affects. You can then make cool 3D GIFs from the videos you make.

Wondershare Filmora - Best Video Editor for Mac/Windows
5,481,435 people have downloaded it.
Build unique custom animations without breaking a sweat.
Focus on creating epic stories and leave the details to Filmora’s auto features.
Start a creative adventure with drag & drop effects and endless possibilities.
Filmora simplifies advanced features to save you time and effort.
Filmora cuts out repetition so you can move on to your next creative breakthrough.
● Key Takeaways from This Episode →
● Animated GIFs are interesting and fun to share with friends. They also make for effective advertising banners and conceptual promotions. So there are lot of applications for learning this skillset and is certainly is fun none the less.
● The easiest way to creating GIFs quick and easy would be by using a GIF creator. There are several amazing GIF creators online with fantastic features you can leverage to make amazing 3D GIFs.
● The basic trick which you should remember is using horizontal guidelines and an element which is moving towards the viewer. Keeping this in mind you can recreate amazing videos in fun GIF moments.
Making and sharing animated GIFs that practically pop out on your friend’s screen can be just the magic one needs to start their day.
3D animated GIFs are growing in popularity and surprisingly, because of a simple trick that even you can try out.
What separates 3D text GIFs or 3D animation GIFs from your regular GIFs is that they are bit more difficult but far more fun to make.
3D GIFs are where it feels like the picture is coming out of your screen. Of course, this is just a visual illusion which can be recreated over any video GIF that meets specific parameters.
In this article
01 [8 Examples of Inspiration for Fun 3D Gifs?](#Part 1)
02 [Top 5 Ways to Make 3D GIF](#Part 2)
03 [How to Make 3D Gifs in Videos More Textured](#Part 3)
Part 1 Examples of Inspiration for Fun 3D Gifs?
Remember that simple trick we mentioned earlier? This approach lets you create convincing 3D GIFs in an easy but deceptive way.
The actual magic behind this trick is the use of white lines that act as reference points separating 3 panels in the image.
Now, any animated elements of the GIF image will seem like they are popping out beyond the pre-set white lines and towards the viewer.
These white lines are used as referencing lines on the screen allowing our brains to bewilder at a passive 3D GIFs coming at us from the screen.
You can recreate this same affect with a few popular GIF makers.
Just to give you a taste of what it looks like, we have enlisted few trending pop culture 3D GIFs that are trending;
● We have all heard of Earth’s Mightiest Heroes, and Cap’ throwing his shield is certainly a fan favourite 3D GIF.

● Heard of Skull Island? Then you better call Skull Pest Control.

● Who wouldn’t love puppies? Well, here’s two.


● When you’re tangled up in things you don’t understand.

● You definitely don’t want to see this squirrel in your backyard.

● Make sure to get a good shot of caffeine when commuting through Elm Street.

● Ray Advertising is getting more innovative each year.

Part 2 Top 5 Ways to Make 3D GIF
The most instantaneous thing you can do to start making GIFs in your own free time is by using a GIF maker online. Online platforms like GIPHY and Imgflip (three more mentioned below) uses pre uploaded image and video content to create GIFs with the help of filters, texts, emoji’s and background effects.
You can simply create creative GIFs and share them directly to your social media pages. Of course if you are running your own business, you can choose to hire your own GIF animator for more personal banners and adverts.
On the other hand, if you are just sparking your creativity using a GIF creator to start out making simple animation GIFs. You can also use a GIF generator to create your GIFs from existing videos.
Now buckle up your imagination and let’s get GIFing.
01Wave.Video

This GIF creator earns its place among the best with sheer convenience. It is by far the easiest GIF maker to use on this list. You can get used to its editing interface in a shorter span of time and make amazing 3D GIFs using versatile features that are bound to impress your friends. Sharing your GIF is quite effortless with Wave.Video. You can take on small portions of your video and make a GIF out of it. It offers an amazing library of stock footage which you can use for a lot of other things too like creating intros for your videos.
02Make a GIF

If you have an image or a URL of a video and you wish to make an animated GIF out of it then Make a GIF is the GIF creator you need. Using this online free tool you can make GIFs out of any Facebook image or video URL. The Make a GIF interface also facilitates using your device’s webcam to click pictures and short clips for our GIFs and add them to the interface using drag and drop facility. You can select from pre uploaded stock samples from over a dozen different categories.
03Imgflip

When you not only need a GIF creator but an Editor as well, go for Imgflip. You can adjust and make changes in your GIF while creating it. It has tools designed into its interface that enables you to adjust the quality of the pictures you upload, their height and width as well. In terms of editing video GIFs you can tweak with the animation time and make adjustments in terms of placement of images using some of Imgflips amazing free tools.
04GIFMaker.me

Yet another animated GIF generator which simplifies your path to unlocking your GIF creativity skills a lot faster using images and videos. GIFMaker.me is compatible with all operating systems namely Windows, Mac and Linux. Although its arsenal of tools is quite basic and lets you only size/resize and reverse your GIFs. GIF maker has a very basic interface but can fulfil a fair average of your GIF creation needs.
05GIPHY

We kept the best for last and even if you type in making GIFs on Google, you might come across this search name quite often as pretty much lot of people are using it. Spark off your GIF creating drive with GIPHY which is an all-rounder in this arena. GIPHY has several awesome features that let you create GIFs by uploading images, videos and even URLs from YouTube or Vimeo or GIPHY itself. Its interface is simple and hassle free to use and lets you add filters, text, stickers and drawings to your GIFs.
Part 3 How to Make 3D Gifs in Videos More Textured
You can use GIF makers to create loops in videos you upload but the trick to making your 3D GIF stand out is about to be explained in the following.
● Step 1: Choosing an Image.
The first step in creating a 3D image is to carefully sort out which moment in your video you wish to convert into 3D. Pick an images or video clips that already have an element that pops out in a forward moving motion.
● Step 2: It should have a smart composition.
Becoming a creator means you need to know more about composition. This can be applicable to anything from making virtual designs to creating GIFs. 3D GIFs requires you to use a special Tumblr ‘frame’ that adds two breaks to the image which creates three horizontal panels. In exceptional cases, you could also use three break points and divide the image into four panels.
● Step 3: Become a content creator.
It’s okay to feel a bit off beat when trying out new skills but the prospects are rewarding. Try taking your own video footage, edit in Photoshop or any similar editing software. You can also opt for instant GIF creator apps that directly converts the footage or image you clicked into a GIF.
● Step 4: Making the split.
The next step would be splitting the image or frame into three panels as guideline for the 3D effects. In Photoshop you can import a GIF and choose ‘View’ from the navigation menu and then click on ‘New Guide’ from the drop down menu. Set the guide to 33% at first and 66% in the second.
● Step 5: Placingthe magical white lines over the guides.
From the shape menu on the sidebar, select the rectangle tool. Right click on this tool to get the shapes menu. Set ‘Fill Colour’ to white and set the weight to five pixels. Click and drag the lines over the guides.
● Step 6: For the final touch.
Merge these line layers and add a layer mask. The objective here is to only mask the panel where the main 3D element of the image which will be moving beyond the guides. How it is done is that you make copies of the frames where the animation goes beyond the guidelines and mask the layers where the element is over the visible layer.
● Step 7: Enjoy your GIF.
Once you are done masking every frame that you have copied. Replay your GIF to see if everything is in order.
Bonus Tip: Use Wondershare Filmora Video Editor to easily edit your videos using amazing tools, filters and affects. You can then make cool 3D GIFs from the videos you make.

Wondershare Filmora - Best Video Editor for Mac/Windows
5,481,435 people have downloaded it.
Build unique custom animations without breaking a sweat.
Focus on creating epic stories and leave the details to Filmora’s auto features.
Start a creative adventure with drag & drop effects and endless possibilities.
Filmora simplifies advanced features to save you time and effort.
Filmora cuts out repetition so you can move on to your next creative breakthrough.
● Key Takeaways from This Episode →
● Animated GIFs are interesting and fun to share with friends. They also make for effective advertising banners and conceptual promotions. So there are lot of applications for learning this skillset and is certainly is fun none the less.
● The easiest way to creating GIFs quick and easy would be by using a GIF creator. There are several amazing GIF creators online with fantastic features you can leverage to make amazing 3D GIFs.
● The basic trick which you should remember is using horizontal guidelines and an element which is moving towards the viewer. Keeping this in mind you can recreate amazing videos in fun GIF moments.
Step by Step to Resize Video in Davinci Resolve
While editing videos, you may change the aspect ratio of the video to change the size of the video to upload on different platforms like YouTube, Facebook, Pinterest, and Instagram. Videos come in different sizes and shapes. Some videos are portraits while the others are landscapes. Similarly, videos are captured in different places with different devices. So, we need to set a certain size of the video.
Definitely, a very large video can make delays in the work, similarly, a small size video can result in low resolution and bad quality. Resizing a video saves a lot of time and money whether you have a business, a YouTube channel, a short film, or a feature film. Today, we shall discuss how to resize the videos?
The two free ways to resize the video…
Here are a number of tools used in the market to resize the videos. We are going to teach How to resize the video in Davinci resolve and Fimora wondershare. Once you have mastered How to resize a video, it would be as simple as the ‘click’.
Now the good news is, you can dramatically export the videos in the same resolution in a very short time.
Let’s dive in !
Part 1. How to resize video in Davinci Resolve
Davinci Resolve is a very powerful tool to edit videos. Let’s suppose, you have some videos shots and all the videos have different sizes, some of the videos fit in the timeline and some are out of the timeline. No matter, you are going to make a video on the same scale with the same size.
Resize the video can be done in three ways:
- Zoom in zoom out
- Cropping
- Retime and scaling
1. Zoom in and Zoom out
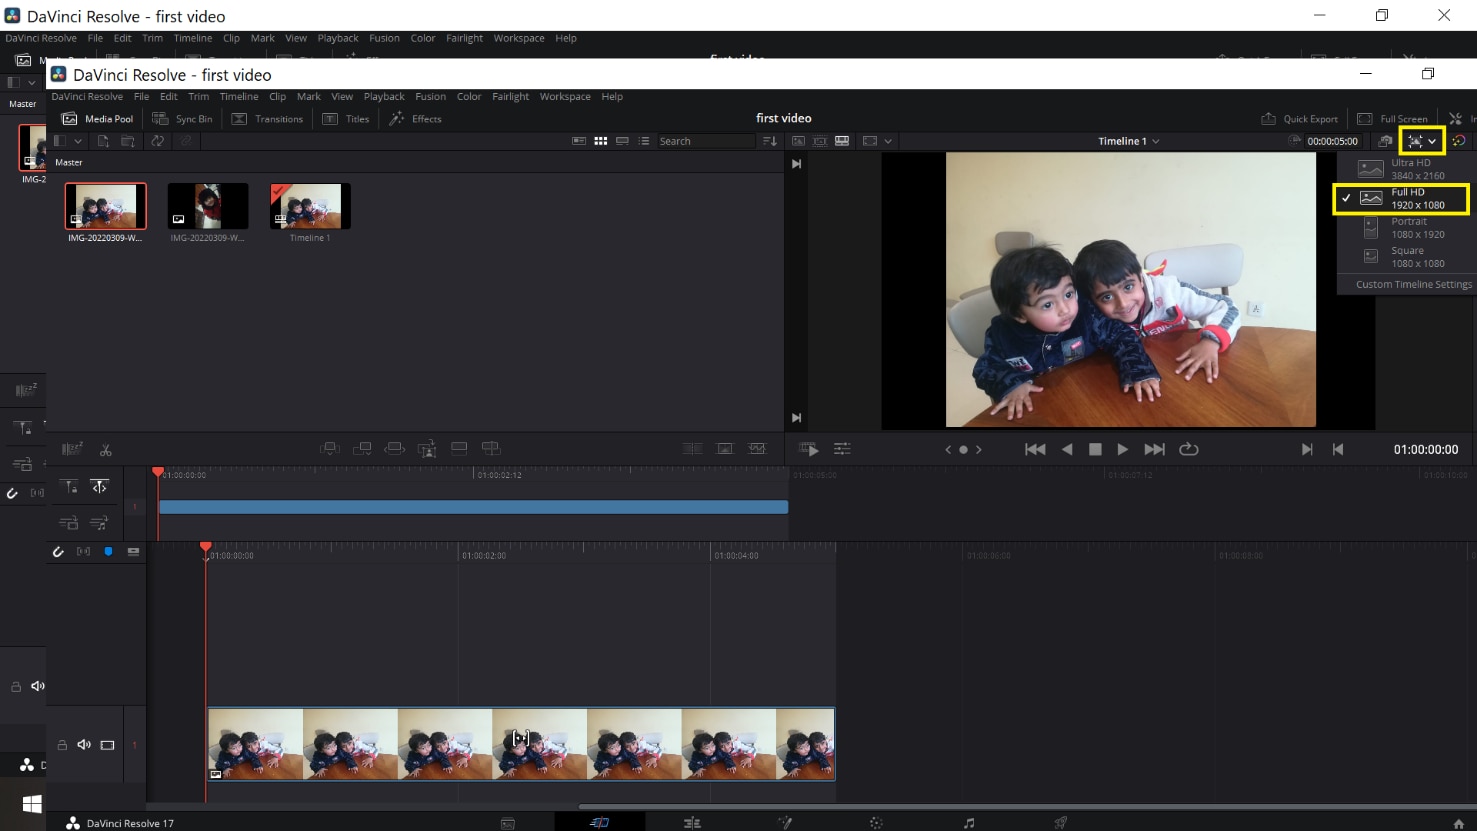
First of all, select the videos in your timeline. You should stay in the middle of the frame to set it because it’s too wide. The timeline moves forward and backward. Let your video be 4k, go to the bottom-right corner and click on timeline format. Select timeline resolution, select ultra HD, or whatever you want from the drop-down list.
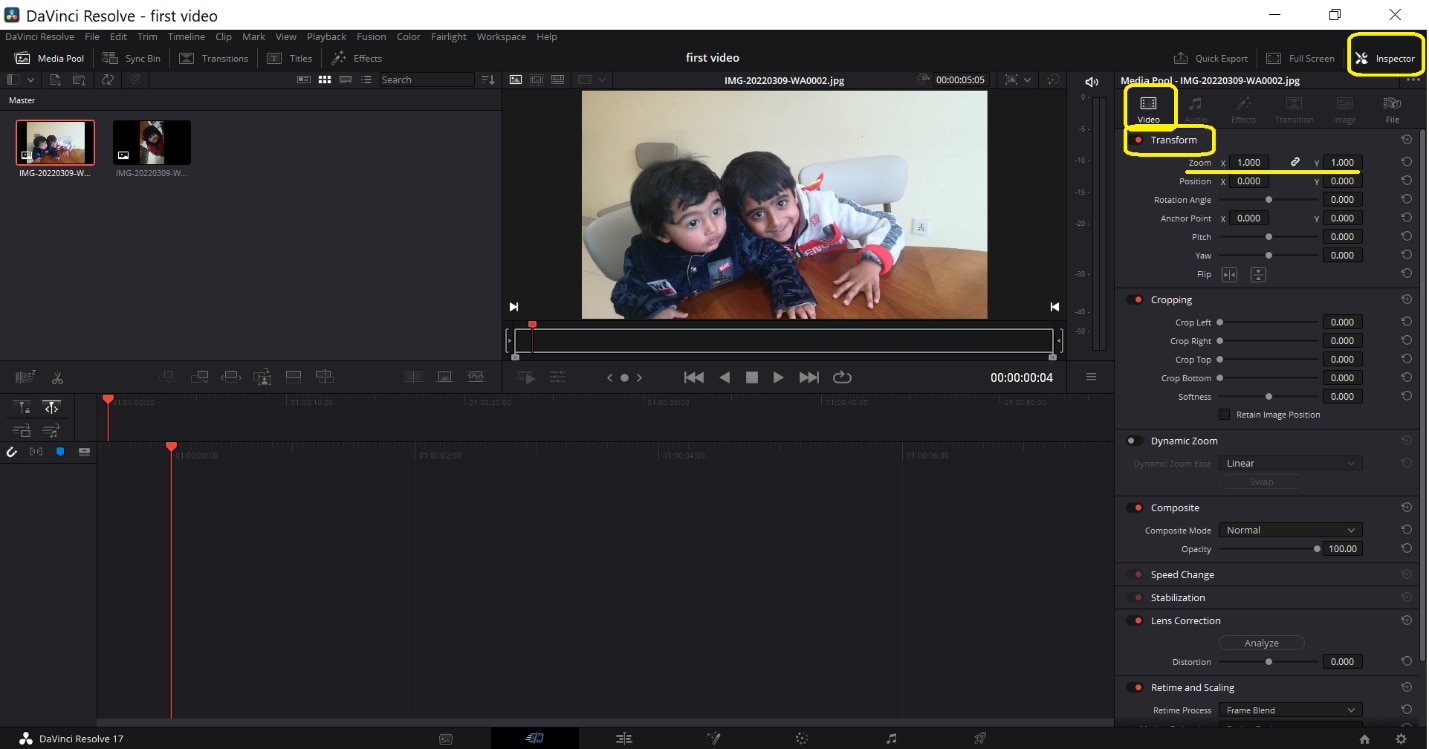
Go to the inspector from the up-right corner and select Transform under the video section. Here you can resize your image. Place the mouse over zoom x (Horizontal) and zoom y (vertical) values to drag left or right for zoom in or zoom out. The video can be resized accordingly.
Here you can also change its rotation.
2. Cropping
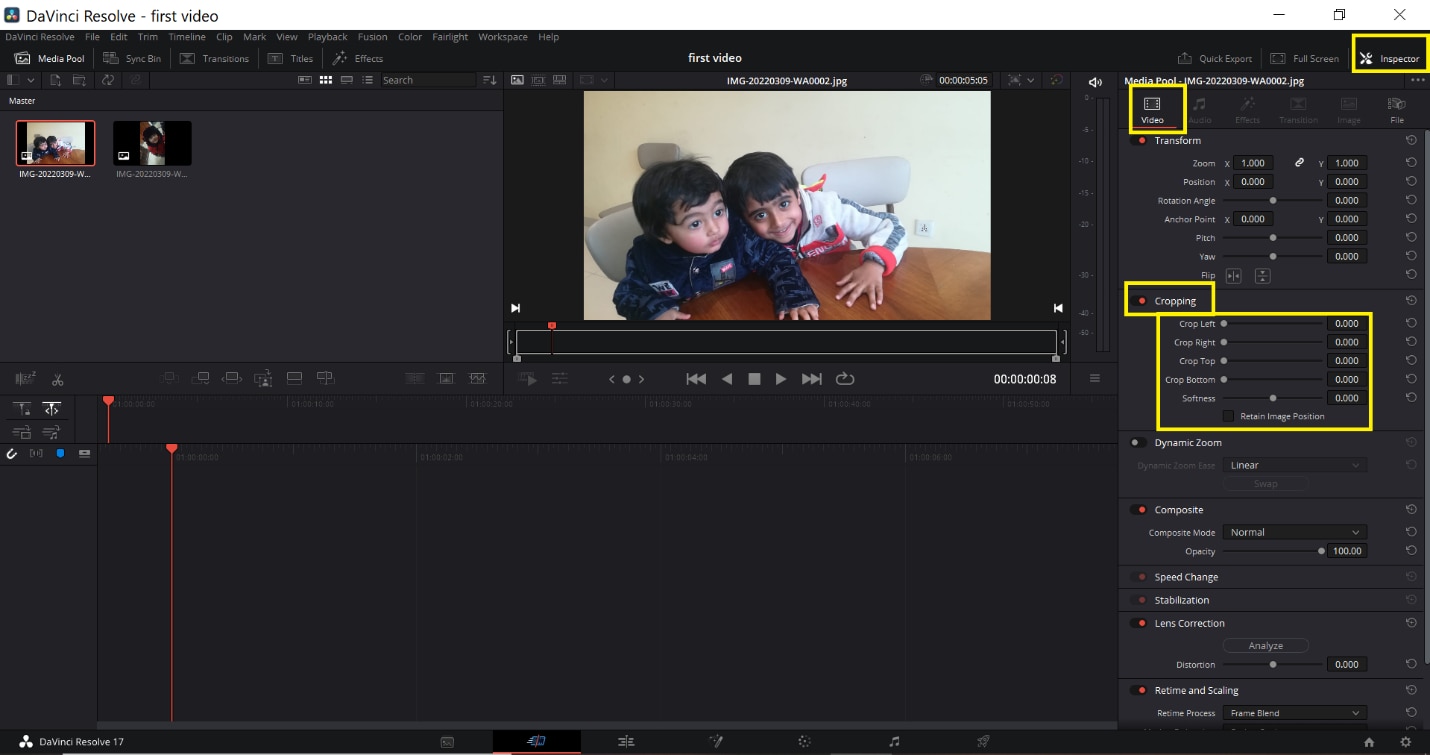
Go to the inspector from the up-right corner and select Transform. Now choose Cropping. Here are four options Crop left, crop right, crop Bottom, and crop Top. You can drag the scale from left to right to adjust the crop settings according to the desired result.
3. Retime and scaling
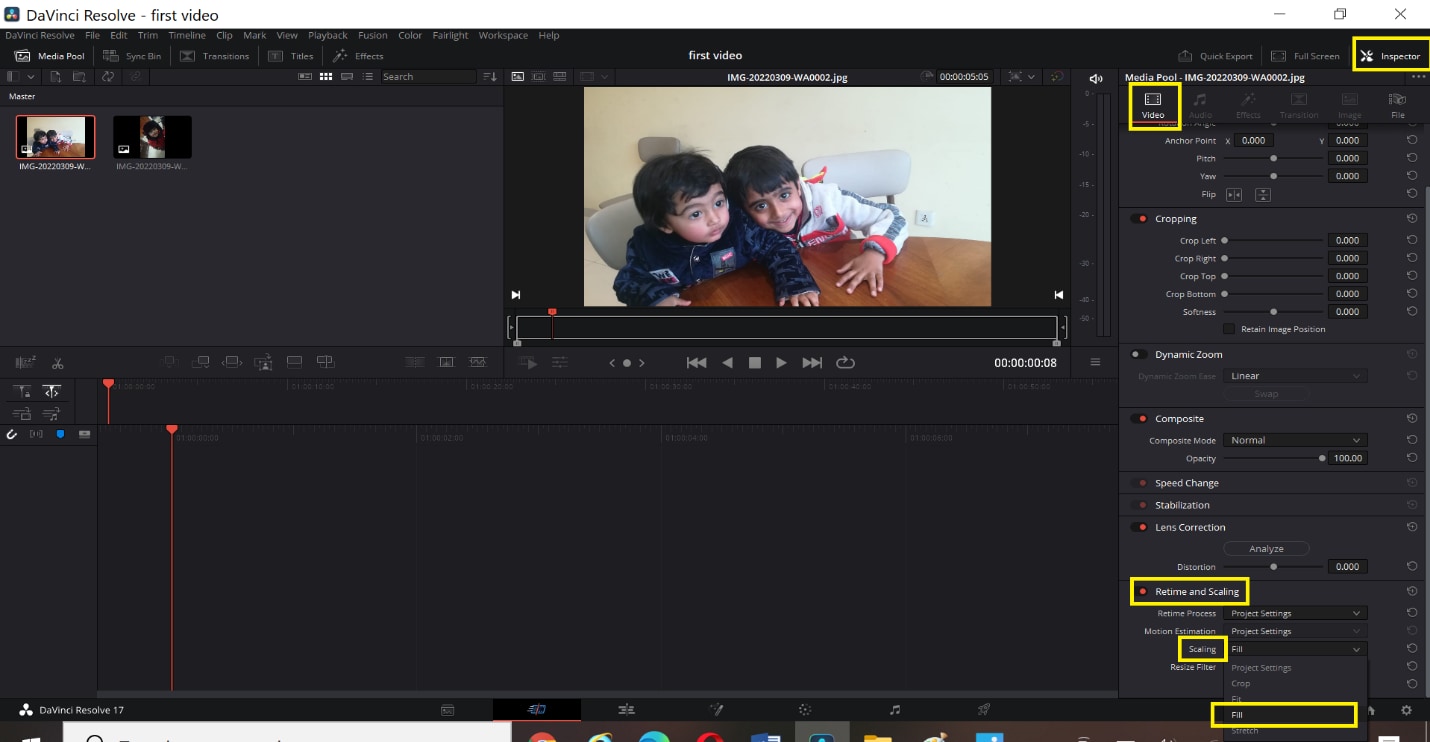
Go to the inspector from the up-right corner and select retime and scaling. You can choose stretch, Fit, Fill, or crop for cropping the video from the drop-down list.
- The Crop function is used to remove the unnecessary or uneven part of the video.
- The Fit function is to have the video auto-center and the selected clips are formatted according to the screen dimensions.
- Stretch Function allows changing the length of the certain clip at a certain duration.
After transforming, cropping, and resizing the videos, you can copy the same settings without repeating the above steps for each video.
Part 2. An alternative way to resize videos with Wondershare
Filmora Video Editor is another great video editing software. It is very easy to use. It offers many different features to resize the videos. Moreover, it allows zooming in the video to highlight the best part of your video. It allows the edited video to export on other devices or YouTube channels.
For Win 7 or later (64-bit)
For macOS 10.14 or later
You can resize your video in three ways:
- Resize video by cropping
- Scale in Scale-out
- Resize by changing Aspect Ratio
1. Resize video by cropping
- Import the videos from your storage by using the import button.
- Drag the videos in the timeline.
- Right-click on the desired video, crop and zoom option will appear in the menu.
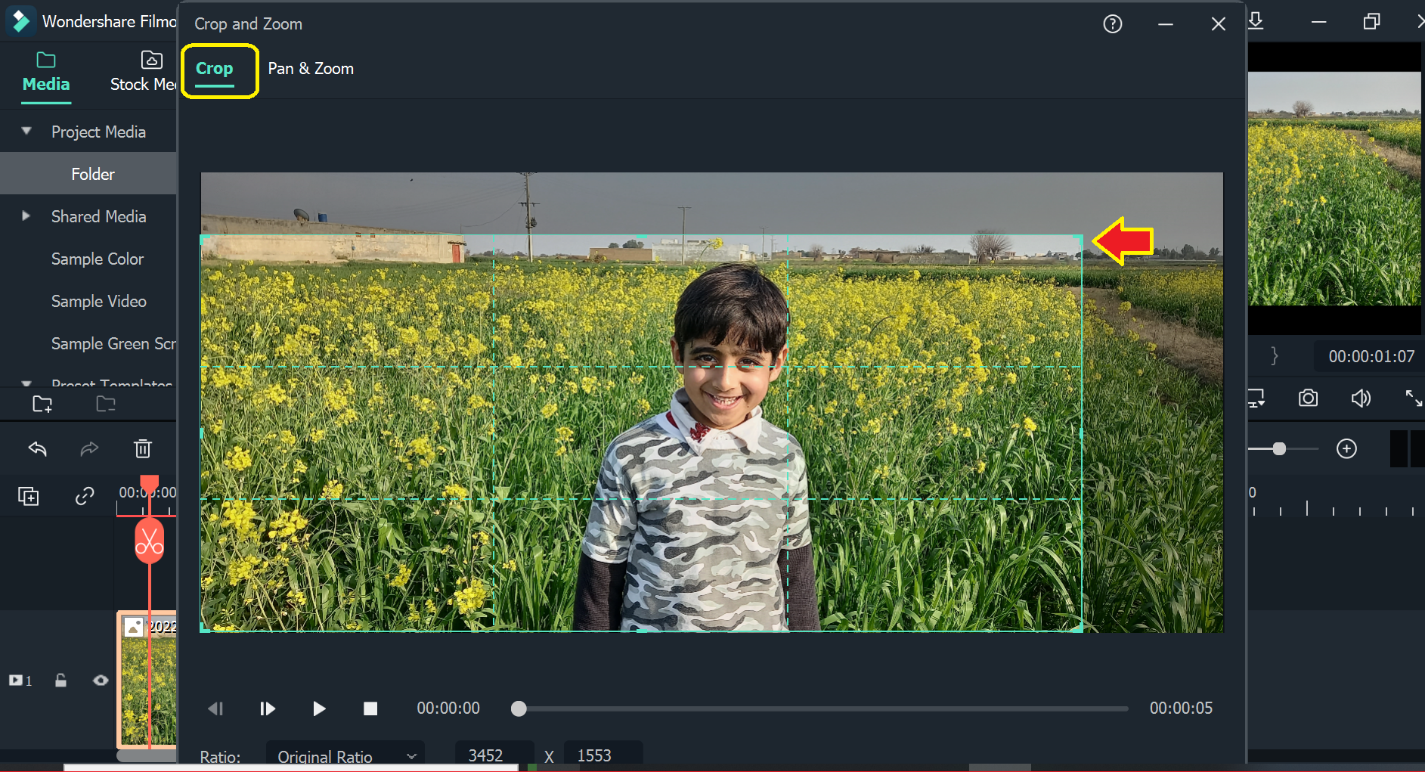
- Select crop tab.
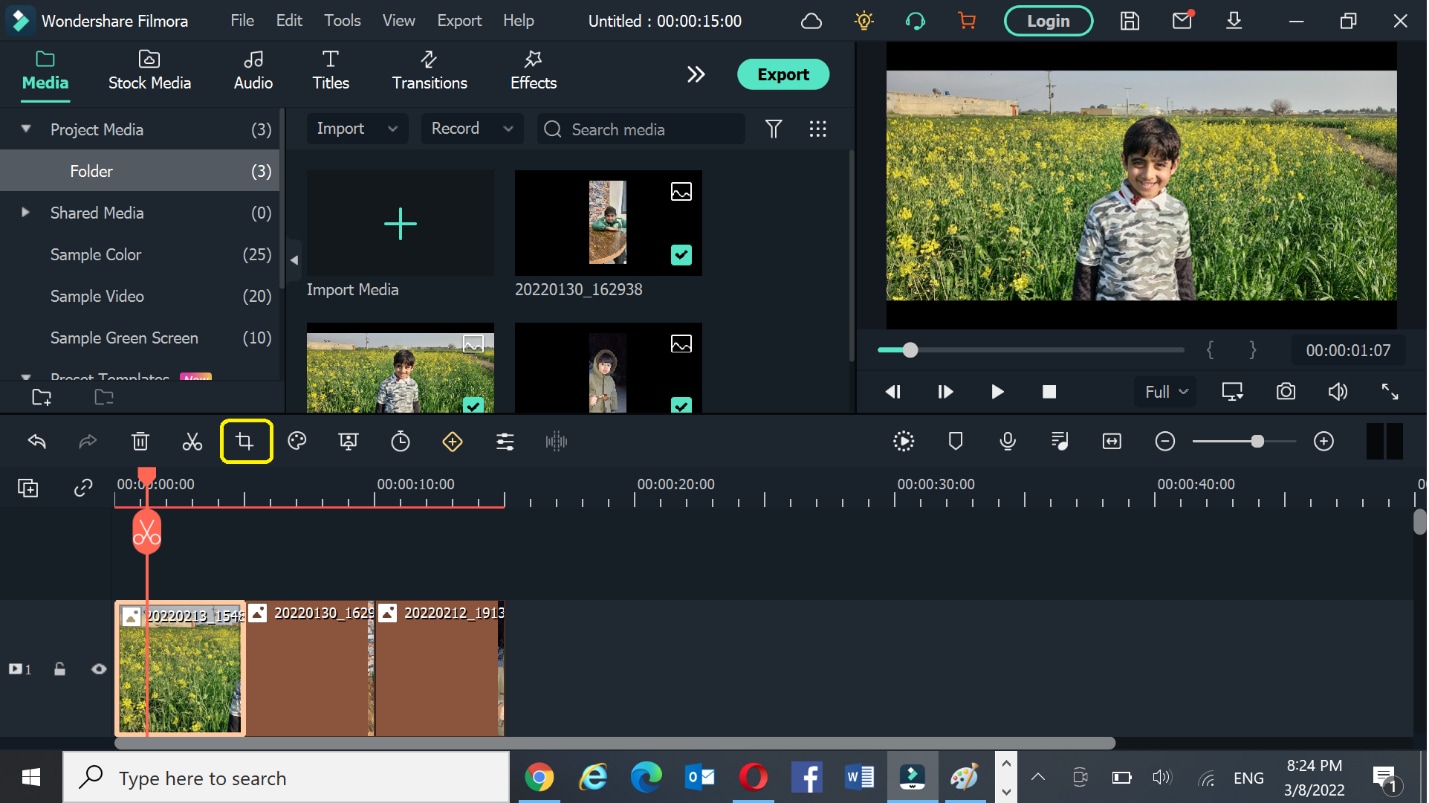
- Grab the corner of the crop inwards, and move to adjust as desired.
- Press the OK tab and your video is cropped.
2. Scale-in and scale-out
- Select the video in the timeline.
- Select the settings
- Click on the Transform tab under image section**.**
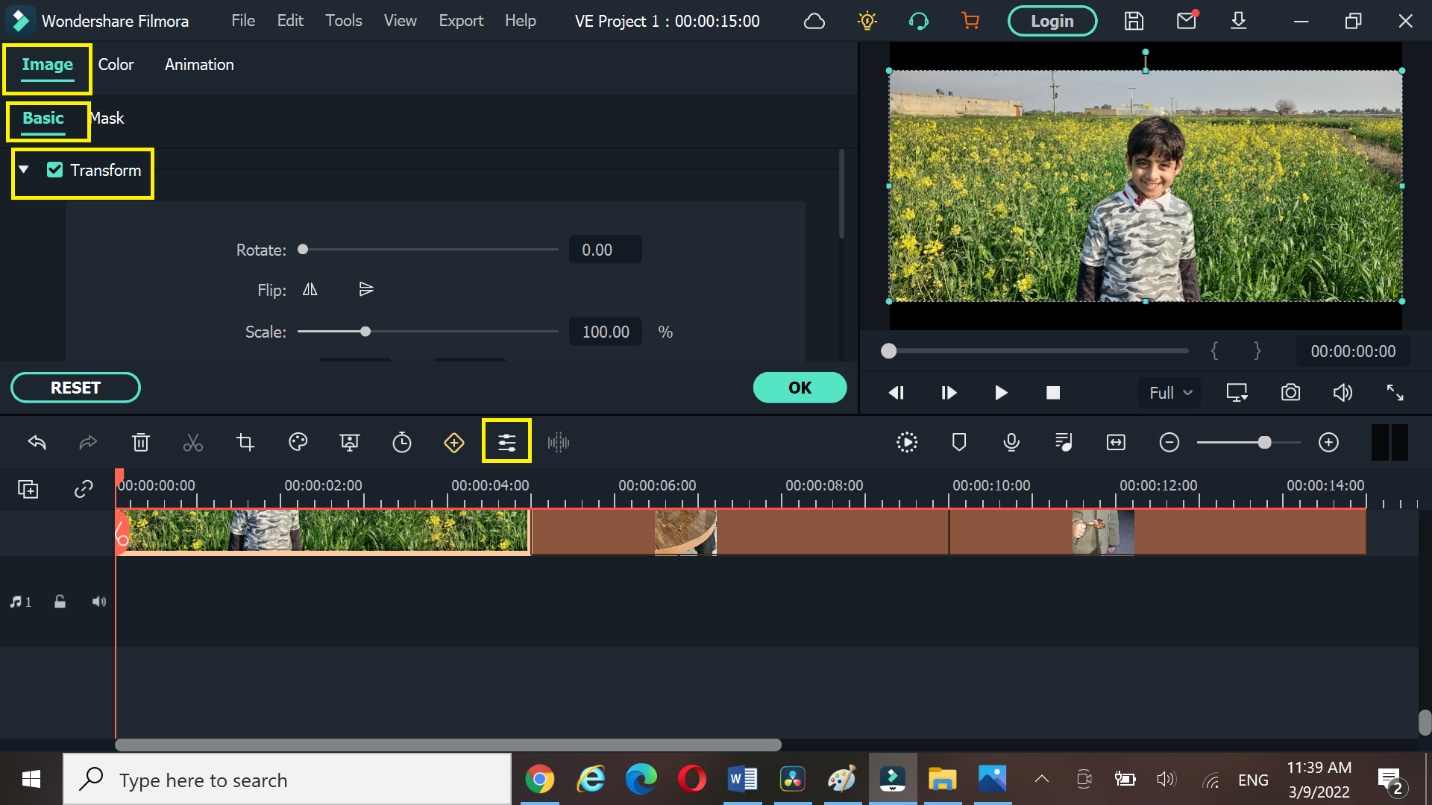
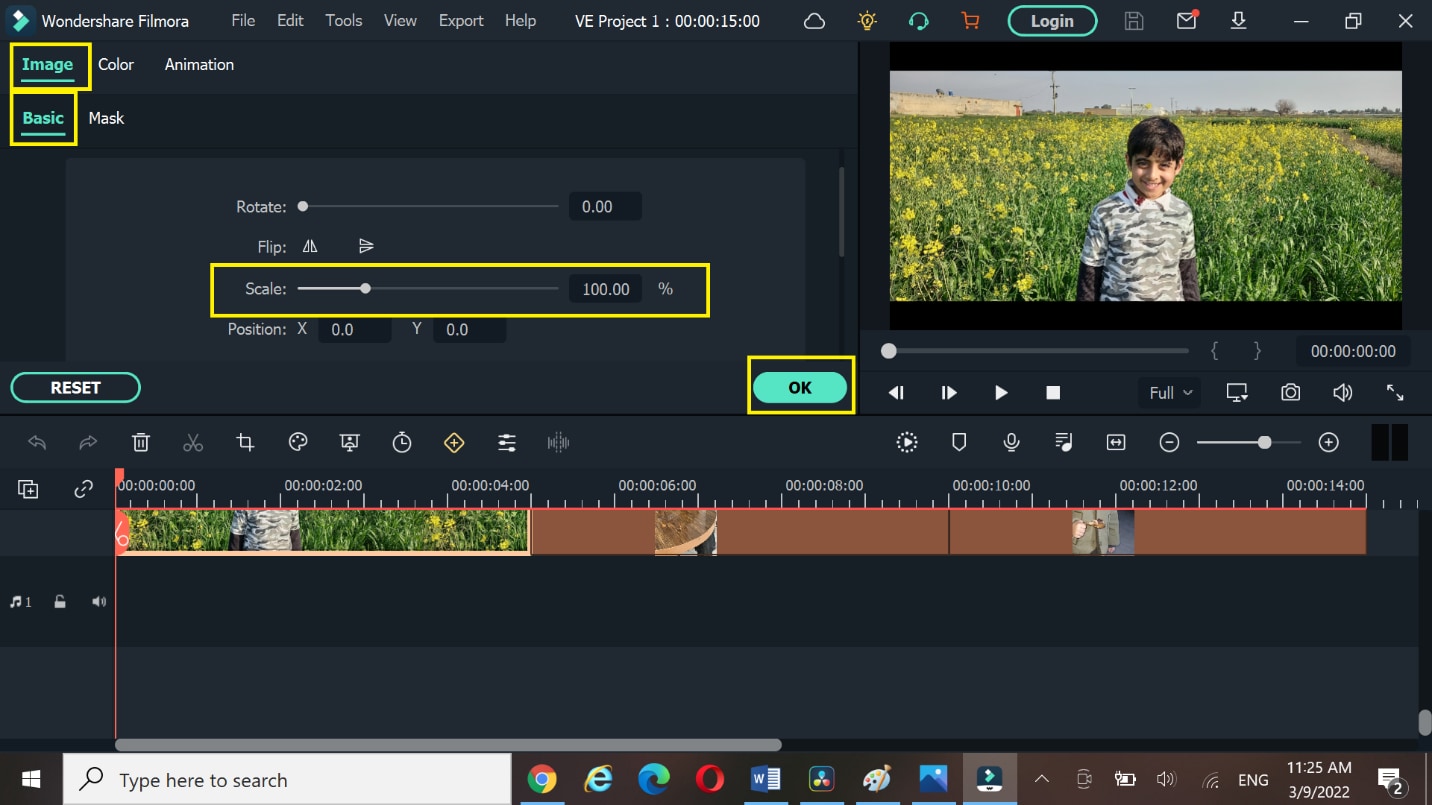
- Move the pointer from left to right on the Scale to zoom in and zoom out the video. You can remove the unwanted portion of the video.
- Press OK tab.
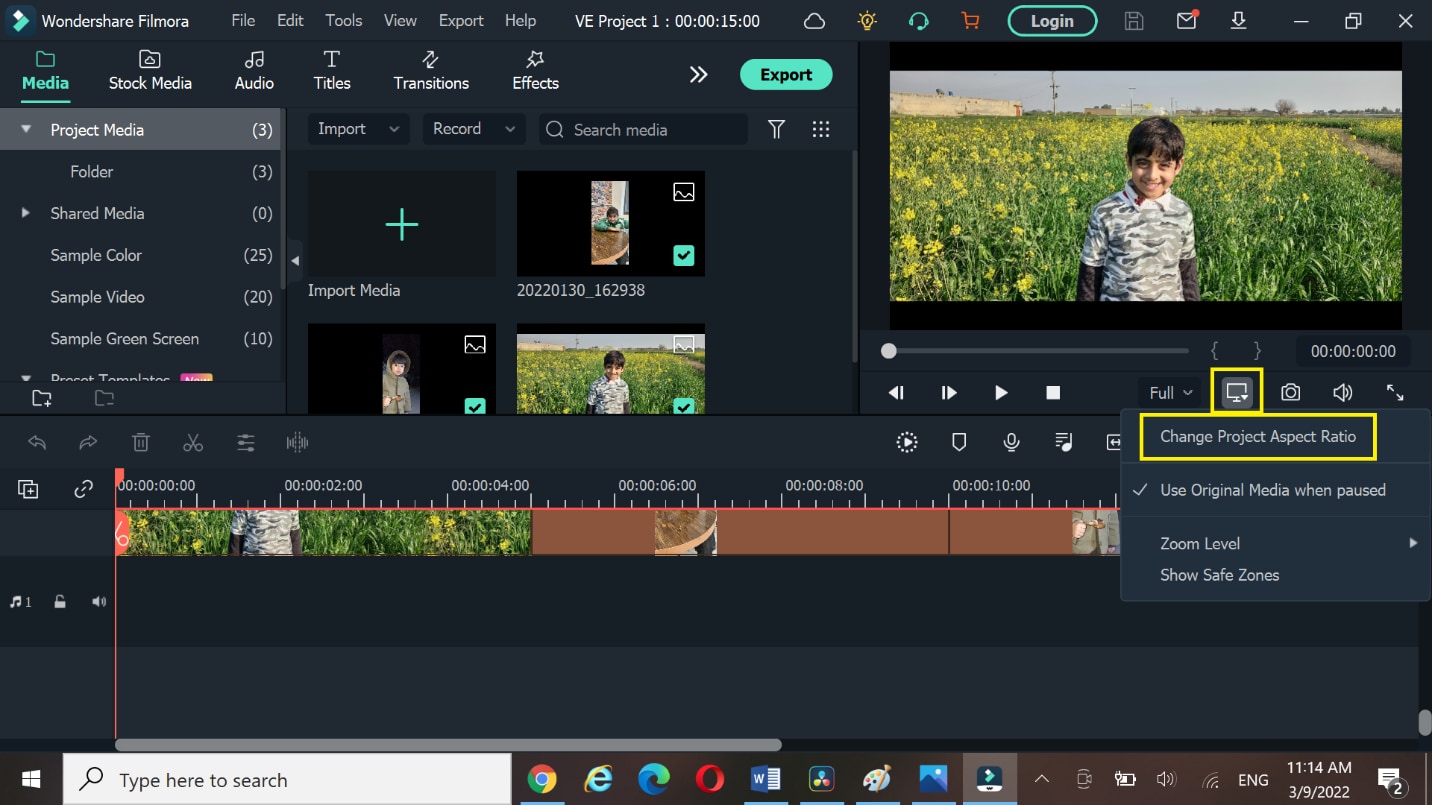
3. Resize video by changing aspect ratio
Some videos are 4k, 6k, and 8k but exporting them in the same resolution and waiting for a long time is really difficult. You need to resize the video to change its width and height. As different social media platforms require a different sizes for videos. We can say, resizing the video in terms of Giga bites and mega bites. You can do it by changing the Project Aspect Ratio. It is a very powerful technique to resize the videos in the timeline.
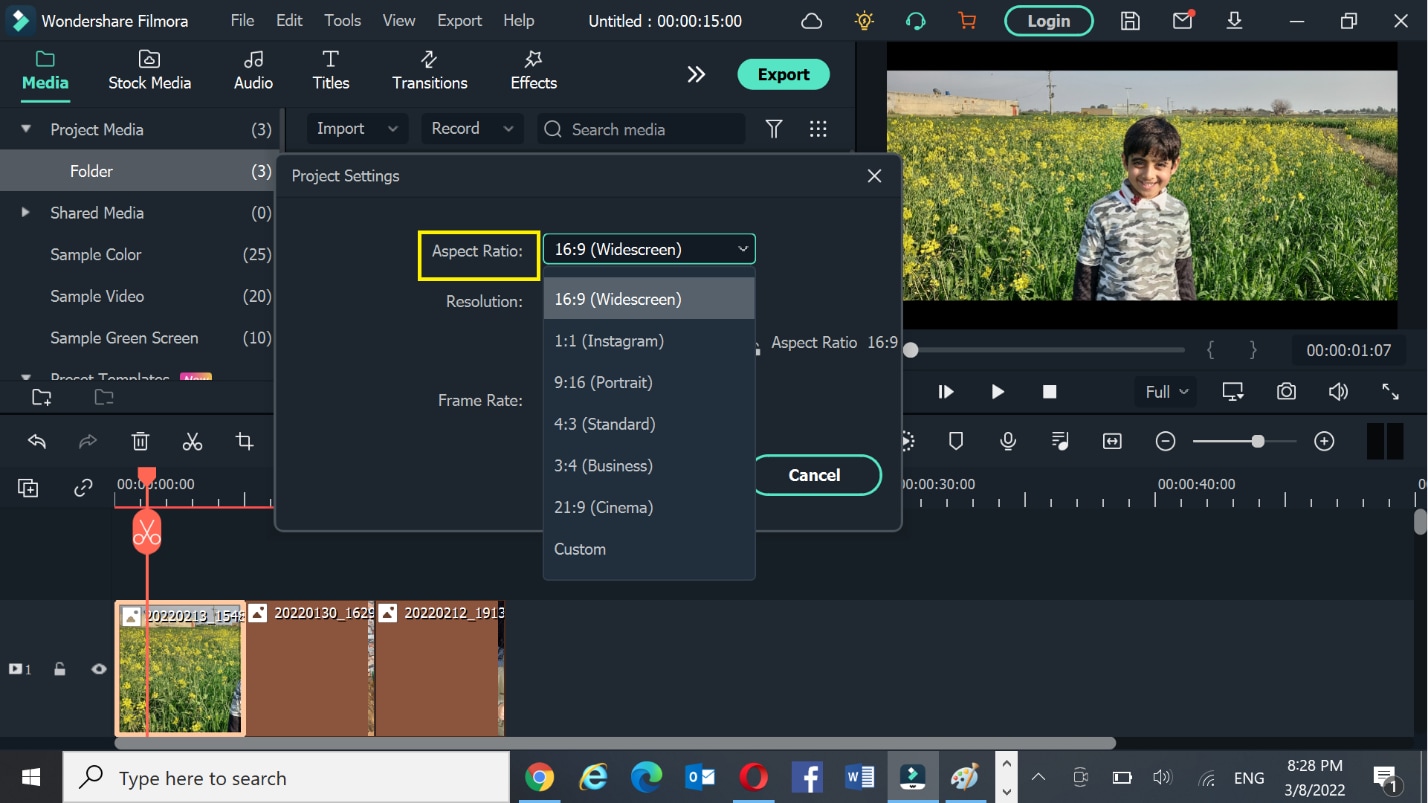
You can change the Project Aspect ratio like 16:9(wide-screen), 1:1(Instagram), 9:16(Portrait), 4:3(standard), 21:9(Cinema), or custom.
- Select the Aspect Ratio
- Change the ratio 16:9, 1:1, 9:16, 4:3, 21:9, or custom as desired.
- Select OK.
Conclusion
At this time, every business is using marketing to boost the economy, but video marketing is at its climax. Therefore, it is essential to take advantage of video editing tools to increase productivity and efficiency of work.
The Davinci Resolve and Filmora Wonder Share are the best video editing tools to resize the videos. You can easily use these tools on your laptop, tablets, or smartphones in a very short time. Along with this, you can share your compressed videos on different social media platforms like Facebook, Twitter, YouTube, Instagram, and LinkedIn. Moreover, you can enjoy the magical effects of these free tools at the ease of your smartphone. It is beneficial at both small and large businesses for the following
- Time saver
- Economical
- Good video quality
- Presentable
- Increase engagement
Hope the content would be useful for you. If you like the article please leave a comment.
Go to the inspector from the up-right corner and select Transform under the video section. Here you can resize your image. Place the mouse over zoom x (Horizontal) and zoom y (vertical) values to drag left or right for zoom in or zoom out. The video can be resized accordingly.
Here you can also change its rotation.

2. Cropping
Go to the inspector from the up-right corner and select Transform. Now choose Cropping. Here are four options Crop left, crop right, crop Bottom, and crop Top. You can drag the scale from left to right to adjust the crop settings according to the desired result.

3. Retime and scaling
Go to the inspector from the up-right corner and select retime and scaling. You can choose stretch, Fit, Fill, or crop for cropping the video from the drop-down list.
- The Crop function is used to remove the unnecessary or uneven part of the video.
- The Fit function is to have the video auto-center and the selected clips are formatted according to the screen dimensions.
- Stretch Function allows changing the length of the certain clip at a certain duration.

After transforming, cropping, and resizing the videos, you can copy the same settings without repeating the above steps for each video.
Part 2. An alternative way to resize videos with Wondershare
Filmora Video Editor is another great video editing software. It is very easy to use. It offers many different features to resize the videos. Moreover, it allows zooming in the video to highlight the best part of your video. It allows the edited video to export on other devices or YouTube channels.
For Win 7 or later (64-bit)
For macOS 10.14 or later
You can resize your video in three ways:
- Resize video by cropping
- Scale in Scale-out
- Resize by changing Aspect Ratio
1. Resize video by cropping
- Import the videos from your storage by using the import button.
- Drag the videos in the timeline.
- Right-click on the desired video, crop and zoom option will appear in the menu.
- Select crop tab.

- Grab the corner of the crop inwards, and move to adjust as desired.
- Press the OK tab and your video is cropped.

2. Scale-in and scale-out
- Select the video in the timeline.
- Select the settings
- Click on the Transform tab under image section**.**

- Move the pointer from left to right on the Scale to zoom in and zoom out the video. You can remove the unwanted portion of the video.
- Press OK tab.

3. Resize video by changing aspect ratio
Some videos are 4k, 6k, and 8k but exporting them in the same resolution and waiting for a long time is really difficult. You need to resize the video to change its width and height. As different social media platforms require a different sizes for videos. We can say, resizing the video in terms of Giga bites and mega bites. You can do it by changing the Project Aspect Ratio. It is a very powerful technique to resize the videos in the timeline.
You can change the Project Aspect ratio like 16:9(wide-screen), 1:1(Instagram), 9:16(Portrait), 4:3(standard), 21:9(Cinema), or custom.

- Select the Aspect Ratio
- Change the ratio 16:9, 1:1, 9:16, 4:3, 21:9, or custom as desired.
- Select OK.

Conclusion
At this time, every business is using marketing to boost the economy, but video marketing is at its climax. Therefore, it is essential to take advantage of video editing tools to increase productivity and efficiency of work.
The Davinci Resolve and Filmora Wonder Share are the best video editing tools to resize the videos. You can easily use these tools on your laptop, tablets, or smartphones in a very short time. Along with this, you can share your compressed videos on different social media platforms like Facebook, Twitter, YouTube, Instagram, and LinkedIn. Moreover, you can enjoy the magical effects of these free tools at the ease of your smartphone. It is beneficial at both small and large businesses for the following
- Time saver
- Economical
- Good video quality
- Presentable
- Increase engagement
Hope the content would be useful for you. If you like the article please leave a comment.
Go to the inspector from the up-right corner and select Transform under the video section. Here you can resize your image. Place the mouse over zoom x (Horizontal) and zoom y (vertical) values to drag left or right for zoom in or zoom out. The video can be resized accordingly.
Here you can also change its rotation.

2. Cropping
Go to the inspector from the up-right corner and select Transform. Now choose Cropping. Here are four options Crop left, crop right, crop Bottom, and crop Top. You can drag the scale from left to right to adjust the crop settings according to the desired result.

3. Retime and scaling
Go to the inspector from the up-right corner and select retime and scaling. You can choose stretch, Fit, Fill, or crop for cropping the video from the drop-down list.
- The Crop function is used to remove the unnecessary or uneven part of the video.
- The Fit function is to have the video auto-center and the selected clips are formatted according to the screen dimensions.
- Stretch Function allows changing the length of the certain clip at a certain duration.

After transforming, cropping, and resizing the videos, you can copy the same settings without repeating the above steps for each video.
Part 2. An alternative way to resize videos with Wondershare
Filmora Video Editor is another great video editing software. It is very easy to use. It offers many different features to resize the videos. Moreover, it allows zooming in the video to highlight the best part of your video. It allows the edited video to export on other devices or YouTube channels.
For Win 7 or later (64-bit)
For macOS 10.14 or later
You can resize your video in three ways:
- Resize video by cropping
- Scale in Scale-out
- Resize by changing Aspect Ratio
1. Resize video by cropping
- Import the videos from your storage by using the import button.
- Drag the videos in the timeline.
- Right-click on the desired video, crop and zoom option will appear in the menu.
- Select crop tab.

- Grab the corner of the crop inwards, and move to adjust as desired.
- Press the OK tab and your video is cropped.

2. Scale-in and scale-out
- Select the video in the timeline.
- Select the settings
- Click on the Transform tab under image section**.**

- Move the pointer from left to right on the Scale to zoom in and zoom out the video. You can remove the unwanted portion of the video.
- Press OK tab.

3. Resize video by changing aspect ratio
Some videos are 4k, 6k, and 8k but exporting them in the same resolution and waiting for a long time is really difficult. You need to resize the video to change its width and height. As different social media platforms require a different sizes for videos. We can say, resizing the video in terms of Giga bites and mega bites. You can do it by changing the Project Aspect Ratio. It is a very powerful technique to resize the videos in the timeline.
You can change the Project Aspect ratio like 16:9(wide-screen), 1:1(Instagram), 9:16(Portrait), 4:3(standard), 21:9(Cinema), or custom.

- Select the Aspect Ratio
- Change the ratio 16:9, 1:1, 9:16, 4:3, 21:9, or custom as desired.
- Select OK.

Conclusion
At this time, every business is using marketing to boost the economy, but video marketing is at its climax. Therefore, it is essential to take advantage of video editing tools to increase productivity and efficiency of work.
The Davinci Resolve and Filmora Wonder Share are the best video editing tools to resize the videos. You can easily use these tools on your laptop, tablets, or smartphones in a very short time. Along with this, you can share your compressed videos on different social media platforms like Facebook, Twitter, YouTube, Instagram, and LinkedIn. Moreover, you can enjoy the magical effects of these free tools at the ease of your smartphone. It is beneficial at both small and large businesses for the following
- Time saver
- Economical
- Good video quality
- Presentable
- Increase engagement
Hope the content would be useful for you. If you like the article please leave a comment.
Go to the inspector from the up-right corner and select Transform under the video section. Here you can resize your image. Place the mouse over zoom x (Horizontal) and zoom y (vertical) values to drag left or right for zoom in or zoom out. The video can be resized accordingly.
Here you can also change its rotation.

2. Cropping
Go to the inspector from the up-right corner and select Transform. Now choose Cropping. Here are four options Crop left, crop right, crop Bottom, and crop Top. You can drag the scale from left to right to adjust the crop settings according to the desired result.

3. Retime and scaling
Go to the inspector from the up-right corner and select retime and scaling. You can choose stretch, Fit, Fill, or crop for cropping the video from the drop-down list.
- The Crop function is used to remove the unnecessary or uneven part of the video.
- The Fit function is to have the video auto-center and the selected clips are formatted according to the screen dimensions.
- Stretch Function allows changing the length of the certain clip at a certain duration.

After transforming, cropping, and resizing the videos, you can copy the same settings without repeating the above steps for each video.
Part 2. An alternative way to resize videos with Wondershare
Filmora Video Editor is another great video editing software. It is very easy to use. It offers many different features to resize the videos. Moreover, it allows zooming in the video to highlight the best part of your video. It allows the edited video to export on other devices or YouTube channels.
For Win 7 or later (64-bit)
For macOS 10.14 or later
You can resize your video in three ways:
- Resize video by cropping
- Scale in Scale-out
- Resize by changing Aspect Ratio
1. Resize video by cropping
- Import the videos from your storage by using the import button.
- Drag the videos in the timeline.
- Right-click on the desired video, crop and zoom option will appear in the menu.
- Select crop tab.

- Grab the corner of the crop inwards, and move to adjust as desired.
- Press the OK tab and your video is cropped.

2. Scale-in and scale-out
- Select the video in the timeline.
- Select the settings
- Click on the Transform tab under image section**.**

- Move the pointer from left to right on the Scale to zoom in and zoom out the video. You can remove the unwanted portion of the video.
- Press OK tab.

3. Resize video by changing aspect ratio
Some videos are 4k, 6k, and 8k but exporting them in the same resolution and waiting for a long time is really difficult. You need to resize the video to change its width and height. As different social media platforms require a different sizes for videos. We can say, resizing the video in terms of Giga bites and mega bites. You can do it by changing the Project Aspect Ratio. It is a very powerful technique to resize the videos in the timeline.
You can change the Project Aspect ratio like 16:9(wide-screen), 1:1(Instagram), 9:16(Portrait), 4:3(standard), 21:9(Cinema), or custom.

- Select the Aspect Ratio
- Change the ratio 16:9, 1:1, 9:16, 4:3, 21:9, or custom as desired.
- Select OK.

Conclusion
At this time, every business is using marketing to boost the economy, but video marketing is at its climax. Therefore, it is essential to take advantage of video editing tools to increase productivity and efficiency of work.
The Davinci Resolve and Filmora Wonder Share are the best video editing tools to resize the videos. You can easily use these tools on your laptop, tablets, or smartphones in a very short time. Along with this, you can share your compressed videos on different social media platforms like Facebook, Twitter, YouTube, Instagram, and LinkedIn. Moreover, you can enjoy the magical effects of these free tools at the ease of your smartphone. It is beneficial at both small and large businesses for the following
- Time saver
- Economical
- Good video quality
- Presentable
- Increase engagement
Hope the content would be useful for you. If you like the article please leave a comment.
How to Use Adjustment Layer in Photoshop?
Adobe Photoshop is a famous and powerful image editor through which you can draw captivating illustrations proficiently. Using this advanced software, you can also work on complex 3D artwork efficiently. You can change image backgrounds and eliminate the flaws in your pictures using Photoshop.
As Photoshop is a layer-based editing software, this article will focus on how to resize the layer in Photoshop effectively. Moreover, you can also discover how to create an adjustment layer in Photoshop within a few clicks.

Part 1: What is Layer in Photoshop?
Do you know how layers work in Photoshop? By using layers in Photoshop, you can execute flawless editing without modifying the composition of the whole image. Moreover, it does not alter the original image, so you can revert the changes anytime you want. You can easily adjust the saturation, brightness, contrast, and other elements on each layer in Photoshop. Moreover, you can add special effects to each layer according to your choice.
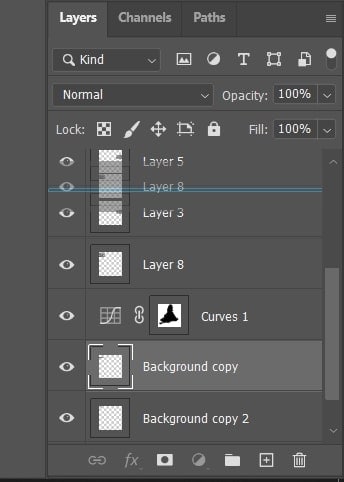
There are different sorts of layers in Photoshop. For example, fill layers consist of color patterns, and type layers allow you to create text and shapes. You can also move and change the position of layers to insert a specific element into the image. Thus, layers are the essential component of Photoshop, enabling you to add text, shapes, and special effects to the images effortlessly.
Part 2: How to Resize a Layer in Photoshop?
Do you want to learn how to change the size of a layer in Photoshop? Here are the simple steps that you can follow to resize a layer in Photoshop:
Step1 Go to the right panel of Photoshop and click on “Layers.” From there, choose the layer that you want to resize.
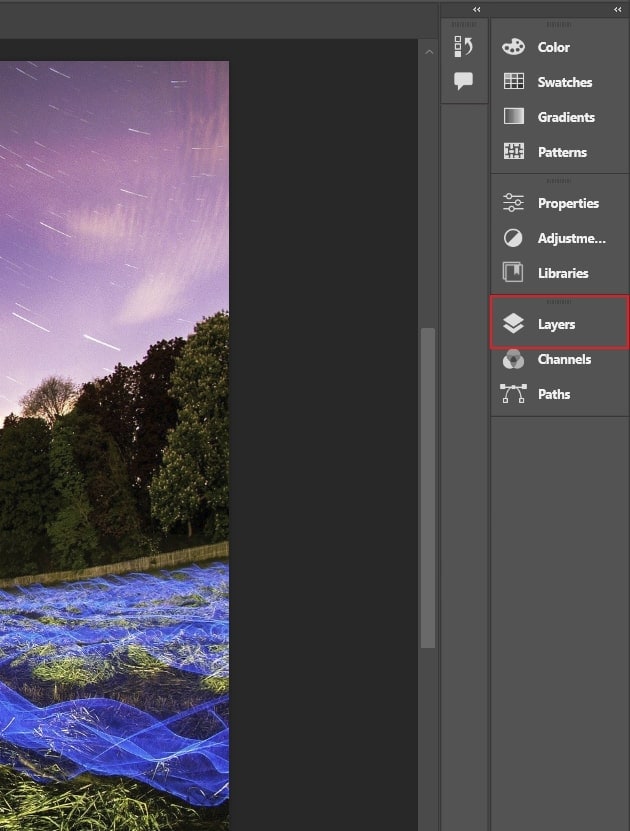
Step2 Once done with selecting the layer, go to the “Edit” tab given at the top. From there, tap on “Free Transform,” which will display the resize bars.
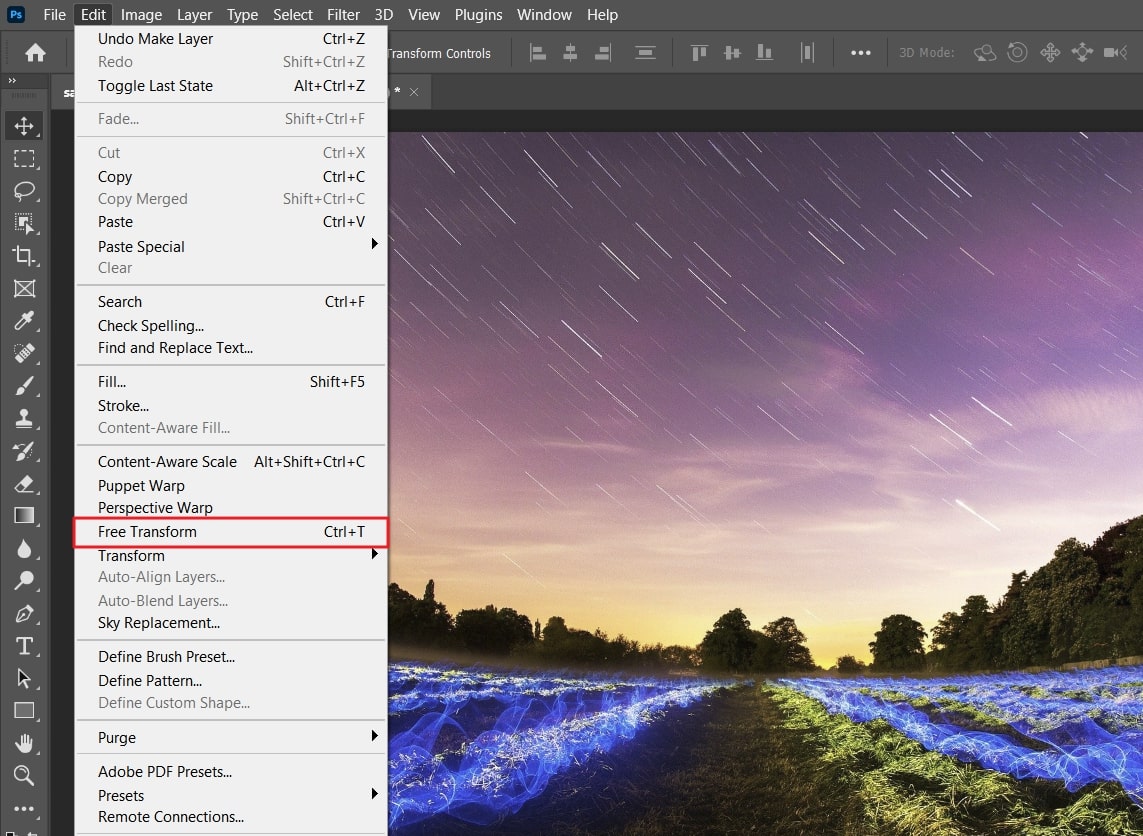
Step3 Now, you can drag and drop the layer according to your preferences. You can also change the height and width of the layer by holding the “Shift” key. Once done, fill in the checkmark at the top options bar. To finalize the resize of your layer, press “Enter” for Windows and “Return” for Mac.
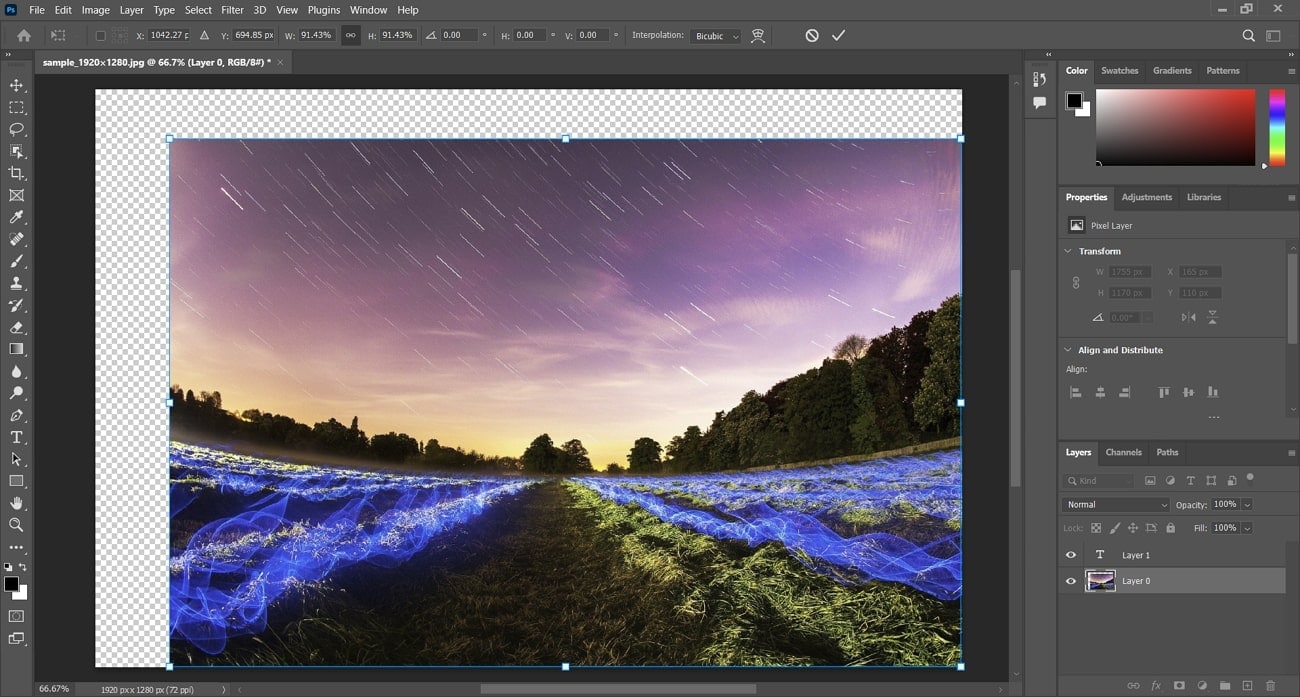
Part 3: How to Change Layer Color in Photoshop?
Do you want to change the color of the layer in Photoshop? Here are the simple steps that you can follow:
Step1 To begin, create a new hue/saturation adjustment layer using the “Adjustments Panel.” Now, double-click on this newly created adjustment layer and select “Create Clipping Mask.” This will let you make color-changing adjustments.
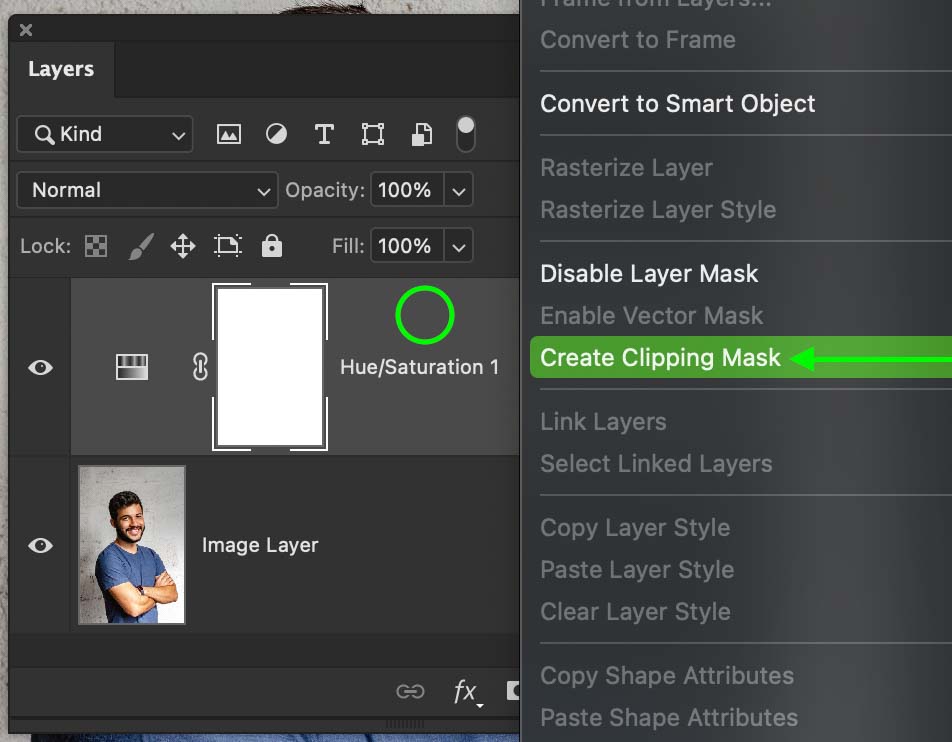
Step2 After creating the clipping mask, you will be able to see a right-angle arrow that is directed down to the image. Now make sure to select the colors of the color channel to make some changes. Afterward, double-click on the “Hue/Saturation” adjustment layer and choose the “Preset” option. Once done, choose the color of your choice.
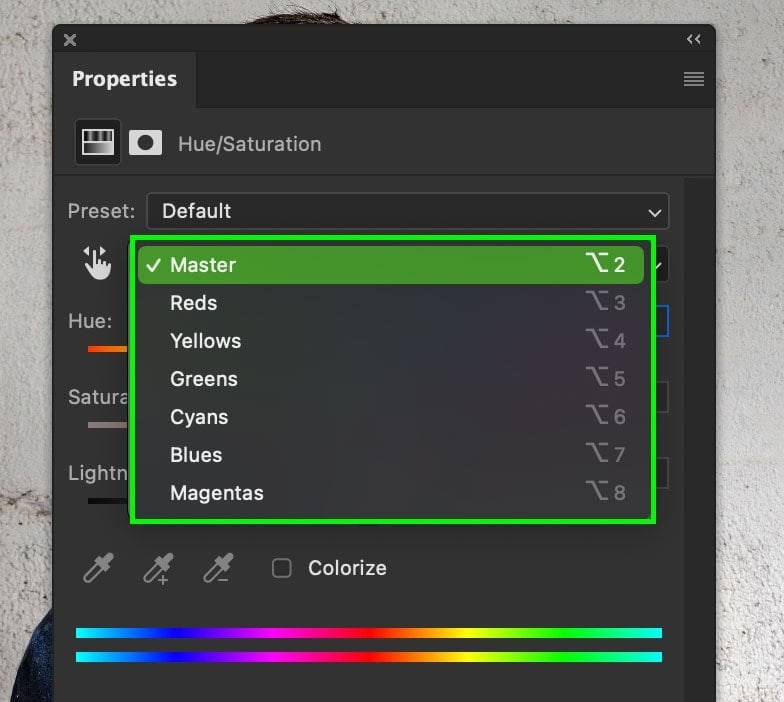
Step3 Once you have chosen the color, make sure to adjust the saturation accordingly. Afterward, manage the hue slider to your preferred color. Once done, you can adjust the sliders of saturation and lightness according to your choice.
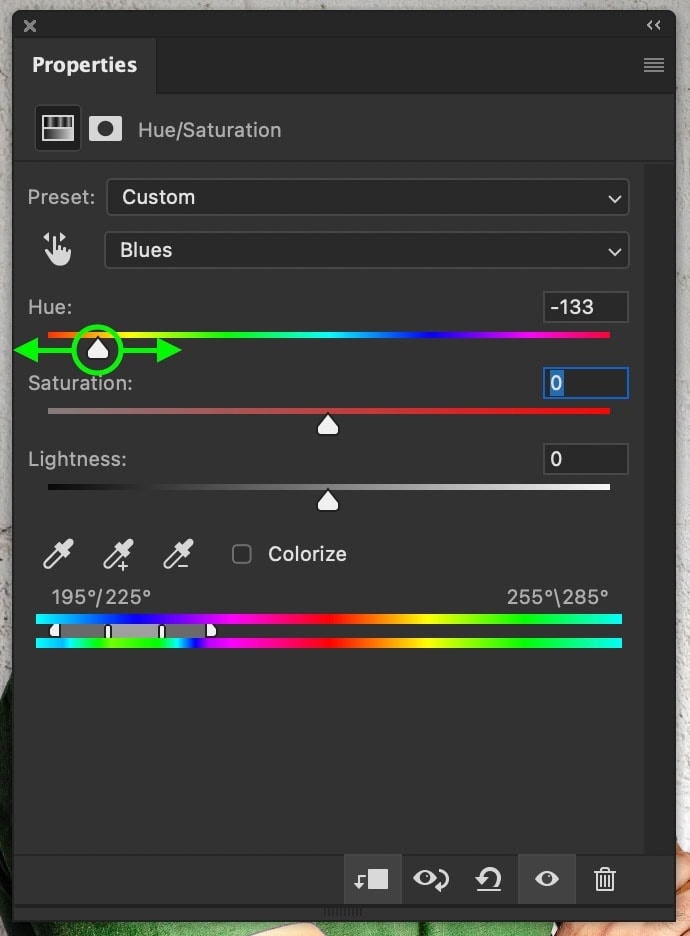
Part 4: How to Use Adjustment Layers in Photoshop?
If you are unaware of how to use adjustment layers in Photoshop, this section will provide you with all the details. Thus, continue reading to find out the significance of adjustment layers in Photoshop.
4.1 Why Do You Need to Add an Adjustment Layer?
Raw images always come with lots of imperfections. If you want to edit and enhance them flawlessly, adjustment layers can help you. By adding the adjustment layer, you can manage the levels and curves of the images to make the shadows darker in the picture. Moreover, you can increase or decrease the contrast of the image in specific parts using the adjustment layers properly.
If your image has light problems, you can set the exposure by adding an adjustment layer. Furthermore, you can make the colors of the image pop out by adjusting the color balance. This is also possible with adjustment layers, as it makes the whole process of image editing efficient. Other components that you can modify using adjustment layers are brightness, curves, hue, photo filter, vibrance, etc.
4.2 What Kinds of Adjustment Layers Can You Try?
There are different kinds of adjustment layers that you can try in Photoshop. To discover about them, proceed to the following section.
1. Add a Color Lookup Adjustment Layer
Once you have opened the image in Photoshop, add an adjustment layer and select the option of “Color Lookup” from the “Layers Panel.” From the properties, you can choose any of the color lookup tables. Here you can select any suitable preset to create a new look in your image. You can try different presets according to your image. Once done, you can use the “Blend Mode” option to make final adjustments.
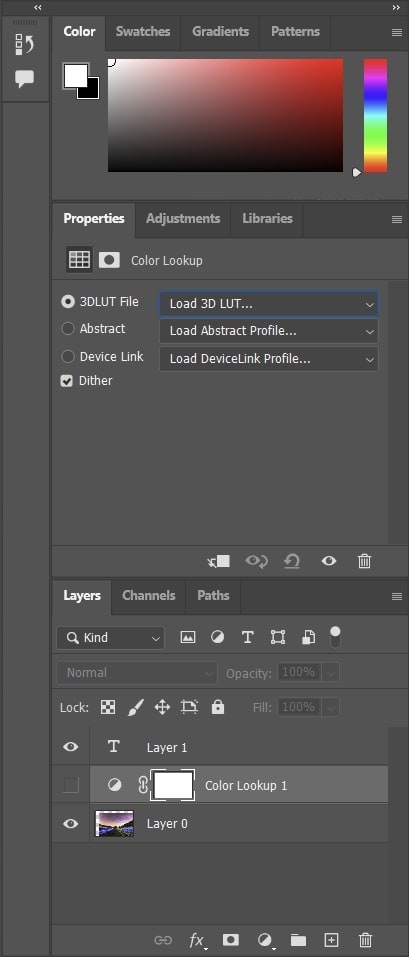
2. Add a Blur Adjustment Layer in Photoshop
First, you have to create an adjustment layer in Photoshop. Once done, you can navigate to the “Filters” and choose any blur effects, such as Gaussian Blur. You can also apply the motion or radial blur effect from the “Filters” tab. Once you have selected the blur effect, apply it to the adjustment layer. Moreover, you can also try the “Layer Mask” to paint on the specific parts you want to make sharp.
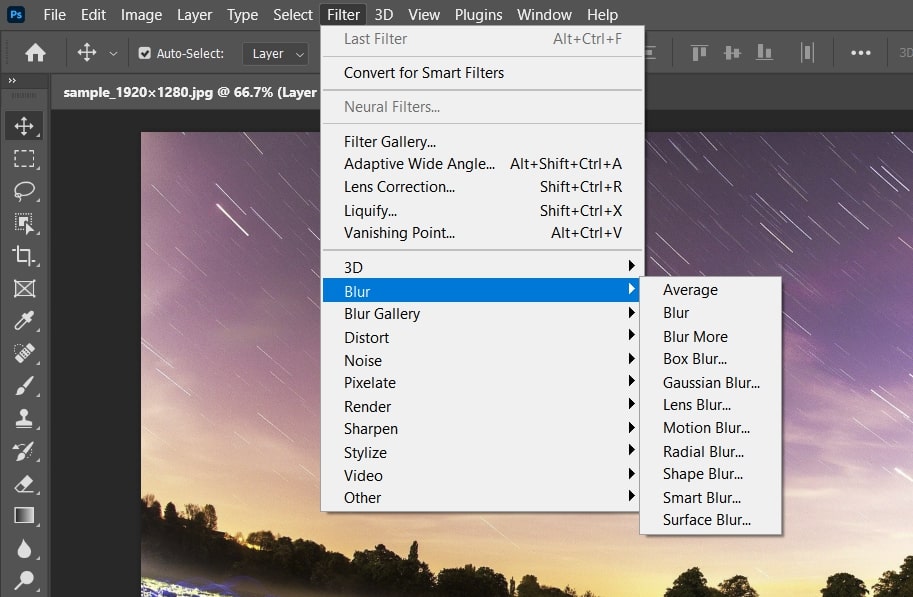
3. Add a Curves Adjustment Layer in Photoshop
If you want to change the color of particular pixels in the image, you can add the curves adjustment in Photoshop. By doing so, you can execute minor changes in your image easily. To do so, go to the “Adjustments Panel” and click on the “Curves” icon.
Now, in the properties panel, you can move the curves to adjust the specific tonal area of the image. You can also add more points to the curve and apply any preset from the preset menu.
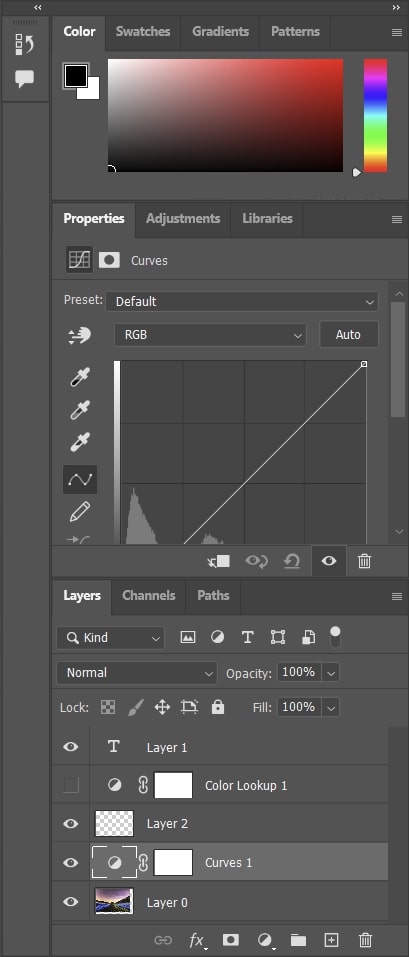
4. Make a Brightness and Contrast Layer in Photoshop
To make a brightness and contrast layer in Photoshop, go to the “Adjustments Panel” first. From there, tap on the “Brightness/Contrast” option that will instantly add a layer in the layers panel. Afterward, a properties panel will also open from which you can modify the settings. Here, you can drag the sliders of brightness and contrast to enhance them accordingly.
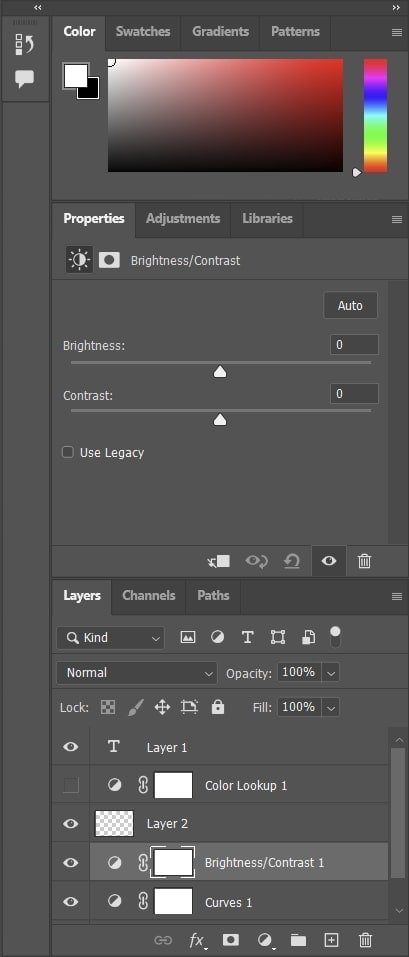
5. Adjust Layer Opacity in Photoshop
To learn how to adjust opacity in Photoshop, select the desired layer and click on the drop-down menu of “Opacity” in the layers panel. Next, move the slider to adjust the opacity accordingly. If you set the opacity value to 0%, the layer will become invisible.
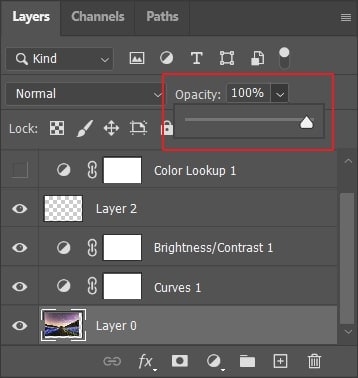
Conclusion
Photoshop is widely used by professionals to perform high-end image editing. If you want to become an expert in using Photoshop, you must know how to add an adjustment layer in Photoshop. Through this article, you have learned about the importance of layers in image editing. Moreover, you have also discovered different kinds of adjustment layers that you can try to enhance your photos.
Adobe Photoshop is a famous and powerful image editor through which you can draw captivating illustrations proficiently. Using this advanced software, you can also work on complex 3D artwork efficiently. You can change image backgrounds and eliminate the flaws in your pictures using Photoshop.
As Photoshop is a layer-based editing software, this article will focus on how to resize the layer in Photoshop effectively. Moreover, you can also discover how to create an adjustment layer in Photoshop within a few clicks.

Part 1: What is Layer in Photoshop?
Do you know how layers work in Photoshop? By using layers in Photoshop, you can execute flawless editing without modifying the composition of the whole image. Moreover, it does not alter the original image, so you can revert the changes anytime you want. You can easily adjust the saturation, brightness, contrast, and other elements on each layer in Photoshop. Moreover, you can add special effects to each layer according to your choice.

There are different sorts of layers in Photoshop. For example, fill layers consist of color patterns, and type layers allow you to create text and shapes. You can also move and change the position of layers to insert a specific element into the image. Thus, layers are the essential component of Photoshop, enabling you to add text, shapes, and special effects to the images effortlessly.
Part 2: How to Resize a Layer in Photoshop?
Do you want to learn how to change the size of a layer in Photoshop? Here are the simple steps that you can follow to resize a layer in Photoshop:
Step1 Go to the right panel of Photoshop and click on “Layers.” From there, choose the layer that you want to resize.

Step2 Once done with selecting the layer, go to the “Edit” tab given at the top. From there, tap on “Free Transform,” which will display the resize bars.

Step3 Now, you can drag and drop the layer according to your preferences. You can also change the height and width of the layer by holding the “Shift” key. Once done, fill in the checkmark at the top options bar. To finalize the resize of your layer, press “Enter” for Windows and “Return” for Mac.

Part 3: How to Change Layer Color in Photoshop?
Do you want to change the color of the layer in Photoshop? Here are the simple steps that you can follow:
Step1 To begin, create a new hue/saturation adjustment layer using the “Adjustments Panel.” Now, double-click on this newly created adjustment layer and select “Create Clipping Mask.” This will let you make color-changing adjustments.

Step2 After creating the clipping mask, you will be able to see a right-angle arrow that is directed down to the image. Now make sure to select the colors of the color channel to make some changes. Afterward, double-click on the “Hue/Saturation” adjustment layer and choose the “Preset” option. Once done, choose the color of your choice.

Step3 Once you have chosen the color, make sure to adjust the saturation accordingly. Afterward, manage the hue slider to your preferred color. Once done, you can adjust the sliders of saturation and lightness according to your choice.

Part 4: How to Use Adjustment Layers in Photoshop?
If you are unaware of how to use adjustment layers in Photoshop, this section will provide you with all the details. Thus, continue reading to find out the significance of adjustment layers in Photoshop.
4.1 Why Do You Need to Add an Adjustment Layer?
Raw images always come with lots of imperfections. If you want to edit and enhance them flawlessly, adjustment layers can help you. By adding the adjustment layer, you can manage the levels and curves of the images to make the shadows darker in the picture. Moreover, you can increase or decrease the contrast of the image in specific parts using the adjustment layers properly.
If your image has light problems, you can set the exposure by adding an adjustment layer. Furthermore, you can make the colors of the image pop out by adjusting the color balance. This is also possible with adjustment layers, as it makes the whole process of image editing efficient. Other components that you can modify using adjustment layers are brightness, curves, hue, photo filter, vibrance, etc.
4.2 What Kinds of Adjustment Layers Can You Try?
There are different kinds of adjustment layers that you can try in Photoshop. To discover about them, proceed to the following section.
1. Add a Color Lookup Adjustment Layer
Once you have opened the image in Photoshop, add an adjustment layer and select the option of “Color Lookup” from the “Layers Panel.” From the properties, you can choose any of the color lookup tables. Here you can select any suitable preset to create a new look in your image. You can try different presets according to your image. Once done, you can use the “Blend Mode” option to make final adjustments.

2. Add a Blur Adjustment Layer in Photoshop
First, you have to create an adjustment layer in Photoshop. Once done, you can navigate to the “Filters” and choose any blur effects, such as Gaussian Blur. You can also apply the motion or radial blur effect from the “Filters” tab. Once you have selected the blur effect, apply it to the adjustment layer. Moreover, you can also try the “Layer Mask” to paint on the specific parts you want to make sharp.

3. Add a Curves Adjustment Layer in Photoshop
If you want to change the color of particular pixels in the image, you can add the curves adjustment in Photoshop. By doing so, you can execute minor changes in your image easily. To do so, go to the “Adjustments Panel” and click on the “Curves” icon.
Now, in the properties panel, you can move the curves to adjust the specific tonal area of the image. You can also add more points to the curve and apply any preset from the preset menu.

4. Make a Brightness and Contrast Layer in Photoshop
To make a brightness and contrast layer in Photoshop, go to the “Adjustments Panel” first. From there, tap on the “Brightness/Contrast” option that will instantly add a layer in the layers panel. Afterward, a properties panel will also open from which you can modify the settings. Here, you can drag the sliders of brightness and contrast to enhance them accordingly.

5. Adjust Layer Opacity in Photoshop
To learn how to adjust opacity in Photoshop, select the desired layer and click on the drop-down menu of “Opacity” in the layers panel. Next, move the slider to adjust the opacity accordingly. If you set the opacity value to 0%, the layer will become invisible.

Conclusion
Photoshop is widely used by professionals to perform high-end image editing. If you want to become an expert in using Photoshop, you must know how to add an adjustment layer in Photoshop. Through this article, you have learned about the importance of layers in image editing. Moreover, you have also discovered different kinds of adjustment layers that you can try to enhance your photos.
Also read:
- New A Complete Overview of VSCO Video Editor for 2024
- This Article Shares Valuable Insight Into the Best Brand Story Videos. Also, It Highlights the Importance of a Video Maker in Your Brand Story Video Ad-Making Process and Why Filmora Should Be Your Go-To Choice
- New Learn More About the Video Editing Interface of Wondershare Filmora
- 2024 Approved 5 Excellent Tools To Convert Video to 60 FPS
- New In 2024, Enhance Your Video Color Accuracy with Video Scopes
- In 2024, How to Add Motion Titles
- New 100+ Best TikTok Captions Enhance Your Content for 2024
- Updated In 2024, Control Playback Speed in Premiere Pro
- New 2024 Approved Color Matching Is the Trickiest Part of Graphic Designing. Learn in Detail About Using Canva Color Match Ideally While Working on Your Pins, Social Media Posts, and Other Designs
- Whatsapp Video converterKeywords Convert Video for Whatsapp 6600; Video Converter for Whatsapp 6600; Reduce Video Size for Whatsapp 1600; Whatsapp Supported Video Formats 720; Convert Video to Whatsapp Format 590
- New In 2024, Step by Step to Rotate Videos Using OBS
- New 2024 Approved Use Your Social Media App and Make Slow-Motion Videos by Reading This Guide. Besides Learning Slow-Motion Snapchat, Get Useful Apps Serving the Same Purposes
- Updated 2024 Approved In This Article Ill Share to You some of the Skin Care Vlog Ideas for You to Start Doing a Skin Care Review on Your YouTube Channel. But Before that Ill Share with You How Important Is Skin Care?
- New In 2024, How to Convert Images Into Video - Kapwing Tutorial
- New 2024 Approved An Intro Video Describing You and Your Content Is the First and the Foremost Thing Which a Viewer Sees. Thinking of How to Make an Interesting Intro Video, This Blog Is Surely a Supportive Guide for You. Learn More Here
- Updated How to Zoom Picture in Picture Easy Solution
- The Way to Make Dynamic Video Collages, In 2024
- Something That You Should Know About MP4 Video Format for 2024
- In 2024, Do You Know How AI Is Helping Video Editors and Enthusiasts? Many Video Editing Software Allows an Auto Reframe Option to Use that Can Help Manage Videos
- Updated 2024 Approved How to Become a Youtuber?
- Updated 2024 Approved Are You Looking for Dark LUTs Premiere Pro Free? This Article Discusses the Dark Moody LUTs with Top Recommendations for Beginning Visual Editing
- New Green Screen Is a Widely Used Effect in After Effects. Many Professional Photographers Use It to Make Creative Video Effects. This Guide Will Show You How to Use Green Screen to Videos in After Effects for 2024
- 2024 Approved Slow-Motion Innovation with Sony S&Q Feature
- Updated 2024 Approved Slow-Motion Innovation with Sony S&Q Feature
- New Get Creative with These 10 Video Editing App With Templates for 2024
- New Why Vimeo Slideshow Maker Become More and More Popular
- Updated 2024 Approved Cropping a Video in Davinci Resolve Step by Step
- In 2024, Free 3D Intro Makers
- New Have the Desire to Create a Stylish Glitch Effect to a Text on Your Video? Use Filmora for the Editing, Following the Given Steps Explained in Detail for 2024
- New How Did AI Video Games Act More Human Than Human, In 2024
- New 2024 Approved Step by Step to Cut Video in Adobe Premiere Pro
- Updated Detailed Tutorial to Crop a Video in KineMaster for 2024
- New 2024 Approved Learn How to Slow Down Time-Lapse Videos on iPhone to Make Detailed and Captivating Slow-Motion Effects in Your Time-Lapse Captures
- Updated 2024 Approved Best Tools To Create Blend Image Collage
- Updated How to Resize FLV Videos EfficientlyWindows, Mac, Android, iPhone & Online
- In 2024, So, without Wasting Time, Let Me Show You How to Mask a Video in Wondershare Filmora. Lets Get Started
- New Do You Want to Edit a TikTok After Posting? This Article Will Provide Multiple Methods Through Which You Can Do It in No Time
- New 2024 Approved Create Chroma Key Written Text Effects in Filmora
- Updated Create Intro Video with Flixpress
- Looking for a Great Way to Make Your Own Anime Music Video? The Following Are the Top AMV Makers to Choose From
- New 2024 Approved Are You Also a Fan of the Slow Mo Guys? Well! Who Isnt? Learn How You Can Create Compelling Slow-Mo Videos Like the Slow Mo Guys Here
- New In 2024, An Overview of the Best Free LUTs to Use
- New In 2024, 2 Solutions to Crop a Video Using After Effects
- In 2024, Step by Step to Add Border to Video Using Premiere Pro
- Best 10 Tools To Make Quiz Videos for 2024
- 2024 Approved How to Add Green Screen Effects In Phhotoshop
- Updated Stop Worrying if Your Adobe Premiere Playback Slows Down. This Guide Will Show You the Best Solutions to Resolve This Issue and a Perfect Alternative
- What Are the Best 10 GIF Creator?
- In 2024, How to Bypass FRP from Vivo X Flip?
- Turn Off Screen Lock - Lava Yuva 3 Pro
- In 2024, 2 Ways to Monitor Samsung Galaxy A05 Activity | Dr.fone
- How Can I Use a Fake GPS Without Mock Location On Oppo Find X7 Ultra? | Dr.fone
- In 2024, How to Reset Gmail Password on Samsung Galaxy A15 4G Devices
- Rootjunky APK To Bypass Google FRP Lock For Vivo S17
- In 2024, Getting the Pokemon Go GPS Signal Not Found 11 Error in Infinix Note 30 Pro | Dr.fone
- Why Your WhatsApp Location is Not Updating and How to Fix On Oppo A79 5G | Dr.fone
- Why Apple Account Disabled From your iPhone 7? How to Fix
- In 2024, Latest way to get Shiny Meltan Box in Pokémon Go Mystery Box On Huawei Nova Y71 | Dr.fone
- Easy Tutorial for Activating iCloud from iPhone 13 mini Safe and Legal
- Title: A Complete Guideline To Better Use QuickTime Player
- Author: Morgan
- Created at : 2024-05-19 05:11:33
- Updated at : 2024-05-20 05:11:33
- Link: https://ai-video-editing.techidaily.com/a-complete-guideline-to-better-use-quicktime-player/
- License: This work is licensed under CC BY-NC-SA 4.0.

