
:max_bytes(150000):strip_icc():format(webp)/GettyImages-1135364530-dec5678c0c2c427ba18ae21452ff6326.jpg)
Finest Approach to Slow Down a Video CapCut All-in-One Video Editor for 2024
Finest Approach to Slow Down a Video: CapCut All-in-One Video Editor
Since the slow-motion trend captured everyone’s attention, it never went out of fashion. Keeping this in view, many content creators followed the trend and created slo-mos. In filmmaking, slow motion assisted in emphasizing high-action scenes and details. Many tools and software like Adobe After Effects or Adobe Premiere Pro can do this.
Smartphone video editors were introduced to enhance the application of slow motion. One of these editors is CapCut , a multifunctional video editor capable of slo-mo creation. This article will focus on how to do slow-mo in CapCut. With tools brief review, you can find the detailed guide on the CapCut slow-mo effect . Along with learning how to do some in CapCut, we’ll look into its alternative.
Slow Motion Video Maker Slow your video’s speed with better control of your keyframes to create unique cinematic effects!
Make A Slow Motion Video Make A Slow Motion Video More Features

Part 1: CapCut Video Editor: An Exceptional Mobile App for Video Editing
CapCut is an editing application that caters to the needs of both Android and iPhone users. Whether you are working as a seasoned editor or a team member, it assists all. It harbors numerous video editing tools like the CapCut slow-motion effect. Moreover, users can also access keyframe editor, effects and filters, stock videos, and more.

The tool offers a sleek user interface with cutting-edge AI technology for automated editing. The interface looks artistic and organized for accessible editing. Along with video editing, users can perform audio, text, and image editing. You can access its Resource collection on its site, which is full of tips and tutorials. To give you a broader vision of CapCut slow-mo effect, here are some of its features:
- Video Filters and Effects: CapCut has a free collection of effects and filters to enhance your footage. The video effects and filters add uniqueness and hide any irregularities in videos. The collection keeps updating, and you can use Business, Ads, and other categories.
- Stock Videos: Use CapCut’s free stock media instead of roaming through the internet. If you must show your abilities as an editor, then try its royalty-free videos. These videos are editable, and you can apply multiple pre-installed animations and stickers to them.
- Keyframe Animation: Although CapCut offers a range of stock animations, you can create one. With its keyframe functioning, users can create custom animations. It offers custom settings like scale, position, opacity, and more adjustments.
- Background Remover: If you want to erase messy backgrounds and replace them, CapCut can assist. Its background remover eliminates video backgrounds with accuracy. Moreover, you can replace them with solid or gradient colors, images, and videos.
- Video Upscaler: This tool is available online and enhances video resolution up to 4K. The tool is compatible with diverse video contexts and gives professional outcomes. The tool is backed by AI, and hence, you just need to upload the video for upscaling.
Part 2: How to Create a Slow Mo on CapCut? A Guide
There are two seamless methods of creating slow-mo on CapCut via “Normal” and “Curve” options. The normal method involves slowing down videos via basic playback speed alteration. However, the Curve method involves multiple speed templates for this. If you do not find an expected speed template, you can utilize the “Custom” option. Following is the procedural guide to the CapCut slow-mo effect:
Step 1
After downloading and launching CapCut on your device, access its main menu. From the main menu, click the “New Project” option and upload a video.

Step 2
Once you have added the video, navigate towards the toolbar at the bottom. From there, locate and select the “Edit” option.

Step 3
From the appearing options, select the “Speed” option for the CapCut slow-mo effect.

Step 4
In the speed display, adjust the position of the slider to add the slo-mo effect. Further, go to the “Normal” section to start speed manipulation.

Step 5
Drag the playback speed slider toward the left side of the screen. This will add a slow-mo effect and will increase the video’s duration. In this section, you can also expand the “Make it smoother” option to enhance the quality. Moreover, you can also enable the “Pitch” option to maintain audio quality. Afterward, click the “ü” icon at the bottom right corner to finalize the slo-mo effect.

Part 3: CapCut Slow Mo Alternative: Wondershare Filmora for Smartphone Users
After seeing how to slow down videos on CapCut, you must think that it is so easy. However, there is an alternative editor that offers a minimal interface with similar qualities. Wondershare Filmora is a professional slow-motion creator catered to your needs. Whether you are skilled or just beginning your journey, it can assist you.
Using this CapCut slow-motion video has its benefits, as it offers multiple speed change options. You can change video speed using Normal playback speed or speed “Curve” alteration. In this section, we’ll teach you how to create a slow motion in Filmora. We are going to use the Curve technique to manipulate speed professionally.
Step-by-Step Guide to Slow Down Video in Filmora App
You can find multiple speed templates here to craft a cinematic-level slow motion. By utilizing the Custom speed setting options, this effect is possible. To fashion professional-grade and artistic slow motion in Filmora, follow these steps:
Step 1Import Videos After Creating a New Project
Download the Filmora app from the Play Store or App Store and launch it. Then, click the “New Project” tab and import a video from the device gallery.

Step 2Access the Speed Curve Option
After importing the video, navigate towards the timeline panel and select the video. From the options appearing in the bar at the bottom, select “Speed.” In the speed section, select the “Curve” section to access speed settings.

Step 3Adjust the Speed Curve Settings
From the appearing options, click the “Customize” option and start editing. To create the slo-mo effect, drag the slider in the downward direction. If you notice, the slider points are distant from each other. It is to edit videos and slow down videos at different durations. Once you are done editing in this CapCut slow-mo effect alternative, hit “Export.”

Bonus Part: Edit Your Slow Mo Video on Desktop with Filmora Desktop
No doubt Wondershare Filmora offers precise editing features compared to other apps. However, skilled and professional editors just prefer the desktop version to bring precision. In addition, there is an optical flow option and an extensive timeline panel. Both these features ensure professional outcomes and a smooth slow-motion effect.
Wondershare Filmora is a powerful alternative to CapCut slow-motion download. The software has a range of video editing features that open unlimited editing opportunities. With its various effects and filters, you can seize the audience’s attention. In addition, the software is compatible with Linux and macOS devices for diversity.
Free Download For Win 7 or later(64-bit)
Free Download For macOS 10.14 or later
Step-by-Step Guide to Create Slow Motion in Filmora for Desktop
In this method, we’ll use Filmora’s Uniform Speed functionality to generate a slow-motion video. This feature uses a simple speed slider to enhance or decelerate video speed. Find the guide to Filmora’s Uniform Speed feature attached below:
Step 1Access the Speed Tab to Start Editing
After opening a project in Filmora, select the video in the timeline and access the settings panel. From there, go to the “Speed” > “Uniform Speed” option and change the slider’s position. By dragging it towards the left side, you can add a slow-motion effect.

Step 2Add Optical Flow Effect
To add a layer of smoothness to your slow-motion video, access “AI Frame Interpolation.” You can find this option at the bottom of the Uniform Speed tab. Expand this option and select the “Optical Flow” option.

Step 3Activate Rendering and Export Video
To analyze the outcome of activating optical flow, navigate towards the timeline panel. From the given options, click on the “Render Preview” icon and wait for its completion. Once the rendering is complete, click the “Export” button after the preview.

Video Editing Features of Filmora
CapCut and Wondershare Filmora both possess AI powers to ensure seamless video creation. However, Filmora offers more video editing features, and all of them offer customization. The interface is just perfect for every professional or non-professional. With its accessible interface, you must try the following video editing tools:
1. Screen Recorder
For the seamless generation of tutorials and ‘How to” videos, this editor offers a screen recorder. The recorder is embedded with custom settings to cater to each user’s requirements. You can accommodate screen resolution, microphone settings, and cam settings with it.
2. Keyframing
Transform your illustrations into reality using Filmora’s keyframe editing feature. You can add keyframes at different points in the timeline to adjust the movements. There are custom settings like position, scale, opacity, color, and more for each keyframe.
3. Split Screen
Make your videos happening and captivating simultaneously with Filmora’s split screen option. This allows you to add distinct videos and auto-adjust them at different split screens. You can also enable manual visual, audio, and AI editing for each split video.
4. Assets Backup & Sync
Why worry about finishing a project at once when you can edit it later with Filmora? With its cloud backup option, you can start editing a video where you left off. In addition, the tool also offers synchronization across devices. This means you can access your videos, downloaded assets, and other storage data with a simple login.
5. AI Text-Based Editing
As discussed earlier, the AI algorithms allow you to edit with full efficiency. This feature of Filmora enhances productivity via text-to-speech function. It creates captions out of a video and allows you to seamlessly cut videos by removing text.
Conclusion
In conclusion, this article considered how to do slow-mo in CapCut. In addition, we saw how you can create a slow-motion video on a smartphone using CapCut. During times that demand the creation of sophisticated slow-motion content, we suggest Filmora. This editing software offers a myriad of editing tools and techniques, facilitating the creation and adjustment of slow motion.
Make A Slow Motion Video Make A Slow Motion Video More Features
Part 1: CapCut Video Editor: An Exceptional Mobile App for Video Editing
CapCut is an editing application that caters to the needs of both Android and iPhone users. Whether you are working as a seasoned editor or a team member, it assists all. It harbors numerous video editing tools like the CapCut slow-motion effect. Moreover, users can also access keyframe editor, effects and filters, stock videos, and more.
The tool offers a sleek user interface with cutting-edge AI technology for automated editing. The interface looks artistic and organized for accessible editing. Along with video editing, users can perform audio, text, and image editing. You can access its Resource collection on its site, which is full of tips and tutorials. To give you a broader vision of CapCut slow-mo effect, here are some of its features:
- Video Filters and Effects: CapCut has a free collection of effects and filters to enhance your footage. The video effects and filters add uniqueness and hide any irregularities in videos. The collection keeps updating, and you can use Business, Ads, and other categories.
- Stock Videos: Use CapCut’s free stock media instead of roaming through the internet. If you must show your abilities as an editor, then try its royalty-free videos. These videos are editable, and you can apply multiple pre-installed animations and stickers to them.
- Keyframe Animation: Although CapCut offers a range of stock animations, you can create one. With its keyframe functioning, users can create custom animations. It offers custom settings like scale, position, opacity, and more adjustments.
- Background Remover: If you want to erase messy backgrounds and replace them, CapCut can assist. Its background remover eliminates video backgrounds with accuracy. Moreover, you can replace them with solid or gradient colors, images, and videos.
- Video Upscaler: This tool is available online and enhances video resolution up to 4K. The tool is compatible with diverse video contexts and gives professional outcomes. The tool is backed by AI, and hence, you just need to upload the video for upscaling.
Part 2: How to Create a Slow Mo on CapCut? A Guide
There are two seamless methods of creating slow-mo on CapCut via “Normal” and “Curve” options. The normal method involves slowing down videos via basic playback speed alteration. However, the Curve method involves multiple speed templates for this. If you do not find an expected speed template, you can utilize the “Custom” option. Following is the procedural guide to the CapCut slow-mo effect:
Step 1
After downloading and launching CapCut on your device, access its main menu. From the main menu, click the “New Project” option and upload a video.
Step 2
Once you have added the video, navigate towards the toolbar at the bottom. From there, locate and select the “Edit” option.
Step 3
From the appearing options, select the “Speed” option for the CapCut slow-mo effect.
Step 4
In the speed display, adjust the position of the slider to add the slo-mo effect. Further, go to the “Normal” section to start speed manipulation.
Step 5
Drag the playback speed slider toward the left side of the screen. This will add a slow-mo effect and will increase the video’s duration. In this section, you can also expand the “Make it smoother” option to enhance the quality. Moreover, you can also enable the “Pitch” option to maintain audio quality. Afterward, click the “ü” icon at the bottom right corner to finalize the slo-mo effect.
Part 3: CapCut Slow Mo Alternative: Wondershare Filmora for Smartphone Users
After seeing how to slow down videos on CapCut, you must think that it is so easy. However, there is an alternative editor that offers a minimal interface with similar qualities. Wondershare Filmora is a professional slow-motion creator catered to your needs. Whether you are skilled or just beginning your journey, it can assist you.
Using this CapCut slow-motion video has its benefits, as it offers multiple speed change options. You can change video speed using Normal playback speed or speed “Curve” alteration. In this section, we’ll teach you how to create a slow motion in Filmora. We are going to use the Curve technique to manipulate speed professionally.
Step-by-Step Guide to Slow Down Video in Filmora App
You can find multiple speed templates here to craft a cinematic-level slow motion. By utilizing the Custom speed setting options, this effect is possible. To fashion professional-grade and artistic slow motion in Filmora, follow these steps:
Step 1Import Videos After Creating a New Project
Download the Filmora app from the Play Store or App Store and launch it. Then, click the “New Project” tab and import a video from the device gallery.
Step 2Access the Speed Curve Option
After importing the video, navigate towards the timeline panel and select the video. From the options appearing in the bar at the bottom, select “Speed.” In the speed section, select the “Curve” section to access speed settings.
Step 3Adjust the Speed Curve Settings
From the appearing options, click the “Customize” option and start editing. To create the slo-mo effect, drag the slider in the downward direction. If you notice, the slider points are distant from each other. It is to edit videos and slow down videos at different durations. Once you are done editing in this CapCut slow-mo effect alternative, hit “Export.”
Bonus Part: Edit Your Slow Mo Video on Desktop with Filmora Desktop
No doubt Wondershare Filmora offers precise editing features compared to other apps. However, skilled and professional editors just prefer the desktop version to bring precision. In addition, there is an optical flow option and an extensive timeline panel. Both these features ensure professional outcomes and a smooth slow-motion effect.
Wondershare Filmora is a powerful alternative to CapCut slow-motion download. The software has a range of video editing features that open unlimited editing opportunities. With its various effects and filters, you can seize the audience’s attention. In addition, the software is compatible with Linux and macOS devices for diversity.
Free Download For Win 7 or later(64-bit)
Free Download For macOS 10.14 or later
Step-by-Step Guide to Create Slow Motion in Filmora for Desktop
In this method, we’ll use Filmora’s Uniform Speed functionality to generate a slow-motion video. This feature uses a simple speed slider to enhance or decelerate video speed. Find the guide to Filmora’s Uniform Speed feature attached below:
Step 1Access the Speed Tab to Start Editing
After opening a project in Filmora, select the video in the timeline and access the settings panel. From there, go to the “Speed” > “Uniform Speed” option and change the slider’s position. By dragging it towards the left side, you can add a slow-motion effect.
Step 2Add Optical Flow Effect
To add a layer of smoothness to your slow-motion video, access “AI Frame Interpolation.” You can find this option at the bottom of the Uniform Speed tab. Expand this option and select the “Optical Flow” option.
Step 3Activate Rendering and Export Video
To analyze the outcome of activating optical flow, navigate towards the timeline panel. From the given options, click on the “Render Preview” icon and wait for its completion. Once the rendering is complete, click the “Export” button after the preview.
Video Editing Features of Filmora
CapCut and Wondershare Filmora both possess AI powers to ensure seamless video creation. However, Filmora offers more video editing features, and all of them offer customization. The interface is just perfect for every professional or non-professional. With its accessible interface, you must try the following video editing tools:
1. Screen Recorder
For the seamless generation of tutorials and ‘How to” videos, this editor offers a screen recorder. The recorder is embedded with custom settings to cater to each user’s requirements. You can accommodate screen resolution, microphone settings, and cam settings with it.
2. Keyframing
Transform your illustrations into reality using Filmora’s keyframe editing feature. You can add keyframes at different points in the timeline to adjust the movements. There are custom settings like position, scale, opacity, color, and more for each keyframe.
3. Split Screen
Make your videos happening and captivating simultaneously with Filmora’s split screen option. This allows you to add distinct videos and auto-adjust them at different split screens. You can also enable manual visual, audio, and AI editing for each split video.
4. Assets Backup & Sync
Why worry about finishing a project at once when you can edit it later with Filmora? With its cloud backup option, you can start editing a video where you left off. In addition, the tool also offers synchronization across devices. This means you can access your videos, downloaded assets, and other storage data with a simple login.
5. AI Text-Based Editing
As discussed earlier, the AI algorithms allow you to edit with full efficiency. This feature of Filmora enhances productivity via text-to-speech function. It creates captions out of a video and allows you to seamlessly cut videos by removing text.
Conclusion
In conclusion, this article considered how to do slow-mo in CapCut. In addition, we saw how you can create a slow-motion video on a smartphone using CapCut. During times that demand the creation of sophisticated slow-motion content, we suggest Filmora. This editing software offers a myriad of editing tools and techniques, facilitating the creation and adjustment of slow motion.
Add Text Animation to A Video Online
Do you want to make a creative video? Do you want your presentation or video to be easy to follow and entertaining? You can take the video to another level with the help of text animation. This article will discuss how to add text animation to online videos. You can use a good video editor from where you can select fresh styles and make the best video from there. One of the simplest ways to elevate your movie from good to excellent is with understandable text animation.
Text animation and short captions can broaden the audience for your content as more consumers view videos without sound these days. It matters what fonts you use in the videos, and they establish the mood and facilitate interaction with most viewers who rely on video captions. Add text, alter the font, add transitions, and use text effects to draw the user’s attention as they scroll. Please continue reading to discover how simple it is to make interactive video titles, words, and supers.
1. Use Kapwing animation text editor
(https://www.kapwing.com/animated-text-video-maker )
You can use the potent online editor Kapwing to add animated text to videos online, utilizing music, videos, GIFs, and images. There are no downloads required because everything is already present inside the browser. Kapwing is a capable tool for content production that is simple enough for everyone to use. The majority of video formats, GIF and image, including avi, png, jpg, gif, MOV, mp4, and more, are supported by Kapwing.
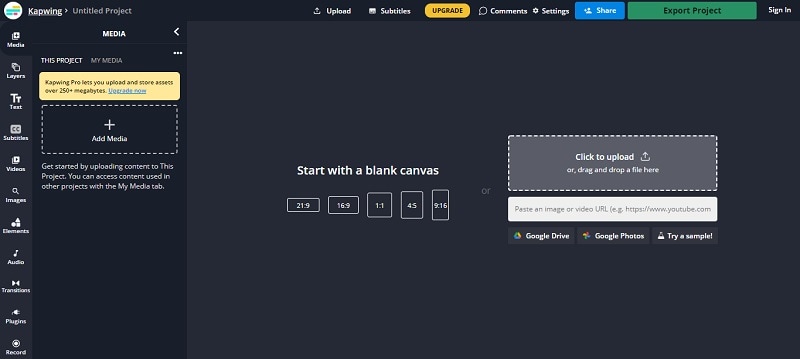
Step1 Upload the Video to Kapwing
You can open Kapwing with the device and tap on “Start Editing” to open up Kapwimg studio. After that, one can use the drag and drop option to upload the video in the studio. You can click on upload or use the link to upload.
If you have a more than 250 MB video, then you will require the Pro version.
Step2 Add the Text
When the video gets uploaded, now you can add your text. You must click the “Text” option on the left and type the text. After that, you can pick your favorite color, background, and color to add style.
You will always want that your text to get animated, but it doesn’t mean that you will have to use explosive fonts or funky or bright, which are very funky. The animation will make your text look attractive, and you can experiment with the colors and fonts to find the best combination.
Step3 Animate the Text
Now the fun part starts; choose the text box present on the right side and click on the “Animate” tab. It will allow the user to select animations like fade, flicker, hue rotates, and many more. Choose the speed according to your requirement, and if you want to change the background and color, you can do it too.
Use “Apply To” for applying this animation in the outro, intro, or both. It will help you to make the text fade out, fade in, or transition out and in with animation. Now the animation library has nine options:
- Drop: It appears on top of the text box
- Flicker: This one is like a candle’s flicker, and text flashes disappear and appear before staying.
- Fade: Opacity can be changed from 0% to 100%.
- Pop:- This grows the text more extensive than the text box and shrinks back to the place.
- Reveal:- Rolls from the left side to the right side
- Wipe:- Rolls from the left side to the right side with a colored background.
- Vibrate: The text box shakes in every direction.
- Hue rotates:- Colour of text cycles through the hue values..
You can use a timeline to adjust the animation’s termination when you set text animation. You can even drag that layer after the start time or use it on end/start time sliders to decrease or increase the time of your video. Text animation can get started when the cursor reaches the start time.
Step4 Export
The video with animated text is now ready to boom. You can click on “Export Video” present at the top and wait for the process. After that, you can download that video and use the links to share it on your social media platform.
2. Use veed.io text video editor
(https://www.veed.io/create/text-video-maker )
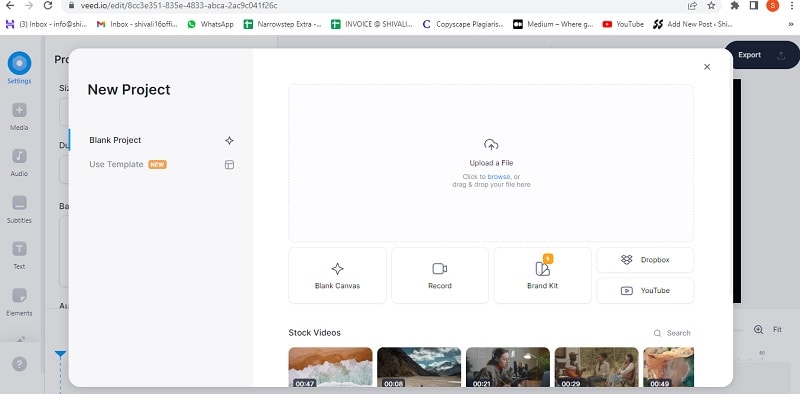
Veed is one of the best video editor text effects online, which allows you to add text to online videos. You can easily add style, color, text, and font in a few clicks. You can upload the video and tap the text to get started. Add title and text or select handwriting font. One can select it from templates. Change transparency, alignment, and font size of the text.
This online software is perfect for creating attractive videos on social media. This is free, which omits the usage of expensive software. It is much easier to avoid many complex video editor apps. With the help of VEED, you can create an excellent video without any experience and do it with a few clicks. Let’s see how to add animated text to photos online.
Step1 Upload the video
Tap on “Choose Video” and choose the file you want to upload on VEED. One can even use the drag and drop option from the folder to the editor.
Step2 Add text
After that, you can add the text by tapping on the “Text” option on the left menu. You can select the text style and start typing.
Step3 Export
Save the video with the text you placed by tapping on “Export.” The video gets saved in an MP4 file.
3. Use Animaker text maker
(https://www.animaker.com/text-animation-maker )
The Animaker is one of the best-animated video makers. This app offers the best collection of charts, BGs, and animated characters. With the help of Animaker, you can make the text disappear or appear off-screen in the best way. After you finish your video, you can download the format in MP4.
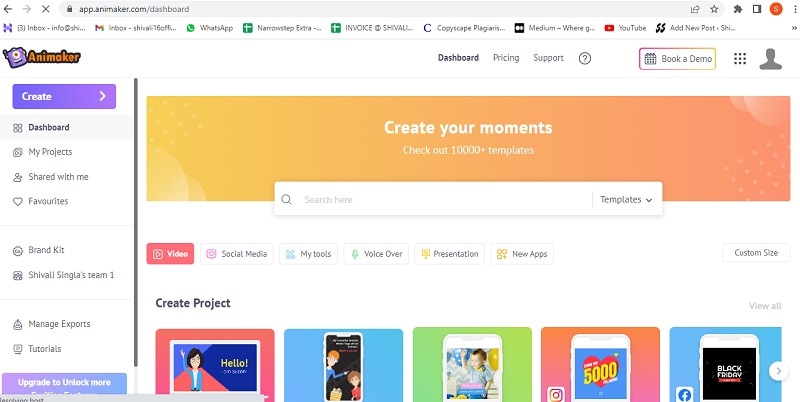
Step1 Upload the video clip
First, you can upload your video clip present on top that you wish to add text animation.
- Tap on the “Upload section” on the bottom left. You can upload your video where you wish to add the animated text.
- The video will get uploaded to “My Files.”
- Click on the uploaded video in the library to load it on the workspace.
Step2 Add text to the video
- You can add text in their text section
- In the next section, one can find two different text types. At the top, you will discover plain text options, and at the bottom, you can find pre-designed boxes seasoned at Animaker.
Let’s see how you can use pre-built text boxes.
- Tap on pre-built designs for your text animation. One can see the text appearing in the center of the workspace, and you can click it and type new text if you want to customize it.
- You can notice widespread options appearing with your text. It is known as the item menu. It will allow the user to modify their text. One can change font size, color, style, etc. Your text will come with pre-defined effects, which will help you to animate text instantly.
- You must have noticed that the purple color bar appears on the timeline, representing the duration of the text visible in the video. For example, if you want that text to get visible between 4rth to 8th seconds, then you will have to drag the edges of that purple bar to the same duration.
To see the scene, you must click on the play button on top of the timeline.
Let’s check the other ways of adding animated text to the video. In the previous one, you have seen how you can add text animation using pre-built boxes. Now you will get to know about doing it by using blank boxes.
- Start tapping the “text section”. Select the bank textbox.
- Click on them and then opt to add new text.
- Opt for clicking the cog icon that is there in the item menu.
- You will notice the settings tab that is on the screen’s right side.
- You can easily opt for the customization of the text in the way you wish. You can start by modifying the style of the font. One can change the size and color of the font as well.
- Use these options and opt for the application of enter and/or exit effects to text. Now, opt to click on the effect option to get more than 50 options. You can select the effect from there.
- Once the animation effect is applied to your timeline, you can notice the pink part in the bar i.e. purple. This completes creating text animation by using Animaker.
Step3 Download the Video
- You can visit the publish option in the right window to download the video.
- Tap on the “download video” option for downloading.
Conclusion
Now, you are aware of how to add text animation to video online and the three best video editors that will help you add animated text to your videos. At this point, you can choose the best one according to your needs and usage. These steps will help you create a unique and good video that will be easy to understand and entertaining.
Free Download For Win 7 or later(64-bit)
Free Download For macOS 10.14 or later
Free Download For macOS 10.14 or later
How to Create an Instant Slideshow on Mac
How to Create an Instant Slideshow on Mac
An easy yet powerful editor
Numerous effects to choose from
Detailed tutorials provided by the official channel
Instant slideshows on Mac devices are elusive graphic elements to creatively convey your information to the target audience. Stay here to have a complete knowhow of the design process!
In this article
01 [How to Create a Slideshow in Photos on Mac](#Part 1)
02 [How to Create a Slideshow in Video on Mac](#Part 2)
03 [How to Make a Slideshow on Mac in Preview](#Part 3)
04 [How to Create Slideshows Online](#Part 4)
05 [FAQs About Slideshows on Mac](#Part 5)
Part 1 How to Create a Slideshow in Photos on Mac
Creating a slideshow is an intuitive exploration of your graphic design skills, either just for a fun-filled entertainment, or catering to some specific information delivery on the professional front. When aiming to create Mac photos slideshow presentations, you can affordably pick any of your preferred devices and a suitable slideshow creator tool.
Speaking in the light of the fact, it is an equally amazing experience to design exemplary movies and presentations for a slide show MacBook, thanks to the high end technical abilities of such devices that work together to facilitate a remarkable and classic slideshow output. Having said that, let us proceed with discussing about the process of creating slideshow Mac presentations in the ‘Photos’ app of a Mac supported device in the following section:
User’s Guide to Create a Slideshow in the Photos App of a Mac Device
Step 1: Launch the App
Open the apps gallery of your Mac device and navigate to the ‘Photos’ app. Launch the same to be greeted by the latter’s welcome screen. Next, head to the sidebar in the left and hit the ‘Library’ option under the ‘Photos’ tab.

Step 2: Select Your Images
Within the ‘Library’ tab, hit the ‘Days’ or ‘All Photos’ subcategory to choose the desired images and videos that you wish to include in your presentation to create slideshow on Mac.

Step 3: View the Presentation
The ‘Photos’ app has a feature to automatically transform your selections in the previous step into an impressive slideshow. You can take a look at the created Mac photo slideshow by navigating to the ‘Menu Bar’ at the top of the app screen and hitting the ‘File’ tab, followed by selecting the ‘Play Slideshow’ option from the dropdown menu that appears next.

Step 4: Customize Your Slideshow
Completion of Step 3 causes a customization window to pop up, where you can select a vibrant theme and background music for your presentation. Once you have made your choices, you can visualize their appearance in the ‘Preview’ window at the right side of the screen.
About the selection of background music, you can either choose an audio track from the in-built music app of your iPad, or go with the inline complementary music of the presentation theme that you have already selected.

Step 5: It’s Time to Play!
When everything seems fine and you are satisfied with your efforts, head to the ‘File’ tab again and select the ‘Play Slideshow’ from the list of options that drops down to start your MacBook Photos slideshow. Once the slideshow begins to run, you can use the ‘Arrow Keys’ on your device to navigate forward and backward within the presentation, or press the ‘Spacebar’ to pause/resume the slideshow. If you want to stop playing the slideshow, press either of the ‘Escape’ or ‘X’ keys on your system’s keyboard.

Part 2 How to Create a Slideshow in Video on Mac
While image centered slideshows add life to still photos, video editions of the same are highly effective in integrating motion with visual excellence. Creating a slideshow on Mac is easy enough. However, if you wish to design elusive video presentations on the device, it is no difficult either. Having understood the credibility and design process of still presentations, let us move ahead with getting an insight into crafting classic masterpieces of video slideshows on a Mac device in what follows next:
User’s Guide to Create a Video Slideshow in a Mac Device
Step 1: Download and Install a Suitable Video Editor Application
Browsing the IT market, you can easily pick your preferred Mac compatible video editing software to address the concern of how to make a slideshow on Mac. As of now, let us try hands at understanding the creation process through the Movavi Slideshow Maker application.
Start with navigating to and downloading the Movavi Slideshow Maker software from the latter’s official website. Having done that, proceed to install the program in your Mac device by following the on screen instructions to run the installation files.
Step 2: Select a Working Mode
After a successful installation of the program, proceed to launch it in your Mac device and wait for the app’s welcome screen to appear. Choosing the Movavi Slideshow Maker program for creating Mac slideshow presentations, you are allowed to work in 2 different creation modes.
If you wish to explicitly convert still images into stunning slideshows, select the ‘Slideshow Wizard’ mode. On the contrary, if you have a task of designing a high end, professional presentation with a series of elements, prefer choosing the ‘Create a Movie in Manual Mode’ option.
Having talked enough about how to create slideshow presentations with images on a Mac device in the previous section, let us now dive into making a classic video presentation on the same, in what follows next. As already stated; select ‘Create a Movie in Manual Mode’ from the software’s main interface to begin with the creation process.

Step 3: Import Media Files
Browse through the local media gallery on your Mac device to select the required image and video files that you wish to create the slideshow presentation from. To do this, navigate to the ‘Elements Panel’ at the left and hit the ‘Import’ tab, followed by clicking on the ‘Add Files’ option in the software’s editor timeline and navigate through your locally saved media files.
When you have selected everything, your choices will automatically appear in the app’s editing workspace. You can alternatively, prefer dragging and dropping the associated files directly to the software timeline.

Step 4: Include Transitions
Adding a suitable transition effect gives the perfect flow to your presentation, while eliminating distortions in between successive slides. To supplement your slideshow with the same, navigate to the ‘Elements Panel’ at the left of the editor timeline and hit the ‘Transitions’ tab. You can choose any preferred transition style from the variety of available options in line with the theme of your presentation.
When you have made your choice, drag the same in between the desired pair of consecutive slides within the editor workspace. If you require supplementing all the presentation slides with a particular transition effect, click on the icon beside the ‘Transitions’ tab to automatically add a selected transition effect to all the slides together.

Step 5: Add an Upbeat Background Music
To add a preferred background audio, head to the ‘Import’ tab in the left side ‘Elements Panel’ and click on the same to see the ‘Add Files’ option. Here, you can traverse through your device’s media gallery and select a desired soundtrack. Click on the track’s thumbnail to automatically include it within the ‘Audio Track’ of the software timeline.

Step 6: Include Titles and Captions
To add text customizations within your presentations, head to the ‘Elements Panel’ at the left and hit the ‘Titles’ tab to open the program’s preset title options. You can select any suitable annotation for your slideshow, followed by dragging and dropping the same to the editor workspace to include it in the presentation.

You can customize the added title by double clicking on the same, either in the ‘Preview’ window above the editor timeline, or within the timeline itself. Next, double click within the text box in the ‘Preview’ window to type the desired text for including it into the slideshow.
To adjust text parameters like, size, font, color of the added title, double click on the same within the program’s timeline to open the title customization interface in the ‘Preview’ window, where you get the liberty to make desired modifications in the preset parameter values. When you have made the required changes, hit ‘Apply’ to confirm them.

Step 7: Export Your Slideshow
When you are satisfied with your efforts till here, proceed to save the presentation by navigating to and hitting the ‘Export’ tab at the right side of the editor workspace. This will direct you to the slideshow export interface, where you can choose from a variety of file saving options according to your specific needs.

Click on ‘Save Video File’ to add the presentation to your device’s local media gallery, or hit the ‘Save for Devices’ option to preserve your creation for an external device export. For a direct export of the slideshow to your ‘YouTube’ channel, click on ‘Upload to YouTube’, or choose to save the presentation in any of the MP4, OGV and WebM media file formats for an online sharing purpose. Once you are done with making all the selections and adjustments, head to and tap the ‘Start’ button.

Part 3 How to Make a Slideshow on Mac in Preview
When the question is how to create a slideshow on Mac devices, the answer can have a diverse range of aspects. You can work with the ‘Photos’ app, create a video slideshow, and much more. Exploring the domain, let us proceed with learning to create a Mac slideshow in the Preview feature of the device in the following section:
User’s Guide to Create a Slideshow in the Preview App of a Mac Device
Step 1: Launch the Application
In the launchpad of your Mac device, head to and tap the ‘Preview’ app icon frame to open the same.
Step 2: Choose Your Photos
Browse through the local media gallery of your device and select the desired images that you wish to include within the presentation. Click the ‘Open’ button, once you have made your choices.
Step 3: Play the Presentation
Navigate to the ‘Functions Toolbar’ at the top of the app’s main interface and hit the ‘View’ tab, followed by clicking on the ‘Slideshow’ option from the dropdown list that appears next.
Step 4: That’s It!
You can now watch and control the automatically created slideshow through the respective buttons that appear on the screen.

Part 4 How to Create Slideshows Online
As is evident by now that MacBook slideshow presentations have a diversity of creation processes and platforms, you can conveniently pick the one that suits your specific design concerns and portability requirements. After discussing about the ways to make Mac compatible slideshow presentations on external software platforms, as well as on the device itself, let us now have an insight into the process of creating slideshows on online utilities in the following section:
User’s Guide to Create Online Slideshow Presentations
Step 1: Launch a Preferred Online Tool
In any of your favorite web browsers, navigate to and launch any desired online slideshow creator tool from its official website. As of now, let us proceed with using the Kapwing video slideshow maker.
Step 2: Upload Media Files
Browse through the media gallery of your device to select and upload the desired set of images, GIFs and videos to the Kapwing video slideshow maker online tool. You can also ‘Drag and Drop’ the media directly to the tool’s editor workspace.

In addition to choosing media files from your device, you can directly import the same from online sources, like, YouTube, Twitter, etc., by copying the media link and pasting it within the tool’s media URL box. The Kapwing slideshow maker allows you to work with a series of media file formats, such as, MOV, JPG, GIF, MP4, PNG, among others.
Step 3: Sort and Edit Your Presentation
Once all the media files are imported to the workspace, you can use the ‘Slideshow Preview’ to sort the Images and videos within the presentation in a desired sequence of appearance. As far as editing the slideshow is concerned, you can set the orientation of the slides to landscape, square or a 9:16 aspect ratio.
There are options to crop the images and videos to include specific sections, while simultaneously adjusting their screen time. You can further, complement the presentation with a cohesive soundtrack in the background and include different graphic elements, like, stickers, titles and text annotations to craft the perfect slideshow.

Step 4: Time to Share!
When you are happy with your work, proceed to the top right corner of the editor workspace and click on the ‘Export’ tab. The Kapwing video maker will now transform your media into an MP4 slideshow presentation, which you are free to either save locally in your device, or share with your social media peers.
Part 5 FAQs About Slideshows on Mac
● How to delete a slideshow?
To delete a saved slideshow for MacBook, navigate to the latter’s destination folder in your device and browse for the particular presentation you wish to remove. Once found, right click on the same, followed by selecting the ‘Delete’ option from the dropdown menu that appears next. A ‘Delete Slideshow’ conformation box pops up, where you need to click on the ‘Yes’ button to move the presentation to your device’s ‘Trash Can’.
● How to include animations within a slideshow presentation?
If you are working on the concern of how to create a slideshow on Mac in the Photo apps of a Mac device, there is no provision for including animations within the slideshow. If at all you choose to add live images and animation files, they will appear as still images when you run the presentation.
● How to export a slideshow in the video format?
For exporting a created slideshow in the video format, all you need to do is, open the slideshow and navigate to the ‘Export’ button at the top right corner. As you hit the tab, the slideshow export interface pops up, where you can select the desired video format and destination of your slideshow. When you have made your choice, click ‘Save’ at the bottom right corner.
● How to create slideshows for Facebook?
To create a slideshow on Facebook, launch the app to login to your Facebook account in your device and head to the ‘Status Update’ tab. From the list of options that follows next, choose ‘Photo/Video’, succeeded by ‘Create a Slideshow’. You can now add the desired media files and adjust the different slideshow parameters to create a presentation.
● How to upload slideshow presentations on Instagram?
To create and upload a slideshow on Instagram, launch the app in your device and click on the ‘+’ icon in the latter’s welcome screen. You now need to hit the ‘Select Multiple’ button and choose the desired images and videos up to a maximum of 10 files from your device to add to the presentation. You can sort the order and add filter customizations before posting your creation. When you are done, click ‘Upload’ and follow the upcoming instructions.
Creating Slideshow Presentations on a Mac Device With Wondershare Filmora Video Editor
For Win 7 or later (64-bit)
For macOS 10.12 or later
The credibility of the Filmora video editor package does not need an introduction in the graphic design world. When the talk is about how to do a slideshow on Mac, the franchise presents its exclusive, Mac compatible slideshow creator program for designing professional quality slideshow movies. The software is handy enough to be easily worked upon by amateurs, casual creators and experienced professionals.
When it comes to the editing flexibility, the program’s inbuilt library is there to deliver a hoard of upgraded and high tech audio-visual and design effects, filters, elements at your disposal. Whether create a presentation from scratch or customize a premade slideshow template, Filmora lets you do everything to generate a slideshow output that is no less than a visual masterpiece. Talking of the output quality, you can safely leave everything to this high resolution program.
● Ending Thoughts →
● Mac devices have a diversity of utilities and in-built apps to automatically create beautiful and stunning slideshow presentations within just a few clicks.
● When addressing the concern of how to make slides on MacBook, you can choose from working with a range of media files to design and customize a classic piece o0f graphic artwork.
● If the talk is about choosing the most reliable Mac slideshow creator alternative, you can pick the Wondershare Filmora slideshow maker application without a second thought.
Instant slideshows on Mac devices are elusive graphic elements to creatively convey your information to the target audience. Stay here to have a complete knowhow of the design process!
In this article
01 [How to Create a Slideshow in Photos on Mac](#Part 1)
02 [How to Create a Slideshow in Video on Mac](#Part 2)
03 [How to Make a Slideshow on Mac in Preview](#Part 3)
04 [How to Create Slideshows Online](#Part 4)
05 [FAQs About Slideshows on Mac](#Part 5)
Part 1 How to Create a Slideshow in Photos on Mac
Creating a slideshow is an intuitive exploration of your graphic design skills, either just for a fun-filled entertainment, or catering to some specific information delivery on the professional front. When aiming to create Mac photos slideshow presentations, you can affordably pick any of your preferred devices and a suitable slideshow creator tool.
Speaking in the light of the fact, it is an equally amazing experience to design exemplary movies and presentations for a slide show MacBook, thanks to the high end technical abilities of such devices that work together to facilitate a remarkable and classic slideshow output. Having said that, let us proceed with discussing about the process of creating slideshow Mac presentations in the ‘Photos’ app of a Mac supported device in the following section:
User’s Guide to Create a Slideshow in the Photos App of a Mac Device
Step 1: Launch the App
Open the apps gallery of your Mac device and navigate to the ‘Photos’ app. Launch the same to be greeted by the latter’s welcome screen. Next, head to the sidebar in the left and hit the ‘Library’ option under the ‘Photos’ tab.
Step 2: Select Your Images
Within the ‘Library’ tab, hit the ‘Days’ or ‘All Photos’ subcategory to choose the desired images and videos that you wish to include in your presentation to create slideshow on Mac.
Step 3: View the Presentation
The ‘Photos’ app has a feature to automatically transform your selections in the previous step into an impressive slideshow. You can take a look at the created Mac photo slideshow by navigating to the ‘Menu Bar’ at the top of the app screen and hitting the ‘File’ tab, followed by selecting the ‘Play Slideshow’ option from the dropdown menu that appears next.
Step 4: Customize Your Slideshow
Completion of Step 3 causes a customization window to pop up, where you can select a vibrant theme and background music for your presentation. Once you have made your choices, you can visualize their appearance in the ‘Preview’ window at the right side of the screen.
About the selection of background music, you can either choose an audio track from the in-built music app of your iPad, or go with the inline complementary music of the presentation theme that you have already selected.
Step 5: It’s Time to Play!
When everything seems fine and you are satisfied with your efforts, head to the ‘File’ tab again and select the ‘Play Slideshow’ from the list of options that drops down to start your MacBook Photos slideshow. Once the slideshow begins to run, you can use the ‘Arrow Keys’ on your device to navigate forward and backward within the presentation, or press the ‘Spacebar’ to pause/resume the slideshow. If you want to stop playing the slideshow, press either of the ‘Escape’ or ‘X’ keys on your system’s keyboard.
Part 2 How to Create a Slideshow in Video on Mac
While image centered slideshows add life to still photos, video editions of the same are highly effective in integrating motion with visual excellence. Creating a slideshow on Mac is easy enough. However, if you wish to design elusive video presentations on the device, it is no difficult either. Having understood the credibility and design process of still presentations, let us move ahead with getting an insight into crafting classic masterpieces of video slideshows on a Mac device in what follows next:
User’s Guide to Create a Video Slideshow in a Mac Device
Step 1: Download and Install a Suitable Video Editor Application
Browsing the IT market, you can easily pick your preferred Mac compatible video editing software to address the concern of how to make a slideshow on Mac. As of now, let us try hands at understanding the creation process through the Movavi Slideshow Maker application.
Start with navigating to and downloading the Movavi Slideshow Maker software from the latter’s official website. Having done that, proceed to install the program in your Mac device by following the on screen instructions to run the installation files.
Step 2: Select a Working Mode
After a successful installation of the program, proceed to launch it in your Mac device and wait for the app’s welcome screen to appear. Choosing the Movavi Slideshow Maker program for creating Mac slideshow presentations, you are allowed to work in 2 different creation modes.
If you wish to explicitly convert still images into stunning slideshows, select the ‘Slideshow Wizard’ mode. On the contrary, if you have a task of designing a high end, professional presentation with a series of elements, prefer choosing the ‘Create a Movie in Manual Mode’ option.
Having talked enough about how to create slideshow presentations with images on a Mac device in the previous section, let us now dive into making a classic video presentation on the same, in what follows next. As already stated; select ‘Create a Movie in Manual Mode’ from the software’s main interface to begin with the creation process.
Step 3: Import Media Files
Browse through the local media gallery on your Mac device to select the required image and video files that you wish to create the slideshow presentation from. To do this, navigate to the ‘Elements Panel’ at the left and hit the ‘Import’ tab, followed by clicking on the ‘Add Files’ option in the software’s editor timeline and navigate through your locally saved media files.
When you have selected everything, your choices will automatically appear in the app’s editing workspace. You can alternatively, prefer dragging and dropping the associated files directly to the software timeline.
Step 4: Include Transitions
Adding a suitable transition effect gives the perfect flow to your presentation, while eliminating distortions in between successive slides. To supplement your slideshow with the same, navigate to the ‘Elements Panel’ at the left of the editor timeline and hit the ‘Transitions’ tab. You can choose any preferred transition style from the variety of available options in line with the theme of your presentation.
When you have made your choice, drag the same in between the desired pair of consecutive slides within the editor workspace. If you require supplementing all the presentation slides with a particular transition effect, click on the icon beside the ‘Transitions’ tab to automatically add a selected transition effect to all the slides together.
Step 5: Add an Upbeat Background Music
To add a preferred background audio, head to the ‘Import’ tab in the left side ‘Elements Panel’ and click on the same to see the ‘Add Files’ option. Here, you can traverse through your device’s media gallery and select a desired soundtrack. Click on the track’s thumbnail to automatically include it within the ‘Audio Track’ of the software timeline.
Step 6: Include Titles and Captions
To add text customizations within your presentations, head to the ‘Elements Panel’ at the left and hit the ‘Titles’ tab to open the program’s preset title options. You can select any suitable annotation for your slideshow, followed by dragging and dropping the same to the editor workspace to include it in the presentation.
You can customize the added title by double clicking on the same, either in the ‘Preview’ window above the editor timeline, or within the timeline itself. Next, double click within the text box in the ‘Preview’ window to type the desired text for including it into the slideshow.
To adjust text parameters like, size, font, color of the added title, double click on the same within the program’s timeline to open the title customization interface in the ‘Preview’ window, where you get the liberty to make desired modifications in the preset parameter values. When you have made the required changes, hit ‘Apply’ to confirm them.
Step 7: Export Your Slideshow
When you are satisfied with your efforts till here, proceed to save the presentation by navigating to and hitting the ‘Export’ tab at the right side of the editor workspace. This will direct you to the slideshow export interface, where you can choose from a variety of file saving options according to your specific needs.
Click on ‘Save Video File’ to add the presentation to your device’s local media gallery, or hit the ‘Save for Devices’ option to preserve your creation for an external device export. For a direct export of the slideshow to your ‘YouTube’ channel, click on ‘Upload to YouTube’, or choose to save the presentation in any of the MP4, OGV and WebM media file formats for an online sharing purpose. Once you are done with making all the selections and adjustments, head to and tap the ‘Start’ button.
Part 3 How to Make a Slideshow on Mac in Preview
When the question is how to create a slideshow on Mac devices, the answer can have a diverse range of aspects. You can work with the ‘Photos’ app, create a video slideshow, and much more. Exploring the domain, let us proceed with learning to create a Mac slideshow in the Preview feature of the device in the following section:
User’s Guide to Create a Slideshow in the Preview App of a Mac Device
Step 1: Launch the Application
In the launchpad of your Mac device, head to and tap the ‘Preview’ app icon frame to open the same.
Step 2: Choose Your Photos
Browse through the local media gallery of your device and select the desired images that you wish to include within the presentation. Click the ‘Open’ button, once you have made your choices.
Step 3: Play the Presentation
Navigate to the ‘Functions Toolbar’ at the top of the app’s main interface and hit the ‘View’ tab, followed by clicking on the ‘Slideshow’ option from the dropdown list that appears next.
Step 4: That’s It!
You can now watch and control the automatically created slideshow through the respective buttons that appear on the screen.
Part 4 How to Create Slideshows Online
As is evident by now that MacBook slideshow presentations have a diversity of creation processes and platforms, you can conveniently pick the one that suits your specific design concerns and portability requirements. After discussing about the ways to make Mac compatible slideshow presentations on external software platforms, as well as on the device itself, let us now have an insight into the process of creating slideshows on online utilities in the following section:
User’s Guide to Create Online Slideshow Presentations
Step 1: Launch a Preferred Online Tool
In any of your favorite web browsers, navigate to and launch any desired online slideshow creator tool from its official website. As of now, let us proceed with using the Kapwing video slideshow maker.
Step 2: Upload Media Files
Browse through the media gallery of your device to select and upload the desired set of images, GIFs and videos to the Kapwing video slideshow maker online tool. You can also ‘Drag and Drop’ the media directly to the tool’s editor workspace.
In addition to choosing media files from your device, you can directly import the same from online sources, like, YouTube, Twitter, etc., by copying the media link and pasting it within the tool’s media URL box. The Kapwing slideshow maker allows you to work with a series of media file formats, such as, MOV, JPG, GIF, MP4, PNG, among others.
Step 3: Sort and Edit Your Presentation
Once all the media files are imported to the workspace, you can use the ‘Slideshow Preview’ to sort the Images and videos within the presentation in a desired sequence of appearance. As far as editing the slideshow is concerned, you can set the orientation of the slides to landscape, square or a 9:16 aspect ratio.
There are options to crop the images and videos to include specific sections, while simultaneously adjusting their screen time. You can further, complement the presentation with a cohesive soundtrack in the background and include different graphic elements, like, stickers, titles and text annotations to craft the perfect slideshow.
Step 4: Time to Share!
When you are happy with your work, proceed to the top right corner of the editor workspace and click on the ‘Export’ tab. The Kapwing video maker will now transform your media into an MP4 slideshow presentation, which you are free to either save locally in your device, or share with your social media peers.
Part 5 FAQs About Slideshows on Mac
● How to delete a slideshow?
To delete a saved slideshow for MacBook, navigate to the latter’s destination folder in your device and browse for the particular presentation you wish to remove. Once found, right click on the same, followed by selecting the ‘Delete’ option from the dropdown menu that appears next. A ‘Delete Slideshow’ conformation box pops up, where you need to click on the ‘Yes’ button to move the presentation to your device’s ‘Trash Can’.
● How to include animations within a slideshow presentation?
If you are working on the concern of how to create a slideshow on Mac in the Photo apps of a Mac device, there is no provision for including animations within the slideshow. If at all you choose to add live images and animation files, they will appear as still images when you run the presentation.
● How to export a slideshow in the video format?
For exporting a created slideshow in the video format, all you need to do is, open the slideshow and navigate to the ‘Export’ button at the top right corner. As you hit the tab, the slideshow export interface pops up, where you can select the desired video format and destination of your slideshow. When you have made your choice, click ‘Save’ at the bottom right corner.
● How to create slideshows for Facebook?
To create a slideshow on Facebook, launch the app to login to your Facebook account in your device and head to the ‘Status Update’ tab. From the list of options that follows next, choose ‘Photo/Video’, succeeded by ‘Create a Slideshow’. You can now add the desired media files and adjust the different slideshow parameters to create a presentation.
● How to upload slideshow presentations on Instagram?
To create and upload a slideshow on Instagram, launch the app in your device and click on the ‘+’ icon in the latter’s welcome screen. You now need to hit the ‘Select Multiple’ button and choose the desired images and videos up to a maximum of 10 files from your device to add to the presentation. You can sort the order and add filter customizations before posting your creation. When you are done, click ‘Upload’ and follow the upcoming instructions.
Creating Slideshow Presentations on a Mac Device With Wondershare Filmora Video Editor
For Win 7 or later (64-bit)
For macOS 10.12 or later
The credibility of the Filmora video editor package does not need an introduction in the graphic design world. When the talk is about how to do a slideshow on Mac, the franchise presents its exclusive, Mac compatible slideshow creator program for designing professional quality slideshow movies. The software is handy enough to be easily worked upon by amateurs, casual creators and experienced professionals.
When it comes to the editing flexibility, the program’s inbuilt library is there to deliver a hoard of upgraded and high tech audio-visual and design effects, filters, elements at your disposal. Whether create a presentation from scratch or customize a premade slideshow template, Filmora lets you do everything to generate a slideshow output that is no less than a visual masterpiece. Talking of the output quality, you can safely leave everything to this high resolution program.
● Ending Thoughts →
● Mac devices have a diversity of utilities and in-built apps to automatically create beautiful and stunning slideshow presentations within just a few clicks.
● When addressing the concern of how to make slides on MacBook, you can choose from working with a range of media files to design and customize a classic piece o0f graphic artwork.
● If the talk is about choosing the most reliable Mac slideshow creator alternative, you can pick the Wondershare Filmora slideshow maker application without a second thought.
Best Free Video Editing Software for Reddit
Reddit is the most popular online platform which users use as a news website, a social media platform, but mostly as a web forum. Reddit has a huge user base, and users prefer posting videos to respond to any question as well as promote products and services. A video is where a user can explain anything in detail, and even viewers prefer watching videos rather than reading a long text response.
That is why users search for free video editing software Reddit to create their videos and post them on Reddit. You will find several questions on Reddit asking “which is the best free video editing software Reddit?” There are only a few high-quality Reddit video editing software available that can get the job done perfectly. Here is the list of the best video editors for Reddit for all categories of users.
Part 1. Why Use a Reddit Video Editor?
When you are posting anything on Reddit, you want other users to read your post or response. According to the current trend, short videos are more engaging than textual posts and responses. That is why you should consider posting videos to answer any question in detail as well as promote your brand. In order to make the video engaging, you have to use a Reddit video editor.
A Reddit video editor lets you edit your video so that you can trim out unnecessary parts, join multiple video clips, and add texts wherever required. Moreover, you can add audio effects, use greenscreen effects as well as add transitions and animation to make the video eye-catching and interesting. All in all, you need a Reddit video editor to publish highly engaging and professional-quality videos on Reddit instantly.
Part 2. Best Video Editors for Reddit
1. Filmora
Wondershare Filmora is the best video editor for Reddit users. It is a premium video editor, and it is available for Windows and Mac users. You can use Filmora to capture your screen as well as record your video through webcam. You can record your system audio as well as sound from external mic. Therefore, you can make videos where you speak on a topic directly to the camera, and you can use greenscreen effect for a professional background.

Coming to the editing part, you can join different video clips, and you can trim out unnecessary parts instantly. You can also add music as well as audio effects in appropriate places. The video editor lets you add transitions, effects, graphical elements, custom texts and titles, and much more. There is also a stock library available for media files. You can publish the video in desired resolution and file formats. Here are the pros and cons of Wondershare Filmora.
For Win 7 or later (64-bit)
For macOS 10.12 or later
Pros –
- Capture your screen as well as webcam.
- Record mic audio and add voiceover to any video.
- Trim and join video clips and photos.
- Transitions, effects, elements, texts and titles.
- Add external audio files, apply audio effects, and stock library.
- Super intuitive user interface for suitability of all users.
Cons –
- Belongs to premium category of video editors.
- Video rendering can take some time.
2. iMovie
iMovie is the Reddit free video editing software for Mac users. It comes with many amazing features that let you create exceptional videos. It has amazing video editing abilities and you can create split-screen videos. The software is easy to use and lets you download it for free. With the software, you will also be able to post your videos to different sites like Facebook and YouTube.
As far as editing is concerned, iMovie lets you add transitions and effects. It also lets you add text with different styles. You can add video clips where it can automatically create and edit by identifying the best footage parts. You will also find video color settings and you can even go for music editing. It lets you open multiple projects at a time. These are the pros and cons of iMovie.

Pros –
- Choose from different transitions and video effects.
- Work on different projects at the same time.
- Add a broadcast feel with split-screen and picture-in-picture.
- Select from multiple filters to add a perfect effect.
- Built-in sound effects automatically adjust the video length.
- Send a project wirelessly via iCloud Drive or AirDrop.
Cons –
- Limited support for different media file formats.
- Takes relatively more space on the hard drive.
3. Lightworks
Lightworks has a user-friendly interface and processes video quickly. You can choose from any frame rate and it even supports any type of file format. The video editing tool can deliver your videos to any social media platform. It supports fast and precision editing with amazing editing options. In Lightworks, you will find creative control for motion graphics and multicam editing.

You can edit videos directly from Cloud storage. It will instantly autosave your work without needing to save it manually. Additionally, there is also background processing for faster rendering. You can assign keyboard shortcuts and have a flexible layout. With the feature of advanced metadata, it let you uses it for professional purposes. The pros and cons of Lightworks are as follows.
Pros –
- Customize the interface by assigning keyboard shortcuts.
- Perform editing even while exporting the video.
- Supports any video format without transcoding.
- Manage content with advanced metadata.
- Share projects instantly on different platforms.
- Choose from hundreds of custom prebuilt graphics.
Cons –
- Application can crash for high-resolution videos.
- Advanced features are locked for premium users.
4. Hitfilm Express
Hitfilm Express has an intuitive interface and lets you download it for free. It supports both Windows and Mac platforms. The reliable video editor comes with versatile features and offers free tutorials of over 100 hours. You don’t have to worry about any watermark and you can create amazing Reddit videos. It comes with advanced features as well that let you use it for professional editing.

The tool comes with motion tracking ability. You will also find free effects that provide access to color adjustments and keying effects. It will let you export the file in 4K format. You will also find prebuilt Behavior effects that can be perfect for creating visually engaging animations. These are the pros and cons of Hitfilm Express.
Pros –
- Create and track professional-looking motion graphics.
- Export in 4K format without any watermark.
- Access the VFX toolkit for different effects and adjustments.
- Vertical video support with easy rotation.
- Comes with quick tools for standard video editing.
- Simple but robust timeline for instant video creation.
Cons –
- Features are limited in the free edition.
- Exporting videos takes relatively more time.
5. OpenShot
Whether it is Windows, Linux, or Mac, Open Shot lets you use it anywhere as it is in open-source video editor. It supports different types of image, video, and audio formats. It is undoubtedly the Reddit best free video editor for computer users. OpenShot has an advanced timeline that enables drag-and-drop, zooming, snapping, scrolling, and panning. It also lets you go for audio editing and mixing.

With OpenShot, you will be able to make multiple layers according to your requirements. It lets you resize or trim timelines in multiple ways. The software also enables rotation and cutting. It features more than 400 transitions that allow adjusting keyframes. Moreover, you can overlap two clips and check with real-time previews. Here are the pros and cons of OpenShot.
Pros –
- Apply 3D animations with the open-source Blender application.
- Animate the direction and speed of the clip with a powerful keyframe.
- Built-in audio editing options with waveforms.
- Select from over 40 title templates and 400 transitions.
- Dedicated audio editor and useful pan and zoom and scroll effect.
Cons –
- Not highly recommended for high-resolution videos.
6. FlexClip
If you are looking for an online video editor Reddit, FlexClip is your best choice. It is loaded with versatile features and is easy to use. While using FlexClip, you don’t have to get any video editing experience before. It is an all-in-one video editor, movie maker, screen recorder, and slideshow maker. You can make a video in just three simple steps. The online video editing tool has thousands of templates and animated texts.

It lets you create stunning videos that can be great for education or business purposes. Packed with some rich animated elements, it lets you choose from different widgets, overlays, and logos. You can also have access to millions of stock media for smooth video editing. FlexClip serves great for making any type of video. The pros and cons of FlexClip are as follows.
Pros –
- Select from thousands of templates for making videos.
- Select from animated elements with diverse dynamic text.
- Engage in immersive editing with a simple interface.
- Access to over 4 million royalty-free photos, videos, and music.
- Record video tutorials, meetings, or games with the screen recorder.
Cons –
- Free plan has limited features.
- Lacks advanced video editing options.
7. CapCut
CapCut video editor is perfect for smartphone users as it is available for Android and iOS users. You can select from advanced filters to add effects to your videos. The app also provides access to a tremendous music library. You can cut everything for making stunning videos. It can perform different operations like rotating, reversing, and splitting.

One of the best things about CapCut is that it lets you use it for free. You can even choose the speed of the video for slow-motion. It is an all-in-one video editing app that has different magical effects. It also lets you select from trending fonts and stickers for expressing your videos. The pros and cons of CapCut are as under.
Pros –
- Edit anything hassle-free with the interactive interface.
- Change speed, cut, or reverse to make incredible videos.
- Select from a range of effects and filers.
- Choose from top and trending fonts and stickers.
- Have access to the tremendous music library.
- Save the video in a high-quality format.
Cons –
- The app can crash when the video tends to be long.
8. LiVES
If you are a beginner and you prefer open-source software, Lives is the best free video editor Reddit. LiVES is also great for professional editors and it is for Windows, Mac, and Linux users. It is easy to use and offers better flexibility in video editing. With it, there would be accurate cutting and editing between the frames. Lives come with versatile features that make it great for editing video and audio.

You can upload almost any type of video clips. It also supports variable and fixed frame rates. Lives will let you re-encode or save the clips or in individual frames. You can easily choose from different transitions and effects. It comes with dynamic loading for effects and you can even apply multiple real-time effects. Here are the pros and cons of Lives.
Pros
- Save everything automatically.
- Import clips from YouTube directly.
- Time stretch or reverse audio blocks.
- Option to have automatic audio gain control.
- Apply multiple real-time effects to frames.
- Trim, rotate or reverse video clips hassle-free.
Cons
- The user interface is outdated.
- Lacks advance video editing options.
Part 3. Related FAQs
1.Where can I edit videos for free?
OpenShot is a great open-source software that you can use on any computer operating system to edit videos for free. You will get all the standard video editing options to publish high-quality videos.
2.What is the best free Reddit editor?
For Mac users, iMovie is the best free Reddit video editor. For Windows users, Hitfilm Express is the best free Reddit editor. OpenShot is the best free Reddit editor for open-source and cross-platform support. But the overall best Reddit video editor is Wondershare Filmora.
For macOS 10.12 or later
Pros –
- Capture your screen as well as webcam.
- Record mic audio and add voiceover to any video.
- Trim and join video clips and photos.
- Transitions, effects, elements, texts and titles.
- Add external audio files, apply audio effects, and stock library.
- Super intuitive user interface for suitability of all users.
Cons –
- Belongs to premium category of video editors.
- Video rendering can take some time.
2. iMovie
iMovie is the Reddit free video editing software for Mac users. It comes with many amazing features that let you create exceptional videos. It has amazing video editing abilities and you can create split-screen videos. The software is easy to use and lets you download it for free. With the software, you will also be able to post your videos to different sites like Facebook and YouTube.
As far as editing is concerned, iMovie lets you add transitions and effects. It also lets you add text with different styles. You can add video clips where it can automatically create and edit by identifying the best footage parts. You will also find video color settings and you can even go for music editing. It lets you open multiple projects at a time. These are the pros and cons of iMovie.
Pros –
- Choose from different transitions and video effects.
- Work on different projects at the same time.
- Add a broadcast feel with split-screen and picture-in-picture.
- Select from multiple filters to add a perfect effect.
- Built-in sound effects automatically adjust the video length.
- Send a project wirelessly via iCloud Drive or AirDrop.
Cons –
- Limited support for different media file formats.
- Takes relatively more space on the hard drive.
3. Lightworks
Lightworks has a user-friendly interface and processes video quickly. You can choose from any frame rate and it even supports any type of file format. The video editing tool can deliver your videos to any social media platform. It supports fast and precision editing with amazing editing options. In Lightworks, you will find creative control for motion graphics and multicam editing.
You can edit videos directly from Cloud storage. It will instantly autosave your work without needing to save it manually. Additionally, there is also background processing for faster rendering. You can assign keyboard shortcuts and have a flexible layout. With the feature of advanced metadata, it let you uses it for professional purposes. The pros and cons of Lightworks are as follows.
Pros –
- Customize the interface by assigning keyboard shortcuts.
- Perform editing even while exporting the video.
- Supports any video format without transcoding.
- Manage content with advanced metadata.
- Share projects instantly on different platforms.
- Choose from hundreds of custom prebuilt graphics.
Cons –
- Application can crash for high-resolution videos.
- Advanced features are locked for premium users.
4. Hitfilm Express
Hitfilm Express has an intuitive interface and lets you download it for free. It supports both Windows and Mac platforms. The reliable video editor comes with versatile features and offers free tutorials of over 100 hours. You don’t have to worry about any watermark and you can create amazing Reddit videos. It comes with advanced features as well that let you use it for professional editing.
The tool comes with motion tracking ability. You will also find free effects that provide access to color adjustments and keying effects. It will let you export the file in 4K format. You will also find prebuilt Behavior effects that can be perfect for creating visually engaging animations. These are the pros and cons of Hitfilm Express.
Pros –
- Create and track professional-looking motion graphics.
- Export in 4K format without any watermark.
- Access the VFX toolkit for different effects and adjustments.
- Vertical video support with easy rotation.
- Comes with quick tools for standard video editing.
- Simple but robust timeline for instant video creation.
Cons –
- Features are limited in the free edition.
- Exporting videos takes relatively more time.
5. OpenShot
Whether it is Windows, Linux, or Mac, Open Shot lets you use it anywhere as it is in open-source video editor. It supports different types of image, video, and audio formats. It is undoubtedly the Reddit best free video editor for computer users. OpenShot has an advanced timeline that enables drag-and-drop, zooming, snapping, scrolling, and panning. It also lets you go for audio editing and mixing.
With OpenShot, you will be able to make multiple layers according to your requirements. It lets you resize or trim timelines in multiple ways. The software also enables rotation and cutting. It features more than 400 transitions that allow adjusting keyframes. Moreover, you can overlap two clips and check with real-time previews. Here are the pros and cons of OpenShot.
Pros –
- Apply 3D animations with the open-source Blender application.
- Animate the direction and speed of the clip with a powerful keyframe.
- Built-in audio editing options with waveforms.
- Select from over 40 title templates and 400 transitions.
- Dedicated audio editor and useful pan and zoom and scroll effect.
Cons –
- Not highly recommended for high-resolution videos.
6. FlexClip
If you are looking for an online video editor Reddit, FlexClip is your best choice. It is loaded with versatile features and is easy to use. While using FlexClip, you don’t have to get any video editing experience before. It is an all-in-one video editor, movie maker, screen recorder, and slideshow maker. You can make a video in just three simple steps. The online video editing tool has thousands of templates and animated texts.
It lets you create stunning videos that can be great for education or business purposes. Packed with some rich animated elements, it lets you choose from different widgets, overlays, and logos. You can also have access to millions of stock media for smooth video editing. FlexClip serves great for making any type of video. The pros and cons of FlexClip are as follows.
Pros –
- Select from thousands of templates for making videos.
- Select from animated elements with diverse dynamic text.
- Engage in immersive editing with a simple interface.
- Access to over 4 million royalty-free photos, videos, and music.
- Record video tutorials, meetings, or games with the screen recorder.
Cons –
- Free plan has limited features.
- Lacks advanced video editing options.
7. CapCut
CapCut video editor is perfect for smartphone users as it is available for Android and iOS users. You can select from advanced filters to add effects to your videos. The app also provides access to a tremendous music library. You can cut everything for making stunning videos. It can perform different operations like rotating, reversing, and splitting.
One of the best things about CapCut is that it lets you use it for free. You can even choose the speed of the video for slow-motion. It is an all-in-one video editing app that has different magical effects. It also lets you select from trending fonts and stickers for expressing your videos. The pros and cons of CapCut are as under.
Pros –
- Edit anything hassle-free with the interactive interface.
- Change speed, cut, or reverse to make incredible videos.
- Select from a range of effects and filers.
- Choose from top and trending fonts and stickers.
- Have access to the tremendous music library.
- Save the video in a high-quality format.
Cons –
- The app can crash when the video tends to be long.
8. LiVES
If you are a beginner and you prefer open-source software, Lives is the best free video editor Reddit. LiVES is also great for professional editors and it is for Windows, Mac, and Linux users. It is easy to use and offers better flexibility in video editing. With it, there would be accurate cutting and editing between the frames. Lives come with versatile features that make it great for editing video and audio.
You can upload almost any type of video clips. It also supports variable and fixed frame rates. Lives will let you re-encode or save the clips or in individual frames. You can easily choose from different transitions and effects. It comes with dynamic loading for effects and you can even apply multiple real-time effects. Here are the pros and cons of Lives.
Pros
- Save everything automatically.
- Import clips from YouTube directly.
- Time stretch or reverse audio blocks.
- Option to have automatic audio gain control.
- Apply multiple real-time effects to frames.
- Trim, rotate or reverse video clips hassle-free.
Cons
- The user interface is outdated.
- Lacks advance video editing options.
Part 3. Related FAQs
1.Where can I edit videos for free?
OpenShot is a great open-source software that you can use on any computer operating system to edit videos for free. You will get all the standard video editing options to publish high-quality videos.
2.What is the best free Reddit editor?
For Mac users, iMovie is the best free Reddit video editor. For Windows users, Hitfilm Express is the best free Reddit editor. OpenShot is the best free Reddit editor for open-source and cross-platform support. But the overall best Reddit video editor is Wondershare Filmora.
Also read:
- Updated Are You Stuck with How to Use Discord GIF Ideally? Check that Out in This Article, as We Will Guide You on All You Need to Know About GIFs for Discord
- New 2024 Approved 4 Solutions to Resize a WebM File
- New Top 31 Video Trimmers That Will Save You Time in Ediitng
- New Freeze Frame Clone Effect Is a Creative Effect to Use for Many Video Creators. This Article Will Show You How to Use Filmora to Make a Frozen Frame Clone Video Effect for 2024
- Updated In 2024, How to Zoom Picture in Picture Easy Solution
- New How to Loop a Video with iMovie on Mac and iPhone for 2024
- New Creating a Slideshow Is Necessity of the Modern Time. Whether You Plan a Business Meeting or You Are Going to Do some Family Event with Slideshow Presentation, a Good Slideshow Maker Will Help You in This Direction for 2024
- Updated Are You Looking for Top AI Video Recognition Software to Choose From? Please Stay on This Article as We Look at the Current Top AI-Based Video Tools for 2024
- 2024 Approved Easy Way to Add Effects to Art Video
- Updated In 2024, Want to Know the Simplest Way to Match the Colors of Your Photos in Photoshop? The Following Discussion Will Help Match Color in Photoshop, Almost Effortlessly
- New With Looping Videos, People Stay on Your Site Longer, Boosting Engagement. With Video Being Watched on Mobile over 3X More than Any Other Content, Its an Essential Part of Mobile Advertising for 2024
- Updated Complete Guide to Make a Super Easy Rotating Video Effect for 2024
- How to Make a GIF With Transparent Background for 2024
- New 2024 Approved Find a Video Background Change Online that Works for You. This Article Contains Tools that Can Edit Video Backgrounds Online with Little Effort
- Updated 2024 Approved Complete Guide to Make a Super Easy Rotating Video Effect
- New Best 10 3D Slideshow Software Review
- Updated Top 10 Sony LUT for Different Purposes for 2024
- Updated In 2024, Bandicut Video Editor Review
- How to Add Subtitles in QuickTime Player for 2024
- Updated What Are the 10 Best GIF Creator, In 2024
- Updated 2024 Approved The Ultimate Guide to Make a Text Collage
- New Looking for Efficient Ways to Create a Slow-Motion Video? Read the Article for Reliable Solutions that Provide Excellent Results for 2024
- How to Change the Speed of Video in DaVinci Resolve for 2024
- Splitting Video in VSDC Step by Step for 2024
- In 2024, How Windows Movie Maker Save MP4 File
- Updated Have You Ever Watched YouTube Live Streams? In Fact, You Can Also Start a Live Streaming on YouTube if You Want. Here Well Share some Tips to Live Stream on YouTube for 2024
- 2024 Approved Splitting the Clips in Adobe After Effects Step by Step
- Srt File Creator for 2024
- Updated 2024 Approved Looking for Simple Steps to Customize the Speed of Your Video in DaVinci Resolve? Find Out How You Can Do that and Discover an Easier Alternative to DaVinci Resolve
- New 10 Best Free Video Player for Windows 11 for 2024
- Have You a Desire to Imbibe Your PowerPoint Presentations with Custom Effects and Tools? Be There to Learn All About Creating Custom Slideshows in PowerPoint with Utmost Ease for 2024
- Updated In 2024, Have You Ever Wondered How to Add Camera Shake to Video in Adobe After Effects? Let Us Share with You some Tips and Tricks on How to Do Just That
- Updated Online Video Makers to Use
- 10+ Royalty-Free 5 Second Countdown Footage HD & 4K Clips Included for 2024
- New The Ultimate Guide to Countdown Animation in Videos for 2024
- New 2024 Approved How to Make a Transparent Background in Paint. How 3D Paint Transparent Background Can Be Made. How to Save an Image with Transparent Background?
- Use The Best LUTs for Lightroom
- Updated How To Achieve LumaFusion Color Grading Through LUTs
- Updated 2024 Approved Do You Need a Royalty-Free 5 Seconds Countdown Video for Your Video but Dont Not Where to Find One? We Will Introduce You to the Best HD and 4K Clips that You Can Always Try Anytime
- LumaFusion Offers Various Look Up Table Presets, or LUTs, Such as FiLMiC deLog and FiLMiC DeFlat, and Several Stylistic LUTs for Use with Neutral Use Video. You Can Also Manually Add the LUTs for 2024
- Want to Loop a Video to Extend Its Duration? You Can Use iMovie to Loop a Video on Your Mac and iPhone and We Will Illustrate How to Loop a Video in iMovie
- Updated In 2024, How to Zoom Desktop Screen
- New 2024 Approved How to Create Vintage Film Effect 1920S
- Updated What Can Be Better than Converting Apple Video Format Into Other Formats so that You Can Use the Files Easily. We Have a Few Options that You Can Use for This Purpose for 2024
- Updated 2024 Approved Blender Tips - How to Make Blender Render Transparent Background
- WebM to GIF Converters (Online and Offline Solutions) for 2024
- Do You Know How You Can Trim or Merge Using Wondershare Filmora? Trimming and Merging Using This Tool Is an Easy Task; Learn How
- Updated Efficient Ways to Manage Your Timeline
- In 2024, Recommended Best Applications for Mirroring Your Tecno Pova 5 Pro Screen | Dr.fone
- Complete Fixes To Solve Apple iPhone 13 mini Randomly Asking for Apple ID Password
- In 2024, Ultimate Guide on iPhone XR iCloud Activation Lock Bypass
- Full Guide on Mirroring Your Oppo A2 to Your PC/Mac | Dr.fone
- 15 Best Strongest Pokémon To Use in Pokémon GO PvP Leagues For Gionee F3 Pro | Dr.fone
- In 2024, How to Unlock Samsung Galaxy A24 Phone without Any Data Loss
- How to Spy on Text Messages from Computer & Vivo V30 Lite 5G | Dr.fone
- 3 Effective Ways to Unlock iCloud Account Without Password From Apple iPhone 13 Pro Max
- In 2024, How to Come up With the Best Pokemon Team On Realme Narzo 60 Pro 5G? | Dr.fone
- How to Watch Hulu Outside US On Motorola Razr 40 Ultra | Dr.fone
- Top 4 Android System Repair Software for Lava Agni 2 5G Bricked Devices | Dr.fone
- In 2024, How to Reset your Xiaomi Redmi Note 12 5G Lock Screen Password
- How to recover old videos from your Realme GT 5 Pro
- In 2024, How to Fake GPS on Android without Mock Location For your Infinix Smart 7 HD | Dr.fone
- 3 Best Tools to Hard Reset Tecno Spark 10C | Dr.fone
- How To Bypass iCloud Activation Lock on Mac For iPhone 11 Pro Max?
- In 2024, How to Change Lock Screen Wallpaper on Xiaomi Redmi Note 12 5G
- Ways to stop parent tracking your Motorola Moto G24 | Dr.fone
- In 2024, How Do You Remove Restricted Mode on iPhone SE (2020)
- Full Guide to Unlock Your Xiaomi Redmi 12
- 9 Mind-Blowing Tricks to Hatch Eggs in Pokemon Go Without Walking On Tecno Pova 5 Pro | Dr.fone
- The way to recover deleted contacts on Nokia G42 5G without backup.
- Edit and Send Fake Location on Telegram For your Vivo T2 Pro 5G in 3 Ways | Dr.fone
- 8 Ultimate Fixes for Google Play Your OnePlus 11R Isnt Compatible | Dr.fone
- What Legendaries Are In Pokemon Platinum On Oppo F25 Pro 5G? | Dr.fone
- How To Transfer WhatsApp From Apple iPhone XS to other iPhone 14 Pro devices? | Dr.fone
- New 2024 Approved What Are Differences Between 2D And 3D Animation
- Proven Ways to Fix There Was A Problem Parsing the Package on Vivo X Fold 2 | Dr.fone
- How PGSharp Save You from Ban While Spoofing Pokemon Go On Vivo Y02T? | Dr.fone
- 7 Ways to Lock Apps on Apple iPhone X and iPad Securely | Dr.fone
- Complete Guide For iPhone XR Lock Screen
- Recover Excel 2016 Files from Virus-Infected Pen Drives for Free | Stellar
- How to Fix Tecno Spark 20 Pro Find My Friends No Location Found? | Dr.fone
- In 2024, How to get the dragon scale and evolution-enabled pokemon On Apple iPhone 13? | Dr.fone
- How To Fix OEM Unlock Missing on Vivo X90S?
- Want to Uninstall Google Play Service from Motorola Razr 40? Here is How | Dr.fone
- In 2024, Ways to trade pokemon go from far away On Xiaomi Redmi Note 12T Pro? | Dr.fone
- Android Safe Mode - How to Turn off Safe Mode on Itel P40+? | Dr.fone
- In 2024, How to Unlock Apple iPhone 11 Pro Max Passcode without iTunes without Knowing Passcode? | Dr.fone
- Unlocking Made Easy The Best 10 Apps for Unlocking Your Vivo Y02T Device
- In 2024, Apple ID Locked for Security Reasons From Apple iPhone 15? Find the Best Solution Here
- In 2024, Apple iPhone 15 Plus Mirror to PC? Top Apps You Must Know | Dr.fone
- In 2024, 6 Proven Ways to Unlock Realme 11 5G Phone When You Forget the Password
- How To Bypass FRP on Nokia C300
- Top 5 Car Locator Apps for Samsung Galaxy S24 | Dr.fone
- Title: Finest Approach to Slow Down a Video CapCut All-in-One Video Editor for 2024
- Author: Morgan
- Created at : 2024-05-19 05:11:59
- Updated at : 2024-05-20 05:11:59
- Link: https://ai-video-editing.techidaily.com/finest-approach-to-slow-down-a-video-capcut-all-in-one-video-editor-for-2024/
- License: This work is licensed under CC BY-NC-SA 4.0.
