
How To Add Scrolling Text Effect

How To Add Scrolling Text Effect
Almost every video has some titles and texts to show to the viewers. Instead of showing static texts on the video, everyone loves to add animated texts so that the video looks attractive and engaging. If you want to show credits and titles in intro and outro of the video, you will usually see texts scrolling vertically on the video.
If you want to show any text repeatedly, you can add horizontal scrolling text effect to your video so that the repeated text does not look weird. You will need a video editor to add scrolling rolling text effect to texts and titles in your video. We will illustrate in simple steps how to animate text on scroll using free as well as premium video editors.
Part 1. Add Scrolling Text to Video with Filmora
Wondershare Filmora is a professional video editor and if you are a Windows PC or Mac user, you can use Filmora to add scrolling text effect. In fact, Filmora is the most intuitive video editor where you can add scrolling text effect instantly without any prior experience in video editing.
Filmora has the best collection of text effects and you can add scrolling text anywhere and customize the effect as per your requirements. As a matter of fact, you can create a video with scrolling text effects only from scratch. Here are the steps to add scrolling text to video using Filmora.
Free Download For Win 7 or later(64-bit)
Free Download For macOS 10.14 or later
Step1 Download and install Filmora on your Windows PC or Mac. Launch the application and click on New Project on the welcome screen. You can also go to File> New option to get started.

Step2 Go to File> Import Media option to bring in your video file user Project Media folder. Thereafter, drag and drop the file into Timeline to get started.

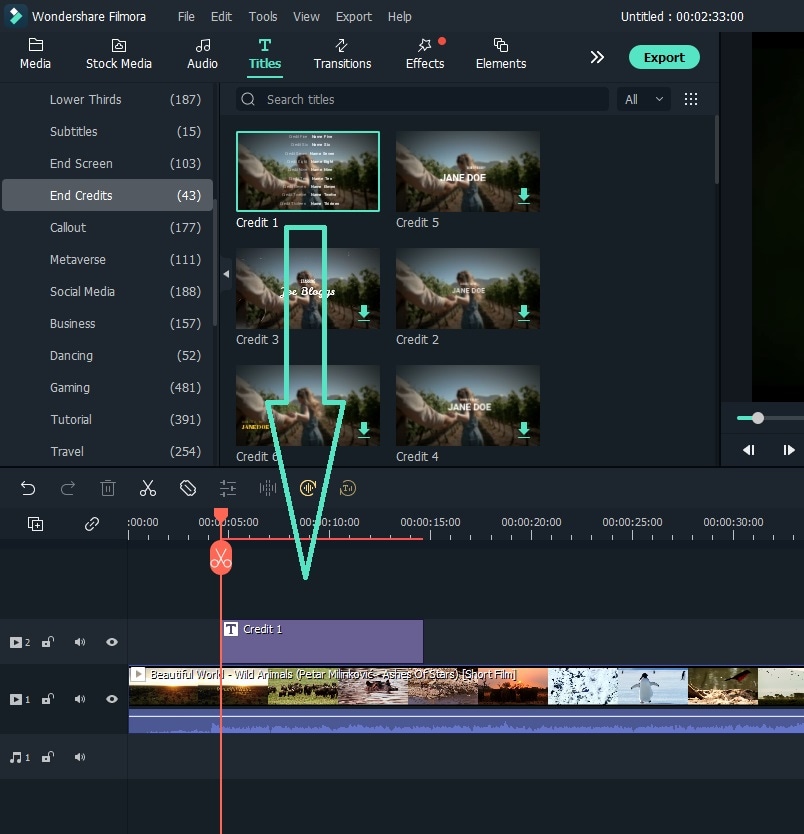
Step3 Go to Titles option located at the top, and on the left panel, go to End Credits option. You will see various scrolling text effects. Place your mouse pointer on them to check their preview.

Step4 Once you are satisfied with any scrolling text effects, drag and drop it into Timeline above the video clip layer. Adjust the position of the text effect so that it appears on the video as expected. You can stretch the duration of the effect as per your preference.
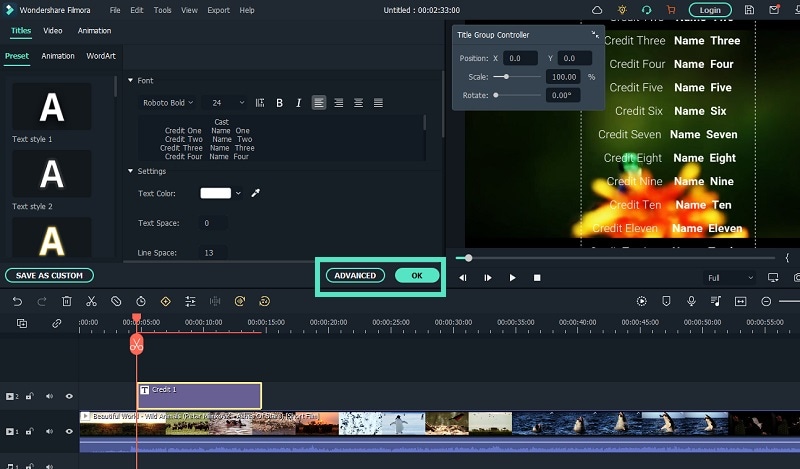
Step5 Double-click on the text layer on Timeline and customize the text and style as you feel. Thereafter, you can click on Advanced button for more customization. Finally, click on OK button.
Part 2. Use After Effects to Create Scrolling Text
Adobe Affect Effects is an extremely popular video editor and there are so many different text effects available to apply to your video. After Effects scrolling text effects come with different variations so that your titles and texts look amazing on the screen. Apart from the available text effects, you can also download and get more text effects from external sources. Here are the steps to add text scroll after effects to your video.
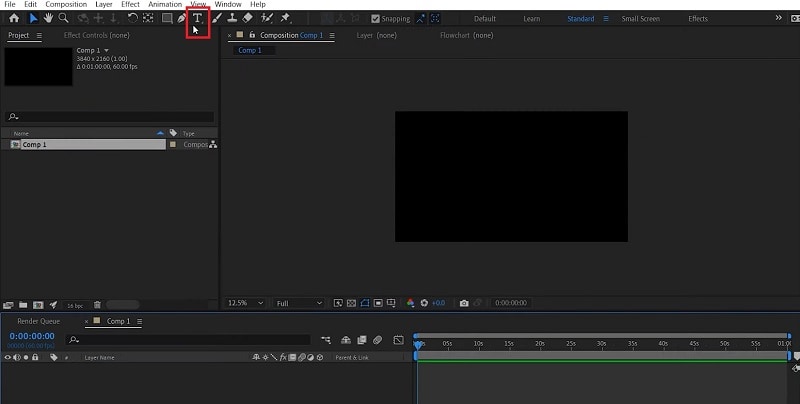
Step1 Launch After Effects and type your text with the Text tool from the top bar.
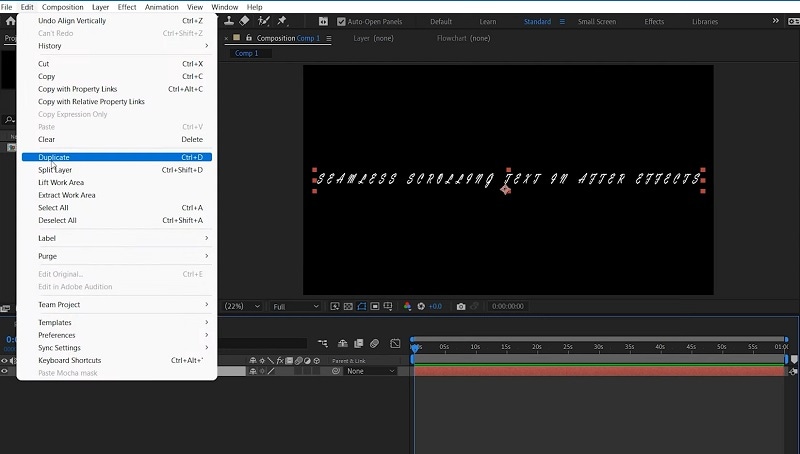
Step2 Duplicate the written text by going to Edit> Duplicate.
Step3 Move the duplicate text out of the visible screen to the left by changing its position value.
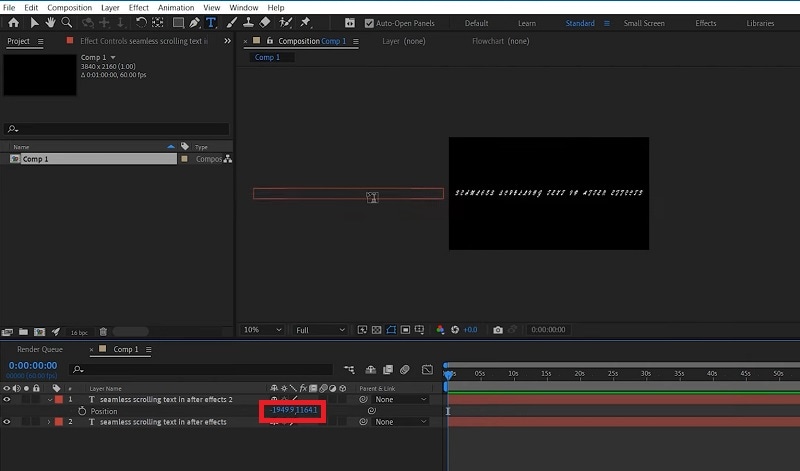
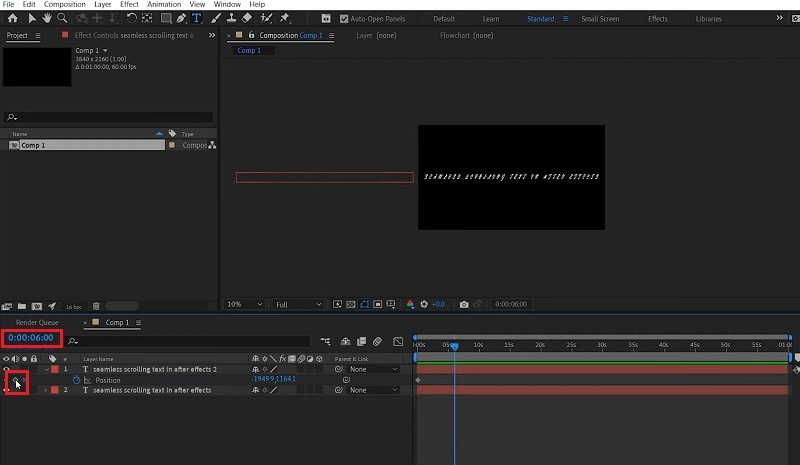
Step4 Turn on Position option and change the duration and add a keyframe.
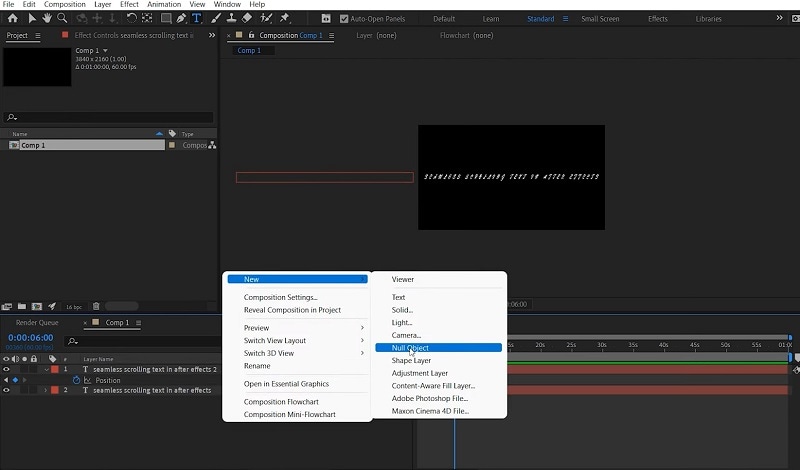
Step5 Right-click on Composition setting and go to New> Null Object. Change the duration and make it the same as the Duplicate layer and add a keyframe there. Besides, move the null object out of the visible screen to the right.
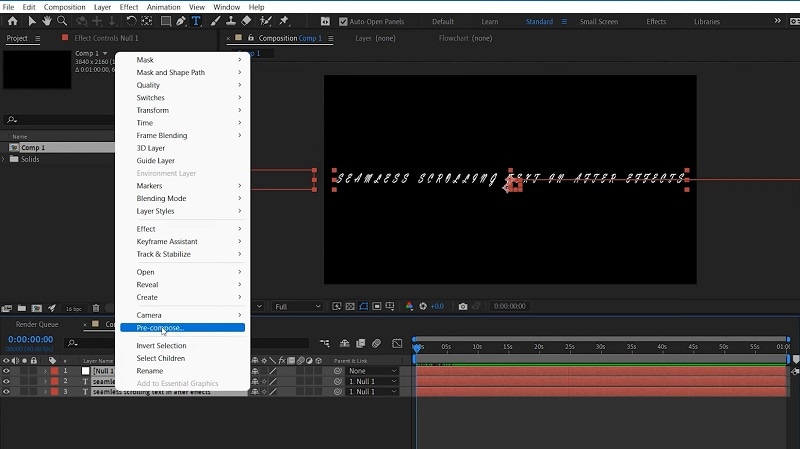
Step6 Select all layers and right-click and select Pre-compose.
Step7 Right-click on Pre-comp and go to Time> Enable Time Remapping. Play the video and you will see the scrolling effects that you see in end credits in videos.
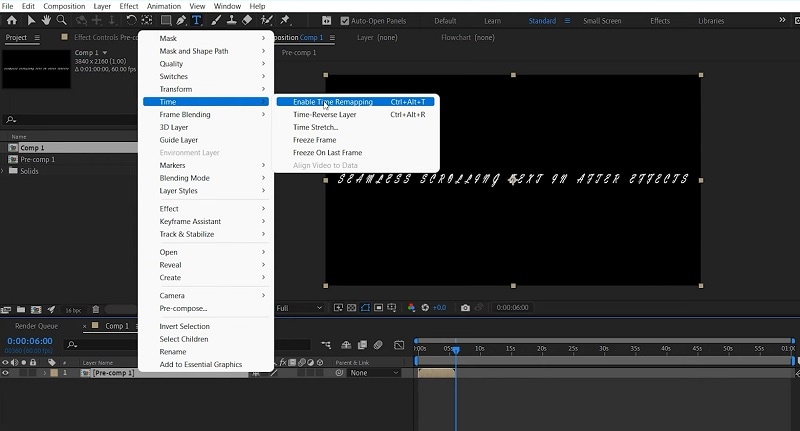
The above-mentioned steps are for horizontal scrolling text effect. If you want vertical scrolling text After Effects, you have to position the duplicate text and null object vertically and the required text will scroll vertically.
Part 3. Add Scrolling Text Effect with VSDC Free Video Editor
So far, we have mentioned premium video editors to add scrolling effect to the text in your video. Now we are going to mention a free video editor where you can add scrolling effect instantly. If you are a Windows user, you can install VSDC free video editor. There are several scrolling text effects available on the video editor through which you can move the text horizontal and vertical. Here are the steps to animate text on scroll using VSDC free video editor.
Step1 Install VSDC free video editor and click on New Project option. Click on Finish button and select the video from your hard drive where you want to add text.
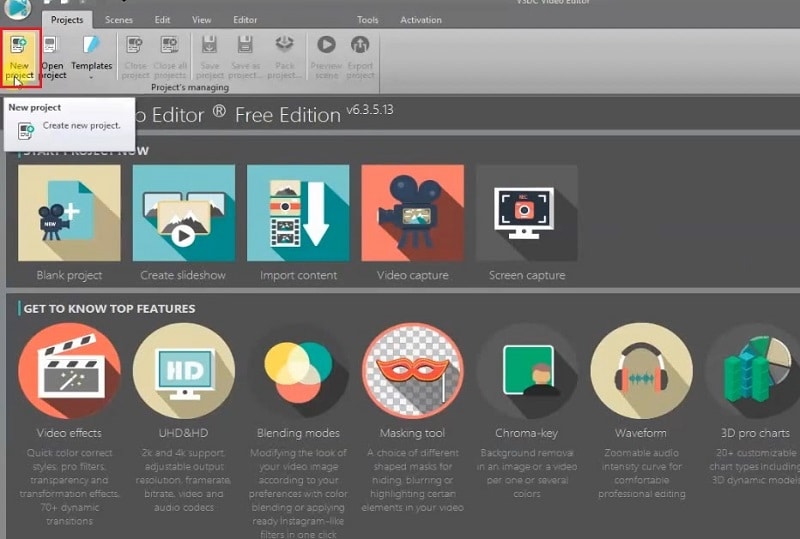
Step2 Select Type tool from the left panel and draw a box on the video where you can type your text. Make sure the text layer is on top of the video layer in Timeline.
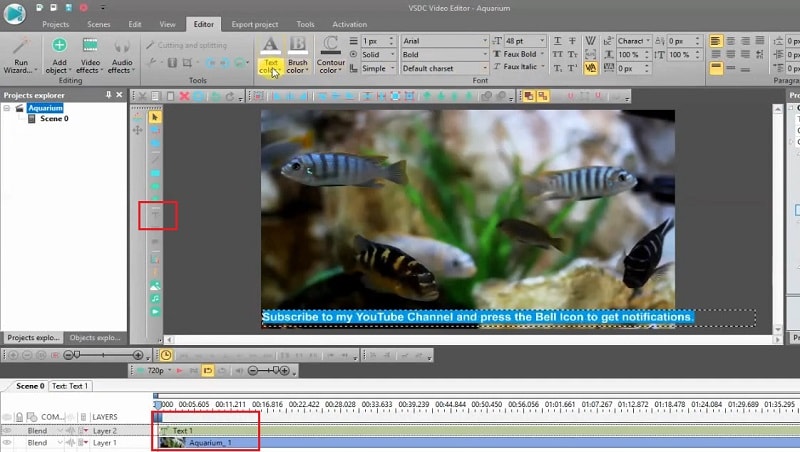
Step3 Type your text and if you want to scroll it like horizontal scrolling text After Effects, place the text out of the viewer on the right side.
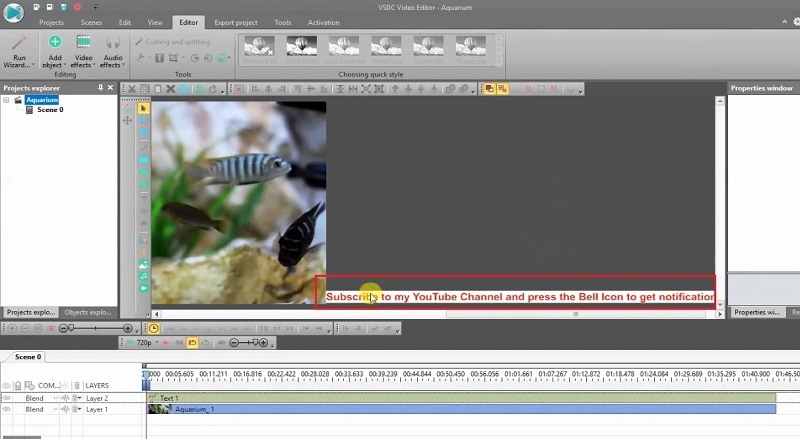
Step4 Double-click on text layer and go to Add Object and click on Movement.
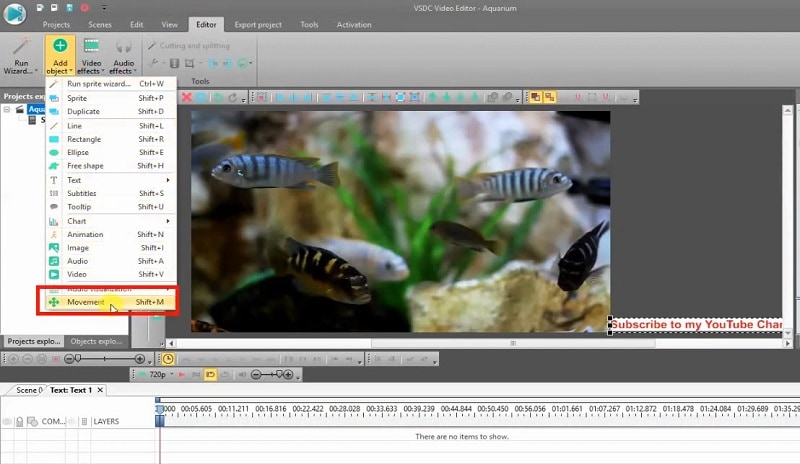
Step5 You will find the mouse pointer change and you have to click on the spot to the left side where you want the text to go in scrolling effect.

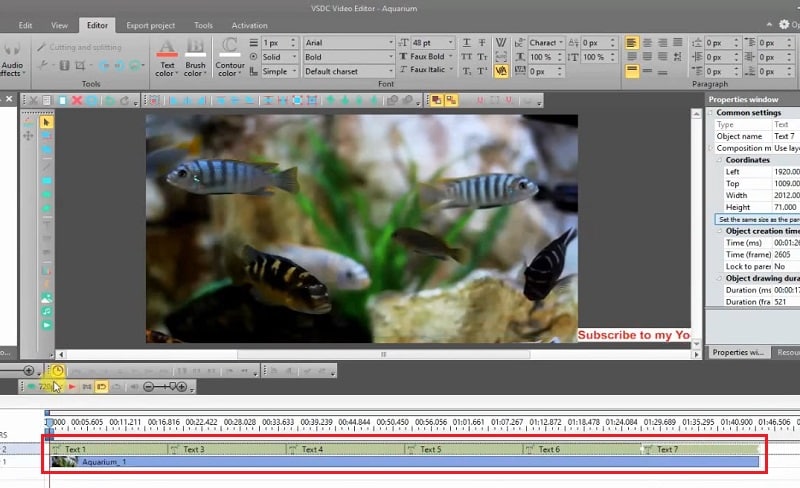
Step6 Shorten the duration of the text layer and then copy the text layer from Timeline. Paste it again and again until you cover the video layer completely so that the scroll effect goes on as long as the video runs.
Takeaway
Adding scrolling text to your video should no more be an issue for you. If you are using After Effects, we have illustrated how you can create horizontal and vertical scrolling effect for text in your video perfectly. If you prefer a free video editor, you can use VSDC free video editor as well. But we recommend Wondershare Filmora where you can add scrolling effects to your text instantly, and there is a wide range of amazing scrolling effects available to apply to your video.
Free Download For macOS 10.14 or later
Step1 Download and install Filmora on your Windows PC or Mac. Launch the application and click on New Project on the welcome screen. You can also go to File> New option to get started.

Step2 Go to File> Import Media option to bring in your video file user Project Media folder. Thereafter, drag and drop the file into Timeline to get started.

Step3 Go to Titles option located at the top, and on the left panel, go to End Credits option. You will see various scrolling text effects. Place your mouse pointer on them to check their preview.

Step4 Once you are satisfied with any scrolling text effects, drag and drop it into Timeline above the video clip layer. Adjust the position of the text effect so that it appears on the video as expected. You can stretch the duration of the effect as per your preference.

Step5 Double-click on the text layer on Timeline and customize the text and style as you feel. Thereafter, you can click on Advanced button for more customization. Finally, click on OK button.

Part 2. Use After Effects to Create Scrolling Text
Adobe Affect Effects is an extremely popular video editor and there are so many different text effects available to apply to your video. After Effects scrolling text effects come with different variations so that your titles and texts look amazing on the screen. Apart from the available text effects, you can also download and get more text effects from external sources. Here are the steps to add text scroll after effects to your video.
Step1 Launch After Effects and type your text with the Text tool from the top bar.

Step2 Duplicate the written text by going to Edit> Duplicate.

Step3 Move the duplicate text out of the visible screen to the left by changing its position value.

Step4 Turn on Position option and change the duration and add a keyframe.

Step5 Right-click on Composition setting and go to New> Null Object. Change the duration and make it the same as the Duplicate layer and add a keyframe there. Besides, move the null object out of the visible screen to the right.

Step6 Select all layers and right-click and select Pre-compose.

Step7 Right-click on Pre-comp and go to Time> Enable Time Remapping. Play the video and you will see the scrolling effects that you see in end credits in videos.

The above-mentioned steps are for horizontal scrolling text effect. If you want vertical scrolling text After Effects, you have to position the duplicate text and null object vertically and the required text will scroll vertically.
Part 3. Add Scrolling Text Effect with VSDC Free Video Editor
So far, we have mentioned premium video editors to add scrolling effect to the text in your video. Now we are going to mention a free video editor where you can add scrolling effect instantly. If you are a Windows user, you can install VSDC free video editor. There are several scrolling text effects available on the video editor through which you can move the text horizontal and vertical. Here are the steps to animate text on scroll using VSDC free video editor.
Step1 Install VSDC free video editor and click on New Project option. Click on Finish button and select the video from your hard drive where you want to add text.

Step2 Select Type tool from the left panel and draw a box on the video where you can type your text. Make sure the text layer is on top of the video layer in Timeline.

Step3 Type your text and if you want to scroll it like horizontal scrolling text After Effects, place the text out of the viewer on the right side.

Step4 Double-click on text layer and go to Add Object and click on Movement.

Step5 You will find the mouse pointer change and you have to click on the spot to the left side where you want the text to go in scrolling effect.

Step6 Shorten the duration of the text layer and then copy the text layer from Timeline. Paste it again and again until you cover the video layer completely so that the scroll effect goes on as long as the video runs.

Takeaway
Adding scrolling text to your video should no more be an issue for you. If you are using After Effects, we have illustrated how you can create horizontal and vertical scrolling effect for text in your video perfectly. If you prefer a free video editor, you can use VSDC free video editor as well. But we recommend Wondershare Filmora where you can add scrolling effects to your text instantly, and there is a wide range of amazing scrolling effects available to apply to your video.
Advancements in Game Recording Software: A Comprehensive Overview
Recording gameplay on PC has been an essential part of operations for many streamers. This has led to developing several recording software dedicated to this specific purpose. With the market flooding with these tools, it is important to look at the quality instead of the quantity.
Let’s dive into the world of top game recorders for PC featuring services for the finest content creation. Take a look at their benefits, along with a simple and cost-effective alternative to make screen recording much easier on your PC.
Screen Recording Now For Win 7 or later(64-bit)
Screen Recording Now For macOS 10.14 or later
Part 1. Finding a Good Gameplay Recorder on PC? Get One Instantly
Now that you are aware of some top benefits that game recorders provide, it is time to learn how to reap these benefits. There are currently several apps to help you capture gameplay on PC. The following list provides an insight into the top 10 apps to record gameplay on your computer:
Top Gameplay Recorder Tools on PC:
1.Bandicam
2. OBS Studio
3.Xbox Game Bar
4.Action! – Game Recorder
5.XSplit Broadcaster
6.FBX
7.D3DGear
8.Geceta by Movavi
9.Radeon ReLive
10.ScreenPal
1.Bandicam
Bandicam stands amongst the top gameplay recorders available for PC today. It is an easy-to-use and free screen recording software that can capture anything you want on your screen.
Bandicam offers several useful features when it comes to screen recording. You can record audio, choose webcam overlay, draw real-time on the screen, and more. Bandicam also offers long-term screen recording, stretching as long as 24 hours. Besides recording gameplay, it is also suitable for recording lectures, webinars, video calls, and more.

2.OBS Studio
OBS Studio offers open-source software for recording and live-streaming videos. The game recorder for PC is available for download on Windows, Mac, and Linux. OBS allows real-time audio and video capturing abilities without compromising on performance. You can capture multiple sources simultaneously, including windows, text, images, webcams, and more.
The tool allows users to set unlimited scenes and seamlessly switch between them. You can easily choose custom transitions, duplicate screens, and tweak other aspects.

3.Xbox Game Bar
Your Windows PC will likely have an in-built Game Bar offered by Xbox. It is a customizable gaming overlay that makes gaming easier. Among other useful features, the Game Bar allows for real-time recording of any gameplay on the PC.
The Xbox Game Bar offers easy keyboard shortcuts that can be customized for various functions. The start and end of the recording are also narrated by the tool, so you can hear when changes are made. Game Bar can also help find new teammates with LFG (Looking For Group) and chat with other Xbox users.

4.Action! – Game Recorder
Action! – Game Recorder is one of the best software currently available for recording gameplay on PC. With smooth recordings and high-quality streaming, it is a reliable option for novice and expert gamers.
It can record HD gameplay at up to 120fps with low CPU usage. Users can easily get around its easy-to-use interface. You can export your videos directly to Facebook and YouTube. Action! also supports live streaming to Twitch, YouTube, and Upstream. You can even control the video recording on your PC via your smartphone.

5.XSplit Broadcaster
Another remarkable tool that offers simple yet powerful gameplay recording is XSplit. You can use tools to create content for popular platforms like Twitch, YouTube, and TikTok. XSplit Broadcaster comes as a feature-packed production studio for content creation.
XSplit offers unlimited customization options when it comes to recording gameplay. It offers flawless video and audio quality without putting additional load on the system. XSplit ensures lag-free gameplay, so your efficiency is not affected while recording.

6.FBX
If you want high-performance HD recordings without interruptions in your gameplay, FBX is a reliable option. It is a dedicated game recorder offering many useful features to users. FBX can save highlights of the best parts of your gameplay. You can customize hotkeys that instantly save short videos of your best action.
It can also capture high-quality screenshots for easy sharing. FBX also allows live streaming options with rapid setups. The tool can automatically adjust to your bandwidth to help eliminate jerky streams.

7.D3DGear
For fast and efficient recordings, you can opt for D3DGear. It is a high-quality game screen recorder for PC containing all the essentials for smooth recordings. The tool is available on Windows computers as a plugin and add-on software.
D3DGear can record gameplay smoothly without causing the game to drop much in the frame rate. It also allows users to live stream their gameplay to Twitch. D3DGear can also record Oculus Rift VR gameplay with HD SBS stereoscopic videos. Furthermore, it can produce Constant Frame Rate (CFR) movies, often required with Adobe software.

8.Gecata by Movavi
Movavi offers its state-of-the-art game recorder for PC in the form of Gecata. The tool is a lightweight and solid program for recording and streaming gameplay. You can use it to grab the best moments of your gaming experience and share them with your peers across the globe.
Gecata enables users to record and stream their games at the same time without any lag. You can also record webcam and microphone, in-game sound effects, music, and dialogues all in one click. Gecata provides full control, allowing you to customize overlays to monitor frame rate, bit count, and other metrics.

9.Radeon ReLive
Radeon ReLive by AMD certainly deserves a spot on this list of game recorder software for PCs. It is a user-friendly game recorder that helps users capture and share gameplay videos and screenshots. Radeon ReLive is configuring-friendly and has a minimal impact on the FPS rate.
The tool works on systems with AMD graphics cards. It allows users to tweak their game and display settings, allowing for seamless gameplay. Radeon also contains a switch for saving power and preventing the system from overheating.

10.ScreenPal
Formerly known as Screencast-o-Matic, ScreenPal is a user-friendly tool designed to capture and share screen recordings. You can record and edit your content on the same platform using this versatile tool. ScreenPal is available on Windows, Mac, iOS, Android, and Chromebook devices.
Besides recording gameplay on a PC, you can also use it for education, work, and other personal purposes. ScreenPal comes with a built-in editor that helps you tweak your videos after recording them. You can also host and share content on its easily accessible cloud.

[Cost-Effective] Screen Recording in Wondershare Filmora
The tools mentioned above are great for recording gameplay on PC. However, you might have noticed that many of these tools offer pricing plans that can prove heavy on the wallet. If you are looking for a cost-effective solution for recording gameplay, Wondershare Filmora is a stellar choice.
Filmora by Wondershare is an all-in-one solution when it comes to content creation. While other game recorders for PC often offer specific tools, Filmora offers a 360-degree approach. Besides recording the screen, Filmora also allows users to compile and edit their recorded gameplay without ever exiting the platform.
Anyone Can Create a Tutorial With These Easy Steps
Free Download For Win 7 or later(64-bit)
Free Download For macOS 10.14 or later
How to Record Gameplay Using Wondershare Filmora
The Screen Record feature on Filmora is a simple yet powerful function that can help you capture your computer’s screen and webcam. You can record audio using the microphone and the system at the same time.
Filmora also lets users customize the area of the screen they wish to capture. This makes it arguably the best game screen recorder for PC. To capture gameplay on PC using Filmora, follow the steps below:
Step1Open Screen Recorder on Filmora
Install and launch Wondershare Filmora on your PC. You can select the “Screen Recorder” feature from the startup window on Filmora.

Alternatively, you can also go to the “File” tab and select “Record Media” from the dropdown list, then choose to record the webcam, PC screen, or voiceover.

Step2Adjust Screen Recording Settings
Once the Screen Recorder panel opens, you can choose the recording ratio from the menu under the “Square” icon. The available options are to record the full screen, a target window, or any custom size. You can then toggle the switches next to the “Microphone,” “System Audio,” and “Camera” options to turn them on or off. Filmora also lets users adjust the frame rate, quality, and other parameters.

Step3 Adjust Screen Recording Settings
Once the Screen Recorder panel opens, you can choose the recording ratio from the menu under the “Square” icon. The available options are to record the full screen, a target window, or any custom size. You can then toggle the switches next to the “Microphone,” “System Audio,” and “Camera” options to turn them on or off. Filmora also lets users adjust the frame rate, quality, and other parameters.
Step4Record Through Filmora and Conclude
After specifying the settings, tap the “Record” button to start recording your gameplay. Filmora will ensure your gameplay is not affected by the recording. Hit the “Stop” button once you are done and edit the file in Filmora. Finally, export the recorded gameplay to a location of your choice.

Conclusion
Many dedicated software are available to help you capture gameplay on PC. The top game recording software for PC and their pricing plans are mentioned above for your convenience. However, our advice is to switch to Wondershare Filmora. Not only does Filmora offer a cost-effective solution, but it is also much easier to use and provides high-quality recordings without lag.
Screen Recording Now For Win 7 or later(64-bit)
Screen Recording Now For macOS 10.14 or later
Part 1. Finding a Good Gameplay Recorder on PC? Get One Instantly
Now that you are aware of some top benefits that game recorders provide, it is time to learn how to reap these benefits. There are currently several apps to help you capture gameplay on PC. The following list provides an insight into the top 10 apps to record gameplay on your computer:
Top Gameplay Recorder Tools on PC:
1.Bandicam
2. OBS Studio
3.Xbox Game Bar
4.Action! – Game Recorder
5.XSplit Broadcaster
6.FBX
7.D3DGear
8.Geceta by Movavi
9.Radeon ReLive
10.ScreenPal
1.Bandicam
Bandicam stands amongst the top gameplay recorders available for PC today. It is an easy-to-use and free screen recording software that can capture anything you want on your screen.
Bandicam offers several useful features when it comes to screen recording. You can record audio, choose webcam overlay, draw real-time on the screen, and more. Bandicam also offers long-term screen recording, stretching as long as 24 hours. Besides recording gameplay, it is also suitable for recording lectures, webinars, video calls, and more.

2.OBS Studio
OBS Studio offers open-source software for recording and live-streaming videos. The game recorder for PC is available for download on Windows, Mac, and Linux. OBS allows real-time audio and video capturing abilities without compromising on performance. You can capture multiple sources simultaneously, including windows, text, images, webcams, and more.
The tool allows users to set unlimited scenes and seamlessly switch between them. You can easily choose custom transitions, duplicate screens, and tweak other aspects.

3.Xbox Game Bar
Your Windows PC will likely have an in-built Game Bar offered by Xbox. It is a customizable gaming overlay that makes gaming easier. Among other useful features, the Game Bar allows for real-time recording of any gameplay on the PC.
The Xbox Game Bar offers easy keyboard shortcuts that can be customized for various functions. The start and end of the recording are also narrated by the tool, so you can hear when changes are made. Game Bar can also help find new teammates with LFG (Looking For Group) and chat with other Xbox users.

4.Action! – Game Recorder
Action! – Game Recorder is one of the best software currently available for recording gameplay on PC. With smooth recordings and high-quality streaming, it is a reliable option for novice and expert gamers.
It can record HD gameplay at up to 120fps with low CPU usage. Users can easily get around its easy-to-use interface. You can export your videos directly to Facebook and YouTube. Action! also supports live streaming to Twitch, YouTube, and Upstream. You can even control the video recording on your PC via your smartphone.

5.XSplit Broadcaster
Another remarkable tool that offers simple yet powerful gameplay recording is XSplit. You can use tools to create content for popular platforms like Twitch, YouTube, and TikTok. XSplit Broadcaster comes as a feature-packed production studio for content creation.
XSplit offers unlimited customization options when it comes to recording gameplay. It offers flawless video and audio quality without putting additional load on the system. XSplit ensures lag-free gameplay, so your efficiency is not affected while recording.

6.FBX
If you want high-performance HD recordings without interruptions in your gameplay, FBX is a reliable option. It is a dedicated game recorder offering many useful features to users. FBX can save highlights of the best parts of your gameplay. You can customize hotkeys that instantly save short videos of your best action.
It can also capture high-quality screenshots for easy sharing. FBX also allows live streaming options with rapid setups. The tool can automatically adjust to your bandwidth to help eliminate jerky streams.

7.D3DGear
For fast and efficient recordings, you can opt for D3DGear. It is a high-quality game screen recorder for PC containing all the essentials for smooth recordings. The tool is available on Windows computers as a plugin and add-on software.
D3DGear can record gameplay smoothly without causing the game to drop much in the frame rate. It also allows users to live stream their gameplay to Twitch. D3DGear can also record Oculus Rift VR gameplay with HD SBS stereoscopic videos. Furthermore, it can produce Constant Frame Rate (CFR) movies, often required with Adobe software.

8.Gecata by Movavi
Movavi offers its state-of-the-art game recorder for PC in the form of Gecata. The tool is a lightweight and solid program for recording and streaming gameplay. You can use it to grab the best moments of your gaming experience and share them with your peers across the globe.
Gecata enables users to record and stream their games at the same time without any lag. You can also record webcam and microphone, in-game sound effects, music, and dialogues all in one click. Gecata provides full control, allowing you to customize overlays to monitor frame rate, bit count, and other metrics.

9.Radeon ReLive
Radeon ReLive by AMD certainly deserves a spot on this list of game recorder software for PCs. It is a user-friendly game recorder that helps users capture and share gameplay videos and screenshots. Radeon ReLive is configuring-friendly and has a minimal impact on the FPS rate.
The tool works on systems with AMD graphics cards. It allows users to tweak their game and display settings, allowing for seamless gameplay. Radeon also contains a switch for saving power and preventing the system from overheating.

10.ScreenPal
Formerly known as Screencast-o-Matic, ScreenPal is a user-friendly tool designed to capture and share screen recordings. You can record and edit your content on the same platform using this versatile tool. ScreenPal is available on Windows, Mac, iOS, Android, and Chromebook devices.
Besides recording gameplay on a PC, you can also use it for education, work, and other personal purposes. ScreenPal comes with a built-in editor that helps you tweak your videos after recording them. You can also host and share content on its easily accessible cloud.

[Cost-Effective] Screen Recording in Wondershare Filmora
The tools mentioned above are great for recording gameplay on PC. However, you might have noticed that many of these tools offer pricing plans that can prove heavy on the wallet. If you are looking for a cost-effective solution for recording gameplay, Wondershare Filmora is a stellar choice.
Filmora by Wondershare is an all-in-one solution when it comes to content creation. While other game recorders for PC often offer specific tools, Filmora offers a 360-degree approach. Besides recording the screen, Filmora also allows users to compile and edit their recorded gameplay without ever exiting the platform.
Anyone Can Create a Tutorial With These Easy Steps
Free Download For Win 7 or later(64-bit)
Free Download For macOS 10.14 or later
How to Record Gameplay Using Wondershare Filmora
The Screen Record feature on Filmora is a simple yet powerful function that can help you capture your computer’s screen and webcam. You can record audio using the microphone and the system at the same time.
Filmora also lets users customize the area of the screen they wish to capture. This makes it arguably the best game screen recorder for PC. To capture gameplay on PC using Filmora, follow the steps below:
Step1Open Screen Recorder on Filmora
Install and launch Wondershare Filmora on your PC. You can select the “Screen Recorder” feature from the startup window on Filmora.

Alternatively, you can also go to the “File” tab and select “Record Media” from the dropdown list, then choose to record the webcam, PC screen, or voiceover.

Step2Adjust Screen Recording Settings
Once the Screen Recorder panel opens, you can choose the recording ratio from the menu under the “Square” icon. The available options are to record the full screen, a target window, or any custom size. You can then toggle the switches next to the “Microphone,” “System Audio,” and “Camera” options to turn them on or off. Filmora also lets users adjust the frame rate, quality, and other parameters.

Step3 Adjust Screen Recording Settings
Once the Screen Recorder panel opens, you can choose the recording ratio from the menu under the “Square” icon. The available options are to record the full screen, a target window, or any custom size. You can then toggle the switches next to the “Microphone,” “System Audio,” and “Camera” options to turn them on or off. Filmora also lets users adjust the frame rate, quality, and other parameters.
Step4Record Through Filmora and Conclude
After specifying the settings, tap the “Record” button to start recording your gameplay. Filmora will ensure your gameplay is not affected by the recording. Hit the “Stop” button once you are done and edit the file in Filmora. Finally, export the recorded gameplay to a location of your choice.

Conclusion
Many dedicated software are available to help you capture gameplay on PC. The top game recording software for PC and their pricing plans are mentioned above for your convenience. However, our advice is to switch to Wondershare Filmora. Not only does Filmora offer a cost-effective solution, but it is also much easier to use and provides high-quality recordings without lag.
How to Make a DIY Vlog or Video
Personally, this is a fun way vlog the DIY vlog because you can make anything that is on your own knowledge, share to the public what they don’t know yet. You See and hear DIY everywhere, and you probably already know what it stands for “Do it Yourself” it’s a pretty straightforward video concept. DIY is about so many things, basically DIY means that you’re choosing to do that task or create those products yourself with no direct help from the experts. DIY is really about you seeking out the knowledge and developing the skills you need to do something that you would normally pay someone else to do for you. Personally, when I think about DIY video, my mind goes to home improvements, things like painting, crafting or how to videos.
In this article I share to you my tips on how to make a DIY vlog or video.
- Informative Content
- Plan your Video
- Write a script
- Make your Video short but full of information
- Edit and Personalize your video
Samples of DIY Vlogs
- How to Videos
- Crafts
- Recycling Handmade Stuff
- Life hacks
- Trick and trips
Here are few tips for creating DIY Vlogs
- Informative Content
- Plan your Video
- Write a script
- Make your Video short but full of information
- Edit and Personalize your video with Filmora
Informative Content
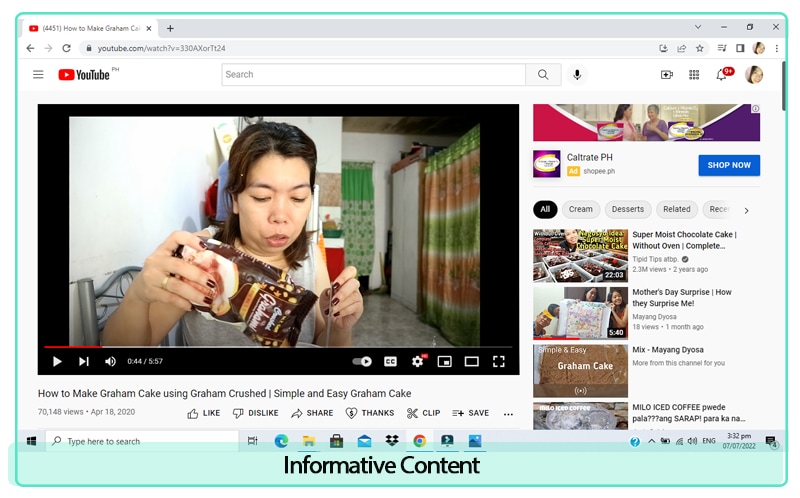
A DIY video should be purely educational. Your audience will forgive your poor production values if they’re learning great information. Be sure your DIY video is full of meaty content that’s meaningful to the viewer. Think of advice, tips or recommendations, this type of video has an instructive and educational content that is both shareable and easy to retain. Information video are good for educating you audience about certain topics related to your video content.
Plan your video
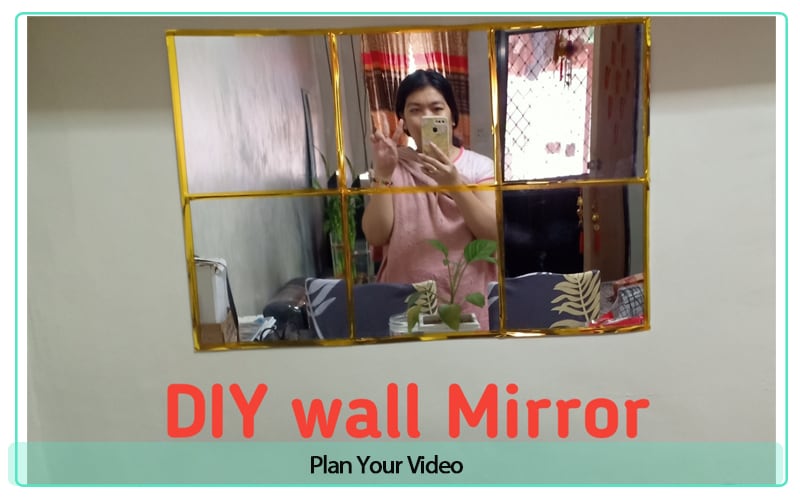
Ask yourself first of what you are trying to accomplish by producing the video. Remember that video is a tool and that it can hurt your channel if you don’t take it seriously and come properly prepared. Get organized and take down note if you have to.
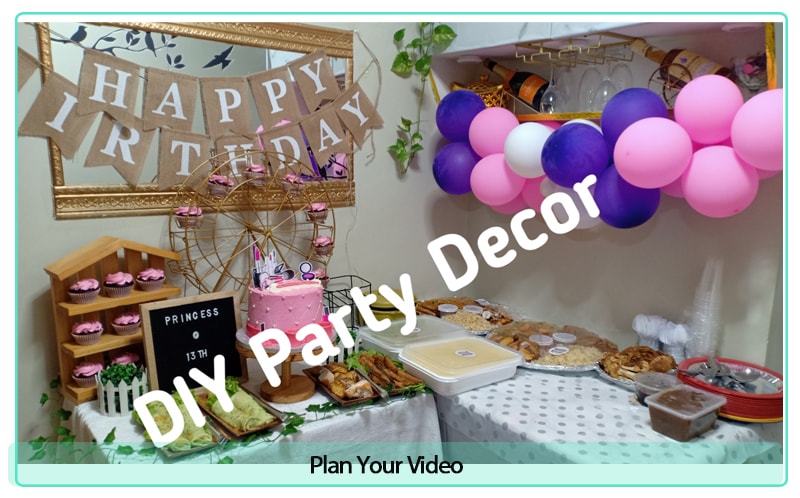
Understand your target audience you need to know who you’ll be speaking to through your video content. Make sure that you really understand what you are doing, by this kind of video content is in need your expertise. You have to share to your audience what your knowledge and experience about your video topic. This is the time where its ok to make or create a script and to map out a storyboard to guide you.
Write a script
Making a script in your video is one way guide for you not to rattle or messed up everything, for me DIY vlog is different from product reviews or unboxing vlog. You can either write a word-by-word script for the video or just the general topics you aim to cover in the video. Either way, the point is to have a reference note so you don’t accidentally forget to cover an essential topic when you begin filming the video. DIY vlogs need to plan and make scripting because this is a more on tutorial video and you don’t like to missed one instruction on your video that is why making a script is a must unless you already doing it over and over again. You don’t have to be perfect and you don’t have to memorize any script. You just have to be relatable and authentic, yet professional.
Make You Video Short but full of information
Make your video short but demand more attentions to your viewers because modern viewers have short attention spans specially when they’re on social media and there is always another video to see. Just make sure to grab your viewers attention by creating a catching footage.
As long as you know well your topic then that’s good enough because it take some guts to get in front of the camera and be confident.
Editing and Personalize your DIY Video
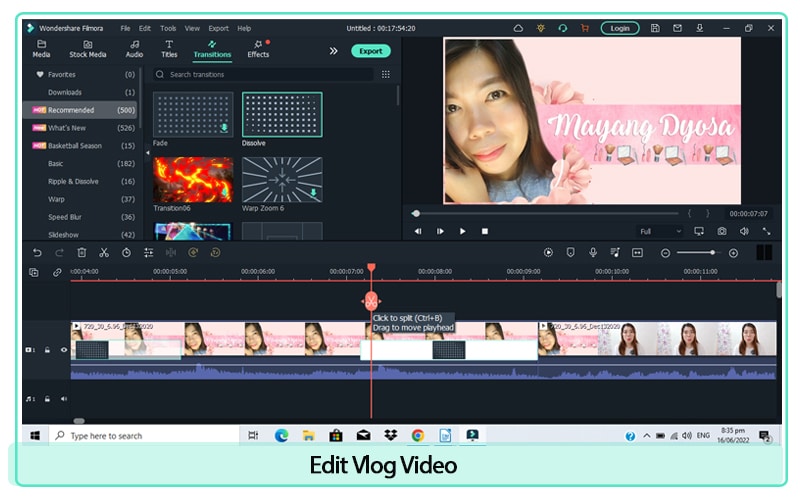
The last step is the process of editing and personalize your video content. There are a number of great video editing apps and programs out there, and with a quick internet search, you should be able to find one that meet your needs, skills level and budget. Editing is what really takes a video to the next level, use a powerful video editing software.
I will recommend Wondershare Filmora because of its great tools that will create your video stand out to others. Enable you to add transitions to your videos, color grade them, add tittles, subtitles intros and outros.
Free Download For Win 7 or later(64-bit)
Free Download For macOS 10.14 or later
Adding in background music always helps liven up a video, just make sure the music isn’t copyrighted. Filmora has a lot of recommended music that is royalty free stock music, you can use this music without worrying and you can add more music if you want to.
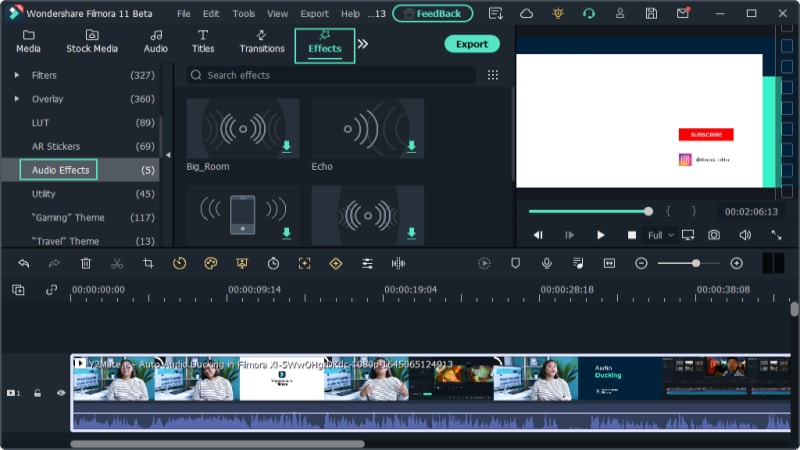
Add in your logo and branding to the video, it will make your video seem professional and customized and reminds you’re viewers of your legitimacy and expertise. Edit this one at Filmora Title and Filter tab you can create an extra ordinary branding that you like, make it creative and catchy so your audience will always remember your channel.
Verdict
Some studies say that making DIY project help reduce stress and improve your mood, that’s why a lot of people are watching DIY vlogs or video. DIY projects require you to use your hands, you’ll be able to learn new techniques and methods to put something together. This could also help you with future projects and you can even teach others how to use those skills as well.
People usually looking for a tutorial that is in video form because in this case it is easy for them to follow step by step the video instruction. Video now a days is used as a valuable marketing tool of businesses today. Online marketing efforts are relying on video content more than ever as a suitable replacement of face-to-face communication. So almost everyone now when there is a need or there are wants to do that cannot afford to do alone, they’re looking for tutorial online.
Now that you know what kind of DIY videos you want to create, be ready and be professional on making your first DIY video.
Samples of DIY Vlogs
- How to Videos
- Crafts
- Recycling Handmade Stuff
- Life hacks
- Trick and trips
Here are few tips for creating DIY Vlogs
- Informative Content
- Plan your Video
- Write a script
- Make your Video short but full of information
- Edit and Personalize your video with Filmora
Informative Content
A DIY video should be purely educational. Your audience will forgive your poor production values if they’re learning great information. Be sure your DIY video is full of meaty content that’s meaningful to the viewer. Think of advice, tips or recommendations, this type of video has an instructive and educational content that is both shareable and easy to retain. Information video are good for educating you audience about certain topics related to your video content.

Plan your video
Ask yourself first of what you are trying to accomplish by producing the video. Remember that video is a tool and that it can hurt your channel if you don’t take it seriously and come properly prepared. Get organized and take down note if you have to.
Understand your target audience you need to know who you’ll be speaking to through your video content. Make sure that you really understand what you are doing, by this kind of video content is in need your expertise. You have to share to your audience what your knowledge and experience about your video topic. This is the time where its ok to make or create a script and to map out a storyboard to guide you.


Write a script
Making a script in your video is one way guide for you not to rattle or messed up everything, for me DIY vlog is different from product reviews or unboxing vlog. You can either write a word-by-word script for the video or just the general topics you aim to cover in the video. Either way, the point is to have a reference note so you don’t accidentally forget to cover an essential topic when you begin filming the video. DIY vlogs need to plan and make scripting because this is a more on tutorial video and you don’t like to missed one instruction on your video that is why making a script is a must unless you already doing it over and over again. You don’t have to be perfect and you don’t have to memorize any script. You just have to be relatable and authentic, yet professional.
Make You Video Short but full of information
Make your video short but demand more attentions to your viewers because modern viewers have short attention spans specially when they’re on social media and there is always another video to see. Just make sure to grab your viewers attention by creating a catching footage.
As long as you know well your topic then that’s good enough because it take some guts to get in front of the camera and be confident.
Editing and Personalize your DIY Video
The last step is the process of editing and personalize your video content. There are a number of great video editing apps and programs out there, and with a quick internet search, you should be able to find one that meet your needs, skills level and budget. Editing is what really takes a video to the next level, use a powerful video editing software.
I will recommend Wondershare Filmora because of its great tools that will create your video stand out to others. Enable you to add transitions to your videos, color grade them, add tittles, subtitles intros and outros.
Free Download For Win 7 or later(64-bit)
Free Download For macOS 10.14 or later
Adding in background music always helps liven up a video, just make sure the music isn’t copyrighted. Filmora has a lot of recommended music that is royalty free stock music, you can use this music without worrying and you can add more music if you want to.

Add in your logo and branding to the video, it will make your video seem professional and customized and reminds you’re viewers of your legitimacy and expertise. Edit this one at Filmora Title and Filter tab you can create an extra ordinary branding that you like, make it creative and catchy so your audience will always remember your channel.

Verdict
Some studies say that making DIY project help reduce stress and improve your mood, that’s why a lot of people are watching DIY vlogs or video. DIY projects require you to use your hands, you’ll be able to learn new techniques and methods to put something together. This could also help you with future projects and you can even teach others how to use those skills as well.
People usually looking for a tutorial that is in video form because in this case it is easy for them to follow step by step the video instruction. Video now a days is used as a valuable marketing tool of businesses today. Online marketing efforts are relying on video content more than ever as a suitable replacement of face-to-face communication. So almost everyone now when there is a need or there are wants to do that cannot afford to do alone, they’re looking for tutorial online.
Now that you know what kind of DIY videos you want to create, be ready and be professional on making your first DIY video.
3 In-Camera Transitions Tricks To Make Videos Like a Pro
You must have seen it in videos when a scene changes to another place or time. How is it possible? Video transitions are a post-production technique that connects two different shots together. And it makes the whole video goes smooth and fluent.
Hopping directly from one clip to the next looks pretty queer. It disturbs the whole dynamics and charm of the video. To avoid this, we use video transitions. This makes the video appear much smoother and more linked.
You may think it is not easy, but after reading this article, you will know how simple it is. All you need is a camera and a few skills. In this article, we will focus on different in-camera transitions and let you know how to edit in a powerful video editor Filmora .
Whip Your Camera
You may have noticed that when an object moves quickly, the camera creates a blurred image of the object. We call it motion blur. The idea with this transition is to cut and paste your shots together by whipping your camera at the end of your first shot and at the beginning of your second one. This effect depends on two aspects. The first is by the speedy motion of the object out of the frame, and the second is by the camera’s movement.
Here is a stepwise guide for you to try
- Plan your shots, where and in what direction you will make the whip.
- Then take the first shot and whip the camera at the end of the shot in the direction the object is moving.
- For the next shot, whip the camera into the action and complete the shot.
- Import both shots in your editing tool and find the point of blur in both.
- Cut and paste them to add a blurring effect to your video.
You can whip your camera in any direction you want. Make sure the movement is fast enough to create a motion blur.
The result would be a smooth transition from the first shot to the second, as in this clip:

Fill The Frame
In this in-camera transition technique, you must fill the frame with an object or subject. Compose the shot with the main subject filling the frame from edge to edge. In this way, those who view the video immediately know what you want them to see.
Here is step-by-step guidance for this transition
- Plan the two shots you are going to take.
- Find a subject or an action that will fill the frame during recording.
- In the first shot, please make the subject move toward the frame so that it fills the frame.
- The second shot will take place at another time or place.
- To record the second shot, cover the frame with an object and then reveal the shot.
- Import both shots into Wondershare Filmora .
- Cut the two shots to the point where the frame is filled and paste these shots together.
Free Download For Win 7 or later(64-bit)
Free Download For macOS 10.14 or later
One important thing is to match the color and brightness of the object or subject. It will provide you with much better results. The video attached below explains all the steps of filling the frame.

Match Cut
In a video, a match cut transitions from one shot to another. During this, the composition of the two shots is matched by action, subject, and subject matter. The goal is to make a visual match between two situations that don’t have a direct link. Here are the steps to creating a match-cut transition in your videos.
- Plan the shot you are going to take.
- Record the action in the first shot, for example, clapping your hands.
- Go to another place or scene to record the second shot.
- Repeat the same action in the second shot.
- Import both camera shots to Wondershare Filmora .
- Cut one shot to another when the action is at its peak.
This way, you can smoothly transition from one place or scene to another. There is a video attached below for a better understanding of the steps.

Final Words
You can use these techniques to create sublime in-camera transitions. Make sure to follow all the steps in the correct order. These transitions will make your videos look more creative and artistic. Plan your ideas, add these transitions to your videos, and create cool videos at home to post on social media.
If you find this article informative, remember to share it with your friends. Which of these transitions did you like the most, and are you going to try them?
Free Download For Win 7 or later(64-bit)
Free Download For macOS 10.14 or later
Free Download For macOS 10.14 or later
One important thing is to match the color and brightness of the object or subject. It will provide you with much better results. The video attached below explains all the steps of filling the frame.

Match Cut
In a video, a match cut transitions from one shot to another. During this, the composition of the two shots is matched by action, subject, and subject matter. The goal is to make a visual match between two situations that don’t have a direct link. Here are the steps to creating a match-cut transition in your videos.
- Plan the shot you are going to take.
- Record the action in the first shot, for example, clapping your hands.
- Go to another place or scene to record the second shot.
- Repeat the same action in the second shot.
- Import both camera shots to Wondershare Filmora .
- Cut one shot to another when the action is at its peak.
This way, you can smoothly transition from one place or scene to another. There is a video attached below for a better understanding of the steps.

Final Words
You can use these techniques to create sublime in-camera transitions. Make sure to follow all the steps in the correct order. These transitions will make your videos look more creative and artistic. Plan your ideas, add these transitions to your videos, and create cool videos at home to post on social media.
If you find this article informative, remember to share it with your friends. Which of these transitions did you like the most, and are you going to try them?
Free Download For Win 7 or later(64-bit)
Free Download For macOS 10.14 or later
Also read:
- 4 Solutions to Add White Border to Video on Mobile and Desktop for 2024
- Hard to Remove Black Background in After Effects?
- Updated Want to Make Your Slideshows More Fun and Exciting? Follow the Given Discussion to Know How to Make a Slideshow Gif, Thereby Making Your Slideshow More Enjoyable than Ever for 2024
- Updated In 2024, Do You Know About some Efficient Slow-Motion Video Editors? Read This Article to Find Out the Best Slow-Motion Video Editing Tools that You Can Try
- New Best Youtube Video Meme Maker
- New A Full Review of Leeming LUT Pro for 2024
- Updated Best Applications That Can Help Apply The Best VHS Camera Effect for 2024
- Updated 2024 Approved Detailed Guide to Rotate Videos in Blender
- Guide To Using Free Luts for OBS
- Updated In 2024, How to Change Frame Rate in Premiere Pro
- New Wondering How to Stand Out with Your Adobe Slideshow Presentation? Follow the Given Discussion to Learn All About the Easiest Ways of Making a Slideshow at Adobe
- 5 Ways to Make a Fake Facetime Call Video for 2024
- In 2024, Find a Solution for Effortless Sky Replacement Photoshop in This Comprehensive Guide. Also, Use the Easiest Video Editing Tool to Make Your Media Stunning
- How To Blur The Video Background in After Effects for 2024
- Updated 2024 Approved Creating Collages on Canva Is Simple and Quick. The Tool Lets You Create some Amazing Customized Collages as Needed. So, Get Ready to Explore the World of Canva Collages
- Updated 2024 Approved Tips & Tricks To Perfectly Use the Audio Mixer in Filmora
- Updated In 2024, AI Features of Wondershare Filmora - Silence Detection in Videos
- Updated 5 Best Video Denoisers
- Updated How to Create Intro Video with Filmora
- 2024 Approved What You Should Know About Speech-to-Text Technology
- New Convert Slow Motion Videos to Regular Videos in Your iOS Device |A How for 2024
- 2024 Approved In This Article, We Shall Take a Look at the Various Steps of Making a Photo Collage in Microsoft Word, and Also at Other Details of the Process, Which Might Be Relevant
- Updated How to Select and Use The Best BRAW LUTs
- Updated Do You Know You Can Add LUTs for Cinematic Color Grading on Your Smartphones? With VN Editor You Can, You Can Add LUTs. Choose the Option VN LUTs Free Download for 2024
- Updated Best PDF to GIF Converters for 2024
- Updated How to Overlay Video in Premiere Pro for 2024
- New 10 Innovative AR Teaching Examples to Tell You What Is AR in Teaching for 2024
- Updated 2024 Approved This Article Covers a Lot of Information About the Freeze-Frame Effect. It Includes Its Power, Its Usage in Films, and How to Create It in Your Videos Using Filmora. It Will Get You a Super Exciting Cinematic Effect
- New Best 10 Anime Movies for All Time for 2024
- New Looking for the Best Alternatives of iPad Compatible Slideshow Applications to Design High End Graphic Presentations? Rest Assured, You Have Landed at the Correct Spot
- 2024 Approved TOP 6 Online Video Speed Controller for Chrome, Safari, Firefox
- Updated In This Article, We Will Introduce You Our Top 5 Picks of Websites and Software Converter Online to Convert Powerpoint to Mp4
- Are You Looking for Funny Discord Emojis to Massively Improve Your Discord Experience? Using some Fun Bots for Discord Is an Excellent Way of Doing That! Thus, We Compiled a List of 10 Fun Discord Bots You Need
- Updated VN Video Editor Templates A Game-Changer for Your Videos for 2024
- New How to Make Text Reveal Effect Easily for 2024
- Updated Adding Shake Effects to Your Video With Alight Motion for 2024
- New In 2024, Deep Learning of AI Video Recognition
- New How to Change Frame Rate in Premiere Pro
- In 2024, Live Stream on YouTube Using Zoom
- In 2024, Are You Also a Fan of the Slow Mo Guys? Well! Who Isnt? Learn How You Can Create Compelling Slow-Mo Videos Like the Slow Mo Guys Here
- 2024 Approved Are You a Videographer or Video Content Creator? Is Enhancing Your Videography Skills Your Priority? Do You Want to Learn the Basics of LumaFusion Color Grading? Read on to Find All the Information You Need
- New This Article Will Reveal the Secrets of Choosing a Location to Shoot Your Viral Music Video. As Well as Tips to Make an Energetic Schedule for Shooting Days for 2024
- New 2024 Approved An Intro Video Describing You and Your Content Is the First and the Foremost Thing Which a Viewer Sees. Thinking of How to Make an Interesting Intro Video, This Blog Is Surely a Supportive Guide for You. Learn More Here
- How to Do Censor Effects with Filmora for 2024
- In 2024, DaVinci Resolve Scopes Have Undergone Significant Improvements. Find Out How to Use These Scopes and Improve Your Video Editing Skills
- Updated In 2024, How To Add Fade In Windows Video Editor
- Updated Merging MP4 Videos Made Simple Top 5 Online Tools
- New Top VHS Sound Effect That You Can Use in Video Making for 2024
- Updated To Find the Best Tool Out of Hundreds of Online and Offline GIF to Video Converters, You Need to Check These Specifications. Read This Review and Get the Best Out of the Best
- TEXT REVEAL Animation | Easy Masking Filmora
- How to Repair Broken video files of A58 4G on Mac?
- How to Fix Error 495 While Download/Updating Android Apps On Huawei Nova Y71 | Dr.fone
- Ultimate Guide to Free PPTP VPN For Beginners On Xiaomi Redmi Note 12 Pro 5G | Dr.fone
- The way to get back lost data from Xiaomi Redmi K70E
- Ways To Find Unlocking Codes For Samsung Galaxy M34 5G Phones
- Top 10 AirPlay Apps in Realme 12+ 5G for Streaming | Dr.fone
- Latest Guide How To Bypass Lava Yuva 3 Pro FRP Without Computer
- In 2024, Planning to Use a Pokemon Go Joystick on Motorola Edge 40 Neo? | Dr.fone
- Will Pokémon Go Ban the Account if You Use PGSharp On Honor Play 7T | Dr.fone
- Mastering Lock Screen Settings How to Enable and Disable on Samsung
- How Can We Unlock Our ZTE Nubia Z60 Ultra Phone Screen?
- In 2024, Android Unlock Code Sim Unlock Your Motorola Moto E13 Phone and Remove Locked Screen
- In 2024, How Oppo F25 Pro 5G Mirror Screen to PC? | Dr.fone
- What You Want To Know About Two-Factor Authentication for iCloud On your Apple iPhone 13 Pro Max
- In 2024, How to Change/Add Location Filters on Snapchat For your Poco C65 | Dr.fone
- PassFab iPhone 12 Pro Backup Unlocker Top 4 Alternatives | Dr.fone
- Network Locked SIM Card Inserted On Your Samsung Galaxy S23 FE Phone? Unlock It Now
- In 2024, How Do You Unlock your iPhone SE? Learn All 4 Methods | Dr.fone
- In 2024, Complete Fixes To Solve iPhone 12 Pro Randomly Asking for Apple ID Password
- In 2024, How to Transfer Data from Samsung Galaxy F04 to BlackBerry | Dr.fone
- In 2024, How to Transfer Data After Switching From Nokia C12 Pro to Latest Samsung | Dr.fone
- In 2024, How To Bypass the Required Apple Store Verification For Apple iPhone 13 Pro
- Does MP4 play on Samsung Galaxy S23+?
- 6 Fixes to Unfortunately WhatsApp has stopped Error Popups On Nubia Red Magic 9 Pro+ | Dr.fone
- In 2024, How to Unlock Realme V30T Phone Password Without Factory Reset?
- In 2024, 2 Ways to Monitor Apple iPhone 8 Activity | Dr.fone
- How to Simulate GPS Movement in AR games On Motorola Edge 40 Neo? | Dr.fone
- How to Check Distance and Radius on Google Maps For your Samsung Galaxy XCover 6 Pro Tactical Edition | Dr.fone
- iCloud Separation How To Disconnect iPhone 14 Plus and iPad
- Methods to Change GPS Location On Nubia Red Magic 9 Pro+ | Dr.fone
- 7 Solutions to Fix Error Code 963 on Google Play Of Vivo V27e | Dr.fone
- How To Simulate GPS Movement With Location Spoofer On Honor Magic 6 Pro? | Dr.fone
- Updated In 2024, Learn Disney Cartoon Drawing to See More Disney Magic Moments
- Mastering Android Device Manager The Ultimate Guide to Unlocking Your Realme GT 3 Device
- 3 Ways to Change Location on Facebook Marketplace for Apple iPhone 13 Pro Max | Dr.fone
- Title: How To Add Scrolling Text Effect
- Author: Morgan
- Created at : 2024-06-15 18:56:51
- Updated at : 2024-06-16 18:56:51
- Link: https://ai-video-editing.techidaily.com/how-to-add-scrolling-text-effect/
- License: This work is licensed under CC BY-NC-SA 4.0.

