:max_bytes(150000):strip_icc():format(webp)/012_how-to-make-video-call-on-android-bd93ab594aa648c7977f4c1ecf42c85b.jpg)
How to Loop Videos with iMovie for 2024

How to Loop Videos with iMovie
If you are a video creator, there are times when you have to loop a video. This is to extend the duration of the original video. For instance, you have a stock video of a short duration. You want it to be the background in your video throughout. You have to extend the duration of the stock video by playing it in a loop.
If you are a macOS user, you can use iMovie to loop your video. iMovie comes pre-install on macOS devices. iMovie happens to be one of the most preferred video editors among beginners. In fact, iMovie comes pre-installed on iPhones and iPads. You can easily loop your video on your mobile devices as well. We will illustrate how to loop a video on iMovie on iPhone as well as on Mac.
Part 1. How to loop a video on iMovie iPhone
iMovie by Apple comes pre-installed on iPhone and iPad. Naturally, it is one of the most widely used video editors by iPhone users. iMovie app has options for basic and even advanced levels of video editing. Looping a video on iMovie involves a few simple steps that everyone can perform easily. Here are the steps on how to loop a video in the iMovie app on your iPhone.
Step1 Launch the iMovie app on your iPhone. If you have uninstalled or disabled the app, you can always go to App Store to install it again.

Step2 If you are opening the app for the first time, you will get a welcome screen. Follow the on-screen instructions to land on the home screen of the app.
Step3 Tap on New Project “+” icon and select the Movie option to get started. This will take you to the phone media gallery to select a media file to get started.

Step4 You should tap on the Video option and select the video that you want to put into a loop. After selecting a video, tap on Create Movie option.

Step5 Tap on the video on the timeline to select the video and tap on the Duplicate option. You will see that the duration of the video has doubled. You can tap on Duplicate as many times as you want to increase the video duration.

Step6 Once you are done with the iMovie loop, tap on the Done option located in the top-left corner. Thereafter, tap on the Share icon at the bottom.

Step7 You will get a pop-up where you have to tap on the Save Video option. The edited video will be saved on your iPhone. You can open the new video from the Photos app.

Part 2. Loop Videos on Mac with iMovie
Editing a video on a Mac is always more comfortable than on an iPhone because of the larger screen. iMovie from Apple comes pre-installed on Mac as well, and hence, you can get started right away. It is completely free to use, and hence, you do not need to install any third-party video editor. Here are the steps on how to loop an iMovie video in simple steps.
Step1 Open the iMovie app from the Applications folder.
Step2 Click on Create New option and then click on the Movie option.

Step3 Bring in the required video under Movie Library by dragging the file from Finder on your Mac. You can also go to File> Import Media option and select the required video. You can also select the required media file from Events or Photos under the Libraries section.

Step4 Drag and drop the video on your timeline. When you want to loop the video, drag and drop the video clip again on the timeline. Make sure there is no gap between the first clip and the second clip on the timeline. You can drag and drop the video clip multiple times on the timeline to increase its duration.

Step5 Once you are done, go to File> Share> File option. Choose the destination to save the edited video.

Part 3. iMovie Alternative to Loop Videos on Mac
If you are looking for an iMovie alternative to perform iMovie loop video action easily, we recommend Wondershare Filmora . Filmora is available for both Mac and Windows. Filmora is a better video editor than iMovie. It is a premium video editor and it has more features and functionalities.
You can loop any video as many times as you want instantly. Besides, you can edit your video clip as per your requirements before looping the edited video. The user interface is highly intuitive for everyone. Hence, it has huge popularity among Mac users. You can also save the looped video in different file formats. Here are the steps to loop a video on Filmora.
Free Download For Win 7 or later(64-bit)
Free Download For macOS 10.14 or later
Step1 Download and install Wondershare Filmora. Launch Filmora and click on New Project on the welcome screen.

Step2 Drag and drop the video file from Finder on Mac to the Project Media folder on Filmora. Thereafter, drop the video file into the timeline.

Step3 Drag and drop the video clip into the timeline again. Make sure that there is no gap between the clips. Besides, make sure that they are on the same channel for looping. You can drag and drop the video into the timeline multiple times.

Step4 You can zoom out the timeline for better viewing. Play the video to check its output on Viewer. Finally, click on the Export button and save the video in the desired file format on your Mac.
The Bottom Line
If you want to loop a video on your Mac, iMovie is the most preferred option. The same is applicable to iPhone users as well. iMovie comes pre-installed, and it is completely free to use. That is why you can loop any video instantly. Wondershare Filmora is the best alternative to iMovie to edit and loop your video.
Free Download For macOS 10.14 or later
Step1 Download and install Wondershare Filmora. Launch Filmora and click on New Project on the welcome screen.

Step2 Drag and drop the video file from Finder on Mac to the Project Media folder on Filmora. Thereafter, drop the video file into the timeline.

Step3 Drag and drop the video clip into the timeline again. Make sure that there is no gap between the clips. Besides, make sure that they are on the same channel for looping. You can drag and drop the video into the timeline multiple times.

Step4 You can zoom out the timeline for better viewing. Play the video to check its output on Viewer. Finally, click on the Export button and save the video in the desired file format on your Mac.
The Bottom Line
If you want to loop a video on your Mac, iMovie is the most preferred option. The same is applicable to iPhone users as well. iMovie comes pre-installed, and it is completely free to use. That is why you can loop any video instantly. Wondershare Filmora is the best alternative to iMovie to edit and loop your video.
Leading Applications to Create Fast Motion in iPhone
Fast motion has always been a time saver since it covers the unnecessary details in seconds. Acquiring this skill is important if you are a content creator or videographer. You might already be aware of how to make fast-motion videos on iPhone.
However, if this is unheard of or you are new to video editing, we’ve got you covered. This article covers the ins and outs of how to make a video fast-motion iPhone. In addition, users can gain insights into some applications and their guides. Moreover, we’ll discuss an AI alternative to those applications.
Slow Motion Video Maker Slow your video’s speed with better control of your keyframes to create unique cinematic effects!
Make A Slow Motion Video Make A Slow Motion Video More Features

Part 1: What are the Different Use Cases of Fast-Motion Videos?
The fast motion effect covers multiple creative ways of speed increase that you can incorporate. All these ways apply to different genres of videos. This section diverts your focus on different use cases of fast-motion videos. Here is how to make video fast motion on iPhone for different purposes:
1. Construction and Development Videos
Fast-motion videos help in video creation where development is happening. Such videos show the before and after results of an area, location, or building. The construction or manufacturing process is shown in fast motion in engineering videos. It also helps in showing the transformation of a non-populated or undeveloped city.
2. Nature Photography or Documentaries
Natural phenomenon like the blooming of a flower usually occurs at a slower rate. Capturing them takes a long time, but the audience may not like such a long duration. Hence, editors can increase the speed of such videos to speed up the phenomenon. In addition, if you watch wildlife or nature documentaries, they also use this effect.
3. Aesthetic Expression
Fast-paced videos bring a sense of creativity to your videos as they are an artistic expression of time. To indicate the passing of time in movies or to show a scene at a railway station or airport. It also indicates that the filmmakers and editors have put in an effort.
Part 2: Different Tools to Help You Make Fast Motion Video on iPhone
Fast-motion tools are important in video editing since they offer a chance at creativity. They have a wide range of applications in the filmmaking and media industry. Do you know how to make a video fast-motion iPhone using a third-party application? If not, here is a detailed guide on some of them:
1. iMovie
If you are looking for an accessible application with an easy-to-use interface, this is for you. The process of speed manipulation consists of a slider for control. After editing, you can integrate multiple soundtracks from 130 pre-assembled tracks. The application is compatible with iPhone X and newer versions.
Steps to Create a Fast Motion Video Using iMovie
Do you want to learn how to make fast-motion videos on your iPhone with this application? Given Below is your perfect guide to crafting a fast-paced video:
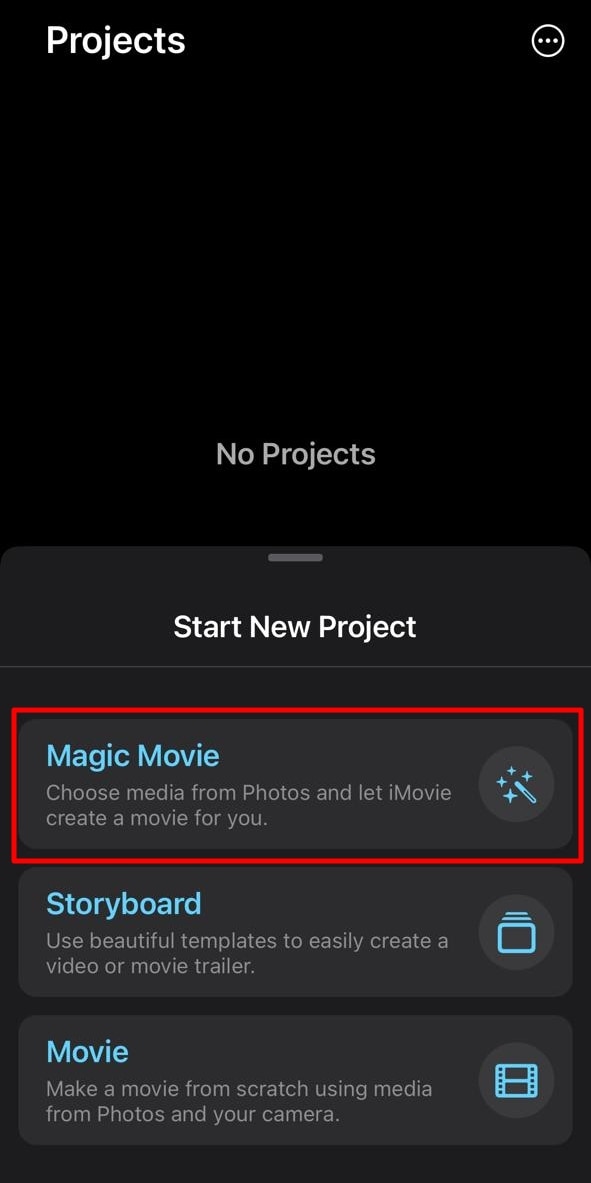
Step 1: After downloading the application on your iPhone, access it and “Start New Project.” Then, select a video from your media library to edit.
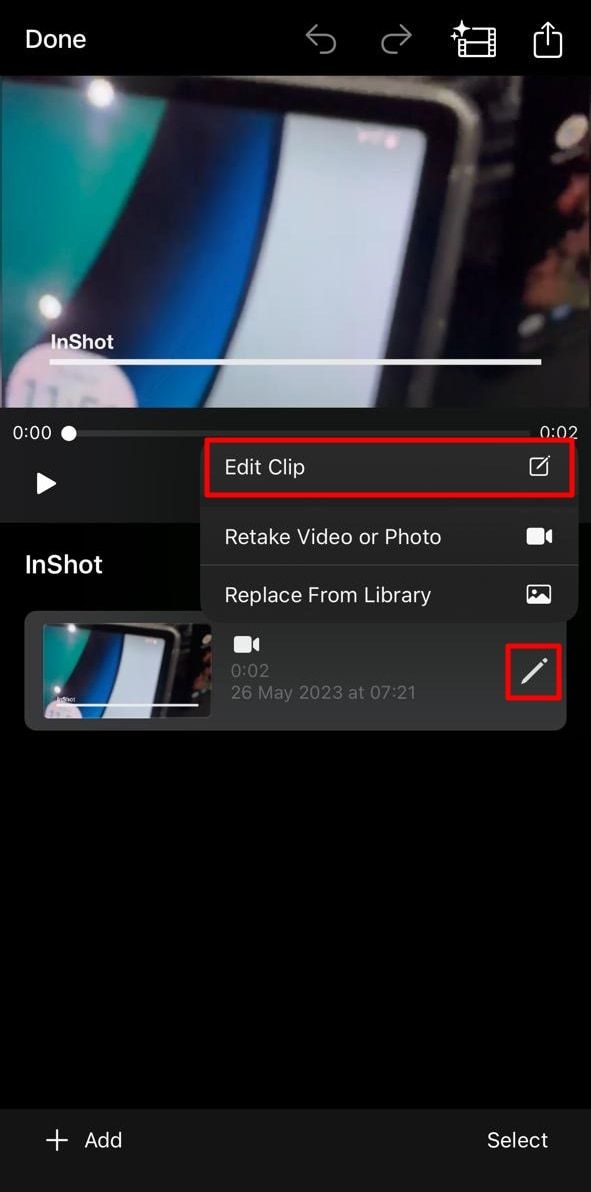
Step 2: After importing the video, click the “Pen” icon to access editing options. Then, click the “Edit Clip” option to do so.
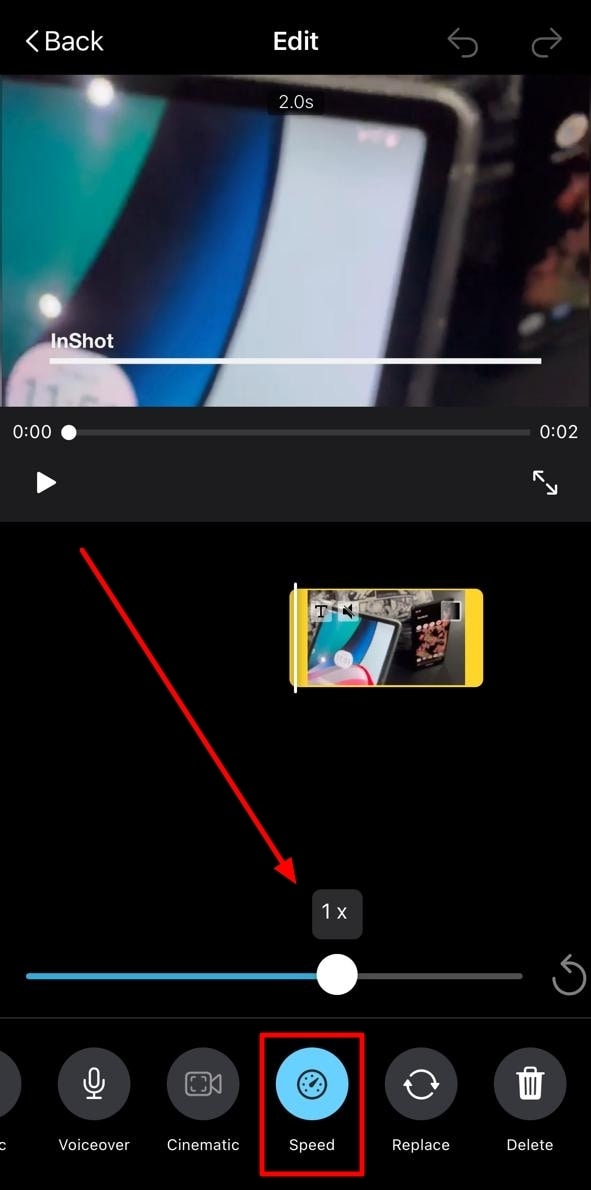
Step 3: Move to the bottom of the screen and slide the given option to access “Speed.” Click it and drag the speed slider towards the right side to increase the speed of the video.
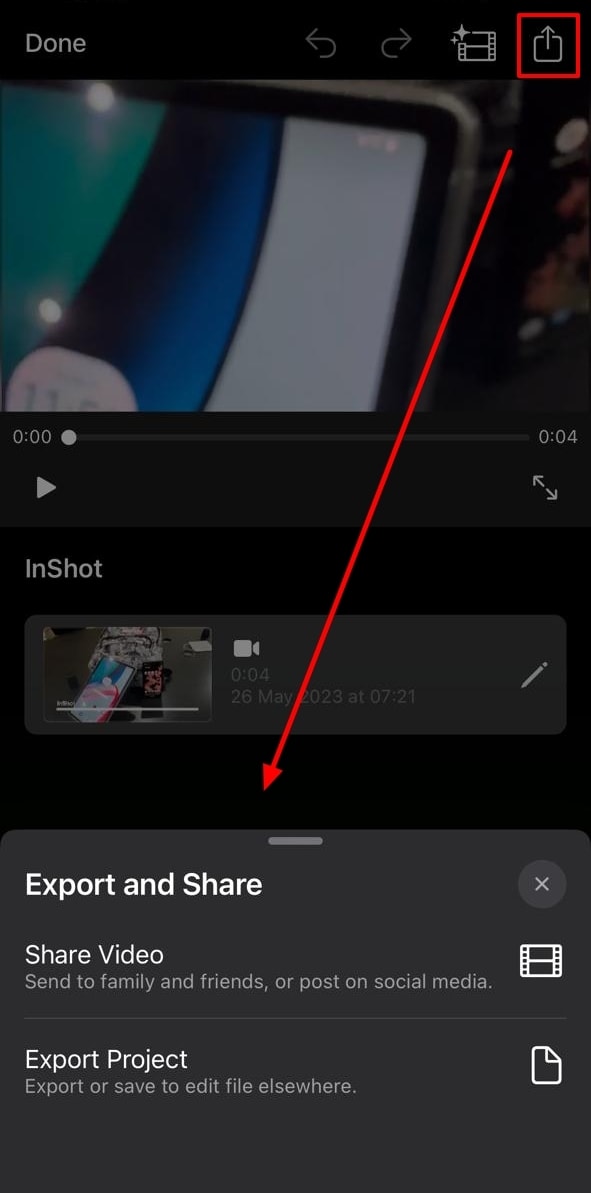
Step 4: Hit the “Play” button to see the speed of the video and re-adjust if required. Go to the top right corner of the screen, locate the “Export” icon, and click it.
2. Video Speed Changer – Editor
Want to learn how to make video fast motion on iPhone without additional technicalities? This application ensures a comprehensive narrative just for speed change. Users can formulate 3 fast motion effects with it at specific frames. For pre-recorded or new videos, it offers Time Wrap, Time Lapse, and Hyper-lapse. The application has been found to support iOS 12.3 and later versions.
Steps to Create a Fast Motion Video Using Video Speed Changer
Multiple applications provide similar services, but none can compare to its UI. Here is how to make a video fast motion iPhone using this
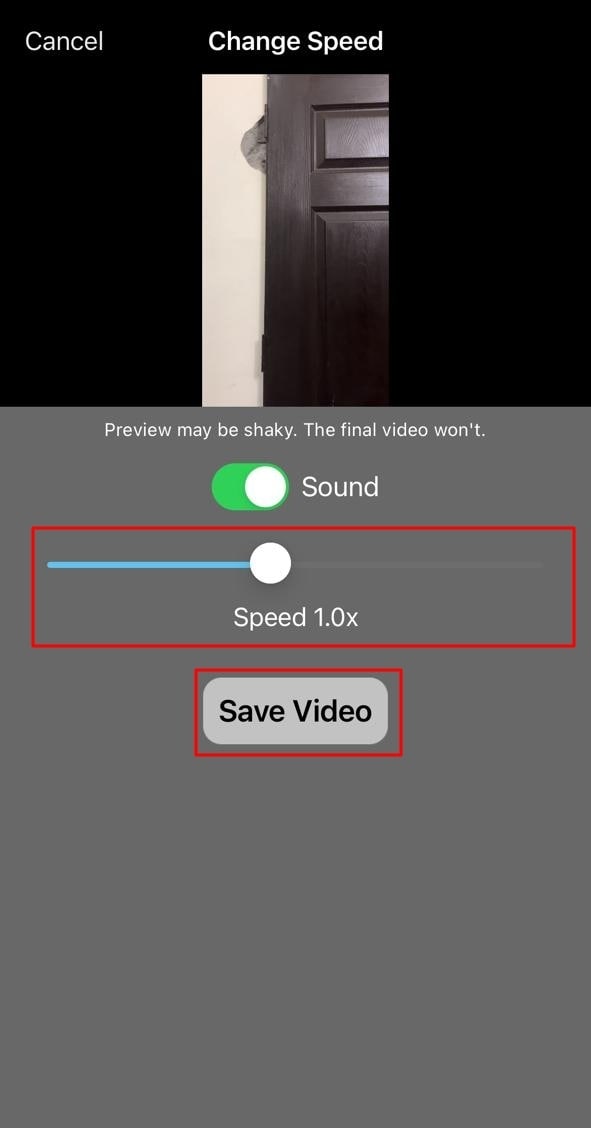
Step 1: Access this application from the App Store and launch it after installation. Click on the “Select Video” button and import a clip.

Step 2: Once you have selected a video, it will take you straight to the speed change option. Change the position of the given slider. Finally, preview the video and click the “Save Video” button to save it on your device.
3. Slow Motion Video FX Edit
Although the name indicates otherwise, this video editor is capable of high-speed change. It comes with an intuitive user interface and is easy for anyone to employ. In addition to speed alteration, you can insert 40 different filters into your video. You can also commence its freeze frame action to add an extra layer of creativity. The tool is compatible with iOS 13.0 and higher versions.
Steps to Create Fast Motion Using Slow Motion Video FX
This is another editor to gain insights on how to make fast-motion videos on an iPhone. We have given the verified step-by-step guide to using this app:
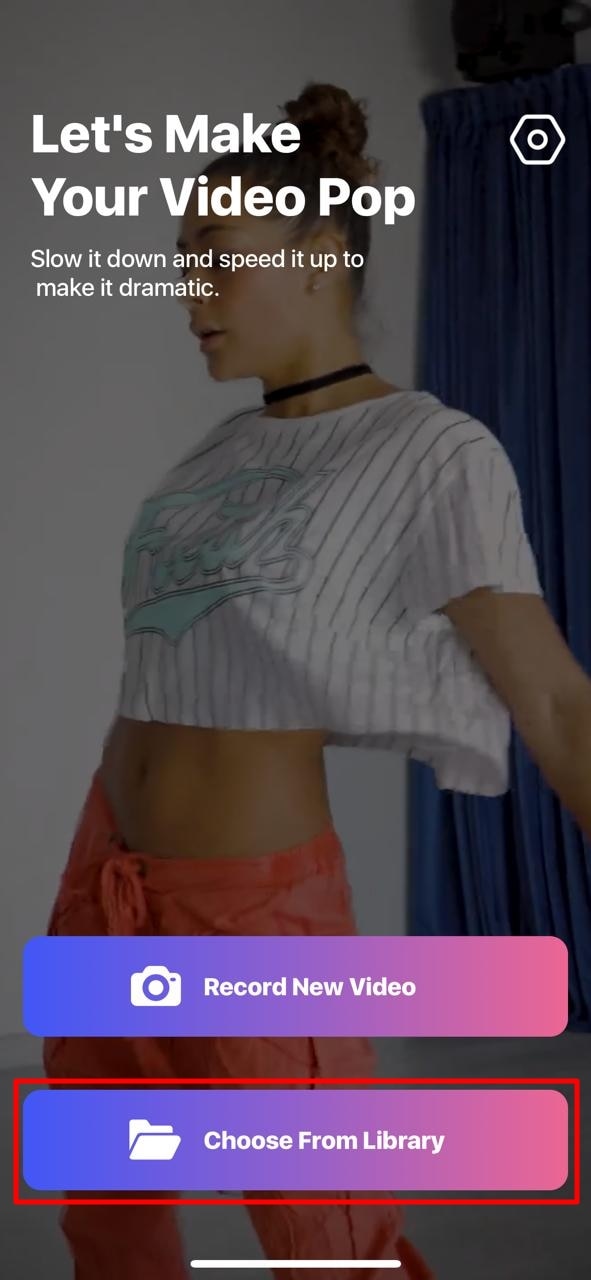
Step 1: After launching this application, click the “Choose From Library” option. Then, select a clip from your device’s gallery.
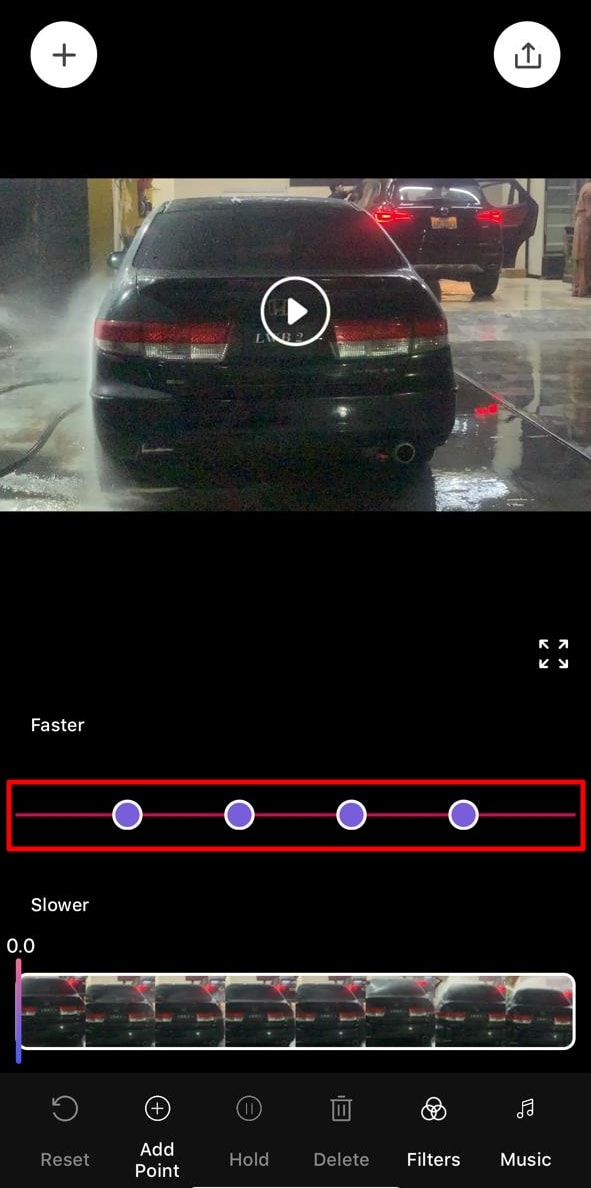
Step 2: Once the video is compressed, you’ll be taken to the speed change screen. From there, you can alter the speed of different clip sections. Move the slider of the relevant section upward to increase the speed.
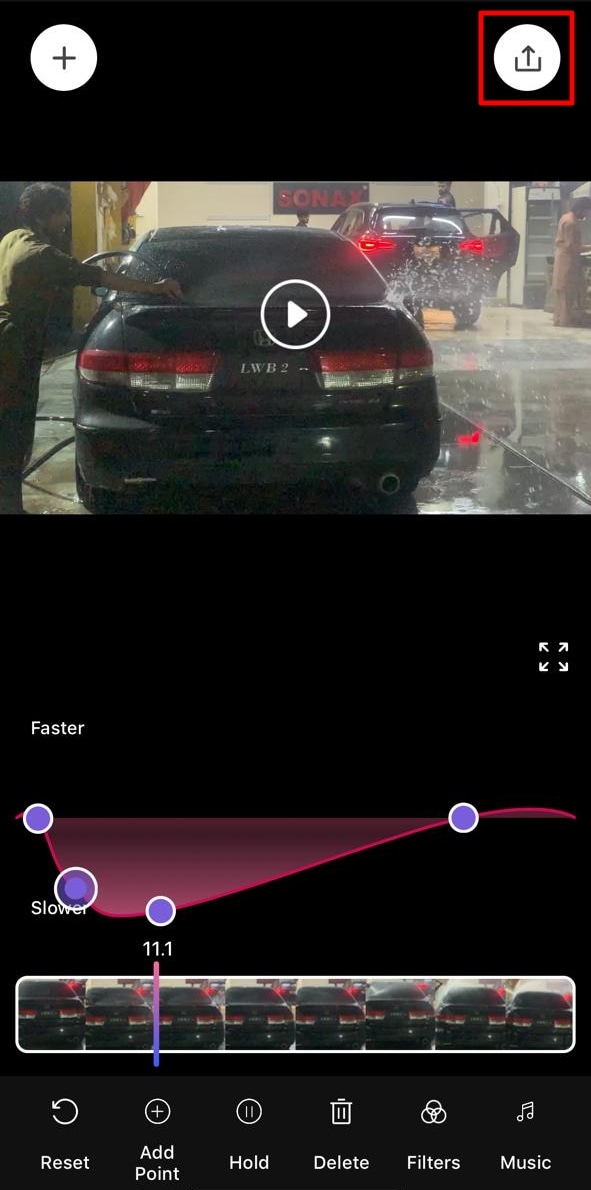
Step 3: Once you have altered the speed, navigate towards the top right corner and click the “Export” icon.
Part 3: Desktop Solution: Remedy for Those Who Want to Speed Up Video on Their Computer
If you have gone through the above applications, you know the fast-motion effect. Do you want to know how to make a video fast motion on an iPhone using a computer? Wondershare Filmora is the best alternative to the above applications for creating this effect. The software is compatible with all the macOS and iOS devices and allows seamless editing.
With this editor, you get multiple options to create a fast-motion video. In this article, we will use the Uniform Speed feature. The operating process is very accessible and designed to assist both professionals and beginners. You can also apply the AI Frame Interpolation option to apply “Frame Bending.”
Free Download For Win 7 or later(64-bit)
Free Download For macOS 10.14 or later
Step-by-Step Guide to Speed Up Video with Filmora
After reading the article till now, you have gained knowledge of Filmora’s speeding options. How to make fast motion video on iPhone now seems like an easy option. Even though the process is easy, we want you to stay ahead. Hence, here is a step-by-step procedure for creating fast motion in Filmora:
Step 1Create a New Project and Import Media
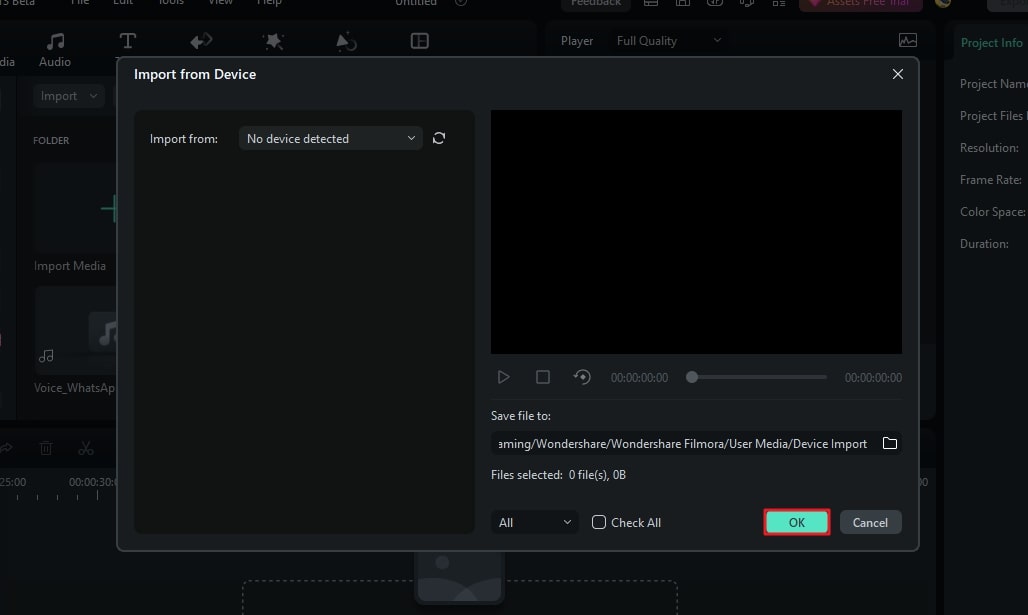
First, connect your iOS device to your Wondershare Filmora device. After that, launch Filmora to access the main menu. From there, click on the “New Project” tab fashioned in the center. Expand the “Import” option in the Project Media section and select the suitable option. In this case, choose the “Import from Phone or Camera” option.
Step 2Access the Uniform Speed Section
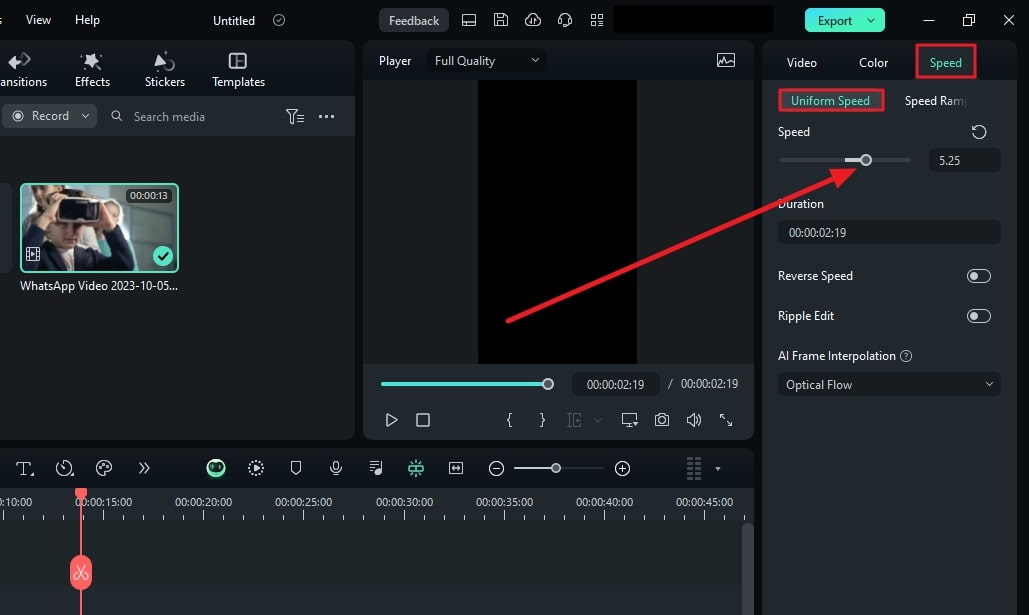
After bringing the imported media to the timeline, select it to access the settings panel. Select the “Speed > Uniform Speed” tab from the appeared panel. Then, drag the Speed slider on the right side to increase speed. Afterward, click the “Play” button on the preview screen to see the results.
Step 3Apply Frame Bending and Export
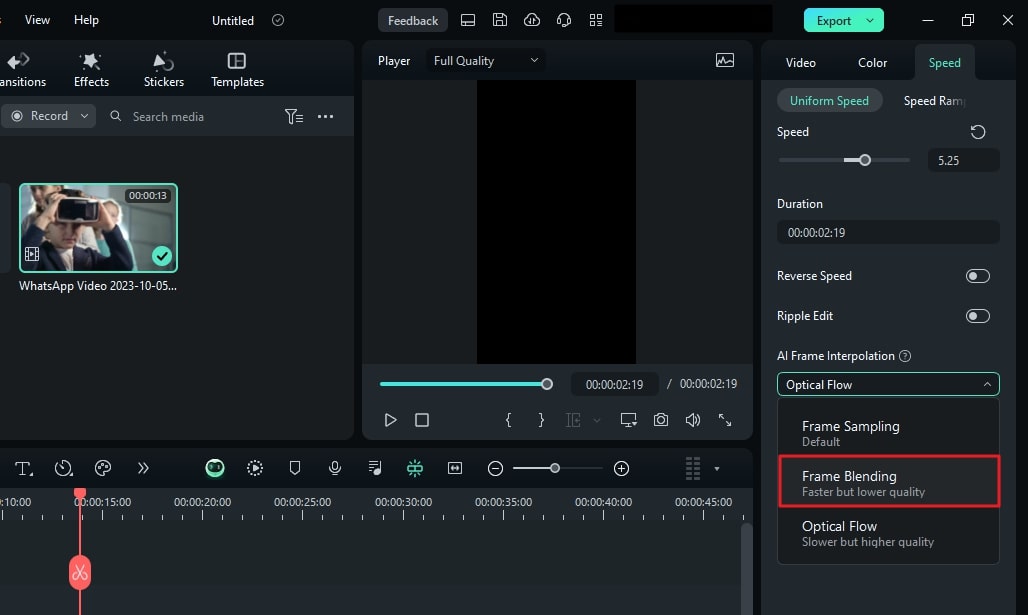
This part is optional, but if you find an irregularity or roughness to the video, apply this. Go to the “AI Frame Interpolation” section at the bottom and expand the options. From the dropdown menu, select the “Frame Bending” option and do the rendering from the timeline. After everything is set, select the “Export” button at the top right corner.
Trending Video Editing Features of Wondershare Filmora
Filmora is a versatile tool that is not confined to speed manipulation or fast motion only. This editor offers audio, text, AI editing options, and video. Here are some prominent key features of Wondershare Filmora to help you in editing:
1. Speed Ramping
The other option for speed modification mentioned previously is speed ramping. This option comes with 6 editable speed change presets for automated editing. However, you can also employ the custom preset to create your own way. Moreover, it allows the audio pitch option to enable automated maintenance of audio.
2. AI Smart Cutout
There is more than one way of removing and replacing a background in Filmora. Smart Cutout offers an AI-integrated masking option to cut out the selected parts. You can also set preferences for Edge Thickness or Edge Feather for accuracy. Afterward, you can introduce three background options: color, grid, or more.
3. AI Text-to-Video
Bring your imagination to visuals with this amazing generative AI video creator. It creates videos from text and covers the voice and graphical elements. Users can customize the AI voice and ratio before generating a video. The prompt section offers up to 1000 characters for adding a script or giving directions.
4. AI Smart Masking
Are there any effects or filters you want to introduce to only a specific part of the video? Use Filmora’s AI mask for automated masking of an object or background. The mask brush selects the relevant area on its own. Besides AI masks, there is a manual masking option or mask shapes to apply. You can also customize the Brush size according to the video.
Conclusion
The article highlighted the importance of increasing video speed in many industries. In addition, we discussed some tools that make fast motion with ease. We also provided step-by-step guides on how to make fast motion video on iPhone. Wondershare Filmora stands amongst all those applications to create fast motion. We recommend this software due to its multiple functionalities and detailed editing abilities.
Make A Slow Motion Video Make A Slow Motion Video More Features

Part 1: What are the Different Use Cases of Fast-Motion Videos?
The fast motion effect covers multiple creative ways of speed increase that you can incorporate. All these ways apply to different genres of videos. This section diverts your focus on different use cases of fast-motion videos. Here is how to make video fast motion on iPhone for different purposes:
1. Construction and Development Videos
Fast-motion videos help in video creation where development is happening. Such videos show the before and after results of an area, location, or building. The construction or manufacturing process is shown in fast motion in engineering videos. It also helps in showing the transformation of a non-populated or undeveloped city.
2. Nature Photography or Documentaries
Natural phenomenon like the blooming of a flower usually occurs at a slower rate. Capturing them takes a long time, but the audience may not like such a long duration. Hence, editors can increase the speed of such videos to speed up the phenomenon. In addition, if you watch wildlife or nature documentaries, they also use this effect.
3. Aesthetic Expression
Fast-paced videos bring a sense of creativity to your videos as they are an artistic expression of time. To indicate the passing of time in movies or to show a scene at a railway station or airport. It also indicates that the filmmakers and editors have put in an effort.
Part 2: Different Tools to Help You Make Fast Motion Video on iPhone
Fast-motion tools are important in video editing since they offer a chance at creativity. They have a wide range of applications in the filmmaking and media industry. Do you know how to make a video fast-motion iPhone using a third-party application? If not, here is a detailed guide on some of them:
1. iMovie
If you are looking for an accessible application with an easy-to-use interface, this is for you. The process of speed manipulation consists of a slider for control. After editing, you can integrate multiple soundtracks from 130 pre-assembled tracks. The application is compatible with iPhone X and newer versions.
Steps to Create a Fast Motion Video Using iMovie
Do you want to learn how to make fast-motion videos on your iPhone with this application? Given Below is your perfect guide to crafting a fast-paced video:
Step 1: After downloading the application on your iPhone, access it and “Start New Project.” Then, select a video from your media library to edit.

Step 2: After importing the video, click the “Pen” icon to access editing options. Then, click the “Edit Clip” option to do so.

Step 3: Move to the bottom of the screen and slide the given option to access “Speed.” Click it and drag the speed slider towards the right side to increase the speed of the video.

Step 4: Hit the “Play” button to see the speed of the video and re-adjust if required. Go to the top right corner of the screen, locate the “Export” icon, and click it.

2. Video Speed Changer – Editor
Want to learn how to make video fast motion on iPhone without additional technicalities? This application ensures a comprehensive narrative just for speed change. Users can formulate 3 fast motion effects with it at specific frames. For pre-recorded or new videos, it offers Time Wrap, Time Lapse, and Hyper-lapse. The application has been found to support iOS 12.3 and later versions.
Steps to Create a Fast Motion Video Using Video Speed Changer
Multiple applications provide similar services, but none can compare to its UI. Here is how to make a video fast motion iPhone using this
Step 1: Access this application from the App Store and launch it after installation. Click on the “Select Video” button and import a clip.

Step 2: Once you have selected a video, it will take you straight to the speed change option. Change the position of the given slider. Finally, preview the video and click the “Save Video” button to save it on your device.

3. Slow Motion Video FX Edit
Although the name indicates otherwise, this video editor is capable of high-speed change. It comes with an intuitive user interface and is easy for anyone to employ. In addition to speed alteration, you can insert 40 different filters into your video. You can also commence its freeze frame action to add an extra layer of creativity. The tool is compatible with iOS 13.0 and higher versions.
Steps to Create Fast Motion Using Slow Motion Video FX
This is another editor to gain insights on how to make fast-motion videos on an iPhone. We have given the verified step-by-step guide to using this app:
Step 1: After launching this application, click the “Choose From Library” option. Then, select a clip from your device’s gallery.

Step 2: Once the video is compressed, you’ll be taken to the speed change screen. From there, you can alter the speed of different clip sections. Move the slider of the relevant section upward to increase the speed.

Step 3: Once you have altered the speed, navigate towards the top right corner and click the “Export” icon.

Part 3: Desktop Solution: Remedy for Those Who Want to Speed Up Video on Their Computer
If you have gone through the above applications, you know the fast-motion effect. Do you want to know how to make a video fast motion on an iPhone using a computer? Wondershare Filmora is the best alternative to the above applications for creating this effect. The software is compatible with all the macOS and iOS devices and allows seamless editing.
With this editor, you get multiple options to create a fast-motion video. In this article, we will use the Uniform Speed feature. The operating process is very accessible and designed to assist both professionals and beginners. You can also apply the AI Frame Interpolation option to apply “Frame Bending.”
Free Download For Win 7 or later(64-bit)
Free Download For macOS 10.14 or later
Step-by-Step Guide to Speed Up Video with Filmora
After reading the article till now, you have gained knowledge of Filmora’s speeding options. How to make fast motion video on iPhone now seems like an easy option. Even though the process is easy, we want you to stay ahead. Hence, here is a step-by-step procedure for creating fast motion in Filmora:
Step 1Create a New Project and Import Media
First, connect your iOS device to your Wondershare Filmora device. After that, launch Filmora to access the main menu. From there, click on the “New Project” tab fashioned in the center. Expand the “Import” option in the Project Media section and select the suitable option. In this case, choose the “Import from Phone or Camera” option.

Step 2Access the Uniform Speed Section
After bringing the imported media to the timeline, select it to access the settings panel. Select the “Speed > Uniform Speed” tab from the appeared panel. Then, drag the Speed slider on the right side to increase speed. Afterward, click the “Play” button on the preview screen to see the results.

Step 3Apply Frame Bending and Export
This part is optional, but if you find an irregularity or roughness to the video, apply this. Go to the “AI Frame Interpolation” section at the bottom and expand the options. From the dropdown menu, select the “Frame Bending” option and do the rendering from the timeline. After everything is set, select the “Export” button at the top right corner.

Trending Video Editing Features of Wondershare Filmora
Filmora is a versatile tool that is not confined to speed manipulation or fast motion only. This editor offers audio, text, AI editing options, and video. Here are some prominent key features of Wondershare Filmora to help you in editing:
1. Speed Ramping
The other option for speed modification mentioned previously is speed ramping. This option comes with 6 editable speed change presets for automated editing. However, you can also employ the custom preset to create your own way. Moreover, it allows the audio pitch option to enable automated maintenance of audio.
2. AI Smart Cutout
There is more than one way of removing and replacing a background in Filmora. Smart Cutout offers an AI-integrated masking option to cut out the selected parts. You can also set preferences for Edge Thickness or Edge Feather for accuracy. Afterward, you can introduce three background options: color, grid, or more.
3. AI Text-to-Video
Bring your imagination to visuals with this amazing generative AI video creator. It creates videos from text and covers the voice and graphical elements. Users can customize the AI voice and ratio before generating a video. The prompt section offers up to 1000 characters for adding a script or giving directions.
4. AI Smart Masking
Are there any effects or filters you want to introduce to only a specific part of the video? Use Filmora’s AI mask for automated masking of an object or background. The mask brush selects the relevant area on its own. Besides AI masks, there is a manual masking option or mask shapes to apply. You can also customize the Brush size according to the video.
Conclusion
The article highlighted the importance of increasing video speed in many industries. In addition, we discussed some tools that make fast motion with ease. We also provided step-by-step guides on how to make fast motion video on iPhone. Wondershare Filmora stands amongst all those applications to create fast motion. We recommend this software due to its multiple functionalities and detailed editing abilities.
Best Ways to Merge FLV Files [Windows, Mac,Android, iPhone & Online]
It’s typical to download numerous small FLV files of a popular movie from YouTube or other video-sharing sites instead of the entire movie. Let me tell you here that an FLV (Flash Video) is a container format used to transmit video or audio over the internet. At this point, you may want to combine multiple FLV files into one. Combining multiple FLV files to create a masterpiece, like a trailer, is of course a terrific idea. Well, to combine these FLV files, you need a professional FLV merger as your assistant.
So, let me help you here. Filmora Video Editor may be the best FLV combiner for Windows and Mac available nowadays. This clever tool is ideal for users seeking professional editing functions like video merging. The software is available for download on Windows and Mac systems and allows for the lossless merging of FLV, MP4, MOV, WebM, and many more file formats. It makes it a lot easier for you to merge or combine FLV files into a large video collection without compromising on video quality even if you lack technical expertise. And, you can use it to watch a movie or your favorite content without any annoying interruptions.
Now, I’ll show you how to quickly and effortlessly merge your favorite video clips into a new video collection.
For Win 7 or later (64-bit)
For macOS 10.14 or later
A Step-by-Step Guide to Merge FLV files on Windows/Mac using Wondershare Filmora
Step 1: Launch Wondershare Filmora and load FLV files…
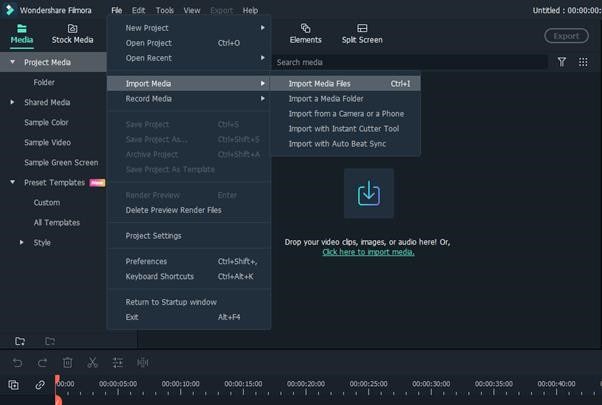
When you run this FLV joiner, simply click “Import” to load all of the local FLV files that you want to merge to the User’s album of this FLV video merger. You can also just drag and drop the target files from your PC into the album.
Step 2: Merge FLV files into one…
At the bottom of this FLV file merger, there lies a Timeline. Drag FLV files from the album to the Timeline and use the slider bar to help you arrange all FLV files in the Timeline without overlapping them. That’s very important as if you put one video to another, the original video will get split. Also, make sure that all FLV files are placed in the sequence in which they are to be played. If not, you can rearrange any video clip with a simple drag-and-drop.

Step 3: Choose the target format as FLV…
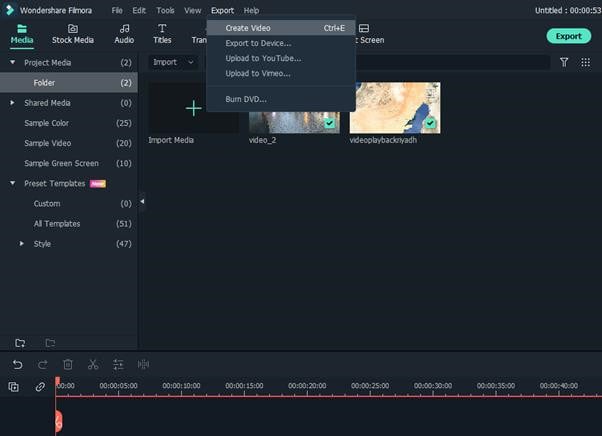
When you are sure that all FLV files are in the correct required order on the Timeline, you can view the effect in real-time in the preview pane. If everything is fine, you are now ready to export this new FLV file. All you have to do is just press the “Create”
button, then go to the “Format” tab > “FLV” output format in the output window.
Step 4: Export a new FLV file…
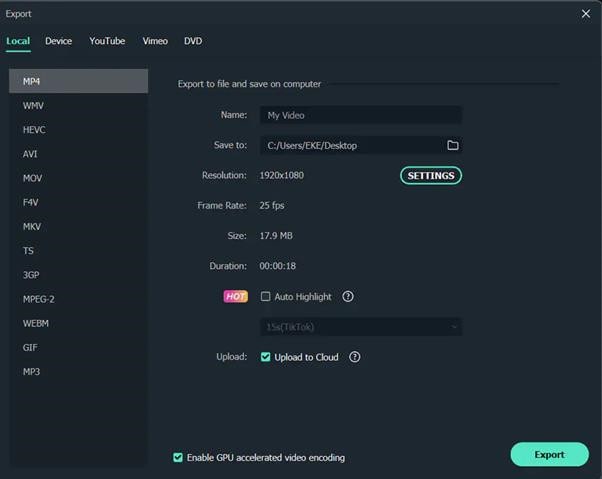
Finally, click the “Create” button to save the settings and export the new FLV file simultaneously. When it’s done, simply navigate to the whole FLV video using the output file path.
Alternative Way to Merge/Combine FLV Files on Windows
Joyoshare Media Cutter (Paid tool to merge FLV Files)
Joyoshare Video Joiner for Windows is a comprehensive and user-friendly audio and video merging software that supports a wide range of file formats such as FLV, F4V, HD,4K, MP4, M4V, M4A, DV, MPEG, FLAV, WMA, and others. It is not only a superb video joiner for joining FLV files in batches without re-encoding, but it is also a video editor thanks to the built-in advanced editing tool. That means you can customize and enhance your FLV files as required before integrating them. The two combing modes (high-speed mode and encoding mode) it employs are also noteworthy. With high-speed mode, you can join an unlimited number of FLV files losslessly and swiftly. You can merge files in different formats without gaps and customize the codec, resolution, bit rate, frame rate, and other parameters of your FLV files while in encoding mode.
A Step-by-Step Guide
Step 1: Add FLV files…
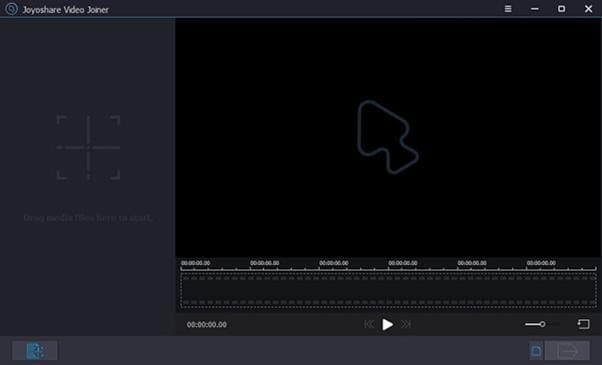
First, go to the Joyoshare website and download the Joyoshare Video Joiner installation package. Install and configure it on your computer. Then, import FLV files into the video joiner. There are two options: click “Open File” to choose them or drag them directly into the software.
Step 2: Choose a merging mode and export format…
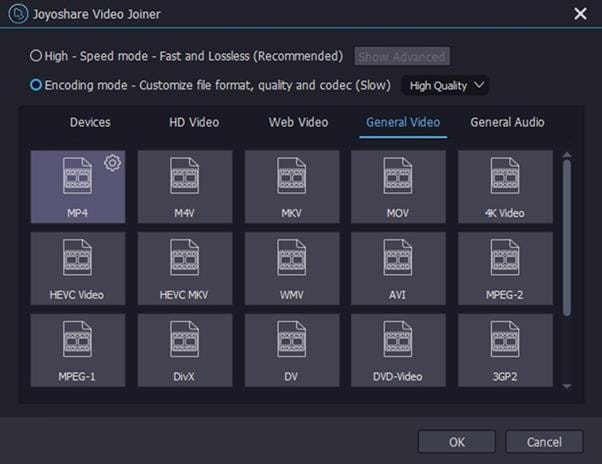
You must pick a format from high-speed mode and encoding mode based on your requirements by using the “Format” button. The former is only for combining files of the same format losslessly at 60 X speed. The other is for users who want to modify files while joining files in different formats. With the use of a gear icon beside the selected output format, users can change video settings such as resolution, bit rate, codes, and so on while in encoding mode.
Step 3: Remove undesirable parts…
Once finished choosing mode and format, simply press “OK” to go back to the main screen. Then double-click these FLV files one by one to preview them. You can change the timeline to remove unnecessary sections from your FLV videos. Moreover, renaming and rearranging these video files can also be realized in this step.

Step 4: Edit FLV files (optional)…
The software has an editor that allows you to easily and flexibly enhance your FLV video files by clicking “Edit” next to each file before joining.
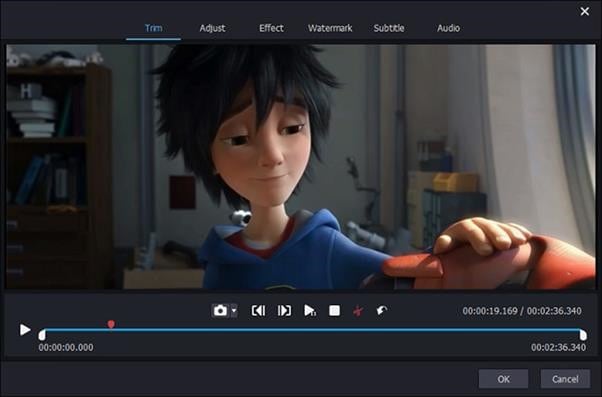
Step 5: Merge FLV files and save…
Finally, all you have to do is press the “Convert” button to enable Joyoshare Video Joiner to begin combining these FLV files. The merged FLV file will be saved as a converted file on your computer.
Format Factory (Free tool to merge FLV Files)
Format Factory is a free Windows video joiner, recorder, converter, downloader, and editor. It supports a wide range of file types, including FLV, MKV, MP4, 3GP, WMV, SWF, AVI, MPG, VOB, WebM, and others. It is not difficult to use it to combine FLV files.
A Step-by-Step Guide
Step 1: Run Format Factory…
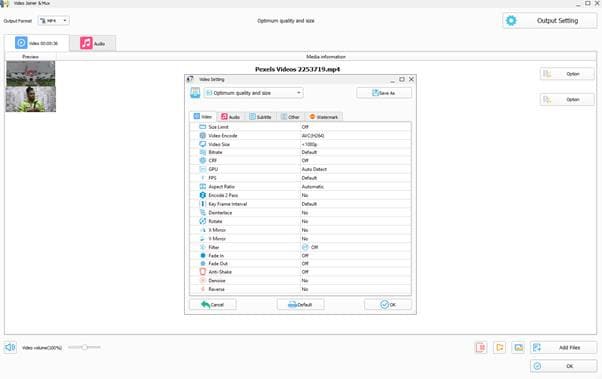
After installing Format Factory, go to “Video Joiner & Mux” to proceed.
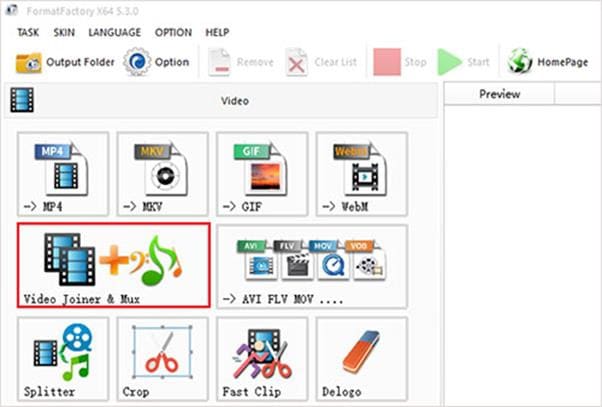
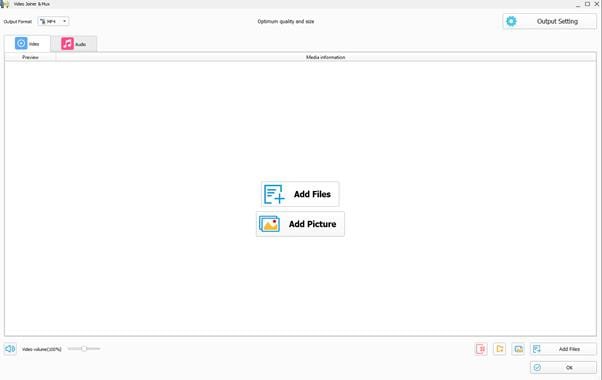
Step 2: Add FLV files…
“Add Files” allows you to import FLV files in batches. When all FLV files have been loaded, click “Clip” to clip and crop FLV files as needed. Then, under “Output Settings,” choose an output format and further customize the output quality.
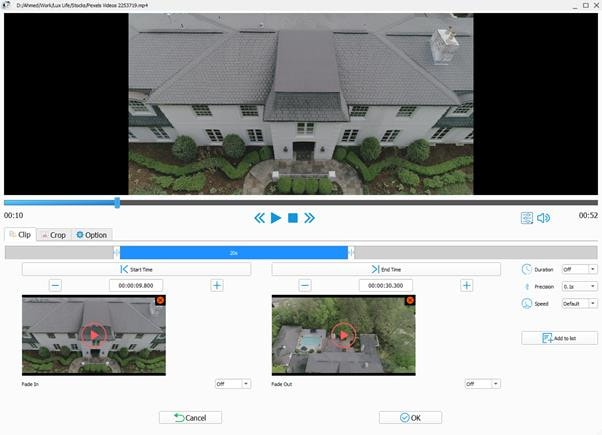
Step 3: Merge files…
Once done, click “OK” to get back to the first window and press “Start” to begin the merging
process.

Alternative Way to Merge/Combine FLV Files on Mac
iDealshare VideoGo (Paid tool to merge FLV Files)
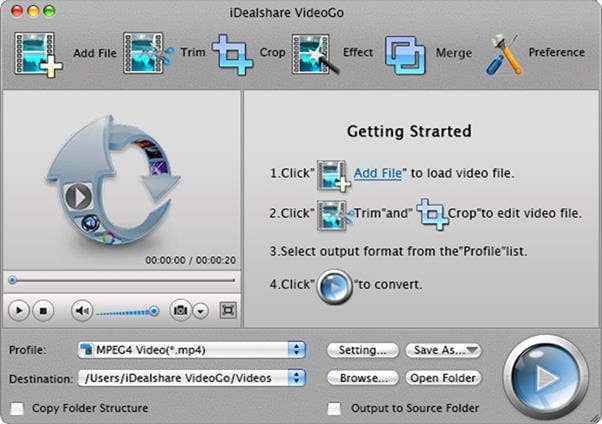
You can use iDealshare VideoGo to convert media files for playback anywhere. It supports a wide range of video formats, both SD and HD. The application also features its own editor, which includes a wide range of activities. It allows you to trim the selected video, crop it, modify the brightness, contrast, and saturation, add text and image watermarks, and manage or add your own subtitles.
A Step-by-Step Guide
Step 1: Import FLV files…
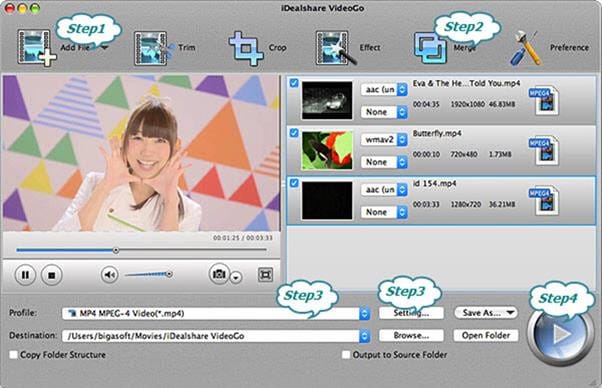
To import the FLV video files that you want to merge, click the “Add File” button or just drag & drop the files.
Step 2: Choose output format…
Choose FLV as the output video format. Select FLV from the “General Video” category from the “Profile” pop-up menu.
Step 3: Merge FLV files…
Select the FLV video files that you wish to merge into one in the main window list, and then choose the “Merge Selected into One” option from the context menu. Click the “Convert” button to start combining the videos.
Faasoft FLV Joiner/Merger (Free tool to merge FLV Files)
Faasoft FLV Joiner/Merger is used to combine FLV files without any re-encoding as well as retain the output quality. Merges FLV files and converts them to more popular formats as well like; MP4, AVI, MOV, WMV, MKV, ASF, ProRes, MXF, OGV, 3GP, etc. to get played on multiple mediums. Apart from FLV files, Faasoft FLV Joiner allows you to merge various kinds of video and audio clips. In addition, this powerful tool works more than just an FLV Merger, i.e.; It is, even more, an in-built video and audio editor, with which, you can optimize any files as per requirement.
A Step-by-Step Guide
Step 1: Load FLV files…
To add FLV files to this Joiner, run FLV Merger and drag and drop the folder containing FLV files to the program’s main screen. If the FLV files you wish to merge are not in the same folder, you can drag them one by one to the software. You should put them together first to save time.
Step 2: List to merge…
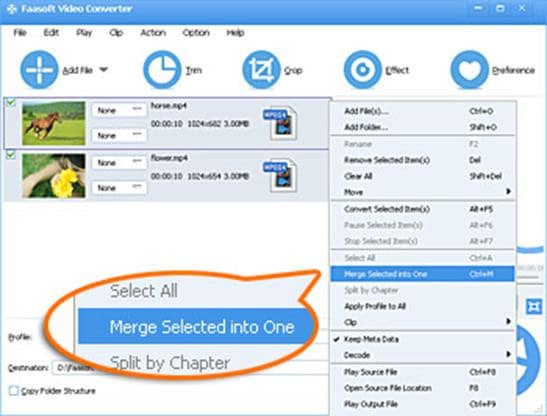
Once all FLV files have loaded, pick them all and choose “Merge Selected into One” from the context menu. In the task list, the combined FLV file will have an extension name similar to “Merge 1.”
Step 3: Convert FLV clips…
Click the “Profile” drop-down button to select “FLV Flash Video Format (*.flv)” from the “Picture & Animation” category as the output format. If you want to re-encode the merged FLV file to another video format, select another output format from the list above.
Step 4: Start joining…
Simply click the round “Convert” button in the bottom right corner and let this fantastic tool do the rest.
2 Ways to Merge/Combine FLV Files on Android
Video Merger by Alyaanah (Paid tool to merge FLV Files)
Video Merger can merge any number of videos together in one video. It also accepts almost any format of videos as input. Some of the input formats for merging that are supported are mp4, mkv, 3gp, 3gpp, mov, flv, avi, mpg, mpeg, m4v, vob, wmv, webm, mts, ts, m2ts, and so on. It can also convert the combined video to a variety of formats. Merged output formats supported include mp4, mkv, mov, avi, 3gp, and others. This application allows you to combine videos with different formats, bitrates, and frame rates into a single video. It also scales multiple videos into a single scale and merges them together. It can also merge videos with different resolutions into one video. The merged videos can also be compressed together maintaining original quality to a smaller sized video than all the original video sizes combined.
Video merger allows you to merge in three different ways as follows;
Side by side:
Choose two files, and they will be merged in a side-by-side format (Horizontal stack).
Top-Bottom:
Choose two files, and they will be merged top to bottom (Vertical stack).
Sequential:
You can select unlimited files and they will be merged one after the other in a sequential format.
VideoChain by Arypex Initiative (Free tool to merge FLV Files)
Now you can combine video files from your Android device camera as well and for free. VideoChain is an easy to learn and use app (with in-built instructions) that allows you to easily combine video clips to create one video using the most advanced encoding techniques. It is an excellent tool for merging video clips from your front and rear cameras, as well as portrait and landscape video files, into a single file. It can combine MP4, MPEG, MKV, FLV, and other video clips with four different quality/compression settings available.
2 Ways to Merge/Combine FLV Files on iPhone
Magisto Video Editor (Paid tool to merge FLV Files)
It is a wonderful app to put FLV clips together on an iPhone. Using this versatile video editing app, you can merge multiple videos and create eye-catching files of up to 5 minutes. You can add text, colors, and even text slides between video frames to the video. The app’s filters can be used to further enhance the files. The app also supports a large library of audio files, which you can use to add music to your video files. And, to use all of the app’s features, you must have a paid subscription.


iMovie (Free tool to merge FLV Files)
iMovie is one of the most popular video editing apps for iOS users. You can edit and merge videos on iMovie with ease. The app is free and secure. If you are looking for a professional way to put two videos together on your iPhone, iMovie can be a good choice. FLV videos can be converted to WMV, M4V, and other popular video formats after merging. You can also modify the video output settings and delete the selected video segments as well.
A Step-by-Step Guide
Step 1: Launch the iMovie app on your iPhone. In the Projects window, press the + button.
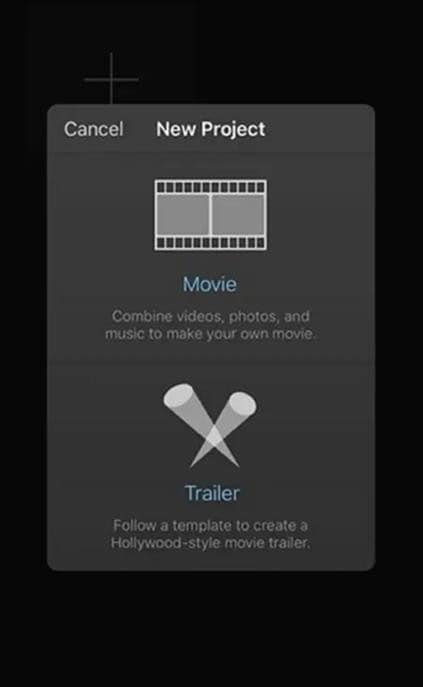
Step 2: In the New Project window, select Movie. Browse through your video clips in the gallery and import them.
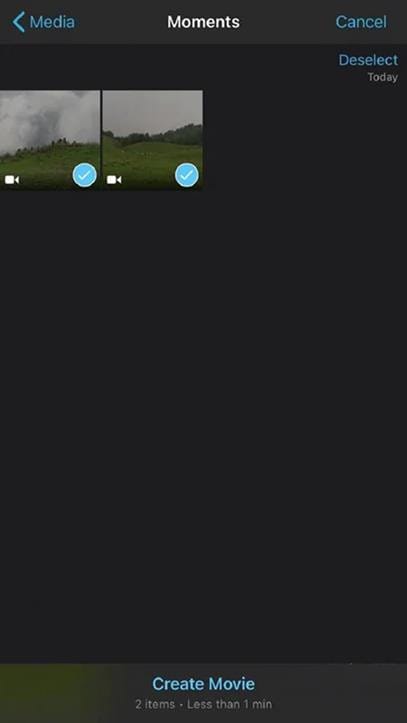
Step 3: Tap Create Movie at the iPhone screen’s bottom. The videos will automatically get merged in the iMovie timeline.
Step 4: Select the desired video file. You can include transition effects, background music, and other profiles.
Step 5: Tap Done to combine two videos into one on the iPhone using iMovie.
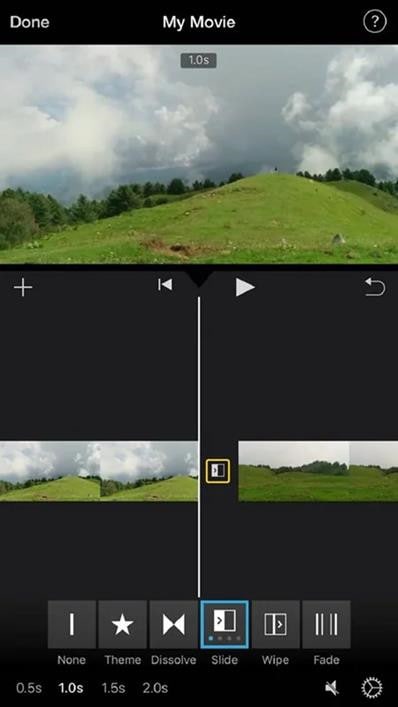
Step 6: To export your merged video file, tap the Share icon to save the video.
2 Ways to Merge/Combine FLV Files Online
Clideo (Paid online tool to merge FLV Files)
Now you can combine your FLV files online using Clideo’s FLV Merger. It allows you to combine several videos, images, and audio files. You will also be able to download the finished product in any format you want. And, as the tool operates online, it will not consume any of your device’s memory. Each file you add in the free edition can be up to 500 MB in size; if this is insufficient for you, you can always subscribe to Clideo Pro.
A Step-by-Step Guide
Step 1: Upload the FLV files…
Click on the “Choose files” button and select the necessary videos from your device. To add a video from Google Drive or Dropbox, use the little arrow to call a drop-down menu.
Step 2: Merge FLV and other files
To add more content, use the menu with all of the options from the previous stage. Rearrange them as you see fit. Crop the frame using one of the available aspect ratios. Upload a soundtrack, then cut it with the scissors icon and adjust the volume. When you’re done, choose a format and click “Merge.”
Step 3: Save joined FLV
Take a peek at the outcome. If you like it, save it to your device or cloud storage. Otherwise, you can return to editing without having to start over.
Veed’s Video Editor (Free online tool to merge FLV Files)
Now there’s no need to pay for expensive apps like Filmora or Wondershare Uniconvertor. You can merge your FLV files using Veed’s Video Editor. It lets you combine multiple flash videos together and export them as a single video file. You can simply do it all straight from your browser and from any device. Veed’s Video Editor is compatible with Windows XP, Windows 10, Mac, Linux, and all mobile devices. And, it is absolutely free. There’s no need for an account or to download anything.
A Step-by-Step Guide
Step 1: Upload the FLV files…
Select multiple FLV videos after clicking on ‘Choose FLV Files’. You can also drag and drop your videos into the box. They’ll be added to the editor.
Step 2: Start editing or add more videos…
You’ll be directed to the video editor, where you can split, combine, and rearrange your video clips. This is a purely optional step. More videos can be added by clicking the plus (+) sign in the editing window or by selecting “Upload” from the left menu.
Step 3: Export your new video…
You can now save your merged videos as a single MP4 file. Simply select ‘Export,’ and your download will initiate.
FAQs about Merging FLV Files
Question 1: How to combine FLV files?
Answer: To combine FLV files, hold down the Ctrl or Shift key while selecting multiple FLV files in the User’s Album, and then drag and drop to the video track on the Timeline. All FLV files will automatically merge one after the other in order.
Question 2: What browser should be used to Merge FLV?
Answer: You can use any modern browser to Merge FLV, such as Google Chrome, Firefox, Opera, or Safari.
Question 3: How long does it take to Merge FLV files?
Answer: The FLV file merger is quite quick and takes only a few seconds.
So, if you have been looking for the best options on how to merge FLV files on different mediums, the above-listed apps will serve your purpose. Now, check out the supported features, formats, and other merging functions of all the apps and choose the one that best meets your needs.
For macOS 10.14 or later
A Step-by-Step Guide to Merge FLV files on Windows/Mac using Wondershare Filmora
Step 1: Launch Wondershare Filmora and load FLV files…
When you run this FLV joiner, simply click “Import” to load all of the local FLV files that you want to merge to the User’s album of this FLV video merger. You can also just drag and drop the target files from your PC into the album.

Step 2: Merge FLV files into one…
At the bottom of this FLV file merger, there lies a Timeline. Drag FLV files from the album to the Timeline and use the slider bar to help you arrange all FLV files in the Timeline without overlapping them. That’s very important as if you put one video to another, the original video will get split. Also, make sure that all FLV files are placed in the sequence in which they are to be played. If not, you can rearrange any video clip with a simple drag-and-drop.

Step 3: Choose the target format as FLV…
When you are sure that all FLV files are in the correct required order on the Timeline, you can view the effect in real-time in the preview pane. If everything is fine, you are now ready to export this new FLV file. All you have to do is just press the “Create”
button, then go to the “Format” tab > “FLV” output format in the output window.

Step 4: Export a new FLV file…
Finally, click the “Create” button to save the settings and export the new FLV file simultaneously. When it’s done, simply navigate to the whole FLV video using the output file path.

Alternative Way to Merge/Combine FLV Files on Windows
Joyoshare Media Cutter (Paid tool to merge FLV Files)
Joyoshare Video Joiner for Windows is a comprehensive and user-friendly audio and video merging software that supports a wide range of file formats such as FLV, F4V, HD,4K, MP4, M4V, M4A, DV, MPEG, FLAV, WMA, and others. It is not only a superb video joiner for joining FLV files in batches without re-encoding, but it is also a video editor thanks to the built-in advanced editing tool. That means you can customize and enhance your FLV files as required before integrating them. The two combing modes (high-speed mode and encoding mode) it employs are also noteworthy. With high-speed mode, you can join an unlimited number of FLV files losslessly and swiftly. You can merge files in different formats without gaps and customize the codec, resolution, bit rate, frame rate, and other parameters of your FLV files while in encoding mode.
A Step-by-Step Guide
Step 1: Add FLV files…
First, go to the Joyoshare website and download the Joyoshare Video Joiner installation package. Install and configure it on your computer. Then, import FLV files into the video joiner. There are two options: click “Open File” to choose them or drag them directly into the software.

Step 2: Choose a merging mode and export format…
You must pick a format from high-speed mode and encoding mode based on your requirements by using the “Format” button. The former is only for combining files of the same format losslessly at 60 X speed. The other is for users who want to modify files while joining files in different formats. With the use of a gear icon beside the selected output format, users can change video settings such as resolution, bit rate, codes, and so on while in encoding mode.

Step 3: Remove undesirable parts…
Once finished choosing mode and format, simply press “OK” to go back to the main screen. Then double-click these FLV files one by one to preview them. You can change the timeline to remove unnecessary sections from your FLV videos. Moreover, renaming and rearranging these video files can also be realized in this step.

Step 4: Edit FLV files (optional)…
The software has an editor that allows you to easily and flexibly enhance your FLV video files by clicking “Edit” next to each file before joining.

Step 5: Merge FLV files and save…
Finally, all you have to do is press the “Convert” button to enable Joyoshare Video Joiner to begin combining these FLV files. The merged FLV file will be saved as a converted file on your computer.
Format Factory (Free tool to merge FLV Files)
Format Factory is a free Windows video joiner, recorder, converter, downloader, and editor. It supports a wide range of file types, including FLV, MKV, MP4, 3GP, WMV, SWF, AVI, MPG, VOB, WebM, and others. It is not difficult to use it to combine FLV files.
A Step-by-Step Guide
Step 1: Run Format Factory…
After installing Format Factory, go to “Video Joiner & Mux” to proceed.

Step 2: Add FLV files…
“Add Files” allows you to import FLV files in batches. When all FLV files have been loaded, click “Clip” to clip and crop FLV files as needed. Then, under “Output Settings,” choose an output format and further customize the output quality.


Step 3: Merge files…
Once done, click “OK” to get back to the first window and press “Start” to begin the merging
process.

Alternative Way to Merge/Combine FLV Files on Mac
iDealshare VideoGo (Paid tool to merge FLV Files)
You can use iDealshare VideoGo to convert media files for playback anywhere. It supports a wide range of video formats, both SD and HD. The application also features its own editor, which includes a wide range of activities. It allows you to trim the selected video, crop it, modify the brightness, contrast, and saturation, add text and image watermarks, and manage or add your own subtitles.

A Step-by-Step Guide
Step 1: Import FLV files…
To import the FLV video files that you want to merge, click the “Add File” button or just drag & drop the files.
Step 2: Choose output format…
Choose FLV as the output video format. Select FLV from the “General Video” category from the “Profile” pop-up menu.
Step 3: Merge FLV files…
Select the FLV video files that you wish to merge into one in the main window list, and then choose the “Merge Selected into One” option from the context menu. Click the “Convert” button to start combining the videos.

Faasoft FLV Joiner/Merger (Free tool to merge FLV Files)
Faasoft FLV Joiner/Merger is used to combine FLV files without any re-encoding as well as retain the output quality. Merges FLV files and converts them to more popular formats as well like; MP4, AVI, MOV, WMV, MKV, ASF, ProRes, MXF, OGV, 3GP, etc. to get played on multiple mediums. Apart from FLV files, Faasoft FLV Joiner allows you to merge various kinds of video and audio clips. In addition, this powerful tool works more than just an FLV Merger, i.e.; It is, even more, an in-built video and audio editor, with which, you can optimize any files as per requirement.
A Step-by-Step Guide
Step 1: Load FLV files…
To add FLV files to this Joiner, run FLV Merger and drag and drop the folder containing FLV files to the program’s main screen. If the FLV files you wish to merge are not in the same folder, you can drag them one by one to the software. You should put them together first to save time.
Step 2: List to merge…
Once all FLV files have loaded, pick them all and choose “Merge Selected into One” from the context menu. In the task list, the combined FLV file will have an extension name similar to “Merge 1.”

Step 3: Convert FLV clips…
Click the “Profile” drop-down button to select “FLV Flash Video Format (*.flv)” from the “Picture & Animation” category as the output format. If you want to re-encode the merged FLV file to another video format, select another output format from the list above.
Step 4: Start joining…
Simply click the round “Convert” button in the bottom right corner and let this fantastic tool do the rest.
2 Ways to Merge/Combine FLV Files on Android
Video Merger by Alyaanah (Paid tool to merge FLV Files)
Video Merger can merge any number of videos together in one video. It also accepts almost any format of videos as input. Some of the input formats for merging that are supported are mp4, mkv, 3gp, 3gpp, mov, flv, avi, mpg, mpeg, m4v, vob, wmv, webm, mts, ts, m2ts, and so on. It can also convert the combined video to a variety of formats. Merged output formats supported include mp4, mkv, mov, avi, 3gp, and others. This application allows you to combine videos with different formats, bitrates, and frame rates into a single video. It also scales multiple videos into a single scale and merges them together. It can also merge videos with different resolutions into one video. The merged videos can also be compressed together maintaining original quality to a smaller sized video than all the original video sizes combined.
Video merger allows you to merge in three different ways as follows;
Side by side:
Choose two files, and they will be merged in a side-by-side format (Horizontal stack).
Top-Bottom:
Choose two files, and they will be merged top to bottom (Vertical stack).
Sequential:
You can select unlimited files and they will be merged one after the other in a sequential format.
VideoChain by Arypex Initiative (Free tool to merge FLV Files)
Now you can combine video files from your Android device camera as well and for free. VideoChain is an easy to learn and use app (with in-built instructions) that allows you to easily combine video clips to create one video using the most advanced encoding techniques. It is an excellent tool for merging video clips from your front and rear cameras, as well as portrait and landscape video files, into a single file. It can combine MP4, MPEG, MKV, FLV, and other video clips with four different quality/compression settings available.
2 Ways to Merge/Combine FLV Files on iPhone
Magisto Video Editor (Paid tool to merge FLV Files)
It is a wonderful app to put FLV clips together on an iPhone. Using this versatile video editing app, you can merge multiple videos and create eye-catching files of up to 5 minutes. You can add text, colors, and even text slides between video frames to the video. The app’s filters can be used to further enhance the files. The app also supports a large library of audio files, which you can use to add music to your video files. And, to use all of the app’s features, you must have a paid subscription.


iMovie (Free tool to merge FLV Files)
iMovie is one of the most popular video editing apps for iOS users. You can edit and merge videos on iMovie with ease. The app is free and secure. If you are looking for a professional way to put two videos together on your iPhone, iMovie can be a good choice. FLV videos can be converted to WMV, M4V, and other popular video formats after merging. You can also modify the video output settings and delete the selected video segments as well.
A Step-by-Step Guide
Step 1: Launch the iMovie app on your iPhone. In the Projects window, press the + button.

Step 2: In the New Project window, select Movie. Browse through your video clips in the gallery and import them.

Step 3: Tap Create Movie at the iPhone screen’s bottom. The videos will automatically get merged in the iMovie timeline.
Step 4: Select the desired video file. You can include transition effects, background music, and other profiles.
Step 5: Tap Done to combine two videos into one on the iPhone using iMovie.

Step 6: To export your merged video file, tap the Share icon to save the video.
2 Ways to Merge/Combine FLV Files Online
Clideo (Paid online tool to merge FLV Files)
Now you can combine your FLV files online using Clideo’s FLV Merger. It allows you to combine several videos, images, and audio files. You will also be able to download the finished product in any format you want. And, as the tool operates online, it will not consume any of your device’s memory. Each file you add in the free edition can be up to 500 MB in size; if this is insufficient for you, you can always subscribe to Clideo Pro.
A Step-by-Step Guide
Step 1: Upload the FLV files…
Click on the “Choose files” button and select the necessary videos from your device. To add a video from Google Drive or Dropbox, use the little arrow to call a drop-down menu.
Step 2: Merge FLV and other files
To add more content, use the menu with all of the options from the previous stage. Rearrange them as you see fit. Crop the frame using one of the available aspect ratios. Upload a soundtrack, then cut it with the scissors icon and adjust the volume. When you’re done, choose a format and click “Merge.”
Step 3: Save joined FLV
Take a peek at the outcome. If you like it, save it to your device or cloud storage. Otherwise, you can return to editing without having to start over.
Veed’s Video Editor (Free online tool to merge FLV Files)
Now there’s no need to pay for expensive apps like Filmora or Wondershare Uniconvertor. You can merge your FLV files using Veed’s Video Editor. It lets you combine multiple flash videos together and export them as a single video file. You can simply do it all straight from your browser and from any device. Veed’s Video Editor is compatible with Windows XP, Windows 10, Mac, Linux, and all mobile devices. And, it is absolutely free. There’s no need for an account or to download anything.
A Step-by-Step Guide
Step 1: Upload the FLV files…
Select multiple FLV videos after clicking on ‘Choose FLV Files’. You can also drag and drop your videos into the box. They’ll be added to the editor.
Step 2: Start editing or add more videos…
You’ll be directed to the video editor, where you can split, combine, and rearrange your video clips. This is a purely optional step. More videos can be added by clicking the plus (+) sign in the editing window or by selecting “Upload” from the left menu.
Step 3: Export your new video…
You can now save your merged videos as a single MP4 file. Simply select ‘Export,’ and your download will initiate.
FAQs about Merging FLV Files
Question 1: How to combine FLV files?
Answer: To combine FLV files, hold down the Ctrl or Shift key while selecting multiple FLV files in the User’s Album, and then drag and drop to the video track on the Timeline. All FLV files will automatically merge one after the other in order.
Question 2: What browser should be used to Merge FLV?
Answer: You can use any modern browser to Merge FLV, such as Google Chrome, Firefox, Opera, or Safari.
Question 3: How long does it take to Merge FLV files?
Answer: The FLV file merger is quite quick and takes only a few seconds.
So, if you have been looking for the best options on how to merge FLV files on different mediums, the above-listed apps will serve your purpose. Now, check out the supported features, formats, and other merging functions of all the apps and choose the one that best meets your needs.
For macOS 10.14 or later
A Step-by-Step Guide to Merge FLV files on Windows/Mac using Wondershare Filmora
Step 1: Launch Wondershare Filmora and load FLV files…
When you run this FLV joiner, simply click “Import” to load all of the local FLV files that you want to merge to the User’s album of this FLV video merger. You can also just drag and drop the target files from your PC into the album.

Step 2: Merge FLV files into one…
At the bottom of this FLV file merger, there lies a Timeline. Drag FLV files from the album to the Timeline and use the slider bar to help you arrange all FLV files in the Timeline without overlapping them. That’s very important as if you put one video to another, the original video will get split. Also, make sure that all FLV files are placed in the sequence in which they are to be played. If not, you can rearrange any video clip with a simple drag-and-drop.

Step 3: Choose the target format as FLV…
When you are sure that all FLV files are in the correct required order on the Timeline, you can view the effect in real-time in the preview pane. If everything is fine, you are now ready to export this new FLV file. All you have to do is just press the “Create”
button, then go to the “Format” tab > “FLV” output format in the output window.

Step 4: Export a new FLV file…
Finally, click the “Create” button to save the settings and export the new FLV file simultaneously. When it’s done, simply navigate to the whole FLV video using the output file path.

Alternative Way to Merge/Combine FLV Files on Windows
Joyoshare Media Cutter (Paid tool to merge FLV Files)
Joyoshare Video Joiner for Windows is a comprehensive and user-friendly audio and video merging software that supports a wide range of file formats such as FLV, F4V, HD,4K, MP4, M4V, M4A, DV, MPEG, FLAV, WMA, and others. It is not only a superb video joiner for joining FLV files in batches without re-encoding, but it is also a video editor thanks to the built-in advanced editing tool. That means you can customize and enhance your FLV files as required before integrating them. The two combing modes (high-speed mode and encoding mode) it employs are also noteworthy. With high-speed mode, you can join an unlimited number of FLV files losslessly and swiftly. You can merge files in different formats without gaps and customize the codec, resolution, bit rate, frame rate, and other parameters of your FLV files while in encoding mode.
A Step-by-Step Guide
Step 1: Add FLV files…
First, go to the Joyoshare website and download the Joyoshare Video Joiner installation package. Install and configure it on your computer. Then, import FLV files into the video joiner. There are two options: click “Open File” to choose them or drag them directly into the software.

Step 2: Choose a merging mode and export format…
You must pick a format from high-speed mode and encoding mode based on your requirements by using the “Format” button. The former is only for combining files of the same format losslessly at 60 X speed. The other is for users who want to modify files while joining files in different formats. With the use of a gear icon beside the selected output format, users can change video settings such as resolution, bit rate, codes, and so on while in encoding mode.

Step 3: Remove undesirable parts…
Once finished choosing mode and format, simply press “OK” to go back to the main screen. Then double-click these FLV files one by one to preview them. You can change the timeline to remove unnecessary sections from your FLV videos. Moreover, renaming and rearranging these video files can also be realized in this step.

Step 4: Edit FLV files (optional)…
The software has an editor that allows you to easily and flexibly enhance your FLV video files by clicking “Edit” next to each file before joining.

Step 5: Merge FLV files and save…
Finally, all you have to do is press the “Convert” button to enable Joyoshare Video Joiner to begin combining these FLV files. The merged FLV file will be saved as a converted file on your computer.
Format Factory (Free tool to merge FLV Files)
Format Factory is a free Windows video joiner, recorder, converter, downloader, and editor. It supports a wide range of file types, including FLV, MKV, MP4, 3GP, WMV, SWF, AVI, MPG, VOB, WebM, and others. It is not difficult to use it to combine FLV files.
A Step-by-Step Guide
Step 1: Run Format Factory…
After installing Format Factory, go to “Video Joiner & Mux” to proceed.

Step 2: Add FLV files…
“Add Files” allows you to import FLV files in batches. When all FLV files have been loaded, click “Clip” to clip and crop FLV files as needed. Then, under “Output Settings,” choose an output format and further customize the output quality.


Step 3: Merge files…
Once done, click “OK” to get back to the first window and press “Start” to begin the merging
process.

Alternative Way to Merge/Combine FLV Files on Mac
iDealshare VideoGo (Paid tool to merge FLV Files)
You can use iDealshare VideoGo to convert media files for playback anywhere. It supports a wide range of video formats, both SD and HD. The application also features its own editor, which includes a wide range of activities. It allows you to trim the selected video, crop it, modify the brightness, contrast, and saturation, add text and image watermarks, and manage or add your own subtitles.

A Step-by-Step Guide
Step 1: Import FLV files…
To import the FLV video files that you want to merge, click the “Add File” button or just drag & drop the files.
Step 2: Choose output format…
Choose FLV as the output video format. Select FLV from the “General Video” category from the “Profile” pop-up menu.
Step 3: Merge FLV files…
Select the FLV video files that you wish to merge into one in the main window list, and then choose the “Merge Selected into One” option from the context menu. Click the “Convert” button to start combining the videos.

Faasoft FLV Joiner/Merger (Free tool to merge FLV Files)
Faasoft FLV Joiner/Merger is used to combine FLV files without any re-encoding as well as retain the output quality. Merges FLV files and converts them to more popular formats as well like; MP4, AVI, MOV, WMV, MKV, ASF, ProRes, MXF, OGV, 3GP, etc. to get played on multiple mediums. Apart from FLV files, Faasoft FLV Joiner allows you to merge various kinds of video and audio clips. In addition, this powerful tool works more than just an FLV Merger, i.e.; It is, even more, an in-built video and audio editor, with which, you can optimize any files as per requirement.
A Step-by-Step Guide
Step 1: Load FLV files…
To add FLV files to this Joiner, run FLV Merger and drag and drop the folder containing FLV files to the program’s main screen. If the FLV files you wish to merge are not in the same folder, you can drag them one by one to the software. You should put them together first to save time.
Step 2: List to merge…
Once all FLV files have loaded, pick them all and choose “Merge Selected into One” from the context menu. In the task list, the combined FLV file will have an extension name similar to “Merge 1.”

Step 3: Convert FLV clips…
Click the “Profile” drop-down button to select “FLV Flash Video Format (*.flv)” from the “Picture & Animation” category as the output format. If you want to re-encode the merged FLV file to another video format, select another output format from the list above.
Step 4: Start joining…
Simply click the round “Convert” button in the bottom right corner and let this fantastic tool do the rest.
2 Ways to Merge/Combine FLV Files on Android
Video Merger by Alyaanah (Paid tool to merge FLV Files)
Video Merger can merge any number of videos together in one video. It also accepts almost any format of videos as input. Some of the input formats for merging that are supported are mp4, mkv, 3gp, 3gpp, mov, flv, avi, mpg, mpeg, m4v, vob, wmv, webm, mts, ts, m2ts, and so on. It can also convert the combined video to a variety of formats. Merged output formats supported include mp4, mkv, mov, avi, 3gp, and others. This application allows you to combine videos with different formats, bitrates, and frame rates into a single video. It also scales multiple videos into a single scale and merges them together. It can also merge videos with different resolutions into one video. The merged videos can also be compressed together maintaining original quality to a smaller sized video than all the original video sizes combined.
Video merger allows you to merge in three different ways as follows;
Side by side:
Choose two files, and they will be merged in a side-by-side format (Horizontal stack).
Top-Bottom:
Choose two files, and they will be merged top to bottom (Vertical stack).
Sequential:
You can select unlimited files and they will be merged one after the other in a sequential format.
VideoChain by Arypex Initiative (Free tool to merge FLV Files)
Now you can combine video files from your Android device camera as well and for free. VideoChain is an easy to learn and use app (with in-built instructions) that allows you to easily combine video clips to create one video using the most advanced encoding techniques. It is an excellent tool for merging video clips from your front and rear cameras, as well as portrait and landscape video files, into a single file. It can combine MP4, MPEG, MKV, FLV, and other video clips with four different quality/compression settings available.
2 Ways to Merge/Combine FLV Files on iPhone
Magisto Video Editor (Paid tool to merge FLV Files)
It is a wonderful app to put FLV clips together on an iPhone. Using this versatile video editing app, you can merge multiple videos and create eye-catching files of up to 5 minutes. You can add text, colors, and even text slides between video frames to the video. The app’s filters can be used to further enhance the files. The app also supports a large library of audio files, which you can use to add music to your video files. And, to use all of the app’s features, you must have a paid subscription.


iMovie (Free tool to merge FLV Files)
iMovie is one of the most popular video editing apps for iOS users. You can edit and merge videos on iMovie with ease. The app is free and secure. If you are looking for a professional way to put two videos together on your iPhone, iMovie can be a good choice. FLV videos can be converted to WMV, M4V, and other popular video formats after merging. You can also modify the video output settings and delete the selected video segments as well.
A Step-by-Step Guide
Step 1: Launch the iMovie app on your iPhone. In the Projects window, press the + button.

Step 2: In the New Project window, select Movie. Browse through your video clips in the gallery and import them.

Step 3: Tap Create Movie at the iPhone screen’s bottom. The videos will automatically get merged in the iMovie timeline.
Step 4: Select the desired video file. You can include transition effects, background music, and other profiles.
Step 5: Tap Done to combine two videos into one on the iPhone using iMovie.

Step 6: To export your merged video file, tap the Share icon to save the video.
2 Ways to Merge/Combine FLV Files Online
Clideo (Paid online tool to merge FLV Files)
Now you can combine your FLV files online using Clideo’s FLV Merger. It allows you to combine several videos, images, and audio files. You will also be able to download the finished product in any format you want. And, as the tool operates online, it will not consume any of your device’s memory. Each file you add in the free edition can be up to 500 MB in size; if this is insufficient for you, you can always subscribe to Clideo Pro.
A Step-by-Step Guide
Step 1: Upload the FLV files…
Click on the “Choose files” button and select the necessary videos from your device. To add a video from Google Drive or Dropbox, use the little arrow to call a drop-down menu.
Step 2: Merge FLV and other files
To add more content, use the menu with all of the options from the previous stage. Rearrange them as you see fit. Crop the frame using one of the available aspect ratios. Upload a soundtrack, then cut it with the scissors icon and adjust the volume. When you’re done, choose a format and click “Merge.”
Step 3: Save joined FLV
Take a peek at the outcome. If you like it, save it to your device or cloud storage. Otherwise, you can return to editing without having to start over.
Veed’s Video Editor (Free online tool to merge FLV Files)
Now there’s no need to pay for expensive apps like Filmora or Wondershare Uniconvertor. You can merge your FLV files using Veed’s Video Editor. It lets you combine multiple flash videos together and export them as a single video file. You can simply do it all straight from your browser and from any device. Veed’s Video Editor is compatible with Windows XP, Windows 10, Mac, Linux, and all mobile devices. And, it is absolutely free. There’s no need for an account or to download anything.
A Step-by-Step Guide
Step 1: Upload the FLV files…
Select multiple FLV videos after clicking on ‘Choose FLV Files’. You can also drag and drop your videos into the box. They’ll be added to the editor.
Step 2: Start editing or add more videos…
You’ll be directed to the video editor, where you can split, combine, and rearrange your video clips. This is a purely optional step. More videos can be added by clicking the plus (+) sign in the editing window or by selecting “Upload” from the left menu.
Step 3: Export your new video…
You can now save your merged videos as a single MP4 file. Simply select ‘Export,’ and your download will initiate.
FAQs about Merging FLV Files
Question 1: How to combine FLV files?
Answer: To combine FLV files, hold down the Ctrl or Shift key while selecting multiple FLV files in the User’s Album, and then drag and drop to the video track on the Timeline. All FLV files will automatically merge one after the other in order.
Question 2: What browser should be used to Merge FLV?
Answer: You can use any modern browser to Merge FLV, such as Google Chrome, Firefox, Opera, or Safari.
Question 3: How long does it take to Merge FLV files?
Answer: The FLV file merger is quite quick and takes only a few seconds.
So, if you have been looking for the best options on how to merge FLV files on different mediums, the above-listed apps will serve your purpose. Now, check out the supported features, formats, and other merging functions of all the apps and choose the one that best meets your needs.
For macOS 10.14 or later
A Step-by-Step Guide to Merge FLV files on Windows/Mac using Wondershare Filmora
Step 1: Launch Wondershare Filmora and load FLV files…
When you run this FLV joiner, simply click “Import” to load all of the local FLV files that you want to merge to the User’s album of this FLV video merger. You can also just drag and drop the target files from your PC into the album.

Step 2: Merge FLV files into one…
At the bottom of this FLV file merger, there lies a Timeline. Drag FLV files from the album to the Timeline and use the slider bar to help you arrange all FLV files in the Timeline without overlapping them. That’s very important as if you put one video to another, the original video will get split. Also, make sure that all FLV files are placed in the sequence in which they are to be played. If not, you can rearrange any video clip with a simple drag-and-drop.

Step 3: Choose the target format as FLV…
When you are sure that all FLV files are in the correct required order on the Timeline, you can view the effect in real-time in the preview pane. If everything is fine, you are now ready to export this new FLV file. All you have to do is just press the “Create”
button, then go to the “Format” tab > “FLV” output format in the output window.

Step 4: Export a new FLV file…
Finally, click the “Create” button to save the settings and export the new FLV file simultaneously. When it’s done, simply navigate to the whole FLV video using the output file path.

Alternative Way to Merge/Combine FLV Files on Windows
Joyoshare Media Cutter (Paid tool to merge FLV Files)
Joyoshare Video Joiner for Windows is a comprehensive and user-friendly audio and video merging software that supports a wide range of file formats such as FLV, F4V, HD,4K, MP4, M4V, M4A, DV, MPEG, FLAV, WMA, and others. It is not only a superb video joiner for joining FLV files in batches without re-encoding, but it is also a video editor thanks to the built-in advanced editing tool. That means you can customize and enhance your FLV files as required before integrating them. The two combing modes (high-speed mode and encoding mode) it employs are also noteworthy. With high-speed mode, you can join an unlimited number of FLV files losslessly and swiftly. You can merge files in different formats without gaps and customize the codec, resolution, bit rate, frame rate, and other parameters of your FLV files while in encoding mode.
A Step-by-Step Guide
Step 1: Add FLV files…
First, go to the Joyoshare website and download the Joyoshare Video Joiner installation package. Install and configure it on your computer. Then, import FLV files into the video joiner. There are two options: click “Open File” to choose them or drag them directly into the software.

Step 2: Choose a merging mode and export format…
You must pick a format from high-speed mode and encoding mode based on your requirements by using the “Format” button. The former is only for combining files of the same format losslessly at 60 X speed. The other is for users who want to modify files while joining files in different formats. With the use of a gear icon beside the selected output format, users can change video settings such as resolution, bit rate, codes, and so on while in encoding mode.

Step 3: Remove undesirable parts…
Once finished choosing mode and format, simply press “OK” to go back to the main screen. Then double-click these FLV files one by one to preview them. You can change the timeline to remove unnecessary sections from your FLV videos. Moreover, renaming and rearranging these video files can also be realized in this step.

Step 4: Edit FLV files (optional)…
The software has an editor that allows you to easily and flexibly enhance your FLV video files by clicking “Edit” next to each file before joining.

Step 5: Merge FLV files and save…
Finally, all you have to do is press the “Convert” button to enable Joyoshare Video Joiner to begin combining these FLV files. The merged FLV file will be saved as a converted file on your computer.
Format Factory (Free tool to merge FLV Files)
Format Factory is a free Windows video joiner, recorder, converter, downloader, and editor. It supports a wide range of file types, including FLV, MKV, MP4, 3GP, WMV, SWF, AVI, MPG, VOB, WebM, and others. It is not difficult to use it to combine FLV files.
A Step-by-Step Guide
Step 1: Run Format Factory…
After installing Format Factory, go to “Video Joiner & Mux” to proceed.

Step 2: Add FLV files…
“Add Files” allows you to import FLV files in batches. When all FLV files have been loaded, click “Clip” to clip and crop FLV files as needed. Then, under “Output Settings,” choose an output format and further customize the output quality.


Step 3: Merge files…
Once done, click “OK” to get back to the first window and press “Start” to begin the merging
process.

Alternative Way to Merge/Combine FLV Files on Mac
iDealshare VideoGo (Paid tool to merge FLV Files)
You can use iDealshare VideoGo to convert media files for playback anywhere. It supports a wide range of video formats, both SD and HD. The application also features its own editor, which includes a wide range of activities. It allows you to trim the selected video, crop it, modify the brightness, contrast, and saturation, add text and image watermarks, and manage or add your own subtitles.

A Step-by-Step Guide
Step 1: Import FLV files…
To import the FLV video files that you want to merge, click the “Add File” button or just drag & drop the files.
Step 2: Choose output format…
Choose FLV as the output video format. Select FLV from the “General Video” category from the “Profile” pop-up menu.
Step 3: Merge FLV files…
Select the FLV video files that you wish to merge into one in the main window list, and then choose the “Merge Selected into One” option from the context menu. Click the “Convert” button to start combining the videos.

Faasoft FLV Joiner/Merger (Free tool to merge FLV Files)
Faasoft FLV Joiner/Merger is used to combine FLV files without any re-encoding as well as retain the output quality. Merges FLV files and converts them to more popular formats as well like; MP4, AVI, MOV, WMV, MKV, ASF, ProRes, MXF, OGV, 3GP, etc. to get played on multiple mediums. Apart from FLV files, Faasoft FLV Joiner allows you to merge various kinds of video and audio clips. In addition, this powerful tool works more than just an FLV Merger, i.e.; It is, even more, an in-built video and audio editor, with which, you can optimize any files as per requirement.
A Step-by-Step Guide
Step 1: Load FLV files…
To add FLV files to this Joiner, run FLV Merger and drag and drop the folder containing FLV files to the program’s main screen. If the FLV files you wish to merge are not in the same folder, you can drag them one by one to the software. You should put them together first to save time.
Step 2: List to merge…
Once all FLV files have loaded, pick them all and choose “Merge Selected into One” from the context menu. In the task list, the combined FLV file will have an extension name similar to “Merge 1.”

Step 3: Convert FLV clips…
Click the “Profile” drop-down button to select “FLV Flash Video Format (*.flv)” from the “Picture & Animation” category as the output format. If you want to re-encode the merged FLV file to another video format, select another output format from the list above.
Step 4: Start joining…
Simply click the round “Convert” button in the bottom right corner and let this fantastic tool do the rest.
2 Ways to Merge/Combine FLV Files on Android
Video Merger by Alyaanah (Paid tool to merge FLV Files)
Video Merger can merge any number of videos together in one video. It also accepts almost any format of videos as input. Some of the input formats for merging that are supported are mp4, mkv, 3gp, 3gpp, mov, flv, avi, mpg, mpeg, m4v, vob, wmv, webm, mts, ts, m2ts, and so on. It can also convert the combined video to a variety of formats. Merged output formats supported include mp4, mkv, mov, avi, 3gp, and others. This application allows you to combine videos with different formats, bitrates, and frame rates into a single video. It also scales multiple videos into a single scale and merges them together. It can also merge videos with different resolutions into one video. The merged videos can also be compressed together maintaining original quality to a smaller sized video than all the original video sizes combined.
Video merger allows you to merge in three different ways as follows;
Side by side:
Choose two files, and they will be merged in a side-by-side format (Horizontal stack).
Top-Bottom:
Choose two files, and they will be merged top to bottom (Vertical stack).
Sequential:
You can select unlimited files and they will be merged one after the other in a sequential format.
VideoChain by Arypex Initiative (Free tool to merge FLV Files)
Now you can combine video files from your Android device camera as well and for free. VideoChain is an easy to learn and use app (with in-built instructions) that allows you to easily combine video clips to create one video using the most advanced encoding techniques. It is an excellent tool for merging video clips from your front and rear cameras, as well as portrait and landscape video files, into a single file. It can combine MP4, MPEG, MKV, FLV, and other video clips with four different quality/compression settings available.
2 Ways to Merge/Combine FLV Files on iPhone
Magisto Video Editor (Paid tool to merge FLV Files)
It is a wonderful app to put FLV clips together on an iPhone. Using this versatile video editing app, you can merge multiple videos and create eye-catching files of up to 5 minutes. You can add text, colors, and even text slides between video frames to the video. The app’s filters can be used to further enhance the files. The app also supports a large library of audio files, which you can use to add music to your video files. And, to use all of the app’s features, you must have a paid subscription.


iMovie (Free tool to merge FLV Files)
iMovie is one of the most popular video editing apps for iOS users. You can edit and merge videos on iMovie with ease. The app is free and secure. If you are looking for a professional way to put two videos together on your iPhone, iMovie can be a good choice. FLV videos can be converted to WMV, M4V, and other popular video formats after merging. You can also modify the video output settings and delete the selected video segments as well.
A Step-by-Step Guide
Step 1: Launch the iMovie app on your iPhone. In the Projects window, press the + button.

Step 2: In the New Project window, select Movie. Browse through your video clips in the gallery and import them.

Step 3: Tap Create Movie at the iPhone screen’s bottom. The videos will automatically get merged in the iMovie timeline.
Step 4: Select the desired video file. You can include transition effects, background music, and other profiles.
Step 5: Tap Done to combine two videos into one on the iPhone using iMovie.

Step 6: To export your merged video file, tap the Share icon to save the video.
2 Ways to Merge/Combine FLV Files Online
Clideo (Paid online tool to merge FLV Files)
Now you can combine your FLV files online using Clideo’s FLV Merger. It allows you to combine several videos, images, and audio files. You will also be able to download the finished product in any format you want. And, as the tool operates online, it will not consume any of your device’s memory. Each file you add in the free edition can be up to 500 MB in size; if this is insufficient for you, you can always subscribe to Clideo Pro.
A Step-by-Step Guide
Step 1: Upload the FLV files…
Click on the “Choose files” button and select the necessary videos from your device. To add a video from Google Drive or Dropbox, use the little arrow to call a drop-down menu.
Step 2: Merge FLV and other files
To add more content, use the menu with all of the options from the previous stage. Rearrange them as you see fit. Crop the frame using one of the available aspect ratios. Upload a soundtrack, then cut it with the scissors icon and adjust the volume. When you’re done, choose a format and click “Merge.”
Step 3: Save joined FLV
Take a peek at the outcome. If you like it, save it to your device or cloud storage. Otherwise, you can return to editing without having to start over.
Veed’s Video Editor (Free online tool to merge FLV Files)
Now there’s no need to pay for expensive apps like Filmora or Wondershare Uniconvertor. You can merge your FLV files using Veed’s Video Editor. It lets you combine multiple flash videos together and export them as a single video file. You can simply do it all straight from your browser and from any device. Veed’s Video Editor is compatible with Windows XP, Windows 10, Mac, Linux, and all mobile devices. And, it is absolutely free. There’s no need for an account or to download anything.
A Step-by-Step Guide
Step 1: Upload the FLV files…
Select multiple FLV videos after clicking on ‘Choose FLV Files’. You can also drag and drop your videos into the box. They’ll be added to the editor.
Step 2: Start editing or add more videos…
You’ll be directed to the video editor, where you can split, combine, and rearrange your video clips. This is a purely optional step. More videos can be added by clicking the plus (+) sign in the editing window or by selecting “Upload” from the left menu.
Step 3: Export your new video…
You can now save your merged videos as a single MP4 file. Simply select ‘Export,’ and your download will initiate.
FAQs about Merging FLV Files
Question 1: How to combine FLV files?
Answer: To combine FLV files, hold down the Ctrl or Shift key while selecting multiple FLV files in the User’s Album, and then drag and drop to the video track on the Timeline. All FLV files will automatically merge one after the other in order.
Question 2: What browser should be used to Merge FLV?
Answer: You can use any modern browser to Merge FLV, such as Google Chrome, Firefox, Opera, or Safari.
Question 3: How long does it take to Merge FLV files?
Answer: The FLV file merger is quite quick and takes only a few seconds.
So, if you have been looking for the best options on how to merge FLV files on different mediums, the above-listed apps will serve your purpose. Now, check out the supported features, formats, and other merging functions of all the apps and choose the one that best meets your needs.
Any Video May Be Enhanced Using Adobe Premiere Transitions. If You Are Looking to Learn How to Add Fade to Black in Premiere Pro? Then, Check Out This Fade to Black Transition Premiere Pro Guide to Learn the Trick
The most fundamental and typical sort of Fading is a simple cut, which is often used by editors to go from one shot to another. Applying effects between clips, at the start of a clip, or at its finish may sometimes help you smooth out or stylize your edit. Fade to black transition premiere pro can be used to get this outcome. To help users create current and trendy styles, Premiere Pro features a vast range of effects and tools including fade to black in premiere pro.
Going back to the days of black and white may sometimes be a welcome change of pace in the era of vivid digital and flashy film. Being a professional editor, you’ll understand that editing should be undetectable. If an editor has done their job well, no one will notice their efforts. You’ve failed as soon as the audience realizes the cut has occurred. But fading out to black (or white) seems out of the ordinary. Use this how to fade to black premiere pro guide to learn the steps in Adobe PR.
Part 1. What is Fade to Black
You will become a better filmmaker if you expand your vocabulary in video editing by learning about transitions. The dissolve-to-black, or fade-to-black (a fade to black in premiere pro), works well in part because it has a certain theatrical feel to it. A fade-out/fade-down, often known as a fade-to-black in theater, occurs in total darkness. One of the key components of video editing is using transitions in Adobe Premiere Pro.
The fundamental elements of many other transitions are fades. Effective use of Fades is a crucial skill in your video editing repertoire since it is subtle to the point of practically being undetectable. A video transition called a “fade to black” causes a scene or clip to gradually conclude with a black backdrop. It dates back to the time when the stage curtains were drawn and the lights were dimmed during a theatrical performance. The stage therefore went completely black while the team behind hurriedly changed into new clothing and stage items for the following action.
Those that seem to take place close together chronologically are edited together, while scenes that occur at separate periods or locales are faded out. These are recognizable features of the film. They alert us to the fact that the tale is moving to a later time or place, either thematically, chronologically, or geographically. In a practical sense, this is the time when the cast and crew switch out the set and clothes. But the fade-to-black marks the end of the scene in a symbolic and narrative sense.
Part 2. How to Fade to Black in Premiere Pro
One of the most widely used video editing programs is Adobe Premiere Pro. In Premiere Pro, a number of transitions are available. One of the first, most important responsibilities for a film editor to do is the utilization of numerous transitions. In fact, many aspiring film editors start off by learning how to fade to black in Premiere. Fortunately, creating a fade to black transition in Premiere isn’t that difficult to do step by step. Everything from straightforward dissolves to wipes, slides, and zooms may be found here.
Steps to Fade to Black in Premiere Pro:
Step1Launch the Program and Refer to the Effects
After launching Adobe Premier Pro CC, simply drag the Dip to Black effect from the Effects tab to the very start or very finish of the clip you want to use. The effect may then be moved around to change its duration as needed. Add two clips to the Premiere Pro timeline.

Step2 Add the fade to black transition
Drag and drop the Dip to Black effect between two clips on the timeline after selecting the Effects tab and typing “dip to black” into the search field. The right half of the clip will display the dip to black effect.

Step3 Customize the fade to black effect
Go to Effect Controls and, while the dip to black effect is chosen, alter the alignment to Center at Cut. Before video B starts, video A will now fade to black.
Step4 Optionally change the fade-to-black effect’s duration
just extend the timeline’s fade to black effect at the very end. The slower and smoother the fade to black effect will be, and vice versa, as you move the effect outward.

Part 3. Premiere Pro Alternative to Fade to Black
Although Premiere Pro is a powerful tool to fade to black, but what if your audience wishes to evoke a certain atmosphere, swap between tales, adopt a different point of view, spice up the narrative, or advance or recede in time? Here, more creative transitions would be beneficial. For that, Filmora is a fantastic substitute for Premiere Pro if you need to quickly apply a fade to black transition to your video.
The tool is packed with built-in features that are powerful enough to polish your videos in addition to fade to black effect. For creating scroll-stopping video content, you can also discover a ton of completely adjustable video templates for YouTube, TikTok, Instagram, Facebook, and other platforms as well as a ton of attractive overlay transitions and royalty-free music and sound effects.
Free Download For Win 7 or later(64-bit)
Free Download For macOS 10.14 or later
Steps to Fade to Black Using Filmora
Step1 Install Filmora on your laptop
You must first download this software application to your computer from one of the following sources in order to start:
You must install it on your computer once you’ve done downloading it before you can use it with your laptop.

Step2 Customize the Video
After the Import, you may edit your audio recordings using tools that are completely customizable. Use the editor in Filmora to edit your recorded audio files, using simple to advanced editing techniques. Your recorded video may be improved using Filmora’s Editor by adding animated titles, spectacular effects, audio enhancements, and more.

Step3 Fade to Black Videos
Spice up the Fade effect into your videos and add the effect into the timeline. You will be able to make it black at the ends by customizing the effect inside the Fade window.

Step4 Add VFX to Your Video
The software is embedded with Effects primarily to give your videos a polished appearance. You may utilize a variety of its eye-catching and adjustable effects to make your video productions stand out from the competition. In this area, we’ve covered some of the best effects for bringing life to your dull, unprofessional videos as shown below:

Step5 Save or Share the Videos
Finally, you may use the complete Filmora editor as previously mentioned when you’ve done editing the recorded video. When you want to submit your creative work right away to YouTube or another well-known website, click the Export option and choose the platform where you want to distribute your video clip. If you like, you may even make changes to the video before uploading it.
Part 4. Related FAQs
How do you fade a clip to black?
Utilizing the dip to black transition in your video sequence is the key to learning how to fade to black in Premiere. To produce the Fade to Black reaction you’re trying to accomplish, you must Dip to Black. Simply drag the feature to the conclusion of your sequence to complete the task. Where you want the fading to start and terminate. The length of the fade or dip may be altered using the effects control panel.
How do I fade to white in Premier Pro?
Contrarily, as this montage demonstrates, fading to white may be utilized to convey uncertainty or a feeling of optimism. One of the most traditional transition effects that is often utilized in movies and videos is the fade to white. Your film gains a cinematic feel from it, and the change from one scene to the next is more seamless.
How do you keyframe colors in Premiere?
You can find other color problems in Premiere Pro that you need to fix. Therefore, it makes sense to adjust your highlight, mid, and black points first and have them dialed in before addressing saturation and color temperature. Open the Color panel on the right side of the screen while your adjustment layer is highlighted in the sequence. Make your color adjustments while keeping in mind that the effect will be applied to every clip below it in the timeline.
We only stop feeling immersed when we notice abrupt cuts. It makes sense to know when to color correct your footage throughout the video editing process. If you color correct your film too early, you can be wasting your time by color grading footage that you might eventually cut out or never use. We hope that this article will assist you in streamlining your editing process if you’re just starting started using Premiere Pro’s adjustments layers. Try experimenting with Filmora if you often utilize them to improve your edits.
Free Download For macOS 10.14 or later
Steps to Fade to Black Using Filmora
Step1 Install Filmora on your laptop
You must first download this software application to your computer from one of the following sources in order to start:
You must install it on your computer once you’ve done downloading it before you can use it with your laptop.

Step2 Customize the Video
After the Import, you may edit your audio recordings using tools that are completely customizable. Use the editor in Filmora to edit your recorded audio files, using simple to advanced editing techniques. Your recorded video may be improved using Filmora’s Editor by adding animated titles, spectacular effects, audio enhancements, and more.

Step3 Fade to Black Videos
Spice up the Fade effect into your videos and add the effect into the timeline. You will be able to make it black at the ends by customizing the effect inside the Fade window.

Step4 Add VFX to Your Video
The software is embedded with Effects primarily to give your videos a polished appearance. You may utilize a variety of its eye-catching and adjustable effects to make your video productions stand out from the competition. In this area, we’ve covered some of the best effects for bringing life to your dull, unprofessional videos as shown below:

Step5 Save or Share the Videos
Finally, you may use the complete Filmora editor as previously mentioned when you’ve done editing the recorded video. When you want to submit your creative work right away to YouTube or another well-known website, click the Export option and choose the platform where you want to distribute your video clip. If you like, you may even make changes to the video before uploading it.
Part 4. Related FAQs
How do you fade a clip to black?
Utilizing the dip to black transition in your video sequence is the key to learning how to fade to black in Premiere. To produce the Fade to Black reaction you’re trying to accomplish, you must Dip to Black. Simply drag the feature to the conclusion of your sequence to complete the task. Where you want the fading to start and terminate. The length of the fade or dip may be altered using the effects control panel.
How do I fade to white in Premier Pro?
Contrarily, as this montage demonstrates, fading to white may be utilized to convey uncertainty or a feeling of optimism. One of the most traditional transition effects that is often utilized in movies and videos is the fade to white. Your film gains a cinematic feel from it, and the change from one scene to the next is more seamless.
How do you keyframe colors in Premiere?
You can find other color problems in Premiere Pro that you need to fix. Therefore, it makes sense to adjust your highlight, mid, and black points first and have them dialed in before addressing saturation and color temperature. Open the Color panel on the right side of the screen while your adjustment layer is highlighted in the sequence. Make your color adjustments while keeping in mind that the effect will be applied to every clip below it in the timeline.
We only stop feeling immersed when we notice abrupt cuts. It makes sense to know when to color correct your footage throughout the video editing process. If you color correct your film too early, you can be wasting your time by color grading footage that you might eventually cut out or never use. We hope that this article will assist you in streamlining your editing process if you’re just starting started using Premiere Pro’s adjustments layers. Try experimenting with Filmora if you often utilize them to improve your edits.
Also read:
- Everything You Need to Know About Color Grading in Photography
- Easily Cut Large Video Faster on Mac
- Updated In 2024, Here We Will Investigate AI-Based Video Interview, How It Is Being Used, and How to Master an Artificial Intelligence Video Interview Act
- New How to Do Masking in After Effects Alternative Provided
- Updated In 2024, The Glitch Effect Shows Errors and Flaws in the Image or a Video. The Write-Up Presents the Complete Procedure of Adding Premiere Pros Glitch Effect and Introduces Eight Free Glitch Effects
- New In 2024, Would You Like to Know How to Change the Ratio of the Video or Which Is the Correct Aspect Ratio for Uploading to the Online Platform? Then, Go Through the Article to Get Complete Details About the Video Aspect Ratio
- Updated In 2024, How to Use 3D Camera Tracking Effects in After Effects
- Updated If You Want to Add an Effect Like a VHS Overlay Free Effect to Enhance Your Videos, You Can Do It on After Effects. Read More to Learn How for 2024
- Updated If You Want to Make an Intro Video, Then Adobe After Effects Will Be a Great Choice. This Article Will Show the Steps to Create an Intro Video with After Effects by Your Own
- New In 2024, How To Add Scrolling Text Effect
- Updated 2024 Approved Camera Shake Effects in Videos Helps to Showcase Aesthetics and Vibes. Do You Wish to Add a Camera Shake in Videos? Consider Using the Video Editor Discussed Here for This
- Updated How To Make Boring Videos Look Cool By B Rolls
- New In 2024, Everything You Need to Know About Color Grading in Photography
- New In 2024, Tutorial Guides for Video Maker with Song
- In 2024, Top-Rated Android Apps For Slowing Down Motion
- Updated 2024 Approved 15 Camera Shake Preset for Premiere Pro to Add Camera Shake with Simple Keyframes. Each Preset Is Editable with Easy Steps. Make Your Video Shocking and Impressive with These Camera Shake Effects
- In 2024, How to Brighten Video in Premiere Pro
- In 2024, Slow Down the GIF to Emphasize Details Better. To Do so, Read This Guide and Learn to Use the Best Platforms for Slow-Motion GIFs
- Top 9 AMV Makers for Computer
- Updated In 2024, Full Guide to Funcall Voice Changer and Its Alternatives
- 3 Best Effects to Appear on Camera for 2024
- Updated How to Perfect Quick and Efficient Video Editing | Keyboard Shortcuts in Filmora for 2024
- Updated Best Online YouTube Video Trimmer 2024
- How to Remove Audio From Video on Mac? Free and Official Solutions for 2024
- Looking for a Full Guide on Removing the Background From PNG Images? Do You Want to Transform JPG to PNG Transparent? If so, Take some Time to Read This Article for 2024
- How To Split Screen On Tiktok for 2024
- New 2024 Approved Are You Looking to Create some Impressive Slow-Motion Video Content? Get This Done with some Impressive Android Slow Motion Video Apps
- Updated How to Convert Videos to Slow Motion for 2024
- In 2024, How To Make a Video Podcast
- 2024 Approved Want to Speed up Your Video to Create Short-Duration Instagram Reels? Here Is How You Can Change the Speed of Pre-Recorded and Live Videos on Instagram Reels
- New How to Use Filmora Slideshow Maker for Making Slideshow, In 2024 What Is Slideshow Filmora? Know the Steps to Make Filmora Slideshow. What Are Steps to Make Filmora Slideshow Template?
- New In 2024, How to Get Motion Blur in Roblox?
- Updated Have You Ever Watched YouTube Live Streams? In Fact, You Can Also Start a Live Streaming on YouTube if You Want. Here Well Share some Tips to Live Stream on YouTube for 2024
- Are You Searching for the Best Cinematic LUTs for Premiere Pro? You Are in the Right Place because This Article Is Dedicated to LUTs for 2024
- New 2024 Approved Create Chroma Key Written Text Effects in Filmora
- Updated How To Create The Best AI Thumbnail Using The Right Tools, In 2024
- New 2024 Approved Magic Effects Video Making How To
- Updated Create Perfect Slow Motion Videos With The Best CapCut Templates for 2024
- Updated In 2024, Leveraging the Vectorscope for Better Color Correction in Premiere Pro
- 2024 Approved Easy Way to Combine Several Xvid Files Into One Windows, Mac,Android
- New 2024 Approved Top List 20 Best LUTs for Music Videos
- In 2024, How Do You Get Sun Stone Evolutions in Pokémon For Xiaomi Civi 3? | Dr.fone
- Complete guide for recovering contacts files on Y100i.
- How To Fix Part of the Touch Screen Not Working on Vivo Y100t | Dr.fone
- How to Change Your Lava Yuva 3 Pro Location on life360 Without Anyone Knowing? | Dr.fone
- Planning to Use a Pokemon Go Joystick on Honor X50i? | Dr.fone
- In 2024, How to Bypass FRP on Meizu?
- In 2024, Unova Stone Pokémon Go Evolution List and How Catch Them For OnePlus Nord N30 5G | Dr.fone
- 9 Solutions to Fix Process System Isnt Responding Error on Lava Blaze Pro 5G | Dr.fone
- In 2024, How to Fake Snapchat Location without Jailbreak On Huawei Nova Y91 | Dr.fone
- In 2024, How to Transfer Contacts from Vivo Y78 5G to Other Android Devices Using Bluetooth? | Dr.fone
- Here are Some Pro Tips for Pokemon Go PvP Battles On Apple iPhone 14 Plus | Dr.fone
- In 2024, The Most Useful Tips for Pokemon Go Ultra League On Vivo Y02T | Dr.fone
- How to Resolve Samsung Galaxy S23 Ultra Screen Not Working | Dr.fone
- In 2024, Detailed guide of ispoofer for pogo installation On Apple iPhone SE | Dr.fone
- How to Cast Infinix Smart 8 Screen to PC Using WiFi | Dr.fone
- Troubleshooting Guide How to Fix an Unresponsive Vivo X90S Screen | Dr.fone
- Restore Missing App Icon on HTC U23 Pro Step-by-Step Solutions | Dr.fone
- Bricked Your Oppo Reno 11 Pro 5G? Heres A Full Solution | Dr.fone
- Rootjunky APK To Bypass Google FRP Lock For Realme 12 5G
- How to recover deleted photos from Android Gallery without backup on Galaxy S23 Tactical Edition
- In 2024, How PGSharp Save You from Ban While Spoofing Pokemon Go On Oppo F23 5G? | Dr.fone
- In 2024, The Ultimate Guide to Poco X6 Pattern Lock Screen Everything You Need to Know
- In 2024, Apple ID Locked or Disabled On iPhone 12 Pro? 7 Mehtods You Cant-Miss
- Forgot iPhone Passcode Again? Unlock iPhone 11 Pro Without Passcode Now | Dr.fone
- In 2024, How To Create an Apple Developer Account On iPhone 12 mini
- Undelete lost call logs from Vivo Y78+
- In 2024, Hassle-Free Ways to Remove FRP Lock from Xiaomi Redmi Note 12 5G Phones with/without a PC
- How To Unlock iPhone 11 3 Ways To Unlock
- Sim Unlock Oppo Find X7 Phones without Code 2 Ways to Remove Android Sim Lock
- In 2024, 3 Things You Must Know about Fake Snapchat Location On Lava Blaze 2 5G | Dr.fone
- In 2024, How To Bypass iCloud By Checkra1n Even From iPhone XS Max If Youve Tried Everything
- Reno 10 Pro 5G Messages Recovery - Recover Deleted Messages from Reno 10 Pro 5G
- How to recover deleted pictures from Samsung Galaxy M54 5G.
- Top 4 Elon Musk Voice Generator Programs to Make You Sound Like the Billionaire for 2024
- iPogo will be the new iSpoofer On Nokia 105 Classic? | Dr.fone
- In 2024, Top 10 Best Spy Watches For your Huawei P60 | Dr.fone
- Title: How to Loop Videos with iMovie for 2024
- Author: Morgan
- Created at : 2024-05-19 05:12:02
- Updated at : 2024-05-20 05:12:02
- Link: https://ai-video-editing.techidaily.com/how-to-loop-videos-with-imovie-for-2024/
- License: This work is licensed under CC BY-NC-SA 4.0.

