
:max_bytes(150000):strip_icc():format(webp)/social-media-text-588a94263df78caebc620f05.jpg)
How to Zoom Webcam on PC
How to Zoom Webcam on PC
Making certain our digital presence is the best it can be pays dividends as more and more of what we do online; similar is the case with how to zoom out webcam windows 10. The majority of experts advise against using the built-in camera that comes with your laptop or computer and instead advocate getting a webcam or an HD camera. These, however, may be hard to come by and pricy if you locate a nice one. If the built-in camera on your laptop doesn’t perform effectively during Zoom meetings, you may want to consider about investing in a separate, better webcam. Webcams offer automatic settings that are intended to function with the largest variety of lighting situations possible. This suggests that they average out a great number of responses to the content of the frame. Because of this, we have incorporated basic PC webcam zooming settings. These answers may be found in the portions that follow.
It’s vital to know how to zoom in on a webcam before visiting there. The camera wasn’t always as vital as it is today, and only very large corporations could afford to employ it as a convenience. But today, nearly everyone, from huge organizations to little firms, acknowledges its value. Everybody needs a webcam that works properly. The camera control software you are using determines the zoom function. The resolution of your picture window and the capabilities of the application dictate how far you can zoom in on the webcam’s video image. You can zoom in and out on camera photos using tools like YouCam and Windows Live Messenger. The most critical camera capabilities for the ideal video conferencing experience are zoom in and zoom out, which at first look may appear trivial. Here, we’ll walk you through each step, in detail. Continue reading, and we’ll check your understanding of webcam zoom in and zoom out skills!
Way 1: Zoom with Windows Live Messenger
When utilizing a camera for video conferencing, you may zoom in on a user’s face to get rid of the background. Webcam settings are not accessible by default in Microsoft Windows. However, camera zoom settings may be changed in instant chat systems. Through an instant messaging tool, such as Windows Live Messenger, you may simply access these options. This application provides private offline chat, video messaging, image and video sharing, and video chatting.
Step1Start Windows Live Messenger on your PC or laptop first. Enter your login name and password by clicking the “Sign In” button.

Step2On the top menu bar, pick “Tools.” And then select the “Audio and Video Setup”. Drag the slider next to “Speaker” to modify the speaker volume. Drag the slider next to “Microphone” to modify the microphone sensitivity. Press “Next.”

Step3From the drop-down list, pick the webcam. The “Camera Control” option is situated on the top; pick “Webcam Settings” after that.
Step4Now, to alter the zoom settings, drag the “Zoom” slider. To zoom in or out, drag the slider to the left or right. Press “OK.”
Way 2: Use Windows 10 Camera App
Wondering how to zoom your camera in the Windows 10 Camera app? The Camera app enables you to zoom in or out on your webcam in both image and video modes. To accomplish so, click or push the Magnification button, and then use the slider to modify the webcam’s zoom level. To operate the zoom feature manually, pick “Manual Zoom.” In the preview window, a square appears when you pick this option. To zoom in on a specific region of the capture window, drag the square there. To expand the image that was acquired by the webcam, slide the slider bar. In simply, The Camera app enables you zoom in or out of photographs and movies shot with your webcam. To do this, click on the “Zoom” button and drag the slider to the left or right as appropriate on your Windows 10 camera. the following steps:
Step1To open the “Start Menu,” make a right-click on “Start.” Now, to access the Camera app, type “Camera App” into the start menu’s search box.

Step2Tap the Camera Control icon when you start or join a meeting. To zoom and pan the camera to the appropriate spot, utilize the icons on the Camera Control panel.
![]()
Step3To exit the Camera Control window and return to the Meeting Controls, touch outside of it.
Way 3: Zoom with YouCam
Unfortunately, the default cameras or webcams bundled with the majority of Windows laptops and desktops don’t have an automatic zoom option. In fact, the only method to adjust their crop is to switch from “Standard” to “Widescreen,” which does slightly zoom in on you but not in the manner we’d want. This makes it inescapable that the only method to manually alter a webcam’s magnification is to acquire one separately and apply its software settings. , like YouCam. YouCam provides video calling, streaming, and broadcasting. includes an integrated app. To employ Zoom with YouCam, refer to the methods given below:
Step1Launch the YouCam camera program and activate the webcam.

Step2In the camera preview window, pick Settings. Then, select “Enable Video Zoom” from the menu.
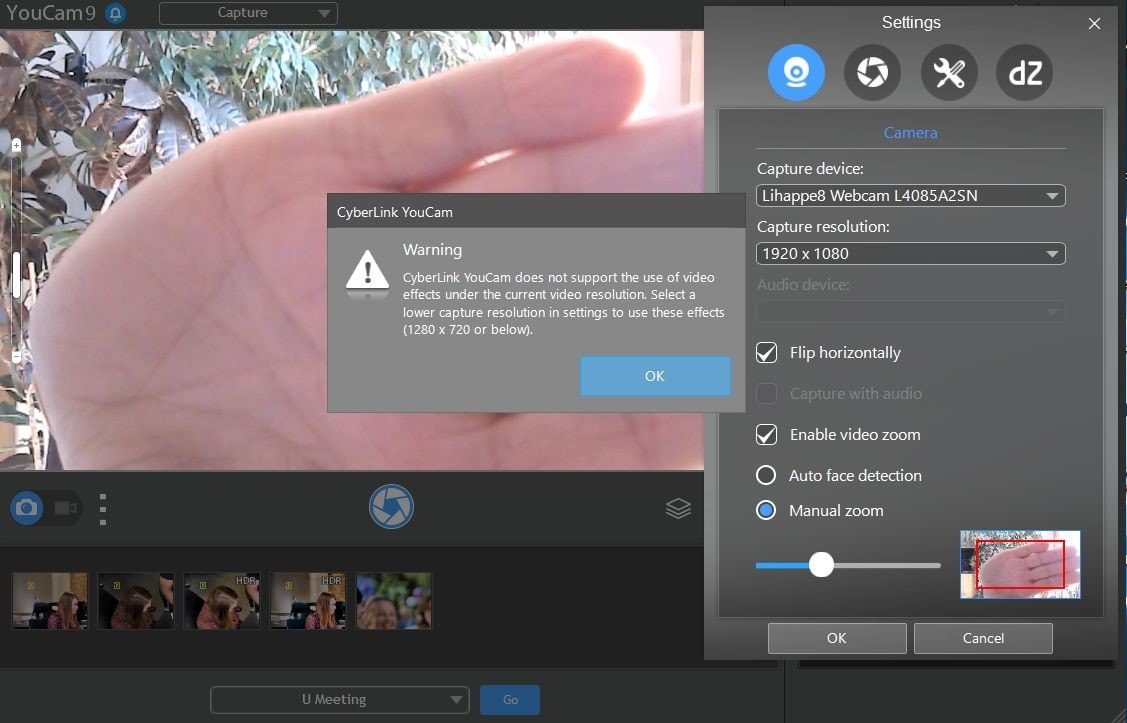
Step3Select “Automatic Face Detection” from the menu. As you wander about in the capture window, the camera watches your face and automatically zooms in on your photo as shown above.
Step4To handle the zoom feature manually, pick “Manual Zoom.” In the preview window, a square appears when you pick this option. To zoom in on a specific region of the capture window, drag the square there. To expand the image that was acquired by the webcam, slide the slider bar.

Way 4: Use iGlasses on Mac
For the perfect webcam look on a MAC, install the Chrome plugin iGlasses for video effects and style tweaks. Your videos will appear better on Zoom as a consequence. You may instantly enhance the appearance of your video interactions by utilizing the digital zoom on your iGlasses. Digital pan, tilt, and zoom are all possible with easy controls. For Macs that support it, an Apple Remote may be used to operate. iGlasses will become an option in Zoom’s video settings when it has been installed. You may improve your camera by altering the settings in iGlasses. You may experiment with a range of amusing effects, like 3-D distortions, using the virtual camera. Let’s learn how to utilize iGlasses on a Mac:
Step1Installing Ecamm’s iGlasses on a MacBook in the first step.
Step2To activate the camera, go to your video settings and pick iGlasses.
Step3Choose the Zoom window and execute the appropriate operations using the Zoom and Flip options. You may now zoom in and out using the camera on your MacBook as you like.

Conclusion
In conclusion, so many people currently take part in online conferences and virtual meetings. You want to create a lasting impression, don’t you? Not or whether you are the host of an online meeting or event, you must now maintain a professional image to prevent turning off attendees. You have discovered how to utilize the tools at your disposal to boost the zoom in and out quality of your camera in this post. However, as will be explained in the sections ahead, you may do it without the third-party plugins. With just one quick plugin, you can significantly transform how you look on a camera. Hence, try out the easy method from the above enlisted ones to get hold on your PC webcam to zoom in or out purposes.
Making certain our digital presence is the best it can be pays dividends as more and more of what we do online; similar is the case with how to zoom out webcam windows 10. The majority of experts advise against using the built-in camera that comes with your laptop or computer and instead advocate getting a webcam or an HD camera. These, however, may be hard to come by and pricy if you locate a nice one. If the built-in camera on your laptop doesn’t perform effectively during Zoom meetings, you may want to consider about investing in a separate, better webcam. Webcams offer automatic settings that are intended to function with the largest variety of lighting situations possible. This suggests that they average out a great number of responses to the content of the frame. Because of this, we have incorporated basic PC webcam zooming settings. These answers may be found in the portions that follow.
It’s vital to know how to zoom in on a webcam before visiting there. The camera wasn’t always as vital as it is today, and only very large corporations could afford to employ it as a convenience. But today, nearly everyone, from huge organizations to little firms, acknowledges its value. Everybody needs a webcam that works properly. The camera control software you are using determines the zoom function. The resolution of your picture window and the capabilities of the application dictate how far you can zoom in on the webcam’s video image. You can zoom in and out on camera photos using tools like YouCam and Windows Live Messenger. The most critical camera capabilities for the ideal video conferencing experience are zoom in and zoom out, which at first look may appear trivial. Here, we’ll walk you through each step, in detail. Continue reading, and we’ll check your understanding of webcam zoom in and zoom out skills!
Way 1: Zoom with Windows Live Messenger
When utilizing a camera for video conferencing, you may zoom in on a user’s face to get rid of the background. Webcam settings are not accessible by default in Microsoft Windows. However, camera zoom settings may be changed in instant chat systems. Through an instant messaging tool, such as Windows Live Messenger, you may simply access these options. This application provides private offline chat, video messaging, image and video sharing, and video chatting.
Step1Start Windows Live Messenger on your PC or laptop first. Enter your login name and password by clicking the “Sign In” button.
Step2On the top menu bar, pick “Tools.” And then select the “Audio and Video Setup”. Drag the slider next to “Speaker” to modify the speaker volume. Drag the slider next to “Microphone” to modify the microphone sensitivity. Press “Next.”
Step3From the drop-down list, pick the webcam. The “Camera Control” option is situated on the top; pick “Webcam Settings” after that.
Step4Now, to alter the zoom settings, drag the “Zoom” slider. To zoom in or out, drag the slider to the left or right. Press “OK.”
Way 2: Use Windows 10 Camera App
Wondering how to zoom your camera in the Windows 10 Camera app? The Camera app enables you to zoom in or out on your webcam in both image and video modes. To accomplish so, click or push the Magnification button, and then use the slider to modify the webcam’s zoom level. To operate the zoom feature manually, pick “Manual Zoom.” In the preview window, a square appears when you pick this option. To zoom in on a specific region of the capture window, drag the square there. To expand the image that was acquired by the webcam, slide the slider bar. In simply, The Camera app enables you zoom in or out of photographs and movies shot with your webcam. To do this, click on the “Zoom” button and drag the slider to the left or right as appropriate on your Windows 10 camera. the following steps:
Step1To open the “Start Menu,” make a right-click on “Start.” Now, to access the Camera app, type “Camera App” into the start menu’s search box.
Step2Tap the Camera Control icon when you start or join a meeting. To zoom and pan the camera to the appropriate spot, utilize the icons on the Camera Control panel.
![]()
Step3To exit the Camera Control window and return to the Meeting Controls, touch outside of it.
Way 3: Zoom with YouCam
Unfortunately, the default cameras or webcams bundled with the majority of Windows laptops and desktops don’t have an automatic zoom option. In fact, the only method to adjust their crop is to switch from “Standard” to “Widescreen,” which does slightly zoom in on you but not in the manner we’d want. This makes it inescapable that the only method to manually alter a webcam’s magnification is to acquire one separately and apply its software settings. , like YouCam. YouCam provides video calling, streaming, and broadcasting. includes an integrated app. To employ Zoom with YouCam, refer to the methods given below:
Step1Launch the YouCam camera program and activate the webcam.
Step2In the camera preview window, pick Settings. Then, select “Enable Video Zoom” from the menu.
Step3Select “Automatic Face Detection” from the menu. As you wander about in the capture window, the camera watches your face and automatically zooms in on your photo as shown above.
Step4To handle the zoom feature manually, pick “Manual Zoom.” In the preview window, a square appears when you pick this option. To zoom in on a specific region of the capture window, drag the square there. To expand the image that was acquired by the webcam, slide the slider bar.
Way 4: Use iGlasses on Mac
For the perfect webcam look on a MAC, install the Chrome plugin iGlasses for video effects and style tweaks. Your videos will appear better on Zoom as a consequence. You may instantly enhance the appearance of your video interactions by utilizing the digital zoom on your iGlasses. Digital pan, tilt, and zoom are all possible with easy controls. For Macs that support it, an Apple Remote may be used to operate. iGlasses will become an option in Zoom’s video settings when it has been installed. You may improve your camera by altering the settings in iGlasses. You may experiment with a range of amusing effects, like 3-D distortions, using the virtual camera. Let’s learn how to utilize iGlasses on a Mac:
Step1Installing Ecamm’s iGlasses on a MacBook in the first step.
Step2To activate the camera, go to your video settings and pick iGlasses.
Step3Choose the Zoom window and execute the appropriate operations using the Zoom and Flip options. You may now zoom in and out using the camera on your MacBook as you like.
Conclusion
In conclusion, so many people currently take part in online conferences and virtual meetings. You want to create a lasting impression, don’t you? Not or whether you are the host of an online meeting or event, you must now maintain a professional image to prevent turning off attendees. You have discovered how to utilize the tools at your disposal to boost the zoom in and out quality of your camera in this post. However, as will be explained in the sections ahead, you may do it without the third-party plugins. With just one quick plugin, you can significantly transform how you look on a camera. Hence, try out the easy method from the above enlisted ones to get hold on your PC webcam to zoom in or out purposes.
Online Calculate and Change Video Aspect Ratio
Versatile Video Editor - Wondershare Filmora
An easy yet powerful editor
Numerous effects to choose from
Detailed tutorials provided by the official channel
While watching movies, you might have noticed specific clips have black lines at the sides of the screen. It is because the original video’s aspect ratio is different from that of the screen on which you see it.
Nowadays, people are using multiple devices with different aspect ratios. Videos are an effective marketing tool that most marketers are using to expand their business. Therefore, the video aspect ratio has become vital.
Some people feel technical aspects such as video aspect ratio or using aspect ratio editor are a bit intimidating. But they are easy and simple to understand. So, let us know more about them.
In this article
01 [How to Calculate Video Aspect Ratio Online?](#Part 1)
02 [Websites to Change Video Aspect Ratio Online](#Part 2)
Part 1 How to Calculate Video Aspect Ratio Online?
Do you want to make changes to the video? If yes, then it is important to understand the basic concepts of video aspect ratios. Moreover, you can determine the specifications using an aspect ratio editor online.
Every photo, canvas, responsive design, digital video, or frame is rectangular with precise proportions. Outline the aspect ratios to create shapes according to different mediums like computers, TV, movies, or camera screens.
With the help of aspect ratio calculators, you can calculate the image’s value and new size. You can also use it to convert the image size and keep the objects in shape to make them look natural.
The formula to find an aspect ratio is: Width / Height
Aspect Ratio Calculation Process
Calculating the aspect resolution is pretty straightforward. The steps mentioned below will help you to get the correct height for the edited image:
- Take the original height-for example, 2400 units.
- Take the actual width- for example, 3200 units.
- Then, divide the height by width- for example, 2400/3200=0.75.
- Multiply the result (quotient) by new expected width- for instance, 0.75*600=450.
- The resulting figure is a new height.
Part 2 Websites to Change Video Aspect Ratio Online
If you want to change the video aspect ratio, you can easily crop the size of the video online with the help of different websites. These websites offer other aspect ratio options. So, let us learn more about them:
Free Convert

FreeConvert.com is a free editing website that allows you to edit video aspect ratio online. Usually, it is a cloud-based editor that converts a variety of files. So, you can use it to change the video aspect ratio of your clip.
You can see various options such as aspect ratio, codec, screen resolution, or more during video file conversion. For example, you can opt for an aspect ratio as per your requirements there.
Then, this converter will fix the clip automatically in the resolution selected by you. This website can process multiple files up to 1GB at once.
Pros:
- No Pop-ups occur while converting
- It did not affect the download speed
- Easy to convert the files
Cons:
- You have a limit of 25 minutes to convert files. After that, you need to upgrade to pro by making monthly payments.
CloudConvert

Cloud Convert is a file conversion service supporting around 200 file formats online for free. You can adjust the aspect ratio of videos on this website easily.
You have to upload a video clip and select its output format as per your original file. Then go to output video configuration to change the aspect ratio there. Choose the aspect ratio from the options given.
Pros:
- Several conversion options for high-quality files
- Supports cloud services
- Platform independent
- User-friendly
- Supports batch conversion
- It offers a powerful API
Cons:
- Get 25 minutes a day to convert the files
Kapwing

It is a free online aspect ratio editor to create content online. This tool has several features and a collection of online material. For example, through this aspect ratio editor, you can crop the size of video online.
You can select or resize video aspect ratio according to different social media platforms. But you can export only 720 p quality through this website for free after that; you have to create an account.
Pros:
- Merge multiple videos or images collectively in any order and add audio.
- Reduce the video size of any format with a single click.
- Add video subtitles
- Resize or crop videos for all social media posts.
- Cut out multiple sections of a video.
Cons:
- 250MB file upload limit
- Export only in 720p quality
- Export video clips for 7 minutes
- Edit or store content till two days
IMOVIE

Try the iMovie iPhone aspect ratio editor if you want to drag or drop the interface for editing videos simply. It has primitive tools to edit videos or images, and you can also import content from local drives or cloud storage with it.
It offers various visual effects like picture-in-picture, split-screen, or green screen effects. You can also enable viewers to zoom in or pass the scenes. Imovie set aspect ratio gives videos a cinematic feel using its 13 different video filters.
Pros:
- It has a simple interface.
- Its 4K resolution support allows you to give a cinematic feel to videos.
- iMovie has great speed controls that enable you for optimal pace-setting of scenes.
Cons:
- It does not have many output controls options.
- It only works on Mac systems.
Wondershare Filmora
If you permanently want to change the aspect ratio online, you must opt for a video converter or editor. Wondershare Filmora is the most remarkable aspect ratio editor that allows you to easily create videos of 4:3, 9:16, 16:9, and 1:1 aspect ratios.
Moreover, it is a convenient tool to edit videos on YouTube, Apple TV, Vimeo, or mobile devices. So, many YouTubers or bloggers are using it.
It is a reliable and cost-effective tool that offers drop and drag effects, audio, templates, soundtracks, filters, and other options. In addition, you can access features like split-screen, green screen, motion tracking, etc.
Its keyframing feature allows you to include custom animations, while motion tracking helps you track objects. Then, the color matching feature enables you to copy the color settings of one video and apply them to another clip.
You can even assign hotkeys shortcuts for various tools to save your time. Moreover, you can use different transitions, motion elements, filters, clips, titles, audios, and many other things with a simple drag and drop option.
Wondershare Filmora
Get started easily with Filmora’s powerful performance, intuitive interface, and countless effects!
Try It Free Try It Free Try It Free Learn More >

With its green screen feature, you can remove or change the video background. Then, you have an audio ducking feature to lower down the background volume or fade the audio track to another.
Here are various methods to change the aspect ratio in Wondershare Filmora:
Method 1: Change Aspect Ratio at the Starting Interface
Wondershare Filmora allows you to resize video aspect ratio when you launch the editor program. First, go to the drop-down menu button. Then, click on it to see various aspect ratios such as 16:9, 1:1, 4:3, 9:16, or 21:9.
Choose the aspect ratio that you want by simply clicking on it.

Method 2: Change Aspect Ratio under Project Settings
You can change the aspect ratio by clicking on the “Project Settings.” You can decide the target aspect ratio based on the aspect ratio of the media source.
For instance, if the aspect ratio of media source files is 4:3, select the standard aspect ratio of 4:3. Then, media files with other aspect ratios will show black bars.
In case of any discordance or if you want to change the aspect ratio, choose the proper ratio from project settings.

Method 3: Change Aspect Ratio during Editing
Even after importing the videos or images into Filmora’s timeline, you can easily change the ratio from the Crop and Zoom tool.
- Go to timeline and right-click on the video clip. Then, select “Crop and Zoom.” You will see the pop-up window.
- Click on 16:9, 4:3, 1:1, or 9:16 manually at the bottom if you like to change the video aspect ratio.
- You can also manually enter the video aspect ratio. Next, click on the “Ok” button.

After changing the aspect ratio, add background blur effects if you notice a black bar. It will enhance the video. You can also intensify your video by using filters, visual effects, overlays, or titles.

Method 4: Change the Aspect Ratio with Auto-Reframe
If you use Filmora’s latest versions, you will notice Auto Reframe helps to change the aspect ratio. Other than cropping, it will find the object in clips and crop it automatically if needed.
The following are steps to change the aspect ratio using the Auto-Reframe option:
Step1 Once you upload the video clips to the media library, right-click on it and choose the Auto-Reframe option

Step2 You will see the Auto Reframe window appear on the screen. Replace the existing video with a new clip. Then, change the video aspect ratio and video motion speed. Make sure to change the aspect ratio that fits most with different social media platforms

Step3 Once you choose the aspect ratio, click on the “Analyze” button. Filmora will Auto-Reframe the video itself. Once the process completes, you can see results in the preview window
Drag box to adjust the frame or to keep the object in it. It will automatically remove the content outside the box.

Step4 After completing adjustment or reframing, click on the “Export” button to save your video
Change the name of the video and select the location where you want to save the video. Now, click on the “Export” again to save.

Method 5: Change Aspect Ratio at Exporting
You can save the clip to your system or smartphones, depending on your requirements. Then, upload them directly to Youtube or burn them into DVD by clicking on the “Export button.” In this way, you can watch on widescreen or standard TV whenever you want.

● Change Aspect Ratio for the Local Computer
First, you will see the “Local” tab. There you can save the clip in a particular aspect ratio to your system.
You can see all resolutions with various aspect ratios after selecting the format. The output video depends on the media click resolution.
● Change Aspect Ratio for a Device
Change the “Device” tab to save the video in formats compatible with popular devices, including iPod, iPhone, PSP, iPad, etc. Once you choose the device, you will see all resolutions. Choose your favorite or the best resolution.
The video quality will continue improving with higher resolutions. But it will also increase the size of the file.
● Change Aspect Ratio for YouTube
Go to the “YouTube” tab and fill in the information. Then, click the “Export” button. Selecting the aspect ratio again is not necessary. It will directly upload your videos to YouTube.
● Change Aspect Ratio for DVD TV
When you go to the “DVD” tab, you will notice various aspect ratio options. Switching the aspect ratio for TV from 4:3 to 16:9 is pretty straightforward. To do so, select what you think is right.
Conclusion
From the article above, you have learned about different online converters. Now you know how to change the video aspect ratio online and use the video aspect ratio editor. Also, understand how to calculate aspect ratios.
So, you can decide for yourself that Wondershare Filmora video editor is one of the best tools. Using its different methods you can change the aspect ratio easily.
Furthermore, you can use it to make changes on both social media platforms and your devices because it is an effective and reliable tool.
For Win 7 or later (64-bit)
For macOS 10.12 or later
While watching movies, you might have noticed specific clips have black lines at the sides of the screen. It is because the original video’s aspect ratio is different from that of the screen on which you see it.
Nowadays, people are using multiple devices with different aspect ratios. Videos are an effective marketing tool that most marketers are using to expand their business. Therefore, the video aspect ratio has become vital.
Some people feel technical aspects such as video aspect ratio or using aspect ratio editor are a bit intimidating. But they are easy and simple to understand. So, let us know more about them.
In this article
01 [How to Calculate Video Aspect Ratio Online?](#Part 1)
02 [Websites to Change Video Aspect Ratio Online](#Part 2)
Part 1 How to Calculate Video Aspect Ratio Online?
Do you want to make changes to the video? If yes, then it is important to understand the basic concepts of video aspect ratios. Moreover, you can determine the specifications using an aspect ratio editor online.
Every photo, canvas, responsive design, digital video, or frame is rectangular with precise proportions. Outline the aspect ratios to create shapes according to different mediums like computers, TV, movies, or camera screens.
With the help of aspect ratio calculators, you can calculate the image’s value and new size. You can also use it to convert the image size and keep the objects in shape to make them look natural.
The formula to find an aspect ratio is: Width / Height
Aspect Ratio Calculation Process
Calculating the aspect resolution is pretty straightforward. The steps mentioned below will help you to get the correct height for the edited image:
- Take the original height-for example, 2400 units.
- Take the actual width- for example, 3200 units.
- Then, divide the height by width- for example, 2400/3200=0.75.
- Multiply the result (quotient) by new expected width- for instance, 0.75*600=450.
- The resulting figure is a new height.
Part 2 Websites to Change Video Aspect Ratio Online
If you want to change the video aspect ratio, you can easily crop the size of the video online with the help of different websites. These websites offer other aspect ratio options. So, let us learn more about them:
Free Convert
FreeConvert.com is a free editing website that allows you to edit video aspect ratio online. Usually, it is a cloud-based editor that converts a variety of files. So, you can use it to change the video aspect ratio of your clip.
You can see various options such as aspect ratio, codec, screen resolution, or more during video file conversion. For example, you can opt for an aspect ratio as per your requirements there.
Then, this converter will fix the clip automatically in the resolution selected by you. This website can process multiple files up to 1GB at once.
Pros:
- No Pop-ups occur while converting
- It did not affect the download speed
- Easy to convert the files
Cons:
- You have a limit of 25 minutes to convert files. After that, you need to upgrade to pro by making monthly payments.
CloudConvert
Cloud Convert is a file conversion service supporting around 200 file formats online for free. You can adjust the aspect ratio of videos on this website easily.
You have to upload a video clip and select its output format as per your original file. Then go to output video configuration to change the aspect ratio there. Choose the aspect ratio from the options given.
Pros:
- Several conversion options for high-quality files
- Supports cloud services
- Platform independent
- User-friendly
- Supports batch conversion
- It offers a powerful API
Cons:
- Get 25 minutes a day to convert the files
Kapwing
It is a free online aspect ratio editor to create content online. This tool has several features and a collection of online material. For example, through this aspect ratio editor, you can crop the size of video online.
You can select or resize video aspect ratio according to different social media platforms. But you can export only 720 p quality through this website for free after that; you have to create an account.
Pros:
- Merge multiple videos or images collectively in any order and add audio.
- Reduce the video size of any format with a single click.
- Add video subtitles
- Resize or crop videos for all social media posts.
- Cut out multiple sections of a video.
Cons:
- 250MB file upload limit
- Export only in 720p quality
- Export video clips for 7 minutes
- Edit or store content till two days
IMOVIE
Try the iMovie iPhone aspect ratio editor if you want to drag or drop the interface for editing videos simply. It has primitive tools to edit videos or images, and you can also import content from local drives or cloud storage with it.
It offers various visual effects like picture-in-picture, split-screen, or green screen effects. You can also enable viewers to zoom in or pass the scenes. Imovie set aspect ratio gives videos a cinematic feel using its 13 different video filters.
Pros:
- It has a simple interface.
- Its 4K resolution support allows you to give a cinematic feel to videos.
- iMovie has great speed controls that enable you for optimal pace-setting of scenes.
Cons:
- It does not have many output controls options.
- It only works on Mac systems.
Wondershare Filmora
If you permanently want to change the aspect ratio online, you must opt for a video converter or editor. Wondershare Filmora is the most remarkable aspect ratio editor that allows you to easily create videos of 4:3, 9:16, 16:9, and 1:1 aspect ratios.
Moreover, it is a convenient tool to edit videos on YouTube, Apple TV, Vimeo, or mobile devices. So, many YouTubers or bloggers are using it.
It is a reliable and cost-effective tool that offers drop and drag effects, audio, templates, soundtracks, filters, and other options. In addition, you can access features like split-screen, green screen, motion tracking, etc.
Its keyframing feature allows you to include custom animations, while motion tracking helps you track objects. Then, the color matching feature enables you to copy the color settings of one video and apply them to another clip.
You can even assign hotkeys shortcuts for various tools to save your time. Moreover, you can use different transitions, motion elements, filters, clips, titles, audios, and many other things with a simple drag and drop option.
Wondershare Filmora
Get started easily with Filmora’s powerful performance, intuitive interface, and countless effects!
Try It Free Try It Free Try It Free Learn More >
With its green screen feature, you can remove or change the video background. Then, you have an audio ducking feature to lower down the background volume or fade the audio track to another.
Here are various methods to change the aspect ratio in Wondershare Filmora:
Method 1: Change Aspect Ratio at the Starting Interface
Wondershare Filmora allows you to resize video aspect ratio when you launch the editor program. First, go to the drop-down menu button. Then, click on it to see various aspect ratios such as 16:9, 1:1, 4:3, 9:16, or 21:9.
Choose the aspect ratio that you want by simply clicking on it.
Method 2: Change Aspect Ratio under Project Settings
You can change the aspect ratio by clicking on the “Project Settings.” You can decide the target aspect ratio based on the aspect ratio of the media source.
For instance, if the aspect ratio of media source files is 4:3, select the standard aspect ratio of 4:3. Then, media files with other aspect ratios will show black bars.
In case of any discordance or if you want to change the aspect ratio, choose the proper ratio from project settings.
Method 3: Change Aspect Ratio during Editing
Even after importing the videos or images into Filmora’s timeline, you can easily change the ratio from the Crop and Zoom tool.
- Go to timeline and right-click on the video clip. Then, select “Crop and Zoom.” You will see the pop-up window.
- Click on 16:9, 4:3, 1:1, or 9:16 manually at the bottom if you like to change the video aspect ratio.
- You can also manually enter the video aspect ratio. Next, click on the “Ok” button.
After changing the aspect ratio, add background blur effects if you notice a black bar. It will enhance the video. You can also intensify your video by using filters, visual effects, overlays, or titles.
Method 4: Change the Aspect Ratio with Auto-Reframe
If you use Filmora’s latest versions, you will notice Auto Reframe helps to change the aspect ratio. Other than cropping, it will find the object in clips and crop it automatically if needed.
The following are steps to change the aspect ratio using the Auto-Reframe option:
Step1 Once you upload the video clips to the media library, right-click on it and choose the Auto-Reframe option
Step2 You will see the Auto Reframe window appear on the screen. Replace the existing video with a new clip. Then, change the video aspect ratio and video motion speed. Make sure to change the aspect ratio that fits most with different social media platforms
Step3 Once you choose the aspect ratio, click on the “Analyze” button. Filmora will Auto-Reframe the video itself. Once the process completes, you can see results in the preview window
Drag box to adjust the frame or to keep the object in it. It will automatically remove the content outside the box.
Step4 After completing adjustment or reframing, click on the “Export” button to save your video
Change the name of the video and select the location where you want to save the video. Now, click on the “Export” again to save.
Method 5: Change Aspect Ratio at Exporting
You can save the clip to your system or smartphones, depending on your requirements. Then, upload them directly to Youtube or burn them into DVD by clicking on the “Export button.” In this way, you can watch on widescreen or standard TV whenever you want.
● Change Aspect Ratio for the Local Computer
First, you will see the “Local” tab. There you can save the clip in a particular aspect ratio to your system.
You can see all resolutions with various aspect ratios after selecting the format. The output video depends on the media click resolution.
● Change Aspect Ratio for a Device
Change the “Device” tab to save the video in formats compatible with popular devices, including iPod, iPhone, PSP, iPad, etc. Once you choose the device, you will see all resolutions. Choose your favorite or the best resolution.
The video quality will continue improving with higher resolutions. But it will also increase the size of the file.
● Change Aspect Ratio for YouTube
Go to the “YouTube” tab and fill in the information. Then, click the “Export” button. Selecting the aspect ratio again is not necessary. It will directly upload your videos to YouTube.
● Change Aspect Ratio for DVD TV
When you go to the “DVD” tab, you will notice various aspect ratio options. Switching the aspect ratio for TV from 4:3 to 16:9 is pretty straightforward. To do so, select what you think is right.
Conclusion
From the article above, you have learned about different online converters. Now you know how to change the video aspect ratio online and use the video aspect ratio editor. Also, understand how to calculate aspect ratios.
So, you can decide for yourself that Wondershare Filmora video editor is one of the best tools. Using its different methods you can change the aspect ratio easily.
Furthermore, you can use it to make changes on both social media platforms and your devices because it is an effective and reliable tool.
For Win 7 or later (64-bit)
For macOS 10.12 or later
How to Make A Slideshow Video (+Filmora Techniques)
You have taken photos and videos all over your trip. Showing them to your friends and family can be a hassle if you have a lot of pictures. Viewing them all at once is possible by creating a slideshow video.
The slideshow video combines all the memories in one place. To make one on your own, we prefer just one best UI editing tools, Wondershare Filmora.
Before we create a slideshow, ensure to learn the basics of the slideshow video. Then, scroll below to get more!
Part 1. What Is a Slideshow Video?
A slideshow video is a video that combines your photos and videos to create a montage. This slideshow can be used as a collection of memories you can watch whenever you like.
You might have a photo album lying around somewhere in your house. A slideshow video can act like a modern-day photo album. But instead of photos, you can also add videos and create a monument of your precious memories.
Modern-day content creators on Youtube and other platforms can use a slideshow method to create short recap videos of their travels.
Part 2. What Are Some of the Uses of Slideshow Videos?
A slideshow video can be a great way to summarize all the moments of a marriage ceremony, graduation event, etc. And the list goes on and on.
- A wedding ceremony
- Anniversary recording
- A graduation ceremony
- A birthday party
- Your pet
- Your friends
- Your family
- A trip that you went on
Part 3. What Are the Benefits of a Slideshow?
There are many benefits to creating a slideshow video.
A long-lasting memory
Creating a slideshow video can be a digital reminiscent, allowing you to hold a precious video with your friends and family. Apart from physical portraits, a slideshow video will be a digital backup for your memories that you can watch in the future.
Easy to save and share
Since a video slideshow is a digital content, typically with an extension .mp4, .mov, etc., you can watch it whenever and wherever you want. Moreover, you can conveniently send it to the person who spent the time and shares the same memories with you.
Part 4. What Will You Need To Make a Slideshow?
To create an attractive slideshow video, you must fulfill the following requirements.
1. Good Quality Photos
To create a good slideshow, you must have good-quality photos with good resolution. Always take pictures with a good-quality camera or a mobile phone whenever you want to create a slideshow. Using filters in the editing software can disrupt the quality of your slideshow.
2. Video Clips
The slideshow is always combined with videos and photos. After taking good-quality images, remember always to record short video clips you can add between your pictures.
3. A Good Video Editor - Wondershare Filmora
To edit a slideshow video, you will need editing software. There’s no better tool to do the job than Wondershare Filmora . Wondershare Filmora enables you to make creative and appealing videos. It has a very engaging system UI that allows even novice users to get the hang of it quickly. You will learn how to make a slideshow in a few simple steps.
Free Download For Win 7 or later(64-bit)
Free Download For macOS 10.14 or later

Let’s start with the step-by-step instructions for making a slideshow video now that you know the requirements for generating a slideshow.
Part 5. Step-by-Step Guide to Creating a Slideshow Video
Utilizing filmora will reduce your workload while producing quality work. Follow the below step-by-step guide to make your slideshow video instantly!
Step1 Download Wondershare Filmora
Wondershare Filmora will provide the working platform. Follow the below steps to download it:
- First, install the Wondershare Filmora.
- Then, launch this application on your PC or Mac
Let’s proceed to edit our video after downloading the Wondershare Filmora software. Continue reading to find out how to begin the editing process.
Step2 Import your Photos and Videos
Importing your videos and pictures to Filmora’s media panel is best to have them all in one folder. Therefore, when you open Wondershare Filmora, you will notice the main import window in the top left corner.
- Click in the center of the import window upon the import icon.
- Browse from the PC library to where your target Videos and Photos are stored.
- Please select the required videos and photos and Open

Your next step will be to add the imported videos and images to the timeline.
Step3 Add your Photos and Videos to the Timeline
When you have multiple videos and photos, you can add all of them simultaneously. Or you can also add them one by one wherever you need. Follow the steps mentioned:
- Right-click on the photo or video you want.
- Keep holding the Right-click and drag it down to the timeline.

Now that we have imported your photos and videos into the timeline, it is time to align and add text.
Step4 Add the Title
To create an attractive slideshow, you will need to add a title before the start of the video. Doing so will allow you to gain more viewers and audiences.
Add a Black Screen
The black screen will eventually act like a canvas to give your title a good look. To add a black screen, follow the steps mentioned:
- Click on the media icon from the bar above the import window.
- You will notice many tabs on the left-hand side under a drop-down bar.
- Scroll below to find the sample media
- Download the black color if it is not downloaded already.
- Click and drag it down below to the start of your video.

Add a Title Tile
Now that we have our canvas, we will now add the title. Above the import media library, there will be a Title icon.
- Click on the title icon, and select the title that you want for your video by browsing and scrolling down.
- For this purpose, we will use a simple title tile called “Title 29.”
![]()
Note: You can find the same title by scrolling, browsing, or searching in the search bar above the import library.
- Click and drag the title onto the black screen that we added.
- Double-click the title to open its settings.
- Here you can type in the text that you want.

You can also change its font. When you click on the font bar, a drop-down option will pop up, and you choose whichever you like.
- Change the animation of the text title from the top left corner animation
Change The Timing of The Title
You can also adjust the timing of the title by below steps:
- Click on the advanced option in the bottom right corner, and settings will pop up.
- Find the title bar and drag it to the right side to increase the timing of the title.

After adding the title, it’s time to go with fading effect as shown below!
Step5 Add a Fade effect
You can also add a fade transition to the start of your video. It will blend the title with the first clip. Follow the steps mentioned to add the transition effects:
- Search the Fade option from the Transitions tab above the import window
![]()
Note: A fade transition will allow your title to fade into the first clip creating a visually pleasing effect.
- Download the Fade transition and drag it between the Black screen and the first clip.

Now that we have added a transition, it is time to move on to our music!
Step6 Add The Music
You can add your music to the slideshow from your PC library, but make sure you have the music rights. It is better to use stock audio by following the steps:
- Click on the Audio icon on the bar above the import window, and the list will pop up.
- Please browse the library to find music that best suits your video and download it.
- Then add it to the timeline’s audio track.
Add Beat Detection
To match your video clips properly with the music, so it remains in sync, you can adjust it with the beat of the music. To add beat detection, follow the steps mentioned:
- Right-Click on the audio that you selected in the audio library.
- You will see a pop-up list, and in the options, you will see Beat detection.
- Click on Beat detection.

- Then click on the audio and drag it below on the timeline.
Match The Video With The Audio Markers
To have the full advantage of beat detection, you must adjust your videos and photos to the markers. Follow the steps mentioned below to do so:

- Check that the video clips are in sync with the marker on the audio.
- For this, drag one video end to a marker or as many videos as you want.
- Ultimately, you will create a timeline in which your videos sync with the audio beat.

After syncing your videos and photos to the audio, it is time to move on to the scaling and background blur.
Step7 Scale and Blur The Background
Now, some of the pictures you have added must-have black borders. It usually means that your image is shorter than the aspect ratio.
If you leave the picture/photo as it is, the black borders will make it look shorter and out of proportion. As a result, it gives a generally poor look, as shown below.

To counter this problem, follow some easy steps:
- Double-click on the picture with black borders, and it will open the settings list.
- Go into the Transform Here you can see multiple settings.
- Increase the size of your photo to match the aspect ratio.

Add a Background Blur Effect
In some cases where you have taken a portrait photo where the picture is vertical, it ultimately stays out of proportion to the aspect ratio.
![]()
Note: Simply scaling the image to match the aspect ratio size is not sensible in this case. Doing so will hide the many pretty features of a portrait.

To counter this problem, you can add a blur effect. This effect will turn your background blur, matching the aspect ratio. Follow the steps mentioned below:
- Click on the Effects tab above the import window and search for Blur.
- Download the blur effect that suits you best and then drag the blur effect above your photo in the timeline.
You will notice the background turn to a blur in the main play screen.

Step8 Add a Transition
You can also add a transition effect to spice up things. It can get bland when your video or photo changes from one to another. To create a good slideshow video, you can add a transition effect by following the steps mentioned below:
- Click on the Transition icon above the import window.
- Browse the library until you find a transition you like, then download one.
- Click on the transition and drag it between the clips.

Adjust The Duration and Placement of The Transition
Now it’s time to adjust the duration and placement of the transition. For this, you can follow the steps mentioned below:
- Double-click on the transition effect, and it will open the settings list.
- You can adjust the duration by setting the timer as per your requirement.
![]()
Note: If other transitions are added to the timeline, you can adjust them by clicking Apply to all.

When you have adjusted the slideshow transitions, it is time to move on to the effects and filters.
Step9 Add the Effects and Filters
If you create a slideshow video of your trip to a historical place. You can add a Vintage filter to your video to give it that vintage tint. Follow the steps mentioned below:
- Head over to the Effects tab, where the effects library will open up
- Select any effect and download
- Click on the effect and drag it to drop in the timeline.

Combining a vintage effect with a dreamy glow will make your video pop up even more. To add a nostalgic glow to your video, follow the steps:
- Click on the effects and search for Glow in the search bar.
- Click and drag the glow effect above the timeline and ensure the effect is in the separate video timeline.
- Ensure the effect is applied to every photo and video.
- Double-click on the effect, and settings will open in the import window.
- Then, you can adjust the radius and opacity of the video. Adjust as you desire.

We are almost done. Let us now move toward our outro!
Step10 Create an Outro
The steps we will do will be similar to the ones we did initially. As we are creating, we will again need a canvas. Follow the steps mentioned below:
- Head to the media icon on the bar and scroll until you see the sample media tab.
- In the sample color option, drag and drop the black color at the end of your video.
Add an Outro Transition
To finalize things, add a transition effect at the end of the clip by these steps:
- In the Transition tab, search for the Fade effect.
- Drag and drop the Fade effect between your last video clip and the Black screen.

Fade out The Audio
If the audio suddenly ends at the end of your slideshow, it will create a bitter effect. Therefore, you should always fade out audio at the end of the video. To do this, follow the steps mentioned:
- Double-click on the audio in the timeline, and the settings list will pop up.
- On the top section of the import window, you will notice fade options.
- In the fade-out bar, drag it to the side to set your fade-out timer.
You can show your friends and family the slideshow or upload it to Youtube. Play the Slideshow Video from the beginning to see the changes.

Conclusion
By the steps mentioned above, you can create a slideshow video. Give every moment a chance to align everything on one side! The slideshow will also save your device space by aligning everything in one video.
Free Download For macOS 10.14 or later
Let’s start with the step-by-step instructions for making a slideshow video now that you know the requirements for generating a slideshow.
Part 5. Step-by-Step Guide to Creating a Slideshow Video
Utilizing filmora will reduce your workload while producing quality work. Follow the below step-by-step guide to make your slideshow video instantly!
Step1 Download Wondershare Filmora
Wondershare Filmora will provide the working platform. Follow the below steps to download it:
- First, install the Wondershare Filmora.
- Then, launch this application on your PC or Mac
Let’s proceed to edit our video after downloading the Wondershare Filmora software. Continue reading to find out how to begin the editing process.
Step2 Import your Photos and Videos
Importing your videos and pictures to Filmora’s media panel is best to have them all in one folder. Therefore, when you open Wondershare Filmora, you will notice the main import window in the top left corner.
- Click in the center of the import window upon the import icon.
- Browse from the PC library to where your target Videos and Photos are stored.
- Please select the required videos and photos and Open
Your next step will be to add the imported videos and images to the timeline.
Step3 Add your Photos and Videos to the Timeline
When you have multiple videos and photos, you can add all of them simultaneously. Or you can also add them one by one wherever you need. Follow the steps mentioned:
- Right-click on the photo or video you want.
- Keep holding the Right-click and drag it down to the timeline.
Now that we have imported your photos and videos into the timeline, it is time to align and add text.
Step4 Add the Title
To create an attractive slideshow, you will need to add a title before the start of the video. Doing so will allow you to gain more viewers and audiences.
Add a Black Screen
The black screen will eventually act like a canvas to give your title a good look. To add a black screen, follow the steps mentioned:
- Click on the media icon from the bar above the import window.
- You will notice many tabs on the left-hand side under a drop-down bar.
- Scroll below to find the sample media
- Download the black color if it is not downloaded already.
- Click and drag it down below to the start of your video.
Add a Title Tile
Now that we have our canvas, we will now add the title. Above the import media library, there will be a Title icon.
- Click on the title icon, and select the title that you want for your video by browsing and scrolling down.
- For this purpose, we will use a simple title tile called “Title 29.”
![]()
Note: You can find the same title by scrolling, browsing, or searching in the search bar above the import library.
- Click and drag the title onto the black screen that we added.
- Double-click the title to open its settings.
- Here you can type in the text that you want.
You can also change its font. When you click on the font bar, a drop-down option will pop up, and you choose whichever you like.
- Change the animation of the text title from the top left corner animation
Change The Timing of The Title
You can also adjust the timing of the title by below steps:
- Click on the advanced option in the bottom right corner, and settings will pop up.
- Find the title bar and drag it to the right side to increase the timing of the title.
After adding the title, it’s time to go with fading effect as shown below!
Step5 Add a Fade effect
You can also add a fade transition to the start of your video. It will blend the title with the first clip. Follow the steps mentioned to add the transition effects:
- Search the Fade option from the Transitions tab above the import window
![]()
Note: A fade transition will allow your title to fade into the first clip creating a visually pleasing effect.
- Download the Fade transition and drag it between the Black screen and the first clip.
Now that we have added a transition, it is time to move on to our music!
Step6 Add The Music
You can add your music to the slideshow from your PC library, but make sure you have the music rights. It is better to use stock audio by following the steps:
- Click on the Audio icon on the bar above the import window, and the list will pop up.
- Please browse the library to find music that best suits your video and download it.
- Then add it to the timeline’s audio track.
Add Beat Detection
To match your video clips properly with the music, so it remains in sync, you can adjust it with the beat of the music. To add beat detection, follow the steps mentioned:
- Right-Click on the audio that you selected in the audio library.
- You will see a pop-up list, and in the options, you will see Beat detection.
- Click on Beat detection.
- Then click on the audio and drag it below on the timeline.
Match The Video With The Audio Markers
To have the full advantage of beat detection, you must adjust your videos and photos to the markers. Follow the steps mentioned below to do so:
- Check that the video clips are in sync with the marker on the audio.
- For this, drag one video end to a marker or as many videos as you want.
- Ultimately, you will create a timeline in which your videos sync with the audio beat.
After syncing your videos and photos to the audio, it is time to move on to the scaling and background blur.
Step7 Scale and Blur The Background
Now, some of the pictures you have added must-have black borders. It usually means that your image is shorter than the aspect ratio.
If you leave the picture/photo as it is, the black borders will make it look shorter and out of proportion. As a result, it gives a generally poor look, as shown below.
To counter this problem, follow some easy steps:
- Double-click on the picture with black borders, and it will open the settings list.
- Go into the Transform Here you can see multiple settings.
- Increase the size of your photo to match the aspect ratio.
Add a Background Blur Effect
In some cases where you have taken a portrait photo where the picture is vertical, it ultimately stays out of proportion to the aspect ratio.
![]()
Note: Simply scaling the image to match the aspect ratio size is not sensible in this case. Doing so will hide the many pretty features of a portrait.
To counter this problem, you can add a blur effect. This effect will turn your background blur, matching the aspect ratio. Follow the steps mentioned below:
- Click on the Effects tab above the import window and search for Blur.
- Download the blur effect that suits you best and then drag the blur effect above your photo in the timeline.
You will notice the background turn to a blur in the main play screen.
Step8 Add a Transition
You can also add a transition effect to spice up things. It can get bland when your video or photo changes from one to another. To create a good slideshow video, you can add a transition effect by following the steps mentioned below:
- Click on the Transition icon above the import window.
- Browse the library until you find a transition you like, then download one.
- Click on the transition and drag it between the clips.
Adjust The Duration and Placement of The Transition
Now it’s time to adjust the duration and placement of the transition. For this, you can follow the steps mentioned below:
- Double-click on the transition effect, and it will open the settings list.
- You can adjust the duration by setting the timer as per your requirement.
![]()
Note: If other transitions are added to the timeline, you can adjust them by clicking Apply to all.
When you have adjusted the slideshow transitions, it is time to move on to the effects and filters.
Step9 Add the Effects and Filters
If you create a slideshow video of your trip to a historical place. You can add a Vintage filter to your video to give it that vintage tint. Follow the steps mentioned below:
- Head over to the Effects tab, where the effects library will open up
- Select any effect and download
- Click on the effect and drag it to drop in the timeline.
Combining a vintage effect with a dreamy glow will make your video pop up even more. To add a nostalgic glow to your video, follow the steps:
- Click on the effects and search for Glow in the search bar.
- Click and drag the glow effect above the timeline and ensure the effect is in the separate video timeline.
- Ensure the effect is applied to every photo and video.
- Double-click on the effect, and settings will open in the import window.
- Then, you can adjust the radius and opacity of the video. Adjust as you desire.
We are almost done. Let us now move toward our outro!
Step10 Create an Outro
The steps we will do will be similar to the ones we did initially. As we are creating, we will again need a canvas. Follow the steps mentioned below:
- Head to the media icon on the bar and scroll until you see the sample media tab.
- In the sample color option, drag and drop the black color at the end of your video.
Add an Outro Transition
To finalize things, add a transition effect at the end of the clip by these steps:
- In the Transition tab, search for the Fade effect.
- Drag and drop the Fade effect between your last video clip and the Black screen.
Fade out The Audio
If the audio suddenly ends at the end of your slideshow, it will create a bitter effect. Therefore, you should always fade out audio at the end of the video. To do this, follow the steps mentioned:
- Double-click on the audio in the timeline, and the settings list will pop up.
- On the top section of the import window, you will notice fade options.
- In the fade-out bar, drag it to the side to set your fade-out timer.
You can show your friends and family the slideshow or upload it to Youtube. Play the Slideshow Video from the beginning to see the changes.
Conclusion
By the steps mentioned above, you can create a slideshow video. Give every moment a chance to align everything on one side! The slideshow will also save your device space by aligning everything in one video.
Learn Topaz Video Enhance AI Review
Learn Topaz Video Enhance AI Review and Achieve Powerful Video Conversion
An easy yet powerful editor
Numerous effects to choose from
Detailed tutorials provided by the official channel
Earlier, you might need a professional to help you with the AI video enhancing process, but now you can do it yourself using Topaz. This app has fascinating features to make your editing experience smooth and unique. This app was used only for photo enhancement earlier. Now with time, it has been updated, and now it can be used to do AI Enhancing of your video. This article is a Topaz Video Enhance AI review. Here in this article, we focus on the usage of Topaz and its effectiveness compared to other AI software.
In this article
01 [What Does Topaz Video Enhance AI Do?](#Part 1)
02 [How Do You Use Topaz Video Enhance AI?](#Part 2)
03 [Deep Learning: Topaz Video Enhance AI Review](#Part 3)
Part 1 What Does Topaz Video Enhance AI Do?
Topaz Video Enhance IA is an all-rounder in its field. This app is used to do AI upscaling in general and is used to improve the display quality of the footage. The AI technology used in this software is so advanced that it does not need any help and edits every frame with accuracy resulting in a natural and smooth visual. Topaz Video Enhance IA can be used to restore old or low-resolution footage. This video enhance AI app allows outstanding slow-motion editing of videos. This software can give your video upscaling experience a new turn.

Part 2 How Do You Use Topaz Video Enhance AI?
When we are talking about topaz labs video enhance AI review, it’s incomplete if we do not talk about the process of using it**.** The whole process of video enhance AI topaz labs can be divided into these parts:
01Importing of videos
To open a dialogue box showing your videos, click on the center of the screen. You can select more than one video or even drag those videos directly into the app from the dialogue box that has been shown.

The videos you have selected will be shown at the bottom of the screen. You can pick each video individually to edit, or you can do a batch edit of all the videos.

To remove a video or a video queue, you can click on the delete icon above the video list.
02Choosing AI Processing Models
You need to choose the suitable models to edit or enhance your video. Different AI Processing models will be available in the app itself; you can choose if you want to choose from those models.
03Settings of the output of the video
The app offers in-built standards to set your output, or you can create your custom settings.

For the output of the video, the app allows both picture and video sequence output.

Sometimes a black bar appears on the output video when non-standard-sized videos are converted to standard preset.
But there is a solution to this, you fill the frame by clicking on the “Crop to fill frame” option.
04Setting a name for your output
With the height, width, and scale of the output video, the current name will be shown by default. You can change this by unchecking the box and selecting the “Use default output name,” Then, there will be a dialogue box on your screen.
In that dialogue box, type the name of your output video, select the format or type of your output file, select the location where you want to save your output and then click on the “Save” option.
05Preview of the output video
You can see a short clip of 30 rendered framed of your output as a preview.
To preview the render, you need to select and drag the slider on your video’s timeline. Position the slider where you want to see the preview of your render or output.
You need to wait for a while so that the clips get processed. After the processing is complete, there will be a split-screen.
One part of the split shows the original video clip, and the other split shows the edited or rendered previews on loop.
06Trimming of the output video
To understand simply, the more your output size, the more time it takes to process.
To save the processing time, you can trim only that part of the rendered video you need.
To start with the trimming process, you need to drag the slider along the video’s timeline to select the starting timestamp of the video.
After you have positioned your slider, click on the “scissor” icon on your screen to trim the beginning of your rendered video.
To trim from the end of the rendered video, you have to drag the slider to the ending position of your video.
After your slider is perfectly positioned, click on the “scissor” icon on your screen to trim the end part of your rendered video.
A part of your timeline will be highlighted; this highlighted portion will be processed as you edit, enhanced output.

07Processing of the final output
To get the final output, you need to process the video.
To start with the processing, click on the “Start Processing” option at the bottom. Your video will be shown frame by frame until the processing of the video is complete.
Part 3 Deep Learning: Topaz Video Enhance AI Review
To make the topaz video enhance review, we need to throw light on these features.
01Cost
All the users are given a one-month free trial. However, the complete version of Topaz Video Enhance AI costs $199.9 (includes an update of one year), and the yearly upgrades run at $99. If you do not want to pay for yearly upgrades, you continue using your previous version or the version you bought previously. You can use coupons to have a discount on your payment.
02Design and Performance
The main designs and performance highlights of this software are:
● Default footage set to 4K resolution.
● This software cleans up old progressive footage
● The app interlaces footage to 4K
● This app cleans up old interlaced footage
● This app supports 400% slow motion and 60fps.
03Features
Topaz Video Enhance AI has several exciting features. The most iconic among those features were:
● Upscaling of video to 4Kor 8K resolution. This application can upgrade your video from SD to HD, from HD to 4K, and from 4K to 8K.
● Topaz Video Enhance AI works as a wonder to remove noise. This app has an excellent performance in removing high ISO noise. Topaz AI uses outstanding photo editing software, which results in wonderful outputs.
● The AI automatically converts your video frame rate from 25fps to 3fps. So, if you need your custom frame rate settings, you can set them in the app.
● Topaz Video Enhance AI acts as amind-blowing editing software when it is about deinterlacing video. Deinterlacing your video gives a smooth and natural finish to your video because there are almost no or very few artifacts in the final output.
04System Requirements
Video Enhance AI has certain system requirements. The features required are:
Windows: This software is not supported by Windows 7 or Windows 8. Appropriate for Windows 10 (build 19041 v2004 and above) and Windows 11.
Mac: 10.14 Mojave and above for CPU support 10.15 Catalina and above GPU support.
The hardware requirements are:
● Processor: Intel HD 5000 iGPU or above AMD CPUs from 2016
● System Memory: 8GB (16GB recommended for better performance)
● Graphics Card: Intel HD 5000 (on CPU DirectX 12, compatible in all Windows) and Mac 10.15 and above.
● Dedicated Graphics Memory: 2GB (8GB recommended for better performance)
05Interface
When Topaz Video Enhance AI is working, the screen is divided into different parts, that is:
● Clip selection or the clip selection bar can be used to select the exact portions that you want to render and export as the final footage.
● Video Processing Window can be used to select the AI model from the preset AI models on the app itself.
● A batch processing window is used to edit the batch by adding footage to the batch for batch editing.
● In this video output section, you can select one of the presets for your footage from an upscale percentage of 1.

06A Comparison to Other Video Enhance AI Software
| Topaz Video Enhance AI | Other Video Enhance AI |
|---|---|
| Preset video resolution is 4K | Most of the video enhance AI has a maximum resolution of 4K. |
| The preset fps rate is 30, and you can change it accordingly. | Other Video Enhance AI software has one preset fps rate and does not allow users to change it. |
| Supports any output format. | Supports only particular formats of output. |
Wondershare Filmora Video Editor is another app you can use to edit your footage and retain its quality. Most of the editing app ruins the quality. You can use this app to edit your own footage or photos. This application is one of the best editing apps because of its cool and user-friendly features. The most amazing part is this app is free and available on both Windows and Mac.
For Win 7 or later (64-bit)
For macOS 10.12 or later
● Ending Thoughts →
● Now you know what usages of Topaz Video Enhance IA are through the topaz video enhance review focused on in this article.
● The main features, minimum system requirements, and, most importantly, the procedure to use this app have been elaborated on in this article.
● Please let us know your views on this post and if you liked it, do share it with your friends and comment below.
Earlier, you might need a professional to help you with the AI video enhancing process, but now you can do it yourself using Topaz. This app has fascinating features to make your editing experience smooth and unique. This app was used only for photo enhancement earlier. Now with time, it has been updated, and now it can be used to do AI Enhancing of your video. This article is a Topaz Video Enhance AI review. Here in this article, we focus on the usage of Topaz and its effectiveness compared to other AI software.
In this article
01 [What Does Topaz Video Enhance AI Do?](#Part 1)
02 [How Do You Use Topaz Video Enhance AI?](#Part 2)
03 [Deep Learning: Topaz Video Enhance AI Review](#Part 3)
Part 1 What Does Topaz Video Enhance AI Do?
Topaz Video Enhance IA is an all-rounder in its field. This app is used to do AI upscaling in general and is used to improve the display quality of the footage. The AI technology used in this software is so advanced that it does not need any help and edits every frame with accuracy resulting in a natural and smooth visual. Topaz Video Enhance IA can be used to restore old or low-resolution footage. This video enhance AI app allows outstanding slow-motion editing of videos. This software can give your video upscaling experience a new turn.
Part 2 How Do You Use Topaz Video Enhance AI?
When we are talking about topaz labs video enhance AI review, it’s incomplete if we do not talk about the process of using it**.** The whole process of video enhance AI topaz labs can be divided into these parts:
01Importing of videos
To open a dialogue box showing your videos, click on the center of the screen. You can select more than one video or even drag those videos directly into the app from the dialogue box that has been shown.
The videos you have selected will be shown at the bottom of the screen. You can pick each video individually to edit, or you can do a batch edit of all the videos.
To remove a video or a video queue, you can click on the delete icon above the video list.
02Choosing AI Processing Models
You need to choose the suitable models to edit or enhance your video. Different AI Processing models will be available in the app itself; you can choose if you want to choose from those models.
03Settings of the output of the video
The app offers in-built standards to set your output, or you can create your custom settings.
For the output of the video, the app allows both picture and video sequence output.
Sometimes a black bar appears on the output video when non-standard-sized videos are converted to standard preset.
But there is a solution to this, you fill the frame by clicking on the “Crop to fill frame” option.
04Setting a name for your output
With the height, width, and scale of the output video, the current name will be shown by default. You can change this by unchecking the box and selecting the “Use default output name,” Then, there will be a dialogue box on your screen.
In that dialogue box, type the name of your output video, select the format or type of your output file, select the location where you want to save your output and then click on the “Save” option.
05Preview of the output video
You can see a short clip of 30 rendered framed of your output as a preview.
To preview the render, you need to select and drag the slider on your video’s timeline. Position the slider where you want to see the preview of your render or output.
You need to wait for a while so that the clips get processed. After the processing is complete, there will be a split-screen.
One part of the split shows the original video clip, and the other split shows the edited or rendered previews on loop.
06Trimming of the output video
To understand simply, the more your output size, the more time it takes to process.
To save the processing time, you can trim only that part of the rendered video you need.
To start with the trimming process, you need to drag the slider along the video’s timeline to select the starting timestamp of the video.
After you have positioned your slider, click on the “scissor” icon on your screen to trim the beginning of your rendered video.
To trim from the end of the rendered video, you have to drag the slider to the ending position of your video.
After your slider is perfectly positioned, click on the “scissor” icon on your screen to trim the end part of your rendered video.
A part of your timeline will be highlighted; this highlighted portion will be processed as you edit, enhanced output.
07Processing of the final output
To get the final output, you need to process the video.
To start with the processing, click on the “Start Processing” option at the bottom. Your video will be shown frame by frame until the processing of the video is complete.
Part 3 Deep Learning: Topaz Video Enhance AI Review
To make the topaz video enhance review, we need to throw light on these features.
01Cost
All the users are given a one-month free trial. However, the complete version of Topaz Video Enhance AI costs $199.9 (includes an update of one year), and the yearly upgrades run at $99. If you do not want to pay for yearly upgrades, you continue using your previous version or the version you bought previously. You can use coupons to have a discount on your payment.
02Design and Performance
The main designs and performance highlights of this software are:
● Default footage set to 4K resolution.
● This software cleans up old progressive footage
● The app interlaces footage to 4K
● This app cleans up old interlaced footage
● This app supports 400% slow motion and 60fps.
03Features
Topaz Video Enhance AI has several exciting features. The most iconic among those features were:
● Upscaling of video to 4Kor 8K resolution. This application can upgrade your video from SD to HD, from HD to 4K, and from 4K to 8K.
● Topaz Video Enhance AI works as a wonder to remove noise. This app has an excellent performance in removing high ISO noise. Topaz AI uses outstanding photo editing software, which results in wonderful outputs.
● The AI automatically converts your video frame rate from 25fps to 3fps. So, if you need your custom frame rate settings, you can set them in the app.
● Topaz Video Enhance AI acts as amind-blowing editing software when it is about deinterlacing video. Deinterlacing your video gives a smooth and natural finish to your video because there are almost no or very few artifacts in the final output.
04System Requirements
Video Enhance AI has certain system requirements. The features required are:
Windows: This software is not supported by Windows 7 or Windows 8. Appropriate for Windows 10 (build 19041 v2004 and above) and Windows 11.
Mac: 10.14 Mojave and above for CPU support 10.15 Catalina and above GPU support.
The hardware requirements are:
● Processor: Intel HD 5000 iGPU or above AMD CPUs from 2016
● System Memory: 8GB (16GB recommended for better performance)
● Graphics Card: Intel HD 5000 (on CPU DirectX 12, compatible in all Windows) and Mac 10.15 and above.
● Dedicated Graphics Memory: 2GB (8GB recommended for better performance)
05Interface
When Topaz Video Enhance AI is working, the screen is divided into different parts, that is:
● Clip selection or the clip selection bar can be used to select the exact portions that you want to render and export as the final footage.
● Video Processing Window can be used to select the AI model from the preset AI models on the app itself.
● A batch processing window is used to edit the batch by adding footage to the batch for batch editing.
● In this video output section, you can select one of the presets for your footage from an upscale percentage of 1.
06A Comparison to Other Video Enhance AI Software
| Topaz Video Enhance AI | Other Video Enhance AI |
|---|---|
| Preset video resolution is 4K | Most of the video enhance AI has a maximum resolution of 4K. |
| The preset fps rate is 30, and you can change it accordingly. | Other Video Enhance AI software has one preset fps rate and does not allow users to change it. |
| Supports any output format. | Supports only particular formats of output. |
Wondershare Filmora Video Editor is another app you can use to edit your footage and retain its quality. Most of the editing app ruins the quality. You can use this app to edit your own footage or photos. This application is one of the best editing apps because of its cool and user-friendly features. The most amazing part is this app is free and available on both Windows and Mac.
For Win 7 or later (64-bit)
For macOS 10.12 or later
● Ending Thoughts →
● Now you know what usages of Topaz Video Enhance IA are through the topaz video enhance review focused on in this article.
● The main features, minimum system requirements, and, most importantly, the procedure to use this app have been elaborated on in this article.
● Please let us know your views on this post and if you liked it, do share it with your friends and comment below.
Also read:
- Updated 2024 Approved How to Make Stunning Glitch Effect in Photoshop? Ultimate Guide
- New 2024 Approved How to Select and Use The Best BRAW LUTs
- Updated In 2024, Are You Searching the Internet for Top Wedding LUTs Premiere Pro? This Article Provides Suggestions on the Best LUT Color Presets
- Thousands Already Know What Ezgif Is and So Can You for 2024
- New 2024 Approved Do You Wish to Convert GIF to Animated PNG? Then, You Need to Know About Using a GIF to APNG Converter to Help You Carry This Process Out in No Time. Read On
- New In 2024, Before & After Editing Trick | Wondershare Filmora Tutorial
- New How to Make a Video Slideshow in iMovie
- Updated Easy Ways to Create Procreate GIFs for 2024
- New How to Remove Background Noise From Video Sony Vegas for 2024
- Updated In 2024, Montage Makes It Easy to Create and Share Videos. This Article Will Explain What It Can Do and Show You Examples of Movies that Use Montage
- Updated Top 6 Best Alternatives to Clownfish Voice Changer for 2024
- Looking For a Cheap Camera to Make Slow Motion Video? Get It Now
- Mastering the Art of Video Framing
- Different Ways to Crop TikTok Video in High-Quality for 2024
- Guide To Using Luts Perfectly in Final Cut Pro
- Learn Topaz Video Enhance AI Review and Achieve Powerful Video Conversion
- How to Create a Clideo Slideshow Simply
- Updated How to Save As MP4 File on Windows Movie Maker?
- Updated Achieving GoPro Slow Motion with Quality An In-Depth Overview for 2024
- In 2024, Do You Know You Can Trim and Cut Your Video Into the Desired Portions Using a Reliable Video Splitter? Get an Easy Video Splitter Now to Simplify Your Work. Here Are 33 Carefully Chosen Apps to Help You in This
- Updated How to Make a Smooth Speed Ramping in Premiere Pro for 2024
- How to Make a GIF With Transparent Background?
- 2024 Approved 15 Amazing GIF Splitter Examples You Need to Bookmark
- Updated In 2024, If You Want to Keep Your Memories in Form of Video or Slideshow Then Keynote Is Great App for You. It Has Amazing and Powerful Tools Which Give Your Slideshow a Great and Beautiful Look
- Updated In 2024, 3 Best Motion Blur Plugins for Adobe After Effects
- Updated 2024 Approved Do You Want to Know How to Add LUTs to Premiere Pro? In This Guide, You Will Find Details and Easy Steps to Proceed with Using LUTs in Premiere Pro
- In 2024, Wondershare Filmora Has Introduced a New Feature - AI Portrait Effect that You Can Use to Remove Background From Various Videos and Images. Explore the Uses, Benefits, and Real-Life Scenarios of This Feature in a Comprehensive Guide
- In 2024, Top 8 AR Apps for Android and iOS | Help You See the World of AR
- Updated This Article Will Focus on Understanding the Secret Tips in Wondershare Filmora that You Can Use to Edit Videos Faster and More Efficiently
- Updated In 2024, Steps to Denoise in Final Cut Pro – Reduce Video and Audio Noise
- 2024 Approved Change Speed of a Video on iPhone
- Updated What Is the Best Frame Rate for 4K Videos, In 2024
- In 2024, How to Use Frame Blending in Premiere Pro
- Updated In 2024, Easy Way to Create an Alternate Reality Effect
- Updated Do You Need to Make Your Video More Immersive? You Can Make It 60 FPS to Achieve That. And Here Are the 5 Best Tools that You Can Use
- 2024 Approved 2 Methods to Cut Video in VLC on Windows
- 2024 Approved Tips for Choosing Location and Scheduling Music Video
- 2024 Approved How to Make a Super Easy Rotating Video Effect
- Updated In 2024, Add Green Screen Effects in Final Cut Pro
- New 2024 Approved How To Achieve LumaFusion Color Grading Through LUTs
- Why Your WhatsApp Live Location is Not Updating and How to Fix on your OnePlus 12R | Dr.fone
- Can I use iTools gpx file to catch the rare Pokemon On Tecno Pova 5 | Dr.fone
- How to Mirror PC Screen to Huawei Nova Y71 Phones? | Dr.fone
- In 2024, How to Unlock iCloud Activation Lock and iCloud Account On Apple iPhone SE (2020)?
- How to recover old videos from your Tecno Phantom V Flip
- Best Video Repair tool to Fix and Repair Corrupted video files of Asus ROG Phone 8 Pro
- In 2024, How Can I Use a Fake GPS Without Mock Location On Tecno Spark 10 4G? | Dr.fone
- In 2024, The 10 Best Tools to Bypass iCloud Activation Lock On iPhone 14 Pro Max You Should Try Out
- How to Unlock iPhone 14 Pro without Passcode or Face ID
- A Detailed VPNa Fake GPS Location Free Review On Apple iPhone 8 Plus | Dr.fone
- How To Unlock Stolen Apple iPhone SE (2020) In Different Conditionsin
- Will the iPogo Get You Banned and How to Solve It On Vivo V30 Pro | Dr.fone
- Simple Solutions to Fix Android SystemUI Has Stopped Error For Poco X6 | Dr.fone
- Read This Guide to Find a Reliable Alternative to Fake GPS On Honor Magic Vs 2 | Dr.fone
- In 2024, How To Change Infinix Smart 7 HD Lock Screen Password?
- How to Factory Reset Tecno Camon 30 Pro 5G If I Forgot Security Code or Password? | Dr.fone
- How to restore wiped messages on OnePlus Nord CE 3 Lite 5G
- In 2024, Best Ways to Bypass iCloud Activation Lock on iPhone 15 Pro/iPad/iPod
- Possible solutions to restore deleted contacts from Samsung Galaxy XCover 6 Pro Tactical Edition.
- Fake the Location to Get Around the MLB Blackouts on Xiaomi Redmi Note 12 Pro+ 5G | Dr.fone
- Title: How to Zoom Webcam on PC
- Author: Morgan
- Created at : 2024-05-19 05:11:39
- Updated at : 2024-05-20 05:11:39
- Link: https://ai-video-editing.techidaily.com/how-to-zoom-webcam-on-pc/
- License: This work is licensed under CC BY-NC-SA 4.0.
