

In 2024, How to Edit Recorded Video
How to Edit Recorded Video
The most critical component of post-production for a video marketer is editing. Your video will seem unfinished and repel your viewers if you cannot effortlessly weave your images together or get your cut to reach the proper frame. Learning to edit a video may soon become a never-ending task. While each project you work on will have somewhat different editing needs, the principles of video editing remain basically the same. You don’t need to spend a lot on costly equipment to have a professional appearance; if you pay attention to a few important things, you can produce excellent movies with whatever you have right now.
Content producers, entrepreneurs, and influencers can have much too much material to include into a single YouTube video. You may not be able to buy video editing software if you’re on a tight budget. So, what does a video marketer do if they don’t have editing software? To assist you with the process of video editing, we’ve put up this thorough tutorial that covers everything you’ll need to know to make stunning films, even if you’ve never done it before. We’ll also demonstrate how to utilize the super-intuitive and user-friendly editor to create a video.
Part 1. Edit Recorded Video in OBS
OBS is a video streaming and recording application. It’s open source, free, and works on Macs, Windows, and Linux. It is a strong and adaptable screencast video creation tool when paired with competent audio and video editing tools. Unfortunately, OBS doesn’t support editing feature and hence, we’re enlisting the recording steps so you can edit them by using a third-party toolkit mentioned in the guide.
Step 1. Download and Install OBS
Install OBS according to the instructions for your operating system by downloading it from the link below.
Step 2. Setup Screen Recording
The window is divided into separate parts called “docks” when you initially launch the app. Every dock has a distinct function. Scenes, Sources, Mixer, and Controls are the areas to pay attention to. OBS employs a Scenes and Sources system, which will be discussed in more depth in a later lesson. These two tools operate in tandem to help you keep track of your video, audio, and other production materials. When you first start OBS, you’ll see that a scene is already loaded, which you can locate in the bottom left corner of the interface.

You’ll also need to add a source to this scene before you can begin recording. Click the Add button at the bottom of the Sources panel, then pick Screen Capture on Linux or Display Capture on Mac and Windows with the default Scene chosen (it will be highlighted).
Step 3. Customize the Recording Source
You’ll need to create a new source before you can begin recording your desktop screen. Select “Display Capture” by clicking the “+” icon on the Sources dock. You will be prompted to name the Display source in a popup window. Click “OK”. At the bottom right of the screen, click the Settings icon. Take note of the Recording Path field under the Output tab. This is where your recorded video will be kept on your computer.

Step 4. Start/Stop Recording
You’ll be able to choose the computer screen display you wish to capture in the following window. If you just have one monitor, make that the default. OBS Studios should show you the screen in the window after a valid display has been chosen. We need to change your graphics settings if OBS is unable to successfully load the screen video. Click the Start Recording button in the bottom right corner when you’re ready to begin recording. When you’re finished, click Stop Recording, and a movie will be saved to the folder you chose in the preferences.

Part 2. Edit Recorded Video in Filmora
Wondershare Filmora is a powerful screen recording application that includes a video editing suite, screen sketching tools, AI face recognition, built-in video effect packs, customizable branding watermark, and more. It may not only make recording movies simpler, but it may also provide you more possibilities for making your films more professional, creative, and attractive. Filmora is a great tool for beginners who want to make high-quality explainer films, training videos, demo videos, and more quickly. Because of the excellent video templates, screen recording is more appealing. To highlight important information, people might utilize annotation tools like as callouts, arrows, and drawing motions.
Steps to Record and Edit with Filmora
Step 1: Install Filmora on your laptop
To begin, you must first download this software program to your system from the following links:
For Win 7 or later (64-bit)
For macOS 10.12 or later
After you’ve finished downloading it, you’ll need to install it on your computer so that you can start using it with your laptop.
Step 2: Launch the Program and Begin Customizing It
The next step is to launch the software application and start recording your screen. Simply click the New Recording button in the start-up box to start recording. You may totally alter your screen recordings using the tools included in Filmora. You may also incorporate your laptop’s Webcam or a microphone as an audio source in your recordings.

Step 3: Start/Stop Screen Recording
Now is the time to begin recording your audio, which you can accomplish by hitting the red circular recording button. Press the Square-shaped button on your laptop’s screen to end the recording.

Step 4: Edit the Recordings and Save Them
Finally, you may adjust your audio recordings with entirely configurable editing tools. To do so, use Filmora’s editor and utilize easy to complicated editing ways to edit your recorded audio files. Filmora’s Editor lets you add Animated Titles, amazing effects, Audio Enhancements, and more to your recorded video to make it more polished.

Step 5: Add Special Effects to Your Video
Wondershare Filmora was designed specifically to provide a professional touch to your videos. It includes a number of eye-catching and adaptable effects that you can use to make your video projects stand out from the crowd. We’ve gone through some of the greatest effects for giving life to your drab and amateurish videos in this section.

Step 6: Save or Share the Videos
Finally, after you’ve finished editing the recorded video, you may utilize the Filmora editor in its entirety, as described before. Click the Export option and select the platform where you wish to share your video clip to post your work of art immediately to YouTube or another well-known website. You may even alter the movie before sharing it if you desire.

Part 3. Edit Recorded Video with Zoom
Trimming and editing Zoom recordings is a necessary for digging out value-packed nuggets from captured footage. But although you already know this, you’re probably putting off doing so as you’re anticipating you’ll need to learn a ton of new tools to edit Zoom recordings.
Steps to Record Videos with Zoom
Step 1For the cloud recordings, go to zoom.us and log in to your account. Then, navigate to ‘Settings’ from the navigation menu on the left.

Step 2 Under Advanced cloud recording options, tick the option for ‘Optimize the recording for 3rd party video editor’ and click ‘Save’.

Step 3Then, navigate to ‘Recording’ from the navigation menu on the left. Check the option for ‘Optimize for 3rd party video editor.

Step 4To really edit a Zoom recording, whether it’s stored on your PC or Zoom cloud, you need to utilize third-party video editing software. But no worries, you don’t need any sophisticated equipment or software here.
Part 4. Edit Recorded Video in Teams
Teams gives the opportunity to record your online meetings. This may be especially beneficial for sharing meeting recordings with individuals unable to attend live, to preserve instructional material for future use, or to enable participants to revisit prior meeting topics. At the top of the meeting window, a message will appear stating that the recording has begun, which alerts participants that their interactions in the meeting may be recorded by the recording. You will also notice a recording sign and the duration of the recording in the top-left corner of the meeting window.
Steps to Record Videos with Teams
Step 1 Open Microsoft Teams on Windows and Mac.
Step 2 Go to appropriate Teams or Channel and click on the Video button at the top to create a video call.

Step 3Invite people and organize a meeting. Whenever you feel you need to record any significant point, click on the three-dot menu at the top.

Step 4 Click on Start recording and Microsoft Teams will start recording the video/voice call. As soon as you start recording, every participant will be told about it.
At any moment, you may stop recording from the same. Once the meeting as concluded, your recording will display in the Chat panel in the main Teams window. Please note that depending on the length of the recording it might take some time for the recording to complete and display in the meeting chat. To find the recording, pick the Chat panel, open the correct meeting from the chat list and the recording will display in the chat window once processed.

Part 5. Edit Recorded Video in Google Meet
With more individuals working from home these days, services like Google Meet are rising in popularity. You may have an online video conference, see everyone’s face, communicate, and take care of business. As with in-office meetings, notes with action items and summaries for online meetings are just as crucial. Unfortunately, it doesn’t always happen. To have formal documentation for your meeting or share it with people who couldn’t attend, try recording your Google Meet.
Steps to Record and Edit Videos by Meet
Step 1. Launch Meet
Visit Google Meet and sign in to join or start your meeting.
Step 2. Start Recording
Select the Activities symbol on the bottom right and pick Recording when you’re ready to start recording.

Step 3. Stop/Save Recording
Visit Google Drive and login in if required. Navigate to My Drive on the left and search for the Meet Recordings folder on the right. It may take several minutes for the recording to show. If you do not already have a Meet Recordings folder, Google Drive will create one. You’ll notice the recording named with the meeting identifier along with the date and hour. If Chat took occurred during the meeting, you’d view this as a distinct text file.
To get a preview of your recording or chat transcript, just double-click the file in the Meet Recordings folder on Google Drive. You may download, distribute, or acquire a link to the recording (or chat) file from the Meet Recordings folder or the File Preview. In the folder, right-click the file and pick an action from the menu. Notice you may execute further options such as Rename, Make a copy, and Open with.

Step 4. Use WeVideo to Edit Videos
WeVideo is the cloud-based video production tool that supports student creativity, narrative, engagement and multimodal learning. Video projects develop deep knowledge about a subject through creating abilities like teamwork, communication and critical thinking. Log in and click Create New. Choose what you want to make (video, recording, etc.) and a format. Upload your media or search the Stock media repository. Make any extra modifications and preview your movie one final time. All done? Click Finish to export, download and share your video!

Part 6: Related FAQs
1. How do I edit video recordings?
Most individuals have the tools they need to film and edit small videos. With a smartphone or tablet and access to a computer, you can get the job done without even checking out equipment, much less employing a key grip. A laptop isn’t the finest equipment to film a movie–that would be extremely uncomfortable. Smartphone or tablet is easy to use. This topic is for those with access to an iPhone and a PC. Android, iPad, and Mac users will have a distinct process. Smartphones and tablets often default to recording video at a very high-Quality level, which takes up a lot of memory and results in big file sizes. Most likely you will want to lessen the resolution that you photograph.
Can you edit an already uploaded video?
If you have found yourself in this circumstance, your initial instinct could be to worry and assume you must repair the issue, delete the uploaded video, and re-upload the new one. However, this procedure will make your prior video URL dead, and any embeds of your video will display the following graphic to visitors. Nevertheless, these aforementioned sites recognizes that artists occasionally make small honest errors, or someone included in the uploaded video may demand that they be removed from it. So, to permit that, makers may chop away sections from their film without resetting a video’s metrics.
How to edit recorded video on iPhone?
If you have iOS 13 or later, you can edit films in the built-in Photos app… much as you edit your images. You may cut, crop, and straighten your films. And you may make your film more attractive by altering brightness, color, or even making it black and white. Filming films on iPhone has gotten more popular as iPhone camera lenses have progressed over the years. Many iPhone filmmakers desire the capacity to edit their video directly from their phone for simple social sharing. Using a video editing software for iPhone is a terrific method to effortlessly produce and upload videos. just open the video you want to modify, then press Edit at the upper right to get it done.
Conclusion:
If you routinely use Google Meet or Zoom, it can be a good idea to record your conferences so you can still return to them at a later period. Recording these conversations and meetings may be a big assistance when it’s time for later evaluations, updates, and enabling absent team members catch up on the meeting topic. For instance, do you wish to share meeting minutes or information with people missing in this meeting? Essentially the call recording is for other co-workers to view afterwards. Instead, you may use the recommended screen recorders to capture every moment and then use a specialist video editor like Filmora to make the required edits before sharing it with others.
For macOS 10.12 or later
After you’ve finished downloading it, you’ll need to install it on your computer so that you can start using it with your laptop.
Step 2: Launch the Program and Begin Customizing It
The next step is to launch the software application and start recording your screen. Simply click the New Recording button in the start-up box to start recording. You may totally alter your screen recordings using the tools included in Filmora. You may also incorporate your laptop’s Webcam or a microphone as an audio source in your recordings.
Step 3: Start/Stop Screen Recording
Now is the time to begin recording your audio, which you can accomplish by hitting the red circular recording button. Press the Square-shaped button on your laptop’s screen to end the recording.
Step 4: Edit the Recordings and Save Them
Finally, you may adjust your audio recordings with entirely configurable editing tools. To do so, use Filmora’s editor and utilize easy to complicated editing ways to edit your recorded audio files. Filmora’s Editor lets you add Animated Titles, amazing effects, Audio Enhancements, and more to your recorded video to make it more polished.
Step 5: Add Special Effects to Your Video
Wondershare Filmora was designed specifically to provide a professional touch to your videos. It includes a number of eye-catching and adaptable effects that you can use to make your video projects stand out from the crowd. We’ve gone through some of the greatest effects for giving life to your drab and amateurish videos in this section.
Step 6: Save or Share the Videos
Finally, after you’ve finished editing the recorded video, you may utilize the Filmora editor in its entirety, as described before. Click the Export option and select the platform where you wish to share your video clip to post your work of art immediately to YouTube or another well-known website. You may even alter the movie before sharing it if you desire.
Part 3. Edit Recorded Video with Zoom
Trimming and editing Zoom recordings is a necessary for digging out value-packed nuggets from captured footage. But although you already know this, you’re probably putting off doing so as you’re anticipating you’ll need to learn a ton of new tools to edit Zoom recordings.
Steps to Record Videos with Zoom
Step 1For the cloud recordings, go to zoom.us and log in to your account. Then, navigate to ‘Settings’ from the navigation menu on the left.
Step 2 Under Advanced cloud recording options, tick the option for ‘Optimize the recording for 3rd party video editor’ and click ‘Save’.
Step 3Then, navigate to ‘Recording’ from the navigation menu on the left. Check the option for ‘Optimize for 3rd party video editor.
Step 4To really edit a Zoom recording, whether it’s stored on your PC or Zoom cloud, you need to utilize third-party video editing software. But no worries, you don’t need any sophisticated equipment or software here.
Part 4. Edit Recorded Video in Teams
Teams gives the opportunity to record your online meetings. This may be especially beneficial for sharing meeting recordings with individuals unable to attend live, to preserve instructional material for future use, or to enable participants to revisit prior meeting topics. At the top of the meeting window, a message will appear stating that the recording has begun, which alerts participants that their interactions in the meeting may be recorded by the recording. You will also notice a recording sign and the duration of the recording in the top-left corner of the meeting window.
Steps to Record Videos with Teams
Step 1 Open Microsoft Teams on Windows and Mac.
Step 2 Go to appropriate Teams or Channel and click on the Video button at the top to create a video call.
Step 3Invite people and organize a meeting. Whenever you feel you need to record any significant point, click on the three-dot menu at the top.
Step 4 Click on Start recording and Microsoft Teams will start recording the video/voice call. As soon as you start recording, every participant will be told about it.
At any moment, you may stop recording from the same. Once the meeting as concluded, your recording will display in the Chat panel in the main Teams window. Please note that depending on the length of the recording it might take some time for the recording to complete and display in the meeting chat. To find the recording, pick the Chat panel, open the correct meeting from the chat list and the recording will display in the chat window once processed.
Part 5. Edit Recorded Video in Google Meet
With more individuals working from home these days, services like Google Meet are rising in popularity. You may have an online video conference, see everyone’s face, communicate, and take care of business. As with in-office meetings, notes with action items and summaries for online meetings are just as crucial. Unfortunately, it doesn’t always happen. To have formal documentation for your meeting or share it with people who couldn’t attend, try recording your Google Meet.
Steps to Record and Edit Videos by Meet
Step 1. Launch Meet
Visit Google Meet and sign in to join or start your meeting.
Step 2. Start Recording
Select the Activities symbol on the bottom right and pick Recording when you’re ready to start recording.
Step 3. Stop/Save Recording
Visit Google Drive and login in if required. Navigate to My Drive on the left and search for the Meet Recordings folder on the right. It may take several minutes for the recording to show. If you do not already have a Meet Recordings folder, Google Drive will create one. You’ll notice the recording named with the meeting identifier along with the date and hour. If Chat took occurred during the meeting, you’d view this as a distinct text file.
To get a preview of your recording or chat transcript, just double-click the file in the Meet Recordings folder on Google Drive. You may download, distribute, or acquire a link to the recording (or chat) file from the Meet Recordings folder or the File Preview. In the folder, right-click the file and pick an action from the menu. Notice you may execute further options such as Rename, Make a copy, and Open with.
Step 4. Use WeVideo to Edit Videos
WeVideo is the cloud-based video production tool that supports student creativity, narrative, engagement and multimodal learning. Video projects develop deep knowledge about a subject through creating abilities like teamwork, communication and critical thinking. Log in and click Create New. Choose what you want to make (video, recording, etc.) and a format. Upload your media or search the Stock media repository. Make any extra modifications and preview your movie one final time. All done? Click Finish to export, download and share your video!
Part 6: Related FAQs
1. How do I edit video recordings?
Most individuals have the tools they need to film and edit small videos. With a smartphone or tablet and access to a computer, you can get the job done without even checking out equipment, much less employing a key grip. A laptop isn’t the finest equipment to film a movie–that would be extremely uncomfortable. Smartphone or tablet is easy to use. This topic is for those with access to an iPhone and a PC. Android, iPad, and Mac users will have a distinct process. Smartphones and tablets often default to recording video at a very high-Quality level, which takes up a lot of memory and results in big file sizes. Most likely you will want to lessen the resolution that you photograph.
Can you edit an already uploaded video?
If you have found yourself in this circumstance, your initial instinct could be to worry and assume you must repair the issue, delete the uploaded video, and re-upload the new one. However, this procedure will make your prior video URL dead, and any embeds of your video will display the following graphic to visitors. Nevertheless, these aforementioned sites recognizes that artists occasionally make small honest errors, or someone included in the uploaded video may demand that they be removed from it. So, to permit that, makers may chop away sections from their film without resetting a video’s metrics.
How to edit recorded video on iPhone?
If you have iOS 13 or later, you can edit films in the built-in Photos app… much as you edit your images. You may cut, crop, and straighten your films. And you may make your film more attractive by altering brightness, color, or even making it black and white. Filming films on iPhone has gotten more popular as iPhone camera lenses have progressed over the years. Many iPhone filmmakers desire the capacity to edit their video directly from their phone for simple social sharing. Using a video editing software for iPhone is a terrific method to effortlessly produce and upload videos. just open the video you want to modify, then press Edit at the upper right to get it done.
Conclusion:
If you routinely use Google Meet or Zoom, it can be a good idea to record your conferences so you can still return to them at a later period. Recording these conversations and meetings may be a big assistance when it’s time for later evaluations, updates, and enabling absent team members catch up on the meeting topic. For instance, do you wish to share meeting minutes or information with people missing in this meeting? Essentially the call recording is for other co-workers to view afterwards. Instead, you may use the recommended screen recorders to capture every moment and then use a specialist video editor like Filmora to make the required edits before sharing it with others.
LumaFusion – What Is It and the Best Alternative to Use
LumaFusion makes itself known as a multi-track video editor available for iOS users. While it presents other compatible versions, it provides some of the most professional video editing and enhancement features that make editing proficient on mobile devices. Its easy-to-use interface, combined with advanced functions of editing videos, adding audio, and adjusting speed, gives a perfect non-linear editing experience.
Pros
- Manageable and Proficient user interface
- Image stabilization is available to enhance performance
- Can add third-party plugins for video enhancement
- Trim unused media before exporting the video
- Videos can be exported directly to Final Cut Pro
Cons
- The user has to pay for the app to download
- Audio synchronization issues in large videos
- You can only add up to 6 audio/video tracks to the timeline
Part 1: What is LumaFusion?
LumaFusion is a multi-track video editing mobile application providing a professional video editing experience on portable devices. It gives uses a platform to create the perfect storyline and environments for bringing out the perfect features of the story that is held by the video. So, while you get a platform with interactive features and tools to work with, video editing simultaneously gets extensive and simple.
People who are not having the time to bring in a professional video editor to work on a task can look forward to this progressive tool designed for portable video editing. While you do not confuse it with a basic video editor, you can find tools that can help you adjust parameters such as the aspect ratio.

Download LumaFusion: Android
You can download this proficient video editor for your iPhone and iPad. It can also be enjoyed on Mac devices, which are now available on Android devices. LumaFusion has scaled its support and compatibility of devices over time.
Pricing Plan
If you intend to use the LumaFusion app to inject creativity into your videos, you must have to pay a single-time price of $19.99 to get access to the application. Apart from that, there are several in-app purchases that you can look forward to for increasing the hold on different tools and features, as per the requirement.
System Requirements of LumaFusion iOS
| iPhone | Requires iOS 15.4 or later. |
|---|---|
| iPad | Requires iPadOS 15.4 or later. |
| iPod Touch | Requires iOS 15.4 or later. |
| Mac | Requires macOS 12.3 or later and a Mac with Apple M1 chip or later. |
| Size | 192.9 MB |
Part 2: Key Features of LumaFusion Video Editor
We will now highlight some essential features that can be considered about the LumaFusion video editor. These features will give a better understanding of the tool and provide a guideline on how to utilize the best functions with ease:
1. Interface
When understanding the interface of the LumaFusion app on iOS, many would think the application won’t provide extensive tools to work with. This video editor does not come with a bland user interface but provides some great functions and features on an interface that allows you to create professional-level videos.
With the option of adding titles, transitions, color grading, and effects, LumaFusion is a complete video editor that provides features that are not commonly observed in many desktop-based video editors. Regardless, it presents an efficient workspace that has managed all the functions properly in rows and different sections.

2. Video’s Layers
Creating proper movies on your iOS device is not difficult with LumaFusion. With the option of including six layers of video in the timeline, a lot can be done with them for improvising different sequences and multiple effects. Its picture-in-picture presets, layered transitions, graphic equalizer, and the use of additional plugins allow you to create complete videos with proper control.
Talking about some renowned iOS video editors in the market, you will find LumaFusion a much better option. iMovie, the dedicated video editor for iOS devices, can only embed two layers of videos in the timeline. This clearly explains why LumaFusion is a much better option with its video layers.

3. Powerful Keyframe
The keyframes function on LumaFusion is not challenging to work with on the video editor. You can ecstatically create animating effects with the help of the keyframe sounds within the application. These effects, once created, can be saved and used on other videos within the platform. To improve your effects on the mobile video editor, you can use the powerful keyframe feature of LumaFusion to create the best results.
With a small price to pay for the video editor, you can gain access to a diversity of keyframes that can help you design the perfect effects for your video.

4. Export to Final Cut Pro
Another impressive and touching feature this video editor provides to its users is its integration with Final Cut Pro - a proficient desktop video editor offered on macOS. You can easily export your created video to Final Cut Pro as an FCPXML.zip file directly after paying a one-time price. Users who are having a rough time editing the file on LumaFusion can easily shift to Final Cut Pro.
This process has disadvantages, regardless of the extensive control and accessibility provided between the applications. If you seek to use Final Cut Pro after editing a video on the LumaFusion app, you will have to add all the assets on FCP when you shift the file onto the platform.
Also, you might have to include many effects such as LUTs, Chroma key, and other relevant features. With this effort, you can easily put your video from LumaFusion to Final Cut Pro.
Part 3: Advantages and Disadvantages of LumaFusion Video Editor
Suppose you are considering using the LumaFusion video editor on your iOS device. In that case, there are a few advantages and disadvantages you must look into to understand more about the tool and get to an absolute decision:
Pros
- You can add third-party plugins to your video editor to enhance the video editing features. This allows you to put better effects, transitions, and enhancement elements in your video.
- It can create smooth slow-motion videos with 120fps and 240fps results.
- Multi-layer titles can be created within the platform and used in further actions.
- The display of the edited video can be previewed across an external monitor.
- It provides stability in video editing by using color tags within frame rates up to 18fps.
Cons
- For large video files, you might face lagging issues and audio synchronization within videos.
- To access the complete library of music and clips, you will have to subscribe to their additional plans.
- The tool is already available at a price tag, which is associated with more subscription plans, making it a devalued option.
Part 4: What’s New in LumaFusion 3.2 Version
The latest iteration of the LumaFusion app brings new and exciting features to the market. To learn more about these features, you will know better how the video editor is improving its operations:
1. 35+ New Transitions
LumaFusion 3.2 comes with a new set of transitions, with almost 35 in number. With different blur transitions, there are some new introductions in the transition section that offers multiple motions.

2. iCloud Backups
If you are confused about how to sustain the storage space on your iOS device, LumaFusion now provides iCloud Drive support and allows the user to back up their data. The data from the iCloud Drive can also be restored directly from the platform.

3. Rename Linked Folders
In the previous versions of LumaFusion, you could not rename the linked folders, or the platform incorrectly named them. With this update, you can now easily rename the linked folders by selecting and holding them within the interface.

4. Localizations for 2 New Versions
Traditional Chinese and Brazilian Portuguese are now among the added localizations in the video editor. The wide range of language support is helping this application set up a new precedent in the market for other mobile video editors.
Part 5: Best Alternative to LumaFusion Video Editor for iOS
LumaFusion video editor is a great option, but its drawbacks restrict it to some extent. To answer this, Wondershare Filmora provides a better option for video editing, offering compatibility on Windows and all other platforms supported by the LumaFusion video editing application. To know more about how good Filmora is, look ahead.
Wondershare Filmora is a complete, easy-to-use video editor providing many features and creativity options. For example, you can find the perfect set of effects and transitions on the platform by supporting a diversity of filters and text overlays. With other options, such as PIP mode and video beautification, Wondershare Filmora supports many file formats for video editing.
Free Download For Win 7 or later(64-bit)
Free Download For macOS 10.14 or later

Conclusion
This article has provided a prominent overview of the LumaFusion review, a video editor that has made video editing operations easier on smartphones. While it is a great iOS video editor, you can find other prominent functions with extensive layered support, intuitive keyframes, and consolidated connectivity to other platforms. As a better option, this article has offered Wondershare Filmora as a more potent tool with better compatibility and inexpensive features.
People Also Want to Know
1. How to download LumaFusion on Windows?
LumaFusion is unavailable on the Windows platform, where you can only find it on Mac, iOS, and Android. As an alternative to this video editor, you can try using Wondershare Filmora.
2. Can LumaFusion edit 4K?
You can easily edit, manage, and export 4K videos within the platform. LumaFusion provides extensive support for managing a broad range of video resolutions.
Part 1: What is LumaFusion?
LumaFusion is a multi-track video editing mobile application providing a professional video editing experience on portable devices. It gives uses a platform to create the perfect storyline and environments for bringing out the perfect features of the story that is held by the video. So, while you get a platform with interactive features and tools to work with, video editing simultaneously gets extensive and simple.
People who are not having the time to bring in a professional video editor to work on a task can look forward to this progressive tool designed for portable video editing. While you do not confuse it with a basic video editor, you can find tools that can help you adjust parameters such as the aspect ratio.
Download LumaFusion: Android
You can download this proficient video editor for your iPhone and iPad. It can also be enjoyed on Mac devices, which are now available on Android devices. LumaFusion has scaled its support and compatibility of devices over time.
Pricing Plan
If you intend to use the LumaFusion app to inject creativity into your videos, you must have to pay a single-time price of $19.99 to get access to the application. Apart from that, there are several in-app purchases that you can look forward to for increasing the hold on different tools and features, as per the requirement.
System Requirements of LumaFusion iOS
| iPhone | Requires iOS 15.4 or later. |
|---|---|
| iPad | Requires iPadOS 15.4 or later. |
| iPod Touch | Requires iOS 15.4 or later. |
| Mac | Requires macOS 12.3 or later and a Mac with Apple M1 chip or later. |
| Size | 192.9 MB |
Part 2: Key Features of LumaFusion Video Editor
We will now highlight some essential features that can be considered about the LumaFusion video editor. These features will give a better understanding of the tool and provide a guideline on how to utilize the best functions with ease:
1. Interface
When understanding the interface of the LumaFusion app on iOS, many would think the application won’t provide extensive tools to work with. This video editor does not come with a bland user interface but provides some great functions and features on an interface that allows you to create professional-level videos.
With the option of adding titles, transitions, color grading, and effects, LumaFusion is a complete video editor that provides features that are not commonly observed in many desktop-based video editors. Regardless, it presents an efficient workspace that has managed all the functions properly in rows and different sections.
2. Video’s Layers
Creating proper movies on your iOS device is not difficult with LumaFusion. With the option of including six layers of video in the timeline, a lot can be done with them for improvising different sequences and multiple effects. Its picture-in-picture presets, layered transitions, graphic equalizer, and the use of additional plugins allow you to create complete videos with proper control.
Talking about some renowned iOS video editors in the market, you will find LumaFusion a much better option. iMovie, the dedicated video editor for iOS devices, can only embed two layers of videos in the timeline. This clearly explains why LumaFusion is a much better option with its video layers.
3. Powerful Keyframe
The keyframes function on LumaFusion is not challenging to work with on the video editor. You can ecstatically create animating effects with the help of the keyframe sounds within the application. These effects, once created, can be saved and used on other videos within the platform. To improve your effects on the mobile video editor, you can use the powerful keyframe feature of LumaFusion to create the best results.
With a small price to pay for the video editor, you can gain access to a diversity of keyframes that can help you design the perfect effects for your video.
4. Export to Final Cut Pro
Another impressive and touching feature this video editor provides to its users is its integration with Final Cut Pro - a proficient desktop video editor offered on macOS. You can easily export your created video to Final Cut Pro as an FCPXML.zip file directly after paying a one-time price. Users who are having a rough time editing the file on LumaFusion can easily shift to Final Cut Pro.
This process has disadvantages, regardless of the extensive control and accessibility provided between the applications. If you seek to use Final Cut Pro after editing a video on the LumaFusion app, you will have to add all the assets on FCP when you shift the file onto the platform.
Also, you might have to include many effects such as LUTs, Chroma key, and other relevant features. With this effort, you can easily put your video from LumaFusion to Final Cut Pro.
Part 3: Advantages and Disadvantages of LumaFusion Video Editor
Suppose you are considering using the LumaFusion video editor on your iOS device. In that case, there are a few advantages and disadvantages you must look into to understand more about the tool and get to an absolute decision:
Pros
- You can add third-party plugins to your video editor to enhance the video editing features. This allows you to put better effects, transitions, and enhancement elements in your video.
- It can create smooth slow-motion videos with 120fps and 240fps results.
- Multi-layer titles can be created within the platform and used in further actions.
- The display of the edited video can be previewed across an external monitor.
- It provides stability in video editing by using color tags within frame rates up to 18fps.
Cons
- For large video files, you might face lagging issues and audio synchronization within videos.
- To access the complete library of music and clips, you will have to subscribe to their additional plans.
- The tool is already available at a price tag, which is associated with more subscription plans, making it a devalued option.
Part 4: What’s New in LumaFusion 3.2 Version
The latest iteration of the LumaFusion app brings new and exciting features to the market. To learn more about these features, you will know better how the video editor is improving its operations:
1. 35+ New Transitions
LumaFusion 3.2 comes with a new set of transitions, with almost 35 in number. With different blur transitions, there are some new introductions in the transition section that offers multiple motions.
2. iCloud Backups
If you are confused about how to sustain the storage space on your iOS device, LumaFusion now provides iCloud Drive support and allows the user to back up their data. The data from the iCloud Drive can also be restored directly from the platform.
3. Rename Linked Folders
In the previous versions of LumaFusion, you could not rename the linked folders, or the platform incorrectly named them. With this update, you can now easily rename the linked folders by selecting and holding them within the interface.
4. Localizations for 2 New Versions
Traditional Chinese and Brazilian Portuguese are now among the added localizations in the video editor. The wide range of language support is helping this application set up a new precedent in the market for other mobile video editors.
Part 5: Best Alternative to LumaFusion Video Editor for iOS
LumaFusion video editor is a great option, but its drawbacks restrict it to some extent. To answer this, Wondershare Filmora provides a better option for video editing, offering compatibility on Windows and all other platforms supported by the LumaFusion video editing application. To know more about how good Filmora is, look ahead.
Wondershare Filmora is a complete, easy-to-use video editor providing many features and creativity options. For example, you can find the perfect set of effects and transitions on the platform by supporting a diversity of filters and text overlays. With other options, such as PIP mode and video beautification, Wondershare Filmora supports many file formats for video editing.
Free Download For Win 7 or later(64-bit)
Free Download For macOS 10.14 or later
Conclusion
This article has provided a prominent overview of the LumaFusion review, a video editor that has made video editing operations easier on smartphones. While it is a great iOS video editor, you can find other prominent functions with extensive layered support, intuitive keyframes, and consolidated connectivity to other platforms. As a better option, this article has offered Wondershare Filmora as a more potent tool with better compatibility and inexpensive features.
People Also Want to Know
1. How to download LumaFusion on Windows?
LumaFusion is unavailable on the Windows platform, where you can only find it on Mac, iOS, and Android. As an alternative to this video editor, you can try using Wondershare Filmora.
2. Can LumaFusion edit 4K?
You can easily edit, manage, and export 4K videos within the platform. LumaFusion provides extensive support for managing a broad range of video resolutions.
Five Thoughts on Discord Create Account’s How-To Questions
Five Thoughts on Discord Create Account
An easy yet powerful editor
Numerous effects to choose from
Detailed tutorials provided by the official channel
Discord was a great alternative to voice chat systems such as TeamSpeak, Mumble, and Ventrilo for online gamers. Gamers make discord accounts for these services to play together rather than the voice communication facilities integrated into games, which are frequently of poor quality and lack functionality.
Founded in 2015, discord allowed individuals to talk while playing PC games seamlessly. Users may utilize the service to establish servers that can include many text and audio channels. A typical discord account server may feature chat rooms dedicated to specific themes (such as “gaming” and “anime x manga”), as well as voice channels devoted to specific games or activities. The service’s high-quality, low-latency audio chat is a popular tool for Twitch broadcasters and podcasters. It has also expanded to accommodate massive video conversations to compete with Zoom.
In this article
01 [How Does Discord Work and What is it Used for?](#Part 1)
02 [How to Make a Discord Signup in the Browser?](#Part 2)
03 [How to Make a Discord Signup with Desktop?](#Part 3)
04 [How to Make a Signup Discord with App?](#Part 4)
05 [Discord Create Account FAQs](#Part 5)
Part 1 How Does Discord Work and What is it Used for?
Discord account allows friends to communicate with one another one-on-one or in groups via a server. You may use it to send direct messages to pals, as well as video calls, audio chat, and screen sharing. Once on a server, you can join a voice chat channel to communicate with other gamers who are playing certain games.
You can share many things on discord, including media files like images, gifs, audio, and videos. Speaking of videos, video editing doesn’t get any better than Filmora. Wondershare Filmora Video Editor is a sophisticated editing application for Windows and Mac users. It was initially known as Wondershare Video Editor, but following its fifth release, it got renamed Filmora. The video editor’s primary features include animation, overlays, audio control, on-screen recording, and multi-editing modes. The video editor is well-known for its feature-rich but the simple interface, making it suited for both novice and experienced users.
For Win 7 or later (64-bit)
For macOS 10.12 or later
Filmora’s standout features
● Editing Audio Equalizer 4K Resolution Support
● Support for GIFs
● Screen Dividers
● Controls For Video And Audio
● Multiple Video Clips Can Be Layered
● Stabilization of Video
● Presets for Color Grading
● Text Editing Expertise
● Tilt-Shift
● The mosaic (Blurring)
● Noise Elimination
● Importance in Social Life
● Preview of Each Frame
● Controlling the Speed
● Audio-Mixer
● Backgrounds in Chroma Key
● Screen Capture
● Separation of audio
● Scene Recognition
You can make your discord account and use it on almost any platform, including discord desktop software for Windows and Mac and iOS and Android apps for talking and calling on the move. If you prefer not to download anything, it also works in a web browser. You can link your discord account app to various popular services, such as Twitch and Spotify, so your friends can see your actions. While there is no discord Xbox app, you may link your discord and Xbox accounts so that others can see what you’re up to on your Xbox Series X or Xbox Series S.
Part 2 How to Make a Discord Signup in the Browser
Don’t have the discord account?
You can quickly sign up using your preferred web browser, i.e., Chrome, Microsoft Edge, Firefox, or Safari.
Follow the steps below to make a discord account using your web browser:
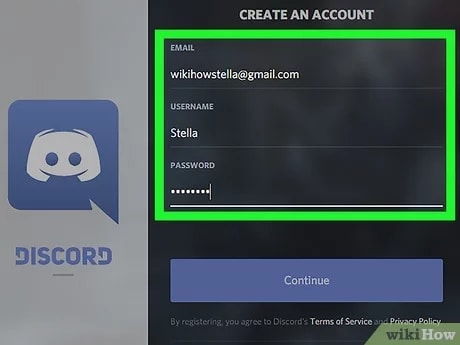
Step 1: Go to <www.discord.com> and click the “Login” button in the upper right corner.
Step 2: To establish a new discord account, click “Register” underneath the login page.
Step 3:
● Enter your email, a username, and a strong password.
● Date of birth.
● Accept the terms of service.
After entering the above, click the “Continue” button.
Step 4: Check the box besides “I am human” to enable the captcha.
Step 5: You will receive an email asking you to confirm your information. Select the “Verify email” option.
Once you’ve signed up for discord, you may access it via the Discord website or the mobile app. The program is free to download for Windows, Linux, Mac, Android, and iOS.
Follow the steps above to sign up on discord account successfully. Easy right? Let’s proceed!
Part 3 How to Make a Discord Signup with Desktop?
The discord creating account on your desktop is pretty much the same as using your browser.
Follow the steps below to make a discord account using your desktop.
Step 1: Click “Login” on the Discord website (top right).
Step 2: Underneath the sign-in box, click “Register.”
Step 3: Enter the email address, username, password, and birth date.
Step 4: Agree to the terms of service and then click “Continue.”
Step 5: Use the captcha to prove that you are not a robot.
Step 6: You will get an email to confirm your data; click on the link in the email to confirm.
See that? No big deal, right?
Part 4 How to Make a Signup Discord with App
Signing up for a discord account through the app is relatively easy, like the procedures above, you will not break a sweat.
Follow the easy steps below for discord create account on your smartphone device:
Step 1: Install and launch the Discord app on your smartphone
Step 2: Select the Register option.
Step 3: Choose whether to register by cellphone number or email address and input either one.
Step 4: You will get a message with a confirmation code or an email with a link.
Step 5: Enter the code or navigate to the URL.
Step 6: Enter your username and password here.
Step 7: Enter your birth date.
Step 8: Accept the terms of the agreement.
Step 9: Click “Next” to finish the Discord registration.
What Happens When You Disable your Discord Account?
When you deactivate your account, it goes to suspension mode. You may reactivate it by signing in and following the on-screen instructions. Keep in mind that discord accounts dormant for two years are removed, so if you want to keep yours, you must reactivate it (but you can disable it after this if you like).
After you deactivate an account, users will no longer get discord alerts. Users may, however, still receive friend requests, and any friend requests users get while their account is blocked will be ready for when they reactivate it. However, when a user decides to delete their account, the said account will get permanently deleted.
Tip: If you want to stay away from your discord account for a while with a plan to return to it later, it is advisable to log out or deactivate rather than delete it.
Part 5 Discord Create Account FAQs
Q. Is discord free, or do I have to pay?
A. Yes and no. The premium edition of discord is not free. If you don’t want to utilize the premium features, you may still download and make a discord account for free.
Q. Is there anything I cannot do on discord?
A. Do not organize, promote, or participate in any unlawful or possibly dangerous activities, such as sexual solicitation, human trafficking, or selling or enabling the sale of forbidden or potentially harmful products (firearms, ammunition, drugs, and controlled substances).
Q. Do messages disappear on discord?
A. Your messages are only destroyed: 1. if they are deleted individually (by you or a user with proper rights), 2. if you get banned, and the person banning you decides to delete all of your messages at once.
Q. Does discord account keep a record of interactions?
A. Yes, discord will track every discussion you have on discord acount, record everything you say on discord, and examine all photographs you transmit over discord.
Q. How will I know when someone blocks me on discord?
A. When you block someone, their online status on discord account changes to “offline” until unblocked and vice versa. They will also show offline in mutual servers or your chat history.
Q. How do I permanently delete my discord account?
A. To delete your discord created account for good, head to user settings, then tap on ‘my account.’ From there, tap on ‘Account Removal’ then tap on ‘Delete Account.’
If you are a server owner, you will have to delete the server or pass ownership of the server.
Q. How do I find servers to join on discord?
A. If you have a buddy who has a discord server you’d want to join, request an invite. If you’re a member of a discord community, ask for an invite or check on the community website.
By tapping the magnifying glass in the left window of the discord account app, you may also search for public servers that anybody can join.
● Ending Thoughts →
● Discord is a web program that works in most browsers. A desktop version is available for Windows, macOS, Linux, iOS, and Android. Discord’s desktop and browser versions are functionally and visually identical in practically every regard if you want to make a discord account. So, re-read the article and the FAQs on discord create account, and start your journey.
● Finally, for the creatives, boost your discord create account and usage experience by using Filmora to edit videos and make cool animations.
Discord was a great alternative to voice chat systems such as TeamSpeak, Mumble, and Ventrilo for online gamers. Gamers make discord accounts for these services to play together rather than the voice communication facilities integrated into games, which are frequently of poor quality and lack functionality.
Founded in 2015, discord allowed individuals to talk while playing PC games seamlessly. Users may utilize the service to establish servers that can include many text and audio channels. A typical discord account server may feature chat rooms dedicated to specific themes (such as “gaming” and “anime x manga”), as well as voice channels devoted to specific games or activities. The service’s high-quality, low-latency audio chat is a popular tool for Twitch broadcasters and podcasters. It has also expanded to accommodate massive video conversations to compete with Zoom.
In this article
01 [How Does Discord Work and What is it Used for?](#Part 1)
02 [How to Make a Discord Signup in the Browser?](#Part 2)
03 [How to Make a Discord Signup with Desktop?](#Part 3)
04 [How to Make a Signup Discord with App?](#Part 4)
05 [Discord Create Account FAQs](#Part 5)
Part 1 How Does Discord Work and What is it Used for?
Discord account allows friends to communicate with one another one-on-one or in groups via a server. You may use it to send direct messages to pals, as well as video calls, audio chat, and screen sharing. Once on a server, you can join a voice chat channel to communicate with other gamers who are playing certain games.
You can share many things on discord, including media files like images, gifs, audio, and videos. Speaking of videos, video editing doesn’t get any better than Filmora. Wondershare Filmora Video Editor is a sophisticated editing application for Windows and Mac users. It was initially known as Wondershare Video Editor, but following its fifth release, it got renamed Filmora. The video editor’s primary features include animation, overlays, audio control, on-screen recording, and multi-editing modes. The video editor is well-known for its feature-rich but the simple interface, making it suited for both novice and experienced users.
For Win 7 or later (64-bit)
For macOS 10.12 or later
Filmora’s standout features
● Editing Audio Equalizer 4K Resolution Support
● Support for GIFs
● Screen Dividers
● Controls For Video And Audio
● Multiple Video Clips Can Be Layered
● Stabilization of Video
● Presets for Color Grading
● Text Editing Expertise
● Tilt-Shift
● The mosaic (Blurring)
● Noise Elimination
● Importance in Social Life
● Preview of Each Frame
● Controlling the Speed
● Audio-Mixer
● Backgrounds in Chroma Key
● Screen Capture
● Separation of audio
● Scene Recognition
You can make your discord account and use it on almost any platform, including discord desktop software for Windows and Mac and iOS and Android apps for talking and calling on the move. If you prefer not to download anything, it also works in a web browser. You can link your discord account app to various popular services, such as Twitch and Spotify, so your friends can see your actions. While there is no discord Xbox app, you may link your discord and Xbox accounts so that others can see what you’re up to on your Xbox Series X or Xbox Series S.
Part 2 How to Make a Discord Signup in the Browser
Don’t have the discord account?
You can quickly sign up using your preferred web browser, i.e., Chrome, Microsoft Edge, Firefox, or Safari.
Follow the steps below to make a discord account using your web browser:
Step 1: Go to <www.discord.com> and click the “Login” button in the upper right corner.
Step 2: To establish a new discord account, click “Register” underneath the login page.
Step 3:
● Enter your email, a username, and a strong password.
● Date of birth.
● Accept the terms of service.
After entering the above, click the “Continue” button.
Step 4: Check the box besides “I am human” to enable the captcha.
Step 5: You will receive an email asking you to confirm your information. Select the “Verify email” option.
Once you’ve signed up for discord, you may access it via the Discord website or the mobile app. The program is free to download for Windows, Linux, Mac, Android, and iOS.
Follow the steps above to sign up on discord account successfully. Easy right? Let’s proceed!
Part 3 How to Make a Discord Signup with Desktop?
The discord creating account on your desktop is pretty much the same as using your browser.
Follow the steps below to make a discord account using your desktop.
Step 1: Click “Login” on the Discord website (top right).
Step 2: Underneath the sign-in box, click “Register.”
Step 3: Enter the email address, username, password, and birth date.
Step 4: Agree to the terms of service and then click “Continue.”
Step 5: Use the captcha to prove that you are not a robot.
Step 6: You will get an email to confirm your data; click on the link in the email to confirm.
See that? No big deal, right?
Part 4 How to Make a Signup Discord with App
Signing up for a discord account through the app is relatively easy, like the procedures above, you will not break a sweat.
Follow the easy steps below for discord create account on your smartphone device:
Step 1: Install and launch the Discord app on your smartphone
Step 2: Select the Register option.
Step 3: Choose whether to register by cellphone number or email address and input either one.
Step 4: You will get a message with a confirmation code or an email with a link.
Step 5: Enter the code or navigate to the URL.
Step 6: Enter your username and password here.
Step 7: Enter your birth date.
Step 8: Accept the terms of the agreement.
Step 9: Click “Next” to finish the Discord registration.
What Happens When You Disable your Discord Account?
When you deactivate your account, it goes to suspension mode. You may reactivate it by signing in and following the on-screen instructions. Keep in mind that discord accounts dormant for two years are removed, so if you want to keep yours, you must reactivate it (but you can disable it after this if you like).
After you deactivate an account, users will no longer get discord alerts. Users may, however, still receive friend requests, and any friend requests users get while their account is blocked will be ready for when they reactivate it. However, when a user decides to delete their account, the said account will get permanently deleted.
Tip: If you want to stay away from your discord account for a while with a plan to return to it later, it is advisable to log out or deactivate rather than delete it.
Part 5 Discord Create Account FAQs
Q. Is discord free, or do I have to pay?
A. Yes and no. The premium edition of discord is not free. If you don’t want to utilize the premium features, you may still download and make a discord account for free.
Q. Is there anything I cannot do on discord?
A. Do not organize, promote, or participate in any unlawful or possibly dangerous activities, such as sexual solicitation, human trafficking, or selling or enabling the sale of forbidden or potentially harmful products (firearms, ammunition, drugs, and controlled substances).
Q. Do messages disappear on discord?
A. Your messages are only destroyed: 1. if they are deleted individually (by you or a user with proper rights), 2. if you get banned, and the person banning you decides to delete all of your messages at once.
Q. Does discord account keep a record of interactions?
A. Yes, discord will track every discussion you have on discord acount, record everything you say on discord, and examine all photographs you transmit over discord.
Q. How will I know when someone blocks me on discord?
A. When you block someone, their online status on discord account changes to “offline” until unblocked and vice versa. They will also show offline in mutual servers or your chat history.
Q. How do I permanently delete my discord account?
A. To delete your discord created account for good, head to user settings, then tap on ‘my account.’ From there, tap on ‘Account Removal’ then tap on ‘Delete Account.’
If you are a server owner, you will have to delete the server or pass ownership of the server.
Q. How do I find servers to join on discord?
A. If you have a buddy who has a discord server you’d want to join, request an invite. If you’re a member of a discord community, ask for an invite or check on the community website.
By tapping the magnifying glass in the left window of the discord account app, you may also search for public servers that anybody can join.
● Ending Thoughts →
● Discord is a web program that works in most browsers. A desktop version is available for Windows, macOS, Linux, iOS, and Android. Discord’s desktop and browser versions are functionally and visually identical in practically every regard if you want to make a discord account. So, re-read the article and the FAQs on discord create account, and start your journey.
● Finally, for the creatives, boost your discord create account and usage experience by using Filmora to edit videos and make cool animations.
Do You Want to Know About Phone Aspect Ratio Vertical? Trying to Learn About iPhone Vertical Video Dimensions? Read This Article to Get All Your Answers on Vertical Phone Aspect Ratio Definition, Types and Tips
Versatile Video Editor - Wondershare Filmora
If you are a professional video or image creator, you know what aspect ratio is and why aspect ratio is important. Even people passionate about their cameras and visual art enthusiasts know it. If you are a newbie, Let us make it easy for you. This article will talk about the vertical phone aspect ratio ratio, its definition, types, iPhone vertical video dimensions, etc. We’ll also provide you solid tips on mobile vertical video size and how to create phone vertical videos easily. Let’s jump into the topic and see what you can learn.
In this article
01 [What is Phone Aspect Ratio Vertical?](#Part 1)
02 [Types of Phone Aspect Ratio Vertical](#Part 2)
03 [Tips to Create Phone Vertical Videos](#Part 3)
Part 1 What is Phone Aspect Ratio Vertical?
The vertical phone aspect ratio is the “proportional” relationship between the screen’s width and height. For example, if your image or video has an aspect ratio of 4:5, it simply means the width of the screen (photo or video) is four times the height of the image.
The vertical phone aspect ratio is the “proportional” relationship between the screen’s width and height. For example, if your image or video has an aspect ratio of 4:5, it simply means the width of the screen (photo or video) is four times the height of the image.
Back in the television days, you might have seen certain old pictures with black padding on either side of the screen. It was just that they were shot in different aspect ratios and your television screen had different aspect ratios.
Aspect Ratio Vs Resolution
Remember that aspect ratio does not refer to the physical size of an image or its dimensions in pixels (resolution). So aspect ratio 3:1 does not refer to the actual width and height of the image or video; it just describes their relationship.
You are wrong if you think aspect ratio is just another fancy name for resolution. Think again. Check out how it is calculated.
“
| | Aspect Ratio | Resolution | |
| ————— | ————————————————————– | ———————————————————————————- |
| Definition | The Ratio of the width of an image to the height of the image. | Total number of pixels displayed on your screen (computer, cell phone, television) |
| Commonly Used | ● 1:1 ● 3:1 ● 3:2 ● 4:3 ● 5:4 ● 9:1 ● 16:9 | ● 640x480 ● 800x600 ● 1024x768 |
Aspect Ratio Calculator
To get the resolution, you need to multiply width times the height. To get aspect ratio, the formula is: Divide the width by the height or simply divide the long side by the short side.
There are multiple online aspect ratio calculators available. Check out the value for both the images and the videos generated through the photo ratio calculator for your ease.
| Common Aspect Ratio | AR Width | AR Height | Image Width | Image Height |
|---|---|---|---|---|
| 1:1(square) | 1 | 1 | 1920 | 1920 |
| 5:4 (large and medium format cameras) | 5 | 4 | 1920 | 1536 |
| 4:3 Standard | 4 | 3 | 1920 | 1440 |
| 3:2 (35mm camera) | 3 | 2 | 1920 | 1280 |
| 16:9 | 16 | 9 | 1920 | 1080 |
| 3:1 Panoramic | 3 | 1 | 1920 | 640 |
| 9:16 | 9 | 16 | 1080 | 1920 |
For example, the aspect ratio of 3:1 may be an image of 3m wide and 1m high. At the same time it can be 3 feet wide and 1 foot high. For further simplification, consider dimensions in pixels: a 6000×4000 image has 3:2 aspect ratios.
Always remember this small but crucial point. The aspect ratio refers to the image or video you captured or recorded and the display (or screen) in which your video or image would be displayed.
Why is the aspect ratio important?
In the age of web content, asking why aspect ratio is important? Some may consider it naïve. Images need to be uploaded at different aspect ratios for different uses (desktop vs. mobile or blog vs. social media). Incorrect aspect ratio affects your final image and end-user experience.
Choice of the wrong aspect ratio can eliminate the potential for editing (cropping and resizing). In addition, using the correct aspect ratios saves you from facing the trouble of distortion or clipping.
Part 2 Types of Phone Aspect Ratio Vertical
Image Aspect Ratios
The aspect ratio decides and changes the entire composition and how the audience perceives the image. First, let us see some common image aspect ratios.

● 1:1 Ratio

If you have seen a square-shaped image, it had probably a 1:1 aspect ratio. It simply means both sides (width and height of the image) are equal. It was initially the aspect ratio of square television sets. However, this is commonly used for print photos, mobile screens, and social platforms.
● 3:2 Ratio

Initially used for classic 35 mm film and still photography, aspect ratio 3:5 is still used on some laptops, tablets, and handheld game consoles. The famous example of this aspect ratio Images framed at 1080×720 pixels or 6″x4″.
● 5:4 Ratio

It was commonly used for photography and art prints. For Images having dimensions, 8″x10″ and 16x20 have the 5:4 aspect ratios.
Video Aspect Ratios

Like the image aspect ratios, video aspect ratios would also profoundly affect its composition and thus how your directed viewers perceive it. Some common mobile vertical video size or video aspect ratios are given below.
● 16:9 Ratio

If you have seen presentation slides, computer monitors, or widescreee seen this slimmer and more elongated rectangular-shaped 16:9 Ratio. This is the standardized widescreen aspect ratio that you see everywhere on the web. In terms of pixel common dimension for 16:9 is 1920×1080 pixels and 1280×720 pixels.
● 9:16 Ratio (Vertical)

When smartphones started coming with video capabilities, this Ratio became popular. Likewise, today this Ratio is trendy for social media platforms with video story capabilities.
The Instagram story typically consists of 1080x1920 pixels, which in terms of aspect ratio is 9:16. Most phones, such as iPhone, have a feature that allows you to record footage in both (16:9 as well as 9:16).
Phone aspect ratio vertical
Back in the day, taking aspect ratio vertical (portrait mode) footage was considered unprofessional and a sign of an amateur. But the digital revolution has changed that. Now from unforgivable sin, the vewayal mode has practically become a mainstream media sensation. Vertical style has now become the dominant format.

Phone aspect ratio vertical simply means taller screen than wider. The most common type is 9:16 (1080x1920 pixels), a typical vertical videos aspect ratio. Although this phone aspect ratio vertical comes in a few more shapes and sizes such as 4:5, 2:3.
Part 3 Tips to Create Phone Vertical Videos
Creating vertical videos is crucial for getting engagements and growing your brand. It is easy with a phone because most smartphones, by default, record in 9:16, which is the standard vertical aspect ratio. But with a camera, you have to manually edit to the correct aspect ratio before you shoot it.
You can also shoot horizontally and then change it to vertical, but it needs professional videographer expertise.
Who wants to rotate their phones watching videos? Well, as far as the trend, Let us see some tiny but handy tips for creating vertical phone videos.
1. Choose the correct aspect ratio
Video taller than the 1:1 aspect ratio is commonly considered Vertical video. Types of these vertical aspects ratio include 4:5 (social), 2:3 and 9:16. They are all taller than they are wide, thus vertical.
Choosing the correct aspect ratio for your vertical video, always think about why and where you intend to use the video. The second important thing you should consider is your plans for editing that video.
Cropping horizontal can be irritating and sometimes disappointing at the same time. Producing a 9:16 vertical frame at HD resolution from a horizontal HD frame may result in very pixelated and low-quality footage.
If, for some reason, you still want first to shoot it horizontal and then change it back to mobile vertical video size. You may need to shoot in 4K horizontally to get extra pixels to work with. It can later be cropped in the sides to 9:16 (Vertical phone aspect ratio). Plus, you won’t need to scale it anymore.
2. Direct your viewer’s eyes
For hooking social media viewers, you need to put your most interesting visual upfront. These include GIFs, colourful stop-motion or looping animation. Always try to match your first couple of shots with your overall brand personality.
3. Screen splitting into two or more

A tall vertical screen can be styled with multiple horizontal clips on top of each other. These clips must relate to your relevant content and overall look. Natural lines or patterns can help display them in the most creative ways.
4. Be close to your subject
For producing an intimate experience with the vertical frame, you should get closer to the subject. Most of the action will be positioned to the centre as your viewers scroll. Do not let cut off or cover up your main subject by any text and make sure you leave enough room for text, emojis and stickers.
5. Filling the vertical space
First, make sure that your subject is vertical-friendly. Then get closer and fill the space within the vertical frame. The vertical frame can be filled through the following:
● Up-close shot (if the subject is personal).
● Raising the camera high and tilting it down (to film things like a long, empty road).
● Bird’s-eye view from above.
5. Rule of Third

This photography rule says not to place the main subject directly in the center of the frame. Create more dynamic composition by creating imaginary (Horizontal & Vertical) lines that divide your frame into thirds.
You have to place your subject either on the lines or where the lines meet up. And guess what? You don’t need to draw imaginary nowadays. Most cameras and smartphones provide you with this option.
6. Avoid Shaking
You do not want to distract your viewers with shaky camera moments. Normal pan and 360-degree rotation are acceptable or maybe even essential. But moving side to side too quickly will make it difficult for the camera to process that information. You better use a selfie stick or gimbal.
Now, check out the best vertical video ratios for various social platforms.
Best video aspect ratios for Facebook

● 1:1 or 4:5 (Feed)
● 9:16 (Stories) Full portrait/Vertical
● 1:1 (Video Carousel)
● 16:9 (In streams, ads) -> Full landscape
● 9:16 (Audience Network)
● 2:3 (Vertical)
Best video aspect ratios for Instagram
● 1:1 (Feed)
● 4:5 (Feed ads)
● 9:16 (Stories)
● 9:16 (Reels)
● 9:16 (ICTV)
Best video aspect ratios for Twitter

● 1:1 (Promoted Videos)
● 1:1 or 9:16 (Sponsorship)
● 16:9 (Live Videos)
● 1:11 or 16:9 (Video Posts)
Best video aspect ratios for TikTok
● 9:16, 1:1, or 16:9 (For ads)
● 9:16 (For organic videos)
Wondershare Filmora
Being a newbie and producing perfect and professional vertical video content can be challenging, especially for the social platform. And then perfection requires delicate skills. If you want to change the aspect ratio after capturing an image or shooting a video, you need post-processing software.
There are tons of post-processing software available that have aspect ratio tools. As a tech geek, I even want essential tools that can serve all my needs and are also simple to use. Wondershare Filmora (iOS and Android) and Wondershare Filmora (Windows) is just that platform where you simply record, edit and share right away. It is loaded with easy-to-use editing features, special effects, social media integration options, and your desired music.
The best thing about Filmora Go is that it is for every skill level, unlike the other video editing software. Moreover, it lets you build unique custom build animation without breaking a sweat. So if you have a horizontal video, Filmora Go makes it easy to edit it into a Vertical one.
Features:
● Allows users to make videos anywhere using your iOS or Android device.
● The powerful editing tools of Filmora and Filmora help you create excellent iPhone vertical video dimensions.
● A dynamic music library helps users to add great background music in the videos.
● Both Filmora and Filmora (Desktop) have a user-friendly and intuitive user interface.
● The new Video Beautification feature helps you modify the shape of your face, lips, or nose in the picture.
Wondershare Filmora
Get started easily with Filmora’s powerful performance, intuitive interface, and countless effects!
Try It Free Try It Free Try It Free Learn More >

Conclusion
The vertical phone aspect ratio may seem avoidable, but you need a near-perfect influence on your desired audience to engage and grow. Thus, the Aspect ratio is not something to avoid if you want to compete in the business. Smartphone digital evolution has shifted the balance towards the phone aspect ratio vertical. In this article, we also talked about iPhone video dimensions vertical, hope it will help you. Platforms like Filmora provides comprehensive and easy editing solutions to edit aspect ratio as desired.
If you are a professional video or image creator, you know what aspect ratio is and why aspect ratio is important. Even people passionate about their cameras and visual art enthusiasts know it. If you are a newbie, Let us make it easy for you. This article will talk about the vertical phone aspect ratio ratio, its definition, types, iPhone vertical video dimensions, etc. We’ll also provide you solid tips on mobile vertical video size and how to create phone vertical videos easily. Let’s jump into the topic and see what you can learn.
In this article
01 [What is Phone Aspect Ratio Vertical?](#Part 1)
02 [Types of Phone Aspect Ratio Vertical](#Part 2)
03 [Tips to Create Phone Vertical Videos](#Part 3)
Part 1 What is Phone Aspect Ratio Vertical?
The vertical phone aspect ratio is the “proportional” relationship between the screen’s width and height. For example, if your image or video has an aspect ratio of 4:5, it simply means the width of the screen (photo or video) is four times the height of the image.
The vertical phone aspect ratio is the “proportional” relationship between the screen’s width and height. For example, if your image or video has an aspect ratio of 4:5, it simply means the width of the screen (photo or video) is four times the height of the image.
Back in the television days, you might have seen certain old pictures with black padding on either side of the screen. It was just that they were shot in different aspect ratios and your television screen had different aspect ratios.
Aspect Ratio Vs Resolution
Remember that aspect ratio does not refer to the physical size of an image or its dimensions in pixels (resolution). So aspect ratio 3:1 does not refer to the actual width and height of the image or video; it just describes their relationship.
You are wrong if you think aspect ratio is just another fancy name for resolution. Think again. Check out how it is calculated.
“
| | Aspect Ratio | Resolution | |
| ————— | ————————————————————– | ———————————————————————————- |
| Definition | The Ratio of the width of an image to the height of the image. | Total number of pixels displayed on your screen (computer, cell phone, television) |
| Commonly Used | ● 1:1 ● 3:1 ● 3:2 ● 4:3 ● 5:4 ● 9:1 ● 16:9 | ● 640x480 ● 800x600 ● 1024x768 |
Aspect Ratio Calculator
To get the resolution, you need to multiply width times the height. To get aspect ratio, the formula is: Divide the width by the height or simply divide the long side by the short side.
There are multiple online aspect ratio calculators available. Check out the value for both the images and the videos generated through the photo ratio calculator for your ease.
| Common Aspect Ratio | AR Width | AR Height | Image Width | Image Height |
|---|---|---|---|---|
| 1:1(square) | 1 | 1 | 1920 | 1920 |
| 5:4 (large and medium format cameras) | 5 | 4 | 1920 | 1536 |
| 4:3 Standard | 4 | 3 | 1920 | 1440 |
| 3:2 (35mm camera) | 3 | 2 | 1920 | 1280 |
| 16:9 | 16 | 9 | 1920 | 1080 |
| 3:1 Panoramic | 3 | 1 | 1920 | 640 |
| 9:16 | 9 | 16 | 1080 | 1920 |
For example, the aspect ratio of 3:1 may be an image of 3m wide and 1m high. At the same time it can be 3 feet wide and 1 foot high. For further simplification, consider dimensions in pixels: a 6000×4000 image has 3:2 aspect ratios.
Always remember this small but crucial point. The aspect ratio refers to the image or video you captured or recorded and the display (or screen) in which your video or image would be displayed.
Why is the aspect ratio important?
In the age of web content, asking why aspect ratio is important? Some may consider it naïve. Images need to be uploaded at different aspect ratios for different uses (desktop vs. mobile or blog vs. social media). Incorrect aspect ratio affects your final image and end-user experience.
Choice of the wrong aspect ratio can eliminate the potential for editing (cropping and resizing). In addition, using the correct aspect ratios saves you from facing the trouble of distortion or clipping.
Part 2 Types of Phone Aspect Ratio Vertical
Image Aspect Ratios
The aspect ratio decides and changes the entire composition and how the audience perceives the image. First, let us see some common image aspect ratios.
● 1:1 Ratio
If you have seen a square-shaped image, it had probably a 1:1 aspect ratio. It simply means both sides (width and height of the image) are equal. It was initially the aspect ratio of square television sets. However, this is commonly used for print photos, mobile screens, and social platforms.
● 3:2 Ratio
Initially used for classic 35 mm film and still photography, aspect ratio 3:5 is still used on some laptops, tablets, and handheld game consoles. The famous example of this aspect ratio Images framed at 1080×720 pixels or 6″x4″.
● 5:4 Ratio
It was commonly used for photography and art prints. For Images having dimensions, 8″x10″ and 16x20 have the 5:4 aspect ratios.
Video Aspect Ratios
Like the image aspect ratios, video aspect ratios would also profoundly affect its composition and thus how your directed viewers perceive it. Some common mobile vertical video size or video aspect ratios are given below.
● 16:9 Ratio
If you have seen presentation slides, computer monitors, or widescreee seen this slimmer and more elongated rectangular-shaped 16:9 Ratio. This is the standardized widescreen aspect ratio that you see everywhere on the web. In terms of pixel common dimension for 16:9 is 1920×1080 pixels and 1280×720 pixels.
● 9:16 Ratio (Vertical)
When smartphones started coming with video capabilities, this Ratio became popular. Likewise, today this Ratio is trendy for social media platforms with video story capabilities.
The Instagram story typically consists of 1080x1920 pixels, which in terms of aspect ratio is 9:16. Most phones, such as iPhone, have a feature that allows you to record footage in both (16:9 as well as 9:16).
Phone aspect ratio vertical
Back in the day, taking aspect ratio vertical (portrait mode) footage was considered unprofessional and a sign of an amateur. But the digital revolution has changed that. Now from unforgivable sin, the vewayal mode has practically become a mainstream media sensation. Vertical style has now become the dominant format.
Phone aspect ratio vertical simply means taller screen than wider. The most common type is 9:16 (1080x1920 pixels), a typical vertical videos aspect ratio. Although this phone aspect ratio vertical comes in a few more shapes and sizes such as 4:5, 2:3.
Part 3 Tips to Create Phone Vertical Videos
Creating vertical videos is crucial for getting engagements and growing your brand. It is easy with a phone because most smartphones, by default, record in 9:16, which is the standard vertical aspect ratio. But with a camera, you have to manually edit to the correct aspect ratio before you shoot it.
You can also shoot horizontally and then change it to vertical, but it needs professional videographer expertise.
Who wants to rotate their phones watching videos? Well, as far as the trend, Let us see some tiny but handy tips for creating vertical phone videos.
1. Choose the correct aspect ratio
Video taller than the 1:1 aspect ratio is commonly considered Vertical video. Types of these vertical aspects ratio include 4:5 (social), 2:3 and 9:16. They are all taller than they are wide, thus vertical.
Choosing the correct aspect ratio for your vertical video, always think about why and where you intend to use the video. The second important thing you should consider is your plans for editing that video.
Cropping horizontal can be irritating and sometimes disappointing at the same time. Producing a 9:16 vertical frame at HD resolution from a horizontal HD frame may result in very pixelated and low-quality footage.
If, for some reason, you still want first to shoot it horizontal and then change it back to mobile vertical video size. You may need to shoot in 4K horizontally to get extra pixels to work with. It can later be cropped in the sides to 9:16 (Vertical phone aspect ratio). Plus, you won’t need to scale it anymore.
2. Direct your viewer’s eyes
For hooking social media viewers, you need to put your most interesting visual upfront. These include GIFs, colourful stop-motion or looping animation. Always try to match your first couple of shots with your overall brand personality.
3. Screen splitting into two or more
A tall vertical screen can be styled with multiple horizontal clips on top of each other. These clips must relate to your relevant content and overall look. Natural lines or patterns can help display them in the most creative ways.
4. Be close to your subject
For producing an intimate experience with the vertical frame, you should get closer to the subject. Most of the action will be positioned to the centre as your viewers scroll. Do not let cut off or cover up your main subject by any text and make sure you leave enough room for text, emojis and stickers.
5. Filling the vertical space
First, make sure that your subject is vertical-friendly. Then get closer and fill the space within the vertical frame. The vertical frame can be filled through the following:
● Up-close shot (if the subject is personal).
● Raising the camera high and tilting it down (to film things like a long, empty road).
● Bird’s-eye view from above.
5. Rule of Third
This photography rule says not to place the main subject directly in the center of the frame. Create more dynamic composition by creating imaginary (Horizontal & Vertical) lines that divide your frame into thirds.
You have to place your subject either on the lines or where the lines meet up. And guess what? You don’t need to draw imaginary nowadays. Most cameras and smartphones provide you with this option.
6. Avoid Shaking
You do not want to distract your viewers with shaky camera moments. Normal pan and 360-degree rotation are acceptable or maybe even essential. But moving side to side too quickly will make it difficult for the camera to process that information. You better use a selfie stick or gimbal.
Now, check out the best vertical video ratios for various social platforms.
Best video aspect ratios for Facebook
● 1:1 or 4:5 (Feed)
● 9:16 (Stories) Full portrait/Vertical
● 1:1 (Video Carousel)
● 16:9 (In streams, ads) -> Full landscape
● 9:16 (Audience Network)
● 2:3 (Vertical)
Best video aspect ratios for Instagram
● 1:1 (Feed)
● 4:5 (Feed ads)
● 9:16 (Stories)
● 9:16 (Reels)
● 9:16 (ICTV)
Best video aspect ratios for Twitter
● 1:1 (Promoted Videos)
● 1:1 or 9:16 (Sponsorship)
● 16:9 (Live Videos)
● 1:11 or 16:9 (Video Posts)
Best video aspect ratios for TikTok
● 9:16, 1:1, or 16:9 (For ads)
● 9:16 (For organic videos)
Wondershare Filmora
Being a newbie and producing perfect and professional vertical video content can be challenging, especially for the social platform. And then perfection requires delicate skills. If you want to change the aspect ratio after capturing an image or shooting a video, you need post-processing software.
There are tons of post-processing software available that have aspect ratio tools. As a tech geek, I even want essential tools that can serve all my needs and are also simple to use. Wondershare Filmora (iOS and Android) and Wondershare Filmora (Windows) is just that platform where you simply record, edit and share right away. It is loaded with easy-to-use editing features, special effects, social media integration options, and your desired music.
The best thing about Filmora Go is that it is for every skill level, unlike the other video editing software. Moreover, it lets you build unique custom build animation without breaking a sweat. So if you have a horizontal video, Filmora Go makes it easy to edit it into a Vertical one.
Features:
● Allows users to make videos anywhere using your iOS or Android device.
● The powerful editing tools of Filmora and Filmora help you create excellent iPhone vertical video dimensions.
● A dynamic music library helps users to add great background music in the videos.
● Both Filmora and Filmora (Desktop) have a user-friendly and intuitive user interface.
● The new Video Beautification feature helps you modify the shape of your face, lips, or nose in the picture.
Wondershare Filmora
Get started easily with Filmora’s powerful performance, intuitive interface, and countless effects!
Try It Free Try It Free Try It Free Learn More >
Conclusion
The vertical phone aspect ratio may seem avoidable, but you need a near-perfect influence on your desired audience to engage and grow. Thus, the Aspect ratio is not something to avoid if you want to compete in the business. Smartphone digital evolution has shifted the balance towards the phone aspect ratio vertical. In this article, we also talked about iPhone video dimensions vertical, hope it will help you. Platforms like Filmora provides comprehensive and easy editing solutions to edit aspect ratio as desired.
Also read:
- New Mastering the Technique Playing Videos in Slow Motion on Your iPhone Like a Pro for 2024
- Updated Want to Add Life to Your Customary Business Presentations and Videos on a MacOs Device with Expressive Emojis? Dive in to Have an Insight Into the Credibility of Using Emojis on a Mac
- 3 In-Camera Transitions Tricks To Make Videos Like a Pro for 2024
- Updated Change Background Color in After Effects for 2024
- Enhance Your Video Color Accuracy with Video Scopes for 2024
- How to Make Foggy Text Reflection Effect for 2024
- New In 2024, How to Merge Audio and Video in VLC Media Player
- New How to Do Masking in After Effects Alternative Provided
- How to Take Slow Motion Videos for 2024
- Updated This Article Will Focus on Understanding the Secret Tips in Wondershare Filmora that You Can Use to Edit Videos Faster and More Efficiently for 2024
- New How to Add Subtitles to MKV Videos on All Platforms
- Little Known Ways of Adding Emojis to Photos on iPhone & Android
- In 2024, How to Use Zoom in Google
- New 2024 Approved ReVisionFX ReelSmart Motion Blur Plugin For Premiere Pro
- Updated Top 10 Free WhatsApp Video Converter 2023 for 2024
- 2024 Approved This Article Provides Helpful Tips for Creating Better Film Footage in Public Places. Learn How to Choose the Right Angle and Re-Record the Audio with Filmora
- Updated Finding The Best Ways To Replace Sky in Lightroom for 2024
- New In 2024, Learn How to Feather Shapes in After Effects and Add a Professional Touch to Your Designs. This Comprehensive Guide Covers Everything From the Basics to Advanced Techniques. Perfect for Beginners and Experts Alike
- The Best Cinematic LUTs in The Market for 2024
- 2024 Approved Are You Working on Editing a Video and Youd Like to Add Text to It? Learn the Various Ways that You Can Add Text to a Video
- Detailed Tutorial to Rotate a Video in Cyberlink PowerDirector
- In 2024, Easy Way to Create a DIY Green Screen Video Effect
- How To Quickly Create A Screen Print Effect In Photoshop Detailed Gui
- Updated How to Make a Movie with Windows Movie Maker?
- Updated In 2024, Free Ways to Download Mobile Phone Green Screen Videos and Pictures No Copyright
- Why Your Transparent GIF Is Hard to Remove for 2024
- New Zoom In and Zoom Out on YouTube for 2024
- Updated If You Want to Replace or Delete the Sky Pictures or Background Media, Then Give a Quick Read to This Article for Effective Solutions
- Check Out All Details About Kinemaster Here and Understand How to Add Effects in Kinemaster. You Can Use the Chroma Key for the Green Screen as Well
- Updated In 2024, How to Make Flying Objects in Wondershare Filmora
- Are You a Newbie Across YouTube? Want to Know Who the Best Vloggers Are? This Article Provides You with the Best Vloggers on YouTube
- New Looking for Ways to Enhance Overall Look for Your Contents Professionally? Then Coming up with These Cool PowerPoint Templates Can Help You a Lot
- 2024 Approved Premiere Pro Slow Playback Issues Finding The Best Solutions
- Updated In 2024, This Article Will Focus on Understanding the Secret Tips in Wondershare Filmora that You Can Use to Edit Videos Faster and More Efficiently
- Updated 9 Best Sparkle Effects Photo and Video Editors You Should Know for 2024
- Updated In 2024, Create Intro Video with Flixpress
- 15 Best Free Cinematic LUTs for Your Film for 2024
- 11 Tips to Make Product Ad Videos for 2024
- Updated How to Add Freeze Frame to Your Video From Any Device for 2024
- Updated 2024 Approved Heres All About GIF Keyboard Youll Ever Want to Know
- Updated
- Converting VTT to SRT, or in Other Words, Converting a Document File Format Web to Subtitles File with the SRT Format Can Be a Cumbersome Process for Many. It Becomes Difficult when You Are New to This and Dont Have Prior Guidance for 2024
- New Do You Want to Learn How to Use Premiere Pro Distortion Effects in Your Videos? We Have Provided a List of Distortion Premiere Pro Effects and How to Use Them for 2024
- New In 2024, Do You Know About some Efficient Slow-Motion Video Editors? Read This Article to Find Out the Best Slow-Motion Video Editing Tools that You Can Try
- Updated 2024 Approved How to Combine Multiple Videos Into One on Instagram
- Top 8 Memoji Makers to Make a Memoji on PC, Android & iPhone for 2024
- Updated Are You Searching the Internet for Top Wedding LUTs Premiere Pro? This Article Provides Suggestions on the Best LUT Color Presets for 2024
- Want to Uninstall Google Play Service from Realme 11 Pro+? Here is How | Dr.fone
- Locked Out of Apple iPhone 14? 5 Ways to get into a Locked Apple iPhone 14
- How to Unlock Apple iPhone XS with a Mask On | Dr.fone
- In 2024, Unlock Your Boost Mobile Apple iPhone SE (2022) Before the Plan Expires
- In 2024, Dose Life360 Notify Me When Someone Checks My Location On Lava Yuva 3? | Dr.fone
- How to use iSpoofer on Oppo Reno 10 5G? | Dr.fone
- How to Fix Videos Not Playing on Vivo X100?
- The way to get back lost data from Nord 3 5G
- In 2024, How To Delete iCloud Account Remove Your Apple ID Permanently On Apple iPhone 13 mini
- How to Unlock Vivo Phone Forgot Password
- 4 Ways to Transfer Music from Realme Narzo 60x 5G to iPhone | Dr.fone
- Everything You Need To Know About Unlocked Apple iPhone 14 | Dr.fone
- In 2024, Full Guide to Unlock Your Xiaomi Redmi Note 12 Pro 5G
- How to Fix My Lava Blaze 2 Location Is Wrong | Dr.fone
- AddROM Bypass An Android Tool to Unlock FRP Lock Screen For your Nokia C02
- 8 Solutions to Fix Find My Friends Location Not Available On Samsung Galaxy M34 | Dr.fone
- Top 7 iCloud Activation Bypass Tools For your iPhone 6
- In 2024, How To Check if Your Vivo V30 Pro Is Unlocked
- 3 Effective Ways to Unlock iCloud Account Without Password On iPhone 14 Pro Max
- Full Tutorial to Bypass Your Infinix Smart 7 HD Face Lock?
- What Legendaries Are In Pokemon Platinum On Vivo Y100A? | Dr.fone
- Fake the Location to Get Around the MLB Blackouts on Motorola Edge 40 Pro | Dr.fone
- Recover lost data from C300
- Unlocking iPhone SE (2022) Lock Screen 3 Foolproof Methods that Actually Work
- 9 Solutions to Fix Process System Isnt Responding Error on Itel A60 | Dr.fone
- Updated What Is an AI Tool?
- In 2024, How I Transferred Messages from Honor Magic 6 Lite to iPhone 12/XS (Max) in Seconds | Dr.fone
- How To Fix Part of the Touch Screen Not Working on Nokia 105 Classic | Dr.fone
- Why Does My Motorola Moto G34 5G Keep Turning Off By Itself? 6 Fixes Are Here | Dr.fone
- In 2024, Best Oppo FRP Bypass Guide
- In 2024, How to Transfer Contacts from Nokia 150 (2023) to iPhone XS/11 | Dr.fone
- In 2024, How To Unlock Any Samsung Galaxy S23+ Phone Password Using Emergency Call
- In 2024, 7 Ways to Unlock a Locked Vivo Y27 4G Phone
- How To Fix Unresponsive Touch Screen on Honor 100 Pro | Dr.fone
- In 2024, 3 Ways to Track Motorola Razr 40 without Them Knowing | Dr.fone
- iSpoofer is not working On Samsung Galaxy A14 4G? Fixed | Dr.fone
- How To Fix OEM Unlock Missing on Samsung Galaxy A14 5G?
- In 2024, How to Track a Lost Nokia C110 for Free? | Dr.fone
- Recover lost data from Tecno Spark 10 5G
- In 2024, Best 3 Software to Transfer Files to/from Your Realme Note 50 via a USB Cable | Dr.fone
- Title: In 2024, How to Edit Recorded Video
- Author: Morgan
- Created at : 2024-07-01 13:02:23
- Updated at : 2024-07-02 13:02:23
- Link: https://ai-video-editing.techidaily.com/in-2024-how-to-edit-recorded-video/
- License: This work is licensed under CC BY-NC-SA 4.0.
