:max_bytes(150000):strip_icc():format(webp)/E-reader-57b936e05f9b58cdfd3e07e1.jpg)
Lets Learn How to Convert a Normal Video Into a Film Shot in the 1920S with Wondershare Filmora

Let’s Learn How to Convert a Normal Video Into a Film Shot in the 1920S with Wondershare Filmora
Do you want to roll back the hands of time and shoot a film like you were in WWI or Charlie Chaplin’s era? That’s what a vintage film effect is all about. In other words, this video effect will give your videos an old-film look and feel. So, without wasting time, let’s learn how to convert a normal video into a film shot in the 1920s with Wondershare Filmora.
Preparation

In this tutorial, you don’t need a lot of creativity to create a vintage film, as Wondershare Filmora will be doing the heavy lifting. Just shoot an action video like chasing each other around, chatting with friends, running away from something, or doing anything else. Let’s learn how to do that below!
Free Download For Win 7 or later(64-bit)
Free Download For macOS 10.14 or later
Step1 Add a video you want to edit
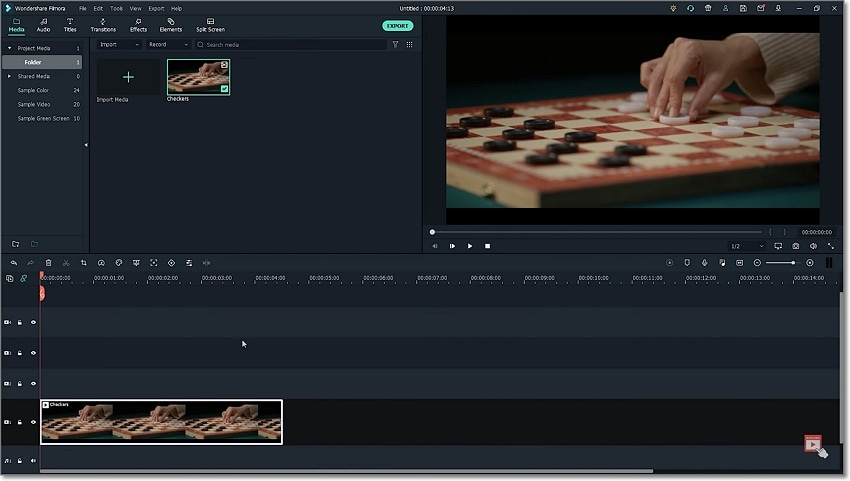
Upload your video on Filmora, then move it to the editing timeline by dragging it. This should take a second or two.
Step2 Add a crop effect
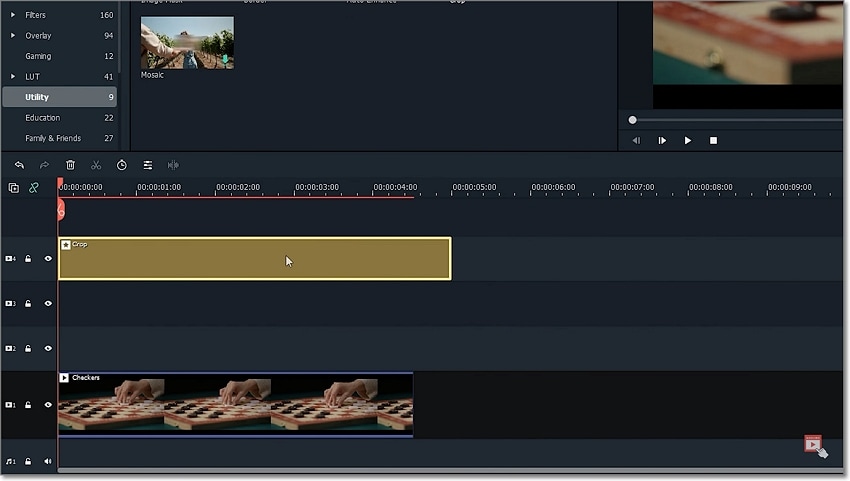
After successfully adding your video to the timeline, tap the Effect tab on top of the screen and click Utility. Then, choose the Crop effect and add a few tracks above the video clip.
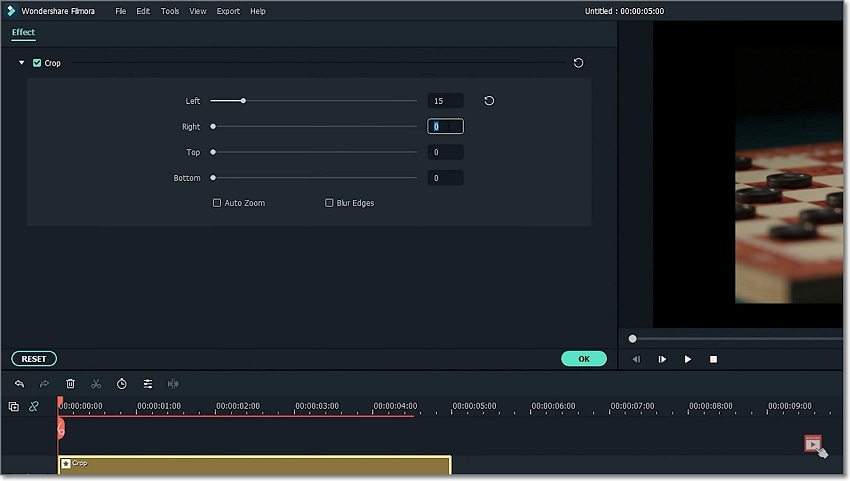
Next, double-tap the Crop effect on the editing timeline to open the effect editing tools. Now change the crop amount to 15 to add a vintage feel to your video. Just enter 15 on the Left and Right boxes.
Step3 Add the Dirty Film and Silent Film effects
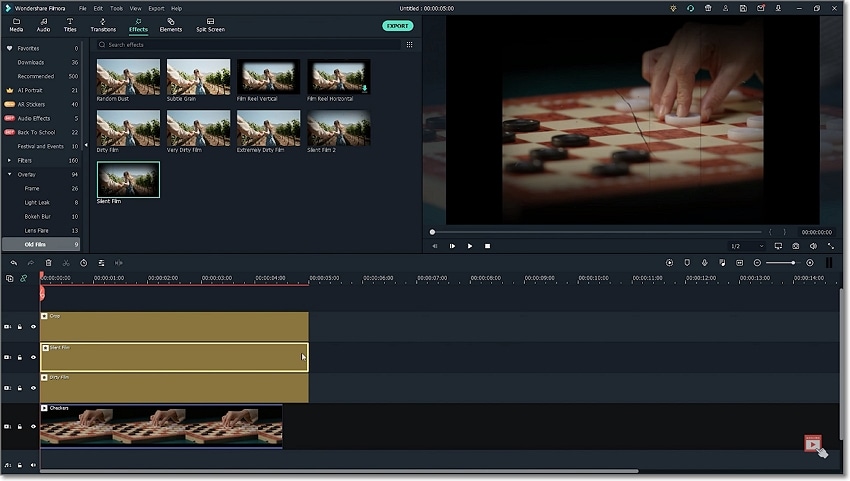
Tap the Effect tab, then open the Overlay drop-down menu. Then, choose the Old Film category before adding a Dirty Film effect above the clip. To apply a more vintage feel to your video, add a Silent Film effect to the track above the Dirty Film effect.
Step4 Add a black & white effect to your video

Up to this point, your film should now start having a more vintage feel. But to make it look even older, double-click the video clip and tap the Color tab. After that, open the 3D LUT arrow and choose the B&W Film option. Now play the video and enjoy.
Summary
See, you don’t need to break a sweat to add a vintage feel to your funny video. With Filmora, you’ll access multiple tools and effects to create an old-looking film with just a single click. And don’t forget to play around with other Filmora overlays and effects to bring out the inner video editor in you. Thanks for reading!
Free Download For macOS 10.14 or later
Step1 Add a video you want to edit

Upload your video on Filmora, then move it to the editing timeline by dragging it. This should take a second or two.
Step2 Add a crop effect

After successfully adding your video to the timeline, tap the Effect tab on top of the screen and click Utility. Then, choose the Crop effect and add a few tracks above the video clip.

Next, double-tap the Crop effect on the editing timeline to open the effect editing tools. Now change the crop amount to 15 to add a vintage feel to your video. Just enter 15 on the Left and Right boxes.
Step3 Add the Dirty Film and Silent Film effects

Tap the Effect tab, then open the Overlay drop-down menu. Then, choose the Old Film category before adding a Dirty Film effect above the clip. To apply a more vintage feel to your video, add a Silent Film effect to the track above the Dirty Film effect.
Step4 Add a black & white effect to your video

Up to this point, your film should now start having a more vintage feel. But to make it look even older, double-click the video clip and tap the Color tab. After that, open the 3D LUT arrow and choose the B&W Film option. Now play the video and enjoy.
Summary
See, you don’t need to break a sweat to add a vintage feel to your funny video. With Filmora, you’ll access multiple tools and effects to create an old-looking film with just a single click. And don’t forget to play around with other Filmora overlays and effects to bring out the inner video editor in you. Thanks for reading!
Free Download For macOS 10.14 or later
Step1 Add a video you want to edit

Upload your video on Filmora, then move it to the editing timeline by dragging it. This should take a second or two.
Step2 Add a crop effect

After successfully adding your video to the timeline, tap the Effect tab on top of the screen and click Utility. Then, choose the Crop effect and add a few tracks above the video clip.

Next, double-tap the Crop effect on the editing timeline to open the effect editing tools. Now change the crop amount to 15 to add a vintage feel to your video. Just enter 15 on the Left and Right boxes.
Step3 Add the Dirty Film and Silent Film effects

Tap the Effect tab, then open the Overlay drop-down menu. Then, choose the Old Film category before adding a Dirty Film effect above the clip. To apply a more vintage feel to your video, add a Silent Film effect to the track above the Dirty Film effect.
Step4 Add a black & white effect to your video

Up to this point, your film should now start having a more vintage feel. But to make it look even older, double-click the video clip and tap the Color tab. After that, open the 3D LUT arrow and choose the B&W Film option. Now play the video and enjoy.
Summary
See, you don’t need to break a sweat to add a vintage feel to your funny video. With Filmora, you’ll access multiple tools and effects to create an old-looking film with just a single click. And don’t forget to play around with other Filmora overlays and effects to bring out the inner video editor in you. Thanks for reading!
Free Download For macOS 10.14 or later
Step1 Add a video you want to edit

Upload your video on Filmora, then move it to the editing timeline by dragging it. This should take a second or two.
Step2 Add a crop effect

After successfully adding your video to the timeline, tap the Effect tab on top of the screen and click Utility. Then, choose the Crop effect and add a few tracks above the video clip.

Next, double-tap the Crop effect on the editing timeline to open the effect editing tools. Now change the crop amount to 15 to add a vintage feel to your video. Just enter 15 on the Left and Right boxes.
Step3 Add the Dirty Film and Silent Film effects

Tap the Effect tab, then open the Overlay drop-down menu. Then, choose the Old Film category before adding a Dirty Film effect above the clip. To apply a more vintage feel to your video, add a Silent Film effect to the track above the Dirty Film effect.
Step4 Add a black & white effect to your video

Up to this point, your film should now start having a more vintage feel. But to make it look even older, double-click the video clip and tap the Color tab. After that, open the 3D LUT arrow and choose the B&W Film option. Now play the video and enjoy.
Summary
See, you don’t need to break a sweat to add a vintage feel to your funny video. With Filmora, you’ll access multiple tools and effects to create an old-looking film with just a single click. And don’t forget to play around with other Filmora overlays and effects to bring out the inner video editor in you. Thanks for reading!
How to Crop a Video in Davinci Resolve [Step by Step]
Sometimes, when it comes to editing a video, we don’t even know where to start, because there are too many options –online platforms which instantly help us edit our clips, without lengthy process of downloading and installing computer programs;
Mobile applications with user-friendly interface, allowing us to manipulate the footage quickly, easily choose our preferred formats and effects and adjust the clips according to the requirements our target platforms set; more time-consuming and advanced software with even more options, but which seem to require us to be more skilled and experienced in editing.
Even though editing, as other innovative and creative actions, is limitless in its possibilities, sometimes we just need to make a little change in our project and it’s quite enough for us to be satisfied with our work and material. One of the things which is rather simple to do, but sometimes essential, when it comes to making our clips better and more picturesque for the audience, is cropping a video.
Cropping, in its essence, is great to “hide” some unnecessary objects in our video, and/or highlight the main ones. In this article, we discuss how to crop a video in a software called DaVinci Resolve, in simple little steps, how to export our work and lastly, what would be the alternate way to do the same in other computer program.
Part 1. How to crop a video in Davinci Resolve
First and foremost, let’s get to know Davinci Resolve! As mentioned above, it is a software, so let’s be well-aware that we have to download and install it on our computer systems. Of course, it takes a bit of time, but to be able to use an advanced software, it’s totally worth it. If we are to search for the information about Davinci Resolve, we come across the following description: “color grading and non-linear video editing application for macOS, Windows, and Linux”. So, no matter which system we have, we can count on this software, which is a real advantage!
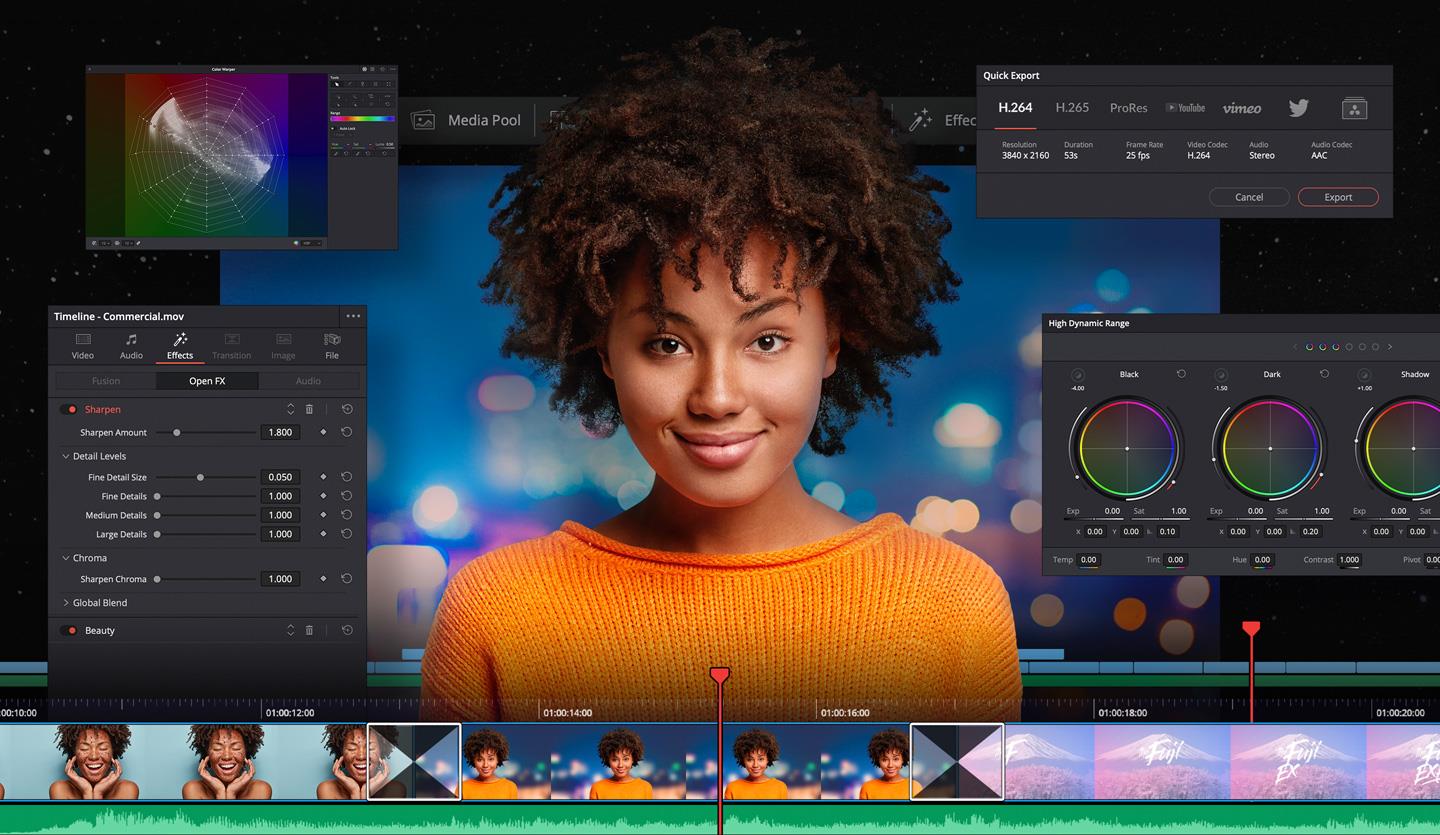
To touch upon the functions, Davinci Resolve includes modules for video editing, color correction, audio mixing and effects, and visual effects. The interface of it is quite advanced, but would be well and soon understandable for someone who has ever used a similar editing software, such as Adobe Premiere Pro. If you are interested in everything the software has to offer, we recommend watching this very viral beginner tutorial .
Now, back to cropping – so, you want to crop the video you took or got somehow, and you also think about using Davinci Resolve? Cropping, in most cases, meaning different applications, platforms and software, is not a complicated task at all, and you can do it in a very short amount of time in Davinci Resolve, too. Therefore, let’s delve into the steps on how to do it!
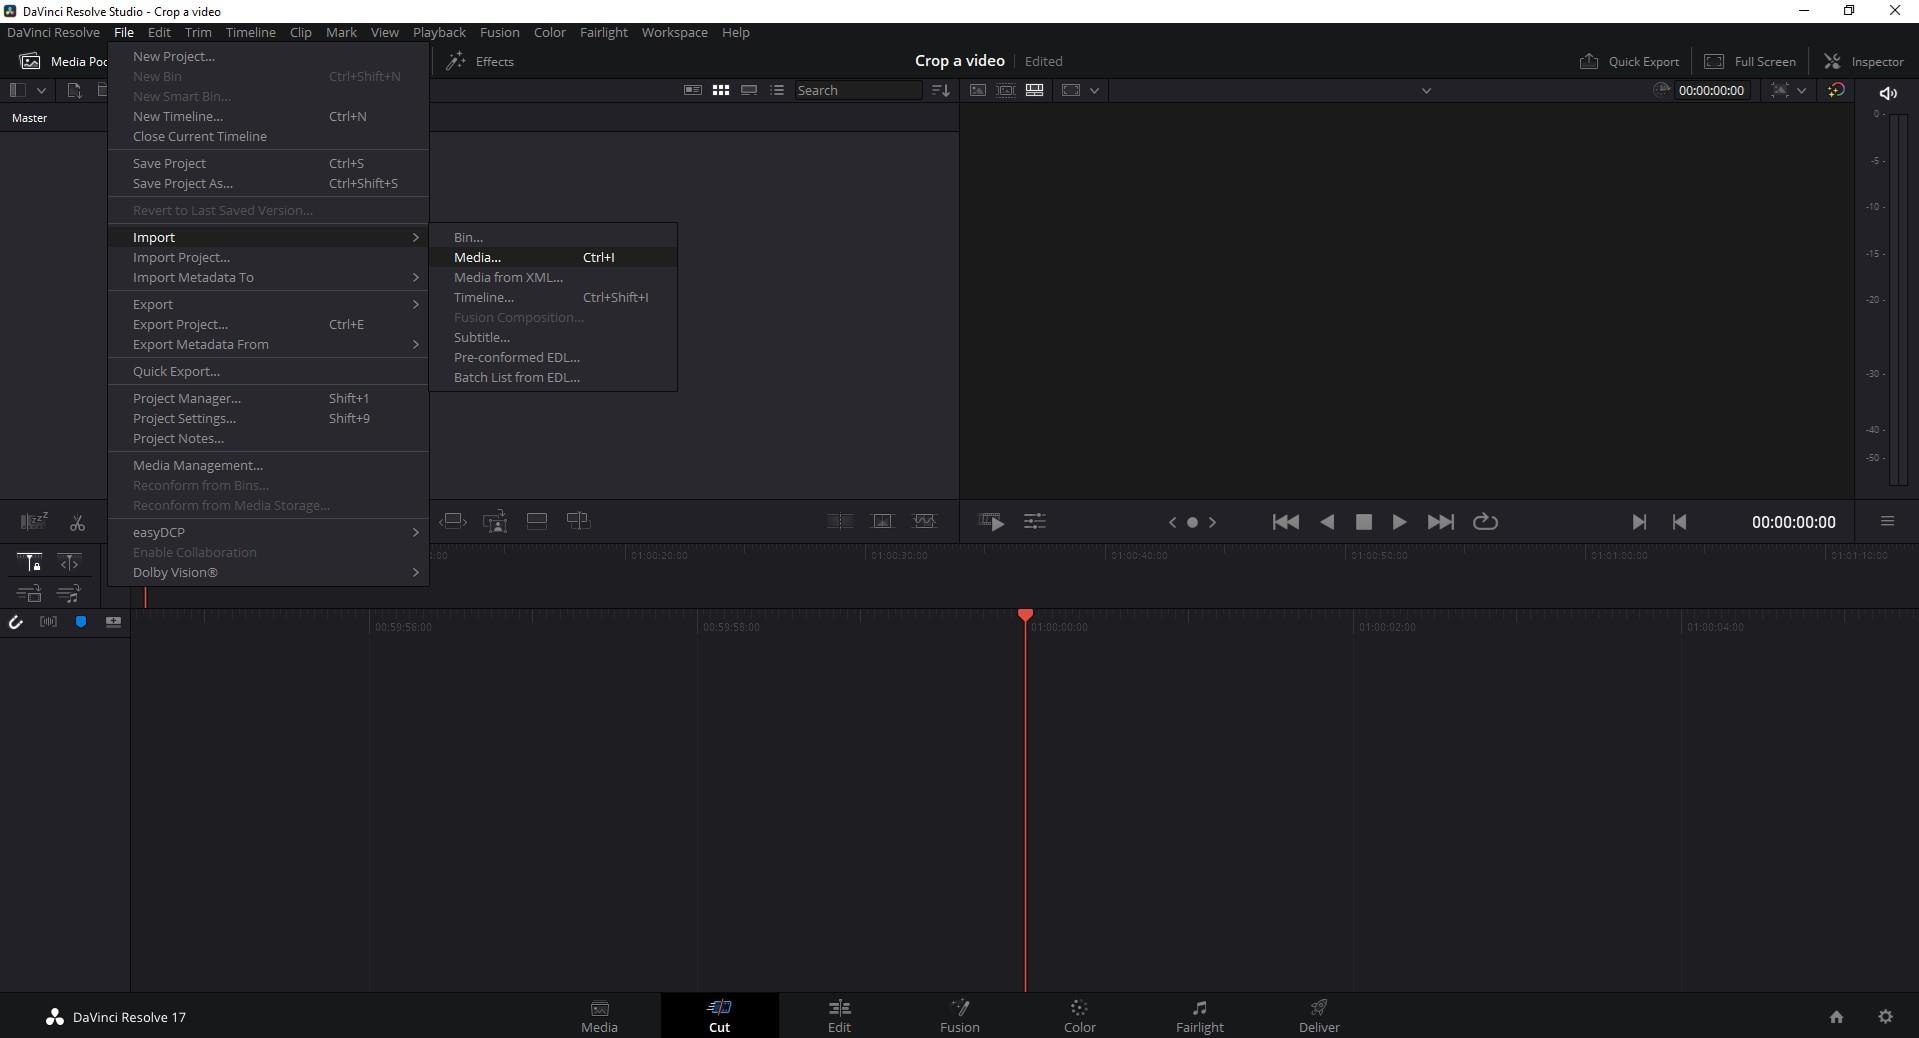
First, download and install the software, and when it is finished, launch it. You will see a totally clean program, until you add the video you want to work on. To do so, you have to find File in the top menu, find Import and then choose Media.
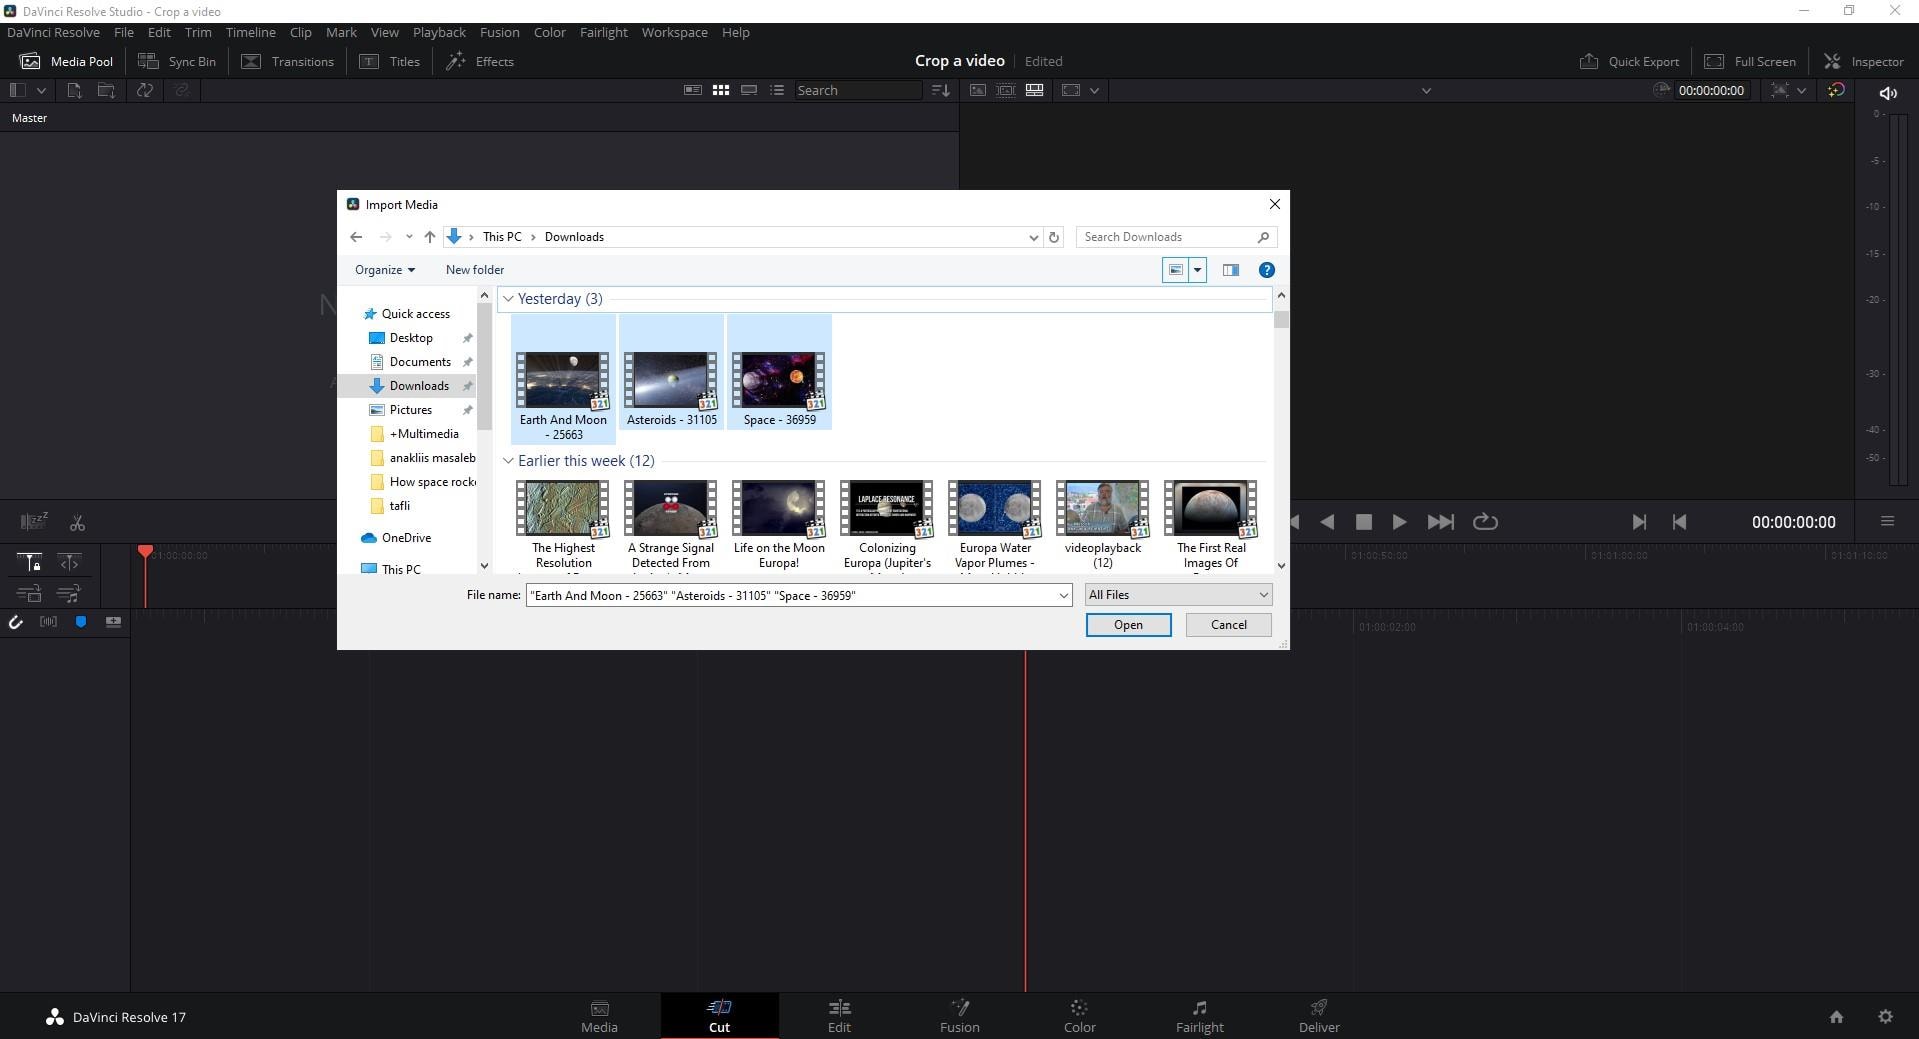
Then it will open a new window where you can choose your file…
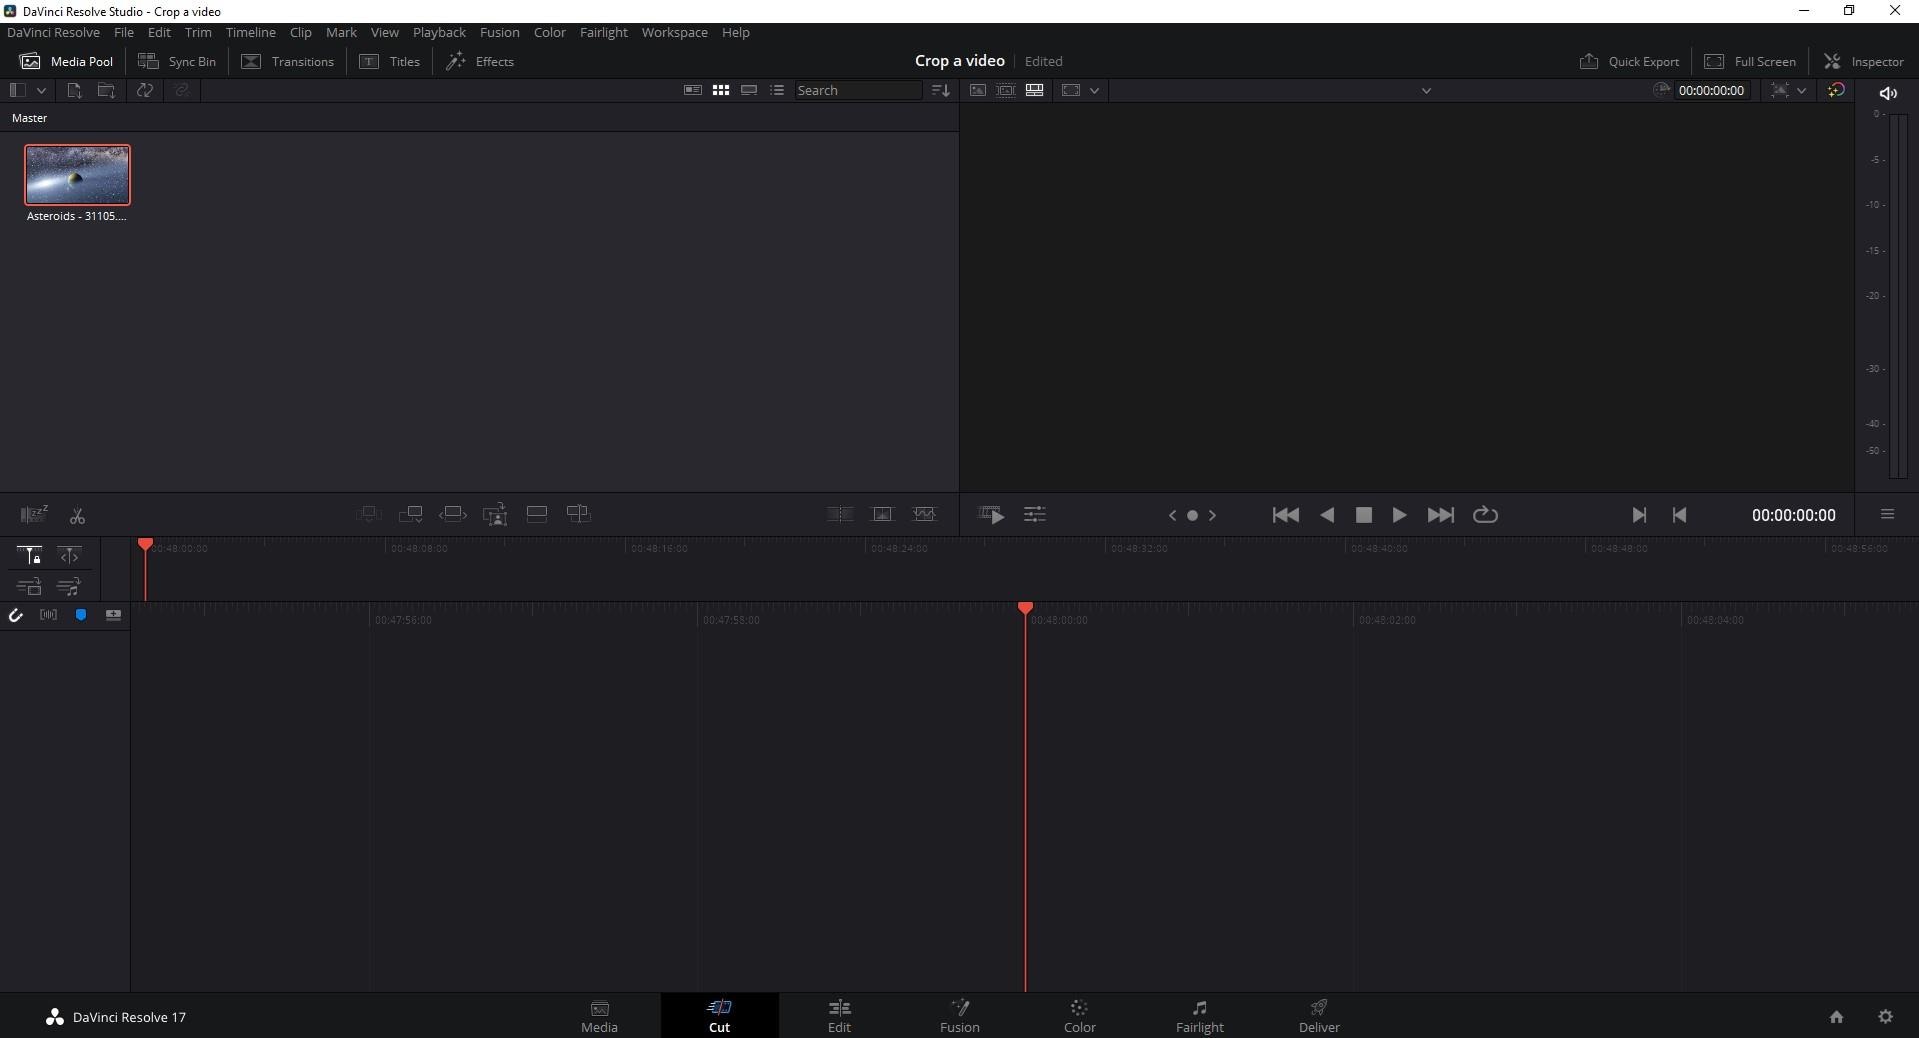
Your chosen file will be added in Media Pool, and to direct it into the sequence, you have to drag and drop it there.
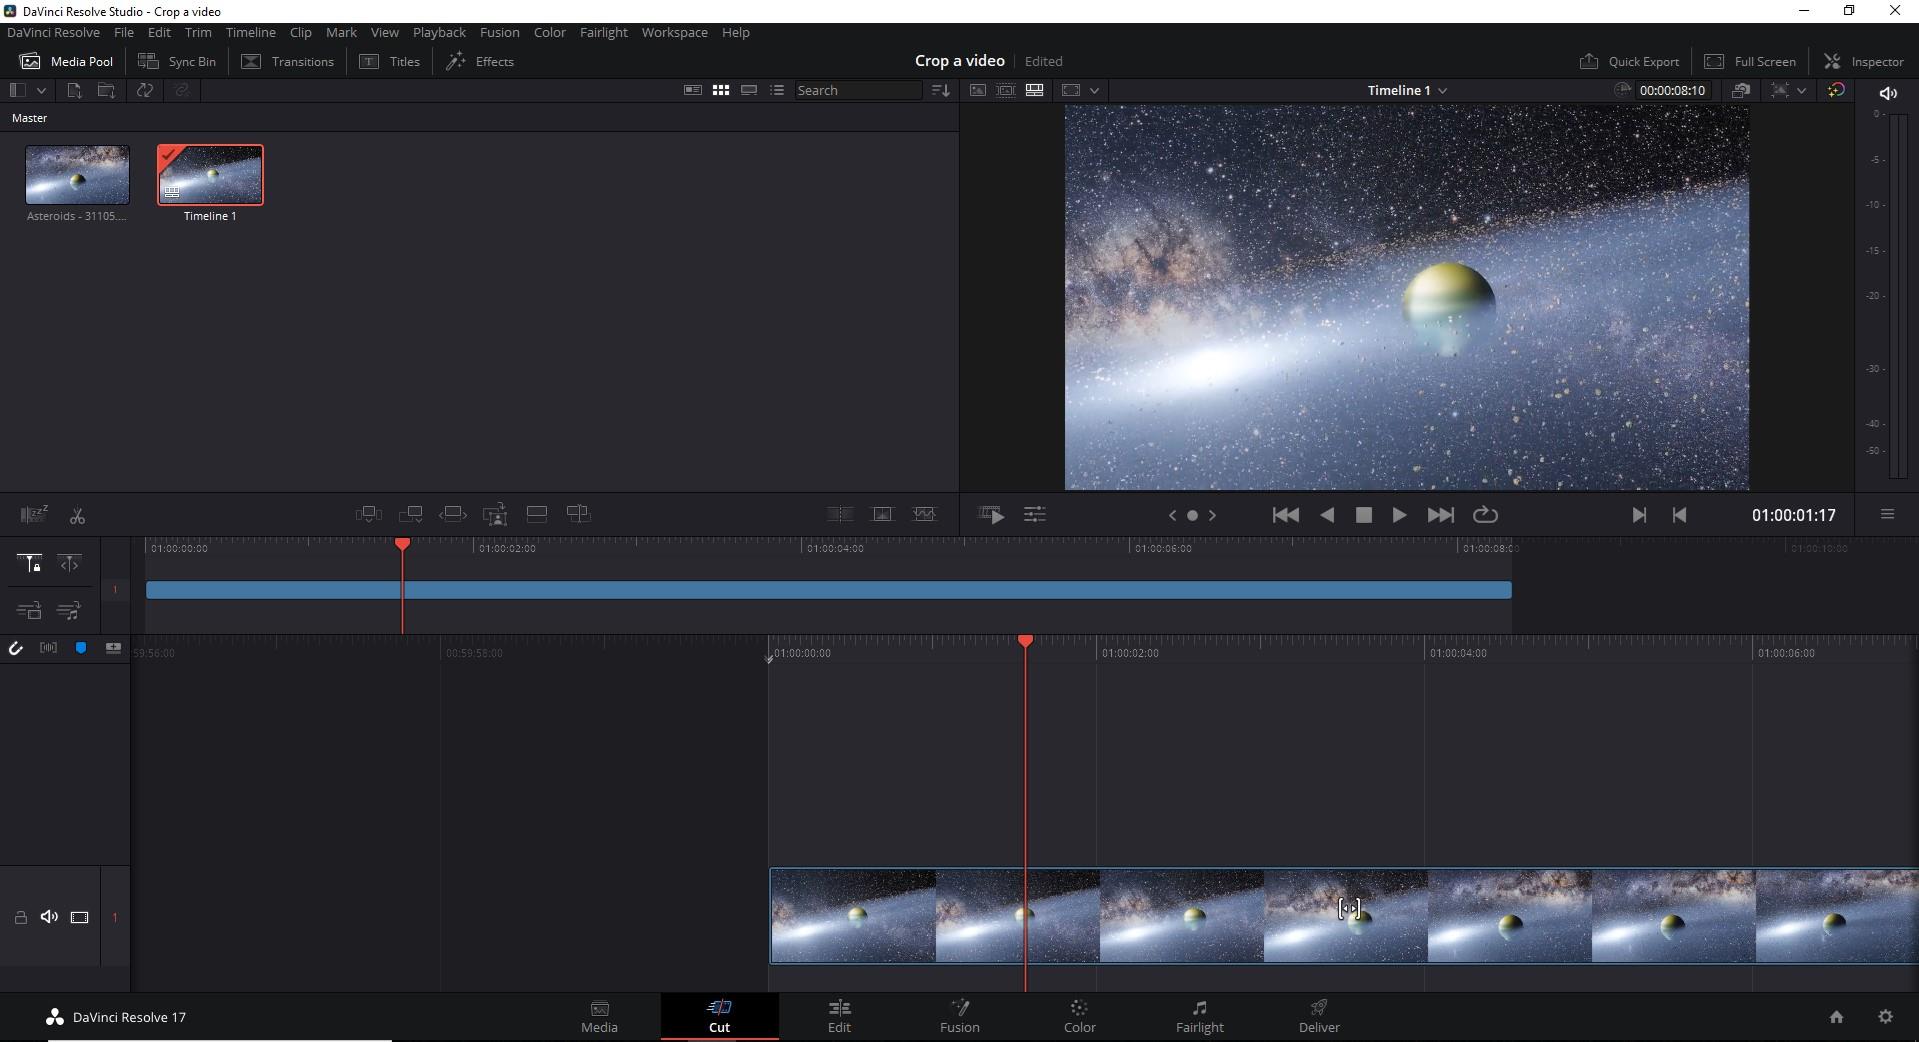
And then you might have difficulty to find the crop button. But here it is – below the screen, on the left, there are two icons, and the second one says – Tools…

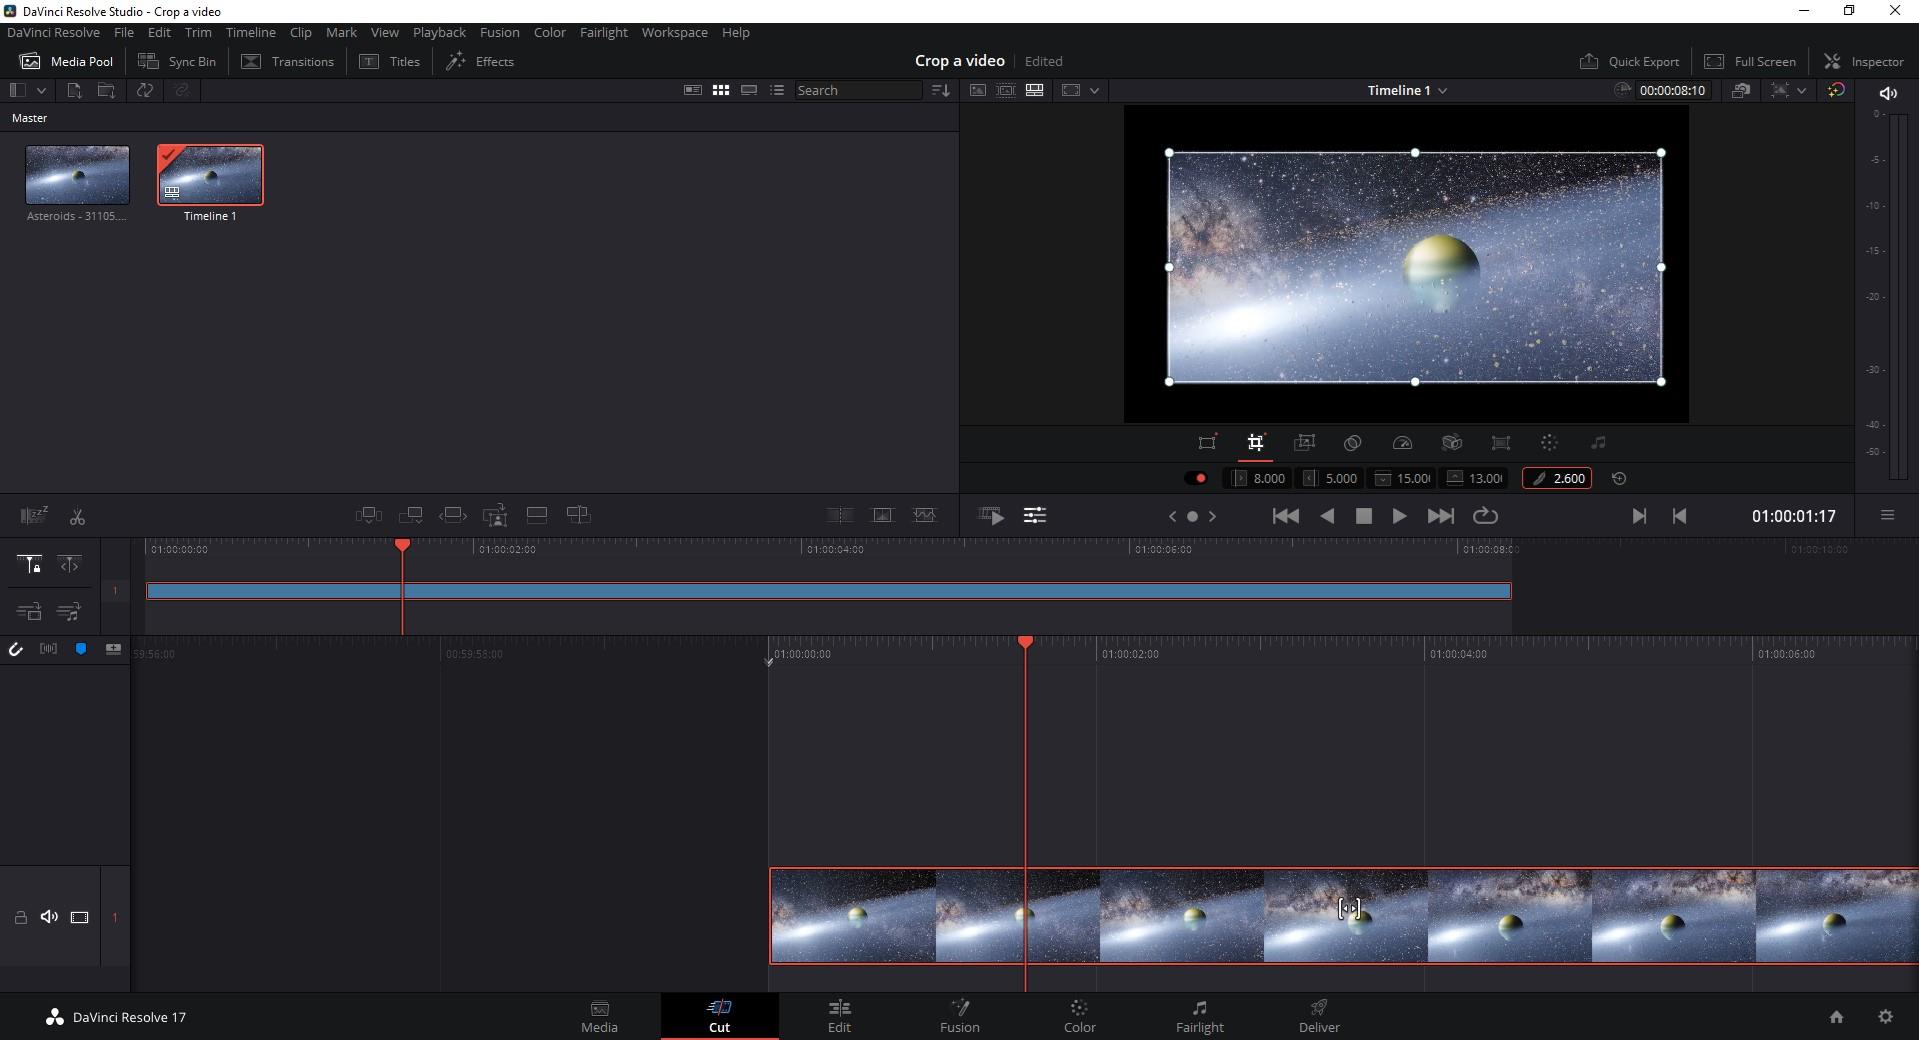
Click on the Tools button and more options will appear down the screen where the video clip is shown. And there, you will notice the famous Crop icon, just the second one, which will put your clip in a new window with the option below to crop each side, plus, to add feather around the cropped video.
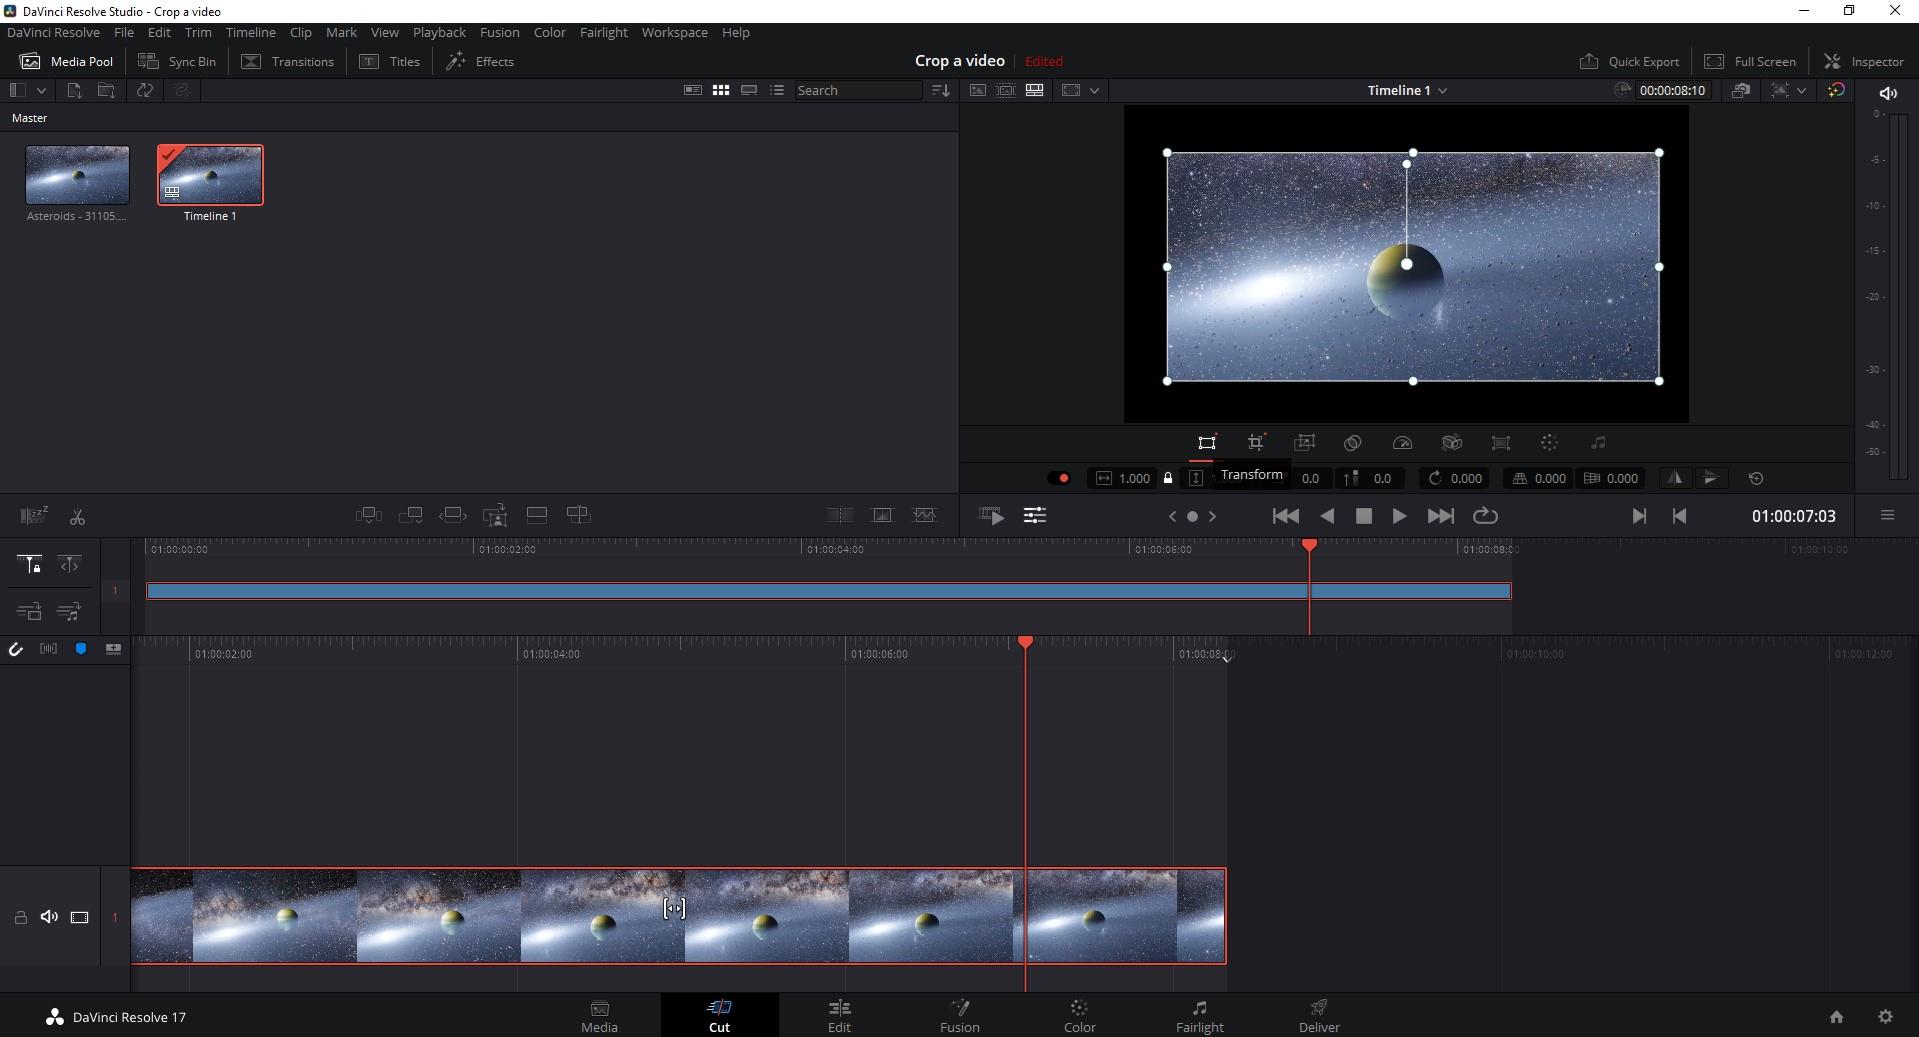
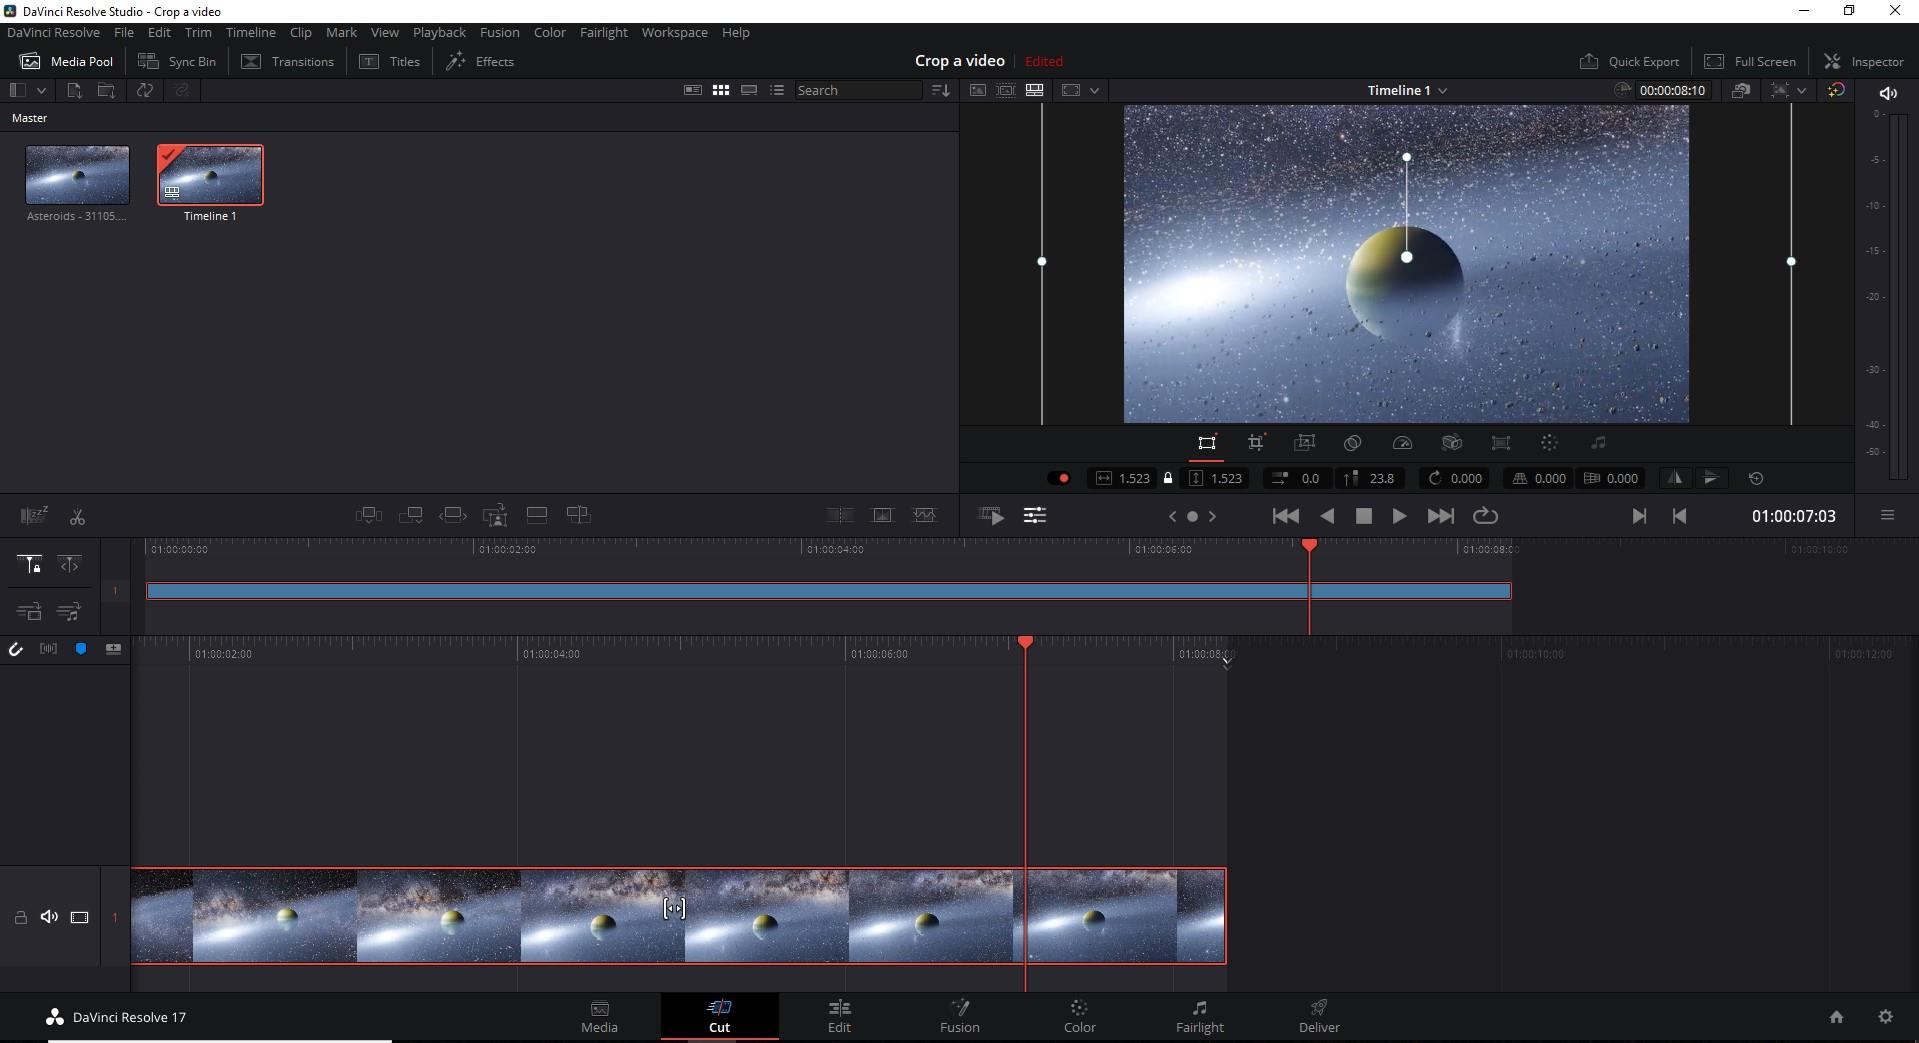
When you are ready to make a video bigger and adjust it to a frame size, you need to choose Transform button, left to the Crop icon. You can “touch” the dots on the video and manually manage the size of your cropped clip.
When you are ready to save the video you cropped, find Quick Export – you will see the button above the clip, on the right. A little window with settings will appear, so you can choose the format you want to save your video in, and then, of course, click on Export for the last time.
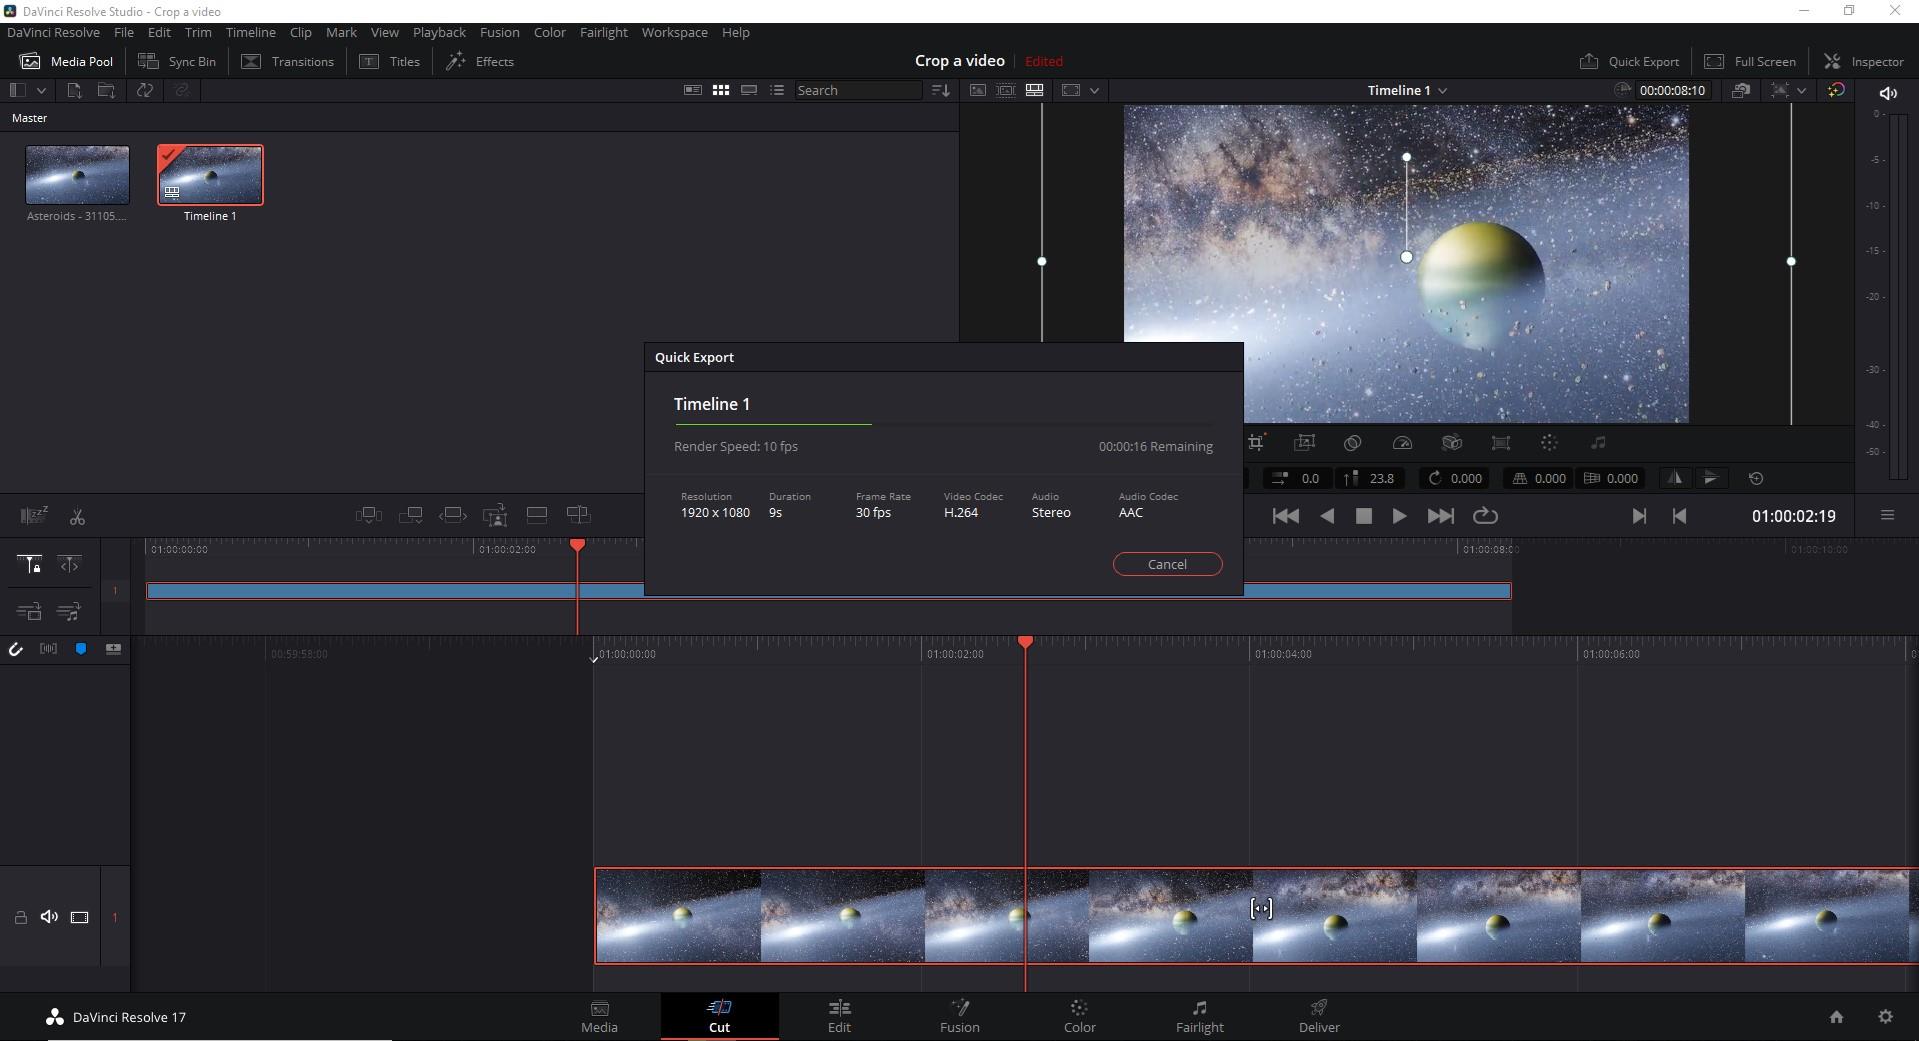
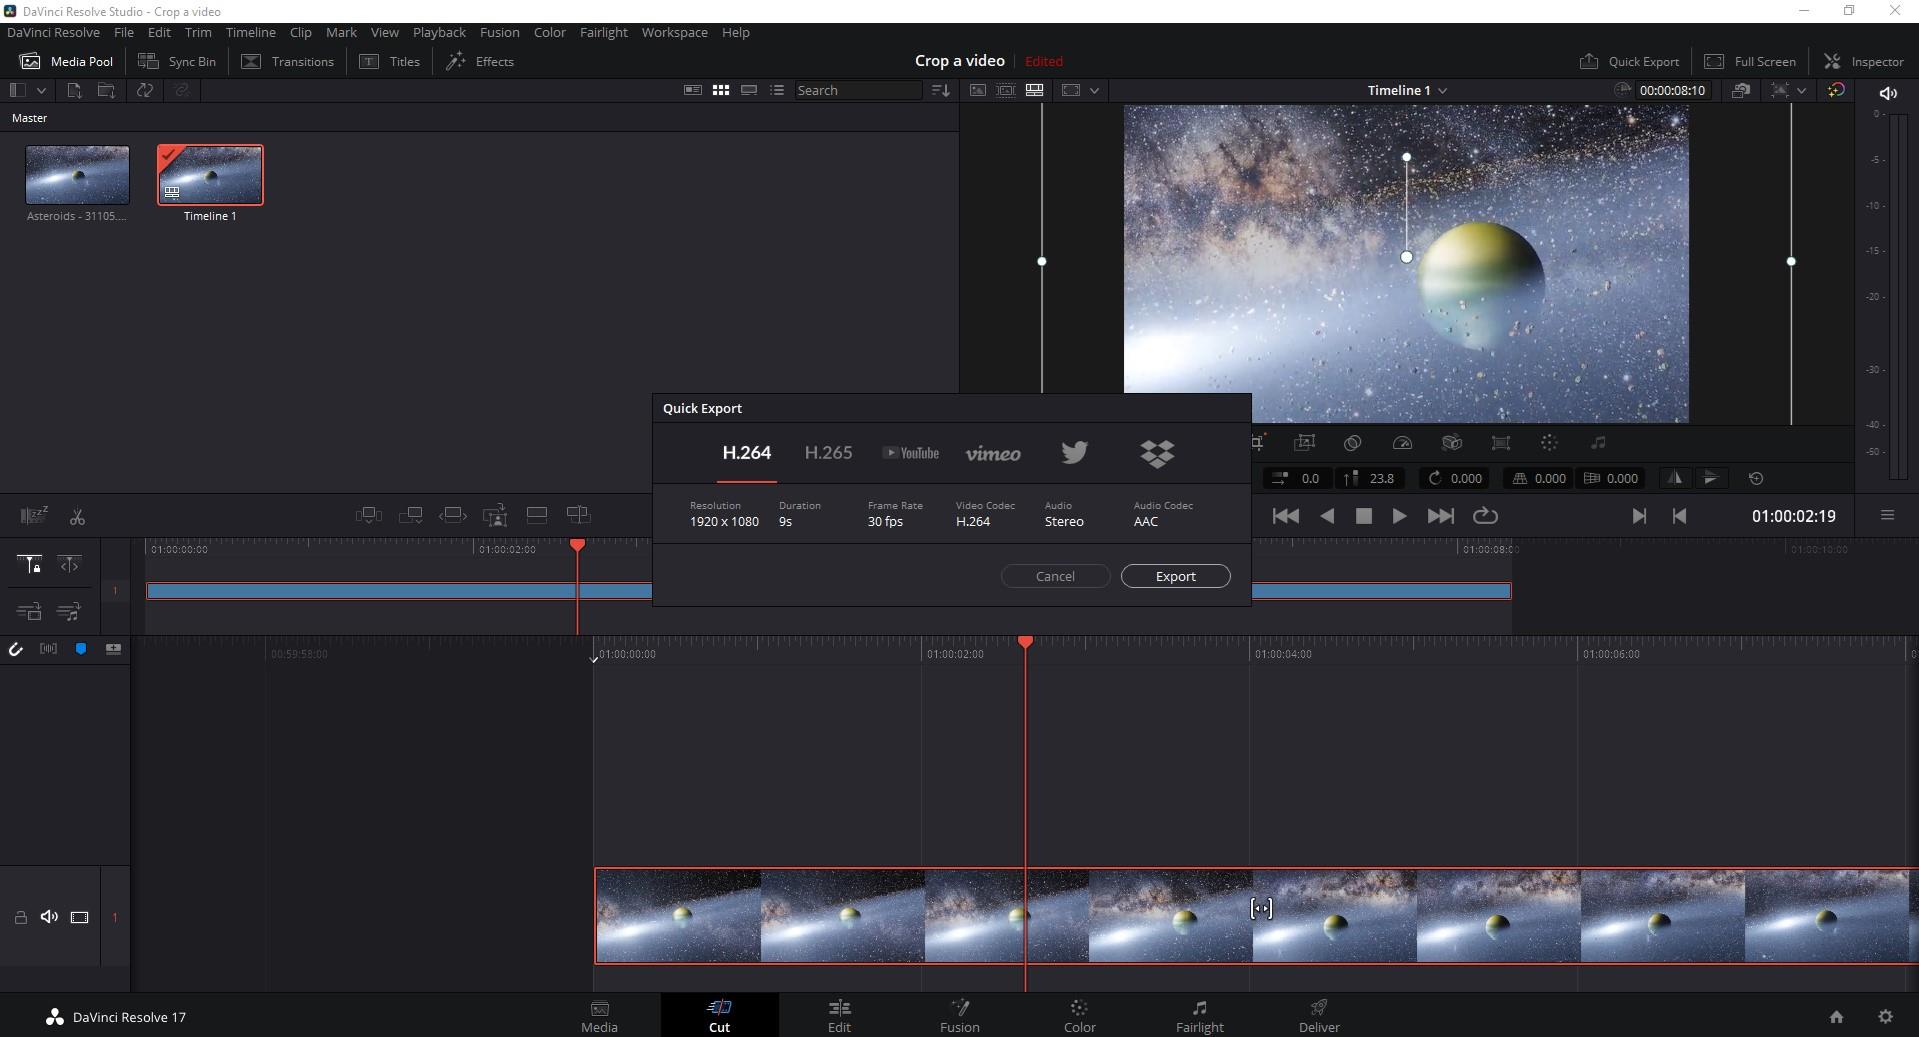
The video will be saved where you wanted to, so, you have just learned – how to crop a video in Davinci Resolve!
Part 2. An easier way to crop a video in Wondershare Filmora
Even though it’s quite easy to crop a video in Davinci Resolve, who knows, maybe for you, other software is preferable? It doesn’t always come down to which is best, but rather, it also boils down to an individual choice – which one do YOU prefer? Especially, let’s say, when it comes to a “cosy” one like Filmora Video Editor is, it’s worth a thought –a pleasant interface and great tools and features attract users and video enthusiasts from all around the world. Filmora is considered as one of the best, the most easy-to-use and, at the same time, advanced software for video editing. So, why not give it a try? Let’s discuss how to crop a video in Wondershare Filmora then, step by step.
For Win 7 or later (64-bit)
For macOS 10.14 or later
First off, we start in the same way – download and install Wondershare Filmora X. Oh – maybe, that is the step you have already taken?..
Click on Import Media Files Here, which will let you add the file(s) you are going to crop.

You will choose your clip(s) you would like to crop and then drag and drop it in the sequence.

Above your video in the sequence you will see little icons and find a Crop one.

After clicking on it, a new window will open – it’s for Crop and Zoom, where you can choose a needed ratio or do it manually (for it, you have to select Custom first).

After clicking OK, your video will be cropped as you like. Then, you can proceed with exporting it – click on Export, choose your preferred settings, and save the video where you want it to be accessible later.

So, in this article, we have discussed software Davinci Resolve and how to crop a video there. A step by step, written guides help you make the best out of your video clips and never lose track of what you are doing, also, comparing different video editing platforms and tools will make you understand which one works best for you or/and your company. Another part of this article was Wondershare Filmora X and how to crop a video there, also, with a detailed guide there. We hope you know a little more about programs, editing, and your own choice!
To touch upon the functions, Davinci Resolve includes modules for video editing, color correction, audio mixing and effects, and visual effects. The interface of it is quite advanced, but would be well and soon understandable for someone who has ever used a similar editing software, such as Adobe Premiere Pro. If you are interested in everything the software has to offer, we recommend watching this very viral beginner tutorial .
Now, back to cropping – so, you want to crop the video you took or got somehow, and you also think about using Davinci Resolve? Cropping, in most cases, meaning different applications, platforms and software, is not a complicated task at all, and you can do it in a very short amount of time in Davinci Resolve, too. Therefore, let’s delve into the steps on how to do it!
First, download and install the software, and when it is finished, launch it. You will see a totally clean program, until you add the video you want to work on. To do so, you have to find File in the top menu, find Import and then choose Media.

Then it will open a new window where you can choose your file…

Your chosen file will be added in Media Pool, and to direct it into the sequence, you have to drag and drop it there.


And then you might have difficulty to find the crop button. But here it is – below the screen, on the left, there are two icons, and the second one says – Tools…

Click on the Tools button and more options will appear down the screen where the video clip is shown. And there, you will notice the famous Crop icon, just the second one, which will put your clip in a new window with the option below to crop each side, plus, to add feather around the cropped video.

When you are ready to make a video bigger and adjust it to a frame size, you need to choose Transform button, left to the Crop icon. You can “touch” the dots on the video and manually manage the size of your cropped clip.


When you are ready to save the video you cropped, find Quick Export – you will see the button above the clip, on the right. A little window with settings will appear, so you can choose the format you want to save your video in, and then, of course, click on Export for the last time.


The video will be saved where you wanted to, so, you have just learned – how to crop a video in Davinci Resolve!
Part 2. An easier way to crop a video in Wondershare Filmora
Even though it’s quite easy to crop a video in Davinci Resolve, who knows, maybe for you, other software is preferable? It doesn’t always come down to which is best, but rather, it also boils down to an individual choice – which one do YOU prefer? Especially, let’s say, when it comes to a “cosy” one like Filmora Video Editor is, it’s worth a thought –a pleasant interface and great tools and features attract users and video enthusiasts from all around the world. Filmora is considered as one of the best, the most easy-to-use and, at the same time, advanced software for video editing. So, why not give it a try? Let’s discuss how to crop a video in Wondershare Filmora then, step by step.
For Win 7 or later (64-bit)
For macOS 10.14 or later
First off, we start in the same way – download and install Wondershare Filmora X. Oh – maybe, that is the step you have already taken?..
Click on Import Media Files Here, which will let you add the file(s) you are going to crop.

You will choose your clip(s) you would like to crop and then drag and drop it in the sequence.

Above your video in the sequence you will see little icons and find a Crop one.

After clicking on it, a new window will open – it’s for Crop and Zoom, where you can choose a needed ratio or do it manually (for it, you have to select Custom first).

After clicking OK, your video will be cropped as you like. Then, you can proceed with exporting it – click on Export, choose your preferred settings, and save the video where you want it to be accessible later.

So, in this article, we have discussed software Davinci Resolve and how to crop a video there. A step by step, written guides help you make the best out of your video clips and never lose track of what you are doing, also, comparing different video editing platforms and tools will make you understand which one works best for you or/and your company. Another part of this article was Wondershare Filmora X and how to crop a video there, also, with a detailed guide there. We hope you know a little more about programs, editing, and your own choice!
To touch upon the functions, Davinci Resolve includes modules for video editing, color correction, audio mixing and effects, and visual effects. The interface of it is quite advanced, but would be well and soon understandable for someone who has ever used a similar editing software, such as Adobe Premiere Pro. If you are interested in everything the software has to offer, we recommend watching this very viral beginner tutorial .
Now, back to cropping – so, you want to crop the video you took or got somehow, and you also think about using Davinci Resolve? Cropping, in most cases, meaning different applications, platforms and software, is not a complicated task at all, and you can do it in a very short amount of time in Davinci Resolve, too. Therefore, let’s delve into the steps on how to do it!
First, download and install the software, and when it is finished, launch it. You will see a totally clean program, until you add the video you want to work on. To do so, you have to find File in the top menu, find Import and then choose Media.

Then it will open a new window where you can choose your file…

Your chosen file will be added in Media Pool, and to direct it into the sequence, you have to drag and drop it there.


And then you might have difficulty to find the crop button. But here it is – below the screen, on the left, there are two icons, and the second one says – Tools…

Click on the Tools button and more options will appear down the screen where the video clip is shown. And there, you will notice the famous Crop icon, just the second one, which will put your clip in a new window with the option below to crop each side, plus, to add feather around the cropped video.

When you are ready to make a video bigger and adjust it to a frame size, you need to choose Transform button, left to the Crop icon. You can “touch” the dots on the video and manually manage the size of your cropped clip.


When you are ready to save the video you cropped, find Quick Export – you will see the button above the clip, on the right. A little window with settings will appear, so you can choose the format you want to save your video in, and then, of course, click on Export for the last time.


The video will be saved where you wanted to, so, you have just learned – how to crop a video in Davinci Resolve!
Part 2. An easier way to crop a video in Wondershare Filmora
Even though it’s quite easy to crop a video in Davinci Resolve, who knows, maybe for you, other software is preferable? It doesn’t always come down to which is best, but rather, it also boils down to an individual choice – which one do YOU prefer? Especially, let’s say, when it comes to a “cosy” one like Filmora Video Editor is, it’s worth a thought –a pleasant interface and great tools and features attract users and video enthusiasts from all around the world. Filmora is considered as one of the best, the most easy-to-use and, at the same time, advanced software for video editing. So, why not give it a try? Let’s discuss how to crop a video in Wondershare Filmora then, step by step.
For Win 7 or later (64-bit)
For macOS 10.14 or later
First off, we start in the same way – download and install Wondershare Filmora X. Oh – maybe, that is the step you have already taken?..
Click on Import Media Files Here, which will let you add the file(s) you are going to crop.

You will choose your clip(s) you would like to crop and then drag and drop it in the sequence.

Above your video in the sequence you will see little icons and find a Crop one.

After clicking on it, a new window will open – it’s for Crop and Zoom, where you can choose a needed ratio or do it manually (for it, you have to select Custom first).

After clicking OK, your video will be cropped as you like. Then, you can proceed with exporting it – click on Export, choose your preferred settings, and save the video where you want it to be accessible later.

So, in this article, we have discussed software Davinci Resolve and how to crop a video there. A step by step, written guides help you make the best out of your video clips and never lose track of what you are doing, also, comparing different video editing platforms and tools will make you understand which one works best for you or/and your company. Another part of this article was Wondershare Filmora X and how to crop a video there, also, with a detailed guide there. We hope you know a little more about programs, editing, and your own choice!
To touch upon the functions, Davinci Resolve includes modules for video editing, color correction, audio mixing and effects, and visual effects. The interface of it is quite advanced, but would be well and soon understandable for someone who has ever used a similar editing software, such as Adobe Premiere Pro. If you are interested in everything the software has to offer, we recommend watching this very viral beginner tutorial .
Now, back to cropping – so, you want to crop the video you took or got somehow, and you also think about using Davinci Resolve? Cropping, in most cases, meaning different applications, platforms and software, is not a complicated task at all, and you can do it in a very short amount of time in Davinci Resolve, too. Therefore, let’s delve into the steps on how to do it!
First, download and install the software, and when it is finished, launch it. You will see a totally clean program, until you add the video you want to work on. To do so, you have to find File in the top menu, find Import and then choose Media.

Then it will open a new window where you can choose your file…

Your chosen file will be added in Media Pool, and to direct it into the sequence, you have to drag and drop it there.


And then you might have difficulty to find the crop button. But here it is – below the screen, on the left, there are two icons, and the second one says – Tools…

Click on the Tools button and more options will appear down the screen where the video clip is shown. And there, you will notice the famous Crop icon, just the second one, which will put your clip in a new window with the option below to crop each side, plus, to add feather around the cropped video.

When you are ready to make a video bigger and adjust it to a frame size, you need to choose Transform button, left to the Crop icon. You can “touch” the dots on the video and manually manage the size of your cropped clip.


When you are ready to save the video you cropped, find Quick Export – you will see the button above the clip, on the right. A little window with settings will appear, so you can choose the format you want to save your video in, and then, of course, click on Export for the last time.


The video will be saved where you wanted to, so, you have just learned – how to crop a video in Davinci Resolve!
Part 2. An easier way to crop a video in Wondershare Filmora
Even though it’s quite easy to crop a video in Davinci Resolve, who knows, maybe for you, other software is preferable? It doesn’t always come down to which is best, but rather, it also boils down to an individual choice – which one do YOU prefer? Especially, let’s say, when it comes to a “cosy” one like Filmora Video Editor is, it’s worth a thought –a pleasant interface and great tools and features attract users and video enthusiasts from all around the world. Filmora is considered as one of the best, the most easy-to-use and, at the same time, advanced software for video editing. So, why not give it a try? Let’s discuss how to crop a video in Wondershare Filmora then, step by step.
For Win 7 or later (64-bit)
For macOS 10.14 or later
First off, we start in the same way – download and install Wondershare Filmora X. Oh – maybe, that is the step you have already taken?..
Click on Import Media Files Here, which will let you add the file(s) you are going to crop.

You will choose your clip(s) you would like to crop and then drag and drop it in the sequence.

Above your video in the sequence you will see little icons and find a Crop one.

After clicking on it, a new window will open – it’s for Crop and Zoom, where you can choose a needed ratio or do it manually (for it, you have to select Custom first).

After clicking OK, your video will be cropped as you like. Then, you can proceed with exporting it – click on Export, choose your preferred settings, and save the video where you want it to be accessible later.

So, in this article, we have discussed software Davinci Resolve and how to crop a video there. A step by step, written guides help you make the best out of your video clips and never lose track of what you are doing, also, comparing different video editing platforms and tools will make you understand which one works best for you or/and your company. Another part of this article was Wondershare Filmora X and how to crop a video there, also, with a detailed guide there. We hope you know a little more about programs, editing, and your own choice!
6 Instant Ways to Create Windows 10 Slideshow
6 Instant Ways to Make Windows 10 Slideshow
An easy yet powerful editor
Numerous effects to choose from
Detailed tutorials provided by the official channel
Slideshows have a distinguished credibility in the realm of graphic centered content presentation. Stay tuned to learn about the quickest ways to design a >Windows 10 slideshow presentation!
In this article
01 [How to Set Up an Image Slideshow in Windows 10](#Part 1)
02 [Best 5 Slideshow Apps for Windows](#Part 2)
03 [How to View Photos as a Slideshow on Windows 10](#Part 3)
04 [FAQs of Making Windows 10 Slideshow](#Part 4)
Part 1 How to Set Up an Image Slideshow in Windows 10
If you are on a streak of exhibiting your still captures and candid images, putting them together in a stunning windows slideshow presentation is something that caters best to the concern. A cherry on the cake is added if you choose to work with a Windows 10 supported device. Explaining the underlying reason, it is amazing to discover that the Windows 10 operating system has a commendable range of solutions to set up image slideshows with the most eye catching outlook.
When proceeding with an image slideshow setup, the Windows 10 operating system greets you with some in-built appealing alternatives to work with. You can however, choose to pick one from the same, or try hands at using a variety of third-party tools available in the IT market.
Heading forward to address the above concern, let us see through some of the most prominent ways to set up an image slideshow for Windows 10 in what follows next:
01Setting Up a Desktop Image Slideshow
You can work with this method by going for a customization of the welcome screen of your Windows 10 device. There is a diversity of preset desktop wallpaper choices within the Windows 10 library, which you can select from to include your image slideshow on the Windows 10 opening screen.
Here’s a practical explanation of how to go about the process to create a Windows slideshow through detailed and stepwise instructions:
How to Set Up a Desktop Image Slideshow
Step 1: Open Slideshow Options
On the welcome screen of your Windows 10 device, make a right click to see an ‘Options’ menu pop up. Select the ‘Personalize’ option from the list, followed by picking the ‘Background’ option from the menu that appears next. As you make the aforesaid sections, the following window will appear on your desktop:
Step 2: Select the Slideshow Images
Click on the drop down arrow of the ‘Background’ tab at the top and choose the ‘Slideshow’ option. Now, hit the ‘Browse’ button to locate the specific folder in your device gallery that houses the slideshow images. All you need to do here is, select the desired images that you wish to create the slideshow from, put them in a separate folder and leave everything to the Windows 10 OS.
Step 3: Set the Image Screen Time
Navigate to and hit the ‘Change Picture Every’ drop down arrow below the ‘Browse’ button to select a desired screen time for the images to stay on your desktop. You can further set the image aspect ratios to remove blank sides, under the ‘Choose to Fit’ tab. All you need to do is, click on the latter’s drop down arrow and select a requisite image fit option from the list that appears next.
02Setting Up a Screen Saver Image Slideshow
The next in the line of image presentation method is the screen saver option to set up a photo slideshow for a Windows 10 desktop. Here’s how you can proceed with the process in just a few quick steps:
How to Set Up a Screen Saver Image Slideshow
Step 1: Open Slideshow Options
Similar to the previous method, you need to start with right clicking on your device’s opening screen to select the ‘Personalize’ option from the list that drops down. In the ‘Personalize’ options menu, choose the ‘Themes and Theme Settings’ option, followed by selecting ‘Screen Saver’ from what appears next to see the following window get displayed on your screen:
Step 2: Choose the Screen Saver Images
Within the window that rests on your screen, hit the ‘Screen Saver’ drop down arrow and select the ‘Photos’ option from the menu that appears. Next, head to the ‘Settings’ tab and click on the same to open the following window on your screen:
In the window displayed above, navigate to and tap the ‘Browse’ button at the top right corner to locate and select a desired image folder within your device gallery that contains your screen saver images. When you have made your choice, proceed to adjust the speed settings of the slideshow images.
You can also choose to shuffle the screen saver images by clicking within the ‘Shuffle Pictures’ checkbox below the speed adjustment option.
Step 3: Save Your Slideshow Settings
When you are satisfied with all the windows photos slideshow settings, navigate to the bottom right corner of the window and click on the ‘Save’ button. This will close the ‘Settings’ window and direct you to the ‘Wait’ box, where you can enter the duration after which the screen saver presentation will start to play if there is no cursor movement. Lastly, tap the ‘Apply’ button to confirm your changes.
03Setting Up a Photos App Image Slideshow
The in-built ‘Photos’ application of the Windows 10 devices caters to maintain a date wise organization of your images into albums. What’s more interesting is, the app’s preset Windows 10 slide show maker utility allows you to create image presentations within a blink. Here’s how you can work with the facility to set up image centered slideshows:
How to Set Up an Image Slideshow in the Photos Application
Step 1: Open a Desired Image Album
As you launch the app in your Windows 10 device, the latter’s main interface pops up. Here, you are required to navigate to the left side ‘Albums’ panel and choose and tap on a preferred one to open it as shown in the following snapshot:
Step 2: Organize Your Images
Within the selected album, you can include o remove images to customize the album with the desired set of photos. To do this, head to and tap on the ‘+ Add or Remove Photos’ button at the bottom left corner of the screen.
Step 3: Run the Slideshow
When all the slideshow images land into the album, you can proceed to play a slideshow of the same by choosing any one of the photos within the album and clicking on the ‘Pencil’ icon in the toolbar at the top right. From the drop down menu that appears, select the ‘Slideshow’ options to run a slideshow of the album images.
04Setting Up a LibreOffice Impress Photo Slideshow
Talking of the diversity of slideshow options, the Windows 10 operating system has a limited reserve of alternatives. For instance, you are not allowed to include transitions and titles within the image slideshow. As an obvious consequence, you may think towards switching to a reliable third party program for an extended liberty on slideshow customization features.
Adhering to the concern, there is the Impress slideshow app, which is essentially a complementary utility of the LibreOffice Suite. The latter can be conveniently integrated with a range of operating systems, including Windows 10, and is completely free to work with. Here’s a detailed guide up on setting up an image slideshow with the Impress program:
How to Set Up an Image Slideshow in the Impress Software Program
Step 1: Download the LibreOffice Software
To begin with, navigate to the official LibreOffice website and initiate a free download of the application in your Windows 10 device. All you need to do is, hit the ‘Download Now’ tab, followed by selecting ‘Windows’ as the operating system. For saving the latter’s setup wizard to your device, click on ‘Download Version 6.3.6’ tab.
Having finished the above formalities, proceed to run the software’s setup wizard in your system for a successful installation of the Office Suite application package. Once the installation process gets completed, head to and click on the ‘LibreOffice Impress’ tab to launch the utility and land across the following interface:
Step 2: Add Slides to Your Presentation
Start with heading to and clicking on the ‘Properties’ icon in the toolbar at the right side of the program interface. A set of slides layouts will be displayed for you to choose from. Before selecting a desired layout, reach to the slide navigation pane at the left and tap ‘New Slide’ to add the same to your presentation.
You can now head to the layout pane under the ‘Properties’ tool and choose a desired layout for the added slides. It is however, preferable to pick the ‘Blank Slide Layout’ for all the presentation slides.
Step 3: Add a Background Image
Reach to the slide navigation pane and right click on any one of the empty slides. A drop down menu appears where you are required to click on the ‘Set Background Image for Slide’ option. Browse through the media gallery of your device to select and add a desired image within the slide.
Cancel the page arrangement option by selecting ‘No’ in the ‘Page Setting’ window that shows up as soon as the image is added. Proceed to include a single image to each of the presentation slides.
Step 4: Include Slide Transitions
Navigate to the toolbar at the right and tap ‘Slide Transition’ icon to get a display of the preset transition effects. You are allowed to supplement each slide of the presentation with a varying transition effect, or apply a single effect to all of them. To proceed with the latter option, choose the desired transition effect and hit the ‘Apply to All Slides’ tab at the bottom of the ‘Slide Transition’ window.
You can further, modify the speed and sound settings of the applied transition effects. When the adjustments make you happy, navigate to and hit the ‘Play’ tab in the ‘Slide Transition’ window for previewing the applied transition effects.
Step 5: Customize the Presentation
Moving ahead, the ‘Slide Transition’ window allows you to adjust the screen time of the transition effects. You can either set automatic play duration for each effect, or prefer changing the transitions by a mouse click.
The automatic duration can be set by clicking on the ‘Automatically After’ radio button, followed by entering a desired value in the text box. After setting the time value, click on the ‘Apply to All Slides’ tab to confine all the slide transitions within the set duration.
Step 6: Adding Subtitles to the Slides
To add a subtitle to any slide, navigate to the ‘Drawing Toolbar’ and click on the ‘Text Box’ icon. You can now, drag the text box to a desired position within the slide and expand it there to type the required text. Select the text box and head to the ‘Properties’ icon in the right side toolbar to customize the added text.
Clicking on the icon will present a series of text formatting options which you can work with to spark up the text as per your will. You can change the font style using the ‘Bold’, ‘Italic’, ‘Underline’ and ‘Strikethrough’ icons, or make the subtitle appear in a suitable font color.
Step 7: Adding a Background Music
To add a background audio within the slides, select any one and open the ‘Sound’ menu by clicking on the latter’s drop down arrow. From here, choose the ‘Other’ sound option. You can now browse through and select a desired music track from your device’s media gallery to add to the selected slide. Skip enabling the ‘Apply to All Slides’ option here; lest the track would play at the appearance of each presentation slide.
Step 8: Preview the Presentation
To have a look at your efforts, navigate to the ‘Menu Bar’ at the top of the app screen and hit the ‘Slide Show’ tab. In the menu that drops down, select the ‘Start From the First Slide’ option to view the presentation from the beginning. To exit the slideshow preview, press the ‘Esc’ key from your system’s keyboard.
Step 9: Save Your Work!
When everything seems fine, proceed to save the created image slideshow locally to your device. To do this, navigate to and click on the ‘File’ tab in the ‘Menu Bar’ at the top, followed by selecting the ‘Save’ option from the drop down menu that appears next.
To save the presentation in a desired file format, like PowerPoint, press the ‘Ctrl + Shift + S’ keys from your device’s keyboard to launch the ‘Save As’ interface. In the ‘Save As Type’ drop down menu, select the desired file format you wish to save the slideshow in.
05Setting Up a Video Editor Image Slideshow
Like the ‘Photos’ application, this one is also an in-built media editor utility of the Windows toolkit. Working with the program, you can create amazing slideshow presentations from a diversity of preset themes, templates and background music. Here’s how you can use the application to assemble your cherished images into a stunning slideshow:
How to Set Up an Image Slideshow in the Video Editor Application
Step 1: Launch the Application
Navigate to the ‘Start Menu’ on your Windows 10 desktop and type ‘Video Editor’ within the search box. From the list of in-built programs that appears, click on ‘Video Editor’ to see the utility get launched within the ‘Photos’ app.
Step 2: Open a New Slideshow Project
In the welcome screen of the utility, navigate to and hit the ‘New Video Project’ button to start working on a slideshow presentation from scratch. Assign a suitable name to the project and lastly, tap ‘OK’ to reach the app’s editor timeline.
Step 3: Import Your Images
In the timeline, navigate to and click on the ‘+Add’ button, followed by the ‘From This PC’ option in the drop down menu that appears next. Browse through the local media gallery of your device to pick the desired images that you want to create the slideshow with. When you have made your choice, hit the ‘Open’ button at the bottom right corner of the selection window to import the images to the app’s project library.
Step 4: Add the Images to the Presentation Slides
The added images will show up in the app’s project library under the ‘My Slideshow’ tab. Add the displayed images to the presentation slides by dragging their thumbnails to the slide panel at the bottom.
ta
Step 5: Set Slide Play Duration
Proceed to set the screen time of the presentation slides by clicking within the checkboxes at the top right corner of their frames, followed by making a right click to open the ‘Options’ drop down menu. To adjust the slide timing, tap on ‘Duration’ within the menu, succeeded by entering a suitable value in the timer box.
Step 6: Add Text Captions
To supplement the slideshow images with suitable text captions, right click on an image and choose the ‘Edit’ option from the drop down menu that follows. In the ‘Edit’ window, tap ‘Text’ on the top toolbar. A text box appears at the bottom of the image, where you can type the preferred caption and also change its font style. When you are done, click on ‘Done’ to confirm the changes.
Step 7: Include a Background Music
To spark up your presentation images with a cohesive audio in the background, navigate to and hit the ‘Background Music’ option at the top of the app’s editing workspace. A list of preset audio tracks pops up to let you choose a preferred music scheme. When you have made your choice; tap ‘Done’ to apply the same to the selected slide.
Step 8: Set a Presentation Theme
You can add stunning background themes to complement the image slides of your presentation. To do this; head to the ‘3 Dots’ icon at the top right corner of the editor timeline and click on the same to select the ‘Themes’ option from the drop down menu that follows. The various theme styles will appear at your display to choose from. Select a suitable motif and hit ‘Done’ to apply it to the slideshow.
Step 9: Almost There!
Navigate to the top toolbar in the app’s design workspace and click on the ‘Finish Video’ button to put everything together.
Step 10: Time to Share!
Lastly, head to the ‘Video Quality’ drop down menu and pick a suitable option in line with your output requirements, followed by clicking on the ‘Export’ option to share your creation with social media peers. You can also save the slideshow to your device’s local media gallery.
06Setting Up a Google Photos Image Slideshow
Google Photos is an all-time favorite online storage space that you can use to keep your photos in the most organized in the most accessible manner. All you need is a Google Account to work with the facility. Here’s how you can set up an image slideshow with the stored photos on a Windows 10 device using the app:
How to Set Up an Image Slideshow in the Google Photos Application
Step 1: Launch the Application
In any of your preferred web browsers, launch the ‘Google Photos’ application to start the create slideshow Windows 10 process. You can also open the utility in Microsoft Edge, the default web browser for Windows compatible devices.
Step 2: Upload Your Images
In case you have not kept an image bank in your Google Photos; navigte to the ‘Upload’ button and click on the same, followed by choosing the ‘Computer’ option from the list that drops down. You device’s image gallery will get opened. Press and hold the ‘Ctrl’ key on your system’s keyboard and pick a collection of desired photos. When you are done, tap ‘Open’ to upload the images.
Step 3: Create a Photo Album
Navigate to the panel at the left side of the app’s screen and click on ‘Albums’ underf the ‘Library’ section. In the top right corner of the app’s screen, tap on the ‘Create Album’ option. Next, assign a suitanble name to the newly created album and hit the ‘Add Photos’ tab. You can now select and add images from those uploaded on the app in Step 2. Make your selections and hit ‘Done’ when you have finished.
Step 4: Create and Play the Presentation
Head to the top right corner of the screen and click on the ‘More Options’ button represented by 3 vertical dots. From the menu that appears next, choose the ‘Slideshow’ option. You can see your image slideshow run from the beginning in the ‘Full Screen’. You can traverse through the added photos using the left and right arrows keys on your device’s keyboard.
Part 2 Best 5 Slideshow Apps for Windows
As already stated, creating slideshow presentations in Windows 10 compatible devices, is an easy and quick process, thanks to the in-built slideshow creation utilities of the operating system. The talked about in-built features however, comes with a restricted customization flexibility, which may often fall short of rendering a high end presentation output in the light of varying and sophisticated professional needs.
To set the issue straight, the software market puts forward a legacy of third party applications and slideshow creator programs. The extensive series of such software claims of effectively addressing the concern of designing top quality image and video slideshow presentations, while facilitating the most diverse media integrations and slideshow customization flexibilities.
Moving ahead in our discussion, let us proceed to have a look at some of the popular third party software applications to create a Windows slideshow in the following section:
01Icecream Slideshow Maker
The Icecream slideshow maker has earned a significant amount of user trust in the realm of graphic design and slideshow presentations as a reliable Windows slideshow app. When the concern is about creating media slideshows on a Windows compatible device, the utility of the software has limitless creative aspects. Working with this slideshow maker program, you will get to use the smartest and cleanest of interfaces, with a feature rich library to add the needed spark to your presentations.
The app boasts of a modernized user interface, with a wide canvas to explore your slideshow customization creativity with a decent range of transition effects, background music, preset design templates, slide screen time adjustments, and a lot of other features. The best thing about the application is, it’s simple, one window interface that puts everything together within a single workspace. You can further, choose to generate the slideshow in a desired output format along with exporting the same across online media sharing and storage platforms.
02Movavi Slideshow Maker
Another powerful entry into the list of Windows compatible slideshow creator programs is the Movavi Slideshow Maker tool, which is explicitly known for its elegant slideshow themes. This slideshow app for Windows allows you to pick and customize a theme in line with the content and setting of the presentation media and elements. This one is a professionally sound program that permits you to play with your editing expertise and supplement the presentation with a series of elements.
You can include titles, subtitles, stickers, transitions and lots more to amplify your slideshow. Adding to the user’s appeal is the software’s responsive interface that suits well enough to beginners and pro level designers. The limiting line of the program is however, its paid subscription worth $ 20, but you can opt for a free trial of the app for a week to examine the latter’s slideshow design credibility with respect to your Windows 10 device.
03Photo Slideshow With Music
This one is the perfect Windows slideshow maker app to work with, if you are aiming at creating image centered slideshow presentations with subtle background music. The design process is no rocket science, and merely requires you to choose and upload a set of images to the software’s timeline. The program is there to handle the rest with the quickest rendering of a stunning slideshow video from the uploaded media files.
As of the customization capabilities, the program lets you experiment with a notable range of effects, filters, stickers, transitions and a series of other graphic elements. And that’s not it with the application’s vast music library that attracts a separate attention. Accessing the library, you get to choose from a diversity of audio tracks to complement your presentation with. You can additionally, pick a locally saved audio from your device to include in the slideshow.
The software is available for a limited period of free usage with a restricted number of features. Another distraction is the high frequency of annoying ads. Both the issues can however be set straight through availing a paid subscription of the program.
04PowerDirector Slideshow Creator
The following application is literally a revolution in the domain of Windows 10 slideshow maker utilities. Of the intense elemental varieties that cater to user credibility, the working interface is the inaugural appeal. While the program allows you to begin the creation spree right from its opening screen, the stepwise working instructions are a welcome bonus. Using the application does not require you to customize the presentations within a storyboard or timeline.
Talking of the editing flexibilities, the program opens up its vast library of audio-visual effects, filters, overlays, transitions and theme centered presentation templates. On the professional front, the software is a reliable choice for designing awesome corporate presentations for business meetings, industry centered events and professional conventions, escaping the boredom of generic, text based slides.
You can further, work with high end AI tools, like, motion tracking, audio enhancement, sky replacement, etc., along with creating screen recordings and video collages. The software however, permits you to export your creations for free in a restricted number of file formats.
05SmartSHOW 3D Slideshow Creator
This one is another great slideshow maker for Windows compatible systems. You can reliably pick the aforesaid graphic toolkit to design top class media presentations with extensive creation flexibilities. The slideshow customization canvas expands wide with capabilities like; slide layering, selected layer animations, image masking, animated 3D text annotations and transitions, shape inclusions, fade-ins, gradients, wipes, keyframe tuning and other forms of graphic art.
The program allows you to stich audio and image files together in a stunning slideshow of your cherished moments, regardless of the occasion. There are multiple export formats which you can choose from to share your creations across social media platforms with family and friends. The software is additionally dedicated to deliver high end, professional standard slideshow presentations for corporate requirements.
Part 3 How to View Photos as a Slideshow on Windows 10
Creating slideshows on a Windows 10 device is, without a doubt, fun and exciting. Nonetheless, you may come across a need to quickly share a presentation with your friends on social media, or just as a random thought, you may want to stitch some cherished images into a slideshow for creating beautiful memories of a valued event.
Windows 10 allows you to bank your images across a variety of local and cloud spaces. However, if you have a concern regarding how to view images as a slideshow presentation on the same, you can see through the following section for working with 2 different methods to sort out the issue:
01Using the Photos Application
Step 1: Upload Images to the App
If you are using the ‘Photos’ application as the default image viewer, you just need to make a double click on the desired image to open the same in the ‘Photos’ application. In an otherwise case, navigate to a preferred image in your device gallery, right click on the same and select the ‘Open With’ option from the menu that drops down. In the ’Open with’ selection window, click on ‘Photos’.
As the slideshow app Windows launches on your desktop, the added images will be displayed on the screen. You can walk through the photos by clicking on the virtual arrows at the bottom of the image window.
Step 2: Beginning the Slideshow
To start playing the slideshow, navigate to the ‘More Options’ button (3 vertical dots) at the top right corner of the app screen and tap on the ‘Slideshow’ option from the drop down menu that follows next.
As the presentation starts to play, you will get to see a sequential appearance of all the added images within a specific folder the ‘Photos’ app. However, if you have grouped images in a subfolder, the latter will not be a part of the slideshow. To advance or rewind back within the slideshow images, press the right and left arrow keys respectively, either from the device keyboard, or at the bottom of the presentation window.
Step 3: Viewing a Slideshow of a Specific Image Folder
The ‘Photos’ app allows you to view a presentation created from the images stored within a particular folder. To avail the facility, all you need to do is, add the desired folder to the ‘Photos’ application.
Start with navigating to the taskbar and clicking on the ‘Windows’ button. In the ‘Start Menu’ that appears, click on the ‘Photos’ option. You can also type the same in the search bar to launch the app.
As you enter the app’s main interface, navigate to the latter’s toolbar at the top and hit the ‘Folders’ tab. From the list that pops down, select ‘Add a Folder’.
You may now come across any one of the following situations:
● A selection window pops up with a list of folders to choose from. You however need to leave them and hit the ‘Add Another Folder’ option to launch your device’s file manager. You can further, choose to add different folders at a later stage.
● You may a pop up window at all, and tapping the ‘Add a Folder’ option takes you directly to the file manager of your system.
Entering into the ‘File Manager’ application, browse through the locally saved image folders on your device to reach a desired one you wish to run the slideshow of. When you have located the same; tap the ‘Add This Folder to Pictures’ button at the bottom right corner of the selection window.
The file manager now closes to direct you to the ‘Photos’ app. Here, you need to open the just added folder. Within the folder, navigate to the top right corner and tap the ‘3 Dots’ icon, followed by selecting the ‘Slideshow’ option from the list that drops down. The device screen gets dark and the slideshow presentation starts to run in full screen mode.
Step 4: Viewing a Slideshow of Specific Images Within a Folder
If you want to view a slideshow of some specific images within the added folder, press and hold the ‘Ctrl’ key, followed by selecting the desired images. For selecting a string of sequential images, press and hold the ‘Shift’ key and select the first and last images of the concerned series.
In either of the above cases, make a right click post your selection, followed by clicking on the ‘Open’ option from the drop down menu that appears next. You will now be directed to the ‘Photos’ app, where you can play the image slideshow by following the previously explained method. Working with the app, you are however not allowed to customize the slideshow settings Windows 10.
02Using the Picture Tools in File Manager
The Windows 10 file manager consists of built-in tools to facilitate a slideshow view of images saved locally in your device, as well as external sources, like, USB drives, data disks, etc. the best part is that the tool permits you to watch a slideshow from images included within the subfolders of a main folder. All you need to do is, take the following steps:
Step 1: Launch the File Manager
Navigate to the taskbar at the bottom of your device screen and click on the ‘File manager’ icon to launch the same on your system.
Step 2: Select Your Images
Browse through your device’s local media gallery to locate and open the folder containing the desired images, followed by tapping on any of the stored images to select the same. You can now see the ‘Manage’ tab appear on the app’s toolbar, accompanied by the ‘Picture Tools’ option.
What you need to do is, hit the ‘Picture Tools’ tab and click on the ‘Slideshow’ button in the drop down menu that appears next. That’s it! The slideshow starts to run instantly.
To view a slideshow of images within a subfolder, navigate to the same, choose an image and adhere to the process explained above.
Step 3: Viewing a Slideshow of Specific Images Within a Folder
To launch a slideshow of specific images within a folder, select the desired images within the folder by pressing and holding the ‘Ctrl’ key from your device’s keyboard. You can further, proceed to pick a series of images by long pressing the ‘Shift’ key on the keyboard, while simultaneously selecting the opening and ending images.
Now click on the ‘Picture Tools’ tab in the app’s toolbar at the top and select the ‘Slideshow’ option from the list that appears next. Your selected images will now run as a slideshow presentation.
Step 4: Controlling the Presentation
To adjust the slideshow parameters, make a right click on a particular image within the slideshow, and you will see the following list of Windows 10 slideshow settings appear on the screen:
Within the menu, you are allowed to adjust the presentation play speed, run the slideshow in a loop, or shuffle the images of the same, and lots more. You can however, not access this menu while playing a slideshow in the ‘Photos’ application.
Part 4 FAQs of Making Windows 10 Slideshow
● What are the different ways to run a Windows 10 slideshow?
To run a slideshow presentation on your Windows 10 device, you can take any one of the following steps:
● Press one of the F5 or F9 keys
● Hit the ‘Slide Show’ tab in the ‘Menu Bar’ and select the ‘Slideshow’ option from the dropdown that follows
● Navigate to either of the ‘Presentation’ or ‘Slide Sorter’ toolbars and tap the ‘Slide Show’ button.
● How can the speed of a slideshow be increased?
To adjust the speed of a presentation, start with playing the slideshow. As the presentation begins to run, make a random right click on the screen to see the ‘ Slideshow Options’ menu pop up. Here, you can choose from ‘Fast’, ‘Medium’ and ‘Slow’ speeds for running the slideshow.
● Where are the images of a Windows 10 slideshow stored?
The images of a slideshow created on a Windows 10 device are housed in the ‘Pictures’ folder, unless you choose to put them at a separate location. You can access the ‘Pictures’ folder by clicking on the ‘This PC’ icon on the desktop, navigating to ‘Libraries’ in the left panel and tapping on ‘Pictures’ therein.
● How to end a running slideshow presentation?
To stop a slideshow from playing in Windows 10, navigate to the ‘Menu Bar’ at the top, followed by clicking on the ‘Slide Show’ tab. A list of options pops down, from where you need to select the ‘End Show’ option to come out of the presentation. as an alternative, you can press the ‘Esc’ key on your system’s keyboard to instantly exit the slideshow.
● Which is the best slideshow creator program?
When looking for the best slideshow maker for windows 10 to create top quality slideshow presentations, the Wondershare Filmora Video Editor slideshow creator program can be a smart choice. Working with the software, you get to access an extensive feature-rich library of advanced effects, filters, preset templates and customization utilities to design jaw dropping slideshows. Additional appeals of the app include a responsive, user-friendly and updated working interface.
For Win 7 or later (64-bit)
For macOS 10.12 or later
● Ending Thoughts →
● Creating slideshow presentations on a Windows 10 device is a wink’s task with the latter’s in-built creation utilities and features.
● Browsing through the software market, you will easily land across a series of Windows 10 compatible software programs to create high end image and video slideshows.
● Taking the most reliable pick, you can work with the Wondershare Filmora Windows 10 slideshow creator program to craft professionally sound slideshow presentations.
How to Loop a Video with iMovie on Mac and iPhone
If you are a video creator, there are times when you have to loop a video. This is to extend the duration of the original video. For instance, you have a stock video of a short duration. You want it to be the background in your video throughout. You have to extend the duration of the stock video by playing it in a loop.
If you are a macOS user, you can use iMovie to loop your video. iMovie comes pre-install on macOS devices. iMovie happens to be one of the most preferred video editors among beginners. In fact, iMovie comes pre-installed on iPhones and iPads. You can easily loop your video on your mobile devices as well. We will illustrate how to loop a video on iMovie on iPhone as well as on Mac.
Part 1. How to loop a video on iMovie iPhone
iMovie by Apple comes pre-installed on iPhone and iPad. Naturally, it is one of the most widely used video editors by iPhone users. iMovie app has options for basic and even advanced levels of video editing. Looping a video on iMovie involves a few simple steps that everyone can perform easily. Here are the steps on how to loop a video in the iMovie app on your iPhone.
Step1 Launch the iMovie app on your iPhone. If you have uninstalled or disabled the app, you can always go to App Store to install it again.

Step2 If you are opening the app for the first time, you will get a welcome screen. Follow the on-screen instructions to land on the home screen of the app.
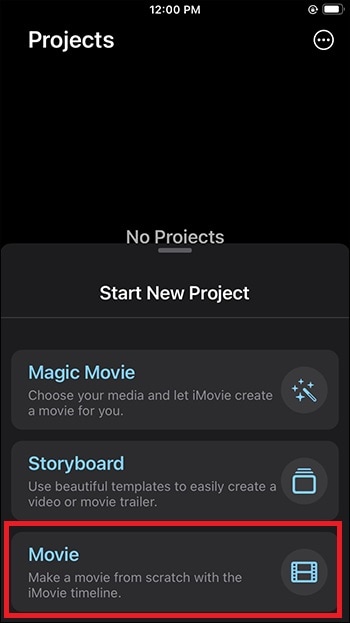
Step3 Tap on New Project “+” icon and select the Movie option to get started. This will take you to the phone media gallery to select a media file to get started.
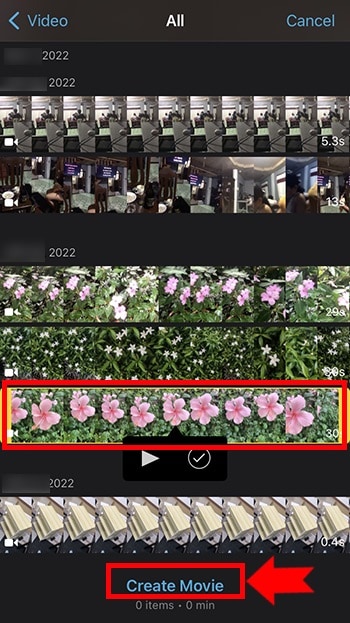
Step4 You should tap on the Video option and select the video that you want to put into a loop. After selecting a video, tap on Create Movie option.
Step5 Tap on the video on the timeline to select the video and tap on the Duplicate option. You will see that the duration of the video has doubled. You can tap on Duplicate as many times as you want to increase the video duration.
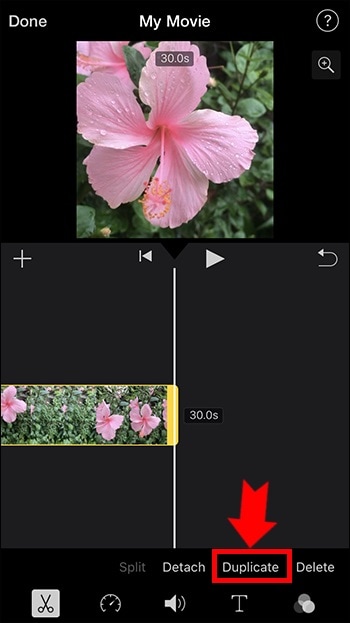
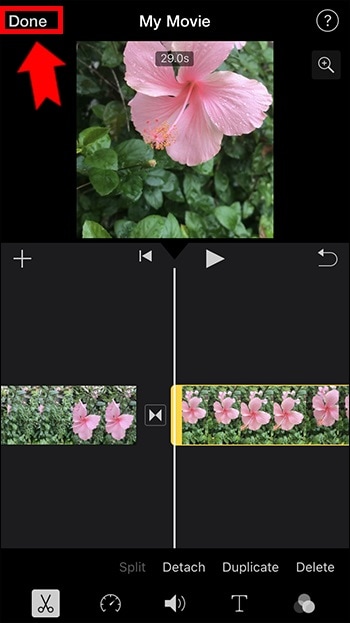
Step6 Once you are done with the iMovie loop, tap on the Done option located in the top-left corner. Thereafter, tap on the Share icon at the bottom.
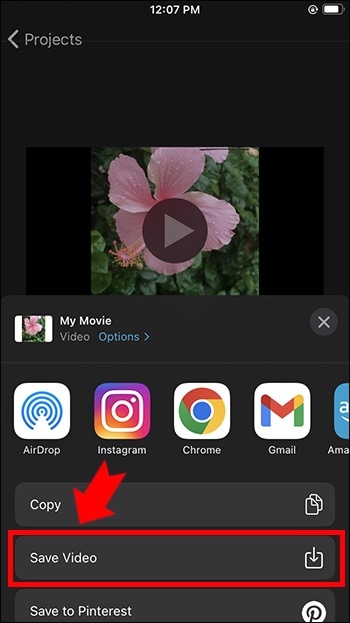
Step7 You will get a pop-up where you have to tap on the Save Video option. The edited video will be saved on your iPhone. You can open the new video from the Photos app.
Part 2. Loop Videos on Mac with iMovie
Editing a video on a Mac is always more comfortable than on an iPhone because of the larger screen. iMovie from Apple comes pre-installed on Mac as well, and hence, you can get started right away. It is completely free to use, and hence, you do not need to install any third-party video editor. Here are the steps on how to loop an iMovie video in simple steps.
Step1 Open the iMovie app from the Applications folder.
Step2 Click on Create New option and then click on the Movie option.

Step3 Bring in the required video under Movie Library by dragging the file from Finder on your Mac. You can also go to File> Import Media option and select the required video. You can also select the required media file from Events or Photos under the Libraries section.

Step4 Drag and drop the video on your timeline. When you want to loop the video, drag and drop the video clip again on the timeline. Make sure there is no gap between the first clip and the second clip on the timeline. You can drag and drop the video clip multiple times on the timeline to increase its duration.

Step5 Once you are done, go to File> Share> File option. Choose the destination to save the edited video.

Part 3. iMovie Alternative to Loop Videos on Mac
If you are looking for an iMovie alternative to perform iMovie loop video action easily, we recommend Wondershare Filmora . Filmora is available for both Mac and Windows. Filmora is a better video editor than iMovie. It is a premium video editor and it has more features and functionalities.
You can loop any video as many times as you want instantly. Besides, you can edit your video clip as per your requirements before looping the edited video. The user interface is highly intuitive for everyone. Hence, it has huge popularity among Mac users. You can also save the looped video in different file formats. Here are the steps to loop a video on Filmora.
Free Download For Win 7 or later(64-bit)
Free Download For macOS 10.14 or later
Step1 Download and install Wondershare Filmora. Launch Filmora and click on New Project on the welcome screen.

Step2 Drag and drop the video file from Finder on Mac to the Project Media folder on Filmora. Thereafter, drop the video file into the timeline.

Step3 Drag and drop the video clip into the timeline again. Make sure that there is no gap between the clips. Besides, make sure that they are on the same channel for looping. You can drag and drop the video into the timeline multiple times.
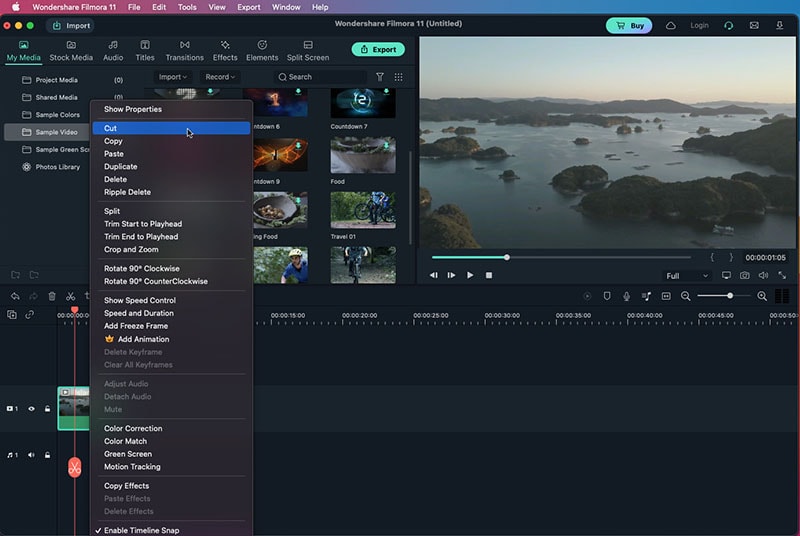
Step4 You can zoom out the timeline for better viewing. Play the video to check its output on Viewer. Finally, click on the Export button and save the video in the desired file format on your Mac.
The Bottom Line
If you want to loop a video on your Mac, iMovie is the most preferred option. The same is applicable to iPhone users as well. iMovie comes pre-installed, and it is completely free to use. That is why you can loop any video instantly. Wondershare Filmora is the best alternative to iMovie to edit and loop your video.
Free Download For macOS 10.14 or later
Step1 Download and install Wondershare Filmora. Launch Filmora and click on New Project on the welcome screen.

Step2 Drag and drop the video file from Finder on Mac to the Project Media folder on Filmora. Thereafter, drop the video file into the timeline.

Step3 Drag and drop the video clip into the timeline again. Make sure that there is no gap between the clips. Besides, make sure that they are on the same channel for looping. You can drag and drop the video into the timeline multiple times.

Step4 You can zoom out the timeline for better viewing. Play the video to check its output on Viewer. Finally, click on the Export button and save the video in the desired file format on your Mac.
The Bottom Line
If you want to loop a video on your Mac, iMovie is the most preferred option. The same is applicable to iPhone users as well. iMovie comes pre-installed, and it is completely free to use. That is why you can loop any video instantly. Wondershare Filmora is the best alternative to iMovie to edit and loop your video.
Also read:
- Do You Have a Sony Camera and Want to Try Different LUTs on Your Digital Content? Youre at the Right Place, as You Can Apply Sony HLG LUTs to Your Media for 2024
- Having Issues Trying to View SRT Files when You Add Subtitle Files for VLC? Learn the Right Ways to Do so and the Best Alternative Solution for 2024
- New How to Add Custom Filters in VN App 2024 Quick Guide
- Updated Top Ways to Make Fast Motion Video on iPhone Solved
- New Templates Increase the Editing Possibilities for Beginners and Professionals. Read This Article to Learn About some Customizable Slow-Motion CapCut Templates
- New 2024 Approved Want to Have Slow Zoom Effect in Your Video? We Will Illustrate How to Apply Slow Zoom Effect to Your Video on Your Smartphone, Computer, and TikTok
- New The Craziest 10 AI Editors Youve Seen for 2024
- New What Can Be Better than Converting Apple Video Format Into Other Formats so that You Can Use the Files Easily. We Have a Few Options that You Can Use for This Purpose
- New In 2024, How to Add Transitions in Adobe Premiere Pro
- New In 2024, Do You Want to Be Aware of VHSs Meaning? There Is Nothing to Be Worried About because We Will Guide You in This Article
- Updated Getting Into The Details A Review of Kodak LUTs for 2024
- New Learn About Open Broadcaster Software and How to Perform Obs Color Correction. Also, Explore the Various Aspects of Color Correction Like Contrast, Brightness, Saturation, Among Others for 2024
- New Review Video Is a Common Type Video and the First Impression Review Is Also Included. This Article Will Show You What Is First Impression Review Video and How to Create One by Yourself
- New Best 8 Animated Video Makers for 2024
- Updated Step by Step to Resize Video in Davinci Resolve
- New In 2024, Do You Know You Can Use Mobile Apps to Apply Camera Effects to Your Videos? Many Smartphone Applications Allow You to Apply Camcorder Effects
- 2024 Approved Slow Motion Video Editors To Look Out For
- New Steps to Remove Background Noise From Video Sony Vegas for 2024
- New Tips & Tricks To Perfectly Use the Audio Mixer in Filmora
- New In 2024, Top Best Free LUTs For Premiere Pro
- 20 Must-Have Graduation Songs
- In 2024, Best 8 AR Apps for Android and iOS | Help You See the World of AR
- New Basic Knowledge About WMV Format and Best WMV Video Editor
- New 10 Best Vloggers on YouTube
- New GIF Splitting Into Frames Is an Interesting Activity to Do with the Right Tools. Convert GIFs Into Frames Easily with Tools and Use Them as Needed
- With Looping Videos, People Stay on Your Site Longer, Boosting Engagement. With Video Being Watched on Mobile over 3X More than Any Other Content, Its an Essential Part of Mobile Advertising for 2024
- New Let Us Help You with Something that You Might Not Know. Have You Ever Worked with MOV File Format Before? Or Do You Know What that Is? Lets Talk About It for 2024
- New Enhance Your Video Color Accuracy with Video Scopes
- Updated In 2024, How to Create an Alternate Reality Effect
- New Looking Forward to Complement Your Weekend Evenings with a Fantasy Tour to the Anime World? Stay Here to Pick the Most Appealing Alternative From the Best and Timeless Anime Creations
- In 2024, Using Track Matte and Tracking in Adobe After Effects Reviewing All Possibilities
- Updated 2024 Approved How to Make a YouTube Intro by Filmora
- New 2024 Approved Want to Add Motion Effects to Your Texts in Your Video? Learn the Simple Steps to Create Motion Text Effects in Popular Video Editors
- In 2024, 10 BEST TEXT TO SPEECH VIDEO MAKERS
- Updated Read This Review to Learn Everything You Need to Know About Leeming LUT Pro and How to Apply Pro LUTs Using Different Video Editors for 2024
- New How to Create Custom Lower Thirds in Filmora for 2024
- In 2024, How To Remove Screen Lock PIN On Poco F5 5G Like A Pro 5 Easy Ways
- In 2024, How To Change Infinix Note 30 Pro Lock Screen Password?
- Can I Bypass a Forgotten Phone Password Of Infinix Hot 40?
- How Can We Bypass Lava Blaze 2 FRP?
- Unlock Apple ID without Phone Number From Apple iPhone 6s
- Updated The 15 Best Apps to Turn Photos Into Cartoons and Sketches
- 3 Effective Ways to Unlock iCloud Account Without Password On iPhone 8
- Simple ways to get lost files back from Poco X6
- In 2024, A Step-by-Step Guide to Finding Your Apple ID On Your iPhone 12 mini
- In 2024, 2 Ways to Monitor Nokia G42 5G Activity | Dr.fone
- Ideas of Learning How to Send WhatsApp Animated Gifs
- 4 Most-Known Ways to Find Someone on Tinder For Oppo Find N3 by Name | Dr.fone
- Reasons for Realme 11 5G Stuck on Boot Screen and Ways To Fix Them | Dr.fone
- Complete guide for recovering photos files on Honor X8b.
- In 2024, Top 5 Car Locator Apps for Samsung Galaxy M54 5G | Dr.fone
- In 2024, How to Come up With the Best Pokemon Team On Motorola Moto G34 5G? | Dr.fone
- Disabled iPhone 11 Pro How to Unlock a Disabled iPhone 11 Pro?
- App Wont Open on Your Honor 90 Pro? Here Are All Fixes | Dr.fone
- 2 Ways to Transfer Text Messages from Vivo Y27 4G to iPhone 15/14/13/12/11/X/8/ | Dr.fone
- In 2024, Fake the Location to Get Around the MLB Blackouts on Samsung Galaxy XCover 6 Pro Tactical Edition | Dr.fone
- Undelete lost data from Nokia C300
- In 2024, Full Guide to Fix iToolab AnyGO Not Working On Samsung Galaxy S23 Tactical Edition | Dr.fone
- How to Fix Pokemon Go Route Not Working On Apple iPhone 7 Plus? | Dr.fone
- Title: Lets Learn How to Convert a Normal Video Into a Film Shot in the 1920S with Wondershare Filmora
- Author: Morgan
- Created at : 2024-05-19 05:11:42
- Updated at : 2024-05-20 05:11:42
- Link: https://ai-video-editing.techidaily.com/lets-learn-how-to-convert-a-normal-video-into-a-film-shot-in-the-1920s-with-wondershare-filmora/
- License: This work is licensed under CC BY-NC-SA 4.0.


