
:max_bytes(150000):strip_icc():format(webp)/tiktok-messages-889fef4cdfac41babb84770288f32cf2.jpg)
New 2024 Approved How to DIY VHS Overlay in After Effects?
How to DIY VHS Overlay in After Effects?
The 90s generation is familiar with Video Home System video. Today, Moviemakers use VHS static overlay to give their videos an antique and vintage look.
The VHS glitch overlay has become increasingly popular as it changes the video’s theme, tone, and whole look. Let’s see how we can add DIY VHS overlay in after effects-
Part 1:Step by Step DIY VHS Overlay in After Effects?
The retro “VHS Look” has become relatively trendy in recent years. The memories associated with the popular VHS trend has helped the trend make a comeback. Creating this effect in After Effects may seem to be a complicated process if you have not tried it before. But we have made it easier for you to add VHS overlay in Adobe After Effects. Follow the steps to add it in after effects-
Before you begin, download and install VHS preset if you haven’t already. Remember that VHS preset only works with After Effects CC 2018 and up. So, make sure you have the recent version of After Effects or the one not older than the 2018 version.
Step 1: To create a VHS look on your video, drop any video of your choice into the project panel and give it a name, let’s say, “VCR static overlay”. Set the width and height to 1920 and 1080 px, respectively.

Step 2: Right-click on your video and select New Comp from Selection. Drag your video to a new composition and then go to Lumetri Color < Basic Correction. Add some contrast. You can set it to 50 or any other number of your choice. Then bring the white level down to -55.

Then open the Creative tab. Increase the faded film to 40. Set sharpening to -70. Bring vibrance to -30.
Note: Here, I changed the number to get the effect I wanted. You can change the numbers and set the values as per your requirements.
Now, click on the Curves option. Drag down the white curve and then align it with the original curve. Move the green curve up a bit and bring down the blue curve. Then comes the Vignette tab. Open it and set the number to -1.

Step 3: Now, we will give our video a subtle RGB spit appearance. For that, we need to use the Channel Blur effect twice. First, go to Effect < Blur & Sharpen < Channel Blur. Set red blurriness to 20. Turn on the repeat edge pixels. Then change the Blur Dimensions from horizontal and vertical to vertical.

Step 4: Again, go to Effect < Blur & Sharpen < Channel Blur. Set blue blurriness to 30. Repeat the process of checking the repeat edge pixels box. Change the Blue Dimensions from horizontal and vertical to horizontal.
Step 5: Next comes giving the video artificial sharpening look using Unsharp Mask. So, go to Effect < Blur & Sharpen < Unsharp Mask. Under the Unmask Mask menu, set the amount to 100 and the radius to 10.

Step 6: To add a font to your video, simply search VHS font on Google. Look for the one you want to use in your video and download it. To give your video that authentic VHS-style look, we suggest downloading free VCR OSD Mono font and installing the font on your system.
Step 7: Go to Layer < New < Solid and choose any color. We chose white. Now, under Effects & Presets, search for a number. Drag it to the white solid. Choose the font VCR OSD Mono. You can change the number to time or date. You can also add time manually. Select the text tool, go to the source text, hold alt, and click on the stopwatch. Write “timeToCurrentFormat() and time will be displayed on the video. Let us say we want to see the date on the video instead of time. So, change the time to date. Drag the date to the bottom right of the video to give it the look of an old VHS tape.
If you are a beginner and want a simple VHS effect, you can follow these easy steps and create the VHS video that will transport you back to the 90s.
BONUS TIP: How to Add VHS Overlays and Glitch Effects to Make Retro Videos in Filmora Video Editor?
Do you remember the look of the VHS and miss it? You can bring your memories back! With Wondershare Filmora, you can add this effect easily to your videos. Adding a VHS overlay transparent brings drama and creates an atmosphere of distortion. It can significantly change the appearance and feel of your video.
So, if you want to create professional-looking VHS overlay free, the only thing you need is Filmora video editing software . Filmora allows you to add three different overlay VHS effects that you can use along with other overlays to create retro videos.
For Win 7 or later (64-bit)
For macOS 10.12 or later
Do you want to add retro videos on Filmora? It is simple!
To create a VHS overlay video, you should first download the Filmora app for free if you haven’t! Let’s learn how the effect can transform your video. You will have to choose various effects and values to get the final VHS overlay video. These effects can be added to any lyric video, intro, outro, and many others.
Let’s look at the steps:
Open your draft in Filmora software and select sample colors from the Media tab on the top left.

You can drag and drop the photo on a track on the timeline. Then adjust the trim handles to change the duration to match the section of the video to be transformed.
In sequence, add these three overlays by dragging them from the Effects panel at the top to their own individual tracks on the timeline: VHS Distortion Bad (alpha = 25), VHS Distortion (alpha = 35), and VHS Rewind (alpha = 10).
You can also add effects like Strong Glitch, Chromatic Aberration, Glitch Distortion, Distort, etc., to enhance the vintage look of the video.
When finished, click export and choose the format and target folder to save the processed file with the added effects.

The smart generation has access to HD videos and high-tech devices, yet VHS is an exciting concept for them. The videos created with this effect resemble those from the 90s era. You have to customize everything when you add a VHS effect, including the title, background noise, overlay, and credits.
By choosing a video-editing software like Wondershare Filmora, users can make such videos and add retro glitch overlay professionally. You can also access Filmstock to download any video effects, stock media, templates, or sound effects for Filmora.
Conclusion
Video editing is now easy and fun. The trend of VCR overlay is now back as VHR overlay. With Wondershare Filmora, you can easily create classic videos with 90’s effects. Take your video editing to the next big level with Filmora Video Editor. We can help you make the best use of this tool to create glitch effect videos and add a VHS tape overlay.
Versatile Video Editor - Wondershare Filmora
An easy yet powerful editor
Numerous effects to choose from
Detailed tutorials provided by the official channel
For macOS 10.12 or later
Do you want to add retro videos on Filmora? It is simple!
To create a VHS overlay video, you should first download the Filmora app for free if you haven’t! Let’s learn how the effect can transform your video. You will have to choose various effects and values to get the final VHS overlay video. These effects can be added to any lyric video, intro, outro, and many others.
Let’s look at the steps:
Open your draft in Filmora software and select sample colors from the Media tab on the top left.
You can drag and drop the photo on a track on the timeline. Then adjust the trim handles to change the duration to match the section of the video to be transformed.
In sequence, add these three overlays by dragging them from the Effects panel at the top to their own individual tracks on the timeline: VHS Distortion Bad (alpha = 25), VHS Distortion (alpha = 35), and VHS Rewind (alpha = 10).
You can also add effects like Strong Glitch, Chromatic Aberration, Glitch Distortion, Distort, etc., to enhance the vintage look of the video.
When finished, click export and choose the format and target folder to save the processed file with the added effects.
The smart generation has access to HD videos and high-tech devices, yet VHS is an exciting concept for them. The videos created with this effect resemble those from the 90s era. You have to customize everything when you add a VHS effect, including the title, background noise, overlay, and credits.
By choosing a video-editing software like Wondershare Filmora, users can make such videos and add retro glitch overlay professionally. You can also access Filmstock to download any video effects, stock media, templates, or sound effects for Filmora.
Conclusion
Video editing is now easy and fun. The trend of VCR overlay is now back as VHR overlay. With Wondershare Filmora, you can easily create classic videos with 90’s effects. Take your video editing to the next big level with Filmora Video Editor. We can help you make the best use of this tool to create glitch effect videos and add a VHS tape overlay.
Versatile Video Editor - Wondershare Filmora
An easy yet powerful editor
Numerous effects to choose from
Detailed tutorials provided by the official channel
Unlock Your Video Editing Potential With Filmora From Wondershare
Are you looking to make a cool, fun video for a special occasion? Look no further than Wondershare Filmora.
With a range of video editing tools and effects, you can easily create stunning visuals and captivating stories. Whether you are making a video for a special occasion or a social media post, Filmora has the features to help you create the perfect video.
In this article, we will discuss the benefits of using Filmora and look further into some of its main features such as split screens, LUTs, keyframes, and more. So, let your creative juices flow and start making awesome videos with Wondershare Filmora today!
Why Choose Wondershare Filmora?
Wondershare Filmora is one of the most affordable video editors available in the market, with features that are usually very expensive to use. This tool is not only available for desktops but also for mobiles. So, you can also create content on the go!

Free Download For Win 7 or later(64-bit)
Free Download For macOS 10.14 or later
Let’s dig a little deeper to see how Filmora can benefit you.
Benefits of Using Filmora
Filmora, as compared to its contestants, has much more to offer. From a range of tools and effects to an easy-to-use interface to affordability, Filmora has it all!
1.Variety of Video Editing Tools and Effects
Wondershare Filmora has a variety of video editing tools and effects. Some of the advanced editing features to spice up your videos are available such as cropping, trimming, and adjusting the audio, as well as adding motion graphics, motion tracking, and more.
Furthermore, users can also access a library of royalty-free video clips, overlays, and sound effects to add the perfect touch to their videos.
2.Easy-to-Use Interface
Whether you are a beginner or a pro, Filmora’s easy-to-use interface will be your favorite! It is simple, plain, and easy to understand.
With its intuitive interface, you can also quickly and easily customize your videos with an array of special effects, including transitions, text, and music.
3.Affordable
Last but not least, the greatest catch of Wondershare Filmora is its affordability. With the wide variety of features that it offers, it has reasonable prices to offer.
With packages starting at just $49.99 per year to $79.99 perpetual, you can avail a multitude of features that update regularly and with every new version of Filmora. With these packages, you can get around 1GB of Filmora cloud storage.
So, what are you waiting for? Download Filmora now. And don’t worry; we have got you covered with some great tips to begin your Filmora journey.
Some Stunning Features in Filmora
Although Filmora is easy to use, and you can explore it on your own, it never hurts to know a few features before you dive in.
1.Split Screen Presets
Starting with split screens that are a great way of enhancing your videos. You can show multiple videos side by side, which gives a very chic look to your overall video. Here’s how to do it in Filmora.
Free Download For Win 7 or later(64-bit)
Free Download For macOS 10.14 or later
Step1Start a new project
Launch Filmora and click on “New Project.”

Step2Choose a split screen preset
On the top, go to “Templates” and then “Split Screen.”

Choose the preset that you need. You can also preview the layout.
Step3Add to timeline
Add the chosen preset to the timeline track.

Step4Add videos to the layout
Import media from your library or use stock media to add videos to your layout. Drag and drop your media on the layout.

Step5Edit the split screen
Once you have all the videos added to the layout, double-click on the split screen in the timeline panel. The edit options will appear on the left.

Choose how you want to edit your video and then save it.
2.Filters and LUTs
Another cool feature that Filmora offers is Filters and LUTs. In order to do so, follow these simple steps.
Free Download For Win 7 or later(64-bit)
Free Download For macOS 10.14 or later
Step1Add media
Import all the video or audio files that you want to edit to the media section.

Step2Go to “Filter & LUT”
Under the “Effects” tab, go to “Filter & LUT.” Choose the LUT that you want to add to your video.

Step3Add the LUT to your video
Add the LUT to your timeline by drag-n-drop.

Drag it to adjust it according to your video. In order to adjust the strength of the LUT, double-click on it.

You can adjust the opacity of the LUT according to your preference. You can make it as soft or as strong as you want.
3.Animated Keyframes
Moving on, another one of the cool Filmora features is keyframing. Filmora allows you to add animated keyframes in your videos to add moving text or such effects. Follow the steps below to do so.
Free Download For Win 7 or later(64-bit)
Free Download For macOS 10.14 or later
Step1Add videos to the timeline
Add a video to your timeline and double-click on it to open up the editing options. Go to the “Animation” tab.

Here, you have different preset animations that you can use for your video.
Step2Add a keyframe
Add your chosen preset and hit play. You will see how that keyframe works. You can also add multiple keyframes to your video to make it look cooler.

Once you play the video, it will look like this.

This is an easy way of making intros or outros of your videos.
4.Detach Audio
Suppose you have a video where you like the audio and want to use it for another video. How would you separate the audio? This is where the Detach Audio feature comes in.
Free Download For Win 7 or later(64-bit)
Free Download For macOS 10.14 or later
Step1Add video to the timeline
Drag and drop the video on the timeline.

Step2Detach audio
To separate the audio, right-click on the video and choose “Detach Audio.” The audio track will appear separately in the timeline. You can then use it as you wish.

5.Blur Effects
Next up, we have the feature of blurring your video or the background in your video. To do so, follow these simple steps.
Free Download For Win 7 or later(64-bit)
Free Download For macOS 10.14 or later
Step1Go to the effects tab
After adding the video to your timeline, go to the Effects tab on top.

Step2Search for blur effects
In the search bar, type “blur.” You will see several blur effects. Choose any effect and see a preview of it.

Step3Add effects to videos
Add the chosen effect to your video. Then adjust its position accordingly. Double-click on the blur effect in the timeline panel to change its size and opacity.

These are some of the most amazing features that we have listed here. FYI, this is just the brink of the iceberg. There is a whole lot more that Filmora has to offer.
Final Words
If you’re looking for a simple and intuitive video editing platform to help you create stunning videos, look no further than Filmora. It is packed with powerful features that let you turn your raw footage into captivating movies in no time.
With its user-friendly design, you can easily access all the tools you need to make amazing videos, no matter your skill level. Try Filmora today and create unforgettable videos that will leave viewers in awe.
Free Download For macOS 10.14 or later
Let’s dig a little deeper to see how Filmora can benefit you.
Benefits of Using Filmora
Filmora, as compared to its contestants, has much more to offer. From a range of tools and effects to an easy-to-use interface to affordability, Filmora has it all!
1.Variety of Video Editing Tools and Effects
Wondershare Filmora has a variety of video editing tools and effects. Some of the advanced editing features to spice up your videos are available such as cropping, trimming, and adjusting the audio, as well as adding motion graphics, motion tracking, and more.
Furthermore, users can also access a library of royalty-free video clips, overlays, and sound effects to add the perfect touch to their videos.
2.Easy-to-Use Interface
Whether you are a beginner or a pro, Filmora’s easy-to-use interface will be your favorite! It is simple, plain, and easy to understand.
With its intuitive interface, you can also quickly and easily customize your videos with an array of special effects, including transitions, text, and music.
3.Affordable
Last but not least, the greatest catch of Wondershare Filmora is its affordability. With the wide variety of features that it offers, it has reasonable prices to offer.
With packages starting at just $49.99 per year to $79.99 perpetual, you can avail a multitude of features that update regularly and with every new version of Filmora. With these packages, you can get around 1GB of Filmora cloud storage.
So, what are you waiting for? Download Filmora now. And don’t worry; we have got you covered with some great tips to begin your Filmora journey.
Some Stunning Features in Filmora
Although Filmora is easy to use, and you can explore it on your own, it never hurts to know a few features before you dive in.
1.Split Screen Presets
Starting with split screens that are a great way of enhancing your videos. You can show multiple videos side by side, which gives a very chic look to your overall video. Here’s how to do it in Filmora.
Free Download For Win 7 or later(64-bit)
Free Download For macOS 10.14 or later
Step1Start a new project
Launch Filmora and click on “New Project.”
Step2Choose a split screen preset
On the top, go to “Templates” and then “Split Screen.”
Choose the preset that you need. You can also preview the layout.
Step3Add to timeline
Add the chosen preset to the timeline track.
Step4Add videos to the layout
Import media from your library or use stock media to add videos to your layout. Drag and drop your media on the layout.
Step5Edit the split screen
Once you have all the videos added to the layout, double-click on the split screen in the timeline panel. The edit options will appear on the left.
Choose how you want to edit your video and then save it.
2.Filters and LUTs
Another cool feature that Filmora offers is Filters and LUTs. In order to do so, follow these simple steps.
Free Download For Win 7 or later(64-bit)
Free Download For macOS 10.14 or later
Step1Add media
Import all the video or audio files that you want to edit to the media section.
Step2Go to “Filter & LUT”
Under the “Effects” tab, go to “Filter & LUT.” Choose the LUT that you want to add to your video.
Step3Add the LUT to your video
Add the LUT to your timeline by drag-n-drop.
Drag it to adjust it according to your video. In order to adjust the strength of the LUT, double-click on it.
You can adjust the opacity of the LUT according to your preference. You can make it as soft or as strong as you want.
3.Animated Keyframes
Moving on, another one of the cool Filmora features is keyframing. Filmora allows you to add animated keyframes in your videos to add moving text or such effects. Follow the steps below to do so.
Free Download For Win 7 or later(64-bit)
Free Download For macOS 10.14 or later
Step1Add videos to the timeline
Add a video to your timeline and double-click on it to open up the editing options. Go to the “Animation” tab.
Here, you have different preset animations that you can use for your video.
Step2Add a keyframe
Add your chosen preset and hit play. You will see how that keyframe works. You can also add multiple keyframes to your video to make it look cooler.
Once you play the video, it will look like this.
This is an easy way of making intros or outros of your videos.
4.Detach Audio
Suppose you have a video where you like the audio and want to use it for another video. How would you separate the audio? This is where the Detach Audio feature comes in.
Free Download For Win 7 or later(64-bit)
Free Download For macOS 10.14 or later
Step1Add video to the timeline
Drag and drop the video on the timeline.
Step2Detach audio
To separate the audio, right-click on the video and choose “Detach Audio.” The audio track will appear separately in the timeline. You can then use it as you wish.
5.Blur Effects
Next up, we have the feature of blurring your video or the background in your video. To do so, follow these simple steps.
Free Download For Win 7 or later(64-bit)
Free Download For macOS 10.14 or later
Step1Go to the effects tab
After adding the video to your timeline, go to the Effects tab on top.
Step2Search for blur effects
In the search bar, type “blur.” You will see several blur effects. Choose any effect and see a preview of it.
Step3Add effects to videos
Add the chosen effect to your video. Then adjust its position accordingly. Double-click on the blur effect in the timeline panel to change its size and opacity.
These are some of the most amazing features that we have listed here. FYI, this is just the brink of the iceberg. There is a whole lot more that Filmora has to offer.
Final Words
If you’re looking for a simple and intuitive video editing platform to help you create stunning videos, look no further than Filmora. It is packed with powerful features that let you turn your raw footage into captivating movies in no time.
With its user-friendly design, you can easily access all the tools you need to make amazing videos, no matter your skill level. Try Filmora today and create unforgettable videos that will leave viewers in awe.
Create Slide Masking Effect Intro
Preparation
What you need to prepare:
- A computer (Windows or macOS)
- Your video materials.
- Filmora video editor
Step 1
The first thing you want to do is download the Filmora video editor . Hit Install and allow the application to start automatically.
Step 2
Once the program loads, head straight over to the Titles tab and drag the Basic Title to Track 3 on the Timeline.
Also, drag the clip from the right side towards the left to make it 4 seconds long.

Step 3
Double-click on the Title clip in the Timeline and edit your Title’s font and size. A panel like this one should pop up when you double-click. When you’re done, click OK.

Step 4
Now, take a snapshot of the new Title that you just created.

Step 5
Next, we’re going to need a few more snapshots. But this time, double-click on the Title again and change its color to whichever one you like. Once you’ve changed its color, go ahead and click the same button as in Step 4 to take another snapshot.

Step 6
Next, double-click on the Title once again and go to “ADVANCED”. From there, go to Add Shape and select the Rectangle shape.

Step 7
Look to the left side panel and switch OFF the Text Fill button. Then, scroll down to the bottom and change the Shape Fill color to White.

Step 8
Now, adjust the rectangle’s shape to a thin line, rotate it, and move it into position like in the image.

Step 9
Delete the text layer from the Advanced panel.

Step 10
The final step in the Advanced panel is to go to the Animation tab from the left side panel and select the Round Zoom Out animation preset. Then, click OK.

Step 11
Now, it’s time to align the clips in the Timeline. First, move your Default Title clip 5 frames further. Then, drag the first snapshot to Track one and move it 8 frames forward.

Step 12
Go to Sample Color and drag the Black color to Track 3 in the Timeline. Align it directly on top of where the clip in Track 1 starts. Then, double-click on the black color clip and align it like in the image here.

Step 13
Now, place the Playhead at the beginning of the clip in Track 1. Then, double-click the snapshot clip in Track 1. Now, start increasing the value of the X-axis until it makes the text disappear, just as in this image here.

Step 14
Next, move the Playhead 10 frames further. Then, reset the position values by clicking on this button.

Step 15
Now, move the Playhead once more and set it at 3 seconds and 10 frames. Then, click on the “+Add” button to add another keyframe.

Step 16
Move the Playhead to the end of the snapshot clip and set the value of the X axis to 391. Then, reduce the opacity to 0%. Move the Playhead at the start of the snapshot clip and reduce the opacity to 0% there as well.

Step 17
Next, Export the clip to your PC. Just hit the Export button near the top-center of the screen. Then, select all of your clips in the Timeline and move them one track above. Then, drag the second snapshot you took earlier to Track 1.

Step 18
Select the Black Color clip once again and move the position of the Black box like this.

Step 19
Now, hide the clip on Track 2 by pressing this button next to it.

Step 20
Click on the second snapshot clip located in Track 1. Then, repeat the process of adding keyframes just like we did with the first snapshot. Review the previous steps to get this right. This time, remember to slide the X axis to the LEFT instead of RIGHT. Just drag the values to the left.
Step 21
Export this. Then, delete all the clips in the Timeline. Now, import both clips you exported earlier during these steps. Also, import a background video that you’d like to appear behind your slide masking text effect.
Step 22
Next, drag the clips to Timeline and adjust each of them to be the same length. Four seconds is a good option.
Step 23
Double-click on the first clip (not the background clip). Go to Video and under Blending Mode select Lighten.

Step 24
Drop your second clip to Track three and repeat the same edits for it.
Step 25
Set the Playhead on frame three and drop the Motion Shape element from the Elements tab on Track 4.

Step 26
Finally, copy and paste the element near the end of the video and Render the project. Then, review your masterpiece. That’s it!

Summary
What you’ve learned:
- Create a slide masking effect intro in Filmora
- Customize masks in the Filmora video editor
- How to take snapshots and edit them thoroughly
- Add keyframes
What you need to prepare:
- A computer (Windows or macOS)
- Your video materials.
- Filmora video editor
Step 1
The first thing you want to do is download the Filmora video editor . Hit Install and allow the application to start automatically.
Step 2
Once the program loads, head straight over to the Titles tab and drag the Basic Title to Track 3 on the Timeline.
Also, drag the clip from the right side towards the left to make it 4 seconds long.
Step 3
Double-click on the Title clip in the Timeline and edit your Title’s font and size. A panel like this one should pop up when you double-click. When you’re done, click OK.
Step 4
Now, take a snapshot of the new Title that you just created.
Step 5
Next, we’re going to need a few more snapshots. But this time, double-click on the Title again and change its color to whichever one you like. Once you’ve changed its color, go ahead and click the same button as in Step 4 to take another snapshot.
Step 6
Next, double-click on the Title once again and go to “ADVANCED”. From there, go to Add Shape and select the Rectangle shape.
Step 7
Look to the left side panel and switch OFF the Text Fill button. Then, scroll down to the bottom and change the Shape Fill color to White.
Step 8
Now, adjust the rectangle’s shape to a thin line, rotate it, and move it into position like in the image.
Step 9
Delete the text layer from the Advanced panel.
Step 10
The final step in the Advanced panel is to go to the Animation tab from the left side panel and select the Round Zoom Out animation preset. Then, click OK.
Step 11
Now, it’s time to align the clips in the Timeline. First, move your Default Title clip 5 frames further. Then, drag the first snapshot to Track one and move it 8 frames forward.
Step 12
Go to Sample Color and drag the Black color to Track 3 in the Timeline. Align it directly on top of where the clip in Track 1 starts. Then, double-click on the black color clip and align it like in the image here.
Step 13
Now, place the Playhead at the beginning of the clip in Track 1. Then, double-click the snapshot clip in Track 1. Now, start increasing the value of the X-axis until it makes the text disappear, just as in this image here.
Step 14
Next, move the Playhead 10 frames further. Then, reset the position values by clicking on this button.
Step 15
Now, move the Playhead once more and set it at 3 seconds and 10 frames. Then, click on the “+Add” button to add another keyframe.
Step 16
Move the Playhead to the end of the snapshot clip and set the value of the X axis to 391. Then, reduce the opacity to 0%. Move the Playhead at the start of the snapshot clip and reduce the opacity to 0% there as well.
Step 17
Next, Export the clip to your PC. Just hit the Export button near the top-center of the screen. Then, select all of your clips in the Timeline and move them one track above. Then, drag the second snapshot you took earlier to Track 1.
Step 18
Select the Black Color clip once again and move the position of the Black box like this.
Step 19
Now, hide the clip on Track 2 by pressing this button next to it.
Step 20
Click on the second snapshot clip located in Track 1. Then, repeat the process of adding keyframes just like we did with the first snapshot. Review the previous steps to get this right. This time, remember to slide the X axis to the LEFT instead of RIGHT. Just drag the values to the left.
Step 21
Export this. Then, delete all the clips in the Timeline. Now, import both clips you exported earlier during these steps. Also, import a background video that you’d like to appear behind your slide masking text effect.
Step 22
Next, drag the clips to Timeline and adjust each of them to be the same length. Four seconds is a good option.
Step 23
Double-click on the first clip (not the background clip). Go to Video and under Blending Mode select Lighten.
Step 24
Drop your second clip to Track three and repeat the same edits for it.
Step 25
Set the Playhead on frame three and drop the Motion Shape element from the Elements tab on Track 4.
Step 26
Finally, copy and paste the element near the end of the video and Render the project. Then, review your masterpiece. That’s it!
Summary
What you’ve learned:
- Create a slide masking effect intro in Filmora
- Customize masks in the Filmora video editor
- How to take snapshots and edit them thoroughly
- Add keyframes
Change Background Color in After Effects
Adobe After Effects is a powerful video editor. After Effects is particularly popular for its special effects that you can add to your videos and blow the mind of your audience. In any video, the background plays a major role in enhancing the overall frame and scene. If you are planning to change background color After Effects or add special effects, you must shoot your video with a solid color background.
During the post-production phase, you can change the background uniformly to any color scheme or special effect as per the requirement of the scene. Since the learning curve for After Effects is slightly steeper, you should know the exact steps to change After Effects background color. We will explain the process in simple steps and provide you with an alternative way to change background color.
Part 1. How to change video BG color in After Effects?
After Effects is widely used for professionals to add animations and special effects to videos during video editing phase. Starting from editing social media videos and YouTube videos to short films and even movies, After Effects finds its application in every field of video editing. Changing background color in After Effects is super simple even though other video editing techniques could be slightly complex for beginners. Here are the steps on how to change background color in After Effects.
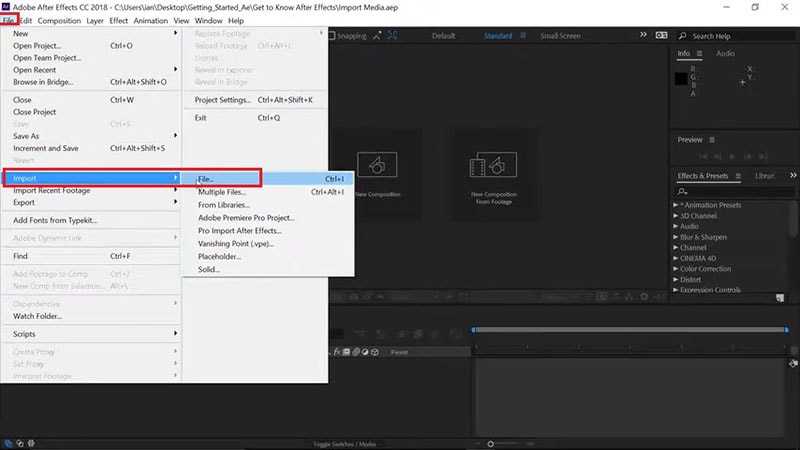
Step1 Open After Effects on your computer. Go to File> Import> File. Select the video file from your hard drive and it will appear under Project tab.
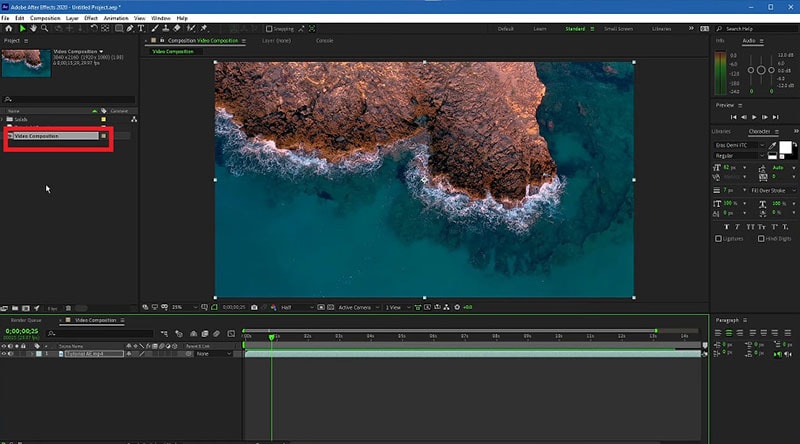
Step2 Drag and drop your video into Timeline. Select the video clip and right-click on Video Composition option located below Project tab.
Step3 From the menu, click on Composition Settings option. You can also use Ctrl + K(Windows) or Command + K(Mac) key combination to open Composition Settings directly.

Step4 On Composition Settings window, go to Background Color and set the color as per your preference. You can also use a color picker as well to select any color from the video directly.
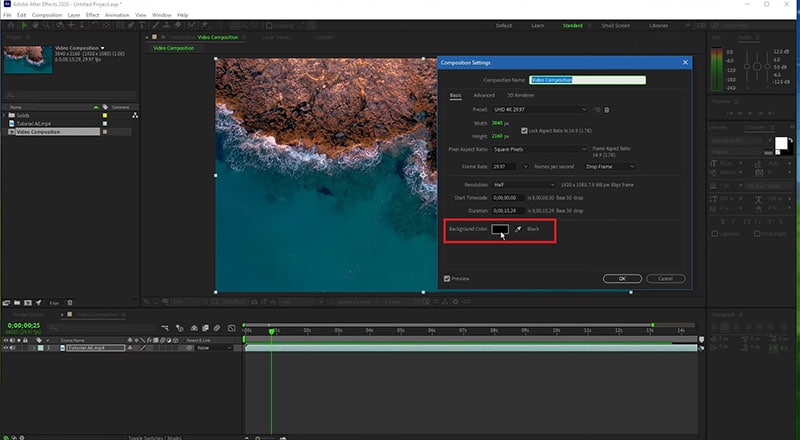
Step5 Click on Ok to set the new background color. Depending on the transparency of your video scene or the transition effect such as fade in and out, the background color will be more prominent.
Part 2. Alternative way to change background color
The best alternative to After Effects is Wondershare Filmora as Filmora has a wide range of special effects and animations. Filmora is a professional video editor where you can perform all basic as well as advanced video editing work. Most importantly, Filmora comes with an intuitive user interface so that even amateurs can use it easily.
There are several ways you can change background color in your video. For example, you can remove background color even when you do not have a solid color. If your video has a solid color, you can change background color to any color or graphical element using Chroma key. Here are the steps to change background color in Filmora .
Free Download For Win 7 or later(64-bit)
Free Download For macOS 10.14 or later
Step1 Download and install Filmora and it is available for Windows and Mac. Launch Filmora and click on New Project.

Step2 Import your video under Project Media folder and drag and drop into Timeline.
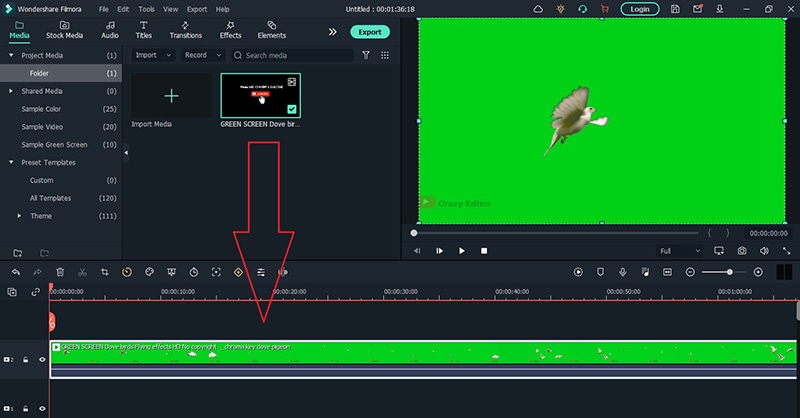
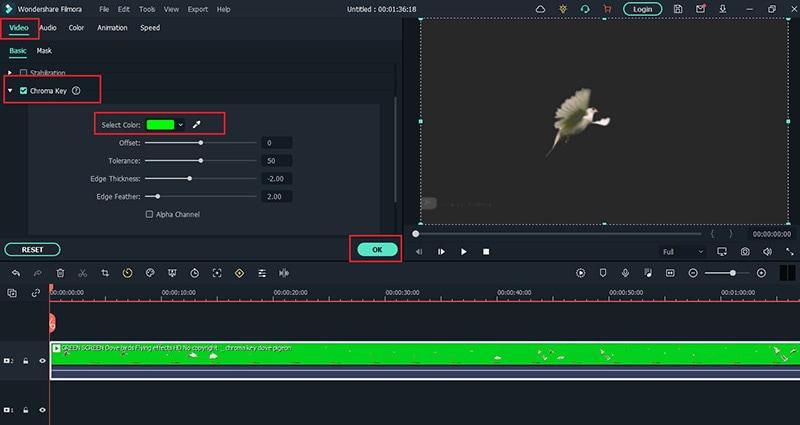
Step3 Double-click on the video clip and go to Video tab and turn on Chroma Key option. Select the solid color present in the background of the video and click on Ok button.
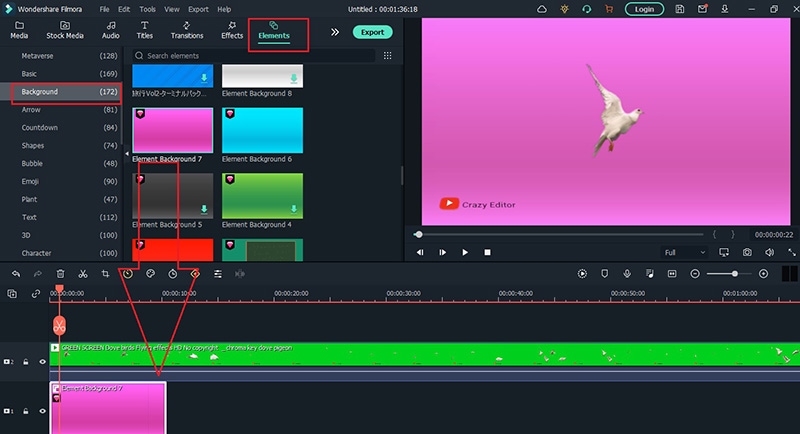
Step4 You will see the background color of the video disappear. Go to Elements> Background and drag and drop any background into Timeline. Make sure it is placed below the video clip and extend the duration of the background color as per your requirements.
Step5 Finally, play the video and click on Export button to save the video.
Part 3. FAQs about Video Background Colors
1. How do I remove background color in After Effects?
Import your video clip with a solid background color and place it on Timeline. Go to Effect menu> Keying> Keylight option. In Effects window and under Keylight, you will see Screen Colour option. Click on the eyedropper icon and select the background color you want to remove.
2. How do I change a solid background in After Effects?
The steps for After Effects how to change background color solid involve removing the background color and adding a layer of solid color to replace the transparency of the video. Go to Layer> New> Solid. Under Solid Settings window, go to Color and select the desired color from Color option and click on OK button. The new color will get reflected in the background of the video.
3. How do you add a white background in After Effects?
Go to Layer> New> Solid and add a white color solid first. However, this white color layer will not be visible unless you turn the background of your video transparent. Go to Effects & Presets and search for Luma Key and drop Luma Key on your video. Set Key type as Brighter and the threshold of the Lema key as per suitability on your video to see the white background appear.
Free Download For macOS 10.14 or later
Step1 Download and install Filmora and it is available for Windows and Mac. Launch Filmora and click on New Project.
Step2 Import your video under Project Media folder and drag and drop into Timeline.
Step3 Double-click on the video clip and go to Video tab and turn on Chroma Key option. Select the solid color present in the background of the video and click on Ok button.
Step4 You will see the background color of the video disappear. Go to Elements> Background and drag and drop any background into Timeline. Make sure it is placed below the video clip and extend the duration of the background color as per your requirements.
Step5 Finally, play the video and click on Export button to save the video.
Part 3. FAQs about Video Background Colors
1. How do I remove background color in After Effects?
Import your video clip with a solid background color and place it on Timeline. Go to Effect menu> Keying> Keylight option. In Effects window and under Keylight, you will see Screen Colour option. Click on the eyedropper icon and select the background color you want to remove.
2. How do I change a solid background in After Effects?
The steps for After Effects how to change background color solid involve removing the background color and adding a layer of solid color to replace the transparency of the video. Go to Layer> New> Solid. Under Solid Settings window, go to Color and select the desired color from Color option and click on OK button. The new color will get reflected in the background of the video.
3. How do you add a white background in After Effects?
Go to Layer> New> Solid and add a white color solid first. However, this white color layer will not be visible unless you turn the background of your video transparent. Go to Effects & Presets and search for Luma Key and drop Luma Key on your video. Set Key type as Brighter and the threshold of the Lema key as per suitability on your video to see the white background appear.
Also read:
- Updated 2024 Approved One of the Latest Tools for Editing Video and Images Is AI Composite Video App Which Is Popular Among Users. Learn All About This Tool and Its Functioning
- Updated 2024 Approved A Detailed Guide to Do Color Correction in OBS
- Updated 2024 Approved Find a Video Background Change Online that Works for You. This Article Contains Tools that Can Edit Video Backgrounds Online with Little Effort
- How to Make Stunning Glitch Effect in Photoshop?
- New As Video Editing Has Become a Pillar Stone in Post-Production Work, You Might Need to Upgrade Your Knowledge About It. In This Article, You Will Learn How to Rotate the Video
- New This Article Discusses What Is Hitfilm Express, How to Download, Install and Use It, and Its Key Features. It Further Discusses Its Alternative for Editing Your Videos and More. Check Out Now for 2024
- Want to Give a Bold and Colorful Look to Your Ad or Abstract Art Project? This Quick and Easy Tutorial Teaches How to Create a Risograph Effect in Photoshop
- Find Out How to Create Your Own Custom Motion Graphics in Filmora. Add Unique Objects, Manipulate Text, and Animate Anything You Want
- In 2024, What Is the Best FPS for YouTube Videos?
- Best 31 Video Trimmers for Computer, Phone and Online
- OBS Green Screen Guide
- Updated Want to Give a Bold and Colorful Look to Your Ad or Abstract Art Project? This Quick and Easy Tutorial Teaches How to Create a Risograph Effect in Photoshop for 2024
- Updated Do You Want to Know About the Photo Video Maker with Song? Are You Ready to Discover It in Detail? This Article Will Give You Valuable Insights on This Topic for 2024
- Updated In 2024, How To Create A YouTube Intro
- Updated How To Create 3D Text In Video
- Updated In 2024, In This Article, Youll Find Four Solutions for Rotating Your Go-Pro Videos. The Following Tools Will Be Used for This Purpose
- 2024 Approved Do You Want to Add a Motion Blur Effect in Valorant? Read This Guide to Find Out How to Create a Motion Blur Effect in Valorant without Any Hassle
- New Adding Shake Effects to Your Video With Alight Motion for 2024
- Updated How to Apply Video Filters
- New 2024 Approved How to Make Hand Shake Effect with Final Cut Pro
- In 2024, Step-by-Step Guide | Control Playback Speed in Premiere Pro
- Updated How to Create the Night-to-Day Effect Video for 2024
- Updated In 2024, How to Remove Motion Blur In Photoshop
- How To Transfer WhatsApp From iPhone 12 to others devices? | Dr.fone
- In 2024, How to Get and Use Pokemon Go Promo Codes On Apple iPhone 13 Pro Max | Dr.fone
- How to Change GPS Location on OnePlus Nord 3 5G Easily & Safely | Dr.fone
- Downloading SamFw FRP Tool 3.0 for Vivo V29 Pro
- How to Flash Dead OnePlus Nord N30 5G Safely | Dr.fone
- Ultimate Guide to Free PPTP VPN For Beginners On Infinix Hot 30i | Dr.fone
- How to Share Location in Messenger On Tecno Spark 20 Pro? | Dr.fone
- How to Reset Gmail Password on Samsung Galaxy F34 5G Devices
- A Detailed VPNa Fake GPS Location Free Review On Xiaomi Redmi Note 13 Pro 5G | Dr.fone
- All Things You Need to Know about Wipe Data/Factory Reset For Infinix Note 30 VIP Racing Edition | Dr.fone
- In 2024, The Top 5 Android Apps That Use Fingerprint Sensor to Lock Your Apps On Realme 10T 5G
- Android Call History Recovery - recover deleted call logs from Samsung Galaxy A24
- Hacks to do pokemon go trainer battles For Honor Play 8T | Dr.fone
- Play Store Stuck on Downloading Of Samsung Galaxy A24? 7 Ways to Resolve | Dr.fone
- In 2024, How to Change Location on TikTok to See More Content On your Vivo Y78 5G | Dr.fone
- Full Guide to Bypass Lava Yuva 2 FRP
- How Can Honor Play 40CMirror Share to PC? | Dr.fone
- In 2024, Does Airplane Mode Turn off GPS Location On Oppo A56s 5G? | Dr.fone
- How Can I Unlock My iPhone 7 After Forgetting my PIN Code? | Dr.fone
- My Videos Arent Playing on Poco X5 Pro – What Can I Do? | Dr.fone
- How To Change Your Apple ID Password On your iPhone 7
- In 2024, How to Unlock Disabled Apple iPhone 6s Plus/iPad Without Computer
- Title: New 2024 Approved How to DIY VHS Overlay in After Effects?
- Author: Morgan
- Created at : 2024-04-24 01:02:33
- Updated at : 2024-04-25 01:02:33
- Link: https://ai-video-editing.techidaily.com/new-2024-approved-how-to-diy-vhs-overlay-in-after-effects/
- License: This work is licensed under CC BY-NC-SA 4.0.
