:max_bytes(150000):strip_icc():format(webp)/GettyImages-184415451-9f59b82b64ac421cad0f28540a515b5f.jpg)
New Fun & Easy Masking Tricks Wondershare Filmora Tutorial

Fun & Easy Masking Tricks: Wondershare Filmora Tutorial
Masking is a video effect that allows you to cut out a scene and use the overlay to duplicate, hide, modify, or reveal your video footage. Just think of it as cutting something on your video so you can see what’s in the bottom layer. So, without wasting time, let me show you how to mask a video in Wondershare Filmora . Let’s get started!
Free Download For Win 7 or later(64-bit)
Free Download For macOS 10.14 or later
Masking Trick 1:
First, you need to shoot footage to add the masking effect. To do that, find a doorway with enough space to walk back and forth before setting up a camera with a tripod facing the entrance. Make sure you set the camera at the center height of the door to prevent lens distortion.

With the tripod set up, film yourself walking behind the door toward the camera. Get close to the camera, then walk back to the door. Then, cross the doorway slowly before walking out of the frame. Now let’s get editing with Wondershare Filmora.

Step 1 Fire up Wondershare Filmora, then import the clip on the video editor. After that, move the clip to the timeline by merely dragging it. Add two clips on the first and second tracks.

Step 2 Now proceed to hide the first track before adding a freeze frame on the second track. To do that, move the playhead to find the starting scene with the door frame without your subject. Then, right-click the clip and tap Add Freeze Frame. After that, extend the freeze frame area and cut out the rest of the clip.

Step 3 Next, click the Effect button and find the Image Mask effect in the Utility folder. Now drag the effect to the top layer.

Step 4 Double-click the clip to open the video editing options, then choose a rectangle image mast under Video Effects. Ensure the mask is inverted by clicking the Invert Mask checkbox. Now adjust the mast to match the door frame before clicking Ok.

Step 5 Up to this point, unhide the first track, then find the scene where the subject appears on the door frame. On the first track, cut the clip before the subject appears on the stage before cutting the scene where the subject crosses the door frame for the second time on the second track. Now play the video to view your masking effect.

Masking Trick: 2
In the second masking effect, we want to create a subject walking in and outside a tree. To do that, find a tree with a clear background, then place your camera to film the center of the tree trunk where the subject will be walking.

Now film the subject walking from one side of the tree, stop for a second, and then turn back. They should repeat the same action, but this time they’ll walk forward outside the frame after the one-second stop. That’s all!

Step 1 Import the clip on Filmora, then add the footage on the first and second timelines. After that, hide the first track, then find the scene where the subject walks forward away from the tree in the second track. Cut off the area before that action.

Step 2 Next, click Effects, choose Utility, then drag the Image Mask effect on the second video track. Then, double-click the second clip, select Video Effects, and choose a rectangular option that masks the right side of the frame.
Now adjust the mask until it covers the entire right side of the tree. After that, unhide the first clip and move the second to match the first clip’s timing. You can also cut out everything outside the scene of the first clip.

Step 3 Play the video to see your subject walking in both directions of the tree.

Masking Trick 3:
For this masking illusion, we’ll create a video with a subject jumping over a house. So, set up your camera tripod on a low level in front of the building. You can also add a mark on the ground for your subject to know where to jump.

Now tell your subject to walk to the marker before jumping and walking out of the scene.

Step 1 Import the clip into Filmora and add it to the first and second tracks. Now hide the first track before finding the scene without the subject in the second track and add a freeze frame. After that, extend the freeze frame area and cut out the rest of the clip.

Step 2 Now, it’s time to customize the clip with a mask. To do that, head to the Utility folder under Effects and choose Image Mask. Click the Invert Mask box to invert the mask.

Step 3 Double-click the video track and choose an image mask under Video Effects. Note that you may need several combinations of masks to mask out the sky and leave the building. So, play around with different masking shapes until the sky is covered.

Step 4 After masking, unhide the first track on the timeline before playing the video to find the scene where the subject appears and cut off everything before that scene. Also, find the scene where the subject jumps in the air and cut the clip in the second track. Then, delete everything after that scene.

Step 5 Play the video to see your subject jumping over the building and walking away from the scene.

Conclusion
That was easy, right? Playing around with Filmora’s masking tools can create incredible masking illusions like the ones we’ve discussed. And don’t forget this video editor has many more creative possibilities. You should try these masking tricks!
Free Download For macOS 10.14 or later
Masking Trick 1:
First, you need to shoot footage to add the masking effect. To do that, find a doorway with enough space to walk back and forth before setting up a camera with a tripod facing the entrance. Make sure you set the camera at the center height of the door to prevent lens distortion.

With the tripod set up, film yourself walking behind the door toward the camera. Get close to the camera, then walk back to the door. Then, cross the doorway slowly before walking out of the frame. Now let’s get editing with Wondershare Filmora.

Step 1 Fire up Wondershare Filmora, then import the clip on the video editor. After that, move the clip to the timeline by merely dragging it. Add two clips on the first and second tracks.

Step 2 Now proceed to hide the first track before adding a freeze frame on the second track. To do that, move the playhead to find the starting scene with the door frame without your subject. Then, right-click the clip and tap Add Freeze Frame. After that, extend the freeze frame area and cut out the rest of the clip.

Step 3 Next, click the Effect button and find the Image Mask effect in the Utility folder. Now drag the effect to the top layer.

Step 4 Double-click the clip to open the video editing options, then choose a rectangle image mast under Video Effects. Ensure the mask is inverted by clicking the Invert Mask checkbox. Now adjust the mast to match the door frame before clicking Ok.

Step 5 Up to this point, unhide the first track, then find the scene where the subject appears on the door frame. On the first track, cut the clip before the subject appears on the stage before cutting the scene where the subject crosses the door frame for the second time on the second track. Now play the video to view your masking effect.

Masking Trick: 2
In the second masking effect, we want to create a subject walking in and outside a tree. To do that, find a tree with a clear background, then place your camera to film the center of the tree trunk where the subject will be walking.

Now film the subject walking from one side of the tree, stop for a second, and then turn back. They should repeat the same action, but this time they’ll walk forward outside the frame after the one-second stop. That’s all!

Step 1 Import the clip on Filmora, then add the footage on the first and second timelines. After that, hide the first track, then find the scene where the subject walks forward away from the tree in the second track. Cut off the area before that action.

Step 2 Next, click Effects, choose Utility, then drag the Image Mask effect on the second video track. Then, double-click the second clip, select Video Effects, and choose a rectangular option that masks the right side of the frame.
Now adjust the mask until it covers the entire right side of the tree. After that, unhide the first clip and move the second to match the first clip’s timing. You can also cut out everything outside the scene of the first clip.

Step 3 Play the video to see your subject walking in both directions of the tree.

Masking Trick 3:
For this masking illusion, we’ll create a video with a subject jumping over a house. So, set up your camera tripod on a low level in front of the building. You can also add a mark on the ground for your subject to know where to jump.

Now tell your subject to walk to the marker before jumping and walking out of the scene.

Step 1 Import the clip into Filmora and add it to the first and second tracks. Now hide the first track before finding the scene without the subject in the second track and add a freeze frame. After that, extend the freeze frame area and cut out the rest of the clip.

Step 2 Now, it’s time to customize the clip with a mask. To do that, head to the Utility folder under Effects and choose Image Mask. Click the Invert Mask box to invert the mask.

Step 3 Double-click the video track and choose an image mask under Video Effects. Note that you may need several combinations of masks to mask out the sky and leave the building. So, play around with different masking shapes until the sky is covered.

Step 4 After masking, unhide the first track on the timeline before playing the video to find the scene where the subject appears and cut off everything before that scene. Also, find the scene where the subject jumps in the air and cut the clip in the second track. Then, delete everything after that scene.

Step 5 Play the video to see your subject jumping over the building and walking away from the scene.

Conclusion
That was easy, right? Playing around with Filmora’s masking tools can create incredible masking illusions like the ones we’ve discussed. And don’t forget this video editor has many more creative possibilities. You should try these masking tricks!
Free Download For macOS 10.14 or later
Masking Trick 1:
First, you need to shoot footage to add the masking effect. To do that, find a doorway with enough space to walk back and forth before setting up a camera with a tripod facing the entrance. Make sure you set the camera at the center height of the door to prevent lens distortion.

With the tripod set up, film yourself walking behind the door toward the camera. Get close to the camera, then walk back to the door. Then, cross the doorway slowly before walking out of the frame. Now let’s get editing with Wondershare Filmora.

Step 1 Fire up Wondershare Filmora, then import the clip on the video editor. After that, move the clip to the timeline by merely dragging it. Add two clips on the first and second tracks.

Step 2 Now proceed to hide the first track before adding a freeze frame on the second track. To do that, move the playhead to find the starting scene with the door frame without your subject. Then, right-click the clip and tap Add Freeze Frame. After that, extend the freeze frame area and cut out the rest of the clip.

Step 3 Next, click the Effect button and find the Image Mask effect in the Utility folder. Now drag the effect to the top layer.

Step 4 Double-click the clip to open the video editing options, then choose a rectangle image mast under Video Effects. Ensure the mask is inverted by clicking the Invert Mask checkbox. Now adjust the mast to match the door frame before clicking Ok.

Step 5 Up to this point, unhide the first track, then find the scene where the subject appears on the door frame. On the first track, cut the clip before the subject appears on the stage before cutting the scene where the subject crosses the door frame for the second time on the second track. Now play the video to view your masking effect.

Masking Trick: 2
In the second masking effect, we want to create a subject walking in and outside a tree. To do that, find a tree with a clear background, then place your camera to film the center of the tree trunk where the subject will be walking.

Now film the subject walking from one side of the tree, stop for a second, and then turn back. They should repeat the same action, but this time they’ll walk forward outside the frame after the one-second stop. That’s all!

Step 1 Import the clip on Filmora, then add the footage on the first and second timelines. After that, hide the first track, then find the scene where the subject walks forward away from the tree in the second track. Cut off the area before that action.

Step 2 Next, click Effects, choose Utility, then drag the Image Mask effect on the second video track. Then, double-click the second clip, select Video Effects, and choose a rectangular option that masks the right side of the frame.
Now adjust the mask until it covers the entire right side of the tree. After that, unhide the first clip and move the second to match the first clip’s timing. You can also cut out everything outside the scene of the first clip.

Step 3 Play the video to see your subject walking in both directions of the tree.

Masking Trick 3:
For this masking illusion, we’ll create a video with a subject jumping over a house. So, set up your camera tripod on a low level in front of the building. You can also add a mark on the ground for your subject to know where to jump.

Now tell your subject to walk to the marker before jumping and walking out of the scene.

Step 1 Import the clip into Filmora and add it to the first and second tracks. Now hide the first track before finding the scene without the subject in the second track and add a freeze frame. After that, extend the freeze frame area and cut out the rest of the clip.

Step 2 Now, it’s time to customize the clip with a mask. To do that, head to the Utility folder under Effects and choose Image Mask. Click the Invert Mask box to invert the mask.

Step 3 Double-click the video track and choose an image mask under Video Effects. Note that you may need several combinations of masks to mask out the sky and leave the building. So, play around with different masking shapes until the sky is covered.

Step 4 After masking, unhide the first track on the timeline before playing the video to find the scene where the subject appears and cut off everything before that scene. Also, find the scene where the subject jumps in the air and cut the clip in the second track. Then, delete everything after that scene.

Step 5 Play the video to see your subject jumping over the building and walking away from the scene.

Conclusion
That was easy, right? Playing around with Filmora’s masking tools can create incredible masking illusions like the ones we’ve discussed. And don’t forget this video editor has many more creative possibilities. You should try these masking tricks!
Free Download For macOS 10.14 or later
Masking Trick 1:
First, you need to shoot footage to add the masking effect. To do that, find a doorway with enough space to walk back and forth before setting up a camera with a tripod facing the entrance. Make sure you set the camera at the center height of the door to prevent lens distortion.

With the tripod set up, film yourself walking behind the door toward the camera. Get close to the camera, then walk back to the door. Then, cross the doorway slowly before walking out of the frame. Now let’s get editing with Wondershare Filmora.

Step 1 Fire up Wondershare Filmora, then import the clip on the video editor. After that, move the clip to the timeline by merely dragging it. Add two clips on the first and second tracks.

Step 2 Now proceed to hide the first track before adding a freeze frame on the second track. To do that, move the playhead to find the starting scene with the door frame without your subject. Then, right-click the clip and tap Add Freeze Frame. After that, extend the freeze frame area and cut out the rest of the clip.

Step 3 Next, click the Effect button and find the Image Mask effect in the Utility folder. Now drag the effect to the top layer.

Step 4 Double-click the clip to open the video editing options, then choose a rectangle image mast under Video Effects. Ensure the mask is inverted by clicking the Invert Mask checkbox. Now adjust the mast to match the door frame before clicking Ok.

Step 5 Up to this point, unhide the first track, then find the scene where the subject appears on the door frame. On the first track, cut the clip before the subject appears on the stage before cutting the scene where the subject crosses the door frame for the second time on the second track. Now play the video to view your masking effect.

Masking Trick: 2
In the second masking effect, we want to create a subject walking in and outside a tree. To do that, find a tree with a clear background, then place your camera to film the center of the tree trunk where the subject will be walking.

Now film the subject walking from one side of the tree, stop for a second, and then turn back. They should repeat the same action, but this time they’ll walk forward outside the frame after the one-second stop. That’s all!

Step 1 Import the clip on Filmora, then add the footage on the first and second timelines. After that, hide the first track, then find the scene where the subject walks forward away from the tree in the second track. Cut off the area before that action.

Step 2 Next, click Effects, choose Utility, then drag the Image Mask effect on the second video track. Then, double-click the second clip, select Video Effects, and choose a rectangular option that masks the right side of the frame.
Now adjust the mask until it covers the entire right side of the tree. After that, unhide the first clip and move the second to match the first clip’s timing. You can also cut out everything outside the scene of the first clip.

Step 3 Play the video to see your subject walking in both directions of the tree.

Masking Trick 3:
For this masking illusion, we’ll create a video with a subject jumping over a house. So, set up your camera tripod on a low level in front of the building. You can also add a mark on the ground for your subject to know where to jump.

Now tell your subject to walk to the marker before jumping and walking out of the scene.

Step 1 Import the clip into Filmora and add it to the first and second tracks. Now hide the first track before finding the scene without the subject in the second track and add a freeze frame. After that, extend the freeze frame area and cut out the rest of the clip.

Step 2 Now, it’s time to customize the clip with a mask. To do that, head to the Utility folder under Effects and choose Image Mask. Click the Invert Mask box to invert the mask.

Step 3 Double-click the video track and choose an image mask under Video Effects. Note that you may need several combinations of masks to mask out the sky and leave the building. So, play around with different masking shapes until the sky is covered.

Step 4 After masking, unhide the first track on the timeline before playing the video to find the scene where the subject appears and cut off everything before that scene. Also, find the scene where the subject jumps in the air and cut the clip in the second track. Then, delete everything after that scene.

Step 5 Play the video to see your subject jumping over the building and walking away from the scene.

Conclusion
That was easy, right? Playing around with Filmora’s masking tools can create incredible masking illusions like the ones we’ve discussed. And don’t forget this video editor has many more creative possibilities. You should try these masking tricks!
Final Cut Pro for iPad- Is It Available?
Final Cut Pro by Apple is the most popular premium video editor among macOS users. Starting from social media videos to short films and movies, Final Cut Pro is a popular choice. Even though video editing using FCP is mostly done on Mac, there are many who prefer video editing on their powerful phones. It is quite shocking that Final Cut Pro for Android and iOS users is not yet available.
Since it is an Apple-exclusive application, you would have expected FCP mobile app for iPhone and iPad. But Apple is yet to develop a mobile app for Final Cut Pro. Naturally, we have to look for Final Cut Pro alternative mobile apps for smartphone users. The alternatives need to be as feature-rich and powerful as FCP. Here is the list of the best Final Cut Pro alternative apps for Android and iOS users.
Part 1. Final Cut Pro Alternative App for Android
There is no Final Cut Pro app available for Android users. It is not surprising because Final Cut Pro is an Apple product. When you search for Final Cut Pro on Play Store, you will come across an FCP app. But it is a fake app and not developed by Apple. Here is our recommendation of the best Final Cut Pro alternative app for Android users.
1. Filmora
Filmora is the best alternative to Final Cut Pro for Android users. The app has a super high rating on Play Store. Filmora is available for free and you can create amazing HD videos. You can add stunning effects, animations, texts, filters, backgrounds, and much more. You can obviously perform the basic video edits such as trim, cut, join, and likewise. The app allows easy sharing of edited videos on social media platforms.
You can add keyframes for personalized creativity animations. There is a wide range of music available to pick from. Besides, there are amazing stickers and emojis available to apply to your video. The user interface is super intuitive for everyone to use easily without prior experience. The free version attaches a watermark and you can remove it by upgrading to VIP membership.

Link – https://play.google.com/store/apps/details?id=com.wondershare.filmorago&hl=en\_IN&gl=US
2. InShot
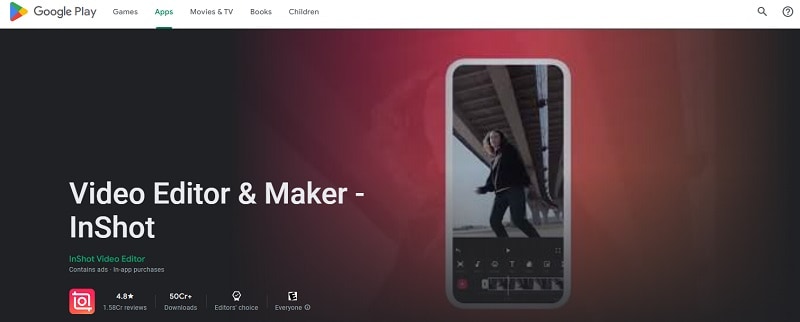
InShot is an extremely popular video editor app among Android users. It is featured as the Editor’s Choice on Play Store. The app has all the features and functionalities you need for basic and advanced video editing. In spite of being a powerful app, the graphical interface is user-friendly.
There are beautiful transitions, stickers, text effects, voice effects, and frames available. You can make picture-in-picture videos, slideshow videos, and slow-motion videos. You can also create stories and GIFs for social media. Besides, there is a keyframe option for texts and stickers. You can easily add voiceover, music, and voice effect to enhance the video content.
Link –https://play.google.com/store/apps/details?id=com.camerasideas.instashot&hl=en\_IN&gl=US
3. KineMaster
KineMaster is a popular video editing app among beginners. You can create your video from scratch using its video templates. KineMaster has a wide range of different categories of video templates to get started. Starting from basic adjustments to adding filters and effects, everything is available on KineMaster.
The user interface is super easy to operate. The app comes with an incredible collection of assets such as animations and clip graphics. You can remove the background from your video or photo instantly. Besides, you can save the edited video in desired video quality and share it instantly on social media platforms.

Link – https://play.google.com/store/apps/details?id=com.nexstreaming.app.kinemasterfree&hl=en\_IN&gl=US
4. Funimate
Funimate is a relatively new video editing app. But in a short time, the app has managed to become a top video editor app on Play Store. This is because it is extremely powerful and it is comparable to Final Cut Pro in terms of features. The app has a stunning collection of video and text effects that will enhance video content. You can work with multiple video layers just like Final Cut Pro.
The keyframe effect is a strong point for customized and personalized animations. You can choose from the different transitions, overlays, and backgrounds. Besides, there is a wide range of chic effects and filters to go with modern video trends. There is a dedicated 3D space available to experiment with object and text animations. You can sync music and choose AI effects and video masks.

Link – https://play.google.com/store/apps/details?id=com.avcrbt.funimate&hl=en\_IN&gl=US
5. Splice
This is another relatively new video editor app but has a superb rating from users. The powerful video editor app makes it easy for beginners to edit videos comfortably. It has a dedicated timeline to work on your video clip and edit as per your requirements. There are beautiful text effects and overlays available.
Besides, you can add and sync music perfectly. Moreover, you can adjust the speed of your video to get the slow-motion effect. The basic video editing tools are available and you can create videos from your photos. There are amazing transitions and video effects present to apply to your photos and video clips. Overall, the video editor is suitable for beginners as well as professionals.

Link – https://play.google.com/store/apps/details?id=com.splice.video.editor&hl=en\_IN&gl=US
Part 2. Final Cut Pro Alternative App for iPhone
Since Final Cut Pro is from Apple, you would have expected an FCP app for iPhone and iPad. Unfortunately, Apple has no plan yet to launch Final Cut Pro mobile app. Here are the Final Cut Pro alternative apps for iPhone and iPad users.
1. iMovie
iMovie by Apple is considered to be an ideal alternative to Final Cut Pro. Even though it is not as advanced as FCP, but there are powerful features for professionals as well. You can create videos from scratch and there are beautiful templates available to get started. You can also make Hollywood-style cinematic trailers to get your viewers excited.
Apart from templates of different categories, there are different text styles and textures available to pick from. You can get the popular picture-in-picture, split screen, and green screen effect options. It supports editing 4K videos at 60 fps. You can send your video projects to iPad and Mac conveniently.

Link – https://apps.apple.com/us/app/imovie/id377298193
2. Quik
Quik by GoPro is one of the most popular video editors. GoPro is the leading action camera brand. Naturally, there is huge traction for its video editor. First of all, its speed adjustment feature is the highlight of the app. You can go for super slow, regular slow, freeze, timelapse, hyper-lapse, and fast motion.
Select from a wide range of themes to get started. There is no dearth of filters, transitions, and effects. Some of the filters are super exclusive to the app. You can share your edited video on social media platforms instantly. The multi-selection timeline is suitable for advanced video editors. The app has exclusive features for GoPro owners.

Link – https://apps.apple.com/us/app/gopro-quik-video-editor/id561350520
3. Magisto
If you are into storytelling with your videos, this is the best app to edit your videos. It has all the features and options to make your video look classic and eye-catching. As a matter of fact, it is arguably the best video editor for social media video creators. You can use its artificial intelligence feature to select the best parts of your video automatically.
There are ready-made templates available to make your video look professional as well as entertaining. You can perform all the basic video editing tasks swiftly. You can work with the music part comfortably so that your video content enhances. Starting from slideshow videos to short videos for social media, the app is perfect for different genres of video making.

Link – https://apps.apple.com/us/app/magisto-video-editor-maker/id486781045
4. VivaVideo
VivaVideo is a highly rated video editing app. The app lets you change video speed, supports high-resolution output, and comes with dynamic effects. You can make short videos with your photos. You can decorate them beautifully with frames and objects available.
There are several cinematic filters available to enhance video quality. Apart from these, you get to select from a wide collection of text effects and emojis. You can work with keyframes and export video in 4k resolution. You can also create GIFs for social media platforms instantly.

Link – https://apps.apple.com/us/app/vivavideo-video-editor-maker/id738897668
5. Adobe Premiere Rush
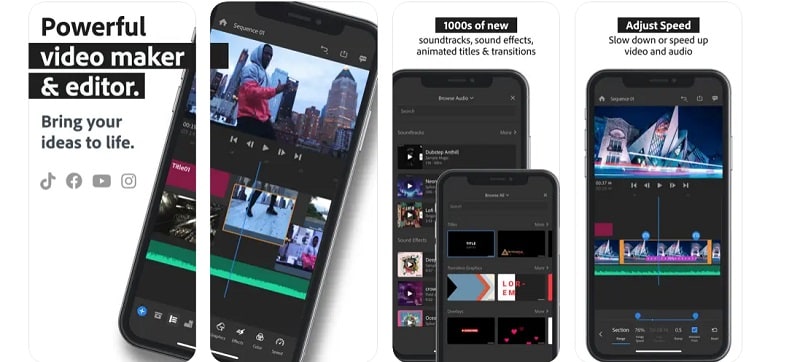
Adobe Premiere is the biggest competitor of Final Cut Pro. But Adobe has gone one step ahead of FCP by releasing its mobile app. Adobe Premiere Rush is undoubtedly a powerful video editor. It is true that all the features of the Adobe Premiere desktop application are not available. But it is still great for a professional video creator.
There are multi-track timeline, customizable animated templates, and stunning video and text effects. The app has AI sensors for automated color balancing. The premium content library has everything you need. There are different aspect ratios available for creating videos for all devices. You can export edited videos in 4K resolution.
Link – https://apps.apple.com/us/app/adobe-premiere-rush-edit-video/id1188753863
Part 3. Related FAQs
1. Is Final Cut Pro a free app?
No, Final Cut Pro is not a free app. It is a paid app that costs $299.99 for lifetime access. However, you can download the free trial version of Final Cut Pro. You can use the trial version for 90 days before purchasing the product.
2. Does Final Cut Pro have a mobile app?
No, Final Cut Pro does not have any mobile app as of now. It is exclusively for iMac and MacBook users. You can use Filmora mobile app if you are looking for an FCP alternative.
3. Is Final Cut Pro Apple only?
Apple is the developer of Final Cut Pro. Therefore, it is an Apple-exclusive product. Naturally, it works only on macOS-based devices such as iMac and MacBook.
Free Download For Win 7 or later(64-bit)
Free Download For macOS 10.14 or later
Part 1. Final Cut Pro Alternative App for Android
There is no Final Cut Pro app available for Android users. It is not surprising because Final Cut Pro is an Apple product. When you search for Final Cut Pro on Play Store, you will come across an FCP app. But it is a fake app and not developed by Apple. Here is our recommendation of the best Final Cut Pro alternative app for Android users.
1. Filmora
Filmora is the best alternative to Final Cut Pro for Android users. The app has a super high rating on Play Store. Filmora is available for free and you can create amazing HD videos. You can add stunning effects, animations, texts, filters, backgrounds, and much more. You can obviously perform the basic video edits such as trim, cut, join, and likewise. The app allows easy sharing of edited videos on social media platforms.
You can add keyframes for personalized creativity animations. There is a wide range of music available to pick from. Besides, there are amazing stickers and emojis available to apply to your video. The user interface is super intuitive for everyone to use easily without prior experience. The free version attaches a watermark and you can remove it by upgrading to VIP membership.

Link – https://play.google.com/store/apps/details?id=com.wondershare.filmorago&hl=en\_IN&gl=US
2. InShot
InShot is an extremely popular video editor app among Android users. It is featured as the Editor’s Choice on Play Store. The app has all the features and functionalities you need for basic and advanced video editing. In spite of being a powerful app, the graphical interface is user-friendly.
There are beautiful transitions, stickers, text effects, voice effects, and frames available. You can make picture-in-picture videos, slideshow videos, and slow-motion videos. You can also create stories and GIFs for social media. Besides, there is a keyframe option for texts and stickers. You can easily add voiceover, music, and voice effect to enhance the video content.

Link –https://play.google.com/store/apps/details?id=com.camerasideas.instashot&hl=en\_IN&gl=US
3. KineMaster
KineMaster is a popular video editing app among beginners. You can create your video from scratch using its video templates. KineMaster has a wide range of different categories of video templates to get started. Starting from basic adjustments to adding filters and effects, everything is available on KineMaster.
The user interface is super easy to operate. The app comes with an incredible collection of assets such as animations and clip graphics. You can remove the background from your video or photo instantly. Besides, you can save the edited video in desired video quality and share it instantly on social media platforms.

Link – https://play.google.com/store/apps/details?id=com.nexstreaming.app.kinemasterfree&hl=en\_IN&gl=US
4. Funimate
Funimate is a relatively new video editing app. But in a short time, the app has managed to become a top video editor app on Play Store. This is because it is extremely powerful and it is comparable to Final Cut Pro in terms of features. The app has a stunning collection of video and text effects that will enhance video content. You can work with multiple video layers just like Final Cut Pro.
The keyframe effect is a strong point for customized and personalized animations. You can choose from the different transitions, overlays, and backgrounds. Besides, there is a wide range of chic effects and filters to go with modern video trends. There is a dedicated 3D space available to experiment with object and text animations. You can sync music and choose AI effects and video masks.

Link – https://play.google.com/store/apps/details?id=com.avcrbt.funimate&hl=en\_IN&gl=US
5. Splice
This is another relatively new video editor app but has a superb rating from users. The powerful video editor app makes it easy for beginners to edit videos comfortably. It has a dedicated timeline to work on your video clip and edit as per your requirements. There are beautiful text effects and overlays available.
Besides, you can add and sync music perfectly. Moreover, you can adjust the speed of your video to get the slow-motion effect. The basic video editing tools are available and you can create videos from your photos. There are amazing transitions and video effects present to apply to your photos and video clips. Overall, the video editor is suitable for beginners as well as professionals.

Link – https://play.google.com/store/apps/details?id=com.splice.video.editor&hl=en\_IN&gl=US
Part 2. Final Cut Pro Alternative App for iPhone
Since Final Cut Pro is from Apple, you would have expected an FCP app for iPhone and iPad. Unfortunately, Apple has no plan yet to launch Final Cut Pro mobile app. Here are the Final Cut Pro alternative apps for iPhone and iPad users.
1. iMovie
iMovie by Apple is considered to be an ideal alternative to Final Cut Pro. Even though it is not as advanced as FCP, but there are powerful features for professionals as well. You can create videos from scratch and there are beautiful templates available to get started. You can also make Hollywood-style cinematic trailers to get your viewers excited.
Apart from templates of different categories, there are different text styles and textures available to pick from. You can get the popular picture-in-picture, split screen, and green screen effect options. It supports editing 4K videos at 60 fps. You can send your video projects to iPad and Mac conveniently.

Link – https://apps.apple.com/us/app/imovie/id377298193
2. Quik
Quik by GoPro is one of the most popular video editors. GoPro is the leading action camera brand. Naturally, there is huge traction for its video editor. First of all, its speed adjustment feature is the highlight of the app. You can go for super slow, regular slow, freeze, timelapse, hyper-lapse, and fast motion.
Select from a wide range of themes to get started. There is no dearth of filters, transitions, and effects. Some of the filters are super exclusive to the app. You can share your edited video on social media platforms instantly. The multi-selection timeline is suitable for advanced video editors. The app has exclusive features for GoPro owners.

Link – https://apps.apple.com/us/app/gopro-quik-video-editor/id561350520
3. Magisto
If you are into storytelling with your videos, this is the best app to edit your videos. It has all the features and options to make your video look classic and eye-catching. As a matter of fact, it is arguably the best video editor for social media video creators. You can use its artificial intelligence feature to select the best parts of your video automatically.
There are ready-made templates available to make your video look professional as well as entertaining. You can perform all the basic video editing tasks swiftly. You can work with the music part comfortably so that your video content enhances. Starting from slideshow videos to short videos for social media, the app is perfect for different genres of video making.

Link – https://apps.apple.com/us/app/magisto-video-editor-maker/id486781045
4. VivaVideo
VivaVideo is a highly rated video editing app. The app lets you change video speed, supports high-resolution output, and comes with dynamic effects. You can make short videos with your photos. You can decorate them beautifully with frames and objects available.
There are several cinematic filters available to enhance video quality. Apart from these, you get to select from a wide collection of text effects and emojis. You can work with keyframes and export video in 4k resolution. You can also create GIFs for social media platforms instantly.

Link – https://apps.apple.com/us/app/vivavideo-video-editor-maker/id738897668
5. Adobe Premiere Rush
Adobe Premiere is the biggest competitor of Final Cut Pro. But Adobe has gone one step ahead of FCP by releasing its mobile app. Adobe Premiere Rush is undoubtedly a powerful video editor. It is true that all the features of the Adobe Premiere desktop application are not available. But it is still great for a professional video creator.
There are multi-track timeline, customizable animated templates, and stunning video and text effects. The app has AI sensors for automated color balancing. The premium content library has everything you need. There are different aspect ratios available for creating videos for all devices. You can export edited videos in 4K resolution.

Link – https://apps.apple.com/us/app/adobe-premiere-rush-edit-video/id1188753863
Part 3. Related FAQs
1. Is Final Cut Pro a free app?
No, Final Cut Pro is not a free app. It is a paid app that costs $299.99 for lifetime access. However, you can download the free trial version of Final Cut Pro. You can use the trial version for 90 days before purchasing the product.
2. Does Final Cut Pro have a mobile app?
No, Final Cut Pro does not have any mobile app as of now. It is exclusively for iMac and MacBook users. You can use Filmora mobile app if you are looking for an FCP alternative.
3. Is Final Cut Pro Apple only?
Apple is the developer of Final Cut Pro. Therefore, it is an Apple-exclusive product. Naturally, it works only on macOS-based devices such as iMac and MacBook.
Free Download For Win 7 or later(64-bit)
Free Download For macOS 10.14 or later
How to Use LUTs in Lumafusion & Free Resource
LumaFusion is one of the most complex iPad and iPhone video editing apps. Many of its customers adore it, and it has some incredible capabilities that you’d find incompetent editing software. They’ve effectively opened up the realm of LUTs to iPhone and iPad users.
LumaFusion LUTs are individual files that act as containers in LumaFusion. This container file includes standard LUT data as well as LumaFusion-specific color preset data. A LumaFusion LUT Preset file is similar to a Super LUT. LumaFusion can only employ one standard LUT at a time; however, LumaFusion LUT presets enable simultaneous Color Grading and Color Corrections.
How will LUTs help with color correction in Lumafusion
Colors in today’s cameras are vibrant, but they may continuously be improved. Color correction corrects the color that’s already there, whether it’s boosting the exposure to brighten a darker photo or increasing the saturation to make the colors pop. Color correction in other NLEs can be difficult, but not in LumaFusion.
The Color Presets tab in the Color & Effects section is where you begin color correcting footage. There are various presets from which to pick. I wouldn’t use these settings on my videos because they’re too stylized, but they’re there. You may alter any of the presets to your taste, so some of the more dramatic ones can be toned down. By picking the original setting, purists can color-fix their raw footage without using LumaFusion. Moving the sliders till the color seems perfect is all that’s required from there.
Exposure, contrast, highlights, shadows, mid-tones, and saturation and hue are all controlled by sliders. The color sliders can be used for a more forceful approach. But proceed with caution. The sliders are delicate, and it’s easy to overdo them. Play around with the sliders until you get the look you want. If you don’t like it, toss it in the trashcan and start over.
Color grading and color correction are not interchangeable terms. Color correction is a technical requirement, but color grading is primarily creative. You’ll have no command over the color grading process if you’re working with film material where primary colors aren’t even visible. Before diving into the creative LUTs, make sure you complete adequate color correcting.
Color grading, unlike color correction, adjusts the shot’s color to modify the atmosphere or feel. The only way to do that in LumaFusion is to play around with the color sliders under the Color Presets tab, but that’s not ideal. As previously stated, the three sliders are sensitive and limited. LumaFusion isn’t designed for color grading, which is OK. Thankfully, LumaFusion allows you to use LUTs.
Always color correct your footage before utilizing any LUTS, which entails changing the White-balance, Highlights, Contrast, and Shadows. Do not apply the LUTS to your footage directly.
How to use LUTs in Lumafusion?
Videographers, colorists, and editors use LUTs because they are efficient. Rather than starting from zero every time you work on a video editing project, you may speed up the color grading process using a LUT with predefined color profiles. It’s elementary to import LUTs. Simply import the preset files into LumaFusion and add the preset to your footage like an Instagram filter.
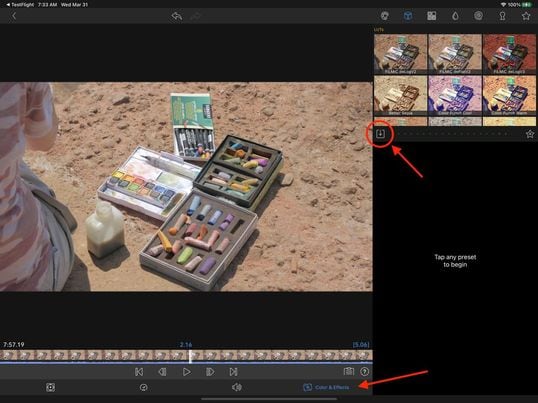
The Import button in the Color & Effects editor is the easiest way to load LUTs.
- Double click on any video/photo clip on the timeline to access the Clip Editors.
- At the bottom of the Clip Editor UI, select the Color & Effects tab.
- The import button is located directly below the effect preset library.
How to use LUTs in Lumafuison
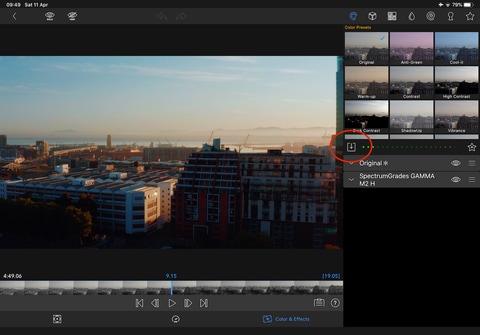
LUTs must be loaded via the LumaFX clip editor at the moment. Follow the steps below to accomplish this:
- To access the LumaFX UI, double-tap any video/photo clip in the timeline.
- At the bottom of the LumaFX UI, select the ‘Color & Effects’ tool.
- In the upper right panel, press the cube icon.
- The import button is located directly below the effect preset library.
Load LumaFX LUTs
- Once hit, it will display your transfer site options; select your desired transfer site and navigate to the folder where your LUTs are stored.
- Select and import all of the LUTs in the folder.
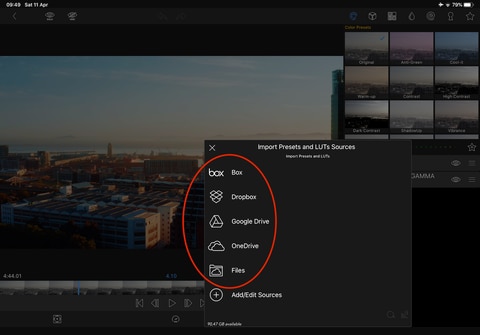
Import LUTs
Free LUTs Resource for Lumafusion
Choosing the appropriate LUT pack will boost your photography and videography immediately. With our quick guide to the top free LUTs available, you can find the appropriate one for you.
1. Jaun Melara free LUTs
LUTs aren’t simply for stylizing video. They’re frequently employed as a color correction tool to ensure that your colors are shown correctly in various formats. Juan Melara has provided a free LUT set to assist you in color correcting your footage for printing on film stock. These free LUTs will provide modest stylization to your footage if you don’t want to send it to print.
Melara developed this video to demonstrate his free LUTs in action. The colors are more subdued than in the other LUTs on this list. This free LUT pack is ideal if you’re looking to produce a modern-style cinematic color grade. Melara also has a great article about using LUTs to create a lovely color grade. DaVinci PowerGrades are available for several of these LUTs. They color correct your film in the same way as LUTs do, but you’ll have more flexibility over individual PowerGrade components.

Jaun Melara free LUTs
2. Small Hd free LUTs
SmallHD, a company that makes small, full HD on-camera monitors, is giving away a free set of color grades that reproduce the appearance of seven classic movies. The company is also releasing a series of video lessons that show how to get the most out of these effects throughout production and post-production. Everything is completely free. The color grades are provided as a.zip file and are in the form of 3D LUT files created in DaVinci Resolve. If you’re unfamiliar with SmallHD, the company offers free LUTs for on-set monitoring in real-time. This free set of Movie Look LUTs is inspired by seven recent films, including Apocalypse Now’s warmth and The Matrix’s green overtones. Take use of SmallHD’s free LUT set if you want to give your footage a dramatic and cinematic vibe.

Small Hd free LUTs
3. Color Grading Central free LUTs
Color Grading Central is essential knowledge for any aspiring colorist or video editor who takes color seriously. CGC is a company that specializes in color grading. Their website has a wide range of outstanding color-related products, from grain to LUTs. They also provide their email members with a wealth of free color grading information. Free trials of some LUTs are also available, so you may try them out before you buy. They’re giving away an array of color presets, grains, and burns exclusively to their email list and the seven free color LUTs. We strongly recommend them if you want to give your footage a shot-on-film look.

Color Grading Central free LUTs
4. PremiumBeat Free LUTs
PremiumBeat has freely given countless LUT packs as well as other assets to any video editor or filmmaker over the years. Todd Blankenship has designed a fresh new set of FREE LUTs for Shutterstock, which is their latest addition. Todd chose distinct looks from films and pictures that inspire his daily work to create this bundle with attention and love. There are many options, and these looks will offer you a great place to start when it comes to grading your footage. They recently published an in-depth evaluation of Photon.io, a new color grading tool. Todd Blankenship, who ended up utilizing the tool to create these LUTs, wrote the initial review. The pack has been fine-tuned to replicate some clean, cinematic looks that you may use as a jumping-off point for your video.

PremiumBeat Free LUTs
5. Frank Glencairn free LUT
Despite having access to the most advanced filming gear, there’s something about a vintage film aesthetic that looks fantastic. Frank Glencairn has made a nice K-Tone LUT that is meant to look like vintage Kodachrome film. This film grade, which was formerly popular among photographers and filmmakers, has fallen out of favor due to the rise of digital cameras. With this free LUT, you can get the appearance of retro-looking reds, blues, and yellows.

Frank Glencairn free LUT
6. Reverse Tree Media free LUTs
Reverse Tree Media is releasing a new LUTS bundle that is absolutely free. In addition to LUTS, this LUTS collection includes utility LUTS, film grains, and a Black-Bar layer. For the color-grading procedure, this is critical. This bundle contains 56 free LUTS for various scenarios like weddings, television commercials, travel films, landscapes, Rec.709, and so on. It also has several useful LUTS and film grain overlays for 8mm, 16mm, and 35mm video, as well as a cinematic black bar PNG file with a ratio of 2.35:1 to assist you in achieving a more cinematic appearance quickly and save time. Check out the link to learn more about LUTS and to obtain their previous cinematic LUTS bundle, which is also free.

Reverse Tree
Wondershare Filmora11 Express Better
Achieve More
Grow Together
Free Download Free Download Learn More

Closing Thoughts:
LUTs are most typically used to build and store color profiles that can be utilized in other film projects. By using contrast and design, you can bring logs and flat materials to life. Everything you need to know is right here. You can now rush to your desk and fix your video.
Free Download Free Download Learn More

Closing Thoughts:
LUTs are most typically used to build and store color profiles that can be utilized in other film projects. By using contrast and design, you can bring logs and flat materials to life. Everything you need to know is right here. You can now rush to your desk and fix your video.
Steps to Create One Click Video Reverse Effect in Filmora
All great video editors use phenomenal video effects in their videos. One of the most professional effects is the reverse video effect. This unique effect is always challenging for the makers to shoot and portray on the screen flawlessly.
At the same time, it is intriguing and always draws the audience’s attention. In this article, you will learn to shoot and edit the video for reverse effects using Filmora. But first, we will learn what does video reverse effect mean. So let us get into this!
Part 1. What Is Video Reverse Effect?
It is a special video effect in which a motion of things starts in the backward direction. This unique effect is used to intrigue the audience.
For example, if a bullet is fired from a gun. With the reverse effect, you can rewind the footage, and the shot goes back into the gun. So today, you can easily rewind fast action scenes and get a wow reaction from the audience.
Famous Examples of Reverse Effect in Films
1- Demolition of a Wall (1896)
Filmmakers first used this striking effect in 1896 in a 90 seconds film, “Demolition of a wall.” Louis Lumiere was the one who made that video. Below is shown an image from the film.

2- Tenet (2020)
It is a viral film by Christopher Nolan, which was a great success. He explained the concept of reverse entropy, in which you start moving back chronologically in time instead of forward. This concept is all shown through this special video reverse effect. Unfortunately, the audience had difficulty digesting this unique concept, which generated an awful response.

Part 2. How To Shoot Video Reverse Effect?
The reverse effect is unique, so special attention should be paid while filming a video. This section will cover some of the crucial prerequisites to film a video.
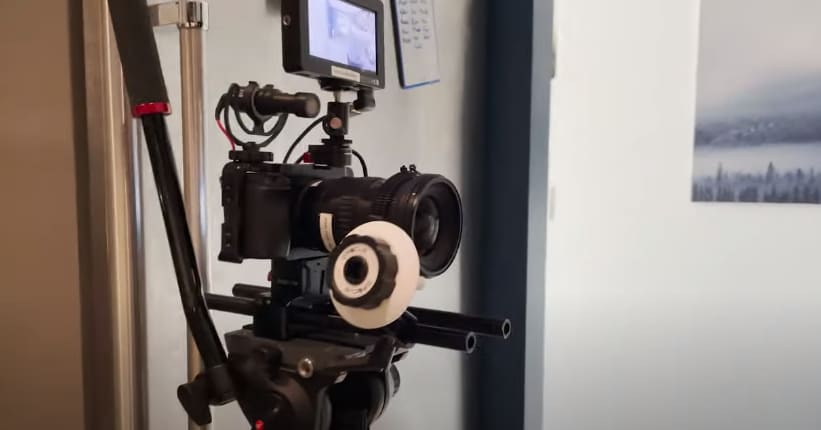
Steady Camera
It would be best to have your camera placed on a steady surface or mounted on a tripod stand to lock the focus. We will split the area and perform different tasks to make it look smooth. The audience will not get the idea that you completed the tasks separately. And it helps in the editing process as well.
A Spacious Area
You will need a spacious area in which you will perform different tasks. Make sure your camera stands still while shooting all the frames of video. In an ample space, it becomes easier to do movements freely. It also helps prevent glitches in the final product.
Splitting of Area into Portions
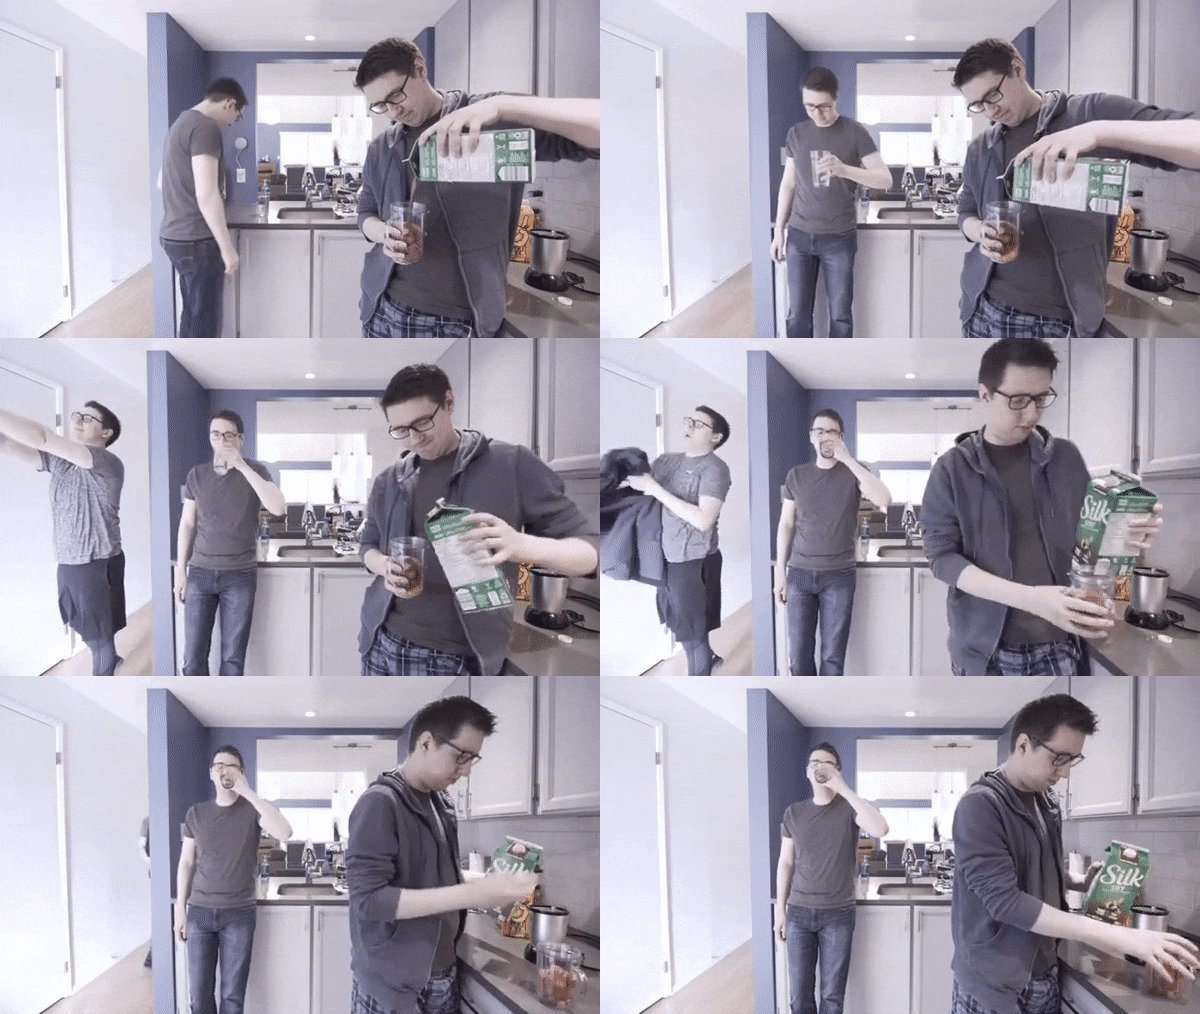
Now you have to split your area into portions. Each task is in its part of the frame, and actions in one frame should not pass over into another. You will do one activity per portion. It makes the editing process a lot easier. Finally, we get all three videos to merge and make it look like a single video.
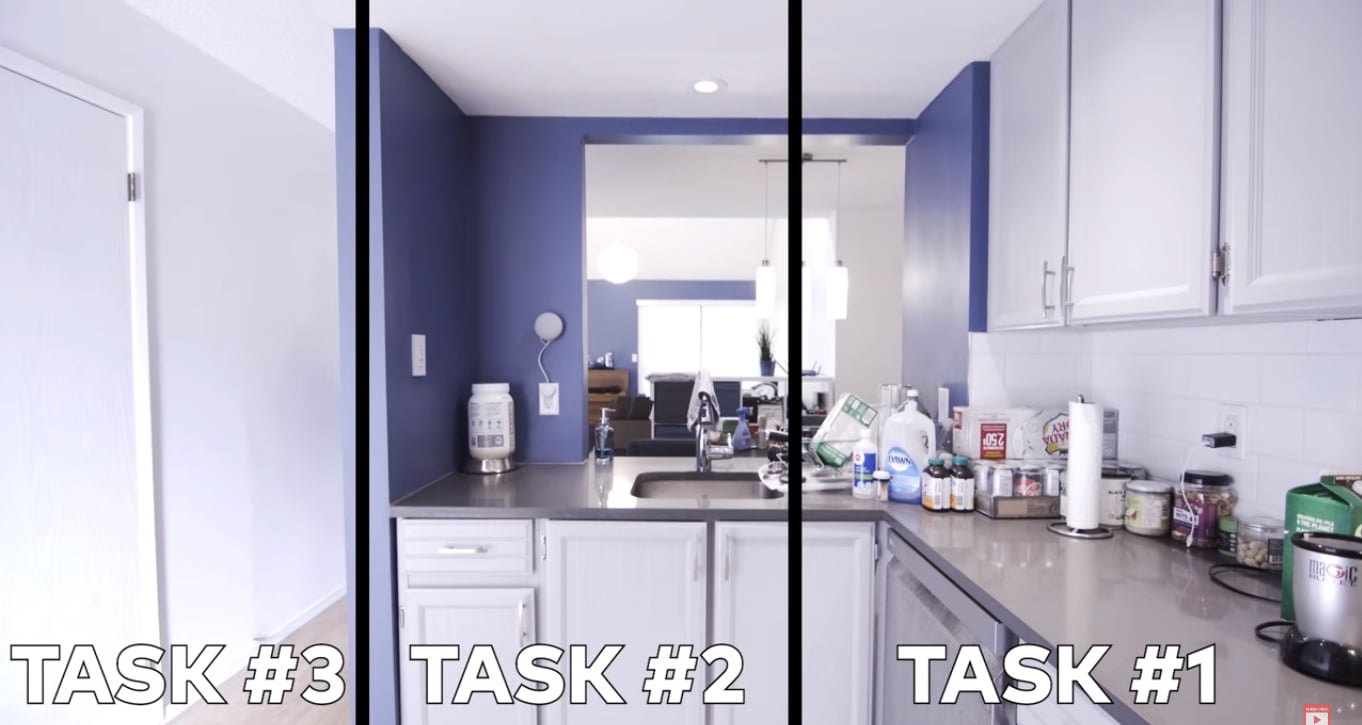
After covering the prerequisites, we will now learn the editing process of creating a video reverse effect.
Part 3. How To Edit Video Reverse Effect In Filmora? [Stepwise Guide]
Creating video reverse effects is much easier these days. Wondershare Filmora is going to help you a lot. Filmora is an exceptional platform for creating innovative and creative videos. It has advanced editing features, which help make professional videos.
Free Download For Win 7 or later(64-bit)
Free Download For macOS 10.14 or later
Applying video reverse effects to your shots here is a wise guide. Please follow the instructions given below.
Step1 Downloading Filmora and Importing Files
- After recording your shots, you will edit them in Filmora. But first, download Filmora from the website and install it.
- After opening the software, import the recording files by clicking “Import Media.”

Step2 Drag the Shots to the Timeline
- Drag the shots to the timeline and drop it. If Filmora asks for a matching resolution on the timeline, please click “Match to Media.” It will adjust your media resolution according to the timeline.
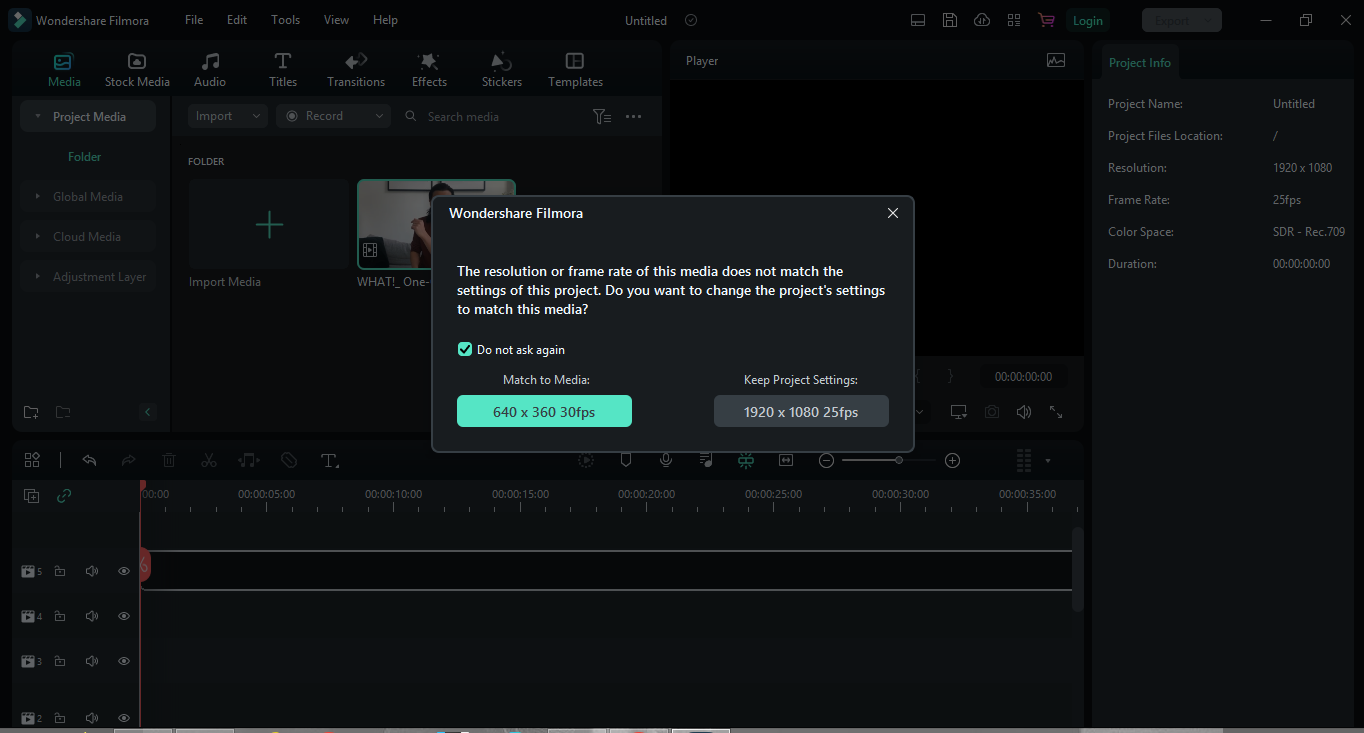
- Add videos of each action on the layers above by drag and drop.
Step3 Adding Image Mask to the Clips
- Now you will add an image mask to the clips you shot at the area’s corners.
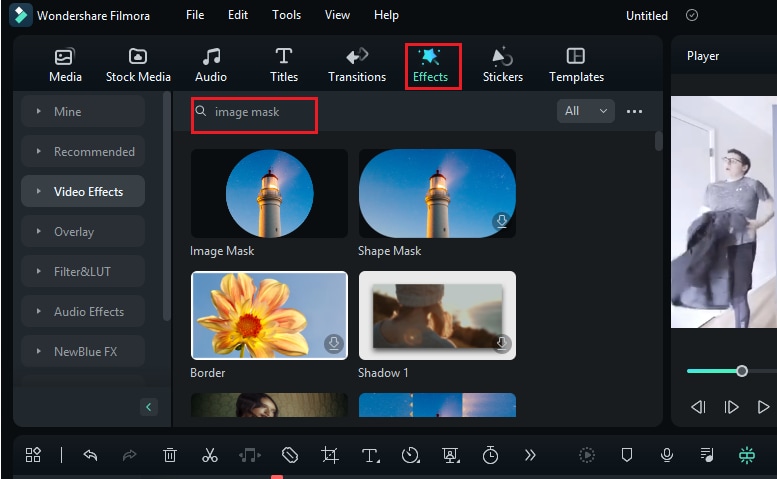
- To simultaneously show each action in the final video, go to “Effects” and click on the search tab.
- Please search “Image Mask.”
- Now drag and drop this effect to the footage shot at corners of the area.
Step4 Adjustment of the Image Mask of each Footage
- Now we will adjust the image mask of each footage so that each will show the task without any glitches.
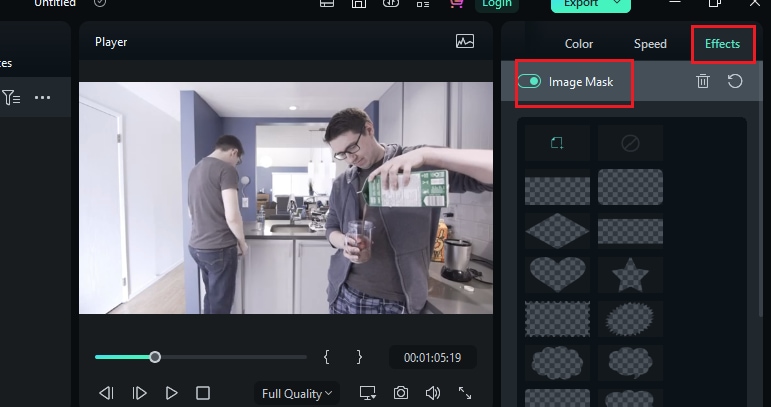
- For that purpose, double-click on the video. Next, click on “Effects” in the top right corner of the screen. Then select “Image Mask” and make the necessary adjustments so that each mask shows each footage.
Step5 Trimming the Video Clip
- You can trim the footage to create a smooth movement in each portion. In this way, all the clips gel together in a single frame.

- We have successfully gelled together three video clips in a single frame.
- But all these videos are moving forward. So let us now apply the reverse effect to a video clip.
Step6 Apply Reverse Speed to Video Clip
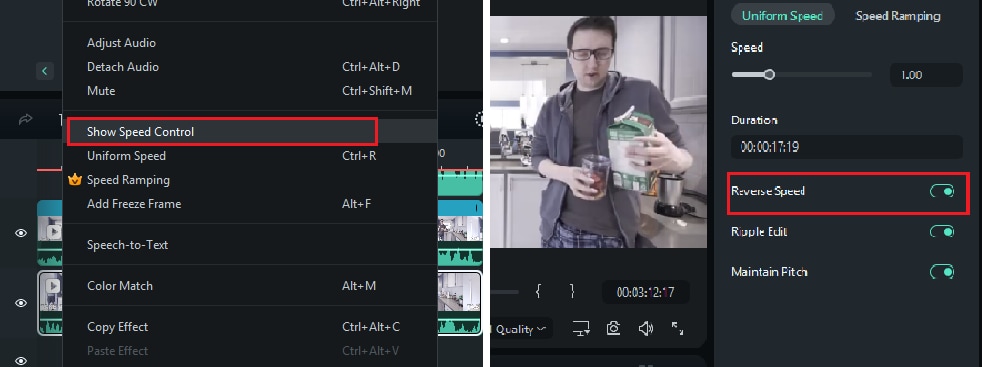
- Please right-click on the video and select “Show speed control.”
- The Control panel will open in the right corner of the screen.
- Then enable the “Reverse Speed” option. You will apply a reverse effect to that clip.
- Your video is ready now, with one clip moving in reverse and two in the forward direction.
- Take a look at the preview of your final product.
- Apply some changes to it if needed.
Step7 Export the Final Project
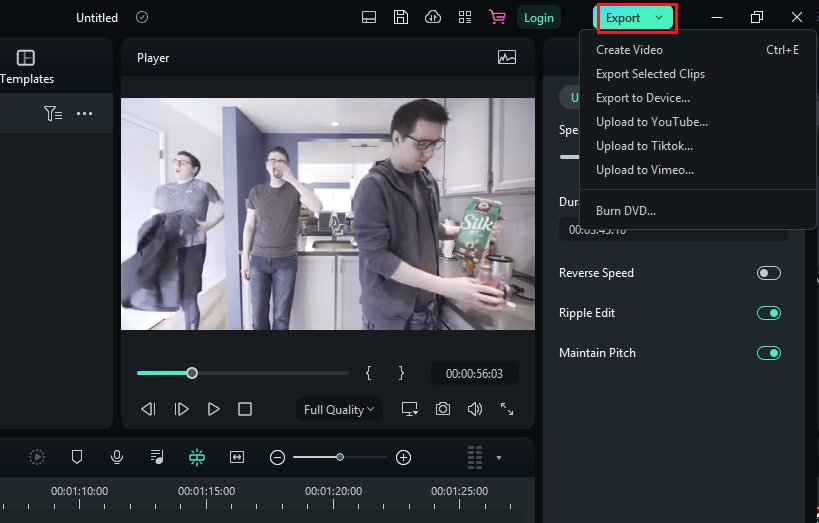
- Now it’s time to export the project to the device.
- Please select “Export” in the top right corner of the screen. And ship it to the device.
Step8 Final Video
Now have a look at the final project. How smooth and perfect it looks. That’s it!
Conclusion
The reverse video effect has a unique characteristic of its own. And it will always work when you use it in your videos. The great success of many popular films is evident by the captivating feature that this effect has got. In this article, we have discussed the prerequisites and steps of creating a reverse video effect.
If this article has helped you, please mention your experience in the comment box. Also, please share this article with your friends and colleagues. Keep creating!
Free Download For macOS 10.14 or later
Applying video reverse effects to your shots here is a wise guide. Please follow the instructions given below.
Step1 Downloading Filmora and Importing Files
- After recording your shots, you will edit them in Filmora. But first, download Filmora from the website and install it.
- After opening the software, import the recording files by clicking “Import Media.”

Step2 Drag the Shots to the Timeline
- Drag the shots to the timeline and drop it. If Filmora asks for a matching resolution on the timeline, please click “Match to Media.” It will adjust your media resolution according to the timeline.

- Add videos of each action on the layers above by drag and drop.
Step3 Adding Image Mask to the Clips
- Now you will add an image mask to the clips you shot at the area’s corners.
- To simultaneously show each action in the final video, go to “Effects” and click on the search tab.
- Please search “Image Mask.”
- Now drag and drop this effect to the footage shot at corners of the area.

Step4 Adjustment of the Image Mask of each Footage
- Now we will adjust the image mask of each footage so that each will show the task without any glitches.
- For that purpose, double-click on the video. Next, click on “Effects” in the top right corner of the screen. Then select “Image Mask” and make the necessary adjustments so that each mask shows each footage.

Step5 Trimming the Video Clip
- You can trim the footage to create a smooth movement in each portion. In this way, all the clips gel together in a single frame.

- We have successfully gelled together three video clips in a single frame.
- But all these videos are moving forward. So let us now apply the reverse effect to a video clip.
Step6 Apply Reverse Speed to Video Clip
- Please right-click on the video and select “Show speed control.”
- The Control panel will open in the right corner of the screen.
- Then enable the “Reverse Speed” option. You will apply a reverse effect to that clip.

- Your video is ready now, with one clip moving in reverse and two in the forward direction.
- Take a look at the preview of your final product.
- Apply some changes to it if needed.
Step7 Export the Final Project
- Now it’s time to export the project to the device.
- Please select “Export” in the top right corner of the screen. And ship it to the device.

Step8 Final Video
Now have a look at the final project. How smooth and perfect it looks. That’s it!

Conclusion
The reverse video effect has a unique characteristic of its own. And it will always work when you use it in your videos. The great success of many popular films is evident by the captivating feature that this effect has got. In this article, we have discussed the prerequisites and steps of creating a reverse video effect.
If this article has helped you, please mention your experience in the comment box. Also, please share this article with your friends and colleagues. Keep creating!
Also read:
- 2024 Approved Best 12 AI Video Generators to Pick
- Updated 2024 Approved In This Article, We Will Discuss How to Rotate Videos in the Lightworks Application. Below Is a Way to Rotate Videos in Lightworks Manually, Here, We Will Use the Z-Axis Rotation
- Updated General Knowledge About MP4 Format and Best MP4 Video Editor
- Updated 2024 Approved Best Voice Changers for WhatsApp Free Included
- New Creating Video Testimonials
- New In 2024, 10 Top Suggestions for AI Video Interviews
- Updated Learn How to Make Your CSGO Montage Impressive for 2024
- New 2024 Approved How to Cut Videos on Mac without Using FFmpeg?
- A Guide to Speed up a Video on Splice for 2024
- 2024 Approved Best Slow Motion Camera Apps for Best Content Creation
- Want to Buy a Drone for Better Videography Creating? This Article Will Review 6 of the Best Drones on the Market for You to Consider
- Updated In 2024, Making Slow Motion Videos in Final Cut Pro The Best Methods
- Lets Learn How to Convert a Normal Video Into a Film Shot in the 1920S with Wondershare Filmora
- Updated 2024 Approved Whats The Best Laptops For Video Editing
- Take Your Video Editing to the Next Level with Video Scopes
- How to Make Video Fade to Black in Movie Maker for 2024
- Updated Speed Up/Down Videos in VLC
- In 2024, Introduction to LUTs Their Overview and Benefits
- 2024 Approved Finding The Best LUTs for Wondershare Filmora
- Updated In 2024, Do You Want to Rotate Your TikTok Video to Stylize It More? This Article Will Provide Simple Methods of Rotating TikTok Videos to Improve the Audience Viewing Experience
- 10 Best Innovative AR Video Effects to Check Out
- Updated In 2024, Best Video Format Converter for PC and Online
- New Enhance Your Video Color Accuracy with Video Scopes
- Updated In 2024, Looking for the Tools that Can Let You Blend Images Perfectly for Creating an Awesome Collage? Shortlisted for You Are the Best Bend Collage Program for an Effortless Task
- New In 2024, Tips That Show Anybody How To Create Youtube Slideshow – Guaranteed
- Updated In 2024, Some Top Methods to Create AI Slow Motion Videos
- Updated 4 Ways to Merge MP4 and MP3
- New 2024 Approved Recording Slow-Motion Videos Is Not More Difficult Using a Smartphone. Learn Everything From How to Record Slow-Motion Video and Edit a Video to Slow Down It
- New In 2024, How to Make a Slideshow on iPhone
- Updated Best 15 Subtitle Apps for 2024
- Step by Step to Rotate Video in Google Photos for 2024
- New 2024 Approved Do You Need a Royalty-Free 5 Seconds Countdown Video for Your Video but Dont Not Where to Find One? We Will Introduce You to the Best HD and 4K Clips that You Can Always Try Anytime
- New 2024 Approved Learn How to Feather Shapes in After Effects and Add a Professional Touch to Your Designs. This Comprehensive Guide Covers Everything From the Basics to Advanced Techniques. Perfect for Beginners and Experts Alike
- Replacing the Sky in Adobe After Effects An Extensive Guide
- New How to Use Lumetri Color in After Effects
- New In 2024, 4 Methods to Resize a WebM File
- New How to Make GIF With Transparent Background for 2024
- New 2024 Approved Converting Files Is Easy with the Right Tools, and Likewise, GIF to JPG Conversion Is. Choose the Best Tool and Get the Expected Results Within the Blink of an Eye
- In 2024, A Comprehensive Review of LUTs Finding LUTs Made by Danny Gevirtz
- New In 2024, Do You Have an Idea on How to Zoom in on Snapchat? Using This Article, You Will Find the Easiest Way to Zoom in and Out on Snapchat Videos for Different Purposes
- 2024 Approved Looking for Ways to Compress Your Videos for Instagram? Keep Reading to Know About some of the Best Video Compressors for Instagram
- New Mastering OpenCV Object Tracking A Comprehensive Guide for Beginners and Experts for 2024
- Are You Stuck with How to Use Discord GIF Ideally? Check that Out in This Article, as We Will Guide You on All You Need to Know About GIFs for Discord
- Updated Figuring Out Proper Ways to Play a Video in Slow Motion on iPhone
- Modern Silence Detection Tools Are Changing the Face of Video Editing. Use Them to Improve the Quality of Your Video Clips. Learn How These Tools Let You Detect Silence with Pinpoint Accuracy
- New Want to Convert MP4 Video To 60 FPS GIF? Read This
- New In 2024, Unlock Your Video Editing Potential With Filmora From Wondershare
- Which is the Best Fake GPS Joystick App On Realme Note 50? | Dr.fone
- What You Want To Know About Two-Factor Authentication for iCloud On your Apple iPhone 7
- The way to get back lost call history from Vivo Y100i
- In 2024, How to Transfer Contacts from ZTE Nubia Flip 5G to Other Android Devices Using Bluetooth? | Dr.fone
- 6 Ways to Change Spotify Location On Your Oppo Reno 11F 5G | Dr.fone
- 4 Ways to Fix Android Blue Screen of Death On Nokia C12 | Dr.fone
- All Must-Knows to Use Fake GPS GO Location Spoofer On Apple iPhone SE (2022) | Dr.fone
- In 2024, 7 Ways to Lock Apps on iPhone 6 Plus and iPad Securely
- Pattern Locks Are Unsafe Secure Your Xiaomi Redmi Note 12T Pro Phone Now with These Tips
- The way to get back lost data from Gionee F3 Pro
- Getting the Pokemon Go GPS Signal Not Found 11 Error in Tecno Spark 20C | Dr.fone
- How to Fake GPS on Android without Mock Location For your Poco C51 | Dr.fone
- Detailed Review of doctorSIM Unlock Service For iPhone 15 Pro | Dr.fone
- In 2024, How to Transfer Contacts from Realme 11 Pro+ to iPhone XS/11 | Dr.fone
- In 2024, How can I get more stardust in pokemon go On Honor Magic5 Ultimate? | Dr.fone
- Which Pokémon can Evolve with a Moon Stone For Oppo K11 5G? | Dr.fone
- How to Fix Android App Not Installed Error on Xiaomi Redmi Note 12 5G Quickly? | Dr.fone
- 6 Ways to Change Spotify Location On Your Lava Blaze 2 | Dr.fone
- How to Reset your Xiaomi Redmi Note 13 Pro+ 5G Lock Screen Password
- In 2024, Unlock Your Samsung Galaxy A54 5Gs Potential The Top 20 Lock Screen Apps You Need to Try
- 4 Easy Ways for Your Realme C67 5G Hard Reset | Dr.fone
- A Detailed Guide on Faking Your Location in Mozilla Firefox On Itel P40 | Dr.fone
- Why Your WhatsApp Location is Not Updating and How to Fix On Apple iPhone 14 | Dr.fone
- In 2024, Top 10 Password Cracking Tools For Samsung
- In 2024, Hassle-Free Ways to Remove FRP Lock from Motorola Edge 40 Pro Phones with/without a PC
- In 2024, How to Lock Apps on Vivo V29 to Protect Your Individual Information
- A Quick Guide to Google Pixel 8 FRP Bypass Instantly
- Can Life360 Track Or See Text Messages? What Can You Do with Life360 On Samsung Galaxy A15 5G? | Dr.fone
- What To Do if Your Nokia C22 Auto Does Not Work | Dr.fone
- In 2024, The Most Useful Tips for Pokemon Go Ultra League On Honor X50i+ | Dr.fone
- How Do You Remove Restricted Mode on iPhone 15 Pro Max | Dr.fone
- In 2024, Top 6 Apps/Services to Trace Any Realme C67 4G Location By Mobile Number | Dr.fone
- In 2024, How To Remove Screen Lock PIN On Infinix Smart 8 Like A Pro 5 Easy Ways
- Updated In 2024, Easy Shortcut to Convert Videos to Gifs on iPhone
- Super Easy Ways To Deal with Vivo G2 Unresponsive Screen | Dr.fone
- How to Unlock Infinix Smart 8 Phone without Any Data Loss
- In 2024, Detailed guide of ispoofer for pogo installation On Honor Magic V2 | Dr.fone
- How To Do ZTE Axon 40 Lite Screen Sharing | Dr.fone
- Detailed Review of doctorSIM Unlock Service For iPhone 11 Pro | Dr.fone
- How to Fix when Apple Account Locked From Apple iPhone 8?
- Can you play MP4 on Xiaomi ?
- New How to Make Animated Explainer Videos
- 11 Proven Solutions to Fix Google Play Store Not Working Issue on Honor Play 7T | Dr.fone
- Fixing Persistent Pandora Crashes on Xiaomi Redmi Note 13 5G | Dr.fone
- Prevent Cross-Site Tracking on Nokia C02 and Browser | Dr.fone
- Title: New Fun & Easy Masking Tricks Wondershare Filmora Tutorial
- Author: Morgan
- Created at : 2024-05-19 05:11:59
- Updated at : 2024-05-20 05:11:59
- Link: https://ai-video-editing.techidaily.com/new-fun-and-easy-masking-tricks-wondershare-filmora-tutorial/
- License: This work is licensed under CC BY-NC-SA 4.0.


