
:max_bytes(150000):strip_icc():format(webp)/handstypingonkeyboardCROPPED-6b13200ac0d24ef58817343cc4975ebd.jpg)
New In 2024, Five Thoughts on Discord Create Accounts How-To Questions
Five Thoughts on Discord Create Account’s How-To Questions
Five Thoughts on Discord Create Account
An easy yet powerful editor
Numerous effects to choose from
Detailed tutorials provided by the official channel
Discord was a great alternative to voice chat systems such as TeamSpeak, Mumble, and Ventrilo for online gamers. Gamers make discord accounts for these services to play together rather than the voice communication facilities integrated into games, which are frequently of poor quality and lack functionality.
Founded in 2015, discord allowed individuals to talk while playing PC games seamlessly. Users may utilize the service to establish servers that can include many text and audio channels. A typical discord account server may feature chat rooms dedicated to specific themes (such as “gaming” and “anime x manga”), as well as voice channels devoted to specific games or activities. The service’s high-quality, low-latency audio chat is a popular tool for Twitch broadcasters and podcasters. It has also expanded to accommodate massive video conversations to compete with Zoom.
In this article
01 [How Does Discord Work and What is it Used for?](#Part 1)
02 [How to Make a Discord Signup in the Browser?](#Part 2)
03 [How to Make a Discord Signup with Desktop?](#Part 3)
04 [How to Make a Signup Discord with App?](#Part 4)
05 [Discord Create Account FAQs](#Part 5)
Part 1 How Does Discord Work and What is it Used for?
Discord account allows friends to communicate with one another one-on-one or in groups via a server. You may use it to send direct messages to pals, as well as video calls, audio chat, and screen sharing. Once on a server, you can join a voice chat channel to communicate with other gamers who are playing certain games.
You can share many things on discord, including media files like images, gifs, audio, and videos. Speaking of videos, video editing doesn’t get any better than Filmora. Wondershare Filmora Video Editor is a sophisticated editing application for Windows and Mac users. It was initially known as Wondershare Video Editor, but following its fifth release, it got renamed Filmora. The video editor’s primary features include animation, overlays, audio control, on-screen recording, and multi-editing modes. The video editor is well-known for its feature-rich but the simple interface, making it suited for both novice and experienced users.
For Win 7 or later (64-bit)
For macOS 10.12 or later
Filmora’s standout features
● Editing Audio Equalizer 4K Resolution Support
● Support for GIFs
● Screen Dividers
● Controls For Video And Audio
● Multiple Video Clips Can Be Layered
● Stabilization of Video
● Presets for Color Grading
● Text Editing Expertise
● Tilt-Shift
● The mosaic (Blurring)
● Noise Elimination
● Importance in Social Life
● Preview of Each Frame
● Controlling the Speed
● Audio-Mixer
● Backgrounds in Chroma Key
● Screen Capture
● Separation of audio
● Scene Recognition
You can make your discord account and use it on almost any platform, including discord desktop software for Windows and Mac and iOS and Android apps for talking and calling on the move. If you prefer not to download anything, it also works in a web browser. You can link your discord account app to various popular services, such as Twitch and Spotify, so your friends can see your actions. While there is no discord Xbox app, you may link your discord and Xbox accounts so that others can see what you’re up to on your Xbox Series X or Xbox Series S.
Part 2 How to Make a Discord Signup in the Browser
Don’t have the discord account?
You can quickly sign up using your preferred web browser, i.e., Chrome, Microsoft Edge, Firefox, or Safari.
Follow the steps below to make a discord account using your web browser:
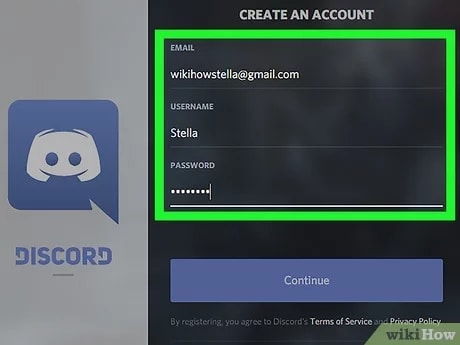
Step 1: Go to <www.discord.com> and click the “Login” button in the upper right corner.
Step 2: To establish a new discord account, click “Register” underneath the login page.
Step 3:
● Enter your email, a username, and a strong password.
● Date of birth.
● Accept the terms of service.
After entering the above, click the “Continue” button.
Step 4: Check the box besides “I am human” to enable the captcha.
Step 5: You will receive an email asking you to confirm your information. Select the “Verify email” option.
Once you’ve signed up for discord, you may access it via the Discord website or the mobile app. The program is free to download for Windows, Linux, Mac, Android, and iOS.
Follow the steps above to sign up on discord account successfully. Easy right? Let’s proceed!
Part 3 How to Make a Discord Signup with Desktop?
The discord creating account on your desktop is pretty much the same as using your browser.
Follow the steps below to make a discord account using your desktop.
Step 1: Click “Login” on the Discord website (top right).
Step 2: Underneath the sign-in box, click “Register.”
Step 3: Enter the email address, username, password, and birth date.
Step 4: Agree to the terms of service and then click “Continue.”
Step 5: Use the captcha to prove that you are not a robot.
Step 6: You will get an email to confirm your data; click on the link in the email to confirm.
See that? No big deal, right?
Part 4 How to Make a Signup Discord with App
Signing up for a discord account through the app is relatively easy, like the procedures above, you will not break a sweat.
Follow the easy steps below for discord create account on your smartphone device:

Step 1: Install and launch the Discord app on your smartphone
Step 2: Select the Register option.
Step 3: Choose whether to register by cellphone number or email address and input either one.
Step 4: You will get a message with a confirmation code or an email with a link.
Step 5: Enter the code or navigate to the URL.
Step 6: Enter your username and password here.
Step 7: Enter your birth date.
Step 8: Accept the terms of the agreement.
Step 9: Click “Next” to finish the Discord registration.
What Happens When You Disable your Discord Account?
When you deactivate your account, it goes to suspension mode. You may reactivate it by signing in and following the on-screen instructions. Keep in mind that discord accounts dormant for two years are removed, so if you want to keep yours, you must reactivate it (but you can disable it after this if you like).
After you deactivate an account, users will no longer get discord alerts. Users may, however, still receive friend requests, and any friend requests users get while their account is blocked will be ready for when they reactivate it. However, when a user decides to delete their account, the said account will get permanently deleted.
Tip: If you want to stay away from your discord account for a while with a plan to return to it later, it is advisable to log out or deactivate rather than delete it.
Part 5 Discord Create Account FAQs
Q. Is discord free, or do I have to pay?
A. Yes and no. The premium edition of discord is not free. If you don’t want to utilize the premium features, you may still download and make a discord account for free.
Q. Is there anything I cannot do on discord?
A. Do not organize, promote, or participate in any unlawful or possibly dangerous activities, such as sexual solicitation, human trafficking, or selling or enabling the sale of forbidden or potentially harmful products (firearms, ammunition, drugs, and controlled substances).
Q. Do messages disappear on discord?
A. Your messages are only destroyed: 1. if they are deleted individually (by you or a user with proper rights), 2. if you get banned, and the person banning you decides to delete all of your messages at once.
Q. Does discord account keep a record of interactions?
A. Yes, discord will track every discussion you have on discord acount, record everything you say on discord, and examine all photographs you transmit over discord.
Q. How will I know when someone blocks me on discord?
A. When you block someone, their online status on discord account changes to “offline” until unblocked and vice versa. They will also show offline in mutual servers or your chat history.
Q. How do I permanently delete my discord account?
A. To delete your discord created account for good, head to user settings, then tap on ‘my account.’ From there, tap on ‘Account Removal’ then tap on ‘Delete Account.’
If you are a server owner, you will have to delete the server or pass ownership of the server.
Q. How do I find servers to join on discord?
A. If you have a buddy who has a discord server you’d want to join, request an invite. If you’re a member of a discord community, ask for an invite or check on the community website.
By tapping the magnifying glass in the left window of the discord account app, you may also search for public servers that anybody can join.
● Ending Thoughts →
● Discord is a web program that works in most browsers. A desktop version is available for Windows, macOS, Linux, iOS, and Android. Discord’s desktop and browser versions are functionally and visually identical in practically every regard if you want to make a discord account. So, re-read the article and the FAQs on discord create account, and start your journey.
● Finally, for the creatives, boost your discord create account and usage experience by using Filmora to edit videos and make cool animations.
Discord was a great alternative to voice chat systems such as TeamSpeak, Mumble, and Ventrilo for online gamers. Gamers make discord accounts for these services to play together rather than the voice communication facilities integrated into games, which are frequently of poor quality and lack functionality.
Founded in 2015, discord allowed individuals to talk while playing PC games seamlessly. Users may utilize the service to establish servers that can include many text and audio channels. A typical discord account server may feature chat rooms dedicated to specific themes (such as “gaming” and “anime x manga”), as well as voice channels devoted to specific games or activities. The service’s high-quality, low-latency audio chat is a popular tool for Twitch broadcasters and podcasters. It has also expanded to accommodate massive video conversations to compete with Zoom.
In this article
01 [How Does Discord Work and What is it Used for?](#Part 1)
02 [How to Make a Discord Signup in the Browser?](#Part 2)
03 [How to Make a Discord Signup with Desktop?](#Part 3)
04 [How to Make a Signup Discord with App?](#Part 4)
05 [Discord Create Account FAQs](#Part 5)
Part 1 How Does Discord Work and What is it Used for?
Discord account allows friends to communicate with one another one-on-one or in groups via a server. You may use it to send direct messages to pals, as well as video calls, audio chat, and screen sharing. Once on a server, you can join a voice chat channel to communicate with other gamers who are playing certain games.
You can share many things on discord, including media files like images, gifs, audio, and videos. Speaking of videos, video editing doesn’t get any better than Filmora. Wondershare Filmora Video Editor is a sophisticated editing application for Windows and Mac users. It was initially known as Wondershare Video Editor, but following its fifth release, it got renamed Filmora. The video editor’s primary features include animation, overlays, audio control, on-screen recording, and multi-editing modes. The video editor is well-known for its feature-rich but the simple interface, making it suited for both novice and experienced users.
For Win 7 or later (64-bit)
For macOS 10.12 or later
Filmora’s standout features
● Editing Audio Equalizer 4K Resolution Support
● Support for GIFs
● Screen Dividers
● Controls For Video And Audio
● Multiple Video Clips Can Be Layered
● Stabilization of Video
● Presets for Color Grading
● Text Editing Expertise
● Tilt-Shift
● The mosaic (Blurring)
● Noise Elimination
● Importance in Social Life
● Preview of Each Frame
● Controlling the Speed
● Audio-Mixer
● Backgrounds in Chroma Key
● Screen Capture
● Separation of audio
● Scene Recognition
You can make your discord account and use it on almost any platform, including discord desktop software for Windows and Mac and iOS and Android apps for talking and calling on the move. If you prefer not to download anything, it also works in a web browser. You can link your discord account app to various popular services, such as Twitch and Spotify, so your friends can see your actions. While there is no discord Xbox app, you may link your discord and Xbox accounts so that others can see what you’re up to on your Xbox Series X or Xbox Series S.
Part 2 How to Make a Discord Signup in the Browser
Don’t have the discord account?
You can quickly sign up using your preferred web browser, i.e., Chrome, Microsoft Edge, Firefox, or Safari.
Follow the steps below to make a discord account using your web browser:
Step 1: Go to <www.discord.com> and click the “Login” button in the upper right corner.
Step 2: To establish a new discord account, click “Register” underneath the login page.
Step 3:
● Enter your email, a username, and a strong password.
● Date of birth.
● Accept the terms of service.
After entering the above, click the “Continue” button.
Step 4: Check the box besides “I am human” to enable the captcha.
Step 5: You will receive an email asking you to confirm your information. Select the “Verify email” option.
Once you’ve signed up for discord, you may access it via the Discord website or the mobile app. The program is free to download for Windows, Linux, Mac, Android, and iOS.
Follow the steps above to sign up on discord account successfully. Easy right? Let’s proceed!
Part 3 How to Make a Discord Signup with Desktop?
The discord creating account on your desktop is pretty much the same as using your browser.
Follow the steps below to make a discord account using your desktop.
Step 1: Click “Login” on the Discord website (top right).
Step 2: Underneath the sign-in box, click “Register.”
Step 3: Enter the email address, username, password, and birth date.
Step 4: Agree to the terms of service and then click “Continue.”
Step 5: Use the captcha to prove that you are not a robot.
Step 6: You will get an email to confirm your data; click on the link in the email to confirm.
See that? No big deal, right?
Part 4 How to Make a Signup Discord with App
Signing up for a discord account through the app is relatively easy, like the procedures above, you will not break a sweat.
Follow the easy steps below for discord create account on your smartphone device:
Step 1: Install and launch the Discord app on your smartphone
Step 2: Select the Register option.
Step 3: Choose whether to register by cellphone number or email address and input either one.
Step 4: You will get a message with a confirmation code or an email with a link.
Step 5: Enter the code or navigate to the URL.
Step 6: Enter your username and password here.
Step 7: Enter your birth date.
Step 8: Accept the terms of the agreement.
Step 9: Click “Next” to finish the Discord registration.
What Happens When You Disable your Discord Account?
When you deactivate your account, it goes to suspension mode. You may reactivate it by signing in and following the on-screen instructions. Keep in mind that discord accounts dormant for two years are removed, so if you want to keep yours, you must reactivate it (but you can disable it after this if you like).
After you deactivate an account, users will no longer get discord alerts. Users may, however, still receive friend requests, and any friend requests users get while their account is blocked will be ready for when they reactivate it. However, when a user decides to delete their account, the said account will get permanently deleted.
Tip: If you want to stay away from your discord account for a while with a plan to return to it later, it is advisable to log out or deactivate rather than delete it.
Part 5 Discord Create Account FAQs
Q. Is discord free, or do I have to pay?
A. Yes and no. The premium edition of discord is not free. If you don’t want to utilize the premium features, you may still download and make a discord account for free.
Q. Is there anything I cannot do on discord?
A. Do not organize, promote, or participate in any unlawful or possibly dangerous activities, such as sexual solicitation, human trafficking, or selling or enabling the sale of forbidden or potentially harmful products (firearms, ammunition, drugs, and controlled substances).
Q. Do messages disappear on discord?
A. Your messages are only destroyed: 1. if they are deleted individually (by you or a user with proper rights), 2. if you get banned, and the person banning you decides to delete all of your messages at once.
Q. Does discord account keep a record of interactions?
A. Yes, discord will track every discussion you have on discord acount, record everything you say on discord, and examine all photographs you transmit over discord.
Q. How will I know when someone blocks me on discord?
A. When you block someone, their online status on discord account changes to “offline” until unblocked and vice versa. They will also show offline in mutual servers or your chat history.
Q. How do I permanently delete my discord account?
A. To delete your discord created account for good, head to user settings, then tap on ‘my account.’ From there, tap on ‘Account Removal’ then tap on ‘Delete Account.’
If you are a server owner, you will have to delete the server or pass ownership of the server.
Q. How do I find servers to join on discord?
A. If you have a buddy who has a discord server you’d want to join, request an invite. If you’re a member of a discord community, ask for an invite or check on the community website.
By tapping the magnifying glass in the left window of the discord account app, you may also search for public servers that anybody can join.
● Ending Thoughts →
● Discord is a web program that works in most browsers. A desktop version is available for Windows, macOS, Linux, iOS, and Android. Discord’s desktop and browser versions are functionally and visually identical in practically every regard if you want to make a discord account. So, re-read the article and the FAQs on discord create account, and start your journey.
● Finally, for the creatives, boost your discord create account and usage experience by using Filmora to edit videos and make cool animations.
Best 10 iPad Slideshow Apps to Create a Slideshow
Top 10 iPad Slideshow Apps to Create a Slideshow
An easy yet powerful editor
Numerous effects to choose from
Detailed tutorials provided by the official channel
Creating slideshow presentations on iPads can be a real excitement and fun with the correct slideshow creator program. Keep reading to learn about the most feasible software choices!
In this article
01 [Common Solutions of Making Slideshow for iPad](#Part 1)
02 [Best 10 iPad Slideshow Apps to Create a Slideshow](#Part 2)
03 [5 Hot FAQs About Creating Slideshow](#Part 3)
Part 1 Common Solutions of Making Slideshow for iPad
Slideshows are an expressive and immersive media of delivering important information in a captivating manner. After all, who does not appreciate a catchy presentation of otherwise customary facts and figures? While there are tons of alternatives and utilities to create and share slideshow presentations on almost any platform, let us pay a special attention towards designing amazing slideshows on an iPad in the following section:
User’s Guide to Create Slideshow Presentations on an iPad
Step 1: Launch the Photos Application
Start with navigating to your iPad’s app gallery and tap on the ‘Photos’ icon frame to launch the application in your device.
Step 2: Creating Automatic Slideshows from Local Images
● Random Selection
In the app’s opening screen, navigate to and hit the left sidebar to access the different commands and media locations of the app. From the list that appears, click on the ‘Library’ tab. Once within the application’s image library, you can browse through and select the desired images according to a particular day, month and year. All the images can also be selected altogether.

● Using the Memory Album
If you wish to make a slideshow of the still memories of your recent vacation, or a cherished family event, you need to head to the left sidebar and click on the ‘For You’ tab. A gallery of a set of images related to a specific date will open up, and you can select the photos that are required to be included in the slideshow by tapping on their respective thumbnails.
You can even watch a slideshow at this very stage within the aforesaid ‘Memories’ image gallery. You just need to hit the ‘Play’ button at the bottom right corner of a specific memory thumbnail.

Slideshow presentations can additionally be created from other albums like, People & Places, in a similar manner. You can further watch slideshows within a variety of media types, like, selfies, panoramas, videos and portraits. All you need to do is, head to the left sidebar and click on ‘Media Types’ within the list of available image categories.

Next, you can pick any of the subcategories, followed by tapping on the ‘Ellipsis’ icon at the top right corner of the app screen. Choose the ‘Slideshow’ option from the dropdown menu that follows and the automatically created slideshow presentation will start playing.

● Select Some Images of Your Own
Before proceeding to choose your own list of images, it is a smart step to save them in an album. In the left sidebar, navigate to and hit the ‘All Albums’ tab. Now head to and tap the ‘+’ icon at the top ribbon on the app screen, followed by choosing the ‘New Album’ option from the menu that drops down.

Assign a name to the created album and proceed to select images while browsing through the app gallery. Tap an image to add it to the album and click on ‘Done’ when you have made your selections. To run your automatic slideshow, navigate to the newly created album in the left sidebar and open it.

Now hit the ‘Ellipses’ icon at the top; right corner of the app screen and select the ‘Slideshow’ option from the list that appears next.

Step 3: Editing the Presentation
To add customizations to a running slideshow, you will need to pause it and tap the ‘Options’ button at the bottom right corner of the app screen. In the dropdown that follows, you can change the theme and background music of the slideshow by selecting respectively, the ‘Theme’ and ‘Music’ options. You can also set a transition effect and adjust the play duration of the presentation.
D

To increase the duration of your slideshow, drag the slider to the left or move the same to the left to decrease the play duration. You can enable the ‘Repeat’ option to watch the slideshow in a loop.

Step 4: Time to Play!
When you are done with making all the effort, click on the ‘Start Slideshow’ button to run the presentation in your iPad.

Part 2 Best 10 iPad Slideshow Apps to Create a Slideshow
iPad compatible software programs to design professional quality slideshows are among the commonest requirements of the graphic design fraternity in today’s times. Having learnt about the fundamental solutions to create awesome slideshow presentations on iPad, let us move ahead to talk about the most preferred and top rated software applications for making an iPad slide show in the following section:
01PicPlayPost
Standing ahead in the list is the aforesaid slideshow creator application that lets you create intuitive, professionally sound iPad slideshow presentations with utmost ease. Working with the program, you can experiment with creating graphic masterpieces by sticking together images, videos, GIFs and audio elements. The software’s high end and easy to use editing features make the latter a convenient slideshow creator alternative even for the newbies of the design world.
The software facilitates an easy and quick clutching of images and video clips and create amazing slideshows with an appreciable output resolution. You can add up to 9 media files and customize the same with a range of filters, effects and features. The music compilation is however, limited and the software leaves a customizable watermark on the slides. The program is available for a free usage in its basic version and greets you with a welcoming interface.

02SlideLab
If you are explicitly concerned about creating image centered slideshow presentations on your iPad, SlideLab can certainly be your go to application. It is hardly a matter of a few minutes with a counted number of clicks for the software program to deliver top quality photo slideshows. No doubt, the aforesaid graphic designer program is an absolute favorite of creative experts around the world.
Talking of the feature rich editor library of the program, you can play with graphic skills to your heart’s content and edit the slideshow media in cohesion with your diverse creation needs. You can customize the images and add background music to the slides, both from your iPad and the SlideLab audio library.
The program further allows you to retain the original aspect ratio of the images and video clips, along with the flexibility to directly share your creation across a variety of media sharing platforms, such as, Instagram, Vine, etc. There are thousands of filters and transitions in the editor library, which you can select from to imbibe your presentations with.
However, if you prefer an Instagram or Facebook export of your slideshow with SlideLab, you will be devoid of importing audio files from your iTunes storage account.

03Photo Slideshow Director
Moving ahead with the list, you have the aforesaid slideshow iPad program, which is conveniently regarded as the most affordable graphic editor package for creating photo slideshow presentations in almost all iOS devices by users across the globe. Not only can you play with a diversity of editing features and effects, but also save and share your presentations as HD movies across all popular media sharing platforms with the software.
The program further assists you in the slideshow creation process through its interactive interface that guides you at every step via intuitive, on screen design instructions. Another appeals of the software include, a full HD display, HD format file export and the flexibility to create and share music videos. The user reviews of the app however, talk of frequent software glitches and variations in the operational speed in relation to the iPad memory space.

04PicFlow
PicFlow is known to exhibit a mix of slideshow features that you may normally get in a series of creator alternatives, but there are a few additional characteristics as well, which make the aforesaid program stand ahead of other graphic creator applications in the line. Working with the software, you are permitted to fix the screen time of your presentation media, while complimenting the same with a subtle audio track of your choice.
The program further allows you to import audio fil.es from your iPod, while promoting the easiest image editing process through positional photo dragging, swipe and pinch tools for image cropping, recording the image screen play, a decent transition library with more than 18 unique transition styles, local device export to the ‘Camera Roll’ folder.
The application a quick slideshow sharing mechanism to upload your artwork on popular social media platforms, like, Instagram and Facebook. The software however, encompasses a restricted number of creation features and editing utilities in its no cost version, and can generate slideshows with a video codec of only 30 frames per second.

05iMovie
This one is undeniably the best slideshow creator alternative you can ever get to make professionally sound iPad photo slideshow presentations. The app has an extensive global fan base on account of the trendy graphic editing features that it seeks to offer. Within the domain of image presentations, you can play with tons of customization choices to transform your otherwise customary slideshows into graphic masterpieces.
Using the application, you can work to add a different background audio to every image, experiment with including a variety of audio-visual effects, titles and transitions, apply movie centered themes and play the slides in line with the perfect music tune.
The program however, has a limited scope of flexibility within its utilities that are mostly rigid in terms of parametric changes, is an iOS and Mac exclusive software and requires a comprehensive understanding of the workflow to begin with the slideshow creation process.

06PIXGRAM- Music Photo Slideshow
PIXGRAM is affordably the most loved slideshow maker program by amateurs in the graphic design realm. You can safely rely on the software to create good quality image and video presentations, even without any creative design experience at all. The application permits you to add your most cherished images and music to the presentation slides and customize them with video filters, audio-visual effects and transitions.
You are further granted the liberty to save your creation locally to the iPad in probably any file size and export them across various social media handles, like, Twitter, Facebook, etc. The software interface is specifically designed in line with the creation abilities of novel users.
While the application lacks advanced features to address the needs of experienced creators, you are additionally left with selecting from the local music tracks on your device, since the program does not support a premade audio library.

07Movavi Clips
Moving ahead with the list, the aforesaid slideshow maker program is an affordable pick to create high end, image centered, iPad photos slideshow presentations. The design process is simple enough, with you just having to work on importing media files from your device, include suitable transition effects to ensure a smooth presentation flow and pick cohesive background music.
You can further choose to overlay the added music in the software’s audio mixer and make volume adjustments. The app is also supportive of direct media share on platforms like, YouTube, Facebook, Instagram stories, etc. The program however, leaves a watermark in its free version, which can be resolved by upgrading to the premium one.
While experienced users may find a miss out of some utilities, the app is otherwise, easy to use, has no cost updates, latest sticker packs, high end technical utilities and does not support ads.

08Animoto Slideshow Creator
If you want to transform the cherished images of your most celebrated events into a quick and classic slideshow movie, you can choose to work with this program. Working with the app, you are allowed to access a vast and licensed library of background audio and over 100 distinguished slideshow themes and styles. There is additionally, a decent range of text customization effects, which you can use to spark up your presentations with elusive and catchy titles, captions, etc.
The software further, houses a diversity of advanced editing features that are greatly preferred by experienced graphic editors; and facilitates a high quality slideshow output, that can be downloaded in HD format. The program is however, not available free of cost and has an expensive purchase license.
Animoto Slideshow Creator Official Download Link: https://animoto.com/

09EverChanging
Creating a slideshow on iPad was never so easy as with the EverChanging slideshow builder program. To begin with, the software comes with the most responsive and clean working interface, allowing users to continently navigate through and access the various software features, elements and utilities.
Talking of the creation process, the application lets you quickly deign awesome presentation with good quality image effects, elaborative themes and subtle background music. You can also adjust the screen time of individual slides and include animated transitions to seamlessly fade images in and out for a smooth presentation flow. While the design time is hardly a few minutes, but the editing features though classy, are limited in number.

10Slide Maker
Last in the list, comes the Slide Maker application, which you can rely on to create professional and personal slideshow presentations in premium quality. The software houses an inbuilt image editor program that you can use exclusively for adding life to your ordinary photos before making them a part of your slideshow. You can try hands at rotating, cropping, and zooming the photos, along with customizing them with expressive filters.
Drop your background music concerns if you have any, because the aforesaid program is a storehouse of royalty free audio tracks that suit almost any and every presentation theme. If that’s not enough, you are free to select a track from the ones on your device or an online storage account. The software additionally works to fine tune the aspect ratio and output quality of the slideshow for a convenient export to social media handles.
The app’s free version is however, restricted to a selection of 10 media files for each presentation, but you can always upgrade to the paid subscription of the program to overcome the same. Also, the working interface of the software may be a bit tricky to understand and use.

Part 3 Hot FAQs About Creating Slideshow
Aiming to create slideshow on iPad is both, fun and exciting, along with catering to the diverse range of information delivery concerns. However, this creative aspect of the graphic design domain is often stacked with a variety of development queries. Focusing on the same, let us try hands at sorting some of the commonest ones in the following section:
01What should you keep in mind before starting the creation?
Before you actually start working on designing the presentation, take time to set a clear objective of your presentation. Decide on the significant elements of the slideshow in line with the main theme, while ensuring that they appear in a sequential flow, lest your slideshow will look like a bundle of stuffed elements.
02What is the right proportion of text based contents?
Including text annotations in your presentation is an elusive way of drawing the viewers’ attention towards precise information. However, you should take care of the aspects like, text size, font, color, orientation, etc., to make sure that the added text enhances the credibility of the slideshow and does not indicate unnecessary inclusion.
03What is the feasible number of slides?
The slide count of your presentation largely depends on the type of information you are aiming to deliver. Make sure that all the included slides have a relevant content and you are not missing out on any specific element of the presentation objective.
04What are the constraints of image selection?
Pay considerable attention to the resolution and quality of the images when adding the same to your presentation, Avoid working with blurry and vague stills, along with keeping the professional aspect of your slideshow in mind, lest you end up putting a hoard of uncanny clips.
05What are the prerequisites of adding audio and video elements?
If you need to supplement the presentation with audio tracks and video footage, take the first step to save them locally or on a USB device to escape the glitches of long buffering and playback issues. Secondly, quality is the thing that matters the most and you should be sure of a high resolution audio-visual inclusion to avoid viewer distraction.
Creating High End Slideshow Presentations in Wondershare Filmora
When aiming to create a slideshow presentation in your iPad, the in-built ‘Photos’ app within the device is a feasible option. However, if you are keen on picking an alternative, choosing the Wondershare Filmora Video Editor graphic editor package would not be a regret. Speaking in the light of slideshow creation processes and utilities, the software has a lot of appeals to attract its users.
For Win 7 or later (64-bit)
For macOS 10.12 or later
Slideshow Centered Features of Wondershare Filmora
● Working with the aforesaid graphic and audio editor software, you are rescued from the notch of sticking to a particular file format to import and use your media. The program works well with all popular image, video and music file formats to ensure a convenient media import and usage.
● You are allowed to pan, zoom and crop the slideshow portions, both, manually and automatically for an enhanced and clear presentation view.
● The program’s inbuilt library lets you explore and play with an enormous range of effects, transitions, audio-visual elements and filters, preset background themes and music templates to spark up your slideshow presentations.
● You can also work with recording your own voiceover and device screen, while customizing the same with a plethora of cohesive editing features and effects.
● Ending Thoughts →
● The process to create slide show on iPad is quite an easy and interesting task when working with the device’s inbuilt ‘Photos’ application.
● Surfing through the software market, you can pick from a diversity of slideshow creator programs that have extensive compatibility with iPad.
● If you are pondering over the best choice from the available software solutions, the Wondershare Filmora slideshow creator program is an affordable selection.
Creating slideshow presentations on iPads can be a real excitement and fun with the correct slideshow creator program. Keep reading to learn about the most feasible software choices!
In this article
01 [Common Solutions of Making Slideshow for iPad](#Part 1)
02 [Best 10 iPad Slideshow Apps to Create a Slideshow](#Part 2)
03 [5 Hot FAQs About Creating Slideshow](#Part 3)
Part 1 Common Solutions of Making Slideshow for iPad
Slideshows are an expressive and immersive media of delivering important information in a captivating manner. After all, who does not appreciate a catchy presentation of otherwise customary facts and figures? While there are tons of alternatives and utilities to create and share slideshow presentations on almost any platform, let us pay a special attention towards designing amazing slideshows on an iPad in the following section:
User’s Guide to Create Slideshow Presentations on an iPad
Step 1: Launch the Photos Application
Start with navigating to your iPad’s app gallery and tap on the ‘Photos’ icon frame to launch the application in your device.
Step 2: Creating Automatic Slideshows from Local Images
● Random Selection
In the app’s opening screen, navigate to and hit the left sidebar to access the different commands and media locations of the app. From the list that appears, click on the ‘Library’ tab. Once within the application’s image library, you can browse through and select the desired images according to a particular day, month and year. All the images can also be selected altogether.
● Using the Memory Album
If you wish to make a slideshow of the still memories of your recent vacation, or a cherished family event, you need to head to the left sidebar and click on the ‘For You’ tab. A gallery of a set of images related to a specific date will open up, and you can select the photos that are required to be included in the slideshow by tapping on their respective thumbnails.
You can even watch a slideshow at this very stage within the aforesaid ‘Memories’ image gallery. You just need to hit the ‘Play’ button at the bottom right corner of a specific memory thumbnail.
Slideshow presentations can additionally be created from other albums like, People & Places, in a similar manner. You can further watch slideshows within a variety of media types, like, selfies, panoramas, videos and portraits. All you need to do is, head to the left sidebar and click on ‘Media Types’ within the list of available image categories.
Next, you can pick any of the subcategories, followed by tapping on the ‘Ellipsis’ icon at the top right corner of the app screen. Choose the ‘Slideshow’ option from the dropdown menu that follows and the automatically created slideshow presentation will start playing.
● Select Some Images of Your Own
Before proceeding to choose your own list of images, it is a smart step to save them in an album. In the left sidebar, navigate to and hit the ‘All Albums’ tab. Now head to and tap the ‘+’ icon at the top ribbon on the app screen, followed by choosing the ‘New Album’ option from the menu that drops down.
Assign a name to the created album and proceed to select images while browsing through the app gallery. Tap an image to add it to the album and click on ‘Done’ when you have made your selections. To run your automatic slideshow, navigate to the newly created album in the left sidebar and open it.
Now hit the ‘Ellipses’ icon at the top; right corner of the app screen and select the ‘Slideshow’ option from the list that appears next.
Step 3: Editing the Presentation
To add customizations to a running slideshow, you will need to pause it and tap the ‘Options’ button at the bottom right corner of the app screen. In the dropdown that follows, you can change the theme and background music of the slideshow by selecting respectively, the ‘Theme’ and ‘Music’ options. You can also set a transition effect and adjust the play duration of the presentation.
D
To increase the duration of your slideshow, drag the slider to the left or move the same to the left to decrease the play duration. You can enable the ‘Repeat’ option to watch the slideshow in a loop.
Step 4: Time to Play!
When you are done with making all the effort, click on the ‘Start Slideshow’ button to run the presentation in your iPad.
Part 2 Best 10 iPad Slideshow Apps to Create a Slideshow
iPad compatible software programs to design professional quality slideshows are among the commonest requirements of the graphic design fraternity in today’s times. Having learnt about the fundamental solutions to create awesome slideshow presentations on iPad, let us move ahead to talk about the most preferred and top rated software applications for making an iPad slide show in the following section:
01PicPlayPost
Standing ahead in the list is the aforesaid slideshow creator application that lets you create intuitive, professionally sound iPad slideshow presentations with utmost ease. Working with the program, you can experiment with creating graphic masterpieces by sticking together images, videos, GIFs and audio elements. The software’s high end and easy to use editing features make the latter a convenient slideshow creator alternative even for the newbies of the design world.
The software facilitates an easy and quick clutching of images and video clips and create amazing slideshows with an appreciable output resolution. You can add up to 9 media files and customize the same with a range of filters, effects and features. The music compilation is however, limited and the software leaves a customizable watermark on the slides. The program is available for a free usage in its basic version and greets you with a welcoming interface.
02SlideLab
If you are explicitly concerned about creating image centered slideshow presentations on your iPad, SlideLab can certainly be your go to application. It is hardly a matter of a few minutes with a counted number of clicks for the software program to deliver top quality photo slideshows. No doubt, the aforesaid graphic designer program is an absolute favorite of creative experts around the world.
Talking of the feature rich editor library of the program, you can play with graphic skills to your heart’s content and edit the slideshow media in cohesion with your diverse creation needs. You can customize the images and add background music to the slides, both from your iPad and the SlideLab audio library.
The program further allows you to retain the original aspect ratio of the images and video clips, along with the flexibility to directly share your creation across a variety of media sharing platforms, such as, Instagram, Vine, etc. There are thousands of filters and transitions in the editor library, which you can select from to imbibe your presentations with.
However, if you prefer an Instagram or Facebook export of your slideshow with SlideLab, you will be devoid of importing audio files from your iTunes storage account.
03Photo Slideshow Director
Moving ahead with the list, you have the aforesaid slideshow iPad program, which is conveniently regarded as the most affordable graphic editor package for creating photo slideshow presentations in almost all iOS devices by users across the globe. Not only can you play with a diversity of editing features and effects, but also save and share your presentations as HD movies across all popular media sharing platforms with the software.
The program further assists you in the slideshow creation process through its interactive interface that guides you at every step via intuitive, on screen design instructions. Another appeals of the software include, a full HD display, HD format file export and the flexibility to create and share music videos. The user reviews of the app however, talk of frequent software glitches and variations in the operational speed in relation to the iPad memory space.
04PicFlow
PicFlow is known to exhibit a mix of slideshow features that you may normally get in a series of creator alternatives, but there are a few additional characteristics as well, which make the aforesaid program stand ahead of other graphic creator applications in the line. Working with the software, you are permitted to fix the screen time of your presentation media, while complimenting the same with a subtle audio track of your choice.
The program further allows you to import audio fil.es from your iPod, while promoting the easiest image editing process through positional photo dragging, swipe and pinch tools for image cropping, recording the image screen play, a decent transition library with more than 18 unique transition styles, local device export to the ‘Camera Roll’ folder.
The application a quick slideshow sharing mechanism to upload your artwork on popular social media platforms, like, Instagram and Facebook. The software however, encompasses a restricted number of creation features and editing utilities in its no cost version, and can generate slideshows with a video codec of only 30 frames per second.
05iMovie
This one is undeniably the best slideshow creator alternative you can ever get to make professionally sound iPad photo slideshow presentations. The app has an extensive global fan base on account of the trendy graphic editing features that it seeks to offer. Within the domain of image presentations, you can play with tons of customization choices to transform your otherwise customary slideshows into graphic masterpieces.
Using the application, you can work to add a different background audio to every image, experiment with including a variety of audio-visual effects, titles and transitions, apply movie centered themes and play the slides in line with the perfect music tune.
The program however, has a limited scope of flexibility within its utilities that are mostly rigid in terms of parametric changes, is an iOS and Mac exclusive software and requires a comprehensive understanding of the workflow to begin with the slideshow creation process.
06PIXGRAM- Music Photo Slideshow
PIXGRAM is affordably the most loved slideshow maker program by amateurs in the graphic design realm. You can safely rely on the software to create good quality image and video presentations, even without any creative design experience at all. The application permits you to add your most cherished images and music to the presentation slides and customize them with video filters, audio-visual effects and transitions.
You are further granted the liberty to save your creation locally to the iPad in probably any file size and export them across various social media handles, like, Twitter, Facebook, etc. The software interface is specifically designed in line with the creation abilities of novel users.
While the application lacks advanced features to address the needs of experienced creators, you are additionally left with selecting from the local music tracks on your device, since the program does not support a premade audio library.
07Movavi Clips
Moving ahead with the list, the aforesaid slideshow maker program is an affordable pick to create high end, image centered, iPad photos slideshow presentations. The design process is simple enough, with you just having to work on importing media files from your device, include suitable transition effects to ensure a smooth presentation flow and pick cohesive background music.
You can further choose to overlay the added music in the software’s audio mixer and make volume adjustments. The app is also supportive of direct media share on platforms like, YouTube, Facebook, Instagram stories, etc. The program however, leaves a watermark in its free version, which can be resolved by upgrading to the premium one.
While experienced users may find a miss out of some utilities, the app is otherwise, easy to use, has no cost updates, latest sticker packs, high end technical utilities and does not support ads.
08Animoto Slideshow Creator
If you want to transform the cherished images of your most celebrated events into a quick and classic slideshow movie, you can choose to work with this program. Working with the app, you are allowed to access a vast and licensed library of background audio and over 100 distinguished slideshow themes and styles. There is additionally, a decent range of text customization effects, which you can use to spark up your presentations with elusive and catchy titles, captions, etc.
The software further, houses a diversity of advanced editing features that are greatly preferred by experienced graphic editors; and facilitates a high quality slideshow output, that can be downloaded in HD format. The program is however, not available free of cost and has an expensive purchase license.
Animoto Slideshow Creator Official Download Link: https://animoto.com/
09EverChanging
Creating a slideshow on iPad was never so easy as with the EverChanging slideshow builder program. To begin with, the software comes with the most responsive and clean working interface, allowing users to continently navigate through and access the various software features, elements and utilities.
Talking of the creation process, the application lets you quickly deign awesome presentation with good quality image effects, elaborative themes and subtle background music. You can also adjust the screen time of individual slides and include animated transitions to seamlessly fade images in and out for a smooth presentation flow. While the design time is hardly a few minutes, but the editing features though classy, are limited in number.
10Slide Maker
Last in the list, comes the Slide Maker application, which you can rely on to create professional and personal slideshow presentations in premium quality. The software houses an inbuilt image editor program that you can use exclusively for adding life to your ordinary photos before making them a part of your slideshow. You can try hands at rotating, cropping, and zooming the photos, along with customizing them with expressive filters.
Drop your background music concerns if you have any, because the aforesaid program is a storehouse of royalty free audio tracks that suit almost any and every presentation theme. If that’s not enough, you are free to select a track from the ones on your device or an online storage account. The software additionally works to fine tune the aspect ratio and output quality of the slideshow for a convenient export to social media handles.
The app’s free version is however, restricted to a selection of 10 media files for each presentation, but you can always upgrade to the paid subscription of the program to overcome the same. Also, the working interface of the software may be a bit tricky to understand and use.
Part 3 Hot FAQs About Creating Slideshow
Aiming to create slideshow on iPad is both, fun and exciting, along with catering to the diverse range of information delivery concerns. However, this creative aspect of the graphic design domain is often stacked with a variety of development queries. Focusing on the same, let us try hands at sorting some of the commonest ones in the following section:
01What should you keep in mind before starting the creation?
Before you actually start working on designing the presentation, take time to set a clear objective of your presentation. Decide on the significant elements of the slideshow in line with the main theme, while ensuring that they appear in a sequential flow, lest your slideshow will look like a bundle of stuffed elements.
02What is the right proportion of text based contents?
Including text annotations in your presentation is an elusive way of drawing the viewers’ attention towards precise information. However, you should take care of the aspects like, text size, font, color, orientation, etc., to make sure that the added text enhances the credibility of the slideshow and does not indicate unnecessary inclusion.
03What is the feasible number of slides?
The slide count of your presentation largely depends on the type of information you are aiming to deliver. Make sure that all the included slides have a relevant content and you are not missing out on any specific element of the presentation objective.
04What are the constraints of image selection?
Pay considerable attention to the resolution and quality of the images when adding the same to your presentation, Avoid working with blurry and vague stills, along with keeping the professional aspect of your slideshow in mind, lest you end up putting a hoard of uncanny clips.
05What are the prerequisites of adding audio and video elements?
If you need to supplement the presentation with audio tracks and video footage, take the first step to save them locally or on a USB device to escape the glitches of long buffering and playback issues. Secondly, quality is the thing that matters the most and you should be sure of a high resolution audio-visual inclusion to avoid viewer distraction.
Creating High End Slideshow Presentations in Wondershare Filmora
When aiming to create a slideshow presentation in your iPad, the in-built ‘Photos’ app within the device is a feasible option. However, if you are keen on picking an alternative, choosing the Wondershare Filmora Video Editor graphic editor package would not be a regret. Speaking in the light of slideshow creation processes and utilities, the software has a lot of appeals to attract its users.
For Win 7 or later (64-bit)
For macOS 10.12 or later
Slideshow Centered Features of Wondershare Filmora
● Working with the aforesaid graphic and audio editor software, you are rescued from the notch of sticking to a particular file format to import and use your media. The program works well with all popular image, video and music file formats to ensure a convenient media import and usage.
● You are allowed to pan, zoom and crop the slideshow portions, both, manually and automatically for an enhanced and clear presentation view.
● The program’s inbuilt library lets you explore and play with an enormous range of effects, transitions, audio-visual elements and filters, preset background themes and music templates to spark up your slideshow presentations.
● You can also work with recording your own voiceover and device screen, while customizing the same with a plethora of cohesive editing features and effects.
● Ending Thoughts →
● The process to create slide show on iPad is quite an easy and interesting task when working with the device’s inbuilt ‘Photos’ application.
● Surfing through the software market, you can pick from a diversity of slideshow creator programs that have extensive compatibility with iPad.
● If you are pondering over the best choice from the available software solutions, the Wondershare Filmora slideshow creator program is an affordable selection.
How To Make a Video by Mouse in Filmora?
Have you ever wondered, what if somehow your keyboard just broken or disappeared? And you’re stuck in the middle of your project with just a mouse. Don’t know how to proceed remaining project with a mouse? Then no worries! We got you.
This article will guide you how to use stock videos and stock audio to create a music video. The catch, you say? We will be doing that only with a use of a mouse.
Things To Know Before Editing
Let us be honest, most shortcuts are not available without the keyboard. To counter that, our approach will need to be more general. General here means you need to know all the necessary controls and panels.

Take the challenge and find a solution together
To counter these difficulties, even if you have a keyboard, you can imagine yourself in a situation. A situation in which we have a keyboard but will not be using it.
Therefore, presenting us with a challenge, so if you someday come across a situation like this, you will be prepared. All in all, you would be learning more things by returning to the roots of your practice, which in most cases, can prove helpful.
Get Ready With the Professional Editing Tool
Before getting into the editing process handicapped from resources, you need to be familiar with the software that we will use. We will use Wondershare Filmora You can click the link below and catch it up.

Create a Music Video Without a Keyboard
Let us get started! Whether you have a real mouseless experience or want to take it as a challenge, let’s get the things clear first.
- We need to create a 20 seconds music video.
- We will only be using the footage from the stock library.
- We will be using music from the Wondershare Filmora library.
- We will have 5 minutes to review the footage and the music available.
- And most importantly, we don’t have a keyboard.
Step 1. Review your footage
Our first and most crucial step will be to use our imagination and creativity. So get those neurons firing, and let us go!

- Head to the stock media folder on the bar mentioned above, the Wondershare Filmora.
- Or you can simply look towards the left window, where you will find the sample videos tab.
- Click on the sample videos tab, and a new window will appear on the library screen.
- Here you will find almost more than 20 videos.
- So apart from using the actual recorded footage, we will work our way with what we have from default.
- For the music, we would be scrolling in the stock audio library.
- Click on the audio tab above and start scrolling.
- You will also find some categories in the left window.
- Choose the category of your choice and listen to the audio.
Do whatever suit you best. Keep in mind you only have 5 minutes.
Step 2. Pick music for your clips
Suppose you have found audio that speaks your vibe. The next step would be to find a video that tallies that audio. Let us suppose we have audio that is of the hip-hop genre. Let that creativity shine now!

If you like to add a more classical vibe, pick a classical song or audio from the audio library.
- After picking the song, move on to the sample videos tab and search for videos that match a classic vibe.
- Now random close-up shots of a piano, cinematic footage of a big orchestra, or simple landscapes with minimalistic movement while focusing on a single object, consider the example below.

Now that a scenario is constructed, our next step is to arrange these clips in the Wondershare Filmora timeline.
Step 3. Download the clips and audio
You have 15 minutes to create the music video. Start the timer! Once you have selected a sample video and audio that matches your scenario, you can download them from the bottom right icon on the thumbnail. Only if you still need to download them.
Step 4. Insert the audio into the timeline
- The first step is to drag the audio to the timeline.
- Now play the audio from the start. If you can work with the audio as a whole, then it’s perfect.
If you want your audio to start at a certain point. You have to follow the below-mentioned steps. It is as simple as that!

- Add your audio to the timeline.
- Then move the timer or the slider where you want your audio to start.
- Right-click on the audio file. Select split.
- Your audio file will split into two parts.
- Delete the prior file and drag the file ahead to the start of the timeline.
The next step is to add the videos to the timeline.
Step 5. Add the video to the timeline
When you have your audio in the timeline, your next step is adding the video. After you have trimmed or split your audio to your wish, follow the below steps.

- Click and drag to drop the video clips where you want the video to start.
- Play the audio first is a good feature for where you want your video to insert.
- Then adjust the timeline slider on that point.
- Simply drag your video and drop it into the timeline.
![]()
Note: now, remember you have multiple videos to match the audio length as we create a music video. The more, the more optimistic. Now, remember you have multiple videos to match the audio length as we create a music video. The more, the more optimistic.
Download the remaining videos that you would wish to be added to the music and follow the steps mentioned above to add the clips where you desire.
Step 6. Finishing touches
You can add some transitions to give your music video a fine touch**.** To add transitions, you can follow the below steps:

- First, click on the transition icon on the bar above. Then, browse as far as your imagination takes you.
- If the effect you want still needs to be downloaded, click on the download icon in the bottom right corner and download the effect.
- Click on the effect and drag it to drop it on your video. It will create a smooth transition while shifting from one video to the other.
Keep going you are almost there!
- Do this for all the videos in the timeline above the audio file.
If you have time, you can also add a few of the effects in the Wondershare Filmora.
- To do so, click on the effect icon on the top bar.
- A window will open to your left, indicating different available effects categories. Select any tab you want that fits your music video scenario.
- Download the effect mentioned above by clicking on the download icon in the bottom right corner of the effect thumbnail.
- Click to drag and drop it on top of your video.
![]()
Note: you can do so as many times as you want for the remaining video clips in the timeline.
It seems our 15 minutes are running out! Play the music video from the beginning and review the edits you made. Then, finalize your edits and Voila. You have successfully created a music video using a mouse on Wondershare Filmora.
So in a rare scenario when you don’t have a keyboard, you can just use your mouse to browse the Wondershare Filmora and put those creative ideas to work.
Conclusion
With just a mouse, you have created a music video! How easy is that? Try different music, audio, and video, and then enjoy the rest! Creativity has no limits if you know how to make the most of it by using the tools at your hand. Tell out more about your creative ideas! We love to hear from your side!
Free Download For Win 7 or later(64-bit)
Free Download For macOS 10.14 or later
Download the remaining videos that you would wish to be added to the music and follow the steps mentioned above to add the clips where you desire.
Step 6. Finishing touches
You can add some transitions to give your music video a fine touch**.** To add transitions, you can follow the below steps:
- First, click on the transition icon on the bar above. Then, browse as far as your imagination takes you.
- If the effect you want still needs to be downloaded, click on the download icon in the bottom right corner and download the effect.
- Click on the effect and drag it to drop it on your video. It will create a smooth transition while shifting from one video to the other.
Keep going you are almost there!
- Do this for all the videos in the timeline above the audio file.
If you have time, you can also add a few of the effects in the Wondershare Filmora.
- To do so, click on the effect icon on the top bar.
- A window will open to your left, indicating different available effects categories. Select any tab you want that fits your music video scenario.
- Download the effect mentioned above by clicking on the download icon in the bottom right corner of the effect thumbnail.
- Click to drag and drop it on top of your video.
![]()
Note: you can do so as many times as you want for the remaining video clips in the timeline.
It seems our 15 minutes are running out! Play the music video from the beginning and review the edits you made. Then, finalize your edits and Voila. You have successfully created a music video using a mouse on Wondershare Filmora.
So in a rare scenario when you don’t have a keyboard, you can just use your mouse to browse the Wondershare Filmora and put those creative ideas to work.
Conclusion
With just a mouse, you have created a music video! How easy is that? Try different music, audio, and video, and then enjoy the rest! Creativity has no limits if you know how to make the most of it by using the tools at your hand. Tell out more about your creative ideas! We love to hear from your side!
Free Download For Win 7 or later(64-bit)
Free Download For macOS 10.14 or later
In This Article, You Will Learn How to Create an Attractive and Engaging Slideshow Video Using Tools Available in the Wondershare Filmora
You have taken photos and videos all over your trip. Showing them to your friends and family can be a hassle if you have a lot of pictures. Viewing them all at once is possible by creating a slideshow video.
The slideshow video combines all the memories in one place. To make one on your own, we prefer just one best UI editing tools, Wondershare Filmora.
Before we create a slideshow, ensure to learn the basics of the slideshow video. Then, scroll below to get more!
Part 1. What Is a Slideshow Video?
A slideshow video is a video that combines your photos and videos to create a montage. This slideshow can be used as a collection of memories you can watch whenever you like.
You might have a photo album lying around somewhere in your house. A slideshow video can act like a modern-day photo album. But instead of photos, you can also add videos and create a monument of your precious memories.
Modern-day content creators on Youtube and other platforms can use a slideshow method to create short recap videos of their travels.
Part 2. What Are Some of the Uses of Slideshow Videos?
A slideshow video can be a great way to summarize all the moments of a marriage ceremony, graduation event, etc. And the list goes on and on.
- A wedding ceremony
- Anniversary recording
- A graduation ceremony
- A birthday party
- Your pet
- Your friends
- Your family
- A trip that you went on
Part 3. What Are the Benefits of a Slideshow?
There are many benefits to creating a slideshow video.
A long-lasting memory
Creating a slideshow video can be a digital reminiscent, allowing you to hold a precious video with your friends and family. Apart from physical portraits, a slideshow video will be a digital backup for your memories that you can watch in the future.
Easy to save and share
Since a video slideshow is a digital content, typically with an extension .mp4, .mov, etc., you can watch it whenever and wherever you want. Moreover, you can conveniently send it to the person who spent the time and shares the same memories with you.
Part 4. What Will You Need To Make a Slideshow?
To create an attractive slideshow video, you must fulfill the following requirements.
1. Good Quality Photos
To create a good slideshow, you must have good-quality photos with good resolution. Always take pictures with a good-quality camera or a mobile phone whenever you want to create a slideshow. Using filters in the editing software can disrupt the quality of your slideshow.
2. Video Clips
The slideshow is always combined with videos and photos. After taking good-quality images, remember always to record short video clips you can add between your pictures.
3. A Good Video Editor - Wondershare Filmora
To edit a slideshow video, you will need editing software. There’s no better tool to do the job than Wondershare Filmora . Wondershare Filmora enables you to make creative and appealing videos. It has a very engaging system UI that allows even novice users to get the hang of it quickly. You will learn how to make a slideshow in a few simple steps.
Free Download For Win 7 or later(64-bit)
Free Download For macOS 10.14 or later

Let’s start with the step-by-step instructions for making a slideshow video now that you know the requirements for generating a slideshow.
Part 5. Step-by-Step Guide to Creating a Slideshow Video
Utilizing filmora will reduce your workload while producing quality work. Follow the below step-by-step guide to make your slideshow video instantly!
Step1 Download Wondershare Filmora
Wondershare Filmora will provide the working platform. Follow the below steps to download it:
- First, install the Wondershare Filmora.
- Then, launch this application on your PC or Mac
Let’s proceed to edit our video after downloading the Wondershare Filmora software. Continue reading to find out how to begin the editing process.
Step2 Import your Photos and Videos
Importing your videos and pictures to Filmora’s media panel is best to have them all in one folder. Therefore, when you open Wondershare Filmora, you will notice the main import window in the top left corner.
- Click in the center of the import window upon the import icon.
- Browse from the PC library to where your target Videos and Photos are stored.
- Please select the required videos and photos and Open

Your next step will be to add the imported videos and images to the timeline.
Step3 Add your Photos and Videos to the Timeline
When you have multiple videos and photos, you can add all of them simultaneously. Or you can also add them one by one wherever you need. Follow the steps mentioned:
- Right-click on the photo or video you want.
- Keep holding the Right-click and drag it down to the timeline.

Now that we have imported your photos and videos into the timeline, it is time to align and add text.
Step4 Add the Title
To create an attractive slideshow, you will need to add a title before the start of the video. Doing so will allow you to gain more viewers and audiences.
Add a Black Screen
The black screen will eventually act like a canvas to give your title a good look. To add a black screen, follow the steps mentioned:
- Click on the media icon from the bar above the import window.
- You will notice many tabs on the left-hand side under a drop-down bar.
- Scroll below to find the sample media
- Download the black color if it is not downloaded already.
- Click and drag it down below to the start of your video.

Add a Title Tile
Now that we have our canvas, we will now add the title. Above the import media library, there will be a Title icon.
- Click on the title icon, and select the title that you want for your video by browsing and scrolling down.
- For this purpose, we will use a simple title tile called “Title 29.”
![]()
Note: You can find the same title by scrolling, browsing, or searching in the search bar above the import library.
- Click and drag the title onto the black screen that we added.
- Double-click the title to open its settings.
- Here you can type in the text that you want.

You can also change its font. When you click on the font bar, a drop-down option will pop up, and you choose whichever you like.
- Change the animation of the text title from the top left corner animation
Change The Timing of The Title
You can also adjust the timing of the title by below steps:
- Click on the advanced option in the bottom right corner, and settings will pop up.
- Find the title bar and drag it to the right side to increase the timing of the title.

After adding the title, it’s time to go with fading effect as shown below!
Step5 Add a Fade effect
You can also add a fade transition to the start of your video. It will blend the title with the first clip. Follow the steps mentioned to add the transition effects:
- Search the Fade option from the Transitions tab above the import window
![]()
Note: A fade transition will allow your title to fade into the first clip creating a visually pleasing effect.
- Download the Fade transition and drag it between the Black screen and the first clip.

Now that we have added a transition, it is time to move on to our music!
Step6 Add The Music
You can add your music to the slideshow from your PC library, but make sure you have the music rights. It is better to use stock audio by following the steps:
- Click on the Audio icon on the bar above the import window, and the list will pop up.
- Please browse the library to find music that best suits your video and download it.
- Then add it to the timeline’s audio track.
Add Beat Detection
To match your video clips properly with the music, so it remains in sync, you can adjust it with the beat of the music. To add beat detection, follow the steps mentioned:
- Right-Click on the audio that you selected in the audio library.
- You will see a pop-up list, and in the options, you will see Beat detection.
- Click on Beat detection.

- Then click on the audio and drag it below on the timeline.
Match The Video With The Audio Markers
To have the full advantage of beat detection, you must adjust your videos and photos to the markers. Follow the steps mentioned below to do so:

- Check that the video clips are in sync with the marker on the audio.
- For this, drag one video end to a marker or as many videos as you want.
- Ultimately, you will create a timeline in which your videos sync with the audio beat.

After syncing your videos and photos to the audio, it is time to move on to the scaling and background blur.
Step7 Scale and Blur The Background
Now, some of the pictures you have added must-have black borders. It usually means that your image is shorter than the aspect ratio.
If you leave the picture/photo as it is, the black borders will make it look shorter and out of proportion. As a result, it gives a generally poor look, as shown below.

To counter this problem, follow some easy steps:
- Double-click on the picture with black borders, and it will open the settings list.
- Go into the Transform Here you can see multiple settings.
- Increase the size of your photo to match the aspect ratio.

Add a Background Blur Effect
In some cases where you have taken a portrait photo where the picture is vertical, it ultimately stays out of proportion to the aspect ratio.
![]()
Note: Simply scaling the image to match the aspect ratio size is not sensible in this case. Doing so will hide the many pretty features of a portrait.

To counter this problem, you can add a blur effect. This effect will turn your background blur, matching the aspect ratio. Follow the steps mentioned below:
- Click on the Effects tab above the import window and search for Blur.
- Download the blur effect that suits you best and then drag the blur effect above your photo in the timeline.
You will notice the background turn to a blur in the main play screen.

Step8 Add a Transition
You can also add a transition effect to spice up things. It can get bland when your video or photo changes from one to another. To create a good slideshow video, you can add a transition effect by following the steps mentioned below:
- Click on the Transition icon above the import window.
- Browse the library until you find a transition you like, then download one.
- Click on the transition and drag it between the clips.

Adjust The Duration and Placement of The Transition
Now it’s time to adjust the duration and placement of the transition. For this, you can follow the steps mentioned below:
- Double-click on the transition effect, and it will open the settings list.
- You can adjust the duration by setting the timer as per your requirement.
![]()
Note: If other transitions are added to the timeline, you can adjust them by clicking Apply to all.

When you have adjusted the slideshow transitions, it is time to move on to the effects and filters.
Step9 Add the Effects and Filters
If you create a slideshow video of your trip to a historical place. You can add a Vintage filter to your video to give it that vintage tint. Follow the steps mentioned below:
- Head over to the Effects tab, where the effects library will open up
- Select any effect and download
- Click on the effect and drag it to drop in the timeline.

Combining a vintage effect with a dreamy glow will make your video pop up even more. To add a nostalgic glow to your video, follow the steps:
- Click on the effects and search for Glow in the search bar.
- Click and drag the glow effect above the timeline and ensure the effect is in the separate video timeline.
- Ensure the effect is applied to every photo and video.
- Double-click on the effect, and settings will open in the import window.
- Then, you can adjust the radius and opacity of the video. Adjust as you desire.

We are almost done. Let us now move toward our outro!
Step10 Create an Outro
The steps we will do will be similar to the ones we did initially. As we are creating, we will again need a canvas. Follow the steps mentioned below:
- Head to the media icon on the bar and scroll until you see the sample media tab.
- In the sample color option, drag and drop the black color at the end of your video.
Add an Outro Transition
To finalize things, add a transition effect at the end of the clip by these steps:
- In the Transition tab, search for the Fade effect.
- Drag and drop the Fade effect between your last video clip and the Black screen.

Fade out The Audio
If the audio suddenly ends at the end of your slideshow, it will create a bitter effect. Therefore, you should always fade out audio at the end of the video. To do this, follow the steps mentioned:
- Double-click on the audio in the timeline, and the settings list will pop up.
- On the top section of the import window, you will notice fade options.
- In the fade-out bar, drag it to the side to set your fade-out timer.
You can show your friends and family the slideshow or upload it to Youtube. Play the Slideshow Video from the beginning to see the changes.

Conclusion
By the steps mentioned above, you can create a slideshow video. Give every moment a chance to align everything on one side! The slideshow will also save your device space by aligning everything in one video.
Free Download For macOS 10.14 or later
Let’s start with the step-by-step instructions for making a slideshow video now that you know the requirements for generating a slideshow.
Part 5. Step-by-Step Guide to Creating a Slideshow Video
Utilizing filmora will reduce your workload while producing quality work. Follow the below step-by-step guide to make your slideshow video instantly!
Step1 Download Wondershare Filmora
Wondershare Filmora will provide the working platform. Follow the below steps to download it:
- First, install the Wondershare Filmora.
- Then, launch this application on your PC or Mac
Let’s proceed to edit our video after downloading the Wondershare Filmora software. Continue reading to find out how to begin the editing process.
Step2 Import your Photos and Videos
Importing your videos and pictures to Filmora’s media panel is best to have them all in one folder. Therefore, when you open Wondershare Filmora, you will notice the main import window in the top left corner.
- Click in the center of the import window upon the import icon.
- Browse from the PC library to where your target Videos and Photos are stored.
- Please select the required videos and photos and Open
Your next step will be to add the imported videos and images to the timeline.
Step3 Add your Photos and Videos to the Timeline
When you have multiple videos and photos, you can add all of them simultaneously. Or you can also add them one by one wherever you need. Follow the steps mentioned:
- Right-click on the photo or video you want.
- Keep holding the Right-click and drag it down to the timeline.
Now that we have imported your photos and videos into the timeline, it is time to align and add text.
Step4 Add the Title
To create an attractive slideshow, you will need to add a title before the start of the video. Doing so will allow you to gain more viewers and audiences.
Add a Black Screen
The black screen will eventually act like a canvas to give your title a good look. To add a black screen, follow the steps mentioned:
- Click on the media icon from the bar above the import window.
- You will notice many tabs on the left-hand side under a drop-down bar.
- Scroll below to find the sample media
- Download the black color if it is not downloaded already.
- Click and drag it down below to the start of your video.
Add a Title Tile
Now that we have our canvas, we will now add the title. Above the import media library, there will be a Title icon.
- Click on the title icon, and select the title that you want for your video by browsing and scrolling down.
- For this purpose, we will use a simple title tile called “Title 29.”
![]()
Note: You can find the same title by scrolling, browsing, or searching in the search bar above the import library.
- Click and drag the title onto the black screen that we added.
- Double-click the title to open its settings.
- Here you can type in the text that you want.
You can also change its font. When you click on the font bar, a drop-down option will pop up, and you choose whichever you like.
- Change the animation of the text title from the top left corner animation
Change The Timing of The Title
You can also adjust the timing of the title by below steps:
- Click on the advanced option in the bottom right corner, and settings will pop up.
- Find the title bar and drag it to the right side to increase the timing of the title.
After adding the title, it’s time to go with fading effect as shown below!
Step5 Add a Fade effect
You can also add a fade transition to the start of your video. It will blend the title with the first clip. Follow the steps mentioned to add the transition effects:
- Search the Fade option from the Transitions tab above the import window
![]()
Note: A fade transition will allow your title to fade into the first clip creating a visually pleasing effect.
- Download the Fade transition and drag it between the Black screen and the first clip.
Now that we have added a transition, it is time to move on to our music!
Step6 Add The Music
You can add your music to the slideshow from your PC library, but make sure you have the music rights. It is better to use stock audio by following the steps:
- Click on the Audio icon on the bar above the import window, and the list will pop up.
- Please browse the library to find music that best suits your video and download it.
- Then add it to the timeline’s audio track.
Add Beat Detection
To match your video clips properly with the music, so it remains in sync, you can adjust it with the beat of the music. To add beat detection, follow the steps mentioned:
- Right-Click on the audio that you selected in the audio library.
- You will see a pop-up list, and in the options, you will see Beat detection.
- Click on Beat detection.
- Then click on the audio and drag it below on the timeline.
Match The Video With The Audio Markers
To have the full advantage of beat detection, you must adjust your videos and photos to the markers. Follow the steps mentioned below to do so:
- Check that the video clips are in sync with the marker on the audio.
- For this, drag one video end to a marker or as many videos as you want.
- Ultimately, you will create a timeline in which your videos sync with the audio beat.
After syncing your videos and photos to the audio, it is time to move on to the scaling and background blur.
Step7 Scale and Blur The Background
Now, some of the pictures you have added must-have black borders. It usually means that your image is shorter than the aspect ratio.
If you leave the picture/photo as it is, the black borders will make it look shorter and out of proportion. As a result, it gives a generally poor look, as shown below.
To counter this problem, follow some easy steps:
- Double-click on the picture with black borders, and it will open the settings list.
- Go into the Transform Here you can see multiple settings.
- Increase the size of your photo to match the aspect ratio.
Add a Background Blur Effect
In some cases where you have taken a portrait photo where the picture is vertical, it ultimately stays out of proportion to the aspect ratio.
![]()
Note: Simply scaling the image to match the aspect ratio size is not sensible in this case. Doing so will hide the many pretty features of a portrait.
To counter this problem, you can add a blur effect. This effect will turn your background blur, matching the aspect ratio. Follow the steps mentioned below:
- Click on the Effects tab above the import window and search for Blur.
- Download the blur effect that suits you best and then drag the blur effect above your photo in the timeline.
You will notice the background turn to a blur in the main play screen.
Step8 Add a Transition
You can also add a transition effect to spice up things. It can get bland when your video or photo changes from one to another. To create a good slideshow video, you can add a transition effect by following the steps mentioned below:
- Click on the Transition icon above the import window.
- Browse the library until you find a transition you like, then download one.
- Click on the transition and drag it between the clips.
Adjust The Duration and Placement of The Transition
Now it’s time to adjust the duration and placement of the transition. For this, you can follow the steps mentioned below:
- Double-click on the transition effect, and it will open the settings list.
- You can adjust the duration by setting the timer as per your requirement.
![]()
Note: If other transitions are added to the timeline, you can adjust them by clicking Apply to all.
When you have adjusted the slideshow transitions, it is time to move on to the effects and filters.
Step9 Add the Effects and Filters
If you create a slideshow video of your trip to a historical place. You can add a Vintage filter to your video to give it that vintage tint. Follow the steps mentioned below:
- Head over to the Effects tab, where the effects library will open up
- Select any effect and download
- Click on the effect and drag it to drop in the timeline.
Combining a vintage effect with a dreamy glow will make your video pop up even more. To add a nostalgic glow to your video, follow the steps:
- Click on the effects and search for Glow in the search bar.
- Click and drag the glow effect above the timeline and ensure the effect is in the separate video timeline.
- Ensure the effect is applied to every photo and video.
- Double-click on the effect, and settings will open in the import window.
- Then, you can adjust the radius and opacity of the video. Adjust as you desire.
We are almost done. Let us now move toward our outro!
Step10 Create an Outro
The steps we will do will be similar to the ones we did initially. As we are creating, we will again need a canvas. Follow the steps mentioned below:
- Head to the media icon on the bar and scroll until you see the sample media tab.
- In the sample color option, drag and drop the black color at the end of your video.
Add an Outro Transition
To finalize things, add a transition effect at the end of the clip by these steps:
- In the Transition tab, search for the Fade effect.
- Drag and drop the Fade effect between your last video clip and the Black screen.
Fade out The Audio
If the audio suddenly ends at the end of your slideshow, it will create a bitter effect. Therefore, you should always fade out audio at the end of the video. To do this, follow the steps mentioned:
- Double-click on the audio in the timeline, and the settings list will pop up.
- On the top section of the import window, you will notice fade options.
- In the fade-out bar, drag it to the side to set your fade-out timer.
You can show your friends and family the slideshow or upload it to Youtube. Play the Slideshow Video from the beginning to see the changes.
Conclusion
By the steps mentioned above, you can create a slideshow video. Give every moment a chance to align everything on one side! The slideshow will also save your device space by aligning everything in one video.
Also read:
- LumaFusion Offers Various Look Up Table Presets, or LUTs, Such as FiLMiC deLog and FiLMiC DeFlat, and Several Stylistic LUTs for Use with Neutral Use Video. You Can Also Manually Add the LUTs
- Split Videos in the Lightworks Step by Step for 2024
- Updated In 2024, How to Make a Bokeh Effect
- 2024 Approved How To Add Motion Blur In Davinci Resolve?
- New In 2024, How to Create Cooking Video Intro and End Screen for YouTube Channel?
- Updated Need to Learn About Halftone Effects? Learn How to Quickly Create a Halftone Effect in Adobe Photoshop with Simple, Easy-to-Follow Instructions for 2024
- Updated You Can Easily Film Rotating Video Illusions From Your Smartphone and Edit Them on Wondershare Filmora in Just a Few Clicks
- New How to Make Fortnite Thumbnail with Motion Blur?
- List of Supported Whatsapp Video Format You May Want to Know for 2024
- New 2024 Approved Detailed Steps to Rotate Videos in Lightworks
- New 2024 Approved How to Make First Impression Review Video
- New A Full Guide to Funcall Voice Changer and Its Alternatives
- Are You Looking to Store Your Videos Securely and Efficiently? Look No Further than Our Top Pick for the Best Cloud Storage Service for Videos
- Best Jump Cut Editing Tricks
- New In 2024, Are You Convincingly Fascinated by the Whole Idea of Augmented Reality and Want to Level up Your Marketing Skills with an AR Integration? Rest Assured, Youve Found the Right Place
- New 2024 Approved Do You Wish to Convert GIF to Animated PNG? Then, You Need to Know About Using a GIF to APNG Converter to Help You Carry This Process Out in No Time. Read On
- Updated Record Slow Motion Videos With Phantom Slow-Mo Camera for 2024
- In 2024, Are You Eager to Discover the Method of Video Scaling in Filmora? You Are in the Right Place because This Discussion Will Cover the Content on This Matter
- 2024 Approved Simple Tricks Make 3D GIF Production of Inspiration Pop up Constantly
- In 2024, How to Become a Youtuber
- Updated The Ultimate Guide to Make a Text Collage
- New In 2024, How to Create a Freeze Frame Sequence Effect
- In 2024, What Are the Best 15 Slideshow Presentation Examples Your Audience Will Love
- Updated Best Video Title Generators for 2024
- 2024 Approved Discover Vintage LUTs Premiere Pro Free and Paid Options Available
- 2024 Approved We All Know Very Well that a 1-Second-Video Has Several Images in a Single Row. Even with iMovie Time-Lapse, You Can Create This! So, without Any Further Ado, Lets Learn How to Make a Timelapse in iMovie
- Updated 2024 Approved Create Slide Masking Effect Intro
- Updated In 2024, 5 Tips for Aquasoft Slideshow
- Do You Want Your Photos and Videos to Give an Old and Vintage Feel? Here Are some Vintage LUTs Premiere Pro Free and Paid Options Available to Download
- Updated In 2024, Here We Are Going to Show You the Best Effects to Appear on Camera Made with Filmora
- Updated Discover the Ultimate LUTs for Wondershare Filmora Uncover the Answer for 2024
- Are You Looking for the Best Way to Add Subtitles to Your Video? The Top SRT File Creators Can Help You Do That for 2024
- New As an Online Marketer, It Is Important to Know the Algorithm of YouTube Platform. Ill Share You the History of Algorithm of YouTube and the New Changes in This Year for 2024
- 2024 Approved Do You Wish to Make Your Discord PFP an Attention-Seeker? If Yes, Try the Animated Discord PFP. Lets Go over Essential Facts on the Topic, Including How to Get an Animated Discord PFP
- Easy Steps to Export Video in Filmora
- 2024 Approved Do You Wish to Make Changes Across Your Video? Are You Looking to Record Your Desktop Screen on Mac? Worry Not, as This Article Provides Details About QuickTime Player that Caters to All User Requirements
- Updated In This Article, We Will Introduce You Our Top 5 Picks of Websites and Software Converter Online to Convert Powerpoint to Mp4
- Updated Which 10 Best Video Editing Online Makers Is Worth Your Attention, In 2024
- Updated 2024 Approved How To Create A Green Screen Video In After Effects
- How to Remove Find My iPhone without Apple ID From your Apple iPhone XS?
- Life360 Circle Everything You Need to Know On Lava Yuva 2 | Dr.fone
- How Can We Bypass Meizu 21 FRP?
- In 2024, How To Leave a Life360 Group On Oppo A78 Without Anyone Knowing? | Dr.fone
- How to Bypass FRP on Itel P55 5G?
- In 2024, For People Wanting to Mock GPS on Honor 80 Pro Straight Screen Edition Devices | Dr.fone
- Apple ID Locked for Security Reasons On Apple iPhone X? Find the Best Solution Here
- Full Guide to Catch 100 IV Pokémon Using a Map On Samsung Galaxy A24 | Dr.fone
- Updated Step-by-Step Guide How to Translate Twitter Video Easily
- In 2024, Hassle-Free Ways to Remove FRP Lock on Xiaomi Redmi 12with/without a PC
- Best 10 Mock Location Apps Worth Trying On Samsung Galaxy F34 5G | Dr.fone
- 10 Easy-to-Use FRP Bypass Tools for Unlocking Google Accounts On Vivo Y36
- Detailed guide of ispoofer for pogo installation On Nokia C210 | Dr.fone
- How To Change Your SIM PIN Code on Your Nubia Z50 Ultra Phone
- Process of Screen Sharing Motorola G24 Power to PC- Detailed Steps | Dr.fone
- Guide on How To Remove Apple ID From iPhone 14
- Top 9 Apple iPhone 7 Monitoring Apps for Parental Controls | Dr.fone
- In 2024, How To Remove Flashlight From Apple iPhone X Lock Screen
- How to Fix Life360 Shows Wrong Location On OnePlus Nord N30 5G? | Dr.fone
- How to Rescue Lost Music from Realme C51
- 10 Fake GPS Location Apps on Android Of your Honor Play 7T | Dr.fone
- What To Do When Oppo A59 5G Has Black Screen of Death? | Dr.fone
- Fix Infinix Smart 8 HD Android System Webview Crash 2024 Issue | Dr.fone
- In 2024, Solutions to Spy on Realme 11 5G with and without jailbreak | Dr.fone
- How To Track IMEI Number Of Vivo Y02T Through Google Earth?
- Ultimate Guide on Xiaomi FRP Bypass
- 9 Best Phone Monitoring Apps for Honor 90 GT | Dr.fone
- Remove the Lock Screen Fingerprint Of Your Samsung Galaxy A54 5G
- How Can I Unlock My Apple iPhone 14 Plus After Forgetting my PIN Code?
- Disabling iPhone 12 Pro Max Parental Restrictions With/Without Password | Dr.fone
- In 2024, How to Unlock Xiaomi Civi 3 Phone with Broken Screen
- Guide on How To Remove Apple ID From iPhone 13
- Title: New In 2024, Five Thoughts on Discord Create Accounts How-To Questions
- Author: Morgan
- Created at : 2024-04-24 01:05:13
- Updated at : 2024-04-25 01:05:13
- Link: https://ai-video-editing.techidaily.com/new-in-2024-five-thoughts-on-discord-create-accounts-how-to-questions/
- License: This work is licensed under CC BY-NC-SA 4.0.
