
Replacing Sky Background Using Adobe Photoshop A Comprehensive Guide

Replacing Sky Background Using Adobe Photoshop: A Comprehensive Guide
Editing images is an essential point for photographers to make their work stand out. Creators use certain editing tools to polish their captured media. Suppose having an image with low sunlight that dims the natural beauty of the surroundings. In this situation, replacing sky backgrounds seems the only way to set a stunning landscape.
Photographers mostly rely on Adobe Photoshop sky replacement packs for this purpose. Using this option, users put life in their dull media with skies. Without further delay, learn everything about sky replacement Photoshop in this guide.
Sky Replacement A cross-platform works like magic for background removal or sky replacement photos!
Free Download Free Download Learn More

Part 1: How Good Has Photoshop Been in Helping Users Make Crisp Pictures and Media?
Adobe Photoshop is a graphics editor tool designed for professional digital art. It is widely used to grow business through designing virtual backgrounds and graphics. You can adjust the subject’s features and poses to make perfect portraits. To transform letters into artistic expressions, it offers Photoshop brushes and paints. Users can collaborate with their teammates and share work for approvals with this tool.
Key Features To Look Out In Adobe Photoshop
This tool can accelerate workflow with its latest features. It allows you to expand, add, and remove content from images with high-quality results. The following are some key features of Photoshop for your better understanding of this tool:
- It offers a sky replacement Photoshop feature that can change the sky from captured images.
- You can remove and replace your background in Photoshop and refine it as required.
- With the remove object feature, users can erase unwanted objects from images.
- Use the “Colorize” feature and make your black-and-white images colorful.
- Enhance workflow by using “Layer” masking that hides part of images without erasing them.
Part 2: A Detailed Guide on How to Replace Sky Background in Photoshop?
With AI integration in Adobe Photoshop, you can change skies with simple clicks. It provides a collection of skies from the Blue Skies, Spectacular, and sunset categories. Also, users can import any sky from their gallery or download one from presets. To do so, let us show you how to change the sky in Photoshop in given steps:
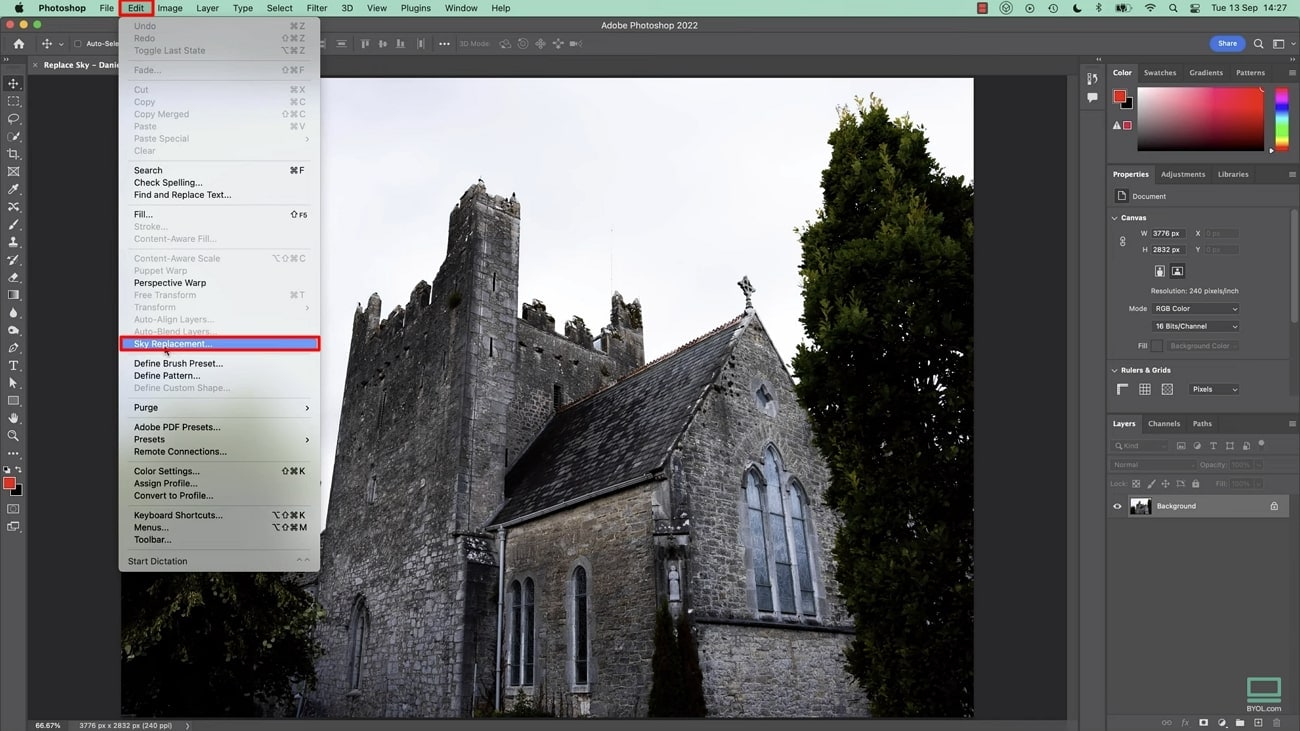
Step 1: Bring your desired image to the Adobe Photoshop. Head to the top toolbar and click the “Edit” option next to the “File.” Look for the “Sky Replacement” option from the list.
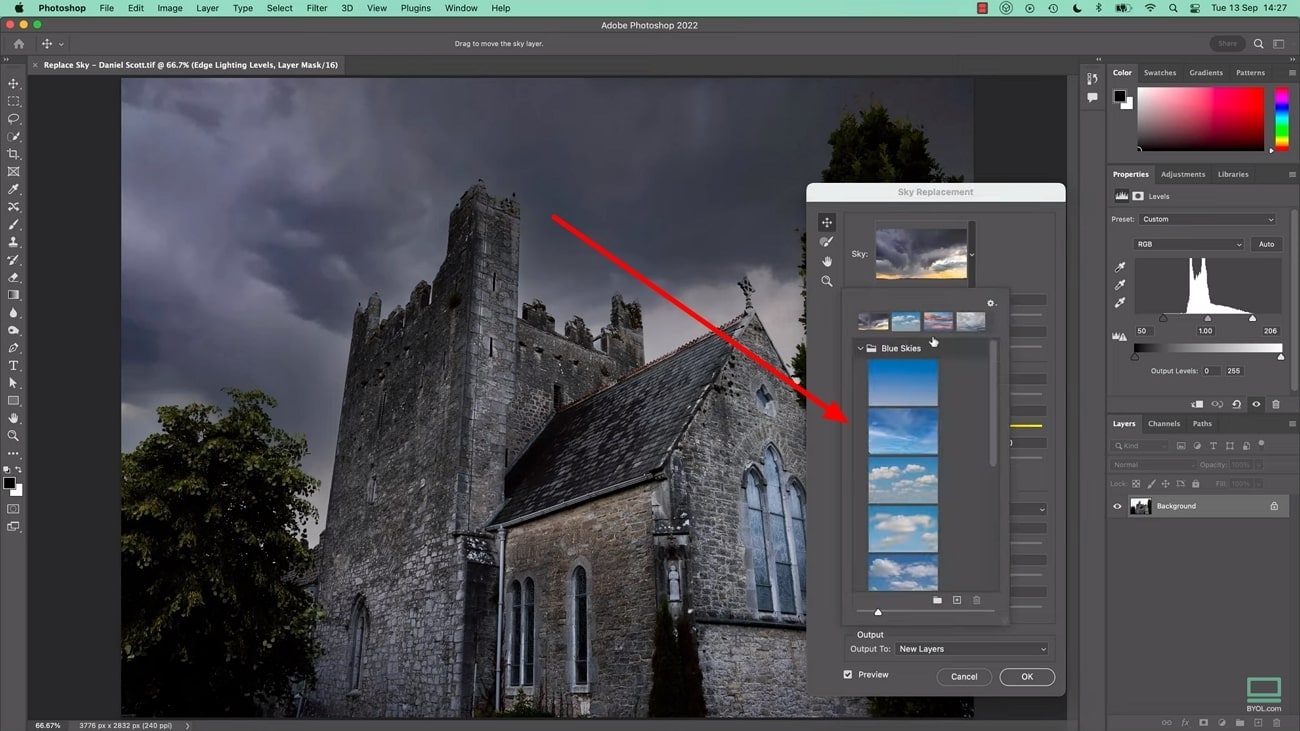
Step 2: After tapping “Sky Replacement,” you will get a respective screen on your front. Press the downward symbol next to the “Sky” and pick one sky from available options.
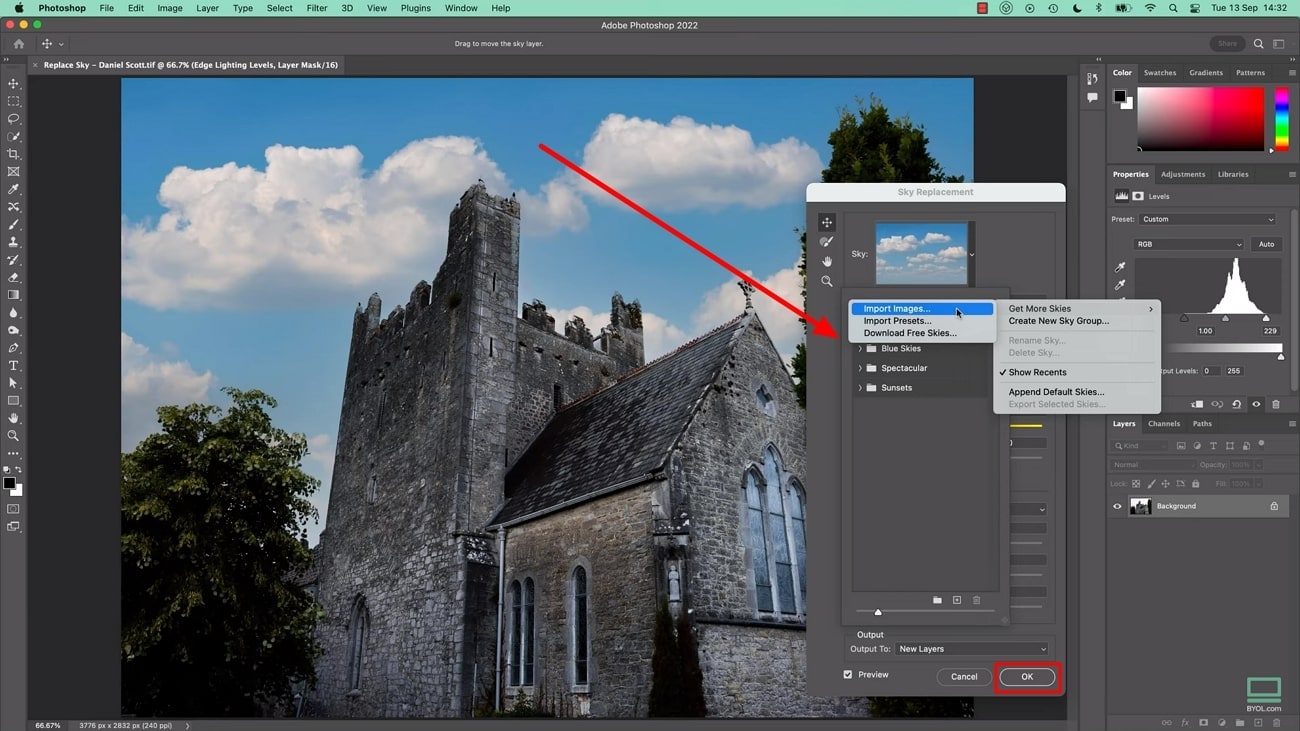
Step 3: Alternatively, you can hit the “+” icon and browse the sky image from your system. When you choose one, it gets added to the existing sky list. Select that and tap the “OK” button to apply changes in your media.
Part 3: An Alternative Solution: Wondershare Filmora Providing Workability with Easy Background Replacement
Changing sky in Photoshop is difficult for beginners and requires a basic skill set. It may take a lot of your time to understand its functionalities. That’s why choosing a tool with simple operation and high-quality output is important. In this regard, you should use Wondershare Filmora as a better option for everyone. It is a video editor that offers a variety of powerful features.
Using this tool, you can remove and change the background from your images or videos. With the integration of AI, it can automatically detect the object and foreground.
Other Prominent Video Editing Features
Apart from changing background, Filmora can perform A to Z video editing tasks. Let’s explore some of the key features to overview its fruitful functionalities:
Free Download For Win 7 or later(64-bit)
Free Download For macOS 10.14 or later
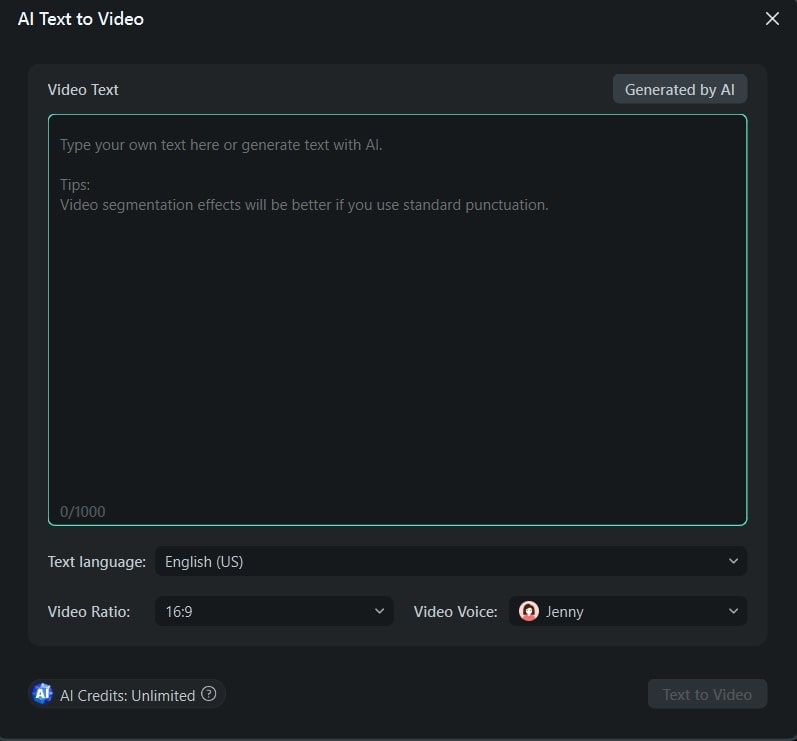
1. AI Text-to-Video
Who needs a camera and crew when you can effortlessly generate video from text? Filmora can transform your text into an engaging storytelling video with just text prompts. After getting the video, you can customize the video’s appearance with fonts, styles, and colors. Users can add smooth transitions between text elements for a cohesive flow.
2. AI Music Generator
Sometimes, we get tired of searching for music that perfectly aligns with our video content. In such cases, AI music generator saves us by providing the music we want. It offers you many options to choose from different genres and styles. You can set the music duration and number of tracks you want to generate. Then, you can make manual adjustments like balancing sound and auto normalization.

3. AI Image
Similar to text-to-video, Filmora can generate images from text. To do so, just describe your imagination in simple words. Then, you are asked to pick one resolution from given options. You can use the generated images in your projects directly. It allows you to generate an image from your chosen style. A few of the styles include Freestyle, Cyberpunk, and Futuristic.

4. AI Copilot Editing
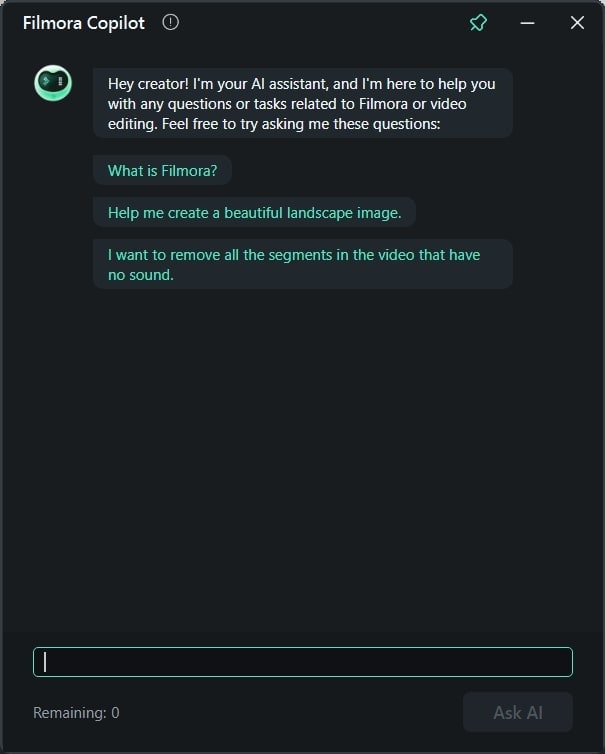
While editing projects, humans often require suggestions or assistance. For this purpose, Filmora provides you with AI Copilot as your personal AI assistant. It will prevent errors in your editing by sending error messages. You can get the best editing solution as per your needs. This way, the quality of your project gets increased.
5. AI Vocal Remover
With advanced algorithms, it is an exceptional feature of Filmora. It relieves your breath by removing unwanted vocals from your audio or video. You can now completely remove vocal sounds from the video and add your recorded ones. It’s an automated process that separates voice and background in the media panel.

Steps To Remove Background Using Two Unique Ways with Wondershare Filmora
Filmora is one of the easiest tools to operate that anyone can use to get desired results. It allows users to approach the same features in different ways. Similarly, there are two unique ways to remove or change the sky Photoshop background, which are given below.
Free Download For Win 7 or later(64-bit)
Free Download For macOS 10.14 or later
Method 1: Using Chroma Key
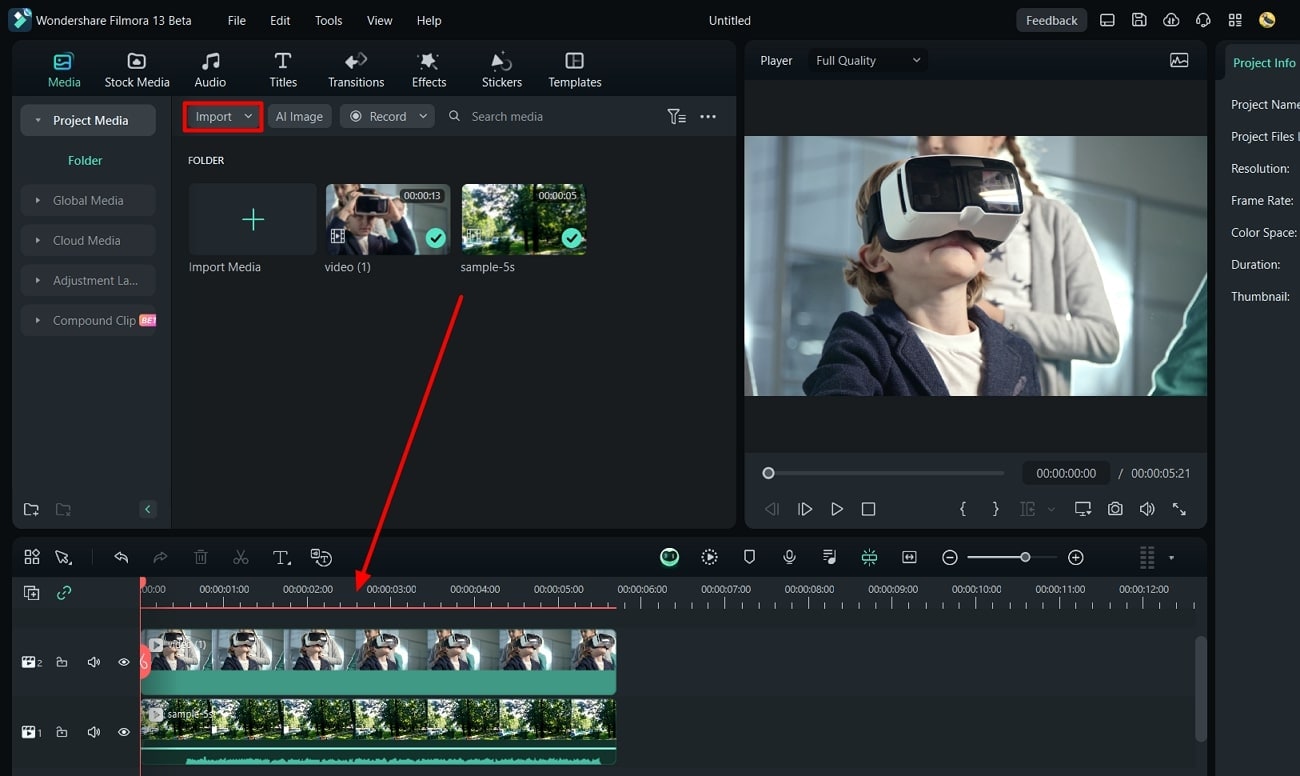
Step 1: Start your project in Filmora and import two files in the timeline. Bring the background clip first in the timeline, then the original file. Cut the unnecessary portion of background-clip.
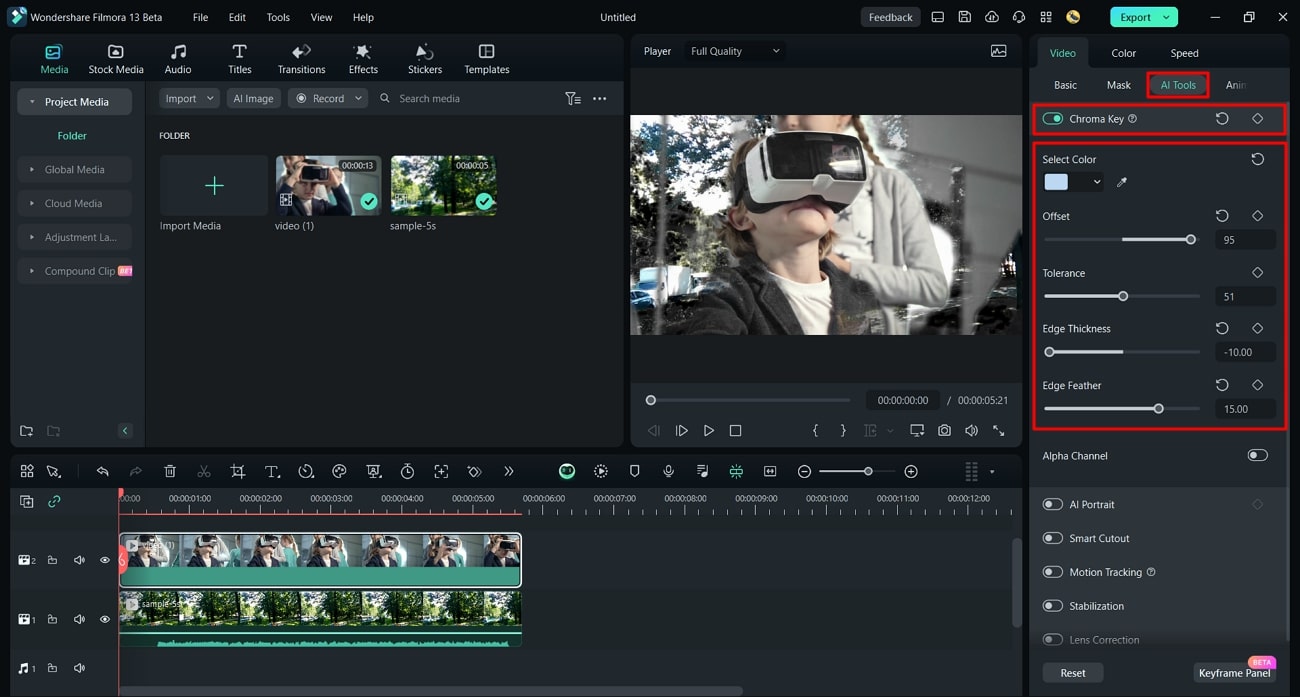
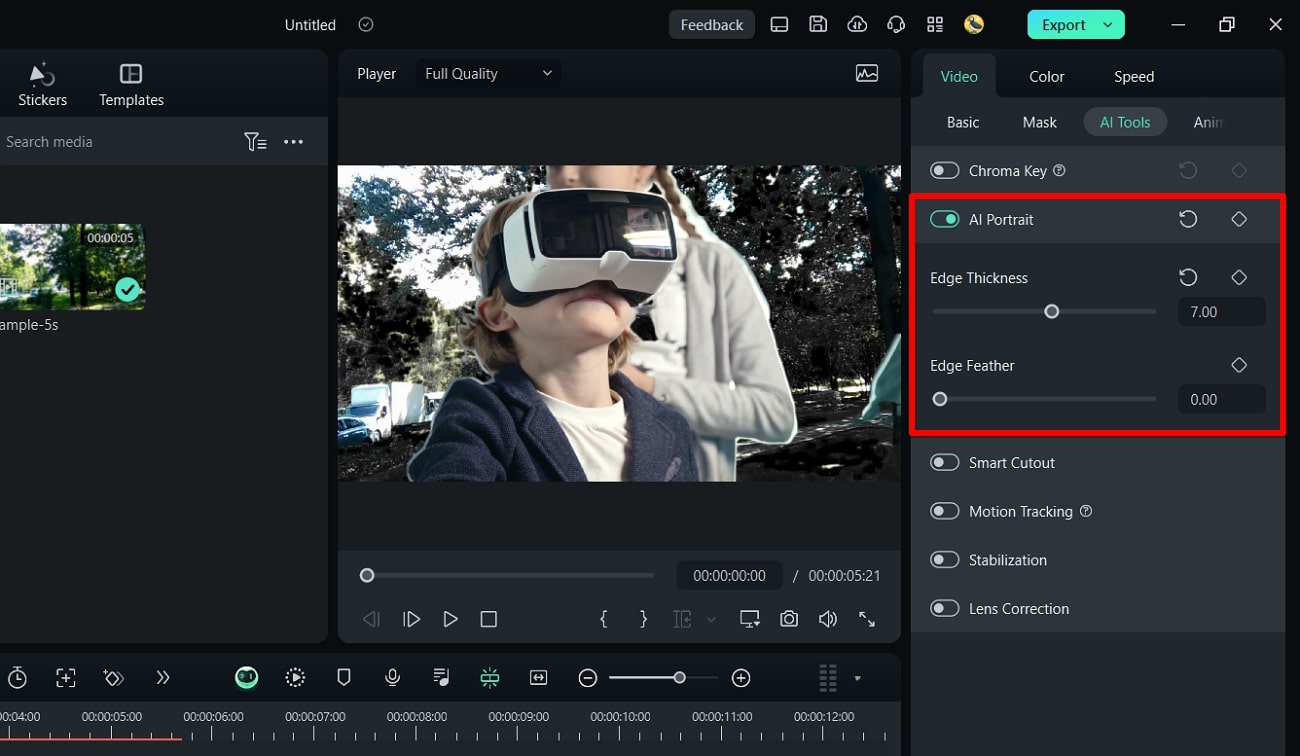
Step 2: Keep them selected and come to the “AI Tools” option in the right-side panel. Enable the “Chroma Key” toggle, and AI will automatically replace the background. You can use the “Tolerance,” “Edge Thickness,” and “Edge Feather” sliders for manual changes.
Method 2: Through AI Portrait
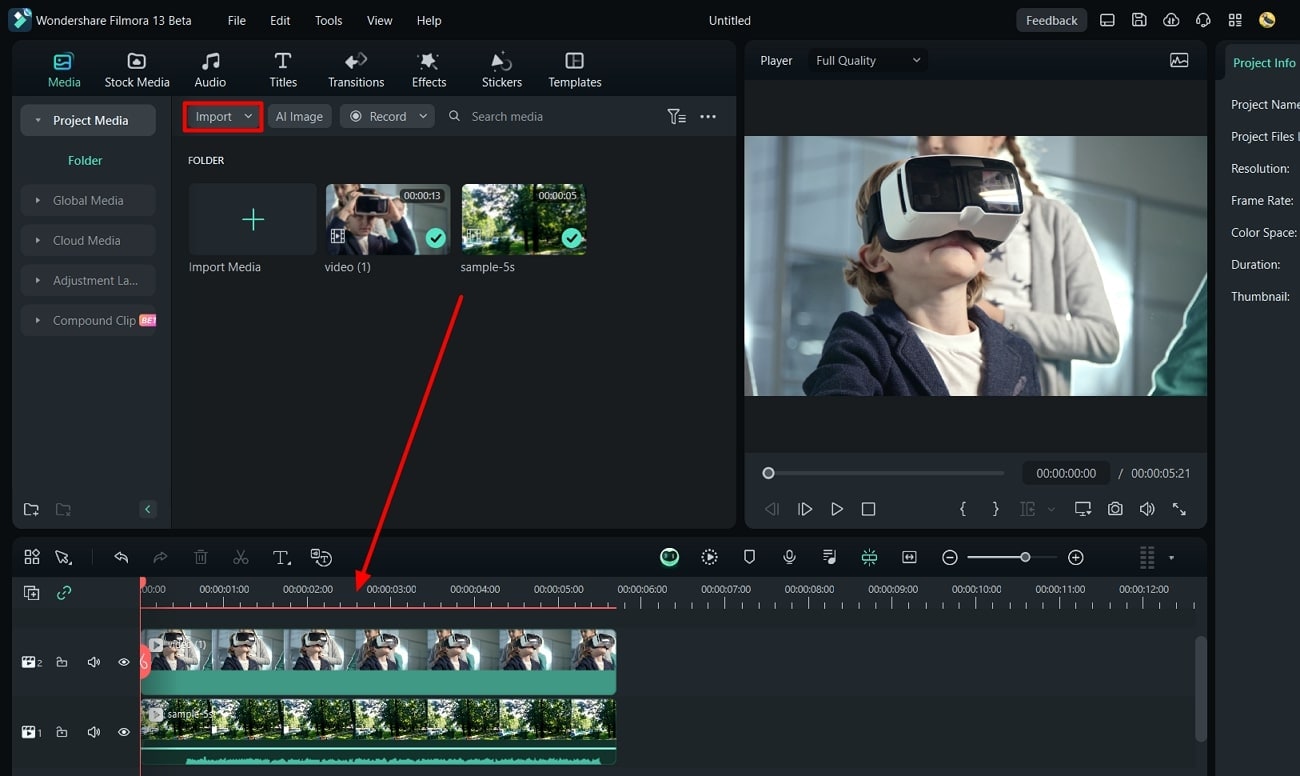
Step 1: Import your background clip and main video in Filmora 13. Place the background clip on track 1 and the main clip on the 2nd track in the timeline.
Step 2: Hold both of them and head to the right-side panel. Press the “AI Tools” option and scroll to access the “AI Portrait.” Enable that option, and your background will automatically change with AI. Now, you can make manual changes by moving the “Edge Thickness” and “Feather” sliders.
Conclusion
To wrap up, let’s say that Sky Photoshop sets the right tone for your media with landscapes. On the other hand, this feature might prove difficult for some users to handle. Thus, they can rely on Wondershare Filmora for convenience. Beginners and professionals can benefit from its extraordinary features in video editing.
Free Download Free Download Learn More

Part 1: How Good Has Photoshop Been in Helping Users Make Crisp Pictures and Media?
Adobe Photoshop is a graphics editor tool designed for professional digital art. It is widely used to grow business through designing virtual backgrounds and graphics. You can adjust the subject’s features and poses to make perfect portraits. To transform letters into artistic expressions, it offers Photoshop brushes and paints. Users can collaborate with their teammates and share work for approvals with this tool.
Key Features To Look Out In Adobe Photoshop
This tool can accelerate workflow with its latest features. It allows you to expand, add, and remove content from images with high-quality results. The following are some key features of Photoshop for your better understanding of this tool:
- It offers a sky replacement Photoshop feature that can change the sky from captured images.
- You can remove and replace your background in Photoshop and refine it as required.
- With the remove object feature, users can erase unwanted objects from images.
- Use the “Colorize” feature and make your black-and-white images colorful.
- Enhance workflow by using “Layer” masking that hides part of images without erasing them.
Part 2: A Detailed Guide on How to Replace Sky Background in Photoshop?
With AI integration in Adobe Photoshop, you can change skies with simple clicks. It provides a collection of skies from the Blue Skies, Spectacular, and sunset categories. Also, users can import any sky from their gallery or download one from presets. To do so, let us show you how to change the sky in Photoshop in given steps:
Step 1: Bring your desired image to the Adobe Photoshop. Head to the top toolbar and click the “Edit” option next to the “File.” Look for the “Sky Replacement” option from the list.

Step 2: After tapping “Sky Replacement,” you will get a respective screen on your front. Press the downward symbol next to the “Sky” and pick one sky from available options.

Step 3: Alternatively, you can hit the “+” icon and browse the sky image from your system. When you choose one, it gets added to the existing sky list. Select that and tap the “OK” button to apply changes in your media.

Part 3: An Alternative Solution: Wondershare Filmora Providing Workability with Easy Background Replacement
Changing sky in Photoshop is difficult for beginners and requires a basic skill set. It may take a lot of your time to understand its functionalities. That’s why choosing a tool with simple operation and high-quality output is important. In this regard, you should use Wondershare Filmora as a better option for everyone. It is a video editor that offers a variety of powerful features.
Using this tool, you can remove and change the background from your images or videos. With the integration of AI, it can automatically detect the object and foreground.
Other Prominent Video Editing Features
Apart from changing background, Filmora can perform A to Z video editing tasks. Let’s explore some of the key features to overview its fruitful functionalities:
Free Download For Win 7 or later(64-bit)
Free Download For macOS 10.14 or later
1. AI Text-to-Video
Who needs a camera and crew when you can effortlessly generate video from text? Filmora can transform your text into an engaging storytelling video with just text prompts. After getting the video, you can customize the video’s appearance with fonts, styles, and colors. Users can add smooth transitions between text elements for a cohesive flow.

2. AI Music Generator
Sometimes, we get tired of searching for music that perfectly aligns with our video content. In such cases, AI music generator saves us by providing the music we want. It offers you many options to choose from different genres and styles. You can set the music duration and number of tracks you want to generate. Then, you can make manual adjustments like balancing sound and auto normalization.

3. AI Image
Similar to text-to-video, Filmora can generate images from text. To do so, just describe your imagination in simple words. Then, you are asked to pick one resolution from given options. You can use the generated images in your projects directly. It allows you to generate an image from your chosen style. A few of the styles include Freestyle, Cyberpunk, and Futuristic.

4. AI Copilot Editing
While editing projects, humans often require suggestions or assistance. For this purpose, Filmora provides you with AI Copilot as your personal AI assistant. It will prevent errors in your editing by sending error messages. You can get the best editing solution as per your needs. This way, the quality of your project gets increased.

5. AI Vocal Remover
With advanced algorithms, it is an exceptional feature of Filmora. It relieves your breath by removing unwanted vocals from your audio or video. You can now completely remove vocal sounds from the video and add your recorded ones. It’s an automated process that separates voice and background in the media panel.

Steps To Remove Background Using Two Unique Ways with Wondershare Filmora
Filmora is one of the easiest tools to operate that anyone can use to get desired results. It allows users to approach the same features in different ways. Similarly, there are two unique ways to remove or change the sky Photoshop background, which are given below.
Free Download For Win 7 or later(64-bit)
Free Download For macOS 10.14 or later
Method 1: Using Chroma Key
Step 1: Start your project in Filmora and import two files in the timeline. Bring the background clip first in the timeline, then the original file. Cut the unnecessary portion of background-clip.

Step 2: Keep them selected and come to the “AI Tools” option in the right-side panel. Enable the “Chroma Key” toggle, and AI will automatically replace the background. You can use the “Tolerance,” “Edge Thickness,” and “Edge Feather” sliders for manual changes.

Method 2: Through AI Portrait
Step 1: Import your background clip and main video in Filmora 13. Place the background clip on track 1 and the main clip on the 2nd track in the timeline.

Step 2: Hold both of them and head to the right-side panel. Press the “AI Tools” option and scroll to access the “AI Portrait.” Enable that option, and your background will automatically change with AI. Now, you can make manual changes by moving the “Edge Thickness” and “Feather” sliders.

Conclusion
To wrap up, let’s say that Sky Photoshop sets the right tone for your media with landscapes. On the other hand, this feature might prove difficult for some users to handle. Thus, they can rely on Wondershare Filmora for convenience. Beginners and professionals can benefit from its extraordinary features in video editing.
Splitting Audio From Video in Sony Vegas [Step by Step]
The Sony Vegas Pro is software for professionally editing videos. There are many tools and effects available for audio and video that you can add respective to your requirements. The stabilization engine is available in Sony Vegas Pro to reduce the movements that you can observe the shaking in the videos. It helps in improving the quality of your content thoroughly. Sony Vegas pro also helps pin the texts or grading of the colours to apply objects in various dimensions.
You can use this software for editing, organizing or viewing the projects that are going on and present on the timeline. Even sharing the small parts of the video is possible. As a user of Sony Vegas Pro, it is a total choice of handling the colouring exposure to maintain the workflow. Here, the main discussion is regarding the split of the audio from the video in the Sony Vegas Pro. There are also some details about the substitute, which is Wondershare Filmora.
How can you separate audio from the video clips in Sony Vegas Pro?
The best features of Sony Vegas Pro help create, edit, trim or even crop the videos. You can use them in making videos worth viewing for your audience. Sony Vegas Pro can make your work on multiple screens at the same time. The most important characteristic is the extraction of the audio from the video.
Step 1: When you have finished the installation of the Sony Vegas Pro on your device, now import the video clip from which you want to extract the audio.
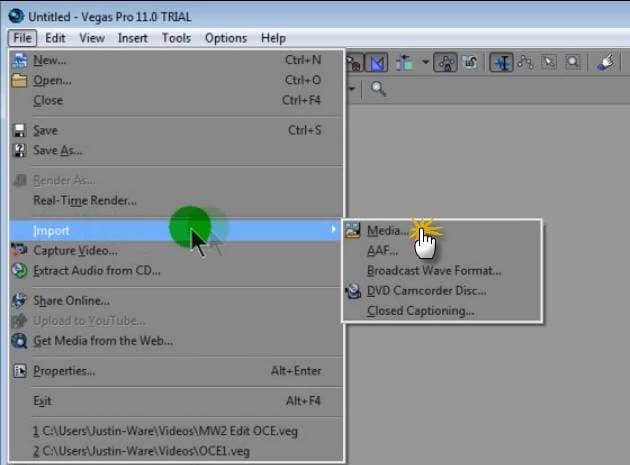
Step 2: Drag and drop your video clip in the editing area. Here, you can easily see the video and audio tracks are all together. Whatever effect you apply, both will show the results.
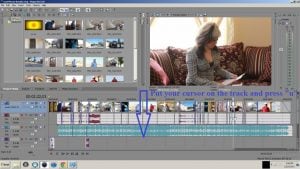
Step 3: You have to separate the audio from the video files in this step. After selecting the track, whether audio or video, simply press the “U” letter on your keyboard. In this step, keep holding the cursor. It permits you to keep moving the video clips quickly. Now, it is easy to download audio files from this area.
Step 4: The tracks are separate now, so you can move, delete or edit them individually. Definitely, it doesn’t affect the other track.
An easier way to split the audio from the video
Most graphic designers and video editors consider the Sony Vegas Pro as the professional level software for editing purposes. Due to the user interface of advanced level, high pricing and availability only for the Mac users make people look for options as the editing tool and accessible on both devices using Windows and Mac.
Filmora Video Editor is the best consideration among all of the editors. You can also use the Wondershare Filmora in dark mode as well. This feature helps the user edit in his comfort zone without causing any harm to the eyes. In the following steps, you can easily separate the audio from the videos in Wondershare Filmora.
For Win 7 or later (64-bit)
For macOS 10.14 or later
Features
- Simple interface and all the tools are easily available
- Just need a few clicks along the drag and drop to perform the functionalities
- Unlimited sharing of the videos on YouTube, Vimeo and many others
- Splitting of the clips and screen
- Easy to split up the audio from the video
Step 1: After running the Wondershare Filmora, select the ratio of your choice 4:3 or 16:9 for entering in the mode of editing. Click on the “Import” so you can add the photos, video and audio from the folder of your system. After importing the videos, drag and drop in the timeline. As a default, all the files get merged with one another with no gap.
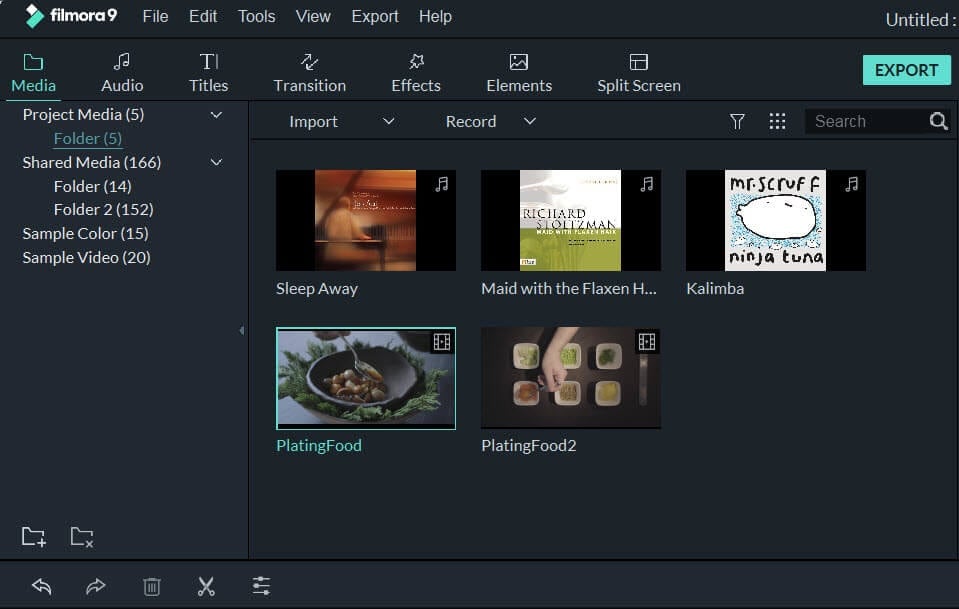
Step 2: Right-click on the video clip from which you want to extract the audio. Select the option of “Detach Audio” from the menu. Instantly, an audio file is visible on the screen, and it is the original one from the source.
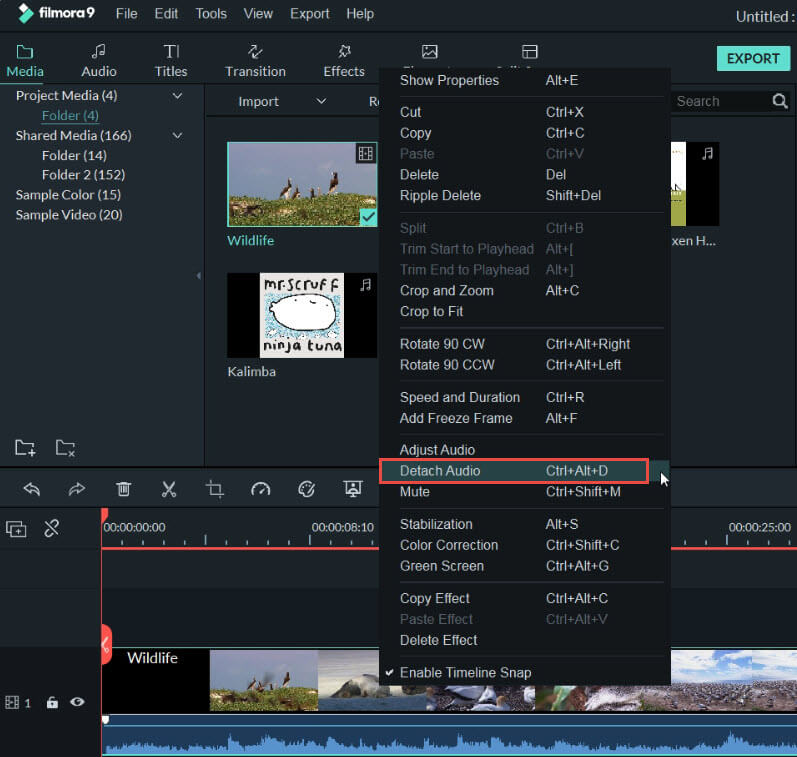
Step 3: Now, the audio track gets separated from the video successfully. Wondershare Filmora also offers to add one more audio file. Yes, it is also possible with this software.
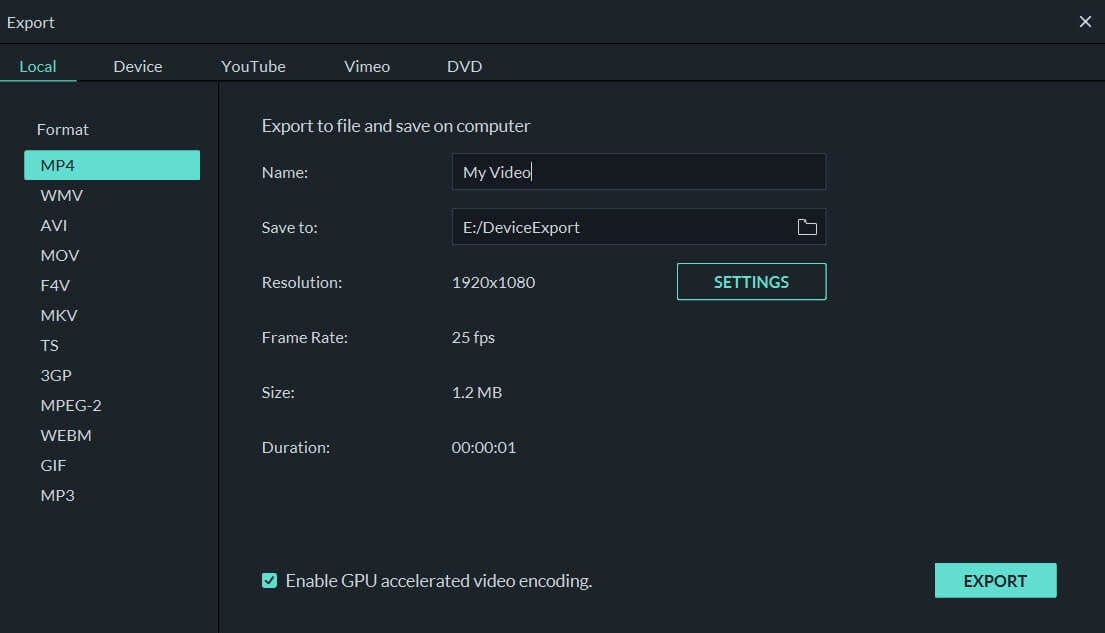
Step 4: After separating the audio from the video, it is simple to delete the track, whether it is audio or video that is not in use or want to use. Click on the “Export” option for saving your required audio tracks, or you can even select the “iPod” for playing the audio. You can also save the audio file separately as the new file on your hard drive. After exporting the audio tracks, load the project file again that has the frames for the video and later export the video file.
Whenever you think about the compatibility of editing software with different operating systems, Wondershare Filmora comes to mind as the first choice. All the new features of Wondershare Filmora in its latest version have received positive feedback and reviews. Definitely, it is the actual replacement of the previously used editors such as video editor in Windows or iMovie in Mac.
Wondershare Filmora not only adds the animation but as well offers customization. Adding the keyframes is very easy for the user to change the positions, scale or rotate the clips. The feature of colour matching is also available so you can match the clips from one frame to another. Even the shortcut keys are available for all the commands that bring effective and efficient editing tasks.
Just little guidance and assistance can help you use the Wondershare Filmora as the options are suitable in front of your screen. No more waiting and thinking; start using this most straightforward editor and enjoy all the features of Wondershare Filmora.
Step 2: Drag and drop your video clip in the editing area. Here, you can easily see the video and audio tracks are all together. Whatever effect you apply, both will show the results.

Step 3: You have to separate the audio from the video files in this step. After selecting the track, whether audio or video, simply press the “U” letter on your keyboard. In this step, keep holding the cursor. It permits you to keep moving the video clips quickly. Now, it is easy to download audio files from this area.
Step 4: The tracks are separate now, so you can move, delete or edit them individually. Definitely, it doesn’t affect the other track.
An easier way to split the audio from the video
Most graphic designers and video editors consider the Sony Vegas Pro as the professional level software for editing purposes. Due to the user interface of advanced level, high pricing and availability only for the Mac users make people look for options as the editing tool and accessible on both devices using Windows and Mac.
Filmora Video Editor is the best consideration among all of the editors. You can also use the Wondershare Filmora in dark mode as well. This feature helps the user edit in his comfort zone without causing any harm to the eyes. In the following steps, you can easily separate the audio from the videos in Wondershare Filmora.
For Win 7 or later (64-bit)
For macOS 10.14 or later
Features
- Simple interface and all the tools are easily available
- Just need a few clicks along the drag and drop to perform the functionalities
- Unlimited sharing of the videos on YouTube, Vimeo and many others
- Splitting of the clips and screen
- Easy to split up the audio from the video
Step 1: After running the Wondershare Filmora, select the ratio of your choice 4:3 or 16:9 for entering in the mode of editing. Click on the “Import” so you can add the photos, video and audio from the folder of your system. After importing the videos, drag and drop in the timeline. As a default, all the files get merged with one another with no gap.

Step 2: Right-click on the video clip from which you want to extract the audio. Select the option of “Detach Audio” from the menu. Instantly, an audio file is visible on the screen, and it is the original one from the source.

Step 3: Now, the audio track gets separated from the video successfully. Wondershare Filmora also offers to add one more audio file. Yes, it is also possible with this software.
Step 4: After separating the audio from the video, it is simple to delete the track, whether it is audio or video that is not in use or want to use. Click on the “Export” option for saving your required audio tracks, or you can even select the “iPod” for playing the audio. You can also save the audio file separately as the new file on your hard drive. After exporting the audio tracks, load the project file again that has the frames for the video and later export the video file.

Whenever you think about the compatibility of editing software with different operating systems, Wondershare Filmora comes to mind as the first choice. All the new features of Wondershare Filmora in its latest version have received positive feedback and reviews. Definitely, it is the actual replacement of the previously used editors such as video editor in Windows or iMovie in Mac.
Wondershare Filmora not only adds the animation but as well offers customization. Adding the keyframes is very easy for the user to change the positions, scale or rotate the clips. The feature of colour matching is also available so you can match the clips from one frame to another. Even the shortcut keys are available for all the commands that bring effective and efficient editing tasks.
Just little guidance and assistance can help you use the Wondershare Filmora as the options are suitable in front of your screen. No more waiting and thinking; start using this most straightforward editor and enjoy all the features of Wondershare Filmora.
Step 2: Drag and drop your video clip in the editing area. Here, you can easily see the video and audio tracks are all together. Whatever effect you apply, both will show the results.

Step 3: You have to separate the audio from the video files in this step. After selecting the track, whether audio or video, simply press the “U” letter on your keyboard. In this step, keep holding the cursor. It permits you to keep moving the video clips quickly. Now, it is easy to download audio files from this area.
Step 4: The tracks are separate now, so you can move, delete or edit them individually. Definitely, it doesn’t affect the other track.
An easier way to split the audio from the video
Most graphic designers and video editors consider the Sony Vegas Pro as the professional level software for editing purposes. Due to the user interface of advanced level, high pricing and availability only for the Mac users make people look for options as the editing tool and accessible on both devices using Windows and Mac.
Filmora Video Editor is the best consideration among all of the editors. You can also use the Wondershare Filmora in dark mode as well. This feature helps the user edit in his comfort zone without causing any harm to the eyes. In the following steps, you can easily separate the audio from the videos in Wondershare Filmora.
For Win 7 or later (64-bit)
For macOS 10.14 or later
Features
- Simple interface and all the tools are easily available
- Just need a few clicks along the drag and drop to perform the functionalities
- Unlimited sharing of the videos on YouTube, Vimeo and many others
- Splitting of the clips and screen
- Easy to split up the audio from the video
Step 1: After running the Wondershare Filmora, select the ratio of your choice 4:3 or 16:9 for entering in the mode of editing. Click on the “Import” so you can add the photos, video and audio from the folder of your system. After importing the videos, drag and drop in the timeline. As a default, all the files get merged with one another with no gap.

Step 2: Right-click on the video clip from which you want to extract the audio. Select the option of “Detach Audio” from the menu. Instantly, an audio file is visible on the screen, and it is the original one from the source.

Step 3: Now, the audio track gets separated from the video successfully. Wondershare Filmora also offers to add one more audio file. Yes, it is also possible with this software.
Step 4: After separating the audio from the video, it is simple to delete the track, whether it is audio or video that is not in use or want to use. Click on the “Export” option for saving your required audio tracks, or you can even select the “iPod” for playing the audio. You can also save the audio file separately as the new file on your hard drive. After exporting the audio tracks, load the project file again that has the frames for the video and later export the video file.

Whenever you think about the compatibility of editing software with different operating systems, Wondershare Filmora comes to mind as the first choice. All the new features of Wondershare Filmora in its latest version have received positive feedback and reviews. Definitely, it is the actual replacement of the previously used editors such as video editor in Windows or iMovie in Mac.
Wondershare Filmora not only adds the animation but as well offers customization. Adding the keyframes is very easy for the user to change the positions, scale or rotate the clips. The feature of colour matching is also available so you can match the clips from one frame to another. Even the shortcut keys are available for all the commands that bring effective and efficient editing tasks.
Just little guidance and assistance can help you use the Wondershare Filmora as the options are suitable in front of your screen. No more waiting and thinking; start using this most straightforward editor and enjoy all the features of Wondershare Filmora.
Step 2: Drag and drop your video clip in the editing area. Here, you can easily see the video and audio tracks are all together. Whatever effect you apply, both will show the results.

Step 3: You have to separate the audio from the video files in this step. After selecting the track, whether audio or video, simply press the “U” letter on your keyboard. In this step, keep holding the cursor. It permits you to keep moving the video clips quickly. Now, it is easy to download audio files from this area.
Step 4: The tracks are separate now, so you can move, delete or edit them individually. Definitely, it doesn’t affect the other track.
An easier way to split the audio from the video
Most graphic designers and video editors consider the Sony Vegas Pro as the professional level software for editing purposes. Due to the user interface of advanced level, high pricing and availability only for the Mac users make people look for options as the editing tool and accessible on both devices using Windows and Mac.
Filmora Video Editor is the best consideration among all of the editors. You can also use the Wondershare Filmora in dark mode as well. This feature helps the user edit in his comfort zone without causing any harm to the eyes. In the following steps, you can easily separate the audio from the videos in Wondershare Filmora.
For Win 7 or later (64-bit)
For macOS 10.14 or later
Features
- Simple interface and all the tools are easily available
- Just need a few clicks along the drag and drop to perform the functionalities
- Unlimited sharing of the videos on YouTube, Vimeo and many others
- Splitting of the clips and screen
- Easy to split up the audio from the video
Step 1: After running the Wondershare Filmora, select the ratio of your choice 4:3 or 16:9 for entering in the mode of editing. Click on the “Import” so you can add the photos, video and audio from the folder of your system. After importing the videos, drag and drop in the timeline. As a default, all the files get merged with one another with no gap.

Step 2: Right-click on the video clip from which you want to extract the audio. Select the option of “Detach Audio” from the menu. Instantly, an audio file is visible on the screen, and it is the original one from the source.

Step 3: Now, the audio track gets separated from the video successfully. Wondershare Filmora also offers to add one more audio file. Yes, it is also possible with this software.
Step 4: After separating the audio from the video, it is simple to delete the track, whether it is audio or video that is not in use or want to use. Click on the “Export” option for saving your required audio tracks, or you can even select the “iPod” for playing the audio. You can also save the audio file separately as the new file on your hard drive. After exporting the audio tracks, load the project file again that has the frames for the video and later export the video file.

Whenever you think about the compatibility of editing software with different operating systems, Wondershare Filmora comes to mind as the first choice. All the new features of Wondershare Filmora in its latest version have received positive feedback and reviews. Definitely, it is the actual replacement of the previously used editors such as video editor in Windows or iMovie in Mac.
Wondershare Filmora not only adds the animation but as well offers customization. Adding the keyframes is very easy for the user to change the positions, scale or rotate the clips. The feature of colour matching is also available so you can match the clips from one frame to another. Even the shortcut keys are available for all the commands that bring effective and efficient editing tasks.
Just little guidance and assistance can help you use the Wondershare Filmora as the options are suitable in front of your screen. No more waiting and thinking; start using this most straightforward editor and enjoy all the features of Wondershare Filmora.
How to Concatenate Videos Using FFmpeg
Video editing is a crucial aspect of creating content for many people. Whether you’re a YouTuber, a marketer, or just someone who wants to share videos with friends and family, being able to edit and manipulate your videos is key. One of the most basic video editing tasks is concatenating videos, which combines multiple files to create one cohesive video.
FFmpeg is a powerful tool that allows you to do just that, and in this guide, we’ll walk you through the process of FFmpeg concatenate videos. Whether a beginner or an experienced video editor, this guide will provide you with all the information you need to seamlessly merge your videos. From installation to execution, we’ll cover it all so you can streamline your video editing process.
Overview and Installation of FFmpeg
FFmpeg is free, open-source project that allows you to record, convert, and stream digital audio and video. It is a command-line tool widely used in video editing and transcoding. FFmpeg can be used to concatenate videos and other tasks, such as adding subtitles, changing video resolution, and more. It is available for Windows, Mac, and Linux, making it a versatile and accessible tool for anyone to use.
Here’s how to install FFmpeg:
Step1 Log in to your Ubuntu server via SSH and update the package index.
$ sudo apt update
Step2 Install FFmpeg and all the required dependencies
$ sudo apt install ffmpeg
Step3 Verify the version of FFmpeg that you’ve installed.
$ ffmpeg -version
Prerequisite
Before we merge videos using FFmpeg, we must understand the various methods available to us. FFmpeg offers three ways to concatenate videos: a demuxer, a filter, or a protocol. However, each method has its own set of considerations, and the best method for you will depend on the properties of the videos you’re working with.
It’s crucial to ensure that all encoding-related properties align with your chosen method. This includes the timebase, height and width, codecs, and pixel format. Some methods require the videos you’re merging to have the same encoding, while others allow for different encodings. It’s essential to keep this in mind to ensure that the final video is seamless without any breaks. Remember that these prerequisites will help you have a smooth process.
Concatenate Videos With Same Codecs Using FFmpeg
If the videos you want to concatenate have the same codec, you can use the FFmpeg “concat” demuxer or protocol to join them together. This simple and efficient method doesn’t require re-encoding the videos, saving time and preserving the original quality. This section will review the steps to concatenate videos using the “concat” demuxer and “concat” protocols in FFmpeg.
Merge Videos With the “Concat” Demuxer
The concat demuxer in FFmpeg allows you to join together multiple video files with the same codecs by reading a list of file paths from a text file and demuxing them in sequence. Each video starts where the previous one finishes without needing to re-encode the videos. Here’s how to do it:
Step1 Create a .txt file and list the paths of the video files you want to merge.
Join_video.txt
file /Users/Video/input1.mp4
file /Users/Video/input2.mp4
![]()
Note: You can add more than two video files.
Step2 Run the FFmpeg command:
ffmpeg -f concat -safe 0 -i join_video.txt -c copy output_demuxer.mp4
![]()
Note: -safe 0 is added to accept any file name.
-c copy will copy all the streams.
As this method allows you to “stream copy” the files instead of re-encoding them, the concatenation is very fast. This can be a good option if you have videos with the same codecs and want to join them quickly without losing quality.
Join Videos With the “Concat” Protocol
The concat protocol in FFmpeg allows you to join together multiple video files in a specific format that supports file-level concatenation, such as MPEG-2 TS. However, it cannot be used for other video formats like MP4 and WEBM.
Here’s how to use the “concat protocol:
Step1 Run the FFmpeg command:
ffmpeg -i “concat:input1.ts|input2.ts” -c copy output_protocol.ts
![]()
Note: The concat protocol allows you to “stream copy” the files by adding the option -c copy.
Step2 Input the file name of the video using this code:
ffmpeg -i “concat:input1.mp4|input2.mp4” -c copy output_protocol.mp4
![]()
Note: If you try to use this method on video formats that are not supported, only the first input video will be saved in the output video. And the video ends after the first video.
Although this method is limited in terms of supported video formats, it’s very easy to use if you merge videos in the supported formats. It’s a single command in the terminal without needing a text file. Additionally, using the -c copy option makes it efficient as it doesn’t require re-encoding, saving time.
Concatenate MP4 Video Files of Different Codecs & Resolutions Using FFmpeg
If the videos you want to concatenate have different codecs or resolutions, you can still use FFmpeg to join them together. However, this method requires re-encoding the videos, which can take longer and may result in a loss of quality. This section will cover the steps to concatenate videos with different codecs or resolutions using FFmpeg.
Here’s how to do it:
Step1 Provide the names of the input files to FFmpeg.
ffmpeg -i file1.mp4 -i file2.mp4 -i file3.mp4 \
Step2 Use the filter_complex filtergraph parameter to instruct FFmpeg from where to take the audio and video.
-filter_complex “[0:v] [0:a] [1:v] [1:a] [2:v] [2:a]
![]()
Note: [0:v][0:a] means FFmpeg needs to take the video and audio from the 0th video (file1.mp4).
Step3 Tell FFmpeg to concatenate three files (n=3).
concat=n=3:v=1:a=1 [vv] [aa]“ \
![]()
Note: The v=1:a=1 implies one stream for the audio and one stream for the video.
Step4 Map these audio and video outputs to the final video container. This is done as follows:
-map “[vv]“ -map “[aa]“ mergedVideo.mp4
It is important to note that this method requires re-encoding the videos, which can take more time and may result in a loss of quality. However, it offers the flexibility of filtering the videos before concatenating them. The filter_complex method in FFmpeg allows you to concatenate videos of different codecs and resolutions. The final step is to map the audio and video outputs to the final video container. This can be done using the -map command.
Concatenate Videos With Multiple Audio Streams Using FFmpeg
Concatenating videos with multiple audio streams can be more complex than concatenating videos with a single audio stream. This section will cover the steps to concatenate videos with multiple audio streams using FFmpeg. We’ll be using the filter_complex method in FFmpeg, which allows you to manipulate and concatenate multiple audio and video streams in a single command. This method is more advanced but allows you to join videos with different audio streams and create a final video with multiple audio tracks.
Step1 Specify the input files and opening.mkv, episode.mkv, and ending.mkv:
$ ffmpeg -i opening.mkv -i episode.mkv -i ending.mkv -filter_complex
Step2 Use the filter_complex parameter in FFmpeg to specify the input streams for the video and audio.
[0:0] [0:1] [0:2] [1:0] [1:1] [1:2] [2:0] [2:1] [2:2]
![]()
Note: Single video stream ([0:0], [1:0], [2:0])
Dual audio streams ([0:1][0:2], [1:1][1:2], [2:1][2:2])
Step3 Use the concat filter to specify that you want to concatenate 3 files (n=3) with 1 video stream (v=1) and 2 audio streams (a=2). Specify the output streams as [v], [a1], [a2]:
concat=n=3:v=1:a=2 [v] [a1] [a2]
Step4 Use the -map option to map the output streams to the final video container:
-map ‘[v]‘ -map ‘[a1]‘ -map ‘[a2]‘ output.mkv
[Bonus] Join Videos Together With Filmora
While FFmpeg offers a wide range of options for joining videos together, it can have a steep learning curve for some users. An alternative method for joining videos is using Filmora. Wondershare Filmora is a user-friendly video editing software that allows you to easily join multiple videos. It’s a great option for users new to video editing or needing experience with command-line tools like FFmpeg.
Free Download For Win 7 or later(64-bit)
Free Download For macOS 10.14 or later
Filmora has a simple drag-and-drop interface, making adding, arranging, and editing videos and audio tracks easy. Additionally, it offers various features like split, trim, crop, merge, and more. It also has various effects, transitions, and animations to enhance the overall look of your video. With Filmora, you can create professional-looking videos with minimal effort.
How-to Steps
Here’s how to merge videos using Filmora:
Step1 Open Filmora and click “New Project.”

Step2 Go to “File“ > “Import Media“ > “Import Media Files“ to add your video files to the media library.

Step3 Drag and drop the files you want to merge from the media library to the timeline, and then you’ll get the merged video seamlessly.

Step4 Edit your video.

Step5 After editing, click the “Export“ tab to save your videos.

Conclusion
FFmpeg is a powerful tool that allows you to concatenate videos in various ways. Whether you’re working with videos of the same codecs and resolutions or videos with multiple audio streams, FFmpeg can handle it. However, for users new to video editing or needing experience with command-line tools, using Filmora can be a more user-friendly option. It offers a simple drag-and-drop interface and a variety of features and effects to enhance the overall look of your video.
Step2 Run the FFmpeg command:
ffmpeg -f concat -safe 0 -i join_video.txt -c copy output_demuxer.mp4
![]()
Note: -safe 0 is added to accept any file name.
-c copy will copy all the streams.
As this method allows you to “stream copy” the files instead of re-encoding them, the concatenation is very fast. This can be a good option if you have videos with the same codecs and want to join them quickly without losing quality.
Join Videos With the “Concat” Protocol
The concat protocol in FFmpeg allows you to join together multiple video files in a specific format that supports file-level concatenation, such as MPEG-2 TS. However, it cannot be used for other video formats like MP4 and WEBM.
Here’s how to use the “concat protocol:
Step1 Run the FFmpeg command:
ffmpeg -i “concat:input1.ts|input2.ts” -c copy output_protocol.ts
![]()
Note: The concat protocol allows you to “stream copy” the files by adding the option -c copy.
Step2 Input the file name of the video using this code:
ffmpeg -i “concat:input1.mp4|input2.mp4” -c copy output_protocol.mp4
![]()
Note: If you try to use this method on video formats that are not supported, only the first input video will be saved in the output video. And the video ends after the first video.
Although this method is limited in terms of supported video formats, it’s very easy to use if you merge videos in the supported formats. It’s a single command in the terminal without needing a text file. Additionally, using the -c copy option makes it efficient as it doesn’t require re-encoding, saving time.
Concatenate MP4 Video Files of Different Codecs & Resolutions Using FFmpeg
If the videos you want to concatenate have different codecs or resolutions, you can still use FFmpeg to join them together. However, this method requires re-encoding the videos, which can take longer and may result in a loss of quality. This section will cover the steps to concatenate videos with different codecs or resolutions using FFmpeg.
Here’s how to do it:
Step1 Provide the names of the input files to FFmpeg.
ffmpeg -i file1.mp4 -i file2.mp4 -i file3.mp4 \
Step2 Use the filter_complex filtergraph parameter to instruct FFmpeg from where to take the audio and video.
-filter_complex “[0:v] [0:a] [1:v] [1:a] [2:v] [2:a]
![]()
Note: [0:v][0:a] means FFmpeg needs to take the video and audio from the 0th video (file1.mp4).
Step3 Tell FFmpeg to concatenate three files (n=3).
concat=n=3:v=1:a=1 [vv] [aa]“ \
![]()
Note: The v=1:a=1 implies one stream for the audio and one stream for the video.
Step4 Map these audio and video outputs to the final video container. This is done as follows:
-map “[vv]“ -map “[aa]“ mergedVideo.mp4
It is important to note that this method requires re-encoding the videos, which can take more time and may result in a loss of quality. However, it offers the flexibility of filtering the videos before concatenating them. The filter_complex method in FFmpeg allows you to concatenate videos of different codecs and resolutions. The final step is to map the audio and video outputs to the final video container. This can be done using the -map command.
Concatenate Videos With Multiple Audio Streams Using FFmpeg
Concatenating videos with multiple audio streams can be more complex than concatenating videos with a single audio stream. This section will cover the steps to concatenate videos with multiple audio streams using FFmpeg. We’ll be using the filter_complex method in FFmpeg, which allows you to manipulate and concatenate multiple audio and video streams in a single command. This method is more advanced but allows you to join videos with different audio streams and create a final video with multiple audio tracks.
Step1 Specify the input files and opening.mkv, episode.mkv, and ending.mkv:
$ ffmpeg -i opening.mkv -i episode.mkv -i ending.mkv -filter_complex
Step2 Use the filter_complex parameter in FFmpeg to specify the input streams for the video and audio.
[0:0] [0:1] [0:2] [1:0] [1:1] [1:2] [2:0] [2:1] [2:2]
![]()
Note: Single video stream ([0:0], [1:0], [2:0])
Dual audio streams ([0:1][0:2], [1:1][1:2], [2:1][2:2])
Step3 Use the concat filter to specify that you want to concatenate 3 files (n=3) with 1 video stream (v=1) and 2 audio streams (a=2). Specify the output streams as [v], [a1], [a2]:
concat=n=3:v=1:a=2 [v] [a1] [a2]
Step4 Use the -map option to map the output streams to the final video container:
-map ‘[v]‘ -map ‘[a1]‘ -map ‘[a2]‘ output.mkv
[Bonus] Join Videos Together With Filmora
While FFmpeg offers a wide range of options for joining videos together, it can have a steep learning curve for some users. An alternative method for joining videos is using Filmora. Wondershare Filmora is a user-friendly video editing software that allows you to easily join multiple videos. It’s a great option for users new to video editing or needing experience with command-line tools like FFmpeg.
Free Download For Win 7 or later(64-bit)
Free Download For macOS 10.14 or later
Filmora has a simple drag-and-drop interface, making adding, arranging, and editing videos and audio tracks easy. Additionally, it offers various features like split, trim, crop, merge, and more. It also has various effects, transitions, and animations to enhance the overall look of your video. With Filmora, you can create professional-looking videos with minimal effort.
How-to Steps
Here’s how to merge videos using Filmora:
Step1 Open Filmora and click “New Project.”

Step2 Go to “File“ > “Import Media“ > “Import Media Files“ to add your video files to the media library.

Step3 Drag and drop the files you want to merge from the media library to the timeline, and then you’ll get the merged video seamlessly.

Step4 Edit your video.

Step5 After editing, click the “Export“ tab to save your videos.

Conclusion
FFmpeg is a powerful tool that allows you to concatenate videos in various ways. Whether you’re working with videos of the same codecs and resolutions or videos with multiple audio streams, FFmpeg can handle it. However, for users new to video editing or needing experience with command-line tools, using Filmora can be a more user-friendly option. It offers a simple drag-and-drop interface and a variety of features and effects to enhance the overall look of your video.
Replacing Sky in Your Pictures Using Online and Offline Tools
An image’s background is essential because it provides context for your shot. Your main subject’s interaction with the background gives the picture more narrative and reinforces its story. If your background isn’t captivating, it can ruin everything. To make a photo appear more appealing or professional, you must know how to eliminate backgrounds effectively and edit photos with backgrounds.
This article aims to provide you with all the necessary information on how you can edit the sky and background. The article will emphasize some leading software for photo editing sky. You can gain knowledge about these tools and their key functionalities. In addition, you’ll read about an offline alternative to changing the sky in a photo.
Sky Replacement A cross-platform works like magic for background removal or sky replacement photos!
Free Download Free Download Learn More

Part 1: Top 8 Photo Sky Editor and Replacers Online [Must View]
Photo editing sky can be very beneficial as it makes your picture more focused and removes undesired objects. This part will take you through the top 8 sky-replacing apps. So, start exploring and choose the one you want:
1. SnapEdit
SnapEdit is one of the most incredible online tools with an AI sky replacement image option. With this function, users can add a more eye-catching sky background to their images instead of the default one. The tool modifies the sky background’s colors, textures, and gradients using artificial intelligence. Additionally, it offers a selection from a library of more attractive, lifelike replacement possibilities.

Key Features
- The tool can remove the grey sky with just a single click and give life to your background.
- If your outfit or tone doesn’t match the sky, you can change its hue according to your liking.
- SnapEdit lets you add and remove objects from the sky so your aesthetic picture is not ruined.
Pricing
| Pricing Plan | Billing |
|---|---|
| Pro | $5/month |
2. Fotor
With this sky replacement photo tool, you can add artistic skies to your images in place of boring ones. A single click can add breathtaking sunny, gloomy, or starry skies to your photos. You can utilize a variety of sky shots, like starry skies, blue skies, and night skies over Hawaii. This adds creativity and beauty to your images. You can also create a custom sky background for any uploaded photos.

Key Features
- You can replace the sky with any other background image. It doesn’t have to be just the sky.
- The tool offers professional Photoshop-like services without going through the complexities.
- AI sky replacement and automated editing give your sky a changed and improved look within seconds.
Pricing
| Pricing Plans | Billing |
|---|---|
| Fotor Pro | $2.66/month |
| Fotor Pro+ | $5.99/month |
3. Wondershare AI Lab
With this tool’s photo editing sky function, you can add a new sky to your images using AI technology. You can alter the sky in your pictures to a bright blue, pink, purple, and grey sky to add drama and interest. The tool can instantly replace the sky in your photo with the desired one and add a unique touch to your horizon. You can upload images up to 5MB, and the application supports most file formats.

Key Features
- The customized graphics will give you control over your photos and make them more beautiful.
- You can change the weather in your photos by replacing and editing the sky to make it better with your picture.
- You can increase sales and boost your post by adding a solid and clear background to the pictures.
Pricing
Free
4. Pixlr
Pixlr can easily swap out the sky in your images for a more visually stimulating background. In a split second, Pixlr’s AI-powered background remover can replace the backdrop image with an image of the sky and erase the original image. The creative and smart functions of the tool make it easy for everyone to change the sky in a photo.

Key Features
- Pixlr allows you to add different kinds of backgrounds to your photos. You can even add pictures directly from your system.
- The customization options help you to blend the background with your photos perfectly.
- The lasso tool will remove the original sky image clearly and precisely, even from the challenging edges.
Pricing
| Pricing Plans | Annual Billing |
|---|---|
| Plus | $0.99/month |
| Premium | $4.90/month |
| Team | $9.91/month |
5. Autoenhance.ai
Autoenhance.ai can identify the sky in your photos and replace it with one from their large collection of excellent sky photos that is more aesthetically pleasing. The tool enhances the overall effect of the picture by using AI technology to replace the sky in your picture subtly. Its sky replacement function can help replace the dreary sky with a sunny one, giving the photos a cheery and inviting appearance.

Key Features
- The photo enhancer can automatically enhance the color of the sky and upscale the quality of the image.
- You can efficiently replace or add sky to a photo with the help of AI.
- The AI can efficiently crop complex backgrounds such as trees or a flying or walking object.
Pricing
| Pricing Plans | Billing Per Month |
|---|---|
| Pay as you go | Minimum: $1.50/1 image Maximum: $309.99/1000 images |
| Subscriptions | Minimum: $49.99/75 images Maximum: $1249.99/10,000 images |
| Enterprise | Minimum: $2189.99/20,000 images Maximum: Custom/50,000+ images |
6. PhotoScissors
Using the photo editing program PhotoScissors, you can change around the sky in your images. The tool’s purpose is to assist you in correcting images that have incorrect exposure or white balance settings on your camera. It just takes three steps around the same number of minutes to change the sky in the photo online. All you need to do is make a few selections, and the tool will handle the rest.

Key Features
- You can remove the image background programmatically using the API of PhotoScissors.
- The tool accurately separates any image from the background or the sky.
- You can enhance the look of the sky quickly and easily by using its editing and customization options.
Pricing
| Number of Credits | Pricing |
|---|---|
| 1000 Credits | $29.99 |
| 200 Credits | $19.99 |
| 50 Credits | $9.99 |
| 10 Credits | $4.99 |
7. BeFunky
BeFunky’s AI-powered Sky Replacer is a specialized tool that recognizes the image’s sky and foreground to replace the sky precisely. The program is an all-in-one sky editor since it contains all the tools needed to alter the sky and foreground separately. This tool can edit the sky and front location so well that grey and dull photos become colorful and brighter.

Key Features
- The tool has a specialized feature for sky replacement images that can immediately change the sky.
- The editing feature enhances the lighting, saturation, and overall look.
- You can choose or download any sky photo and add it as your background.
Pricing
| Pricing Plan | Annual Billing |
|---|---|
| BeFunky Plus | $5.99/month |
8. remove.bg
With the sky replacement feature offered by the remove.bg software, you can add a new sky to your pictures. When you wish to enhance depth or alter the tone of your photo, this tool comes in handy. The software automatically replaces your photo’s background with a fresh sky image using artificial intelligence (AI). A range of sky photos are available for selection, including starry, dark sunny, galaxy sky, and more.

Key Features
- You can create impressive real estate photos by replacing the dull sky background with a fresh one.
- The tool can do batch processing, so you can drag many photos at once and edit them.
- You can remove any kind of background with great precision to get the perfect cutout.
Pricing
| Pricing Plan | Annual Billing/month |
|---|---|
| Subscription Plan | Minimum: $0.20/40 Credits Maximum: Custom Pricing |
| Pay as you go | Minimum: $1.99/1 Maximum: Custom Pricing |
Part 2: Wondershare Filmora: A Comprehensive Offline Solution for Background Replacement with Perfection
Background replacement can assist you in highlighting the primary topic to attract viewers while giving your products or marketing materials a polished, professional appearance. Many users look for offline background removal to edit their photos immediately. If you’re working on some projects, offline tools are a much safer option as they depend on the availability of the internet network.
When you think about an app that works offline and provides professional quality background removal, only one name comes to mind: Wondershare Filmora . The tool works like magic for background removal or sky replacement photos. You can completely rely on it for all your video editing and generating needs because of its intelligent AI features. It suits both professionals and beginners because of the ease of use and efficient AI system.
Free Download For Win 7 or later(64-bit)
Free Download For macOS 10.14 or later
Steps To Do Background Replacement Using Wondershare Filmora
There are various methods of removing and replacing the background in Wondershare Filmora. Follow the step-by-step instructions given below to use this function:
Step 1: Import Media Files To Filmora
Open the Wondershare Filmora tool and click on “New Project.” Now import your media file into the tool and then drag and drop it into the editing timeline. Import both the media files, i.e., the file from which you want to remove the background and the file you will use as a background.

Step 2: Remove Background from Imported Media
Now that both files have been brought together click on the media file that needs the background replacement. On the right side of the screen, you will see the editing tools of the app. Select the media type you edit and click the “AI Tools” option. Now, toggle on the “Chroma Key.”

Step 3: Preview and Export Final Results
Once you click on the chroma key option, the app automatically replaces the background of your media file. You can preview it, and if you are satisfied with the results, click “Export,” and save your new video.

Conclusion
Background removal and sky replacement images have become vital tools for content creators. The background of your images and videos is important as it sets a complete tone for the media. Many users use applications to replace the sky and background.
It’s important to do thorough research before you choose the right app for the job. This article gives you the best possible solutions for background replacement. You can professionally change the background of your media after reading the article.
Free Download Free Download Learn More

Part 1: Top 8 Photo Sky Editor and Replacers Online [Must View]
Photo editing sky can be very beneficial as it makes your picture more focused and removes undesired objects. This part will take you through the top 8 sky-replacing apps. So, start exploring and choose the one you want:
1. SnapEdit
SnapEdit is one of the most incredible online tools with an AI sky replacement image option. With this function, users can add a more eye-catching sky background to their images instead of the default one. The tool modifies the sky background’s colors, textures, and gradients using artificial intelligence. Additionally, it offers a selection from a library of more attractive, lifelike replacement possibilities.

Key Features
- The tool can remove the grey sky with just a single click and give life to your background.
- If your outfit or tone doesn’t match the sky, you can change its hue according to your liking.
- SnapEdit lets you add and remove objects from the sky so your aesthetic picture is not ruined.
Pricing
| Pricing Plan | Billing |
|---|---|
| Pro | $5/month |
2. Fotor
With this sky replacement photo tool, you can add artistic skies to your images in place of boring ones. A single click can add breathtaking sunny, gloomy, or starry skies to your photos. You can utilize a variety of sky shots, like starry skies, blue skies, and night skies over Hawaii. This adds creativity and beauty to your images. You can also create a custom sky background for any uploaded photos.

Key Features
- You can replace the sky with any other background image. It doesn’t have to be just the sky.
- The tool offers professional Photoshop-like services without going through the complexities.
- AI sky replacement and automated editing give your sky a changed and improved look within seconds.
Pricing
| Pricing Plans | Billing |
|---|---|
| Fotor Pro | $2.66/month |
| Fotor Pro+ | $5.99/month |
3. Wondershare AI Lab
With this tool’s photo editing sky function, you can add a new sky to your images using AI technology. You can alter the sky in your pictures to a bright blue, pink, purple, and grey sky to add drama and interest. The tool can instantly replace the sky in your photo with the desired one and add a unique touch to your horizon. You can upload images up to 5MB, and the application supports most file formats.

Key Features
- The customized graphics will give you control over your photos and make them more beautiful.
- You can change the weather in your photos by replacing and editing the sky to make it better with your picture.
- You can increase sales and boost your post by adding a solid and clear background to the pictures.
Pricing
Free
4. Pixlr
Pixlr can easily swap out the sky in your images for a more visually stimulating background. In a split second, Pixlr’s AI-powered background remover can replace the backdrop image with an image of the sky and erase the original image. The creative and smart functions of the tool make it easy for everyone to change the sky in a photo.

Key Features
- Pixlr allows you to add different kinds of backgrounds to your photos. You can even add pictures directly from your system.
- The customization options help you to blend the background with your photos perfectly.
- The lasso tool will remove the original sky image clearly and precisely, even from the challenging edges.
Pricing
| Pricing Plans | Annual Billing |
|---|---|
| Plus | $0.99/month |
| Premium | $4.90/month |
| Team | $9.91/month |
5. Autoenhance.ai
Autoenhance.ai can identify the sky in your photos and replace it with one from their large collection of excellent sky photos that is more aesthetically pleasing. The tool enhances the overall effect of the picture by using AI technology to replace the sky in your picture subtly. Its sky replacement function can help replace the dreary sky with a sunny one, giving the photos a cheery and inviting appearance.

Key Features
- The photo enhancer can automatically enhance the color of the sky and upscale the quality of the image.
- You can efficiently replace or add sky to a photo with the help of AI.
- The AI can efficiently crop complex backgrounds such as trees or a flying or walking object.
Pricing
| Pricing Plans | Billing Per Month |
|---|---|
| Pay as you go | Minimum: $1.50/1 image Maximum: $309.99/1000 images |
| Subscriptions | Minimum: $49.99/75 images Maximum: $1249.99/10,000 images |
| Enterprise | Minimum: $2189.99/20,000 images Maximum: Custom/50,000+ images |
6. PhotoScissors
Using the photo editing program PhotoScissors, you can change around the sky in your images. The tool’s purpose is to assist you in correcting images that have incorrect exposure or white balance settings on your camera. It just takes three steps around the same number of minutes to change the sky in the photo online. All you need to do is make a few selections, and the tool will handle the rest.

Key Features
- You can remove the image background programmatically using the API of PhotoScissors.
- The tool accurately separates any image from the background or the sky.
- You can enhance the look of the sky quickly and easily by using its editing and customization options.
Pricing
| Number of Credits | Pricing |
|---|---|
| 1000 Credits | $29.99 |
| 200 Credits | $19.99 |
| 50 Credits | $9.99 |
| 10 Credits | $4.99 |
7. BeFunky
BeFunky’s AI-powered Sky Replacer is a specialized tool that recognizes the image’s sky and foreground to replace the sky precisely. The program is an all-in-one sky editor since it contains all the tools needed to alter the sky and foreground separately. This tool can edit the sky and front location so well that grey and dull photos become colorful and brighter.

Key Features
- The tool has a specialized feature for sky replacement images that can immediately change the sky.
- The editing feature enhances the lighting, saturation, and overall look.
- You can choose or download any sky photo and add it as your background.
Pricing
| Pricing Plan | Annual Billing |
|---|---|
| BeFunky Plus | $5.99/month |
8. remove.bg
With the sky replacement feature offered by the remove.bg software, you can add a new sky to your pictures. When you wish to enhance depth or alter the tone of your photo, this tool comes in handy. The software automatically replaces your photo’s background with a fresh sky image using artificial intelligence (AI). A range of sky photos are available for selection, including starry, dark sunny, galaxy sky, and more.

Key Features
- You can create impressive real estate photos by replacing the dull sky background with a fresh one.
- The tool can do batch processing, so you can drag many photos at once and edit them.
- You can remove any kind of background with great precision to get the perfect cutout.
Pricing
| Pricing Plan | Annual Billing/month |
|---|---|
| Subscription Plan | Minimum: $0.20/40 Credits Maximum: Custom Pricing |
| Pay as you go | Minimum: $1.99/1 Maximum: Custom Pricing |
Part 2: Wondershare Filmora: A Comprehensive Offline Solution for Background Replacement with Perfection
Background replacement can assist you in highlighting the primary topic to attract viewers while giving your products or marketing materials a polished, professional appearance. Many users look for offline background removal to edit their photos immediately. If you’re working on some projects, offline tools are a much safer option as they depend on the availability of the internet network.
When you think about an app that works offline and provides professional quality background removal, only one name comes to mind: Wondershare Filmora . The tool works like magic for background removal or sky replacement photos. You can completely rely on it for all your video editing and generating needs because of its intelligent AI features. It suits both professionals and beginners because of the ease of use and efficient AI system.
Free Download For Win 7 or later(64-bit)
Free Download For macOS 10.14 or later
Steps To Do Background Replacement Using Wondershare Filmora
There are various methods of removing and replacing the background in Wondershare Filmora. Follow the step-by-step instructions given below to use this function:
Step 1: Import Media Files To Filmora
Open the Wondershare Filmora tool and click on “New Project.” Now import your media file into the tool and then drag and drop it into the editing timeline. Import both the media files, i.e., the file from which you want to remove the background and the file you will use as a background.

Step 2: Remove Background from Imported Media
Now that both files have been brought together click on the media file that needs the background replacement. On the right side of the screen, you will see the editing tools of the app. Select the media type you edit and click the “AI Tools” option. Now, toggle on the “Chroma Key.”

Step 3: Preview and Export Final Results
Once you click on the chroma key option, the app automatically replaces the background of your media file. You can preview it, and if you are satisfied with the results, click “Export,” and save your new video.

Conclusion
Background removal and sky replacement images have become vital tools for content creators. The background of your images and videos is important as it sets a complete tone for the media. Many users use applications to replace the sky and background.
It’s important to do thorough research before you choose the right app for the job. This article gives you the best possible solutions for background replacement. You can professionally change the background of your media after reading the article.
Also read:
- Best Tricks for Learning Photo Slideshow
- Updated 2024 Approved Having GoPro Accessories Is Easy, but Editing on GoPro Quik Is Challenging. Read This Guide and, Stepwise, Learn to Use GoPro Slow-Motion for Perfect Shots
- Step by Step to Rotate Videos in Windows Media Player for 2024
- Updated 2024 Approved Stunning Glitch Effect and Its Creation Steps for Premiere Pro
- Updated Looking Forward to Try Hands at Using the Icecream Slideshow Maker Program to Create High End Slideshow Presentations? Stay Here for a Complete Insight Into the Process
- Learn How to Make Your CSGO Montage Impressive for 2024
- Updated In 2024, How to Perfect Quick and Efficient Video Editing | Keyboard Shortcuts in Filmora
- Updated In 2024, Useful Guide to Speed Up/Down Videos in VLC
- In 2024, How to Make a Time-Lapse Video Online
- Best Software or Website to Convert Video Format for 2024
- Updated Color Lut in Video - Color Grade Your Video for 2024
- Updated How to Use Speed Ramping to Create a Footage
- In 2024, Browse the List of the Best 8 Scanners or Converters for Converting the Slides to Digital Images. Also, Know the Other Important Information of Slides to Digital Conversion
- New In 2024, What Is MKV Format and How To Play MKV Video?
- Updated Tips for Choosing Location & Scheduling Music Video
- Updated How to Put a Background on A Green Screen
- Updated In 2024, How to Create Intro with Legend Intro Maker
- 2024 Approved How to Make Coin Magic With Filmora
- In 2024, Looking for Efficient Ways to Create a Slow-Motion Video? Read the Article for Reliable Solutions that Provide Excellent Results
- New In 2024, 3 Best Effects to Appear on Camera
- 10 Best Innovative AR Video Effects to Check Out
- Updated 2024 Approved 10 Best Suggestions for AI Video Interviews
- New 2024 Approved How To Polish Your Music Video Edits Using Filmora
- Updated This Article Shares Valuable Insight Into the Best Brand Story Videos. Also, It Highlights the Importance of a Video Maker in Your Brand Story Video Ad-Making Process and Why Filmora Should Be Your Go-To Choice
- New In 2024, Have You Recently Experienced Motion Blur in Games? Do You Wish to Learn More About It? This Article Provides an Overview and the Need for Motion Blur Gaming
- Updated 2024 Approved Logo Intro Videos Are the Hottest Trend in Town and Are Gaining Popularity Quickly. Keep Reading This Article to Learn Their Importance and How to Design One
- How to Resolve Vivo Y100 5G Screen Not Working | Dr.fone
- How to Unlock Nokia C02 Bootloader Easily
- Full Guide to Unlock Your Itel S23+
- Is your Poco M6 5G working too slow? Heres how you can hard reset it | Dr.fone
- Stuck at Android System Recovery Of Xiaomi 13 Ultra ? Fix It Easily | Dr.fone
- Why Your WhatsApp Location is Not Updating and How to Fix On Vivo S17t | Dr.fone
- In 2024, Remove the Lock Screen Fingerprint Of Your Samsung Galaxy S24
- Top 10 Best Spy Watches For your Samsung Galaxy A23 5G | Dr.fone
- How to Change Location on TikTok to See More Content On your Samsung Galaxy Z Fold 5 | Dr.fone
- In 2024, Remove the Lock Screen Fingerprint Of Your Xiaomi Redmi A2
- Getting the Pokemon Go GPS Signal Not Found 11 Error in Honor Magic Vs 2 | Dr.fone
- Mastering Lock Screen Settings How to Enable and Disable on Vivo Y02T
- How to recover deleted photos from Realme Narzo N53.
- Fix Unfortunately Settings Has Stopped on Lava Blaze Curve 5G Quickly | Dr.fone
- Best 10 Chinese Video to English Translator
- Title: Replacing Sky Background Using Adobe Photoshop A Comprehensive Guide
- Author: Morgan
- Created at : 2024-06-08 08:36:39
- Updated at : 2024-06-09 08:36:39
- Link: https://ai-video-editing.techidaily.com/replacing-sky-background-using-adobe-photoshop-a-comprehensive-guide/
- License: This work is licensed under CC BY-NC-SA 4.0.


