:max_bytes(150000):strip_icc():format(webp)/jens-kreuter-85328-c5ada5fb87224444a49aaa4ad1e16897.jpg)
Step by Step to Cut Video in Adobe Premiere Pro

Step by Step to Cut Video in Adobe Premiere Pro
Video editing is an essential skill in a world that has a growing focus on creative fields. And if you work with videos, knowing which clips to use and where to cut is essential in conveying your story and increasing its impact. So, if you are a beginner and want to familiarise yourself with steps and terms used in video editing, in this article, we will go through the steps you will need to cut your video file in Adobe Premiere Pro and Wondershare Filmora.
This guide uses Adobe Premiere Pro 2022 and Wondershare Filmora X.
How to cut video in Adobe Premiere Pro?
Once you have Adobe Premiere Pro open on your computer, follow the steps listed below.
Step 1: Create a new project in Premiere Pro.
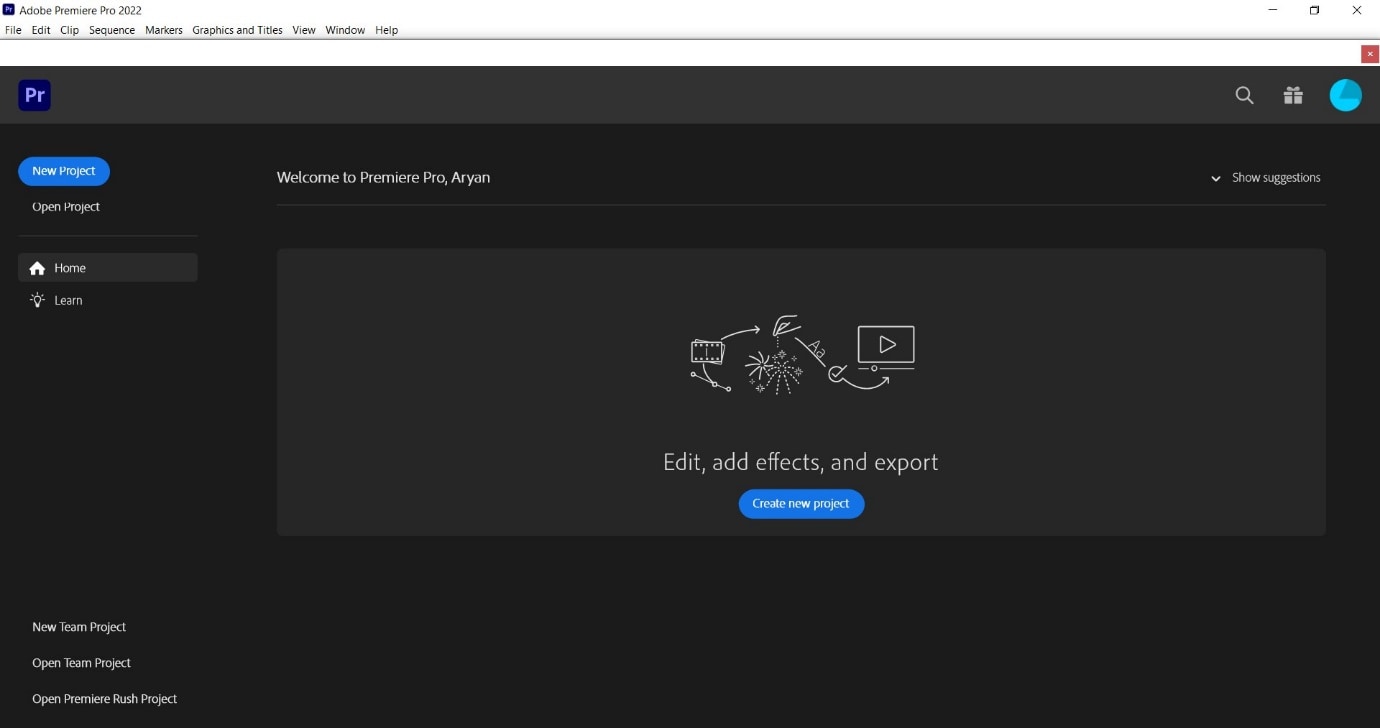
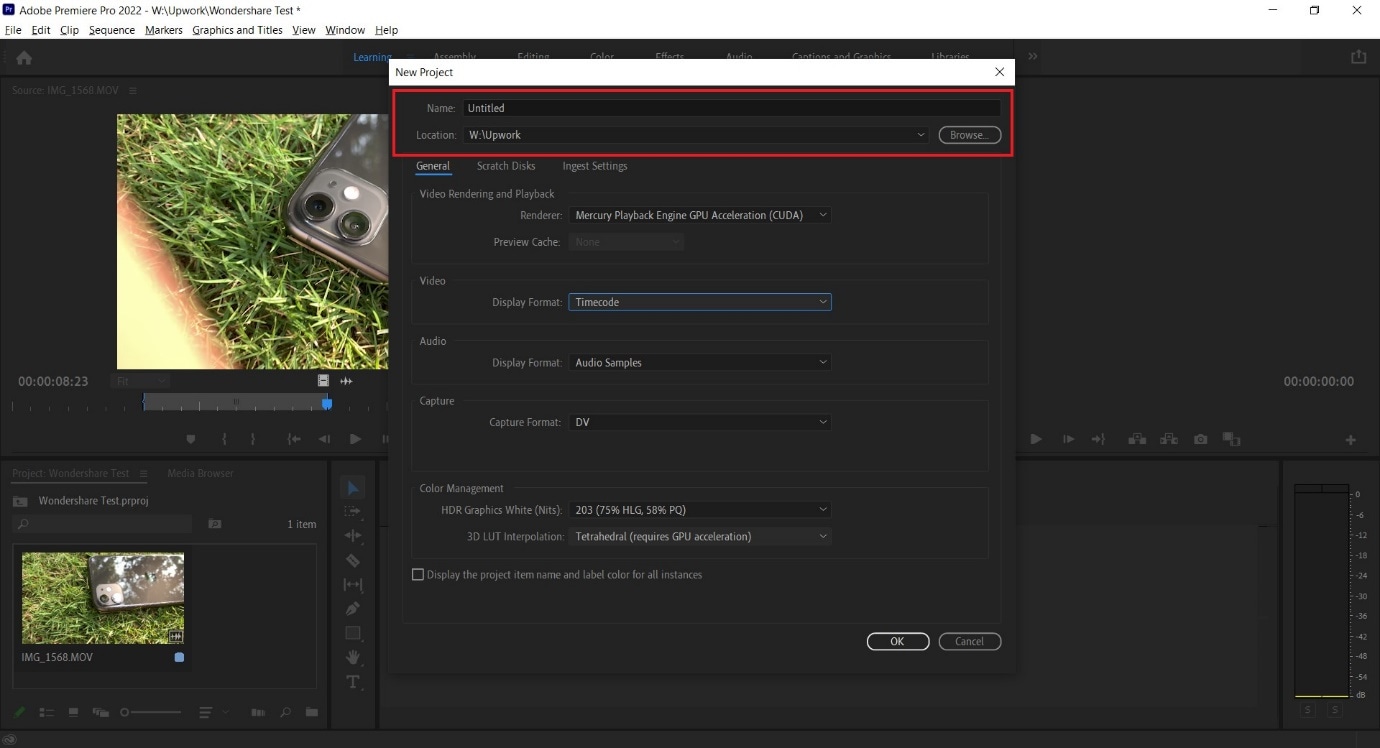
During project creation, we recommend keeping an eye on the file name set and the storage location; this can help reduce the time spent in locating the Premiere Project.
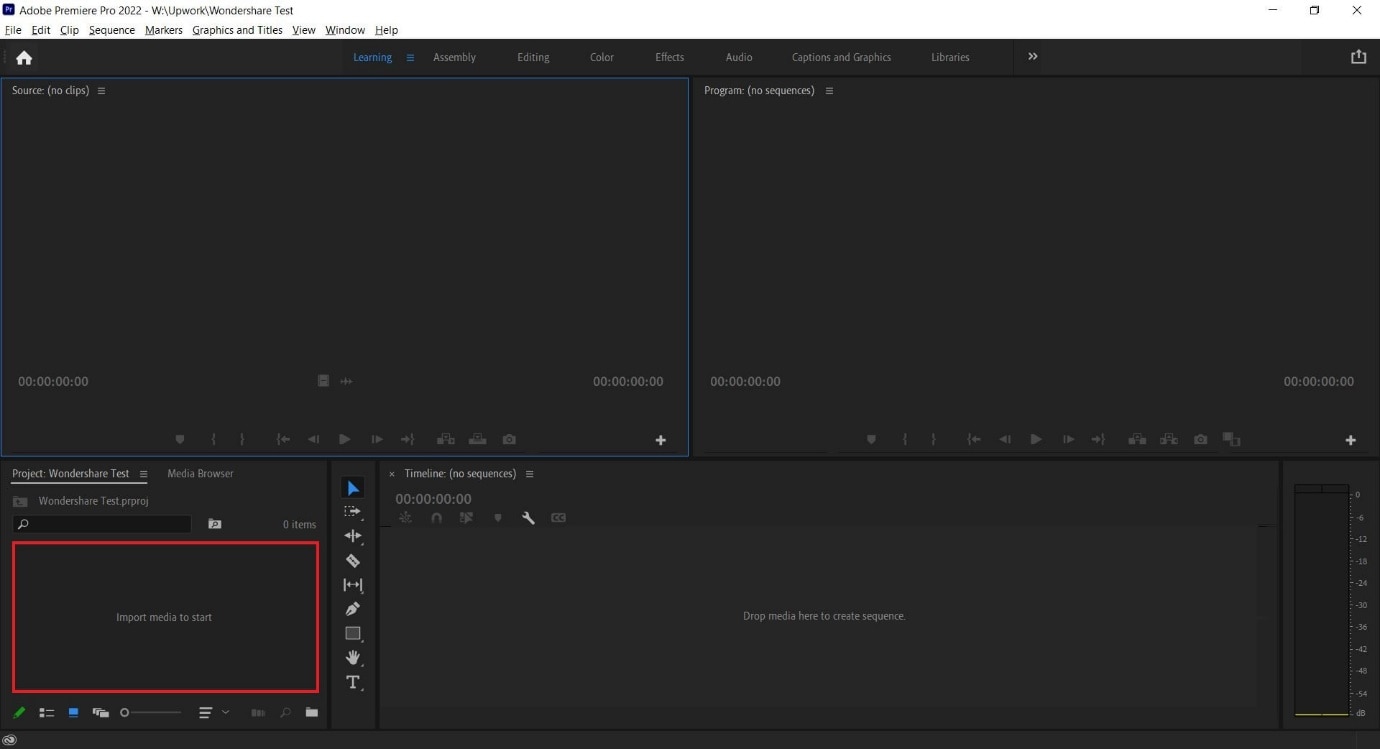
Step 2: Import a video file into Premiere Pro with a double click in the marked area and choose the file from its stored location.
Step 3: Double click on any imported media to activate it and send it to the Source Window.
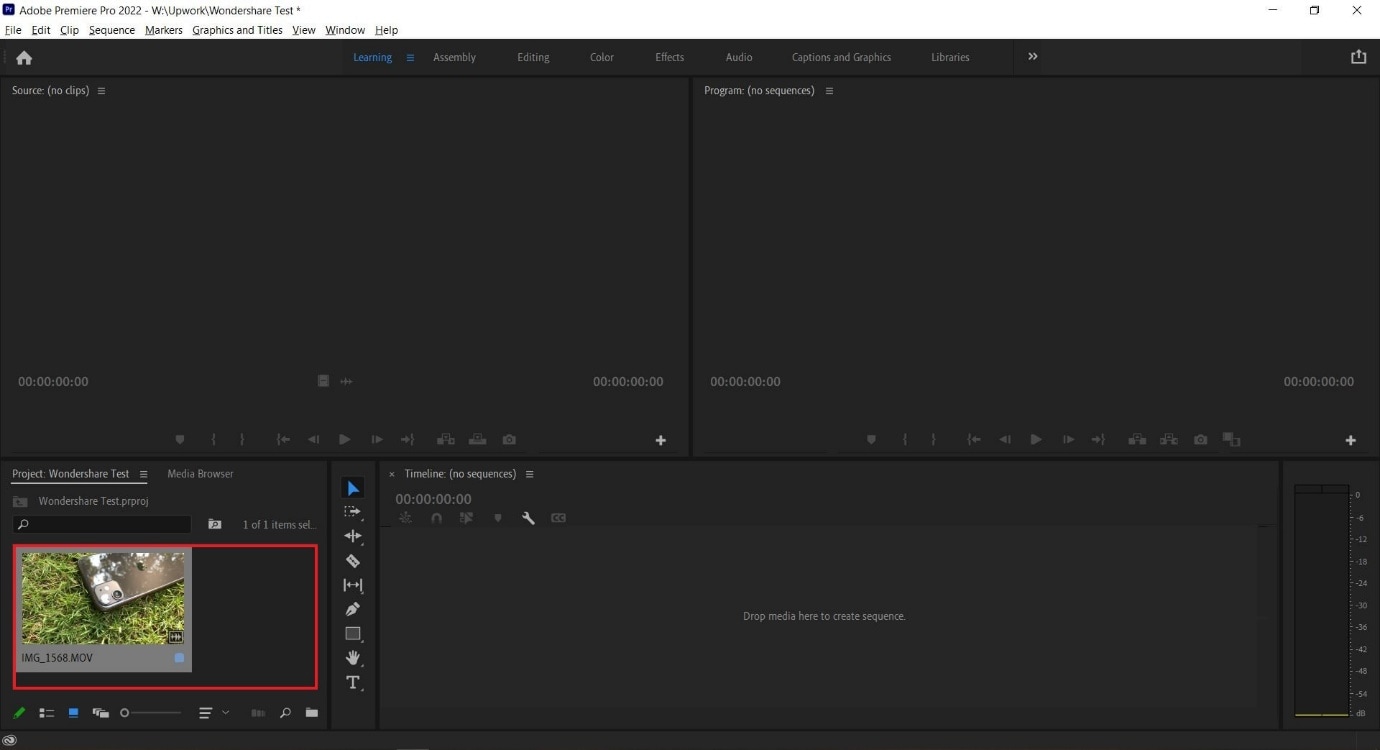
You can continue to import more media by double-clicking within the marked area. For better organization, users can also create Bins, which are folders within a Premiere Pro File that are often in use to sort out imported media.
Users can create Bins with a right-click in the red box marked area (refer to image above).
Step 4: Select either the whole clip or a part of it from the Source Window and drag it onto the Timeline.
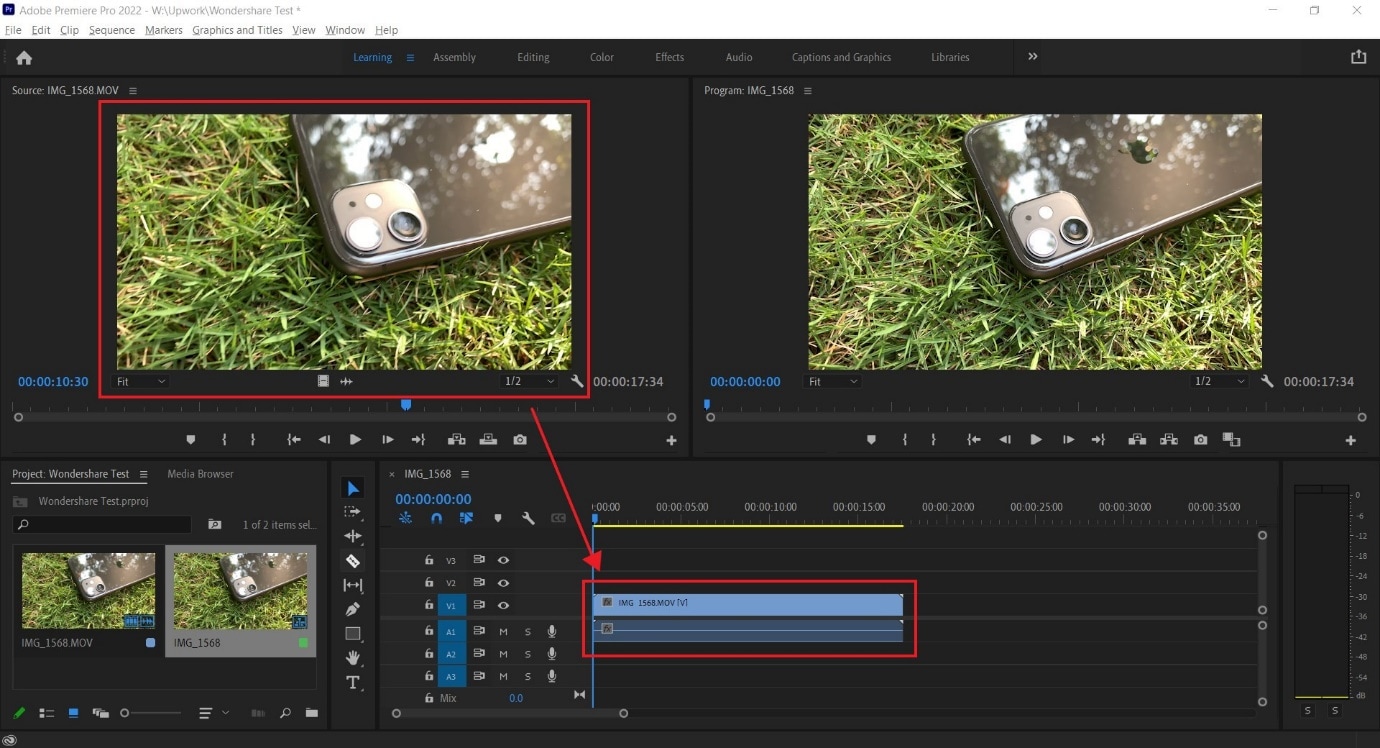
Step 5: Select the Razor Tool from the Tools Window. Now, pick the point where you want to introduce a cut and confirm with your left mouse button; this will split your video track into two parts.
Make a second cut where desired, following which you can move around the newly generated clip or delete it.
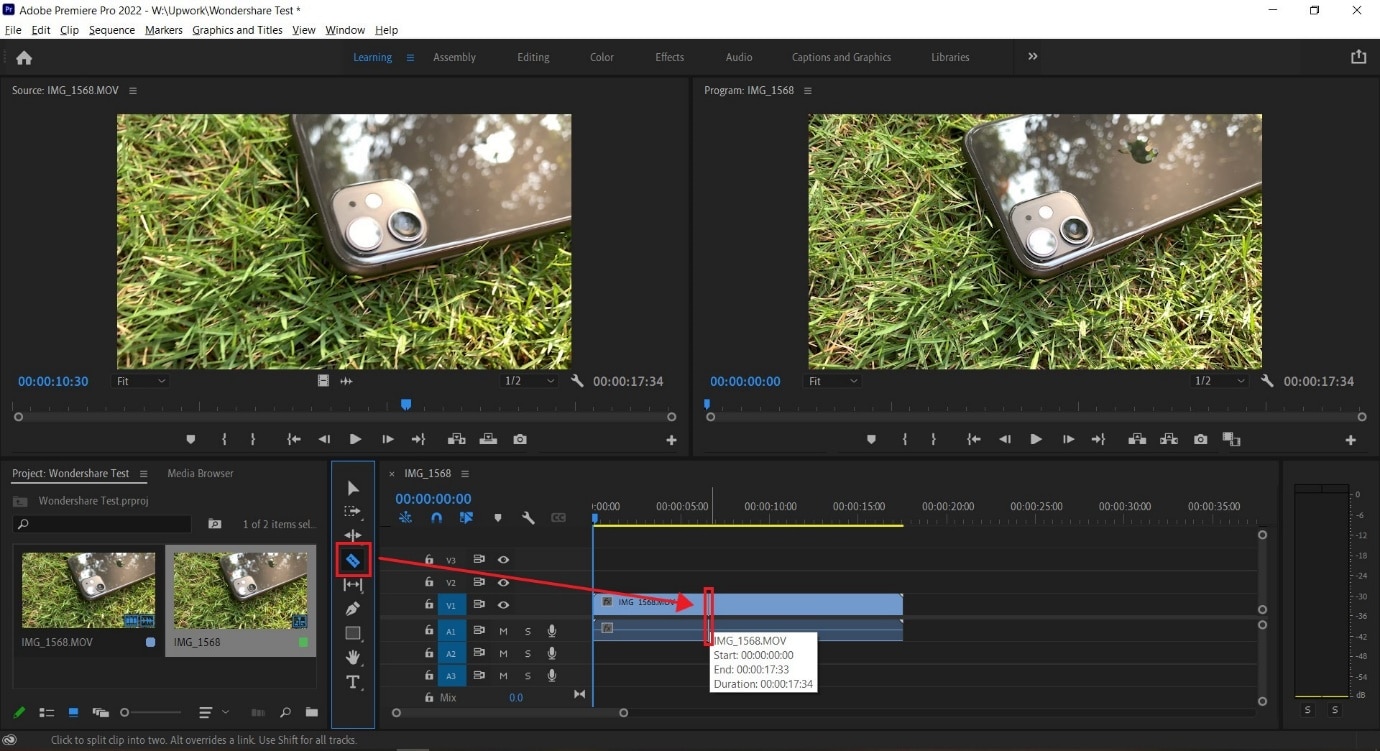
**Tip:**You can also select the Razor Tool by pressing C on the keyboard_._
We also recommend using the Snap in Timeline feature (activated with (S) on your keyboard or by choosing the magnet option), which will match your mouse pointer with the Playhead to ensure your cut will match the exact frame shown on your screen.
-—————————————————————————————————————————————-
Some more tips for Adobe Premiere Pro:
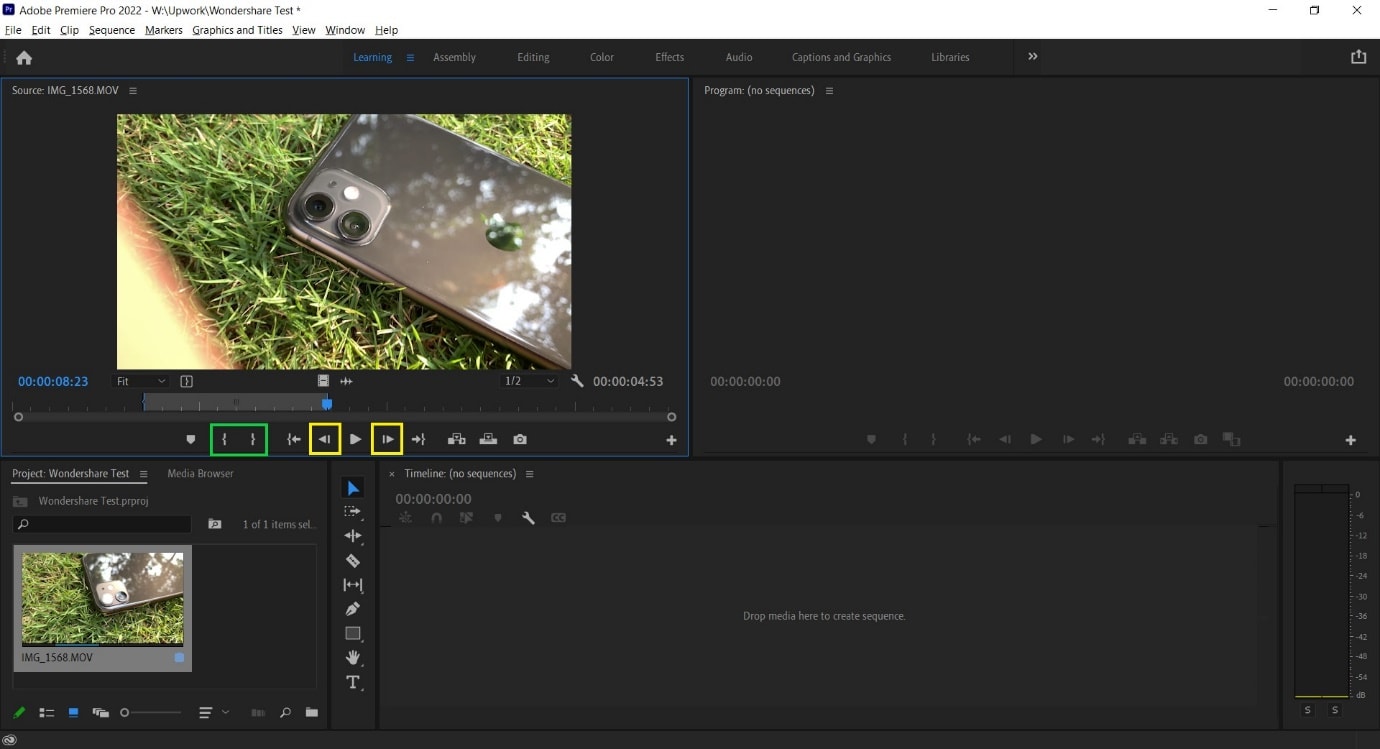
- Using the I and O keys on your keyboard while playing a video in the Source Window will allow you to set an In Pointand an Out Point. These markers will allow you to move a specific part of your video file into the Timeline, thus, reducing the amount of time spent making the right cut.
We have tagged the Mark In and Mark Out buttons with a Green Box in the image below.
- Clicking on the Step Frame Buttons [marked in Yellow] will also help increase the accuracy of your cut by allowing you to select the exact moment you desire.
- You can also mark a Point of Interest in your video file with the help of Markers in Premiere Pro. These afford you the ability to come back to the moment at a later time and see why it interested you in the first place, as editing sessions can often take hours at an end.
An alternative way to cut video with Wondershare Filmora
In Wondershare Filmora Video Editor , the steps to cut a video are simplified and don’t require as many steps as seen earlier. Opening the application throws you straight into a project, and following this, you can import a video file and begin editing. From the process you will learn below, it is easy to assume that Wondershare Filmora is more convenient for beginners and provides software features that match paid professional software.
For Win 7 or later (64-bit)
For macOS 10.14 or later
Note: If you don’t have Wondershare Filmora installed, you can get the video editor by visiting its official website . Once the setup program download completes, execute it and begin the installation process.
Once you have the editing software open, follow the steps listed below.
Step 1: Import a video file by clicking on the import window.
The default project setting for Filmora X is 1920x1080 at 25 frames per second. Users can change this to match their video file by going into Project Settings under the File tab or by accepting the automatic prompt that appears when dragging the video file onto the Timeline.
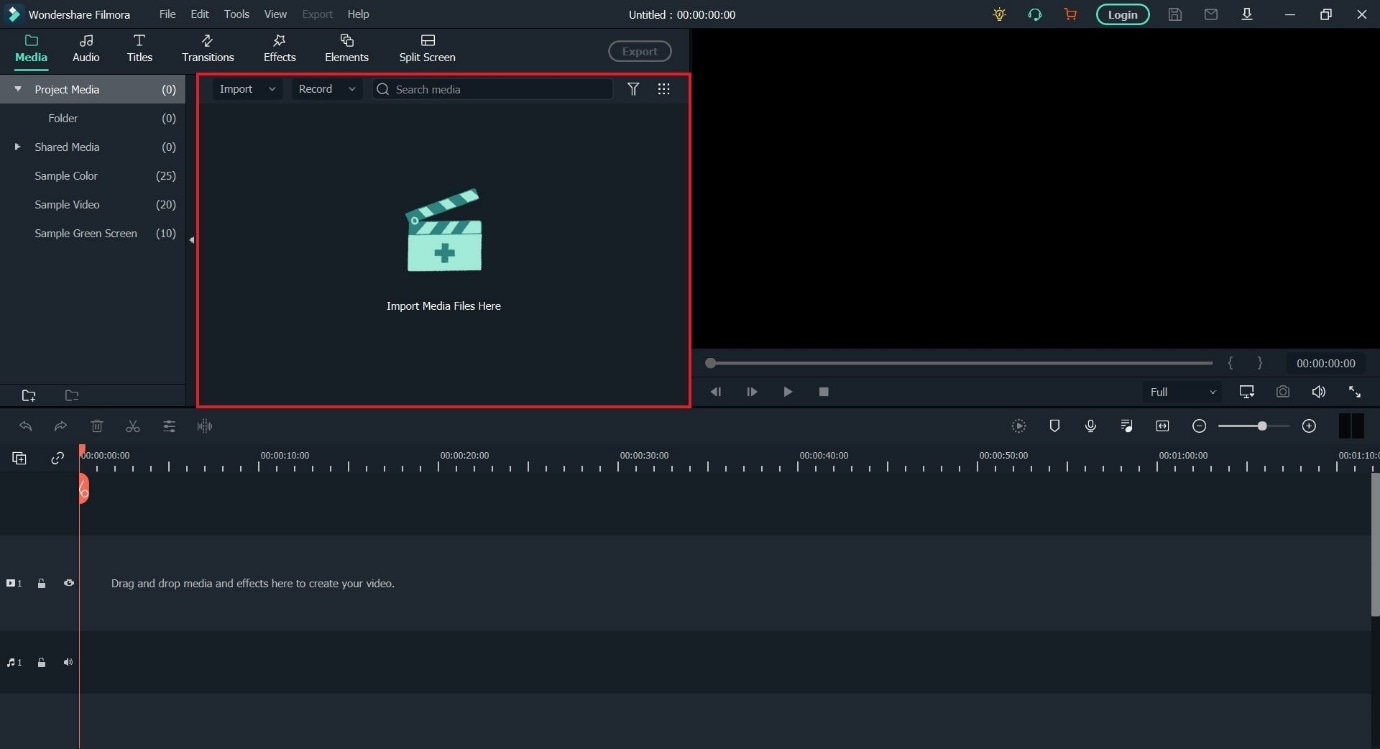
Note: If you have a PC with weak hardware, Wondershare Filmora gives you the option to create Video Proxies that will reduce the load on your computer by creating smaller clips that are lower in size, resulting in a smoother and faster experience. You can also do this in Premiere Pro, but Filmora does it for you automatically once given permission.
Step 2: Drag the video file onto the Timeline to begin previewing it in the Playback Window and commence editing operations.
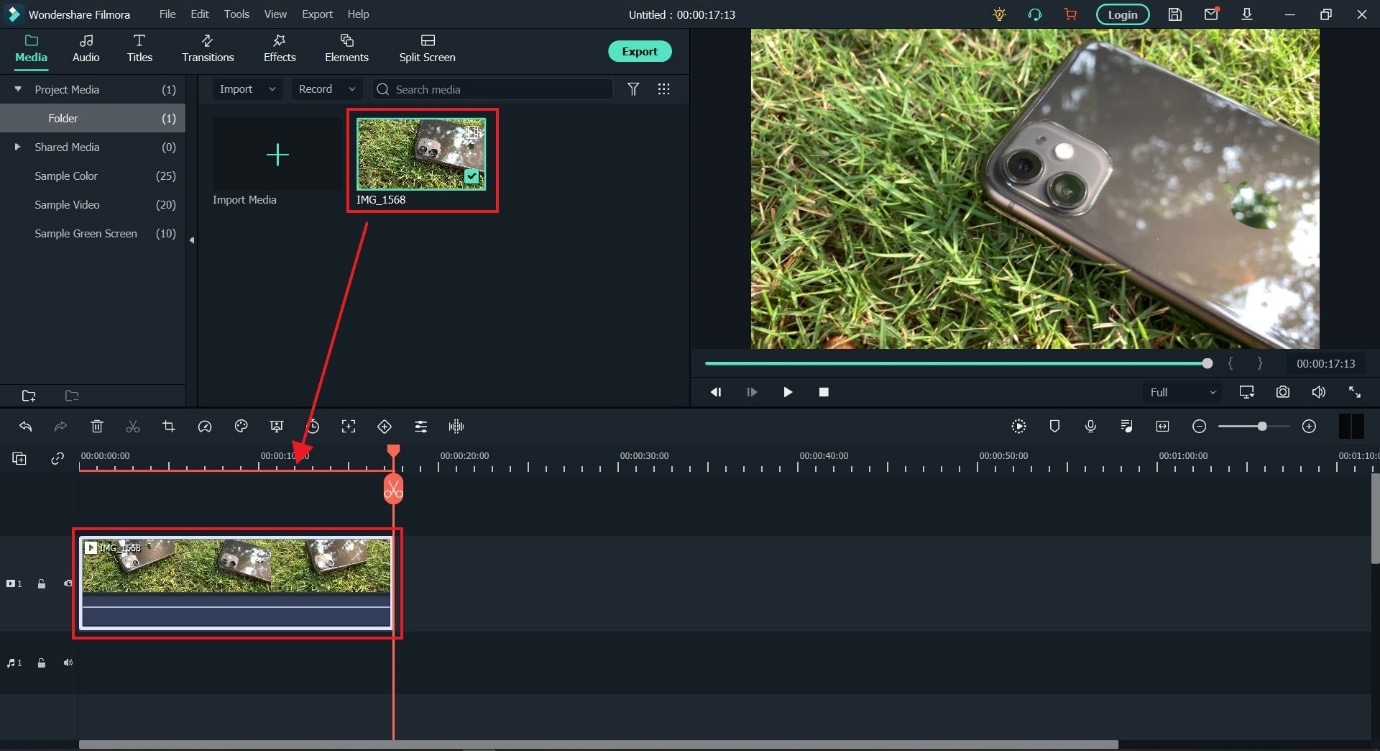
Step 3: Locate where you want to cut in the video file and click on the orange scissors option to split the video file.
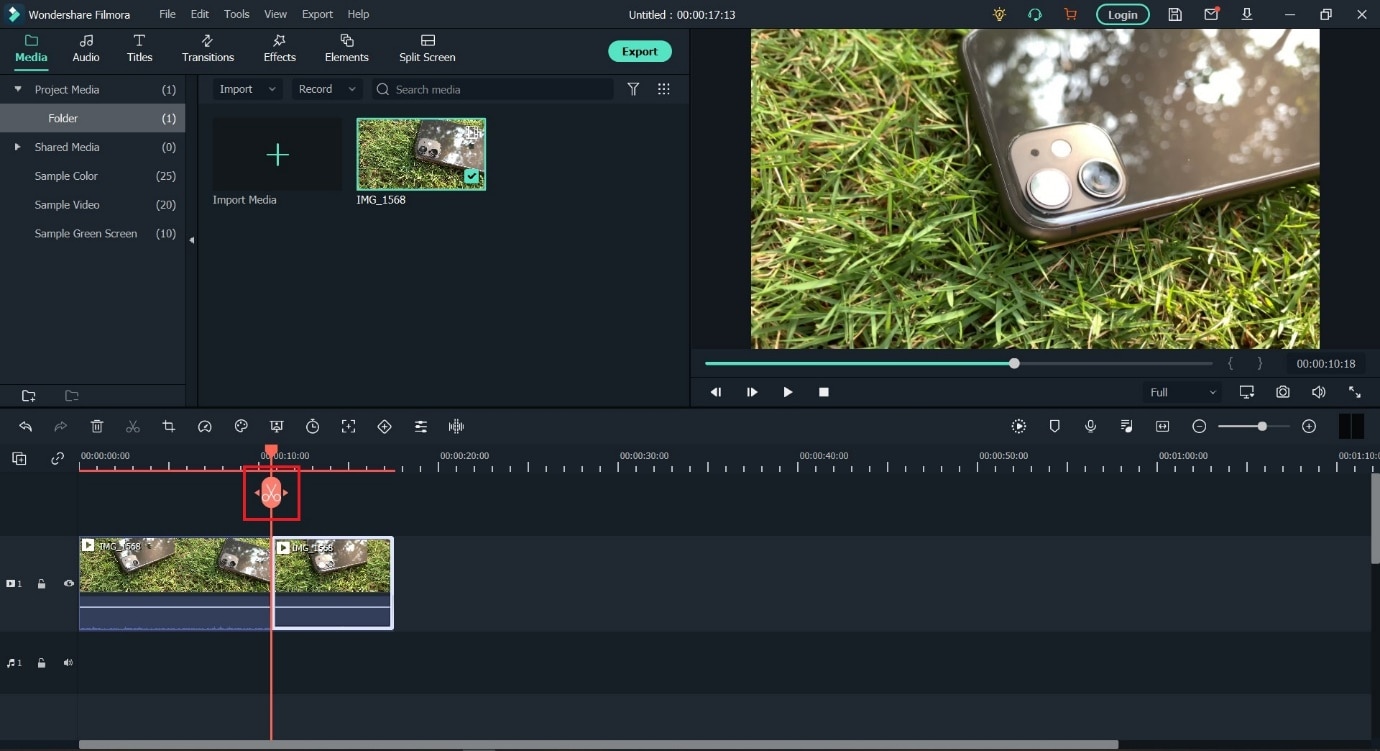
Tip: You can also use the keyboard shortcut (CTRL+B) to cut without using a mouse click, in case you make use of a trackpad while editing.
The Bottom Line
As said earlier, knowing where to cut is essential in improving the feel of your video, and we hope this guide showed you exactly how to perform the actions to create your best project. If you are a beginner, the simplistic approach of Wondershare Filmora will be more welcoming and easier to navigate. In addition, the software is also free to download, with added features that you can activate by paying a monthly, yearly, or one-time fee. Adobe Premiere Pro is an option worth considering if you plan on using third-party plugins and other applications from the Creative Cloud Suite.
During project creation, we recommend keeping an eye on the file name set and the storage location; this can help reduce the time spent in locating the Premiere Project.

Step 2: Import a video file into Premiere Pro with a double click in the marked area and choose the file from its stored location.

Step 3: Double click on any imported media to activate it and send it to the Source Window.

You can continue to import more media by double-clicking within the marked area. For better organization, users can also create Bins, which are folders within a Premiere Pro File that are often in use to sort out imported media.
Users can create Bins with a right-click in the red box marked area (refer to image above).
Step 4: Select either the whole clip or a part of it from the Source Window and drag it onto the Timeline.

Step 5: Select the Razor Tool from the Tools Window. Now, pick the point where you want to introduce a cut and confirm with your left mouse button; this will split your video track into two parts.
Make a second cut where desired, following which you can move around the newly generated clip or delete it.

**Tip:**You can also select the Razor Tool by pressing C on the keyboard_._
We also recommend using the Snap in Timeline feature (activated with (S) on your keyboard or by choosing the magnet option), which will match your mouse pointer with the Playhead to ensure your cut will match the exact frame shown on your screen.
-—————————————————————————————————————————————-
Some more tips for Adobe Premiere Pro:
- Using the I and O keys on your keyboard while playing a video in the Source Window will allow you to set an In Pointand an Out Point. These markers will allow you to move a specific part of your video file into the Timeline, thus, reducing the amount of time spent making the right cut.
We have tagged the Mark In and Mark Out buttons with a Green Box in the image below.
- Clicking on the Step Frame Buttons [marked in Yellow] will also help increase the accuracy of your cut by allowing you to select the exact moment you desire.
- You can also mark a Point of Interest in your video file with the help of Markers in Premiere Pro. These afford you the ability to come back to the moment at a later time and see why it interested you in the first place, as editing sessions can often take hours at an end.

An alternative way to cut video with Wondershare Filmora
In Wondershare Filmora Video Editor , the steps to cut a video are simplified and don’t require as many steps as seen earlier. Opening the application throws you straight into a project, and following this, you can import a video file and begin editing. From the process you will learn below, it is easy to assume that Wondershare Filmora is more convenient for beginners and provides software features that match paid professional software.
For Win 7 or later (64-bit)
For macOS 10.14 or later
Note: If you don’t have Wondershare Filmora installed, you can get the video editor by visiting its official website . Once the setup program download completes, execute it and begin the installation process.
Once you have the editing software open, follow the steps listed below.
Step 1: Import a video file by clicking on the import window.
The default project setting for Filmora X is 1920x1080 at 25 frames per second. Users can change this to match their video file by going into Project Settings under the File tab or by accepting the automatic prompt that appears when dragging the video file onto the Timeline.

Note: If you have a PC with weak hardware, Wondershare Filmora gives you the option to create Video Proxies that will reduce the load on your computer by creating smaller clips that are lower in size, resulting in a smoother and faster experience. You can also do this in Premiere Pro, but Filmora does it for you automatically once given permission.
Step 2: Drag the video file onto the Timeline to begin previewing it in the Playback Window and commence editing operations.

Step 3: Locate where you want to cut in the video file and click on the orange scissors option to split the video file.

Tip: You can also use the keyboard shortcut (CTRL+B) to cut without using a mouse click, in case you make use of a trackpad while editing.
The Bottom Line
As said earlier, knowing where to cut is essential in improving the feel of your video, and we hope this guide showed you exactly how to perform the actions to create your best project. If you are a beginner, the simplistic approach of Wondershare Filmora will be more welcoming and easier to navigate. In addition, the software is also free to download, with added features that you can activate by paying a monthly, yearly, or one-time fee. Adobe Premiere Pro is an option worth considering if you plan on using third-party plugins and other applications from the Creative Cloud Suite.
During project creation, we recommend keeping an eye on the file name set and the storage location; this can help reduce the time spent in locating the Premiere Project.

Step 2: Import a video file into Premiere Pro with a double click in the marked area and choose the file from its stored location.

Step 3: Double click on any imported media to activate it and send it to the Source Window.

You can continue to import more media by double-clicking within the marked area. For better organization, users can also create Bins, which are folders within a Premiere Pro File that are often in use to sort out imported media.
Users can create Bins with a right-click in the red box marked area (refer to image above).
Step 4: Select either the whole clip or a part of it from the Source Window and drag it onto the Timeline.

Step 5: Select the Razor Tool from the Tools Window. Now, pick the point where you want to introduce a cut and confirm with your left mouse button; this will split your video track into two parts.
Make a second cut where desired, following which you can move around the newly generated clip or delete it.

**Tip:**You can also select the Razor Tool by pressing C on the keyboard_._
We also recommend using the Snap in Timeline feature (activated with (S) on your keyboard or by choosing the magnet option), which will match your mouse pointer with the Playhead to ensure your cut will match the exact frame shown on your screen.
-—————————————————————————————————————————————-
Some more tips for Adobe Premiere Pro:
- Using the I and O keys on your keyboard while playing a video in the Source Window will allow you to set an In Pointand an Out Point. These markers will allow you to move a specific part of your video file into the Timeline, thus, reducing the amount of time spent making the right cut.
We have tagged the Mark In and Mark Out buttons with a Green Box in the image below.
- Clicking on the Step Frame Buttons [marked in Yellow] will also help increase the accuracy of your cut by allowing you to select the exact moment you desire.
- You can also mark a Point of Interest in your video file with the help of Markers in Premiere Pro. These afford you the ability to come back to the moment at a later time and see why it interested you in the first place, as editing sessions can often take hours at an end.

An alternative way to cut video with Wondershare Filmora
In Wondershare Filmora Video Editor , the steps to cut a video are simplified and don’t require as many steps as seen earlier. Opening the application throws you straight into a project, and following this, you can import a video file and begin editing. From the process you will learn below, it is easy to assume that Wondershare Filmora is more convenient for beginners and provides software features that match paid professional software.
For Win 7 or later (64-bit)
For macOS 10.14 or later
Note: If you don’t have Wondershare Filmora installed, you can get the video editor by visiting its official website . Once the setup program download completes, execute it and begin the installation process.
Once you have the editing software open, follow the steps listed below.
Step 1: Import a video file by clicking on the import window.
The default project setting for Filmora X is 1920x1080 at 25 frames per second. Users can change this to match their video file by going into Project Settings under the File tab or by accepting the automatic prompt that appears when dragging the video file onto the Timeline.

Note: If you have a PC with weak hardware, Wondershare Filmora gives you the option to create Video Proxies that will reduce the load on your computer by creating smaller clips that are lower in size, resulting in a smoother and faster experience. You can also do this in Premiere Pro, but Filmora does it for you automatically once given permission.
Step 2: Drag the video file onto the Timeline to begin previewing it in the Playback Window and commence editing operations.

Step 3: Locate where you want to cut in the video file and click on the orange scissors option to split the video file.

Tip: You can also use the keyboard shortcut (CTRL+B) to cut without using a mouse click, in case you make use of a trackpad while editing.
The Bottom Line
As said earlier, knowing where to cut is essential in improving the feel of your video, and we hope this guide showed you exactly how to perform the actions to create your best project. If you are a beginner, the simplistic approach of Wondershare Filmora will be more welcoming and easier to navigate. In addition, the software is also free to download, with added features that you can activate by paying a monthly, yearly, or one-time fee. Adobe Premiere Pro is an option worth considering if you plan on using third-party plugins and other applications from the Creative Cloud Suite.
During project creation, we recommend keeping an eye on the file name set and the storage location; this can help reduce the time spent in locating the Premiere Project.

Step 2: Import a video file into Premiere Pro with a double click in the marked area and choose the file from its stored location.

Step 3: Double click on any imported media to activate it and send it to the Source Window.

You can continue to import more media by double-clicking within the marked area. For better organization, users can also create Bins, which are folders within a Premiere Pro File that are often in use to sort out imported media.
Users can create Bins with a right-click in the red box marked area (refer to image above).
Step 4: Select either the whole clip or a part of it from the Source Window and drag it onto the Timeline.

Step 5: Select the Razor Tool from the Tools Window. Now, pick the point where you want to introduce a cut and confirm with your left mouse button; this will split your video track into two parts.
Make a second cut where desired, following which you can move around the newly generated clip or delete it.

**Tip:**You can also select the Razor Tool by pressing C on the keyboard_._
We also recommend using the Snap in Timeline feature (activated with (S) on your keyboard or by choosing the magnet option), which will match your mouse pointer with the Playhead to ensure your cut will match the exact frame shown on your screen.
-—————————————————————————————————————————————-
Some more tips for Adobe Premiere Pro:
- Using the I and O keys on your keyboard while playing a video in the Source Window will allow you to set an In Pointand an Out Point. These markers will allow you to move a specific part of your video file into the Timeline, thus, reducing the amount of time spent making the right cut.
We have tagged the Mark In and Mark Out buttons with a Green Box in the image below.
- Clicking on the Step Frame Buttons [marked in Yellow] will also help increase the accuracy of your cut by allowing you to select the exact moment you desire.
- You can also mark a Point of Interest in your video file with the help of Markers in Premiere Pro. These afford you the ability to come back to the moment at a later time and see why it interested you in the first place, as editing sessions can often take hours at an end.

An alternative way to cut video with Wondershare Filmora
In Wondershare Filmora Video Editor , the steps to cut a video are simplified and don’t require as many steps as seen earlier. Opening the application throws you straight into a project, and following this, you can import a video file and begin editing. From the process you will learn below, it is easy to assume that Wondershare Filmora is more convenient for beginners and provides software features that match paid professional software.
For Win 7 or later (64-bit)
For macOS 10.14 or later
Note: If you don’t have Wondershare Filmora installed, you can get the video editor by visiting its official website . Once the setup program download completes, execute it and begin the installation process.
Once you have the editing software open, follow the steps listed below.
Step 1: Import a video file by clicking on the import window.
The default project setting for Filmora X is 1920x1080 at 25 frames per second. Users can change this to match their video file by going into Project Settings under the File tab or by accepting the automatic prompt that appears when dragging the video file onto the Timeline.

Note: If you have a PC with weak hardware, Wondershare Filmora gives you the option to create Video Proxies that will reduce the load on your computer by creating smaller clips that are lower in size, resulting in a smoother and faster experience. You can also do this in Premiere Pro, but Filmora does it for you automatically once given permission.
Step 2: Drag the video file onto the Timeline to begin previewing it in the Playback Window and commence editing operations.

Step 3: Locate where you want to cut in the video file and click on the orange scissors option to split the video file.

Tip: You can also use the keyboard shortcut (CTRL+B) to cut without using a mouse click, in case you make use of a trackpad while editing.
The Bottom Line
As said earlier, knowing where to cut is essential in improving the feel of your video, and we hope this guide showed you exactly how to perform the actions to create your best project. If you are a beginner, the simplistic approach of Wondershare Filmora will be more welcoming and easier to navigate. In addition, the software is also free to download, with added features that you can activate by paying a monthly, yearly, or one-time fee. Adobe Premiere Pro is an option worth considering if you plan on using third-party plugins and other applications from the Creative Cloud Suite.
Using AI to Replace Skies: Finding the Right Methods
Digital imagery has seen some ground-breaking revolutions in previous years. The latest AI trends have transformed how we edit and see images. Many creative tools now have integrated features to let users manipulate images as they wish. One of the applications of these AI integrated tools is their ability to replace sky.
You can now use AI to replace the sky in an image, change the background, add or remove elements, and whatnot. If you want to read more about sky replacement and how to do it in photos, the following read is at your service. Discover the leading tools to help you with sky replacement with a bonus tip for this task.
Sky Replacement A cross-platform works like magic for background removal or sky replacement photos!
Free Download Free Download Learn More

Part 1: AI Sky Replacement with BeFunky: Looking into the Step-by-Step Overview
If you are looking for a smart tool to replace a sky online, you can try BeFunky . BeFunky is a notable image editor and graphic design tool. It offers an all-in-one creative platform to help you easily edit photos, create graphic designs, make collages, and more.
BeFunky previously offered a background remover tool to replace skies. But now, it has a dedicated sky replacement feature that can easily detect the sky and foreground of your image. This allows for precise adjustments and accurate replacements.
Steps for BeFunky’s AI Sky Replacer
Step 1: Open the Sky Replacer feature of BeFunky on your web browser. Tap the “Open” button or drop the images into the interface for sky replacement.

Step 2: Select the “Change Sky” button once you have uploaded your image.

Step 3: You can now select a new sky from the stock images provided or choose an image from your device. You can also manually adjust the contrast, saturation, and other aspects of the sky or the foreground. Tap on the “Save” button to save the image to your device.

Part 2: Fotor AI: Performing Sky Replacement with Perfection
Another remarkable AI tool that can be used to change the sky from the background is Fotor . It is a free online photo editor that can help enhance images. Fotor is quite useful for bulk-editing images. You can also use it to transform text into images.
Fotor features a free sky replacement option that can be used to swap skies from images. You can easily add starry, sunny, gloomy, cloudy, and rainy skies to your images. The AI sky replacement of Fotor can help personalize skies in no time.
Steps for Sky Replacement in Fotor AI
Step 1: Launch Fotor on your browser and open the “Background Remover” tool. Upload your image to Fotor, and it will automatically remove the image background.

Step 2: From the toolbar at the right, tap “Backgrounds.” Here, you can find lots of sky images that you can use in your picture. You can also generate a custom sky by writing prompts in the built-in AI background generator. Now, replace the sky and download the image to your device.

Part 3: Changing Skies with Autoenhance.ai: A Review
Autoenhance.ai is a web-based photo editor integrated with AI power. It offers fast and automatic processing to enhance your workflow. Autoenhance.ai offers perspective correction to fix wonky angles in images. It also offers image relighting and HDR merging for better results.
This online platform lets users create the perfect sky effect in their images. Its comprehensive sky packs cover a range of seasons and vibrant views. The tool caters well to business and professional needs. Using this sky replacement online, you can add a vibrant yet natural touch to your images.
Step 1: Go to Autoenhance.ai and toggle the switch next to the “Sky Replacement” option to turn it on. Now, use the dropdown menu below the option to choose a sky preference for your image. Then, upload the images to change the sky online.

Step 2: Based on your chosen sky pack, Autoenhance.ai will replace the sky in your image. You can then download your image with the replaced sky.

Part 4: SnapEdit: Online AI Sky Replacement Made Easy
For a simple and clean online editor to replace a sky, you can try SnapEdit . It is an easy-to-use photo editor with AI technology to bring the best out of your photos. You can use SnapEdit to remove unwanted objects from photos. The tool can also remove watermarks and text from images.
For efficient sky change online, SnapEdit offers an effective solution. Its sky replacement feature can change the sky’s color, feel, and gradient in the background. While changing the sky, SnapEdit automatically adjusts the photo’s overall color for better results.
Steps to Replace Sky Using SnapEdit
Step 1: Open the Sky Changer feature of SnapEdit on your device. Tap the “Upload Image” button or paste the image whose background you wish to remove.

Step 2: SnapEdit will offer a range of sky options you can choose to swap with the original. You can tap the “More Sky” option and find further options to choose from. The slider next to the “Color Set” option is available to help blend the image with the background. Once you are satisfied with the results, tap the “Download” button to save your image.

Bonus Part: Make Composed AI Background Replacements with Wondershare Filmora
The above-mentioned tools are wonderful options to help you change sky online. However, online tools require constant internet stability and can crash due to heavy site traffic. To avoid these issues, it is better to choose offline tools that can make the editing process easier. For AI editing, there is no better software solution than Wondershare Filmora .
Filmora is a video editing software designed for professional use. It is an intuitive solution that can create powerful results in no time. With a wide range of resourceful toolsets, Filmora contains everything your videos might need. This multi-platform tool can help users bring the best out of their videos in no time. You can use Filmora to enhance your videos and boost your productivity.
Free Download For Win 7 or later(64-bit)
Free Download For macOS 10.14 or later
Key Features of Wondershare Filmora
Filmora offers a wide range of useful features for videos. It is the perfect one-stop solution for video editing. Some of the features offered by Filmora include:
- Motion Tracking: Filmora lets users track the movement of an object in a video. This helps to pin graphics and media files to follow the motion. You can add text, mosaic, or other elements that move smoothly with the object using Filmora.

- Preset Templates: To help you start your video editing journey, Filmora offers built-in templates. More than 1000 preset templates are available to give your videos a head-start. You can also create and share your own templates in Filmora.

- Screen Recorder: Filmora acts as an efficient screen recorder. You can record your screen and webcam at the same time for video. You can thus record high-quality gameplay, tutorials, lectures, and other videos.

- AI Copywriting: Using Filmora, you can now create AI scripts for your videos. The tool uses ChatGPT integration to help you create custom content for videos. This also helps generate creative video titles and descriptions.

- Auto Reframe: You can resize your videos automatically using Filmora. The tool enables users to convert horizontal videos to portrait versions. Filmora can also help users adjust the frame ratios manually. Its built-in size templates can help you create videos for all major platforms.

Step-by-Step Guide to Replace Background of Videos using Filmora
Filmora offers a quick and simple process for AI sky replacement. Here is the step-by-step guide to help you replace the background of videos using AI on Filmora:
Step 1Add Tracks in Filmora
Install and launch Wondershare Filmora on your device. From the main interface, tap the “Add” button to import the video whose background you wish to change. Also, add the track with the background you wish to swap with the original one.

Step 2Replace Background From Media
While keeping the layer with the original video selected, go to the “Video” tab from the right panel and tap “AI Tools”. Toggle the switch next to the “Chroma Key” option if your video features a monochromatic background. If you want to replace a more complex background, enable the “AI Portrait” option. As soon as you toggle the switch, Filmora will automatically replace the background.

Step 3Export Video After Sky Replacement
Once you are done with the AI sky swapping, tap the “Export” button from the top. In the pop-up window, you can rename your project and select other preferences, such as the resolution and frame rate. Choose a pathway and tap “Export” to save your video with the replaced background.

Free Download For Win 7 or later(64-bit)
Free Download For macOS 10.14 or later
Conclusion
The power of AI has now made it easy to enhance and edit images. Sky replacement is one of the wonders bestowed by AI tools. You can use the wonderful editors mentioned above for AI sky replacement online. If you want a thorough offline solution, you can try Wondershare Filmora. Its remarkable toolset and powerful features make it one of the best tools for replacing skies in images.
Free Download Free Download Learn More

Part 1: AI Sky Replacement with BeFunky: Looking into the Step-by-Step Overview
If you are looking for a smart tool to replace a sky online, you can try BeFunky . BeFunky is a notable image editor and graphic design tool. It offers an all-in-one creative platform to help you easily edit photos, create graphic designs, make collages, and more.
BeFunky previously offered a background remover tool to replace skies. But now, it has a dedicated sky replacement feature that can easily detect the sky and foreground of your image. This allows for precise adjustments and accurate replacements.
Steps for BeFunky’s AI Sky Replacer
Step 1: Open the Sky Replacer feature of BeFunky on your web browser. Tap the “Open” button or drop the images into the interface for sky replacement.

Step 2: Select the “Change Sky” button once you have uploaded your image.

Step 3: You can now select a new sky from the stock images provided or choose an image from your device. You can also manually adjust the contrast, saturation, and other aspects of the sky or the foreground. Tap on the “Save” button to save the image to your device.

Part 2: Fotor AI: Performing Sky Replacement with Perfection
Another remarkable AI tool that can be used to change the sky from the background is Fotor . It is a free online photo editor that can help enhance images. Fotor is quite useful for bulk-editing images. You can also use it to transform text into images.
Fotor features a free sky replacement option that can be used to swap skies from images. You can easily add starry, sunny, gloomy, cloudy, and rainy skies to your images. The AI sky replacement of Fotor can help personalize skies in no time.
Steps for Sky Replacement in Fotor AI
Step 1: Launch Fotor on your browser and open the “Background Remover” tool. Upload your image to Fotor, and it will automatically remove the image background.

Step 2: From the toolbar at the right, tap “Backgrounds.” Here, you can find lots of sky images that you can use in your picture. You can also generate a custom sky by writing prompts in the built-in AI background generator. Now, replace the sky and download the image to your device.

Part 3: Changing Skies with Autoenhance.ai: A Review
Autoenhance.ai is a web-based photo editor integrated with AI power. It offers fast and automatic processing to enhance your workflow. Autoenhance.ai offers perspective correction to fix wonky angles in images. It also offers image relighting and HDR merging for better results.
This online platform lets users create the perfect sky effect in their images. Its comprehensive sky packs cover a range of seasons and vibrant views. The tool caters well to business and professional needs. Using this sky replacement online, you can add a vibrant yet natural touch to your images.
Step 1: Go to Autoenhance.ai and toggle the switch next to the “Sky Replacement” option to turn it on. Now, use the dropdown menu below the option to choose a sky preference for your image. Then, upload the images to change the sky online.

Step 2: Based on your chosen sky pack, Autoenhance.ai will replace the sky in your image. You can then download your image with the replaced sky.

Part 4: SnapEdit: Online AI Sky Replacement Made Easy
For a simple and clean online editor to replace a sky, you can try SnapEdit . It is an easy-to-use photo editor with AI technology to bring the best out of your photos. You can use SnapEdit to remove unwanted objects from photos. The tool can also remove watermarks and text from images.
For efficient sky change online, SnapEdit offers an effective solution. Its sky replacement feature can change the sky’s color, feel, and gradient in the background. While changing the sky, SnapEdit automatically adjusts the photo’s overall color for better results.
Steps to Replace Sky Using SnapEdit
Step 1: Open the Sky Changer feature of SnapEdit on your device. Tap the “Upload Image” button or paste the image whose background you wish to remove.

Step 2: SnapEdit will offer a range of sky options you can choose to swap with the original. You can tap the “More Sky” option and find further options to choose from. The slider next to the “Color Set” option is available to help blend the image with the background. Once you are satisfied with the results, tap the “Download” button to save your image.

Bonus Part: Make Composed AI Background Replacements with Wondershare Filmora
The above-mentioned tools are wonderful options to help you change sky online. However, online tools require constant internet stability and can crash due to heavy site traffic. To avoid these issues, it is better to choose offline tools that can make the editing process easier. For AI editing, there is no better software solution than Wondershare Filmora .
Filmora is a video editing software designed for professional use. It is an intuitive solution that can create powerful results in no time. With a wide range of resourceful toolsets, Filmora contains everything your videos might need. This multi-platform tool can help users bring the best out of their videos in no time. You can use Filmora to enhance your videos and boost your productivity.
Free Download For Win 7 or later(64-bit)
Free Download For macOS 10.14 or later
Key Features of Wondershare Filmora
Filmora offers a wide range of useful features for videos. It is the perfect one-stop solution for video editing. Some of the features offered by Filmora include:
- Motion Tracking: Filmora lets users track the movement of an object in a video. This helps to pin graphics and media files to follow the motion. You can add text, mosaic, or other elements that move smoothly with the object using Filmora.

- Preset Templates: To help you start your video editing journey, Filmora offers built-in templates. More than 1000 preset templates are available to give your videos a head-start. You can also create and share your own templates in Filmora.

- Screen Recorder: Filmora acts as an efficient screen recorder. You can record your screen and webcam at the same time for video. You can thus record high-quality gameplay, tutorials, lectures, and other videos.

- AI Copywriting: Using Filmora, you can now create AI scripts for your videos. The tool uses ChatGPT integration to help you create custom content for videos. This also helps generate creative video titles and descriptions.

- Auto Reframe: You can resize your videos automatically using Filmora. The tool enables users to convert horizontal videos to portrait versions. Filmora can also help users adjust the frame ratios manually. Its built-in size templates can help you create videos for all major platforms.

Step-by-Step Guide to Replace Background of Videos using Filmora
Filmora offers a quick and simple process for AI sky replacement. Here is the step-by-step guide to help you replace the background of videos using AI on Filmora:
Step 1Add Tracks in Filmora
Install and launch Wondershare Filmora on your device. From the main interface, tap the “Add” button to import the video whose background you wish to change. Also, add the track with the background you wish to swap with the original one.

Step 2Replace Background From Media
While keeping the layer with the original video selected, go to the “Video” tab from the right panel and tap “AI Tools”. Toggle the switch next to the “Chroma Key” option if your video features a monochromatic background. If you want to replace a more complex background, enable the “AI Portrait” option. As soon as you toggle the switch, Filmora will automatically replace the background.

Step 3Export Video After Sky Replacement
Once you are done with the AI sky swapping, tap the “Export” button from the top. In the pop-up window, you can rename your project and select other preferences, such as the resolution and frame rate. Choose a pathway and tap “Export” to save your video with the replaced background.

Free Download For Win 7 or later(64-bit)
Free Download For macOS 10.14 or later
Conclusion
The power of AI has now made it easy to enhance and edit images. Sky replacement is one of the wonders bestowed by AI tools. You can use the wonderful editors mentioned above for AI sky replacement online. If you want a thorough offline solution, you can try Wondershare Filmora. Its remarkable toolset and powerful features make it one of the best tools for replacing skies in images.
You Are at the Right Post if You Are Surfing for a GIF to MP4 Conversion Tool. This Article Will Provide You with the Top Best Converters that Can Help You Convert GIF to MP4 Videos Quickly and Easily
Great Video Converter - Wondershare Filmora
Provide abundant video effects - A creative video editor
Powerful color correction and grading
Detailed tutorials provided by the official channel
Introduction.
Many people have been searching online for the best GIF to MP4 converter that will help them playback their GIF files on their media player. It is easier for GIF animated files to be converted to MP4 files, as Mp4 is the most popular file format compatible with many devices. Some compatible devices include iOS devices, Mac, Android devices, Windows, etc.
By converting GIF into video, you make a wise move as an encoded MP4 video contains richer colors and higher resolutions, weighs 5 to 10 times lighter in file size, and has engaging audio compared to the GIF. In addition, MP4 is also a wide-known and accepted format for social sharing videos across the web. So, whether you want to convert your Gif to Mp4 for Instagram or you intend to add songs to your animated texts and convert to Mp4, this article will help you out.
We shall explore:
In this article
Part 1: Best Online GIF to MP4 Converters
Part 2: Top GIF to MP4 Software
Part 3: How to Convert GIF to MP4
Part 1: Best Online GIF to MP4 Converters
GIF pictures are a perfect source of entertainment and can also be helpful as memes on the internet. Those wondering what a GIF picture is all about are small videos without sound. They can be used in the comment section of the internet or sent as memes in messages on smartphones.
However, due to third-party keyboard applications, the use and sending of GIFs have become very easy. Thus, many people are trying to migrate from GIF to MP4, and this article is for them. We will give you the best four (4) GIFs to video converter online that you can use.
1. Ezgif
Ezgif is a free GIF to MP4 online converter that allows you to turn your ezGif GIF into MP4 videos with a single click leaving no watermark on your video. The process is relatively easy as you just need to upload a GIF file up to 35MB, then click the “Convert to MP4” button, and your MP4 video will be ready. Besides, it supports the conversions of WEBP and APNG to MP4.
Pros
It is super-fast and free.
It does not have a watermark.
There is no advert on the site.
It does not require any software to download.
Cons
It allows you to convert one file at a time.

2. Adobe Creative Cloud Express
Adobe Creative Cloud Express is a collection of mobile app-based and web-based video editing tools that all content creators use. It allows you to upload GIFs online and then convert GIFs to MP4. It also allows you to trim the GIF and directly download the MP4 to the local PC.
Pros
It is very free to use
it allows you to trim the GIF
it is available online and on App Store
it does not require any software to download.
Cons
Allows you to upload one GIF at a time
It has limited features


3. FlexClip
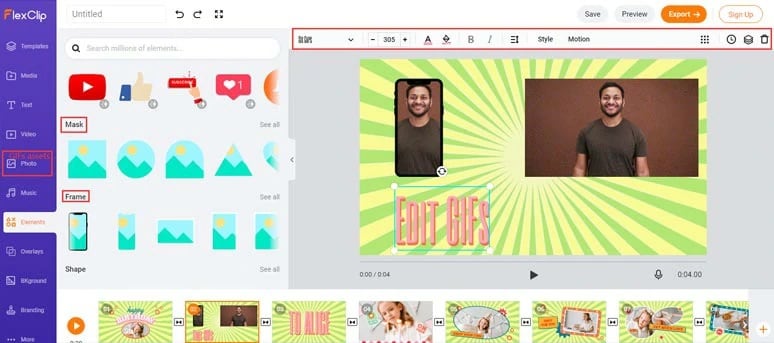
This tool is a feature-packed online video maker and GIF to MP4 converter. It allows users to easily upload GIFs from either their mobile phones or PC to FlexClip’s in-browser editor and also make some edits with both the GIFs and videos before you can convert them.
Pros
No software downloads are required
No experience is needed.
There are tons of features available
Cons
GIFs are irreversible
You cannot change GIFs speed
4. Convertio
This online conversion tool has made GIFs to MP4 conversion much more effortless. This free GIF to video converter has a simple interface and easy-to-use tools that help you turn GIF files to MP4 in a few clicks.
Pros
It is swift and free.
You can convert several files at once.
It does not require any download.
Cons
There are loads of ads on the site.
You can only use 2 concurrent conversions for the free account.

Part 2: Top GIF to MP4 Software
Many people have tried different software to convert GIFs into MP4 that have proven abortive. Most software on the internet only allows you to convert MPEG to GIF, WMV to GIF, or images to GIF files. Only a few software allows the conversion from GIF to videos.
Here are some of the top 4 GIF to MP4 Conversion software:
1. Filmora
Filmora Video Editor is the best software to convert any GIF picture to an MP4 video file. The best part is that you do not need to use the internet, and it works perfectly for all users. In addition, the software is super stable and does not crash even if you load more than ten video files on it. However, the Filmora video editor is a complete package that allows users to edit and convert any video with many accessible features. More so, you are not required to be a professional video editor to be able to convert the GIF image to a professional video.
With the Filmora software, you do not have to download and pay for the music, as the editor also has a great music library from which you can choose to add music within seconds. Moreover, the software has more than 100 different text styles and effects to make your GIF into MP4 videos more beautiful.
Pros
Available for both Windows and Mac Users
Beginners can also use it
It is free and easy to use
You don’t have to use the internet for it to work
Cons
It requires you to download it on your PC

2. Cloudconvert
This free online service tool allows users to convert any GIF image to an MP4 file. In addition, the user interface is quite tricky, but you can edit the videos, trim the videos, and crop them. Users can add subtitles to videos using the SRT files, and finally, you can export files directly to the Dropbox account.
Pros
It is free to use
It helps you export videos directly to your Dropbox
It provides you with a ton of audio and video editing features
Use SRT to add subtitles to your videos
Cons
It has a complicated user-interface
It does not support uploading to video sharing websites

3. Online-Convert
This is a perfect tool to convert GIF image to an MP4 file. In addition, this is a complete online video editor that allows users to perform various kinds of basic video converting options on their files. Users can rotate or crop the videos and extract the unwanted parts from the screen. Once the videos convert successfully, they can be downloaded or directly exported to Google Drive or Dropbox.
Pros
Users can directly export the converted files to the Cloud services
It allows users to convert different files to MP4
It provides users with files settings for basic video editing
Cons
No interactive interface
Many ads on the website

4. File-Conversion
One of the most popular file conversion websites offers this video editing software. In addition, it provides various video editing services rather than just converting GIFs to MP4 video files. It also provides a few settings, including size, resolution, and frame rate.
Pros
· It is user friendly
· It is free to use
· Allows users to change the quality of the output videos
Cons
· Using the service requires sign-up
It does not have an option to crop the Mp4 Videos or edit the frame rate
It does not have an option to export the videos to the third-party cloud services

Part 3: How to Convert GIF to MP4
Here are the quick and easy steps to Ezgif GIF to MP4 online conversion:
>
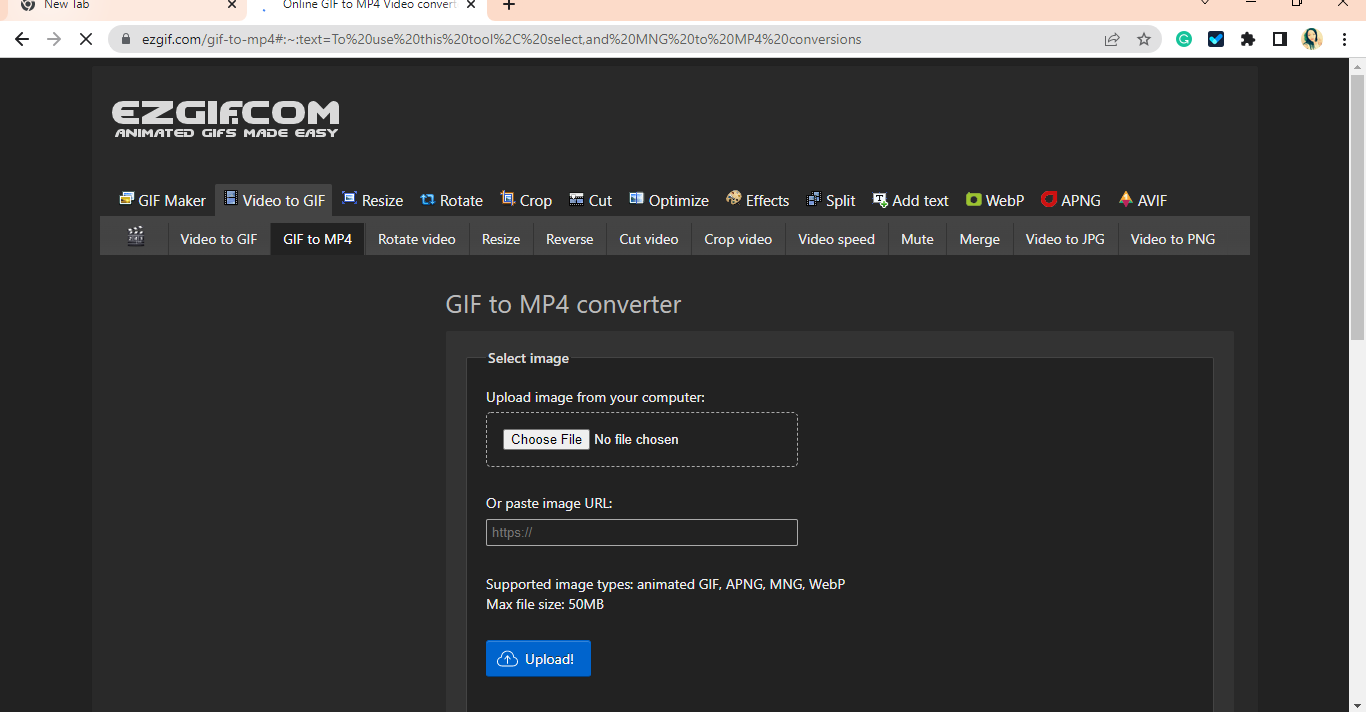
Step1: Choose File to Browse or Copy-Paste URL to Upload
Upload a GIF file to your timeline or paste an image URL that is up to 35MB and Click the “Upload” button
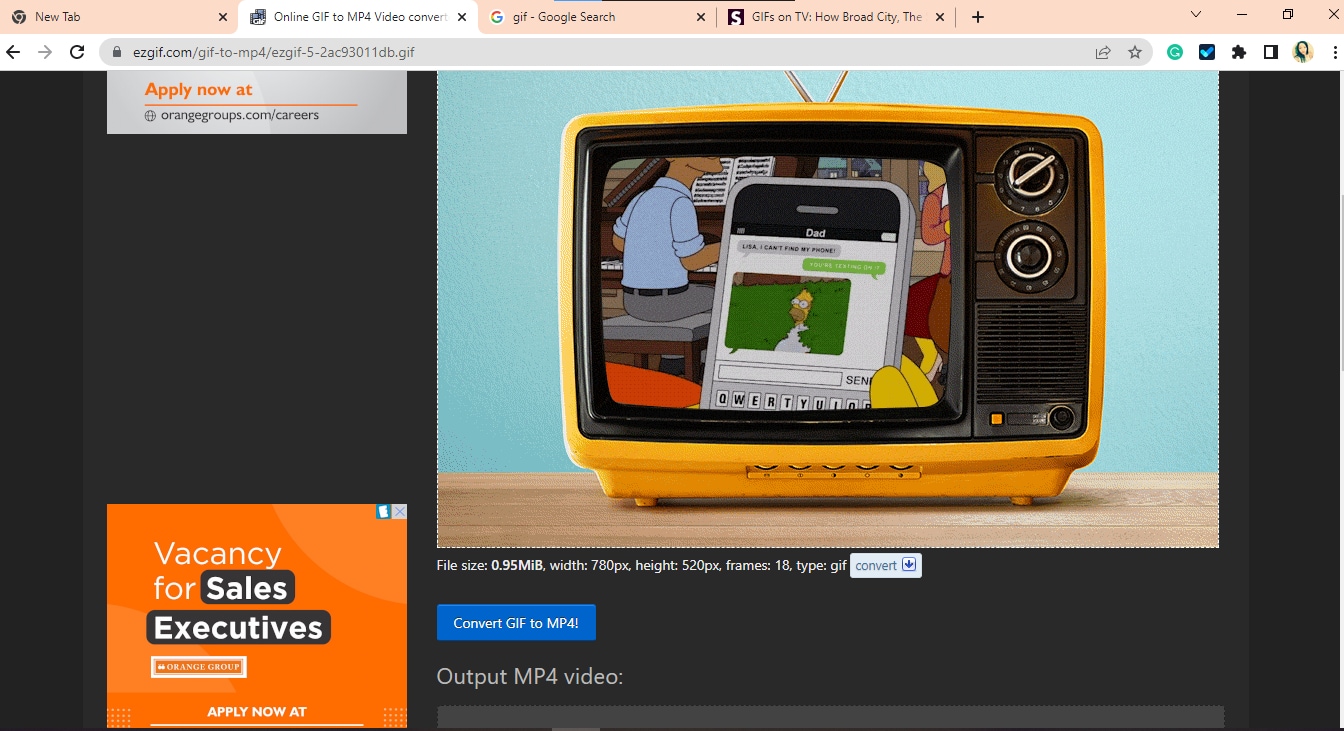
Step 2: Tap on Convert GIF to MP4
After the upload, click Convert GIF to MP4, and it will automatically get converted.
Step 3: Download the MP4
Export your video and download it on your device
Here is how to convert GIF to MP4 using Filmora software
Step 1: Install Filmora and Choose New Project
Open your Filmora software, click on New Project import GIF, or drag and drop them to your timeline.

Step 2: Import Media
If the media aspect ratio and resolution do not match when importing a file, a popup will appear. Make sure you click on DON’T CHANGE.

Step 3: Convert GIF to MP4
Click on export, then you rename and select your desired file format (MP4), and your GIFs will automatically convert.

Step 4: Export and Save
Finally, you can save the file on your device once the conversion process is complete.
Conclusion
From this article, we can pick that Ezgif is the best online tool and Filmora video editor is the easiest and perfect software that is good for GIF converter to MP4. This article also listed other video editors that can help you make GIFs from MP4 quickly and without stress.
Introduction.
Many people have been searching online for the best GIF to MP4 converter that will help them playback their GIF files on their media player. It is easier for GIF animated files to be converted to MP4 files, as Mp4 is the most popular file format compatible with many devices. Some compatible devices include iOS devices, Mac, Android devices, Windows, etc.
By converting GIF into video, you make a wise move as an encoded MP4 video contains richer colors and higher resolutions, weighs 5 to 10 times lighter in file size, and has engaging audio compared to the GIF. In addition, MP4 is also a wide-known and accepted format for social sharing videos across the web. So, whether you want to convert your Gif to Mp4 for Instagram or you intend to add songs to your animated texts and convert to Mp4, this article will help you out.
We shall explore:
In this article
Part 1: Best Online GIF to MP4 Converters
Part 2: Top GIF to MP4 Software
Part 3: How to Convert GIF to MP4

Part 1: Best Online GIF to MP4 Converters
GIF pictures are a perfect source of entertainment and can also be helpful as memes on the internet. Those wondering what a GIF picture is all about are small videos without sound. They can be used in the comment section of the internet or sent as memes in messages on smartphones.
However, due to third-party keyboard applications, the use and sending of GIFs have become very easy. Thus, many people are trying to migrate from GIF to MP4, and this article is for them. We will give you the best four (4) GIFs to video converter online that you can use.
1. Ezgif
Ezgif is a free GIF to MP4 online converter that allows you to turn your ezGif GIF into MP4 videos with a single click leaving no watermark on your video. The process is relatively easy as you just need to upload a GIF file up to 35MB, then click the “Convert to MP4” button, and your MP4 video will be ready. Besides, it supports the conversions of WEBP and APNG to MP4.
Pros
It is super-fast and free.
It does not have a watermark.
There is no advert on the site.
It does not require any software to download.
Cons
It allows you to convert one file at a time.

2. Adobe Creative Cloud Express
Adobe Creative Cloud Express is a collection of mobile app-based and web-based video editing tools that all content creators use. It allows you to upload GIFs online and then convert GIFs to MP4. It also allows you to trim the GIF and directly download the MP4 to the local PC.
Pros
It is very free to use
it allows you to trim the GIF
it is available online and on App Store
it does not require any software to download.
Cons
Allows you to upload one GIF at a time
It has limited features


3. FlexClip
This tool is a feature-packed online video maker and GIF to MP4 converter. It allows users to easily upload GIFs from either their mobile phones or PC to FlexClip’s in-browser editor and also make some edits with both the GIFs and videos before you can convert them.
Pros
No software downloads are required
No experience is needed.
There are tons of features available
Cons
GIFs are irreversible
You cannot change GIFs speed

4. Convertio
This online conversion tool has made GIFs to MP4 conversion much more effortless. This free GIF to video converter has a simple interface and easy-to-use tools that help you turn GIF files to MP4 in a few clicks.
Pros
It is swift and free.
You can convert several files at once.
It does not require any download.
Cons
There are loads of ads on the site.
You can only use 2 concurrent conversions for the free account.

Part 2: Top GIF to MP4 Software
Many people have tried different software to convert GIFs into MP4 that have proven abortive. Most software on the internet only allows you to convert MPEG to GIF, WMV to GIF, or images to GIF files. Only a few software allows the conversion from GIF to videos.
Here are some of the top 4 GIF to MP4 Conversion software:
1. Filmora
Filmora Video Editor is the best software to convert any GIF picture to an MP4 video file. The best part is that you do not need to use the internet, and it works perfectly for all users. In addition, the software is super stable and does not crash even if you load more than ten video files on it. However, the Filmora video editor is a complete package that allows users to edit and convert any video with many accessible features. More so, you are not required to be a professional video editor to be able to convert the GIF image to a professional video.
With the Filmora software, you do not have to download and pay for the music, as the editor also has a great music library from which you can choose to add music within seconds. Moreover, the software has more than 100 different text styles and effects to make your GIF into MP4 videos more beautiful.
Pros
Available for both Windows and Mac Users
Beginners can also use it
It is free and easy to use
You don’t have to use the internet for it to work
Cons
It requires you to download it on your PC

2. Cloudconvert
This free online service tool allows users to convert any GIF image to an MP4 file. In addition, the user interface is quite tricky, but you can edit the videos, trim the videos, and crop them. Users can add subtitles to videos using the SRT files, and finally, you can export files directly to the Dropbox account.
Pros
It is free to use
It helps you export videos directly to your Dropbox
It provides you with a ton of audio and video editing features
Use SRT to add subtitles to your videos
Cons
It has a complicated user-interface
It does not support uploading to video sharing websites

3. Online-Convert
This is a perfect tool to convert GIF image to an MP4 file. In addition, this is a complete online video editor that allows users to perform various kinds of basic video converting options on their files. Users can rotate or crop the videos and extract the unwanted parts from the screen. Once the videos convert successfully, they can be downloaded or directly exported to Google Drive or Dropbox.
Pros
Users can directly export the converted files to the Cloud services
It allows users to convert different files to MP4
It provides users with files settings for basic video editing
Cons
No interactive interface
Many ads on the website

4. File-Conversion
One of the most popular file conversion websites offers this video editing software. In addition, it provides various video editing services rather than just converting GIFs to MP4 video files. It also provides a few settings, including size, resolution, and frame rate.
Pros
· It is user friendly
· It is free to use
· Allows users to change the quality of the output videos
Cons
· Using the service requires sign-up
It does not have an option to crop the Mp4 Videos or edit the frame rate
It does not have an option to export the videos to the third-party cloud services

Part 3: How to Convert GIF to MP4
Here are the quick and easy steps to Ezgif GIF to MP4 online conversion:
>
Step1: Choose File to Browse or Copy-Paste URL to Upload
Upload a GIF file to your timeline or paste an image URL that is up to 35MB and Click the “Upload” button

Step 2: Tap on Convert GIF to MP4
After the upload, click Convert GIF to MP4, and it will automatically get converted.

Step 3: Download the MP4
Export your video and download it on your device
Here is how to convert GIF to MP4 using Filmora software
Step 1: Install Filmora and Choose New Project
Open your Filmora software, click on New Project import GIF, or drag and drop them to your timeline.

Step 2: Import Media
If the media aspect ratio and resolution do not match when importing a file, a popup will appear. Make sure you click on DON’T CHANGE.

Step 3: Convert GIF to MP4
Click on export, then you rename and select your desired file format (MP4), and your GIFs will automatically convert.

Step 4: Export and Save
Finally, you can save the file on your device once the conversion process is complete.
Conclusion
From this article, we can pick that Ezgif is the best online tool and Filmora video editor is the easiest and perfect software that is good for GIF converter to MP4. This article also listed other video editors that can help you make GIFs from MP4 quickly and without stress.
Introduction.
Many people have been searching online for the best GIF to MP4 converter that will help them playback their GIF files on their media player. It is easier for GIF animated files to be converted to MP4 files, as Mp4 is the most popular file format compatible with many devices. Some compatible devices include iOS devices, Mac, Android devices, Windows, etc.
By converting GIF into video, you make a wise move as an encoded MP4 video contains richer colors and higher resolutions, weighs 5 to 10 times lighter in file size, and has engaging audio compared to the GIF. In addition, MP4 is also a wide-known and accepted format for social sharing videos across the web. So, whether you want to convert your Gif to Mp4 for Instagram or you intend to add songs to your animated texts and convert to Mp4, this article will help you out.
We shall explore:
In this article
Part 1: Best Online GIF to MP4 Converters
Part 2: Top GIF to MP4 Software
Part 3: How to Convert GIF to MP4

Part 1: Best Online GIF to MP4 Converters
GIF pictures are a perfect source of entertainment and can also be helpful as memes on the internet. Those wondering what a GIF picture is all about are small videos without sound. They can be used in the comment section of the internet or sent as memes in messages on smartphones.
However, due to third-party keyboard applications, the use and sending of GIFs have become very easy. Thus, many people are trying to migrate from GIF to MP4, and this article is for them. We will give you the best four (4) GIFs to video converter online that you can use.
1. Ezgif
Ezgif is a free GIF to MP4 online converter that allows you to turn your ezGif GIF into MP4 videos with a single click leaving no watermark on your video. The process is relatively easy as you just need to upload a GIF file up to 35MB, then click the “Convert to MP4” button, and your MP4 video will be ready. Besides, it supports the conversions of WEBP and APNG to MP4.
Pros
It is super-fast and free.
It does not have a watermark.
There is no advert on the site.
It does not require any software to download.
Cons
It allows you to convert one file at a time.

2. Adobe Creative Cloud Express
Adobe Creative Cloud Express is a collection of mobile app-based and web-based video editing tools that all content creators use. It allows you to upload GIFs online and then convert GIFs to MP4. It also allows you to trim the GIF and directly download the MP4 to the local PC.
Pros
It is very free to use
it allows you to trim the GIF
it is available online and on App Store
it does not require any software to download.
Cons
Allows you to upload one GIF at a time
It has limited features


3. FlexClip
This tool is a feature-packed online video maker and GIF to MP4 converter. It allows users to easily upload GIFs from either their mobile phones or PC to FlexClip’s in-browser editor and also make some edits with both the GIFs and videos before you can convert them.
Pros
No software downloads are required
No experience is needed.
There are tons of features available
Cons
GIFs are irreversible
You cannot change GIFs speed

4. Convertio
This online conversion tool has made GIFs to MP4 conversion much more effortless. This free GIF to video converter has a simple interface and easy-to-use tools that help you turn GIF files to MP4 in a few clicks.
Pros
It is swift and free.
You can convert several files at once.
It does not require any download.
Cons
There are loads of ads on the site.
You can only use 2 concurrent conversions for the free account.

Part 2: Top GIF to MP4 Software
Many people have tried different software to convert GIFs into MP4 that have proven abortive. Most software on the internet only allows you to convert MPEG to GIF, WMV to GIF, or images to GIF files. Only a few software allows the conversion from GIF to videos.
Here are some of the top 4 GIF to MP4 Conversion software:
1. Filmora
Filmora Video Editor is the best software to convert any GIF picture to an MP4 video file. The best part is that you do not need to use the internet, and it works perfectly for all users. In addition, the software is super stable and does not crash even if you load more than ten video files on it. However, the Filmora video editor is a complete package that allows users to edit and convert any video with many accessible features. More so, you are not required to be a professional video editor to be able to convert the GIF image to a professional video.
With the Filmora software, you do not have to download and pay for the music, as the editor also has a great music library from which you can choose to add music within seconds. Moreover, the software has more than 100 different text styles and effects to make your GIF into MP4 videos more beautiful.
Pros
Available for both Windows and Mac Users
Beginners can also use it
It is free and easy to use
You don’t have to use the internet for it to work
Cons
It requires you to download it on your PC

2. Cloudconvert
This free online service tool allows users to convert any GIF image to an MP4 file. In addition, the user interface is quite tricky, but you can edit the videos, trim the videos, and crop them. Users can add subtitles to videos using the SRT files, and finally, you can export files directly to the Dropbox account.
Pros
It is free to use
It helps you export videos directly to your Dropbox
It provides you with a ton of audio and video editing features
Use SRT to add subtitles to your videos
Cons
It has a complicated user-interface
It does not support uploading to video sharing websites

3. Online-Convert
This is a perfect tool to convert GIF image to an MP4 file. In addition, this is a complete online video editor that allows users to perform various kinds of basic video converting options on their files. Users can rotate or crop the videos and extract the unwanted parts from the screen. Once the videos convert successfully, they can be downloaded or directly exported to Google Drive or Dropbox.
Pros
Users can directly export the converted files to the Cloud services
It allows users to convert different files to MP4
It provides users with files settings for basic video editing
Cons
No interactive interface
Many ads on the website

4. File-Conversion
One of the most popular file conversion websites offers this video editing software. In addition, it provides various video editing services rather than just converting GIFs to MP4 video files. It also provides a few settings, including size, resolution, and frame rate.
Pros
· It is user friendly
· It is free to use
· Allows users to change the quality of the output videos
Cons
· Using the service requires sign-up
It does not have an option to crop the Mp4 Videos or edit the frame rate
It does not have an option to export the videos to the third-party cloud services

Part 3: How to Convert GIF to MP4
Here are the quick and easy steps to Ezgif GIF to MP4 online conversion:
>
Step1: Choose File to Browse or Copy-Paste URL to Upload
Upload a GIF file to your timeline or paste an image URL that is up to 35MB and Click the “Upload” button

Step 2: Tap on Convert GIF to MP4
After the upload, click Convert GIF to MP4, and it will automatically get converted.

Step 3: Download the MP4
Export your video and download it on your device
Here is how to convert GIF to MP4 using Filmora software
Step 1: Install Filmora and Choose New Project
Open your Filmora software, click on New Project import GIF, or drag and drop them to your timeline.

Step 2: Import Media
If the media aspect ratio and resolution do not match when importing a file, a popup will appear. Make sure you click on DON’T CHANGE.

Step 3: Convert GIF to MP4
Click on export, then you rename and select your desired file format (MP4), and your GIFs will automatically convert.

Step 4: Export and Save
Finally, you can save the file on your device once the conversion process is complete.
Conclusion
From this article, we can pick that Ezgif is the best online tool and Filmora video editor is the easiest and perfect software that is good for GIF converter to MP4. This article also listed other video editors that can help you make GIFs from MP4 quickly and without stress.
Introduction.
Many people have been searching online for the best GIF to MP4 converter that will help them playback their GIF files on their media player. It is easier for GIF animated files to be converted to MP4 files, as Mp4 is the most popular file format compatible with many devices. Some compatible devices include iOS devices, Mac, Android devices, Windows, etc.
By converting GIF into video, you make a wise move as an encoded MP4 video contains richer colors and higher resolutions, weighs 5 to 10 times lighter in file size, and has engaging audio compared to the GIF. In addition, MP4 is also a wide-known and accepted format for social sharing videos across the web. So, whether you want to convert your Gif to Mp4 for Instagram or you intend to add songs to your animated texts and convert to Mp4, this article will help you out.
We shall explore:
In this article
Part 1: Best Online GIF to MP4 Converters
Part 2: Top GIF to MP4 Software
Part 3: How to Convert GIF to MP4

Part 1: Best Online GIF to MP4 Converters
GIF pictures are a perfect source of entertainment and can also be helpful as memes on the internet. Those wondering what a GIF picture is all about are small videos without sound. They can be used in the comment section of the internet or sent as memes in messages on smartphones.
However, due to third-party keyboard applications, the use and sending of GIFs have become very easy. Thus, many people are trying to migrate from GIF to MP4, and this article is for them. We will give you the best four (4) GIFs to video converter online that you can use.
1. Ezgif
Ezgif is a free GIF to MP4 online converter that allows you to turn your ezGif GIF into MP4 videos with a single click leaving no watermark on your video. The process is relatively easy as you just need to upload a GIF file up to 35MB, then click the “Convert to MP4” button, and your MP4 video will be ready. Besides, it supports the conversions of WEBP and APNG to MP4.
Pros
It is super-fast and free.
It does not have a watermark.
There is no advert on the site.
It does not require any software to download.
Cons
It allows you to convert one file at a time.

2. Adobe Creative Cloud Express
Adobe Creative Cloud Express is a collection of mobile app-based and web-based video editing tools that all content creators use. It allows you to upload GIFs online and then convert GIFs to MP4. It also allows you to trim the GIF and directly download the MP4 to the local PC.
Pros
It is very free to use
it allows you to trim the GIF
it is available online and on App Store
it does not require any software to download.
Cons
Allows you to upload one GIF at a time
It has limited features


3. FlexClip
This tool is a feature-packed online video maker and GIF to MP4 converter. It allows users to easily upload GIFs from either their mobile phones or PC to FlexClip’s in-browser editor and also make some edits with both the GIFs and videos before you can convert them.
Pros
No software downloads are required
No experience is needed.
There are tons of features available
Cons
GIFs are irreversible
You cannot change GIFs speed

4. Convertio
This online conversion tool has made GIFs to MP4 conversion much more effortless. This free GIF to video converter has a simple interface and easy-to-use tools that help you turn GIF files to MP4 in a few clicks.
Pros
It is swift and free.
You can convert several files at once.
It does not require any download.
Cons
There are loads of ads on the site.
You can only use 2 concurrent conversions for the free account.

Part 2: Top GIF to MP4 Software
Many people have tried different software to convert GIFs into MP4 that have proven abortive. Most software on the internet only allows you to convert MPEG to GIF, WMV to GIF, or images to GIF files. Only a few software allows the conversion from GIF to videos.
Here are some of the top 4 GIF to MP4 Conversion software:
1. Filmora
Filmora Video Editor is the best software to convert any GIF picture to an MP4 video file. The best part is that you do not need to use the internet, and it works perfectly for all users. In addition, the software is super stable and does not crash even if you load more than ten video files on it. However, the Filmora video editor is a complete package that allows users to edit and convert any video with many accessible features. More so, you are not required to be a professional video editor to be able to convert the GIF image to a professional video.
With the Filmora software, you do not have to download and pay for the music, as the editor also has a great music library from which you can choose to add music within seconds. Moreover, the software has more than 100 different text styles and effects to make your GIF into MP4 videos more beautiful.
Pros
Available for both Windows and Mac Users
Beginners can also use it
It is free and easy to use
You don’t have to use the internet for it to work
Cons
It requires you to download it on your PC

2. Cloudconvert
This free online service tool allows users to convert any GIF image to an MP4 file. In addition, the user interface is quite tricky, but you can edit the videos, trim the videos, and crop them. Users can add subtitles to videos using the SRT files, and finally, you can export files directly to the Dropbox account.
Pros
It is free to use
It helps you export videos directly to your Dropbox
It provides you with a ton of audio and video editing features
Use SRT to add subtitles to your videos
Cons
It has a complicated user-interface
It does not support uploading to video sharing websites

3. Online-Convert
This is a perfect tool to convert GIF image to an MP4 file. In addition, this is a complete online video editor that allows users to perform various kinds of basic video converting options on their files. Users can rotate or crop the videos and extract the unwanted parts from the screen. Once the videos convert successfully, they can be downloaded or directly exported to Google Drive or Dropbox.
Pros
Users can directly export the converted files to the Cloud services
It allows users to convert different files to MP4
It provides users with files settings for basic video editing
Cons
No interactive interface
Many ads on the website

4. File-Conversion
One of the most popular file conversion websites offers this video editing software. In addition, it provides various video editing services rather than just converting GIFs to MP4 video files. It also provides a few settings, including size, resolution, and frame rate.
Pros
· It is user friendly
· It is free to use
· Allows users to change the quality of the output videos
Cons
· Using the service requires sign-up
It does not have an option to crop the Mp4 Videos or edit the frame rate
It does not have an option to export the videos to the third-party cloud services

Part 3: How to Convert GIF to MP4
Here are the quick and easy steps to Ezgif GIF to MP4 online conversion:
>
Step1: Choose File to Browse or Copy-Paste URL to Upload
Upload a GIF file to your timeline or paste an image URL that is up to 35MB and Click the “Upload” button

Step 2: Tap on Convert GIF to MP4
After the upload, click Convert GIF to MP4, and it will automatically get converted.

Step 3: Download the MP4
Export your video and download it on your device
Here is how to convert GIF to MP4 using Filmora software
Step 1: Install Filmora and Choose New Project
Open your Filmora software, click on New Project import GIF, or drag and drop them to your timeline.

Step 2: Import Media
If the media aspect ratio and resolution do not match when importing a file, a popup will appear. Make sure you click on DON’T CHANGE.

Step 3: Convert GIF to MP4
Click on export, then you rename and select your desired file format (MP4), and your GIFs will automatically convert.

Step 4: Export and Save
Finally, you can save the file on your device once the conversion process is complete.
Conclusion
From this article, we can pick that Ezgif is the best online tool and Filmora video editor is the easiest and perfect software that is good for GIF converter to MP4. This article also listed other video editors that can help you make GIFs from MP4 quickly and without stress.
8 Best Free Title Maker You Must Try and Put to Use
Do you know what’s more important in a blog post? Yes, you guessed it right, headline. It helps your blog grab attention and encourages people to click through. Additionally, the title is a key factor in how search engines categorize and rank posts. A great blog free title maker might be a handy tool for those who want to boost their site’s traffic.
A headline generator may assist you in creating a compelling and efficient title that will make your blog distinguish itself from others by letting you enter a few essential details. Additionally, exploring ideas might be a terrific approach if you’re feeling stuck. A title generator is unquestionably something you should consider including in the toolkit if you’re signed in marketing and blogging.
8 Best Free Title Maker You Must Try and Put to Use
1. SEMrush Title Generator

While writing and publishing something the first thing that grabs a user’s attention is the title of the post. It must be catchy and good enough for them to read the whole thing. What SEMrush ideas generator does is that it suggests you some catchy and interesting title ideas when you type in and search the same keyword.
You can opt to choose the best among the suggested ones and grab people’s attention and make them read your blog/article. Since it’s a free title generator you need not worry about spending money for title ideas and search for as many topics as you need. You may also look for topic ideas by clicking the “get more content ideas” button that is there on the right side at the bottom.
2. Contentrow Title Generator
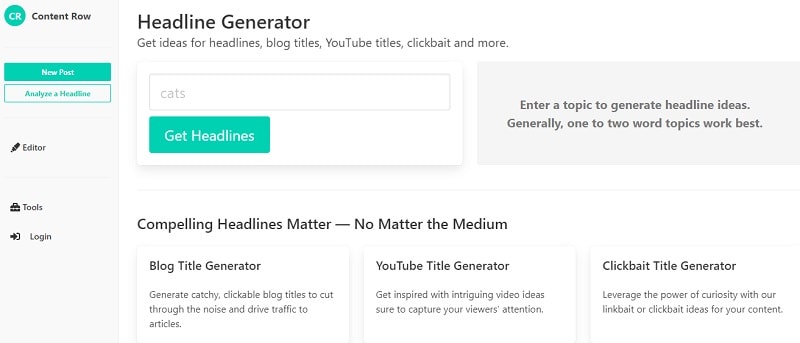
Another excellent title intro maker online free is Content Row. It provides specific outcomes when a specific keyword is used. You only have to register with the email ID if you want to discover your keyword’s currently trending titles. You can use this free tool to analyze your headline score as well. Once you’ve chosen the blog title or headline, you can assess the topic’s strength. Additionally, it provides some ideas on which you might base your new headline.
Also, this tool displays hot subjects currently being widely or passionately debated online. A case converter or word counter is also an option. Contentrow Title Generator helps you to generate clickable and catchy blog titles to drive traffic to the articles. Discover unique video ideas that will inspire you and interest your audience. Use the clickbait or linkbait ideas for the content with their title generator to capitalize on readers’ curiosity.
3. Hubspot Title Generator

The HubSpot Title Generator has a lot going for it, not the least because it is free to use. This indicates that using the tool is not dependent upon having a HubSpot account. Here are a few additional reasons you should use it, besides being free. HubSpot Title Generator is one of the most accessible content marketing strategies. Type up to five distinct nouns into the area provided and click “Give Me Blog Ideas.”
Afterward, you can navigate through a week’s generated blog post ideas. All it takes is that. It will only take a few seconds to generate title ideas, and once you have entered the nouns into the generator field, you will be given new ideas to create new posts instantly. Users can get a unique title every week based on the nouns they put. Hubspot doesn’t share copied blog titles, producing unique and plagiarism-free titles.
4. Tweak Your Biz
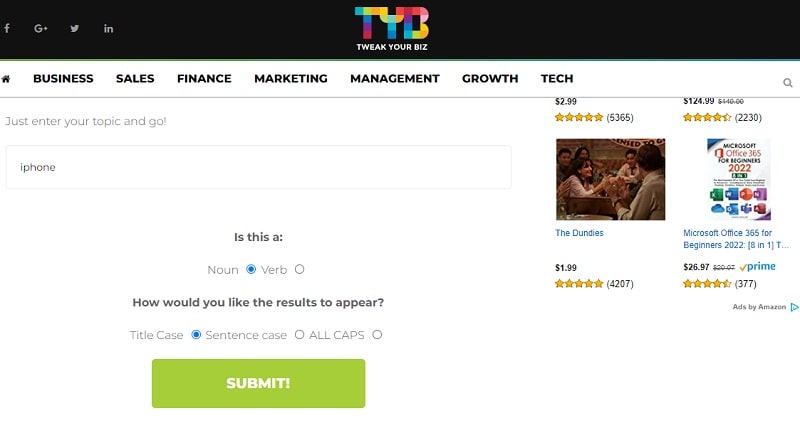
Tweak your Biz Title Maker. Create catchy headlines for your blog posts and articles. A great title can boost visitor traffic, Facebook Likes, and tweets by 50% or more. An online web-only creative title generator called Tweak Your Biz title generator online free is available to experienced and inexperienced bloggers and social media influencers. It is the free headline maker that provides the two-way service, and it serves as the best headline analyzer and generator.
The target word can be searched as a verb or a noun before the output in the Tweak Your Biz headline maker. Input your subject or topic in the box provided on this innovative title generator and press the “Submit” button. It provides headlines for various topics that are grouped under several categories and gives a variety of headlines to fit the tone of your site. Use this free headline generator to create attention-grabbing headlines for your blog or social media sites. It does not require the installation of any programs, just a web browser, to function.
5. The Hoth

A well-known free online title generator and marketing provider called The HOTH offers a variety of solutions for business owners and marketers. They provide a free blog subject headline generator so you can rapidly develop headlines for your posts to help you obtain the maximum traffic to your article. The HOTH’s headline generator is a fantastic choice if you want more control over the suggestions. It still requires little time to operate and is simple, but it requires more input than many other tools.
You must add a keyword, your audience’s intended goal, a frequent key point, the name of your industry, your target audience, and other information into this tool to generate titles. After that, the program generates ten titles simultaneously, each with options specific to the abovementioned factors. The title generator on the HOTH is still a quick and straightforward approach to developing a list of intriguing title concepts. You can specify your preferred term, target market, and other details to make the headline more suited to your needs.
6. Wix Title Generator
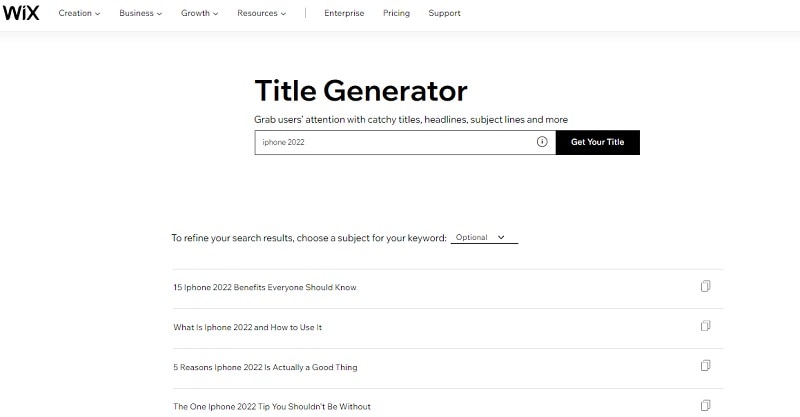
Well, this tool called Wix title generator is no different than others as it comes with a plethora of options. All you got to do is open the website using the above link and enter around 2 main keywords to look for a relevant and catchy title for your blog/article. Put the required keywords and then opt for clicking the button that says, “Get your Title.”
You will be given around 7-8 options for the title of the blog and you can choose whatever feels best for the same. You may also load more options by clicking the button that is there at the bottom of the PC’s screen. Once chosen, you can copy the title and use it however you like being it a free tool to be used as many times as you wish.
7. Small Biz Trends

Well, the Small Biz Trends title generator is a bit different when it comes to generating title ideas for your blog than other tools mentioned here. It’s because when you open the website and type in your topic and click the submit button, you will be given a ton of blog title options. Not just that, the options here will be presented to you category-wise. Isn’t this convenient?
Yes, it is, if you feel the other tools are giving you lesser options or ideas. You can just copy whatever title appeals to you the most and use it however you need to. Also, you may use the option given above the submit button “i.e. Small business trends Thesaurus,” of you wish to opt for generating more ideas.
8. fatjoe
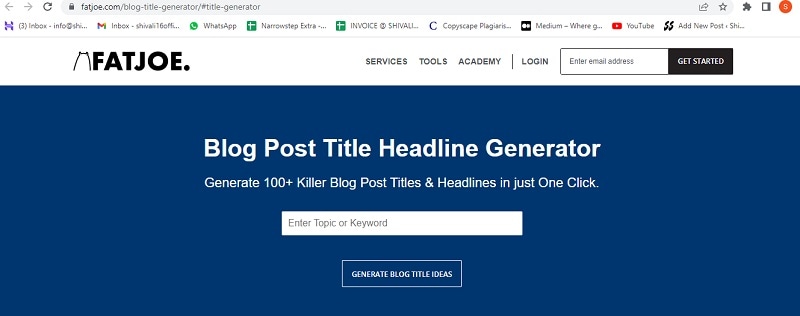
With the help of the well-liked headline generator from FatJoe, users may quickly come up with over 100 ideas for blog posts. Have trouble coming to a title for your most recent blog post? There are always options available here. You can enter the focus keyword or selected subject to get the best clickable and SEO-friendly titles.
In addition to providing one of the best headline creation tools for free, Fat Joe is a link-building business. One can create more than 100 titles and even the best headline ideas. You can even create new topics for generating other topics.
Conclusion
Online free title creator can create catchy headlines that increase social media engagement, drive website traffic, and accomplish various other goals. Several automated solutions will handle your labor-intensive tasks, so you don’t have to rely only on your creativity to develop article titles. With the correct tools, you can improve your SEO content and grow your business without going over budget by bringing in more customers and increasing conversions.
Free Download For Win 7 or later(64-bit)
Free Download For macOS 10.14 or later
Free Download For macOS 10.14 or later
Also read:
- Updated How to Make a Slideshow GIF, In 2024
- Updated 2024 Approved How to Use Rules of Thirds
- How to Add Green Screen Effects In Phhotoshop for 2024
- YouTube Lives Are Very Popular Nowadays and People Can Interact with the Anchor at Real Time. If You Want to Comment on a YouTube Live Chat, You Can Follow the Guide Below for 2024
- Updated 2024 Approved A Vlog Has Many Elements to Answer. While Setting up Ideas for It, There Are Several Things Into Which You Should Look. This Article Presents a Picture of How a Vlog Video Is Made Perfectly
- Updated Read This Review to Learn Everything You Need to Know About Leeming LUT Pro and How to Apply Pro LUTs Using Different Video Editors for 2024
- Top 10 Free WhatsApp Video Converter
- New In 2024, Looking For a Cheap Camera to Make Slow Motion Video? Get It Now
- Guaranteed 10 Storyboard Creators To Make Animation Easier For You
- How to Make Discord Logo GIF for 2024
- Updated In 2024, Looking for Efficient Ways to Create a Slow-Motion Video? Read the Article for Reliable Solutions that Provide Excellent Results
- The Complete Guide to Slideshow Maker with Music for 2024
- Updated 2024 Approved Some of the Top Sites to Replace a Sky Background in Videos
- Updated 10 Best Camera for YouTube Beginners for 2024
- Detailed Tutorial to Resize Your Video in VLC
- How to Change Video Thumbnail in Google Drive for 2024
- Step by Step to Rotate Videos in Windows Media Player
- New In 2024, Are You Convincingly Fascinated by the Whole Idea of Augmented Reality and Want to Level up Your Marketing Skills with an AR Integration? Rest Assured, Youve Found the Right Place
- In 2024, Do You Want to Use a Video Editor for Your iOS Device? This Article Introduces LumaFusion, a Perfect Multi-Track Video Editor Designed to Cater to Your Needs
- Updated Steps to Make a Neon Dance Effect With Filmora
- In 2024, How Vivo V29e Mirror Screen to PC? | Dr.fone
- In 2024, Is pgsharp legal when you are playing pokemon On Infinix Smart 8? | Dr.fone
- Guide to Mirror Your Itel A60 to Other Android devices | Dr.fone
- In 2024, Forgot Your Apple ID Password and Email On iPhone 6s Plus? Heres the Best Fixes
- Ultimate Guide to Free PPTP VPN For Beginners On Motorola Razr 40 | Dr.fone
- How to Create Slideshow in LinkedIn
- How to Track Samsung Galaxy A34 5G Location by Number | Dr.fone
- How to Transfer Music from Tecno Spark 20 Pro+ to iPod | Dr.fone
- Edit and Send Fake Location on Telegram For your Tecno Spark 20 Pro in 3 Ways | Dr.fone
- How to recover old videos from your Realme GT 5 (240W)
- Mastering Lock Screen Settings How to Enable and Disable on Vivo V30 Lite 5G
- How to Make the Most of Your iPhone 13 Pro Max Lock Screen with Notifications? | Dr.fone
- Google Play Services Wont Update? 12 Fixes are Here on OnePlus Ace 2 | Dr.fone
- A Working Guide For Pachirisu Pokemon Go Map On Realme 11 Pro+ | Dr.fone
- In 2024, How To Fix OEM Unlock Missing on Realme?
- In 2024, 6 Ways To Transfer Contacts From Itel P40+ to iPhone | Dr.fone
- How To Use Special Features - Virtual Location On Poco F5 Pro 5G? | Dr.fone
- Title: Step by Step to Cut Video in Adobe Premiere Pro
- Author: Morgan
- Created at : 2024-05-19 05:11:36
- Updated at : 2024-05-20 05:11:36
- Link: https://ai-video-editing.techidaily.com/step-by-step-to-cut-video-in-adobe-premiere-pro/
- License: This work is licensed under CC BY-NC-SA 4.0.

