
:max_bytes(150000):strip_icc():format(webp)/GettyImages-136612668-5c640cc5c9e77c00010a4ff4.jpg)
Updated 2024 Approved How Do You Create In-Camera Transitions in Your Videos? A Complete Guide for Beginners to Create These Transitions Using Their Camera at Home
How Do You Create In-Camera Transitions in Your Videos? A Complete Guide for Beginners to Create These Transitions Using Their Camera at Home
You must have seen it in videos when a scene changes to another place or time. How is it possible? Video transitions are a post-production technique that connects two different shots together. And it makes the whole video goes smooth and fluent.
Hopping directly from one clip to the next looks pretty queer. It disturbs the whole dynamics and charm of the video. To avoid this, we use video transitions. This makes the video appear much smoother and more linked.
You may think it is not easy, but after reading this article, you will know how simple it is. All you need is a camera and a few skills. In this article, we will focus on different in-camera transitions and let you know how to edit in a powerful video editor Filmora .
Whip Your Camera
You may have noticed that when an object moves quickly, the camera creates a blurred image of the object. We call it motion blur. The idea with this transition is to cut and paste your shots together by whipping your camera at the end of your first shot and at the beginning of your second one. This effect depends on two aspects. The first is by the speedy motion of the object out of the frame, and the second is by the camera’s movement.
Here is a stepwise guide for you to try
- Plan your shots, where and in what direction you will make the whip.
- Then take the first shot and whip the camera at the end of the shot in the direction the object is moving.
- For the next shot, whip the camera into the action and complete the shot.
- Import both shots in your editing tool and find the point of blur in both.
- Cut and paste them to add a blurring effect to your video.
You can whip your camera in any direction you want. Make sure the movement is fast enough to create a motion blur.
The result would be a smooth transition from the first shot to the second, as in this clip:

Fill The Frame
In this in-camera transition technique, you must fill the frame with an object or subject. Compose the shot with the main subject filling the frame from edge to edge. In this way, those who view the video immediately know what you want them to see.
Here is step-by-step guidance for this transition
- Plan the two shots you are going to take.
- Find a subject or an action that will fill the frame during recording.
- In the first shot, please make the subject move toward the frame so that it fills the frame.
- The second shot will take place at another time or place.
- To record the second shot, cover the frame with an object and then reveal the shot.
- Import both shots into Wondershare Filmora .
- Cut the two shots to the point where the frame is filled and paste these shots together.
Free Download For Win 7 or later(64-bit)
Free Download For macOS 10.14 or later
One important thing is to match the color and brightness of the object or subject. It will provide you with much better results. The video attached below explains all the steps of filling the frame.

Match Cut
In a video, a match cut transitions from one shot to another. During this, the composition of the two shots is matched by action, subject, and subject matter. The goal is to make a visual match between two situations that don’t have a direct link. Here are the steps to creating a match-cut transition in your videos.
- Plan the shot you are going to take.
- Record the action in the first shot, for example, clapping your hands.
- Go to another place or scene to record the second shot.
- Repeat the same action in the second shot.
- Import both camera shots to Wondershare Filmora .
- Cut one shot to another when the action is at its peak.
This way, you can smoothly transition from one place or scene to another. There is a video attached below for a better understanding of the steps.

Final Words
You can use these techniques to create sublime in-camera transitions. Make sure to follow all the steps in the correct order. These transitions will make your videos look more creative and artistic. Plan your ideas, add these transitions to your videos, and create cool videos at home to post on social media.
If you find this article informative, remember to share it with your friends. Which of these transitions did you like the most, and are you going to try them?
Free Download For Win 7 or later(64-bit)
Free Download For macOS 10.14 or later
Free Download For macOS 10.14 or later
One important thing is to match the color and brightness of the object or subject. It will provide you with much better results. The video attached below explains all the steps of filling the frame.
Match Cut
In a video, a match cut transitions from one shot to another. During this, the composition of the two shots is matched by action, subject, and subject matter. The goal is to make a visual match between two situations that don’t have a direct link. Here are the steps to creating a match-cut transition in your videos.
- Plan the shot you are going to take.
- Record the action in the first shot, for example, clapping your hands.
- Go to another place or scene to record the second shot.
- Repeat the same action in the second shot.
- Import both camera shots to Wondershare Filmora .
- Cut one shot to another when the action is at its peak.
This way, you can smoothly transition from one place or scene to another. There is a video attached below for a better understanding of the steps.
Final Words
You can use these techniques to create sublime in-camera transitions. Make sure to follow all the steps in the correct order. These transitions will make your videos look more creative and artistic. Plan your ideas, add these transitions to your videos, and create cool videos at home to post on social media.
If you find this article informative, remember to share it with your friends. Which of these transitions did you like the most, and are you going to try them?
Free Download For Win 7 or later(64-bit)
Free Download For macOS 10.14 or later
How to Remove Audio From Videos with FFmpeg?
Unbelievably, the globe has been making headway in its endeavors. Considering how far the world has come in producing amazing things in recent times, it is impossible to fathom the progress made in the digital industry. There are now millions of video editing programs like FFmpeg that remove audio, each allowing you to accomplish anything. In addition to video editing, it is now possible to modify the music playing in the backdrop of a video. Doesn’t it seem impossible to you? However, it has an actual appearance and is simple to pull audio from a video. You will, however, need to choose a tool with great care and consideration.
In the following parts, we will discuss how to remove audio from video with FFmpeg successfully. In addition, we have also looked at other software that has the potential to be an alternative to FFmpeg that is far more effective.

Part 1: How to Use FFmpeg to Remove Audio from Videos?
FFMPEG is a highly flexible video editing program from the command line. You may use it for various purposes, including converting between different file formats. But in addition to that, you may use it to remove audio from your videos or clips. Here are two different ways to delete audio using FFMPEG, depending on what you want to do. But most crucially, speed and quality are not sacrificed with any of these choices. It’s about coding. When using other people’s code, also label the author. Using FFmpeg, you can separate the audio. The audio in video files may be removed, added, extracted, and added again with the help of this powerful utility.
You will only need to install FFmpeg on your computer after you have purchased it. Removing video is straightforward, so you won’t have to put in much effort to achieve this goal. Let’s look at the many methods available.
Use the Command Line
Step1 The command to extract audio from your video file is visible for your review.

Step2 It would be helpful if you updated the extension and the name of the file that was entered, but other than that, you won’t need to do anything else.

The preceding command is successful if the input file certifies. This is why you need to find the codec for the audio stream. If you obey this order, you will accomplish what you set out to do. A user might sometimes use an audio format returned by the previous command. However, this will only occasionally be successful.
The storage format that FFmpeg employs is determined by looking at the output file’s extension. It would help if you knew that a storage format, a container, and an audio format are distinct. You will encounter a scenario where the audio format does not have a container named after it. Two problematic formats are among the most common formats; they are PCM and Vorbis. OGG is compatible with Vorbis, whereas WAV is compatible with PCM.
Let’s investigate another approach to extract audio from a video using FFmpeg if the prior one was too difficult for you to grasp.
Use the Terminal
Step1 Verify that the format remains the same.
You will need to locate the video in its original format to be able to extract the audio from it. If you are unfamiliar with the primary format, you will be unable to determine the appropriate file extension. Because of this, you are going to need to make use of the ffprobe command.

Now, change “myvideo.mp4” to the name of the video file you want to use. This will verify that you are familiar with the video’s original file format.
After learning about the original audio’s format, you can reencode a video clip to remove the audio from it.

Step2 Modify the format, please.
You might try replacing myvideo.mp4 with the directory and filename to see if it helps. Additionally, it would be helpful if you updated the name of the audio.ogg file with the name you want to use.
Therefore, if you follow the two approaches discussed above, you can extract audio from your video files with little to no work. To completely comprehend the stages, you must examine them in great detail.
Part 2: The Most Straightforward Way to Mute Audio in Videos
If you seek an alternative method to FFmpeg removing audio, you can meet with an overwhelming number of possibilities, each claiming that it is superior to the others. However, in this instance, additional investigation is not required at all. Wondershare Filmora will turn out to be one of the better options. It is software designed for editing videos that will make it simple for you to work on any editing job. It is one of the choices held in the highest esteem among those offered in the industry nowadays.
Free Download For Win 7 or later(64-bit)
Free Download For macOS 10.14 or later
Some core audio editing features of Filmora are:
Audio Ducking: When VoiceOver is speaking, temporarily lower the loudness of the material played. Automatically Select the Caller as the Speaker: When you move your iPhone away from your ear during a call, the audio will automatically transfer over to the speaker system.
Silence Detection: Users of Filmora X have access to an add-on called Silence Detection, which is a paid add-on that helps users more quickly erase quiet pauses that occur throughout a film. To help you save time and make the editing process more comfortable, the add-on searches for the whole movie in search of any periods of silence automatically eliminates them all.
Auto Synchronization: When shooting with a camera or video camera and utilizing a microphone, this feature allows the user to easily replace the audio recorded with the audio in the movie. In addition, it can align the audio and video clips in the project automatically, eliminating the need for human alignment.
Speech to Text (STT): computational linguistics permits the recognition and translation of spoken language into written form. Other names for this technology are computer voice recognition and speech recognition.
Text to Speech (TTS): reads digital text aloud. This kind of technology is called “read-aloud” technology. TTS can take the text shown on a computer or any other digital device and turn it into sound by clicking a button or touching it with your finger.
Audio Visualizer: The Most Powerful Audio and Video Editor Available Today. With the help of Filmora Audio Visualizer, your music video may come to life. The effect will dynamically adapt the sound to the video while intelligently matching the sound.
Step1 Download, Install and Run the Filmora Video Editor.
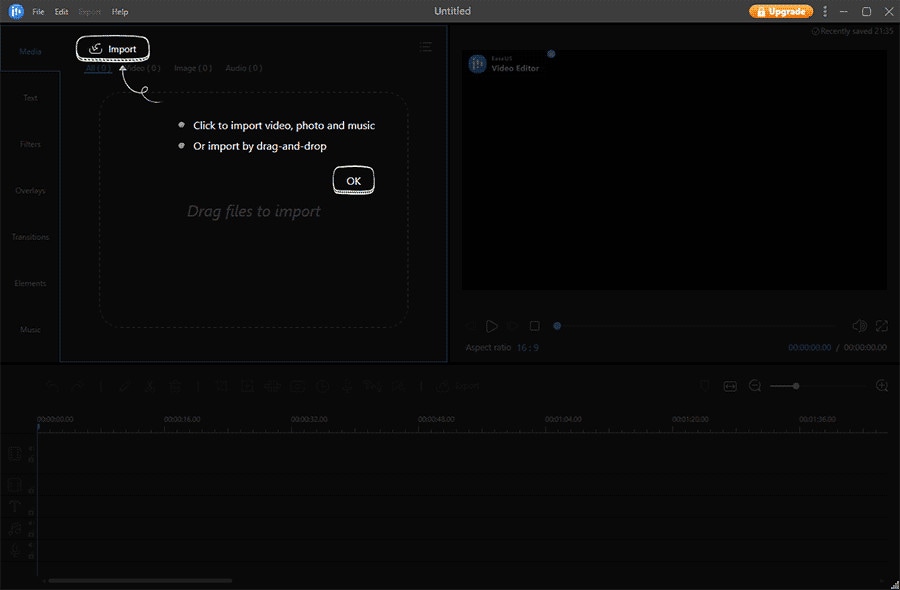
After opening Filmora, the following user interface will appear: You may upload the video file from which you wish to delete the audio tracks by clicking the “Import” button.

Step2 Detach Audio from Uploaded Files
Remove the audio tracks from the original MP4 file by a drag and drop into the timeline, then right-clicking on the file and selecting “Detach Audio” from the menu that appears. After that, the split audio track will show in the Audio Timeline. To delete audio from an MP4, right-click the audio file and choose “Delete” from the menu that appears.

Step3 Export the Silenced Video
After that, pick the preferred export method by clicking the “Export” button. You can set the output video format to be the identical to the one used to record the video in the first place or select it as any other video format. After that, choose the video you want to export by clicking the “Export” option.
In addition, you can save the altered file to your iPhone, iPad, PSP, or other compatible device or instantly upload it to YouTube to share with your friends.
There you go! You successfully explored an excellent alternative software to remove audio from videos via FFmpeg.
Part 3: FAQs
1. How do I change audio in a video?
Changing audio in a video is easy if you use compatible high-end software like Filmora. This audio and video editing tool can modify or change the audio or soundtrack in a video. Much software of this kind is available for both Windows and Mac. Therefore, choose a reliable one, try it, and then begin using it.
2. How exactly does one go about switching the pre-installed audio track on a video?
When you’re viewing a video, you can get the impression that the music playing in the background doesn’t go very well with the content, and you might want to switch it. There are a variety of programs available that will assist you in replacing the audio with video. And now, I’m going to offer Filmora Video Editor as the ideal option since it is the program that is both the simplest and the quickest to do that task.
Conclusion
So, after reading this, you should be able to remove audio from video FFmpeg. Have you ever encountered an editing tool that exceeded your expectations in terms of performance? Although FFmpeg removes audio, the other editing tool we discussed is relatively good quality. Yes, Filmora is a video editing application that provides you with the most outstanding potential services you could have ever imagined having access to. Because it includes several exciting features and a high-quality user interface, it is one of the options people will find ideal.
Free Download For macOS 10.14 or later
Some core audio editing features of Filmora are:
Audio Ducking: When VoiceOver is speaking, temporarily lower the loudness of the material played. Automatically Select the Caller as the Speaker: When you move your iPhone away from your ear during a call, the audio will automatically transfer over to the speaker system.
Silence Detection: Users of Filmora X have access to an add-on called Silence Detection, which is a paid add-on that helps users more quickly erase quiet pauses that occur throughout a film. To help you save time and make the editing process more comfortable, the add-on searches for the whole movie in search of any periods of silence automatically eliminates them all.
Auto Synchronization: When shooting with a camera or video camera and utilizing a microphone, this feature allows the user to easily replace the audio recorded with the audio in the movie. In addition, it can align the audio and video clips in the project automatically, eliminating the need for human alignment.
Speech to Text (STT): computational linguistics permits the recognition and translation of spoken language into written form. Other names for this technology are computer voice recognition and speech recognition.
Text to Speech (TTS): reads digital text aloud. This kind of technology is called “read-aloud” technology. TTS can take the text shown on a computer or any other digital device and turn it into sound by clicking a button or touching it with your finger.
Audio Visualizer: The Most Powerful Audio and Video Editor Available Today. With the help of Filmora Audio Visualizer, your music video may come to life. The effect will dynamically adapt the sound to the video while intelligently matching the sound.
Step1 Download, Install and Run the Filmora Video Editor.
After opening Filmora, the following user interface will appear: You may upload the video file from which you wish to delete the audio tracks by clicking the “Import” button.
Step2 Detach Audio from Uploaded Files
Remove the audio tracks from the original MP4 file by a drag and drop into the timeline, then right-clicking on the file and selecting “Detach Audio” from the menu that appears. After that, the split audio track will show in the Audio Timeline. To delete audio from an MP4, right-click the audio file and choose “Delete” from the menu that appears.
Step3 Export the Silenced Video
After that, pick the preferred export method by clicking the “Export” button. You can set the output video format to be the identical to the one used to record the video in the first place or select it as any other video format. After that, choose the video you want to export by clicking the “Export” option.
In addition, you can save the altered file to your iPhone, iPad, PSP, or other compatible device or instantly upload it to YouTube to share with your friends.
There you go! You successfully explored an excellent alternative software to remove audio from videos via FFmpeg.
Part 3: FAQs
1. How do I change audio in a video?
Changing audio in a video is easy if you use compatible high-end software like Filmora. This audio and video editing tool can modify or change the audio or soundtrack in a video. Much software of this kind is available for both Windows and Mac. Therefore, choose a reliable one, try it, and then begin using it.
2. How exactly does one go about switching the pre-installed audio track on a video?
When you’re viewing a video, you can get the impression that the music playing in the background doesn’t go very well with the content, and you might want to switch it. There are a variety of programs available that will assist you in replacing the audio with video. And now, I’m going to offer Filmora Video Editor as the ideal option since it is the program that is both the simplest and the quickest to do that task.
Conclusion
So, after reading this, you should be able to remove audio from video FFmpeg. Have you ever encountered an editing tool that exceeded your expectations in terms of performance? Although FFmpeg removes audio, the other editing tool we discussed is relatively good quality. Yes, Filmora is a video editing application that provides you with the most outstanding potential services you could have ever imagined having access to. Because it includes several exciting features and a high-quality user interface, it is one of the options people will find ideal.
15 Best Free MP4 Video Rotators [Windows,Mac, Android, iPhone & Online
Have you ever encountered a problem where you saved a video in the wrong orientation? So you ask yourself what’s the best tool to rotate. There are tools that help to flip videos recorded so that you don’t get frustrated while you watch them later on your pc or phone. So why don’t you take a look at the best video rotators that are available for Android, iOs, Windows, Mac, and online tools?
Best MP4 Video Rotators to Rotate MP4 Video on Windows and Mac - Filmroa Video Editor
Filmora Video Editor allows you to rotate your video to any angle. You can also zoom in and crop out the parts of the video that you don’t want to see. It also includes predefined aspect ratios such as 16:9, 9:16, 4:5, 1:1, and others to help you quickly discover the ideal aspect ratio for YouTube, Instagram, and other sites. Let’s look at how to modify the orientation of a video in Filmora.
For Win 7 or later (64-bit)
For macOS 10.14 or later
How to change the video orientation in Filmora
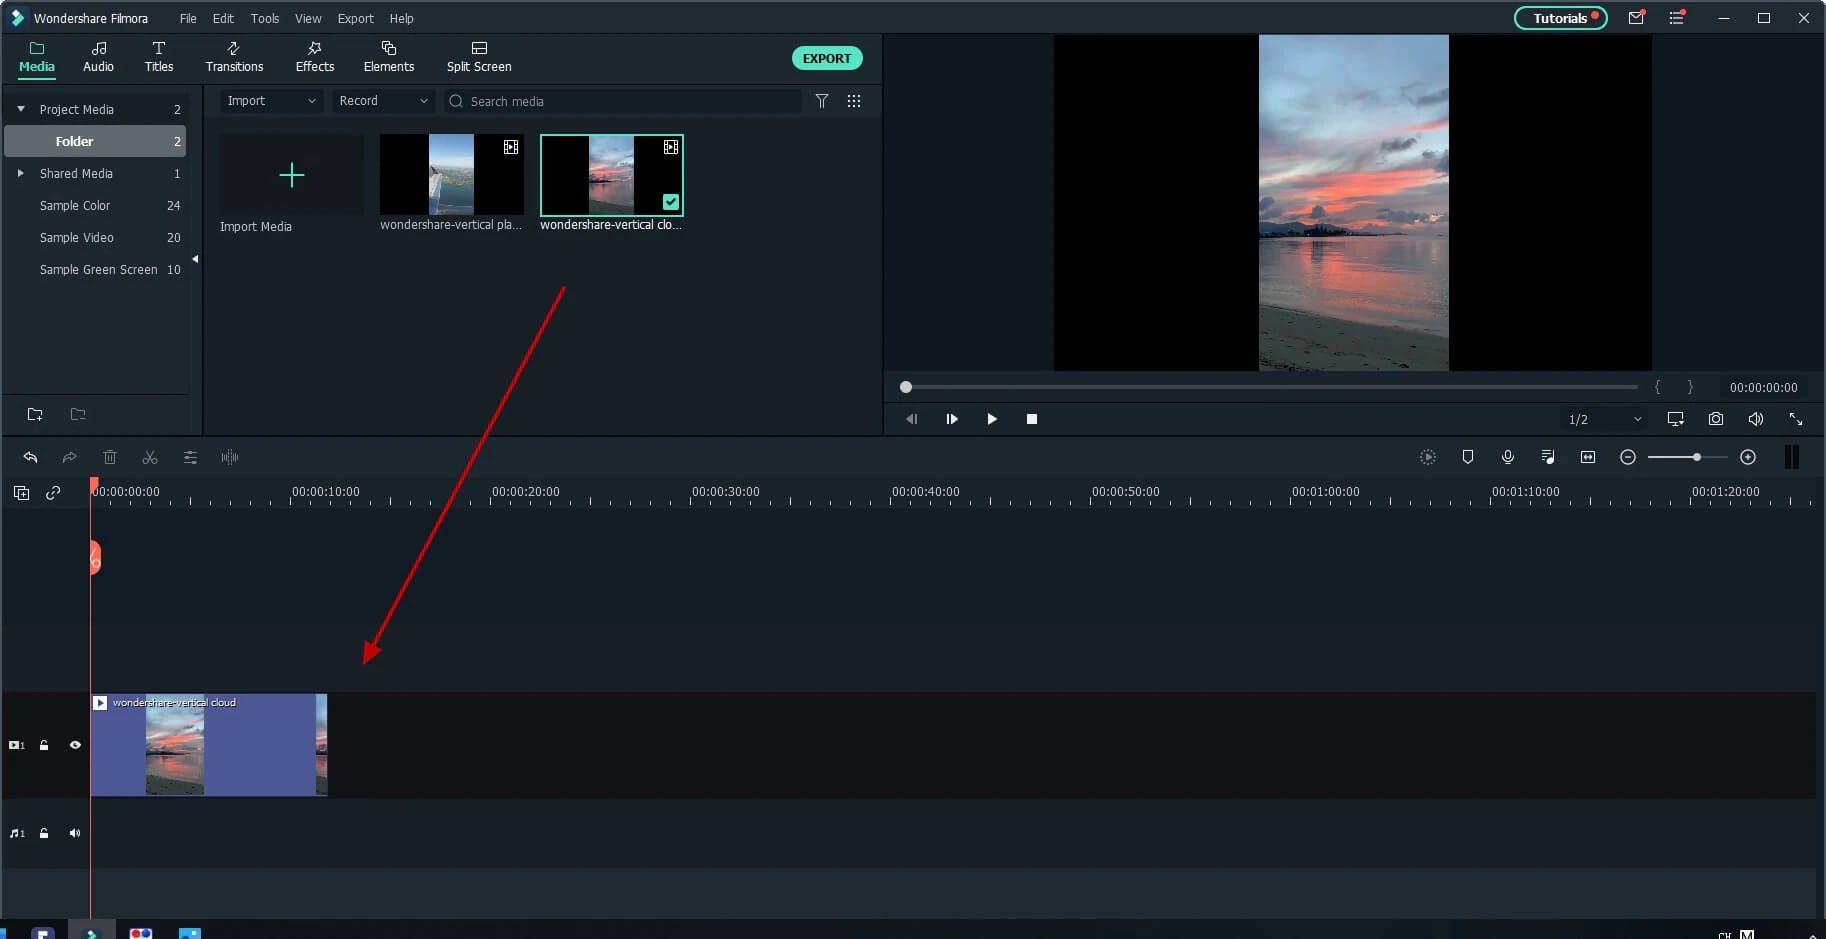
Step 1:Import the video file into Filmora, and then drag it to the timeline.
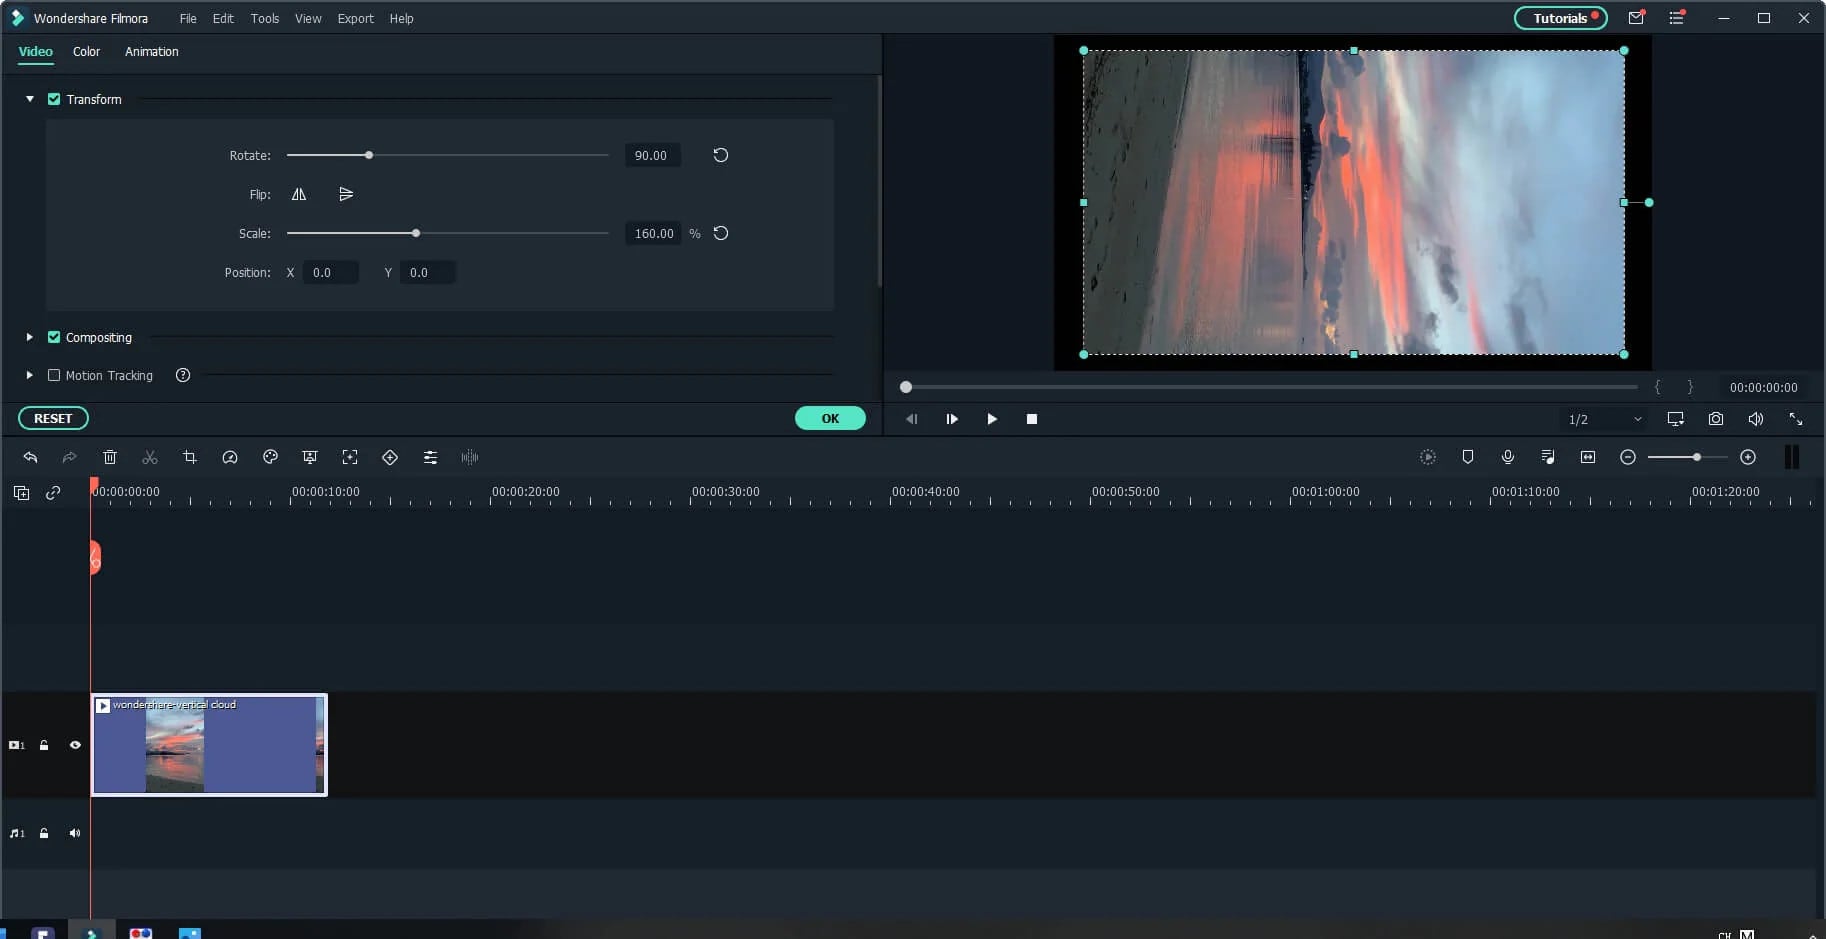
Step 2: To enter the video editing panel, double-click the video clip in the timeline. Locate the “Rotate” option under the “Transform” menu. You can drag the slider or enter a specific number to adjust the rotation value. You can rotate up to 360 degrees. When you enter “90” in the box, the video clip will be rotated 90 degrees.
By dragging the “Scale” slider, you can make the full image screen, or you can directly adjust its position, size, shape, etc., in the Viewer panel.
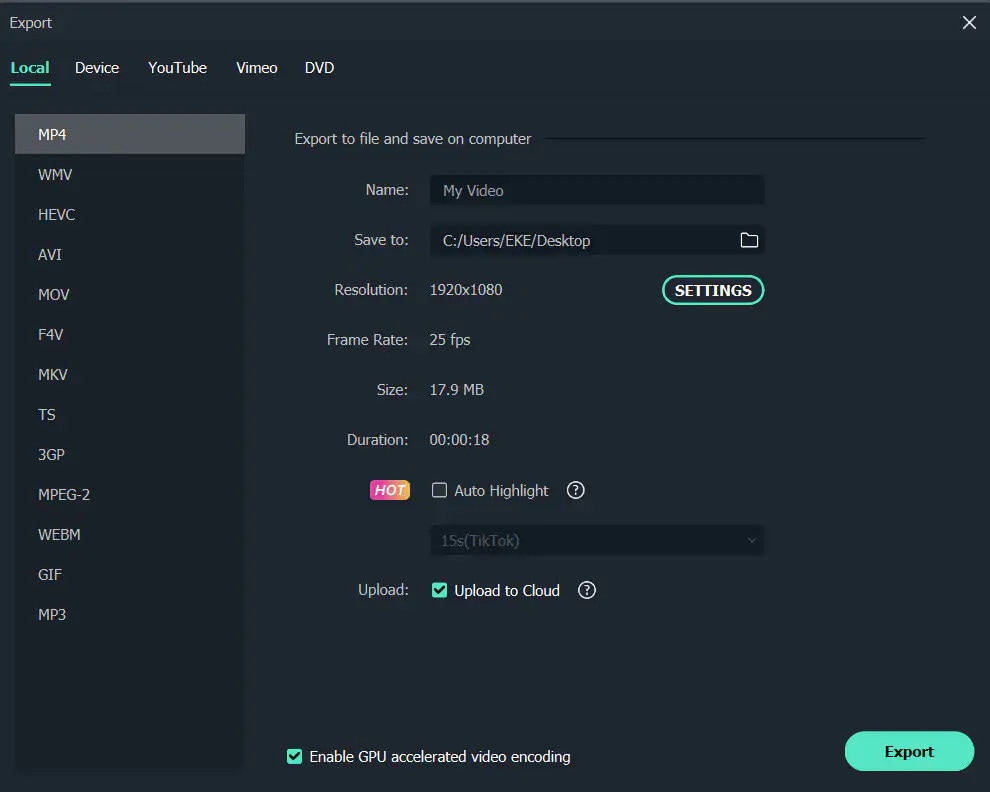
Step 3: After you are satisfied, click the export button. You can change the format here, or you can upload the file to YouTube.
Top 3 Free MP4 Video Rotators on Windows
Looking for the best free video rotator?
If you are looking for a free video rotator for windows, then this article has got you covered. A list of the top 3 free video rotators for windows has been listed.
- VSDC Free Video Editor

It is a highly functional video editing suite with easy controls. It provides anyone who is a beginner to easily access and edit the video easily.
It helps you rotate the videos in increments of 90 degrees, be it clockwise or anticlockwise )
VSDC is a free video editor with non-linear editing capabilities. Users may swiftly convert video and audio files from one format to another with VSDC. A built-in disk burning tool for DVDs is also included in the software. This free program, designed for educational purposes, can be used by businesses or individuals.
VSDC Free Video Editor features
- Built-In DVD Burning Tool
- Colour Blending And Filters
- Specific Multimedia Devices Creation
- Desktop Video Capture
- Export To Social Networking Sites
- Masking
- Non-Linear Video Editing
- Subpixel Accuracy
- Supports Popular Formats
- Video File Converter
Pros
- It’s completely free.
- There is no watermark.
- There are numerous free video editing programs available.
- Support a wide range of file formats
Cons
There isn’t a macOS version available.
Take a severe learning curve into consideration.
There are numerous premium-only features.
The timeline isn’t the same as most NLE editing software.
- Windows Movie Maker
The most well-known video rotator and editor are probably Windows Movie Maker. Most of us who grew up with Microsoft’s various operating systems have had access to it because it comes as a free download with most Microsoft products. It can handle a wide range of files and is generally simple to use. Adding features like sound, music, special effects, or even speeding up the video is simple, and you’ll love the variety of skins available.
For beginners, Windows Video Maker is ideal. It is available for free on Windows PCs and includes basic capabilities and workflow aspects found in professional video editing systems. Its user-friendly interface resembles a simplified version of a video editor timeline and is simple enough for even inexperienced editors to understand.
Features of Windows Movie Maker
- Customization Tool’s title
- Auto Movie Options
- Credit Customization Tool
- Special Effects Options
- Overlays for Transitions
Pros:
- Various video editing functions;
- A variety of output possibilities
Cons:
- Many different versions of the same product;
- No longer included in the Windows operating system.
3.EaseUS Video Editor
EaseUS Video Editor is one of the few most popular video rotators we have today. Its video editing provides tools that can change the video orientation by 90 degrees anticlockwise and clockwise, which can flip vertically and horizontally.
In terms of videos, adding great filters, sound, music, subtitles and other elements to have a great video output can be achieved using the EaseUS. Moreover, it accepts video formats and can convert files to MP4 and other great features.
Features of EaseUS Video Editor
- Can easily trim, cut, split, merge, rotate, and mix video clips.
- Ability to apply stylish video effects
- Can add or remove the watermark and reduce background or wind noise from a video.
Pros:
- User-friendly interface, perfect for beginners
- Easily trim, cut, split, merge, rotate, mix video clips
- A full range of free visual and audio effects
- Change of contrast, exposure, brightness, and other video aspects
- Use the voiceover function to add your comments to the video
Cons:
- The software has no version for macOS
Top 3 Free MP4 Video Rotators on Mac
- iMovie
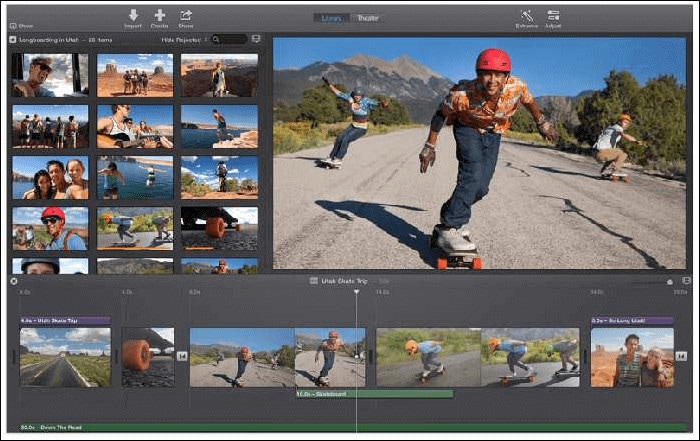
The iMovie for Mac users is an exceptional video rotator. You can turn any video or movie you may have into an amazing masterpiece with more features due to the special after-effects it has. Simple application to use and navigate easily, although when importing video takes a while at certain times.
Features of the iMovie include
- Full range of options to modify
- Ability to enhance colour settings
- Easily crop and edit video clips ease
- Ability to change the speed of clips.
Pros:
- Nice interface;
- The function is to create fun Movie Trailers.
Cons:
- Supports only a few video formats;
- Pre-processing and import trans-coding can be time-consuming.
- Movavi Video Editor
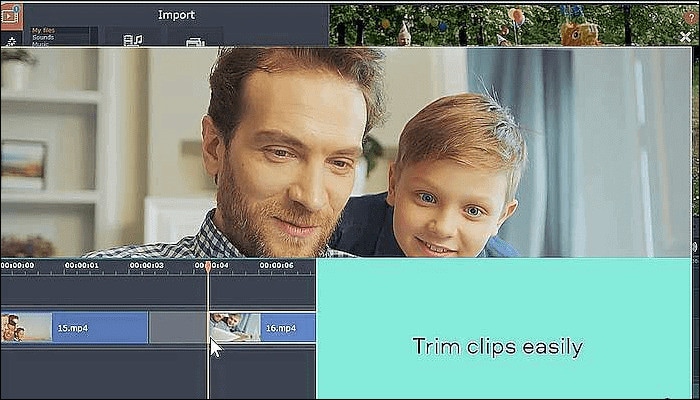
Movavi has a free version that is easy to use, especially for beginners. It allows you to add titles, filters, transitions, and special effects to your videos and photographs to make attractive movies. You can use the animation to smoothly move things around the screen in your film. On the multi-track timeline, you can add as many tracks as you wish. From the expanded built-in collection, you can get more example video clips, stickers, and audio tracks.
Features of Movavi Video Editor
- You can upload files and photographs in almost any format.
- To make videos automatically, use the Montage Wizard.
- Transition Wizard allows you to quickly put together slideshows.
- Enhance image quality by cutting, cropping, and rotating videos on the timeline.
- Apply artistic filters, and make transitions between portions as smooth as possible.
- Create animated headlines, stickers, callouts, and video overlays:
Pros:
- It’s appropriate for newcomers and casual users alike.
- A number of video formats are supported, including.mov (QuickTime)
- Chroma Key and Slow Motion are examples of special effects.
Cons
- Only the premium version supports the advanced features.
- It uses the basic colour grading tool
- QuickTime Player
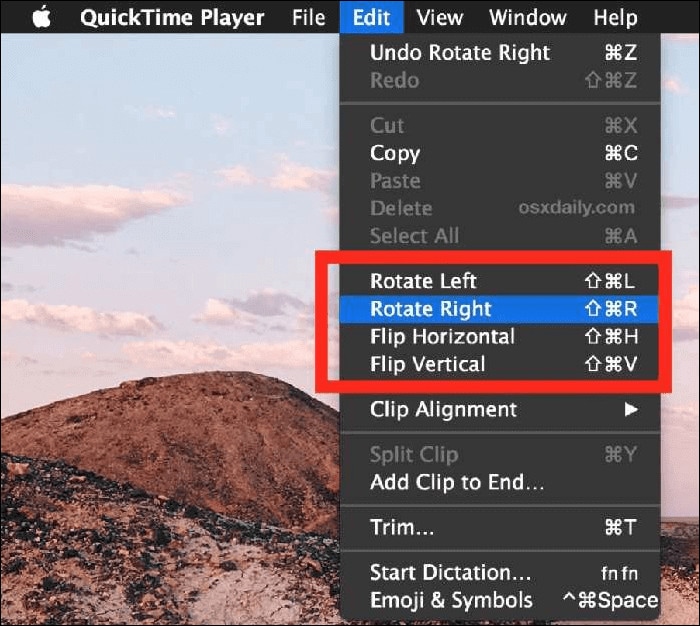
The key advantage of Apple’s QuickTime is that it comes pre-installed on your Mac’s macOS operating system. It’s powerful enough to rotate your clip, yet it’s simple enough for beginners to do. iTunes files can be played and edited with QuickTime. After rotation, it exports a new video file, leaving the old clip on the Mac. The output video will be compressed slightly, resulting in a smaller rotational video file than the original.
Features of QuickTime Player
- Anything can be recorded, including video, audio, and the screen.
- Cropping, audio detachment, combining, and rotation are all simple video editing techniques.
- From 4K to 480p video compression
- Quickly share your video: directly upload videos to YouTube
Pros:
- With macOS, it comes pre-installed.
- Work with iTunes files Streaming video player with no configuration
Cons:
- Only QuickTime Pro 7 unlocks the editing feature.
- There will be no more Windows versions.
- It isn’t compatible with standard subtitle files.
Top 3 Free MP4 Video Rotators on Android
When we use a smartphone to capture a video or download one from a website, we occasionally discover that the video has been inverted. As a result, we’ll require a video rotator app to correct the problem. On the market, there are many different sorts of tools for various platforms. However, you may have discovered that separating the wheat from the chaff can be difficult at times. To save you time, I’ve compiled a list of 3 video rotator applications for Android
- VivaVideo
VivaVideo is one of the top movie producers and free video rotators for Android devices as a media editor. This application allows you to alter the orientation of your videos. Aside from rotating videos, this software also includes cropping, combining, cutting, and other editing features. “The best video editor software is VivaVideo - Video Maker App,” an Android expert previously said. This program is a video producer as well as an editor.
Features of VivaVideo
- It allows you to add music to videos.
- Combine videos clips into one video
- Can apply video effects.
- After you’ve finished editing your videos, you may save and share them on YouTube and TikTok! To rotate video, use this program!
Pros
- It has an In-app camera with live effects previews for capturing videos.
- More than 60 effects to choose from with additional downloadable effects.
- Enhance the videos using themes.
- Ability to Merge videos and create montages with storyboarding features
- Edit frames within a video
Cons
- There is no negative review to say about this app
2.Google Photos
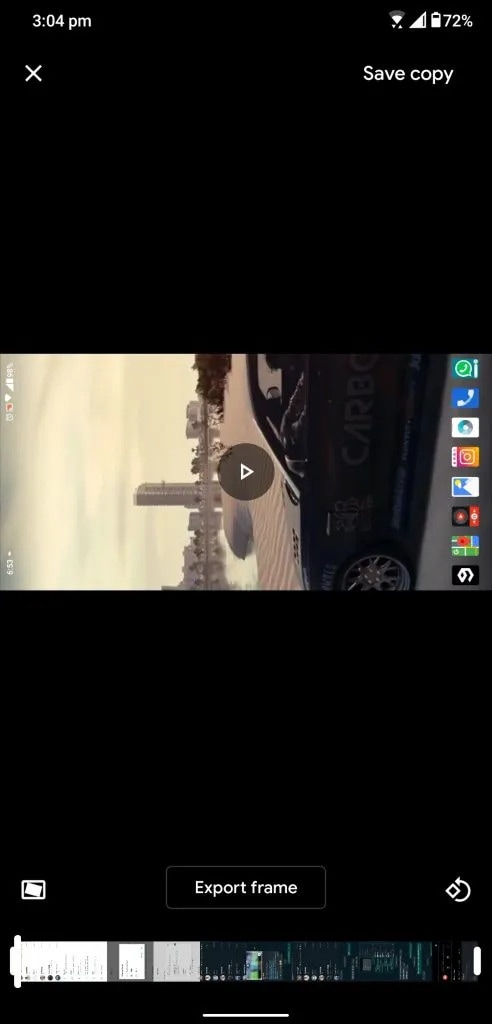
This app may already be installed on your smartphone, but you are unaware of its full potential. This program includes a built-in picture and video editor in addition to backing up your photos. This program includes three essential video editing tools that are extremely basic and easy to use.
The first is to stabilize the video; if your video is unsteady, you can use this option in Google Photos to stabilize it. You may also use the timeline below the video to cut the video. If you mistakenly captured the video in the wrong orientation, there is a tool to rotate it.
Features of Google Photos
- You can modify photographs and videos in Google Photos.
- On Google Photos, make a collage or a movie.
- Recover photos or videos that were recently erased.
- Clear off some space on Google Photos…
- Place photos in the Archive.
Pros
Google Images automatically backs up all of your device’s photos and videos.
Despite its many advantages, the reason I choose Google Photos is that it helps me save space on my smartphone.
The original quality of images stored in Google Photos is really high. Photos and videos are saved in the same resolution as when they were taken.
Over time, Google has improved the Google Photos interface, and it now incorporates AI to provide consumers with even better performance.
Cons
There aren’t many effects, and there aren’t any other editing tools.
The lack of a password-protection option in Google Photos is annoying. Some photos are private, and you may not wish to share them with others.
Users of Google Photos will no longer have limitless storage.
3Adobe Rush
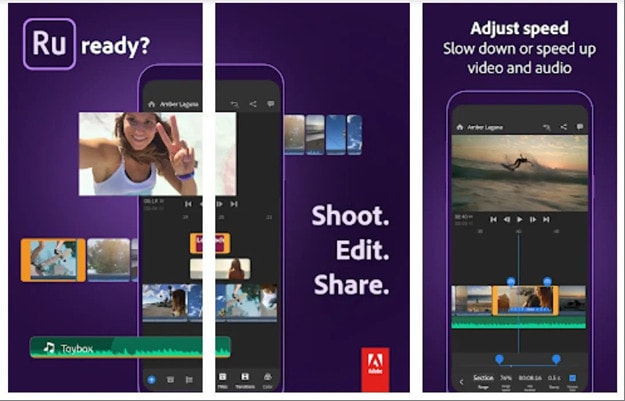
Adobe Rush is a new video editor that Adobe released via a partnership with Samsung’s latest flagship smartphone. This app is a simple yet powerful tool for editing videos on the go, on your smartphone.
This app comes with some powerful tools which you find on some high-end video editing apps. You get a timeline interface to edit your videos perfectly, and you get some music recommendations right into the app.
Features Of Adobe Rush
- In the timeline, you can make changes to your video.
- Audio can be added and refined.
- Change the colour, size, and position of the video.
- Make a title.
- Add transitions, pan and zoom effects, and reframe your clips automatically.
- Change the clip’s attributes.
- Change your video’s aspect ratio.
- Create the illusion of a picture-in-picture effect.
Pros
- It has a user-friendly UI that is responsive and snappy.
- It’s easy to use and provides helpful advice for newcomers.
- It enables Adobe users to quickly and easily produce stunning videos that are customized to their preferences.
- When compared to its competitors, exporting files is a breeze.
- Unlike most of its competitors, it comes with good colour and title tools.
- YouTube, Facebook, Vimeo, Snapchat, Instagram, and Twitter are just a few of the social media channels where the finished files can be simply shared.
- It synchronizes projects between desktop and mobile devices, making them more accessible.
Cons
- When compared to its competitors, it is a little costly.
- It renders projects slowly and only supports three transitions.
- The app does not have storyboard templates and cannot specify the exact structure for output files.
- It only comes with a few video and audio editing capabilities.
- Many standard video effects are missing.
Top 3 Free MP4 Video Rotators on iPhone
1.Splice

Trimming, cropping, effects, titles, speed adjustments, animation, transitions, and music are all available in this well-known video editor, which has a cultish following of dedicated Splicers.
Splice’s music library is one of its strongest assets. It offers a large selection of free music and sound effects to layer over your video, as well as the ability to sync your movie to the beat of your soundtrack.
Features of Splice
Clips should be cropped and trimmed to focus on the highlights.
With an Audio Library and iTunes Integration, you may add music to your videos.
To smooth transitions between clips and images, use transitions.
Enhance videos with effects.
Pros:
- Developed by GoPro, award-winning, highly regarded.
Cons:
- Only available on iOS devices.
2. Clips

It’s easy to miss pre-loaded apps like Apple’s Clips, but this video editing tool has lots of impressive features to enjoy, thanks to the weight of the tech giant’s greatest brains behind it. Take, for example, their live tiles setting. You can use this to generate animated captions and titles that appear as you speak.
To liven things up, you may add animated emojis and backgrounds, and music tracks dynamically sync to the length of your video.
Features of Clips
- Ability to generate animated captions
- Full access to Animated emojis and backgrounds
- Ability to have your music sync to your videos
Pros:
- Simple to use, unique features, and Apple’s support.
Cons:
- It’s only for iOS devices (obviously! ), and it has trouble with a big number of clips.
3. Quik

You may apply transitions and effects to up to 200 photographs and video clips from your photo library or GoPro Plus with this free software. You may not only crop, zoom, and rotate photos and video clips, but you can also customize them with 26 different themes, fonts, effects, and artwork.
You may make HD 1080p or 720p films for social sharing in cinema, square, or portrait formats, and you can store your draft creations for up to seven days.
Features of Quik
- Everything that is available for free.
- There are no limits to the number of mural events.
- Editing is unrestricted.
- There are now a total of 25 more photo and video filters.
Pros:
- Tons of features, including access to 100+ free songs,
- Flashbacks and QuikStories, which make videos based on your most recent footage,
- syncs footage to the beat of your soundtrack, and AI editing help.
Cons:
- Limited control and no trimming option; customers have claimed that it is occasionally glitchy.
Top 3 Free MP4 Video Rotators Online
1.Online Video Cutter
This web tool comes in helpful when you need to rapidly edit a small video file. It is not necessary to install it; you may use it right from your browser. The clip can only be rotated 90, 180, or 270 degrees. It’ll come in handy, especially if you’ve closed the video in portrait mode and want to watch it on a big screen. The service’s provider says that the files will be automatically erased from the servers a few hours after you accomplish your task, resulting in a high level of security.
Features of Online Video cutter.
- It Supports Any Video Format. …
- Completely Online for you to access
- Additional Settings to make more edits to videos
- Easy to use, User-friendly interface.
Pros:
It has a very simple user interface.
You do not need to pay for a license to utilize it.
Almost every video format is supported.
Cons:
Only suitable for little clips
Performing simply the most basic functions, such as rotating and cropping
2.EzGif
This unique internet tool not only creates animated GIFs but can also rotate video. You simply choose the clip from your local folder. However, the file’s maximum size is limited to 100MB. A basic tool for rotating the video through 90, 180, and 270 degrees. You can also vertically and horizontally flip the video before exporting it in a different format and encoding.
Features of EzGif
- A simple user interface to find your way around the website.
- Ability to do resizing and rotating of videos and images.
- Capable of video conversions and editing
Pros:
- Many video formats are supported, including MP4, WebM, AVI, MPEG, FLV, MOV, and 3GP.
- The rotation procedure is quick and simple to utilize.
- After rotating, provide a preview function.
Cons:
- The maximum file size is 100 megabytes.
- There are no filters or transitions, and only basic editing functions are available.
3.Videorotate
- This is a free online video rotator that is simple and quick to use. You can upload your video from a local folder or import a recorded clip from major cloud services like Dropbox, Google Drive, and One Drive, just like the other online services (there are buttons for each of them). You can flip the clip or rotate it left and right. Other video capabilities available on the site include cropping, stabilizing, and slicing.
Features of Videorotate
- Ability to crop, stabilize and slice videos.
Pros:
- Simple and straightforward to use
- Clips from your Dropbox, Google Drive, and OneDrive accounts can be uploaded.
- A specific “Reset” button is available.
Cons:
- For basic operations, a service for newcomers is available.
- Only a few video file formats are supported.
FAQs about Video Rotator
- What is the best way to rotate a video?
Use an easy-to-use video editing program. It’s easy to rotate a video, even if you’ve never edited one before. You can also use some media players.
- How do I rotate a video permanently?
In this guide, we will show you exactly how to rotate video in Windows with EaseUS Video Editor and save it permanently.
3.How can I rotate a video for free on the internet?
It’s simple to rotate a video online, and there are various services that offer free online video rotators.
- Videorotate
- Ezgif
- Video cutter on the internet
- How do I mirror a video on the internet?
The websites that support video rotation also offer the ability to “flip” the video vertically and horizontally. You’ll have “mirroring” frames in this manner as if you’re filming your pals in the mirror.
For macOS 10.14 or later
How to change the video orientation in Filmora
Step 1:Import the video file into Filmora, and then drag it to the timeline.
Step 2: To enter the video editing panel, double-click the video clip in the timeline. Locate the “Rotate” option under the “Transform” menu. You can drag the slider or enter a specific number to adjust the rotation value. You can rotate up to 360 degrees. When you enter “90” in the box, the video clip will be rotated 90 degrees.
By dragging the “Scale” slider, you can make the full image screen, or you can directly adjust its position, size, shape, etc., in the Viewer panel.
Step 3: After you are satisfied, click the export button. You can change the format here, or you can upload the file to YouTube.
Top 3 Free MP4 Video Rotators on Windows
Looking for the best free video rotator?
If you are looking for a free video rotator for windows, then this article has got you covered. A list of the top 3 free video rotators for windows has been listed.
- VSDC Free Video Editor
It is a highly functional video editing suite with easy controls. It provides anyone who is a beginner to easily access and edit the video easily.
It helps you rotate the videos in increments of 90 degrees, be it clockwise or anticlockwise )
VSDC is a free video editor with non-linear editing capabilities. Users may swiftly convert video and audio files from one format to another with VSDC. A built-in disk burning tool for DVDs is also included in the software. This free program, designed for educational purposes, can be used by businesses or individuals.
VSDC Free Video Editor features
- Built-In DVD Burning Tool
- Colour Blending And Filters
- Specific Multimedia Devices Creation
- Desktop Video Capture
- Export To Social Networking Sites
- Masking
- Non-Linear Video Editing
- Subpixel Accuracy
- Supports Popular Formats
- Video File Converter
Pros
- It’s completely free.
- There is no watermark.
- There are numerous free video editing programs available.
- Support a wide range of file formats
Cons
There isn’t a macOS version available.
Take a severe learning curve into consideration.
There are numerous premium-only features.
The timeline isn’t the same as most NLE editing software.
- Windows Movie Maker
The most well-known video rotator and editor are probably Windows Movie Maker. Most of us who grew up with Microsoft’s various operating systems have had access to it because it comes as a free download with most Microsoft products. It can handle a wide range of files and is generally simple to use. Adding features like sound, music, special effects, or even speeding up the video is simple, and you’ll love the variety of skins available.
For beginners, Windows Video Maker is ideal. It is available for free on Windows PCs and includes basic capabilities and workflow aspects found in professional video editing systems. Its user-friendly interface resembles a simplified version of a video editor timeline and is simple enough for even inexperienced editors to understand.
Features of Windows Movie Maker
- Customization Tool’s title
- Auto Movie Options
- Credit Customization Tool
- Special Effects Options
- Overlays for Transitions
Pros:
- Various video editing functions;
- A variety of output possibilities
Cons:
- Many different versions of the same product;
- No longer included in the Windows operating system.
3.EaseUS Video Editor
EaseUS Video Editor is one of the few most popular video rotators we have today. Its video editing provides tools that can change the video orientation by 90 degrees anticlockwise and clockwise, which can flip vertically and horizontally.
In terms of videos, adding great filters, sound, music, subtitles and other elements to have a great video output can be achieved using the EaseUS. Moreover, it accepts video formats and can convert files to MP4 and other great features.
Features of EaseUS Video Editor
- Can easily trim, cut, split, merge, rotate, and mix video clips.
- Ability to apply stylish video effects
- Can add or remove the watermark and reduce background or wind noise from a video.
Pros:
- User-friendly interface, perfect for beginners
- Easily trim, cut, split, merge, rotate, mix video clips
- A full range of free visual and audio effects
- Change of contrast, exposure, brightness, and other video aspects
- Use the voiceover function to add your comments to the video
Cons:
- The software has no version for macOS
Top 3 Free MP4 Video Rotators on Mac
- iMovie
The iMovie for Mac users is an exceptional video rotator. You can turn any video or movie you may have into an amazing masterpiece with more features due to the special after-effects it has. Simple application to use and navigate easily, although when importing video takes a while at certain times.
Features of the iMovie include
- Full range of options to modify
- Ability to enhance colour settings
- Easily crop and edit video clips ease
- Ability to change the speed of clips.
Pros:
- Nice interface;
- The function is to create fun Movie Trailers.
Cons:
- Supports only a few video formats;
- Pre-processing and import trans-coding can be time-consuming.
- Movavi Video Editor
Movavi has a free version that is easy to use, especially for beginners. It allows you to add titles, filters, transitions, and special effects to your videos and photographs to make attractive movies. You can use the animation to smoothly move things around the screen in your film. On the multi-track timeline, you can add as many tracks as you wish. From the expanded built-in collection, you can get more example video clips, stickers, and audio tracks.
Features of Movavi Video Editor
- You can upload files and photographs in almost any format.
- To make videos automatically, use the Montage Wizard.
- Transition Wizard allows you to quickly put together slideshows.
- Enhance image quality by cutting, cropping, and rotating videos on the timeline.
- Apply artistic filters, and make transitions between portions as smooth as possible.
- Create animated headlines, stickers, callouts, and video overlays:
Pros:
- It’s appropriate for newcomers and casual users alike.
- A number of video formats are supported, including.mov (QuickTime)
- Chroma Key and Slow Motion are examples of special effects.
Cons
- Only the premium version supports the advanced features.
- It uses the basic colour grading tool
- QuickTime Player
The key advantage of Apple’s QuickTime is that it comes pre-installed on your Mac’s macOS operating system. It’s powerful enough to rotate your clip, yet it’s simple enough for beginners to do. iTunes files can be played and edited with QuickTime. After rotation, it exports a new video file, leaving the old clip on the Mac. The output video will be compressed slightly, resulting in a smaller rotational video file than the original.
Features of QuickTime Player
- Anything can be recorded, including video, audio, and the screen.
- Cropping, audio detachment, combining, and rotation are all simple video editing techniques.
- From 4K to 480p video compression
- Quickly share your video: directly upload videos to YouTube
Pros:
- With macOS, it comes pre-installed.
- Work with iTunes files Streaming video player with no configuration
Cons:
- Only QuickTime Pro 7 unlocks the editing feature.
- There will be no more Windows versions.
- It isn’t compatible with standard subtitle files.
Top 3 Free MP4 Video Rotators on Android
When we use a smartphone to capture a video or download one from a website, we occasionally discover that the video has been inverted. As a result, we’ll require a video rotator app to correct the problem. On the market, there are many different sorts of tools for various platforms. However, you may have discovered that separating the wheat from the chaff can be difficult at times. To save you time, I’ve compiled a list of 3 video rotator applications for Android
- VivaVideo
VivaVideo is one of the top movie producers and free video rotators for Android devices as a media editor. This application allows you to alter the orientation of your videos. Aside from rotating videos, this software also includes cropping, combining, cutting, and other editing features. “The best video editor software is VivaVideo - Video Maker App,” an Android expert previously said. This program is a video producer as well as an editor.
Features of VivaVideo
- It allows you to add music to videos.
- Combine videos clips into one video
- Can apply video effects.
- After you’ve finished editing your videos, you may save and share them on YouTube and TikTok! To rotate video, use this program!
Pros
- It has an In-app camera with live effects previews for capturing videos.
- More than 60 effects to choose from with additional downloadable effects.
- Enhance the videos using themes.
- Ability to Merge videos and create montages with storyboarding features
- Edit frames within a video
Cons
- There is no negative review to say about this app
2.Google Photos
This app may already be installed on your smartphone, but you are unaware of its full potential. This program includes a built-in picture and video editor in addition to backing up your photos. This program includes three essential video editing tools that are extremely basic and easy to use.
The first is to stabilize the video; if your video is unsteady, you can use this option in Google Photos to stabilize it. You may also use the timeline below the video to cut the video. If you mistakenly captured the video in the wrong orientation, there is a tool to rotate it.
Features of Google Photos
- You can modify photographs and videos in Google Photos.
- On Google Photos, make a collage or a movie.
- Recover photos or videos that were recently erased.
- Clear off some space on Google Photos…
- Place photos in the Archive.
Pros
Google Images automatically backs up all of your device’s photos and videos.
Despite its many advantages, the reason I choose Google Photos is that it helps me save space on my smartphone.
The original quality of images stored in Google Photos is really high. Photos and videos are saved in the same resolution as when they were taken.
Over time, Google has improved the Google Photos interface, and it now incorporates AI to provide consumers with even better performance.
Cons
There aren’t many effects, and there aren’t any other editing tools.
The lack of a password-protection option in Google Photos is annoying. Some photos are private, and you may not wish to share them with others.
Users of Google Photos will no longer have limitless storage.
3Adobe Rush
Adobe Rush is a new video editor that Adobe released via a partnership with Samsung’s latest flagship smartphone. This app is a simple yet powerful tool for editing videos on the go, on your smartphone.
This app comes with some powerful tools which you find on some high-end video editing apps. You get a timeline interface to edit your videos perfectly, and you get some music recommendations right into the app.
Features Of Adobe Rush
- In the timeline, you can make changes to your video.
- Audio can be added and refined.
- Change the colour, size, and position of the video.
- Make a title.
- Add transitions, pan and zoom effects, and reframe your clips automatically.
- Change the clip’s attributes.
- Change your video’s aspect ratio.
- Create the illusion of a picture-in-picture effect.
Pros
- It has a user-friendly UI that is responsive and snappy.
- It’s easy to use and provides helpful advice for newcomers.
- It enables Adobe users to quickly and easily produce stunning videos that are customized to their preferences.
- When compared to its competitors, exporting files is a breeze.
- Unlike most of its competitors, it comes with good colour and title tools.
- YouTube, Facebook, Vimeo, Snapchat, Instagram, and Twitter are just a few of the social media channels where the finished files can be simply shared.
- It synchronizes projects between desktop and mobile devices, making them more accessible.
Cons
- When compared to its competitors, it is a little costly.
- It renders projects slowly and only supports three transitions.
- The app does not have storyboard templates and cannot specify the exact structure for output files.
- It only comes with a few video and audio editing capabilities.
- Many standard video effects are missing.
Top 3 Free MP4 Video Rotators on iPhone
1.Splice
Trimming, cropping, effects, titles, speed adjustments, animation, transitions, and music are all available in this well-known video editor, which has a cultish following of dedicated Splicers.
Splice’s music library is one of its strongest assets. It offers a large selection of free music and sound effects to layer over your video, as well as the ability to sync your movie to the beat of your soundtrack.
Features of Splice
Clips should be cropped and trimmed to focus on the highlights.
With an Audio Library and iTunes Integration, you may add music to your videos.
To smooth transitions between clips and images, use transitions.
Enhance videos with effects.
Pros:
- Developed by GoPro, award-winning, highly regarded.
Cons:
- Only available on iOS devices.
2. Clips
It’s easy to miss pre-loaded apps like Apple’s Clips, but this video editing tool has lots of impressive features to enjoy, thanks to the weight of the tech giant’s greatest brains behind it. Take, for example, their live tiles setting. You can use this to generate animated captions and titles that appear as you speak.
To liven things up, you may add animated emojis and backgrounds, and music tracks dynamically sync to the length of your video.
Features of Clips
- Ability to generate animated captions
- Full access to Animated emojis and backgrounds
- Ability to have your music sync to your videos
Pros:
- Simple to use, unique features, and Apple’s support.
Cons:
- It’s only for iOS devices (obviously! ), and it has trouble with a big number of clips.
3. Quik
You may apply transitions and effects to up to 200 photographs and video clips from your photo library or GoPro Plus with this free software. You may not only crop, zoom, and rotate photos and video clips, but you can also customize them with 26 different themes, fonts, effects, and artwork.
You may make HD 1080p or 720p films for social sharing in cinema, square, or portrait formats, and you can store your draft creations for up to seven days.
Features of Quik
- Everything that is available for free.
- There are no limits to the number of mural events.
- Editing is unrestricted.
- There are now a total of 25 more photo and video filters.
Pros:
- Tons of features, including access to 100+ free songs,
- Flashbacks and QuikStories, which make videos based on your most recent footage,
- syncs footage to the beat of your soundtrack, and AI editing help.
Cons:
- Limited control and no trimming option; customers have claimed that it is occasionally glitchy.
Top 3 Free MP4 Video Rotators Online
1.Online Video Cutter
This web tool comes in helpful when you need to rapidly edit a small video file. It is not necessary to install it; you may use it right from your browser. The clip can only be rotated 90, 180, or 270 degrees. It’ll come in handy, especially if you’ve closed the video in portrait mode and want to watch it on a big screen. The service’s provider says that the files will be automatically erased from the servers a few hours after you accomplish your task, resulting in a high level of security.
Features of Online Video cutter.
- It Supports Any Video Format. …
- Completely Online for you to access
- Additional Settings to make more edits to videos
- Easy to use, User-friendly interface.
Pros:
It has a very simple user interface.
You do not need to pay for a license to utilize it.
Almost every video format is supported.
Cons:
Only suitable for little clips
Performing simply the most basic functions, such as rotating and cropping
2.EzGif
This unique internet tool not only creates animated GIFs but can also rotate video. You simply choose the clip from your local folder. However, the file’s maximum size is limited to 100MB. A basic tool for rotating the video through 90, 180, and 270 degrees. You can also vertically and horizontally flip the video before exporting it in a different format and encoding.
Features of EzGif
- A simple user interface to find your way around the website.
- Ability to do resizing and rotating of videos and images.
- Capable of video conversions and editing
Pros:
- Many video formats are supported, including MP4, WebM, AVI, MPEG, FLV, MOV, and 3GP.
- The rotation procedure is quick and simple to utilize.
- After rotating, provide a preview function.
Cons:
- The maximum file size is 100 megabytes.
- There are no filters or transitions, and only basic editing functions are available.
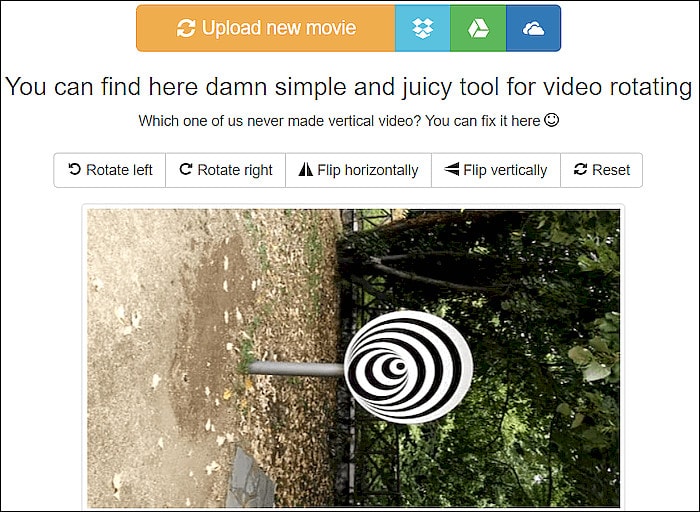
3.Videorotate
- This is a free online video rotator that is simple and quick to use. You can upload your video from a local folder or import a recorded clip from major cloud services like Dropbox, Google Drive, and One Drive, just like the other online services (there are buttons for each of them). You can flip the clip or rotate it left and right. Other video capabilities available on the site include cropping, stabilizing, and slicing.
Features of Videorotate
- Ability to crop, stabilize and slice videos.
Pros:
- Simple and straightforward to use
- Clips from your Dropbox, Google Drive, and OneDrive accounts can be uploaded.
- A specific “Reset” button is available.
Cons:
- For basic operations, a service for newcomers is available.
- Only a few video file formats are supported.
FAQs about Video Rotator
- What is the best way to rotate a video?
Use an easy-to-use video editing program. It’s easy to rotate a video, even if you’ve never edited one before. You can also use some media players.
- How do I rotate a video permanently?
In this guide, we will show you exactly how to rotate video in Windows with EaseUS Video Editor and save it permanently.
3.How can I rotate a video for free on the internet?
It’s simple to rotate a video online, and there are various services that offer free online video rotators.
- Videorotate
- Ezgif
- Video cutter on the internet
- How do I mirror a video on the internet?
The websites that support video rotation also offer the ability to “flip” the video vertically and horizontally. You’ll have “mirroring” frames in this manner as if you’re filming your pals in the mirror.
For macOS 10.14 or later
How to change the video orientation in Filmora
Step 1:Import the video file into Filmora, and then drag it to the timeline.
Step 2: To enter the video editing panel, double-click the video clip in the timeline. Locate the “Rotate” option under the “Transform” menu. You can drag the slider or enter a specific number to adjust the rotation value. You can rotate up to 360 degrees. When you enter “90” in the box, the video clip will be rotated 90 degrees.
By dragging the “Scale” slider, you can make the full image screen, or you can directly adjust its position, size, shape, etc., in the Viewer panel.
Step 3: After you are satisfied, click the export button. You can change the format here, or you can upload the file to YouTube.
Top 3 Free MP4 Video Rotators on Windows
Looking for the best free video rotator?
If you are looking for a free video rotator for windows, then this article has got you covered. A list of the top 3 free video rotators for windows has been listed.
- VSDC Free Video Editor
It is a highly functional video editing suite with easy controls. It provides anyone who is a beginner to easily access and edit the video easily.
It helps you rotate the videos in increments of 90 degrees, be it clockwise or anticlockwise )
VSDC is a free video editor with non-linear editing capabilities. Users may swiftly convert video and audio files from one format to another with VSDC. A built-in disk burning tool for DVDs is also included in the software. This free program, designed for educational purposes, can be used by businesses or individuals.
VSDC Free Video Editor features
- Built-In DVD Burning Tool
- Colour Blending And Filters
- Specific Multimedia Devices Creation
- Desktop Video Capture
- Export To Social Networking Sites
- Masking
- Non-Linear Video Editing
- Subpixel Accuracy
- Supports Popular Formats
- Video File Converter
Pros
- It’s completely free.
- There is no watermark.
- There are numerous free video editing programs available.
- Support a wide range of file formats
Cons
There isn’t a macOS version available.
Take a severe learning curve into consideration.
There are numerous premium-only features.
The timeline isn’t the same as most NLE editing software.
- Windows Movie Maker
The most well-known video rotator and editor are probably Windows Movie Maker. Most of us who grew up with Microsoft’s various operating systems have had access to it because it comes as a free download with most Microsoft products. It can handle a wide range of files and is generally simple to use. Adding features like sound, music, special effects, or even speeding up the video is simple, and you’ll love the variety of skins available.
For beginners, Windows Video Maker is ideal. It is available for free on Windows PCs and includes basic capabilities and workflow aspects found in professional video editing systems. Its user-friendly interface resembles a simplified version of a video editor timeline and is simple enough for even inexperienced editors to understand.
Features of Windows Movie Maker
- Customization Tool’s title
- Auto Movie Options
- Credit Customization Tool
- Special Effects Options
- Overlays for Transitions
Pros:
- Various video editing functions;
- A variety of output possibilities
Cons:
- Many different versions of the same product;
- No longer included in the Windows operating system.
3.EaseUS Video Editor
EaseUS Video Editor is one of the few most popular video rotators we have today. Its video editing provides tools that can change the video orientation by 90 degrees anticlockwise and clockwise, which can flip vertically and horizontally.
In terms of videos, adding great filters, sound, music, subtitles and other elements to have a great video output can be achieved using the EaseUS. Moreover, it accepts video formats and can convert files to MP4 and other great features.
Features of EaseUS Video Editor
- Can easily trim, cut, split, merge, rotate, and mix video clips.
- Ability to apply stylish video effects
- Can add or remove the watermark and reduce background or wind noise from a video.
Pros:
- User-friendly interface, perfect for beginners
- Easily trim, cut, split, merge, rotate, mix video clips
- A full range of free visual and audio effects
- Change of contrast, exposure, brightness, and other video aspects
- Use the voiceover function to add your comments to the video
Cons:
- The software has no version for macOS
Top 3 Free MP4 Video Rotators on Mac
- iMovie
The iMovie for Mac users is an exceptional video rotator. You can turn any video or movie you may have into an amazing masterpiece with more features due to the special after-effects it has. Simple application to use and navigate easily, although when importing video takes a while at certain times.
Features of the iMovie include
- Full range of options to modify
- Ability to enhance colour settings
- Easily crop and edit video clips ease
- Ability to change the speed of clips.
Pros:
- Nice interface;
- The function is to create fun Movie Trailers.
Cons:
- Supports only a few video formats;
- Pre-processing and import trans-coding can be time-consuming.
- Movavi Video Editor
Movavi has a free version that is easy to use, especially for beginners. It allows you to add titles, filters, transitions, and special effects to your videos and photographs to make attractive movies. You can use the animation to smoothly move things around the screen in your film. On the multi-track timeline, you can add as many tracks as you wish. From the expanded built-in collection, you can get more example video clips, stickers, and audio tracks.
Features of Movavi Video Editor
- You can upload files and photographs in almost any format.
- To make videos automatically, use the Montage Wizard.
- Transition Wizard allows you to quickly put together slideshows.
- Enhance image quality by cutting, cropping, and rotating videos on the timeline.
- Apply artistic filters, and make transitions between portions as smooth as possible.
- Create animated headlines, stickers, callouts, and video overlays:
Pros:
- It’s appropriate for newcomers and casual users alike.
- A number of video formats are supported, including.mov (QuickTime)
- Chroma Key and Slow Motion are examples of special effects.
Cons
- Only the premium version supports the advanced features.
- It uses the basic colour grading tool
- QuickTime Player
The key advantage of Apple’s QuickTime is that it comes pre-installed on your Mac’s macOS operating system. It’s powerful enough to rotate your clip, yet it’s simple enough for beginners to do. iTunes files can be played and edited with QuickTime. After rotation, it exports a new video file, leaving the old clip on the Mac. The output video will be compressed slightly, resulting in a smaller rotational video file than the original.
Features of QuickTime Player
- Anything can be recorded, including video, audio, and the screen.
- Cropping, audio detachment, combining, and rotation are all simple video editing techniques.
- From 4K to 480p video compression
- Quickly share your video: directly upload videos to YouTube
Pros:
- With macOS, it comes pre-installed.
- Work with iTunes files Streaming video player with no configuration
Cons:
- Only QuickTime Pro 7 unlocks the editing feature.
- There will be no more Windows versions.
- It isn’t compatible with standard subtitle files.
Top 3 Free MP4 Video Rotators on Android
When we use a smartphone to capture a video or download one from a website, we occasionally discover that the video has been inverted. As a result, we’ll require a video rotator app to correct the problem. On the market, there are many different sorts of tools for various platforms. However, you may have discovered that separating the wheat from the chaff can be difficult at times. To save you time, I’ve compiled a list of 3 video rotator applications for Android
- VivaVideo
VivaVideo is one of the top movie producers and free video rotators for Android devices as a media editor. This application allows you to alter the orientation of your videos. Aside from rotating videos, this software also includes cropping, combining, cutting, and other editing features. “The best video editor software is VivaVideo - Video Maker App,” an Android expert previously said. This program is a video producer as well as an editor.
Features of VivaVideo
- It allows you to add music to videos.
- Combine videos clips into one video
- Can apply video effects.
- After you’ve finished editing your videos, you may save and share them on YouTube and TikTok! To rotate video, use this program!
Pros
- It has an In-app camera with live effects previews for capturing videos.
- More than 60 effects to choose from with additional downloadable effects.
- Enhance the videos using themes.
- Ability to Merge videos and create montages with storyboarding features
- Edit frames within a video
Cons
- There is no negative review to say about this app
2.Google Photos
This app may already be installed on your smartphone, but you are unaware of its full potential. This program includes a built-in picture and video editor in addition to backing up your photos. This program includes three essential video editing tools that are extremely basic and easy to use.
The first is to stabilize the video; if your video is unsteady, you can use this option in Google Photos to stabilize it. You may also use the timeline below the video to cut the video. If you mistakenly captured the video in the wrong orientation, there is a tool to rotate it.
Features of Google Photos
- You can modify photographs and videos in Google Photos.
- On Google Photos, make a collage or a movie.
- Recover photos or videos that were recently erased.
- Clear off some space on Google Photos…
- Place photos in the Archive.
Pros
Google Images automatically backs up all of your device’s photos and videos.
Despite its many advantages, the reason I choose Google Photos is that it helps me save space on my smartphone.
The original quality of images stored in Google Photos is really high. Photos and videos are saved in the same resolution as when they were taken.
Over time, Google has improved the Google Photos interface, and it now incorporates AI to provide consumers with even better performance.
Cons
There aren’t many effects, and there aren’t any other editing tools.
The lack of a password-protection option in Google Photos is annoying. Some photos are private, and you may not wish to share them with others.
Users of Google Photos will no longer have limitless storage.
3Adobe Rush
Adobe Rush is a new video editor that Adobe released via a partnership with Samsung’s latest flagship smartphone. This app is a simple yet powerful tool for editing videos on the go, on your smartphone.
This app comes with some powerful tools which you find on some high-end video editing apps. You get a timeline interface to edit your videos perfectly, and you get some music recommendations right into the app.
Features Of Adobe Rush
- In the timeline, you can make changes to your video.
- Audio can be added and refined.
- Change the colour, size, and position of the video.
- Make a title.
- Add transitions, pan and zoom effects, and reframe your clips automatically.
- Change the clip’s attributes.
- Change your video’s aspect ratio.
- Create the illusion of a picture-in-picture effect.
Pros
- It has a user-friendly UI that is responsive and snappy.
- It’s easy to use and provides helpful advice for newcomers.
- It enables Adobe users to quickly and easily produce stunning videos that are customized to their preferences.
- When compared to its competitors, exporting files is a breeze.
- Unlike most of its competitors, it comes with good colour and title tools.
- YouTube, Facebook, Vimeo, Snapchat, Instagram, and Twitter are just a few of the social media channels where the finished files can be simply shared.
- It synchronizes projects between desktop and mobile devices, making them more accessible.
Cons
- When compared to its competitors, it is a little costly.
- It renders projects slowly and only supports three transitions.
- The app does not have storyboard templates and cannot specify the exact structure for output files.
- It only comes with a few video and audio editing capabilities.
- Many standard video effects are missing.
Top 3 Free MP4 Video Rotators on iPhone
1.Splice
Trimming, cropping, effects, titles, speed adjustments, animation, transitions, and music are all available in this well-known video editor, which has a cultish following of dedicated Splicers.
Splice’s music library is one of its strongest assets. It offers a large selection of free music and sound effects to layer over your video, as well as the ability to sync your movie to the beat of your soundtrack.
Features of Splice
Clips should be cropped and trimmed to focus on the highlights.
With an Audio Library and iTunes Integration, you may add music to your videos.
To smooth transitions between clips and images, use transitions.
Enhance videos with effects.
Pros:
- Developed by GoPro, award-winning, highly regarded.
Cons:
- Only available on iOS devices.
2. Clips
It’s easy to miss pre-loaded apps like Apple’s Clips, but this video editing tool has lots of impressive features to enjoy, thanks to the weight of the tech giant’s greatest brains behind it. Take, for example, their live tiles setting. You can use this to generate animated captions and titles that appear as you speak.
To liven things up, you may add animated emojis and backgrounds, and music tracks dynamically sync to the length of your video.
Features of Clips
- Ability to generate animated captions
- Full access to Animated emojis and backgrounds
- Ability to have your music sync to your videos
Pros:
- Simple to use, unique features, and Apple’s support.
Cons:
- It’s only for iOS devices (obviously! ), and it has trouble with a big number of clips.
3. Quik
You may apply transitions and effects to up to 200 photographs and video clips from your photo library or GoPro Plus with this free software. You may not only crop, zoom, and rotate photos and video clips, but you can also customize them with 26 different themes, fonts, effects, and artwork.
You may make HD 1080p or 720p films for social sharing in cinema, square, or portrait formats, and you can store your draft creations for up to seven days.
Features of Quik
- Everything that is available for free.
- There are no limits to the number of mural events.
- Editing is unrestricted.
- There are now a total of 25 more photo and video filters.
Pros:
- Tons of features, including access to 100+ free songs,
- Flashbacks and QuikStories, which make videos based on your most recent footage,
- syncs footage to the beat of your soundtrack, and AI editing help.
Cons:
- Limited control and no trimming option; customers have claimed that it is occasionally glitchy.
Top 3 Free MP4 Video Rotators Online
1.Online Video Cutter
This web tool comes in helpful when you need to rapidly edit a small video file. It is not necessary to install it; you may use it right from your browser. The clip can only be rotated 90, 180, or 270 degrees. It’ll come in handy, especially if you’ve closed the video in portrait mode and want to watch it on a big screen. The service’s provider says that the files will be automatically erased from the servers a few hours after you accomplish your task, resulting in a high level of security.
Features of Online Video cutter.
- It Supports Any Video Format. …
- Completely Online for you to access
- Additional Settings to make more edits to videos
- Easy to use, User-friendly interface.
Pros:
It has a very simple user interface.
You do not need to pay for a license to utilize it.
Almost every video format is supported.
Cons:
Only suitable for little clips
Performing simply the most basic functions, such as rotating and cropping
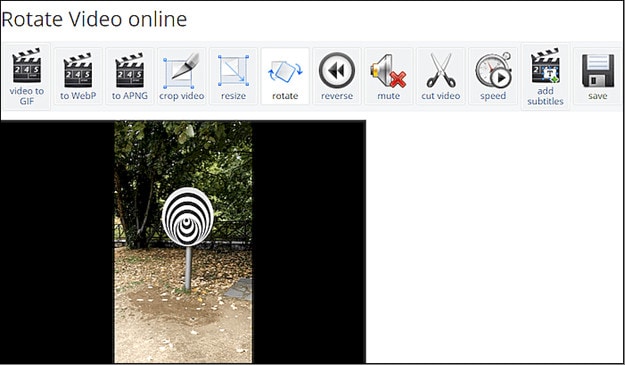
2.EzGif
This unique internet tool not only creates animated GIFs but can also rotate video. You simply choose the clip from your local folder. However, the file’s maximum size is limited to 100MB. A basic tool for rotating the video through 90, 180, and 270 degrees. You can also vertically and horizontally flip the video before exporting it in a different format and encoding.
Features of EzGif
- A simple user interface to find your way around the website.
- Ability to do resizing and rotating of videos and images.
- Capable of video conversions and editing
Pros:
- Many video formats are supported, including MP4, WebM, AVI, MPEG, FLV, MOV, and 3GP.
- The rotation procedure is quick and simple to utilize.
- After rotating, provide a preview function.
Cons:
- The maximum file size is 100 megabytes.
- There are no filters or transitions, and only basic editing functions are available.
3.Videorotate
- This is a free online video rotator that is simple and quick to use. You can upload your video from a local folder or import a recorded clip from major cloud services like Dropbox, Google Drive, and One Drive, just like the other online services (there are buttons for each of them). You can flip the clip or rotate it left and right. Other video capabilities available on the site include cropping, stabilizing, and slicing.
Features of Videorotate
- Ability to crop, stabilize and slice videos.
Pros:
- Simple and straightforward to use
- Clips from your Dropbox, Google Drive, and OneDrive accounts can be uploaded.
- A specific “Reset” button is available.
Cons:
- For basic operations, a service for newcomers is available.
- Only a few video file formats are supported.
FAQs about Video Rotator
- What is the best way to rotate a video?
Use an easy-to-use video editing program. It’s easy to rotate a video, even if you’ve never edited one before. You can also use some media players.
- How do I rotate a video permanently?
In this guide, we will show you exactly how to rotate video in Windows with EaseUS Video Editor and save it permanently.
3.How can I rotate a video for free on the internet?
It’s simple to rotate a video online, and there are various services that offer free online video rotators.
- Videorotate
- Ezgif
- Video cutter on the internet
- How do I mirror a video on the internet?
The websites that support video rotation also offer the ability to “flip” the video vertically and horizontally. You’ll have “mirroring” frames in this manner as if you’re filming your pals in the mirror.
For macOS 10.14 or later
How to change the video orientation in Filmora
Step 1:Import the video file into Filmora, and then drag it to the timeline.
Step 2: To enter the video editing panel, double-click the video clip in the timeline. Locate the “Rotate” option under the “Transform” menu. You can drag the slider or enter a specific number to adjust the rotation value. You can rotate up to 360 degrees. When you enter “90” in the box, the video clip will be rotated 90 degrees.
By dragging the “Scale” slider, you can make the full image screen, or you can directly adjust its position, size, shape, etc., in the Viewer panel.
Step 3: After you are satisfied, click the export button. You can change the format here, or you can upload the file to YouTube.
Top 3 Free MP4 Video Rotators on Windows
Looking for the best free video rotator?
If you are looking for a free video rotator for windows, then this article has got you covered. A list of the top 3 free video rotators for windows has been listed.
- VSDC Free Video Editor
It is a highly functional video editing suite with easy controls. It provides anyone who is a beginner to easily access and edit the video easily.
It helps you rotate the videos in increments of 90 degrees, be it clockwise or anticlockwise )
VSDC is a free video editor with non-linear editing capabilities. Users may swiftly convert video and audio files from one format to another with VSDC. A built-in disk burning tool for DVDs is also included in the software. This free program, designed for educational purposes, can be used by businesses or individuals.
VSDC Free Video Editor features
- Built-In DVD Burning Tool
- Colour Blending And Filters
- Specific Multimedia Devices Creation
- Desktop Video Capture
- Export To Social Networking Sites
- Masking
- Non-Linear Video Editing
- Subpixel Accuracy
- Supports Popular Formats
- Video File Converter
Pros
- It’s completely free.
- There is no watermark.
- There are numerous free video editing programs available.
- Support a wide range of file formats
Cons
There isn’t a macOS version available.
Take a severe learning curve into consideration.
There are numerous premium-only features.
The timeline isn’t the same as most NLE editing software.
- Windows Movie Maker
The most well-known video rotator and editor are probably Windows Movie Maker. Most of us who grew up with Microsoft’s various operating systems have had access to it because it comes as a free download with most Microsoft products. It can handle a wide range of files and is generally simple to use. Adding features like sound, music, special effects, or even speeding up the video is simple, and you’ll love the variety of skins available.
For beginners, Windows Video Maker is ideal. It is available for free on Windows PCs and includes basic capabilities and workflow aspects found in professional video editing systems. Its user-friendly interface resembles a simplified version of a video editor timeline and is simple enough for even inexperienced editors to understand.
Features of Windows Movie Maker
- Customization Tool’s title
- Auto Movie Options
- Credit Customization Tool
- Special Effects Options
- Overlays for Transitions
Pros:
- Various video editing functions;
- A variety of output possibilities
Cons:
- Many different versions of the same product;
- No longer included in the Windows operating system.
3.EaseUS Video Editor
EaseUS Video Editor is one of the few most popular video rotators we have today. Its video editing provides tools that can change the video orientation by 90 degrees anticlockwise and clockwise, which can flip vertically and horizontally.
In terms of videos, adding great filters, sound, music, subtitles and other elements to have a great video output can be achieved using the EaseUS. Moreover, it accepts video formats and can convert files to MP4 and other great features.
Features of EaseUS Video Editor
- Can easily trim, cut, split, merge, rotate, and mix video clips.
- Ability to apply stylish video effects
- Can add or remove the watermark and reduce background or wind noise from a video.
Pros:
- User-friendly interface, perfect for beginners
- Easily trim, cut, split, merge, rotate, mix video clips
- A full range of free visual and audio effects
- Change of contrast, exposure, brightness, and other video aspects
- Use the voiceover function to add your comments to the video
Cons:
- The software has no version for macOS
Top 3 Free MP4 Video Rotators on Mac
- iMovie
The iMovie for Mac users is an exceptional video rotator. You can turn any video or movie you may have into an amazing masterpiece with more features due to the special after-effects it has. Simple application to use and navigate easily, although when importing video takes a while at certain times.
Features of the iMovie include
- Full range of options to modify
- Ability to enhance colour settings
- Easily crop and edit video clips ease
- Ability to change the speed of clips.
Pros:
- Nice interface;
- The function is to create fun Movie Trailers.
Cons:
- Supports only a few video formats;
- Pre-processing and import trans-coding can be time-consuming.
- Movavi Video Editor
Movavi has a free version that is easy to use, especially for beginners. It allows you to add titles, filters, transitions, and special effects to your videos and photographs to make attractive movies. You can use the animation to smoothly move things around the screen in your film. On the multi-track timeline, you can add as many tracks as you wish. From the expanded built-in collection, you can get more example video clips, stickers, and audio tracks.
Features of Movavi Video Editor
- You can upload files and photographs in almost any format.
- To make videos automatically, use the Montage Wizard.
- Transition Wizard allows you to quickly put together slideshows.
- Enhance image quality by cutting, cropping, and rotating videos on the timeline.
- Apply artistic filters, and make transitions between portions as smooth as possible.
- Create animated headlines, stickers, callouts, and video overlays:
Pros:
- It’s appropriate for newcomers and casual users alike.
- A number of video formats are supported, including.mov (QuickTime)
- Chroma Key and Slow Motion are examples of special effects.
Cons
- Only the premium version supports the advanced features.
- It uses the basic colour grading tool
- QuickTime Player
The key advantage of Apple’s QuickTime is that it comes pre-installed on your Mac’s macOS operating system. It’s powerful enough to rotate your clip, yet it’s simple enough for beginners to do. iTunes files can be played and edited with QuickTime. After rotation, it exports a new video file, leaving the old clip on the Mac. The output video will be compressed slightly, resulting in a smaller rotational video file than the original.
Features of QuickTime Player
- Anything can be recorded, including video, audio, and the screen.
- Cropping, audio detachment, combining, and rotation are all simple video editing techniques.
- From 4K to 480p video compression
- Quickly share your video: directly upload videos to YouTube
Pros:
- With macOS, it comes pre-installed.
- Work with iTunes files Streaming video player with no configuration
Cons:
- Only QuickTime Pro 7 unlocks the editing feature.
- There will be no more Windows versions.
- It isn’t compatible with standard subtitle files.
Top 3 Free MP4 Video Rotators on Android
When we use a smartphone to capture a video or download one from a website, we occasionally discover that the video has been inverted. As a result, we’ll require a video rotator app to correct the problem. On the market, there are many different sorts of tools for various platforms. However, you may have discovered that separating the wheat from the chaff can be difficult at times. To save you time, I’ve compiled a list of 3 video rotator applications for Android
- VivaVideo
VivaVideo is one of the top movie producers and free video rotators for Android devices as a media editor. This application allows you to alter the orientation of your videos. Aside from rotating videos, this software also includes cropping, combining, cutting, and other editing features. “The best video editor software is VivaVideo - Video Maker App,” an Android expert previously said. This program is a video producer as well as an editor.
Features of VivaVideo
- It allows you to add music to videos.
- Combine videos clips into one video
- Can apply video effects.
- After you’ve finished editing your videos, you may save and share them on YouTube and TikTok! To rotate video, use this program!
Pros
- It has an In-app camera with live effects previews for capturing videos.
- More than 60 effects to choose from with additional downloadable effects.
- Enhance the videos using themes.
- Ability to Merge videos and create montages with storyboarding features
- Edit frames within a video
Cons
- There is no negative review to say about this app
2.Google Photos
This app may already be installed on your smartphone, but you are unaware of its full potential. This program includes a built-in picture and video editor in addition to backing up your photos. This program includes three essential video editing tools that are extremely basic and easy to use.
The first is to stabilize the video; if your video is unsteady, you can use this option in Google Photos to stabilize it. You may also use the timeline below the video to cut the video. If you mistakenly captured the video in the wrong orientation, there is a tool to rotate it.
Features of Google Photos
- You can modify photographs and videos in Google Photos.
- On Google Photos, make a collage or a movie.
- Recover photos or videos that were recently erased.
- Clear off some space on Google Photos…
- Place photos in the Archive.
Pros
Google Images automatically backs up all of your device’s photos and videos.
Despite its many advantages, the reason I choose Google Photos is that it helps me save space on my smartphone.
The original quality of images stored in Google Photos is really high. Photos and videos are saved in the same resolution as when they were taken.
Over time, Google has improved the Google Photos interface, and it now incorporates AI to provide consumers with even better performance.
Cons
There aren’t many effects, and there aren’t any other editing tools.
The lack of a password-protection option in Google Photos is annoying. Some photos are private, and you may not wish to share them with others.
Users of Google Photos will no longer have limitless storage.
3Adobe Rush
Adobe Rush is a new video editor that Adobe released via a partnership with Samsung’s latest flagship smartphone. This app is a simple yet powerful tool for editing videos on the go, on your smartphone.
This app comes with some powerful tools which you find on some high-end video editing apps. You get a timeline interface to edit your videos perfectly, and you get some music recommendations right into the app.
Features Of Adobe Rush
- In the timeline, you can make changes to your video.
- Audio can be added and refined.
- Change the colour, size, and position of the video.
- Make a title.
- Add transitions, pan and zoom effects, and reframe your clips automatically.
- Change the clip’s attributes.
- Change your video’s aspect ratio.
- Create the illusion of a picture-in-picture effect.
Pros
- It has a user-friendly UI that is responsive and snappy.
- It’s easy to use and provides helpful advice for newcomers.
- It enables Adobe users to quickly and easily produce stunning videos that are customized to their preferences.
- When compared to its competitors, exporting files is a breeze.
- Unlike most of its competitors, it comes with good colour and title tools.
- YouTube, Facebook, Vimeo, Snapchat, Instagram, and Twitter are just a few of the social media channels where the finished files can be simply shared.
- It synchronizes projects between desktop and mobile devices, making them more accessible.
Cons
- When compared to its competitors, it is a little costly.
- It renders projects slowly and only supports three transitions.
- The app does not have storyboard templates and cannot specify the exact structure for output files.
- It only comes with a few video and audio editing capabilities.
- Many standard video effects are missing.
Top 3 Free MP4 Video Rotators on iPhone
1.Splice
Trimming, cropping, effects, titles, speed adjustments, animation, transitions, and music are all available in this well-known video editor, which has a cultish following of dedicated Splicers.
Splice’s music library is one of its strongest assets. It offers a large selection of free music and sound effects to layer over your video, as well as the ability to sync your movie to the beat of your soundtrack.
Features of Splice
Clips should be cropped and trimmed to focus on the highlights.
With an Audio Library and iTunes Integration, you may add music to your videos.
To smooth transitions between clips and images, use transitions.
Enhance videos with effects.
Pros:
- Developed by GoPro, award-winning, highly regarded.
Cons:
- Only available on iOS devices.
2. Clips
It’s easy to miss pre-loaded apps like Apple’s Clips, but this video editing tool has lots of impressive features to enjoy, thanks to the weight of the tech giant’s greatest brains behind it. Take, for example, their live tiles setting. You can use this to generate animated captions and titles that appear as you speak.
To liven things up, you may add animated emojis and backgrounds, and music tracks dynamically sync to the length of your video.
Features of Clips
- Ability to generate animated captions
- Full access to Animated emojis and backgrounds
- Ability to have your music sync to your videos
Pros:
- Simple to use, unique features, and Apple’s support.
Cons:
- It’s only for iOS devices (obviously! ), and it has trouble with a big number of clips.
3. Quik
You may apply transitions and effects to up to 200 photographs and video clips from your photo library or GoPro Plus with this free software. You may not only crop, zoom, and rotate photos and video clips, but you can also customize them with 26 different themes, fonts, effects, and artwork.
You may make HD 1080p or 720p films for social sharing in cinema, square, or portrait formats, and you can store your draft creations for up to seven days.
Features of Quik
- Everything that is available for free.
- There are no limits to the number of mural events.
- Editing is unrestricted.
- There are now a total of 25 more photo and video filters.
Pros:
- Tons of features, including access to 100+ free songs,
- Flashbacks and QuikStories, which make videos based on your most recent footage,
- syncs footage to the beat of your soundtrack, and AI editing help.
Cons:
- Limited control and no trimming option; customers have claimed that it is occasionally glitchy.
Top 3 Free MP4 Video Rotators Online
1.Online Video Cutter
This web tool comes in helpful when you need to rapidly edit a small video file. It is not necessary to install it; you may use it right from your browser. The clip can only be rotated 90, 180, or 270 degrees. It’ll come in handy, especially if you’ve closed the video in portrait mode and want to watch it on a big screen. The service’s provider says that the files will be automatically erased from the servers a few hours after you accomplish your task, resulting in a high level of security.
Features of Online Video cutter.
- It Supports Any Video Format. …
- Completely Online for you to access
- Additional Settings to make more edits to videos
- Easy to use, User-friendly interface.
Pros:
It has a very simple user interface.
You do not need to pay for a license to utilize it.
Almost every video format is supported.
Cons:
Only suitable for little clips
Performing simply the most basic functions, such as rotating and cropping
2.EzGif
This unique internet tool not only creates animated GIFs but can also rotate video. You simply choose the clip from your local folder. However, the file’s maximum size is limited to 100MB. A basic tool for rotating the video through 90, 180, and 270 degrees. You can also vertically and horizontally flip the video before exporting it in a different format and encoding.
Features of EzGif
- A simple user interface to find your way around the website.
- Ability to do resizing and rotating of videos and images.
- Capable of video conversions and editing
Pros:
- Many video formats are supported, including MP4, WebM, AVI, MPEG, FLV, MOV, and 3GP.
- The rotation procedure is quick and simple to utilize.
- After rotating, provide a preview function.
Cons:
- The maximum file size is 100 megabytes.
- There are no filters or transitions, and only basic editing functions are available.
3.Videorotate
- This is a free online video rotator that is simple and quick to use. You can upload your video from a local folder or import a recorded clip from major cloud services like Dropbox, Google Drive, and One Drive, just like the other online services (there are buttons for each of them). You can flip the clip or rotate it left and right. Other video capabilities available on the site include cropping, stabilizing, and slicing.
Features of Videorotate
- Ability to crop, stabilize and slice videos.
Pros:
- Simple and straightforward to use
- Clips from your Dropbox, Google Drive, and OneDrive accounts can be uploaded.
- A specific “Reset” button is available.
Cons:
- For basic operations, a service for newcomers is available.
- Only a few video file formats are supported.
FAQs about Video Rotator
- What is the best way to rotate a video?
Use an easy-to-use video editing program. It’s easy to rotate a video, even if you’ve never edited one before. You can also use some media players.
- How do I rotate a video permanently?
In this guide, we will show you exactly how to rotate video in Windows with EaseUS Video Editor and save it permanently.
3.How can I rotate a video for free on the internet?
It’s simple to rotate a video online, and there are various services that offer free online video rotators.
- Videorotate
- Ezgif
- Video cutter on the internet
- How do I mirror a video on the internet?
The websites that support video rotation also offer the ability to “flip” the video vertically and horizontally. You’ll have “mirroring” frames in this manner as if you’re filming your pals in the mirror.
Secret Tips & Tricks to Use in Filmora
Wondershare Filmora is a great video editing software with millions of users worldwide. It has many features that it provides to its users. However, there are some other features hidden up its sleeve.
This article will share some “secrets” of Wondershare Filmora features you may not know that they exist in Filmora. Scroll below to see the features that level up your editing skills.
Part 1. Shared Media Folder
You might have had the hassle of importing the same videos for a considerable time in a different project. It can become a problem for you. It may be fine if you have organized your videos from the start.
Shared Media Folder in Filmora, now called the Global Media Folder, can store video and audio that you’ve imported for future projects. So you don’t have to keep re-importing your media for future videos.

Moreover, when you have imported files into the Shared Media Folder, you can create new Sub-Folders. You can name these folders according to the types of media you are going to use.
Suppose you are a content creator and want to spice up your content with memes. You can create a meme folder to import recent memes into your videos.
Once you have imported them into the Wondershare Filmora’s Shared Media Folder, you can access them anytime. Doing so will allow you to save time and build a base for your future projects.
Free Download For Win 7 or later(64-bit)
Free Download For macOS 10.14 or later
Part 2. Customize Proxy Files
Before understanding the custom proxy settings, let us know what proxy files are.
Proxy Files
Proxy files in Wondershare Filmora allow you to render and edit 4K and other higher-resolution videos easily, regardless of your computer’s processing power.
No one wants to compromise PC performance when editing videos. But if you are importing a video with a higher resolution than your PC, you can only play it sometimes. Other than that, your PC might get stuck and slow down.
If your PC has a built-in resolution of 1080p, but the video you are going to import is 2160p, you can encounter rendering and performance problems. But in the case of Wondershare Filmora Proxy files, you can smoothly edit your videos without any trouble.
How to Customize Proxy Files in Filmora
Although Wondershare Filmora automatically creates proxy files when it encounters resolutions more significant than the PC performance. But you can also set them to your preference.
And customize your proxy files takes some simple and easy steps. But first, follow the steps mentioned below.
Step1 Find the File option on the top left corner of the Wonderhsare Filmora home interface.
Step2 Click on Files and go to Preferences.
Step3 A window will pop up, and here you can see multiple options.
Step4 Go to the performance.
Step5 In the performance tab, scroll down till your see Proxy.
Step6 Here check the box that says, “Automatically create proxies when resolution higher than:”

Step7 Below you can see multiple options. In these options, select the resolution that you want.
Step8 You can also click on the box below to automatically delete the proxies when you close your project.
Now, whenever you encounter a resolution of a higher video than the one you selected, Wondershare Filmora will do its magic.
Part 3. Delete Project Render Cache
Another hack you can use to save space on your hard drive is Deleting the Render cache. But before we do that, let us understand what Render cache is!
What is Render Cache?
Rendering can be a giant leap to give you a smooth performance experience. However, when you import your videos into the timeline, you can always render to have an uninterrupted playback experience.
Doing so will allow you to work in your zone quickly and efficiently. You can do a manual rendering before you begin the editing process. Or you can also opt to choose automatic rendering. In the automatic rendering option, you can continue your editing process. In the meantime, your timeline will be rendered.
How to Delete Render Cache in Filmora
To save up storage space on your computer, you can delete your render cache by following the steps.
Step1 Click on files in the top left corner of the Wondershare Filmora home interface.
Step2 Go to Preferences.
Step3 A window will pop up and go to Performance.
Step4 In the performance tab, scroll down below to the Preview Render.
Step5 Check the box saying, “Automatically delete render files when a project is closed.”

Step6 Click on OK to save your changes.
Now, whenever you close your project, your render cache will be deleted and would have given you extra space on your computer.
Part 4. Remove Split Button on Playhead
In some instances, when you are moving the playhead on the timelines, it can distract you from doing your editing. Or even more, you can mistakenly click on the Split button to split the clips you don’t want them to.
Well, no worries at all! Wondershare Filmora takes care of that for you. You can hide or remove the Split button on the playhead. It only takes a few simple and easy steps. Follow the steps mentioned below to remove the Split button:
Step1 You will notice the File option on the top left corner of the Wonderhsare Filmora home interface.
Step2 Click on Files and go to Preferences.
Step3 A window will pop up, and here you can see multiple options.
Step4 Go to the editing
Step5 In the editing tab, scroll down till your see the Split button.

Step6 Check the box. Then, click OK to save your changes.
Doing so would have removed the Split button from your playhead. So now you can edit your videos without any distractions.
Part 5. Copy and Paste Effects
Copy and paste are one of the oldest tricks in editing procedures. Wondershare Filmora comes with a range of commands and features that allow you to save time and be reliable.
Suppose you want to add an effect to a video clip in the timeline. Then, after adding the effect to your video, make custom changes to make it look more closely to the style you want. You can now use the copy-and-paste function to add the same effect to another clip. That helps you save a lot of time from tedious and time-consuming work.
How to Copy and Paste Effects
While editing, you will need to ensure that your editing process is as clean as possible and that you have all the time on hand.
But there is a solution! You can easily copy and paste the effects you placed on one video clip to another. Just follow the steps mentioned, and you will be good to go:
Step1 Right-click on the video to you added the effects too.
Step2 A drop-down column will pop up.
Step3 In the options below, you will notice an option called “Copy Effects.”
Step4 Click on the “Copy Effects” option.
Step5 Now move the playhead to the video clip on which you want to paste the effects.
Step6 Right-click on the video that you want to place the effect on.
Step7 In the pop-up column, select the Paste Effect
Step8 It adjusts the video clip according to the changes of the prior one.
You can save editing time by simply copying and pasting video effects.

Part 6. Timeline Snap
You might have added multiple videos in the same timeline track. If you removed the video ahead of the video clip, you have to close the gap in between.
So, arranging and moving clips in the timeline are hectic and time-consuming. However, that is the case without timeline snapping.
How to Apply Timeline Snap in Filmora
Timeline snapping will allow you to arrange video clips side by side without any breaks and cut-offs. Also, it will enable you to place it precisely above other video and audio gaps in the timeline.
In most cases, Timeline snapping is enabled from the start. But if you are encountering some problems managing your videos. Or if you want to remove the Timeline snap feature. Follow the steps mentioned below:
Step1 Right-click on the Timeline.
Step2 A pop will open up, giving you multiple options.
Step3 Click on timeline Snapping to either enable it or disable it.

Now you can easily enable and disable timeline snapping according to your choice!
Part 7. Color Code Video Clips
When editing footage from multiple cameras, you might want to organize which media is from which source in the timeline. You can do this by color coding your clips.
Steps to Color Code Your Videos
Color coding allows you to edit all the clips marked with a particular color to be selected simultaneously without selecting them manually in the timeline.
To color code a video, follow the steps as mentioned:
Step1 Select the clips you want to color code, right-click, and choose from the available colors.
Step2 Once you’ve color coded your clips, you can right-click on the clip again and choose to select all clips from the color mark option.
Step3 And all the clips marked with that color will be selected.

Part 8. Group Clips Together
Now in an editing timeline, you might encounter a situation where you want to arrange a video clip with specific audio. Again, it allows you to stay organized and save up a lot of time.
Grouping clips together can also be helpful when you want to edit multiple clips in the timeline but want to maintain a particular order. The group will remain in its place and allow you to edit your other video clips quickly.
Stepwise Guide to Grouping the Clips in Filmora
You can group video and audio clips in straightforward steps. Just follow the actions ahead, and you will be good to go:
Step1 Hold Left-click and drag across the clips that you want to select.
Step2 When you are done, Right-click on the clip to open the options tab.
Step3 Scroll down, and you will see a “” option.
Step4 Select Group, and that’s done.

Your whole group will be selected whenever you select a video clip or an audio clip.
Part 9. Pan and Zoom Shortcut
Editing shortcuts are excellent. They allow you to save up a lot of time. Some people prefer to use a mouse only to edit their videos, but professionals always use a keyboard.
But there are some other shortcuts too! In these shortcuts, you would not necessarily need a keyboard; only a mouse will work and give a good outcome.
You might have seen those videos in which a specific screen ratio moves over a picture. Or, in some cases when you have to pan and zoom to create a flow effect.
Instead of manually adjusting the ratio of your videos and photos, Pan and Zoom shortcuts will allow you to use multiple features. These features allow you to select where your video or photo will start, zoom, and end.
These shortcuts are so easy to apply. Just go through the steps below, and you will accomplish the following:
Step1 Right-click on a photo or a video clip.
Step2 Go to the crop and zoom tab above the timeline.
Step3 In the window that opens up, you will see a pan and zoom option in the top left corner. Click on it.
Step4 And on the bottom right corner of the window, you can see the pan and zoom shortcuts available.
Step5 Please select any of them you want and then click on OK.

Part 10. New Feature Request
One of the significant features of Wondershare Filmora that sets it among the best is its capability to listen to the users. When you have been using Wondershare Filmora for a long time, there will come a time when you wish for a feature. You can also do so in a few simple steps. Just follow the steps mentioned:
Step1 Multiple options are available on the top left corner of the Wondershare Filmora home interface. Click on help.
Step2 A drop-down box will open up.
Step3 In the options offered to you, select suggest a feature.

Step4 It automatically directs you to your default browser, where you can see the multiple feature requests.
Step5 You can vote for a feature you want in the next update.
Step6 Or you can also create a request for another particular feature.

Summing Up
Wondershare Filmora is the best in the business regarding editing your videos. It has such creative and easy-to-use software that even a beginner efficiently edits videos.
There are a lot of features that Wondershare Filmora provides. But now, with these secret and hidden tips, you can edit your videos more creatively.
Free Download For macOS 10.14 or later
Part 2. Customize Proxy Files
Before understanding the custom proxy settings, let us know what proxy files are.
Proxy Files
Proxy files in Wondershare Filmora allow you to render and edit 4K and other higher-resolution videos easily, regardless of your computer’s processing power.
No one wants to compromise PC performance when editing videos. But if you are importing a video with a higher resolution than your PC, you can only play it sometimes. Other than that, your PC might get stuck and slow down.
If your PC has a built-in resolution of 1080p, but the video you are going to import is 2160p, you can encounter rendering and performance problems. But in the case of Wondershare Filmora Proxy files, you can smoothly edit your videos without any trouble.
How to Customize Proxy Files in Filmora
Although Wondershare Filmora automatically creates proxy files when it encounters resolutions more significant than the PC performance. But you can also set them to your preference.
And customize your proxy files takes some simple and easy steps. But first, follow the steps mentioned below.
Step1 Find the File option on the top left corner of the Wonderhsare Filmora home interface.
Step2 Click on Files and go to Preferences.
Step3 A window will pop up, and here you can see multiple options.
Step4 Go to the performance.
Step5 In the performance tab, scroll down till your see Proxy.
Step6 Here check the box that says, “Automatically create proxies when resolution higher than:”
Step7 Below you can see multiple options. In these options, select the resolution that you want.
Step8 You can also click on the box below to automatically delete the proxies when you close your project.
Now, whenever you encounter a resolution of a higher video than the one you selected, Wondershare Filmora will do its magic.
Part 3. Delete Project Render Cache
Another hack you can use to save space on your hard drive is Deleting the Render cache. But before we do that, let us understand what Render cache is!
What is Render Cache?
Rendering can be a giant leap to give you a smooth performance experience. However, when you import your videos into the timeline, you can always render to have an uninterrupted playback experience.
Doing so will allow you to work in your zone quickly and efficiently. You can do a manual rendering before you begin the editing process. Or you can also opt to choose automatic rendering. In the automatic rendering option, you can continue your editing process. In the meantime, your timeline will be rendered.
How to Delete Render Cache in Filmora
To save up storage space on your computer, you can delete your render cache by following the steps.
Step1 Click on files in the top left corner of the Wondershare Filmora home interface.
Step2 Go to Preferences.
Step3 A window will pop up and go to Performance.
Step4 In the performance tab, scroll down below to the Preview Render.
Step5 Check the box saying, “Automatically delete render files when a project is closed.”
Step6 Click on OK to save your changes.
Now, whenever you close your project, your render cache will be deleted and would have given you extra space on your computer.
Part 4. Remove Split Button on Playhead
In some instances, when you are moving the playhead on the timelines, it can distract you from doing your editing. Or even more, you can mistakenly click on the Split button to split the clips you don’t want them to.
Well, no worries at all! Wondershare Filmora takes care of that for you. You can hide or remove the Split button on the playhead. It only takes a few simple and easy steps. Follow the steps mentioned below to remove the Split button:
Step1 You will notice the File option on the top left corner of the Wonderhsare Filmora home interface.
Step2 Click on Files and go to Preferences.
Step3 A window will pop up, and here you can see multiple options.
Step4 Go to the editing
Step5 In the editing tab, scroll down till your see the Split button.
Step6 Check the box. Then, click OK to save your changes.
Doing so would have removed the Split button from your playhead. So now you can edit your videos without any distractions.
Part 5. Copy and Paste Effects
Copy and paste are one of the oldest tricks in editing procedures. Wondershare Filmora comes with a range of commands and features that allow you to save time and be reliable.
Suppose you want to add an effect to a video clip in the timeline. Then, after adding the effect to your video, make custom changes to make it look more closely to the style you want. You can now use the copy-and-paste function to add the same effect to another clip. That helps you save a lot of time from tedious and time-consuming work.
How to Copy and Paste Effects
While editing, you will need to ensure that your editing process is as clean as possible and that you have all the time on hand.
But there is a solution! You can easily copy and paste the effects you placed on one video clip to another. Just follow the steps mentioned, and you will be good to go:
Step1 Right-click on the video to you added the effects too.
Step2 A drop-down column will pop up.
Step3 In the options below, you will notice an option called “Copy Effects.”
Step4 Click on the “Copy Effects” option.
Step5 Now move the playhead to the video clip on which you want to paste the effects.
Step6 Right-click on the video that you want to place the effect on.
Step7 In the pop-up column, select the Paste Effect
Step8 It adjusts the video clip according to the changes of the prior one.
You can save editing time by simply copying and pasting video effects.
Part 6. Timeline Snap
You might have added multiple videos in the same timeline track. If you removed the video ahead of the video clip, you have to close the gap in between.
So, arranging and moving clips in the timeline are hectic and time-consuming. However, that is the case without timeline snapping.
How to Apply Timeline Snap in Filmora
Timeline snapping will allow you to arrange video clips side by side without any breaks and cut-offs. Also, it will enable you to place it precisely above other video and audio gaps in the timeline.
In most cases, Timeline snapping is enabled from the start. But if you are encountering some problems managing your videos. Or if you want to remove the Timeline snap feature. Follow the steps mentioned below:
Step1 Right-click on the Timeline.
Step2 A pop will open up, giving you multiple options.
Step3 Click on timeline Snapping to either enable it or disable it.
Now you can easily enable and disable timeline snapping according to your choice!
Part 7. Color Code Video Clips
When editing footage from multiple cameras, you might want to organize which media is from which source in the timeline. You can do this by color coding your clips.
Steps to Color Code Your Videos
Color coding allows you to edit all the clips marked with a particular color to be selected simultaneously without selecting them manually in the timeline.
To color code a video, follow the steps as mentioned:
Step1 Select the clips you want to color code, right-click, and choose from the available colors.
Step2 Once you’ve color coded your clips, you can right-click on the clip again and choose to select all clips from the color mark option.
Step3 And all the clips marked with that color will be selected.
Part 8. Group Clips Together
Now in an editing timeline, you might encounter a situation where you want to arrange a video clip with specific audio. Again, it allows you to stay organized and save up a lot of time.
Grouping clips together can also be helpful when you want to edit multiple clips in the timeline but want to maintain a particular order. The group will remain in its place and allow you to edit your other video clips quickly.
Stepwise Guide to Grouping the Clips in Filmora
You can group video and audio clips in straightforward steps. Just follow the actions ahead, and you will be good to go:
Step1 Hold Left-click and drag across the clips that you want to select.
Step2 When you are done, Right-click on the clip to open the options tab.
Step3 Scroll down, and you will see a “” option.
Step4 Select Group, and that’s done.
Your whole group will be selected whenever you select a video clip or an audio clip.
Part 9. Pan and Zoom Shortcut
Editing shortcuts are excellent. They allow you to save up a lot of time. Some people prefer to use a mouse only to edit their videos, but professionals always use a keyboard.
But there are some other shortcuts too! In these shortcuts, you would not necessarily need a keyboard; only a mouse will work and give a good outcome.
You might have seen those videos in which a specific screen ratio moves over a picture. Or, in some cases when you have to pan and zoom to create a flow effect.
Instead of manually adjusting the ratio of your videos and photos, Pan and Zoom shortcuts will allow you to use multiple features. These features allow you to select where your video or photo will start, zoom, and end.
These shortcuts are so easy to apply. Just go through the steps below, and you will accomplish the following:
Step1 Right-click on a photo or a video clip.
Step2 Go to the crop and zoom tab above the timeline.
Step3 In the window that opens up, you will see a pan and zoom option in the top left corner. Click on it.
Step4 And on the bottom right corner of the window, you can see the pan and zoom shortcuts available.
Step5 Please select any of them you want and then click on OK.
Part 10. New Feature Request
One of the significant features of Wondershare Filmora that sets it among the best is its capability to listen to the users. When you have been using Wondershare Filmora for a long time, there will come a time when you wish for a feature. You can also do so in a few simple steps. Just follow the steps mentioned:
Step1 Multiple options are available on the top left corner of the Wondershare Filmora home interface. Click on help.
Step2 A drop-down box will open up.
Step3 In the options offered to you, select suggest a feature.
Step4 It automatically directs you to your default browser, where you can see the multiple feature requests.
Step5 You can vote for a feature you want in the next update.
Step6 Or you can also create a request for another particular feature.
Summing Up
Wondershare Filmora is the best in the business regarding editing your videos. It has such creative and easy-to-use software that even a beginner efficiently edits videos.
There are a lot of features that Wondershare Filmora provides. But now, with these secret and hidden tips, you can edit your videos more creatively.
Also read:
- Updated Here You Can Lean About the Different Ways for GIMP Transparent Background PNG Format Files
- Updated In 2024, What Is the Best MP4 Cutters for YouTubers on Mac?
- Updated Discover the Best Video Frame Rate Converters for Smooth Playback, Including Online and Offline Options. Learn How to Convert Frame Rates for Free and Elevate Your Video Quality with These Top 8 Tools for 2024
- New 2024 Approved If You Wish to Edit FLV Videos without Any Problems, You Should Utilize a Multipurpose Video Editor that Supports the FLV File Format
- Updated How to Use a Stabilization Tool in Filmora for 2024
- New Enhance Your Video Color Accuracy with Video Scopes
- Best Shortcut Towards Timeline Template
- New 2024 Approved Twitch Green Screen Guide
- Updated In 2024, Video Inspiration for Birthday Slideshow
- Updated 6 Free Tools To Radial Blur Photos Online for 2024
- Updated Camera Shake Effects in Videos Helps to Showcase Aesthetics and Vibes. Do You Wish to Add a Camera Shake in Videos? Consider Using the Video Editor Discussed Here for This for 2024
- How to Animate Your Designs With Canva GIF
- Are You Eager to Know How to Create an Adjustment Layer in Premiere Pro? This Article Will Highlight the Significance of Adding an Adjustment Layer in Premiere Pro
- New How to Change Frame Rate in Premiere Pro
- New This Post Will Make You Learn Anything and Everything About Animated GIFs, the Ways to Use Cool Gifs in My Marketing, and How to Create Unique Custom Animated Gifs
- Updated In 2024, Green Screens Are a Fun Way for Creators to Bring Their Personality to Their Stream, Allowing Them to Dynamically Alter Their Stream Background and Make Their Content Appear Even More Engaging and Polished
- Ultimate Guide To Make A Political Video for 2024
- New In 2024, The Best Cinematic LUTs in The Market
- New Best Way To Color Grading & Color Correction in Filmora
- New Do You Wish to Create High-Quality Videos and Experience Effective Videos with Editing? No Problem at All because the Keyboard Shortcuts Listed Here Will Assist You for 2024
- Updated 2024 Approved Synchronizing Videos Can Be Hectic, but Do You Wish to Know a Good Tool for This Purpose? This Article Will Discuss Wondershare Filmora, Which Is Perfect for This
- New 2024 Approved How To Change Font In Premiere Pro
- New In 2024, Detailed Steps to Cut a Video in QuickTime
- Are You Looking to Make Subscribe Channel Graphics? Here Is a Complete Guide on How to Make One on Your Own for 2024
- New Detailed Steps to Rotate Video Using KMPlayer
- Updated Have You Tried Creating an Engaging Video? Try Out Impressive AI Video Ideas that Give You a Clue on How to Create an Attention Catching Video. Here Is a Breakdown of What an AI Video Idea Generator Is and How to Utilize It Efficiently
- Updated What Is a Memoji and How to Make a Memoji? You Can Learn Top 8 Memoji Makers for PC, Android, or iOS, and the Steps to Make a Memoji for 2024
- New In 2024, Learning How to Create LUTs with LUTs Generator
- New Create Realistic Fire Effects by Filmora
- New 2024 Approved Add a Miniature Effect on Your Video for Filmy Looks. To Add This Effect, Read the Complete Guide and Make Your Video Cinematic by Wondershare Filmora
- Step-by-Step Guide | Control Playback Speed in Premiere Pro for 2024
- New 2024 Approved Looking for Simple Steps to Apply Fade in Effect to Your Text in Premiere Pro? Here Are Two Different Methods Along with an Alternative Way to Fade Text in Videos
- Updated How to Create a Freeze Frame Sequence Effect
- Updated In 2024, 8 Top Premiere Pro Slideshow Templates
- This Article Shares Valuable Insight Into the Best Brand Story Videos. Also, It Highlights the Importance of a Video Maker in Your Brand Story Video Ad-Making Process and Why Filmora Should Be Your Go-To Choice for 2024
- Updated 2024 Approved Are You a Videographer or Video Content Creator? Is Enhancing Your Videography Skills Your Priority? Do You Want to Learn the Basics of LumaFusion Color Grading? Read on to Find All the Information You Need
- New Best Tips on How to Design Travel Slideshow
- Converting Files Is Easy with the Right Tools, and Likewise, GIF to JPG Conversion Is. Choose the Best Tool and Get the Expected Results Within the Blink of an Eye for 2024
- Reasons for Oppo A38 Stuck on Startup Screen and Ways To Fix Them | Dr.fone
- 6 Fixes to Unfortunately WhatsApp has stopped Error Popups On Honor Magic Vs 2 | Dr.fone
- How to retrieve lost files from Samsung Galaxy S23 Tactical Edition?
- Top 11 Free Apps to Check IMEI on Vivo T2 Pro 5G Phones
- Complete Guide to Hard Reset Your Tecno Camon 20 Premier 5G | Dr.fone
- All Things You Need to Know about Wipe Data/Factory Reset For Lava Blaze 2 Pro | Dr.fone
- How To Repair iPhone 11 Pro System? | Dr.fone
- Does Huawei Nova Y71 support AVCHD video?
- New In 2024, Top 10 Streaming Services Worth a Try
- Recommended Best Applications for Mirroring Your Nokia 130 Music Screen | Dr.fone
- 10 Best Fake GPS Location Spoofers for Apple iPhone 6 Plus | Dr.fone
- In 2024, The Best iSpoofer Alternative to Try On Oppo Find X7 Ultra | Dr.fone
- How to create a digital signature and certificate for .jpeg
- 5 Ways to Reset Motorola Edge 40 Pro Without Volume Buttons | Dr.fone
- How To Use Allshare Cast To Turn On Screen Mirroring On Tecno Phantom V Flip | Dr.fone
- How To Fix Part of the Touch Screen Not Working on OnePlus Nord CE 3 5G | Dr.fone
- Can I recover permanently deleted photos from Infinix
- How to Fix Samsung Galaxy M54 5G Find My Friends No Location Found? | Dr.fone
- How Can Samsung Galaxy M14 5GMirror Share to PC? | Dr.fone
- 8 Workable Fixes to the SIM not provisioned MM#2 Error on Vivo V29 | Dr.fone
- 6 Fixes to Unfortunately WhatsApp has stopped Error Popups On Google Pixel 8 | Dr.fone
- Simple ways to get lost videos back from Vivo X Fold 2
- In 2024, For People Wanting to Mock GPS on Poco C51 Devices | Dr.fone
- How to Bypass Apple iPhone 14 Pro Passcode Easily Video Inside | Dr.fone
- Tips and Tricks for Apple ID Locked Issue On iPhone 13 Pro Max
- Things You Dont Know About Samsung Galaxy XCover 6 Pro Tactical Edition Reset Code | Dr.fone
- Latest Guide How To Bypass Honor Magic 5 FRP Without Computer
- Apply These Techniques to Improve How to Detect Fake GPS Location On Xiaomi 14 Pro | Dr.fone
- How to Transfer Photos from Infinix Hot 30i to New Android? | Dr.fone
- App Wont Open on Your Samsung Galaxy A05s? Here Are All Fixes | Dr.fone
- Two Ways to Track My Boyfriends Vivo Y27 4G without Him Knowing | Dr.fone
- In 2024, Step-by-Step Tutorial How To Bypass Lava Agni 2 5G FRP
- How to retrieve lost files from U23 Pro?
- Unova Stone Pokémon Go Evolution List and How Catch Them For Motorola Defy 2 | Dr.fone
- In 2024, How to Delete iCloud Account with or without Password from your Apple iPhone 15 Pro Max/Windows/Mac
- How to sign a PDF v1.7 document with digital signature software
- New How to Make an Emoji of Yourself on Android and iPhone Emoji Yourself for 2024
- Title: Updated 2024 Approved How Do You Create In-Camera Transitions in Your Videos? A Complete Guide for Beginners to Create These Transitions Using Their Camera at Home
- Author: Morgan
- Created at : 2024-04-24 01:10:01
- Updated at : 2024-04-25 01:10:01
- Link: https://ai-video-editing.techidaily.com/updated-2024-approved-how-do-you-create-in-camera-transitions-in-your-videos-a-complete-guide-for-beginners-to-create-these-transitions-using-their-camera-a/
- License: This work is licensed under CC BY-NC-SA 4.0.
