:max_bytes(150000):strip_icc():format(webp)/iOS-wwdc-7d655ca37a3b43b99fd9dac09bec13c4.jpg)
Updated How to Create a Special Animated Transition in Filmora in Just 2 Minutes. This Simple Step-by-Step Guide Will Show You the Easy Way

How to Create a Special Animated Transition in Filmora in Just 2 Minutes. This Simple Step-by-Step Guide Will Show You the Easy Way
Preparation
What you need to prepare:
- A computer (Windows or macOS)
- Your video materials.
- Filmora video editor
Step 1
First off, download the Filmora video editor . After it downloads, click install and follow the provided steps.

Step 2
After installing, the editor will start automatically. When it does, click on the “New Project” button to finally open the editor.

Step 3
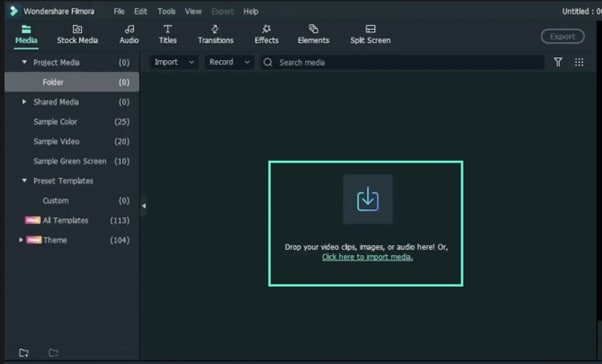
From the upper-left side of the screen, click the highlighted text to import media. This is where you insert your video files into the editor. Once the folder opens, select the videos you want to import and click “Open”.
Step 4
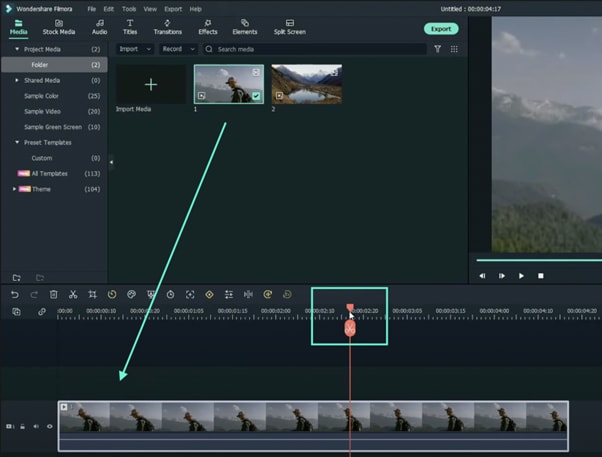
Drag your first clip to the timeline. Then, move the Playhead to where you want to start your transition.
Step 5
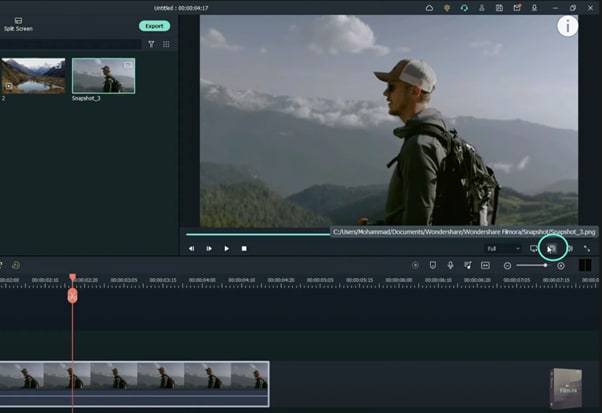
Take a snapshot of this frame.
Step 6
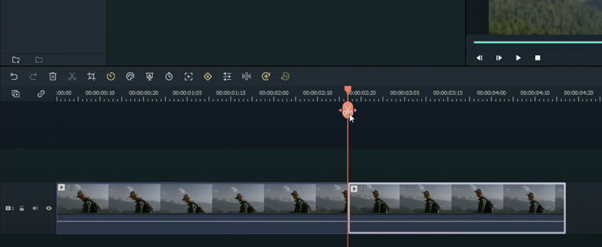
Split the footage and delete the part on the right side of the Playhead.
Step 7
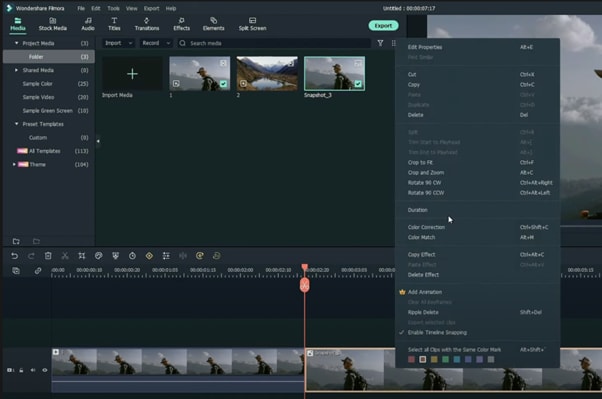
Without moving the Playhead, simply drag the snapshot you took earlier. Right-click on the snapshot in the timeline and click on “Duration”. Then, set the duration to 1 second. Finally, click “OK”.
Step 8
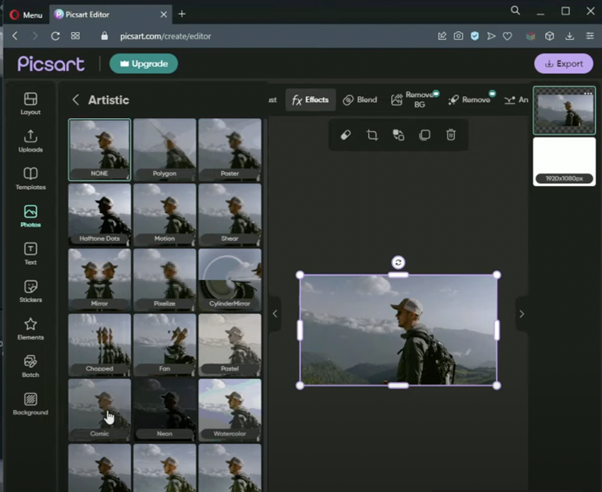
Open your browser and go to the Picsart photo effects editor . Upload the same snapshot we made in Filmora and apply the “Comic” preset on it. Then, download the photo and import it back into Filmora.
Step 9
Drag the snapshot with the Comic preset to the Timeline and set its duration to 1 second as well.
Step 10
Repeat the same process with the second clip. Take a snapshot, add the Comic effect, and import it back into Filmora. But this time, align the clips as follows: Add the snapshot with the comic preset first, then the snapshot without any effects, and then the video. It should look like this.

Step 11
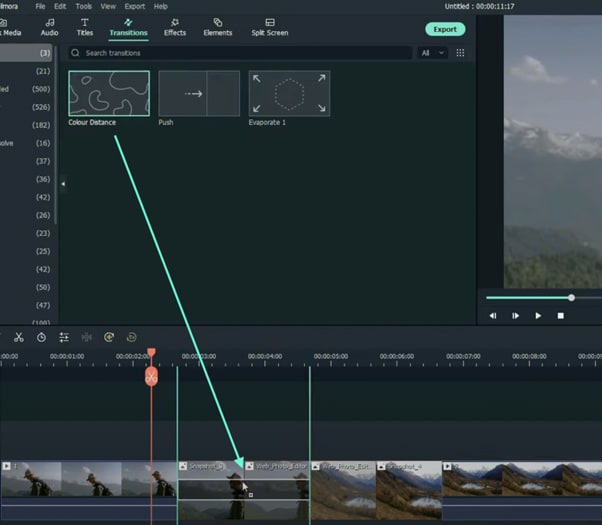
Go to the Transitions tab and drag the “Color Distance” transition between the first and second snapshot on your Timeline. Then, right-click on the transition box in the timeline and select “Edit Properties”. From there, change the duration of the transition to 1 second and click “OK”.
Step 12
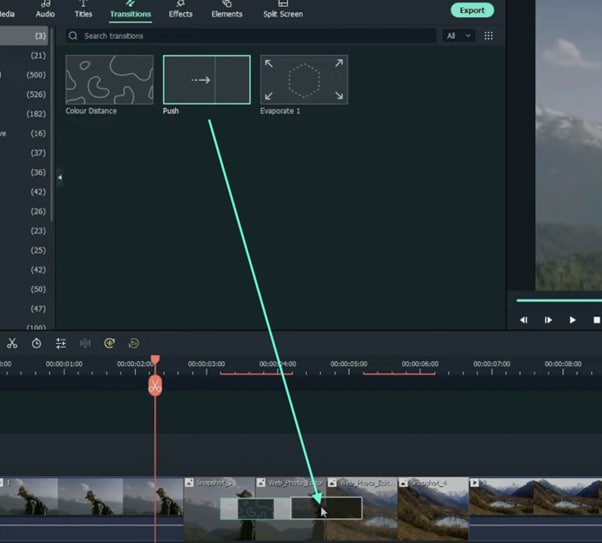
Drag the “Push” transition between the next two snapshots. Set its duration to 1 second as well by right clicking the transition and going to “Edit Properties”.
Step 13
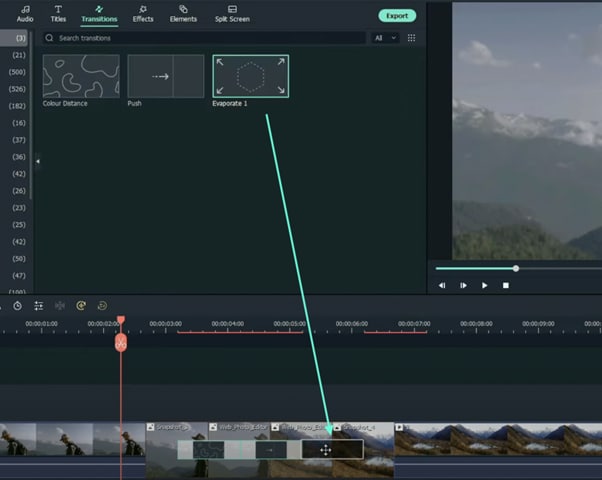
Place the last transition between the last two snapshots in your timeline. This time, we’re going to use the “Evaporate” transition. Set its duration to 1 second as well.
Step 14
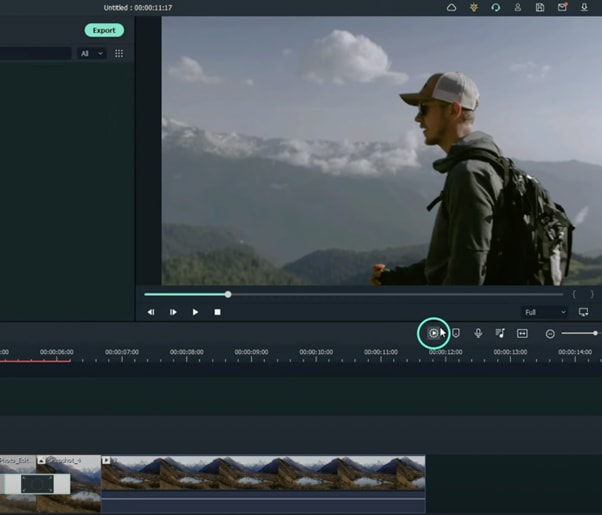
The final step is to render the video. Click this button and you will finally be done.
Summary
What you’ve learned:
- How to add any type of transition to video clips and images in Filmora
- How to take quick snapshots of any frame in Filmora
- A quick way to Render videos and watch the final preview
- Add custom effects to images
What you need to prepare:
- A computer (Windows or macOS)
- Your video materials.
- Filmora video editor
Step 1
First off, download the Filmora video editor . After it downloads, click install and follow the provided steps.

Step 2
After installing, the editor will start automatically. When it does, click on the “New Project” button to finally open the editor.

Step 3
From the upper-left side of the screen, click the highlighted text to import media. This is where you insert your video files into the editor. Once the folder opens, select the videos you want to import and click “Open”.

Step 4
Drag your first clip to the timeline. Then, move the Playhead to where you want to start your transition.

Step 5
Take a snapshot of this frame.

Step 6
Split the footage and delete the part on the right side of the Playhead.

Step 7
Without moving the Playhead, simply drag the snapshot you took earlier. Right-click on the snapshot in the timeline and click on “Duration”. Then, set the duration to 1 second. Finally, click “OK”.

Step 8
Open your browser and go to the Picsart photo effects editor . Upload the same snapshot we made in Filmora and apply the “Comic” preset on it. Then, download the photo and import it back into Filmora.

Step 9
Drag the snapshot with the Comic preset to the Timeline and set its duration to 1 second as well.
Step 10
Repeat the same process with the second clip. Take a snapshot, add the Comic effect, and import it back into Filmora. But this time, align the clips as follows: Add the snapshot with the comic preset first, then the snapshot without any effects, and then the video. It should look like this.

Step 11
Go to the Transitions tab and drag the “Color Distance” transition between the first and second snapshot on your Timeline. Then, right-click on the transition box in the timeline and select “Edit Properties”. From there, change the duration of the transition to 1 second and click “OK”.

Step 12
Drag the “Push” transition between the next two snapshots. Set its duration to 1 second as well by right clicking the transition and going to “Edit Properties”.

Step 13
Place the last transition between the last two snapshots in your timeline. This time, we’re going to use the “Evaporate” transition. Set its duration to 1 second as well.

Step 14
The final step is to render the video. Click this button and you will finally be done.

Summary
What you’ve learned:
- How to add any type of transition to video clips and images in Filmora
- How to take quick snapshots of any frame in Filmora
- A quick way to Render videos and watch the final preview
- Add custom effects to images
What you need to prepare:
- A computer (Windows or macOS)
- Your video materials.
- Filmora video editor
Step 1
First off, download the Filmora video editor . After it downloads, click install and follow the provided steps.

Step 2
After installing, the editor will start automatically. When it does, click on the “New Project” button to finally open the editor.

Step 3
From the upper-left side of the screen, click the highlighted text to import media. This is where you insert your video files into the editor. Once the folder opens, select the videos you want to import and click “Open”.

Step 4
Drag your first clip to the timeline. Then, move the Playhead to where you want to start your transition.

Step 5
Take a snapshot of this frame.

Step 6
Split the footage and delete the part on the right side of the Playhead.

Step 7
Without moving the Playhead, simply drag the snapshot you took earlier. Right-click on the snapshot in the timeline and click on “Duration”. Then, set the duration to 1 second. Finally, click “OK”.

Step 8
Open your browser and go to the Picsart photo effects editor . Upload the same snapshot we made in Filmora and apply the “Comic” preset on it. Then, download the photo and import it back into Filmora.

Step 9
Drag the snapshot with the Comic preset to the Timeline and set its duration to 1 second as well.
Step 10
Repeat the same process with the second clip. Take a snapshot, add the Comic effect, and import it back into Filmora. But this time, align the clips as follows: Add the snapshot with the comic preset first, then the snapshot without any effects, and then the video. It should look like this.

Step 11
Go to the Transitions tab and drag the “Color Distance” transition between the first and second snapshot on your Timeline. Then, right-click on the transition box in the timeline and select “Edit Properties”. From there, change the duration of the transition to 1 second and click “OK”.

Step 12
Drag the “Push” transition between the next two snapshots. Set its duration to 1 second as well by right clicking the transition and going to “Edit Properties”.

Step 13
Place the last transition between the last two snapshots in your timeline. This time, we’re going to use the “Evaporate” transition. Set its duration to 1 second as well.

Step 14
The final step is to render the video. Click this button and you will finally be done.

Summary
What you’ve learned:
- How to add any type of transition to video clips and images in Filmora
- How to take quick snapshots of any frame in Filmora
- A quick way to Render videos and watch the final preview
- Add custom effects to images
What you need to prepare:
- A computer (Windows or macOS)
- Your video materials.
- Filmora video editor
Step 1
First off, download the Filmora video editor . After it downloads, click install and follow the provided steps.

Step 2
After installing, the editor will start automatically. When it does, click on the “New Project” button to finally open the editor.

Step 3
From the upper-left side of the screen, click the highlighted text to import media. This is where you insert your video files into the editor. Once the folder opens, select the videos you want to import and click “Open”.

Step 4
Drag your first clip to the timeline. Then, move the Playhead to where you want to start your transition.

Step 5
Take a snapshot of this frame.

Step 6
Split the footage and delete the part on the right side of the Playhead.

Step 7
Without moving the Playhead, simply drag the snapshot you took earlier. Right-click on the snapshot in the timeline and click on “Duration”. Then, set the duration to 1 second. Finally, click “OK”.

Step 8
Open your browser and go to the Picsart photo effects editor . Upload the same snapshot we made in Filmora and apply the “Comic” preset on it. Then, download the photo and import it back into Filmora.

Step 9
Drag the snapshot with the Comic preset to the Timeline and set its duration to 1 second as well.
Step 10
Repeat the same process with the second clip. Take a snapshot, add the Comic effect, and import it back into Filmora. But this time, align the clips as follows: Add the snapshot with the comic preset first, then the snapshot without any effects, and then the video. It should look like this.

Step 11
Go to the Transitions tab and drag the “Color Distance” transition between the first and second snapshot on your Timeline. Then, right-click on the transition box in the timeline and select “Edit Properties”. From there, change the duration of the transition to 1 second and click “OK”.

Step 12
Drag the “Push” transition between the next two snapshots. Set its duration to 1 second as well by right clicking the transition and going to “Edit Properties”.

Step 13
Place the last transition between the last two snapshots in your timeline. This time, we’re going to use the “Evaporate” transition. Set its duration to 1 second as well.

Step 14
The final step is to render the video. Click this button and you will finally be done.

Summary
What you’ve learned:
- How to add any type of transition to video clips and images in Filmora
- How to take quick snapshots of any frame in Filmora
- A quick way to Render videos and watch the final preview
- Add custom effects to images
Control Playback Speed in Premiere Pro
Versatile Video Editor - Wondershare Filmora
An easy and powerful editor
Numerous effects to choose from
Detailed tutorials are provided by the official channel
According to the business, Adobe Premiere Pro is one of the most widely used video editing products on the market today. The option to speed up or slow down individual clips is one of the most important capabilities of Premiere Pro.

In terms of video editing, Adobe Premiere Pro is one of the most powerful applications on the market, and it’s well-known for its versatility. Speeding up movies is one of the program’s many features required for the insertion of special effects and transitions. A lot of ways are there for you to pick from while using premiere pro to speed up the film as desired.

You can’t overwrite or replace your media files by doing anything in Premiere Pro, which means that nothing you do will have an effect on your media files. The point remains: a copy of your project and all its media assets should always be kept on hand just in case.
Adobe Premiere Pro is an excellent editing tool in terms of its functionality and capabilities. Still, it has a steep hill to climb that makes it difficult for newbies and users without previous editing experience. To get the most out of Adobe Premiere Pro, one must thoroughly understand the product.

No need to worry, folks; as in this article, we will be looking at how we can alter premiere pro speed.
Fast Forward or Speed up Playback Speed in Premiere Pro
On analog editing systems, the speed of film could permanently be altered; but, because of the limitations of the technology, if you slowed anything down too much, the frame rate at which it was taken may become evident, and the image quality would begin to suffer as a consequence.
Adobe Premiere Pro is a feature-rich and professional video editor designed for the Macintosh platform. It has a variety of editing features built-in. Adobe Premiere Pro lets you change and control the speed at which movies are played back.
Premiere provides three choices for adjusting the tempo of a movie or speeding it up. We’ll go over them one by one as we scroll down the page.

Method 1
- Download and Install Adobe Premiere Pro. Launch the application on your system.
- Once you’ve set up a new project in Adobe Premiere Pro, import the video you want to edit.
- In order to place the video where you want it, drag the necessary video clips into the timeline. In the end, you’ll have a new series to call your own.
- Using the right-click menu, you may choose the whole movie or only a portion of it that you wish to edit.
- The popup dialog box will display if you choose Speed/Duration from the context menu list.
- Choose Clip> Speed Duration instead from the program’s drop-down menu.
- The Speed field should be raised, and then the OK button should be pressed to accept the change.
Method 2: Rate Stretch Tool
Adobe Premiere Pro has a Rate Stretch feature that lets you manually alter the movie’s tempo by sliding the trim bar along the timeline. To utilize the Rate Stretch tool to speed up a video clip, you must first divide the movie into pieces.
Here’s a quick method for altering the video speed so that it fits under the time limit:
- Launch the application on your respective systems.
- Drag and drop the selected video onto the timeline in Premiere Pro.
- Then, choose the Ripple Edit Tool from the toolbar, followed by the Rate Stretch Tool by clicking and holding the Ripple Edit Tool. Click the Rate Stretch button on the timeline’s left side to begin a timer.
- You may also use the R key on your keyboard to activate the Rate Stretch Tool, which is a shortcut key.
- Drag the video’s start and endpoints to their respective ends on the right and left sides to prolong or reduce the duration. As a consequence, the video speed will be improved. The bigger the period of time the video is dragged inwards, the faster it rises.
Method 3: Time Remapping Tool
In Adobe Premiere Pro, the time remapping tool is where you go to speed up a selected video section. With a video clip, this function may be utilized to create the illusion of speed and slowness.
- It’s time to fire up Adobe Premiere Pro and start fiddling with your footage.
- Simply right-click on it to bring up the context menu, and then choose Show Clip Keyframes from the display list. Afterward, choose Time Remapping from the context menu that opens.
- Click on it to make it go faster. The video will be colored blue, and a horizontal rubber band line will be drawn down its center if this option is selected. One of the video’s frame rate lines may be found here.
- A white speed-control track may be seen just below the title bar in the upper part of the video. If you can’t see it well when zooming in, you may try again. The rubber band may be dragged higher in Premiere Pro to speed up the video.
The tooltip will show how long it has been since the change happened compared to the original speed. As the movie progresses, so does the speed at which it is shown, and the duration of the video fluctuates as well. The audio remains unaltered and tied to the video when using Time Remapping.
How to Slow Down A Video in Premiere Pro?
Now, let’s discuss how to slow down a video in premiere pro
Time stretch
A one-second video clip at 60 frames per second is an example of this situation. When the game is being played at a reasonable speed on any given platform or software, 60 frames will be shown. Because of this, each frame will take twice as long to play at a 0.5X slower pace.
To put it another way, you’d see 30 frames in a second that weren’t repeated. A second has been added to the video’s duration, which will now be 2 seconds instead of 1. There will be no deterioration in quality in this situation.
- Create a new project in Premiere Pro on your PC.
- To import a video file, choose Import from the File menu at the top of the screen. After that, drag the video into either the timeline or the project panel, whichever you like.
- Right-clicking and choosing the Duration/Speed option causes the video to begin playing.
- This stage necessitates a decrease in speed from 100% to a lower percentage.
Using Keyframes
When you attempt to slow down a video by adjusting the frame rate, you are essentially eliminating frames from the video stream. This procedure will allow you to slow down a movie to your desired speed without sacrificing quality.
- After downloading and installing Adobe Premiere Pro, the first step is to launch the program. Later, you’ll need to choose a specific video that you’d want to have slowed down.
- After you’ve chosen it, you may upload it to Premiere Pro. After importing the video, you must drag and drop it into the timeline in Premiere.
- By right-clicking the mouse, choose Modify > Interpret from the drop-down menu.
- You’ll need to make some changes to the frame information now. Hit the Assume this frame rate button and input a value that is lower than the original video frame rate.
Utlizing Time Remapping
The remapping tool is a very common tool for creating slow-motion videos. It may be found in many video editing programs. It gives you the option of selecting a particular section of a video clip and then slowing down the video clip.
- Launching Adobe Premiere Pro is the initial step once it has been downloaded and installed on your computer. A particular video that you’d want slow-motioned will need to be selected later on in the process.
- After dragging the video to the timeline, you’ll need to choose the area of the movie that you want to slow down.
- Now you must choose the Key Frames and Speed from your video by clicking on the video’s right-click menu.
- Only the “Pen Tool” must be used to lock the specific region you wish to slow down in order to push the Speed Line through the Selection tool to slow down the video during this phase.
Why Is Premiere Pro Playback Fast?
If this issue arises in your program, you’ll notice choppy playback, a character that speaks too rapidly, and audio that skips frames in the narration.
The multimedia editor Premiere Pro is one of the best currently available on the market. In addition to creating YouTube videos, feature films, music videos, and other sorts of content, many professionals turn to it.
It is said that Adobe Premiere Pro suffers from a playback issue. It has the ability to make the video creation process more complicated and demanding than it should be. Let me show you how to fix this easy error in just two simple steps.
Start the program on your computer’s operating system.
Select Edit from the drop-down menu.
Look towards preference
Afterward, choose audio hardware.
No input should be used as the default input, regardless of what it is currently set to.
When you click on Playback your film, you will notice that the issue has been rectified.

How can we Alter the speed of Videos in WonderShare Filmora?
Before understanding the process of speed altering in WonderShare Filmora, let’s have an overview of “what WonderShare Filmora is”.
What is Wondershare Filmora?

Wondershare Filmora is the best video editor for content creators who are just getting started and those who want to produce Hollywood-quality visuals and content without having to invest years in training and certification. WonderShare Filmora streamlines the video editing process through the use of intelligent, intuitive features that can automate repetitive tasks and save time.
Individuals can subscribe to WonderShare Filmora for a one-year fee of $68.98 per year. Filmora is well-known as a straightforward video editor designed for novice users and social media influencers who want to devote more time to their creative endeavors. A few new features have been added, and we can now create professional-looking videos without having to go through a lengthy learning curve.
Features that Stand Out
For both new and experienced film creators, WonderShare Filmora has been designed to offer a scalable environment. Even if you’ve never edited a movie before, you can start doing so right now.
Millions of Free Media to Choose From:
Over 10 million media files are available in the stock media library of WonderShare Filmora, making it easy for filmmakers to bring their visions to life. Speed ramping and auto beat sync are also included.
Toolbar Quick Access:
After the application is installed on your computer, the toolbar allows rapid access to all the program’s capabilities. These features include media and audio files, titles, effects, split-screen formatting, components, transitions, and other elements.
Quick Editing Feature:
For content producers who don’t want to spend hours on video editing and instead want to concentrate on other areas of their work, WonderShare Filmora is the appropriate solution.
Use Animated Transitions to Bring Life into Your Videos:
Your video may get tedious if you repeatedly use the same frame. Animated transitions may be added to video and photo collages using the Split Screen feature. Using this feature, you may divide your screen into as many as six individual displays.
Improved Speed Ramping Function:
WonderShare Filmora’s new speed ramping functionality is one of the most intriguing new additions. The speed of a video clip may be gradually increased or decreased with this tool, and the transition between the various speed levels is smooth.
Capture Every Scene with Ease:
Using a slew of cameras, skilled videographers may capture the same topic from a variety of vantage points. A single camera may be used in certain circumstances to record the whole scene and a close-up, while others may be used to capture a variety of views and expressions.
Automation at its Best:
With WonderShare Filmora, you don’t have to manually synchronize the audio and video from many cameras, saving you time and effort.
Enhance Your Creativity with Masking:
Masking” is a new feature that is included in this version. Using a mask to combine different clips helps you to expand your creative horizons. You could get something fantastic, particularly if you use effects that are used in commercial ads.”
Hundred’s of Themes to Choose from:
WonderShare Filmora has 115 video themes, including business, travel, vlogging, slideshows, and many more. It’s possible to make a whole movie using Filmora AI by letting it figure out the best way to edit your video.
In short, the most popular features that it offers are:
- Motion Tracking
- Split Screen
- Audio Ducking
- Speed Ramping
- Green screen
- Color Grading
- Third-Party Stock media
- Auto Synchronization
- Masking
- Color Match
How to speed up Playback in Filmora?
In Filmora, you can also modify the length of the video clip, which allows you to change the video speed.
For a “close up in time,” the slow-motion effect may be the best choice, while the fast-forward effect may be used to make dramatic or humorous videos, depending on your tastes.
Filmora’s user-friendly interface and simple editing capabilities have made it a popular choice for professionals throughout the globe. As a result, many people prefer it over alternative editing software.
Steps
- Download and Install The latest version of Filmora.
- Launch the application on your respective system

Among the many formats that Wondershare Filmora can handle are MP4 and AVI, WMV and MOV, and even FLV and M4V. Go to your computer’s media library and choose Import from the Import menu to begin the process of bringing in videos from your computer.
Alternatively, you may just drag & drop the file you want.
Drag movies from your User’s Album onto a video track on the Timeline to access the Speed and Duration settings for that track’s duration.

- A pop-up window will appear. In order to determine the speed at which a motion effect is moving, you may use the speed numbers provided. After then, it’s up to you how fast or slow you want to go. To see how sped-up or slowed-down videos will seem, just click on the preview box. It’s a good balance if you think the present speed is too high: 0.5 speed.


- The speed at which video is played back affects the speed at which audio is played back in a similar manner. Remove the video’s audio if you want the video’s audio to play at the same speed as it did before.

- You must first double-click an audio clip in the audio editing window to begin making changes to it. Fade in and out effects, as well as reducing background noise may all be added or removed. ‘

- Once you’ve finished adjusting the speed of your movie, click “Export.” When editing a movie, choose Format from the File menu to save it in a standard format.

- It can also post your videos to sites like YouTube and Vimeo, as well as create a DVD if you so like.

- Using the drop-down menu, choose the proper symbol for your iPod, iPhone, or iPad to view your new video output (if you have one of these devices).
Conclusion
This tutorial looked at how to slow down a video in Premiere Pro using the Video Speed Controller plugin for Windows. It also emphasizes how Filmora may assist you in achieving your goal in a more efficient manner.
Aside from video effects like as rapid motion and slow motion, Filmora also allows you to do some simple and complex editing tasks such as rotating, reversing, chroma-keying, etc.
WonderShare Filmora is a substantial improvement and redesign of the previous Filmora Video Editor, released in 2008. One of the most endearing aspects of Filmora has always been that, although having a robust set of functions, the developers stayed committed to making the program essential in the design and straightforward to learn and use.
A large number of new features have been included in WonderShare Filmora to meet customer demand, and it has been necessary to incorporate access to those functions into the user interface as well.
According to the business, Adobe Premiere Pro is one of the most widely used video editing products on the market today. The option to speed up or slow down individual clips is one of the most important capabilities of Premiere Pro.

In terms of video editing, Adobe Premiere Pro is one of the most powerful applications on the market, and it’s well-known for its versatility. Speeding up movies is one of the program’s many features required for the insertion of special effects and transitions. A lot of ways are there for you to pick from while using premiere pro to speed up the film as desired.

You can’t overwrite or replace your media files by doing anything in Premiere Pro, which means that nothing you do will have an effect on your media files. The point remains: a copy of your project and all its media assets should always be kept on hand just in case.
Adobe Premiere Pro is an excellent editing tool in terms of its functionality and capabilities. Still, it has a steep hill to climb that makes it difficult for newbies and users without previous editing experience. To get the most out of Adobe Premiere Pro, one must thoroughly understand the product.

No need to worry, folks; as in this article, we will be looking at how we can alter premiere pro speed.
Fast Forward or Speed up Playback Speed in Premiere Pro
On analog editing systems, the speed of film could permanently be altered; but, because of the limitations of the technology, if you slowed anything down too much, the frame rate at which it was taken may become evident, and the image quality would begin to suffer as a consequence.
Adobe Premiere Pro is a feature-rich and professional video editor designed for the Macintosh platform. It has a variety of editing features built-in. Adobe Premiere Pro lets you change and control the speed at which movies are played back.
Premiere provides three choices for adjusting the tempo of a movie or speeding it up. We’ll go over them one by one as we scroll down the page.

Method 1
- Download and Install Adobe Premiere Pro. Launch the application on your system.
- Once you’ve set up a new project in Adobe Premiere Pro, import the video you want to edit.
- In order to place the video where you want it, drag the necessary video clips into the timeline. In the end, you’ll have a new series to call your own.
- Using the right-click menu, you may choose the whole movie or only a portion of it that you wish to edit.
- The popup dialog box will display if you choose Speed/Duration from the context menu list.
- Choose Clip> Speed Duration instead from the program’s drop-down menu.
- The Speed field should be raised, and then the OK button should be pressed to accept the change.
Method 2: Rate Stretch Tool
Adobe Premiere Pro has a Rate Stretch feature that lets you manually alter the movie’s tempo by sliding the trim bar along the timeline. To utilize the Rate Stretch tool to speed up a video clip, you must first divide the movie into pieces.
Here’s a quick method for altering the video speed so that it fits under the time limit:
- Launch the application on your respective systems.
- Drag and drop the selected video onto the timeline in Premiere Pro.
- Then, choose the Ripple Edit Tool from the toolbar, followed by the Rate Stretch Tool by clicking and holding the Ripple Edit Tool. Click the Rate Stretch button on the timeline’s left side to begin a timer.
- You may also use the R key on your keyboard to activate the Rate Stretch Tool, which is a shortcut key.
- Drag the video’s start and endpoints to their respective ends on the right and left sides to prolong or reduce the duration. As a consequence, the video speed will be improved. The bigger the period of time the video is dragged inwards, the faster it rises.
Method 3: Time Remapping Tool
In Adobe Premiere Pro, the time remapping tool is where you go to speed up a selected video section. With a video clip, this function may be utilized to create the illusion of speed and slowness.
- It’s time to fire up Adobe Premiere Pro and start fiddling with your footage.
- Simply right-click on it to bring up the context menu, and then choose Show Clip Keyframes from the display list. Afterward, choose Time Remapping from the context menu that opens.
- Click on it to make it go faster. The video will be colored blue, and a horizontal rubber band line will be drawn down its center if this option is selected. One of the video’s frame rate lines may be found here.
- A white speed-control track may be seen just below the title bar in the upper part of the video. If you can’t see it well when zooming in, you may try again. The rubber band may be dragged higher in Premiere Pro to speed up the video.
The tooltip will show how long it has been since the change happened compared to the original speed. As the movie progresses, so does the speed at which it is shown, and the duration of the video fluctuates as well. The audio remains unaltered and tied to the video when using Time Remapping.
How to Slow Down A Video in Premiere Pro?
Now, let’s discuss how to slow down a video in premiere pro
Time stretch
A one-second video clip at 60 frames per second is an example of this situation. When the game is being played at a reasonable speed on any given platform or software, 60 frames will be shown. Because of this, each frame will take twice as long to play at a 0.5X slower pace.
To put it another way, you’d see 30 frames in a second that weren’t repeated. A second has been added to the video’s duration, which will now be 2 seconds instead of 1. There will be no deterioration in quality in this situation.
- Create a new project in Premiere Pro on your PC.
- To import a video file, choose Import from the File menu at the top of the screen. After that, drag the video into either the timeline or the project panel, whichever you like.
- Right-clicking and choosing the Duration/Speed option causes the video to begin playing.
- This stage necessitates a decrease in speed from 100% to a lower percentage.
Using Keyframes
When you attempt to slow down a video by adjusting the frame rate, you are essentially eliminating frames from the video stream. This procedure will allow you to slow down a movie to your desired speed without sacrificing quality.
- After downloading and installing Adobe Premiere Pro, the first step is to launch the program. Later, you’ll need to choose a specific video that you’d want to have slowed down.
- After you’ve chosen it, you may upload it to Premiere Pro. After importing the video, you must drag and drop it into the timeline in Premiere.
- By right-clicking the mouse, choose Modify > Interpret from the drop-down menu.
- You’ll need to make some changes to the frame information now. Hit the Assume this frame rate button and input a value that is lower than the original video frame rate.
Utlizing Time Remapping
The remapping tool is a very common tool for creating slow-motion videos. It may be found in many video editing programs. It gives you the option of selecting a particular section of a video clip and then slowing down the video clip.
- Launching Adobe Premiere Pro is the initial step once it has been downloaded and installed on your computer. A particular video that you’d want slow-motioned will need to be selected later on in the process.
- After dragging the video to the timeline, you’ll need to choose the area of the movie that you want to slow down.
- Now you must choose the Key Frames and Speed from your video by clicking on the video’s right-click menu.
- Only the “Pen Tool” must be used to lock the specific region you wish to slow down in order to push the Speed Line through the Selection tool to slow down the video during this phase.
Why Is Premiere Pro Playback Fast?
If this issue arises in your program, you’ll notice choppy playback, a character that speaks too rapidly, and audio that skips frames in the narration.
The multimedia editor Premiere Pro is one of the best currently available on the market. In addition to creating YouTube videos, feature films, music videos, and other sorts of content, many professionals turn to it.
It is said that Adobe Premiere Pro suffers from a playback issue. It has the ability to make the video creation process more complicated and demanding than it should be. Let me show you how to fix this easy error in just two simple steps.
Start the program on your computer’s operating system.
Select Edit from the drop-down menu.
Look towards preference
Afterward, choose audio hardware.
No input should be used as the default input, regardless of what it is currently set to.
When you click on Playback your film, you will notice that the issue has been rectified.

How can we Alter the speed of Videos in WonderShare Filmora?
Before understanding the process of speed altering in WonderShare Filmora, let’s have an overview of “what WonderShare Filmora is”.
What is Wondershare Filmora?

Wondershare Filmora is the best video editor for content creators who are just getting started and those who want to produce Hollywood-quality visuals and content without having to invest years in training and certification. WonderShare Filmora streamlines the video editing process through the use of intelligent, intuitive features that can automate repetitive tasks and save time.
Individuals can subscribe to WonderShare Filmora for a one-year fee of $68.98 per year. Filmora is well-known as a straightforward video editor designed for novice users and social media influencers who want to devote more time to their creative endeavors. A few new features have been added, and we can now create professional-looking videos without having to go through a lengthy learning curve.
Features that Stand Out
For both new and experienced film creators, WonderShare Filmora has been designed to offer a scalable environment. Even if you’ve never edited a movie before, you can start doing so right now.
Millions of Free Media to Choose From:
Over 10 million media files are available in the stock media library of WonderShare Filmora, making it easy for filmmakers to bring their visions to life. Speed ramping and auto beat sync are also included.
Toolbar Quick Access:
After the application is installed on your computer, the toolbar allows rapid access to all the program’s capabilities. These features include media and audio files, titles, effects, split-screen formatting, components, transitions, and other elements.
Quick Editing Feature:
For content producers who don’t want to spend hours on video editing and instead want to concentrate on other areas of their work, WonderShare Filmora is the appropriate solution.
Use Animated Transitions to Bring Life into Your Videos:
Your video may get tedious if you repeatedly use the same frame. Animated transitions may be added to video and photo collages using the Split Screen feature. Using this feature, you may divide your screen into as many as six individual displays.
Improved Speed Ramping Function:
WonderShare Filmora’s new speed ramping functionality is one of the most intriguing new additions. The speed of a video clip may be gradually increased or decreased with this tool, and the transition between the various speed levels is smooth.
Capture Every Scene with Ease:
Using a slew of cameras, skilled videographers may capture the same topic from a variety of vantage points. A single camera may be used in certain circumstances to record the whole scene and a close-up, while others may be used to capture a variety of views and expressions.
Automation at its Best:
With WonderShare Filmora, you don’t have to manually synchronize the audio and video from many cameras, saving you time and effort.
Enhance Your Creativity with Masking:
Masking” is a new feature that is included in this version. Using a mask to combine different clips helps you to expand your creative horizons. You could get something fantastic, particularly if you use effects that are used in commercial ads.”
Hundred’s of Themes to Choose from:
WonderShare Filmora has 115 video themes, including business, travel, vlogging, slideshows, and many more. It’s possible to make a whole movie using Filmora AI by letting it figure out the best way to edit your video.
In short, the most popular features that it offers are:
- Motion Tracking
- Split Screen
- Audio Ducking
- Speed Ramping
- Green screen
- Color Grading
- Third-Party Stock media
- Auto Synchronization
- Masking
- Color Match
How to speed up Playback in Filmora?
In Filmora, you can also modify the length of the video clip, which allows you to change the video speed.
For a “close up in time,” the slow-motion effect may be the best choice, while the fast-forward effect may be used to make dramatic or humorous videos, depending on your tastes.
Filmora’s user-friendly interface and simple editing capabilities have made it a popular choice for professionals throughout the globe. As a result, many people prefer it over alternative editing software.
Steps
- Download and Install The latest version of Filmora.
- Launch the application on your respective system

Among the many formats that Wondershare Filmora can handle are MP4 and AVI, WMV and MOV, and even FLV and M4V. Go to your computer’s media library and choose Import from the Import menu to begin the process of bringing in videos from your computer.
Alternatively, you may just drag & drop the file you want.
Drag movies from your User’s Album onto a video track on the Timeline to access the Speed and Duration settings for that track’s duration.

- A pop-up window will appear. In order to determine the speed at which a motion effect is moving, you may use the speed numbers provided. After then, it’s up to you how fast or slow you want to go. To see how sped-up or slowed-down videos will seem, just click on the preview box. It’s a good balance if you think the present speed is too high: 0.5 speed.


- The speed at which video is played back affects the speed at which audio is played back in a similar manner. Remove the video’s audio if you want the video’s audio to play at the same speed as it did before.

- You must first double-click an audio clip in the audio editing window to begin making changes to it. Fade in and out effects, as well as reducing background noise may all be added or removed. ‘

- Once you’ve finished adjusting the speed of your movie, click “Export.” When editing a movie, choose Format from the File menu to save it in a standard format.

- It can also post your videos to sites like YouTube and Vimeo, as well as create a DVD if you so like.

- Using the drop-down menu, choose the proper symbol for your iPod, iPhone, or iPad to view your new video output (if you have one of these devices).
Conclusion
This tutorial looked at how to slow down a video in Premiere Pro using the Video Speed Controller plugin for Windows. It also emphasizes how Filmora may assist you in achieving your goal in a more efficient manner.
Aside from video effects like as rapid motion and slow motion, Filmora also allows you to do some simple and complex editing tasks such as rotating, reversing, chroma-keying, etc.
WonderShare Filmora is a substantial improvement and redesign of the previous Filmora Video Editor, released in 2008. One of the most endearing aspects of Filmora has always been that, although having a robust set of functions, the developers stayed committed to making the program essential in the design and straightforward to learn and use.
A large number of new features have been included in WonderShare Filmora to meet customer demand, and it has been necessary to incorporate access to those functions into the user interface as well.
According to the business, Adobe Premiere Pro is one of the most widely used video editing products on the market today. The option to speed up or slow down individual clips is one of the most important capabilities of Premiere Pro.

In terms of video editing, Adobe Premiere Pro is one of the most powerful applications on the market, and it’s well-known for its versatility. Speeding up movies is one of the program’s many features required for the insertion of special effects and transitions. A lot of ways are there for you to pick from while using premiere pro to speed up the film as desired.

You can’t overwrite or replace your media files by doing anything in Premiere Pro, which means that nothing you do will have an effect on your media files. The point remains: a copy of your project and all its media assets should always be kept on hand just in case.
Adobe Premiere Pro is an excellent editing tool in terms of its functionality and capabilities. Still, it has a steep hill to climb that makes it difficult for newbies and users without previous editing experience. To get the most out of Adobe Premiere Pro, one must thoroughly understand the product.

No need to worry, folks; as in this article, we will be looking at how we can alter premiere pro speed.
Fast Forward or Speed up Playback Speed in Premiere Pro
On analog editing systems, the speed of film could permanently be altered; but, because of the limitations of the technology, if you slowed anything down too much, the frame rate at which it was taken may become evident, and the image quality would begin to suffer as a consequence.
Adobe Premiere Pro is a feature-rich and professional video editor designed for the Macintosh platform. It has a variety of editing features built-in. Adobe Premiere Pro lets you change and control the speed at which movies are played back.
Premiere provides three choices for adjusting the tempo of a movie or speeding it up. We’ll go over them one by one as we scroll down the page.

Method 1
- Download and Install Adobe Premiere Pro. Launch the application on your system.
- Once you’ve set up a new project in Adobe Premiere Pro, import the video you want to edit.
- In order to place the video where you want it, drag the necessary video clips into the timeline. In the end, you’ll have a new series to call your own.
- Using the right-click menu, you may choose the whole movie or only a portion of it that you wish to edit.
- The popup dialog box will display if you choose Speed/Duration from the context menu list.
- Choose Clip> Speed Duration instead from the program’s drop-down menu.
- The Speed field should be raised, and then the OK button should be pressed to accept the change.
Method 2: Rate Stretch Tool
Adobe Premiere Pro has a Rate Stretch feature that lets you manually alter the movie’s tempo by sliding the trim bar along the timeline. To utilize the Rate Stretch tool to speed up a video clip, you must first divide the movie into pieces.
Here’s a quick method for altering the video speed so that it fits under the time limit:
- Launch the application on your respective systems.
- Drag and drop the selected video onto the timeline in Premiere Pro.
- Then, choose the Ripple Edit Tool from the toolbar, followed by the Rate Stretch Tool by clicking and holding the Ripple Edit Tool. Click the Rate Stretch button on the timeline’s left side to begin a timer.
- You may also use the R key on your keyboard to activate the Rate Stretch Tool, which is a shortcut key.
- Drag the video’s start and endpoints to their respective ends on the right and left sides to prolong or reduce the duration. As a consequence, the video speed will be improved. The bigger the period of time the video is dragged inwards, the faster it rises.
Method 3: Time Remapping Tool
In Adobe Premiere Pro, the time remapping tool is where you go to speed up a selected video section. With a video clip, this function may be utilized to create the illusion of speed and slowness.
- It’s time to fire up Adobe Premiere Pro and start fiddling with your footage.
- Simply right-click on it to bring up the context menu, and then choose Show Clip Keyframes from the display list. Afterward, choose Time Remapping from the context menu that opens.
- Click on it to make it go faster. The video will be colored blue, and a horizontal rubber band line will be drawn down its center if this option is selected. One of the video’s frame rate lines may be found here.
- A white speed-control track may be seen just below the title bar in the upper part of the video. If you can’t see it well when zooming in, you may try again. The rubber band may be dragged higher in Premiere Pro to speed up the video.
The tooltip will show how long it has been since the change happened compared to the original speed. As the movie progresses, so does the speed at which it is shown, and the duration of the video fluctuates as well. The audio remains unaltered and tied to the video when using Time Remapping.
How to Slow Down A Video in Premiere Pro?
Now, let’s discuss how to slow down a video in premiere pro
Time stretch
A one-second video clip at 60 frames per second is an example of this situation. When the game is being played at a reasonable speed on any given platform or software, 60 frames will be shown. Because of this, each frame will take twice as long to play at a 0.5X slower pace.
To put it another way, you’d see 30 frames in a second that weren’t repeated. A second has been added to the video’s duration, which will now be 2 seconds instead of 1. There will be no deterioration in quality in this situation.
- Create a new project in Premiere Pro on your PC.
- To import a video file, choose Import from the File menu at the top of the screen. After that, drag the video into either the timeline or the project panel, whichever you like.
- Right-clicking and choosing the Duration/Speed option causes the video to begin playing.
- This stage necessitates a decrease in speed from 100% to a lower percentage.
Using Keyframes
When you attempt to slow down a video by adjusting the frame rate, you are essentially eliminating frames from the video stream. This procedure will allow you to slow down a movie to your desired speed without sacrificing quality.
- After downloading and installing Adobe Premiere Pro, the first step is to launch the program. Later, you’ll need to choose a specific video that you’d want to have slowed down.
- After you’ve chosen it, you may upload it to Premiere Pro. After importing the video, you must drag and drop it into the timeline in Premiere.
- By right-clicking the mouse, choose Modify > Interpret from the drop-down menu.
- You’ll need to make some changes to the frame information now. Hit the Assume this frame rate button and input a value that is lower than the original video frame rate.
Utlizing Time Remapping
The remapping tool is a very common tool for creating slow-motion videos. It may be found in many video editing programs. It gives you the option of selecting a particular section of a video clip and then slowing down the video clip.
- Launching Adobe Premiere Pro is the initial step once it has been downloaded and installed on your computer. A particular video that you’d want slow-motioned will need to be selected later on in the process.
- After dragging the video to the timeline, you’ll need to choose the area of the movie that you want to slow down.
- Now you must choose the Key Frames and Speed from your video by clicking on the video’s right-click menu.
- Only the “Pen Tool” must be used to lock the specific region you wish to slow down in order to push the Speed Line through the Selection tool to slow down the video during this phase.
Why Is Premiere Pro Playback Fast?
If this issue arises in your program, you’ll notice choppy playback, a character that speaks too rapidly, and audio that skips frames in the narration.
The multimedia editor Premiere Pro is one of the best currently available on the market. In addition to creating YouTube videos, feature films, music videos, and other sorts of content, many professionals turn to it.
It is said that Adobe Premiere Pro suffers from a playback issue. It has the ability to make the video creation process more complicated and demanding than it should be. Let me show you how to fix this easy error in just two simple steps.
Start the program on your computer’s operating system.
Select Edit from the drop-down menu.
Look towards preference
Afterward, choose audio hardware.
No input should be used as the default input, regardless of what it is currently set to.
When you click on Playback your film, you will notice that the issue has been rectified.

How can we Alter the speed of Videos in WonderShare Filmora?
Before understanding the process of speed altering in WonderShare Filmora, let’s have an overview of “what WonderShare Filmora is”.
What is Wondershare Filmora?

Wondershare Filmora is the best video editor for content creators who are just getting started and those who want to produce Hollywood-quality visuals and content without having to invest years in training and certification. WonderShare Filmora streamlines the video editing process through the use of intelligent, intuitive features that can automate repetitive tasks and save time.
Individuals can subscribe to WonderShare Filmora for a one-year fee of $68.98 per year. Filmora is well-known as a straightforward video editor designed for novice users and social media influencers who want to devote more time to their creative endeavors. A few new features have been added, and we can now create professional-looking videos without having to go through a lengthy learning curve.
Features that Stand Out
For both new and experienced film creators, WonderShare Filmora has been designed to offer a scalable environment. Even if you’ve never edited a movie before, you can start doing so right now.
Millions of Free Media to Choose From:
Over 10 million media files are available in the stock media library of WonderShare Filmora, making it easy for filmmakers to bring their visions to life. Speed ramping and auto beat sync are also included.
Toolbar Quick Access:
After the application is installed on your computer, the toolbar allows rapid access to all the program’s capabilities. These features include media and audio files, titles, effects, split-screen formatting, components, transitions, and other elements.
Quick Editing Feature:
For content producers who don’t want to spend hours on video editing and instead want to concentrate on other areas of their work, WonderShare Filmora is the appropriate solution.
Use Animated Transitions to Bring Life into Your Videos:
Your video may get tedious if you repeatedly use the same frame. Animated transitions may be added to video and photo collages using the Split Screen feature. Using this feature, you may divide your screen into as many as six individual displays.
Improved Speed Ramping Function:
WonderShare Filmora’s new speed ramping functionality is one of the most intriguing new additions. The speed of a video clip may be gradually increased or decreased with this tool, and the transition between the various speed levels is smooth.
Capture Every Scene with Ease:
Using a slew of cameras, skilled videographers may capture the same topic from a variety of vantage points. A single camera may be used in certain circumstances to record the whole scene and a close-up, while others may be used to capture a variety of views and expressions.
Automation at its Best:
With WonderShare Filmora, you don’t have to manually synchronize the audio and video from many cameras, saving you time and effort.
Enhance Your Creativity with Masking:
Masking” is a new feature that is included in this version. Using a mask to combine different clips helps you to expand your creative horizons. You could get something fantastic, particularly if you use effects that are used in commercial ads.”
Hundred’s of Themes to Choose from:
WonderShare Filmora has 115 video themes, including business, travel, vlogging, slideshows, and many more. It’s possible to make a whole movie using Filmora AI by letting it figure out the best way to edit your video.
In short, the most popular features that it offers are:
- Motion Tracking
- Split Screen
- Audio Ducking
- Speed Ramping
- Green screen
- Color Grading
- Third-Party Stock media
- Auto Synchronization
- Masking
- Color Match
How to speed up Playback in Filmora?
In Filmora, you can also modify the length of the video clip, which allows you to change the video speed.
For a “close up in time,” the slow-motion effect may be the best choice, while the fast-forward effect may be used to make dramatic or humorous videos, depending on your tastes.
Filmora’s user-friendly interface and simple editing capabilities have made it a popular choice for professionals throughout the globe. As a result, many people prefer it over alternative editing software.
Steps
- Download and Install The latest version of Filmora.
- Launch the application on your respective system

Among the many formats that Wondershare Filmora can handle are MP4 and AVI, WMV and MOV, and even FLV and M4V. Go to your computer’s media library and choose Import from the Import menu to begin the process of bringing in videos from your computer.
Alternatively, you may just drag & drop the file you want.
Drag movies from your User’s Album onto a video track on the Timeline to access the Speed and Duration settings for that track’s duration.

- A pop-up window will appear. In order to determine the speed at which a motion effect is moving, you may use the speed numbers provided. After then, it’s up to you how fast or slow you want to go. To see how sped-up or slowed-down videos will seem, just click on the preview box. It’s a good balance if you think the present speed is too high: 0.5 speed.


- The speed at which video is played back affects the speed at which audio is played back in a similar manner. Remove the video’s audio if you want the video’s audio to play at the same speed as it did before.

- You must first double-click an audio clip in the audio editing window to begin making changes to it. Fade in and out effects, as well as reducing background noise may all be added or removed. ‘

- Once you’ve finished adjusting the speed of your movie, click “Export.” When editing a movie, choose Format from the File menu to save it in a standard format.

- It can also post your videos to sites like YouTube and Vimeo, as well as create a DVD if you so like.

- Using the drop-down menu, choose the proper symbol for your iPod, iPhone, or iPad to view your new video output (if you have one of these devices).
Conclusion
This tutorial looked at how to slow down a video in Premiere Pro using the Video Speed Controller plugin for Windows. It also emphasizes how Filmora may assist you in achieving your goal in a more efficient manner.
Aside from video effects like as rapid motion and slow motion, Filmora also allows you to do some simple and complex editing tasks such as rotating, reversing, chroma-keying, etc.
WonderShare Filmora is a substantial improvement and redesign of the previous Filmora Video Editor, released in 2008. One of the most endearing aspects of Filmora has always been that, although having a robust set of functions, the developers stayed committed to making the program essential in the design and straightforward to learn and use.
A large number of new features have been included in WonderShare Filmora to meet customer demand, and it has been necessary to incorporate access to those functions into the user interface as well.
According to the business, Adobe Premiere Pro is one of the most widely used video editing products on the market today. The option to speed up or slow down individual clips is one of the most important capabilities of Premiere Pro.

In terms of video editing, Adobe Premiere Pro is one of the most powerful applications on the market, and it’s well-known for its versatility. Speeding up movies is one of the program’s many features required for the insertion of special effects and transitions. A lot of ways are there for you to pick from while using premiere pro to speed up the film as desired.

You can’t overwrite or replace your media files by doing anything in Premiere Pro, which means that nothing you do will have an effect on your media files. The point remains: a copy of your project and all its media assets should always be kept on hand just in case.
Adobe Premiere Pro is an excellent editing tool in terms of its functionality and capabilities. Still, it has a steep hill to climb that makes it difficult for newbies and users without previous editing experience. To get the most out of Adobe Premiere Pro, one must thoroughly understand the product.

No need to worry, folks; as in this article, we will be looking at how we can alter premiere pro speed.
Fast Forward or Speed up Playback Speed in Premiere Pro
On analog editing systems, the speed of film could permanently be altered; but, because of the limitations of the technology, if you slowed anything down too much, the frame rate at which it was taken may become evident, and the image quality would begin to suffer as a consequence.
Adobe Premiere Pro is a feature-rich and professional video editor designed for the Macintosh platform. It has a variety of editing features built-in. Adobe Premiere Pro lets you change and control the speed at which movies are played back.
Premiere provides three choices for adjusting the tempo of a movie or speeding it up. We’ll go over them one by one as we scroll down the page.

Method 1
- Download and Install Adobe Premiere Pro. Launch the application on your system.
- Once you’ve set up a new project in Adobe Premiere Pro, import the video you want to edit.
- In order to place the video where you want it, drag the necessary video clips into the timeline. In the end, you’ll have a new series to call your own.
- Using the right-click menu, you may choose the whole movie or only a portion of it that you wish to edit.
- The popup dialog box will display if you choose Speed/Duration from the context menu list.
- Choose Clip> Speed Duration instead from the program’s drop-down menu.
- The Speed field should be raised, and then the OK button should be pressed to accept the change.
Method 2: Rate Stretch Tool
Adobe Premiere Pro has a Rate Stretch feature that lets you manually alter the movie’s tempo by sliding the trim bar along the timeline. To utilize the Rate Stretch tool to speed up a video clip, you must first divide the movie into pieces.
Here’s a quick method for altering the video speed so that it fits under the time limit:
- Launch the application on your respective systems.
- Drag and drop the selected video onto the timeline in Premiere Pro.
- Then, choose the Ripple Edit Tool from the toolbar, followed by the Rate Stretch Tool by clicking and holding the Ripple Edit Tool. Click the Rate Stretch button on the timeline’s left side to begin a timer.
- You may also use the R key on your keyboard to activate the Rate Stretch Tool, which is a shortcut key.
- Drag the video’s start and endpoints to their respective ends on the right and left sides to prolong or reduce the duration. As a consequence, the video speed will be improved. The bigger the period of time the video is dragged inwards, the faster it rises.
Method 3: Time Remapping Tool
In Adobe Premiere Pro, the time remapping tool is where you go to speed up a selected video section. With a video clip, this function may be utilized to create the illusion of speed and slowness.
- It’s time to fire up Adobe Premiere Pro and start fiddling with your footage.
- Simply right-click on it to bring up the context menu, and then choose Show Clip Keyframes from the display list. Afterward, choose Time Remapping from the context menu that opens.
- Click on it to make it go faster. The video will be colored blue, and a horizontal rubber band line will be drawn down its center if this option is selected. One of the video’s frame rate lines may be found here.
- A white speed-control track may be seen just below the title bar in the upper part of the video. If you can’t see it well when zooming in, you may try again. The rubber band may be dragged higher in Premiere Pro to speed up the video.
The tooltip will show how long it has been since the change happened compared to the original speed. As the movie progresses, so does the speed at which it is shown, and the duration of the video fluctuates as well. The audio remains unaltered and tied to the video when using Time Remapping.
How to Slow Down A Video in Premiere Pro?
Now, let’s discuss how to slow down a video in premiere pro
Time stretch
A one-second video clip at 60 frames per second is an example of this situation. When the game is being played at a reasonable speed on any given platform or software, 60 frames will be shown. Because of this, each frame will take twice as long to play at a 0.5X slower pace.
To put it another way, you’d see 30 frames in a second that weren’t repeated. A second has been added to the video’s duration, which will now be 2 seconds instead of 1. There will be no deterioration in quality in this situation.
- Create a new project in Premiere Pro on your PC.
- To import a video file, choose Import from the File menu at the top of the screen. After that, drag the video into either the timeline or the project panel, whichever you like.
- Right-clicking and choosing the Duration/Speed option causes the video to begin playing.
- This stage necessitates a decrease in speed from 100% to a lower percentage.
Using Keyframes
When you attempt to slow down a video by adjusting the frame rate, you are essentially eliminating frames from the video stream. This procedure will allow you to slow down a movie to your desired speed without sacrificing quality.
- After downloading and installing Adobe Premiere Pro, the first step is to launch the program. Later, you’ll need to choose a specific video that you’d want to have slowed down.
- After you’ve chosen it, you may upload it to Premiere Pro. After importing the video, you must drag and drop it into the timeline in Premiere.
- By right-clicking the mouse, choose Modify > Interpret from the drop-down menu.
- You’ll need to make some changes to the frame information now. Hit the Assume this frame rate button and input a value that is lower than the original video frame rate.
Utlizing Time Remapping
The remapping tool is a very common tool for creating slow-motion videos. It may be found in many video editing programs. It gives you the option of selecting a particular section of a video clip and then slowing down the video clip.
- Launching Adobe Premiere Pro is the initial step once it has been downloaded and installed on your computer. A particular video that you’d want slow-motioned will need to be selected later on in the process.
- After dragging the video to the timeline, you’ll need to choose the area of the movie that you want to slow down.
- Now you must choose the Key Frames and Speed from your video by clicking on the video’s right-click menu.
- Only the “Pen Tool” must be used to lock the specific region you wish to slow down in order to push the Speed Line through the Selection tool to slow down the video during this phase.
Why Is Premiere Pro Playback Fast?
If this issue arises in your program, you’ll notice choppy playback, a character that speaks too rapidly, and audio that skips frames in the narration.
The multimedia editor Premiere Pro is one of the best currently available on the market. In addition to creating YouTube videos, feature films, music videos, and other sorts of content, many professionals turn to it.
It is said that Adobe Premiere Pro suffers from a playback issue. It has the ability to make the video creation process more complicated and demanding than it should be. Let me show you how to fix this easy error in just two simple steps.
Start the program on your computer’s operating system.
Select Edit from the drop-down menu.
Look towards preference
Afterward, choose audio hardware.
No input should be used as the default input, regardless of what it is currently set to.
When you click on Playback your film, you will notice that the issue has been rectified.

How can we Alter the speed of Videos in WonderShare Filmora?
Before understanding the process of speed altering in WonderShare Filmora, let’s have an overview of “what WonderShare Filmora is”.
What is Wondershare Filmora?

Wondershare Filmora is the best video editor for content creators who are just getting started and those who want to produce Hollywood-quality visuals and content without having to invest years in training and certification. WonderShare Filmora streamlines the video editing process through the use of intelligent, intuitive features that can automate repetitive tasks and save time.
Individuals can subscribe to WonderShare Filmora for a one-year fee of $68.98 per year. Filmora is well-known as a straightforward video editor designed for novice users and social media influencers who want to devote more time to their creative endeavors. A few new features have been added, and we can now create professional-looking videos without having to go through a lengthy learning curve.
Features that Stand Out
For both new and experienced film creators, WonderShare Filmora has been designed to offer a scalable environment. Even if you’ve never edited a movie before, you can start doing so right now.
Millions of Free Media to Choose From:
Over 10 million media files are available in the stock media library of WonderShare Filmora, making it easy for filmmakers to bring their visions to life. Speed ramping and auto beat sync are also included.
Toolbar Quick Access:
After the application is installed on your computer, the toolbar allows rapid access to all the program’s capabilities. These features include media and audio files, titles, effects, split-screen formatting, components, transitions, and other elements.
Quick Editing Feature:
For content producers who don’t want to spend hours on video editing and instead want to concentrate on other areas of their work, WonderShare Filmora is the appropriate solution.
Use Animated Transitions to Bring Life into Your Videos:
Your video may get tedious if you repeatedly use the same frame. Animated transitions may be added to video and photo collages using the Split Screen feature. Using this feature, you may divide your screen into as many as six individual displays.
Improved Speed Ramping Function:
WonderShare Filmora’s new speed ramping functionality is one of the most intriguing new additions. The speed of a video clip may be gradually increased or decreased with this tool, and the transition between the various speed levels is smooth.
Capture Every Scene with Ease:
Using a slew of cameras, skilled videographers may capture the same topic from a variety of vantage points. A single camera may be used in certain circumstances to record the whole scene and a close-up, while others may be used to capture a variety of views and expressions.
Automation at its Best:
With WonderShare Filmora, you don’t have to manually synchronize the audio and video from many cameras, saving you time and effort.
Enhance Your Creativity with Masking:
Masking” is a new feature that is included in this version. Using a mask to combine different clips helps you to expand your creative horizons. You could get something fantastic, particularly if you use effects that are used in commercial ads.”
Hundred’s of Themes to Choose from:
WonderShare Filmora has 115 video themes, including business, travel, vlogging, slideshows, and many more. It’s possible to make a whole movie using Filmora AI by letting it figure out the best way to edit your video.
In short, the most popular features that it offers are:
- Motion Tracking
- Split Screen
- Audio Ducking
- Speed Ramping
- Green screen
- Color Grading
- Third-Party Stock media
- Auto Synchronization
- Masking
- Color Match
How to speed up Playback in Filmora?
In Filmora, you can also modify the length of the video clip, which allows you to change the video speed.
For a “close up in time,” the slow-motion effect may be the best choice, while the fast-forward effect may be used to make dramatic or humorous videos, depending on your tastes.
Filmora’s user-friendly interface and simple editing capabilities have made it a popular choice for professionals throughout the globe. As a result, many people prefer it over alternative editing software.
Steps
- Download and Install The latest version of Filmora.
- Launch the application on your respective system

Among the many formats that Wondershare Filmora can handle are MP4 and AVI, WMV and MOV, and even FLV and M4V. Go to your computer’s media library and choose Import from the Import menu to begin the process of bringing in videos from your computer.
Alternatively, you may just drag & drop the file you want.
Drag movies from your User’s Album onto a video track on the Timeline to access the Speed and Duration settings for that track’s duration.

- A pop-up window will appear. In order to determine the speed at which a motion effect is moving, you may use the speed numbers provided. After then, it’s up to you how fast or slow you want to go. To see how sped-up or slowed-down videos will seem, just click on the preview box. It’s a good balance if you think the present speed is too high: 0.5 speed.


- The speed at which video is played back affects the speed at which audio is played back in a similar manner. Remove the video’s audio if you want the video’s audio to play at the same speed as it did before.

- You must first double-click an audio clip in the audio editing window to begin making changes to it. Fade in and out effects, as well as reducing background noise may all be added or removed. ‘

- Once you’ve finished adjusting the speed of your movie, click “Export.” When editing a movie, choose Format from the File menu to save it in a standard format.

- It can also post your videos to sites like YouTube and Vimeo, as well as create a DVD if you so like.

- Using the drop-down menu, choose the proper symbol for your iPod, iPhone, or iPad to view your new video output (if you have one of these devices).
Conclusion
This tutorial looked at how to slow down a video in Premiere Pro using the Video Speed Controller plugin for Windows. It also emphasizes how Filmora may assist you in achieving your goal in a more efficient manner.
Aside from video effects like as rapid motion and slow motion, Filmora also allows you to do some simple and complex editing tasks such as rotating, reversing, chroma-keying, etc.
WonderShare Filmora is a substantial improvement and redesign of the previous Filmora Video Editor, released in 2008. One of the most endearing aspects of Filmora has always been that, although having a robust set of functions, the developers stayed committed to making the program essential in the design and straightforward to learn and use.
A large number of new features have been included in WonderShare Filmora to meet customer demand, and it has been necessary to incorporate access to those functions into the user interface as well.
Explore the Advanced Tools to Help You Reshape the Art of Sky Replacement in Digital Imagery. Discover Methods to Enhance Your Visual Narratives Through AI
Digital imagery has seen some ground-breaking revolutions in previous years. The latest AI trends have transformed how we edit and see images. Many creative tools now have integrated features to let users manipulate images as they wish. One of the applications of these AI integrated tools is their ability to replace sky.
You can now use AI to replace the sky in an image, change the background, add or remove elements, and whatnot. If you want to read more about sky replacement and how to do it in photos, the following read is at your service. Discover the leading tools to help you with sky replacement with a bonus tip for this task.
Sky Replacement A cross-platform works like magic for background removal or sky replacement photos!
Free Download Free Download Learn More

Part 1: AI Sky Replacement with BeFunky: Looking into the Step-by-Step Overview
If you are looking for a smart tool to replace a sky online, you can try BeFunky . BeFunky is a notable image editor and graphic design tool. It offers an all-in-one creative platform to help you easily edit photos, create graphic designs, make collages, and more.
BeFunky previously offered a background remover tool to replace skies. But now, it has a dedicated sky replacement feature that can easily detect the sky and foreground of your image. This allows for precise adjustments and accurate replacements.
Steps for BeFunky’s AI Sky Replacer
Step 1: Open the Sky Replacer feature of BeFunky on your web browser. Tap the “Open” button or drop the images into the interface for sky replacement.

Step 2: Select the “Change Sky” button once you have uploaded your image.

Step 3: You can now select a new sky from the stock images provided or choose an image from your device. You can also manually adjust the contrast, saturation, and other aspects of the sky or the foreground. Tap on the “Save” button to save the image to your device.

Part 2: Fotor AI: Performing Sky Replacement with Perfection
Another remarkable AI tool that can be used to change the sky from the background is Fotor . It is a free online photo editor that can help enhance images. Fotor is quite useful for bulk-editing images. You can also use it to transform text into images.
Fotor features a free sky replacement option that can be used to swap skies from images. You can easily add starry, sunny, gloomy, cloudy, and rainy skies to your images. The AI sky replacement of Fotor can help personalize skies in no time.
Steps for Sky Replacement in Fotor AI
Step 1: Launch Fotor on your browser and open the “Background Remover” tool. Upload your image to Fotor, and it will automatically remove the image background.

Step 2: From the toolbar at the right, tap “Backgrounds.” Here, you can find lots of sky images that you can use in your picture. You can also generate a custom sky by writing prompts in the built-in AI background generator. Now, replace the sky and download the image to your device.

Part 3: Changing Skies with Autoenhance.ai: A Review
Autoenhance.ai is a web-based photo editor integrated with AI power. It offers fast and automatic processing to enhance your workflow. Autoenhance.ai offers perspective correction to fix wonky angles in images. It also offers image relighting and HDR merging for better results.
This online platform lets users create the perfect sky effect in their images. Its comprehensive sky packs cover a range of seasons and vibrant views. The tool caters well to business and professional needs. Using this sky replacement online, you can add a vibrant yet natural touch to your images.
Step 1: Go to Autoenhance.ai and toggle the switch next to the “Sky Replacement” option to turn it on. Now, use the dropdown menu below the option to choose a sky preference for your image. Then, upload the images to change the sky online.

Step 2: Based on your chosen sky pack, Autoenhance.ai will replace the sky in your image. You can then download your image with the replaced sky.

Part 4: SnapEdit: Online AI Sky Replacement Made Easy
For a simple and clean online editor to replace a sky, you can try SnapEdit . It is an easy-to-use photo editor with AI technology to bring the best out of your photos. You can use SnapEdit to remove unwanted objects from photos. The tool can also remove watermarks and text from images.
For efficient sky change online, SnapEdit offers an effective solution. Its sky replacement feature can change the sky’s color, feel, and gradient in the background. While changing the sky, SnapEdit automatically adjusts the photo’s overall color for better results.
Steps to Replace Sky Using SnapEdit
Step 1: Open the Sky Changer feature of SnapEdit on your device. Tap the “Upload Image” button or paste the image whose background you wish to remove.

Step 2: SnapEdit will offer a range of sky options you can choose to swap with the original. You can tap the “More Sky” option and find further options to choose from. The slider next to the “Color Set” option is available to help blend the image with the background. Once you are satisfied with the results, tap the “Download” button to save your image.

Bonus Part: Make Composed AI Background Replacements with Wondershare Filmora
The above-mentioned tools are wonderful options to help you change sky online. However, online tools require constant internet stability and can crash due to heavy site traffic. To avoid these issues, it is better to choose offline tools that can make the editing process easier. For AI editing, there is no better software solution than Wondershare Filmora .
Filmora is a video editing software designed for professional use. It is an intuitive solution that can create powerful results in no time. With a wide range of resourceful toolsets, Filmora contains everything your videos might need. This multi-platform tool can help users bring the best out of their videos in no time. You can use Filmora to enhance your videos and boost your productivity.
Free Download For Win 7 or later(64-bit)
Free Download For macOS 10.14 or later
Key Features of Wondershare Filmora
Filmora offers a wide range of useful features for videos. It is the perfect one-stop solution for video editing. Some of the features offered by Filmora include:
- Motion Tracking: Filmora lets users track the movement of an object in a video. This helps to pin graphics and media files to follow the motion. You can add text, mosaic, or other elements that move smoothly with the object using Filmora.

- Preset Templates: To help you start your video editing journey, Filmora offers built-in templates. More than 1000 preset templates are available to give your videos a head-start. You can also create and share your own templates in Filmora.

- Screen Recorder: Filmora acts as an efficient screen recorder. You can record your screen and webcam at the same time for video. You can thus record high-quality gameplay, tutorials, lectures, and other videos.

- AI Copywriting: Using Filmora, you can now create AI scripts for your videos. The tool uses ChatGPT integration to help you create custom content for videos. This also helps generate creative video titles and descriptions.

- Auto Reframe: You can resize your videos automatically using Filmora. The tool enables users to convert horizontal videos to portrait versions. Filmora can also help users adjust the frame ratios manually. Its built-in size templates can help you create videos for all major platforms.

Step-by-Step Guide to Replace Background of Videos using Filmora
Filmora offers a quick and simple process for AI sky replacement. Here is the step-by-step guide to help you replace the background of videos using AI on Filmora:
Step 1Add Tracks in Filmora
Install and launch Wondershare Filmora on your device. From the main interface, tap the “Add” button to import the video whose background you wish to change. Also, add the track with the background you wish to swap with the original one.

Step 2Replace Background From Media
While keeping the layer with the original video selected, go to the “Video” tab from the right panel and tap “AI Tools”. Toggle the switch next to the “Chroma Key” option if your video features a monochromatic background. If you want to replace a more complex background, enable the “AI Portrait” option. As soon as you toggle the switch, Filmora will automatically replace the background.

Step 3Export Video After Sky Replacement
Once you are done with the AI sky swapping, tap the “Export” button from the top. In the pop-up window, you can rename your project and select other preferences, such as the resolution and frame rate. Choose a pathway and tap “Export” to save your video with the replaced background.

Free Download For Win 7 or later(64-bit)
Free Download For macOS 10.14 or later
Conclusion
The power of AI has now made it easy to enhance and edit images. Sky replacement is one of the wonders bestowed by AI tools. You can use the wonderful editors mentioned above for AI sky replacement online. If you want a thorough offline solution, you can try Wondershare Filmora. Its remarkable toolset and powerful features make it one of the best tools for replacing skies in images.
Free Download Free Download Learn More

Part 1: AI Sky Replacement with BeFunky: Looking into the Step-by-Step Overview
If you are looking for a smart tool to replace a sky online, you can try BeFunky . BeFunky is a notable image editor and graphic design tool. It offers an all-in-one creative platform to help you easily edit photos, create graphic designs, make collages, and more.
BeFunky previously offered a background remover tool to replace skies. But now, it has a dedicated sky replacement feature that can easily detect the sky and foreground of your image. This allows for precise adjustments and accurate replacements.
Steps for BeFunky’s AI Sky Replacer
Step 1: Open the Sky Replacer feature of BeFunky on your web browser. Tap the “Open” button or drop the images into the interface for sky replacement.

Step 2: Select the “Change Sky” button once you have uploaded your image.

Step 3: You can now select a new sky from the stock images provided or choose an image from your device. You can also manually adjust the contrast, saturation, and other aspects of the sky or the foreground. Tap on the “Save” button to save the image to your device.

Part 2: Fotor AI: Performing Sky Replacement with Perfection
Another remarkable AI tool that can be used to change the sky from the background is Fotor . It is a free online photo editor that can help enhance images. Fotor is quite useful for bulk-editing images. You can also use it to transform text into images.
Fotor features a free sky replacement option that can be used to swap skies from images. You can easily add starry, sunny, gloomy, cloudy, and rainy skies to your images. The AI sky replacement of Fotor can help personalize skies in no time.
Steps for Sky Replacement in Fotor AI
Step 1: Launch Fotor on your browser and open the “Background Remover” tool. Upload your image to Fotor, and it will automatically remove the image background.

Step 2: From the toolbar at the right, tap “Backgrounds.” Here, you can find lots of sky images that you can use in your picture. You can also generate a custom sky by writing prompts in the built-in AI background generator. Now, replace the sky and download the image to your device.

Part 3: Changing Skies with Autoenhance.ai: A Review
Autoenhance.ai is a web-based photo editor integrated with AI power. It offers fast and automatic processing to enhance your workflow. Autoenhance.ai offers perspective correction to fix wonky angles in images. It also offers image relighting and HDR merging for better results.
This online platform lets users create the perfect sky effect in their images. Its comprehensive sky packs cover a range of seasons and vibrant views. The tool caters well to business and professional needs. Using this sky replacement online, you can add a vibrant yet natural touch to your images.
Step 1: Go to Autoenhance.ai and toggle the switch next to the “Sky Replacement” option to turn it on. Now, use the dropdown menu below the option to choose a sky preference for your image. Then, upload the images to change the sky online.

Step 2: Based on your chosen sky pack, Autoenhance.ai will replace the sky in your image. You can then download your image with the replaced sky.

Part 4: SnapEdit: Online AI Sky Replacement Made Easy
For a simple and clean online editor to replace a sky, you can try SnapEdit . It is an easy-to-use photo editor with AI technology to bring the best out of your photos. You can use SnapEdit to remove unwanted objects from photos. The tool can also remove watermarks and text from images.
For efficient sky change online, SnapEdit offers an effective solution. Its sky replacement feature can change the sky’s color, feel, and gradient in the background. While changing the sky, SnapEdit automatically adjusts the photo’s overall color for better results.
Steps to Replace Sky Using SnapEdit
Step 1: Open the Sky Changer feature of SnapEdit on your device. Tap the “Upload Image” button or paste the image whose background you wish to remove.

Step 2: SnapEdit will offer a range of sky options you can choose to swap with the original. You can tap the “More Sky” option and find further options to choose from. The slider next to the “Color Set” option is available to help blend the image with the background. Once you are satisfied with the results, tap the “Download” button to save your image.

Bonus Part: Make Composed AI Background Replacements with Wondershare Filmora
The above-mentioned tools are wonderful options to help you change sky online. However, online tools require constant internet stability and can crash due to heavy site traffic. To avoid these issues, it is better to choose offline tools that can make the editing process easier. For AI editing, there is no better software solution than Wondershare Filmora .
Filmora is a video editing software designed for professional use. It is an intuitive solution that can create powerful results in no time. With a wide range of resourceful toolsets, Filmora contains everything your videos might need. This multi-platform tool can help users bring the best out of their videos in no time. You can use Filmora to enhance your videos and boost your productivity.
Free Download For Win 7 or later(64-bit)
Free Download For macOS 10.14 or later
Key Features of Wondershare Filmora
Filmora offers a wide range of useful features for videos. It is the perfect one-stop solution for video editing. Some of the features offered by Filmora include:
- Motion Tracking: Filmora lets users track the movement of an object in a video. This helps to pin graphics and media files to follow the motion. You can add text, mosaic, or other elements that move smoothly with the object using Filmora.

- Preset Templates: To help you start your video editing journey, Filmora offers built-in templates. More than 1000 preset templates are available to give your videos a head-start. You can also create and share your own templates in Filmora.

- Screen Recorder: Filmora acts as an efficient screen recorder. You can record your screen and webcam at the same time for video. You can thus record high-quality gameplay, tutorials, lectures, and other videos.

- AI Copywriting: Using Filmora, you can now create AI scripts for your videos. The tool uses ChatGPT integration to help you create custom content for videos. This also helps generate creative video titles and descriptions.

- Auto Reframe: You can resize your videos automatically using Filmora. The tool enables users to convert horizontal videos to portrait versions. Filmora can also help users adjust the frame ratios manually. Its built-in size templates can help you create videos for all major platforms.

Step-by-Step Guide to Replace Background of Videos using Filmora
Filmora offers a quick and simple process for AI sky replacement. Here is the step-by-step guide to help you replace the background of videos using AI on Filmora:
Step 1Add Tracks in Filmora
Install and launch Wondershare Filmora on your device. From the main interface, tap the “Add” button to import the video whose background you wish to change. Also, add the track with the background you wish to swap with the original one.

Step 2Replace Background From Media
While keeping the layer with the original video selected, go to the “Video” tab from the right panel and tap “AI Tools”. Toggle the switch next to the “Chroma Key” option if your video features a monochromatic background. If you want to replace a more complex background, enable the “AI Portrait” option. As soon as you toggle the switch, Filmora will automatically replace the background.

Step 3Export Video After Sky Replacement
Once you are done with the AI sky swapping, tap the “Export” button from the top. In the pop-up window, you can rename your project and select other preferences, such as the resolution and frame rate. Choose a pathway and tap “Export” to save your video with the replaced background.

Free Download For Win 7 or later(64-bit)
Free Download For macOS 10.14 or later
Conclusion
The power of AI has now made it easy to enhance and edit images. Sky replacement is one of the wonders bestowed by AI tools. You can use the wonderful editors mentioned above for AI sky replacement online. If you want a thorough offline solution, you can try Wondershare Filmora. Its remarkable toolset and powerful features make it one of the best tools for replacing skies in images.
Easy Way to Add Effects to Art Video
Filmora is a powerful tool and with the know-how can make your art be more than just a still image. Whether it is for a music video or a portfolio showreel, there are better ways than just inserting an image and letting it fade to the next still image. We can make use of effects and transitions to put our art to better use.
In this guide I’m going to show a couple of ways to enhance your images within Filmora for your videos.
Transitions
By inserting a transition to your image, you can add some diversity to how the viewer first see’s your image, You may want to emphasis a certain element of your art and therefore would select a transition that zooms in on that element before zooming out to the whole image or maybe you have a painting of a cyberpunk angel and wish to have the image enter in a grid formation. The point is that by experimenting with transitions and trying to select the best ones based on the element in your work you will achieve a better first impression. This is true for all aspects of video creation.
Having multiple transitions can create a unique look for your videos with minimal understanding of how to create a transition but there needs to be an understanding of how the layers work in Filmora being that a layer on top is in front of the one below, remember this when you start to add transitions as sometime you may need to duplicate your art as to keep it in the shot.
Free Download For Win 7 or later(64-bit)
Free Download For macOS 10.14 or later
As you can see here, I have duplicated my image onto separate channels as to always keep the image in the scene.
In the image above you can see how I used multiple transitions, I did this as my image is off center and I wanted to emphasize that, I picked transitions that had clear symmetry and lines so that the viewer had a reference point of where center was without me having to place that in my art. This is a very useful way of adding information to your art without telling the viewer directly. As for the color theory, I went with oranges and yellows predominantly here as they are neighboring colors on the color wheel and we know they work well together with my main color of yellow. As for the composition I have tried to keep all the eye-catching points along the top third of the image as to create a piece more pleasing to the eye even with all this information going on.
Effects
The inclusion of effect onto your art should not be discouraged depending on what the art is used for, in my example i created this as though it was album art and the musician wanted to upload a simple music video using that art, on its own it is static and can loose engagement but by applying relevant effects you can capture the viewer’s eye and make the listening experience more enjoyable. Effects can also be stacked to create unique assets for your art and help tell a story, if your art includes fire why not add a fire effect breaking the stillness of the image or maybe your art has motion, you could include a motion effect to your still image and give the viewer more information.
Even when using effects you can use fundamentals such as color theory or composition to better enhance your imagery.

In this image you can see I have added an audio visualizer effect as well as a spectral light effect. I did this to reinforce the face of my image having a strong light source, it creates dynamic movement and the audio visualizer was added due to the nature of the video being music oriented but I felt this could have been done better. The composition of the audio visualizer was front and center and seemed boring and uninteresting. This is where the research into art fundamentals comes into play as remembering the rule of thirds and how all the main features of the image are in the top horizontal third, we can make use of the vertical thirds to gain a better composition and hopefully create more engagement.
As you can see, we have duplicated the audio visualizer and made better use of the thirds nor having opposing placement within the scene, the same information is being given by the effect but we have managed to use the space more effectively and created a visually pleasing aesthetic to our video. Trick like this can make your still image feel more animated and have more purpose within the video itself.
Adding Titles and Text
Adding text is another way of adding information to your art. It’s said an image can speak a thousand words but sometimes you need words to talk for an image. When words are needed for your video, there should be some thought into how them words are presented as just selecting any text and inserting that to your video may look jarring to the viewer and result in a loss of interest towards your videos. Selecting the right transition for your text or the color or even the font can have different results and can help with affordance depending on what you’re looking to portray.

In my example I wanted to say thank you and felt sharp edges would seem formal and because of the main image it would be too similar so I went with a font that was more rounded. When inserting text onto a scene such as this one you are given a lot of information for your selections, we already have color in there to help us choose our font and background color, I went with yellow and pink due to the fact it was already in the scene and I didn’t want to take the attention away from the focus. The way the text transitions onto the screen secures just enough attention to itself that the viewer knows it’s there and can read it if they wish to. If I wanted to gain full attention i would have picked a transition that overlaps the key element and picked complementary colors on the opposite sides of the color wheel guaranteeing the viewer’s eyes would notice and engage with the motion.
Conclusion
By incorporating all the art fundamentals and skills we have learned we can use the tools provided by Filmora more effectively and create dynamic and engaging videos that are aesthetically pleasing for our audience. Upon learning the many different types and styles of transitions, effects, and titles we can enhance our artwork for use within our video. This includes artwork specifically made for use in video or even to show off your art and gain a wider audience. These are forever evolving and what you find is pleasing now may change in the future but that’s part of the fun with learning a new skill as you will find what you like and progress from there creating an identifiable style that viewers will recognize and associate you with.
Free Download For macOS 10.14 or later

As you can see here, I have duplicated my image onto separate channels as to always keep the image in the scene.

In the image above you can see how I used multiple transitions, I did this as my image is off center and I wanted to emphasize that, I picked transitions that had clear symmetry and lines so that the viewer had a reference point of where center was without me having to place that in my art. This is a very useful way of adding information to your art without telling the viewer directly. As for the color theory, I went with oranges and yellows predominantly here as they are neighboring colors on the color wheel and we know they work well together with my main color of yellow. As for the composition I have tried to keep all the eye-catching points along the top third of the image as to create a piece more pleasing to the eye even with all this information going on.
Effects
The inclusion of effect onto your art should not be discouraged depending on what the art is used for, in my example i created this as though it was album art and the musician wanted to upload a simple music video using that art, on its own it is static and can loose engagement but by applying relevant effects you can capture the viewer’s eye and make the listening experience more enjoyable. Effects can also be stacked to create unique assets for your art and help tell a story, if your art includes fire why not add a fire effect breaking the stillness of the image or maybe your art has motion, you could include a motion effect to your still image and give the viewer more information.
Even when using effects you can use fundamentals such as color theory or composition to better enhance your imagery.

In this image you can see I have added an audio visualizer effect as well as a spectral light effect. I did this to reinforce the face of my image having a strong light source, it creates dynamic movement and the audio visualizer was added due to the nature of the video being music oriented but I felt this could have been done better. The composition of the audio visualizer was front and center and seemed boring and uninteresting. This is where the research into art fundamentals comes into play as remembering the rule of thirds and how all the main features of the image are in the top horizontal third, we can make use of the vertical thirds to gain a better composition and hopefully create more engagement.

As you can see, we have duplicated the audio visualizer and made better use of the thirds nor having opposing placement within the scene, the same information is being given by the effect but we have managed to use the space more effectively and created a visually pleasing aesthetic to our video. Trick like this can make your still image feel more animated and have more purpose within the video itself.
Adding Titles and Text
Adding text is another way of adding information to your art. It’s said an image can speak a thousand words but sometimes you need words to talk for an image. When words are needed for your video, there should be some thought into how them words are presented as just selecting any text and inserting that to your video may look jarring to the viewer and result in a loss of interest towards your videos. Selecting the right transition for your text or the color or even the font can have different results and can help with affordance depending on what you’re looking to portray.

In my example I wanted to say thank you and felt sharp edges would seem formal and because of the main image it would be too similar so I went with a font that was more rounded. When inserting text onto a scene such as this one you are given a lot of information for your selections, we already have color in there to help us choose our font and background color, I went with yellow and pink due to the fact it was already in the scene and I didn’t want to take the attention away from the focus. The way the text transitions onto the screen secures just enough attention to itself that the viewer knows it’s there and can read it if they wish to. If I wanted to gain full attention i would have picked a transition that overlaps the key element and picked complementary colors on the opposite sides of the color wheel guaranteeing the viewer’s eyes would notice and engage with the motion.
Conclusion
By incorporating all the art fundamentals and skills we have learned we can use the tools provided by Filmora more effectively and create dynamic and engaging videos that are aesthetically pleasing for our audience. Upon learning the many different types and styles of transitions, effects, and titles we can enhance our artwork for use within our video. This includes artwork specifically made for use in video or even to show off your art and gain a wider audience. These are forever evolving and what you find is pleasing now may change in the future but that’s part of the fun with learning a new skill as you will find what you like and progress from there creating an identifiable style that viewers will recognize and associate you with.
Also read:
- 2024 Approved Premiere Pro Best Slow Motion Effects To Use
- Updated In 2024, Do You Want to Apply BRAW LUTs to Your Pictures and Video Footage? Here We Will Discuss some of the Best Options Available to Help You Choose the Right One
- Updated 2024 Approved The Quick and Simple Way to Mirror Video in Premiere Pro
- 2024 Approved Easy Way to Create a DIY Green Screen Video Effect
- Best Free Video Editing Software to Boost Your Content Creation for 2024
- New Powerpoint Supported Video Format and User Tips for 2024
- Updated In 2024, Best iPhone LUTs App to Use
- TXT to SRT 3 Effective Ways to Convert TXT to SRT
- Updated 2024 Approved Cropping a Video in Davinci Resolve Step by Step
- Updated 10 Top Innovative AR Video Effects to Check Out for 2024
- In 2024, Do You Want to Know How to Add Captivating Audio in Simple Videos? Nothing to Be Concerned About because This Article Will Help You in This Matter
- New In 2024, The Best Wedding LUTs for Premiere Pro
- New How to Make a Video Slideshow in iMovie for 2024
- How to Create Vintage Film Effect 1950S
- 2024 Approved 10 Top Innovative AR Video Effects to Check Out
- How to Make Split Screen Videos in Filmora for 2024
- HOW to Add Fade to Black on Premiere Pro
- Updated 2024 Approved Read on to Learn About OpenCV Object Tracking, What It Is, and How to Implement It in Python, and OpenCV
- Updated Top 10 Picks for Flawless Slow Motion Video Generation for 2024
- Updated In 2024, Top 7 Color Match Paint Apps
- New Learning The Details Of How To Replace Sky in Lightroom for 2024
- Updated 2024 Approved Creating Collages on Canva Is Simple and Quick. The Tool Lets You Create some Amazing Customized Collages as Needed. So, Get Ready to Explore the World of Canva Collages
- Updated In 2024, Use Path Blur In Photoshop To Create Motion Effect
- How to Rotate Videos With Media Player Classic
- Updated 2024 Approved Want to Speed up Your Video to Create Short-Duration Instagram Reels? Here Is How You Can Change the Speed of Pre-Recorded and Live Videos on Instagram Reels
- New 2024 Approved How to Use Adjustment Layer in Final Cut Pro
- Updated Top 10 Best Free Video Compressors
- 2024 Approved So, without Further Dilly-Dallying, Lets Learn How to Create a Retro 1950-Style Video with This Simple Filmora Tutorial
- New 2024 Approved This Article Describes Different Ways for Removing Gif Backgrounds, How We Can Use Them, and How This Way Differs From One Another
- New In 2024, Know How You Can Get some Cool Discord Animated Icons Through some Simple Steps. Presenting the Latest Tool to Get Animated PFP and Logos Instantly for Discord
- How to Add Filter to Video Online for 2024
- New 2024 Approved Ideas to Make A Perfect Café Vlog
- In 2024, What Is the Best FPS for YouTube Videos?
- New In 2024, Recommended Video Background Online Changers
- In 2024, Step by Step to Add Border to Video Using Premiere Pro
- New AR, or Augmented Reality, Is One of the Most Significant Technological Inventions. This Technology Is Used in Many Applications that We Use Daily, Like, Maps, Music, Video Games, Tourism, Sightseeing, Etc
- New 2024 Approved Looking Forward to Try Hands at Using the Icecream Slideshow Maker Program to Create High End Slideshow Presentations? Stay Here for a Complete Insight Into the Process
- New Looking for Final Cut Pro Alternative App for Your Android Smartphone or iPhone? Here Is the List of the Best FCP Alternative Apps for Android and iOS Users
- New In 2024, 15 Stunning GIF Splitter Examples You Need to Bookmark
- New Create Slow Motion Videos Using Final Cut Pro with Ease
- Updated In 2024, Some Leading AI Tools to Replace Sky Backgrounds
- Updated Detailed Steps to Rotate Video Using KMPlayer
- New How to Make Foggy Text Reflection Effect for 2024
- Fix Cant Take Screenshot Due to Security Policy on Tecno Phantom V Flip | Dr.fone
- Does Xiaomi Redmi Note 13 Pro 5G has native HEVC support?
- 4 Ways to Fix Android Blue Screen of Death On Infinix Note 30 5G | Dr.fone
- Unlock Apple ID without Phone Number From Apple iPhone 15 Plus
- In 2024, How to Transfer Contacts from Realme Note 50 to Outlook | Dr.fone
- Ultimate Guide to Free PPTP VPN For Beginners On Infinix Smart 8 Plus | Dr.fone
- How PGSharp Save You from Ban While Spoofing Pokemon Go On Samsung Galaxy A34 5G? | Dr.fone
- In 2024, How to Change Google Play Location On Xiaomi 13 Ultra | Dr.fone
- How To Open Your iPhone 6s Plus Without a Home Button
- In 2024, How to Screen Mirroring Motorola G54 5G to PC? | Dr.fone
- Ultimate guide to get the meltan box pokemon go For Oppo Reno 8T | Dr.fone
- Complete Tutorial to Use GPS Joystick to Fake GPS Location On Apple iPhone 15 | Dr.fone
- Unlock iPhone 11 without Face ID
- How to Find iSpoofer Pro Activation Key On Oppo Reno 11F 5G? | Dr.fone
- In 2024, Top 6 Apps/Services to Trace Any Apple iPhone 8 Plus Location By Mobile Number | Dr.fone
- How To Fake GPS On OnePlus Nord N30 5G For Mobile Legends? | Dr.fone
- How to Track ZTE Blade A73 5G Location without Installing Software? | Dr.fone
- How to Intercept Text Messages on Samsung Galaxy A24 | Dr.fone
- 9 Quick Fixes to Unfortunately TouchWiz has stopped Of Honor 90 | Dr.fone
- In 2024, How to Change/Add Location Filters on Snapchat For your OnePlus Nord CE 3 5G | Dr.fone
- Here are Some Pro Tips for Pokemon Go PvP Battles On Sony Xperia 10 V | Dr.fone
- Three Solutions to Hard Reset Realme 11 Pro+? | Dr.fone
- In 2024, How To Unlock Any Realme 12 Pro+ 5G Phone Password Using Emergency Call
- How To Restore Missing Music Files from OnePlus Open
- In 2024, How to Reset a Locked Infinix Smart 8 HD Phone
- Title: Updated How to Create a Special Animated Transition in Filmora in Just 2 Minutes. This Simple Step-by-Step Guide Will Show You the Easy Way
- Author: Morgan
- Created at : 2024-05-19 05:12:36
- Updated at : 2024-05-20 05:12:36
- Link: https://ai-video-editing.techidaily.com/updated-how-to-create-a-special-animated-transition-in-filmora-in-just-2-minutes-this-simple-step-by-step-guide-will-show-you-the-easy-way/
- License: This work is licensed under CC BY-NC-SA 4.0.

