
:max_bytes(150000):strip_icc():format(webp)/family-hanging-out-watching-videos-online-1166432791-309c6f7ac8cb4cc99875db5a77fd6f35.jpg)
Updated If Youre Considering Starting a Podcast Video Recording, You Need to Read This Article and Learn All You Need to Know About Making a Successful Podcast
If You’re Considering Starting a Podcast Video Recording, You Need to Read This Article and Learn All You Need to Know About Making a Successful Podcast
Starting a video podcast can be quite intimidating, but the truth is; having the proper knowledge will help you do things more correctly.
As we all know, knowledge is the key to success. So, for you to navigate your way around the video podcasting industry easily, you need to consume enough information that will enable you to make fewer wrong decisions.
To help you out, we took our time to do more research on how to record video podcasts, and in this post, we will share all you need to know to record a video podcast that stands out.
Part 1. But first: why record with a video?
If you’ve done a little research, you’ll notice many podcasters switched to recording with videos instead of audio. Did they decide to start doing that so we could see their faces? Well, the answer is NO. But before we discuss more on that, you should know what a video podcast is and its types.
You guessed right. A video podcast is a podcast with video. The video element could be a static image or a video recording of the podcast host and the guest. A video podcast will help you do the following;
1. Enhance the visual content
Research shows that humans learn more from what they visualize than what is heard. Yes, this is because 30% of the human brain comprises neurons dedicated to visual processing, and just 3% is dedicated to hearing. Besides, videos are always more engaging compared to audio. So why not combine both to boost your podcast performance?
2. Level up the personality and relatability
Most people have more belief in what they see than what is heard. So, video podcasts allow audiences to easily see your expression and understand your passion for the subject you discuss. It also builds a deeper level of connections between you and them. Also, it helps to add to the originality of your podcast and your brand as a whole.
3. Make the content more accessible
Your podcast show becomes more accessible when it’s in the video. You won’t be limited to just uploading it on podcast platforms but also on social media as a short TikTok trailer, Instagram post, YouTube video, etc. Doing this will get your content in front of a wide range of audience, thus prompting more people to engage with your podcast.
Part 2. Get your gear set up
The first step to starting a video podcast is getting your gear set up. We recommend you start with the following podcast equipment:
- A camera (if recording a video podcast)
- Microphone(s)
- Headphone(s)
- Memory cards
- Tripods
- Computers
- Recording software or a digital audio workstation
Let’s dig deeper into each of these. We’ve compiled the best podcast equipment for beginners and pros alike based on our extensive research.
1. DSLRs Camera – Sony A6300 ($779)

If you’re looking to record remotely, just like most podcasters in 2022, we’d advise using a DSLR camera by connecting it to your computer using an Elgato Cam link. A $30 version of the device is available on Amazon.
DSLR cameras are perfect for video podcasts, and one of the most reliable options is the Sony A6300 camera. It’s one rugged camera that feels very good at hand, and it offers excellent 4K video recording quality that allows you to shoot amazing videos for podcasts. You can never go wrong with such a camera at your fingertips.
2. Microphones - Shure SM58 ($89)

There is also other equipment – a microphone you need to start a podcast. There are many quality microphones in the market, but one of the most popular options among podcasters is the Shure SM58. It’s an XLR microphone that usually requires an interface to record. However, if you prefer a USB microphone, you can purchase either Rode, NT-USB mini, or the Shure MV7.
3. Headphones - Monoprice Premium Hi-Fi DJ Style ($26.60)

Headphones are a must for any kind of podcast. Yes, this helps you hear how everyone on your podcast sounds. One of the best choices for podcasters is the Monoprice Premium hi-fi DJ style. The headphones produce the best sound quality and are equipped with thick and comfortable padding that keeps music inside and prevents external noise.
4. Memory Card - SanDisk 128GB Ultra MicroSDXC UHS-I Memory Card ($16.35)

A memory card is also crucial when you’re recording a video podcast. It allows you to store recorded footage safely. Plus, it facilitates moving recorded videos between your computer and camera, especially when you cannot use a USB cable.
5. Tripods - Aureday 74 Camera Tripod ($36.99)

It would help if you had a tripod to shoot stable podcast videos. A tripod is a support tool that will enable you to adjust your camera height, movement, and stability to record a perfect video from any required angle. It is essential if you don’t have anyone helping you behind the camera.
6. Computers - ASUS VivoBook 15 F515 ($358.99)

A computer is just like a mastermind of the whole podcasting process. Yes, it’s where every other device is connected to, and you need it to edit the recorded podcast according to your requirements. Of course, any primary computer is perfect for the process. But if you’re looking to acquire one, the ASUS VivoBook 15 F515 is affordable.
7. Video Podcast Software - Filmora

Free Download For Win 7 or later(64-bit)
Free Download For macOS 10.14 or later
Your podcast gear setup isn’t complete without video podcast software. Yes, this one is also essential, as it’s required for performing podcast recording editing to spice up your videos. Wondershare Filmora is an ideal choice for anyone to edit podcast content with high quality!
Part 3. Build your set
Besides having a good quality camera and other podcast gear mentioned above, it’s also crucial to make your set look gorgeous. It makes your video podcast look more professional. Below are ideas for some techniques you can employ.
1. Depth & lighting
To make a professional-looking video podcast, you need to add as much depth as possible. So yes, there should be enough distance between you and the background (don’t be too close or too far). However, if this is impossible because you have a small space, good lighting should spice things up. Godox SL -150 is one perfect choice that you can opt for.
2. Make your background interesting
Your background shouldn’t just be left alone. It would be best to put up some fascinating stuff that will blend with the podcast’s theme and make the video look more admirable. For example, if your podcast discusses relationships, you should have a background that suits the topic.
3. Declutter
It’s never a good idea to leave unnecessary items in the background because that makes it look messy. Also, it may compromise everything you’ve done to spice it up. So, after you finish putting up an exciting background, take a few minutes to inspect the lighting, the elements, and lots more. Then, ensure it’s clean and tidy.
Part 4. Create a collaborative doc
Creating a collaborative doc is also essential for making a podcast. You might ask: “what is a collaborative doc?” Well, it’s where you jot down information on the following;
- Niche or Topic
- Brand name
- Format for the Show and each of the Episodes
- Intro and Outro Music
- Create a Cover Art
- Ideas to record the first podcast
Part 5. Create your show
Now that you have a perfect plan and setup, the next thing is to start the show. But first, what format have you chosen for your first show? Is it the static image recording? The remote interview recording? The in-studio recording? or interview & b-roll recording? Not sure of which format to start with? Worry less. We’ll walk you through the steps of the process for each process. Just keep reading;
Method 1: Static Image Podcast Recording

It is the simplest way to record a video podcast. You don’t necessarily have to show your face. Instead, record an audio podcast, then convert its file into a video file and add a static image to the background to keep playing as the viewer is listening.
You need video editing software to create this kind of video podcast - Filmora is a perfect choice. However, keep in mind that this kind of video podcast is usually less engaging, only that you’ll be able to publish it on various video platforms.
Equipment Required:
- Video editor - Filmora
- Computer
Method 2: In-studio Podcast Recording

Unlike static image recording, this kind of video podcast requires you to show in the video. It involves capturing the conversation between you and a guest or your colleague from a perfectly set up studio.
Equipment required:
- Camera
- Microphone
- Tripod (if you have nobody to stay behind the camera)
- Computer
- Headphones
- Video editing software - Filmora
Method 3: Remote Interview Podcast Recording

It is just like a live-stream podcast. It involves recording multiple speakers who are not in the same room as you. This kind of video podcast is reliable when you intend to shoot online interviews with guests across the country.
Equipment Required:
- Software that supports capturing multiple webcams. An example is Riverside.
- Microphone
- Computer
- Video Editor - Filmora
Part 6. Edit your video podcast
After creating your show, the next thing is to edit your video podcast to make it look worthy when you publish it on any platform. But for this operation, you need powerful video editing software like Filmora.
Filmora is an efficient video editor with many excellent features, including audio recording, audio effects, speech-to-text, and many more. Also, it allows users with any level of experience to create nice-looking videos using these features. With Filmora, you can;
- Record high-quality podcasts with no quality loss.
- Edit podcast videos with over 1,000 stunning effects and elements.
- Add subtitles in different languages, fonts, and formats for your podcast.
- Publish podcast videos directly to platforms like YouTube and Vimeo.
- Edit audio efficiently with audio denoise, auto beat sync, silence detection, etc.
Here is how to use Filmora to edit a video podcast
Step1 Download and Install Filmora software on your computer
Step2 Create a New Project
You can launch the Filmora app and click Create New Project.

Step3 Upload footage
Click the import button to upload your podcast video, then drag-n-drop it to the timeline.

Step4 Edit Podcast
Right-click the podcast video clip from the timeline > choose Edit Properties. Then, in the pop-up window, tick the checkbox next to Ducking and use the appropriate buttons to adjust the Fade in, Fade out, and pitch.

Step5 Use Speech-to-text
To convert your podcast voiceover into readable text, right-click on the podcast clip from the timeline and select Speech-to-text from the pop-up list.
Select the Language you wish to convert the voiceover to click OK to proceed.

Step6 Add Video & Audio Effects
To add video and audio effects to your podcast, you just need to click Effects from the top side of the screen. Then, click an option from the left side of the screen and select the effect you’d like to use in your video. After that, drag-n-drop the effect to the timeline.

Step7 Preview and Save Video
Finally, play the clip to preview the edited podcast and use the Export button at the top of the screen to save it to your computer.

For more detailed video podcast recording steps with Filmora, we advise you to refer to this video Record Podcast on Filmora
Part 7. Upload your video podcast
Firstly, you need a video platform to upload your show. Some of the excellent options you can find in the industry include YouTube, RSS, Spotify, Vimeo, Riverside.fm, and many others. Also, you can upload the show to video platforms like YouTube, Vimeo, etc. To upload the podcast video to a platform like YouTube, you just have to do the following;
Step1 Open YouTube’s official website and create or login into your account.
Step2 On the new interface, click Create New from the top-right corner and choose Upload Video.

Step3 Next, click Select Files and upload the podcast video.

Step4 Once the upload is complete, adjust the editing/settings according to your requirements and publish your video to complete the operation.

Part 8. Share and promote your video podcast
Most people think the final phase of making a video podcast is uploading to a video platform, but you still have to share and promote your content on different platforms. Nevertheless, it will help get the podcast to a wide range of audiences.
Thankfully, a video podcast allows you to upload a short clip of your show to different social media platforms like Instagram, TikTok, Twitter, etc. With this, your show will become more accessible across various platforms, thus increasing your show’s engagement. Honestly, it’s a win-win!
The Bottom Line
There you have it! Just like that, you’re ready to be a part of the top-rated video podcasters you can ever think of. With all that’s discussed in the article, we believe you can now focus on creating valuable and engaging content for your audience.
However, as you start to record video podcasts, we advise you to invest in the right marketing tools to help you gain more attraction in the industry.
Free Download For macOS 10.14 or later
Your podcast gear setup isn’t complete without video podcast software. Yes, this one is also essential, as it’s required for performing podcast recording editing to spice up your videos. Wondershare Filmora is an ideal choice for anyone to edit podcast content with high quality!
Part 3. Build your set
Besides having a good quality camera and other podcast gear mentioned above, it’s also crucial to make your set look gorgeous. It makes your video podcast look more professional. Below are ideas for some techniques you can employ.
1. Depth & lighting
To make a professional-looking video podcast, you need to add as much depth as possible. So yes, there should be enough distance between you and the background (don’t be too close or too far). However, if this is impossible because you have a small space, good lighting should spice things up. Godox SL -150 is one perfect choice that you can opt for.
2. Make your background interesting
Your background shouldn’t just be left alone. It would be best to put up some fascinating stuff that will blend with the podcast’s theme and make the video look more admirable. For example, if your podcast discusses relationships, you should have a background that suits the topic.
3. Declutter
It’s never a good idea to leave unnecessary items in the background because that makes it look messy. Also, it may compromise everything you’ve done to spice it up. So, after you finish putting up an exciting background, take a few minutes to inspect the lighting, the elements, and lots more. Then, ensure it’s clean and tidy.
Part 4. Create a collaborative doc
Creating a collaborative doc is also essential for making a podcast. You might ask: “what is a collaborative doc?” Well, it’s where you jot down information on the following;
- Niche or Topic
- Brand name
- Format for the Show and each of the Episodes
- Intro and Outro Music
- Create a Cover Art
- Ideas to record the first podcast
Part 5. Create your show
Now that you have a perfect plan and setup, the next thing is to start the show. But first, what format have you chosen for your first show? Is it the static image recording? The remote interview recording? The in-studio recording? or interview & b-roll recording? Not sure of which format to start with? Worry less. We’ll walk you through the steps of the process for each process. Just keep reading;
Method 1: Static Image Podcast Recording
It is the simplest way to record a video podcast. You don’t necessarily have to show your face. Instead, record an audio podcast, then convert its file into a video file and add a static image to the background to keep playing as the viewer is listening.
You need video editing software to create this kind of video podcast - Filmora is a perfect choice. However, keep in mind that this kind of video podcast is usually less engaging, only that you’ll be able to publish it on various video platforms.
Equipment Required:
- Video editor - Filmora
- Computer
Method 2: In-studio Podcast Recording
Unlike static image recording, this kind of video podcast requires you to show in the video. It involves capturing the conversation between you and a guest or your colleague from a perfectly set up studio.
Equipment required:
- Camera
- Microphone
- Tripod (if you have nobody to stay behind the camera)
- Computer
- Headphones
- Video editing software - Filmora
Method 3: Remote Interview Podcast Recording
It is just like a live-stream podcast. It involves recording multiple speakers who are not in the same room as you. This kind of video podcast is reliable when you intend to shoot online interviews with guests across the country.
Equipment Required:
- Software that supports capturing multiple webcams. An example is Riverside.
- Microphone
- Computer
- Video Editor - Filmora
Part 6. Edit your video podcast
After creating your show, the next thing is to edit your video podcast to make it look worthy when you publish it on any platform. But for this operation, you need powerful video editing software like Filmora.
Filmora is an efficient video editor with many excellent features, including audio recording, audio effects, speech-to-text, and many more. Also, it allows users with any level of experience to create nice-looking videos using these features. With Filmora, you can;
- Record high-quality podcasts with no quality loss.
- Edit podcast videos with over 1,000 stunning effects and elements.
- Add subtitles in different languages, fonts, and formats for your podcast.
- Publish podcast videos directly to platforms like YouTube and Vimeo.
- Edit audio efficiently with audio denoise, auto beat sync, silence detection, etc.
Here is how to use Filmora to edit a video podcast
Step1 Download and Install Filmora software on your computer
Step2 Create a New Project
You can launch the Filmora app and click Create New Project.
Step3 Upload footage
Click the import button to upload your podcast video, then drag-n-drop it to the timeline.
Step4 Edit Podcast
Right-click the podcast video clip from the timeline > choose Edit Properties. Then, in the pop-up window, tick the checkbox next to Ducking and use the appropriate buttons to adjust the Fade in, Fade out, and pitch.
Step5 Use Speech-to-text
To convert your podcast voiceover into readable text, right-click on the podcast clip from the timeline and select Speech-to-text from the pop-up list.
Select the Language you wish to convert the voiceover to click OK to proceed.
Step6 Add Video & Audio Effects
To add video and audio effects to your podcast, you just need to click Effects from the top side of the screen. Then, click an option from the left side of the screen and select the effect you’d like to use in your video. After that, drag-n-drop the effect to the timeline.
Step7 Preview and Save Video
Finally, play the clip to preview the edited podcast and use the Export button at the top of the screen to save it to your computer.
For more detailed video podcast recording steps with Filmora, we advise you to refer to this video Record Podcast on Filmora
Part 7. Upload your video podcast
Firstly, you need a video platform to upload your show. Some of the excellent options you can find in the industry include YouTube, RSS, Spotify, Vimeo, Riverside.fm, and many others. Also, you can upload the show to video platforms like YouTube, Vimeo, etc. To upload the podcast video to a platform like YouTube, you just have to do the following;
Step1 Open YouTube’s official website and create or login into your account.
Step2 On the new interface, click Create New from the top-right corner and choose Upload Video.
Step3 Next, click Select Files and upload the podcast video.
Step4 Once the upload is complete, adjust the editing/settings according to your requirements and publish your video to complete the operation.
Part 8. Share and promote your video podcast
Most people think the final phase of making a video podcast is uploading to a video platform, but you still have to share and promote your content on different platforms. Nevertheless, it will help get the podcast to a wide range of audiences.
Thankfully, a video podcast allows you to upload a short clip of your show to different social media platforms like Instagram, TikTok, Twitter, etc. With this, your show will become more accessible across various platforms, thus increasing your show’s engagement. Honestly, it’s a win-win!
The Bottom Line
There you have it! Just like that, you’re ready to be a part of the top-rated video podcasters you can ever think of. With all that’s discussed in the article, we believe you can now focus on creating valuable and engaging content for your audience.
However, as you start to record video podcasts, we advise you to invest in the right marketing tools to help you gain more attraction in the industry.
MP3 CUTTER DOWNLOADMP3 Cutter Download Is One of the Most Reliable Tools for Editing of Music Files in a Fast and Friendly Way
MP3 cutter download is one of the most reliable tools for editing of music files in a fast and friendly way. MP3 cutter free download at the same time supports merging and cutting audio files like WAV, ACC, MP3 AC3, OPUS, OGG, among others. Cutter MP3 free download application is designed in a way to make editing of music so enjoyable, easy and fun. The application is usually free, it supports the split of large music files into shorter ones, the app can also be used to split a whole album to receive the original tracks without. MP3 cutter download is also used to support trimming by silent detection.
MP3 Cutter download is a free app for Android users available in the Audio File Players line of apps, part of Audio & Multimedia. The company that develops MP3 Cutter is called accountlab. The most current version released by the developer is 1.0. To upload MP3 Cutter on your Android operating system device, just click on the green Continue To App button to begin the installation process of this MP3 cutter application. The MP3 cutter download app has been listed on their website since 2021-10-21 and has had 1639 downloads. The app is made in such a way that it pre-checks a files safety before the download. Though for personal protection reasons, its recommended that one should scan the downloaded app using an antivirus before using the app. In some instances, there is a possibility of your antivirus detecting the MP3 cutter as malware, there is a contact page where one can connect to customer care for help.
1. MP3 Cutter Download for Windows
MP3 Cutter is a Windows desktop application that enables the user to cut and split a large MP3 or video to tiny audio pieces. While using the MP3 Cutter download for windows, you are capable of cutting and splitting a number of formats besides the MP3 like WAV, AMR, WMA, WMV, MPG4, AVI, MP4, 3GP, FLAC WMV, MOV and many more formats audio and video formats. The layout of bits generated from the audio data is called the audio coding format. A format can be compressed or depressed using an MP3 cutter for windows or any other right program. In some cases, the data can be a raw bit-stream in the audio coding format. However, it’s normally embedded in an audio data format with a specified storage layer. If you intend to cut such a file, you should do so without messing up the quality of the entire file. That’s exactly what MP3 Cutter download for windows does.
There are several reasons where someone would want to cut an MP3 file or a video file. For example, you may be having some nice audio tune or a video track that you may like to have as a ringtone, using an MP3 cutter for windows will enable you to extract the part you like most. The cut tune can be used for your morning alarm, SMS notification or ringtone. You can also use the cut a MP3 file for fixing files or broken and damaged songs. For example, you may have recorded a song from the radio then you realize there is a part that was not clearly captured or an information you don’t want, you’ll use MP3 cutter download to reorganize the music. Cutter download for MP3 allows you to manipulate your audio files without the degradation in their quality.
How to use Free MP3 Cutter Joiner
Step 1: Addition of a File
On the app’s interface, click the “Add “ button to enable you to import files. The chosen file will play automatically.
Step 2: Setting of a Start Point and End Point
By left clicking to drag the red line to quickly locate, then click on the button to set start point and end point
Tip: You can use the format hh:mm:ss.fff to directly input start point and end point in the blank edit control.
Step 3: Start Cuttting
You will simply click on the ‘CUT’ button to start cutting the file needed.
How to Join MP3 with Using Free MP3 Cutter Joiner
Step 1: Add File
You will be asked to click “Add “ button so as to enable you to import multi files.
Step 2: Click “Setting” button to set audio quality, channels, sample rate
Step 3: Start Join
Go to the button written join and click “Join” button to start the joining process.
2. MP3 Cutter Download for Android
MP3 Cutter download for Android is meant to help you to easily mix music, trim music, merge music and preciously clip out the wanted part of music and set it as a unique ringtone for every on the android device. Cutter MP3 download for android can be applied in the customization of your own alarm tone and other notifications. It also supports bitrate & volume adjustment to create the highest quality melody for you. Steps to follow while using MP3 Cutter Download for Android:
1. Make a choice of the music clip you want to cut from your phone/ SD card
2. Secondly make a selection of the length of music that you want to cut or trim
3. Edit and tag for the clip(Title, Format, Bitrate, Volume etc)
4. And lastly save as the cut music as a ringtone/Alarm/Notification or Share as desired
3. MP3 Cutter Download for iPhone
Are you looking for an app to make a ringtone on your iPhone device? MP3 cutter for iPhone is the best choice for you to make personalized ringtones, it supports aiff, m4a, mp3 and wav formats. A user can use this app to edit a recorded and it also supports trimming. Free MP3 cutter download for iPhone supports mp3, wav, aiff, m4a and other types of music formats. Mp3 download for iPhone is also referred to as music editor, ringtone cutter, alarm tone maker or notification tone creator in other instances.
MP3 download cutter for Iphone is the best application for cutting music. The cut mp3, m4a, and ringtone application will help you cut that favorite part of an audio tune or a music file. You can use the cut music as ringtone, notification tone or a music song and alarm tone. The cut pieces can be shared with friendly since the cut results are easily manageable.
Instead of buying or endlessly searching the web for a ringtone, you can rather easily make the desired ringtone yourself using the files already stored in your phone even those audios from a video. Our Online MP3 Cutter download for iPhone allows making custom ringtones from your favorite song, voice memo or video, it can then be exported in several formats. It can be used on iPhone and Android phones, Windows or Mac computers.
Below are the steps to follow while using an audio cutter for iPhone.
Step 1: Selecting a file
Open MP3 Cutter download for iPhone tool first. Then select the file you want to work with by clicking on “Choose file”. If you want to select it from Dropbox or Google Drive account where the file exists, tap on the small arrow.
If using a computer, you will just need to drag and drop the file onto the page.
Once you have selected your file, a progress bar will appear to show you the status of the upload. The speed of the upload will definitely depend on the file size or the available internet speed. It will be slower if the file is large or if the internet speed is slow.
Step 2: Editing the audio
As the representation of the audio bar appears, you can slide it to the left or to the right to choose the exact location to start cutting and where to end the ringtone clip. There is an additional feature that allows you to enter time stamps manually. The application also gives you an option of checking if you want to add a “Fade in” or “Fade out” effects.
When you are through with cropping the audio, you can decide on what file format to export. The app supports popular audio codecs such as MP3, AIFF, OGG and WAV. An Android device is capable of accepting a varied number of sound formats, but while exporting a file format, it is advisable to stick to OGG or MP3 formats.
After selecting the desired option, select “Cut” at the right bottom of the page.
Step 3: Preview and download your ringtone
The speed of processing an audio will be directly affected by the file size and the internet speed. After you shall have successfully completed the download, you can press on play button to preview or hear the audio file.
The completed file can be saved in downloads or it can alternatively be added to the Dropbox or sent to Google drive.
If you need tweaking or wants to edit a piece of audio, you’ll get back to the tool.
4. MP3 Cutter for Mac
Whether you are running a podcast or you are a musician who aspires to share audio files through Spotify, SoundCloud, YouTube, or any other platform and or a smartphone app, you need to do some editing to your MP3 files before the final product is ready. Having access to a reliable and feature-rich MP3 cutter for Mac enables you to edit the audio file in a manner that helps you in delivering the exceptional listening experience your audience expects.
It is the reason why it is important to wisely pick your MP3 cutter wisely while considering a variety of other factors. Some of these factors are reliability, cost, performance and ease of use.
Wondershare Filmora
It is feature-rich audio as well as a video editor that allows beginners to edit their audio and video files quickly and easily. It has been specially designed for audio editing amateurs with a simple and user-friendly layout that ensures there is an easy learning curve. With the help of Filmora, you can record your music and voice using a built-in feature and also use it to trim, merge, split, and cut your MP3 files.
Apart from that, you can also make necessary adjustments to volume, pitch, and speed ensuring that your audio has the clarity you need. You can use Filmora for personal use as well to create customized ringtones by cutting songs and add special sound effects to your presentation.
For Win 7 or later (64-bit)
For macOS 10.12 or later
Import audio file to Filmora. You can also import a video and then detach the MP3 file from it.

Right click on the audio and you’ll see a list out editing options, such as cut, reverse, speed change etc.
For macOS 10.12 or later
Import audio file to Filmora. You can also import a video and then detach the MP3 file from it.
Right click on the audio and you’ll see a list out editing options, such as cut, reverse, speed change etc.
For macOS 10.12 or later
Import audio file to Filmora. You can also import a video and then detach the MP3 file from it.
Right click on the audio and you’ll see a list out editing options, such as cut, reverse, speed change etc.
For macOS 10.12 or later
Import audio file to Filmora. You can also import a video and then detach the MP3 file from it.
Right click on the audio and you’ll see a list out editing options, such as cut, reverse, speed change etc.
How to Brighten Video in Premiere Pro
Create High-Quality Video - Wondershare Filmora
An easy and powerful YouTube video editor
Numerous video and audio effects to choose from
Detailed tutorials provided by the official channel
Brighter videos always attract more attention. Indeed, a well-lit video can make your content shine and bring out the best in your story. But what if you forgot to turn on the lights or the camera just couldn’t handle the situation? We’ve all been there: you’re shooting a video, but there aren’t enough light sources. You end up with dark footage. It’s impossible to share this on your social media accounts or with your friends and family.
There are many reasons why people want to brighten a dark video. Maybe you recorded a video with your phone, but the lighting was too dim in the room. Or maybe you were outside, and the sun was behind you, casting shadows on your face while recording. In these cases, it can be helpful to know how to make a dark video brighter.
There is a way to apply simple corrections using Premiere Pro, no matter the reason. In this article, I’ll show you how to brighten your video in Premiere Pro so you can keep all the details in the highlights. This can be very useful if you’re working with a lot of footage that has been underexposed, and sometimes your shot might look too dark or even black.
In this article
01 Can I Brighten A Dark Video?
02 How to Brighten Video in Adobe Premiere Pro?
03 How To Lighten Up A Dark Video In Adobe Premiere Pro?
04 Enhancing Your Video In Premiere Pro
Can I Brighten A Dark Video?
This is a common question that comes up among video editors, so I thought I’d answer it here. The quick answer is yes. There are many online tools that can help you brighten a dark video or adjust the brightness of your video. A lot of times, you’ll get a video file that was shot in low light, and it will make your subject look dark and underexposed. Video brightness is an important feature that is easy to adjust. However, if your video is too dark to start off with, it may be difficult to brighten it in a way that doesn’t look unnatural.
There are several ways you can brighten a dark video. For example, you can use color correction or add more light to the scene before you film. If you already have a dark video, then you’ll need to adjust the contrast and brightness of your video during post-production. You can easily do this by using video editing software but keep in mind that too much brightness or too much contrast can result in poor video quality. So, you have to keep everything in balance.
How to Brighten Video in Adobe Premiere Pro?
Adobe Premiere Pro is your one-stop solution for editing videos, whether you’re editing a film or a TV ad. It gives you the flexibility to edit videos of any format. Adobe Premium makes brightening videos easy. Follow the steps below.
Step 1
Launch Adobe Premiere Pro, open a project, and then import the video file you want to brighten. Make sure that the video file has been imported into the media library before you start editing it.
Step 2
Next, click on the brightness and contrast option in the Effects panel, located at the bottom left of the software to adjust the brightness and contrast of your video.

Step 3
Bring the brightness and contrast option to the center area below the uploaded video. You can do this by simply dragging it and dropping it beneath the video.
Step 4
You can now easily increase the brightness by changing the brightness number in the effects control panel located to the right of the uploaded video.

Step 5
Adjust the brightness according to your needs and save the video with your preferred settings so you can watch it later or share it with your friends across different platforms.
How To Lighten Up A Dark Video In Adobe Premiere Pro?
The first method that we used was quite simple. All you needed to do was to increase the brightness of the video, and you were good to go. But this method is a bit different. Although it is a little more complicated than the first method, it can do wonders for you. Suppose you have a video shot in very dim light, and it has a lot of dark sections. There is a chance that Increasing the brightness won’t do much. So, you can use this method to brighten your video and improve its visibility. Just follow the steps mentioned below:
Step 1
If you haven’t already opened your video in Adobe Premiere Pro, launch the program and import your footage. Then drag it onto the timeline so that it appears at the top.
Step 2
Effects tab can be found in the left-most panel of adobe premiere pro. Click the Effects tab and search for Lightning effects in the search bar and click on it.

Step 3
Use the drag-and-drop method to add the lighting effects to the clip. Once you have done that, you will feel like your video is having a distorted flash-like effect. But don’t worry as we are not going for that.
Step 4
Now go to the effects control tab present at the top of the screen, and from there, you have to click on the lighting effects.

Step 5
Once you click on the lighting effects, you will see many options on your screen. Click on the “Light 1” button to open its dropdown menu. There you will see the spotlight selected by default.

Step 6
Click on the dropdown icon adjacent to the spotlight to open up the menu. You need to select “Directional” instead of Spotlight, and you will notice that the dark sections have been brightened significantly.

Step 7
The brightness intensity can even be increased by changing the value for the intensity option within the effect control panel.

Enhancing Your Video In Premiere Pro
Once you have done all the steps above, you can also use the video enhancing feature of adobe premiere pro to improve the quality of your videos. When you brighten a video, there is a chance that you might lose quality a little bit. So, to overcome that deficiency, this method might be helpful. Enhancing your videos with Premiere Pro is easy once you know the proper steps to do so. Just follow the steps described below:
Step 1
In the effects panel, search for “unsharp Mask” and drag it to the video clip.

Step 2
In the effect control panel under the Unsharp mask, set the amounts, radius, and threshold to enhance the video.

Keep in mind that you can increase the values of these parameters too high, but you will end up with a distorted video. Try increasing the values by small increments and see what happens. Avoid increasing the “amount” and radius value beyond 100% and ten, respectively.
Conclusion
● Brightening in Premiere Pro is a simple process that can benefit some video projects. Whether you want to brighten the video by increasing exposure, increasing luminance, or adding a vignette effect altogether, there are several ways to do so in Premiere Pro.
● However, you should know that neither option is necessarily better than the other. Video editing in general does take a bit of practice to master, but in this article, we have provided you with the basics and helped you on your way. All methods can be helpful in different situations, and even with similar circumstances, you might find advantages to all practices. Try out these methods for yourself and see which one best suits your needs.
Brighter videos always attract more attention. Indeed, a well-lit video can make your content shine and bring out the best in your story. But what if you forgot to turn on the lights or the camera just couldn’t handle the situation? We’ve all been there: you’re shooting a video, but there aren’t enough light sources. You end up with dark footage. It’s impossible to share this on your social media accounts or with your friends and family.
There are many reasons why people want to brighten a dark video. Maybe you recorded a video with your phone, but the lighting was too dim in the room. Or maybe you were outside, and the sun was behind you, casting shadows on your face while recording. In these cases, it can be helpful to know how to make a dark video brighter.
There is a way to apply simple corrections using Premiere Pro, no matter the reason. In this article, I’ll show you how to brighten your video in Premiere Pro so you can keep all the details in the highlights. This can be very useful if you’re working with a lot of footage that has been underexposed, and sometimes your shot might look too dark or even black.
In this article
01 Can I Brighten A Dark Video?
02 How to Brighten Video in Adobe Premiere Pro?
03 How To Lighten Up A Dark Video In Adobe Premiere Pro?
04 Enhancing Your Video In Premiere Pro
Can I Brighten A Dark Video?
This is a common question that comes up among video editors, so I thought I’d answer it here. The quick answer is yes. There are many online tools that can help you brighten a dark video or adjust the brightness of your video. A lot of times, you’ll get a video file that was shot in low light, and it will make your subject look dark and underexposed. Video brightness is an important feature that is easy to adjust. However, if your video is too dark to start off with, it may be difficult to brighten it in a way that doesn’t look unnatural.
There are several ways you can brighten a dark video. For example, you can use color correction or add more light to the scene before you film. If you already have a dark video, then you’ll need to adjust the contrast and brightness of your video during post-production. You can easily do this by using video editing software but keep in mind that too much brightness or too much contrast can result in poor video quality. So, you have to keep everything in balance.
How to Brighten Video in Adobe Premiere Pro?
Adobe Premiere Pro is your one-stop solution for editing videos, whether you’re editing a film or a TV ad. It gives you the flexibility to edit videos of any format. Adobe Premium makes brightening videos easy. Follow the steps below.
Step 1
Launch Adobe Premiere Pro, open a project, and then import the video file you want to brighten. Make sure that the video file has been imported into the media library before you start editing it.
Step 2
Next, click on the brightness and contrast option in the Effects panel, located at the bottom left of the software to adjust the brightness and contrast of your video.
Step 3
Bring the brightness and contrast option to the center area below the uploaded video. You can do this by simply dragging it and dropping it beneath the video.
Step 4
You can now easily increase the brightness by changing the brightness number in the effects control panel located to the right of the uploaded video.
Step 5
Adjust the brightness according to your needs and save the video with your preferred settings so you can watch it later or share it with your friends across different platforms.
How To Lighten Up A Dark Video In Adobe Premiere Pro?
The first method that we used was quite simple. All you needed to do was to increase the brightness of the video, and you were good to go. But this method is a bit different. Although it is a little more complicated than the first method, it can do wonders for you. Suppose you have a video shot in very dim light, and it has a lot of dark sections. There is a chance that Increasing the brightness won’t do much. So, you can use this method to brighten your video and improve its visibility. Just follow the steps mentioned below:
Step 1
If you haven’t already opened your video in Adobe Premiere Pro, launch the program and import your footage. Then drag it onto the timeline so that it appears at the top.
Step 2
Effects tab can be found in the left-most panel of adobe premiere pro. Click the Effects tab and search for Lightning effects in the search bar and click on it.
Step 3
Use the drag-and-drop method to add the lighting effects to the clip. Once you have done that, you will feel like your video is having a distorted flash-like effect. But don’t worry as we are not going for that.
Step 4
Now go to the effects control tab present at the top of the screen, and from there, you have to click on the lighting effects.
Step 5
Once you click on the lighting effects, you will see many options on your screen. Click on the “Light 1” button to open its dropdown menu. There you will see the spotlight selected by default.
Step 6
Click on the dropdown icon adjacent to the spotlight to open up the menu. You need to select “Directional” instead of Spotlight, and you will notice that the dark sections have been brightened significantly.
Step 7
The brightness intensity can even be increased by changing the value for the intensity option within the effect control panel.
Enhancing Your Video In Premiere Pro
Once you have done all the steps above, you can also use the video enhancing feature of adobe premiere pro to improve the quality of your videos. When you brighten a video, there is a chance that you might lose quality a little bit. So, to overcome that deficiency, this method might be helpful. Enhancing your videos with Premiere Pro is easy once you know the proper steps to do so. Just follow the steps described below:
Step 1
In the effects panel, search for “unsharp Mask” and drag it to the video clip.
Step 2
In the effect control panel under the Unsharp mask, set the amounts, radius, and threshold to enhance the video.
Keep in mind that you can increase the values of these parameters too high, but you will end up with a distorted video. Try increasing the values by small increments and see what happens. Avoid increasing the “amount” and radius value beyond 100% and ten, respectively.
Conclusion
● Brightening in Premiere Pro is a simple process that can benefit some video projects. Whether you want to brighten the video by increasing exposure, increasing luminance, or adding a vignette effect altogether, there are several ways to do so in Premiere Pro.
● However, you should know that neither option is necessarily better than the other. Video editing in general does take a bit of practice to master, but in this article, we have provided you with the basics and helped you on your way. All methods can be helpful in different situations, and even with similar circumstances, you might find advantages to all practices. Try out these methods for yourself and see which one best suits your needs.
What Is Animated GIF
What Is Animated GIF | GIF Example & Advantages of GIF
An easy yet powerful editor
Numerous effects to choose from
Detailed tutorials provided by the official channel
Gifs today have become an indispensable part of our social media conversations. Be it Whatsapp, Facebook, Instagram, or any other online messaging platform, no conversations are complete without using Gifs. These animated images can express the whole emotion during a conversation which cannot be expressed by a text message.
You all might have used or been using Gifs but most people never try to know and learn the different ways you can use Gifs. Gifs could be used in marketing and business to boost the attractiveness of your products.
So in this article we bring you all about Gifs, all your questions like What Are Gifs?, What are Different Kinds of Gifs?, How to Use Cool Gifs as Part of Your Marketing?, How to create animated custom Gifs? Which is the best gif template maker? And many more will be cleared after reading the whole article.
In this article
01 [What Is Animated GIF](#Part 1)
02 [10 Amazing Examples of Animated Gifs in Email Marketing Templates](#Part 2)
03 [5 GIF Makers That Lets You Create Unique Custom Animations](#Part 3)
Part 1 What Is Animated GIF
01What Are Gifs?
To begin with, we will start by understanding what is a Gif. Gif stands for Graphics Interface Format and the kind of animation you use today has had a presence on the internet for more than 30 years as of now. A Gif named “flying airplane” was first created by Steve Wilhite and his team of developers in 1987 while working for Compuserve. At the time of their inception, Gifs were small-sized normal moving images placed on any kind of background.
The early Gifs came into use with the increase in popularity of social sharing websites like Geocities, Myspace, and later Imgur and Tumblr. Today we are using the most advanced versions of Gifs, these can be downloaded or embedded on your website, we can use them on almost every messaging platform and creating Gifs today has become a child’s play.
02Different Kinds of Gifs
Now the question comes about what are different types of Gifs. After their creation, Gifs are now used for various purposes and hence then began a custom to define them according to their use.
● Reaction GIFs
These are the most widely used Gifs in social media and messaging platforms. You might have used them to comment to express your feelings. These help to convey your message by animation and you don’t need to type all the stuff. reaction GIFs are bits and pieces of videos or movies looped into a GIF. Almost all the emotions and feelings like applause, happiness, sadness, etc can be expressed by them.
● Illustration and Cartoon Gifs
GIFs that were illustrated specifically to be turned into a GIF comes under this category. These are mostly used to explain something in simple visual form rather than typing all the stuff. Very attractive animation and bright colors are used here to make them seamless.
● Gif Art
You might have not noticed but Gifs can be used very efficiently to showcase art. Many digital artists use the .gif format to create cool GIFs of their own to present their art. On the Gif website like Giphy, you can find thousands of artistic Gifs.
● Optical illusion GIFs
These kinds of Gifs create an illusion to the human eyes and are very attractive. You can use them while the conversation with your friends for a fun purpose.
● Branded Gifs
You might have noticed, nowadays almost all the brands use cool Gifs to promote their products online. Out of all, the apparel brands have made use of this feature in a very wide spectrum to promote their sales.
● Cinemagraphs
These are very special kinds of animated images. These are normal moving images that are continuously looped and make us feel like a real live image. Kevin Burg and Jamie Beck in 2011 created the first cinematograph Gif.
03Different Ways to Use Cool Gifs in Marketing
Gifs could be a fun way of using interesting and cool animations in your marketing. There are thousands of Gifs available on websites like Giphy from where you can choose the suitable Gif. You can also create a dedicated brand Gifs for your particular use. Just keep some of the important things in mind while selecting Gifs for your products and brand.
● It must deliver an appropriate message from your brand and product.
● It must be under legal circumference. Do not try to use copyrighted Gifs or celebrity faces Gifs without obtaining due permission.
● It must match your branding style on other platforms.
● Must be visually understandable and appealing.
04How to Use Cool Gifs as Part of Your Marketing
As you already know that apart from being a source of fun during social media conversations, Gifs could also be used in marketing. You can use very cool Gifs to promote your product and boost up your sales. Following are some creative ideas in which you can use Gifs to market your products.
● You can arrange a contest asking the participants to create a Gif based on your product.
● You can create cool Gifs related to your products and circulate them over different social media platforms, information on social media receives very quick attention.
● Cinemagraphs could be a great option when you want to showcase details about your product in an innovative form. This kind of Gifs could be very useful in fashion-related marketing.
● Create your brand Gifs and add cool emojis to them. Emojis in a Gif make it more attractive.
● You can use Gif for the “thank you” purpose. You can send a Gif “thank you” Gif when someone shares something about your product on social media.
● Infographics and Virtual representation are an important part of marketing today. You can use Gif to design creative infographics.
● The logo of your brand is like soul to product. Using Gifs you can design a catchy and attractive logo that helps in boosting the marketing of your product.
Part 2 10 Amazing Examples of Animated Gifs in Email Marketing Templates
Gif has become a cool and easy way of expressing your feelings so now you don’t need to type all those long boring messages. Nowadays, email marketers are using a wide range of Gifs to market their products to customers. These Gifs attract the interest of viewers and lead to an increase in sales. You too can use animated GIFs to display your products and services in action. Here you will see 10 amazing examples of marketing gif templates.
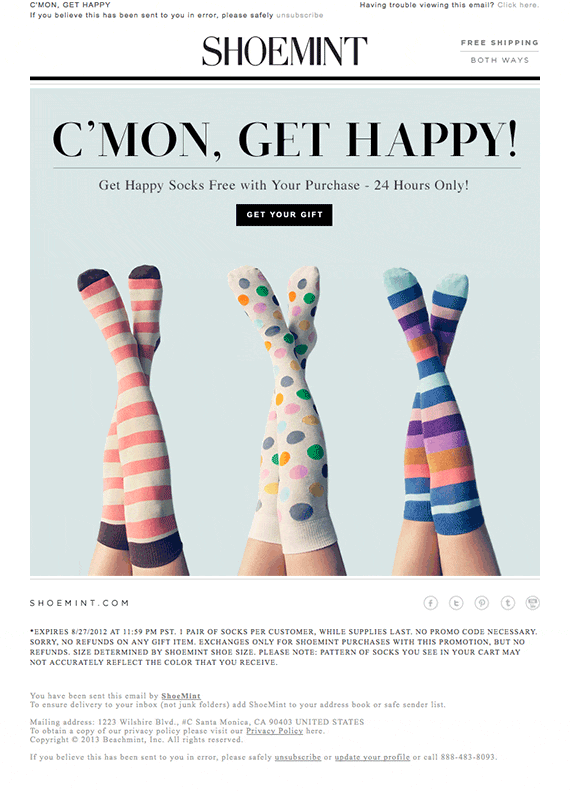
01ShoeMint
ShoeMint, a colored socks company has used very catchy Gif to market their socks. ShoeMint goes by email marketing template – “C’mon, Get Happy!” as their tag line and when you look at the Gif of colorful socks you will have a smile on your face.
02Modcloth
Modcloth markets the dresses which can be combined and paired with different trendy and stylish outfits. Their email marketing template attracts viewers’ attention when they see the same dress paired with different other dresses in an animated form.

03Bed Bath & Beyond
This brand markets a unique Ziploc Space Bag which can be folded and rolled up. The tag line of the email template is “dorm space savers that easily roll up and out to make room for more” and their animated Gifs very well explains the purpose and advantages of these bags.

04Bonobos
To promote their tearaway trousers, Bonobos uses a Gif in which the man removes his pants by just tearing them away. This email marketing template attracts viewers’ attention exactly in the way the company desires.

05Jack Spade
If you are a branded garment lover then you might have received email marketing templates from Jack Spade in the form of Gifs. This brand uses Gif at a wide range to promote its products online.
06Mr. Porter
Mr. Porter, a brand which is known for its warm and cozy comfort wears. This email marketing template shows a man sitting in a very comfortable position near the fire. This Gif puts the urge for the same comfort level in the viewer’s mind.

07Anthropologie
Anthropologie makes use of octopus made out of paper and flapping its tentacles around in a joyous and happy manner. This catchy Gif abates the viewer to go for the product marketed by the email.

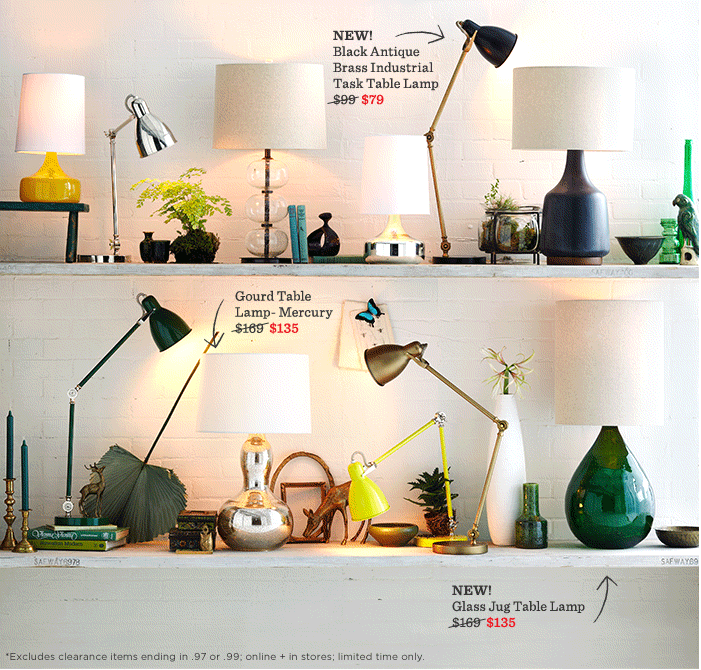
08West Elm
The modern furniture and home decoration company West Elm showcases various lamps in Gif form in their email newsletter. This Gif creates an urge in the viewer’s mind about their need for the home decoration.
09Chanel
The Watch making company Chanel showcases their triple row watches using wonderful animated Gif.

10 Singer 22
This company uses a party-type email marketing template to attract customers who’ve just reached the next level of their rewards program.

Part 3 5 GIF Makers That Lets You Create Unique Custom Animations
Now you might want to know which the best and easiest Gif maker to design unique custom animation is. If you search on Google for an online Gif maker, then your search result will be filled with hundreds of such Gifs makers. But here we have shortlisted the 5 best and easy-to-use Gif makers using which you can create unique custom animation as per your requirements.
01**Wondershare Filmora Video Editor **
To feature at the top of our list is Filmora. Filmora is one of the best video editing tools to turn videos into GIF images. This app uses fabulous text and animation effects to turn your video and images into catchy Gifs. This tool works very smoothly with various OS like Windows 7/Windows 8.1/Windows 10/Windows 11 ( 64 bit OS).

Wondershare Filmora - Best Video Editor for Mac/Windows
5,481,435 people have downloaded it.
Build unique custom animations without breaking a sweat.
Focus on creating epic stories and leave the details to Filmora’s auto features.
Start a creative adventure with drag & drop effects and endless possibilities.
Filmora simplifies advanced features to save you time and effort.
Filmora cuts out repetition so you can move on to your next creative breakthrough.
The best thing about this gif template maker is that you don’t need any technical expertise to use it. You can create gif from all popular video formats like .wmv, .mp4, .mkv, .evo, .dat, .wav, .mpeg and .avi etc. as per your requirements.
02Imgflip
Next on our list is Imgflip, apart from being an efficient Gif creator the main highlight of this tool is that you can create animated GIFs from your pictures or even a Facebook or YouTube video URL. You can also use webcam video directly and rearrange the image to create Gifs.

03GIFMaker.me
Another great gif template maker isGIFMaker.me. This tool enables the generation of quick and attractive Gifs in a matter of a few minutes. No matter you use Mac, Windows, or Linux, this tool will effortlessly create GIFs from images and videos.

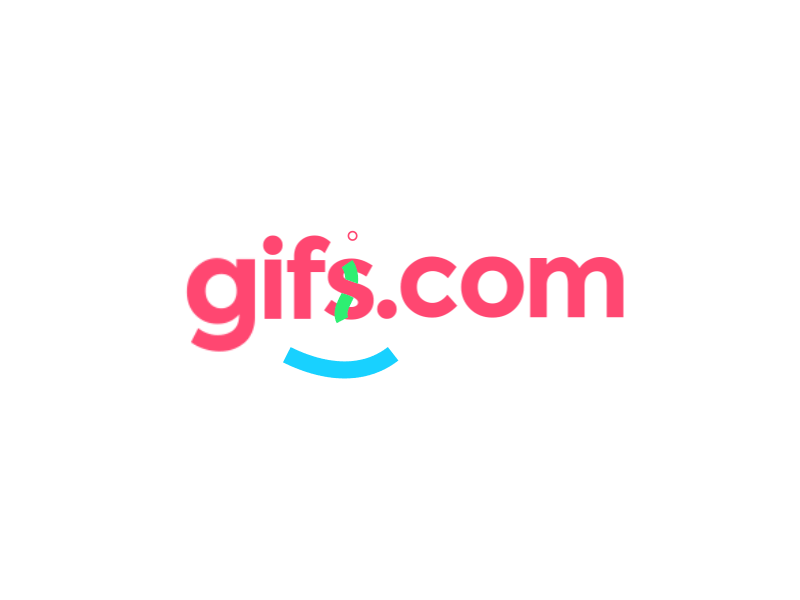
04Gifs.com
Next on our list of best gif template makers is Gifs.com. The website claims to be “the fastest way to make and edit Gifs and short videos”. Gifs.com allows you to access a free and easy-to-use media editor which makes it the fastest GIF creator.
05Imgur
Last but not least to feature in our list of Imgur. Imgur is both a Gif gallery as well as a creator. This tool offers various functions to edit the GIFs you create with features like crop, rotate, resize, etc.
● Ending Thoughts →
● So guys, now it’s time to end the article. After reading this article you might have understood the meaning of Gifs. Gifs could be a fun way to interact on social media and also they could be an important tool in the marketing of your products.
● You can learn to design email templates from the examples provided in the articles. This will help you to boost the marketing of your products online.
● If you want to create Gifs as per your requirements then you can go for any of the five Gif makers suggested in the article but we suggest to go with Filmora first as it is the best and easiest of all the mentioned Gifs makers.
Gifs today have become an indispensable part of our social media conversations. Be it Whatsapp, Facebook, Instagram, or any other online messaging platform, no conversations are complete without using Gifs. These animated images can express the whole emotion during a conversation which cannot be expressed by a text message.
You all might have used or been using Gifs but most people never try to know and learn the different ways you can use Gifs. Gifs could be used in marketing and business to boost the attractiveness of your products.
So in this article we bring you all about Gifs, all your questions like What Are Gifs?, What are Different Kinds of Gifs?, How to Use Cool Gifs as Part of Your Marketing?, How to create animated custom Gifs? Which is the best gif template maker? And many more will be cleared after reading the whole article.
In this article
01 [What Is Animated GIF](#Part 1)
02 [10 Amazing Examples of Animated Gifs in Email Marketing Templates](#Part 2)
03 [5 GIF Makers That Lets You Create Unique Custom Animations](#Part 3)
Part 1 What Is Animated GIF
01What Are Gifs?
To begin with, we will start by understanding what is a Gif. Gif stands for Graphics Interface Format and the kind of animation you use today has had a presence on the internet for more than 30 years as of now. A Gif named “flying airplane” was first created by Steve Wilhite and his team of developers in 1987 while working for Compuserve. At the time of their inception, Gifs were small-sized normal moving images placed on any kind of background.
The early Gifs came into use with the increase in popularity of social sharing websites like Geocities, Myspace, and later Imgur and Tumblr. Today we are using the most advanced versions of Gifs, these can be downloaded or embedded on your website, we can use them on almost every messaging platform and creating Gifs today has become a child’s play.
02Different Kinds of Gifs
Now the question comes about what are different types of Gifs. After their creation, Gifs are now used for various purposes and hence then began a custom to define them according to their use.
● Reaction GIFs
These are the most widely used Gifs in social media and messaging platforms. You might have used them to comment to express your feelings. These help to convey your message by animation and you don’t need to type all the stuff. reaction GIFs are bits and pieces of videos or movies looped into a GIF. Almost all the emotions and feelings like applause, happiness, sadness, etc can be expressed by them.
● Illustration and Cartoon Gifs
GIFs that were illustrated specifically to be turned into a GIF comes under this category. These are mostly used to explain something in simple visual form rather than typing all the stuff. Very attractive animation and bright colors are used here to make them seamless.
● Gif Art
You might have not noticed but Gifs can be used very efficiently to showcase art. Many digital artists use the .gif format to create cool GIFs of their own to present their art. On the Gif website like Giphy, you can find thousands of artistic Gifs.
● Optical illusion GIFs
These kinds of Gifs create an illusion to the human eyes and are very attractive. You can use them while the conversation with your friends for a fun purpose.
● Branded Gifs
You might have noticed, nowadays almost all the brands use cool Gifs to promote their products online. Out of all, the apparel brands have made use of this feature in a very wide spectrum to promote their sales.
● Cinemagraphs
These are very special kinds of animated images. These are normal moving images that are continuously looped and make us feel like a real live image. Kevin Burg and Jamie Beck in 2011 created the first cinematograph Gif.
03Different Ways to Use Cool Gifs in Marketing
Gifs could be a fun way of using interesting and cool animations in your marketing. There are thousands of Gifs available on websites like Giphy from where you can choose the suitable Gif. You can also create a dedicated brand Gifs for your particular use. Just keep some of the important things in mind while selecting Gifs for your products and brand.
● It must deliver an appropriate message from your brand and product.
● It must be under legal circumference. Do not try to use copyrighted Gifs or celebrity faces Gifs without obtaining due permission.
● It must match your branding style on other platforms.
● Must be visually understandable and appealing.
04How to Use Cool Gifs as Part of Your Marketing
As you already know that apart from being a source of fun during social media conversations, Gifs could also be used in marketing. You can use very cool Gifs to promote your product and boost up your sales. Following are some creative ideas in which you can use Gifs to market your products.
● You can arrange a contest asking the participants to create a Gif based on your product.
● You can create cool Gifs related to your products and circulate them over different social media platforms, information on social media receives very quick attention.
● Cinemagraphs could be a great option when you want to showcase details about your product in an innovative form. This kind of Gifs could be very useful in fashion-related marketing.
● Create your brand Gifs and add cool emojis to them. Emojis in a Gif make it more attractive.
● You can use Gif for the “thank you” purpose. You can send a Gif “thank you” Gif when someone shares something about your product on social media.
● Infographics and Virtual representation are an important part of marketing today. You can use Gif to design creative infographics.
● The logo of your brand is like soul to product. Using Gifs you can design a catchy and attractive logo that helps in boosting the marketing of your product.
Part 2 10 Amazing Examples of Animated Gifs in Email Marketing Templates
Gif has become a cool and easy way of expressing your feelings so now you don’t need to type all those long boring messages. Nowadays, email marketers are using a wide range of Gifs to market their products to customers. These Gifs attract the interest of viewers and lead to an increase in sales. You too can use animated GIFs to display your products and services in action. Here you will see 10 amazing examples of marketing gif templates.
01ShoeMint
ShoeMint, a colored socks company has used very catchy Gif to market their socks. ShoeMint goes by email marketing template – “C’mon, Get Happy!” as their tag line and when you look at the Gif of colorful socks you will have a smile on your face.
02Modcloth
Modcloth markets the dresses which can be combined and paired with different trendy and stylish outfits. Their email marketing template attracts viewers’ attention when they see the same dress paired with different other dresses in an animated form.
03Bed Bath & Beyond
This brand markets a unique Ziploc Space Bag which can be folded and rolled up. The tag line of the email template is “dorm space savers that easily roll up and out to make room for more” and their animated Gifs very well explains the purpose and advantages of these bags.
04Bonobos
To promote their tearaway trousers, Bonobos uses a Gif in which the man removes his pants by just tearing them away. This email marketing template attracts viewers’ attention exactly in the way the company desires.
05Jack Spade
If you are a branded garment lover then you might have received email marketing templates from Jack Spade in the form of Gifs. This brand uses Gif at a wide range to promote its products online.
06Mr. Porter
Mr. Porter, a brand which is known for its warm and cozy comfort wears. This email marketing template shows a man sitting in a very comfortable position near the fire. This Gif puts the urge for the same comfort level in the viewer’s mind.
07Anthropologie
Anthropologie makes use of octopus made out of paper and flapping its tentacles around in a joyous and happy manner. This catchy Gif abates the viewer to go for the product marketed by the email.
08West Elm
The modern furniture and home decoration company West Elm showcases various lamps in Gif form in their email newsletter. This Gif creates an urge in the viewer’s mind about their need for the home decoration.
09Chanel
The Watch making company Chanel showcases their triple row watches using wonderful animated Gif.
10 Singer 22
This company uses a party-type email marketing template to attract customers who’ve just reached the next level of their rewards program.
Part 3 5 GIF Makers That Lets You Create Unique Custom Animations
Now you might want to know which the best and easiest Gif maker to design unique custom animation is. If you search on Google for an online Gif maker, then your search result will be filled with hundreds of such Gifs makers. But here we have shortlisted the 5 best and easy-to-use Gif makers using which you can create unique custom animation as per your requirements.
01**Wondershare Filmora Video Editor **
To feature at the top of our list is Filmora. Filmora is one of the best video editing tools to turn videos into GIF images. This app uses fabulous text and animation effects to turn your video and images into catchy Gifs. This tool works very smoothly with various OS like Windows 7/Windows 8.1/Windows 10/Windows 11 ( 64 bit OS).
Wondershare Filmora - Best Video Editor for Mac/Windows
5,481,435 people have downloaded it.
Build unique custom animations without breaking a sweat.
Focus on creating epic stories and leave the details to Filmora’s auto features.
Start a creative adventure with drag & drop effects and endless possibilities.
Filmora simplifies advanced features to save you time and effort.
Filmora cuts out repetition so you can move on to your next creative breakthrough.
The best thing about this gif template maker is that you don’t need any technical expertise to use it. You can create gif from all popular video formats like .wmv, .mp4, .mkv, .evo, .dat, .wav, .mpeg and .avi etc. as per your requirements.
02Imgflip
Next on our list is Imgflip, apart from being an efficient Gif creator the main highlight of this tool is that you can create animated GIFs from your pictures or even a Facebook or YouTube video URL. You can also use webcam video directly and rearrange the image to create Gifs.
03GIFMaker.me
Another great gif template maker isGIFMaker.me. This tool enables the generation of quick and attractive Gifs in a matter of a few minutes. No matter you use Mac, Windows, or Linux, this tool will effortlessly create GIFs from images and videos.
04Gifs.com
Next on our list of best gif template makers is Gifs.com. The website claims to be “the fastest way to make and edit Gifs and short videos”. Gifs.com allows you to access a free and easy-to-use media editor which makes it the fastest GIF creator.
05Imgur
Last but not least to feature in our list of Imgur. Imgur is both a Gif gallery as well as a creator. This tool offers various functions to edit the GIFs you create with features like crop, rotate, resize, etc.
● Ending Thoughts →
● So guys, now it’s time to end the article. After reading this article you might have understood the meaning of Gifs. Gifs could be a fun way to interact on social media and also they could be an important tool in the marketing of your products.
● You can learn to design email templates from the examples provided in the articles. This will help you to boost the marketing of your products online.
● If you want to create Gifs as per your requirements then you can go for any of the five Gif makers suggested in the article but we suggest to go with Filmora first as it is the best and easiest of all the mentioned Gifs makers.
Also read:
- Updated Want to Make a Single Video From Different Clips? Follow These Ways to Learn About How to Merge Clips in DaVinci Resolve for 2024
- Updated Best Online GIF to Image (PNG/JPG) Converters
- 2024 Approved How To Add Motion Blur On CapCut? (IPhone & Android)
- How to Build A Video Editing Career
- Updated 2024 Approved How to Brighten a Video in Windows 10 | Step-By-Step Guide
- New In 2024, 7 Solutions Cut Video For Instagram On Mac
- Looking for Free Tools to Create Radial Blur Images Online? Read Our Full Guide to Learn About the 6 Best Programs to Add This Effect to Your Pictures for 2024
- In 2024, How to Concatenate Videos Using FFmpeg
- If You Want to Know More About the Basics of Final Cut Pro, It Would Be Helpful to Watch a Beginner Tutorial, with the Length of only 20 Minutes, an Introduction of the Whole Program for 2024
- Updated Hey! Are You Looking for Video Reverse Effects in Your Videos? Then, You Are at the Right Place. This Article Will Guide You in Creating a Video Reverse Effect
- Dubbing Videos With Voiceovers | Wondershare Filmora Tutorial
- Updated Read This Review to Learn Everything You Need to Know About Leeming LUT Pro and How to Apply Pro LUTs Using Different Video Editors for 2024
- Updated Here We Are Going to Show You the Best Effects to Appear on Camera Made with Filmora for 2024
- Updated Find Out the Best Animated Text Video Tools and Learn How to Animate Text in a Video in Simple Steps. Discover the Best Fonts to Animate Text Along with the Text Animation Templates for 2024
- 2024 Approved Step by Step to Crop Videos with CyberLink PowerDirector
- In 2024, Free 3D Intro Makers
- New Looking for a Great Way to Make Your Own Anime Music Video? The Following Are the Top AMV Makers to Choose From for 2024
- New Are You Trying to Make Slow-Mo Videos on Instagram? In This Article, We Will Discuss Top-Rated Ways to Produce Perfect Slow-Motion Videos for Instagram
- New Do You Know About some Efficient Slow-Motion Video Editors? Read This Article to Find Out the Best Slow-Motion Video Editing Tools that You Can Try
- New 3 Best Effects to Appear on Camera
- Are You Finding It Challenging to Convert GIFs Into JPG or PNG Images? Do Not Worry! The Best Free Online Tool and Software to Change Your GIF Into PNG or JPG Images Are Below
- Updated In 2024, Advancements in Game Recording Software A Comprehensive Overview
- 2024 Approved Best 5 Apps To Add Song To Video
- New In 2024, Free
- New 2024 Approved How to Rotate a Video in Windows 10
- New In 2024, Cropping Videos in VLC Step by Step
- Updated How to Use LUTS to Color Grade on Your iPhone
- Updated How to Fade to Black Premiere Pro
- How to Change Realme GT Neo 5 Location on Skout | Dr.fone
- Quick Fixes for Why Is My Realme 11X 5G Black and White | Dr.fone
- How to Fix Pokemon Go Route Not Working On Samsung Galaxy M34 5G? | Dr.fone
- New In 2024, Coqui Voice Cloning The Ultimate Solution to Streamline Audio Content
- In 2024, 5 Ways Change Your Home Address in Google/Apple Map on Apple iPhone 6/iPad | Dr.fone
- In 2024, How to Unlock iPhone X With an Apple Watch & What to Do if It Doesnt Work
- In 2024, 4 Ways to Sync Contacts from Apple iPhone 13 Pro Max to iPad Easily | Dr.fone
- What To Do if Your Samsung Galaxy M34 5G Auto Does Not Work | Dr.fone
- In 2024, Where Is the Best Place to Catch Dratini On Vivo T2 5G | Dr.fone
- In 2024, How to Track Vivo S18 Pro Location by Number | Dr.fone
- Things You Dont Know About Nubia Red Magic 8S Pro Reset Code | Dr.fone
- Preparation to Beat Giovani in Pokemon Go For Samsung Galaxy A15 4G | Dr.fone
- In 2024, How To Unlock Stolen iPhone X In Different Conditionsin | Dr.fone
- How to Fix Pokemon Go Route Not Working On Oppo A79 5G? | Dr.fone
- In 2024, How to Unlock Xiaomi Redmi 12 5G Phone without PIN
- Spoofing Life360 How to Do it on Vivo Y100i Power 5G? | Dr.fone
- Google Play Services Wont Update? 12 Fixes are Here on Oppo Find X6 | Dr.fone
- In 2024, Ultimate Guide on Samsung Galaxy A24 FRP Bypass
- How can I get more stardust in pokemon go On Nokia C12? | Dr.fone
- How To Transfer Data From iPhone 6s Plus To Other iPhone 13 Pro devices? | Dr.fone
- How to restore wiped messages on Oppo F23 5G
- In 2024, How and Where to Find a Shiny Stone Pokémon For Apple iPhone SE (2020)? | Dr.fone
- Easy steps to recover deleted messages from Nubia Red Magic 8S Pro
- 5 Easy Ways to Change Location on YouTube TV On Realme 12 Pro+ 5G | Dr.fone
- Title: Updated If Youre Considering Starting a Podcast Video Recording, You Need to Read This Article and Learn All You Need to Know About Making a Successful Podcast
- Author: Morgan
- Created at : 2024-05-19 05:12:37
- Updated at : 2024-05-20 05:12:37
- Link: https://ai-video-editing.techidaily.com/updated-if-youre-considering-starting-a-podcast-video-recording-you-need-to-read-this-article-and-learn-all-you-need-to-know-about-making-a-successful-podca/
- License: This work is licensed under CC BY-NC-SA 4.0.
