
:max_bytes(150000):strip_icc():format(webp)/GettyImages-screen-mirroring-842272124-5a7897e104d1cf0037763c0a.jpg)
Updated In 2024, Are You Facing Trouble in Playing a TS File? We Got You! Read the Article Below to Learn the Most About TS Format, Pros and Cons, and More
Are You Facing Trouble in Playing a TS File? We Got You! Read the Article Below to Learn the Most About TS Format, Pros and Cons, and More
Have you been downloading videos and looking at the files having the ‘.ts’ extension at the end? We guess you have seen them. The question is, do you know what the TS file format is? Many compressed video files have TS format. Do you want to learn more about the file format?
Take our help. Allow us to tell you what this extension means, along with what work they do. We will also tell you its difference with other formats. So, to learn in detail about TS video format, continue reading.
In this article
02 Pros and Coins about TS Video Format
03 How to Play TS Video Files with VLC Media Player?
04 How to Edit TS Video Files with Filmora Video Editor?
05 TS VS. MP4: What’s the Difference?
Part 1. What Is TS Video Format?
A TS format file is a Video Transport Stream file. The TS file extension is used to store video data, mostly on DVDs. The video files are standardly compressed with .MPEG video compression. If you are looking for a file extension to save streamed or broadcast videos, TS video format is ideal for this. Are you worried about how to play a TS file?

Well, a video file with this format can easily be played on a certain media player or video editing program . Various video playback apps, video development tools, and also DVD creation programs support the TS format. The .ts file extension can also contain any data, and TS files don’t always need to store media or documents.
Part 2. Pros and Coins about TS Video Format
Everything has its beneficial factors and disadvantages, so does TS video format has. Are you ready to know more about the TS file format? After learning about the format, it’s time to share its advantages and drawbacks with you. Let’s get started!
Advantages of TS File Format
A great thing about TS format is that, after each keyframe, the file information is added automatically. The format is impressive when it comes to maintaining transmission integrity. This is because of all the elementary streams, synchronization patterns, and error corrections; everything is encapsulated in a container format.
Do you know what else benefits TS format has? It is widely used for broadcasting because broadcasting doesn’t need the complete stream for playing it. You can easily share large files over the communication media in real-time as tiny chunks of the audio or video file are sent. Along with this, the error is easily detected as extra information is shared with every chunk, helping in error detection.
Drawbacks of TS File Format
Moving on to its disadvantages, let’s start with the device compatibility. The biggest drawback of using the TS file format is that it is not compatible with many devices. For instance, a built-in media player like Windows Media Player does not support the format; eventually, users must change the file format.
Do you know another significant disadvantage? You cannot share TS files online. Different platforms like Facebook, YouTube, etc., support other famous formats, so hence, sharing TS video files requires a format converter. Do you know how much space does a TS file occupies? Well, it acquires a significant storage space, more than other file formats.
Part 3. How to Play TS Video Files with VLC Media Player?
As mentioned, only specific programs support and play TS video format, so VLC Media Player is one of those. The software is famous among its competitors because it supports a wide range of file formats.
VLC is an open-source, free cross-platform media player that lets you play various multimedia files and DVDs, VCDs, Audio CDs, and other streaming protocols. VLC also plays most codecs like MPEG-2, MPEG-4, MKV, MP3, etc. The media player runs on Windows, macOS, Linux, Unix, iOS, and Android.
Do you know a great thing about VLC? Surprisingly, the software has no spyware, no user tracking, and no ads. VLC is a simple yet super-fast and powerful media player of all time. Learn how to play TS files on VLC by following the steps below:
Step 1: Install or Update VLC
To play TS file format, first of all, download and install the VLC media player on your respective device. If you have already installed the media player, update it to the latest version. With this, all the codecs will be working properly. Move to the ‘Help’ section from the top menu and hit ‘Check for Updates.’

Step 2: Open the TS File
Now, launch the VLC media player and head over to the ‘Media’ option. From the menu list, select the ‘Open File’ option, locate the TS file from your device and add it to the media player. You can also directly drag the TS video file to VLC to play it.

Step 3: Enjoy Watching TS File
After your file has been successfully imported to the VLC media player, you can now enjoy watching the TS Video format without any trouble.

Part 4. How to Edit TS Video Files with Filmora Video Editor?
Now that you know how to play TS video format with a VLC media player let’s also share how you can edit your TS videos. With Wondershare Filmora , you can edit a stunning video. The video editor offers more features than you can imagine. The software comes with features like Record PC Screen, Color Match, Silence Detection, Scene Detection, etc.
For Win 7 or later (64-bit)
For macOS 10.12 or later
Some more advanced editing tools are offered, like Power Tool, Stabilize Video, Auto Reframe, Auto Highlight, and whatnot. If you are interested in editing your TS file format videos with Filmora, take help from the steps shared below.
Step 1: Import TS File
After you have launched Wondershare Filmora on your device, import the media file so that you can start the editing; for that, head to the ‘File’ tab and hover on the ‘Import Media’ option. By doing this, a sub-menu will appear, select the ‘Import Media Files’ option and locate the TS video.

Step 2: TS Audio Edit
After importing the media file, drag it to the timeline to start the editing. With Filmora, add cool sound effects to your videos from the ‘Audio’ section. You get various effects like Happy, Jazz, Young & Bright, and other options.

Step 3: Use Transitions and Effects
What is a video without Effects and Transitions? Filmora comes with a wide range of options to add unique effects and transitions to your videos.

Step 4: Add Elements
Head to the ‘Elements’ section to add amazing little fun things to your video and make it interesting. You get elements like Laser Eye, various Emoji options, and a lot more.

Step 5: Export TS Video
Once all the editing is complete and satisfied with the final result, export the video. Hit the ‘Export’ button and select TS file format from the ‘Locals’ tab as the output format.

Part 5. TS VS. MP4: What’s the Difference?
What is the difference between the TS file format and MP4? Allow us to tell you some. You might have read about both formats, but a few differences are discussed as follows:
TS
TS format is used in DVD and Blu-ray discs that you have on your respective device. It does the same work as MP4, but the TS file breaks the data into tiny chinks. TS format comprises a few elements, making it a faster transporter for MPEG-2 format compressed video data. It is used widely in broadcasting and streaming.
MP4
MP4 is considered more compatible as compared to TS format, as not all the software allows the ‘.ts’ extension. If the file is not transmitted properly or is not closed properly, it can lose the data it has. MP4 is divided into two parts, one has the media data, and the other has metadata. Due to compression differences in both formats, it has a smaller size than the TS format.
Bottom Line
The article has shared great details about the TS format. We talked about how you can play TS files on VLC and also shed light on its pros and cons. Moreover, we also shared a video editor to edit your TS file format videos. Now, let’s talk about Wondershare Filmora.
Wondershare Filmora is a great video editor and is perfect for creating brilliant videos. The comprehensive list of features that you get from Filmora makes it unique and unforgettable. AI Portrait, Auto Normalization, Video Snapshot, Animation Keyframing, and many others are among its various features. For creating good videos, Filmora is an ideal option.
Wondershare Filmora
Get started easily with Filmora’s powerful performance, intuitive interface, and countless effects!
Try It Free Try It Free Try It Free Learn More >

02 Pros and Coins about TS Video Format
03 How to Play TS Video Files with VLC Media Player?
04 How to Edit TS Video Files with Filmora Video Editor?
05 TS VS. MP4: What’s the Difference?
Part 1. What Is TS Video Format?
A TS format file is a Video Transport Stream file. The TS file extension is used to store video data, mostly on DVDs. The video files are standardly compressed with .MPEG video compression. If you are looking for a file extension to save streamed or broadcast videos, TS video format is ideal for this. Are you worried about how to play a TS file?
Well, a video file with this format can easily be played on a certain media player or video editing program . Various video playback apps, video development tools, and also DVD creation programs support the TS format. The .ts file extension can also contain any data, and TS files don’t always need to store media or documents.
Part 2. Pros and Coins about TS Video Format
Everything has its beneficial factors and disadvantages, so does TS video format has. Are you ready to know more about the TS file format? After learning about the format, it’s time to share its advantages and drawbacks with you. Let’s get started!
Advantages of TS File Format
A great thing about TS format is that, after each keyframe, the file information is added automatically. The format is impressive when it comes to maintaining transmission integrity. This is because of all the elementary streams, synchronization patterns, and error corrections; everything is encapsulated in a container format.
Do you know what else benefits TS format has? It is widely used for broadcasting because broadcasting doesn’t need the complete stream for playing it. You can easily share large files over the communication media in real-time as tiny chunks of the audio or video file are sent. Along with this, the error is easily detected as extra information is shared with every chunk, helping in error detection.
Drawbacks of TS File Format
Moving on to its disadvantages, let’s start with the device compatibility. The biggest drawback of using the TS file format is that it is not compatible with many devices. For instance, a built-in media player like Windows Media Player does not support the format; eventually, users must change the file format.
Do you know another significant disadvantage? You cannot share TS files online. Different platforms like Facebook, YouTube, etc., support other famous formats, so hence, sharing TS video files requires a format converter. Do you know how much space does a TS file occupies? Well, it acquires a significant storage space, more than other file formats.
Part 3. How to Play TS Video Files with VLC Media Player?
As mentioned, only specific programs support and play TS video format, so VLC Media Player is one of those. The software is famous among its competitors because it supports a wide range of file formats.
VLC is an open-source, free cross-platform media player that lets you play various multimedia files and DVDs, VCDs, Audio CDs, and other streaming protocols. VLC also plays most codecs like MPEG-2, MPEG-4, MKV, MP3, etc. The media player runs on Windows, macOS, Linux, Unix, iOS, and Android.
Do you know a great thing about VLC? Surprisingly, the software has no spyware, no user tracking, and no ads. VLC is a simple yet super-fast and powerful media player of all time. Learn how to play TS files on VLC by following the steps below:
Step 1: Install or Update VLC
To play TS file format, first of all, download and install the VLC media player on your respective device. If you have already installed the media player, update it to the latest version. With this, all the codecs will be working properly. Move to the ‘Help’ section from the top menu and hit ‘Check for Updates.’
Step 2: Open the TS File
Now, launch the VLC media player and head over to the ‘Media’ option. From the menu list, select the ‘Open File’ option, locate the TS file from your device and add it to the media player. You can also directly drag the TS video file to VLC to play it.
Step 3: Enjoy Watching TS File
After your file has been successfully imported to the VLC media player, you can now enjoy watching the TS Video format without any trouble.
Part 4. How to Edit TS Video Files with Filmora Video Editor?
Now that you know how to play TS video format with a VLC media player let’s also share how you can edit your TS videos. With Wondershare Filmora , you can edit a stunning video. The video editor offers more features than you can imagine. The software comes with features like Record PC Screen, Color Match, Silence Detection, Scene Detection, etc.
For Win 7 or later (64-bit)
For macOS 10.12 or later
Some more advanced editing tools are offered, like Power Tool, Stabilize Video, Auto Reframe, Auto Highlight, and whatnot. If you are interested in editing your TS file format videos with Filmora, take help from the steps shared below.
Step 1: Import TS File
After you have launched Wondershare Filmora on your device, import the media file so that you can start the editing; for that, head to the ‘File’ tab and hover on the ‘Import Media’ option. By doing this, a sub-menu will appear, select the ‘Import Media Files’ option and locate the TS video.
Step 2: TS Audio Edit
After importing the media file, drag it to the timeline to start the editing. With Filmora, add cool sound effects to your videos from the ‘Audio’ section. You get various effects like Happy, Jazz, Young & Bright, and other options.
Step 3: Use Transitions and Effects
What is a video without Effects and Transitions? Filmora comes with a wide range of options to add unique effects and transitions to your videos.
Step 4: Add Elements
Head to the ‘Elements’ section to add amazing little fun things to your video and make it interesting. You get elements like Laser Eye, various Emoji options, and a lot more.
Step 5: Export TS Video
Once all the editing is complete and satisfied with the final result, export the video. Hit the ‘Export’ button and select TS file format from the ‘Locals’ tab as the output format.
Part 5. TS VS. MP4: What’s the Difference?
What is the difference between the TS file format and MP4? Allow us to tell you some. You might have read about both formats, but a few differences are discussed as follows:
TS
TS format is used in DVD and Blu-ray discs that you have on your respective device. It does the same work as MP4, but the TS file breaks the data into tiny chinks. TS format comprises a few elements, making it a faster transporter for MPEG-2 format compressed video data. It is used widely in broadcasting and streaming.
MP4
MP4 is considered more compatible as compared to TS format, as not all the software allows the ‘.ts’ extension. If the file is not transmitted properly or is not closed properly, it can lose the data it has. MP4 is divided into two parts, one has the media data, and the other has metadata. Due to compression differences in both formats, it has a smaller size than the TS format.
Bottom Line
The article has shared great details about the TS format. We talked about how you can play TS files on VLC and also shed light on its pros and cons. Moreover, we also shared a video editor to edit your TS file format videos. Now, let’s talk about Wondershare Filmora.
Wondershare Filmora is a great video editor and is perfect for creating brilliant videos. The comprehensive list of features that you get from Filmora makes it unique and unforgettable. AI Portrait, Auto Normalization, Video Snapshot, Animation Keyframing, and many others are among its various features. For creating good videos, Filmora is an ideal option.
Wondershare Filmora
Get started easily with Filmora’s powerful performance, intuitive interface, and countless effects!
Try It Free Try It Free Try It Free Learn More >
How to Zoom Picture in Picture [Easy Solution]
Zoom is one of the greatest options on the market for video conferencing. It doesn’t matter whether you use it at home or in an office environment; it will quickly link the team members. One of the most popular video conferencing programs is Zoom. When in-person meetings aren’t feasible, it enables you to communicate electronically with employees, and it’s been a major popularity for social occasions as well. In case you’re not acquainted, picture-in-picture mode enables you to watch videos from one app while using your PC normally. The movie will keep playing in a tiny thumbnail window so that two applications may work simultaneously on your smartphone.
You may create virtual audio and video conferences, webinars, live chats, screen sharing, and other collaboration tools with Zoom, a cloud-based video communications solution. Zoom’s most recent iPhone apps let you dismiss a Zoom Meeting while keeping the Zoom video call open in a picture-in-picture mode. To join a Zoom conference, you don’t need an account, and because the software works with Mac, Windows, Linux, iOS, and Android devices, nearly anybody can use it. Since using Zoom’s picture-in-picture mode is the same as using it with other applications, you shouldn’t have any trouble if you often use PiP mode. Here are the top 4 methods you can refer to picture in picture in Zoom.
Method 1: Swap Shared Screen with Video
You may move the Zoom Meeting PiP window across the screen, change the thumbnail’s size, and utilize other applications while it remains open, just like any other picture-in-picture window. Before leaving the meeting if you’re not giving a presentation or speaking, you should definitely mute Zoom on your iPhone to prevent noises from your typing or other activities from entering the conversation. Additionally, keep in mind to switch off the camera if you’re engaged in something distracting, at least for the duration of your activity. To reopen the Zoom Meeting and go back to the Zoom app, touch the Picture-in-Picture mode pane. Here are some actions to keep in mind:
Steps to Swap Shared Screen for Zoom Picture in Picture
Step1Launch or enter a Zoom meeting. Keep the video on your main screen at all times, closing the chat and participant list as necessary.
Step2Tap the Home button or swipe up from the bottom of the screen.
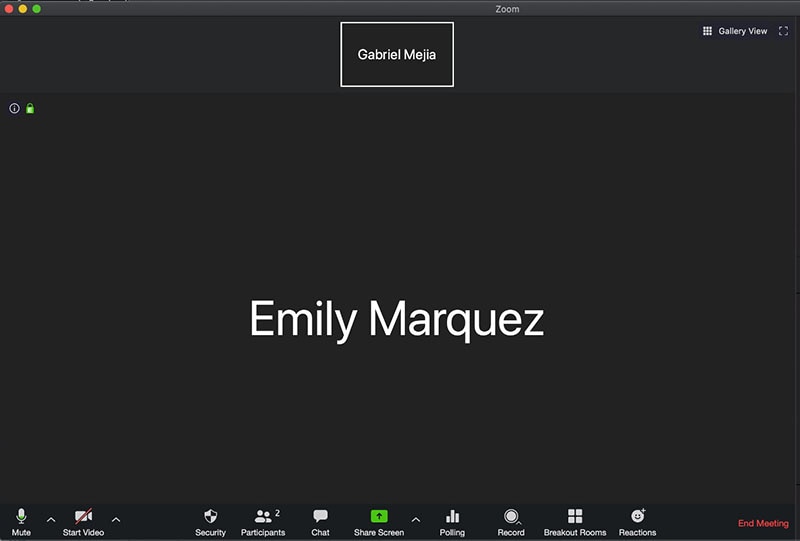
Step3Picture-in-picture mode should be activated automatically throughout the meeting.
Method 2: Use Ecamm Live
Live streaming is a fantastic way to provide original content and stand out from the crowd. To prevent any operational difficulties, a more sophisticated virtual camera is absolutely necessary. You now have magical abilities thanks to Ecamm virtual cam, including the ability to add text, animations, observe a live stream, post viewer comments, play music, share your screen, use sound effects, and many more. It offers the Ecamm live virtual camera zoom function for video conferences so you may improve your Zoom discussions by sending output to other PC programs. You could see a quality difference between what you view in Ecamm Live and what your Zoom visitors see while utilizing virtual camera with Zoom. The quality of a Zoom video stream cannot be improved using Ecamm Live. Simply broadcast the Zoom app using Ecamm Live’s Screen Share mode to utilize Ecamm Live for picture-in-picture virtual presentations on Zoom.
Steps to Use Ecamm Live for Zoom Picture in Picture
Step1Download the Ecamm Application
Install Ecamm Live on your computer, then choose the center button in the source switcher at the top of the main window to enter Screen Share mode.
Step2Create Scenes
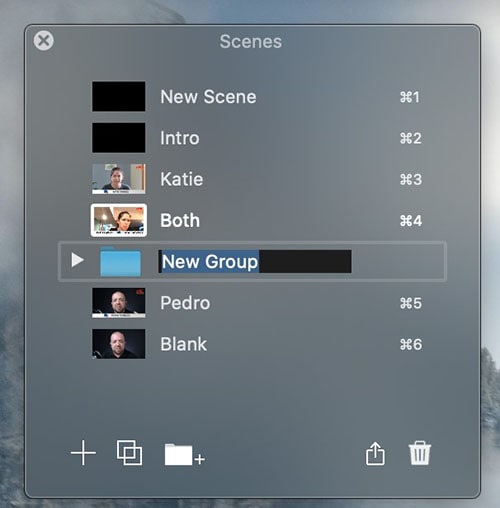
With the use of Ecamm Live’s Virtual Camera and Virtual Mic capabilities, you may transfer Ecamm Live’s output to almost any other Mac software, including Zoom. After setting, create the scenes in the program to quickly switch between various cameras.
Step3Select Ecamm on Zoom
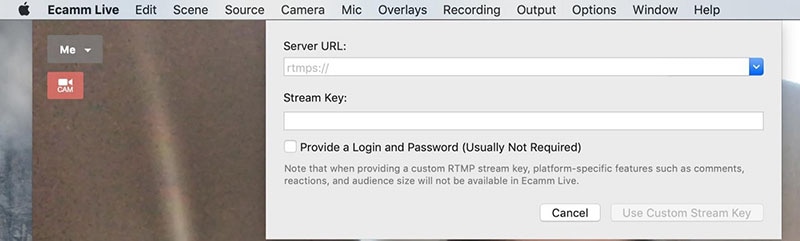
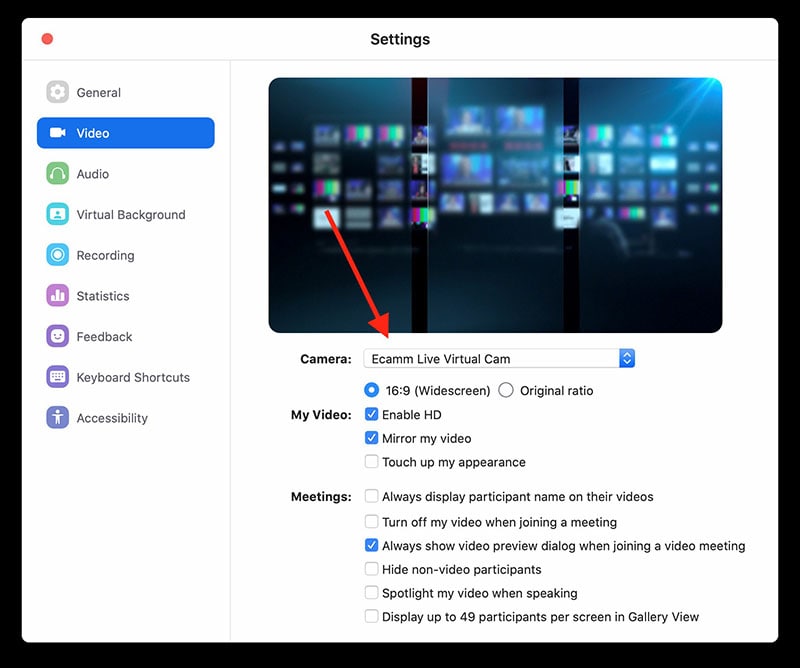
You may also utilize Ecamm Live’s Sharing Window capability to feed Ecamm Live output into Zoom. Simply activate the virtual camera, and then, as seen below, choose Ecamm Live Virtual Camera in Zoom’s video settings:
Step4Begin Your Presentation
Finally, click the PC share option to show your Zoom app to your audience. To conceal a picture-in-picture window that displays your camera image while live streaming, click the PIP button.
Method 3: Use Filmora as A Switcher
Zoom has solutions that will make your meetings simple and secure. It gives your remote staff a secure setting to interact and share crucial information. Ideal control over your film and configuration options to make them aesthetically pleasing is something Zoom lacks. To overcome the drawbacks and improve the quality of your online meetings, you may take use of the capabilities of Zoom in conjunction with Filmora. Filmora was developed with the intention of easing user burden and supporting applications. Though complicated, the program is simple to use. The perhaps most popular web information that may be saved on your computer can be easily captured by just angling your screen. For more information on how to record and save your Zoom for picture in picture, see the guide here.
To broadcast a variety of situations in a grid style, you may also combine inputs from your camera, microphone, computer screen, and web conferencing software. Wondershare -the finest desktop application for recording a Zoom Picture in Picture meeting- is Filmora. With the majority of cameras, this app’s screen recording capability is both user-friendly and feature-rich. Here, users may either choose a particular region to record or record their zoom meetings in Fullscreen mode. Additionally, you may choose the camera and input microphone that will be used while recording a video overlay. The addition of relevant comments like phrases, lines, drawings, symbols, etc. is also possible by users. The detailed procedure for recording a Zoom Picture-in-Picture meeting using a Filmora recorder is given below:
Free Download For Win 7 or later(64-bit)
Free Download For macOS 10.14 or later
Step1Download and Install Filmora Zoom Recorder
You may find both types, i.e., the most recent Windows and Mac versions, by first visiting the usual website and then using this Zoom. Install the program on your computer once you download it to get started.

Step2Initiate Filmora Recorder
After finishing the installation process for this Reside Zoom recorder, launch it from the main menus and choose “New Task” when prompted. It will take you to Filmora’s streamlined user interface where you can immediately start filming. Then, as seen in the picture below, you may adjust the screen recording using your preferred camera, microphone, and system settings:

Step3Begin/End the Recording
When you are through configuring this Zoom picture in picture recorder, click the Record button, and it will immediately begin recording your customized screen. Similar to that, after you’re done recording, click Stop, which will take you inside the video editor where you may edit your recorded information.

Step4Share Recordings
When you have everything ready, export your recording right away. After you’re done with the editing part, you do have a lot of options to choose from when displaying your screen capture and webcam stories. To do so, click the Export button in the item user interface’s top-right corner as shown below:
You may easily choose your preferred way to share from there if you choose to upload your work of zoom picture in picture recordings straight to the YouTube or other reputable websites right now. Simply refer to the Sharing plug-ins in the Export window to find out more.
Method 4: Use Hardware Switcher ATEM Mini Pro
Particularly on Zoom, the ATEM Mini is excellent for video conferences. The Blackmagic ATEM Mini is a USB video interface and HDMI switcher. Four HDMI inputs, or four cameras that can produce an HDMI video stream, may be switched between live. This device integrates Zoom meetings fast and makes it incredibly simple to set up your audio, a sometimes-forgotten aspect of video broadcasting. This sophisticated video switcher promises to offer broadcast-quality multi-camera footage with ease and is targeted at gamers, streamers, and online reviewers. It connects to a computer via a USB-C to USB-A connection. The video feed may then be sent to distant colleagues via a number of well-liked videos streaming services, including Zoom.
Step1The ATEM Mini Pro is a basic control switcher with pro-broadcast performance. Your ATEM Mini Pro is really simple to set up. You can connect a full setup with several cameras and microphones in around 30 minutes.

Step2You may connect several camera sources to the inputs of the ATEM Mini Pro. The 4 HDMI inputs each have a separate standards converter built in. As a result, the ATEM Mini can automatically convert inputs that are 1080p, 1080i, or 720p to the switcher’s video standard. You may make quick changes between inputs with no latency or disruption to your video output by using the ergonomic buttons.
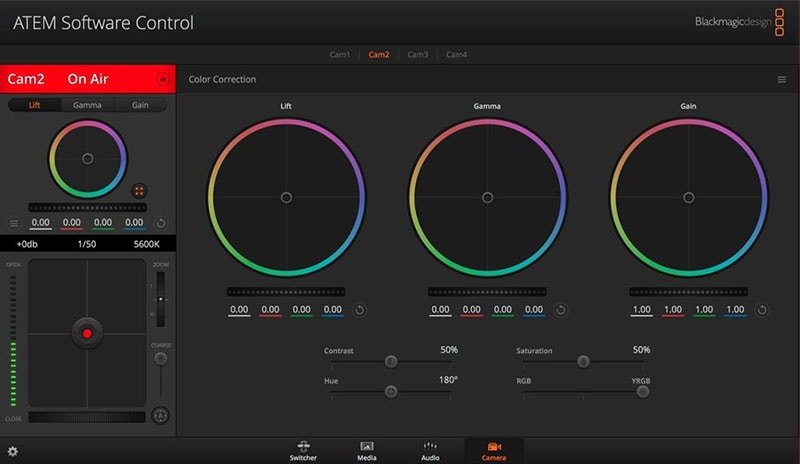
Step3As a third option, Zoom offers ATEM Mini, which enables you to switch between several inputs, add custom visuals, and adjust audio levels all from a single interface. To improve the quality of your production, you may even use smooth transitions like wipes or fades. You can even test any input stream before making it live.
Conclusion
When you are doing a Zoom Meeting and share your screen, only to discover that what the other attendees see is a split screen with your material and the other Attendee cams, it is highly annoying. You may move the Zoom Meeting PiP window across the screen, change the thumbnail’s size, and utilize other applications while it remains open, just like any other picture-in-picture window. Someone must be sharing information in the Zoom conference for the Picture in Picture, or “Split Screen” option, to be active. We’ve listed the top techniques for doing it effectively above. To do this work without difficulty, use them as your guide.
Free Download For macOS 10.14 or later
Step1Download and Install Filmora Zoom Recorder
You may find both types, i.e., the most recent Windows and Mac versions, by first visiting the usual website and then using this Zoom. Install the program on your computer once you download it to get started.
Step2Initiate Filmora Recorder
After finishing the installation process for this Reside Zoom recorder, launch it from the main menus and choose “New Task” when prompted. It will take you to Filmora’s streamlined user interface where you can immediately start filming. Then, as seen in the picture below, you may adjust the screen recording using your preferred camera, microphone, and system settings:
Step3Begin/End the Recording
When you are through configuring this Zoom picture in picture recorder, click the Record button, and it will immediately begin recording your customized screen. Similar to that, after you’re done recording, click Stop, which will take you inside the video editor where you may edit your recorded information.
Step4Share Recordings
When you have everything ready, export your recording right away. After you’re done with the editing part, you do have a lot of options to choose from when displaying your screen capture and webcam stories. To do so, click the Export button in the item user interface’s top-right corner as shown below:
You may easily choose your preferred way to share from there if you choose to upload your work of zoom picture in picture recordings straight to the YouTube or other reputable websites right now. Simply refer to the Sharing plug-ins in the Export window to find out more.
Method 4: Use Hardware Switcher ATEM Mini Pro
Particularly on Zoom, the ATEM Mini is excellent for video conferences. The Blackmagic ATEM Mini is a USB video interface and HDMI switcher. Four HDMI inputs, or four cameras that can produce an HDMI video stream, may be switched between live. This device integrates Zoom meetings fast and makes it incredibly simple to set up your audio, a sometimes-forgotten aspect of video broadcasting. This sophisticated video switcher promises to offer broadcast-quality multi-camera footage with ease and is targeted at gamers, streamers, and online reviewers. It connects to a computer via a USB-C to USB-A connection. The video feed may then be sent to distant colleagues via a number of well-liked videos streaming services, including Zoom.
Step1The ATEM Mini Pro is a basic control switcher with pro-broadcast performance. Your ATEM Mini Pro is really simple to set up. You can connect a full setup with several cameras and microphones in around 30 minutes.
Step2You may connect several camera sources to the inputs of the ATEM Mini Pro. The 4 HDMI inputs each have a separate standards converter built in. As a result, the ATEM Mini can automatically convert inputs that are 1080p, 1080i, or 720p to the switcher’s video standard. You may make quick changes between inputs with no latency or disruption to your video output by using the ergonomic buttons.
Step3As a third option, Zoom offers ATEM Mini, which enables you to switch between several inputs, add custom visuals, and adjust audio levels all from a single interface. To improve the quality of your production, you may even use smooth transitions like wipes or fades. You can even test any input stream before making it live.
Conclusion
When you are doing a Zoom Meeting and share your screen, only to discover that what the other attendees see is a split screen with your material and the other Attendee cams, it is highly annoying. You may move the Zoom Meeting PiP window across the screen, change the thumbnail’s size, and utilize other applications while it remains open, just like any other picture-in-picture window. Someone must be sharing information in the Zoom conference for the Picture in Picture, or “Split Screen” option, to be active. We’ve listed the top techniques for doing it effectively above. To do this work without difficulty, use them as your guide.
Top 5 Ways To Convert Hdr To Sdr Videos
HDR or the High Dynamic Range Images points out the brightest and the darkest spots on an image, while an SDR has fewer details and colors. In comparison, HDR has a resolution four times as excellent as an SDR video. With a higher contrast ratio and color information, HDR videos are more vivid and pleasing.
Then why is there a need to convert HDR to SDR? An HDR file is huge and is currently incompatible with many old and some new devices. To view HDR videos, you need to lower the resolution and change the size of the file tidbit to convert it to 1080 SDR without compromising on the quality.
Plenty of HDR converters can perform the task, but only a few have the benefit of retaining the 4K quality of the original video. This article will walk you through the five easiest ways of converting videos from HDR to SDR format. So without further ado, let’s begin.
Easiest Fix - Edit and Convert HDR Videos in Wondershare Filmora [PC & Mac]
You must be living under a rock if you are still unaware of Wondershare Filmora . Filmora is an excellent app to make and edit your videos with the finesse of a professional. Wondershare Filmora comes with professional video editing tools packaged perfectly for beginners.
Filmora is especially a blessing for content creators looking to create unique and exciting videos in any resolution, video quality, and format they want. Apart from its usual video editing tools, a perk of having Wondershare Filmora is that you can easily change the videos from one format to another. For example, you can convert an HDR video to SDR in Filmora so that users with older devices incompatible with HDR can also view the video without burning their eyes.
It does not matter if you have iPhone 12 HDR videos or an HDR clip shot with a professional camera; Filmora can handle it all. The best part of converting the video is that Filmora supports efficient transferring of HDR files from your phone to your PC. So, without further ado, let us start with how you can convert an HDR video to SDR in Filmora.
Free Download For Win 7 or later(64-bit)
Free Download For macOS 10.14 or later
How to Convert an HDR video to SDR without data loss in Filmora
To convert your video to SDR, start by downloading Wondershare Filmora if you do not already have it downloaded.
Download the Application
Download Wondershare Filmora according to your PC type, i.e., Mac or Windows. Install it and run it. Launch the application to get working.
Import Your Videos
- Next, import your HDR video file. To import, click on the Import button in the primary window. From there, select the video file you want to convert to SDR.
- Once imported, drag the file to the timeline. You can tweak or edit it too before converting. You may trim it or cut an unwanted section.

- If you want to change to SDR while editing the project, click the File button and select Project Settings. From the settings, go to Colour space and select the SDR-Rec709 option.

Exporting the File
- If you want to only change the color space setting for the exported file, go to Export and then click on Settings.
- From settings, click on the Colour Space option, and from the drop-down menu, select SDR-Rec709.

- Press Ok to save the changes and export the file in your desired format.
- If you want to adjust the resolution according to the device like iPhone, Samsung, Playstation, or Xbox you can also do that directly with Filmora by clicking the Device tab in the Export Confirm the settings and press Ok.

This is the easiest and cleanest way to get an SDR copy of an HDR file. Filmora does it effortlessly, allowing you to get an SDR video out of an HDR one.
Decode Video from HDR to SDR with a Video Converter
If you have ever worked with converting videos, then you are probably familiar with Handbrake. Handbrake is a household name for video converting, especially when it comes to 4KHDR to SDR video conversions. It has a free open source feature that allows you to convert to SDR videos with an MP4 or MKV format.
Steps of Decoding HDR Video to SDR with Handbrake
Before converting your HDR video to SDR, make sure you have downloaded Handbrake on your computer.
- Open the Handbrake app.
- To import your video to Handbrake, click on File, then Source Selection. You can also drag and drop the video to scan it. Next, wait for Handbrake to scan the title. Once the video scan is complete, all the information will be displayed in the source section.

- Once the file is imported, you can now select the output format from the right panel under General. The default format already specified in Handbrake is Fast 1080p30; you can change that if you are looking for a different form.

- You can also change the format depending on the device type in Handbrake.
- Lastly, go to Presets, click Production, and select Production Standard to convert 4K HDR video to 4K SDR. You can also do that by going to General Profile under the Legacy column.

- Now, select format, quality, resolution, and video codec.
- Lastly, select the destination for the file from the Browse button and press encode to start the conversion.

With a few simple clicks, your HDR file can easily be converted to SDR using Handbrake.
Transcode Video from HDR to SDR by Image Editing [Samsung only]
If you own the latest Samsung S22 phone, you are probably aware of its feature that allows you to record in an HDR10 view. But, what do you do if you want to send the video to someone whose phone is incompatible with HDR? The video will appear too bright and washed out.
By converting the video to SDR, you can send them the video without burning their retinas. This method to convert HDR videos to SDR is especially for Samsung Galaxy phones. The gallery app initially used to have a built-in option to do that, but it’s not there anymore. While the original option is removed, you can still use the method below to convert an HDR video to SDR with just a few taps.
- To convert HDR10+ video to SDR on a Samsung Galaxy phone, you can directly proceed with it on your phone.
- Head to and open Gallery, choose your HDR10+ video and tap three dots in the bottom right corner.
- From the pop-up menu, select Open in Video Player.
- Once the video opens in the video player, click on another three dots in the top right corner.
- From there, tap on the Editor
- In the editor, tap again on three dots on the bottom right and now select Size and Format.
- From this menu, you can change the resolution of the video as well as its format. From the format drop-down, you can select SDR to convert your video to SDR.
- Make sure you do not tap on Save; instead, click on the three dots again and tap on Save as Copy. This will leave your original HDR video untouched and save a copy for the SDR video.
Convert HDR 4K Video to SDR with YouTube [Untested]
HDR videos on Youtube show higher color dynamics and contrast ratios than an SDR video. Viewers with HDR-compatible devices will see ‘HDR’ after every video quality option in the video settings (1080p HDR).
However, the videos uploaded as HDR on youtube can be viewed on HDR unsupported devices too. This happens because youtube automatically converts all HDR videos to SDR to be viewed on non-HDR devices. Here is a brief introduction to the steps of converting HDR to SDR on Youtube:
- Record the metadata by exporting it from an HDR-supported application like Wondershare Filmora . The metadata should be in a codec or container to be played by Youtube correctly.
- Grade your HDR properly as Rec. 2020 with PQ or HLG. Ensure the videos are graded correctly using an HDR transfer function to retain the quality. If you are unsure about the videos graded as HDR, you should not use this method because it can distort the video.
- rectly using an HDR transfer function to retain the quality. If you are not sure about the videos graded as HDR, you should not use this method because it can distort the video.

- Once done, upload it on Youtube. If it detects HDR metadata during the upload, Youtube automatically produces an SDR conversion for non-HDR compatible devices.

- Downloading the video from HDR unsupported devices will save an SDR video.
This method seems easy but has greater risks involved such as distortion of video if improper HDR grading is done.
Get Real-time Video HDR to SDR Conversion by Video Content Providers
With gaming becoming almost a sport, online streaming has grown immensely popular. These streaming services allow you to stream in 4K HDR format. However, a significant downside of this is that many devices are still incompatible with HDR video.
We have listed multiple methods to convert your HDR video clips to SDR, but what about a live stream? We highly recommend checking out the Intel official blog post for converting your HDR videos to SDR in real-time. The blog post describes how you can convert your live stream to SDR with different methods. You can give it a read if you are interested in that.
Hot FAQs on How to Convert HDR to SDR
1. Is SDR better than HDR?
SDR is Standard Dynamic Range, while HDR stands for High Dynamic Range. HDR is the latest technology concerning quality, clear and detailed images. HDR is perfect for videos that require high contrast, shadows, and mixed light.
HDR is definitely better than SDR because the “High” definition takes everything to the next level. However, SDR is frequently used as most devices are not compatible with HDR.
2. Why is HDR smaller than SDR?
Undoubtedly, HDR provides better image quality, colors, and clarity than SDR, but why is the file size smaller then? The answer is quite simple. HDR10 files are equipped with HVAC. HVAC is a very efficient file compressor that compresses the file while keeping its quality intact. SDR files are not compressed with SDR; hence the file size is much bigger.
3. Why does HDR look washed out?
An HDR video might look too bright or washed out if your device is incompatible with HDR color space. Unlike the iPhone 12 or Samsung Galaxy S22, phones have a built-in HDR recording feature. However, older versions may not be able to enjoy the clarity and colors offered by an HDR recording. Hence when an HDR video is sent to someone with an older phone, it looks as if the video is washed out.
Final Words
While HDR might be a superior color space, SDR is frequently used for video clips so maximum people can enjoy the video despite what their devices are compatible with. You can easily convert an HDR video to SDR using Wondershare Filmora or any other methods listed above.
An important point to note is that HDR videos converted to SDR might look a little off sometimes with darker shadows and sharpness. It might be a better idea to record in SDR rather than convert it to SDR later. However, converting is still a popular way to go with an HDR video; you will also have a beautiful high-quality video and an SDR copy.
Free Download For macOS 10.14 or later
How to Convert an HDR video to SDR without data loss in Filmora
To convert your video to SDR, start by downloading Wondershare Filmora if you do not already have it downloaded.
Download the Application
Download Wondershare Filmora according to your PC type, i.e., Mac or Windows. Install it and run it. Launch the application to get working.
Import Your Videos
- Next, import your HDR video file. To import, click on the Import button in the primary window. From there, select the video file you want to convert to SDR.
- Once imported, drag the file to the timeline. You can tweak or edit it too before converting. You may trim it or cut an unwanted section.
- If you want to change to SDR while editing the project, click the File button and select Project Settings. From the settings, go to Colour space and select the SDR-Rec709 option.
Exporting the File
- If you want to only change the color space setting for the exported file, go to Export and then click on Settings.
- From settings, click on the Colour Space option, and from the drop-down menu, select SDR-Rec709.
- Press Ok to save the changes and export the file in your desired format.
- If you want to adjust the resolution according to the device like iPhone, Samsung, Playstation, or Xbox you can also do that directly with Filmora by clicking the Device tab in the Export Confirm the settings and press Ok.
This is the easiest and cleanest way to get an SDR copy of an HDR file. Filmora does it effortlessly, allowing you to get an SDR video out of an HDR one.
Decode Video from HDR to SDR with a Video Converter
If you have ever worked with converting videos, then you are probably familiar with Handbrake. Handbrake is a household name for video converting, especially when it comes to 4KHDR to SDR video conversions. It has a free open source feature that allows you to convert to SDR videos with an MP4 or MKV format.
Steps of Decoding HDR Video to SDR with Handbrake
Before converting your HDR video to SDR, make sure you have downloaded Handbrake on your computer.
- Open the Handbrake app.
- To import your video to Handbrake, click on File, then Source Selection. You can also drag and drop the video to scan it. Next, wait for Handbrake to scan the title. Once the video scan is complete, all the information will be displayed in the source section.
- Once the file is imported, you can now select the output format from the right panel under General. The default format already specified in Handbrake is Fast 1080p30; you can change that if you are looking for a different form.
- You can also change the format depending on the device type in Handbrake.
- Lastly, go to Presets, click Production, and select Production Standard to convert 4K HDR video to 4K SDR. You can also do that by going to General Profile under the Legacy column.
- Now, select format, quality, resolution, and video codec.
- Lastly, select the destination for the file from the Browse button and press encode to start the conversion.
With a few simple clicks, your HDR file can easily be converted to SDR using Handbrake.
Transcode Video from HDR to SDR by Image Editing [Samsung only]
If you own the latest Samsung S22 phone, you are probably aware of its feature that allows you to record in an HDR10 view. But, what do you do if you want to send the video to someone whose phone is incompatible with HDR? The video will appear too bright and washed out.
By converting the video to SDR, you can send them the video without burning their retinas. This method to convert HDR videos to SDR is especially for Samsung Galaxy phones. The gallery app initially used to have a built-in option to do that, but it’s not there anymore. While the original option is removed, you can still use the method below to convert an HDR video to SDR with just a few taps.
- To convert HDR10+ video to SDR on a Samsung Galaxy phone, you can directly proceed with it on your phone.
- Head to and open Gallery, choose your HDR10+ video and tap three dots in the bottom right corner.
- From the pop-up menu, select Open in Video Player.
- Once the video opens in the video player, click on another three dots in the top right corner.
- From there, tap on the Editor
- In the editor, tap again on three dots on the bottom right and now select Size and Format.
- From this menu, you can change the resolution of the video as well as its format. From the format drop-down, you can select SDR to convert your video to SDR.
- Make sure you do not tap on Save; instead, click on the three dots again and tap on Save as Copy. This will leave your original HDR video untouched and save a copy for the SDR video.
Convert HDR 4K Video to SDR with YouTube [Untested]
HDR videos on Youtube show higher color dynamics and contrast ratios than an SDR video. Viewers with HDR-compatible devices will see ‘HDR’ after every video quality option in the video settings (1080p HDR).
However, the videos uploaded as HDR on youtube can be viewed on HDR unsupported devices too. This happens because youtube automatically converts all HDR videos to SDR to be viewed on non-HDR devices. Here is a brief introduction to the steps of converting HDR to SDR on Youtube:
- Record the metadata by exporting it from an HDR-supported application like Wondershare Filmora . The metadata should be in a codec or container to be played by Youtube correctly.
- Grade your HDR properly as Rec. 2020 with PQ or HLG. Ensure the videos are graded correctly using an HDR transfer function to retain the quality. If you are unsure about the videos graded as HDR, you should not use this method because it can distort the video.
- rectly using an HDR transfer function to retain the quality. If you are not sure about the videos graded as HDR, you should not use this method because it can distort the video.
- Once done, upload it on Youtube. If it detects HDR metadata during the upload, Youtube automatically produces an SDR conversion for non-HDR compatible devices.
- Downloading the video from HDR unsupported devices will save an SDR video.
This method seems easy but has greater risks involved such as distortion of video if improper HDR grading is done.
Get Real-time Video HDR to SDR Conversion by Video Content Providers
With gaming becoming almost a sport, online streaming has grown immensely popular. These streaming services allow you to stream in 4K HDR format. However, a significant downside of this is that many devices are still incompatible with HDR video.
We have listed multiple methods to convert your HDR video clips to SDR, but what about a live stream? We highly recommend checking out the Intel official blog post for converting your HDR videos to SDR in real-time. The blog post describes how you can convert your live stream to SDR with different methods. You can give it a read if you are interested in that.
Hot FAQs on How to Convert HDR to SDR
1. Is SDR better than HDR?
SDR is Standard Dynamic Range, while HDR stands for High Dynamic Range. HDR is the latest technology concerning quality, clear and detailed images. HDR is perfect for videos that require high contrast, shadows, and mixed light.
HDR is definitely better than SDR because the “High” definition takes everything to the next level. However, SDR is frequently used as most devices are not compatible with HDR.
2. Why is HDR smaller than SDR?
Undoubtedly, HDR provides better image quality, colors, and clarity than SDR, but why is the file size smaller then? The answer is quite simple. HDR10 files are equipped with HVAC. HVAC is a very efficient file compressor that compresses the file while keeping its quality intact. SDR files are not compressed with SDR; hence the file size is much bigger.
3. Why does HDR look washed out?
An HDR video might look too bright or washed out if your device is incompatible with HDR color space. Unlike the iPhone 12 or Samsung Galaxy S22, phones have a built-in HDR recording feature. However, older versions may not be able to enjoy the clarity and colors offered by an HDR recording. Hence when an HDR video is sent to someone with an older phone, it looks as if the video is washed out.
Final Words
While HDR might be a superior color space, SDR is frequently used for video clips so maximum people can enjoy the video despite what their devices are compatible with. You can easily convert an HDR video to SDR using Wondershare Filmora or any other methods listed above.
An important point to note is that HDR videos converted to SDR might look a little off sometimes with darker shadows and sharpness. It might be a better idea to record in SDR rather than convert it to SDR later. However, converting is still a popular way to go with an HDR video; you will also have a beautiful high-quality video and an SDR copy.
Add Emoji to Linkedin Post – 5 Tips You Need to Know
Add Emoji to Linkedin Post - 5 Tips You Need to Know
An easy yet powerful editor
Numerous effects to choose from
Detailed tutorials provided by the official channel
Emojis are fun loving symbols as they represent your real emotions. Adding emojis to your LinkedIn can add personality to your posts. If you want to stand out your posts from others – use emojis.
In this article
01 [Why Emojis Matter](#Part 1)
02 [5 Tips for You to Add Emoji to Linkedin Posts](#Part 2)
03 [Add Emoji to Linkedin Post Q&A](#Part 3)
Part 1 Why Emojis Matter
Emojis are a visual portrayal of an emotion, object, sign and symbol. Emojis are very helpful in expressing our actual feelings to anyone. Sometimes you want to express anything to anyone but you cannot express them with your words. This is where emojis help you in portraying the actual meaning of the message. Emojis expresses their feelings better than words.
Emojis are becoming the common language in the 21st century. “A picture is worth a thousand words” is totally relevant in today’s time. Language is evolving day by day and emojis are a part of this evolvement as you don’t have to write long sentences, emojis convey the content in fewer words. Thus, they are now also used in the professional environment. They make the posts more engaging and also make other remember you. Emojis in some or the other way also make you popular and appear to be friendly.

Here is why they are important.
01Make your LinkedIn profile more intelligible
Using emojis in your LinkedIn bio will catch more attention from the viewers and make them to read your LinkedIn profile. However, it is essential to add the right emoji at the right place. Reading a bio which is of (2800) characters is boring and hardly any viewer is going to invest time in reading it. If you will add some emoji it will add more value to your bio and will also make your bio interesting.
Thus, it is one of the best ways to make your content much more interactive and engaging by adding emojis to it. Emojis are more advanced form of texts, which makes the reader engaged.
02Using emoji to support branding
You can use emojis to connect to your audience and it makes them feel more relatable because it is what they are using in their daily lives. You can use a perfect skin tone of emoji to expresses your brand logo.
Using an emoji as a symbol which is relevant to your brand, again and again will help the viewers to recognize the brand whenever they will see that emoji. This is how an emoji helps you to support your brand. Writing only text makes it boring and decreases the audience viewership. Adding emojis is a creative idea as they will amplify your content and make it more interesting.
03Portraying your personality
Linkedin is a professional online platform where how you represent yourself is very important. Putting anything can affect your personality as it shows who you are, what are your beliefs or your values. Use emojis which are relevant, according to your personality. It makes your personality more impactful. Adding emojis is a creative aspect of job search.
04Universality of emojis
If you are from other country and writing things which are known to your location and unknown to other person from different country, how will he/she be able to understand? A simple solution to this is, use of emojis because they are universal and known to everyone. It can be understood easily as they represent what you want to express.
Part 2 5 Tips for you to Add Emoji to Linkedin Post
● Adding an emoji helps you to express what you want to say. Sometimes texts can be monotonous, so adding an emojis which are relevant can be helpful. Texts are not enough sometimes to actually express what we are trying to say. Adding emoji to it will be a great idea but don’t stuff a lot emojis.
● Using the perfect emoji depending on the situation is a thing you should always keep in mind. There are varieties of emojis from which you can choose. Selection of perfect emoji which portrays your actual situation is actually very important.
● Using the wrong emoji that doesn’t suit the situation can offend anyone. For example, if a person is having a bad day and he/she is telling it to you and you send them a laughing emoji, it can make them feel bad and insulted.
● Placing an emoji on the right place plays an important role. Suppose if content is funny and on the other side you are putting a sad emoji then your content representation will go out of context. So the placement of an emoji on the right place is important.
● Emojis work as an upliftment of your content so placing them in wrong place will not make a match between your content and emoji. The result is it will mislead the audience. If you will use wrong emojis, viewers will stop relating to your content. So, it is important to keep in mind that you don’t have to stuff emojis anywhere, place them where you think it’s relevant to the content.
Part 3 Add Emoji to Linkedin Post Q&A
ADD EMOJI TO LINKEDIN POST Q&A
How can you add an emoji to your linkedin post?
A. You can insert an emoji to your linkedin post, emails or in a message by using a keyboard shortcut CTRL + CMD + SPACE..
Is it a good idea to use emojis on linkedin?
A. You can add emojis to your Linkedin profile as well as posts as it makes your linkedin profile more readable. If you will use emojis people will notice your posts and it will stand out from the crowd. Adding emojis to your post will give you more exposure on your profile. Emojis are helpful in adding actual emotions to your online communication.
Using emojis at work is professional or unprofessional?
A. Some people think that using emojis at work is professional because sometimes only content is not enough to explain what you wanted to convey. Adding an emoji to your work will add more value to it and will make it readable to the audience. While some people think that using emojis at work is highly unprofessional as it breaks the bar of professionalism and makes it look more casual.
What is the advantage of adding emojis to your communication?
A. Emojis express the facial expression, gestures and emotions. Having a communication online and adding emojis to it will make the communication stronger, as it represents what you want to say with what expression and emotions. It will add feelings to your communication.
What will be the best software to access latest emojis?
A. You can consider using Filmora. Filmora is editing and video creation software which was developed by Wondershare and it is the best software and it has its own built-in animated emoji library. In Wondershare Filmora Video Editor click on the elements option, as it contains various categories such as shapes, badges and emojis. Click on the emoji category and select any according to your content. Drag and drop the emoji where you want to place it then adjust the duration and size according to you.
For Win 7 or later (64-bit)
For macOS 10.12 or later
● Ending Thoughts →
● Emoji expresses your gestures, facial expressions, and your actual emotions. Adding emoji will add more value to your content and make you stand out from others.
● It can also be used professionally if you know what will be the right emoji and place to insert it. It helps you to covey your message correctly and makes your linkedin posts readable.
● You can consider using Filmora as it has its own built-in animated emoji library and variety of emojis from which you can choose and place them wherever you want.
Emojis are fun loving symbols as they represent your real emotions. Adding emojis to your LinkedIn can add personality to your posts. If you want to stand out your posts from others – use emojis.
In this article
01 [Why Emojis Matter](#Part 1)
02 [5 Tips for You to Add Emoji to Linkedin Posts](#Part 2)
03 [Add Emoji to Linkedin Post Q&A](#Part 3)
Part 1 Why Emojis Matter
Emojis are a visual portrayal of an emotion, object, sign and symbol. Emojis are very helpful in expressing our actual feelings to anyone. Sometimes you want to express anything to anyone but you cannot express them with your words. This is where emojis help you in portraying the actual meaning of the message. Emojis expresses their feelings better than words.
Emojis are becoming the common language in the 21st century. “A picture is worth a thousand words” is totally relevant in today’s time. Language is evolving day by day and emojis are a part of this evolvement as you don’t have to write long sentences, emojis convey the content in fewer words. Thus, they are now also used in the professional environment. They make the posts more engaging and also make other remember you. Emojis in some or the other way also make you popular and appear to be friendly.
Here is why they are important.
01Make your LinkedIn profile more intelligible
Using emojis in your LinkedIn bio will catch more attention from the viewers and make them to read your LinkedIn profile. However, it is essential to add the right emoji at the right place. Reading a bio which is of (2800) characters is boring and hardly any viewer is going to invest time in reading it. If you will add some emoji it will add more value to your bio and will also make your bio interesting.
Thus, it is one of the best ways to make your content much more interactive and engaging by adding emojis to it. Emojis are more advanced form of texts, which makes the reader engaged.
02Using emoji to support branding
You can use emojis to connect to your audience and it makes them feel more relatable because it is what they are using in their daily lives. You can use a perfect skin tone of emoji to expresses your brand logo.
Using an emoji as a symbol which is relevant to your brand, again and again will help the viewers to recognize the brand whenever they will see that emoji. This is how an emoji helps you to support your brand. Writing only text makes it boring and decreases the audience viewership. Adding emojis is a creative idea as they will amplify your content and make it more interesting.
03Portraying your personality
Linkedin is a professional online platform where how you represent yourself is very important. Putting anything can affect your personality as it shows who you are, what are your beliefs or your values. Use emojis which are relevant, according to your personality. It makes your personality more impactful. Adding emojis is a creative aspect of job search.
04Universality of emojis
If you are from other country and writing things which are known to your location and unknown to other person from different country, how will he/she be able to understand? A simple solution to this is, use of emojis because they are universal and known to everyone. It can be understood easily as they represent what you want to express.
Part 2 5 Tips for you to Add Emoji to Linkedin Post
● Adding an emoji helps you to express what you want to say. Sometimes texts can be monotonous, so adding an emojis which are relevant can be helpful. Texts are not enough sometimes to actually express what we are trying to say. Adding emoji to it will be a great idea but don’t stuff a lot emojis.
● Using the perfect emoji depending on the situation is a thing you should always keep in mind. There are varieties of emojis from which you can choose. Selection of perfect emoji which portrays your actual situation is actually very important.
● Using the wrong emoji that doesn’t suit the situation can offend anyone. For example, if a person is having a bad day and he/she is telling it to you and you send them a laughing emoji, it can make them feel bad and insulted.
● Placing an emoji on the right place plays an important role. Suppose if content is funny and on the other side you are putting a sad emoji then your content representation will go out of context. So the placement of an emoji on the right place is important.
● Emojis work as an upliftment of your content so placing them in wrong place will not make a match between your content and emoji. The result is it will mislead the audience. If you will use wrong emojis, viewers will stop relating to your content. So, it is important to keep in mind that you don’t have to stuff emojis anywhere, place them where you think it’s relevant to the content.
Part 3 Add Emoji to Linkedin Post Q&A
ADD EMOJI TO LINKEDIN POST Q&A
How can you add an emoji to your linkedin post?
A. You can insert an emoji to your linkedin post, emails or in a message by using a keyboard shortcut CTRL + CMD + SPACE..
Is it a good idea to use emojis on linkedin?
A. You can add emojis to your Linkedin profile as well as posts as it makes your linkedin profile more readable. If you will use emojis people will notice your posts and it will stand out from the crowd. Adding emojis to your post will give you more exposure on your profile. Emojis are helpful in adding actual emotions to your online communication.
Using emojis at work is professional or unprofessional?
A. Some people think that using emojis at work is professional because sometimes only content is not enough to explain what you wanted to convey. Adding an emoji to your work will add more value to it and will make it readable to the audience. While some people think that using emojis at work is highly unprofessional as it breaks the bar of professionalism and makes it look more casual.
What is the advantage of adding emojis to your communication?
A. Emojis express the facial expression, gestures and emotions. Having a communication online and adding emojis to it will make the communication stronger, as it represents what you want to say with what expression and emotions. It will add feelings to your communication.
What will be the best software to access latest emojis?
A. You can consider using Filmora. Filmora is editing and video creation software which was developed by Wondershare and it is the best software and it has its own built-in animated emoji library. In Wondershare Filmora Video Editor click on the elements option, as it contains various categories such as shapes, badges and emojis. Click on the emoji category and select any according to your content. Drag and drop the emoji where you want to place it then adjust the duration and size according to you.
For Win 7 or later (64-bit)
For macOS 10.12 or later
● Ending Thoughts →
● Emoji expresses your gestures, facial expressions, and your actual emotions. Adding emoji will add more value to your content and make you stand out from others.
● It can also be used professionally if you know what will be the right emoji and place to insert it. It helps you to covey your message correctly and makes your linkedin posts readable.
● You can consider using Filmora as it has its own built-in animated emoji library and variety of emojis from which you can choose and place them wherever you want.
Also read:
- Updated Complete Guide to Make an Intro Video
- Updated 2024 Approved You Can Splice Video on the iPhone Using Various Applications. This Article Will Guide You Through the Steps Necessary to Splice Your Videos
- How To Make Transparent Background On Picsart
- Updated In 2024, Top 7 Best GoPro Video Editors for Mac
- On the Tiktok App, You Can Make a Photo Video Slideshow. You Can Make Photo Video Slideshow with Music, Animated Tiktok Templates, and Can Also Add Text to Slideshow Video
- New In 2024, In This Article, We Will Discuss What Lens Distortion Is, How It May Be Fixed, and the Factors You Need to Pay Attention to Avoid Lens Distortion when Taking or Recording Videos
- Updated How to Use Lumetri Color in Adobe After Effects for 2024
- How to Add a Lower Third to Your Video for 2024
- Updated Splitting the Clips in Adobe After Effects Step by Step
- Updated In 2024, Best Phantom Slow-Mo Camera For Recording Slow Motion Videos
- New 2024 Approved How to Comment on YouTube Live Chat
- Updated Many People Choose Video Editing or Post-Editing as Their Career in These Days. Is This a Good Choice? How to Start a Video Editing Career? This Article Will Tell You the Complete Details
- Updated 2024 Approved How to Use Zoom in Google
- Updated How to Resize FLV Video Efficiently Windows, Mac,Android, iPhone & O
- Updated What Is the Selective Color Effect, and How Can You Add This Effect to Your Videos Using Wondershare Filmora? A Complete Guide for Beginners
- Are You Looking to Store Your Videos Securely and Efficiently? Look No Further than Our Top Pick for the Best Cloud Storage Service for Videos
- Updated | Top GIF to MP4 Converters
- In 2024, Adding Shake Effects to Your Video With Alight Motion
- New In 2024, Top 5 Websites and Software to Convert Powerpoint to Mp4
- Updated In 2024, Easy Way to Create an Alternate Reality Effect
- Updated In 2024, How to Create a Light Sweep (Shine) Effect
- Updated In 2024, Thousands Already Know Ezgif and So Can You
- Updated TikTok Slow Zoom | Create Your Slow Zoom TikTok in Minutes for 2024
- In 2024, How to Remove Background From a Video in Premier Pro
- New 2024 Approved Find Out How to Create Your Own Custom Motion Graphics in Filmora. Add Unique Objects, Manipulate Text, and Animate Anything You Want
- Updated Discover the Top 6 Online Video Speed Controllers Compatible with Chrome, Safari, Firefox for Enhanced Video Playback and Viewing Experience
- Updated The Background in Your Footage Might Be Bland or Unpleasant. This Article Will Discuss Video Background Templates You Can Use to Spice Things up and Make Your Videos Go Viral for 2024
- New In 2024, What Is Motion Blur in the Game? Do You Really Need It?
- Updated 2024 Approved Top 7 Best GoPro Video Editors for Mac
- New In 2024, 6 Best Methods to Make a Video Longer
- In 2024, How to Make Discord GIF Avatar in Depth Guide
- New 2024 Approved Have You Ever Applied the Gaussian Blur Effect to Your Videos? Read This Article to Find a Reliable and Convenient Tool to Generate the Gaussian Blur Effect
- Updated Best Tips for Camtasia Freeze-Frame
- In 2024, For Artists Who Are Making Videos for Show Their Knowledge or Projects, Add some Effects for the Video Can Always Provoke Interests and Attention. This Article Will Show You How to Do that Easily
- Best 10 Mock Location Apps Worth Trying On Vivo T2x 5G | Dr.fone
- How to Delete All Photos from iPhone 14 Pro Max Beyond Scope of Recovery? | Stellar
- Getting the Pokemon Go GPS Signal Not Found 11 Error in Oppo Reno 10 Pro 5G | Dr.fone
- New Top 4 Eminem Voice Generator Apps for PC, Mac, Mobile, and Online for 2024
- In 2024, The Easy Way to Remove an Apple ID from Your MacBook For your Apple iPhone 12 Pro
- How to Track a Lost OnePlus Nord CE 3 5G for Free? | Dr.fone
- How to Transfer Photos from Vivo V29 Pro to New Android? | Dr.fone
- How to rescue lost call logs from Realme 12+ 5G
- In 2024, The Ultimate Guide to Get the Rare Candy on Pokemon Go Fire Red On Oppo A56s 5G | Dr.fone
- 5 Quick Methods to Bypass Xiaomi Redmi Note 13 5G FRP
- Undelete lost messages from Samsung Galaxy F54 5G
- In 2024, Edit and Send Fake Location on Telegram For your Apple iPhone 14 Pro in 3 Ways | Dr.fone
- In 2024, Easy Fixes How To Recover Forgotten iCloud Password From your Apple iPhone 11 Pro
- Simple and Effective Ways to Change Your Country on YouTube App Of your Apple iPhone 14 Pro Max | Dr.fone
- 10 Free Location Spoofers to Fake GPS Location on your Infinix Zero 30 5G | Dr.fone
- Quick Steps to Change Weather Location on Apple iPhone 11 Pro Max | Dr.fone
- How to Transfer Data from Infinix Note 30 Pro to Other Android Devices? | Dr.fone
- New Easy Steps To Create Talking Memoji on iPhone Free
- Title: Updated In 2024, Are You Facing Trouble in Playing a TS File? We Got You! Read the Article Below to Learn the Most About TS Format, Pros and Cons, and More
- Author: Morgan
- Created at : 2024-04-24 01:08:20
- Updated at : 2024-04-25 01:08:20
- Link: https://ai-video-editing.techidaily.com/updated-in-2024-are-you-facing-trouble-in-playing-a-ts-file-we-got-you-read-the-article-below-to-learn-the-most-about-ts-format-pros-and-cons-and-more/
- License: This work is licensed under CC BY-NC-SA 4.0.
