:max_bytes(150000):strip_icc():format(webp)/SDC18_Keynote_OneUI-5be8d33f46e0fb002d108acf.jpg)
Updated VSDC Free Video Editor Review

VSDC Free Video Editor Review
If you are a Window user and you are looking for a free video editor without a watermark, VSDC free video editor is definitely a great application. There are only a handful of free video editors available where the output video will not have a watermark, and there is no limitation on the video length. VSDC video editor belongs to the non-liner video editor group where you can combine video clips, photos, objects, and blend and overlap them as per your requirements.
For a beginner, VSDC free video editor is undoubtedly one of the best video editors. It supports different types of video and audio formats as well as codes. The system requirements are very basic, and hence, it is perfect for low-end computers? But can you rely on VSDC editor when you need slightly advanced video editing? Check out our VSDC editor review and find a better alternative.
Part 1. How to Download and Install VSDC?
VSDC editor download is only available for Windows users. It is tailor-made for those who have a low-end computer with older Windows version OS. The software is compatible with Windows 2000 to Windows 11. The minimum RAM requirement is 128MB and free disk space of 200 MB. Here are the steps to download and install VSDC editor.
Step 1: Open your web browser and visit ‘www.videosoftdev.com/free-video-editor/download” .
Step 2: Click on Download Video Editor button based on 32-bit or 64-bit version of your computer. If you have Windows XP, you have to download VDSC video editor version 6.4 instead of the latest version for compatibility.
Step 3: Give some time for the installer file to get downloaded. It is merely 100 MB and it should not take long. After downloading the installer, launch it and follow the on-screen instruction to complete the installation.
Step 4: After proper installation, launch VSDC video editor. You will get the options to create a new project and capture screen, start editing an existing video and export the finished project in a proper video format.
Part 2. Key Features of VSDC
There are two versions of VSDC video editor available – Free video editor and Pro video editor. The free version has limited features while Pro version has advanced features. Here are going to discuss the key features of VSDC Free Video Editor.
Low System Requirements – One of the reasons for the wide popularity of VSDC video editor is that it does not demand high system configurations like most other video editors. If you have a low-end computer with an outdated Windows operating system, you can use VSDC video editor without any issue.
Basic Editing – Among the basic editing tools, you can cut, trim, split and join video clips. There are options for rotating and resizing videos. You can also go for color correction and put overlays on videos as applicable. Besides, you can edit 36-degree videos with zoom and chart tools.
Effects – VSDC has a wide collection of video, audio and text effects. You can also add objects to your video and apply different ready-made filters. There are also transitions to apply in between video clips and slides. You can also use green screen effect to change your background. The special split-screen effect and picture-in-picture effects are quite eye-catching.
Capture Video – VSDC video editor is equally competent in capturing videos from your webcam as well as recording your screen video. In fact, there is a dedicated option available for creating slideshow videos from photos. You can even record your voiceover if you want to.
File Formats - VSDC supports all the popular file formats for importing and exporting video and audio files. There are different export profiles available so that you can save your edited video for different devices conveniently.
Apart from these, if you opt for the Pro version, you get motion tracking, video masking, video stabilization, and much more such advanced video editing tools.
Part 3. How to Edit Videos with VSDC
If you have the recorded video and you want to edit it with VSDC video editor, the steps are quite simple. You can even record your webcam and screen video with audio if you want to start from scratch. Coming to the editing part, you can split large video files, merge video clips, add transitions in between, add objects in the video as well as crop and rotate videos. There are different effects you can apply to uplift video content. Here are the steps to edit videos with VSDC editor.
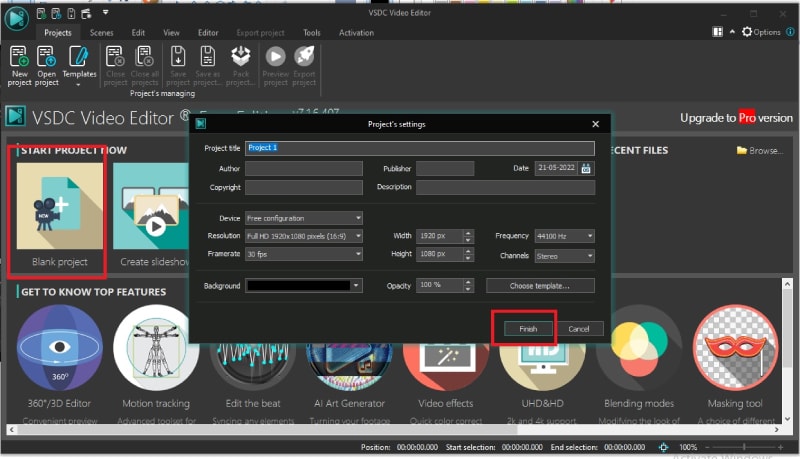
Step 1: Open VSDC Video Editor and click on Blank Project option. Name the project and change parameters, and click on Finish.
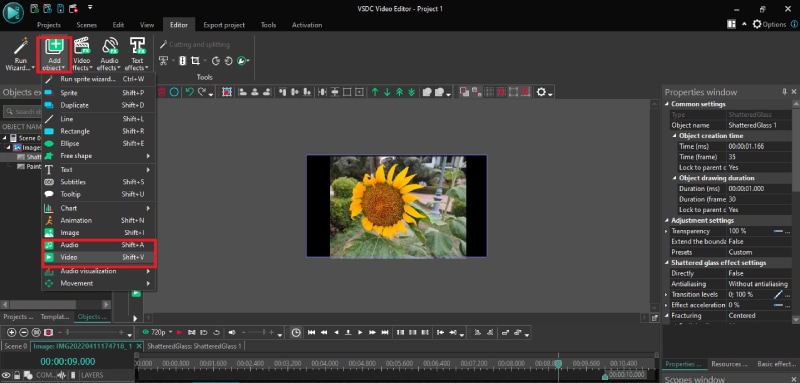
Step 2: Click on Add Object option at the top and select Video. Import the video clips saved on your hard drive. Similarly, you can go to Add Objects> Audio to import audio files.
Step 3: All the imported media files will appear on the timeline. If you have multiple video clips, you can shift the position of clips on the timeline so that one video clip ends and the other begins.
Step 4: If you want to add transitions in between the video clips, go to Video Effects> Transitions> select the effect you want to apply. Check the on-screen parameters such as duration and click on Ok button.
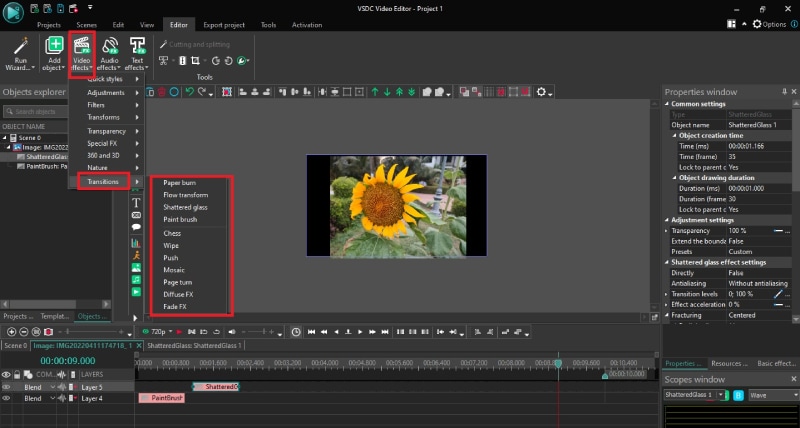
Step 5: If you want to add objects, go to Add Object and select shapes, texts, animations, charts, and much more. You can also add Audio Effects as well as Text Effects from the top bar.
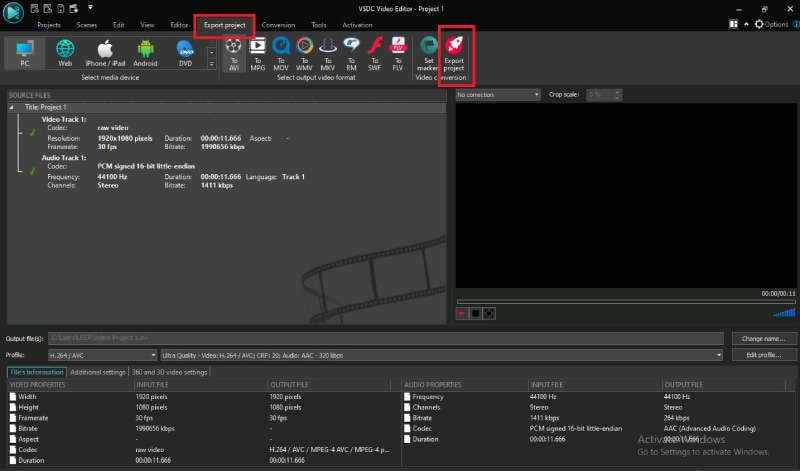
Step 6: Once you are happy with the preview of the edited video, go to Export Project and check all the parameters. Click on Export Project option.
Part 4. Best VSDC Alternative Video Editor
Since VSDC video editor is available completely free, there is no hard in downloading the application and trying it out. But soon, you will understand that the video editor is limited as far as tools and features are concerned. If you want to get more than just basic tools, you will have to upgrade to its Pro version. However, there are better premium video editors available. We recommend Wondershare Filmora as a better alternative to VSDC video editor.
Filmora is extremely popular in the professional video editing world as it has an intuitive interface and does not demand high-end computers. There are tons of transitions, effects, filters, and objects available to add to your edit. You can perform all standard and advanced video editing to take your video to the next level. Here are all the steps to edit videos on Filmora.
For Win 7 or later (64-bit)
For macOS 10.12 or later
Step 1: Download and install Filmora and it is available for Windows and Mac. Launch Filmora and click on New Project. Import all your media files into Project Media folder by drag and drop action.

Step 2: Arrange the video clips and audio clips on the timeline by drag and drop action. You should be placing the video and audio files on different tracks. This is where you can do all the basic editing such as trimming, cutting, splitting, and merging.

Step 3: To add transitions in between the video clips, go to Transitions from the top bar and drag and drop any transition in between the clips. Check out Titles, Effects, and Elements from the top bar and insert them on the timeline as you think appropriate.

Step 4: Play the video to see if everything is perfect and click on Export button to save your video to your hard drive.

Part 5. FAQs about VSDC
1. Is VSDC video editor really free?
Yes, VSDC video editor is completely free to use. However, there is a pro version available where more features are present. But the free version does not put watermark on the output video and has all the standard tools for video editing without any limitation.
2. Is VSDC better than Adobe Premiere Pro?
No, VSDC is not better than Adobe Premiere Pro. VSDC is a free video tor while Adobe Premiere Pro is a premium one. Naturally, Adobe Premiere Pro has more features and functionalities. However, VSDC is better for beginners and those who have low-end computers if you compare it with Adobe Premiere Pro.
3. Is VSDC safe?
Yes VSDC video editor is safe and stable to use. However, there was an incident in 2019 where VSDC video editor’s official website was hacked, but the software itself is safe to use on Windows computers.
For macOS 10.12 or later
Step 1: Download and install Filmora and it is available for Windows and Mac. Launch Filmora and click on New Project. Import all your media files into Project Media folder by drag and drop action.

Step 2: Arrange the video clips and audio clips on the timeline by drag and drop action. You should be placing the video and audio files on different tracks. This is where you can do all the basic editing such as trimming, cutting, splitting, and merging.

Step 3: To add transitions in between the video clips, go to Transitions from the top bar and drag and drop any transition in between the clips. Check out Titles, Effects, and Elements from the top bar and insert them on the timeline as you think appropriate.

Step 4: Play the video to see if everything is perfect and click on Export button to save your video to your hard drive.

Part 5. FAQs about VSDC
1. Is VSDC video editor really free?
Yes, VSDC video editor is completely free to use. However, there is a pro version available where more features are present. But the free version does not put watermark on the output video and has all the standard tools for video editing without any limitation.
2. Is VSDC better than Adobe Premiere Pro?
No, VSDC is not better than Adobe Premiere Pro. VSDC is a free video tor while Adobe Premiere Pro is a premium one. Naturally, Adobe Premiere Pro has more features and functionalities. However, VSDC is better for beginners and those who have low-end computers if you compare it with Adobe Premiere Pro.
3. Is VSDC safe?
Yes VSDC video editor is safe and stable to use. However, there was an incident in 2019 where VSDC video editor’s official website was hacked, but the software itself is safe to use on Windows computers.
For macOS 10.12 or later
Step 1: Download and install Filmora and it is available for Windows and Mac. Launch Filmora and click on New Project. Import all your media files into Project Media folder by drag and drop action.

Step 2: Arrange the video clips and audio clips on the timeline by drag and drop action. You should be placing the video and audio files on different tracks. This is where you can do all the basic editing such as trimming, cutting, splitting, and merging.

Step 3: To add transitions in between the video clips, go to Transitions from the top bar and drag and drop any transition in between the clips. Check out Titles, Effects, and Elements from the top bar and insert them on the timeline as you think appropriate.

Step 4: Play the video to see if everything is perfect and click on Export button to save your video to your hard drive.

Part 5. FAQs about VSDC
1. Is VSDC video editor really free?
Yes, VSDC video editor is completely free to use. However, there is a pro version available where more features are present. But the free version does not put watermark on the output video and has all the standard tools for video editing without any limitation.
2. Is VSDC better than Adobe Premiere Pro?
No, VSDC is not better than Adobe Premiere Pro. VSDC is a free video tor while Adobe Premiere Pro is a premium one. Naturally, Adobe Premiere Pro has more features and functionalities. However, VSDC is better for beginners and those who have low-end computers if you compare it with Adobe Premiere Pro.
3. Is VSDC safe?
Yes VSDC video editor is safe and stable to use. However, there was an incident in 2019 where VSDC video editor’s official website was hacked, but the software itself is safe to use on Windows computers.
For macOS 10.12 or later
Step 1: Download and install Filmora and it is available for Windows and Mac. Launch Filmora and click on New Project. Import all your media files into Project Media folder by drag and drop action.

Step 2: Arrange the video clips and audio clips on the timeline by drag and drop action. You should be placing the video and audio files on different tracks. This is where you can do all the basic editing such as trimming, cutting, splitting, and merging.

Step 3: To add transitions in between the video clips, go to Transitions from the top bar and drag and drop any transition in between the clips. Check out Titles, Effects, and Elements from the top bar and insert them on the timeline as you think appropriate.

Step 4: Play the video to see if everything is perfect and click on Export button to save your video to your hard drive.

Part 5. FAQs about VSDC
1. Is VSDC video editor really free?
Yes, VSDC video editor is completely free to use. However, there is a pro version available where more features are present. But the free version does not put watermark on the output video and has all the standard tools for video editing without any limitation.
2. Is VSDC better than Adobe Premiere Pro?
No, VSDC is not better than Adobe Premiere Pro. VSDC is a free video tor while Adobe Premiere Pro is a premium one. Naturally, Adobe Premiere Pro has more features and functionalities. However, VSDC is better for beginners and those who have low-end computers if you compare it with Adobe Premiere Pro.
3. Is VSDC safe?
Yes VSDC video editor is safe and stable to use. However, there was an incident in 2019 where VSDC video editor’s official website was hacked, but the software itself is safe to use on Windows computers.
Some Facts That Few People Know on How to Make Transparent Background in Canva
Some Facts That Few People Know on How to Make Transparent Background in Canva
An easy yet powerful editor
Numerous effects to choose from
Detailed tutorials provided by the official channel
Canva is a very well-known website that enables you to do your entire image editing work online. If you are regularly working with the editing of images then you may know about the Canva. If you still don’t know about it then we are going to share the information about it in this article with you. You can also learn about how Canva makes a background transparent in this article.
In this article
01 [Why Would You Need a Graphic to Have a Transparent Background](#Part 1)
02 [How to Remove the Background of Images in Canva](#Part 2)
03 [How to Change the Transparency of an Object in Canva](#Part 3)
04 [Get a Transparent Background for Free](#Part 4)
Part 2 How to Remove the Background of Images in Canva
Canva website allows users to turn their imagination into reality for free of cost. It offers you a free version that helps you to design mostly anything you want and there are many templates offered to make designs for free of cost. But, if you are looking for transparent background on Canva then you have to spend for it because this feature is not offered for free. If you already have paid versions then let’s see the steps for Canva background transparent.
● Step 1:
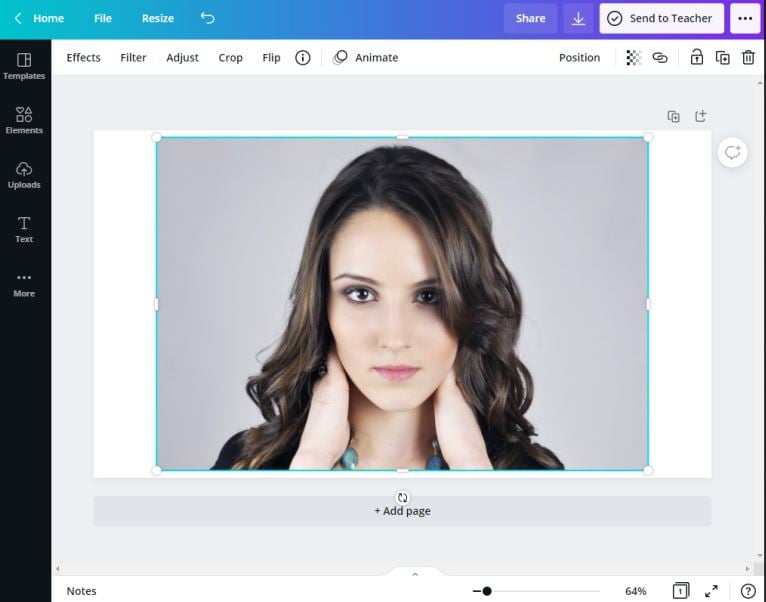
Firstly, sign in to your Canva account and select the image which you want to make a transparent background in Canva.
● Step 2:
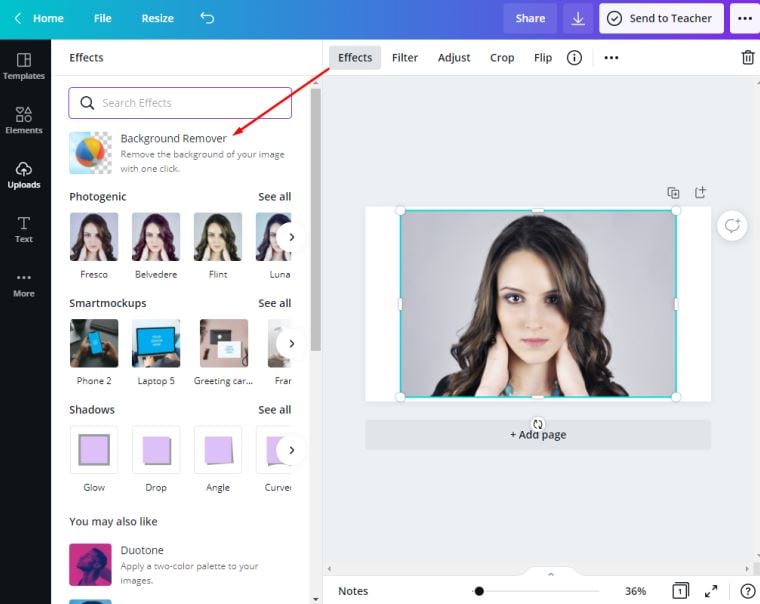
After adding the image first of all you have to color the background layer of the image you have added. Click the “Effect” available at the top corner of the Canva interfaces toolbar. From here select the “Background remover”. Now, the background of the image will be removed and you are ready to make it transparent.
● Step 3:
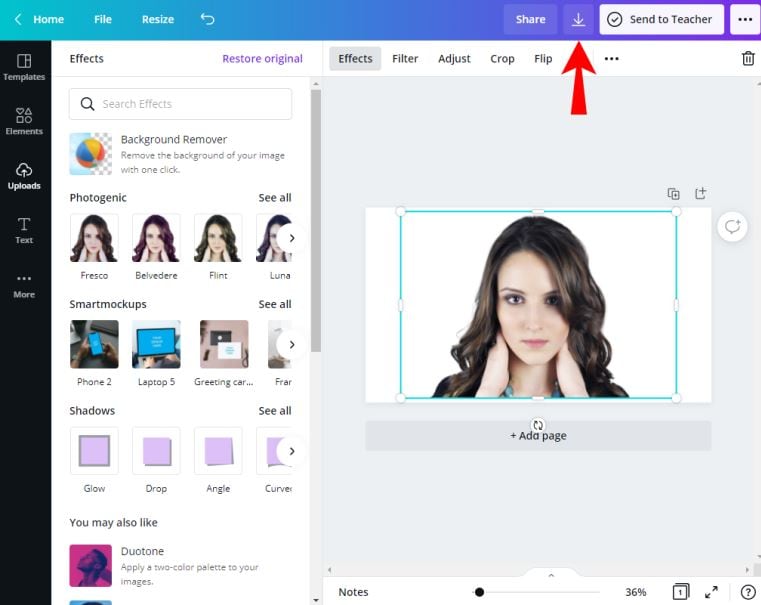
Once the image background is removed click the “Download” icon available at the top of the interface.
● Step 4:
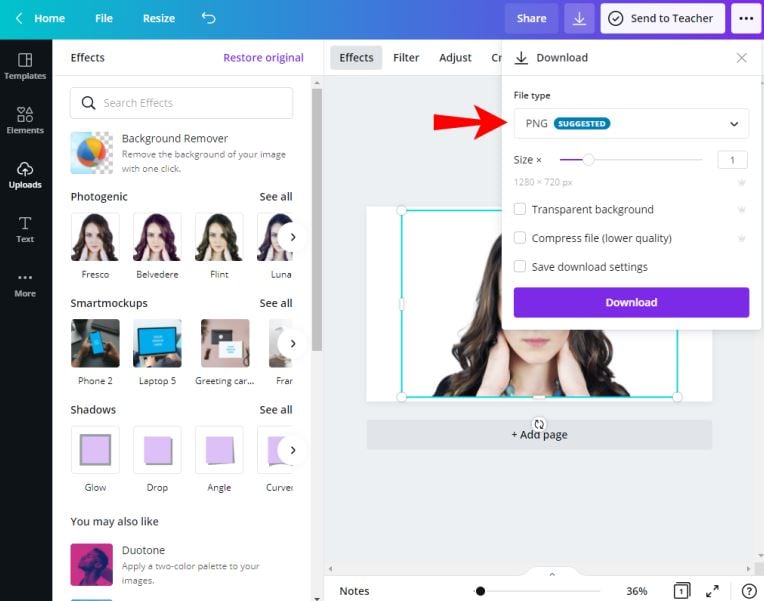
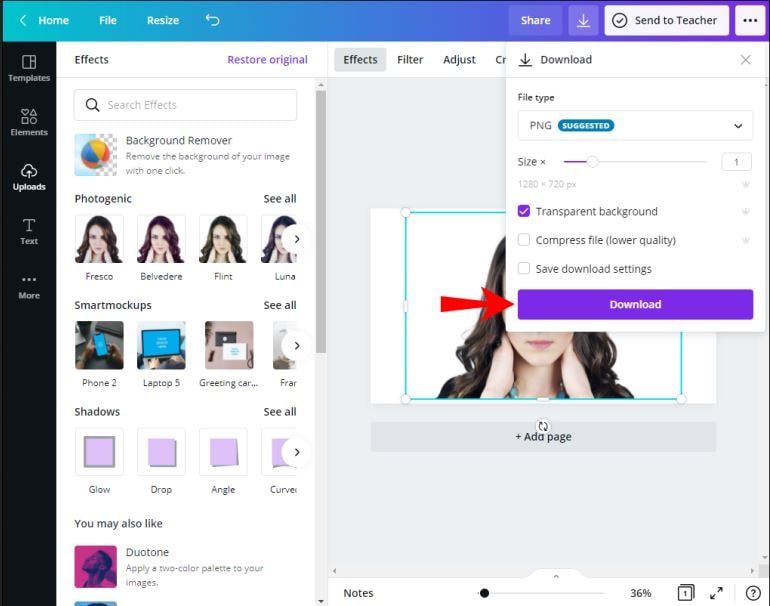
When you click the download button you will see a dialog box where you have to select the “PNG” format to download the image. Make sure to keep it PNG otherwise background will be not transparent.
● Step 5:
Now, under the options in the pop-up box you have to select check the “Transparent Background” option then click the “Download” button. Now the Canva background transparent is finished and the image will be saved on your system with a transparent background.
Part 3 How to Change the Transparency of an Object in Canva
While adding a text box on the images or if you want to merge several images in the one then you have to make at least one image transparent which will help you to get a better effect. Please follow the below steps to know about how you can do this.
● Step 1:
Firstly, select the text box or the image that you need to make transparent. After selecting the image the Canva interface will show you a pop-up box on the top side and then click the 4 dots on the right side of the popup. After clicking on it you will several other options. From this menu click the “Transparency”.

● Step 2:
On the screen you will see a slider. Use this slider to adjust the transparency of the text. This is the way to change the object transparency in the Canva. You can now download your image or continue working on it.

Part 4 Get a Transparent Background for Free
If you want your Canva design to make a transparent background without spending or paying anything to the Canva then you have several options to do that. Here we are going to tell you 2 options. The first option is that you can simply use the free 30 days trial version of the Canva to do that or you can also use the other website which is Kapwing. This website offers you options to remove the background of the image for free of cost without spending anything. Let’s see how you can do it with the help of Kapwing.
● Step 1:
Firstly, you have to download your Canva design in PNG format. After downloading the image you can browse the below URL of kapwing background remover.

● Step 2:
Now click the “Upload” button and select the PNG file from your computer. Now you have to hit the “Magic Wand” option and then hit the image background. Now, press the “Remove Pixels” option which is available at the right side menu.

● Step 3:
By following the previous step the image background will be removed but still if you see any part of the background on image then you may have to repeat the step again until the all parts of the background are not removed. Once you are satisfied with the final results then simply click the “Done” button.

● Step 4:
After clicking the “Done” button you will be redirected to the page where you can download your image on your computer with a transparent background. This is the process to for Canva no background for free of cost.

Editing the Videos While making Photos:
Sometimes while editing the photos for your projects if you need to make a video then you may also need to a video editor to make the best videos. You can use the photos you have created directly in the video you are going to make. In this case there is a product Wondershare Filmora Video Editor is available which really helps you a lot in making the best videos or edits the videos according to your project requirement. Wondershare Filmora is offered by the developers for the windows as well as the Mac operating system computers. This software offers you best options for making or editing the videos. Some of the features of the software are available below.
For Win 7 or later (64-bit)
For macOS 10.12 or later
Key Features:
● The program offers you cool video editing features such as split screen, motion tracking, keyframing, speed ramping, instant mode, auto beat sync etc.
● You can apply several effects such as green screen, AI Portrait, green screen and video effects.
● In the audio features it helps you to detect silence, audio synchronization and audio ducking.
● Wondershare Filmora offers you feature of correcting the colors of videos and match the color as well.

● Ending Thoughts →
● We hope now you know about how to make transparent background in Canva with the help of Canva website without doing much effort. Well, if you like to make a video with the help of images created using Canva then you can also try the Wondershare Filmora. It’s really perfect video editor software that enables you to create the best videos.
Canva is a very well-known website that enables you to do your entire image editing work online. If you are regularly working with the editing of images then you may know about the Canva. If you still don’t know about it then we are going to share the information about it in this article with you. You can also learn about how Canva makes a background transparent in this article.
In this article
01 [Why Would You Need a Graphic to Have a Transparent Background](#Part 1)
02 [How to Remove the Background of Images in Canva](#Part 2)
03 [How to Change the Transparency of an Object in Canva](#Part 3)
04 [Get a Transparent Background for Free](#Part 4)
Part 2 How to Remove the Background of Images in Canva
Canva website allows users to turn their imagination into reality for free of cost. It offers you a free version that helps you to design mostly anything you want and there are many templates offered to make designs for free of cost. But, if you are looking for transparent background on Canva then you have to spend for it because this feature is not offered for free. If you already have paid versions then let’s see the steps for Canva background transparent.
● Step 1:
Firstly, sign in to your Canva account and select the image which you want to make a transparent background in Canva.

● Step 2:
After adding the image first of all you have to color the background layer of the image you have added. Click the “Effect” available at the top corner of the Canva interfaces toolbar. From here select the “Background remover”. Now, the background of the image will be removed and you are ready to make it transparent.

● Step 3:
Once the image background is removed click the “Download” icon available at the top of the interface.

● Step 4:
When you click the download button you will see a dialog box where you have to select the “PNG” format to download the image. Make sure to keep it PNG otherwise background will be not transparent.

● Step 5:
Now, under the options in the pop-up box you have to select check the “Transparent Background” option then click the “Download” button. Now the Canva background transparent is finished and the image will be saved on your system with a transparent background.

Part 3 How to Change the Transparency of an Object in Canva
While adding a text box on the images or if you want to merge several images in the one then you have to make at least one image transparent which will help you to get a better effect. Please follow the below steps to know about how you can do this.
● Step 1:
Firstly, select the text box or the image that you need to make transparent. After selecting the image the Canva interface will show you a pop-up box on the top side and then click the 4 dots on the right side of the popup. After clicking on it you will several other options. From this menu click the “Transparency”.

● Step 2:
On the screen you will see a slider. Use this slider to adjust the transparency of the text. This is the way to change the object transparency in the Canva. You can now download your image or continue working on it.

Part 4 Get a Transparent Background for Free
If you want your Canva design to make a transparent background without spending or paying anything to the Canva then you have several options to do that. Here we are going to tell you 2 options. The first option is that you can simply use the free 30 days trial version of the Canva to do that or you can also use the other website which is Kapwing. This website offers you options to remove the background of the image for free of cost without spending anything. Let’s see how you can do it with the help of Kapwing.
● Step 1:
Firstly, you have to download your Canva design in PNG format. After downloading the image you can browse the below URL of kapwing background remover.

● Step 2:
Now click the “Upload” button and select the PNG file from your computer. Now you have to hit the “Magic Wand” option and then hit the image background. Now, press the “Remove Pixels” option which is available at the right side menu.

● Step 3:
By following the previous step the image background will be removed but still if you see any part of the background on image then you may have to repeat the step again until the all parts of the background are not removed. Once you are satisfied with the final results then simply click the “Done” button.

● Step 4:
After clicking the “Done” button you will be redirected to the page where you can download your image on your computer with a transparent background. This is the process to for Canva no background for free of cost.

Editing the Videos While making Photos:
Sometimes while editing the photos for your projects if you need to make a video then you may also need to a video editor to make the best videos. You can use the photos you have created directly in the video you are going to make. In this case there is a product Wondershare Filmora Video Editor is available which really helps you a lot in making the best videos or edits the videos according to your project requirement. Wondershare Filmora is offered by the developers for the windows as well as the Mac operating system computers. This software offers you best options for making or editing the videos. Some of the features of the software are available below.
For Win 7 or later (64-bit)
For macOS 10.12 or later
Key Features:
● The program offers you cool video editing features such as split screen, motion tracking, keyframing, speed ramping, instant mode, auto beat sync etc.
● You can apply several effects such as green screen, AI Portrait, green screen and video effects.
● In the audio features it helps you to detect silence, audio synchronization and audio ducking.
● Wondershare Filmora offers you feature of correcting the colors of videos and match the color as well.

● Ending Thoughts →
● We hope now you know about how to make transparent background in Canva with the help of Canva website without doing much effort. Well, if you like to make a video with the help of images created using Canva then you can also try the Wondershare Filmora. It’s really perfect video editor software that enables you to create the best videos.
Canva is a very well-known website that enables you to do your entire image editing work online. If you are regularly working with the editing of images then you may know about the Canva. If you still don’t know about it then we are going to share the information about it in this article with you. You can also learn about how Canva makes a background transparent in this article.
In this article
01 [Why Would You Need a Graphic to Have a Transparent Background](#Part 1)
02 [How to Remove the Background of Images in Canva](#Part 2)
03 [How to Change the Transparency of an Object in Canva](#Part 3)
04 [Get a Transparent Background for Free](#Part 4)
Part 2 How to Remove the Background of Images in Canva
Canva website allows users to turn their imagination into reality for free of cost. It offers you a free version that helps you to design mostly anything you want and there are many templates offered to make designs for free of cost. But, if you are looking for transparent background on Canva then you have to spend for it because this feature is not offered for free. If you already have paid versions then let’s see the steps for Canva background transparent.
● Step 1:
Firstly, sign in to your Canva account and select the image which you want to make a transparent background in Canva.

● Step 2:
After adding the image first of all you have to color the background layer of the image you have added. Click the “Effect” available at the top corner of the Canva interfaces toolbar. From here select the “Background remover”. Now, the background of the image will be removed and you are ready to make it transparent.

● Step 3:
Once the image background is removed click the “Download” icon available at the top of the interface.

● Step 4:
When you click the download button you will see a dialog box where you have to select the “PNG” format to download the image. Make sure to keep it PNG otherwise background will be not transparent.

● Step 5:
Now, under the options in the pop-up box you have to select check the “Transparent Background” option then click the “Download” button. Now the Canva background transparent is finished and the image will be saved on your system with a transparent background.

Part 3 How to Change the Transparency of an Object in Canva
While adding a text box on the images or if you want to merge several images in the one then you have to make at least one image transparent which will help you to get a better effect. Please follow the below steps to know about how you can do this.
● Step 1:
Firstly, select the text box or the image that you need to make transparent. After selecting the image the Canva interface will show you a pop-up box on the top side and then click the 4 dots on the right side of the popup. After clicking on it you will several other options. From this menu click the “Transparency”.

● Step 2:
On the screen you will see a slider. Use this slider to adjust the transparency of the text. This is the way to change the object transparency in the Canva. You can now download your image or continue working on it.

Part 4 Get a Transparent Background for Free
If you want your Canva design to make a transparent background without spending or paying anything to the Canva then you have several options to do that. Here we are going to tell you 2 options. The first option is that you can simply use the free 30 days trial version of the Canva to do that or you can also use the other website which is Kapwing. This website offers you options to remove the background of the image for free of cost without spending anything. Let’s see how you can do it with the help of Kapwing.
● Step 1:
Firstly, you have to download your Canva design in PNG format. After downloading the image you can browse the below URL of kapwing background remover.

● Step 2:
Now click the “Upload” button and select the PNG file from your computer. Now you have to hit the “Magic Wand” option and then hit the image background. Now, press the “Remove Pixels” option which is available at the right side menu.

● Step 3:
By following the previous step the image background will be removed but still if you see any part of the background on image then you may have to repeat the step again until the all parts of the background are not removed. Once you are satisfied with the final results then simply click the “Done” button.

● Step 4:
After clicking the “Done” button you will be redirected to the page where you can download your image on your computer with a transparent background. This is the process to for Canva no background for free of cost.

Editing the Videos While making Photos:
Sometimes while editing the photos for your projects if you need to make a video then you may also need to a video editor to make the best videos. You can use the photos you have created directly in the video you are going to make. In this case there is a product Wondershare Filmora Video Editor is available which really helps you a lot in making the best videos or edits the videos according to your project requirement. Wondershare Filmora is offered by the developers for the windows as well as the Mac operating system computers. This software offers you best options for making or editing the videos. Some of the features of the software are available below.
For Win 7 or later (64-bit)
For macOS 10.12 or later
Key Features:
● The program offers you cool video editing features such as split screen, motion tracking, keyframing, speed ramping, instant mode, auto beat sync etc.
● You can apply several effects such as green screen, AI Portrait, green screen and video effects.
● In the audio features it helps you to detect silence, audio synchronization and audio ducking.
● Wondershare Filmora offers you feature of correcting the colors of videos and match the color as well.

● Ending Thoughts →
● We hope now you know about how to make transparent background in Canva with the help of Canva website without doing much effort. Well, if you like to make a video with the help of images created using Canva then you can also try the Wondershare Filmora. It’s really perfect video editor software that enables you to create the best videos.
Canva is a very well-known website that enables you to do your entire image editing work online. If you are regularly working with the editing of images then you may know about the Canva. If you still don’t know about it then we are going to share the information about it in this article with you. You can also learn about how Canva makes a background transparent in this article.
In this article
01 [Why Would You Need a Graphic to Have a Transparent Background](#Part 1)
02 [How to Remove the Background of Images in Canva](#Part 2)
03 [How to Change the Transparency of an Object in Canva](#Part 3)
04 [Get a Transparent Background for Free](#Part 4)
Part 2 How to Remove the Background of Images in Canva
Canva website allows users to turn their imagination into reality for free of cost. It offers you a free version that helps you to design mostly anything you want and there are many templates offered to make designs for free of cost. But, if you are looking for transparent background on Canva then you have to spend for it because this feature is not offered for free. If you already have paid versions then let’s see the steps for Canva background transparent.
● Step 1:
Firstly, sign in to your Canva account and select the image which you want to make a transparent background in Canva.

● Step 2:
After adding the image first of all you have to color the background layer of the image you have added. Click the “Effect” available at the top corner of the Canva interfaces toolbar. From here select the “Background remover”. Now, the background of the image will be removed and you are ready to make it transparent.

● Step 3:
Once the image background is removed click the “Download” icon available at the top of the interface.

● Step 4:
When you click the download button you will see a dialog box where you have to select the “PNG” format to download the image. Make sure to keep it PNG otherwise background will be not transparent.

● Step 5:
Now, under the options in the pop-up box you have to select check the “Transparent Background” option then click the “Download” button. Now the Canva background transparent is finished and the image will be saved on your system with a transparent background.

Part 3 How to Change the Transparency of an Object in Canva
While adding a text box on the images or if you want to merge several images in the one then you have to make at least one image transparent which will help you to get a better effect. Please follow the below steps to know about how you can do this.
● Step 1:
Firstly, select the text box or the image that you need to make transparent. After selecting the image the Canva interface will show you a pop-up box on the top side and then click the 4 dots on the right side of the popup. After clicking on it you will several other options. From this menu click the “Transparency”.

● Step 2:
On the screen you will see a slider. Use this slider to adjust the transparency of the text. This is the way to change the object transparency in the Canva. You can now download your image or continue working on it.

Part 4 Get a Transparent Background for Free
If you want your Canva design to make a transparent background without spending or paying anything to the Canva then you have several options to do that. Here we are going to tell you 2 options. The first option is that you can simply use the free 30 days trial version of the Canva to do that or you can also use the other website which is Kapwing. This website offers you options to remove the background of the image for free of cost without spending anything. Let’s see how you can do it with the help of Kapwing.
● Step 1:
Firstly, you have to download your Canva design in PNG format. After downloading the image you can browse the below URL of kapwing background remover.

● Step 2:
Now click the “Upload” button and select the PNG file from your computer. Now you have to hit the “Magic Wand” option and then hit the image background. Now, press the “Remove Pixels” option which is available at the right side menu.

● Step 3:
By following the previous step the image background will be removed but still if you see any part of the background on image then you may have to repeat the step again until the all parts of the background are not removed. Once you are satisfied with the final results then simply click the “Done” button.

● Step 4:
After clicking the “Done” button you will be redirected to the page where you can download your image on your computer with a transparent background. This is the process to for Canva no background for free of cost.

Editing the Videos While making Photos:
Sometimes while editing the photos for your projects if you need to make a video then you may also need to a video editor to make the best videos. You can use the photos you have created directly in the video you are going to make. In this case there is a product Wondershare Filmora Video Editor is available which really helps you a lot in making the best videos or edits the videos according to your project requirement. Wondershare Filmora is offered by the developers for the windows as well as the Mac operating system computers. This software offers you best options for making or editing the videos. Some of the features of the software are available below.
For Win 7 or later (64-bit)
For macOS 10.12 or later
Key Features:
● The program offers you cool video editing features such as split screen, motion tracking, keyframing, speed ramping, instant mode, auto beat sync etc.
● You can apply several effects such as green screen, AI Portrait, green screen and video effects.
● In the audio features it helps you to detect silence, audio synchronization and audio ducking.
● Wondershare Filmora offers you feature of correcting the colors of videos and match the color as well.

● Ending Thoughts →
● We hope now you know about how to make transparent background in Canva with the help of Canva website without doing much effort. Well, if you like to make a video with the help of images created using Canva then you can also try the Wondershare Filmora. It’s really perfect video editor software that enables you to create the best videos.
Using Track Matte and Tracking in Adobe After Effects: Reviewing All Possibilities
The realm of video editing has seen significant progress in recent years. With premium tools such as Adobe After Effects, you can take your videos to the next level. However, not every tool is easy to navigate. Some features in popular video editing software can be hard to get around.
The following guide provides valuable insight on how to use Track Matte in After Effects. Explore the endless possibilities of Track Mattes After Effects and Mask Tracking in After Effects. Also, discover a simple alternative to make After Effects mask tracking easy.
AI Smart Masking Spice up your video content with the endless possibilities of AI masking functions!
Free Download Free Download Learn More

Part 1: How to Utilize Track Mattes in Adobe After Effects?
After Effects by Adobe is a software application dedicated to visual effects and motion graphics for videos. The tool is commonly used in the post-production process of videos. The wide toolset of After Effects can be useful in filmmaking, video gaming, and TV. After Effects offers everything you need to take your creative inspirations to the next level.
- Motion Graphics: After Effects lets users animate characters and backgrounds in videos. You can generate 3-dimensional models from 2D animations. After Effects also supports the animation of logos to bring your elements to life.
- Rotoscoping: You can remove elements or drop new ones in your video using After Effects. The Roto Brush Tool can easily separate the background and foreground. You can then replace unwanted objects and replace them with new elements.
- Motion Tracking: Tracking the movement of an object is quite simple in After Effects. You can pin any element to a moving object. The smooth dynamics can enhance the overall result of the footage.
- VFX and Special Effects: After Effects is the perfect tool to add special effects to your videos. Its VFX tool lets users add magic to the footage. You can make objects disappear, control the weather, stabilize your video, and more.
Using Track Mattes in After Effects
In Adobe After Effects, a track matte is a layer that defines the transparency of another layer. It acts as a stencil, determining which parts of the underlying layer are visible and which are transparent. Track mattes are used for creating various effects such as text animations, transitions, and seamlessly composing multiple layers. After Effects offers four Track Matte options:
![]()
- Alpha Matte: Alpha matte in After Effects allows white areas in the matte layer to become visible while black areas become transparent. Effectively, this helps the underlying layer to show through.
- Alpha Inverted Matte: In an alpha inverted matte, black areas in the matte layer are visible, and white areas are transparent. It reverses the transparency values to create unique effects.
- Luma Matte: A luma matte uses the brightness values of the matte layer to determine visibility. Bright areas in the matte layer are visible, while dark areas are transparent.
- Luma Inverted Matte: The luma inverted matte works opposite to the luma matte. The top layer’s dark areas are visible, while bright areas are transparent.
![]()
You can use any of the track mattes in After Effects according to your requirements. Following is a step-by-step guide on how to use track mattes:
Step 1
To apply a track matte to your video, you must work with two layers. The top layer acts as the alpha or the luminance layer. The bottom layer acts as the fill. Once you have identified the layers, you can proceed to the next step.
Step 2
Go to the “Modes” column and open the dropdown menu next to “Layer List.” Here, select the layer you wish to use as the track matte.
![]()
Step 3
You will see two toggle switches once you select your layer. You can use these switches and the available options to set the transparency for the Track Matte. You can add alpha matte in After Effects or other types from here.
![]()
Part 2: Performing Mask Tracking With Adobe After Effects: Reviewing the Steps
Another remarkable feature that After Effects offers is mask tracking. Using After Effects mask tracking, you can automatically animate a mask’s position, shape, or path. This is done to match the movement of an object in a video clip. You can now easily deal with complex or fast-moving footage with this feature. To use Track Mask in After Effects, you can follow these steps:
Step 1
Import the footage you wish to edit in After Effects. Select the clip you wish to track from the timeline. Then, select the “Pen” tool from the top toolbar or press G on your keyboard. Select the area around the object you wish to mask in the footage.
![]()
Step 2
Now, open the layer and right-click on the mask name to select “Track Mask.” This will open the mask tracker in the tracker panel at the right. Open the dropdown menu next to the “Method” option. Here, you can find a range of options for tracking methods. Choose the one according to your requirements. If the object isn’t moving much, you can choose a simple option such as “Position.”
![]()
Step 3
Tap the “Analyze Forward” icon and let the tracker analyze the frames in the clip. Once the process has finished, you can restart your clip and set “Mask Mode” from the timeline to “Subtract.” This will remove the selected object from the clip.
![]()
Step 4
To fill in the details, go to the “Window” menu from the top and select “Content Aware Fill.” Once you see the panel on the screen, set the “Alpha Extension” slider to a number of your choice and click on “Generate Fill Layer.”
![]()
Part 3: How to Make Masking Easy? Try Wondershare Filmora
Although After Effects is a great tool for professional-quality video editing, it is not everyone’s cup of tea. Features such as motion track masks in After Effects are challenging to navigate. Novice users can face trouble getting around the complex masking process in After Effects. For a simpler alternative, you can try Wondershare Filmora .
Filmora is the complete solution when it comes to video editing. The multi-platform tool offers a range of useful features for video and audio manipulation. With thousands of built-in templates and presets, Filmora can help users kick-start their creative journey. You can use this easy-to-use tool as the perfect alternative to After Effects mask tracking.
Free Download For Win 7 or later(64-bit)
Free Download For macOS 10.14 or later
Main Highlights of Wondershare Filmora
Filmora offers a comprehensive toolset to help users make the most of their media files. Some useful resources provided by Wondershare Filmora include:
- AI Text-Based Editing: Filmora allows users to convert audio from videos into editable text. This can help you easily modify your video content. The feature can be used for quick transcriptions, subtitles, and translations.
![]()
- Speed Ramping: Using Filmora, users can apply professional speed effects in footage. You can adjust your video speed and create unique cinematic effects in no time. Filmora also helps maintain the audio pitch to avoid abrupt changes.
![]()
- Compound Clip: Filmora can help users merge multiple clips into a single footage. You can obtain complete control over the integrated clip for editing. This can help users manage and adjust multiple clips easily.
![]()
- AI Vocal Remover: The Vocal Remover tool of Filmora offers AI power to separate vocals and music from any audio. You can get separate acapella and vocals for various purposes. From karaoke to creative dubs, everything is now possible with Filmora.
![]()
Using AI Smart Masking in Filmora – A Step-by-Step Guide
Filmora offers an AI-powered masking feature for users. This allows automatic recognition and selection of objects in videos. You can create seamless transitions, color-correct elements, remove background, and more. The tool can easily detect and separate objects, so you don’t have to put in manual effort. Here is the step-by-step guide for AI smart masking using Filmora:
Step 1: Import Footage in Filmora
Install and launch Wondershare Filmora on your device. From the homepage, tap “New Project” and go to the “File” tab from the top. Tap “Import Media” in the dropdown menu and insert your video clips into the timeline.
![]()
Step 2: Enable AI Mask
Select your clip in the timeline and go to the “Video” tab from the right panel. Select the “Mask” option and tap the “AI Mask” icon. Under the section, you can choose from options such as “Select Character” or “Smart Brush.” Select one according to your requirements and hit “Add Mask.”
![]()
Step 3: Adjust Mask Settings and Export File
After you apply the masking option, you can adjust other mask settings. Filmora allows users to set the expansion range, blur strength, opacity, and other aspects. Once satisfied with the results, tap the “Export” button from the top-right corner and choose a pathway to save your video.
![]()
Free Download For Win 7 or later(64-bit)
Free Download For macOS 10.14 or later
Conclusion
Adobe After Effects is an industry-standard tool for video editing and manipulation. Track Mattes and Track Masks in After Effects are valuable tools that can help elevate your video’s potential. For a simple and effective alternative, you can try Wondershare Filmora. The tool uses smart masking using AI to make the process easier.
Free Download Free Download Learn More

Part 1: How to Utilize Track Mattes in Adobe After Effects?
After Effects by Adobe is a software application dedicated to visual effects and motion graphics for videos. The tool is commonly used in the post-production process of videos. The wide toolset of After Effects can be useful in filmmaking, video gaming, and TV. After Effects offers everything you need to take your creative inspirations to the next level.
- Motion Graphics: After Effects lets users animate characters and backgrounds in videos. You can generate 3-dimensional models from 2D animations. After Effects also supports the animation of logos to bring your elements to life.
- Rotoscoping: You can remove elements or drop new ones in your video using After Effects. The Roto Brush Tool can easily separate the background and foreground. You can then replace unwanted objects and replace them with new elements.
- Motion Tracking: Tracking the movement of an object is quite simple in After Effects. You can pin any element to a moving object. The smooth dynamics can enhance the overall result of the footage.
- VFX and Special Effects: After Effects is the perfect tool to add special effects to your videos. Its VFX tool lets users add magic to the footage. You can make objects disappear, control the weather, stabilize your video, and more.
Using Track Mattes in After Effects
In Adobe After Effects, a track matte is a layer that defines the transparency of another layer. It acts as a stencil, determining which parts of the underlying layer are visible and which are transparent. Track mattes are used for creating various effects such as text animations, transitions, and seamlessly composing multiple layers. After Effects offers four Track Matte options:
![]()
- Alpha Matte: Alpha matte in After Effects allows white areas in the matte layer to become visible while black areas become transparent. Effectively, this helps the underlying layer to show through.
- Alpha Inverted Matte: In an alpha inverted matte, black areas in the matte layer are visible, and white areas are transparent. It reverses the transparency values to create unique effects.
- Luma Matte: A luma matte uses the brightness values of the matte layer to determine visibility. Bright areas in the matte layer are visible, while dark areas are transparent.
- Luma Inverted Matte: The luma inverted matte works opposite to the luma matte. The top layer’s dark areas are visible, while bright areas are transparent.
![]()
You can use any of the track mattes in After Effects according to your requirements. Following is a step-by-step guide on how to use track mattes:
Step 1
To apply a track matte to your video, you must work with two layers. The top layer acts as the alpha or the luminance layer. The bottom layer acts as the fill. Once you have identified the layers, you can proceed to the next step.
Step 2
Go to the “Modes” column and open the dropdown menu next to “Layer List.” Here, select the layer you wish to use as the track matte.
![]()
Step 3
You will see two toggle switches once you select your layer. You can use these switches and the available options to set the transparency for the Track Matte. You can add alpha matte in After Effects or other types from here.
![]()
Part 2: Performing Mask Tracking With Adobe After Effects: Reviewing the Steps
Another remarkable feature that After Effects offers is mask tracking. Using After Effects mask tracking, you can automatically animate a mask’s position, shape, or path. This is done to match the movement of an object in a video clip. You can now easily deal with complex or fast-moving footage with this feature. To use Track Mask in After Effects, you can follow these steps:
Step 1
Import the footage you wish to edit in After Effects. Select the clip you wish to track from the timeline. Then, select the “Pen” tool from the top toolbar or press G on your keyboard. Select the area around the object you wish to mask in the footage.
![]()
Step 2
Now, open the layer and right-click on the mask name to select “Track Mask.” This will open the mask tracker in the tracker panel at the right. Open the dropdown menu next to the “Method” option. Here, you can find a range of options for tracking methods. Choose the one according to your requirements. If the object isn’t moving much, you can choose a simple option such as “Position.”
![]()
Step 3
Tap the “Analyze Forward” icon and let the tracker analyze the frames in the clip. Once the process has finished, you can restart your clip and set “Mask Mode” from the timeline to “Subtract.” This will remove the selected object from the clip.
![]()
Step 4
To fill in the details, go to the “Window” menu from the top and select “Content Aware Fill.” Once you see the panel on the screen, set the “Alpha Extension” slider to a number of your choice and click on “Generate Fill Layer.”
![]()
Part 3: How to Make Masking Easy? Try Wondershare Filmora
Although After Effects is a great tool for professional-quality video editing, it is not everyone’s cup of tea. Features such as motion track masks in After Effects are challenging to navigate. Novice users can face trouble getting around the complex masking process in After Effects. For a simpler alternative, you can try Wondershare Filmora .
Filmora is the complete solution when it comes to video editing. The multi-platform tool offers a range of useful features for video and audio manipulation. With thousands of built-in templates and presets, Filmora can help users kick-start their creative journey. You can use this easy-to-use tool as the perfect alternative to After Effects mask tracking.
Free Download For Win 7 or later(64-bit)
Free Download For macOS 10.14 or later
Main Highlights of Wondershare Filmora
Filmora offers a comprehensive toolset to help users make the most of their media files. Some useful resources provided by Wondershare Filmora include:
- AI Text-Based Editing: Filmora allows users to convert audio from videos into editable text. This can help you easily modify your video content. The feature can be used for quick transcriptions, subtitles, and translations.
![]()
- Speed Ramping: Using Filmora, users can apply professional speed effects in footage. You can adjust your video speed and create unique cinematic effects in no time. Filmora also helps maintain the audio pitch to avoid abrupt changes.
![]()
- Compound Clip: Filmora can help users merge multiple clips into a single footage. You can obtain complete control over the integrated clip for editing. This can help users manage and adjust multiple clips easily.
![]()
- AI Vocal Remover: The Vocal Remover tool of Filmora offers AI power to separate vocals and music from any audio. You can get separate acapella and vocals for various purposes. From karaoke to creative dubs, everything is now possible with Filmora.
![]()
Using AI Smart Masking in Filmora – A Step-by-Step Guide
Filmora offers an AI-powered masking feature for users. This allows automatic recognition and selection of objects in videos. You can create seamless transitions, color-correct elements, remove background, and more. The tool can easily detect and separate objects, so you don’t have to put in manual effort. Here is the step-by-step guide for AI smart masking using Filmora:
Step 1: Import Footage in Filmora
Install and launch Wondershare Filmora on your device. From the homepage, tap “New Project” and go to the “File” tab from the top. Tap “Import Media” in the dropdown menu and insert your video clips into the timeline.
![]()
Step 2: Enable AI Mask
Select your clip in the timeline and go to the “Video” tab from the right panel. Select the “Mask” option and tap the “AI Mask” icon. Under the section, you can choose from options such as “Select Character” or “Smart Brush.” Select one according to your requirements and hit “Add Mask.”
![]()
Step 3: Adjust Mask Settings and Export File
After you apply the masking option, you can adjust other mask settings. Filmora allows users to set the expansion range, blur strength, opacity, and other aspects. Once satisfied with the results, tap the “Export” button from the top-right corner and choose a pathway to save your video.
![]()
Free Download For Win 7 or later(64-bit)
Free Download For macOS 10.14 or later
Conclusion
Adobe After Effects is an industry-standard tool for video editing and manipulation. Track Mattes and Track Masks in After Effects are valuable tools that can help elevate your video’s potential. For a simple and effective alternative, you can try Wondershare Filmora. The tool uses smart masking using AI to make the process easier.
How to Remove Audio From Video Without Watermark?
Remove audio from video without watermark is easy if you use the right tool. Nonetheless, many tools to remove audio are bad, since they have a hard user interface. Therefore, some beginners will take time to remove audio from the video. Moreover, many tools also have a slow problem, which is time-consuming. Fortunately, this article provides you with some tools to remove audio from video online free without watermark and open-source tools. It will also be complete with a tutorial on how to do it in each tool.
Part1: Method 1: Use online free tools to remove audio without watermark (800 words)
1. AudioRemover
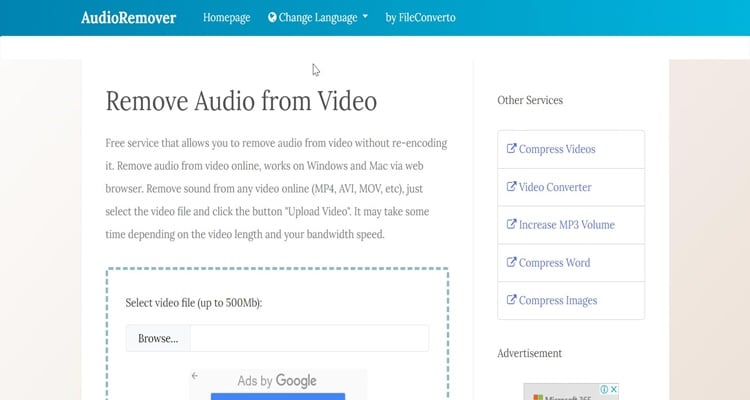
As the name suggests, AudioRemover is an online service that lets you take out audio from videos without re-encoding. This site also has a simple user interface that makes it easy for anyone to use. Moreover, AudioRemover allows you to remove audio from video without watermark.
How to remove audio from video with AudioRemover
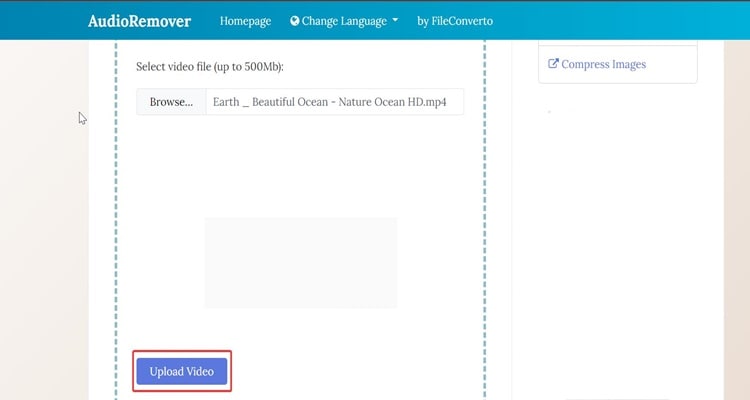
Step1 First, open any browser on your computer and go to the AudioRemover site. After that, click “Browse” and add your video to AudioRemover. After choosing your video, click the “Upload Video” to upload your video into AudioRemover.
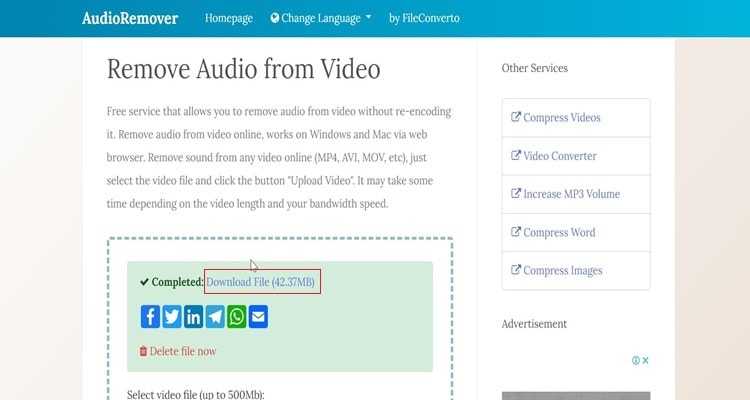
Step2 Wait until the uploading video is done. Once it is done, you just need to click “Download file.” The video that you download when it is played will no longer have sound in the video
2. Veed.io
If you are seeking for a tool for mute video online free no watermark, then you should try VEED. VEED is an exceptional online video editing tool that allows you to take out audio from video in just a few clicks. Since VEED is an online video editor, there is no installation. Instead, you do it straight from your favorite browser.

How to mute video online without watermark with VEED.io
Step1 Firstly, open any browser on your computer and search for “remove a voice from video with VEED.” After that, go click “Choose video” to import your video to VEED

Step2 In the next window, simply click “Upload a file” to browse the video file you want to remove the audio on your computer.
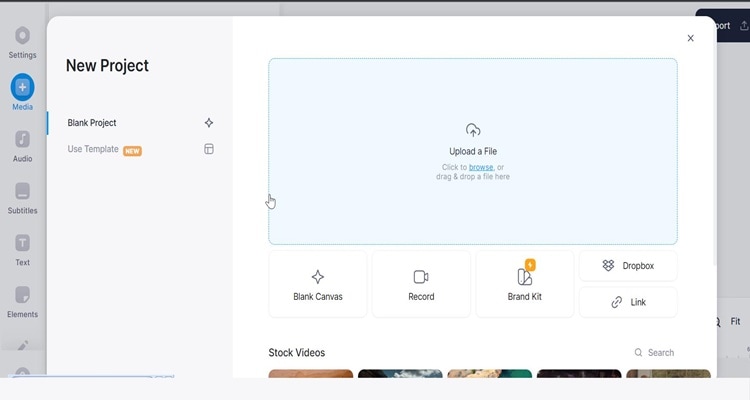
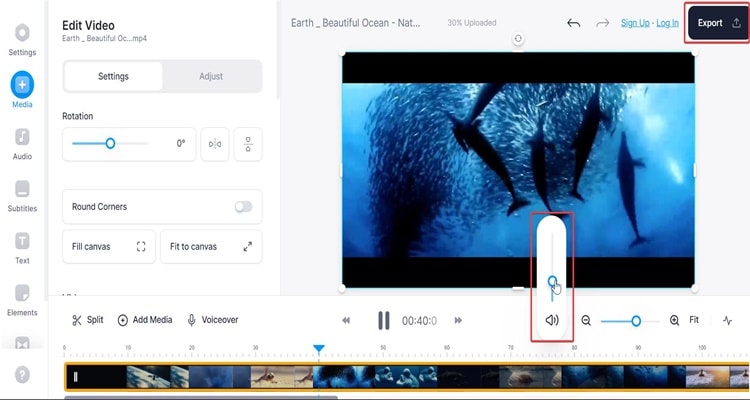
Step3 Once you import your video to the editing page, go to the sound icon and swipe down the bar to remove the audio. Next, click “Export” in the most top right on your screen.

Step4 If you want to save the video to your computer after the exporting process is complete, click “download.”
3. Canva
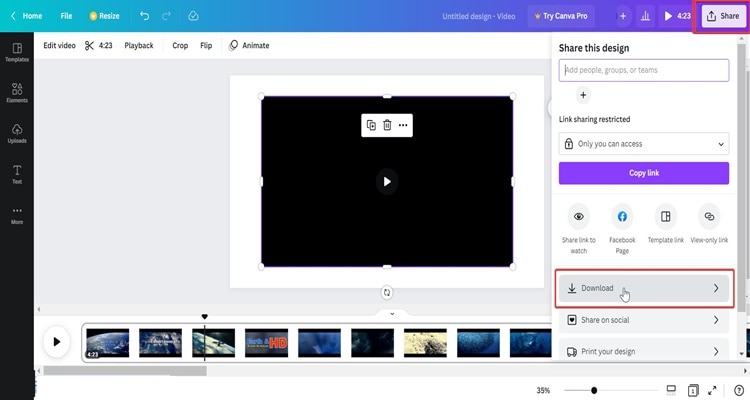
Canva is not only for creating image designs, templates, and post designs for social media, but Canva is also a very good tool for removing audio from videos. Indeed, you can easily remove audio from video online without watermark. Follow all the steps below to know how to remove audio from video with Canva.

Step1 First, you can visit Canva to remove audio from video , then click “Remove audio from the video.”

Step2 Drag your video to the black space.
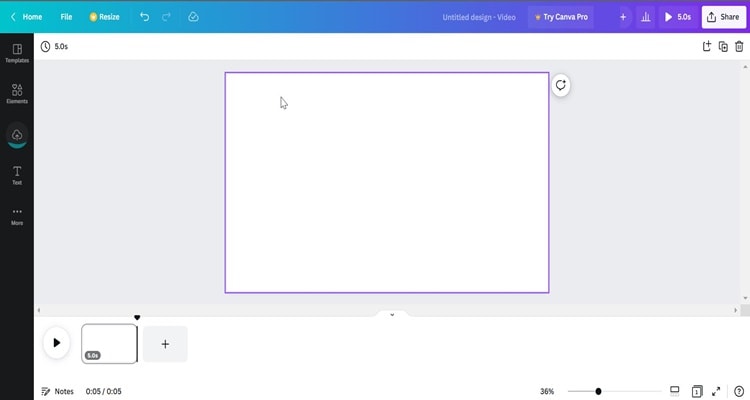
Step3 After you import your video to the black space, you click on the “Sound” icon at the top of your screen. Then, drag the bar to the left to remove the audio.
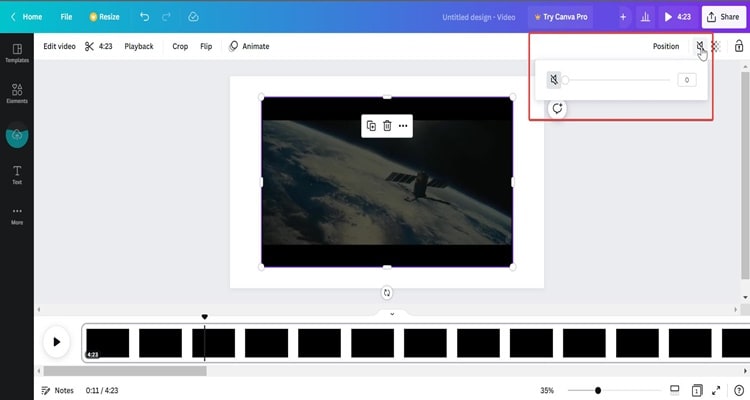
Step4 Once you have removed the sound from your video, you can click “Share” in the top right corner of your screen. Then, click “Download” to save the file on your computer.
Part2: Method 2: Use free and open source video editors (800 words)
1. VideoLAN Client (VLC)
VLC is a widely known media player that works on Windows and Mac. In fact, VLC is a free, open-source, cross-platform multimedia player and framework that can perform many multimedia files and several streaming protocols. Even though VLC is mostly a media player and not a video editor, you can remove a video’s audio using the built-in converter.

Follow the simple steps below to discover how to use VLC to remove audio from a video.
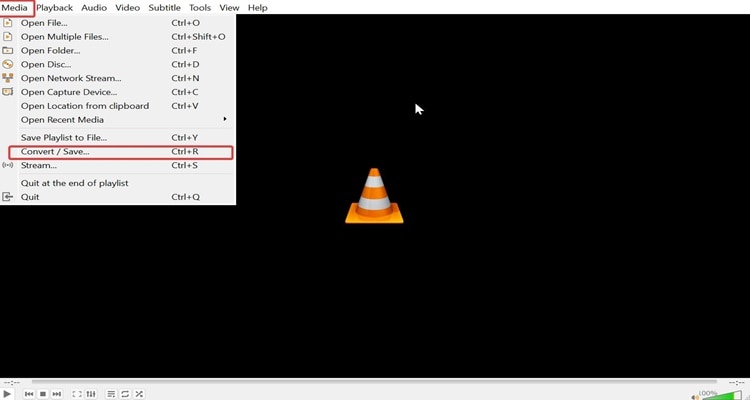
Step1 First, you must download and launch VLC on your computer. After that, navigate to “Media” and “Convert/save.”
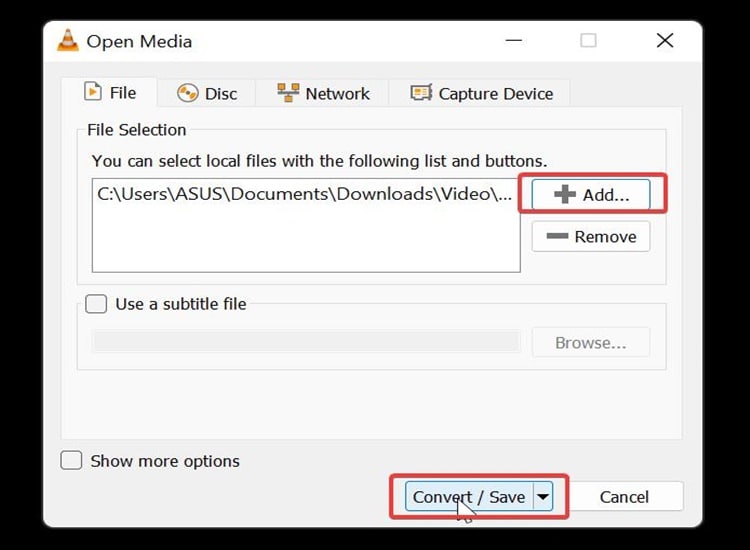
Step2 Select the video you wish to mute by clicking the “Add” button in the Open Media window. Afterward, click the” Convert/Save” in the lower right corner of the same window.
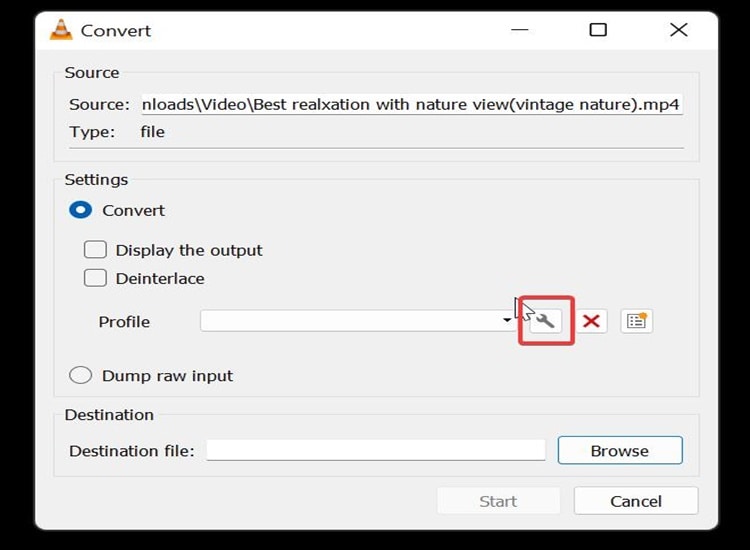
Step3 Click the “wrench” icon in the Convert window, as seen in the picture below.
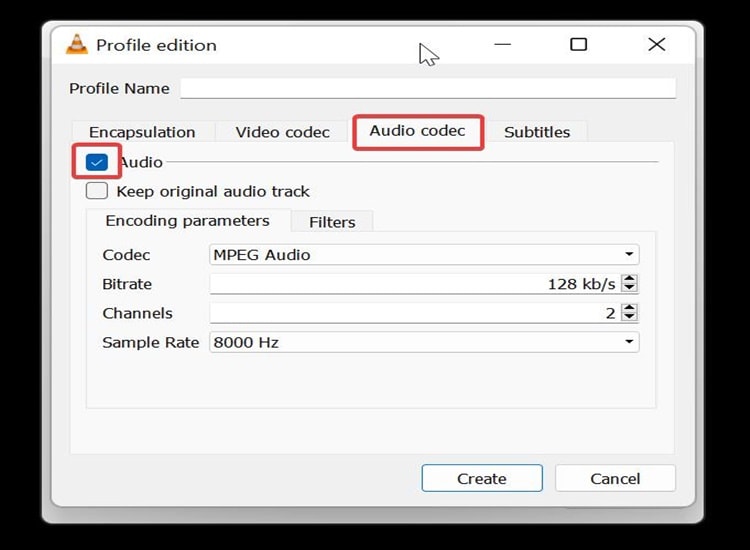
Step4 lick on “Media codec” in the next window. After that, untick the Audio checkbox. Next, click the Create button in the bottom right corner of the same window. You’ll now come back to the Convert window.
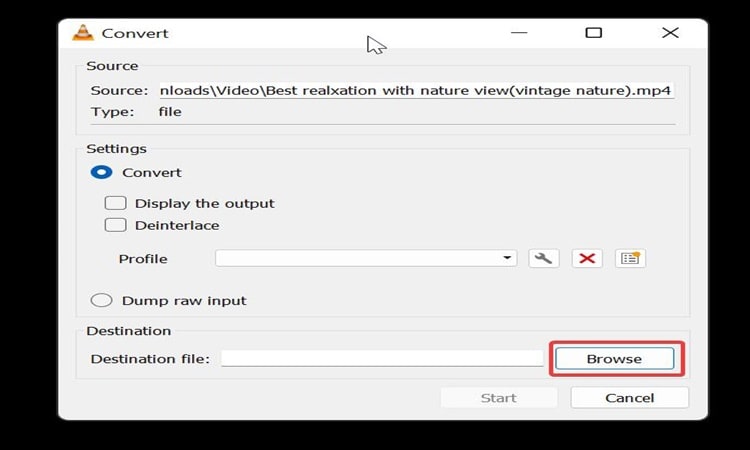
Step5 Click “Browser” to choose the location of your video to save. Lastly, click “Start” to save the video.
2. Shotcut
The Shotcut Video Editor is a cross-platform (Windows, macOS, Linux, and Chrome OS) free and open-source video editor. If you are looking for an open-source editor to remove audio from video without watermark you should try Shotcut.

Follow easy steps below to remove audio from video with Shotcut
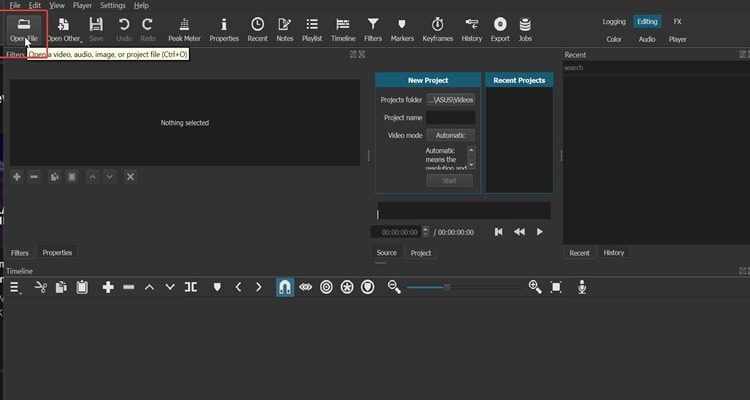
Step1 Download and launch the Shotcut on your computer. When the Shotcut is open, click “Open file” to import the file.
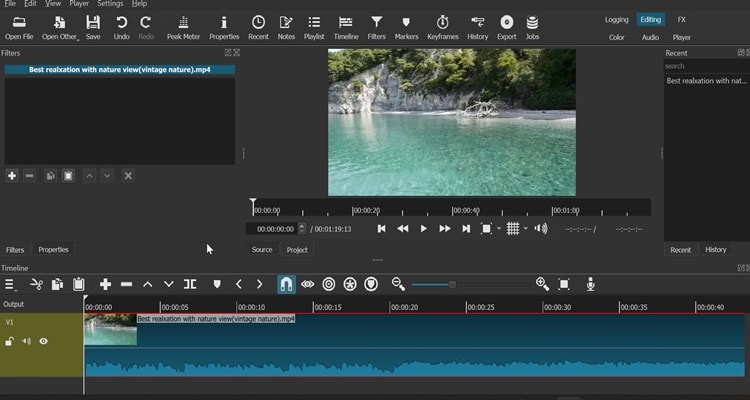
Step2 After importing the video file into Shotcut, you must drag it to the timeline.
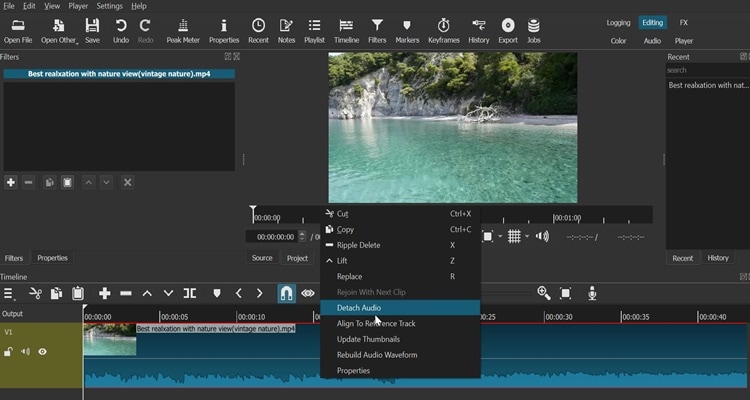
Step3 Next, right click in audio track of the video, then click “Detach audio.”
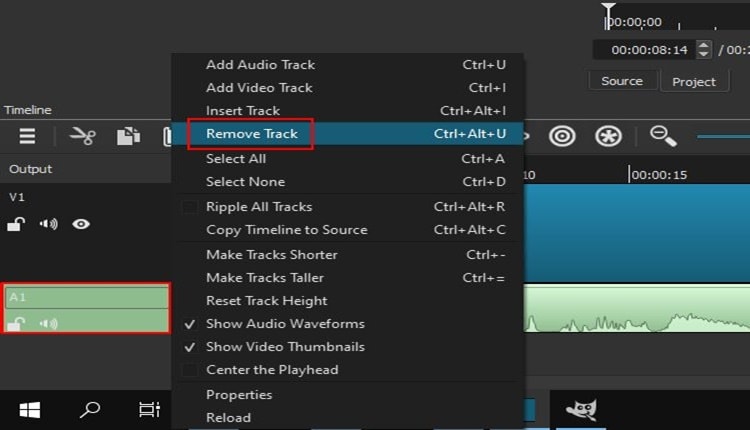
Step4 Right-click on the audio track in the Output section on the left and then click on “Remove Track.”
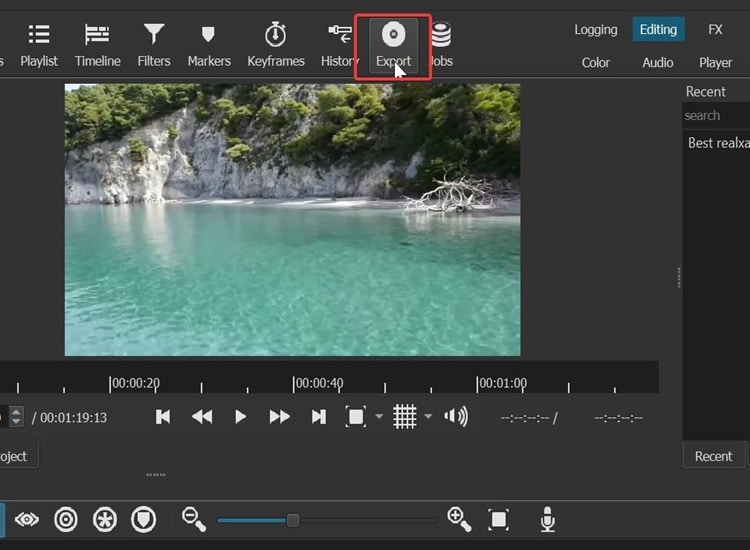
Step5 After you remove the audio, then click “Export.”
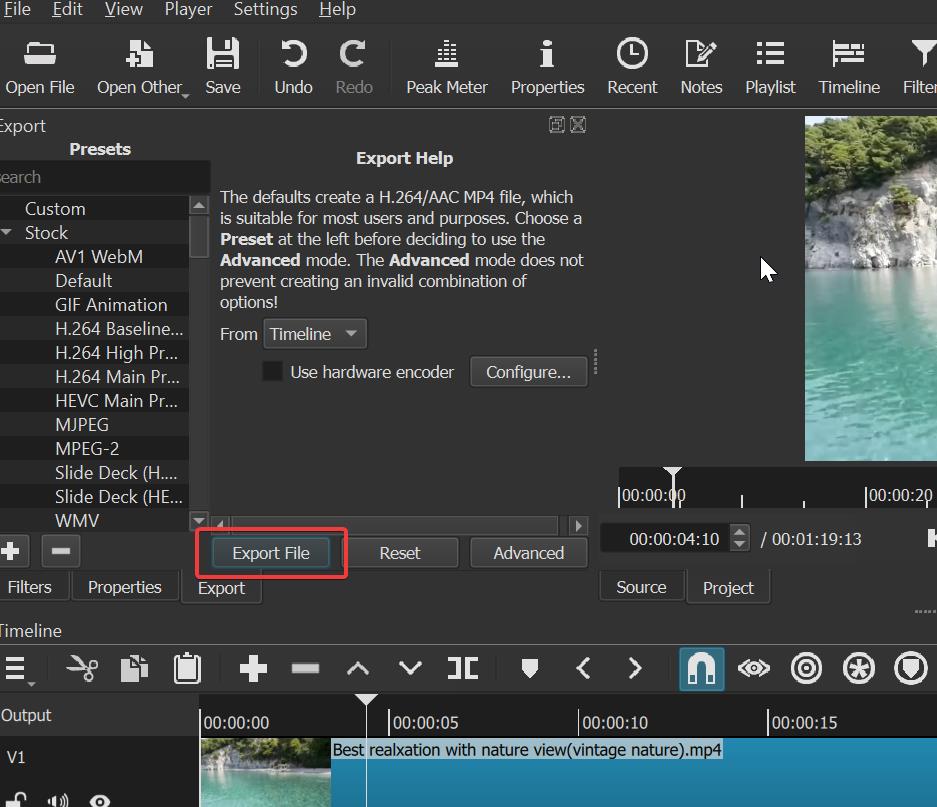
Step6 Finally, click “Export file” to save your mute video on your computer.
3. OpenShot
The OpenShot Video Editor is a cross-platform (Linux, Mac, Windows) free and open-source video editor. OpenShot is a video editor that aims to be intuitive, simple to use, yet unexpectedly potent. The video or film can be easily sliced, cut, and edited.

Step1 You must download and launch the Openshot on your computer.
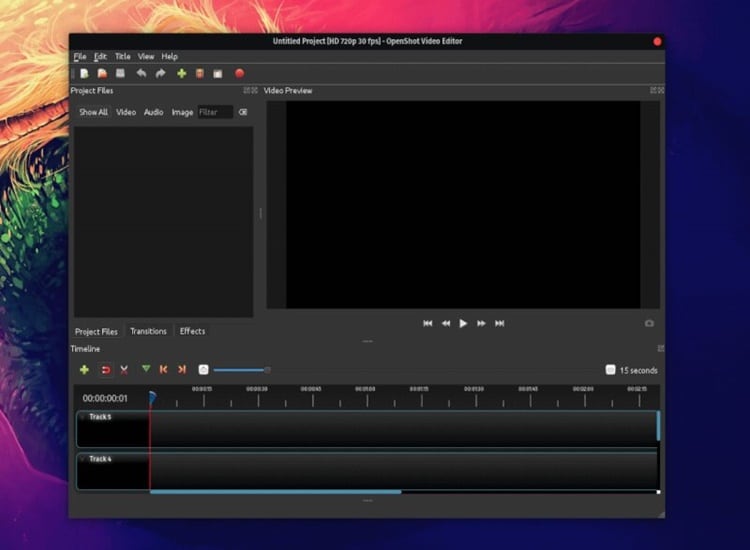
Step2 Drag your video you want to mute in the time line.
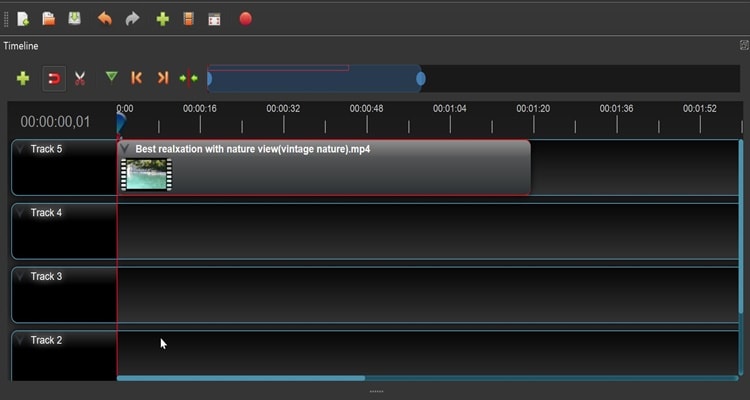
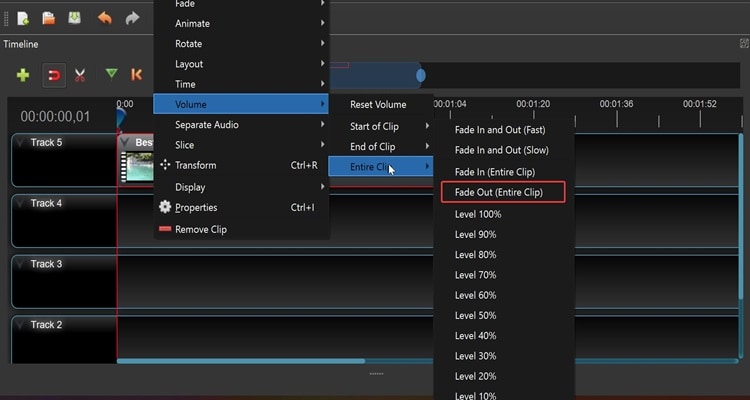
Step3 Right-click on the clip, then navigate “Volume,” “Entire clip,” and “Fade out (entire clip).
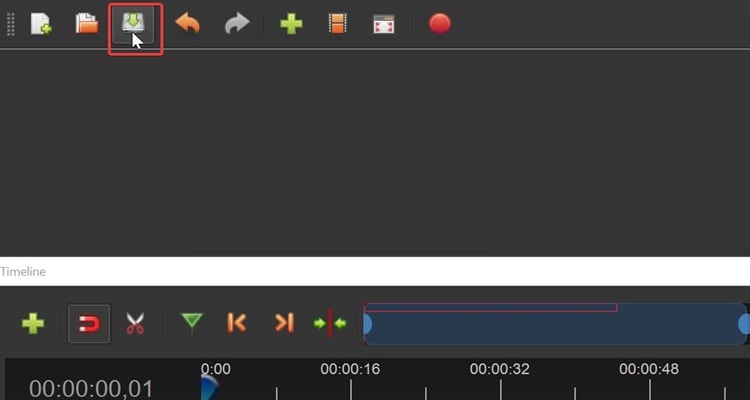
Step4 Once you done removing the audio from the video, click “Save project” to save your video.
Part3: Method 3: Get a video editor that can do everything for you (500 words)
1. Filmora
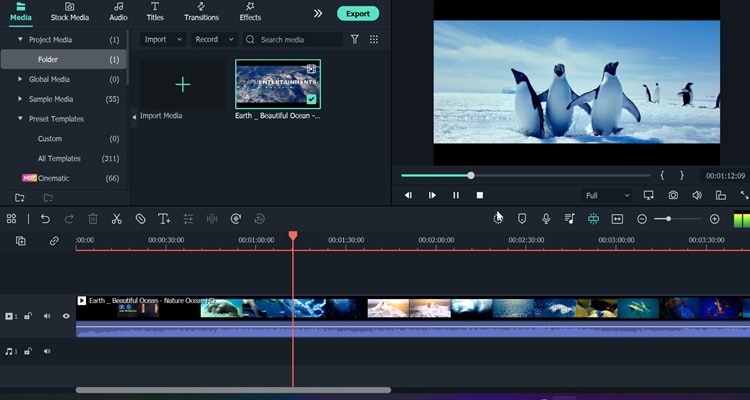
Step1 Download Filmora and launch it on your computer before starting. At this point, you can start a “new project” by selecting that option.

Step2 Here, you’ll find the video on your hard drive and upload it into Filmora. Upload the clip to Filmora’s timeline after that.
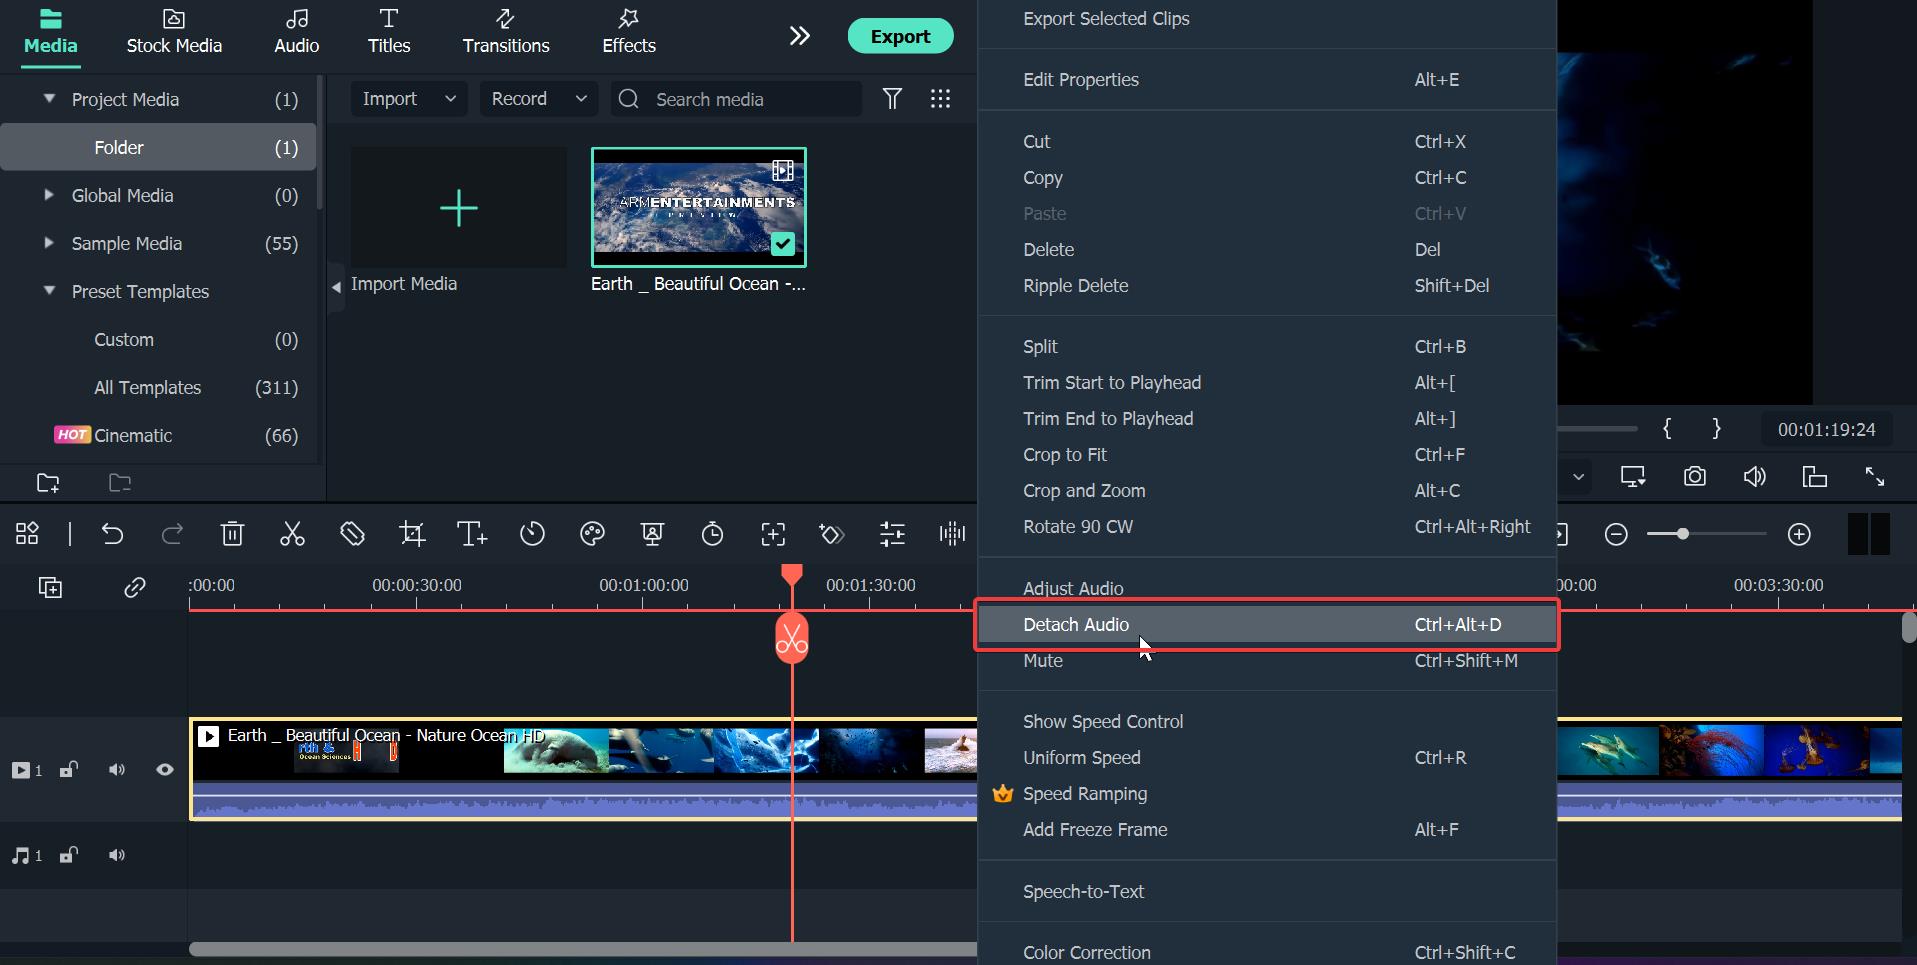
Step3 The next thing you need to do after dragging the video onto the Filmora timeline is to right-click on the Filmora timeline. After that, click “Detach audio” option.
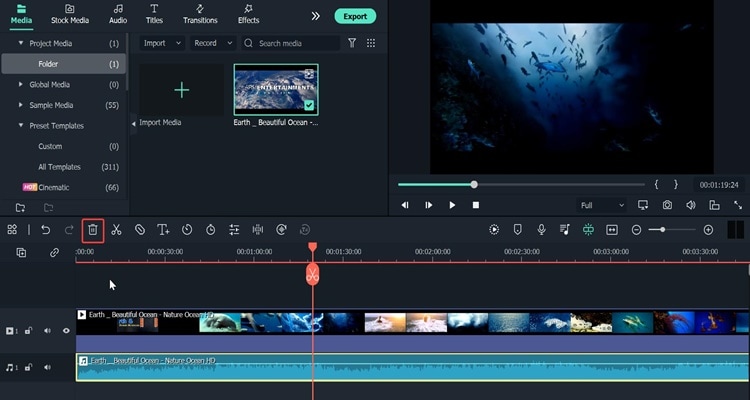
Step4 The audio track will appear underneath the video track. To delete an audio track, you need only to click on it and then click the “trash” icon. At long last, you have successfully silenced the audio track in your video.
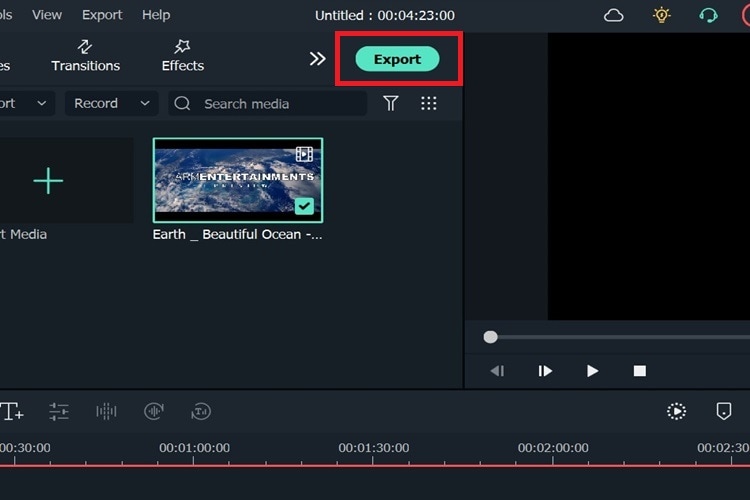
Step5 Simply click “Export” after you’re finished to save your video to your computer..
Filmora doesn’t just let you remove audio from videos; it also has a lot of other tools for editing audio that you can use to improve your videos. Some of Filmora’s audio editing features will be talked about below.
Free Download For Win 7 or later(64-bit)
Free Download For macOS 10.14 or later
#1. Silence Detection
Filmora has some great audio features, and silence detection is one of them. Silence detection simply recognizes instances of silence and removes them from your video instantly. Silence can make people confused or disappointed. Indeed, Filmora can instantly find the part of no sound and cut it out.
#2. Audio Ducking
Moreover, there is audio ducking, another great audio feature from Filmora. When recording voiceovers, narrations, translations, podcasts, etc., you can automatically lower the volume of one track to make another track clearer by using a Filmora audio feature called “audio ducking.”
#3. Auto Synchronization
Meanwhile, you can record videos and additional audio to improve the video’s audio quality. Filmora’s audio synchronization feature will help the video’s sound by perfectly matching the two simultaneously. With audio sync, it’ll be easier to match the sound to the video, making it sound clearer.
#4. Speech to Text (STT)
With Filmora’s Speech to Text (STT) feature, you can quickly turn your voice into subtitles. Furthermore, using speech-to-text will save you a lot of time on subtitling and speed up the editing process. When you hover on the Speech to Text button, Filmora will instantly detect the speech in your video and turn it into text.
#5. Text to Speech (TTS)
With Filmora’s Text to Speech (TTS) feature, adding voice to your video is straightforward. When you click on the button, Filmora could well turn your text files into speech instantly.
#6. Audio Visualizer
Last but not least, Audio Visualizer is an exceptional audio feature that Filmore offer. The Filmora Audio Visualizer will bring your music video to life. The effect will dynamically sync with the sound in your video.
Conclusion
Remove audio from video without watermark is fairly easy. You can choose a tool that has been recommended and read a complete tutorial on how to do it. However, if you are looking for a good online editing maker, we recommend Filmora, considering that Filmora is rich in features.
Also read:
- Updated This Article Will Focus on Understanding the Secret Tips in Wondershare Filmora that You Can Use to Edit Videos Faster and More Efficiently
- 2024 Approved How to Stabilize Videos for Free with Google Photos App
- In 2024, How to Calculate & Change Video Aspect Ratio Online
- Updated Looking for the Best Way to Create Stunning Video Animations? Here, We Look at some of the Best Animated Video Maker Solutions to Use
- New In 2024, The Only Guide Youll Ever Need to Learn GIF Design That Get Shared Like Crazy
- Updated How to Speed Up Video with Canva Online Tool, In 2024
- Updated 2024 Approved Liquid Water Text Reveal Intro Offers an Impressive Opening to Any Video Content. Go Through the Detailed Steps to Create Liquid Water Reveal Intro in Wondershare Filmora
- New Looking for a Video Editor Where You Can Edit Your Tutorial and Training Videos? Camtasia Is a Great Choice. But Is It the Best Video Editor Available? Find Out From Our Camtasia Review for 2024
- Best Method to Split Video Into Parts Online for 2024
- Updated 2024 Approved Top Free LUTs To Use in Shotcut An Overview
- Make Super Easy Coin Magic With Filmora for 2024
- Updated How to Turn On/Off Motion Blur in Minecraft, In 2024
- Updated 2024 Approved Easy Way to Apply Green Screen to YouTube Videos
- New 2024 Approved In This Article, We Talk About How to Add Old Film Overlays and Other Effects to Turn the Videos or Photos More Vintage and with an Older Aspect. We Take a Look at Filmora in This Guide and Give Tips on How to Create Great Retro Videos
- New Want to Make a Single Video From Different Clips? Follow These Ways to Learn About How to Merge Clips in DaVinci Resolve for 2024
- How to Fade in Text in Adobe Premiere Pro
- In 2024, Free 3D Intro Makers
- Updated Create Intro Video with Flixpress
- In 2024, How to Add Background to Video With/Without a Green Screen
- Time Lapse Videos Play an Important Part in Videography. If You Want to Start Video Shooting, Then You Shouldnt Miss Time Lapse Video. This Article Will Show You some Ideas over This
- New Learn How to Use Face Tracking in After Effects to Quickly Mask Out Faces, Animate Objects on Faces, and More for 2024
- Updated 2024 Approved Easy Steps to Export Video in Filmora
- Updated How to Add Font Effects to Videos for 2024
- 2024 Approved Easy Steps to Export Video in Filmora
- New Want to Make Your Slideshows More Fun and Exciting? Follow the Given Discussion to Know How to Make a Slideshow Gif, Thereby Making Your Slideshow More Enjoyable than Ever
- New ReVisionFX ReelSmart Motion Blur Plugin For Premiere Pro for 2024
- 3 Actionable Ways to Create Countdown Animation for Videos
- Best Cinematic LUTs For Premiere Pro You Can Come Across for 2024
- 10 Best Innovative AR Video Effects to Check Out
- New Progressive Solutions to Add VHS Effects to Video with Ease for 2024
- Updated Do You Know What Is Motion Blur in Fortnite? Read This Article to Find Out How to Apply Motion Blur in Fortnite Efficiently and with Ease for 2024
- Updated What Slideshow Templates Can Teach You About Aesthetic
- New How To Edit Youtube Videos In Simple Steps
- Updated In 2024, Ultimate Guide on How to Plan and Storyboard a Music Video
- 2024 Approved How to Loop Video in Canva
- New Step by Step to Rotate Videos in Davinci Resolve
- Updated In 2024, How to Add Motion Titles
- New 2024 Approved How to Add Slideshow in PowerPoint
- Updated Top 9 Sparkle Effects Photo and Video Editors You Should Know for 2024
- Updated Best 4 Love Video Maker with Music
- Updated What Is Lumetri Color and How Do You Use It in Adobe After Effects? Find Out the Numerous Functions of Lumetri Panel and Ways to Apply Them to Your Video for 2024
- New How to Make Dynamic Video Collages, In 2024
- 2024 Approved Have You Ever Heard Hyperlapse and Tume Lapse Videos? Do You Know the Differences Between Them? This Article Will Introduce the Concepts, Features and Differnces of Them
- New In 2024, Guide to Make Timelapse Video with iMovie
- New Step by Step to Rotate Videos Using Handbrake
- New 2024 Approved Have You Ever Applied the Gaussian Blur Effect to Your Videos? Read This Article to Find a Reliable and Convenient Tool to Generate the Gaussian Blur Effect
- New How To Make a Photo Collage in Microsoft Word — Step by Step Guide
- Updated Windows Movie Maker Review
- New In 2024, The Article Is a Guide About the Split of the Videos in VLC. There Is Also a Particular Description of Its Alternative Wondershare Filmora. It Is Suitable as Well as Reasonable
- Updated How to Split a Clip in DaVinci Resolve Step by Step
- How to Repair corrupt MP4 and AVI files of Poco X6 with Video Repair Utility on Windows?
- Pokemon Go No GPS Signal? Heres Every Possible Solution On Vivo S18 | Dr.fone
- Top 9 Samsung Galaxy A15 5G Monitoring Apps for Parental Controls | Dr.fone
- In 2024, List of Pokémon Go Joysticks On Realme 11 Pro | Dr.fone
- 2024 Approved Beginners Guide for Learning 3D Animation
- How To Fix Part of the Touch Screen Not Working on Samsung Galaxy S24 Ultra | Dr.fone
- In 2024, How Do You Get Sun Stone Evolutions in Pokémon For Vivo Y78+ (T1) Edition? | Dr.fone
- Everything To Know About Apple ID Password Requirements For Apple iPhone SE (2022)
- In 2024, How to Bypass Google FRP Lock on Lenovo ThinkPhone Devices
- A Comprehensive Review of Descript Overdub AI Feature for 2024
- Complete Review & Guide to Techeligible FRP Bypass and More For Realme 12 Pro+ 5G
- How do i add my signature to .uot file
- Nokia C12 Pro Camera Not Working Unexpected Error? Fix It Now | Dr.fone
- Title: Updated VSDC Free Video Editor Review
- Author: Morgan
- Created at : 2024-05-19 05:12:10
- Updated at : 2024-05-20 05:12:10
- Link: https://ai-video-editing.techidaily.com/updated-vsdc-free-video-editor-review/
- License: This work is licensed under CC BY-NC-SA 4.0.

